
FU-28H-A - Air purifier SHARP - Free user manual and instructions
Find the device manual for free FU-28H-A SHARP in PDF.


| Product Type | Air Purifier |
| Model | FU-28H-A |
| Brand | Sharp |
| Dimensions (H x W x D) | 36.0 x 20.0 x 44.0 cm (approx.) |
| Weight | 4.5 kg (approx.) |
| Power Supply | 220-240V, 50Hz |
| Power Consumption | 30W (approx.) |
| Air Purification Technology | Plasmacluster Ion Technology |
| CADR (Dust) | 200 m³/h (approx.) |
| CADR (Pollen) | 200 m³/h (approx.) |
| Fan Speeds | 3 speeds (Low, Medium, High) |
| Timer | 2/4/8 hours |
| Filter Types | Pre-filter, HEPA filter, Carbon filter (optional) |
| Pre-filter Cleaning | Washable every month |
| HEPA Filter Replacement | Every 2 years (approx.) |
| Recommended Room Size | Up to 25 m² |
| Noise Level | 20 - 45 dB (approx.) |
| Control Type | Touch buttons / Remote control |
| Display | LED indicators for filter and mode |
| Safety Features | Auto shut-off when front panel opened, child lock |
| Replacement Parts | HEPA filter (FZ-Y28HFE), Remote control (optional) |
| Warranty | 2 years (subject to region) |
Frequently Asked Questions - FU-28H-A SHARP
User questions about FU-28H-A SHARP
0 question about this device. Answer the ones you know or ask your own.
Ask a new question about this device
Download the instructions for your Air purifier in PDF format for free! Find your manual FU-28H-A - SHARP and take your electronic device back in hand. On this page are published all the documents necessary for the use of your device. FU-28H-A by SHARP.
USER MANUAL FU-28H-A SHARP
natural_image
Illustration of a rectangular electronic device with a remote control and indicator lights, no text or symbols present.香港電器安全規格
(國際電工委員會規格適合)
Wall-mounting type
壁掛型
*Plasmacluster is a trademark of Sharp Corporation.
*Plasma 是聲賽公司的商標。
FU-28H-A
AIR PURIFIER
INSTALLATION MANUAL
OPERATION MANUAL
空氣清新機
安裝說明書
使用說明書
ENGLISH
HOW SHARP AIR PURIFIER WORKS
An air purifier draws in room air from its air intake, lets the air pass through an Active Carbon Filter (Deodorizing Filter) and a HEPA Filter (dust collection filter) inside the unit, then discharges the air from its air outlet. The air purifier repeats this process by moving its internal fan.
As air passes through, the HEPA Filter can remove dust particles. The Active Carbon Filter gradually absorbs odour elements as they repeatedly pass through the filter.
(Odour elements are absorbed by HEPA Filter as well.)
Some odour ingredients absorbed by the filters may become separated and may be discharged through the air outlet and result in additional odour. Depending on the usage environment, this odour may become strong in a shorter period than expected. In this case, purchase the optional replacement filter kit FZ-28SEF.
NOTE
The air purifier is designed to remove air-suspended dust and odour, but not harmful gases (for example, carbon monoxide contained in cigarette smoke). Neither can it completely remove odours that are always present (for example, odours from construction materials and pet odours).

CONTENTS
IMPORTANT SAFETY INSTRUCTIONS .... E-2
• W ARNING E-2
• CAUTIONS CONCERNING OPERATION ... E-2
• REMOTE CONTROL LIMITATIONS .....E-3
- CAUTIONS WHEN MOUNTING
THIS PRODUCT TO A WALL ......E-3
• FILTER GUIDELINES E-3
PART NAMES ...... E-4
- MAIN UNIT DISPLAY ......E-4
- BACK E-4
- ACCESSORIES ......E-4
PREPARATION..... E-5
- INSERTING BATTERIES IN THE REMOTE CONTROL ...... E-5
- REMOTE CONTROL USE ...... E-5
INSTALLATION E-6
FILTER INSTALLATION ...... E-10
Thank you for purchasing the SHARP FU-28H-A. Please read this manual carefully for the correct usage information. Before using this product, be sure to read the section: "Important Safety Instructions."
After reading this manual, retain it in a convenient location for future reference.
IMPORTANT SAFETY INSTRUCTIONS
When using electrical appliances, basic safety precautions should be followed, including the following:
WARNING - To reduce the risk of electrical shock, fire or injury to persons:
- Read all instructions before using the air purifier.
- Use only a 220 volt outlet.
- Do not use the air purifier if the power cord or plug is damaged or the connection to the wall outlet is loose.
- Periodically remove dust from the power plug.
- Do not insert fingers or foreign objects into the intake or air outlet.
When removing the power plug, always hold the plug and never pull the cord.
Electrical shock and/or fire from short circuit may occur as result.
- Do not use this air purifier near gas appliances or fireplaces.
- Remove the power plug from the wall outlet before cleaning the unit and when not using the unit.
Electrical shock from bad insulation and / or fire from short circuit may occur as a result.
- If the power cord is damaged, it must be replaced by the manufacturer, its service agent, Sharp authorized service or similarly qualified person in order to avoid a hazard.
- Do not operate when using aerosol insecticides or in rooms where there is oily residue, incense, sparks from lit cigarettes, chemical fumes in the air or a humidity condition.
- Use care when cleaning the air purifier. Strong corrosive cleansers may damage the exterior.
- Only Sharp Authorized Servicers should service this air purifier. Contact the nearest Servicer for any problems, adjustments, or repairs.
- The batteries must be removed from the remote control before disposal, and the batteries must be disposed safely.
CAUTIONS CONCERNING OPERATION
- Do not block the intake and air outlet.
- Do not use the unit near or on hot objects, such as range or where it may come into contact with steam.
• Always hold the main unit when moving it.
Holding the front panel when carrying may cause it to detach, thus dropping the unit and resulting in bodily injury.
- Do not operate the unit without the filter.
- Do not wash the Active Carbon Filter and the HEPA Filter.
Not only it does not improve filter performance, it may cause electric shock or malfunction.
- Clean the exterior with a soft cloth only.
The unit surface may be damaged or cracked.
In addition, the sensor may malfunction as a result.
REMOTE CONTROL LIMITATIONS
DO NOT USE THE REMOTE CONTROL IN THE FOLLOWING LOCATIONS:
- Any location where there is inverter lighting equipment or electronic spontaneous lighting equipment
The remote control may become inoperative. In this case, move away from such lighting equipment or change direction. - Location exposed to direct sunlight or fluorescent.
The unit may not receive signals from the remote control.
CAUTIONS WHEN MOUNTING THIS PRODUCT ON A WALL
- A void a location where the sensor is exposed to direct wind.
The unit may not operate properly. - A void a location where curtains, etc., come into contact with the intake or air outlet.
Curtains, etc., may become dirty or a malfunction may occur. - Avoid locations where the unit is exposed to condensation, due to drastic temperature changes.
- Place on a stable surface with sufficient air circulation.
- Install the unit on a wall, wooden pillar, crosspiece, etc. that is flat and strong enough.
- Do not install the unit on a thin wall or on plasterboard. The unit may fall down if installed on an insufficiently strong wall.
- To install the unit on a wooden wall that is less than 10 mm thick, consult your dealer and have them confirm the strength of the wall before installation.
• Always hold the main unit when moving it.
Holding the front panel may cause it to become detached, thus dropping the unit and resulting in bodily injury. - Do not install when there is generation of lampblack, such as in a kitchen, etc.
The unit surface may crack or the sensor may malfunction as a result.
FILTER GUIDELINES
- Follow the instructions in this manual for correct care and maintenance of the filters.
PART NAMES

INSERTING BATTERIES IN THE REMOTE CONTROL

natural_image
Illustration of a hand holding a remote control device with an arrow indicating left-hand motion (no text or symbols present)1 Remove the back cover Press and slide the back cover to remove.
2 Insert batteries Insert batteries with - and as shown below. 3 Close the back cover
About the batteries
• The battery life is about 1 year.
- Replace the batteries when the remote control becomes inoperative.
- Incorrect usage of the batteries may cause battery fluid leakage and/or damage. Take care of the following when handling:
- When replacing the batteries, replace both batteries with new ones of the same type. (Use 2 AA manganese batteries.)
- When not using the unit or remote control for an extended period, remove the batteries. This prevents malfunction of the remote control from battery fluid leakage.
•The batteries of the accessory are for initial use only and may be depleted within 1 year.
REMOTE CONTROL USE
- Operate the remote control facing the main unit receiver.
• The signal range is about 7m (front). - Make sure there are no objects blocking the path of the signal.
• A beep sound will be heard from the main unit when a signal is received.
NOTE
- A void dropping or damaging the remote control, using in a high humidity condition, in direct sunlight or near a heat source.

FOR APPROPRIATE INSTALLATION
To remove room odour
Installing the unit high up on the wall is most effective.
To remove room dust
Free Standing Installation.
In case you prefer free standing installation, optional stand FZ-FC1TS is available.
Comparatively large dust particles such as pollen and house dust collect in the lower strata of the room air.
Select a location in the room where the air circulation is good.
This improves the cleaning performance and causes Plasmacluster ions to spread throughout the room.
Operating Conditions
Please operate the unit under the following conditions.
It is recommended to use the unit in a room where the temperature is in the range of 0 - 35C°. Avoid locations where the unit is exposed to condensation, due to drastic temperature changes.

Determine the mounting location
Leave space around the bracket referring to the drawing below. The unit cannot be mounted if there is insufficient spacing around the bracket.

Installation Cautions
- Before fixing the wall mounting bracket, make sure there is nothing that could obstruct installation of the unit. Then fix the wall mounting bracket through screw holes with the supplied wood screws.
• Install the unit on a wall, wooden pillar, crosspiece or the like that is flat and strong enough.. - If the wall is weak or made of concrete, have the unit installed by a specialist such as an electric appliance store.
- A void locations near inverter lamps or where the unit is exposed to direct sunlight.

Mount wall mounting bracket
- Mount the bracket using the included wood screws so that it is mounted in horizontal balanced level.
● Installation on a concrete, block or mortar surface
Drill holes of at least 35 mm depth and 5 mm diameter into the wall, drive in fisher plugs, and fix the unit with wood screws.

● Installation on a wooden pillar, crosspiece or other wooden surface Use wood screws for installation.

Caution
- To install the unit on a wooden wall that is less than 10 mm thick, consult your dealer and have them confirm the strength of the wall before installation.
• Install the unit on a wall, wooden pillar, crosspiece, etc. that is flat and strong enough. - Make sure that the unit is installed in an upright position, without leaning to the right or left.
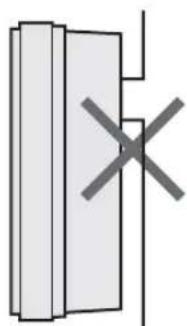
natural_image
Simple line drawing of a door with a cross mark, no text or symbols presentBefore starting the wall installation, be sure to remove the front panel and filter frame.
3
Install the unit on the wall.
1 Place the unit facing up, remove the Front Panel and Filter Frame.
Air Outlet
Front Panel
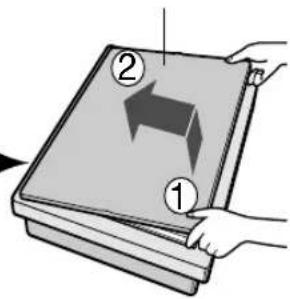
Filter Frame
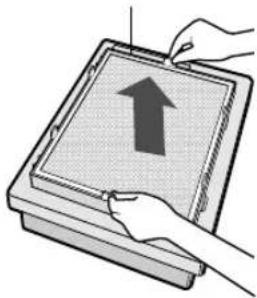
natural_image
Illustration of hands holding a tablet with an upward arrow (no text or symbols)2 Adjust the length of the power cord.
1 Measure the distance between the unit and the wall outlet. (Refer to E-6)
2 Place the unit face down, and insert the power cord into the power cord adjusting guide so as to adjust it to the measured length.


natural_image
Diagram of a device with internal components and a cross mark, no text or symbols presentDo not wire the power cord right below the wall mounting bracket.
In case the power plug to be lead to the right of the unit.
Power cord adjusting guide

natural_image
Technical line drawing of a portable electronic device with internal cooling pipes and a terminal outlet (no text or symbols)In case the power plug to be lead to the left of the unit.
Cautions
- To avoid scratching or damaging the unit, place it on a soft piece of cloth until it is installed on the wall.
- Do not lead the power cord together with other cord and do not twist it.
- Never modify the power cord.
• Take care not to damage the power cord.
3 Apply a mark (tape, etc.) 8 cm above both ends of the wall mounting bracket.
4 Lift up the unit so that the hooking holes on the unit are aligned with the marks, hook the unit onto the wall mounting bracket and slide it to the right.
When positioned correctly, the unit will move down slightly until it engages.
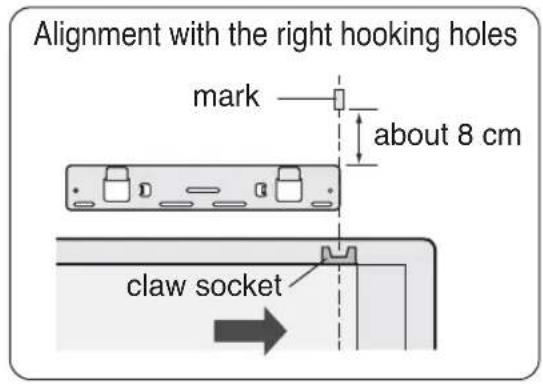


5 Double-check the installation.
Make sure that the claws of the unit are hooked in properly. If they are not, the unit will move sideways. In addition, the unit may fall off the wall and be damaged.
- Make sure that the power cord is not caught in the unit.
6 Remove the mark.
HOW TO REMOVE THE UNIT
Pull the power plug out of the wall outlet and remove the Front Panel and Filter Frame. Holding the unit by its lower corners, lift it up slightly, then slide it to the right or left and lift it off toward the top.

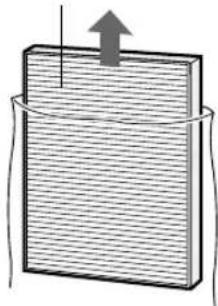
1 Remove the Pre-Filter, Active Carbon Filter and HEPA Filter from the Filter Frame.
2 Remove the Active Carbon Filter and HEPA Filter from the plastic bags.
3 Place the HEPA Filter within the Filter Frame.
Do not install the filter backwards or the unit will not operate properly.
4 Place the Active Carbon Filter within the Filter Frame on top of the HEPA Filter.
The Active Carbon Filter does not have a front and a back.
5 Next, place the Pre-Filter within the Filter Frame.
Fit the 4 tabs of the Pre-Filter into the holes in the Filter Frame.

natural_image
Illustration of a hand using a tool to adjust or install a component, enclosed in a circular frame (no text or symbols)Tabs
How to Remove the Stainless Steel Pre-Filter

natural_image
Technical illustration of a rectangular electronic device with a grid-patterned panel and mounting brackets (no text or symbols)
Active Carbon Filter

natural_image
Diagram of a rectangular panel with a horizontal wire wrapped around it, showing an upward arrow above it (no text or symbols present)HEPA Filter

natural_image
Simple line drawing of a rectangular block with a horizontal hatched fill and an upward arrow above it, enclosed in a wire loop (no text or symbols)
HEPA Filter
Filter Frame

Tabs

6 Mount the Filter Frame to the main unit.
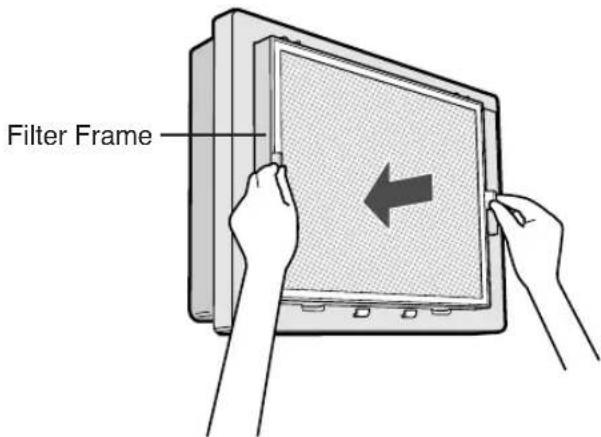
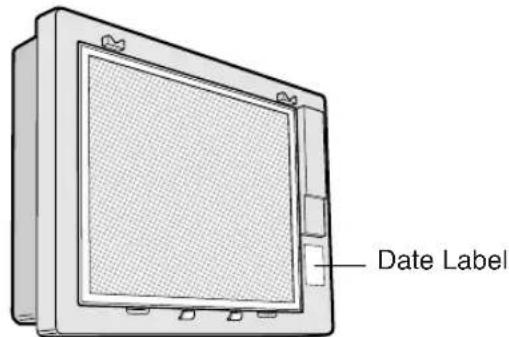
7 Fill in the usage start date on the Date Label.
Use the date as a guide for the Filter Replacement schedule.
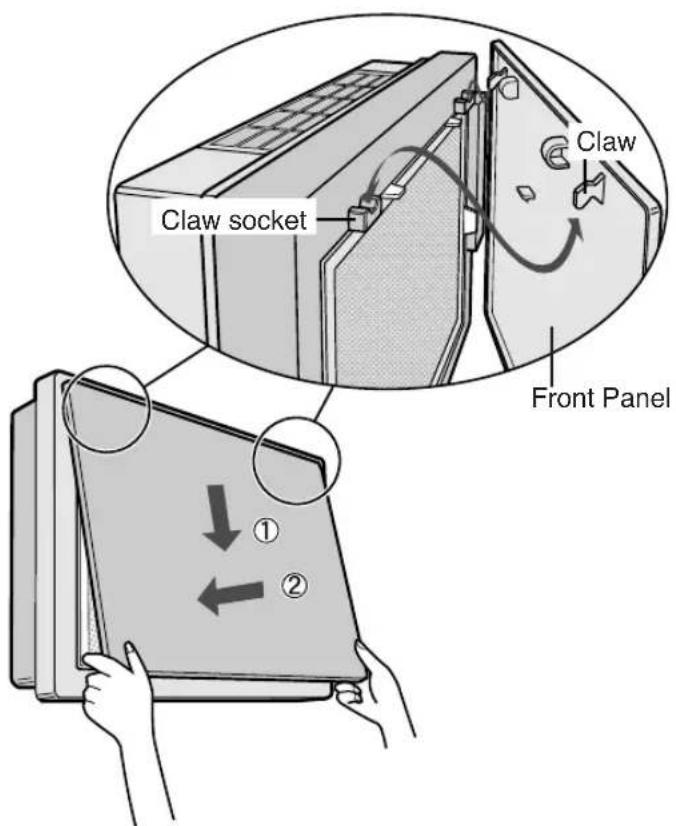
8 Mount the Front Panel to the main unit.
9 Insert the power plug into the wall outlet and check on/off operation using the remote control.
- Auto Operation
Odour sensor checks the amount of impurities in the air and the fan speed switches automatically.
- Manual Operation
Regardless of the amount of impurities, desired fan speed can be switched between Silent and Max.
MAIN UNIT OPERATION

POWER ON/OFF button
• Used to start AUTO operation (short beep) and stop operation (long beep).
- Plasmacluster Indicator Light and Fan Speed Indicator Light (AUTO) turn on/off.
- Unless unplug the power cord, the operation starts in the previous mode the unit was operated in.
Fan Control button
The fan speed can be switched among Silent, Max and AUTO.

flowchart
graph LR
    A["Silent"] --> B["Max"]
    B --> C["AUTO"]
    C --> A
OFF Timer button
- The set timer switches every time the button is pressed as shown below.
- When "4 hours" is selected "4 H" indicator light activates. When the remaining time becomes 1 hour, then indicator light switches to "1 H".
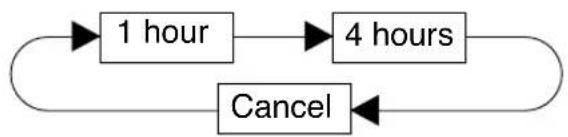
flowchart
graph TD
    A["1 hour"] --> B["4 hours"]
    B --> C["Cancel"]
    C --> A
Plasmacluster Ion Operation
While the product is in operation, the unit will constantly discharge approximately the same amount of Positive and Negative cluster ions. This is effective for inactivating airborne mold, viruses, bacteria, allergens and reducing mold odors.
• Used to start AUTO operation (short beep) and stop operation (long beep).
- Plasmacluster Indicator Light, and Fan Speed Indicator Light (AUTO) turn on/off.
- Unless unplug the power cord, the operation starts in the previous mode the unit was operated in.
AUTO (Fan Speed) button
The fan speed switches automatically depending on the amount of impurities in the air.
MANUAL (Fan Speed) button
The fan speed can be switched between Silent, Max.

flowchart
graph LR
    A["Silent"] --> B["Max"]
OFF Timer button
- The set timer switches every time the button is pressed as shown below.
- When "4 hours" is selected "4 H" indicator light activates. When the remaining time becomes 1 hour, then indicator light switches to "1 H".
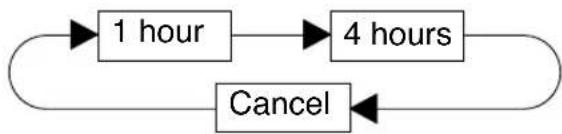
flowchart
graph TD
    A["1 hour"] --> B["4 hours"]
    B --> C["Cancel"]
    C --> A
CARE AND MAINTENANCE
To maintain optimum performance of this air purifier, please clean the unit including the sensor and filters periodically.
When cleaning the unit, be sure to unplug the power cord, and never handle the plug with wet hands. Electrical shock and/or bodily injury may occur as a result.
FILTER REPLACEMENT GUIDELINES
Depending on the usage environment, air outlet odour may become strong after several months.
If dust or odours cannot be removed easily, replace the filters.
(Refer to HOW SHARP AIR PURIFIER WORKS E-1)
Guide for filter replacement timing
- The following filter life and replacement period is based on the condition of smoking 10 cigarettes per day, reducing the dust collection/deodorization power to half compared with that of new filters.
• HEPA Filter About 12 months after opening
• Active Carbon Filter About 12 months after opening
REPLACING THE FILTERS
1 See page E-10,11 for directions on how to install the filters when replacing.
2 Fill in the usage start date of the filters on the Date Label.
Replacement Filters
Model: FZ-28SEF
• HEPA Filter(with Microbial Corbon Filter): 1 unit
• Active Carbon Filter: 1 unit
Please ask for replacement filters at your dealer of purchase.


Disposal of Filters
Please dispose of replaced filters according to the local disposal laws and regulations.
HEPA Filter materials:
- Filter: Polypropylene
- Frame: Polyester
- Microbial Control Filter: Polypropylene, polyethylene
Active Carbon Filter Materials:
- Deodorizer: Activated charcoal
- Frame: Paper
• Net: Polypropylene 60% Polyester 40%
MAIN UNIT
To prevent dirt or stains on the main unit, clean as often as necessary. If stains are allowed to remain, they may become hard to clean.
Wipe with a dry, soft cloth
For stubborn stains or dirt, use a soft cloth dampened with warm water.
Do not use volatile fluids
Benzene, paint thinner, polishing powder, etc., may damage the surface.
Do not use detergents
Detergent ingredients may damage the unit.
Keep the unit away from water
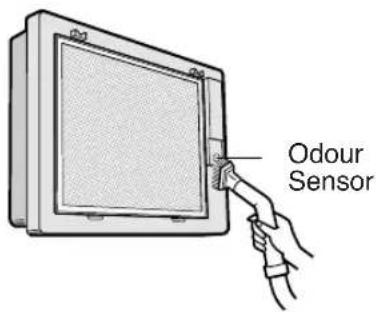
ODOUR SENSOR
Remove dust from the surfaces of the sensor openings with a vacuum cleaner.
PRE-FILTER
Remove the Filter Frame, Clean the top surface of the Pre-Filter lightly with a vacuum cleaner.
If it is contaminated heavily, remove it from the Filter Frame to wash it.
NOTE
• In case of washing, use a soft brush etc. and cold/warm water.
• Metal brushes or scrub brushes may cause damage.
• After washing, leave it in the shade until it gets dried. Then place it back to the Filter Frame.

SPECIFICATIONS
| Model | FU-28H-A | ||
| Power Supply | 220V 50Hz | ||
| Fan Speed Operation | Fan Speed Adjustment | MAX | SILENT |
| Rated Power | 29 W | 3.1 W | |
| Air Flow Volume | 168m^3/hour | 30m^3/hour | |
| Applicable Floor Surface | ~21 m^2 | ||
| Cord Length | 2.5m | ||
| Dimensions | 482mm(W)x142mm(D)x337mm(H) | ||
| 482mm(W)x228mm(D)x373mm(H) (Stand installation) | |||
| Weight | 6.2kg | ||
* The applicable floor surface area is the surface area for when operating the unit in MAX fan level. Applicable floor surface area indicates the space where a certain amount of dust pollution can be removed in 30 minutes.
About the reduction of standby power
In order to operate the electrical circuits while the power plug is inserted in the wall outlet, this product consumes about 1.0W of standby power.
For the conservation of energy, remove the power plug when not using the unit.
TROUBLESHOOTING
Before calling for repair, please review the list below, since the problem may not be a unit malfunction.
| SYMPTOM | REMEDY (not a malfunction) |
| The Remote Control does not work | Have the batteries been depleted?Are the batteries inserted correctly?Is a fluorescent lighting in the room flickering due to service life? (Refer to E-5) |
| Odours and smoke are not removed | Replace the filters if they appear to be heavily soiled. (Refer to E-14) |
| A ticking sound is heard from the unit | T icking sound is emitted when the unit is generating ions. This is normal and not a malfunction. |
| The discharged air has an aroma or odour. | Check to see if the filters are heavily soiled.Replace filters (Refer to E-14)Plasmacluster Air Purifiers emit small traces of ozone which may produce an odour. These ozone emissions are below safety levels set by the IEC 60335-2-65. |
| The unit does not operate when cigarette smoke is in the air. | Is the unit installed in a location that is difficult for the sensor to detect cigarette smoke?Are the odour sensor openings blocked or clogged? (In this case, clean the openings.) (Refer to E-15) |
ERROR DISPLAY
| LAMP INDICATION | REMEDY |
| The “Silent” Fan Speed Indicator Light blinks. | Fan motor disconnected or abnormal.Operation stops.Pressing the ON/OFF button will reset the error display, but if error occurs again, contact the shop where you purchased the unit. |
OPTIONAL STAND
Model : FZ-FC1TS
In case you prefer free standing installation, optional stand FZ-FC1TS is available.
Please ask for optional stand at your dealer.

natural_image
Illustration of a laptop and a desktop monitor on a desk, with no visible text or symbols.中文
聲寶空氣清新機操作原理
natural_image
Illustration of a hand holding a remote control device with a scroll, showing internal components and a directional arrow (no text or symbols)1 打開後蓋
按下並滑動,以打開後蓋。
2 裝入電池
natural_image
Simple line drawing of a door with a cross mark, no text or symbols presentnatural_image
Illustration of a hand using a tool to adjust or install a component, no text or symbols present頁片
如何取下不銹鋼前過濾網

natural_image
Technical line drawing of a rectangular electronic device with internal components and a circled area highlighting a feature (no text or symbols)
natural_image
Diagram of a rectangular panel with a horizontal wire wrapped around it, showing an upward arrow above it (no text or symbols present)HEPA過濾網
natural_image
Simple line drawing of a rectangular block with horizontal lines and an upward arrow, no text or symbols present.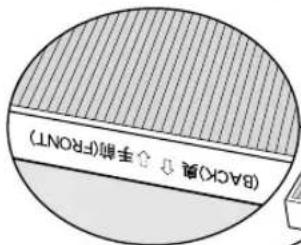
HEPA過濾網
過濾網支架

頁片

natural_image
Illustration of a laptop stand with a monitor on top, shown in two views: one with front panel and one with backrest (no text or symbols)SHARP
SHARP CORPORATION

- 香港電器安全規格
- Wall-mounting type
- 壁掛型
- FU-28H-A
- AIR PURIFIER
- INSTALLATION MANUAL
- OPERATION MANUAL
- ENGLISH
- HOW SHARP AIR PURIFIER WORKS
- NOTE
- CONTENTS
- IMPORTANT SAFETY INSTRUCTIONS .... E-2
- PART NAMES ...... E-4
- PREPARATION..... E-5
- INSTALLATION E-6
- FILTER INSTALLATION ...... E-10
- IMPORTANT SAFETY INSTRUCTIONS
- WARNING - To reduce the risk of electrical shock, fire or injury to persons:
- CAUTIONS CONCERNING OPERATION
- REMOTE CONTROL LIMITATIONS
- DO NOT USE THE REMOTE CONTROL IN THE FOLLOWING LOCATIONS:
- CAUTIONS WHEN MOUNTING THIS PRODUCT ON A WALL
- FILTER GUIDELINES
- PART NAMES
- INSERTING BATTERIES IN THE REMOTE CONTROL
- About the batteries
- REMOTE CONTROL USE
- FOR APPROPRIATE INSTALLATION
- To remove room odour
- To remove room dust
- Select a location in the room where the air circulation is good.
- Operating Conditions
- Please operate the unit under the following conditions.
- Determine the mounting location
- Installation Cautions
- Mount wall mounting bracket
- Caution
- 3
- Adjust the length of the power cord.
- Cautions
- HOW TO REMOVE THE UNIT
- - Auto Operation
- - Manual Operation
- MAIN UNIT OPERATION
- POWER ON/OFF button
- Fan Control button
- OFF Timer button
- Plasmacluster Ion Operation
- AUTO (Fan Speed) button
- MANUAL (Fan Speed) button
- CARE AND MAINTENANCE
- FILTER REPLACEMENT GUIDELINES
- Guide for filter replacement timing
- REPLACING THE FILTERS
- Replacement Filters
- Disposal of Filters
- MAIN UNIT
- Wipe with a dry, soft cloth
- Do not use volatile fluids
- Do not use detergents
- ODOUR SENSOR
- PRE-FILTER
- About the reduction of standby power
- TROUBLESHOOTING
- ERROR DISPLAY
- OPTIONAL STAND
- Model : FZ-FC1TS
- 中文
- 聲寶空氣清新機操作原理
- 打開後蓋
- 裝入電池
- SHARP
- SHARP CORPORATION
Brand : SHARP
Model : FU-28H-A
Category : Air purifier