
FRF254SS - Refrigerator Campomatic - Free user manual and instructions
Find the device manual for free FRF254SS Campomatic in PDF.


| Product Type | Refrigerator with freezer |
| Brand | Campomatic |
| Model | FRF254SS |
| Dimensions (without handle) | W911 x D728.5 x H1775 mm |
| Net Weight | 137 kg |
| Total Storage Volume | 540 L (Refrigerator: 420 L, Freezer: 120 L) |
| Climate Class | T |
| Energy Efficiency Class | A+ |
| Energy Consumption | 1.18 kWh/24h |
| Rated Voltage/Frequency | AC 220-240 V / 50 Hz |
| Rated Power | 110 W |
| Defrost Power | 370 W |
| Refrigerant | R134a, 180 g |
| Freezing Capacity | 10 kg/24h |
| Noise Level | 45 dB(A) |
| Compressor Type | Embraco frequency-variable (imported from Brazil) |
| Door Design | Four-door with stainless steel anti-fingerprint finish |
| Cooling System | Air-cooling, frost-free |
| Key Functions | Smart mode, fast cooling, fast freezing, energy saving, child lock, ice maker, temperature-adjustable compartment |
| Interior Lighting | LED lamps on three sides |
| Cleaning | Use neutral detergent and soft cloth; avoid alkaline or abrasive cleaners |
| Safety Features | Overheat protection, child lock, door open alarm |
| Repairability | Repairs must be carried out by qualified professionals; use only manufacturer-approved parts |
Frequently Asked Questions - FRF254SS Campomatic
User questions about FRF254SS Campomatic
0 question about this device. Answer the ones you know or ask your own.
Ask a new question about this device
Download the instructions for your Refrigerator in PDF format for free! Find your manual FRF254SS - Campomatic and take your electronic device back in hand. On this page are published all the documents necessary for the use of your device. FRF254SS by Campomatic.
USER MANUAL FRF254SS Campomatic
Please read this manual carefully before using the product.
Congratulations
- Thank you for your choice of such a modern and quality household refrigerator from us.
● The refrigerator is featured by outstanding energy efficiency.
● All our household appliances have been examined thoroughly before ex-factory in order to ensure their stability and sound condition. - Please contact our customer service department as soon as possible in case of any doubts, in particular, about the connection and installation of the refrigerator.
- For more information and introduction of more products, please visit our website.
- Please read carefully and follow the operation instruction, installation instruction and other relevant information enclosed to the refrigerator.
- Please keep all files safe, as you can view them in case of any problems or give them to the new user in case of transfer.
Notes:
● Please pay attention to the safety precautions before use.
- Please keep all files safe after reading for future review.
- Our products are being improved all the time and they are subject to change without prior notice.
Table of contents:
Components and Parts....1
Before Using Your Refrigerator....2
Correct Use for Your Refrigerator....3
Introduction of Your Refrigerator's Functions....8
Attentions....10
Repair and Maintenance of Your Refrigerator....11
Simple Failure Analysis and Troubleshooting....12
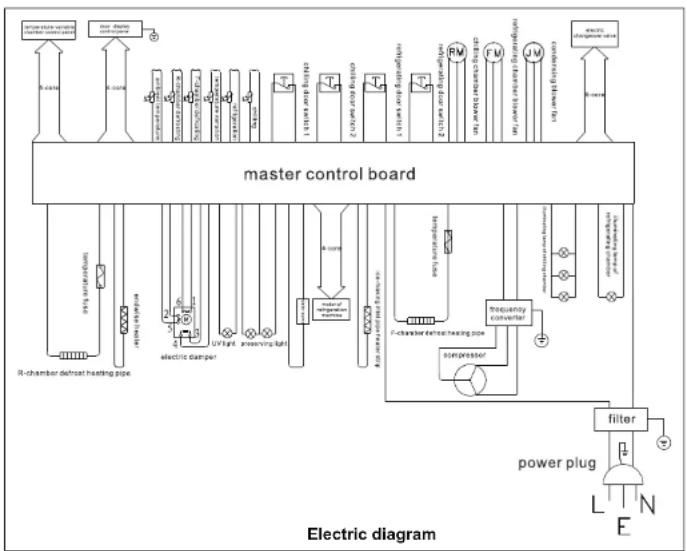
Technical Parameters and Electrical Diagrams....13
Install the door handels....15
Energy Saving Tips:
For household refrigerating appliances, information shall be provided in the instruction booklet provided by manufacturers concerning: the combination of drawers, baskets and shelves that result in the most efficient use of energy for the appliance, and how to minimise the energy consumption of the household refrigerating appliance in the use-phase.
REQUESTING ASSISTANCE OR SERVICE
If you have any doubt or extra assistance, please call:
Customer Service: Hefei Hualing Co., Ltd.
Telephone: 4008899315
Address: 176 Jin Xiu Road,Hefei Economic And Technological Development
Area,230601 Anhui,P.R.China
Fax: +86-551-3634
E-mail: Zhangkun3@midea.com.cn
NOTICE:
This appliance is intended to be used in household and similar applications such as -staff kitchen areas in shops, offices and other working environments;
-farm houses and by clients in hotels, motels and other residential type environments;
-bed and breakfast type environments;
-Catering and similar non-retail applications.
This appliance is not intended for use by persons (including children) with reduced physical, sensory or mental capabilities, or lack of experience and knowledge, unless they have been given supervision or instruction concerning use of the appliance by a person responsible for their safety.
Children should be supervised to ensure that they do not play with the appliance.
If the supply cord is damaged, it must be replaced by the manufacturer, its service agent or similarly qualified persons in order to avoid a hazard.
WARNING:
WARNING: Keep ventilation openings, in the appliance enclosure or in the built-in structure, clear of obstruction.
WARNING: Do not use mechanical devices or other means to accelerate the defrosting process, other than those recommended by the manufacturer.
WARNING: Do not damage the refrigerant circuit.
WARNING: Do not use electrical appliances inside the food storage compartments of the appliance, unless they are of the type recommended by the manufacturer.
WARNING: Do not store explosive substances such as aerosol cans with a flammable propellant in this appliance.
Correct Disposal of this product
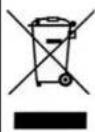
Correct Disposal of this product
This marking indicates that this product should not be disposed with other household wastes throughout the EU. To prevent possible harm to the environment or human health from uncontrolled waste disposal, recycle it responsibly to promote the sustainable reuse of material resources. To return your used device, please use the return and collection systems or contact the retailer where the product was purchased. They can take this product for environmental safe recycling.
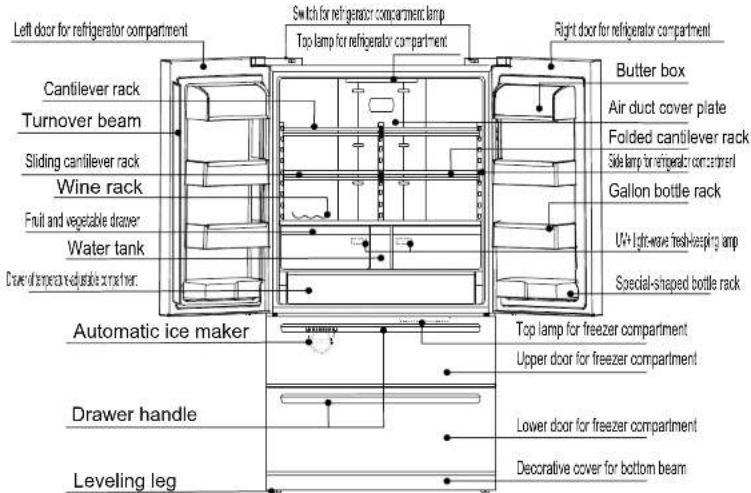
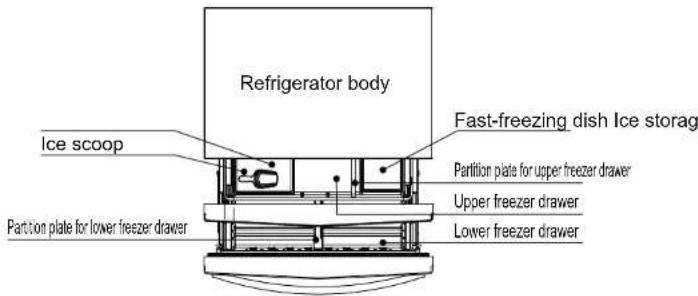
Components and Parts
Some features and parts of your refrigerator may be different from this diagram. The packing list enclosed to your refrigerator shall prevail. We apologize for the inconvenience arising thereof.
Before Using Your Refrigerator
Features
• Stainless steel door panel
It is made with the proprietary anti-fingerprint technology and has an elegant and luxurious appearance.
Thermostatic freshness preservation technology
The refrigerator compartment is provided with independent air supply system and independent temperature control system. It has constant storage temperature and could preserve the freshness of food for long.
The maximum moisturizing rate is as high as 80%, so it could preserve and prolong the freshness of the stored food.
DC frequency conversion technology
The refrigerator is capable of automatic adjustment of the cold and efficiency of the frequency-variable compressor according to the surrounding temperature, setting temperature, interior temperature, the temperature and amount of the stored food, and it is featured by quick freezing, good performance in freshness preservation, high energy-efficiency and low noises.
Smart defrosting
The refrigerator is capable of smart defrosting according to the actual frequency of use and frosting rate.
Dual system
The food could be stored in either the refrigerator compartment or the freezer compartment to avoid tainting.
Key parts and components
The compressor is Embraco frequency-variable compressor, which is imported from Brazil and featured by high efficiency, energy saving and low noises.
Temperature-adjustable compartment
A temperature-adjustable compartment is set below the refrigerator compartment. It could set different temperatures according to the requirements of the food stored here.
Ice maker
The freezer compartment is provided with an automatic ice maker, whose water supply box is set in the refrigerator compartment. It is provided with water filter blocks, which are capable of sterilization and removal of impurities, and push E and indicator 5 is On, then the ice-maker starts to work. As a result, clean ice is made.
Artificial intelligence
The refrigerator is capable of being adjusted automatically to the optimal performance according to the interior temperature and surrounding temperature without the need of manual adjustment.
Super-large and super-luxurious design
The refrigerator is designed with super-large capacity for both refrigerator compartment and freezer compartment. The refrigerator compartment adopts the adjustable cantilever shelves and has a big fruit and vegetable drawer.
--Free of Freon or frost, air-cooling refrigeration system, capable of cryogenic treatment and quick freezing
--Automatic display of faults
--Provided with condensing unit and blower, excellent refrigerating performance, long service-life of condenser
--Open alarm and large-screen LCD
--Four-door design, easy for use: refrigerating drawers are designed reasonably and can be fully used
--Luxurious LED lamps on three sides in the refrigerator compartment
Scheme of installation of cold storage door handle
Difference between the chilling and refrigeration handle: lie them flat, the one with higher chordal height is the refrigeration handle
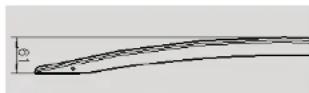
Cold storage door handle
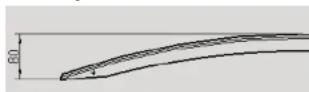
Refrigeration handle
Erection instructions of cold storage door handle:
-
Firstly, take the handle set bolts out from the refrigerator, use cross recessed screwdriver to set the bolt on the door. Fix it tight with all the screw thread twisted through the hole, as shown in the figure;
-
After the first step is completed, take the Cold storage door handle out from the box, place it as per the direction shown in the figure (Note: i.e. the direction which both screw holes on the handle are close to the edge), and hang the handle above the set bolt;
-
Use the small hexagon spanner supplied in the box to set the handle fixing socket head cap screws into both the small screwed holes on the handle. After they are screwed down, gently shake the handle, so as to confirm that the handle is well erected.
Erection instructions of the refrigeration door handle:
The erection steps of the refrigeration door handle is same with that of the cold storage door handle. Please note that: during the erection of the handle, the direction of tapping hole is downward (to the ground).
flowchart
graph TD
    A["main master control board"] --> B["R-chamber front heating pipe"]
    A --> C["electric damper"]
    A --> D["compressor"]
    A --> E["compressor with cooling unit"]
    A --> F["compressor with cooling unit"]
    A --> G["compressor with cooling unit"]
    A --> H["compressor with cooling unit"]
    A --> I["compressor with cooling unit"]
    A --> J["compressor with cooling unit"]
    A --> K["compressor with cooling unit"]
    A --> L["compressor with cooling unit"]
    A --> M["compressor with cooling unit"]
    A --> N["compressor with cooling unit"]
    A --> O["compressor with cooling unit"]
    A --> P["compressor with cooling unit"]
    A --> Q["compressor with cooling unit"]
    A --> R["compressor with cooling unit"]
    A --> S["compressor with cooling unit"]
    A --> T["compressor with cooling unit"]
    A --> U["compressor with cooling unit"]
    A --> V["compressor with cooling unit"]
    A --> W["compressor with cooling unit"]
    A --> X["compressor with cooling unit"]
    A --> Y["compressor with cooling unit"]
    A --> Z["compressor with cooling unit"]
    A --> AA["compressor with cooling unit"]
    A --> AB["compressor with cooling unit"]
    A --> AC["compressor with cooling unit"]
    A --> AD["compressor with cooling unit"]
    A --> AE["compressor with cooling unit"]
    A --> AF["compressor with cooling unit"]
    A --> AG["compressor with cooling unit"]
    A --> AH["compressor with cooling unit"]
    A --> AI["compressor with cooling unit"]
    A --> AJ["compressor with cooling unit"]
    A --> AK["compressor with cooling unit"]
    A --> AL["compressor with cooling unit"]
    A --> AM["compressor with cooling unit"]
    A --> AN["compressor with cooling unit"]
    A --> AO["compressor with cooling unit"]
    A --> AP["compressor with cooling unit"]
    A --> AQ["compressor with cooling unit"]
    A --> AR["compressor with cooling unit"]
    A --> AS["compressor with cooling unit"]
    A --> AT["compressor with cooling unit"]
    A --> AU["compressor with cooling unit"]
    A --> AV["compressor with cooling unit"]
    A --> AW["compressor with cooling unit"]
    A --> AX["compressor with cooling unit"]
    A --> AY["compressor with cooling unit"]
    A --> AZ["compressor with cooling unit"]
    A --> BA["compressor with cooling unit"]
    A --> BB["compressor with cooling unit"]
    A --> BC["compressor with cooling unit"]
    A --> BD["compressor with cooling unit"]
    A --> BE["compressor with cooling unit"]
    A --> BF["compressor with cooling unit"]
    A --> BG["compressor with cooling unit"]
    A --> BH["compressor with cooling unit"]
    A --> BI["compressor with cooling unit"]
    A --> BJ["compressor with cooling unit"]
    A --> BK["compressor with cooling unit"]
    A --> BL["compressor with cooling unit"]
    A --> BM["compressor with cooling unit"]
    A --> BN["compressor with cooling unit"]
    A --> BO["compressor with cooling unit"]
    A --> BP["compressor with cooling unit"]
    A --> BQ["compressor with cooling unit"]
    A --> BR["compressor with cooling unit"]
    A --> BS["compressor with cooling unit"]
    A --> BT["compressor with cooling unit"]
    A --> BU["compressor with cooling unit"]
    A --> BV["compressor with cooling unit"]
    A --> BW["compressor with cooling unit"]
    A --> BX["compressor with cooling unit"]
    A --> BY["compressor with cooling unit"]
    A --> BZ["compressor with cooling unit"]
    A --> CA["compressor with cooling unit"]
    A --> CB["compressor with cooling unit"]
    A --> CC["compressor with cooling unit"]
    A --> CD["compressor with cooling unit"]
    A --> CE["compressor with cooling unit"]
    A --> CF["compressor with cooling unit"]
    A --> CG["compressor with cooling unit"]
    A --> CH["compressor with cooling unit"]
    A --> CI["compressor with cooling unit"]
    A --> CJ["compressor with cooling unit"]
    A --> CK["compressor with cooling unit"]
    A --> CL["compressor with cooling unit"]
    A --> CM["compressor with cooling unit"]
    A --> CN["compressor with cooling unit"]
    A --> CO["compressor with cooling unit"]
    A --> CP["compressor with cooling unit"]
    A --> CQ["compressor with cooling unit"]
    A --> CR["compressor with cooling unit"]
    A --> CS["compressor with cooling unit"]
    A --> CT["compressor with cooling unit"]
    A --> CU["compressor with cooling unit"]
    A --> CV["compressor with cooling unit"]
    A --> CW["compressor with cooling unit"]
    A --> CX["compressor with cooling unit"]
    A --> CY["compressor with cooling unit"]
Correct Use for Your Refrigerator
Warnings
- Don't use mechanical equipment or other methods to accelerate the defrosting process except the means recommended by the manufacturer.
- Don't use any electrical appliances in the food storage compartments except the model recommended by the manufacture.
The R134a refrigerant and cyclopentane foaming material used in the refrigerator are inflammable. All waste and discarded refrigerators shall be placed away from naked fire and they are not allowed to burn.
New refrigerator is coming - Remove all packaging material before using the new refrigerator. This includes the foam base and all adhesive tape holding the refrigerator accessories inside and outside.
- Clean both the inside and outside of the refrigerator with wet cloth (a little detergent could be added into the warm water to wash the cloth and then wipe it again with the clean water);
● Prepare an independent two-pole socket with grounding contact for the refrigerator and it shall not share a multi-purpose socket with other electrical appliances; - Do connect grounding wire! The grounding pole of the socket shall be provided with a reliable grounding wire.
- Open the refrigerator body and take out the accessory
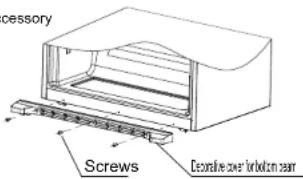
(decorative cover for bottom beam) and the three screws from the instruction packaging bag; then install them into the bottom beam as shown by the schematic diagram on the right.
Note: The decorative cover for bottom beam is used as ornament, so you can choose not to install it. It won't affect the refrigerator's performance or conditions no matter whether you install it or not.
Transport and Placing of Your Refrigerator
Transport
- Keep upright and avoid squeezing or vibration during transport. Avoid a slant angle over 45 degree during handling.
● Avoid the door or top cap from being under excessive stress when moving; otherwise, it may become deformed.
Placing
- Place your refrigerator in a well-ventilated place and keep it from heat source and direct sunlight. Don't place it in any humid or wet place so as to avoid rust and weakening of insulation effect.
- There shall be a space not less than 30cm from the top of your refrigerator and not less than 10cm from both sides or the back of the refrigerator to the adjacent walls respectively. This requirement is good for open and close of the door and also for heat emission.
● The refrigerator shall be placed on a flat and firm ground (if not flat, you can use the leveling legs for adjustment).
Keep Your Refrigerator Standing
- Don't connect your refrigerator to the power supply immediately after it is placed vertically. You should keep it standing for at least 6 hours before switching it on in order to ensure it running well.
Note: Make sure the power wire is not pinned by the refrigerator or other objects so as to avoid accidents arising from power wire faults. Please check the voltage scope of your refrigerator against the actual power supply before switching it on.
Correct Use for Your Refrigerator
Start to Use
You ought to get a good knowledge of all safety precautions and make sure that your refrigerator has been placed properly in its final position before using.
1. Unpacking
Please install the decorative cover for bottom beam onto your refrigerator after unpacking and adjust the front leveling legs to level your refrigerator.
2. Connecting Your Refrigerator to the Power Supply
Your refrigerator will enter the ex-factory default state after connecting to the power supply and it will display target temperature for the refrigerator compartment and freezer compartment.
3. Work Modes of Your Refrigerator
You can set your refrigerator in either of the following two ways:
(1) Smart mode: we suggest you choosing this mode if you have no special requirements.
Your refrigerator will work automatically after you chose this mode.
(2) Manual mode: You can set the temperature by pressing the temperature adjustment key.
4. Put Food into Your Refrigerator
You can put you for ed in to the re frig erat or af te r a pe riod of tim e (ab cu thou rs in sum me r) when the re fr iger ator bas s al re ady ful ly refr iger ated it s int er l r com pa rtme nts.
Tips: The interior temperature may require a certain period of time to reach balance if the setting temperature is changed or other food is put into the refrigerator. Such a period of time depends on the change to the setting temperature, the surrounding
Refrigerator compartment
Though the temperature-adjustable device could keep most of the refrigerator compartment at an average temperature around 2-8?, it fails to preserve the freshness of food for long. As a result, the refrigerator compartment can be used only for short-term storage.
• Use of turnover beam
Please keep strictly to the warnings on the label of the turnover beam. It is a normal phenomenon that the surface of the turnover beam is hot. Dews on the surface are also normal in summer or when the surrounding environment is wet. What you need to do is to clean them away with cloth.
• Use of water tank
Add pure water or mineral water into the tank other than tap water (don't put juice, milk or other drinks into the water tank; otherwise, the pipe may be blocked). Please fill water as soon as possible if the water level in the tank is low. Generally, the water filter blocks in the tank shall be changed annually, as the case may be.
• Adjustment of cantilever rack
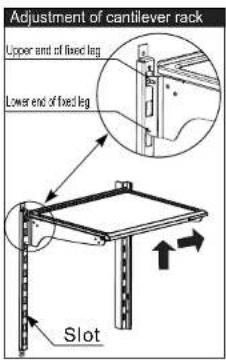
The cantilever rack could be adjusted to the proper height as required by food. Please adjust the cantilever rack by following the arrows as shown in the diagram. Raise it upward first and then take it out by tilting it upward. During installation, put the upper end of the fixed leg into one of the upper slots on the supporting iron first and then put the lower end of the fixed leg into the third slot on the lower part of the supporting iron.
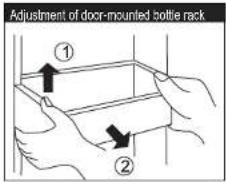
● Height adjustment and cleaning of door-mounted bottle rack
Raise the bottle rack in the direction ?, hold it with both hands and take it out in the direction ?. After cleaning, you can install the rack in the reverse order and you can also adjust the height of the rack.
Technical parameters and electric diagram
| Climate Class | T |
| Protection Against | |
| Electric Shock | I |
| Rated Voltage/Frequency | AC220-240V/50Hz |
| Rated Power | 110W |
| Defrost Power | 370W |
| Lamp Rated Power | 3.3W |
| Rated Current | 1.5A |
| Foaming Agent | Cyclopantane |
| Energy Consumption | 1.18kW · h/24h |
| Energy Efficiency Class | A+ |
| Total Gross Volume | 570L |
| Total Storage Volume | 540L |
| Refrigerator Storage Volume | 420L |
| Freezer Storage Volume | 120L |
| Variable Temperature Volume | / |
| Refrigerant,Amount | R134a,180g |
| Freezing Capacity | 10kg/24h |
| Net Weight | 137kg |
| Noise | 45dB(A) |
| Dimensions | W911xD728.5xH1775(without handle) |
| Compressor | VEG Z7H |
We will not provide further notice after parameters are changed due to product improvement or technical update. Please refer to the nameplate on back of the refrigerator as final parameters.
Simple steps to identify and solve problems
Please read the following section carefully before repair.
| Phenomena | Possible reasons, items to check |
| The refrigerator doesn't work | ● Whether the power is switched on, whether the pl is secured? ● Whether the voltage is too low? |
| Can't freeze properly | ●Whether the temperature is set too high (might reduce the temperature as required). ? ● Whether too much food is stored? ● Whether hot foot is stored? ● Whether the door is opened and closed too frequent ● Whether there is hot source around the refrigerator ● Whether the door seal is closed? |
| Loud noises | ● Whether the ground is leveled and the refrigerator placed on leveled ground? ● Whether accessories of the refrigerator are put at right position? |
| Food is frozen inside the refrigerator compartment. | ● Whether the food is put near the air outlet? |
| The refrigerator has unpleasant smell | ● Food with special odor shall be tightly wrapped. ● Check whether the food has gone bad ● Clean inside the refrigerator |
If the situation doesn't turn better after you have checked all above items, please contact with the after-sales Service Department of the Company. If power cables are damaged, please get it changed by the repairmen designated by our Company to avoid any risk.
Normal phenomena not regarded as malfunctioning
● Refrigerant inside the capillary tubes of the refrigerator flow in high speed and might have a few amount of bubbles. Hence, irregular noises might appear at the outlet.
- When the air humidity is excessively high, moisture or water droplets might appear around the refrigerator's door. You just need to wipe it off.
Correct Use for Your Refrigerator
● Food suggested to store in refrigerator compartment
(1) Cooked wheaten food, cans, milk, etc.
(2) Snack food, food subject to tainting, dairy product
(3) Cooked cold meal, sausage
(4) Fruit, vegetables
(5) Eggs, butter, cheese
(6) Zip-top cans, sea
(7) Drinks, other bottled food
Freezer compartment
The temperature in the freezer compartment is very low so it could preserve the freshness of food for long. Those that shall be stored for long could be put in this compartment but not exceed the storage period specified on the packaging of each kind of food.
Remark: You can take out the drawers of the freezer compartment to increase its capacity and store more food.
● Food suggested to store in freezer compartment
(1) The upper drawer of the freezer could be used to store fish, meat, ice-cream and etc.
(2) Japanese-style ice maker is used to make ice
(3) Ice storage box is used to store the ice
(4) The lower drawer of the freezer is used to store fish, meat and packaged poultry meat.
Note: Don't touch the freezer tray directly with hands to avoid cold injury for the temperature inside is too low.
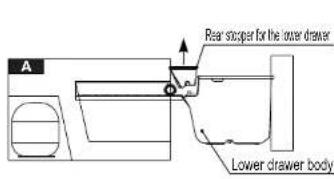
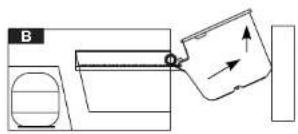
Taking-out and installation of the lower freezer drawer
(1) Pull out the lower freezer drawer first.
(2) Take out the two fixed screws from the partition plate of the lower freezer drawer with screw driver and then take off the partition plate.
(3) Take off the rear stopper for the lower drawer as shown by Fig. A.
(4) Take out the lower drawer body with force as directed by the arrows in Fig. B.
(5) The installation of the lower drawer body is conducted in the reverse order. You should install the lower drawer body first and then install the rear stopper for the lower drawer as shown in Fig. C. Finally, both sides of the drawer shall be connected to the position shown by the arrows respectively.
(6) The partition plate is installed into the corresponding slots and then is fixed with screws. The position of the partition plate for the lower drawer could be adjusted according to your preference.
Advice: Don't remove the lower freezer drawer if not necessary.
natural_image
Pure mechanical diagram showing a lever and pivot with no text or symbols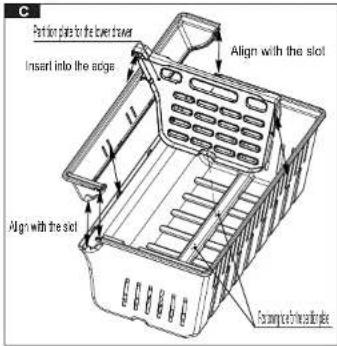
Temperature-adjustable compartment
It could be set to different temperature based on the needs of food stored.
- Set to Fruit and Vegetable mode for food that can't be frozen.
- Set to Zero Degree Fresh-keeping Mode for perishable food that could be frozen and stored for a short period.
- The drawer of temperature-adjustable compartment has a maximum load not greater than 10Kg.
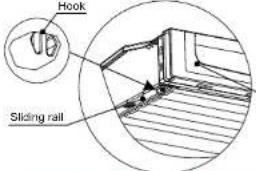
Pull out and install the temperature - adjustable compartment
(1). Pull out the drawer of the temperature-adjustable compartment:
(2). Find the hook at the left and right sides at the drawer bottom of the temperature-adjustable compartment (shown in the Fig. below).
(3). Hold the hook at two sides with a nose pliers or tweezers and push it up and out of the groove of sliding rail, and take out the hook at the other side with the same method. (4). Take out the drawer
(5). Install the drawer by putting the hook into the right place
Drawer of the temperature adjustable compartment
Ice-maker
NOTE: If you did not use the fridge for a long time, you need to get the water out of the ice-maker when using again, and clean the ice-maker. To make sure the ice is pure.
(1). Operating instructions on the ice-maker
1). When the refrigerator is used for the first time, start the ice-maker after 20min. The ice-maker is capable of producing 1.4-1.7Kg ice in 24hr, depending on the temperature of freezer compartment, surrounding temperature, times of door opening/closing and other working conditions. 2). If the ice-maker isn't used for a long period, please close the ice-maker at the control panel of the freezer door, clear the ice cube box and ice storage box.
3). When the ice marker starts again after a long period of power off, please ensure that ice cubes are not smelled. Otherwise, please clear the ice cube box and ice storage box.
4). Check the level of water tank from time to time (if the level of water tank is too low, ice cubes will be smaller).
5). The ice-maker checks the ice amount automatically and stop ice-making when the ice storage box is full. It stops also when the water level is below the alarm level, please add more water.
6). You will hear the sound of motor after about two hours, which is the sound of pump providing water to the ice maker and doesn't indicate malfunctioning.
7). It is normal that several ice cubes may stick together or get crushed.
8). When the refrigerator is used for the first time, the ice maker starts to work after the freezer compartment is cooling for about three hours (maybe longer when there are much food stored). The ice-maker could produce about 1.2Kg ice cubes within 24 hours, which may vary depending on the temperature of freezer compartment, surrounding temperature, times of door opening/closing and other working conditions.
9). The ice-maker is capable of automatic water supply, ice-making and ice-removal. Please don't take out the ice cube box and add water by yourself.
natural_image
Diagram of a mechanical pulley system with a rope and angle annotation (no text or symbols)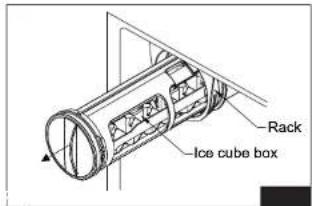
6
Repair and Maintenance of Your Refrigerator Correct Use for Your Refrig
Refrigerator's maintenance and repair
Cleaning
Clean regularly dust from the back of refrigerator and ground.
Clean regularly the space inside the refrigerator to avoid any unpleasant smell. Before cleaning, pull out the plug and use soft towels and neutral detergent and clean it finally with clear water. It is recommended to clean once half a year.
Never use following substances to clean the space inside the refrigerator:
● Alkaline or weakly alkaline detergent (it might cause cracking of the liner and plastic parts)
- Soap powder, benzoline, thinner, alcohol and etc (might damage plastic parts) - Wipe off edible oil or flavoring immediately (might cause cracking of plastic parts)
Lights and replacement
- Replace by professionals
Refrigerator compartmentkeep fresh with optical wave, degrade pesticide
- Keep fresh with optical wave--- use the optical-wave lamp to maintain the photosynthesis of fruit and vegetables, prolong the growth period and keep it fresh effectively
● Degrade the pesticideuse UV-LED light to degrade pesticide residue on the fruit and vegetable, clean with water before eating, healthier, more sanitary.
Shutdown
When the refrigerator isn't used for a long period:
- Pull out the power cable to avoid that the power cable gets old and causes electric shock or fire.
● Clean the space inside the refrigerator
- Open the door for a period for drying, close the door with a gap left to avoid unpleasant odor.
Power outage
Reduce the times of door opening during power outage, don't put fresh food inside the refrigerator anymore.
Disposal
When you discard an unused refrigerator, remove the door seal to avoid locking children inside the refrigerator.
Attentions
Attentions
The refrigerator works with AC 220V/50Hz power supply. If the voltage fluctuates in a wide range (out of the 187-242V range), the refrigerator might fail to start, the main control panel or compressor might break down, or the compressor might work with abnormal noises. You must use an automatic voltage stabilizer above 750W in such situations. The refrigerator has a three-phase (earthing) power cable plug that shall be plugged into the standard three-phase (earthing) socket. Never cut off or remove the third pin (earthing) of the power cable. After the refrigerator is installed to the right place, the socket shall be in the accessible range for ease of plugging/unplugging. The plug shall contact securely with the socket, otherwise, it might cause fire.
- Never pull out the plug by pulling the power cable. Always hold the plug and pull it out from the socket. Don't have the power cable pressed under the refrigerator or feet. When the refrigerator is moved away from the wall, never press or damage the power cable. When the power cable is damaged or the plug is worn, don't use it anymore. When the power cable is worn or damaged, you must change it at the repair station designated by the manufacturer.
- When coal gas or other inflammable gases are leaked, close the valve for leaking gases. Open the door and windows. Don't pull out or insert the plug of refrigerator or other electric appliances.
- Don't put inflammable, explosive, volatile or strongly corrosive substances into the refrigerator to avoid damaging the refrigerator or starting fire or other accidents.
- Don't use inflammable solvent near the refrigerator to avoid fire.
- It is advisable that you don't put the power socket, voltage stabilizer, microwave oven and other electric appliances on top of refrigerator to ensure safety. Don't use any electric appliances inside the refrigerator (except for the model recommended) to avoid electromagnetic interference or other accidents.
- Please keep children from entering or climbing the refrigerator to avoid locking the children inside the refrigerator and hurting them when the refrigerator falls.
- When the refrigerator starts to work, don't touch the cold surface of the freezer compartment, especially with wet hands, to avoid hurting.
- The gap between doors and between the door and refrigerator body is small. Don't put your hands into these areas to avoid finger squeeze. When you open the refrigerator's door, don't let children approach.
- Don't sprinkle water onto rinse the refrigerator with water. Don't put the refrigerator in wet or easy-to-sprinkle places so as not to influence the electric insulation property of the refrigerator.
- Don't disassemble or reform the refrigerator by yourself. Never damage the refrigeration pipeline. Please get the refrigerator repaired by professionals.
- Don't put fluid substances in bottles or sealed containers into the freezer, like bottled beer or drinks to avoid that the explosive cracking during freezing causes other losses.
- When power outage or cleaning, pull out the plug. Turn on the power supply after at least five minutes to avoid that repeated startup might damage the compressor.
- When the refrigerator is out of service, please take down the refrigerator's door, remove the door seal and shelves and put them at proper places to avoid that children might play inside and cause accident.
- This product is a household refrigerator and is only suitable for storage of food according to state standards. It can't be used for other purposes, like storage of blood, drugs, biological products and etc.
Correct Use for Your Refrigerator
- Take out, clean and install the ice cube box
- If the ice maker isn't used for a long period, ice cubes that are just produced might have unpleasant smell. You must take out and clean the ice cube box.
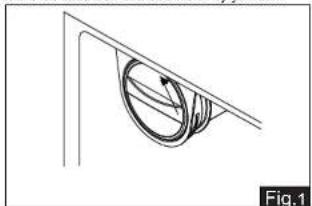
- Open the upper drawer in the freezer compartment, rotate the knob of ice maker counterclockwise by 90, turn the handle from the horizontal position to vertical position to release the lock (as shown in Fig. 1 of Pg. 6), pull it out (as shown in Fig. 2 of Pg. 6) and take out the ice cube box.
- Rinse the ice cube box with warm water (below 60°C) and don't use detergent.
● Dry the ice cube box completely in air in case that water droplets in the ice cube box might cause abnormal functioning of the ice maker. - When the ice maker can't move, separate the ice maker as shown in Fig. 1 and Fig.2. Then install after ice cubes are smelted.
◆ Insert the ice cube box onto the rack according to original sequence and rotate to the locked position.
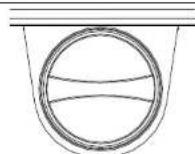
Locked status Unlocked status
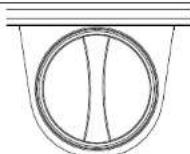
Fig.3
- Take out and install the ice maker (Fig. 4).
When the ice maker isn't used, it could be taken out and the vacated space could be used as a part of the freezer compartment. - Push the Ice Maker button on the control panel at the freezer door and the ice-making sign disappears.
- Open the door and take out the drawer
- Pull the ice-maker out (as shown in Fig1), and then downwards, so that the ice maker is unhooked (as shown in Fig. 2).
- Pull down the ice maker's power plug so that it is detached from the ice-maker's power socket (as shown in Fig. 3)
- Install the ice maker into the original position, push the Ice Maker button, the ice making symbol appears.
- Close the door after the ice maker is installed to the proper place, otherwise, it might damage the ice maker.
Ice maker's power socket
Ice maker's power plug
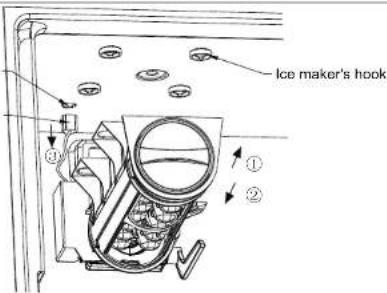
Fig.4
Introduction of Your Refrigerator's Functions Introduction of Your Refrigerator's Functions
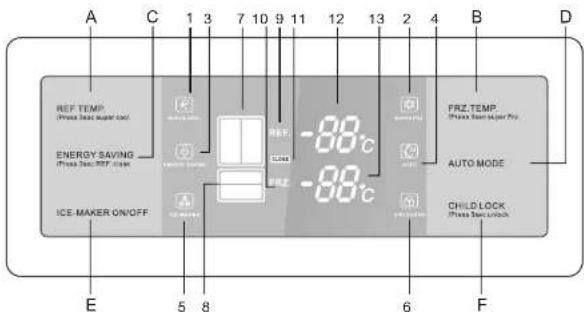
1. Control buttons
A. Refrigerator temperature control B. Freezer temperature control
C. Energy saving model D. Auto model E. Ice-making switch F. Child Lock
2. Display items
- Fast-cooling icon 2. Fast-freezing icon 3. Energy-saving icon
- Smart icon 5. Ice-making icon 6. Locked icon
- Refrigerator compartment icon 8. Freezer compartment icon
- Refrigerator text 10. Freezer text 11. Closed icon
- Refrigerator temperature 13. Freezer temperature
3. Initial power-on status
Indicators 5, 6, 7, 8, 9, 10, 11, 12, 13 are on and indicators 1, 2, 3, 4, 11 are off upon initial power-on.
4. Locking and unlocking
Under unlocked status (indicator 6 is off), push down F for three seconds to lock and indicator 6 is on. Under locked status, push down F for three seconds to unlock. If no other keys are pushed within 25sec under the unlocked status, it will enter into the locked status automatically.
Below functions shall be carried out under unlocked status.
5. Energy saving model
Enter into the model: Push C and indicator 3 is On. Choose the energy saving model for the refrigerator and previous models will be disabled.
Exit the model:
(1). Enter into another model (2). Push A or B to adjust the temperature
(3). Push C. It will exit the energy-saving model when any of above situations occurs.
6. Auto mode
Enter into the mode: Push D and indicator 4 is On. Choose the smart mode and the previous mode will disappear.
Exit the mode
(1). Enter into another mode, (2). Push A or B to adjust the temperature, (3). Push D. It will exit the smart mode when any of above situations occurs.
7. Fast-cooling mode
Enter into the mode: Push down A for three seconds and indicator 1 is On. Choose the fast-cooling mode for the refrigerator compartment and the original energy-saving mode or smart mode is cancelled.
Exit the mode:
(1). Enter into the energy-saving or smart model,
(2). Push A or B to adjust the temperature,
(3). Hold down A for three seconds
It will exit the fast-cooling mode when any of above situations occurs.
8. Fast-freezing mode
Enter into the mode: Push down B for three seconds and indicator 2 is On. Choose the fast-freezing mode for the freezer compartment and the original energy-saving mode or smart mode is cancelled Exit the mode:
(1). Enter into the energy-saving or smart model,
(2). Push A or B to adjust the temperature,
(3). Hold down B for three seconds
It will exit the fast-freezing mode when any of above situations occurs.
- Shut down the refrigerator compartment
Push down C for three seconds to shut down the refrigerator compartment, indicator 7 is Off and indicator 11 is On. Indicator 12 shows “--”. Then push down C for three seconds to turn on the refrigerator compartment. Indicator 7 is On and indicator 11 is Off, indicator 12 has normal display.
- Set the temperature of refrigerator compartment Push A and the temperature of freezer compartment will change at the sequence of (8)-(2)-(8) with a step of 1°C.
11. Set the temperature of freezer compartment
Push B and the temperature of refrigerator compartment will change at the sequence of (-15)-(-24) (-
15) with a step of 1
12. Ice-making switch
Push E and indicator 5 is On. Then, the ice maker starts to work. Push E and indicator 5 is off. The, the
ice marker stops working
13. Backlight action
The backlight is On with 100% luminance when the refrigerator or freezer doors are opened or buttons
are pushed. When no button is pushed and after the refrigerator or freezer doors are opened for 25sec, the backlight is On with 50% luminance.
Temperature-adjustable compartment's control panel
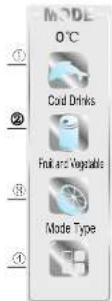
Open the refrigerator compartment's door and you might find indictors as shown in the right figure.
1. Indicators
(1). Zero degree fresh-keeping mode (2). Cold drinks mode
(3). Fruit and vegetable mode (4). Mode selection
2. Instructions
Push key (4) and indicator (1) is On to enter into the zero-degree fresh-keeping
mode.
Push key (4) and indicator (2) is On to enter into the cold drinks mode.
Push key (4) and indicator (3) is On to enter into the fruit and vegetable mode.
The temperature-adjustable compartment could choose one of above modes. Three modes could be adjusted in the cycle of “zero-degree fresh-keeping modecold drinks--fruit and vegetables” to store and keep fresh different types of food.
- Congratulations
- Notes:
- Table of contents:
- Energy Saving Tips:
- REQUESTING ASSISTANCE OR SERVICE
- NOTICE:
- WARNING:
- Correct Disposal of this product
- Components and Parts
- Before Using Your Refrigerator
- Features
- Correct Use for Your Refrigerator
- Warnings
- Transport and Placing of Your Refrigerator
- Transport
- Placing
- Keep Your Refrigerator Standing
- Start to Use
- Unpacking
- Connecting Your Refrigerator to the Power Supply
- Work Modes of Your Refrigerator
- Put Food into Your Refrigerator
- Refrigerator compartment
- • Use of turnover beam
- • Use of water tank
- • Adjustment of cantilever rack
- Simple steps to identify and solve problems
- Normal phenomena not regarded as malfunctioning
- Temperature-adjustable compartment
- Ice-maker
- Repair and Maintenance of Your Refrigerator Correct Use for Your Refrig
- Refrigerator's maintenance and repair
- Cleaning
- Never use following substances to clean the space inside the refrigerator:
- Lights and replacement
- Refrigerator compartmentkeep fresh with optical wave, degrade pesticide
- Shutdown
- Power outage
- Disposal
- Attentions
- Introduction of Your Refrigerator's Functions Introduction of Your Refrigerator's Functions
- Control buttons
- Display items
- Initial power-on status
- Locking and unlocking
- Energy saving model
- Exit the model:
- Auto mode
- Fast-cooling mode
- Exit the mode:
- Fast-freezing mode
- Set the temperature of freezer compartment
- Ice-making switch
- Backlight action
- Temperature-adjustable compartment's control panel
- Indicators
- Instructions
Brand : Campomatic
Model : FRF254SS
Category : Refrigerator