
FP750W - Uncategorized Campomatic - Free user manual and instructions
Find the device manual for free FP750W Campomatic in PDF.


| Product Type | Food Processor |
| Brand | Campomatic |
| Model | FP750W |
| Power Consumption | 750 W |
| Bowl Capacity | 2.0 L |
| Speed Settings | 2 speeds + pulse |
| Material | Plastic body, stainless steel blades |
| Dimensions (W x D x H) | 30 x 20 x 25 cm |
| Weight | 4.5 kg |
| Power Cord Length | 1.2 m |
| Safety Features | Safety lock lid, non-slip feet |
| Included Accessories | S-blade, shredding disc, slicing disc, spatula |
| Dishwasher Safe Parts | Yes (bowl, lid, blades, discs) |
| Functions | Chopping, slicing, shredding, mixing, pureeing |
| Pulse Function | Yes |
| Wattage | 750 W |
| Voltage | 220-240 V |
| Frequency | 50/60 Hz |
| Maintenance | Clean with damp cloth; blades handle with care |
| Spare Parts Availability | Contact Campomatic customer service |
Frequently Asked Questions - FP750W Campomatic
User questions about FP750W Campomatic
0 question about this device. Answer the ones you know or ask your own.
Ask a new question about this device
Download the instructions for your Uncategorized in PDF format for free! Find your manual FP750W - Campomatic and take your electronic device back in hand. On this page are published all the documents necessary for the use of your device. FP750W by Campomatic.
USER MANUAL FP750W Campomatic
natural_image
White kitchen blender with clear plastic casing and red control knob (no visible text or symbols)Made in China

INSTRUCTION MANUAL
Caution: Read and follow all safety and operating instruction before first use of this product.
Campomatic S.R.L. Via Configliachi 5/B . 35031, Abano Terme (Padova), ITALIA
WWW.CAMPOMATIC.COM
IMPORTANT SAFETY INSTRUCTION
When using electrical appliances, basic safety precaution must always be followed:
- Carefully read all instructions before operating and save for future reference.
- This appliance is for normal household use only.
- This appliance is not intended for use by persons (including children) with reduced physical, sensory or mental capabilities, or lack of experience and knowledge, unless they have been given supervision or instruction concerning use of the appliance by a person responsible for their safety.
- Young children must be supervised to ensure that they do not play with the appliance.
- If the supply cord is damaged, it must be replaced before further use by the manufacturer, its service agent or similarly qualified persons in order to avoid a hazard.
- This appliance includes a safety switch which prevents operation unless the accessories are securely installed.
- This appliance incorporates a protective device against high temperatures. If the temperature becomes too high, the unit will turn off automatically and will resume operation when the motor has cooled sufficiently (after about 15 minutes).
- Do NOT operate the appliance for more than a minute at a stretch.
- If operation is not finished within 1 minute, turn off the machine and let it cool for 10 minutes before the next round of operation. If more than 5 rounds of operation are required, cool the machine for 90 minutes to room temperature before the next 5 rounds. This can lengthen lifespan of the machine.
- The temperature of accessible surfaces may be high when the appliance is operating.
- To protect against risk of electric shock, fire or personal injury, do not immerse power cord, plug or motor base in water or any form of liquid.
- Unplug when it is not in use and before cleaning.
- Do not immerse Motor Base in water, neither rinse it under tap water.
- Do not push food with fingers, or other objects (like knives), always use the enclosed pusher for feeding food.
- Be extremely careful when handling blades and inserts, especially while assembling and disassembling, and cleaning after use. Blades are very sharp.
- Do not let power cord hang over the edge of a table or counter, or touch any hot surface
- Do not place the appliance near a gas outlet, electric burner, or heated oven.
- Please wait till all the components stop running before unplugging the power cord and taking off the processing bowl.
- Ensure the capacities shown in the Specifications section are not exceeded.
- Always use a reliable earthed power supply to operate the appliance.
- The appliances are not intended to be operated by means of an external timer or separate remote-control system.
SPECIFICATIONS
Model: SG500W
Voltage: 220-240V,50/60Hz
Max. power: 750W
Max. capacity for processing bowl:2.0L ; Working capacity for processing bowl:1.2L
OVERVIEW
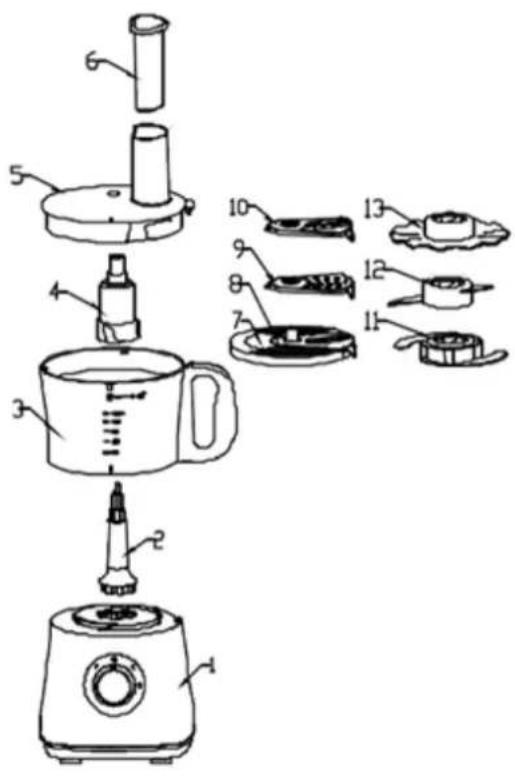
-
Motor Base
-
Driver
-
Processing Bowl
-
Blade Adapter
-
Bowl Cover
-
Pusher
-
Blade Holder
-
Slicing blade
-
Coarse grating blade
-
Fine grating blade
-
Chopper
-
Kneading blade
-
Emulsifying plate
After unpacking, disassemble unit before using first time. Refer to “HOW TO DISASSEMBLE” for directions. Wash all parts except motor base in warm, soapy water. Rinse and dry immediately. DO NOT IMMERSE MOTOR BASE IN WATER.
ASSEMBLY
Chopper Assembly
- Position Driver on motor base.
- Position processing bowl into the Driver and turn clockwise to seat firmly on motor base.
- Place blade adaptor onto the Driver.
- Place chopper onto the blade adaptor.
- Turn the chopper to the right position.
- Place cover on bowl, turn clockwise until cover interlocks on bowl.
- Place pusher into feeding chute
| Processed Food | Measurement Per per batch |
| Chocolate ≤100g | |
| Cheese ≤200g | |
| meat ≤500g | |
| Tea or Spice 50~100g | |
| Fruit & Vegetable 100~300g | |
| Onion ≤500g |
Notes (Chopper):
- Always keep the chopper inside the bowl before feeding food.
- Use pulse function for several times to avoid cutting too fine. Do not run for too long while cutting hard cheese or chocolate. Otherwise these materials will overheat and begin to melt.
- Standard chopping period: 30-60 sec.
Kneading blade Assembly
- Position Driver on motor base.
- Position processing bowl into the Driver and turn clockwise to seat firmly on motor base.
- Place blade adaptor onto the Driver.
- Place kneading blade onto the blade adaptor.
- Turn the kneading blade to the right position.
- Place cover on bowl, turn clockwise until cover interlocks on bowl.
- Place pusher into feeding chute
| Processed Food | Measurement per batch |
| Flour / Soft Cheese ≤300g | |
| Egg ≤5pieces | |
Notes (Kneading Disc):
- Always attach kneading disc in the bowl before feeding food.
- Standard kneading period: 30-180 sec.
Emulsifying plate Assembly
- Position Driver on motor base.
- Position processing bowl into the Driver and turn clockwise to seat firmly on motor base.
- Place blade adaptor onto the Driver.
- Place Emulsifying plate onto the blade adaptor.
- Turn the Emulsifying plate to the right position.
- Place cover on bowl, turn clockwise until cover locks on bowl.
- Place pusher into feeding chute
| Processed Food | Measurement per batch | Time per batch |
| Egg | 2~5pcs | 30~70sec |
| Cheese | 125~350ml | 20sec |
Notes (Emulsifying Disc):
- Emulsifying Disc can be used to mix cheese and egg, to make mayonnaise and pudding rapidly.
- Do not use Emulsifying Disc to knead flour.
Slicing blade, Coarse grating blade, Fine grating blade Assembly
- Position Driver on motor base.
- Position processing bowl into the Driver and turn clockwise to seat firmly on motor base.
- Install desired blade onto the blade holder.
- Place blade holder onto the Driver.
- Place cover on bowl
- Turn cover clockwise until cover interlocks on bowl.
- Put food into the feeding chute.
- Use pusher to push the food down for processing.
Notes:
- Choose desired disc according to the processed food and desired shape of food.
- Push softly when feeding food.
- Pre-cutting food into smaller pieces according to the diameter of feeding tube.
- Feed gradually for better effect. When cutting soft food, choose lower speed to avoid the food turning soupy. If large quantity food needs to be cut, please cut it for several batches. 1200ml for one batch.
HOW TO DISASSEMBLE
-
Remove pusher. Turn cover counterclockwise, lift and remove.
-
Lift blade holder from driver.
- Lift blade and remove from blade holder.
- Turn bowl counterclockwise to unlock from motor base. Lift and remove.
CLEANING
Wash all parts except motor base in warm, soapy water. The discs can be disassembled to wash with water, but be careful during disassembly.
DO NOT IMMERSE MOTOR BASE IN WATER.
TROUBLESHOOTING
| Problem | Solution |
| Machine does not work. | Ensure correct assembly.Make sure power plug is plugged in properly.Check if the mains have tripped, or if there is a power outage. |
| Machine stops running suddenly. | Processing bowl may loosen during vigorous processing. Please re-install the bowl cover. |
| Motor is running, while components do not run. | Make sure the Driver is installed correctly. |
Brand : Campomatic
Model : FP750W
Category : Uncategorized