
MG1700 - Meat Grinder Campomatic - Free user manual and instructions
Find the device manual for free MG1700 Campomatic in PDF.


| Product Type | Electric Meat Grinder / Kitchen Mincer |
| Brand | Campomatic |
| Model | MG1700 |
| Power Consumption | 1700 W (max), continuous use up to 800 W |
| Voltage | 220-240 V ~ 50/60 Hz |
| Main Functions | Mincing, Sausage Making, Kebbe Making |
| Safety Features | Overheat auto cut-off, Reverse function, Release button for cutter housing |
| Motor Unit Material | Plastic body with metal internal parts |
| Detachable Parts Material | Stainless steel cutting blade and discs, plastic housing |
| Cleaning | Removable parts washable in hot soapy water (not dishwasher); motor unit wipe with damp cloth |
| Continuous Use Limit | Max 3 minutes at full load, then allow cooling |
| Included Accessories | Pusher, Tray, 3 grinding discs (coarse, medium, fine), Screw ring, Cutter knife, Kebbe cone, Sausage horn, Separator, Wrench (fixity keystoke) |
| Cord Storage | Yes, on bottom of motor unit |
| Maintenance | Apply a few drops of edible oil to metal parts after cleaning to prevent rust |
| Forbidden Use | Do not grind bones, nuts, or frozen meat |
| Warranty | Invalid if non-original accessories used |
Frequently Asked Questions - MG1700 Campomatic
User questions about MG1700 Campomatic
0 question about this device. Answer the ones you know or ask your own.
Ask a new question about this device
Download the instructions for your Meat Grinder in PDF format for free! Find your manual MG1700 - Campomatic and take your electronic device back in hand. On this page are published all the documents necessary for the use of your device. MG1700 by Campomatic.
USER MANUAL MG1700 Campomatic
natural_image
Black and silver CAMPOMATIC 1700W electrician feeder with control buttons (Stop, Rev) and a circular logo (no text-heavy elements)Made in China

TABLE OF CONTENT
English 3
عربية 9
BEFORE USING
Read these instructions thoroughly first and keep them for future reference. Check whether the voltage in the hone corresponds with that of the appliance. Only connect this appliance to an earthed electric socket.
Remove all packaging materials and stickers from the appliance. Clean the appliance and all removable accessories and dry them thoroughly (see 'Cleaning and maintenance'). Place the motor unit on a flat and stable surface.

PARTS
- Pusher
- Tray
- Fixity keystoke
- Body
- Handle
- Switch
- Screw pusher
- "T" Piece
- Plastic sheath 01
- Plastic sheath 02
- Revolve knife
- Middle hole knife
- Fixation nut
- Long sheath
- Short sheath
HOW TO USE
Mincing
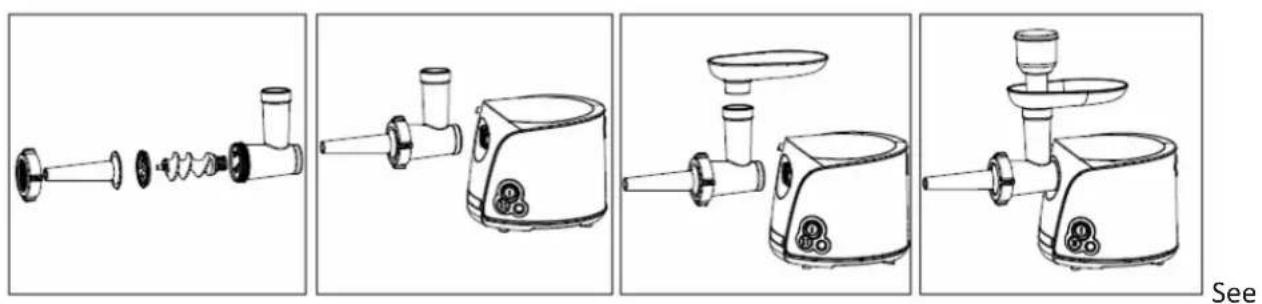
See below figure 2

natural_image
Line drawings of four different types of kitchen electricizers, showing exploded and assembled views (no text or labels)-
Insert the worm shaft into the cutter housing, the plastic end first. Fit the cutter blade unit onto the other end of worm shaft. (The cutting edge should be placed at the front side). And then you can also fit the coarse/medium/fine grinding disc (Depending on the consistency you prefer). Make sure the notch of the grinding disc fit into the projection on the opening of cutter house. Fit the screw ring on the cutter housing by turning the screw ring clockwise until it is properly fastened.
-
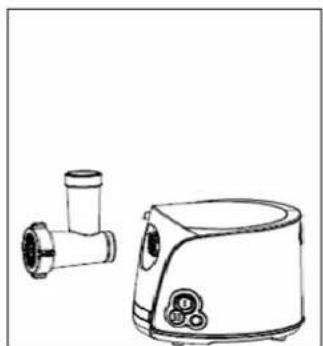
Fit the cutter housing on the motor unit. The lugs on the motor unit must fit precisely into the slots on the cutter housing. Rotate the cutter housing anti-clockwise until hear a click. The cutter housing is then locked in the position You can remove the cutter housing by pressing the release button on the appliance and turning the cutter housing clockwise.
-
Place the tray on the upright part of the cutter housing.
-
Now the appliance is ready for mincing.
MINCING:
Cut the meat into 10 cm long, 2 cm thick strips. Remove bones, pieces of gristle and sinews as much as possible.
Note: never use frozen meat!
Place the meat on the tray. Use the pusher to gently push the meat into the cutter housing.
For steak tartare, mince the meat with the medium grinding disc twice.
MAKING SAUSAGES
natural_image
Four-panel line drawing showing a kitchen tool with exploded, side, top, and back views (no text or symbols)below figure 3
-
Mince the meat(see 'Mincing' sections)
-
Switch off the appliance.
-
Press the release button on the appliance and turn the cutter housing clockwise to remove it from the motor unit. Note: Make sure the appliance is switched off and stops running before you remove the cutter housing.
-
Remove the screw ring by turn it anti-clockwise.
-
Remove the grinding disc.
-
Fit separator, sausage horn on the metal end of worm shaft. Then fit the screw ring on the cutter housing by turning the screw ring clockwise until it is properly fastened. Make sure the notch of separator fit into the projection on the opening of cutter house.
-
Fit the cutter housing on the motor unit. The lugs on the motor unit must fit precisely into the slots on the cutter housing. Rotate the cutter housing anti-clockwise until heat a click. The cutter housing is then locked in the position.
-
Place the tray on the upright part of the cutter housing.
-
Now the appliance is ready for making sausages.
MAKING SAUSAGES:
Put the ingredients in the tray. Use the pusher to gently push the meat into the cutter housing.
Put the sausage skin in lukewarm water for 10 minutes. Then slide the wet skin onto the sausage horn.
Push the (seasoned) minced meat into the cutter housing. If the skin gets stuck onto the sausage horn, wet it with some water.
MAKING KEBBE
See below figure 4

natural_image
Four-panel line drawing showing the assembly of a kitchen grater with labeled components (no text or symbols)- Insert the worm shaft into the cutter housing, the plastic end first.
- Fit the cone on the metal end of worm shaft, and then fit the former. Make sure the notch of the cone fit into the projection on the opening of cutter house.
- fit the screw ring on the cutter housing by turning the screw ring clockwise until it is properly fastened.
- Fit the cutter housing on the motor unit. The lugs on the motor unit must fit precisely into the slots on the cutter housing. Rotate the cutter housing anti-clockwise until hear a click. The cutter housing is then locked in the position.
- Place the tray on the upright part of the cutter housing.
- The appliance is ready for making kebbe.
MAKING KEBBE:
Feed the prepared kebbe mixture through the kebbe maker. Cut the continuous hollow cylinder into the desired lengths and user as required
Kebbe is a traditional Middle Eastern dish made primarily of lamb and burgul wheat which are minced together to form a paste the mixture is extruded through the kebbe maker and cut into short lengths. The tubes can then be stuffed with a minced meat mixture, the ends pinched together and then deep fried.
TEMP STOP/REVERSE
-
Keep pressing 'REV' button when the appliance is in the mode of switch on, the appliance temporarily stops working. Release the button, the appliance resumes working.
-
If the appliance is blocked, switch off the appliance first and press 'REV' button, the worm shaft will turn in the reverse direction. Then the appliance can renew its normal condition.
AUTO CUT OFF
This appliance is equipped with a thermostat system. This system will automatically cut off the supply power in case of over heating. If this happens, unplug the appliance and let the appliance cool down for 60 minutes. After that the appliance can resume working.
TIPS
- This appliance is only suitable for household use. Don't use outside.
- Check if the voltage indicated on the appliance corresponds to the local mains voltage before you connect to the appliance.
- Never use any accessories of parts from other manufactures. Your guarantee will become invalid if such accessories or parts have been used.
- Do not use the appliance if the mains cord, the plug or other parts are damaged.
- If the mains cord of this appliance is damaged, it must always be replaced by manufacture or a service center authorized, In order to avoid hazardous situations
- Make sure every part fits in its position before you switch on the appliance.
- Never use you finger or an object to push ingredients down the feed tube while the appliance is running. Only the pusher is to be used for this purpose.
- Keep the appliance out of the reach of children.
- Never let the appliance run unattended.
- Unplug the power cord from power supply socket before detaching and installing any accessory.
- Wait until moving parts have stopped running before you remove the parts of the appliance.
- Do not attempt to grind bones, nuts or other hard units.
- Never reach into the cutter housing. Always use the pusher.
- Unplug the appliance immediately after use.
- Never operate the appliance continuously for more than 3 minutes at 800W.
- Children should be supervised to ensure that they do not play with the appliance.
- The use of this appliance by children or persons with a physical, sensory, mental or motorial disability, or lack of experience and knowledge can give cause to hazards. Persons responsible for their safety should give explicit instructions or supervise the use of the appliance.
CLEANING AND MAINTENANCE
REMOVE THE PLUG FROM THE SOCKED. CLEAN THE APPLIANCE IMMEDIATELY AFTER EACH USE DISMANTLE REMOVABLE PARTS ONLY WHEN ALL MOVING PARTS HAVE STOPPED RUNNING
Apart from the motor unit, all removable parts can be cleaned in hot, soapy water. Do not use any abrasive or corrosive cleaning products or scourers. Do not clean parts in dishwasher. Clean the motor unit with a damp cloth. Dry them thoroughly before storage.
MAINTENANCE:
- Mincer meat only without bones and skin
- Wash the mincer every time after use and wipe dry, coat it with a few drops of edible oil to prevent rusting
DON'T IMMERSE THE MOTOR UNIT IN WATER OR IN OTHER LIQUIDS. IF THIS HAPPES DON'T USE THE APPLIANCE ANY MORE; DISPOSE OF THE APPLIANCE.
STORAGE
You can store the power cord in the power cord storage on the bottom of the appliance.
The separator, sausage horn, former and cone can be stored in the pusher. See figure 5

natural_image
3D illustration of a mechanical component with exploded view and red arrow indicating motion (no text or symbols)Fig.5
تصائج:
تعمال.
natural_image
3D illustration of a mechanical assembly with exploded view and red arrow indicating direction (no text or symbols)natural_image
Four-panel line drawing showing a kitchen brush and its three variants of a food processor (no text or labels)natural_image
Exploded view diagram of a mechanical component showing internal parts and assembly (no text or labels)1
natural_image
Line drawing of a kitchen electric shaver and blender (no text or symbols)2

natural_image
Line drawing of a kitchen electric shaver with handle and control knob (no text or symbols)3

natural_image
Line drawing of a kitchen grater with handle and control panel (no text or symbols)4
natural_image
Black and silver CAMPOMATIC 1700W electrician feeder with control buttons (Stop, Rev) and a mesh blade (no visible text or symbols on the device body)صنع في الصين

كتب التعليمات
Brand : Campomatic
Model : MG1700
Category : Meat Grinder