
RAP-B-417-400U - Accessory RAM Mount - Free user manual and instructions
Find the device manual for free RAP-B-417-400U RAM Mount in PDF.


| Product Type | Accessory Mount (Universal Cradle) |
| Brand | RAM Mount |
| Model | RAP-B-417-400U |
| Material | High-strength composite, rubber cushion |
| Color | Black |
| Dimensions | Approx. 4.0 x 3.0 x 2.5 inches (102 x 76 x 64 mm) |
| Weight | 0.35 lbs (160 g) |
| Compatibility | Universal fit for most GPS, smartphones, and small electronics |
| Mounting Type | Ball and socket system (standard RAM B size) |
| Device Width Range | 1.5 to 4.0 inches (38 to 102 mm) |
| Rotational Range | 360° rotation, tilt adjustable |
| Includes | Mount cradle, rubber pads, hardware kit |
| Installation | Tool-free tightening knob |
| Care & Cleaning | Wipe with damp cloth; mild soap if needed; avoid solvents |
| Safety | Use only as intended; ensure secure fastening; check periodically |
| Spare Parts & Repairability | Replacement rubber pads available; modular design |
| Warranty | Limited lifetime warranty (details on manufacturer website) |
| Country of Origin | USA |
Frequently Asked Questions - RAP-B-417-400U RAM Mount
User questions about RAP-B-417-400U RAM Mount
0 question about this device. Answer the ones you know or ask your own.
Ask a new question about this device
Download the instructions for your Accessory in PDF format for free! Find your manual RAP-B-417-400U - RAM Mount and take your electronic device back in hand. On this page are published all the documents necessary for the use of your device. RAP-B-417-400U by RAM Mount.
USER MANUAL RAP-B-417-400U RAM Mount
Rubber Cap Placement (Optional)
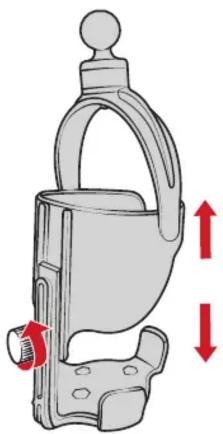
Height Adjustment Settings
Loosen the knob on the back of the Level Cup XL to adjust the overall height.
natural_image
Illustration of a mechanical device with red directional arrows indicating movement or force (no text or symbols)Follow these steps if your cup/bottle tapers towards the bottom, or if your drink feels somewhat loose in the Level Cup XL. *Important*: Adhesive solution may be extremely watery. Use caution while handling. Use of gloves and paper towels recommended.
① Cut tip of tube to expose adhesive.
② Apply only a couple drops of adhesive into the cap.
3 While holding the Level Cup XL upside down, position the cap over the fin of the Level Cup XL. Repeat for remaining rubber caps. Glue dries immediately.

natural_image
Illustration showing two steps of a hand using scissors to cut a tool, with red arrows indicating the process (no text or symbols present)
natural_image
Illustration of hands holding a device with a red arrow indicating a change (no text or symbols present)RPR-INS-417
This document, including images, may not be reproduced partly or fully without the expressed written consent of National Products, Inc.

RAM®
MOUNTS
1.800.497.7479
support@rammount.com
rammount.com
Level Cup ™ XL
Height Adjustment Settings
Loosen the knob on the back of the Level Cup XL to adjust the overall height.

natural_image
Illustration of a mechanical device with a handle and side brackets, showing bidirectional red arrows indicating movement or force (no text or symbols)Rubber Cap Placement (Optional)
Follow these steps if your cup/bottle tapers towards the bottom, or if your drink feels somewhat loose in the Level Cup XL. *Important*: Adhesive solution may be extremely watery. Use caution while handling. Use of gloves and paper towels recommended.
① Cut tip of tube to expose adhesive.
② Apply only a couple drops of adhesive into the cap.
3 While holding the Level Cup XL upside down, position the cap over the fin of the Level Cup XL. Repeat for remaining rubber caps. Glue dries immediately.

natural_image
Illustration showing two steps of a hand using scissors to cut a tool, with red arrows indicating the process (no text or symbols present)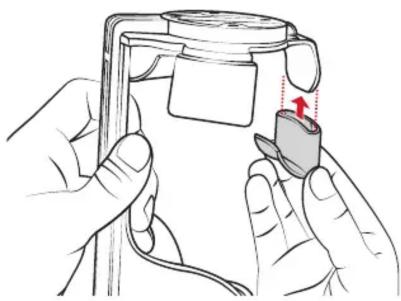
natural_image
Illustration of hands holding a device with a red arrow indicating a change (no text or symbols present)RPR-INS-417


Brand : RAM Mount
Model : RAP-B-417-400U
Category : Accessory