
ST-RMK - Computer accessory Crestron - Free user manual and instructions
Find the device manual for free ST-RMK Crestron in PDF.


| Product Type | Rack Mount Kit |
| Brand | Crestron |
| Model | ST-RMK |
| Material | Steel, powder coated |
| Dimensions (H x W x D) | 1.72 in x 17.0 in x 6.0 in (4.4 cm x 43.2 cm x 15.2 cm) |
| Weight | 2.2 lbs (1.0 kg) |
| Rack Units | 1U |
| Compatibility | Select Crestron devices (e.g., DIN-AP3, DIN-IO8) |
| Mounting Type | 19-inch rack mount |
| Included Hardware | Mounting screws, brackets |
| Color | Black |
| Finish | Matte |
| Installation | Requires basic tools (screwdriver) |
| Application | Professional AV systems, control rooms |
| Operating Temperature | 32°F to 104°F (0°C to 40°C) |
| Storage Temperature | -4°F to 140°F (-20°C to 60°C) |
| Warranty | 1 year limited |
| Certifications | CE, FCC |
| Country of Origin | USA |
| Package Contents | Rack mount kit, hardware pack, manual |
| Manual Language | English |
Frequently Asked Questions - ST-RMK Crestron
User questions about ST-RMK Crestron
0 question about this device. Answer the ones you know or ask your own.
Ask a new question about this device
Download the instructions for your Computer accessory in PDF format for free! Find your manual ST-RMK - Crestron and take your electronic device back in hand. On this page are published all the documents necessary for the use of your device. ST-RMK by Crestron.
USER MANUAL ST-RMK Crestron
Rack Mount Kit: ST-RMK
Physical Description
The ST-RMK is a rack mount kit that is capable of holding either one or two CEN Ethernet Modules, SmarTouch STS Expansion Modules, ST-CP Control Processors, or any combination of units in a single rack space. The front extrusion and bracket are provided to occupy the open bay of the ST-RMK so that when only one module (or ST-CP) is installed, no gaps are visible in the rack. The front extrusion and bracket may be installed in either the left or right bay of the ST-RMK. When the ST-RMK accommodates two modules, the extrusion and bracket are not used.
Items 1 through 6 listed below are the supplied components of the ST-RMK. The tools required for installation of the ST-RMK are a #1 Phillips 1/4-inch hex bit, a 1/4-inch hex socket, and an inch-pound torque driver. Follow the installation procedures in the next section.
Supplied Components
| ITEM | DESCRIPTION PART NUMBER QUANTITY | |
| 1 Assembly, chassis & front extrusion AY17489-1 1 | ||
| 2 Assembly, front extrusion & label AY17490-1 1* | ||
| 3 Bracket MTBK02315-1 1* | ||
| 4 Screw, 4-40 x 1/4"L, steel, pan, phillips, black SR04-40-0R2500-8 8* | ||
| 5 Nut, 4-40, hex, steel, zinc MTPL02390-1 4 | ||
| 6 Washer, lock, steel, internal, #4, zinc WA04L0-1 | 4 |
* Depending upon number of modules installed, not all items may be required.
Rack Mount Instructions
Front Extrusion and Bracket Installation
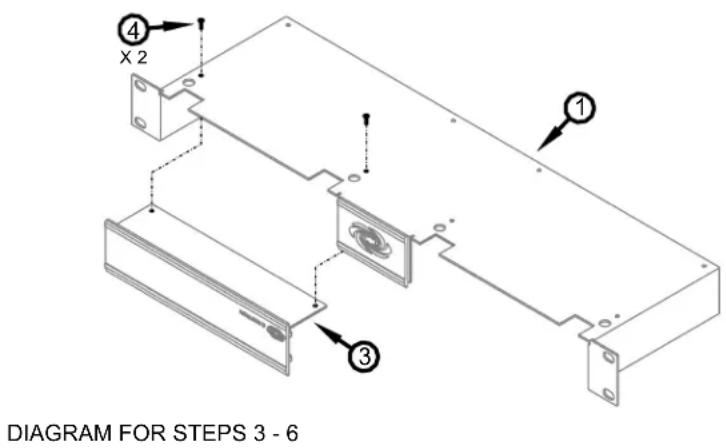
If two modules (or ST-CPs) are to be installed onto the ST-RMK, skip this procedure and proceed to the next section. If only one module is to be installed, the front extrusion and bracket should be installed into either the left or right bay of the chassis. To install the extrusion and bracket, refer to the diagrams and steps below (installation into the right bay is shown, left bay installation is identical).
Install Front Extrusion & Bracket

-
With the label on the front extrusion properly orientated, position the four threaded studs of the extrusion through the four holes of the bracket.
-
Loosely install four lockwashers and four hex nuts onto the studs of the front extrusion. Using a 1/4-inch hex socket and an inch-pound torque driver, tighten the hex nuts to 8-inch pounds (0.90 newton-meters) to secure extrusion.
-
Place the chassis ① upside down on a clean surface.
-
Turn front extrusion and bracket upside-down and position into open bay of chassis.
-
Align two screw holes in bracket ③ with holes in the chassis. Using a #1 Phillips 1/4-inch hex bit and an inch-pound torque driver, install two screws ④ and tighten to 8-inch pounds (0.90 newton-meters) to secure bracket.
-
Return the ST-RMK to its proper orientation and proceed to the next procedure to install a module (or ST-CP) into the ST-RMK.
Module (or ST-CP) Installation into ST-RMK
Refer to the procedure below and complete the following steps for proper installation of a module (or ST-CP) into the ST-RMK.
-
Place module into chassis ① so that front panel of the module is exposed, the two front rubber feet of the module fit into cutouts in the chassis, and the two rear rubber feet extend from the rear edge.
-
As shown below, keep the module and chassis ① together and place upside down on a clean surface.
Module Installation

-
Align screw holes in the chassis ① with holes in the module. Using a #1 Phillips 1/4-inch hex bit and an inch-pound torque driver, install four screws ④ and tighten to 4-inch pounds (0.45 newton-meters) to secure module.
-
If installing another module, repeat this procedure. If not installing another module, return ST-RMK and module(s) to proper orientation and install into system rack. (Rack mounting screws are not supplied.)
Return and Warranty Policies
Merchandise Returns / Repair Service
- No merchandise may be returned for credit, exchange, or service without prior authorization from CRESTRON. To obtain warranty service for CRESTRON products, contact the factory and request an RMA (Return Merchandise Authorization) number. Enclose a note specifying the nature of the problem, name and phone number of contact person, RMA number, and return address.
- Products may be returned for credit, exchange, or service with a CRESTRON Return Merchandise Authorization (RMA) number. Authorized returns must be shipped freight prepaid to CRESTRON, Crosskill, N.J., or its authorized subsidiaries, with RMA number clearly marked on the outside of all cartons. Shipments arriving freight collect or without an RMA number shall be subject to refusal. CRESTRON reserves the right in its sole and absolute discretion to charge a 15% restocking fee, plus shipping costs, on any products returned with an RMA.
- Return freight charges following repair of items under warranty shall be paid by CRESTRON, shipping by standard ground carrier. In the event repairs are found to be non-warranty, return freight costs shall be paid by the purchaser.
CRESTRON Limited Warranty
CRESTRON ELECTRONICS, Inc. warrants its products to be free from manufacturing defects in materials and workmanship under normal use for a period of three (3) years from the date of purchase from CRESTRON, with the following exceptions: disk drives and any other moving or rotating mechanical parts, pan/tilt heads and power supplies are covered for a period of one (1) year; touchscreen display and overlay components are covered for 90 days; batteries and incandescent lamps are not covered.
This warranty extends to products purchased directly from CRESTRON or an authorized CRESTRON dealer. Purchasers should inquire of the dealer regarding the nature and extent of the dealer's warranty, if any.
CRESTRON shall not be liable to honor the terms of this warranty if the product has been used in any application other than that for which it was intended, or if it has been subjected to misuse, accidental damage, modification, or improper installation procedures. Furthermore, this warranty does not cover any product that has had the serial number altered, defaced, or removed.
This warranty shall be the sole and exclusive remedy to the original purchaser. In no event shall CRESTRON be liable for incidental or consequential damages of any kind (property or economic damages inclusive) arising from the sale or use of this equipment. CRESTRON is not liable for any claim made by a third party or made by the purchaser for a third party.
CRESTRON shall, at its option, repair or replace any product found defective, without charge for parts or labor. Repaired or replaced equipment and parts supplied under this warranty shall be covered only by the unexpired portion of the warranty.
Except as expressly set forth in this warranty, CRESTRON makes no other warranties, expressed or implied, nor authorizes any other party to offer any other party to offer any warranty, including any implied warranties of merchantability or fitness for a particular purpose. Any implied warranties that may be imposed by law are limited to the terms of this limited warranty. This warranty statement supersedes all previous warranties.
Trademark Information
All brand names, product names, and trademarks are the sole property of their respective owners. Windows is a registered trademark of Microsoft Corporation. Windows95/98/Me/XP and WindowsNT/2000 are trademarks of Microsoft Corporation
Brand : Crestron
Model : ST-RMK
Category : Computer accessory