
RS-TOUCH7-W - Interactive touchscreen Black Box - Free user manual and instructions
Find the device manual for free RS-TOUCH7-W Black Box in PDF.


| Product Type | Touch Screen Controller |
| Brand | Black Box |
| Model | RS-TOUCH7-W |
| Display Size | 7 inches |
| Resolution | 1024 x 600 pixels |
| Touch Technology | Capacitive multi-touch |
| Power Input | 12V DC, 1A |
| Power Consumption | 12W typical |
| Connectivity | Ethernet, USB 2.0, RS-232, HDMI output |
| Operating System | Embedded Linux |
| Operating Temperature | 0°C to 50°C |
| Storage Temperature | -20°C to 60°C |
| Relative Humidity | 10% to 90% (non-condensing) |
| Dimensions (W x H x D) | 200 x 150 x 30 mm |
| Weight | 0.5 kg |
| Mounting Type | Wall mount or panel mount |
| Ingress Protection | IP54 (front panel) |
| Compliance | CE, FCC, RoHS |
| Applications | Home automation, industrial control, digital signage |
| Cleaning | Wipe with a soft, dry cloth; avoid solvents |
| Warranty | 2 years limited |
Frequently Asked Questions - RS-TOUCH7-W Black Box
User questions about RS-TOUCH7-W Black Box
0 question about this device. Answer the ones you know or ask your own.
Ask a new question about this device
Download the instructions for your Interactive touchscreen in PDF format for free! Find your manual RS-TOUCH7-W - Black Box and take your electronic device back in hand. On this page are published all the documents necessary for the use of your device. RS-TOUCH7-W by Black Box.
USER MANUAL RS-TOUCH7-W Black Box
TABLE OF CONTENTS
NEED HELP?
LE AVE THE TECH TO US
LIVE 24/7
TECHNICAL
SUPPORT
1.877.877.2269
- INTRODUCTION....3
1.1 Description 3
1.2 Requirements 3
1.3 Settings 3
- ACCOUNT SETTING 4
2.1 Introduction....4
2.2 Creating a User Account....4
2.3 Creating a Room Account 7
- OPTIONS NOT VIA WEB....12
3.1 Office 365 Options Settings Not Available through Web Interface 12
- PANELS 14
4.1 The First Panel Setting.... 14
4.2 Adding More Panels.... 18
1.1 DESCRIPTION
THIS DOCUMENT IS INTENDED FOR USERS OF MICROSOFT OFFICE 365 SUBSCRIPTION. IT DESCRIBES THE PROCESS OF SETTING UP ACCOUNTS IN THE MICROSOFT OFFICE 365 AND SETTINGS OF IN-SESSION 7" AND 12" ROOM SCHEDULER PANELS WORKING WITH THIS SUBSCRIPTION.
Before you start, read IN-SESSION 7" and 12" Room Scheduler - Setup Guide - Common Settings. There you will find basic information on the IN-SESSION 7" and 12" Room Scheduler reservation system and a description of the common settings of the panels.
1.2 REQUIREMENTS
FOR PROPER OPERATION OF THE IN-SESSION 7" AND 12" ROOM SCHEDULER RESERVATION SYSTEM, MAKE SURE YOU HAVE THE FOLLOWING:
- Microsoft Office 365 subscription: any Business, Education, Enterprise or Government plan with support of resource/room mailboxes; home and personal plans are not supported.
User accounts: you need to have at least one user account for each 25 rooms managed with the IN-SESSION 7" and 12" Room Scheduler reservation system.
1.3 SETTINGS
TO SET THE IN-SESSION 7" AND 12" ROOM SCHEDULER SYSTEM, YOU NEED TO:
- Prepare an account on the Microsoft Office 365.
- Configure the IN-SESSION 7" and 12" Room Scheduler panels.
2.1 INTRODUCTION
SET THE FOLLOWING ACCOUNTS IN MICROSOFT OFFICE 365:
Room accounts: There is an email account of MEETING ROOM or RESOURCE kind designated for room scheduling in Office 365. The IN-SESSION 7" and 12" Room Scheduler system uses the calendar of this account for arranging meetings in the particular room.
User account: This is a typical user email account with read and write access to the calendars of rooms accounts. The IN-SESSION 7" and 12" Room Scheduler system uses the user account for accessing the rooms calendars. That is because the original rooms accounts cannot administer themselves.
WHEN YOU ARRANGE A MEETING THROUGH THE IN-SESSION 7" AND 12" ROOM SCHEDULER PANEL, THE SPECIFIC USER ACCOUNT WILL BE INDICATED AS ITS ORGANIZER.
Since there is a limitation in the default setting of Office 365 to no more than 27 simultaneous accesses to room accounts at a time, we recommend having one such account for no more than 25 rooms. You can find further information on https://msdn.microsoft.com/en-us/library/office/jj945066(v=exchg.150).aspx. Here the maximum number of simultaneous accesses is set by EWSMaxConcurrency parameter.
If you need to manage more rooms, either use more user accounts or change the EWSMaxConcurrency parameter in detailed administrator settings (if allowed by your Office 365 license).
2.2 CREATING A USER ACCOUNT
To create accounts, you need to have administrator access to Office 365 settings.
FOLLOW THESE STEPS:
- Go to https://login.microsoftonline.com and log in to your Office 365 administrator account.

Office 365
Work or school account


Keep me signed in

Back
FIGURE 2-1. LOGIN SCREEN
CHAPTER 2: ACCOUNT SETTING
NEED HELP?
LE AVE THE TECH TO US
LIVE 24/7
TECHNICAL
SUPPORT
1.877.877.2269
- Go to "Admin".
Collaborate with Office Online
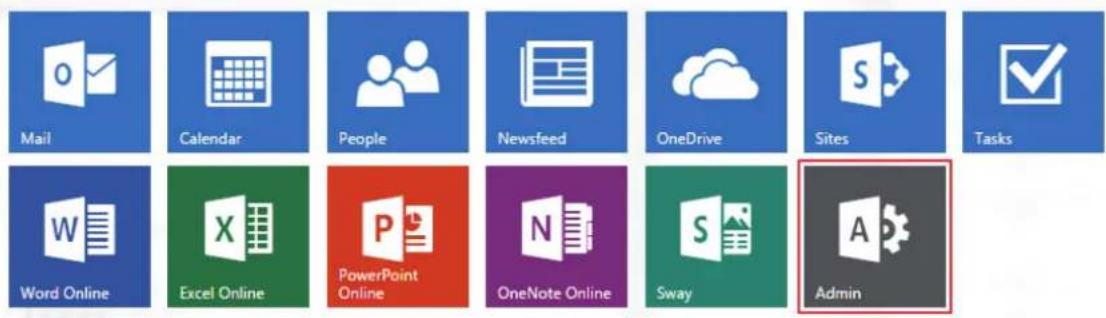
FIGURE 2-2. ADMIN SCREEN
- Choose DASHBOARD in the side menu and click on "Add new users."

FIGURE 2-3. ADD NEW USERS SCREEN
CHAPTER 2: ACCOUNT SETTING
NEED HELP?
LE AVE THE TECH TO US
LIVE 24/7
TECHNICAL
SUPPORT
1.877.877.2269
- Enter your full name, Display name, Password, and other information and confirm by clicking on "Create."
Create new user account

FIGURE 2-4. ENTER IDENTIFYING INFORMATION
CHAPTER 2: ACCOUNT SETTING
NEED HELP?
LE AVE THE TECH TO US
LIVE 24/7
TECHNICAL
SUPPORT
1.877.877.2269
- If the user account was created correctly, you will see the following screen.
Create new user account

User
created
successfully!
User name
Password:
Licenses

Office 365 Business Premium
FIGURE 2-5. NEW USER ACCOUNT CREATED SCREEN
2.3 CREATING A ROOM ACCOUNT
- In the left-side menu of Office 365 Admin Center, click on "MEETING ROOMS" and then on a "+" button.
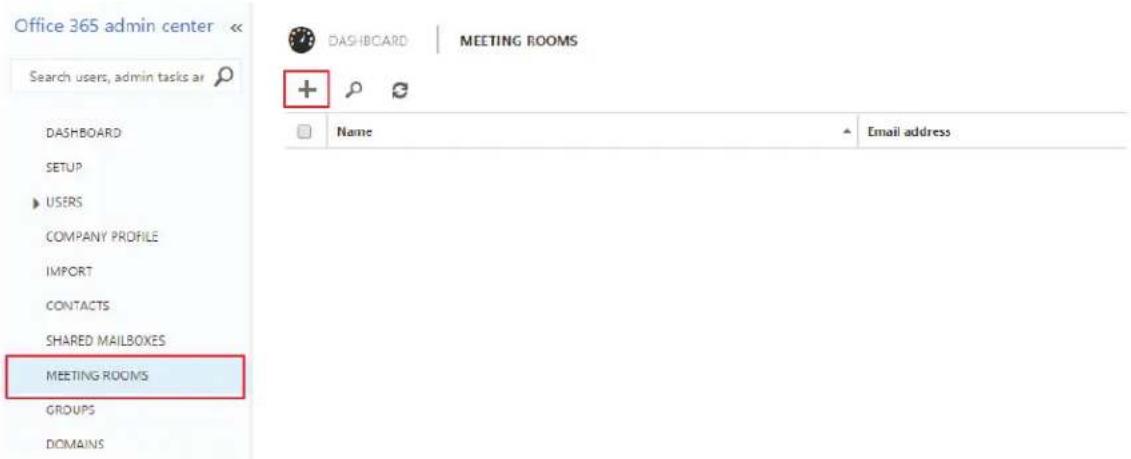
FIGURE 2-6. SELECT MEETING ROOMS
CHAPTER 2: ACCOUNT SETTING
NEED HELP?
LE AVE THE TECH TO US
LIVE 24/7
TECHNICAL
SUPPORT
1.877.877.2269
- Fill in the name of the room, email address, location etc. Then confirm it by clicking on "Create."
Add a meeting room
You can add meeting rooms to your organization's address book that represent physical locations in your office space. These rooms can be reserved by people when they schedule meetings.
Name

* Email address

* Room capacity

Room location

Phone number

Create
Cancel
FIGURE 2-7. ADD A MEETING ROOM SCREEN
CHAPTER 2: ACCOUNT SETTING
NEED HELP?
LE AVE THE TECH TO US
LIVE 24/7
TECHNICAL
SUPPORT
1.877.877.2269
- Choose a room from the list by clicking on the check-box and then click on "Edit more properties."

FIGURE 2-8. EDIT PROPERTIES SCREEN
- Choose "mailbox delegation" and scroll down to "Full Access" section. Click on "+".

FIGURE 2-9. CHOOSE MAILBOX
CHAPTER 2: ACCOUNT SETTING
NEED HELP?
LE AVE THE TECH TO US
LIVE 24/7
TECHNICAL
SUPPORT
1.877.877.2269
- Choose the user account designated for the particular room, click "add" and confirm by clicking "OK."
![DISPLAY NAME EMAIL ADDRESS Add [remove] OK Cancel I selected of 27 total](/content/2026/05/991155/images/1151e9c437767709e52cbebce5d55f8db2c3990fc3a1f0d0d35d751966a67465.jpg)
FIGURE 2-10. SELECT USER ACCOUNT
- The user account will appear in the "Full Access" list.
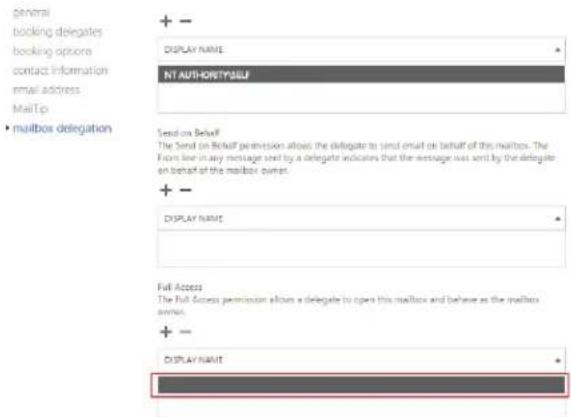
FIGURE 2-11. FULL ACCESS LIST
CHAPTER 2: ACCOUNT SETTING
NEED HELP?
LE AVE THE TECH TO US
LIVE 24/7
TECHNICAL
SUPPORT
1.877.877.2269
- Click on "booking delegates" and check whether the room account is set to "Accept or decline booking requests automatically." Then confirm changes by clicking on "Save."

FIGURE 2-12. BOOKING REQUESTS SCREEN
NOW THE BASIC ACCOUNT SETTING IS DONE. SOME OF THE USEFUL OPTIONS OF ACCOUNT SETTING ARE NOT AVAILABLE THROUGH A WEB INTERFACE. EVEN THOUGH THESE OPTIONS ARE NOT MANDATORY, THEY CAN IMPROVE THE BEHAVIOR OF THE RESERVATION SYSTEM.
For further information please see the chapter Office 365 options settings not available through web interface.
3.1 OFFICE 365 OPTIONS SETTINGS NOT AVAILABLE THROUGH WEB INTERFACE
In the default Office 365 settings, some account properties are set rather inconveniently. It can happen that, for example, you schedule a meeting from Outlook and reserve a room but in the room calendar the subject of the meeting will be replaced with your name. Another troublesome feature is that when you cancel a meeting, it will stay in the room calendar, only renamed to "Cancelled." This means that the room still appears occupied and it is not possible to use it for other meetings. You can change this behavior, but not through the administrator web interface. The following method is for computers with Windows 10, 64-bit operation system.
YOU NEED TO HAVE ADMINISTRATOR ACCESS TO OFFICE 365 SETTINGS TO CREATE ACCOUNTS.
Install the following packages to your computer (see https://msdn.microsoft.com/en-us/library/jj151815.aspx, Install the Azure AD Module chapter):
- https://www.microsoft.com/en-US/download/details.aspx?id=41950 – Microsoft Online Services Sign-In Assistant for IT Professionals RTW
- Install Azure Active Directory Module for Windows PowerShell (64-bit version) from http://go.microsoft.com/fwlink/p/?linkid=236297
If the above-mentioned links become inactive, try searching for "Manage Azure AD using Windows PowerShell" on http://msdn.microsoft.com.
Launch Azure Active Directory Module for Windows PowerShell as an administrator. A terminal window will appear. Enter the following commands respectively:
- Set-ExecutionPolicy Unrestricted -Force
- Start-Service WinRM
- Import-Module MSOnline -verbose
\$LiveCred = Get-Credential
NOW A POP-UP WINDOW WILL APPEAR FOR YOU TO LOG IN THE ADMINISTRATOR ACCOUNT, SO ENTER THE NAME AND PASSWORD OF YOUR OFFICE 365 ADMINISTRATOR ACCOUNT.
Enter following commands in the terminal window:
- Session = New-PSSession -ConfigurationName Microsoft.Exchange -ConnectionUri https://outlook.office365.com/powershell-liveid/-CredentialLiveCred -Authentication Basic -AllowRedirection$
- Import-PSSession \$Session -Allowclobber
- Connect-MsolService -Credential \$LiveCred
You are now logged in and can change account properties. The following steps need to be made for all room accounts. Replace the expression
The following command will set the room account so that the actual subject of a meeting will be displayed in the "Subject" field, not its organizer:
- Set-CalendarProcessing -Identity
-DeleteSubject \False -AddOrganizerSubject \False
Example: Set-CalendarProcessing -Identity „demoroom@cuesystem.com“ -DeleteSubject \False -AddOrganizerSubject \False
CHAPTER 3: OPTIONS NOT VIA WEB
NEED HELP?
LE AVE THE TECH TO US
LIVE 24/7
TECHNICAL
SUPPORT
1.877.877.2269
The following command will set the room account so that after cancelling a meeting, it will be erased, not just marked as "Cancelled":
- Set-CalendarProcessing -Identity
-RemoveOldMeetingMessages \$true
Example: Set-CalendarProcessing -Identity „demoroom@cuesystem.com“ -RemoveOldMeetingMessages \$true
You can verify the successfulness of the settings through this command:
◆ Get-CalendarProcessing -Identity
Example: Get-CalendarProcessing -Identity „demoroom@in-session-system.com“ | Format-List
After you set all accounts use the following command to exit:
- exit
4.1 FIRST PANEL SETTING
After switching on the first IN-SESSION 7" and 12" Room Scheduler system panel, the following screen will appear on it:
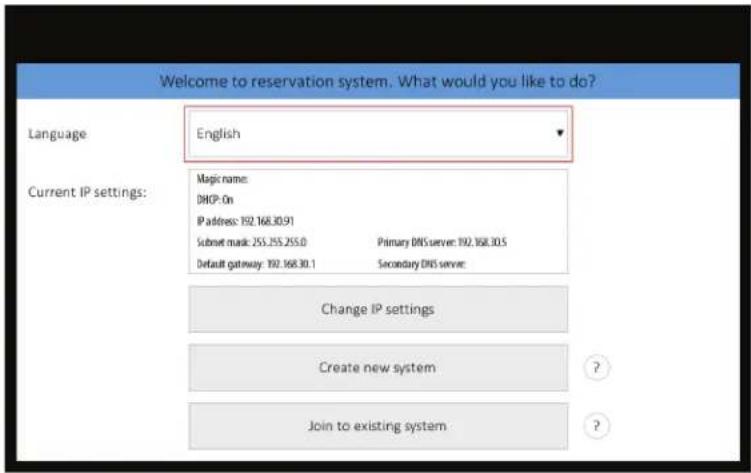
Figure 4-1. First Panel Screen
You can change the user interface language of the panel in "Language." Touch the red-marked field and a list of available languages appears. Choose your preferred language.

FIGURE 4-2. CHOOSE LANGUAGE SCREEN
CHAPTER 4: PANELS
NEED HELP?
LE AVE THE TECH TO US
LIVE 24/7
TECHNICAL
SUPPORT
1.877.877.2269
In the default setting, the panel can obtain the IP address and DNS servers using your network's DHCP. Under the item "Current IP settings" you can check whether the assigned addresses correspond with your network. If this setting does not meet your requirements, you can change it according to the instructions in the IN-SESSION 7" and 12" Room Scheduler - Setup Guide - Common Settings,
IP settings chapter. At this point, you do not need to change the item "Magic name." Its function is also explained in the above mentioned chapter. Now you can create a new reservation system just by tapping on "Create new system."

Panels connected to the same reservation system share their settings, e.g. if you need to change the user account password, you can just do it on one panel and all the other ones within the same reservation system will adopt the change automatically. The reservation system name and password serve for mutual identification of panels. The password is also used for accessing the panels' settings. At first touch field "Select server type" and select "Office 365".

FIGURE 4-4. SELECT OFFICE 365 SERVER SCREEN
CHAPTER 4: PANELS
NEED HELP?
LE AVE THE TECH TO US
LIVE 24/7
TECHNICAL
SUPPORT
1.877.877.2269
Now enter the reservation system name and password. You need to confirm the password by entering it twice ("Enter Password" and "Reenter Password"). The entered passwords must be identical. Keyboard appears after tapping any of the red-marked fields. When you enter the name or password, press Enter on the keyboard. Confirm the creation of the new account by tapping "Create."

FIGURE 4-5. KEYBOARD
Enter the user account email and password on the next screen. A keyboard will appear when you tap "+" so that you can enter a user account email (e.g. "IN-SESSION 7" and 12" Room Scheduler@in-session-system.com"). Now enter the user account password and you can test the user account via the "Test" button. Continue by tapping "Next."

FIGURE 4-6. ENTER USER ACCOUNT EMAIL AND PASSWORD
CHAPTER 4: PANELS
NEED HELP?
LE AVE THE TECH TO US
LIVE 24/7
TECHNICAL
SUPPORT
1.877.877.2269
Now you need to set the room account. Tap "+" and enter room account email (e.g. "demoroom@in-session-system.com"). In the field "Room displayed name," you can enter the room name that will be shown in the upper left-hand corner of the IN-SESSION 7" and 12" Room Scheduler panel.
The server address and user account email are pre-entered in "Server" and "User account." You can test the room account by tapping "Test." You can now save the configuration by tapping "OK" and start using the IN-SESSION 7" and 12" Room Scheduler panel. To change other detailed settings of the panel, tap "Next." For more information, see the IN-SESSION 7" and 12" Room Scheduler - Setup Guide - Common Settings, Detailed IN-SESSION 7" and 12" Room Scheduler panel settings chapter.
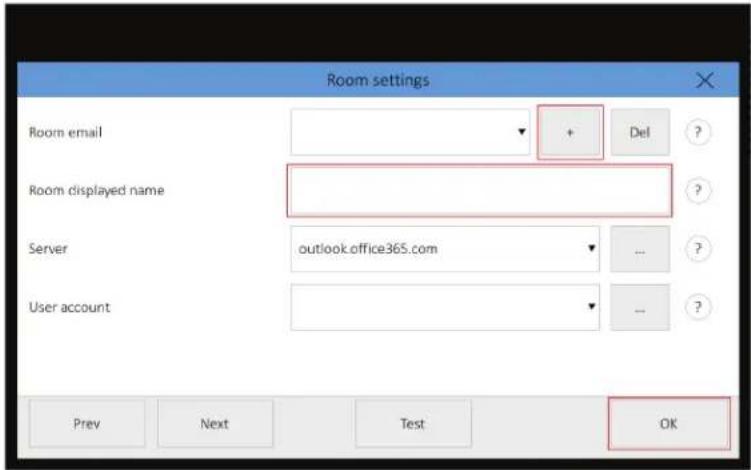
FIGURE 4-7. SET THE ROOM ACCOUNT SCREEN
CHAPTER 4: PANELS
4.2 ADDING MORE PANELS
Once you set the first panel and create a new reservation system, you may add more panels to this system. Connect another panel to your network. The opening screen will appear on the panel. Identically, as when setting the first panel, you can change the language and IP settings. Then tap "Join to existing system."
NOTE: TO JOIN A PANEL TO AN EXISTING RESERVATION SYSTEM, AT LEAST ONE OTHER PANEL CONNECTED TO THIS SYSTEM MUST BE SWITCHED ON.

FIGURE 4-8. OPENING SCREEN TO ADD NEW PANELS
On the next screen, choose which reservation system you want to join to, if you manage more of them ("Choose reservation system" item), and enter the password ("Enter password" item) you chose during the creation of the system. Continue by tapping "Join."

FIGURE 4-9. JOIN A RESERVATION SYSTEM
NOTE: This is the only way to join an existing system. Even if you create a new reservation system with the same name and password, it will be considered a different one.
CHAPTER 4: PANELS
NEED HELP?
LE AVE THE TECH TO US
LIVE 24/7
TECHNICAL
SUPPORT
1.877.877.2269

FIGURE 4-10. ADD ROOM EMAIL ADDRESS
TIf you want to use a different user account for a specific room, tap “...” next to “User account.” It will take you to user accounts settings where you can add more user accounts. When you return to this screen, tap the user account field. An already-defined user account list expands so that you can choose one. You can test the room account by tapping “Test.” Finish setting the panel by tapping “OK” or continue to detailed panel settings by tapping “Next.” You can find the description of detailed panel settings inthe IN-SESSION 7" and 12" Room Scheduler - Setup Guide - Common Settings document, Detailed IN-SESSION 7" and 12" Room Scheduler panel settings chapter.
If you need to change the configuration of a panel that is already set, connected to the reservation system, and in normal operation, tap and hold the upper-left corner (where the room name is) for about 5 seconds until keyboard appears along with an "Enter password" notice. Enter the password you chose during the creation of the reservation system. You will enter the settings pages. For further information, see the IN-SESSION 7" and 12" Room Scheduler - Setup Guide - Common Settings, Detailed IN-SESSION 7" and 12" Room Scheduler panel settings chapter.
NEED HELP? LEAVE THE TECH TO US
LIVE 24/7 TECHNICAL SUPPORT
1.877.8 7 7.2 269
- TABLE OF CONTENTS
- DESCRIPTION
- REQUIREMENTS
- SETTINGS
- INTRODUCTION
- SET THE FOLLOWING ACCOUNTS IN MICROSOFT OFFICE 365:
- WHEN YOU ARRANGE A MEETING THROUGH THE IN-SESSION 7" AND 12" ROOM SCHEDULER PANEL, THE SPECIFIC USER ACCOUNT WILL BE INDICATED AS ITS ORGANIZER.
- CREATING A USER ACCOUNT
- FOLLOW THESE STEPS:
- Office 365
- CHAPTER 2: ACCOUNT SETTING
- CREATING A ROOM ACCOUNT
- Add a meeting room
- OFFICE 365 OPTIONS SETTINGS NOT AVAILABLE THROUGH WEB INTERFACE
- YOU NEED TO HAVE ADMINISTRATOR ACCESS TO OFFICE 365 SETTINGS TO CREATE ACCOUNTS.
- CHAPTER 3: OPTIONS NOT VIA WEB
- FIRST PANEL SETTING
- CHAPTER 4: PANELS
- ADDING MORE PANELS
- LIVE 24/7 TECHNICAL SUPPORT
Brand : Black Box
Model : RS-TOUCH7-W
Category : Interactive touchscreen