
PNQ601K - Screen SHARP - Free user manual and instructions
Find the device manual for free PNQ601K SHARP in PDF.


| Product Type | Professional LCD Display |
| Screen Size | 60 inches (diagonal) |
| Resolution | 3840 x 2160 (4K UHD) |
| Display Technology | IPS LCD with LED backlight |
| Brightness | 500 cd/m² (typical) |
| Contrast Ratio | 4000:1 (typical) |
| Response Time | 8 ms (Grey-to-Grey) |
| Viewing Angle | 178° horizontal / 178° vertical |
| Input Connectors | HDMI (2), DisplayPort, VGA, USB |
| Built-in Speakers | Yes, 2 x 10W |
| VESA Mount | 400 x 400 mm |
| Power Consumption | 120 W (typical), <0.5 W standby |
| Dimensions (Without Stand) | 1349 x 776 x 48 mm |
| Weight (Without Stand) | 22.5 kg |
| Operating Temperature | 0°C to 40°C |
| Energy Efficiency Class | G (EU 2019/2021) |
| Cleaning Instructions | Wipe with a soft, dry cloth. Do not use liquid cleaners. |
| Safety Precautions | Ensure proper ventilation; do not block vents. Avoid exposure to moisture. |
| Spare Parts Availability | Power supply, main board, and panel available through Sharp service centers. |
| Warranty | 3 years standard (depending on region) |
Frequently Asked Questions - PNQ601K SHARP
User questions about PNQ601K SHARP
0 question about this device. Answer the ones you know or ask your own.
Ask a new question about this device
Download the instructions for your Screen in PDF format for free! Find your manual PNQ601K - SHARP and take your electronic device back in hand. On this page are published all the documents necessary for the use of your device. PNQ601K by SHARP.
USER MANUAL PNQ601K SHARP
- Please choose your favorite page from the content. If you want to close the operation manual, press the EXIT button. Also, if you want to return to the previously displayed page, press the RETURN button.
LIQUID CRYSTAL MONITOR
OPERATION MANUAL


1080P

DOLBY AUDIO™

dts 2.0+Digital Out

Contents
1. Part Names
1-1. Monitor (For PN-Q601/701/801 models)
1-2. Monitor (For PN-Q901 model)
1-3. Remote Control Unit
2. Introduction
2-1. Displaying an External Equipment Image
2-2. Initial Installation
3. Direct Button Operation
3-1. Changing Volume
3-2. MUTE
3-3 APPS
3-4. AUDIO/Sleep Timer
4. On-Screen Display Menu
4-1. Introduction
4-3. On-Screen Display Menu Operation
4-4. Menu Operation Buttons
4-5. Initial Setup
4-8. Information
4-11. Picture Settings
4-15. Audio Settings
4-16. Network Settings
4-18. System Options
5. Enjoying Photo/Music/Video Playback
5-1. Preparation
5-2. Selecting the Folders to Play Back
5-4. Playing Back Files on a USB Memory Device/Home Network Server
6. Using LINK Operation
6-1. Controlling HDMI Equipment Using LINK Operation
6-3. Link Operation Menu
6-5. Using a Smartphone with the Monitor
7. Using a PC
7-1. Adjusting the PC Image
7-2. Setting Audio Input
7-3. Control of the Monitor
7-9. PC Compatibility Chart/AV Compatibility Chart
8. Using the Internet
8-1. Connecting to the Internet
8-2. Entering Text (Software Keyboard)
8-8. Using Keyboard and Mouse
9. Appendix
9-1. Removing the Stand
9-2. Setting the Monitor on the Wall
9-6. Troubleshooting
10. Specifications
10-1. Monitor (For PN-Q901 model)
10-2. Monitor (For PN-Q801/701/601 models)
11. Trademarks
12. Dimensional Drawings
13. Software License
IMPORTANT INFORMATION

Information on the Disposal of this Equipment and its Batteries
IF YOU WISH TO DISPOSE OF THIS EQUIPMENT OR ITS BATTERIES, DO NOT USE THE ORDINARY WASTE BIN, AND DO NOT PUT THEM INTO A FIREPLACE!
Used electrical and electronic equipment and batteries should always be collected and treated SEPARATELY in accordance with local law.
Separate collection promotes an environment-friendly treatment, recycling of materials, and minimizing final disposal of waste. IMPROPER DISPOSAL can be harmful to human health and the environment due to certain substances! Take USED EQUIPMENT to a local, usually municipal, collection facility, where available.
Remove USED BATTERIES from equipment, and take them to a battery collection facility; usually a place where new batteries are sold.
If in doubt about disposal, contact your local authorities or dealer and ask for the correct method of disposal.
ONLY FOR USERS IN THE EUROPEAN UNION, AND SOME OTHER COUNTRIES; FOR INSTANCE NORWAY AND SWITZERLAND: Your participation in separate collection is requested by law. The symbol shown above appears on electrical and electronic equipment and batteries (or the packaging) to remind users of this. If 'Hg' or 'Pb' appears below the symbol, this means that the battery contains traces of mercury (Hg) or lead (Pb), respectively.
Users from PRIVATE HOUSEHOLDS are requested to use existing return facilities for used equipment and batteries. Batteries are collected at points of sale. Return is free of charge.
If the equipment has been used for BUSINESS PURPOSES, please contact your SHARP dealer who will inform you about take-back. You might be charged for the costs arising from take-back. Small equipment (and small quantities) might be taken back by your local collection facility. For Spain: Please contact the established collection system or your local authority for take-back of your used products.
This equipment complies with the e-waste (Management and Handling) Rules, 2016. On restriction of the hazardous constituents as specified in rule 16 in electrical and electronic equipment. For more information to recycle properly, please see the website. http://www.shail.com

WARNING: TO REDUCE THE RISK OF FIRE OR ELECTRIC SHOCK, DO NOT EXPOSE THIS PRODUCT TO RAIN OR MOISTURE.


CAUTION: TO REDUCE THE RISK OF ELECTRIC SHOCK, DO NOT REMOVE COVER. NO USER-SERVICEABLE PARTS INSIDE. REFER SERVICING TO QUALIFIED SERVICE PERSONNEL.

The lightning flash with arrowhead symbol, within a triangle, is intended to alert the user to the presence of uninsulated "dangerous voltage" within the product's enclosure that may be of sufficient magnitude to constitute a risk of electric shock to persons.

The exclamation point within a triangle is intended to alert the user to the presence of important operating and maintenance (servicing) instructions in the literature accompanying the product.
NOTE FOR USERS IN U.K. IMPORTANT
The wires in this mains lead are coloured in accordance with the following code:
BLUE: "NEUTRAL"
BROWN: "LIVE"
CONNECTING PLUG TO MAINS LEAD:
As the colours of the wires in the mains lead of this apparatus may not correspond with the coloured markings identifying the terminals in your plug, proceed as follows:
- The wire which is coloured BLUE must be connected to the terminal which is marked with the letter N or coloured BLACK.
- The wire which is coloured BROWN must be connected to the terminal which is marked with the letter L or coloured RED.
CAUTION:
Do not connect the Live (BROWN) wire or the neutral (BLUE) wire to the earth terminal of your 3 pin mains plug.

DEAR SHARP CUSTOMER
Thank you for your purchase of a SHARP LCD product. To ensure safety and many years of trouble-free operation of your product, please read the Safety Precautions carefully before using this product.
SAFETY PRECAUTIONS
Electricity is used to perform many useful functions, but it can also cause personal injuries and property damage if improperly handled. This product has been engineered and manufactured with the highest priority on safety. However, improper use can result in electric shock and/or fire. In order to prevent potential danger, please observe the following instructions when installing, operating and cleaning the product. To ensure your safety and prolong the service life of your LCD product, please read the following precautions carefully before using the product.
- Read instructions — All operating instructions must be read and understood before the product is operated.
- Keep this manual in a safe place — These safety and operating instructions must be kept in a safe place for future reference.
- Observe warnings — All warnings on the product and in the instructions must be observed closely.
- Follow instructions — All operating instructions must be followed.
- Cleaning — Unplug the power cord from the AC outlet before cleaning the product. Use a dry cloth to clean the product. Do not use liquid cleaners or aerosol cleaners. Do not use dirty cloths. Doing so may damage the product.
- Attachments — Do not use attachments not recommended by the manufacturer. Use of inadequate attachments can result in accidents.
- Water and moisture — Do not use the product near water. Do not install the product in a place where water may splash onto it. Be careful of equipment which drains water such as an air-conditioner.
- Ventilation — The vents and other openings in the cabinet are designed for ventilation. Do not cover or block these vents and openings since insufficient ventilation can cause overheating and/or shorten the life of the product. Do not place the product on a sofa, rug or other similar surface, since they can block ventilation openings. Do not place the product in an enclosed place such as a bookcase or rack, unless proper ventilation is provided or the manufacturer's instructions are followed.
- Power cord protection — The power cords must be routed properly to prevent people from stepping on them or objects from resting on them.
- The LCD panel used in this product is made of glass. Therefore, it can break when the product is dropped or applied with impact. Be careful not to be injured by broken glass pieces in case the LCD panel breaks.
- Overloading — Do not overload AC outlets or extension cords. Overloading can cause fire or electric shock.
- Entering of objects and liquids — Never insert an object into the product through vents or openings. High voltage flows in the product, and inserting an object can cause electric shock and/or short internal parts. For the same reason, do not spill water or liquid on the product.
- Servicing — Do not attempt to service the product yourself. Removing covers can expose you to high voltage and other dangerous conditions. Request a qualified service person to perform servicing.
- Repair — If any of the following conditions occurs, unplug the power cord from the AC outlet, and request a qualified service person to perform repairs.
a. When the power cord or plug is damaged.
b. When a liquid was spilled on the product or when objects have fallen into the product.
c. When the product has been exposed to rain or water.
d. When the product does not operate properly as described in the operating instructions.
Do not touch the controls other than those described in the operating instructions. Improper adjustment of controls not described in the instructions can cause damage, which often requires extensive adjustment work by a qualified technician.
e. When the product has been dropped or damaged.
SAFETY PRECAUTIONS
f. When the product displays an abnormal condition. Any noticeable abnormality in the product indicates that the product needs servicing.
- Replacement parts — In case the product needs replacement parts, make sure that the service person uses replacement parts specified by the manufacturer, or those with the same characteristics and performance as the original parts. Use of unauthorized parts can result in fire, electric shock and/or other danger.
- Safety checks — Upon completion of service or repair work, request the service technician to perform safety checks to ensure that the product is in proper operating condition.
- Wall mounting — When mounting the product on a wall, be sure to install the product according to the method recommended by the manufacturer.
- Heat sources — Keep the product away from heat sources such as radiators, heaters, stoves and other heat-generating products (including amplifiers).
- Batteries — Incorrect use of batteries may cause the batteries to burst or ignite. A leaky battery may corrode the equipment, dirty your hands or spoil your clothing. In order to avoid these problems, make sure to observe the precautions below:
- Use the specified batteries only.
• Install the batteries with due attention to the plus (+) and minus (-) sides of the batteries according to the instructions in the compartment.
- Do not mix old and new batteries.
- Do not mix batteries of different types. Voltage specifications of batteries of the same shape may vary. - Replace an exhausted battery with a new one promptly.
- If you will not use the remote control for a long time, remove the batteries.
- If leaked battery fluid gets on your skin or clothing, rinse immediately and thoroughly. If it gets into your eye, bathe your eye well rather than rubbing and seek medical treatment immediately. Leaked battery fluid that gets into your eye or your clothing may cause a skin irritation or damage your eye.
- Usage of the monitor must not be accompanied by fatal risks or dangers that could lead directly to death, personal injury, severe physical damage or other loss, including nuclear reaction control in nuclear facility, medical life support system, and missile launch control in a weapon system.
- Do not stay in contact with the parts of the product that become hot for long periods of time. Doing so may result in low-temperature burns.
- Do not modify this product.
WARNING:
To prevent the spread of fire, keep candles or other open flames away from this product at all times.

WARNING:
This is a Class A product. In a domestic environment this product may cause radio interference in which case the user may be required to take adequate measures.
To maintain compliance with EMC regulations, use shielded cables to connect to the following terminals: PC/AV HDMI input terminal, PC/AV D-SUB input terminal and RS-232C input terminals.
Where the mains plug or an appliance coupler is used as the disconnect device, the disconnect device shall remain readily operable.

SAFETY PRECAUTIONS
If a monitor is not positioned in a sufficiently stable location, it can be potentially hazardous due to falling. Many injuries, particularly to children, can be avoided by taking simple precautions such as: Using fixing devices like wall mount brackets recommended by the manufacturers. Only using furniture that can safely support the monitor. Ensuring the monitor is not overhanging the edge of the supporting furniture. Not placing the monitor on tall furniture (for example, cupboards or bookcases) without anchoring both the furniture and the monitor to a suitable support. Not standing the monitors on cloth or other materials placed between the monitor and supporting furniture. Educating children about the dangers of climbing on furniture to reach the monitor or its controls.
Especially for child safety
Don't allow children to climb on or play with the monitor.
Don't place the monitor on furniture that can easily be used as steps, such as a chest of drawers.
Remember that children can become excited while watching a program, especially on a "larger than life" monitor. Care should be taken to place or install the monitor where it cannot be pushed, pulled over, or knocked down.
Care should be taken to route all cords and cables connected to the monitor so that they cannot be pulled or grabbed by curious children.
TIPS AND SAFETY INSTRUCTIONS
- The TFT color LCD panel used in this monitor is made with the application of high precision technology. However, there may be minute points on the screen where pixels never light or are permanently lit. Also, if the screen is viewed from an acute angle there may be uneven colors or brightness. Please note that these are not malfunctions but common phenomena of LCDs and will not affect the performance of the monitor.
- Do not display a still picture for a long period, as this could cause a residual image.
Never rub or tap the monitor with hard objects.
Please understand that SHARP CORPORATION bears no responsibility for errors made during use by the customer or a third party, nor for any other malfunctions or damage to this product arising during use, except where indemnity liability is recognized under law.
This monitor and its accessories may be upgraded without advance notice.
Do not use the monitor where there is a lot of dust, where humidity is high, or where the monitor may come into contact with oil or steam. Do not use in an environment where there are corrosive gases (sulfur dioxide, hydrogen sulfide, nitrogen dioxide, chlorine, ammonia, ozone, etc.). As this could lead to fire.
Ensure that the monitor does not come into contact with water or other fluids. Ensure that no objects such as paper clips or pins enter the monitor as this could lead to fire or electric shock.
- Do not place the monitor on top of unstable objects or in unsafe places. Do not allow the monitor to receive strong shocks or to strongly vibrate. Causing the monitor to fall or topple over may damage it.
- Do not use the monitor near heating equipment or in places where there is likelihood of high temperature, as this may lead to generation of excessive heat and outbreak of fire.
- Do not use the monitor in places where it may be exposed to direct sunlight.
- Please be sure to constantly remove dust and garbage that has attached to the ventilation opening. If dust collects in the ventilation opening or the inside of the monitor, it may lead to excessive heat, outbreak of fire, or malfunction.
Please request a cleaning of the inside of the monitor from an authorized SHARP servicing dealer or service center.
– Images cannot be rotated on this monitor.
When using in portrait orientation, you will need to prepare appropriately orientated content in advance. – The AC outlet shall be installed near the equipment and shall be easily accessible.
- Continuous operating time and warranty. This product is designed for a maximum daily use of 16 hours. Continual use in excess of 16 hours per day is not covered by the warranty.
TIPS AND SAFETY INSTRUCTIONS
The Power Cord
– Use only the power cord supplied with the monitor.
- Do not damage the power cord nor place heavy objects on it, stretch it or over bend it. Also, do not add extension cords. Damage to the cord may result in fire or electric shock.
- Do not use the power cord with a power tap.
Adding an extension cord may lead to fire as a result of overheating.
- Do not remove or insert the power plug with wet hands. Doing so could result in electric shock.
- Unplug the power cord if it is not used for a long time.
- Do not attempt to repair the power cord if it is broken or malfunctioning. Refer the servicing to the service representative.
LED Backlight
• The LED backlight in this product has a limited lifetime.
* If the screen gets dark or does not turn on, it may be necessary to replace the LED backlight. * This LED backlight is exclusive to this product and must be replaced by an authorized SHARP servicing dealer or service center. Please contact an authorized SHARP servicing dealer or service center for assistance.
MOUNTING PRECAUTIONS
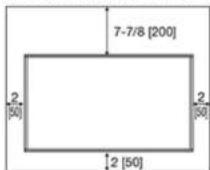
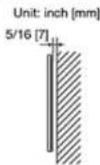
• This product is for use indoors. - A mounting bracket compliant with VESA specifications is required. - Since the monitor is heavy, consult your dealer before installing, removing or moving the monitor. - Mounting the monitor on the wall requires special expertise and the work must be performed by an authorized SHARP dealer. You should never attempt to perform any of this work yourself. Our company will bear no responsibility for accidents or injuries caused by improper mounting or mishandling. - Use the monitor with the surface perpendicular to a level surface. If necessary, the monitor may be tilted up to 20 degrees upward or downward. - This monitor should be used at an ambient temperature between 0°C and 40°C. Provide enough space around the monitor to prevent heat from accumulating inside. - If it is difficult to provide sufficient space for any reason such as the installation of the monitor inside a housing, or if the ambient temperature may be outside of the range of 0°C to 40°C, install a fan or take other measures to keep the ambient temperature within the required range. - Temperature condition may change when using the monitor together with the optional equipments recommended by SHARP. In such cases, please check the temperature condition specified by the optional equipments. - Do not block any ventilation openings. If the temperature inside the monitor rises, this could lead to a malfunction. - Do not place the monitor on a device which generates heat.

Part Names
Monitor (For PN-Q601/701/801 models)
(Front)
*1 See page 4-12. *2 See page 4-22.
(Side)
* See pages 2-1 and 4-4 for button operations.
(Rear)
*1 See the Setup Guide. And see page 6-1 for external equipment connection. *2 See page 7-2, for details on the Audio Select function. *3 See page 6-2. for details on the Audio Return Channel. *4 See page 6-5, for details on the MHL function. *5 See page 4-6, for details on the Input Select function.
- The illustrations and on-screen displays in this operation manual are for explanation purposes and may vary slightly from the actual operations.
- The examples used throughout this manual are based on the PN-Q601 model.

Part Names
Monitor (For PN-Q901 model)
(Front)![graph TD A["Power indicator *2"] --> B["OPC sensor *1"] B --> C["Remote control sensor"]](/content/2026/05/990969/images/08e245ea2fa4eaa133d63539da8b0841cc727d0996019ce52dd8779082b9f861.jpg)
*1 See page 4-12. *2 See page 4-22.
(Side)
* See pages 2-1 and 4-4 for button operations.
(Rear)
^1 See the Setup Guide.
And see page 6-1 for external equipment connection.
*2 See page 7-2 for details on the Audio Select function.
*3 See page 6-2 for details on the Audio Return Channel.
^4 See page 6-5 for details on the MHL function.
*5 See page 4-6 for details on the Input Select function.
- The illustrations and on-screen displays in this operation manual are for explanation purposes and may vary slightly from the actual operations.

Part Names
Remote Control Unit

NOTE
- When using the remote control unit, point it at the Monitor.
1 POWER: Switch the monitor power on or enter standby. 2 DISPLAY: Display the information. 3 SLEEP: Set the sleep timer (See page 3-4.) 40-9: Input number. 5 • (DOT): Used for MHL and Web browser. (See pages 6-5, 8-1 to 8-8.) 6 OPTION: Display the Link Operation Menu screen. This button will function only when HDMI CEC Link Operation is used (See page 6-31 7 VOL+/-: Set the volume. (See page 3-1.) 8 AUDIO: Select the audio mode during multichannel audio. (See page 3-4.) 9 MUTE: Mute the sound. (See page 3-2.) 10 ▲▼◀(ENTER): Select a desired item on the screen. 11 EXIT: Turn off the menu screen. 12 A/B/C/D: Playback control. (See page 5-4 to 5-8.) 13 MANUAL: Display the operation manual. (See page 4-10.) 14 APPS: Display the application window (See page 3-3.) 15 INPUT: Select a monitor input source. (See page 2-1.) 16 CH: Scroll up and down in the Web browser. (See page 8-1 to 8-8.) 17 MENU: Display the menu screen. (See page 4-1.) 18 RETURN: Return to previous menu screen.

Introduction
Displaying an External Equipment Image
To view external source images, select the input source by pressing INPUT on the remote control unit or on the Monitor.


1 Press INPUT.
• The INPUT list screen displays. 2 Press ▲▼ to select the input source. - An image from the selected source automatically displays.
- You can also select the input source by pressing INPUT.
- Each time INPUT is pressed, the input source toggles. HDMI 1 → HDMI 2 → HDMI 3 → VIDEO1 ↑ ↓ Home Network ← USB ← PC IN ← COMPONENT

Introduction

Initial Installation
Perform the following steps before you press POWER on the remote control unit.
- Insert the batteries into the remote control unit.
- Plug in the AC cord to the AC outlet.
Language (Language setting)
Select from among 6 languages: English, French, Spanish, German, Italian and Russian.
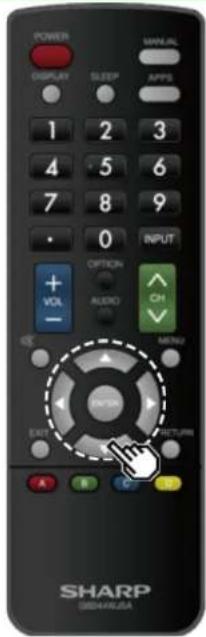
1 Press ▲ to select the desired language listed on the screen, and then press ENTER.

ENG 2-2

Introduction
Initial Installation (Continue)
Power Saving
Select "Yes" or "No" to configure default Display settings.
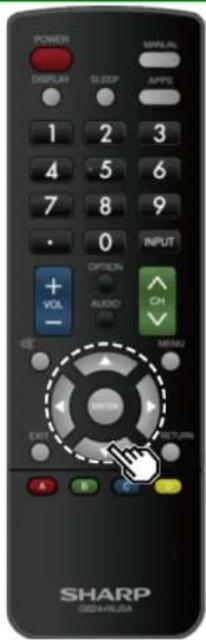
2 Press ← to select "Yes" or "No". Press ENTER to enter the setting.

Yes: AV MODE is set to "STANDARD" and Automatic Light Sensor is set to "On".
No: AV MODE is set to "DYNAMIC (Fixed)" and Automatic Light Sensor is set to "Off". Picture Reset can be set.
Picture Reset: AV MODE will be set to "DYNAMIC (Fixed)" regardless of whether Picture Reset is "On" or "Off".
- If you select "On" and there is no operation for 30 minutes: - AV MODE will be reset to "DYNAMIC (Fixed)".
- When "Off" is selected: - Even after 30 minutes elapses, AV MODE is not reset to "DYNAMIC (Fixed)".
Introduction
Initial Installation (Continue)
Completed
3 The settings confirmation screen is displayed. Confirm the information displayed on the screen, and then press ENTER.
Examples of the settings confirmation screen

NOTE
- For changing the settings of the Initial Installation, perform "Easy Setup" on the Initial Setup menu on page 4-5.
Direct Button Operation

Changing Volume
You can change the volume by pressing VOL+/- on the
Monitor or on the remote control unit.
• To increase the volume, press VOL +.
• To decrease the volume, press VOL -.

Audio status
| Output device | Output Select | |
| Fixed Variable | ||
| Speaker Variable sound Mute | ||
- When "Output Select" is set to "Variable", the indicator on
the screen changes as shown below.

NOTE
• See page 4-6 for details on the Output Select function.
Direct Button Operation

MUTE
Mutes the current sound output.
Press (MUTE)
- "MUTE" will be displayed on the screen, and the sound is silenced.
NOTE
- Mute can be cancelled by pressing VOL+/- or MUTE.
Direct Button Operation

APPS
Allows you to directly activate various types of applications.
Press APPS to display the application window.
- Press APPS again to switch back to the currently selected input.
2 Press ⚠️ to select the desired application, and then press ENTER.
- If "B" is displayed, check the USB connection.
- If "is displayed, check your Monitor's network settings and connection.
NOTE
• See page 5-2. 8-4 for details of viewable applications. - When this function is not available. "Can not operate this function now" will display.

Direct Button Operation
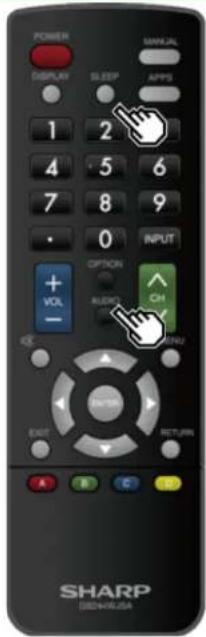
AUDIO
Press AUDIO to toggle between multi channel audio.
Sleep Timer
Allows you to set a time when the Monitor automatically switches to standby. Press SLEEP.
- The remaining time displays when the sleep timer has been set.
- Each time you press SLEEP, the remaining time switches as shown below.
- When set, the time automatically starts counting down.
- If you want to adjust the sleep timer, you can press SLEEP twice then change the time setting.
- When it is 5 minutes before the time expires, the remaining time will start to keep appearing every minute.
NOTE
- Select "Off" by pressing SLEEP to cancel the sleep timer.
- The Monitor will enter standby when the remaining time reaches 0.
On-Screen Display Menu

Introduction
![LCFONT embedded System Options Initial Setup Information Picture Settings Menu Select Menu Select Enter Exit Picture Settings STANDARD AV MODE [STANDARD] Automatic Light Sensor [OnDisplay] Backlight +72 -16 +18 Contrast +32 0 +43 Brightness 01 -30 +32 Color +23 -30 +32 Tint 01 -30 +32 Sharpness -5 0…](/content/2026/05/990969/images/81f2451b37610a6b1b38a9982480686cfb1102a76d39199b65b03acbd8fd2cdd.jpg)
①Guide display
- This indicates the buttons that can be operated on the displayed screen. The guide display varies depending on the menu setting screen.
- The operations for some selected items may be displayed in the operational guide bar at the bottom of the screen. ② Item displayed in blue
- This indicates the item currently selected.
- Press ENTER to go to the adjustment screen for this item. ③ Item in brackets
- This indicates the current setting for the item.
④ Item displayed in white • This indicates that the item can be selected. ⑤ Item displayed in gray - This indicates that the item cannot be selected. There are various reasons why the items cannot be selected, but the main reasons are as follows: — Nothing is connected to the selected input terminal. — The function is not compatible with the current input signal. — When this conflicts with other functions, you must change the settings for the other functions.
On-Screen Display Menu

Introduction (Continued)
About Menu Items
- Some menu items may not be displayed depending on the selected input source.
NOTE
- The screens in the operation manual are for explanation purposes (some are enlarged, others cropped) and may vary slightly from the actual screens.
- The order of explanations for each menu item in the following pages is not necessarily in accordance with the alignment of the items on the screen.

LCFONT:
- This product is embedded with LC Font technology, which was developed by SHARP Corporation for clearly displaying easy-to-read characters on LCD screens.
On-Screen Display Menu

On-Screen Display Menu Operation
Example
![System Options Initial Setup Information Picture Settings Menu Select Menu Select Window Enter Window Exit Picture Settings STANDARD AV MODE [STANDARD] Automatic Light Sensor (OnPower) [Backlight +5] -10 Contrast +50 Brightness +50 Color +27 -20 Tint +50 Sharpness +50 Advanced Reset ① ② ③](/content/2026/05/990969/images/40b49667ab311dcee806fa68cadba352899596d2585cdc7aa48dc8d0751eb1fc.jpg)
1 Press MENU to display the MENU screen.
2 Press / to select the desired menu.
② Press ▲ to select a specific adjustment item, and then press ENTER. - Additional related adjustment items may be displayed. Press 4 to select the desired item. ③ Adjust the item while referring to the guide display. - Operations vary depending on the function or item. Refer to the guide display corresponding to the menu setting screen for button operations.
3 Press MENU to exit.
NOTE
- Menu options differ in the selected input modes, but the operating procedures are the same.

On-Screen Display Menu

Menu Operation Buttons
Using the remote control
Use the following buttons on the remote control to operate the menu.
MENU: Press to open or close the menu screen.
▲/▼/▲ Press to select a desired item on the screen or adjust a selected item.
ENTER: Press to go to the next step or complete the setting. RETURN: Press to return to the previous step.
Using the control panel of the Monitor
You can also operate the menu with the control panel of the Monitor.
Button operations on the control panel correspond to the ones on the remote control as shown below.

MENU: MENU on the remote control.
INPUT: ENTER on the remote control.
CHA Cursor / online remote control.
VOL+/-: Cursor 📄 on the remote control.
On-Screen Display Menu
Example![Initial Setup Menu Initial Setup Easy Setup Language [English] Input Settings Reset](/content/2026/05/990969/images/beec44f3ae2b0e773417a0fef1ec414b2d5876b32499e9f5efff4cfbaae3361c.jpg)
Initial Setup
NOTE
- For operating the on-screen display menu, see page 4-3.
Easy Setup
You can change the settings of the Initial Installation. Language: Select from among 6 languages (English, French, Spanish, German, Italian and Russian). Power Saving: Select "Yes" or "No" to configure default Display settings. Yes: AV MODE is set to "STANDARD" and Automatic Light Sensor is set to "On". No: AV MODE is set to "DYNAMIC (Fixed)" and Automatic Light Sensor is set to "Off". Picture Reset can be set. Picture Reset: AV MODE will be set to "DYNAMIC (Fixed)" regardless of whether Picture Reset is "On" or "Off". If you select "On", AV MODE will be reset to "DYNAMIC (Fixed)" if there is no operation for 30 minutes. When "Off" is selected, even after 30 minutes elapses, AV MODE is not reset to "DYNAMIC (Fixed)". Completed: The settings confirmation screen is displayed. Confirm the information displayed on the screen.
NOTE
• See Initial Installation on pages 2-2 to 2-4 for setting each item.
Language
You can also select a language from the Initial Setup menu. Select from among 6 languages: English, French, Spanish, German, Italian and Russian.
NOTE
- To change the language of the manual, select "MENU" > "Initial Setup" > "Language" to change the language. Then, press MANUAL again.
On-Screen Display Menu
Example![Initial Setup Menu Initial Setup Easy Setup Language [English] Input Settings Reset](/content/2026/05/990969/images/57634e5eb7471bac0e800d43f30055a6d30ff7b1e5657a0baf4b733591872bc1.jpg)
Initial Setup (Continue)
Input Settings
HDMI auto view
When you view images sent from external equipment in an HDMI connection, this function allows the image size on the Monitor to automatically switch to an appropriate one.
NOTE
- Refer to your external equipment operation manual for the signal type.
Digital Audio Output
You can output digital audio to an AV amplifier or similar device whose DIGITAL AUDIO INPUT terminal is connected to the DIGITAL AUDIO OUT terminal on the Monitor. Please select an audio output format compatible with the audio format of the program you are watching and the equipment connected.
PCM: For connecting to equipment that does not support Dolby Digital and DTS. The same audio (main, sub, or main/sub) as the audio of the program being viewed is output.
2-channel audio with a sampling rate of 48 kHz or less is output as linear PCM audio.
Bitstream: For connecting to an audio system that supports Dolby Digital and DTS. Audio is output through both the main and sub channels.
NOTE
- Video input audio is output in PCM mode even when "Bitstream" is selected.
- PCM digital input signals are output in PCM mode even when "Bitstream" is selected.
Audio Select
This function sets the terminal to output the computer audio. The adjustment items vary depending on the input source. Select the input source corresponding to the terminal connected to the PC and then adjust the desired item. To perform the operation, refer to "Initial Setup" > "Input Settings" > "Audio Select".
(See page 7-2.)
Output Select
Allows you to select what controls the audio output.
Fixed: Sound via speaker is adjusted with VOL+/- on the remote control unit or on the Monitor.
Sound via the AUDIO OUT terminal is not adjustable and outputs at a consistent level.
Variable: Sound via the AUDIO OUT terminal is adjusted with VOL+/- on the remote control unit or on the Monitor.
Sound via speaker is muted.
Input Select
For image input applied to the COMPONENT IN or VIDEO IN terminal, switch to "COMPONENT" or "Video", respectively.
COMPONENT: Select component video.
Video: Select composite video.
NOTE
- If no (color) image display, try changing to another signal type.
- Check the operation manual of the external equipment for the signal type.
Input Skip
This setting allows you to skip the HDMI or PC IN Input ("PC IN, COMPONENT, HDMI 1, HDMI 2, HDMI 3 and VIDEO") on the Input Selection operation.
On-Screen Display Menu
Example![Initial Setup Menu Initial Setup Easy Setup Language [English] Input Settings Reset](/content/2026/05/990969/images/7832c1fdfbb80637ea9c9d74fba7487c00863cc46a61318b453e59c2db785554.jpg)
Initial Setup (Continue)
Input Settings
Color System
Select the video signal system compatible with your
equipment from the list below: AUTO, NTSC, PAL-M, PAL-N
AUTO/NTSC/PAL-M/PAL-N
NOTE
- "Color System" can only be set for the VIDEO IN.
HDMI CEC Link
Make the settings to use LINK Operation.
Set the settings with "Initial Setup" > "Input Settings" > "HDMI
CEC LINK
(See page 6-2.)
Fine Sync.
You can adjust the position on the image input from a PC. Set the
settings with "Initial Setup" > "Input Settings" > "Fine Sync."
(See page 7-1.)
Reset
If complex adjustments are made and the settings cannot be restored to normal, you can reset the settings to the factory preset values.
On-Screen Display Menu
Example

Information
NOTE
- For operating the on-screen display menu, see page 4-3.
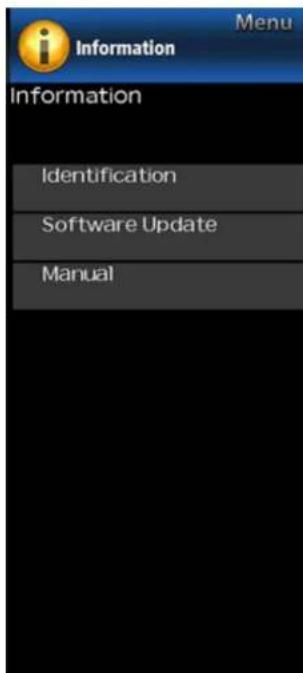
Identification
The current version of the Monitor software is displayed.
Software Update
This is used to upgrade the system software to enhance the Monitor functions.
1 Press MENU to display the MENU screen, and then press ▶ to select "Information". 2 Press ▲ to select "Software Update", and then press ENTER. 3 Press ▲ to select "Manual Update" or "Auto Update Setting", and then press ENTER. - The operations thereafter vary depending on the setting.
Auto Update Setting
When the Monitor is on, or when an Internet application is being accessed, this function enables the Monitor to connect to the network and check for updates automatically. When an update is available, a message is displayed. Press ▶ ▶ select "Yes", and then press ENTER to display the download screen. (See page 4-10.)
NOTE
- This function does not work when a broadband connection or Internet Setup is not available.
- A message may also be displayed when an application is running. The message varies depending on the application
Manual Update
Select the method for manually updating the software.
USB Update: Updates the software using a USB memory device containing the update file. (See "Updating the Software with a USB Memory Device".)
Network Update: Downloads the update file via the network and then updates the software. (See page 4-10.)
NOTE
- A broadband connection and Internet Setup are required to update the software using the network. (See page 8-1.)
- It may take time to access and download the update depending on the Internet connection and other factors.
On-Screen Display Menu
Example

Information (Continue)
Software Update
Manual Update
CAUTION
- Do not remove the USB memory device or unplug the AC cord while the software is being updated.
- Be sure to properly follow the whole procedure described below, step by step. Otherwise, for example, the Monitor cannot read the data in the USB memory device and software updating will fail.
1 Insert the USB memory device with the update file into the USB terminal on the Monitor.

2 Press ▲▼ on the Manual Update screen to select "USB Update", and then press ENTER. 3 Press ENTER to start checking the data in the USB memory device.

4 During the data checking, "Checking" blinks.
- The current version of the Monitor software and the version of the update file on the USB memory device are displayed.
- If the USB memory device is not properly installed or the correct update file cannot be found on the USB memory device, an error message is displayed. Check the file on the USB memory device, and then reinsert the USB memory device correctly.
On-Screen Display Menu
Example
Information (Continue)
Software Update
Manual Update
CAUTION
- Do not remove the USB memory device or unplug the AC cord while the software is being updated.
5 When the software is successfully updated, a screen is displayed indicating that the update process is completed.
After this screen is displayed, the Monitor automatically turns off and then turns on again.
- If the update has failed, check the file in the USB memory device and try Software Update again.
6 Remove the USB memory device.
Updating the Software via the Network
1 Press ▲ on the Manual Update screen to select "Network Update", and then press ENTER.
- The Monitor connects to the network and checks for updates.
• To cancel, press ENTER.
2 The current version of the Monitor and the latest version of software are displayed. To update the Monitor software, select "Yes", and then press ENTER.
- When a server connection cannot be established or an update is not available, a message is displayed. If a server connection cannot be established, check the broadband connection and Internet Setup.
3 After the update file is downloaded, the software update process begins.
CAUTION
- Do not unplug the AC cord while the software is being updated.
4 When the software is successfully updated, a screen is displayed indicating that the update process is completed. A screen indicating that the update is completed is displayed. 4 seconds later, the Monitor restarts automatically.
- If the software was not updated successfully, check the broadband connection and Internet Setup, and then try updating the software again.
Manual
Displays the built-in operation manual on the screen. You can read information about how to use this device.
On-Screen Display Menu
Example![Menu Picture Settings Picture Settings STANDARD AV MODE [STANDARD] Automatic Light Sensor [On:Display] Backlight [+7] -16 +16 Contrast [+32] 0 +40 Brightness [0] -30 +30 Color [+2] -30 +30 Tint [0] -30 +30 Sharpness [+5] 0 +20 Advanced Reset](/content/2026/05/990969/images/f0a92bd8650da0e158244c5dd325c791c024217d4988abc172355db219ad3ab1.jpg)
Picture Settings
Adjusts the picture to your preference with the following picture settings.
NOTE
- For operating the on-screen display menu, see page 4-3.
| Selected Item button button | ||
| Backlight The screen dims The screen | brightens | |
| Contrast For less contrast For more contrast | ||
| Brightness For less brightness For more brightness | brightness | |
| Color For less color intensity | For more color intensity | |
| Tint Skin tones become reddish | Skin tones become greenish | |
| Sharpness For less sharpness For more sharpness | ||
- For resetting all Picture adjustment items to the factory preset values, press ▲ to select "Reset", press ENTER, press ▲ to select "Yes", and then press ENTER.
AV MODE (Changing Pic.Quality)
The audio and video settings can be changed to suit the program or input content being watched. You can use USER Mode to create customized settings for each Monitor input. These settings will be automatically saved on each input for convenience.
STANDARD: For a highly defined image in a normal lighting.
MOVIE: For a movie.
PC: For PC.
USER: Allows the user to customize settings as desired. You can set the mode for each input source.
DYNAMIC: For a clear-cut image emphasizing high contrast, useful for sports viewing.
DYNAMIC (Fixed): Changes the image and sound settings to the factory preset values. No adjustments are allowed.
NOTE
- You can select a different AV MODE item for each input mode. (For example, select STANDARD for Monitor input and DYNAMIC for COMPONENT.)
On-Screen Display Menu
Example![Picture Settings Menu Picture Settings STANDARD AV MODE [STANDARD] Automatic Light Sensor [On:Display] Backlight [+7] -16 +16 Contrast [+32] 0 +40 Brightness [0] -30 +30 Color [+2] -30 +30 Tint [0] -30 +30 Sharpness [+5] 0 +20 Advanced Reset](/content/2026/05/990969/images/54810a30033a7eaa93b00ab2926459a8c2691af4a66cb2a38e1fb9d5bfb01d61.jpg)
Picture Settings (Continue)
Automatic Light Sensor (Light Sensor)
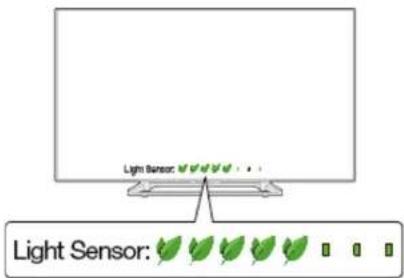
Automatically adjusts the brightness of the screen. Off: The brightness is fixed at the value set in "Backlight". On: Automatically adjusts. On: Display: Displays the Light Sensor effect on the screen while adjusting the brightness of the screen.
NOTE
- When set to "On", the Light Sensor senses the surrounding light and automatically adjusts the backlight brightness. Make sure nothing obstructs the Light Sensor, which could affect its ability to sense surrounding light. - When set to "On:Display", Light Sensor effect displays on the screen while the Light Sensor adjusts the screen brightness.
On-Screen Display Menu
Example![Picture Settings Menu Advanced STANDARD Motion Enhancement [120HZ] Digital Noise Reduction [AUTO] C.M.S.-Hue C.M.S.-Saturation C.M.S.-Value Color Temp. [High] Active Contrast [On] Film Mode [Advanced] Monochrome [Off]](/content/2026/05/990969/images/b618dd6b5eb52e2cf76eaa664846b31f0990fdf56e1b32cea0c5039e301ec908.jpg)
Picture Settings (Continue)
Advanced
Motion Enhancement
Use Motion Enhancement to view fast-action video more clearly.
| Selected item Description | |
| AquoMotion240 Turn | the LED backlight on or off for 120Hz drive display. |
| 120Hz For obtaining a clearer image. | |
| Off Original image. | |
NOTE
- "Motion Enhancement" may cause image noise. If this occurs, turn the function "Off".
Digital Noise Reduction
Produces a clearer video image.
AUTO: Automatically adjusts the level of noise reduction.
High/Middle/Low: You can select a desired level for viewing a clearer video image.
Off: No adjustment.
C.M.S.
(Color Management System)
Color tone is managed using the six-color adjustment setting.
C.M.S.-Hue: This is a standard to adjust the color either more reddish or more bluish in tone.
C.M.S.-Saturation: Increases or decreases the saturation of a selected color.
C.M.S.-Value: A higher value makes the image brighter. A lower value makes the image darker.
NOTE
- For resetting all adjustment items to the factory preset values, press ▲ to select "Reset", and then press ENTER.
Color Temp. (Color Temperature)
For a better white balance, use color temperature correction. High: White with bluish tone
Middle:

Low: White with reddish tone
Fine tuning the color temperature
White balance can be adjusted between a maximum of +30 and a minimum of -30 for each color temperature.
NOTE
- For resetting all adjustment items to the factory preset values, press ▲ to select "Reset", and then press ENTER.
On-Screen Display Menu
Example![Picture Settings Menu Advanced STANDARD Motion Enhancement [120HZ] Digital Noise Reduction [AUTO] C.M.S.-Hue C.M.S.-Saturation C.M.S.-Value Color Temp. [High] Active Contrast [On] Film Mode [Advanced] Monochrome [Off]](/content/2026/05/990969/images/996b56d3001b16893c09645ce1afbe1807b66aa7495fbae189e4805914ee9d12.jpg)
Picture Settings (Continue)
Advanced
Active Contrast
Automatically adjusts the image contrast according to the
scene.
On: Produces high contrast image.
Off: No adjustment.
Film Mode (3:2 pull-down)
This function provides high-quality playback of images
originally encoded at 24 frames/second, such as films.
Advanced: Adjusts effects to reduce judder in film content.
You can select a desired level of Judder reduction from 0
to +10.
Standard: Plays back image with equal display time for
each frame, reproducing movie theater experience.
Off: Normal viewing mode.
NOTE
- "Film Mode" does not function depending on input signal type.
- "Standard" does not function depending on input signal type.
Monochrome
For viewing a video in monochrome.
Reset
Returns Picture Settings to their factory preset values. To reset, select "YES" and then press ENTER.
On-Screen Display Menu
Example![Audio Settings Menu Audio Settings STANDARD Treble [0] -15 +15 Bass [0] -15 +15 Balance [0] -15 +15 SURROUND [Off] Auto Volume [Off] Reset](/content/2026/05/990969/images/8cbe12fa200fd13ee73ebd81714e19c2058c3df1a520f624b7dea01963082bf1.jpg)
Audio Settings
You can adjust the sound quality to your preference with the following settings.
NOTE
- For operating the on-screen display menu, see page 4-3.
| Selected item | ◀button button | ▶ |
| Treble For weaker treble For stronger treble | ||
| Bass For weaker bass For stronger bass | ||
| Balance Decrease audio from the right speaker | Decrease audio from the left speaker | |
NOTE
- The Audio menu is grayed out when "Output Select" is set to "Variable".
(See page 4-6.)
- For resetting Audio adjustment items to the factory preset values, press ▲ to select "Reset", press ENTER, press ▲ to select "Yes", and then press ENTER.
SURROUND
The surround function produces Surround effect from the speakers.
NOTE
- The Audio Settings menu is grayed out when "Output Select" is set to "Variable". (See page 4-6.)
- For some discs, setup may be required on your BD/DVD player. In this case, please refer to the operation manual of your BD/DVD player.
Auto Volume
Different sound sources sometimes do not have the same loudness level, such as a program and its commercial breaks. The Automatic Volume Control (Auto Volume) reduces this problem by equalizing.
ON: Reduces the loudness gaps among different sound sources. The result is automatically adjusted according to the sound sources.
OFF: No adjustment.
Reset
Returns Audio Settings to their factory preset values. To reset, select "YES" and then press ENTER.
On-Screen Display Menu
Example

Network Settings
Dashboard
You can display a list of the main Network settings.
Wired Setup
You can make adjustments manually for the IP.
- You can switch the "Connect Type" to "AUTO" or "Manual".
- Check that numbers are displayed for each setting.
- If there are any settings without numbers, specify the
numbers by following the on-screen instructions
- Inputs the IP address etc by using remote control buttons
0-9.
IP Control
Set this function when operating the Monitor from equipment connected by LAN.
(See page 7-3.)
On-Screen Display Menu
Example

Network Settings (Continue)
Device Name
Set this function when operating the Monitor from equipment connected by LAN. (See page 7-3.)
Use the software keyboard when you need to input text at Device Name. Software Keyboard
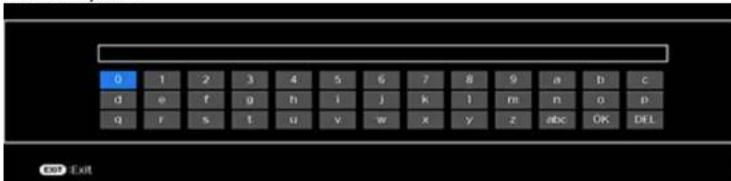
ABC
Switches character to uppercase. If "abc" is pressed again, switches character to lowercase. ":&12"
Changes character set into the alphabet, numbers, symbols, etc. OK
Applies the entered information and closes the software keyboard. space
Enters a space.
DEL
Erases the character string.
Wake on LAN
You can enable or disable Wake on LAN function.
Enable: Wake on LAN is available.
Disable: Wake on LAN is unavailable.
NOTE
- Wake on LAN (Magic packet) can be used to turn on Monitor via Wired network (LAN). - Disabling Wake on LAN reduces the standby power consumption.
On-Screen Display Menu
Example![System Options Power Control View Option Caption Setup Startup Screen [Off] Front Indicator Light [On] Auto Play [Off] Public Mode](/content/2026/05/990969/images/2d57092ddc7517621e168baec79f9abedca38ed4b0ff7af892bec6c03b6199dd.jpg)
System Options
NOTE
- For operating the on-screen display menu, see page 4-3.
Power Control
Power control setting allows you to save energy.
No Signal Off
When this function is enabled, the Monitor automatically shuts down if no signal is received for more than 15 minutes.
NOTE
- When it is 5 minutes before the power shuts down, the remaining time will start to keep appearing every minute. - When a Monitor program finishes, this function may not operate.
No Operation Off
When you enable this function, the Monitor automatically shuts down if no operation is performed for more than 3 hours.
NOTE
- When it is 5 minutes before the power shuts down, the remaining time will start to keep appearing every minute.
On-Screen Display Menu
Example
![System Options Menu System Options Power Control View Option Caption Setup Startup Screen [Off] Front Indicator Light [On] Auto Play [Off] Public Mode](/content/2026/05/990969/images/d4775724f170ccd1faf420ce3210464acb12ee181a0e6efa4186600a41056099.jpg)
System Options (Continue)
View Option
View Mode
This function changes the screen size. Select "View Option" on the menu to display the View Mode menu screen. The View Mode menu varies depending on the input source.
For HD video source
| Stretch | Dot by Dot (Full Screen) S. Stretch (Smart stretch) Zoom | ||
 Suitable for viewing wide-screen 1.78:1 aspect ratio video source, stretch mode will still show very thin black bands at the top and bottom of the screen. Suitable for viewing wide-screen 1.78:1 aspect ratio video source, stretch mode will still show very thin black bands at the top and bottom of the screen. |  "Dot by Dot" when the number of pixels on the screen and the resolution of the signal are the same. "Full Screen" when the number of pixels on the screen and the resolution of the signal are different. In either case, the image fully fills the screen. "Dot by Dot" when the number of pixels on the screen and the resolution of the signal are the same. "Full Screen" when the number of pixels on the screen and the resolution of the signal are different. In either case, the image fully fills the screen. |  Suitable for stretching 4:3 video source to fill the screen. Suitable for stretching 4:3 video source to fill the screen. |  Suitable for viewing wide-screen 2.35:1 aspect-ratio video source in full screen. Suitable for viewing wide-screen 2.35:1 aspect-ratio video source in full screen. |
NOTE
- When using Dot by Dot or Full Screen, it is possible to see noise or bars around different outer portions of the screen. Please change view mode to correct this.
On-Screen Display Menu
Example
![System Options Power Control View Option Caption Setup Startup Screen [Off] Front Indicator Light [On] Auto Play [Off] Public Mode](/content/2026/05/990969/images/1590a65debf8022768534cec4b4ad75df92fb189214abb3afaa02ac347f4d2f2.jpg)
System Options (Continue)
View Option
View Mode
For 4:3 Video source Example: Screen size images
| Side Bar S.Stretch (Smart stretch) Zoom Stretch | |||
 Suitable for viewing conventional 4:3 video source in their normal format. Suitable for viewing conventional 4:3 video source in their normal format. |  Suitable for stretching 4:3 video source to fill the screen. Suitable for stretching 4:3 video source to fill the screen. |  Suitable for viewing wide screen 2.35:1 anamorphic DVDs in full screen. Suitable for viewing wide screen 2.35:1 anamorphic DVDs in full screen. |  This mode is useful for 1.78:1 DVDs. When viewing 1.85:1 DVDs, stretch mode will still show very thin black bands at the top and bottom of the screen. This mode is useful for 1.78:1 DVDs. When viewing 1.85:1 DVDs, stretch mode will still show very thin black bands at the top and bottom of the screen. |
For USB-Video or Home Network Video Example: Screen size images
| Input signal Auto | Original Stretch | |||
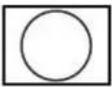 |  |  |  | 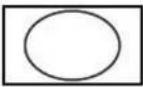 |
| Keeps the original aspect ratio in a full screen display. | Displays an Image by an original size. | An image fully fills the screen. | ||
On-Screen Display Menu
Example
![System Options Menu System Options Power Control View Option Caption Setup Startup Screen [Off] Front Indicator Light [On] Auto Play [Off] Public Mode](/content/2026/05/990969/images/736d7501a605da49d2b058c43c0a44b2b96c0f3c3a6eaccbcc428dc4c35e6107.jpg)
System Options (Continue)
View Option
View Mode
For PC Example: Screen size images
![graph LR A["Input signal Normal Stretch Dot by Dot"] --> B["Keeps the original aspect ratio in a full screen display."] B --> C["An image fully fills the screen."] C --> D["Detects the resolution of the signal and displays an image with the same number of pixels on the screen."]](/content/2026/05/990969/images/32ad07154d8098f2503b3d82e91faec54e5ceb84b511c86152cfb1dacd3d6fe5.jpg)
NOTE
- Connect the PC before making adjustments. See the Setup Guide.
- Selectable screen size may vary with input signal type.
Audio Only
When listening to music from a music program, you can turn the screen off and enjoy audio only.
NOTE
- The screen image will return to normal when a button (except those for audio adjustment, such as VOL, MUTE) is pressed.
Change CC
Allows you to change the Closed Caption display. Select "Change CC" on the menu to display the Closed Caption information. • The information displayed varies depending on the video you are watching.
NOTE
- Closed Caption is available for Video input and is unavailable for Component input.
On-Screen Display Menu
Example![System Options Menu Power Control View Option Caption Setup Startup Screen [Off] Front Indicator Light [On] Auto Play [Off] Public Mode](/content/2026/05/990969/images/c572c85cb208b5a926388ba5ea8995b7982e7bc460b7151fd1d4cc37e524e098.jpg)
System Options (Continue)
Caption Setup
This function allows you to adjust the closed caption screen appearance to suit your preference.
Size/Edge Effect/Edge Color/Text Color/Background Color/Text Opacity/Background Opacity
Startup Screen
With this function activated, the SHARP logo will be displayed when you turn on the Monitor.
Front Indicator Light
When this function is set to "On", the LED on the front of the Monitor turns on.
NOTE
- "On" is the factory preset value. If you want to turn off the LED, set the function to "Off".
Auto Play
You can automatically start USB media player or web browser.
Off: This function does not work.
USB: After the power is turned on, the video is played back continuously or slide show of still images automatically starts.
Web Browser: After the power is turned on, the Web Browser starts automatically and displays the Home Page.
NOTE
- When more than one video is played back continuously, the screen goes black while the data of the next video is being loaded. To shorten this blackout time, adjust the data size of the content.
- Create a folder named "AutoPlay" in the root directory of the USB memory device (the first directory when the USB memory device is opened), and store into the folder the video or still images you want to playback.
- When both video and still images are saved in "AutoPlay" folder, video has priority and still images will not be played.
- You must insert the USB memory device to the Monitor before turning off the Monitor.
- If there are images on the USB memory device but they do not appear on the screen, switch to USB mode and check whether the image files on the USB memory device are shown correctly.
- It will be interrupted by remote control operation. After a few minutes, it will automatically start again.
Public Mode
1. How to start Public Mode setup screen
- There are two ways to enter the public mode.
① Press ▲▼ ▶ select "MENU" > "System Options" > "Public Mode", and then press ENTER.
② Press the "INPUT" and "VOL (+)* keys on the set at once and turn on the power.
- Get the password input screen displayed.
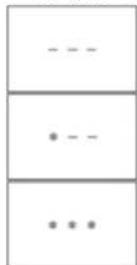
Procedure
- The Input starts with the left most digit.
- Use the numeric keys [1] thru [9] and [0] keys on the remote controller. The other keys are not acceptable.
- With a numeric-key input, "-" will change to * The input position will move one digit to the right.
- With all the 3 digits entered, the password will be verified.
- The 3-digit password is now verified. The password [0] [2] [7] provides for the public mode screen. With any other passwords, the screen changes to the normal mode.
On-Screen Display Menu
Example![System Options Power Control View Option Caption Setup Startup Screen [Off] Front Indicator Light [On] Auto Play [Off] Public Mode](/content/2026/05/990969/images/64c220689f272a5d45571592a13f61cf2de7698a313040e3c2108c9220d82d12.jpg)
System Options (Continue)
Public Mode
2. How to exit from Public Mode setup screen
There are the following ways to quit the public mode setup screen.
- Turn off the power with the "POWER" key.
- Select "EXECUTE"
3. Public Mode Menu
The guidance is not displayed on screen. Setup procedure
- Turn off the power with the "POWER" key.
- To move the cursor up and down, use the "cursor UP/DOWN" key (remote controller) or "CH (A)" key (remote controller and Monitor).
- To change the settings, use the "cursor RIGHT/LEFT" key (remote controller) or "VOL (+)/(-)" key (remote controller and Monitor).
- To save new settings, select "EXECUTE" and press "ENTER" key (remote controller) or "Input" key (Monitor).
4. How to use USB clone
This is the function that copies one Monitor's user setting to other Monitors or copies previous user setting to itself. Cloning is available between the same model.
- Insert the USB memory to Monitor.
- Enter Public Mode
- Select "COPY MODE".
- Then select the "TV→USB [Start]".
- "USB Cloning Finished." message is displayed when it is finished, then select "Reset". Monitor will restart.
- Insert the USB which has the data from Monitor to another Monitor or Itself.
- Enter public mode.
- Select "COPY MODE".
- Then select the "USB→TV [Start]".
- "USB Cloning Finished." message is displayed when it is finished, then select "Reset". Monitor will restart.
- Confirm the user setting is copied.
| PUBLIC MODE |
| POWER ON FIXED [ VARIABLE ] |
| MAXIMUM VOLUME [ 100 ] |
| VOLUME FIXED [ VARIABLE ] |
| VOLUME FIXED LEVEL [ 30 ] |
| RC BUTTON [ RESPOND ] |
| PANEL BUTTON [ RESPOND ] |
| MENU BUTTON [ RESPOND ] |
| AV POSITION FIXED [ VARIABLE ] |
| ON SCREEN DISPLAY [ YES ] |
| INPUT MODE START [ NORMAL ] |
| INPUT MODE FIXED [ VARIABLE ] |
| LOUD SPEAKER [ ON ] |
| RC PATH THROUGH [ OFF ] |
| REMOTE POWON [ ENABLE ] |
| PUBLIC MODE [ OFF ] |
| RESET |
| EXECUTE |
| COPY MODE |
Example
5. On Setting Items
- POWER ON FIXED
Selection: Selection between "Variable" and "Fixed"
Default: (Variable)
Explanation: In "Fixed" setting, the power-off by the power key of the unit is invalidated and the image is kept being received. The power can be turned off by stopping the power supply from AC.
Limit in Setting: Refer to the "Power-On Fixed" sheet.
Exception: None
Remarks: In "Variable" setting, the power operation is in wait for 1 sec and then turn off when the main power switch is off.
2. MAXIMUM VOLUME
Selection: Adjustment from 0 to 100
Default: 100
Explanation: Sound volume cannot be adjusted higher than the present value.
Limit in Setting: When the sound volume is set lower than 99, only figures are displayed and the sound volume bar is not displayed.
Exception
Remarks
3. VOLUME FIXED
Selection: Selection between "Variable", "Fixed", "ACON (AC CTRL)" and "AC/RCON (AC/RC CTRL)"
Default: (Variable)
Explanation: FIXED: Fixed at the level adjusted for a fixed volume.
AC CTRL: Start-up at the level specified for a fixed volume at ACON.
AC/RC CTRL: Start-up at the level specified for a fixed volume at start.
Limit in Setting: The sound volume for the ON-timer (Wake up timer) is fixed also without display of menu. Besides, the setting is made impossible. (Basically, the menu is not displayed.)
The following keys become invalid when set to "Fixed":
Sound volume Up/Down (VOL +/-) [for both remote control and the unit]
Mute (MUTE)
Exception
Exception
Remarks: As for sound volume fixing and sound volume MAX level, the sound volume fixing has priority.
On-Screen Display Menu
Example![System Options Menu System Options Power Control View Option Caption Setup Startup Screen [Off] Front Indicator Light [On] Auto Play [Off] Public Mode](/content/2026/05/990969/images/9aa4f2f86bf231d9bfbad473da4d5c6edd8ebb8fb92c9cc0e7471591a1d9dd74.jpg)
System Options (Continued)
PUBLIC MODE
- VOLUME FIXED LEVEL
| Selection Adjustment from 1 to 100 | |
| Default 30 | |
| Explanation The sound volume to be fixed by "Volume fixed" is determined. | |
| Limit in Setting None | |
| Exception None | |
| Remarks | Settingis valid when "Volume fixed" Is selected for "fixed", "ACON (AC CTRL)" or "AC/RCON (AC/RC CTRL)". |
- RC BUTTON
| Selection Selection between "Respond", "No Respond" and "Limited" | |
| Default Respond | |
| Explanation Making | • At the "No Respond" setting, the remote controller keys are disabled. Its power key (reception/standby key) is disabled too.• At the "Limit" setting, volume ▲ channel /▲, POWER button are operative. |
| Limit in Setting In | "No respond" setting, all the keys (including the power key) are not accepted. |
| Exception | |
| Remarks | |
- PANEL BUTTON
| Selection Selection between "Respond" and "No respond" | |
| Default Respond | |
| Explanation All the operations by keys (except the power key) of the unit can be invalidated. Limit | |
| Limit in Setting | |
| Exception | |
| Remarks | |
On-Screen Display Menu
Example
![System Options Menu Power Control View Option Caption Setup Startup Screen [Off] Front Indicator Light [On] Auto Play [Off] Public Mode](/content/2026/05/990969/images/2029b8b07e6d35d226edbf4650ef32681580c92ed9e0ec85039bd5b29506b348.jpg)
System Options (Continued)
PUBLIC MODE
- MENU BUTTON
| Selection Selection between "Respond" and "No respond" | |
| Default Respond | |
| Explanation | In "No respond" setting, the menu operation by the menu key of the remote control and the menu key of the unit are invalid-dated. |
| Limit in Setting | |
| Exception | |
| Remarks | |
- AV POSITION FIXED
| Selection Selection between "Variable" and "Fixed" | |
| Default Variable | |
| Explanation In case of "Fixed" setting,-Menu "Picture" and "Audio" setting can't be changed like "Dynamic (Fixed)".-When "AV Mode" key is pressed, Monitor just displays current AV Mode (cannot be changed.). | |
| Limit in Setting None | |
| Exception None | |
| Remarks | • When receiving AV Position key and other direct audio select keys, the current display stays on and no setting can be changed. |
- ON SCREEN DISPLAY
| Selection Selection between "Yes", "No" | |
| Default Yes | |
| Explanation | • At the "No" setting, all OSD except public mode menu are not displayed on screen. An input selection is immediately made because the menu is not displayed. |
| Limit in Setting Keye falling under any of the following items become invalid.1 Appearance of screen changes and the sound changes.2 Personal functions which are hard to restore.Screen display, menu, OFF-timer, AV MODE, screen size switching, AUDIO ONLY, sound changeover, LANGUAGE, CLOSED CAPTION | |
| Others Simple input switching is generated | |
| Exception Such a caution which is displayed independently is displayed as it is. Non-responding signal caution | |
| Remarks When CO has already been ON, CLOSED CAPTION is displayed. | |
On-Screen Display Menu
Example
![System Options Menu System Options Power Control View Option Caption Setup Startup Screen [Off] Front Indicator Light [On] Auto Play [Off] Public Mode](/content/2026/05/990969/images/ce899077a9c985be1a7d5b05770afa45ebe11397fdeed84399725c3ad0d72831.jpg)
System Options (Continued)
PUBLIC MODE
- INPUT MODE START
| Selection Selection between "Normal", "COMPONENT", "VIDEO", "PC", "HDMI 1/2/3" | |
| Default Normal | |
| Explanation In power-ON, the input source to be started or channel can be set.(In standard mode, the operation follows the last memory.) | |
| About options | All the input sources in the model are made selectable. |
| Limit in Setting The display of channel setting menu and the channel setting operation are prohibited. | |
| Exception | |
| Remarks | In setting at "Normal", the setting of "Input mode fixed" is changed to "Variable" and selection should be prohibited. |
- INPUT MODE FIXED
| Selection Selection between "Variable", "Fixed", "ACON (AC CTRL)" and "AC/RCON (AC/RC CTRL)" | |
| Default - (Variable) | |
| Explanation | At the "Fixed" setting, the Monitor set gets started with the settings of "Input mode start", and then any other channels and inputs are not accepted.At the "ACON (AC CTRL)' setting, the Monitor set gets started with the settings of "Input mode start" under AC control.At the "AC/RCON (AC/RC CTRL)" setting, the Monitor set gets started with the settings of "Input mode start" under either control. |
| Limit in Setting The following keys are invalidated.input: however, the keys (input switching and CH /▲keys) of the unit for menu operation remain valid. | |
| Exception None | |
| Remarks | In the following case, setting is cancelled and mode is changed to "Variable".When the setting of "Input mode start" is set to "Normal". |
| Selection Selection between "ON" and "OFF" | |
| Default ON | |
| Explanation II "OFF" is selected, Monitor stops Speaker output. | |
| Limit in Setting None | |
| Exception None | |
| Remarks | Press the volume UP/DOWN key, and the mute icon appears for 4 seconds.The mute key and audio-related keys are displayed with caution.Usually, the audio output can be adjustable. |
On-Screen Display Menu
Example
![System Options Menu System Options Power Control View Option Caption Setup Startup Screen [Off] Front Indicator Light [On] Auto Play [Off] Public Mode](/content/2026/05/990969/images/ae274ee4fc1a7928155b4865976dc18b3de763849016041b71e7cf1ba99d9dea.jpg)
System Options (Continued)
PUBLIC MODE
- RC PATH THROUGH
| Selection Selection between "OFF", "ON: Display RCE" and "ON: Display RCD" | |
| Default OFF | |
| Explanation Function to feed the remote controller-received signal to Pin 9 (open) on the RS232C. | |
| Limit in Setting None | |
| Exception None | |
| Remarks When the setting is "ON: Monitor RCD", Monitor doesn't respond to the RC operation. | |
- REMOTE POWON
| Selection Selection between "Disable" and "Enable" | |
| Default Enable | |
| Explanation In the standby mode, the power-on by the 232C command is enabled or disabled. | |
| Limit in Setting None | |
| Exception None | |
| Remarks The setting by "RSPW" RS-232C/IP control command has priority overthis setting. | |
- PUBLIC MODE (ON/OFF)
| Selection Selection between "ON" and "OFF" | |
| Default OFF | |
| Explanation In case of "ON", public mode settings are effected. | |
| Limit in Setting None | |
| Exception None | |
| Remarks The public-mode settings are operable only when this item is set at ON. | |

Enjoying Photo/Music/Video Playback
Preparation
You can connect to a USB memory device, USB hard drive or Home Network server to enjoy viewing pictures, listening to music, and watching videos.
NOTE
- Depending on the USB memory device/USB hard drive/Home Network server, the Monitor may not be able to recognize the recorded data.
- It may take time to read the recorded data if the USB memory device/USB hard drive/Home Network server contains many files or folders.
- Use only alphanumeric characters for naming files.
- File names over 80 characters (may vary depending on character set) may not be displayed.
Connecting a USB Memory Device/USB Hard Drive
Insert the USB memory device with recorded photos, music or videos into the USB terminal on the Monitor.

- When connecting a USB hard drive, be sure to use a hard drive with an AC adapter.
- Do not remove a USB memory device or memory card from the Monitor while transferring files, using the slide show function, or switching screens, or before you exit "USB" from the INPUT list.
- Do not insert and remove a USB memory device/USB hard drive to and from the Monitor repeatedly.
- When using a card reader, be sure to insert a USB memory device first.
CAUTION
- Do not use a USB extension cable when connecting a USB memory device to the USB terminal on the monitor.
- Using a USB extension cable with the USB memory device may prevent the Monitor from performing correctly.
Connecting a Home Network Server
Connect the Monitor to the Home Network server using an ETHERNET cable.
![graph LR A["Home Network server"] -->|ETHERNET cable| B["Router"] B --> C["Output"]](/content/2026/05/990969/images/823394f1f87d18ad17a799b4b8cd2ce78f672c4348b1fd838d8c8c3dd7e1dd97.jpg)
NOTE
- Do not disconnect a Home Network server from the Monitor while transferring files, when a screen is switching to another or before you exit "Home Network" from the INPUT list.
- Do not connect and disconnect a Home Network server from the Monitor repeatedly.
Enjoying Photo/Music/Video Playback

Selecting the Folders to Play Back
- To play back data on a USB memory device, insert the USB memory device on the Monitor.
- Use the following procedure to switch back to USB mode after switching from USB mode to another mode. 1 Select "USB" or "Home Network" from INPUT list screen. 2 Press ▶ to select "Photo", "Music" or "Video", and then press ENTER.

3 Press ⬆ select the desired folder, and then press ENTER.
- "VIEW MODE" is fixed during the Music mode. During "Video mode", you can select "Auto", "Original" or "Stretch".
- During "Video mode", videos that are smaller than the number of pixels on the screen are displayed at their original size. In these cases, switch "VIEW MODE" to "Auto" to have the video fill the screen.
NOTE
- 16 is the maximum number of USB drives and 10 is the maximum number of Home Network servers that can be displayed.
USB Device Compatibility
| USB device USB | Memory, USB card reader (Mass Storage class), USB hard drive |
| File system FAT | FAT32/NTFS (USB hard drive only) |
| Photo file format | JPEG (.jpg) (DCF2.0 compliant) |
| Music file format | MP3 (.mp3) Bitrate: 32k, 40k, 48k, 56k, 64k, 80k, 96k, 112k, 128k, 160k, 192k, 224k, 256k, 320kbps Sampling frequency: 32k, 44.1k, 48kHz |
Enjoying Photo/Music/Video Playback

Selecting the Folders to Play Back (Continued)
| Video file format | |||
| File extension | Container | Video Audio | |
| .avi AVI | MPEG-1MPEG-4SP/ASP(XviD)MPEG-4 AVC(H.264)Motion JPEG | MPEG-AudioLPCMMS-ADPCDMTSAC3 | |
| .mkv MKV | MPEG-1MPEG-2MPEG-4SP/ASP(XviD)MPEG-4 AVC(H.264) | MPEG-AudioLPCMMS-ADPCM DTSAC3 | |
| .asf.wmv | ASFWMV | MPEG-4SP/ASP(XviD)WMV 7/8/9 | LPCMWMA |
| .mp4 MP4 | MPEG-4SP/ASP(XviD)MPEG-4 AVC(H.264)Motion JPEG | MPEG-AudioLPCMMS-ADPCMAC3 | |
| .mpg.mpeg | MPG | MPEG-1MPEG-2 | MPEG-AudioLPCMMS-ADPCMAC3 |
NOTE
• Progressive format JPEG files are not supported. • USB 1.1 devices may not play properly. - Operation using USB hubs is not guaranteed. - Some video file formats may not be played depending on the file. - Some images may not be displayed in the appropriate aspect ratio depending on the file format.
Home Network Server Compatibility
| Photo file format JPEG | |
| Music file format LPCM, MP3 | |
| Video file format AVI | ASF, MP4, WMV, MPG |
NOTE
- Progressive format JPEG files are not supported. - Some video file formats may not be played depending on the file or the server.
Enjoying Photo/Music/Video Playback

Playing Back Files on a USB Memory Device/Home Network Server
NOTE
- The screen images in this section are for USB mode. They may be slightly different in Home Network mode.
Photo Mode
Viewing Thumbnails

Buttons for thumbnail operations
| Buttons Description | |
| ▲▼●Elect a desired item. | |
| ENTER When selecting a folder icon:Enter this directory.When selecting a photo thumbnail:Start the slide show. | |
| RETURN Return to the previous process. | |
| A (red) Clear the file information display. | |
| B (green) | |
| C (blue) | |
| D (yellow) | |
NOTE
- A few seconds after the cursor is positioned on a thumbnail, the file information is displayed on the right side of the center of the screen.
Enjoying Photo/Music/Video Playback

Playing Back Files on a USB Memory Device/Home Network Server (Continued)
Slide Show
The photos displayed on the thumbnail selection screen are displayed as a slide show.
Buttons for slide show operation
| Buttons Description |
| RETURN Return to the thumbnail selection screen. |
| B (green) Previous file |
| C (blue) Displaying/hiding operation guidance |
| D (yellow) Next file |
NOTE
- Rotating photos only applies to the temporarily selected item and this setting is not saved.
Enjoying Photo/Music/Video Playback

Playing Back Files on a USB Memory Device/Home Network Server (Continued)
Music Mode
Example
Buttons for music mode
| Buttons Description | |
| ▲▼/●●ect a desired item. | |
| ENTER When selecting a folder icon:Enter this directory.When selecting a music file:Play music. | |
| RETURN Return to the previous process. | |
| A (red) Clear the file information display. | |
| B (green) | |
| C (blue) | |
| D (yellow) | |
NOTE
- The displayed play time may differ slightly from the actual play time depending on the files.
- A few seconds after the cursor is positioned on a thumbnail, the file information is displayed in the right of the center of the screen.
Enjoying Photo/Music/Video Playback

Playing Back Files on a USB Memory Device/Home Network Server (Continue)
Video Mode

Buttons for file selecting operations
| Buttons Description | |
| ▲▼/●●ect a desired item. | |
| ENTER When selecting a folder icon:Enter this directory.When selecting a video file: Play the video. | |
| RETURN Return to the previous process. | |
| A (red) Clear the file information display. | |
| B (green) | |
| C (blue) | |
| D (yellow) | |
NOTE
- A few seconds after the cursor is positioned on a thumbnail, the file information is displayed in the right of the center of the screen.
- When multiple movies are played continuously, blackout occurs while loading the next data. Please adjust the data size of contents to shorten blackout.
Enjoying Photo/Music/Video Playback

Playing Back Files on a USB Memory Device/Home Network Server (Continue)
| Buttons for playing mode | |
| Buttons Description | |
| ▲ | Stop playback |
| ▼ | Stop playback |
| ▶ | Fast forward |
| ◀ | Fast rewind |
| A (red) Subtitle | |
| B (green) Previous file | |
| C (blue) Display/hide operation guide | |
| D (yellow) Next file | |
| RETURN Go back to the file selection screen. | |

Using LINK Operation
Controlling HDMI Equipment Using LINK Operation
What's LINK Operation?
• Using the HDMI CEC (Consumer Electronics Control) protocol, with LINK Operation you can - interactively operate compatible system equipment (Blu-ray disc equipment, AV amplifier, DVD). - LINK Operation allows you to operate the HDMI-connected equipment with one remote control.
NOTE
- For connecting the Monitor to LINK-compatible equipment, use commercially available cables.
- Point the remote control toward the Monitor, not to connected HDMI equipment.
- Video noise may occur depending on the type of HDMI cable used. Make sure to use an HDMI-certified cable.
- Up to 3 pieces of HDMI recording equipment and one AV amplifier can be connected using this system.
- These operations affect the HDMI equipment selected as the current input source. If the equipment does not operate, turn on the equipment and select the appropriate input source using INPUT.
- The LINK feature may not operate properly when an HDMI splitter or AV selector unit is used. These devices may cause interruptions to the image and/or sound.
Connected LINK-compatible devices can be operated without changing the settings of the remote control unit.
The OPTION button will function only when LINK Operation is used.
Control the LINK-compatible audio system
Set the volume of LINK-compatible audio system.
NOTE
• The steps in "HDMI CEC Link" on page 6-2 need to be completed beforehand. - Refer to this operation manual and the operation manual of the LINK device to be used with this Monitor.
Buttons for playing mode
| Buttons Description | |
| ▲▼/●lect a desired item | |
| ENTER Activate the selected function | |
| A (red) Stop | |
| B (green) Previous chapter | |
| C (blue) Play | |
| D (yellow) Next chapter | |
| RETURN Go back to the previous page | |
| EXIT Exit from the page | |
![graph TD A["LINK-compatible audio system"] --> B["HLM"] A --> C["HLM"] B --> D["HGDA"] C --> E["HGDA"] D --> F["Back panel surface inputs"] E --> G["Back panel vertical inputs"] F --> H["Example: HDMI IN 1 to connect ARC compatible equipment"] G --> I["Back panel surface inputs"] J["Optical fiber ca…](/content/2026/05/990969/images/446f5d3f97cad42660fd81b24cb02be930e40591ed56f08902a3b620c54484be.jpg)
Using LINK Operation

Controlling HDMI Equipment Using LINK Operation (Continue)
HDMI CEC Link
Make the settings to use LINK Operation. Set the settings with "Initial Setup" > "Input Settings" > "HDMI CEC Link".
Link Operation
Select LINK Operation Control to disable the LINK function even when a LINK-compatible HDMI device is connected to the Monitor. This function prevents the device from starting to operate unexpectedly.
Auto Power On
If this is activated, the One Touch Play function is enabled. While the Monitor is in standby mode, it automatically turns on and plays back the image from the HDMI source.
Audio Return Channel
This function allows you to listen to the Monitor audio via audio equipment without using an optical fiber cable, which conventionally is required.
Requirements for using an ARC-compatible AV amplifier:
- ARC-compatible AV amplifier connected to the ARC-compatible HDMI IN terminal. (HDMI IN 1) (Refer to the operation manual of the ARC-compatible equipment for details.)
• Use of an ARC-compatible cable.
On: You can listen to the Monitor audio with ARC-compatible audio equipment.
Off: This function does not work.
NOTE
- If the Monitor audio cannot be output from the AV amplifier even after making the necessary settings, connect the Monitor to the AV amplifier with an optical fiber cable and select "Off".
Using LINK Operation
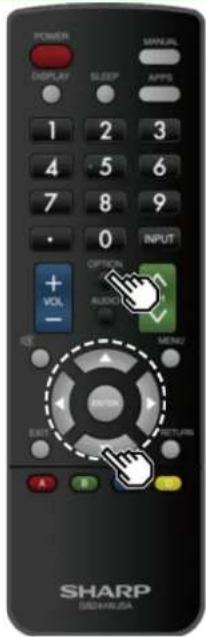
Link Operation Menu

Device Power On/Off
You can manually turn on/off the power of the connected LINK-compatible equipment. Each time you press ENTER, the connected equipment switches on or off.
The Link Operation Menu allows you to make adjustments during operation of LINK-compatible equipment.
1 Press OPTION to display the Link Operation Menu.
2 Press ▲▼ to select the desired item, and then press
ENTER
- Specific operations differ depending on the item you select. Following are the basic operations for each item.

Using LINK Operation

Link Operation Menu (Continued)
Show Start Menu
You can call up a setup menu from the connected LINK-compatible equipment.
NOTE
- Depending on the status of the equipment (recording or in standby mode, etc.), the setup menu will not be displayed.
Change Audio Output Device
You can select to listen to the Monitor sound only from the LINK-compatible audio system.
Audio Return Channel: The sound from the Monitor speaker is muted and only the sound from the LINK-compatible audio system is audible. • You can use VOL+/- and MUTE.
Built-in Speaker: The sound is output from the Monitor speaker.
HDMI Device Selection
If multiple HDMI devices are connected in a daisy chain, you can specify which device to control here. Press ▲▼ to select the desired device from a list of connected HDMI devices, and then press ENTER.
HDMI CEC Link
You can also display the HDMI CEC Link screen from the Link Operation Menu.
Using LINK Operation

Using a Smartphone with the Monitor
This function enables you to connect the Monitor to a smartphone that supports Mobile High-Definition Link (MHL™) using an MHL cable.
To connect the Monitor to your MHL-compatible smartphone,
be sure to use an MHL cable (commercially available). You can view pictures and video on a large screen.
- You can view pictures and video - You can play back music files.
NOTE
- An MHL-compatible portable device is required to use this function. Connect the device to the HDMI IN 3 terminal. • This product incorporates MHL 2.2.
Auto Power On
When an MHL-compatible device is connected to the Monitor, the Monitor turns on automatically.
- This function operates when "LINK Operation" is set to "On".
(See page 6-2.)
Auto Input Selection
When an MHL-compatible device is connected while the Monitor is on, the input mode is selected automatically.
- This function operates when "LINK Operation" is set to "On".
(See page 6-2.)
Operation Using the Remote Control
The remote control of the Monitor can be used to operate a portable device.
• ▲▼◀, ENTER, EXIT, 0-9, • (DOT), ENT, etc. - The operations vary depending on the connected equipment and content being viewed.
![graph LR A["Smartphone"] -->|MHL cable| B["Video Signal"] B --> C["Computer"] D["Audio Signal"] -->|MHL cable| B E["Video Signal"] -->|MHL cable| B](/content/2026/05/990969/images/5c868c27ff2735b85aa95e03ab5b5920c745f95078aed2525b57a7f0b5a46f10.jpg)
Back panel vertical inputs

Using a PC
Adjusting the PC Image
You can adjust the position of the image input from a PC by selecting "Initial Setup" > "Input Settings" > "Fine Sync.".
Fine Sync.
Ordinarily you can easily adjust the picture as necessary to change image position using "Auto Sync.". In some cases, however, manual adjustment is needed to optimize the image.
Input Signal: Select the input signal.
1024x768
1360x768
Auto Sync.: For automatically adjusting the PC image.
Yes: Auto Sync. starts and "Now adjusting the image." is displayed.
No: This function does not work.
H-Pos.: Centers the image by moving it to the left or right.
V-Pos.: Centers the image by moving it up or down.
Clock: Adjust when the image flickers with vertical stripes.
Phase: Adjust when characters have low contrast or when the image flickers.
NOTE
- "Auto Sync." may fail if the computer image has low resolution, has unclear (black) edges, or is moved while executing "Auto Sync.".
- Be sure to connect the PC to the Monitor and switch it on before starting "Auto Sync."
- It is not necessary to adjust the "Clock" or "Phase" when a digital signal is being input, so it cannot
- The default cursor position may not be in the center, because the screen position variable ranges may be asymmetrical.
- The screen position variable ranges depend on the View Mode or the signal type. The ranges can be seen on the position-setting screen.
Using a PC
Setting Audio Input
Audio Select
This function sets the terminal to output the computer audio. The adjustment items vary depending on the input source. Select the input source corresponding to the terminal connected to the PC and then adjust the desired item. To perform the operation, refer to "Initial Setup" > "Input Settings" > "Audio Select".
HDMI 2
HDMI2(Digital): Select this when the Monitor and PC are connected using an HDMI-certified cable and audio is input via the same cable. HDMI+Analog: Select this when the Monitor and PC are connected using an HDMI-certified cable and the audio is input via a ∅ 3.5 mm stereo minijack.
NOTE
- When "Audio Select" is set to "HDMI+Analog", sound will not be produced if you use only an HDMI-certified cable to connect HDMI-compatible equipment. To produce sound, you should make an analog audio connection. - If you want to connect HDMI-compatible equipment using only an HDMI-certified cable, set "Audio Select" to "HDMI2(Digital)".

Using a PC
Control of the Monitor
- The Monitor can be controlled from a PC, control panels and other devices using the RS-232C or IP.
- Use a cross-type RS-232C cable, ETHERNET cable (commercially available) or wireless LAN for the connections.
![graph LR A["Computer"] --> B["USB Port"] B --> C["Cross-type RS-232C cable"] C --> D["USB Port"] D --> E["Computer"]](/content/2026/05/990969/images/3b5b221f85f2d3d700844ccd6874ebe6825fb080526a24d99a6a9fdbc40482ff.jpg)
![graph LR A["Computer"] -->|Ethernet cable| B["AT&T Ethernet Port"] B --> C["Hub"] C --> D["Computer"]](/content/2026/05/990969/images/37b51ae55f9b586ded06c7af783bfdd25411d3227a8c77738c36601219f30878.jpg)
NOTE
- This operation system should be used by a person who is accustomed to using computers.
IP Control
Set this function when operating the Monitor from equipment connected by LAN. To perform the operation, refer to "Network Settings".
IP Control
When "IP Control" is selected, "Change" will be highlighted. Press ENTER.
Detailed Settings
Make the detailed settings (Login ID, password, etc.). Follow the on-screen instructions to configure the settings.
Device Name Setting
Set the name of the Monitor displayed on other network devices.
- Use the software keyboard to set the name. See page 4-17 for details on the software keyboard.
Communication Conditions for IP
Connect to the Monitor with the following settings made for IP on the PC.
| IP protocol: TCP/IP | |
| Host IP address: Set the IP address on the Monitor menu | |
| Service: None (Do not select Telnet or SSH) | |
| TCP port : Set a port number on the Monitor menu (Control port) | |
When you set your ID and password on the Monitor menu, you need to enter them as soon as you connect to the Monitor.
NOTE
- When you use this function, make settings for "IP Control". • The connection will be cut off when there has been no communication for 3 minutes.
Communication Conditions for RS-232C
Set the RS-232C communication settings on the PC to match the Monitor's communication conditions. The Monitor's communication settings are as follows:
The Monitor's communication settings are as follows:
| Baud rate: 9,600 bps | |
| Data length: 8 bits | |
| Parity bit: None | |
| Stop bit: 1 bit | |
| Flow control: None |
Communication procedure
Send the control commands from the PC via the RS-232C or IP. The Monitor operates according to the received command and sends a response message to the PC. Do not send multiple commands at the same time. Wait until the PC receives the OK response before sending the next command. If the set is switched off to stand by, please wait for more than 20 seconds until you send the next RS232 power-on command.

Using a PC
Control of the Monitor (Continue)
Command format
Eight ASCII codes + CR

Command 4-digits Parameter 4-digits Return code
Command 4-digits: Command. The text of four characters.
Parameter 4-digits: Parameter 0–9, x, blank, ?
Parameter
Input the parameter values, aligning left, and fill with blank(s) for the remainder. (Be sure that 4 values are input for the parameter.)
When the input parameter is not within an adjustable range, "ERR" returns. (Refer to "Response code format".)
Any numerical value can replace the "x" on the table.
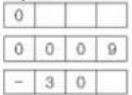
When "?" is input
commands, the
present setting
value responds

Response code format
Normal response

Return code (ODH)
Problem response
(communication error or Incorrect command)

Return code (ODH)
Command table
- Commands not indicated here are not guaranteed to operate.
| CONTROL ITEM COMMAND PARAMETER CONTROL CONTENTS | |||||||||||
| POWER ONCOMMAND SETTING | R S | P W | 0 | _ | Off | The | Power | On | commandrejected. | ||
| 1 _ | _ | On [RS-232C] The Power On | commandaccepted. | ||||||||
| 2 _ | _ | On [IP] The Power On | commandaccepted. | ||||||||
| POWER SETTING P O W | R O | _ | _ | Power | Off | It | shifts to | standby. | |||
| 1 _ | _ | Power | On | Power On*1 | |||||||
| INPUTSELECTION | TOGGLE | I | T | G | D | x | _ | _ | _ | (Toggle) | It input-switches by the toggle. (It is the same as an input change key) |
*1 For RS-232C only.
You can use "Wake On LAN (Magic Packet)" to turn on the power via LAN.
It is not possible to turn on the monitor with the IP Control command.
NOTE
- If an underbar ( ) appears in the parameter column, enter a space.
- If an asterisk (*) appears, enter a value in the range indicated in brackets under CONTROL CONTENTS.
- Any numerical value can replace the "x" on the table.

Using a PC
Control of the Monitor (Continue)
| CONTROL ITEM COMMAND PARAMETER CONTROL CONTENTS | |||||||||||
| INPUT SELECTION | 1-6 I A V D | ______ | 1: HDMI IN 1 | 2: HDMI IN 2,3: HDMI IN 3,4: VIDEO IN 1,5:COMPONENT/VIDEOIN 2,6: PC IN | |||||||
| AV MODE SELECTION A | V M | D * | ______ | 0: (Toggle). | 1: STANDARD,2: MOVIE,4: USER,5: DYNAMIC (Fixed),6: DYNAMIC,7: PC | Although it can choose now, it is toggle operation in inside. | |||||
| VOLUME VOL M *** Volume | 0-100) | ||||||||||
| POSITION H | POSITION | H | P | O | S | * | * | * | – | (-50-50) | For PC input.The screen position variable ranges depend on the View Mode or the signal type.The ranges can be seen on the position- setting screen. |
| V- POSITION | V P O | S * | * _ | (-50-50) | |||||||
| CLOCK | C | L | C | K | ^ | * | * | – | (0-100) | ||
| PHASE | P H | $ E * | ______ | (0-63) | |||||||
| CONTROL ITEM | COMMAND PARAMETER | CONTROL CONTENTS | ||||||||
| VIEW MODE | W | I | D | E | * | * | - | - | 0: (Toggle) [AV],1: Side Bar [AV],2: S.Stretch [AV]3: Zoom [AV],4: Stretch [AV, USB-Video, Home Network Video or Internet applications],5: Normal [PC]7: Stretch [PC],8: Dot by Dot [PC] [AV],9: Full Screen [AV]10: Auto [USB-Video, USB-Photo, Home Network Video, Photo or Internet applications],11: Original [USB-Video, USB-Photo, Home Network Video, Photo or Internet applications] | 0: Although it can choose now, it is toggle operation In Inside.1: Only available when 4:3 signal is being input.5: Only available when 4:3 signal is being input.8: [PC] Available except when UXGA is being input.[AV] Only available when 1080/p is being input.9: Only available when 720p is being input.10, 11: Available when USB-Video, USB-Photo, Home Network Video, Photo or Internet application is used. |
| MUTE | M | U | T | E | * | - | - | - | 0: (Toggle),1: On,2: Off | |
NOTE
- If an underbar ( ) appears in the parameter column, enter a space.
- If an asterisk (*) appears, enter a value in the range indicated in brackets under CONTROL CONTENTS.
- Any numerical value can replace the "x" on the table.
Using a PC
Control of the Monitor (Continue)
| CONTROL ITEM COMMAND PARAMETER CONTROL CONTENTS | ||||||||||
| SURROUND A C S | U * | ____ | 0: (Toggle), | 1: On,2: Off | ||||||
| AUDIO SELECTION | A C | H A x | ____ | (Toggle) | ||||||
| SLEEP TIMER OF | T M * | ____ | 0: Off. | 1: OFF TIMER - 30 MIN.,2: OFF TIMER - 60 MIN.,3: OFF TIMER - 90 MIN.,4: OFF TIMER - 120 MIN.5: OFF TIMER - 150 MIN. | ||||||
NOTE
- If an underbar (_) appears in the parameter column, enter a space.
- If an asterisk (*) appears, enter a value in the range indicated in brackets under CONTROL CONTENTS.
- Any numerical value can replace the "x" on the table.
Using a PC
Control of the Monitor (Continue)
| CONTROL ITEM COMMAND PARAMETER CONTROL CONTENTS | ||||||||
| CC C L C P x ____(Toggle) Toggle operation of a closed caption. | ||||||||
| DEVICE NAME T V | N M | 1 ____ | The device name set in "Device Name" is displayed. | |||||
| MODEL NAME M N | R D | 1 ____ | The model name of the Monitor | |||||
| SOFTWARE VERSION | S W V N | 1 ____ | The current version of the Monitor software is displayed. | |||||
| IP PROTOCOL VERSION | I | P P V | 1 ____ | The currently supported version of IP protocol is displayed. | ||||
NOTE
- If an underbar (_) appears in the parameter column, enter a space.
- If an asterisk (*) appears, enter a value in the range indicated in brackets under CONTROL CONTENTS.
- Any numerical value can replace the "x" on the table.
Using a PC
Control of the Monitor (Continue)
| CONTROL ITEM COMMAND PARAMETER CONTROL CONTENTS | ||||||||||
| REMOTE CONTROL BUTTONS | R C | K Y * | -- | 0-9: 0-9, | 10: DOT,12: POWER,13: DISPLAY,23: OPTION,24: SLEEP,31: MUTE,32: VOL-,33: VOL+,34: CH,35: CH√36: INPUT,38: MENU,39: APPS,40: ENTER,41▲42▼43▲44▲45: RETURN,46: EXIT,49: AUDIO,50: A (red),51: B (green),52: C (blue),53: D (yellow),61: MANUAL | |||||
NOTE
- If an underbar ( ) appears in the parameter column, enter a space.
- If an asterisk (*) appears, enter a value in the range indicated in brackets under CONTROL CONTENTS.
- Any numerical value can replace the "x" on the table.
- You can use "Wake On LAN (Magic Packet)" to turn on the power via LAN.

Using a PC
PC Compatibility Chart It is necessary to set the PC correctly to display XGA and WXGA signals.
| Resolution | Horizontal Frequency | Vertical Frequency | VESA Standard | |
| VGA | 720 x 400 31 | 5 kHz 70 Hz — | ||
| 640 x 480 | 31.5 kHz 60 Hz | ○ | ||
| 37.9 kHz 72 Hz | ○ | |||
| 37.5 kHz 75 Hz | ○ | |||
| SVGA 800 x 600 | 35.1 kHz 56 Hz | ○ | ||
| 37.9 kHz 60 Hz | ○ | |||
| 48.1 kHz 72 Hz | ○ | |||
| 46.9 kHz 75 Hz | ○ | |||
| XGA 1024 x 768 | 48.4 kHz 60 Hz | ○ | ||
| 56.5 kHz 70 Hz | ○ | |||
| 60.0 kHz 75 Hz | ○ | |||
| WXGA 1360 x 768 47.7 kHz 60 Hz | ○ | |||
| SXGA 1280 x 1024 64.0 kHz 60 Hz | ○ | |||
| SXGA+ 1400 x 1050 65.3 kHz 60 Hz | ○ | |||
| UXGA 1600 x 1200 75.0 kHz 60 Hz | ○ | |||
| 1080p 1920 x 1080 67.5 kHz 60 Hz — | ||||
VGA and XGA are registered trademarks of International Business Machines Corp.
AV Compatibility Chart
| Resolution | Vertical Frequency | HDMI Component |
| 640 x 480p | 59.94 Hz — | ○ |
| 60 Hz — | ○ | |
| 720 x 480p | 59.94 Hz | ○ |
| 60 Hz | ○ | |
| 720 x 576p 50 Hz | ○ | |
| 720(1440) x 480i | 59.94 Hz | ○ |
| 60 Hz | ○ | |
| 720(1440) x 576i 50 Hz | ○ | |
| 1280 x 720p | 50 Hz | ○ |
| 59.94 Hz | ○ | |
| 60 Hz | ○ | |
| 1920 x 1080i | 50 Hz | ○ |
| 59.94 Hz | ○ | |
| 60 Hz | ○ | |
| 1920 x 1080p | 24 Hz — | ○ |
| 50 Hz | ○ | |
| 59.94 Hz | ○ | |
| 60 Hz | ○ | |

Using the Internet
By connecting your Monitor to a broadband system, you can access the Internet from the Monitor.
Connecting to the Internet
• To connect your Monitor to the Internet, you must have a broadband Internet connection. - If you do not have a broadband Internet connection, consult the store where you purchased your Monitor or ask your Internet service provider or telephone company.
Using an ETHERNET cable
Use an ETHERNET cable (commercially available) to connect the ETHERNET terminal on the Monitor to your broadband router (commercially available).
![graph LR A["Internet"] --> B["ETHERNET CABLE"] B --> C["ASAN"] C --> D["Broadband router"] D --> E["Modem"] E --> F["PC"] F --> G["Internet"] style A fill:#f9f,stroke:#333 style G fill:#ccf,stroke:#333](/content/2026/05/990969/images/c91aca6c5f35b77abe6bd5d9f677ac40282dcbb1a9cffd794e174d5f13711f77.jpg)
Network Settings
Perform the procedure below to make adjustments or to confirm the settings for accessing the Internet.
1 Press MENU to display the MENU screen, and then press ENTER. 2 Press ◀▶ to select "Network Setting", and then press ENTER. 3 Press ▲ to select "Wired Setup" and then press ENTER. See page 4-16. 4 Press MENU to exit.
Using the Internet

Entering Text (Software Keyboard)
When you are editing an input screen or specifying the Network settings used for accessing the Internet, enter text from the software keyboard.
NOTE
• You can enter up to 128 characters for text.
- Some special characters or diacritics may not be available depending on where you enter the text.
The text you enter is displayed as you type it in.

While you are entering text, likely input conversion candidates are displayed based on what you typed in.
↑Shift
If "alphabet" is selected, this switches characters between uppercase and lowercase.
Each time you press ENTER, the character type switches.

Press ENTER to select the type of characters entered: alphabet, or sign.

(BACKSPACE)
Erases text one character at a time.

Using the Internet
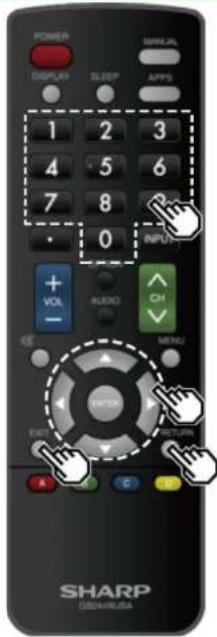
Entering Text (Software Keyboard) (Continued)
Enter Applies the entered information and closes the software keyboard.
Space Enters a space.
Clear
Erases the character string.
- When the cursor is somewhere in a line: the character string to the right of the cursor will be erased.
- When the cursor is at the right end of a line: the entire line will be erased.
Close
Closes the software keyboard without applying the entered information.
| Buttons on the remote control unit | Description |
| ▲▼▼aves the focus. | When moved at the far edge, the focus moves to the opposite edge. |
| ENTER Performs the | processing for the button currently in the focus. |
| EXIT Closes the software keyboard | without applying the original input elements for the entered text. |
| RETURN | |
| 0-9 Directly enters the | single-byte number for that button. |
| • (DOT) Erases text one character at a time. | |
Using the Internet

Using the Browser
1 Press APPS, press 🔊 to select the browser icon from the application window, and then press ENTER. - Press APPS again to switch back to the currently tuned channel.
Buttons for Using the Browser
ENTER,
- Press ▲▼ to select a link that you want to jump to, and then press ENTER.
EXIT
Press the button to return to the Monitor screen.
RETURN
Press the button to return to the previous page.
NOTE
Restrictions apply to window display.
Using the Application Window
During Dock Display
You can move the application icons. Example

1 Select an application, and then press ▲
2 Press ←→ move the icon to the desired location.
Move the Icons
You can move the icons of the more commonly used applications closer to the left.
Press ▶ to move the icon to the desired location.
Using the Internet

Using the Browser (Continued)
| Tool bar | ← | → | → | → | http://www.shanpusa.com/ |
| Selected item | Description |
 | Allows you to go back to the previous page. |
 | Allows you to go to the next page. |
 | Refreshes the page.Interrupts a page while it is loading. |
 | Displays the home page. |
| Selected item | Description |
| Displays the bookmarks list. | |
| Displays your browsing history. | |
| Configures browser settings. |
Using the Toolbar
You can use the toolbar to control the browser and to specify settings.
1 Press ▶ to select a function, and then press ENTER.
Browsing Web Contents
You can display the web content you want to enjoy.
1 Press to move to the address area in the toolbar, and then press ENTER. • The Enter Address menu is displayed. 2 Enter an address, and then press ENTER. • The web content you want to view is displayed.

Using the Internet

Using the Browser (Continued)
CAUTION
- If the power is cut due to a power failure or the Monitor being unplugged while you are using the Internet, information such as bookmarks or cookies may not be saved correctly.
To users who access the Internet from a PC - When you access the Internet from this Monitor, the procedures may not be the same as regular browser-based access on a PC. - On some pages, video and audio, text or images may not be displayed correctly. - Due to a large number of pictures or information, the loading time for an internet site can be considerably extended. Sometimes Internet pages can not be loaded.
About links
- Web pages on the Internet often include "links" that allow you to jump to other web pages (or sites).
- "Links" can take various forms, including words or images, but they always work in the same way letting you jump to the link destination when you select them.
- Selected items (such as links or text input fields) are enclosed in a frame.
- You can jump from a "link" to the corresponding link destination.
Using the Internet

Using the Browser (Continued)
Browser Settings
You can check or modify your browser settings from the Browser menu.
1. Press to select the toolbar, and then press ENTER. 2. Press ▲▼ to specify the required setting, and then press ENTER.
Using the Internet

Using Keyboard and Mouse
You can use a keyboard or mouse for operating the Monitor while using the browser.
- When you use the USB devices, connect the device to the USB terminal on the Monitor.
NOTE
- The keyboard and mouse can only be used on a browser screen.
The keyboard or mouse may not operate properly depending on the application being used.

Appendix
Removing the Stand
- Before detaching (or attaching) the stand, make sure to turn off the Monitor and unplug the AC cord.
CAUTION
- Do not remove the stand from the Monitor unless using an optional wall mount bracket to mount it.
1 Unfasten the four screws used to secure the stand in place. Example

2 Detach the stand from the Monitor.

NOTE
- Be sure to always carry the Monitor by two people (90/80 inch models: three people) holding it with two hands.
- In the installation procedure, be careful not to catch your fingers between the Monitor set and the floor.


Appendix
Setting the Monitor on the Wall
The wall mount kit commercially available allows you to mount the Monitor on the wall. For detailed information on installing the wall mount, see the instructions provided with the product. We recommend you to contact a technician for assistance when installing it. SHARP is not responsible for any damage to the product or injury to yourself or others if you elect to install the wall mount on your own.
CAUTION
- Install your wall mount on a solid wall perpendicular to the floor. When you want to attach the wall mount to surfaces other than plaster board, please contact your nearest retailer/adviser for additional information. If you install the Monitor on a ceiling or slanted wall, it may fall and result in severe personal injury. Always have two people mount the Monitor on a wall.
NOTE
- Due to the terminal configuration on this Monitor, when you wall-mount this model, make sure there is enough space between the wall and the Monitor for the cables. - To use this Monitor mounted on a wall, remove the AC cord holder on the rear of the Monitor, and then use the screws supplied with the wall mount bracket to secure the bracket to the rear of the Monitor.
Appendix
Setting the Monitor on the Wall (Continue)
PN-Q901/PN-Q801
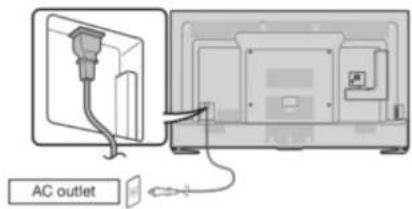
PN-Q701/PN-Q601

- The location of the AC cord holder differs depending on whether it is in its shipment location (A) or has been used as a cable tie (B).

Appendix
Setting the Monitor on the Wall (Continue)
Wall Mount Kit Specifications
Standard dimensions for wall mount kits are shown below.
- The illustration is based on the PN-Q601 model as an example.

a1: Maximum distance from the mounting hole a2: Maximum distance from the Monitor's center b1: Distance between the Monitor's center and the mounting hole b2: Maximum distance from the Monitor's center b3: Maximum distance from the mounting hole c1: Minimum gap
Unit: inch
(mm)
| PN-Q901 PN-Q801 PN-Q701 PN-Q601 | |||||
| VESA screwhole specs (A-B) | 23 5/8(600)-15 3/4(400) 15 3/4(400) - 15 3/4(400) | ||||
| Width | a1 1 37/64(40) 2 3/8(60) | ||||
| a2 13 25/64(340) 10 1/4(260) | |||||
| Height | b1 7 7/8(200) 8 9/32(210) 8 43/64(220) | ||||
| b2 14 49/64(375) 11 47/64(298) 10 29/32(277) 10 33/64(267) | |||||
| b3 6 57/64(175) 4 7/32(107) 3 7/16(87) | |||||
| c1 3 5/32(80) 3 13/64(81) 1 15/16(49) 1 31/32(50) | |||||
Appendix
Setting the Monitor on the Wall (Continued)
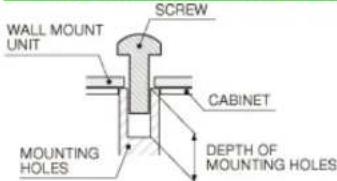
Unit: inch (mm)
For the screws, refer to the table shown below.
| 90/80 inch models 70/60 inch models | ||
| Standard screws M8 (Use 1.25 pitch screws.) M6 (Use 1.0 pitch screws.) | ||
| Length(Depth of mounting holes) 15/32(12) 15/32 (12) | ||
| Quantity 4 pcs. 4 pcs. | ||
NOTE
• To use this Monitor mounted on a wall, remove the cable tie as needed. - Do not use screws that do not comply with the VESA standard screw specifications. - Do not use screws that are longer than the standard length. Screws that are too long may cause damage to the inside of the Monitor. - Do not fasten the screws too firmly or loosely. This may damage the product or cause the product to fall, leading to personal injury. SHARP is not liable for these kinds of accidents. - SHARP is not liable for product damage or personal injury when a non-VESA or non-specified wall mount is used or the consumer fails to follow the product installation instructions.

Do not install the wall mount kit while your Monitor is turned on. It may result in personal injury due to electric shock.

Appendix
Troubleshooting
| Problem Possible Solution | |
| No power Check | •il you pressed POWER on the remote control unit.• Is the AC cord disconnected?• Has the power been turned on? |
| Unit cannot be operated. | • External influences such as lightning, static electricity, may cause improper operation. In this case, operate the unit after first turning off the power of the Monitor or unplugging the AC cord and replugging it in after 1 or 2 minutes. |
| Remote control unit does not operate. | • Are batteries inserted with polarity (+,-) aligned?• Are batteries worn out? (Replace with new batteries.)• Are you using it under strong or fluorescent lighting?• Is a fluorescent light illuminated near the remote control sensor? |
| Picture is cut off/with sidebar screen. | • Is the image position correct?Page 7-1• Are screen mode adjustments such as picture size made correctly?Pages 4-19 to 4-21 |
| Strange color, light color, or color misalignment | • Adjust the picture tone.Pages 4-11 to 4-14• Is the room too bright? The picture may look dark in a room that is too bright. |
| Power is suddenly turned off. | • Is the sleep timer set?Pages 3-4• Check the power control settings.Page 4-18• The unit's internal temperature has increased. Remove any objects blocking vent or clean. |
| Problem Possible Solution | |
| No picture is connection to other components correct?Is the correct input selected?Pages 2-1Is "On" selected in "Audio Only"?Page 4-21If the PC image is not displayed, check the following:- When connecting a laptop PC to the Monitor, check that display output mode of the PC is set to external monitor.- Check the resolution setting on the PC. Is a non-compatible signal being input?Page 7-9 | |
| Picture quality of HD video is poor. | To enjoy HD images from external equipment, you are required to set up HDMI connection or component connection.If the video source is not of HD quality, HD images cannot be displayed. Check that the video source you are viewing provides HD images.The HD cable/satellite set-top box may need to be configured to output HD images via cable/satellite. |
| The Monitor sometimes makes a cracking sound. | This is not a malfunction. This happens when the cabinet slightly expands and contracts according to change in temperature. This does not affect the Monitor's performance. |
| Some Internet functions used on a PC are not available from the Monitor. | The Monitor has only limited functions compared with regular PC browsers.Pages 8-4 to 8-6 |

Appendix
Troubleshooting (Continued)
Problem Possible Solution
- No sound is connection to
other components correct?
• Is the volume too low?
• Is "Variable" selected in "Output Select"?
- Have you pressed MUTE on the remote control unit?
- Check the audio output of the connected external equipment. Is the volume too low or muted?
- When external equipment is connected via an HDMI cable, you may need to configure the audio to be output through the HDMI cable.
- When audio is not output from external equipment connected to the PC IN or HDMI IN 2 terminal, check the "Audio Select" setting.
- Even when external equipment is connected using an HDMI-certified cable, an audio cable connection may be required depending on the type of equipment and the media being played back. In this case, in addition to connecting an HDMI-certified cable to the HDMI IN 2 terminal, connect a 3.5 mm stereo minijack cable to the AUDIO IN terminal and set "Audio Select" to "HDMI+Analog".
- When connecting a PC via an HDMI-certified cable, check the following:
- Is the audio output of the PC configured correctly? Check the audio output settings and output audio format in Sound Properties on the PC.
The audio formats compatible with this Monitor are PCM and Dolby Digital. With other formats, audio cannot be output.
- Depending on the board, only video signals may be output. In this case, in addition to connecting an HDMI-certified cable to the HDMI IN 2 terminal, connect a ∅ 3.5 mm stereo minijack cable to the AUDIO IN terminal and set "Audio Select" to "HDMI+Analog".
Cautions regarding use in high and low temperature environments
- When the unit is used in a low temperature space (e.g. room, office), the picture may leave trails or appear slightly delayed. This is not a malfunction, and the unit will recover when the temperature returns to normal.
- Do not leave the unit in a hot or cold location. Also, do not leave the unit in a location exposed to direct sunlight or near a heater, as this may cause the cabinet to deform and the front panel to malfunction.
Storage temperature: -20°C to +60°C

Specifications
Monitor (For PN-Q901 model)
| Item Model: PN-Q901 | |||
| LCD panel | Size 90" Class (90 1/64" Diagonal) | ||
| Resolution 2,073,600 pixels (1.920 x 1,080) | |||
| Audio out 10W x 2 | |||
| Terminals | Back panel vertical side | HDMI IN 1 HDMI in with HDCP, ARC | |
| HDMI IN 2 HDMI in with HDCP, Audio In (∅ 3.5 mm stereo jack) | |||
| HDMI IN 3 HDMI in with HDCP, MHL | |||
| USB Photo/Music/Video mode, Software update, USB | keyboard/mouse | ||
| Back panel surface side | COMPONENT IN COMPONENT IN | ||
| VIDEO IN 1 AV in | |||
| AUDIO OUT Audio out | |||
| PC IN ANALOG RGB (PC) in (15-pin mini D-sub female connector), Audio in (∅ 3.5 mm stereo jack) | |||
| RS-232C 9-pin D-sub male connector | |||
| Back panel horizontal side | AUDIO IN Audio in (∅ 3.5 mm stereo jack) | ||
| DIGITAL AUDIO OUT Optical Digital audio out x 1 (PCM/Dolby Digital/DTS) | |||
| ETHERNET Network connector | |||
| OSD language English, French, Spanish, German, Italian and Russian | |||
| Power Requirement AC 110-240 V, 50/60 Hz | |||
| On Mode Power 211 W | |||
| Power Consumption | 290 W (0.5 W Standby with AC 230 V) | ||
| Weight | Monitor + stand | 150.0 lbs./68.0 kg | |
| Monitor only | 141.1 lbs./64.0 kg | ||
| Dimensions*2W x H x D inch (mm) | Monitor+ stand | 80 7/8 (2054) x 48 61/64 (1243) x 17 3/32 (434) | |
| Monitor only | 80 7/8 (2054) x 47 11/16 (1211) x 4 37/64 (116) | ||
| Operating temperature | 0°C to +40°C | ||
- As part of policy of continuous improvement, SHARP reserves the right to make design and specification changes for product improvement without prior notice. The performance specification figures indicated are nominal values of production units. There may be some deviations from these values in individual units.
Specifications
Monitor (For PN-Q801/701/601 models)
| Item Model: PN-Q801 Model:PN-Q701 Model: PN-Q601 | |||||
| LCD panel | Size 80" Class (80" Diagonal) 70" Class (69 1/2" Diagonal) 60" Class (60 3/32" Diagonal) | ||||
| Resolution 2,073,600 pixels (1,920 x 1,080) | |||||
| Audio out 10W x 2 | |||||
| Terminals | Back panel vertical side | HDMI IN 3 HDMI in with | HDCP, MHL | ||
| USB Photo/Music/Video mode, Software update, USB keyboard/mouse | |||||
| RS-232C 9-pin D-sub male connector. | |||||
| Back panel surface side | HDMI IN 1 HDMI in with | HDCP, ARC | |||
| HDMI IN 2 HDMI in with | HDCP, Audio in (∅ 3.5 mm stereo jack) | ||||
| COMPONENT/VIDEO IN | COMPONENT in, AV in | ||||
| VIDEO IN 1 AV In | |||||
| PC IN ANALOG RGB (PC) in (15-pin mini D-sub female connector), Audio in (∅ 3.5 mm stereo jack) | |||||
| AUDIO IN Audio in (∅ 3.5 mm stereo jack) | |||||
| AUDIO OUT Audio out (RCA) | |||||
| DIGITAL AUDIO OUT Optical Digital audio out x 1 (PCM/Dolby Digital/DTS) | |||||
| ETHERNET | Network connector | ||||
| OSD language | English, French, Spanish, Geramn, Italian and Russian | ||||
| Power Requirement | AC 110-240 V, 50/60 Hz | ||||
| On Mode Power | 173 W | 125 W | 104 W | ||
| Power Consumption | 300 W (0.5 W Standby with AC 230 V) | 180 W (0.5 W Standby with AC 230 V) | 150 W (0.5 W Standby with AC 230 V) | ||
| Weight | Monitor + stand | 114.6lbs./52.0kg | 78.3 lbs./35.5 kg | 56.2 lbs./25.5 kg | |
| Monitor only | 110.2lbs./50.0kg | 75.0 lbs./34.0 kg | 52.9 lbs./24.0 kg | ||
| Dimensions*2(W x H x D)(inch) | Monitor + stand | 71 1/2 (1816) x 43 (1092) x 17 59/64 (455) | 61 35/64 (1563) x 37 1/16 (941) x 13 3/4 (349) | 53 23/64 (1355) x 32 31/64 (825) x 13 3/4 (349) | |
| Monitor only | 71 1/2 (1816) x 41 35/64 (1055) x 4 1/2 (114) | 61 35/64 (1563) x 35 3/4 (908) x 3 7/16 (87) | 53 23/64 (1355) x 31 3/16 (792) x 3 25/64 (86) | ||
| Operating temperature | 0°C to +40°C | ||||
- As part of policy of continuous improvement, SHARP reserves the right to make design and specification changes for product improvement without prior notice. The performance specification figures indicated are nominal values of production units. There may be some deviations from these values in individual units.

Trademarks
• Dolby and the double-D symbol are trademarks of Dolby Laboratories. - The terms HDMI and HDMI High-Definition Multimedia Interface, and the HDMI Logo are trademarks or registered trademarks of HDMI Licensing Administrator, Inc. in the United States and other countries. - LCフォント、LCFONT、エルシーフォント and LC logo mark are registered trademarks of SHARP Corporation. This product is embedded with LC Font technology, which was developed by SHARP Corporation for clearly displaying easy-to-read characters on an LCD screen. However, other non-LCD fonts are used for displaying some screen pages.
- For DTS patents, see http://patents.dts.com. Manufactured under license from DTS Licensing Limited. DTS, the Symbol, & DTS and the Symbol together are registered trademarks & DTS 2.0+Digital Out is a trademark of DTS, Inc. © DTS, Inc. All Rights Reserved.
- MHL, the MHL Logo, and Mobile High-Definition Link are trademarks or registered trademarks of MHL LLC in the United States and other countries.

Dimensional Drawings
PN-Q901
Unit: inch (mm)


*1 Active area *2 Thinnest part *3 Including projecting parts
ENG 12-1
Dimensional Drawings
PN-Q801


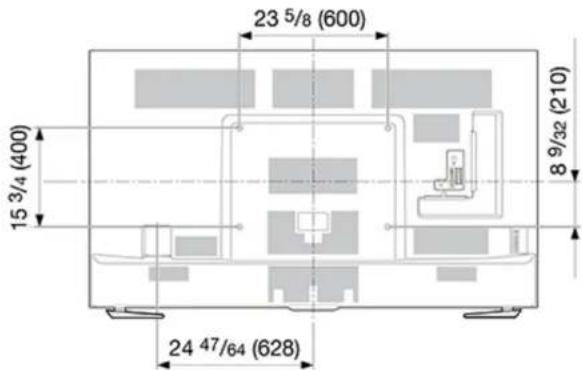
*1 Active area *2 Thinnest part *3 Including projecting parts
Unit: inch (mm)

Dimensional Drawings
PN-Q701


*1 Active area *2 Thinnest part *3 Including projecting parts
Unit: inch (mm)

Dimensional Drawings
PN-Q601


*1 Active area *2 Thinnest part *3 Including projecting parts
Unit: inch (mm)

Software License
Information on the open-source software license.
Software composition
The software included in this product is comprised of various software components whose individual copyrights are held by third parties.
This product also makes use of freely distributed software and software components whose copyrights are held by third parties. These include software components covered by a GNU General Public License (hereafter GPL), a GNU Lesser General Public License (hereafter LGPL) or other license agreement.
Obtaining source code
Some of the open source software licensors require the distributor to provide the source code with the executable software components. GPL and LGPL include similar requirements. For information on obtaining the source code for the open source software and for obtaining the GPL, LGPL, and other license agreement information.
Acknowledgements
The following open source software components are included in this product:
/bootcode/uboot
/linux-3.7.2
/system/ap/develop/busybox/busybox-1.18.4
/system/lib/develop/e2fsprogs/e2fsprogs-1.42.6
/system/lib/develop/uClibc-0.9.30.3
/system/ap/develop/mtd/util
/system/tools/squashis
/Platform Lib/Graphics/FontRenderer/libotf-0.9.9
/Platform Lib/Graphics/FontRenderer/fribidi-0.10.9
/Platform Lib/Graphics/FontRenderer/freetype-2.3.5
/Utility/tinyxml
/Application/Win32/RSSClient/tinyxml
/Include/Utility/tinyxml"
/Utility/wpa_supplicant
/system/tools/izma
/open source/icu-54.1
/open source/harfbuzz/harfbuzz-0.9.35
/open_source/graphite2/graphite2-1.2.4
/src/Platform_Lib/Graphics/DirectFB/DirectFB-1.4.2
/open_source/curl/curl-7.32.0
/open_source/libwebp/libwebp-0.4.1
/open_source/FastJpegLib/jpeg-6b
/open_source/libmng/libmng-2.0.2
/open_source/Libpng
/open_source/font/freetype-2.4.11
/open_source/c-ares/c-ares-1.10.0
/open_source/openssl-1.0.1j
/open_source/expat
/open_source/zlib-1.2.3
/open_source/Tremor
/open_source/Alsa/alsa-lib-1.0.23
/open_source/picotts
/Utility/wpa_supplicant
/libmediaplayerservice/wfdisplay/spu/core/bigd*
/open_source/HTTPC
/open_source/upnp
/system/src/Platform_Lib/Graphics/JpegRenderer
/system/open_source/libpng
/system/open_source/gif
/system/open_source/libwebp
http://tv.bobitag.com/LGPL/alsa-lib-1.0.23.tgz
http://tv.bobitag.com/LGPL/curl-7.28.1.tgz
http://tv.bobitag.com/LGPL/c-ares-1.9.1.tgz
http://tv.bobitag.com/LGPL/icu-4.8.1.1.tgz
http://tv.bobitag.com/LGPL/mpg123-1.21.0.tgz
http://tv.bobitag.com/LGPL/fontconfig-2.11.0.tgz
http://tv.bobitag.com/LGPL/expat.2.0.1.tar.gz
http://tv.bobitag.com/LGPL/qt-everywhere-opensource-src-5.0.0.lgz
http://tv.bobitag.com/LGPL/openssl-1.0.11.tgz

Software License
Software copyrights
Bootcode:
uboot
GPL V2 http://tv.bobitag.com/LGPL/uboot.tgz
Kernel:
vmlinux
GPL V2 http://tv.bobitag.com/LGPL/linux-3.7.2.tgz
busybox
GPL V2 http://tv.bobitag.com/LGPL/busybox-1.18.4.tgz
e2fsprogs
GPL V2 http://tv.bobitag.com/LGPL/e2fsprogs-1.42.6.tar.gz
http://tv.bobitag.com/LGPL/e2fsprogs-libs-1.42.6.tar.gz
uclibc
LGPL 2.1 http://tv.bobitag.com/LGPL/uClibc-0.9.30.3.tar.bz2
GPL V2 http://tv.bobitag.com/LGPL/jffs2.tgz
mksquashfs
GPL V2 http://tv.bobitag.com/LGPL/squashfs4.2.tar.gz
Library:
libotf
LGPL V2.1 http://tv.bobitag.com/LGPL/libotf-0.9.9.tar.gz
fribidi
LGPL V2.1 http://tv.bobitag.com/LGPL/fribidi-0.10.9.tar.gz
freetype
FTL ~ BSD http://tv.bobitag.com/LGPL/freetype-2.4.11.tar.gz
tinyxml
zlib http://sourceforge.net/projects/tinyxml/files/
openssl
Apache License 1.0 BSD
http://tv.bobltag.com/LGPL/openssl-1.0.11.tgz
http://tv.bobitag.com/LGPL/openssl-1.0.1j.tar.gz
Utility:
wpa_supplicant
BSD http://tv.bobitag.com/LGPL/wpa_supplicant-2.4.tar.gz
LZMA
public domain http://tv.bobitag.com/LGPL/lzma-4.65.tgz
HarfBuzz
MIT
http://tv.bobitag.com/LGPL/harfbuzz-0.9.35.tar.bz2
Graphite
Apache 2.0 http://tv.bobltag.com/LGPL/graphite2-1.2.4.tgz
gperftools
New BSD License http://tv.bobilag.com/LGPL/gperftools-2.2.tar.gz
directFB
LGPL V2 http://tv.bobitag.com/LGPL/DirectFB-1.4.2.tar.gz
libjpeg
JPEG
libmng
MNG License

Software License
libpng
libpng license.
FreeType
freetype
c-ares
MIT
openSSL
OpenSSL/SSLeay
expat
MIT/X
zlib
Zlib
Tremor
Xiph.org
alsa
LGPL 2.1
http://tv.bobitag.com/LGPL/alsa-lib-1.0.23.tar.gz
http://tv.bobitag.com/LGPL/alsa-lib-1.0.23.tgz
picoTTS
apache 2
LGPL 2 http://tv.bobitag.com/LGPL/JavaScriptCore.r118995.tar.gz
MIT
BSD
HTTP:
neon
GPL http://tv.bobitag.com/LGPL/HTTPC.tar.bz2
DLNA:
upnp
No License
http://tv.bobitag.com/LGPL/upnp.1.6.16.tar.gz
http://tv.bobitag.com/LGPL/upnp.tar.bz2
photo:
jpeg6b
public domain http://tv.bobitag.com/LGPL/jpegsrc.v6b.tar.gz
libpng
public domain
http://tv.bobitag.com/LGPL/libpng-1.6.7.tar.gz
http://tv.bobitag.com/LGPL/libpng-1.6.17.tar.gz
giflib
public domain http://tv.bobitag.com/LGPL/giflib-5.1.1.tar.bz2
libwebp
public domain
http://tv.bobitag.com/LGPL/libwebp-0.4.1.tar.gz
http://tv.bobitag.com/LGPL/libwebp-0.4.3.tar.gz
Others:
alsa
LGP1 2.1
http://tv.bobitag.com/LGPL/alsa-lib-1.0.23.tar.gz
http://tv.bobitag.com/LGPL/alsa-lib-1.0.23.tgz
curl
MIT/X derivate license
http://tv.bobitag.com/LGPL/curl-7.28.1.tgz
http://tv.bobitag.com/LGPL/curl-7.32.0.tar.gz

Software License
c-ares
C89 compatibility, MIT licensed
http://tv.bobitag.com/LGPL/c-ares-1.9.1.tgz
http://tv.bobitag.com/LGPL/c-ares-1.10.0.tar.gz
icu
ICU license, a simple, permissive non-copyleft free software license, compatible with the GNU GPL.
http://tv.bobitag.com/LGPL/icu-4.8.1.1.tgz
http://tv.bobitag.com/LGPL/icu4c-53 1.tgz
http://tv.bobitag.com/LGPL/icu4c-54 1-src.tgz
mpg123
LGPL 2
http://tv.bobitag.com/LGPL/mpg123-1.21.0.tgz
fontconfig
Copyright © 2000,2001,2002,2003,2004,2006,2007 Keith Packard
Copyright © 2005 Patrick Lam
Copyright © 2009 Roozbeh Pournader
Copyright © 2008, 2009 Red Hat, Inc.
Copyright © 2008 Danilo Šegan
Copyright © 2012 Google, Inc.
http://tv.bobitag.com/LGPL/fontconfig-2.11.0.tgz
expat
same as the MIT/X Consortium license.
http://tv.bobitag.com/LGPL/expat-2.0.1.tar.gz
http://tv.bobitag.com/LGPL/expat-1.95.tgz
QT (including Webkit)
LGPL 2.1 http://tv.bobitag.com/LGPL/qt-everywhere-opensource-src-5.0.0.tgz
openssl
Apache License 1.0 BSD
http://lv.bobitag.com/LGPL/openssl-1.0.1j.tar.gz
http://tv.bobitag.com/LGPL/openssl-1.0.11.tgz
GNU GENERAL PUBLIC LICENSE
Version 2, June 1991
Copyright (C) 1989, 1991 Free Software Foundation, Inc.
51 Franklin Street, Fifth Floor, Boston, MA 02110-1301, USA
Everyone is permitted to copy and distribute verbatim copies of this license document, but changing it is not allowed.
Preamble
The licenses for most software are designed to take away your freedom to share and change it. By contrast, the GNU General Public License is intended to guarantee your freedom to share and change free software--to make sure the software is free for all its users. This General Public License applies to most of the Free Software Foundation's software and to any other program whose authors commit to using it. (Some other Free Software Foundation software is covered by the GNU Lesser General Public License instead.) You can apply it to your programs, too.
When we speak of free software, we are referring to freedom, not price. Our General Public Licenses are designed to make sure that you have the freedom to distribute copies of free software (and charge for this service if you wish), that you receive source code or can get it if you want it, that you can change the software or use pieces of it in new free programs; and that you know you can do these things.
To protect your rights, we need to make restrictions that forbid anyone to deny you these rights or to ask you to surrender the rights. These restrictions translate to certain responsibilities for you if you distribute copies of the software, or if you modify it.
For example, if you distribute copies of such a program, whether gratis or for a fee, you must give the recipients all the rights that you have. You must make sure that they, too, receive or can get the source code. And you must show them these terms so they know their rights.
We protect your rights with two steps: (1) copyright the software, and (2) offer you this license which gives you legal permission to copy, distribute and/or modify the software.

Software License
Also, for each author's protection and ours, we want to make certain that everyone understands that there is no warranty for this free software. If the software is modified by someone else and passed on, we want its recipients to know that what they have is not the original, so that any problems introduced by others will not reflect on the original authors' reputations.
Finally, any free program is threatened constantly by software patents. We wish to avoid the danger that redistributors of a free program will individually obtain patent licenses, in effect making the program proprietary. To prevent this, we have made it clear that any patent must be licensed for everyone's free use or not licensed at all.
The precise terms and conditions for copying, distribution and modification follow.
TERMS AND CONDITIONS FOR COPYING, DISTRIBUTION AND MODIFICATION
- This License applies to any program or other work which contains a notice placed by the copyright holder saying it may be distributed under the terms of this General Public License. The "Program", below, refers to any such program or work, and a "work based on the Program" means either the Program or any derivative work under copyright law: that is to say, a work containing the Program or a portion of it, either verbatim or with modifications and/or translated into another language. (Hereinafter, translation is included without limitation in the term "modification".) Each licensee is addressed as "you".
Activities other than copying, distribution and modification are not covered by this License; they are outside its scope. The act of running the Program is not restricted, and the output from the Program is covered only if its contents constitute a work based on the Program (independent of having been made by running the Program). Whether that is true depends on what the Program does.
- You may copy and distribute verbatim copies of the Program's source code as you receive it, in any medium, provided that you conspicuously and appropriately publish on each copy an appropriate copyright notice and disclaimer of warranty; keep intact all the notices that refer to this License and to the absence of any warranty; and give any other recipients of the Program a copy of this License along with the Program.
You may charge a fee for the physical act of transferring a copy, and you may at your option offer warranty protection in exchange for a fee.
- You may modify your copy or copies of the Program or any portion of it, thus forming a work based on the Program, and copy and distribute such modifications or work under the terms of Section 1 above, provided that you also meet all of these conditions:
a) You must cause the modified files to carry prominent notices stating that you changed the files and the date of any change.
b) You must cause any work that you distribute or publish, that in whole or in part contains or is derived from the Program or any part thereof, to be licensed as a whole at no charge to all third parties under the terms of this License.
c) If the modified program normally reads commands interactively when run, you must cause it, when started running for such interactive use in the most ordinary way, to print or display an announcement including an appropriate copyright notice and a notice that there is no warranty (or else, saying that you provide a warranty) and that users may redistribute the program under these conditions, and telling the user how to view a copy of this License. (Exception: if the Program itself is interactive but does not normally print such an announcement, your work based on the Program is not required to print an announcement.)
These requirements apply to the modified work as a whole. If identifiable sections of that work are not derived from the Program, and can be reasonably considered independent and separate works in themselves, then this License, and its terms, do not apply to those sections when you distribute them as separate works. But when you distribute the same sections as part of a whole which is a work based on the Program, the distribution of the whole must be on the terms of this License, whose permissions for other licensees extend to the entire whole, and thus to each and every part regardless of who wrote it.
Thus, it is not the intent of this section to claim rights or contest your rights to work written entirely by you; rather, the intent is to exercise the right to control the distribution of derivative or collective works based on the Program.
In addition, mere aggregation of another work not based on the Program with the Program (or with a work based on the Program) on a volume of a storage or distribution medium does not bring the other work under the scope of this License.

Software License
- You may copy and distribute the Program (or a work based on it, under Section 2) in object code or executable form under the terms of Sections 1 and 2 above provided that you also do one of the following:
a) Accompany it with the complete corresponding machine-readable source code, which must be distributed under the terms of Sections 1 and 2 above on a medium customarily used for software interchange; or.
b) Accompany it with a written offer, valid for at least three years, to give any third party, for a charge no more than your cost of physically performing source distribution, a complete machine-readable copy of the corresponding source code, to be distributed under the terms of Sections 1 and 2 above on a medium customarily used for software interchange; or.
c) Accompany it with the information you received as to the offer to distribute corresponding source code. (This alternative is allowed only for noncommercial distribution and only if you received the program in object code or executable form with such an offer, in accord with Subsection b above.)
The source code for a work means the preferred form of the work for making modifications to it. For an executable work, complete source code means all the source code for all modules it contains, plus any associated interface definition files, plus the scripts used to control compilation and installation of the executable. However, as a special exception, the source code distributed need not include anything that is normally distributed (in either source or binary form) with the major components (compiler, kernel, and so on) of the operating system on which the executable runs, unless that component itself accompanies the executable.
If distribution of executable or object code is made by offering access to copy from a designated place, then offering equivalent access to copy the source code from the same place counts as distribution of the source code, even though third parties are not compelled to copy the source along with the object code.
- You may not copy, modify, sublicense, or distribute the Program except as expressly provided under this License. Any attempt otherwise to copy, modify, sublicense or distribute the Program is void, and will automatically terminate your rights under this License. However, parties who have received copies, or rights, from you under this License will not have their licenses terminated so long as such parties remain in full compliance.
- You are not required to accept this License, since you have not signed it. However, nothing else grants you permission to modify or distribute the Program or its derivative works. These actions are prohibited by law if you do not accept this License. Therefore, by modifying or distributing the Program (or any work based on the Program), you indicate your acceptance of this License to do so, and all its terms and conditions for copying, distributing or modifying the Program or works based on it.
- Each time you redistribute the Program (or any work based on the Program), the recipient automatically receives a license from the original licensor to copy, distribute or modify the Program subject to these terms and conditions. You may not impose any further restrictions on the recipients' exercise of the rights granted herein. You are not responsible for enforcing compliance by third parties to this License.
- If, as a consequence of a court judgment or allegation of patent infringement or for any other reason (not limited to patent issues), conditions are imposed on you (whether by court order, agreement or otherwise) that contradict the conditions of this License, they do not excuse you from the conditions of this License. If you cannot distribute so as to satisfy simultaneously your obligations under this License and any other pertinent obligations, then as a consequence you may not distribute the Program at all. For example, if a patent license would not permit royalty-free redistribution of the Program by all those who receive copies directly or indirectly through you, then the only way you could satisfy both it and this License would be to refrain entirely from distribution of the Program.
If any portion of this section is held invalid or unenforceable under any particular circumstance, the balance of the section is intended to apply and the section as a whole is intended to apply in other circumstances.
It is not the purpose of this section to induce you to infringe any patents or other property right claims or to contest validity of any such claims; this section has the sole purpose of protecting the integrity of the free software distribution system, which is implemented by public license practices. Many people have made generous contributions to the wide range of software distributed through that system in reliance on consistent application of that system; it is up to the author/donor to decide if he or she is willing to distribute software through any other system and a licensee cannot impose that choice.
This section is intended to make thoroughly clear what is believed to be a consequence of the rest of this License.

- If the distribution and/or use of the Program is restricted in certain countries either by patents or by copyrighted interfaces, the original copyright holder who places the Program under this License may add an explicit geographical distribution limitation excluding those countries, so that distribution is permitted only in or among countries not thus excluded. In such case, this License incorporates the limitation as if written in the body of this License.
- The Free Software Foundation may publish revised and/or new versions of the General Public License from time to time. Such new versions will be similar in spirit to the present version, but may differ in detail to address new problems or concerns.
Each version is given a distinguishing version number. If the Program specifies a version number of this License which applies to it and "any later version", you have the option of following the terms and conditions either of that version or of any later version published by the Free Software Foundation. If the Program does not specify a version number of this License, you may choose any version ever published by the Free Software Foundation.
- If you wish to incorporate parts of the Program into other free programs whose distribution conditions are different, write to the author to ask for permission. For software which is copyrighted by the Free Software Foundation, write to the Free Software Foundation; we sometimes make exceptions for this. Our decision will be guided by the two goals of preserving the free status of all derivatives of our free software and of promoting the sharing and reuse of software generally.
NO WARRANTY
- BECAUSE THE PROGRAM IS LICENSED FREE OF CHARGE, THERE IS NO WARRANTY FOR THE PROGRAM, TO THE EXTENT PERMITTED BY APPLICABLE LAW. EXCEPT WHEN OTHERWISE STATED IN WRITING THE COPYRIGHT HOLDERS AND/OR OTHER PARTIES PROVIDE THE PROGRAM "AS IS" WITHOUT WARRANTY OF ANY KIND, EITHER EXPRESSED OR IMPLIED, INCLUDING, BUT NOT LIMITED TO, THE IMPLIED WARRANTIES OF MERCHANTABILITY AND FITNESS FOR A PARTICULAR PURPOSE. THE ENTIRE RISK AS TO THE QUALITY AND PERFORMANCE OF THE PROGRAM IS WITH YOU. SHOULD THE PROGRAM PROVE DEFECTIVE, YOU ASSUME THE COST OF ALL NECESSARY SERVICING, REPAIR OR CORRECTION.
- IN NO EVENT UNLESS REQUIRED BY APPLICABLE LAW OR AGREED TO IN WRITING WILL ANY COPYRIGHT HOLDER, OR ANY OTHER PARTY WHO MAY MODIFY AND/OR REDISTRIBUTE THE PROGRAM AS PERMITTED ABOVE, BE LIABLE TO YOU FOR DAMAGES, INCLUDING ANY GENERAL, SPECIAL, INCIDENTAL OR CONSEQUENTIAL DAMAGES ARISING OUT OF THE USE OR INABILITY TO USE THE PROGRAM (INCLUDING BUT NOT LIMITED TO LOSS OF DATA OR DATA BEING RENDERED INACCURATE OR LOSSES SUSTAINED BY YOU OR THIRD PARTIES OR A FAILURE OF THE PROGRAM TO OPERATE WITH ANY OTHER PROGRAMS), EVEN IF SUCH HOLDER OR OTHER PARTY HAS BEEN ADVISED OF THE POSSIBILITY OF SUCH DAMAGES.
END OF TERMS AND CONDITIONS
How to Apply These Terms to Your New Programs
If you develop a new program, and you want it to be of the greatest possible use to the public, the best way to achieve this is to make it free software which everyone can redistribute and change under these terms.
To do so, attach the following notices to the program. It is safest to attach them to the start of each source file to most effectively convey the exclusion of warranty: and each file should have at least the "copyright" line and a pointer to where the full notice is found.
one line to give the program's name and an idea of what it does. Copyright (C) yyyy name of author
This program is free software; you can redistribute it and/or modify it under the terms of the GNU General Public License as published by the Free Software Foundation; either version 2 of the License, or (at your option) any later version.
This program is distributed in the hope that it will be useful, but WITHOUT ANY WARRANTY; without even the implied warranty of MERCHANTABILITY or FITNESS FOR A PARTICULAR PURPOSE. See the GNU General Public License for more details.

Software License
You should have received a copy of the GNU General Public License along with this program; if not, write to the Free Software Foundation, Inc., 51 Franklin Street, Fifth Floor, Boston, MA 02110-1301, USA.
Also add information on how to contact you by electronic and paper mail.
If the program is interactive, make it output a short notice like this when it starts in an interactive mode:
Gnomovision version 69, Copyright (C) year name of author Gnomovision comes with ABSOLUTELY NO WARRANTY: for details type 'show w'. This is free software, and you are welcome to redistribute it under certain conditions; type 'show c' for details.
The hypothetical commands 'show w' and 'show c' should show the appropriate parts of the General Public License. Of course, the commands you use may be called something other than 'show w' and 'show c'; they could even be mouse-clicks or menu items--whatever suits your program.
You should also get your employer (if you work as a programmer) or your school, if any, to sign a "copyright disclaimer" for the program, if necessary. Here is a sample; alter the names:
Yoyodyne, Inc., hereby disclaims all copyright interest in the program 'Gnomovision' (which makes passes at compilers) written by James Hacker.
signature of Ty Coon, 1 April 1989 Ty Coon, President of Vice
This General Public License does not permit incorporating your program into proprietary programs. If your program is a subroutine library, you may consider it more useful to permit linking proprietary applications with the library. If this is what you want to do, use the GNU Lesser General Public License instead of this License.

- LIQUID CRYSTAL MONITOR
- CONTENTS
- PART NAMES
- INTRODUCTION
- DIRECT BUTTON OPERATION
- ON-SCREEN DISPLAY MENU
- ENJOYING PHOTO/MUSIC/VIDEO PLAYBACK
- USING LINK OPERATION
- USING A PC
- USING THE INTERNET
- APPENDIX
- SPECIFICATIONS
- TRADEMARKS
- DIMENSIONAL DRAWINGS
- SOFTWARE LICENSE
- IMPORTANT INFORMATION
- INFORMATION ON THE DISPOSAL OF THIS EQUIPMENT AND ITS BATTERIES
- NOTE FOR USERS IN U.K. IMPORTANT
- DEAR SHARP CUSTOMER
- SAFETY PRECAUTIONS
- WARNING
- ESPECIALLY FOR CHILD SAFETY
- TIPS AND SAFETY INSTRUCTIONS
- THE POWER CORD
- LED BACKLIGHT
- MOUNTING PRECAUTIONS
- MONITOR (FOR PN-Q601/701/801 MODELS)
- MONITOR (FOR PN-Q901 MODEL)
- REMOTE CONTROL UNIT
- NOTE
- DISPLAYING AN EXTERNAL EQUIPMENT IMAGE
- INITIAL INSTALLATION
- LANGUAGE (LANGUAGE SETTING)
- INITIAL INSTALLATION (CONTINUE)
- COMPLETED
- EXAMPLES OF THE SETTINGS CONFIRMATION SCREEN
- CHANGING VOLUME
- MUTE
- APPS
- AUDIO
- SLEEP TIMER
- ①GUIDE DISPLAY
- INTRODUCTION (CONTINUED)
- ABOUT MENU ITEMS
- LCFONT
- ON-SCREEN DISPLAY MENU OPERATION
- MENU OPERATION BUTTONS
- INITIAL SETUP
- EASY SETUP
- LANGUAGE
- INITIAL SETUP (CONTINUE)
- INPUT SETTINGS
- HDMI AUTO VIEW
- DIGITAL AUDIO OUTPUT
- AUDIO SELECT
- OUTPUT SELECT
- INPUT SELECT
- INPUT SKIP
- RESET
- EXAMPLE
- INFORMATION
- IDENTIFICATION
- SOFTWARE UPDATE
- AUTO UPDATE SETTING
- MANUAL UPDATE
- INFORMATION (CONTINUE)
- CAUTION
- UPDATING THE SOFTWARE VIA THE NETWORK
- MANUAL
- PICTURE SETTINGS
- AV MODE (CHANGING PIC.QUALITY)
- PICTURE SETTINGS (CONTINUE)
- AUTOMATIC LIGHT SENSOR (LIGHT SENSOR)
- ADVANCED
- DIGITAL NOISE REDUCTION
- C.M.S
- COLOR TEMP. (COLOR TEMPERATURE)
- MIDDLE
- FINE TUNING THE COLOR TEMPERATURE
- ACTIVE CONTRAST
- FILM MODE (3:2 PULL-DOWN)
- MONOCHROME
- AUDIO SETTINGS
- SURROUND
- AUTO VOLUME
- NETWORK SETTINGS
- DASHBOARD
- WIRED SETUP
- IP CONTROL
- NETWORK SETTINGS (CONTINUE)
- WAKE ON LAN
- SYSTEM OPTIONS
- POWER CONTROL
- NO SIGNAL OFF
- NO OPERATION OFF
- SYSTEM OPTIONS (CONTINUE)
- AUDIO ONLY
- CHANGE CC
- CAPTION SETUP
- STARTUP SCREEN
- FRONT INDICATOR LIGHT
- AUTO PLAY
- PUBLIC MODE
- HOW TO START PUBLIC MODE SETUP SCREEN
- PROCEDURE
- HOW TO EXIT FROM PUBLIC MODE SETUP SCREEN
- PUBLIC MODE MENU
- HOW TO USE USB CLONE
- ON SETTING ITEMS
- MAXIMUM VOLUME
- VOLUME FIXED
- SYSTEM OPTIONS (CONTINUED)
- PREPARATION
- CONNECTING A USB MEMORY DEVICE/USB HARD DRIVE
- CONNECTING A HOME NETWORK SERVER
- SELECTING THE FOLDERS TO PLAY BACK
- PLAYING BACK FILES ON A USB MEMORY DEVICE/HOME NETWORK SERVER
- PHOTO MODE
- VIEWING THUMBNAILS
- PLAYING BACK FILES ON A USB MEMORY DEVICE/HOME NETWORK SERVER (CONTINUED)
- SLIDE SHOW
- PLAYING BACK FILES ON A USB MEMORY DEVICE/HOME NETWORK SERVER (CONTINUE)
- CONTROLLING HDMI EQUIPMENT USING LINK OPERATION
- WHAT'S LINK OPERATION
- CONTROL THE LINK-COMPATIBLE AUDIO SYSTEM
- CONTROLLING HDMI EQUIPMENT USING LINK OPERATION (CONTINUE)
- HDMI CEC LINK
- LINK OPERATION
- AUTO POWER ON
- AUDIO RETURN CHANNEL
- REQUIREMENTS FOR USING AN ARC-COMPATIBLE AV AMPLIFIER
- LINK OPERATION MENU
- DEVICE POWER ON/OFF
- ENTER
- LINK OPERATION MENU (CONTINUED)
- SHOW START MENU
- CHANGE AUDIO OUTPUT DEVICE
- HDMI DEVICE SELECTION
- USING A SMARTPHONE WITH THE MONITOR
- AUTO INPUT SELECTION
- OPERATION USING THE REMOTE CONTROL
- ADJUSTING THE PC IMAGE
- FINE SYNC
- X
- SETTING AUDIO INPUT
- HDMI
- CONTROL OF THE MONITOR
- DETAILED SETTINGS
- DEVICE NAME SETTING
- COMMUNICATION CONDITIONS FOR IP
- COMMUNICATION CONDITIONS FOR RS-232C
- COMMUNICATION PROCEDURE
- CONTROL OF THE MONITOR (CONTINUE)
- COMMAND FORMAT
- PARAMETER
- RESPONSE CODE FORMAT
- COMMAND TABLE
- CONNECTING TO THE INTERNET
- ENTERING TEXT (SOFTWARE KEYBOARD)
- ↑SHIFT
- ENTERING TEXT (SOFTWARE KEYBOARD) (CONTINUED)
- CLEAR
- CLOSE
- USING THE BROWSER
- BUTTONS FOR USING THE BROWSER
- EXIT
- RETURN
- USING THE APPLICATION WINDOW
- DURING DOCK DISPLAY
- MOVE THE ICONS
- USING THE BROWSER (CONTINUED)
- USING THE TOOLBAR
- BROWSING WEB CONTENTS
- ABOUT LINKS
- BROWSER SETTINGS
- USING KEYBOARD AND MOUSE
- REMOVING THE STAND
- SETTING THE MONITOR ON THE WALL
- SETTING THE MONITOR ON THE WALL (CONTINUE)
- WALL MOUNT KIT SPECIFICATIONS
- SETTING THE MONITOR ON THE WALL (CONTINUED)
- TROUBLESHOOTING (CONTINUED)
- PROBLEM POSSIBLE SOLUTION
- C-ARES
- ICU
- MPG
- FONTCONFIG
- EXPAT
- QT (INCLUDING WEBKIT)
- OPENSSL
- GNU GENERAL PUBLIC LICENSE
- PREAMBLE
- NO WARRANTY
- END OF TERMS AND CONDITIONS
Brand : SHARP
Model : PNQ601K
Category : Screen