
JTF8500XL - Waste press WHIRLPOOL - Free user manual and instructions
Find the device manual for free JTF8500XL WHIRLPOOL in PDF.


| Product Type | Waste press (Trash compactor) |
| Brand | Whirlpool |
| Model | JTF8500XL |
| Dimensions (H x W x D) | 34.5 x 15 x 22 inches |
| Weight | 85 lbs |
| Power Supply | 120V, 60Hz, 15A |
| Capacity | 1.5 cubic feet (holds 35-40 lbs of trash) |
| Compaction Ratio | 4:1 (reduces trash volume by 75%) |
| Cycle Time | Approximately 10 seconds |
| Motor Type | ½ HP induction motor |
| Noise Level | 65 dB (normal operation) |
| Safety Features | Key lock, safety interlock on drawer, anti-jam mechanism |
| Installation Type | Built-in or free-standing (requires cutout under counter) |
| Control Type | Push button start with indicator light |
| Finish | White or black (optional trim kit) |
| Drawer Opening | Soft-close, full-extension drawer with handle |
| Maintenance | Wipe interior with damp cloth; air freshener pack included |
| Included Accessories | Trash bag adaptor ring, 2 air freshener cartridges |
| Certifications | ETL listed, Energy Star qualified |
| Warranty | 1 year parts and labor |
Frequently Asked Questions - JTF8500XL WHIRLPOOL
User questions about JTF8500XL WHIRLPOOL
0 question about this device. Answer the ones you know or ask your own.
Ask a new question about this device
Download the instructions for your Waste press in PDF format for free! Find your manual JTF8500XL - WHIRLPOOL and take your electronic device back in hand. On this page are published all the documents necessary for the use of your device. JTF8500XL by WHIRLPOOL.
USER MANUAL JTF8500XL WHIRLPOOL

TRASH MASHER® Compactor
Model JTF8500XL
Safety First
- Read all instructions before using your compactor.
- Do not let children operate or play with your compactor. Anything placed in the unit will be crushed or compacted.
- Keep the compactor locked when it's not in use. Remove the key knob to a safe place.
- Always place glass bottles, etc., on their sides in the center of the drawer so the waste-paper below and beside the bottle can help keep broken glass near the center of the bag, away from bag sides.
- Always handle a filled compactor bag with care. Never lift it by the sides. Broken glass or other sharp objects in the bag can cause injury.
- Always carry a filled compactor bag by the folded top or a bag carrier. Watch out for glass that may have cut through the bag sides.
- Always use the compactor only for the purpose it was designed to do.
- Do not use the compactor as a counter for electrical cooking appliances nor as a cutting board.
- Do not set hot pans, etc., on the compactor top.
- Do not spill any liquids on compactor top.
• Always wipe off any broken glass before touching the ram cover. - Do not shove items down into the compactor with hands or feet. To avoid being cut, let the compactor do the compacting.
- Do not compact any container or material which might contain poisonous or explosive products.
- Do not compact cloths or cans containing paint liquids, thinners, etc. which could create a fire hazard.
Installation Safety
• OBSERVE ALL GOVERNING ELECTRICAL CODES AND ORDINANCES.
- Be sure your compactor is electrically grounded in an approved manner.
- Do not remove the power supply cord ground prong.
- Do not use an extension cord.
- Use care when leveling your compactor, so that the unit does not drop on your hand.
- Use care when changing front panels. As with any cut metal edges, they could cause injury if handled carelessly.
- Never operate the compactor when the drawer handle is removed.
- Be sure your compactor is properly installed in an appropriate level area and a place suitable for the size, function and protection of the compactor.
- SAVE THE INSTALLATION INSTRUCTIONS FOR FUTURE REFERENCE.
Before You Use Your Compactor
It is your personal responsibility and obligation to be sure your compactor:
- Has been installed where it is protected from the elements
- Has been installed on a floor strong enough to support its weight.
• Is properly maintained.
- Has not been installed where flammable materials are stored or used. Fumes from these materials may result in a fire or explosion.
Your TRASH MASHER® Compactor
Model JTF8500XL
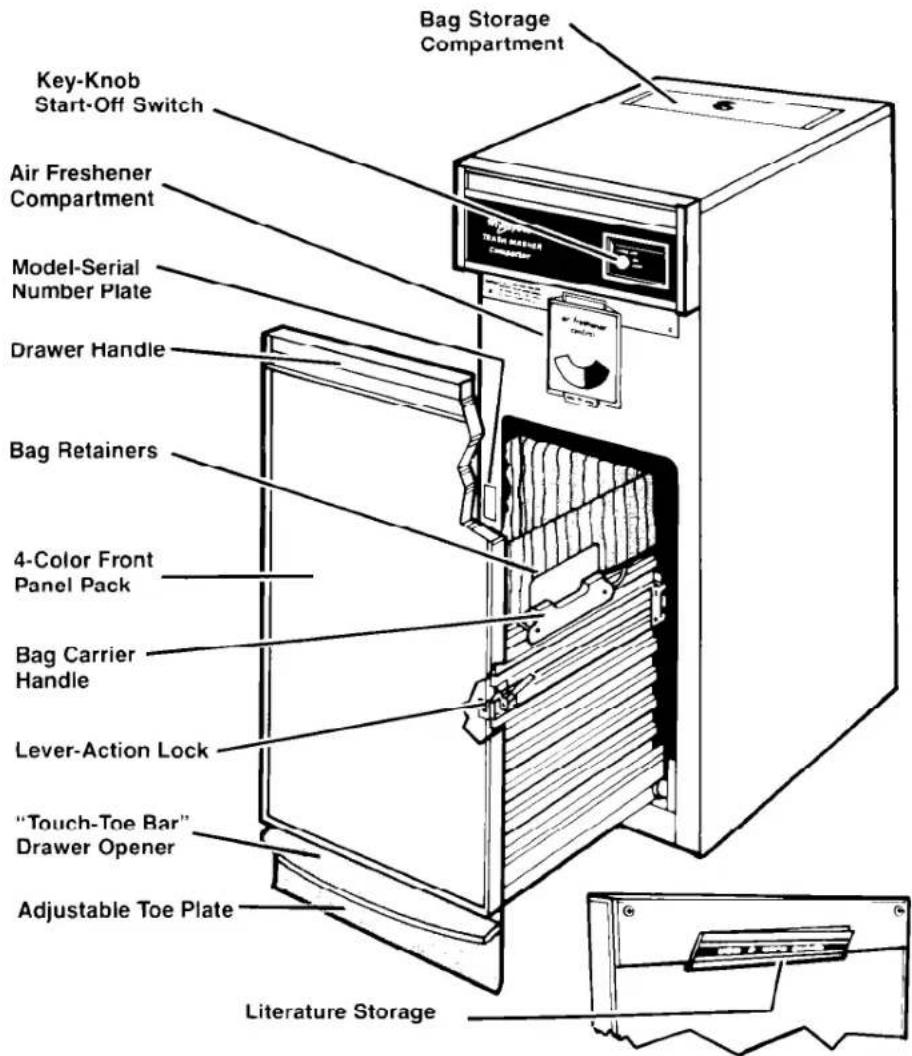
Now is the time... to fill in the spaces below. You will need this information if you call for service or assistance. Record all letters and numbers.
There is no warranty registration card to be returned.
Model No
Serial No
Purchase Date
Service Company Telephone No
SAVE THESE INSTRUCTIONS
*Trademarks WI HIRLPOOL and TRASH MASHER in Canada Used by Authority of Canadian Trademark Owner, WHIRLPOOL CORPORATION, U.S.A.
1. Open the drawer.
Lift and pull the handle or press the Touch-Toe Bar to open the drawer.


2. Put in the trash.
- Load almost any kind of trash.
- Wrap or cover wet or messy trash
- Load bottles or cans on their sides in the center of the drawer.
DO NOT compact:
- Any container or aerosol cans which might contain poisonous or explosive products.
- Cloths or cans containing paint liquids, thinners, etc. which would create a fire hazard.
- Items that may develop offensive odors such as raw meat, fish, grapefruit rinds, disposable diapers, or personal hygiene items.
NOTE: Your TRASH MASHER® Compactor is designed for household use only.
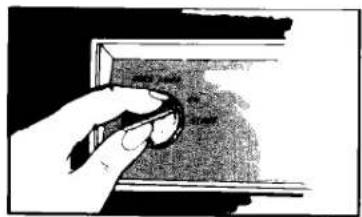
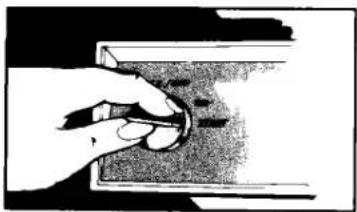
3. Close the drawer; turn the key-knob to START; let the knob go.
• The compactor will stop at the end of the cycle.
- To remove the key-knob, turn it to LOCK/OFF. Remove and store in safe place out of children's reach.
- To stop the compactor during a cycle, turn the key-knob to LOCK/OFF. Then turn it to ON. The compacting ram will rise. When it stops rising, you can open the drawer.

Air Fresheners
The Air Freshener Control is designed to help control odors that might develop in the trash. There are many solid air fresheners available on the market.

- Raise the door
- Put in solid air freshener
- Set dial to NORMAL
- Move to MAXimum or MINimum if needed
How the compactor works

The compacting ram does not go to the drawer bottom. You will not see compacting of the first few loadings.

Compaction starts after the drawer is about 1/2 full. You may hear a noise when glass breaks. Strong glass bottles may not break at all.

The trash in a full compac-tor bag will be about 1/4 the size of its original bulk.
Removing a filled bag
When the compactor bag is full, follow these steps to remove it.

- Pull all four bag cuffs up.
- Tuck in slotted sides.
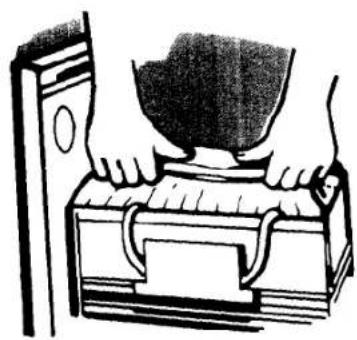
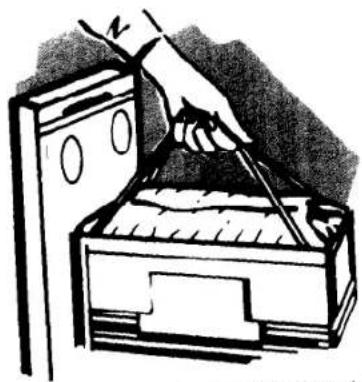
- Bring top edges together and roll or fold to close bag.
- Remove bag carrier handles from side retainers and hold.
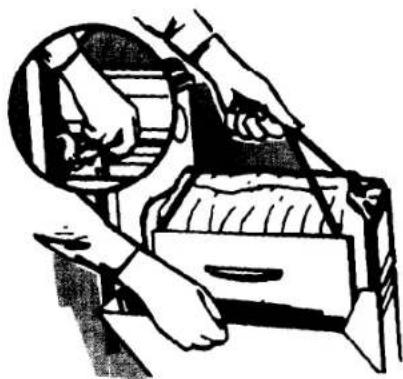

- Push side-lock latch down and tilt drawer side open.
- Use bag carrier to lift out bag and carry it away. Be careful. Bits of glass may stick through the bag.
Installing a new bag

- Be sure the drawer side is securely locked.
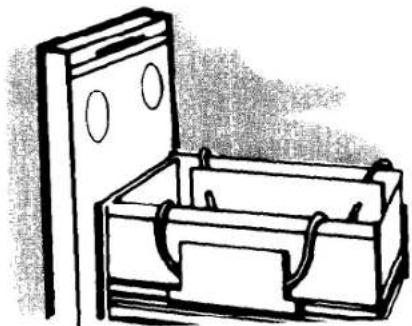
- Fit the bag caddy in the drawer. Tuck the rope handles behind the bag retainers as shown.
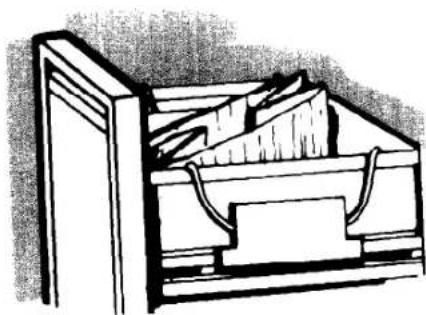
- Put unopened bag in drawer as shown. Spread front bag corners and slide cuff over right-front corner.
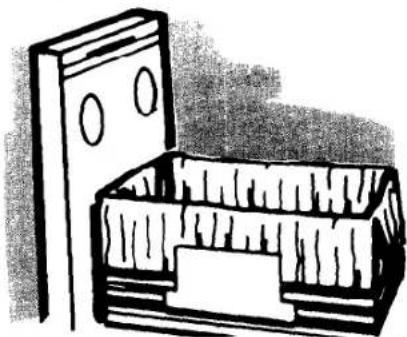
- Spread rear bag corners and slide cuff over left-rear corner. Tuck cuffs behind bag retainers as shown.
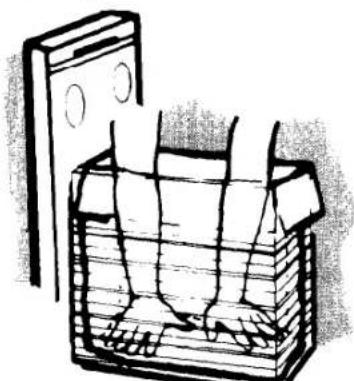
- Press inside of bag against drawer bottom, sides and corners for smooth fit.

- Store extra bags in the bag storage compartment in the top at the back.
DO NOT USE ANY KIND OF BAG OTHER THAN THE PLASTIC-LINED PAPER BAGS DESIGNED ESPECIALLY FOR USE IN YOUR COMPACTOR. TRASH MASHER* Compactor bags may be purchased from your Whirlpool Appliance Dealer (Part No. 675186) or from Whirlpool Corporation, LaPorte Division, 1900 Whirlpool Drive. LaPorte, Indiana 46350
CARING
for your TRASH MASHER® Compactor
As is true of most appliances proper care is needed to give you continued satisfaction.

Clean exterior surfaces
- Wipe with warm, sudsy water and a damp cloth. Rinse. Dry with a soft cloth.
- Wipe up spills right away. Some foods can mar the finish if left on the top.
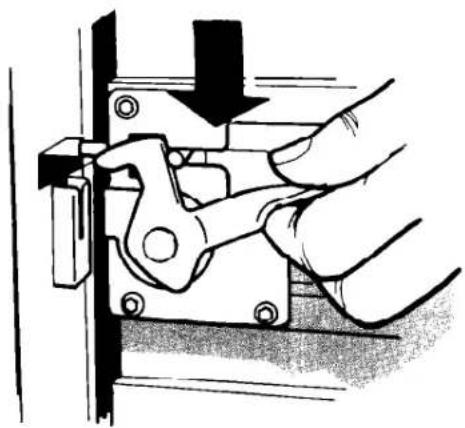
Tilt the drawer side open
- Press side-lock latch down.
- Hold latch and tilt side of drawer until the latch clears the drawer front

Clean inside the drawer
- Wear rubber gloves. There may be bits of glass in the drawer.
- Wash with a damp cloth using warm, sudsy water. Rinse. Dry with a soft cloth.
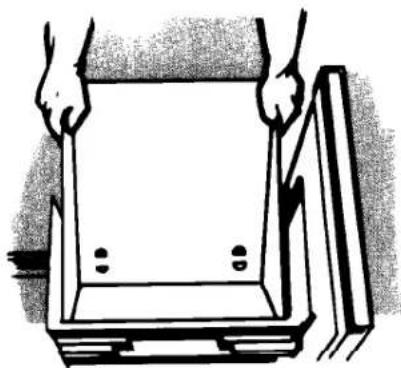
Removing and replacing the drawer side
- To remove the drawer side, tilt it out. Then lift it out.
- To replace it, slide it back, tilted. Press the latch down while pushing the side to upright position.
- Lock the latch.
If you will be away for more than a couple of days, remove the compactor bag. Lock the compactor and remove the key-knob. Store the key-knob in a safe place.

To remove and replace the air freshener compartment
• To remove it, lift cover and pull.
- To replace it, set in the bottom first. Then snap in the top
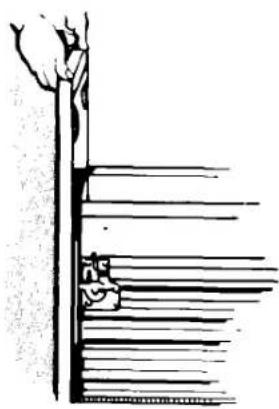
To clean inside the cabinet, remove the drawer
- Pull the drawer out until it stops.
- Note the tracks in which the drawer rollers move.
- Lift the front to clear the drawer stops.

Wipe off the ram cover
- WEAR RUBBER GLOVES.
- Wipe glass particles off ram cover with a cloth or paper towels.
- Use warm sudsy water to remove foods. Rinse Dry with soft cloth.

- Grasp the drawer on the sides.
• Pull it out the rest of the way. - Set it down gently.
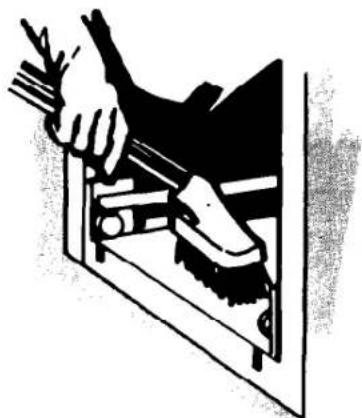
Clean inside the cabinet
- WEAR RUBBER GLOVES.
• Vacuum inside of cabinet - Wash, rinse and dry inside.
- Replace drawer.
Changing your compactor's color
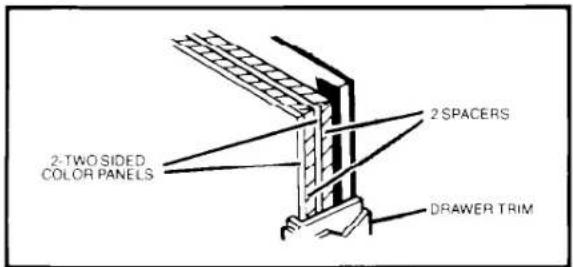
Behind the color panel on the front of your compactor's drawer are one or two extra panels, depending on the model you have. Each of the panels has a different color on each of its sides, so you have a choice of four or six colors for the front. The Consumer Buy Guide label lists the color choices.
To change the color of your compactor's front panel, follow the directions below. All you need is a medium-sized screwdriver.
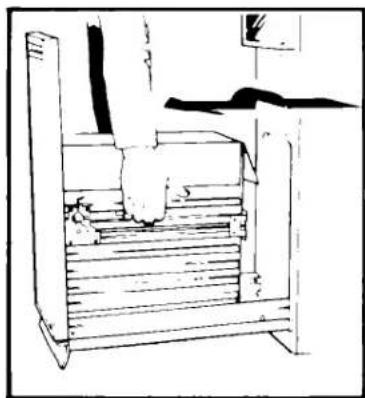
- Slide out drawer until it stops.
- Lift front to clear stops.
• Pull straight out.
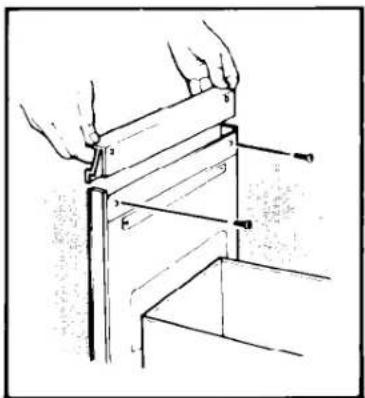
- Remove two screws shown.
- Remove handle.
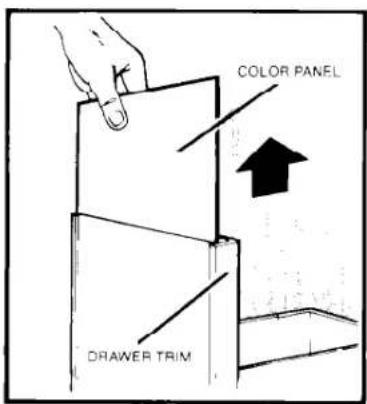
- Remove the color panel you want.
- Be careful—edges may be sharp.
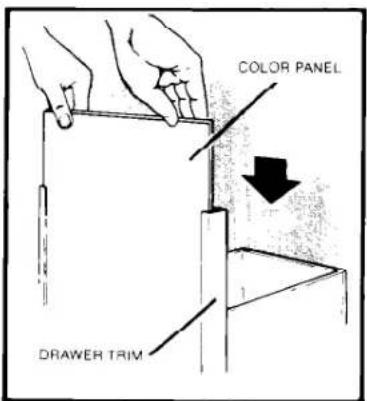
• Install desired color panel in front, behind drawer trim.
- Reinstall the remaining color panel between spacers.
- Make sure panels are all the way down.

Option: Match your kitchen's color scheme by replacing color panels with your own creation (wallpaper, panelling). See "Installation Instructions."
- WARNING: REPLACE HANDLE BEFORE OPERATING COMPACTOR TO AVOID INJURY FROM MOVING PARTS.
- Replace the drawer:
—Put drawer rollers over stops in the drawer guides.
—Slide drawer back to stops.
—Lift front of drawer to clear stops.
—Slide it all the way in.
INSTALLATION INSTRUCTIONS
BEFORE YOU BEGIN, READ THE FOLLOWING INSTRUCTIONS COMPLETELY AND CAREFULLY. THEY WILL SIMPLIFY THE INSTALLATION.
Before you use your TRASH MASHER compactor...
Be sure your compactor is properly installed in an appropriate level area and a place suitable for the size, function and protection of the compactor.
ELECTRICAL REQUIREMENTS
Observe All Governing Codes and Ordinances.
A 120 Volt, 60 Hz. AC only 15 Ampere fused electrical supply is required (time delay fuse or circuit breaker is recommended). It is recommended that a separate circuit serving only this appliance be provided. DO NOT use an extension cord.
Electrical ground is required on this appliance.
DO NOT, UNDER ANY CIRCUMSTANCES, REMOVE THE POWER SUPPLY CORD GROUND PRONG.
RECOMMENDED GROUNDING METHOD
For your personal safety, this appliance must be grounded. This appliance is equipped with a power supply cord having a 3-prong grounding plug. To minimize possible shock hazard, the cord must be plugged into a mating 3-prong grounding type wall receptacle, grounded in accordance with the National Electrical Code and local codes and ordinances. If a mating wall receptacle is not available, it is the personal responsibility and obligation of the customer to have a properly grounded 3-prong wall receptacle installed by a qualified electrician. See Figure 1.
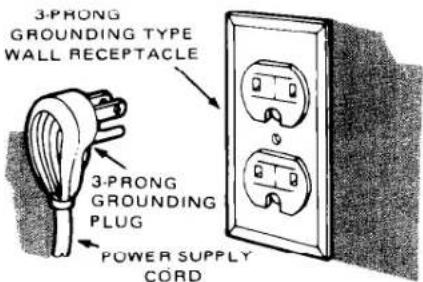
Figure 1 RECOMMENDED GROUNDING METHOD
INSTALLATION INSTRUCTIONS
- After removing the shipping carton, be sure to remove all protective materials such as tape, shipping pads, etc.
NOTE: Waxy residue from protective shipping material may be removed from compactor with a mild solution of liquid household cleaner and water. - Open the drawer and remove materials shipped in the container.
- Remove the drawer as shown:
A. Grip handle and raise front of drawer until it clears stops. See Figure 3.

Figure 3

Figure 4
B. Grasp side ridges of the drawer front and lift drawer out. See Figure 4.
- Lay two carton corner posts or other protective material (such as a throw rug) on the floor, then lay the unit on either of its sides on the corner posts. The corner posts will protect the finish of the compactor and the floor. See Figure 5.
NOTE: Do not truck or handle by console.

Figure 5
- Remove the cardboard shipping pad located on the bottom. See Figure 5.
NOTE: Do not move or slide the compactor on the floor until the feet have been pre-adjusted. Pre-adjust the leveling feet, by turning them part way out.
A suitable hand tool may be required to pre-adjust the leveling feet. - Stand compactor upright.
The compactor's overall dimensions are: Height 34 1/2 (87.3 cm), Depth 24" (61 cm), Width 15" (38.1 cm). In installing your compactor it is desirable to leave at least 6 inches (15 cm) clearance from the right edge of the drawer front for convenient bag removal. Also allow 23 inches (58.4 cm) in front of the appliance for drawer removal. - Put extra key-knob in a safe place
- Move compactor to its permanent operating location.
- For best drawer operation, place a small level on the top of the unit and adjust the 4 leveling feet as needed.
CAUTION: Use care so that the compactor does not drop on your hand. - To replace the drawer, grasp side ridges of the drawer (Figure 4). Place drawer onto tracks lifting the front to clear stops (Figure 3). Close drawer.
- Plug the power supply cord into the grounded receptacle.
- See Use and Care Instructions for complete details on how to operate and care for your TRASH MASHER compactor.
NOTE: If space is available (check the measurements), a Free Standing Compactor may be installed in a recessed area.
Using a Freestanding Compactor in a Recessed Area.
Measure the recessed area you wish to install the compactor in. It must be at least 34 1/2 " (87.6 cm) high, 24" (61 cm) deep, and 15 1/8 " (38.4 cm) wide.
The recess must have a grounded outlet at least 18" (45 cm) above the floor.
Install the cord clip on the cord, and attach the clip to the rear of the cabinet as shown in Figure 12.

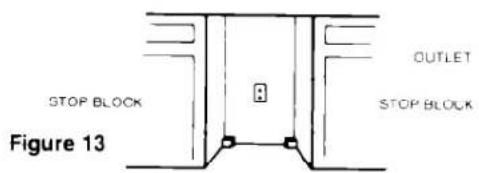
To prevent the power supply cord from being pinched, or the power supply cord plug from being crushed, install a stop block at the lower rear corners of the recessed opening. The blocks should be at least 11/2 " (1.27 cm) deep by 2" (5.1 cm) wide, by 2" (5.1 cm) high. See Figure 13 for details.
NOTE: Measure the front to back distance of the opening. To have the front of the compactor cabinet align with the adjacent cabinets, the stop block may need to be more than 1/2 " (1.27 cm) deep. Subtract 23" (58.4 cm) from the depth of the opening. This is the depth dimension of the stop block.
After the recessed installation area is prepared:
- Level the compactor as needed.
- Remove the compactor from the opening and plug the power supply cord into the grounded outlet.
- Slide the compactor back into the recess until the compactor is against the stop blocks.
Adjustable Toe Plate
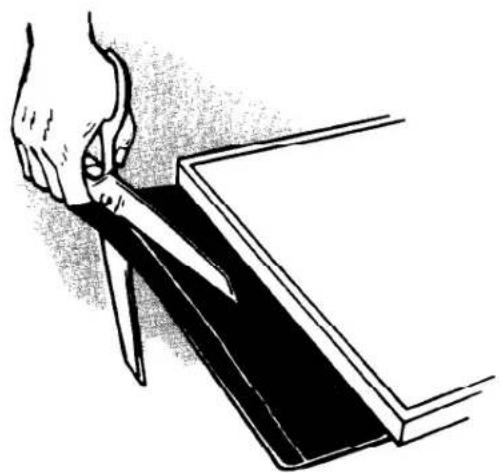
In some installations, the top plate may rub the floor covering. If this occurs, the top plate clearance may be changed as follows:
- Determine the amount of interference of the toe plate with the floor covering.
- Slide the drawer from the unit. (Refer to Step 3 of the Installation Instructions.)
- Lay drawer so the front panel faces upward.
- With a ruler and a pencil or chalk, draw a line where the top plate interferes with the floor covering.
- Use a pair of scissors and cut toe plate along this line.
- Replace drawer in unit.
BEFORE YOU CALL FOR SERVICE
If your compactor does not seem to be operating properly, check the following before calling for service.
If the compactor won't operate:
- Is the electric cord securely plugged in?
- Have you checked the main fuse or circuit breaker box?
• Is the drawer completely closed? - Is the key-knob turned all the way to START before it is released?
If compactor stops during operation:
- Push drawer in while turning key-knob to start. Repeat if necessary. Rearrange trash load—do not load rigid items at front of drawer.
Trash not compacted:
- Drawer must be at least 1/3 full to to see compaction.
Not enough compaction or force:
- Compacting works best when only a few items are loaded. Use the compacting cycle frequently.
Bottles don't break:
- Not all bottles will break every time, depending upon trash load below it.
Drawer won't open:
- Make sure drawer is closed. Turn key-knob to START. Drawer will open only when the ram is all the way up.
Service...
It's reassuring to know that Inglis Limited stands behind your Whirlpool appliance with its network of 20 branches and over 560 service depots. Service by Inglis is designed to fulfill your Warranty and provide after-warranty service and maintenance to keep your new Whirlpool appliance in top notch condition, anywhere in Canada. Inglis wants you to get the service that you would expect on quality Whirlpool home appliances.
If you move...
To make sure that your Whirlpool appliance is correctly installed and to insure its continued satisfactory operation, please telephone Inglis Direct Factory Service Branch, or the nearest service organization authorized by Inglis to service Whirlpool products. (Installation cost will, of course, be paid by you.)
Or, if you need service...
- Contact your Whirlpool appliance dealer from whom you purchased the appliance or consult your local telephone directory for the nearest service organization authorized by Inglis to service Whirlpool products.
- If you can't find him in the Yellow Pages, call your Inglis Direct Factory Service branch.
REMEMBER...Please include the complete model and serial number of your appliance when requesting service. Also, retain your sales slip and Warranty to verify your warranty status.
Learn the benefits of Inglis service for maintaining the quality originally built into your WHIRLPOOL appliance.

Making your world a little easier.
Distributed by: Inglis Limited, 1901 Minnesota Court, Mississauga, Ontario L5N 3A7 • Branches Across Canada *Trademarks in Canada, Use by Authority of Canadian Trademark Owner, WHIRLPOOL CORPORATION, U.S.A.


- TRASH MASHER® COMPACTOR
- SAFETY FIRST
- INSTALLATION SAFETY
- BEFORE YOU USE YOUR COMPACTOR
- YOUR TRASH MASHER® COMPACTOR
- MODEL JTF8500XL
- SAVE THESE INSTRUCTIONS
- OPEN THE DRAWER
- PUT IN THE TRASH
- DO NOT COMPACT
- CLOSE THE DRAWER; TURN THE KEY-KNOB TO START; LET THE KNOB GO
- AIR FRESHENERS
- HOW THE COMPACTOR WORKS
- REMOVING A FILLED BAG
- INSTALLING A NEW BAG
- CARING
- FOR YOUR TRASH MASHER® COMPACTOR
- CLEAN EXTERIOR SURFACES
- TILT THE DRAWER SIDE OPEN
- CLEAN INSIDE THE DRAWER
- REMOVING AND REPLACING THE DRAWER SIDE
- TO REMOVE AND REPLACE THE AIR FRESHENER COMPARTMENT
- TO CLEAN INSIDE THE CABINET, REMOVE THE DRAWER
- WIPE OFF THE RAM COVER
- CLEAN INSIDE THE CABINET
- CHANGING YOUR COMPACTOR'S COLOR
- INSTALLATION INSTRUCTIONS
- BEFORE YOU BEGIN, READ THE FOLLOWING INSTRUCTIONS COMPLETELY AND CAREFULLY. THEY WILL SIMPLIFY THE INSTALLATION
- BEFORE YOU USE YOUR TRASH MASHER COMPACTOR
- ELECTRICAL REQUIREMENTS
- ELECTRICAL GROUND IS REQUIRED ON THIS APPLIANCE
- RECOMMENDED GROUNDING METHOD
- USING A FREESTANDING COMPACTOR IN A RECESSED AREA
- ADJUSTABLE TOE PLATE
- BEFORE YOU CALL FOR SERVICE
- IF THE COMPACTOR WON'T OPERATE
- IF COMPACTOR STOPS DURING OPERATION
- TRASH NOT COMPACTED
- NOT ENOUGH COMPACTION OR FORCE
- BOTTLES DON'T BREAK
- DRAWER WON'T OPEN
- SERVICE
- IF YOU MOVE
- OR, IF YOU NEED SERVICE
Brand : WHIRLPOOL
Model : JTF8500XL
Category : Waste press