
TC8750X - Waste press WHIRLPOOL - Free user manual and instructions
Find the device manual for free TC8750X WHIRLPOOL in PDF.


| Product Type | Waste Compactor |
| Model | TC8750X |
| Brand | Whirlpool |
| Installation | Built-in under counter |
| Overall Width | 15 inches (38.1 cm) |
| Overall Height | 34.5 inches (87.6 cm) |
| Overall Depth | 24 inches (61 cm) |
| Net Weight | 95 lbs (43 kg) |
| Power Supply | 120V, 60 Hz, 15 A |
| Motor Power | 1/3 HP |
| Compaction Force | 3000 lbs |
| Container Capacity | 0.9 cubic feet (25.5 L) |
| Maximum Waste Capacity (Pre-Compaction) | Approximately 30 gallons |
| Cycle Time | 15 seconds |
| Noise Level | 50 dB |
| Safety Features | Safety switch, automatic shutoff, anti-jam mechanism |
| Maintenance | Wipe with damp cloth; clean container monthly |
| Spare Parts Availability | Motor, container, ram, switches available |
| Repairability Index | 7.5/10 |
| Energy Consumption | 0.1 kWh per cycle |
Frequently Asked Questions - TC8750X WHIRLPOOL
User questions about TC8750X WHIRLPOOL
0 question about this device. Answer the ones you know or ask your own.
Ask a new question about this device
Download the instructions for your Waste press in PDF format for free! Find your manual TC8750X - WHIRLPOOL and take your electronic device back in hand. On this page are published all the documents necessary for the use of your device. TC8750X by WHIRLPOOL.
USER MANUAL TC8750X WHIRLPOOL
Use & Care Guide

COMPACTORS
MODEL SERIES
TC8700X TC8750X TC4700X TU4700X
5/95
Contents
Page
Grounding Instructions 2
Important Safety Instructions 3
Additional safety instructions 3
Using Your Compactor 4
Removing a filled bag 6
Installing a new bag 8
How Your Compactor Works 10
Caring For Your Compactor 11
Changing Your Compactor's Color 13
If You Need Service Or Assistance 14
Whirlpool Compactor Warranty 16
©1992 Whirlpool Corporation
Thank you for buying a Whirlpool appliance. Please complete and mail the Owner Registration Card provided with this product. Then complete the form below. Have this information ready if you need service or call with a question.
- Copy model and serial numbers from plate (see diagram on front cover) and purchase date from sales slip.
- Keep this book and sales slip together in a handy place.
Model Number
Serial Number
Purchase Date
Service Company Phone Number
Grounding Instructions
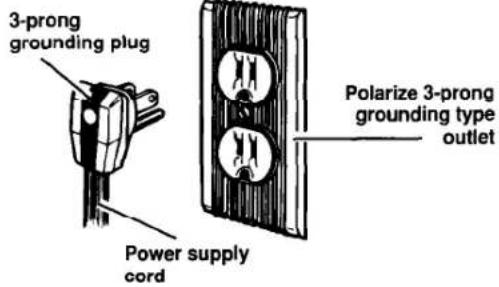
The compactor is for use on a single phase, 115-volt, 60 Hz, AC only 15 or 20 ampere fused and properly grounded circuit and is equipped with a grounding plug as shown above. Time delay fuse or circuit breaker is recommended. It is recommended that a separate circuit serving only this appliance be provided. For your personal safety, the compactor must be grounded. In the event of an electrical short circuit, grounding reduces the risk of electric shock by providing an escape wire for the electric current. This appliance is equipped with a polarized 3-prong grounding plug. It must be plugged into a correctly polarized mating 3-prong grounding type outlet, properly installed and grounded in accordance with the National Electrical Code and local codes and ordinances. No adapter should be used with this appliance.
WARNING
Electrical Shock Hazard
Do not modify the power supply plug provided with the compactor. If it will not fit the outlet, or if you are in doubt as to whether the wall outlet is properly grounded, check with a qualified electrician.
Failure to do so could result in electrical shock or personal injury.
Important Safety Instructions
WARNING
To reduce the risk of fire, electric shock, or injury to persons when using your compactor, follow basic precautions, including the following:
- Read all instructions before using the compactor.
- Close supervision of children is necessary when the compactor is used near children.
- Do not allow compactor to be used as a toy, or to run unattended at any time. Lock the Key-Switch or Key-Knob when not in use and store key out of reach of children.
- Do not touch moving parts.
• Have appliance examined, repaired or adjusted by an authorized serviceman. - Do not compact:
-lighted cigarettes, cigars or other hot or burning items.
-any container or aerosol can containing insecticide, hair spray, paint, engine starting fluid or other poisonous, toxic, or explosive products.
-volatile flammable material such as oily rags, thinner, etc., which would create a fire hazard or explosion. - Do not take apart this appliance. Incorrect reassembly can cause electric shock when subsequently used.
-
Use only for intended use as described in this manual. Do not use other than manufacturer's recommended attachments.
-
Never lift the bag by the sides. Broken glass or other sharp objects in the bag can cause injury.
- This compactor is designed for household use only.
- Unplug compactor from electrical outlet before servicing.
• The compactor must be electrically grounded. See the grounding instructions. - Do not overload trash bag with heavy material such as glass.
- Never operate the compactor if:
-it is not working right.
-it is damaged.
-parts are missing.
-the cord set, plug or motor is damaged in any manner. - Never use or store flammable fluids (dry cleaning solvents, gasoline, kerosene, etc.) in or near your compactor. These substances give off vapors that can create a fire hazard or explosion.
• See Installation Instructions.
-SAVE THESE INSTRUCTIONS-
Additional safety instructions and your responsibilities
- Do not shove items down into the compactor with hands or feet. Let the compactor do the compacting.
• Always place glass bottles, etc., on their sides in the center of the drawer. The waste paper below and beside the bottle can help keep broken glass near center of bag. - Do not use the compactor as a counter for electrical cooking appliances nor as a cutting board (freestanding models only).
-
Do not install or store compactor where it will be exposed to the weather.
-
You are responsible for making sure that your compactor:
-is used only for jobs normally expected of home compactors.
—is properly installed and leveled on a floor that can support its weight. - Do not set hot pans, etc., on the compactor top. Do not spill any liquids on the compactor top (freestanding models only).
Using Your Compactor
The drawings in this book may vary slightly from your compactor model. They are designed to show the different features of all the models covered by this book.
NOTE: Your model may not include all the features shown.
WARNING
Fire or Personal Injury Hazard
- Do not compact any container, aerosol cans or cloths which might contain insecticide, hair spray, engine starting fluid, paints, liquids, thinners or any other poisonous or explosive products. Failure to do so may result in a fire hazard or explosion.
- Broken glass or sharp edges may be present in trash. Do not shove items down into compactor with feet or hands. Failure to do so may result in personal injury.

natural_image
Illustration showing a hand inserting a cable into a device, with no visible text or symbols.Open the drawer
Lift and pull the handle or press the Touch-Toc Bar to open the drawer.
Put in the trash
- Wrap or cover wet or messy trash.
- I pad bottles or cans on their sides in the center of the drawer.
- Do not compact items that may develop offensive odors such as raw meat, fish, grapefruit rinds, disposable diapers, or personal hygiene items.
Close the drawer
Push drawer in until it stops.
TC4700/TU4700 Model series


To start the compactor
- Turn the Key-Knob to START.
- Let the Key-Knob go. The compactor will stop at the end of the cycle.
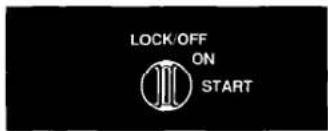



To stop the compactor during a cycle
- Turn the Key-Knob to LOCK/OFF.
- Turn the Key-Knob to ON. The compacting ram will rise.
- When the ram stops rising, you can open the drawer.
To remove the Key-Knob
- Turn the Key-Knob to the LOCK/OFF position.
- Remove and store key in a safe place out of children's reach.
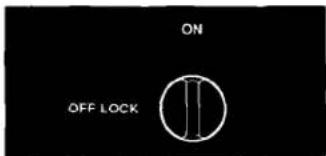
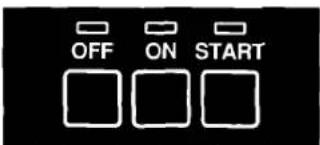
TC8700/TC8750 Model series
To start the compactor
-
Open the drawer. Turn the On-Off Key-Switch to ON.
-
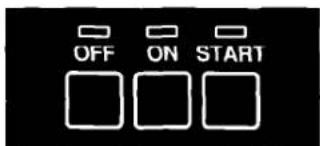
Press the ON control pad.
- Press the START control pad. The compactor will stop at the end of the cycle.
To stop the compactor during a cycle
- Press the OFF control pad.
- Press the ON control pad. The compacting ram will rise.
- When the ram stops rising, you can open the drawer.
To remove the Key-Switch
- Turn the Key-Switch to the OFF/LOCK position.
- Remove and store key in a safe place out of children's reach.
Using Your Compactor Continued
Removing a filled bag
When the trash is compacted to the top of the drawer, remove the bag. If the bag is too heavy, compact less trash before emptying in the future.
WARNING
Personal Injury Hazard
Sharp objects may protrude through bag after removal from compactor. Handle bag carefully. Failure to do so may result in personal injury.

natural_image
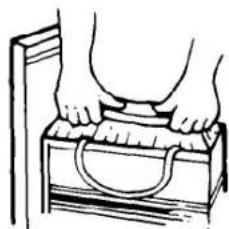
Illustration of hands handling a box with a handle, no text or symbols presentIf you are using paper compactor bags:
- Pull the drawer completely open.
-
Pull all four bag cuffs up.
-
Tuck in slotted sides.

natural_image
Illustration of hands handling a bag or drawer with a handle (no text or symbols)- Bring top edges together and roll or fold to close bag.
natural_image
Line drawing of hands using a tool on a wooden box (no text or symbols)- Push Side-Lock Latch down and tilt drawer side open.

natural_image
Illustration of a hand using a computer to interact with a file (no text or symbols visible)
- Lift bag by bag carrier handles.
If your compactor has bag retainer buttons and you are using plastic compactor bags:
- Pull the drawer completely open.
-
Remove top of bag from bag retainer buttons. Pull up all 4 bag cuffs.
-
Close bags with twist ties provided.
-
Push Side-Lock Latch down and tilt drawer side open.
-
Lift bag by bag carrier handles.
Using Your Compactor Continued
Installing a new bag
Before installing a new bag, be sure:
- The drawer side is securely locked.
- The container is clean and free of sharp debris that may have punctured the bag.
Do not use any kind of bag other than those designed especially for use in your compactor.
Compactor bags may be purchased from your Whirlpool Appliance Dealer or:
Whirlpool Corporation
Attention: Customer Service Dept.
1900 Whirlpool Drive
LaPorte, IN 46350
You may also order approved compactor bags by calling our TOLL-FREE telephone number:
1-800-253-1301

natural_image
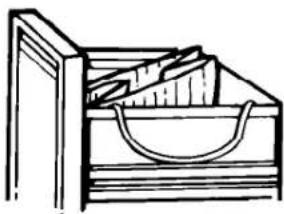
Line drawing of a wooden toolbox with a handle, no text or symbols presentIf you are using paper compactor bags:
- Fit the bag caddy in the drawer.
natural_image
Simple line drawing of a wooden filing cabinet with a handle (no text or symbols)- Put unopened bag in drawer as shown. Spread front bag corners and slide cuff over right-front corner.

natural_image
Simple line drawing of a wooden crate with a vertical post on top (no text or symbols)- Spread rear bag corners and slide cuff over left rear corner.

natural_image
Simple line drawing of a wooden crate with handles and a lid, no text or symbols present- Press inside of bag against drawer bottom, sides and corners for a smooth fit.

natural_image
Simple line drawing of a wooden toolbox with a handle, no text or symbols presentIf your compactor has bag retainer buttons and you are using plastic compactor bags:
- Fit the bag caddy in the drawer.

natural_image
Line drawing of a person pressing down on a wooden plank (no text or symbols)-
Place folded bag into the drawer. Open bag and pull top edges over the drawer top.
-
Lock bag in place by pulling the 4 prepunched holes over the bag retainer buttons. Holes will expand over the buttons without harming the bag.

natural_image
Line drawing of a person's legs resting on a wooden plank (no text or symbols)- Press inside of bag against the drawer bottom, sides and corners for a smooth fit.
How Your Compactor Works

natural_image
Diagram of a mechanical setup with two vertical rods and stacked components inside a dashed cube (no text or symbols)The compacting ram does not go to the drawer bottom. You will not see compacting of the first few loadings.

natural_image
Diagram of a structural assembly with embedded beams and blocks, enclosed in a dashed border (no text or labels)Compaction starts after the drawer is about 13 full. You may hear a noise when glass breaks. Strong glass bottles may not break at all.

natural_image
Diagram of a layered geological or material structure with embedded soil layers (no text or symbols)The trash in a full compactor bag will be about 14 the size of its original bulk.

natural_image
Simple line drawing of a rectangular container filled with various internal objects (no text or symbols)Bottles or cans not placed in the center may become caught between the ram and the drawer. The Drawer Monitor Switch senses a "misload" and causes the ram to return to the "up" position without compacting. Load bulky trash, bottles and cans in the center of the drawer.
Caring For Your Compactor
WARNING
Personal Injury Hazard
Wear protective gloves when cleaning the inside of the compactor. Failure to do so may result in cuts if bits of broken glass are present.
As is true of most appliances, proper care is needed to give you continued satisfaction. Before cleaning the compactor, turn the Key-Knob or Key-Switch to the OFF position and remove. If you will be away for more than a couple of days, remove the compactor bag. Lock the compactor and remove the Key-Knob or Key-Switch. Store the Key-Knob or Key-Switch in a safe place.
Clean exterior surfaces:
- Wipe with warm, sudsy water and a damp cloth. Rinse. Dry with a soft cloth.
- Wipe up spills right away. Some foods can damage the finish if left on the compactor surface.
Clean inside the drawer:
- Remove the bag. (See "Removing a filled bag" on pages 6 and 7.)
- Wear protective gloves. There may be bits of glass in the drawer.
- Press Side-Lock Latch down.

natural_image
Hand using a tool to adjust or install a mechanical component, no text or symbols visible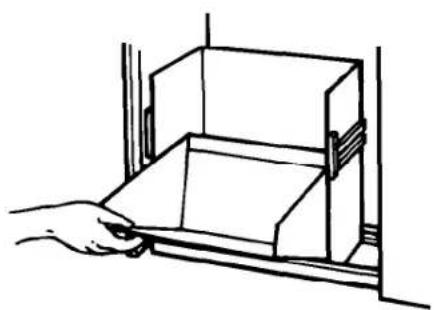
natural_image
Line drawing of a hand opening a rectangular box (no text or symbols)- Hold Side-Lock Latch and tilt side of drawer until the latch clears the drawer front.
NOTE: Drawer side can be removed by tilting it out, then lifting out. - Wash with a damp cloth using warm, sudsy water. Rinse. Dry with a soft cloth.
- If drawer side was removed, slide it back into the tilted position.
- Press the Side-Lock Latch down while pressing the side to the upright position.
- Lock the Side-Lock Latch.
Caring For Your Compactor Continued
natural_image
Diagram of a hand operating a vertical control panel with a handle, showing internal structure (no text or symbols)
natural_image
Line drawing of a person using a balance scale device (no text or symbols)
natural_image
Illustration of a hand using a tool to clean or brush a surface (no text or symbols)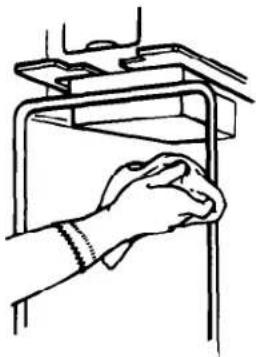
natural_image
Line drawing of a hand cleaning a metal frame (no text or symbols)Clean inside the cabinet:
- Wear protective gloves. There may be bits of glass in the cabinet.
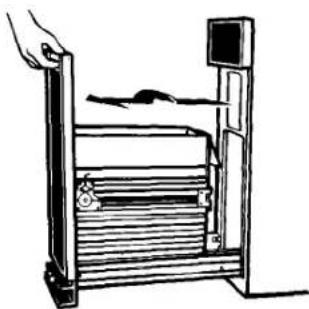
- Pull the drawer out until it stops.
-
Note the tracks in which the drawer rollers move.
-
Lift the front to clear the drawer stops.
- Grasp the drawer on the sides.
- Pull it out the rest of the way.
-
Set it down gently.
-
Vacuum inside of cabinet. Liquid spills or wet trash should be cleaned up by hand, or use a vacuum designed to pick up liquids.
- Wash, rinse and dry inside.
- Replace drawer.
Wipe off the ram cover:
- Wear protective gloves. There may be bits of glass on the ram cover.
- Wipe glass particles off ram cover with a cloth or paper towels.
- Use warm, sudsy water to remove foods. Rinse. Dry with a soft cloth.
Changing Your Compactor's Color

The color panel on the front of your compactor's drawer reverses to another color. You may also be able to order an extra color panel, depending on the model you have. Contact your authorized Whirlpool dealer.
To change the color of your compactor's front panel, follow the directions below. All you need is a medium-sized screwdriver.
- Slide drawer out.
- Remove two screws shown.
- Remove handle.
WARNING
Personal Injury Hazard
Do not handle front panels carelessly when changing; metal edge could cause injury.
- Remove the color panel and reverse. Be careful —edges may be sharp.
OR
Place extra panel at front with desired color showing.
- Make sure panels are all the way down.
-
Be sure to replace cardboard spacer in its former position.
-
Replace handle and screws.
- Slide drawer back in.
OPTION: Match your kitchen's color scheme by replacing color panel with your own creation (wallpaper, paneling). See Installation Instructions.
If You Need Service Or Assistance
We suggest you follow these steps:
1. Before calling for assistance ...
Performance problems often result from little things you can find and fix yourself without tools of any kind.
If your compactor won't operate:
- Is the power cord plugged into a live circuit with the proper voltage?
- Have you checked your home's main fuses or circuit breaker box?
• Is the drawer completely closed? - Is the Key-Knob turned all the way to START before it is released (TC4700/TU4700 model series)?
- Is the Key-Switch turned to ON (TC8700/TC8750 model series)?
- Did you press the ON button before pressing the START button (TC8700/TC8750 model series)?
Drawer won't open:
- Drawer will open only when ram is all the way up.
• To raise the ram, turn the Key-Knob to START and release (TC4700/TU4700 model series). - To raise the ram, press the OFF button, then press the ON button (TC8700/TC8750 model series).
If trash is not compacting:
- Is the drawer loaded properly? If anything gets between the ram and the drawer, the ram will return to the "up" position, without compacting.
- Drawer must be at least 1/3 full before compactor will compact.
Not enough compaction or force:
- Compacting works best when only a few items are loaded. Use the compacting cycle frequently.
Bottles don't break:
- Not all bottles will break every time, depending on the bottle and the trash load below it.
2. If you need assistance\* ...
Call Whirlpool Consumer Assistance Center telephone number. Dial free from anywhere in the U.S.:
1-800-253-1301
and talk with one of our trained consultants. The consultants can instruct you in how to obtain satisfactory operation from your appliance or, if service is necessary, recommend a qualified service company in your area.
If you prefer, write to:
Mr. William Clark
Consumer Assistance Representative
Whirlpool Corporation
2000 M-63
Benton Harbor, MI 49022
Please include a daytime phone number in your correspondence.
3. If you need service\* ...

Whirlpool has a nation-wide network of authorized Whirlpool ^SM service companies. Whirlpool service technicians are trained to fulfill the
product warranty and provide after-warranty service, anywhere in the United States. To locate the authorized Whirlpool service company in your area, call our Consumer Assistance Center telephone number (see Step 2) or look in your telephone directory Yellow Pages under:
APPLIANCE-HOUSEHOLD-MAJOR-SERVICE & REPAIR
ELECTRICAL APPLIANCES-MAJOR-REPAIRING & PARTS
OR
WASHING MACHINES, DRYERS & IRONERS-SERVICING
WHIRLPOOL APPLIANCES FRANCHISED TECH-CARE SERVICE
SERVICECOMPANIES XYZ SERVICE CO 120 MAPLE....999-9999
4. If you need FSP® replacement parts\* ...
FSP is a registered trademark of Whirlpool Corporation for quality parts. Look for this symbol of quality whenever you need a replacement part for your Whirlpool appliance. FSP replacement parts will fit right and work right, because they are made to the same exacting specifications used to build every new Whirlpool appliance.
To locate FSP replacement parts in your area, refer to Step 3 above or call the Whirlpool Consumer Assistance Center number in Step 2.
5. If you are not satisfied with how the problem was solved\* ...
- Contact the Major Appliance Consumer Action Panel (MACAP). MACAP is a group of independent consumer experts that voices consumer views at the highest levels of the major appliance industry.
- Contact MACAP only when the dealer, authorized servicer and Whirlpool have failed to resolve your problem.
Major Appliance Consumer Action Panel 20 North Wacker Drive Chicago, IL 60606
• MACAP will in turn inform us of your action.
* When requesting assistance, please provide: model number, serial number, date of purchase, and a complete description of the problem. This information is needed in order to better respond to your request.
WHIRLPOOL® Compactor Warranty
CP003
| LENGTH OF WARRANTY | WHIRLPOOL WILL PAY FOR |
| FULL ONE-YEAR WARRANTYFrom Date of Purchase | FSP® replacement parts and repair labor to correct defects in materials or workmanship. Service must be provided by an authorized WhirlpoolSM service company. |
| WHIRLPOOL WILL NOT PAY FOR | |
| A. Service calls to:1. Correct the installation of the compactor.2. Instruct you how to use the compactor.3. Replace house fuses or correct house wiring.B. Repairs when compactor is used in other than normal, single-family household use.C. Pickup and delivery. This product is designed to be repaired in the home.D. Damage to compactor caused by accident, misuse, fire, flood, acts of God or use of products not approved by Whirlpool.E. Repairs to parts or systems caused by unauthorized modifications made to the appliance. | |
WHIRLPOOL CORPORATION SHALL NOT BE LIABLE FOR INCIDENTAL OR CONSEQUENTIAL DAMAGES. Some states do not allow the exclusion or limitation of incidental or consequential damages so this limitation or exclusion may not apply to you. This warranty gives you specific legal rights, and you may also have other rights which vary from state to state.
Outside the United States, a different warranty may apply. For details, please contact your authorized Whirlpool distributor or military exchange.
If you need service, first see the "Service and Assistance" section of this book. After checking "Service and Assistance," additional help can be found by calling our Consumer Assistance Center telephone number, 1-800-253-1301, from anywhere in the U.S.
® Registered Trademark/SM Service Mark of Whirlpool Corporation.


- Use & Care Guide
- Contents
- WARNING
- Electrical Shock Hazard
- Important Safety Instructions
- -SAVE THESE INSTRUCTIONS-
- Additional safety instructions and your responsibilities
- Using Your Compactor
- Fire or Personal Injury Hazard
- Open the drawer
- Put in the trash
- Close the drawer
- To start the compactor
- To stop the compactor during a cycle
- To remove the Key-Knob
- TC8700/TC8750 Model series
- To remove the Key-Switch
- Removing a filled bag
- If your compactor has bag retainer buttons and you are using plastic compactor bags:
- Installing a new bag
- Before installing a new bag, be sure:
- If you are using paper compactor bags:
- How Your Compactor Works
- Caring For Your Compactor
- Clean exterior surfaces:
- Clean inside the drawer:
- Caring For Your Compactor Continued
- Clean inside the cabinet:
- Wipe off the ram cover:
- Changing Your Compactor's Color
- OR
- If You Need Service Or Assistance
- We suggest you follow these steps:
- Before calling for assistance ...
- If your compactor won't operate:
- Drawer won't open:
- If trash is not compacting:
- Not enough compaction or force:
- Bottles don't break:
- If you need assistance\* ...
- 1-800-253-1301
- If you prefer, write to:
- If you need service\* ...
- If you need FSP® replacement parts\* ...
- If you are not satisfied with how the problem was solved\* ...
- WHIRLPOOL® Compactor Warranty
Brand : WHIRLPOOL
Model : TC8750X
Category : Waste press