
LD50EL - Humidifier LG - Free user manual and instructions
Find the device manual for free LD50EL LG in PDF.


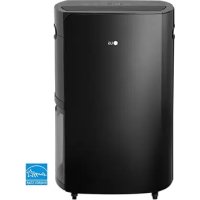
| Type | Dehumidifier |
| Brand | LG |
| Model | LD50EL |
| Control Type | Electronic with touch buttons |
| Humidity Setting Range | 35% to 70% RH in increments of 5%, plus continuous "On" mode |
| Fan Speeds | High and Low |
| Timer | 2-hour or 4-hour On/Off cycling |
| Auto Restart | Resumes previous settings after power outage |
| Bucket Full Indicator | LED glows when bucket is full or not properly positioned |
| Drain Connection | Standard garden hose compatible |
| Air Filter | Washable, clean every two weeks |
| Coil Cleaning | Brush with mild detergent; avoid water spray |
| Power Cord | 3-prong grounded plug |
| Electrical Rating | 115 V, 60 Hz (typical US) |
| Warranty (Parts & Labor) | 5 years from date of purchase |
| Warranty (Compressor) | 5 years from date of purchase |
| Safety | Grounded outlet required; do not use extension cord or adapter |
| Installation Clearance | At least 12 inches on all sides |
| Weight Support | Must support approx. 90 lbs (40 kg) with full bucket |
| Low Temperature Operation | Effective down to 42°F (6°C) for low temp model |
Frequently Asked Questions - LD50EL LG
User questions about LD50EL LG
0 question about this device. Answer the ones you know or ask your own.
Ask a new question about this device
Download the instructions for your Humidifier in PDF format for free! Find your manual LD50EL - LG and take your electronic device back in hand. On this page are published all the documents necessary for the use of your device. LD50EL by LG.
USER MANUAL LD50EL LG
Please retain this owner's manual for future reference after reading it thoroughly.
You can refer to the Energy Star program in detail at
"www.energystar.gov".
DEHUMIDIFIER OWNER'S MANUAL
Safety Precautions ....3
Prior to Operation....7
Instruction 8
Electrical Safety......9
Operating Instructions .....11
Installation....13
Maintenance and Service......14

FOR YOUR RECORDS
Write the model and serial numbers here:
Model #
Serial #
You can find them on a label on the side of each unit.
Dealer's Name
Date Purchased
■ Staple your receipt to this page in the event you need it to prove date of purchase or for warranty issues.

READ THIS MANUAL
Inside you will find many helpful hints on how to use and maintain your dehumidifier properly. Just a little preventive care on your part can save you a great deal of time and money over the life of your dehumidifier.
You'll find many answers to common problems in the chart of troubleshooting tips. If you review our chart of
Troubleshooting Tips first, you may not need to call for service at all.

PRECAUTION
- Contact the authorized service technician for repair or maintenance of this unit.
- Contact the installer for installation of this unit.
- The dehumidifier is not intended for use by young children or invalids without supervision.
- Young children should be supervised to ensure that they do not play with the dehumidifier.
- When the power cord is to be replaced, replacement work shall be performed by authorized personnel only using only genuine replacement parts.

Safety Precautions
Read all instructions before using.
■ To prevent injury to the user or other people and property damage, the following instructions must be followed. ■ Incorrect operation due to ignoring instructions will cause harm or damage; the seriousness is classified by the following indications.

WARNING
This symbol indicates the possibility of death or serious injury.

CAUTION
This symbol indicates the possibility of injury or damage to property only.
■ Meanings of symbols used in this manual are as shown below.
 | Be sure not to do. |
 | Be sure to follow the instruction. |

WARNING
■ Installation
Do not place the power cord near a heater.
- It may cause fire and electric shock.

Do not use the power cord near flammable gas or combustibles such as gasoline, benzene, thinner, etc.
• It may cause explosion or fire.

Do not disassemble or modify products.
- It may cause electric shock and failure.

Operation
Plug in the power plug properly.
- Otherwise, it will cause electric shock or fire.
Do not operate or stop the unit by inserting or pulling out the power plug.
- It will cause electric shock or fire.
Do not damage or use an unspecified power cord.
- It will cause electric shock or fire.


Do not modify power cord length.
- It will cause electric shock or fire.

Do not share the outlet with other appliances.
- It will cause electric shock or fire.

Always plug into a grounded outlet.
- No grounding may cause electric shock.

Unplug the unit if strange sounds, odors, or smoke come from it.
- Otherwise it may cause a fire or an electric shock.

Do not use the socket if it is loose or damaged.
- It may cause fire and electric shock.

Do not operate with wet hands or in damp environment.
- It may cause electric shock.

Ventilate before operating defumidifier when gas goes out.
- It may cause explosion, fire, and burn.

Do not clean the dehumidifier with water.
• Water may enter the unit and degrade the insulation. It may cause an electric shock.

Turn off the power and breaker first when cleaning the unit.
- Since the fan rotates at high speed during operation, it may cause injury.

If water enters the product, turn off the dehumidifier's power switch. Contact service center after taking the power-plug out from the socket.
- It will cause machine failure or electric shock.


CAUTION
■ Installation
Never touch the metal parts of the unit when removing the filter.
• They are sharp and may cause injury.

Do not block the inlet or outlet.
- It may cause failure of appliance or performance deterioration.

Hold the plug by the head when taking it out.
- It may cause electric shock and damage.
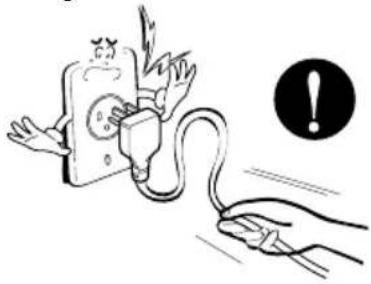
Turn off the main power switch when not using the dehumidifier for a long time.
- It will waste power consumption in vain and it may cause an accident.

Secure wheels with blocks to prevent unit from falling when installed on a table or shelf.
- It may damage the dehumidifier or cause other damage or injury.

Make sure the dehumidifier is the correct size for the area you want to dehumidify.
- It is not designed to dehumidify the entire house.

Install the dehumidifier properly on a floor, table, or shelf that is level and strong enough to support it when the water collection bucket is full.
- It should withstand around 90 lbs (40kg) of weight.

Close all doors, windows and other outside openings to the room.
• The dehumidifier must be operated in an enclosed area to be most effective.

Operation
Use a soft cloth to clean. Do not use wax, thinner, or a strong detergent.
The appearance of the dehumidifier may deteriorate, change color, or develop surface flaws.

Be sure to replace the bucket properly after emptying to prevent water from collecting on the floor.
Otherwise, it will cause property damage.

Do not operate satisfactorily if the room temperature is below 65°F (18°C).
The Low Temperature model will continuously cycle up to temperature 42°F (6°C).
Low temperatures could cause coils to frost.

Do not put a pet or house plant where it will be exposed to direct air flow.
This could injure the pet or plant.

Do not use this appliance for special purposes such as pets, foods, precision machinery, or art objects.
It is a general use appliance not precision equipment.

Do not use the water collected in the bucket for drinking purposes.
It is not sanitary and could cause illness or personal injury.
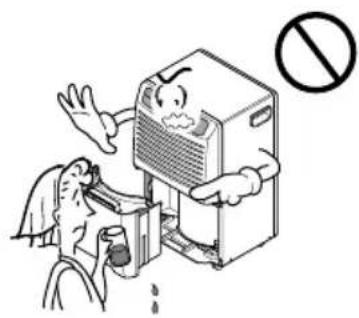
Always insert the filter securely. Clean it every two weeks.
• Operation without filters will cause failure.

Prior to Operation
Preparing for operation
- Consult an installation specialist for installation.
- Plug in the power plug properly.
- Use a dedicated circuit.
- Do not use an extension cord.
- Do not start/stop operation by plugging/unplugging the power cord.
- If the cord/plug is damaged, only replace it with an authorized replacement part.
Usage
- Being exposed to direct airflow for an extended period of time could be hazardous to your health. Do not expose occupants, pets, or plants to direct airflow for extended periods of time.
- Ventilate the room when the dehumidifier is used with other heating devices. Otherwise the oxygen supply may be inadequate.
- Do not use this dehumidifier for non-specified special purposes (e.g. preserving precision devices, food, pets, plants, and art objects). Such usage could damage the items.
Cleaning and maintenance
- Do not touch the metal parts of the unit when removing the filter. Injuries can occur when handling sharp metal edges.
- Do not use water to clean inside the dehumidifier. Exposure to water can destroy the insulation, leading to possible electric shock.
- When cleaning the unit, first make sure that the power and breaker are turned off. The fan rotates at a very high speed during operation. There is a possibility of injury if the unit's power is accidentally turned on while the interior of the unit is being cleaned.
Service
For repair and maintenance, contact your authorized service dealer.
Instruction
Symbols used in this Manual

This symbol alerts you to the risk of electric shock.

This symbol alerts you to hazards that could cause harm to the dehumidifier.
NOTICE
This symbol indicates special notes.
Features

WARNING: This appliance should be installed in accordance with national wiring regulations. This guide acts as a guide to help to explain product features.

Electrical Safety

WARNING: This appliance must be properly grounded.
The power cord of this appliance is equipped with a three-prong grounding plug. To minimize the risk of electric shock, use the plug with a standard three-slot grounding wall power outlet. If the power outlet does not include a grounding slot, have a qualified electrician replace the outlet before you use the dehumidifier.
Preferred method
Ensure proper ground exists before use

WARNING: Do not cut or remove the grounding prong from the power plug.

WARNING: Attaching the adapter ground terminal to the wall receptacle cover screw does not ground the appliance unless the cover screw is metal and not insulated, and the wall receptacle is grounded through the house wiring.

WARNING: If you have any doubt whether the dehumidifier is properly grounded, have the wall receptacle and circuit checked by a qualified electrician.
Temporary Use of an Adapter
We strongly discourage the use of an adapter due to potential safety hazards. For temporary connections, use only a UL-listed adapter, available from most local hardware stores. To disconnect the power cord from the adapter, use one hand on each to avoid damaging the ground terminal. Avoid frequently unplugging the power cord as this can lead to eventual ground terminal damage.


WARNING: Never use the appliance with a broken adapter.
Temporary Use of an Extension Cord
We strongly discourage the use of an extension cord due to potential safety hazards.
Operating Instructions

CONTROL PANEL HAS FOLLOWING
- POWER key --- Pressing this key once turns the dehumidifier "ON" and pressing again turns the dehumidifier "OFF".
- HUMIDITY CONTROL keys --- Are used to select the desired humidity setting.
- △: Used to raise the desired humidity setting. • ▽: Used to lower the desired humidity setting. • The desired humidity can be selected within a range of 35% to 70% RH in increments of 5%.
- If you press the ▽ key once again at 35%RH, "On" mode is selected. In "On" mode the unit operates continuously, regardless of humidity conditions.
- HUMIDITY SETTING display --- The desired humidity selected is displayed here.
- FAN SPEED key --- Is used to set the fan speed as "High" or "Low".
- Pressing this key changes the fan speed from High → Low → High.
- The selected fan speed is indicated by indicator lights marked "High" and "Low".
- TIMER key --- It is used to select the type of operation.
- Select either 2 or 4 hr. On/Off for cycled operation. In this case the unit will run for 2 or 4 hours, and then shut off completely for 2 or 4 hours. The cycle will repeat until you change the setting.
- When TIMER key is pressed, the TIMER indicator lights shift from 2hr.On/Off to 4hr.On/Off.
- BUCKET FULL Indicator --- This light glows when the bucket is full and needs to be emptied. It also glows, when the bucket is not properly positioned. When bucket full indicator light glows, the compressor and fan will turn "OFF".
- AUTO RESTART --- Once the power is restored after a power outage, the unit begins to operate at its previous operation setting. The fan will run by default for 2 minutes. After 2 minutes both fan and compressor will be ON or OFF depending on the humidity conditions.
- Plug the power cord into the electrical outlet. Press the POWER key.
- Set the Humidity control anywhere between 35% to 70% for normal operation.
- For less humidity, press the ▼ HUMIDITY CONTROL key.
- For higher humidity, press the △ HUMIDITY CONTROL key.
- Press the TIMER key, to set the amount of time for which you want the unit to cycle On and Off. The time can be set for 2 hours or 4 hours.
- If you want to change the fan speed, press the FAN SPEED key. Each time the FAN SPEED key is pressed the fan speed changes as High → Low → High.
- Press the POWER key to stop the unit manually.
NOTICE Water bucket must be properly installed.
- The dehumidifier will not run if the bucket is not properly installed.
- The dehumidifier shuts off when the desired humidity setting is reached.
Automatic shut off
The dehumidifier will turn off automatically when the bucket is full, or when the bucket is removed or not replaced in the proper position.
The bucket must be replaced in the proper position for the dehumidifier to work. The light will be on and the dehumidifier will not run if the bucket is not in the proper position.

Water level control switch
Disposing of collected water
1. Empty the bucket manually.
When the bucket is full, pull it out by grasping the handle and empty it into a large sink or tub, then replace it properly.
NOTICE: Do not remove the bucket while the dehumidifier is operating. This can cause water to drop on the base pan or the floor. Empty the bucket when the indicator light turns on.
NOTICE: It is advisable to carry the bucket by supporting it from the bottom as well as by the handle. Carrying by only the handle may cause the handle or bucket cover to break.
2. Attach a length of garden hose to the threaded drain hose connection to carry water to the drain.
- Remove the drain-hole cover.
- Connect a garden hose to the threaded drain hose connector.
- Push the hose connector tightly to the drain-hole on the rear grille.
When attaching the drain hose to the hose connector, do not bend or kink the hose. The hose should lie flat from the dehumidifier to the drain.
NOTICE: The hose attachment will accept a standard garden hose fitting.
Do not over-tighten the hose when connecting it to the hose connector. Use a rubber washer and tighten by hand firmly without stripping the plastic threads.

Installation
Choosing the proper location for your dehumidifier
- Use the dehumidifier in a basement to help prevent moisture damage.
- Use the dehumidifier in laundry drying, bathing, and dishwashing areas which have excessive moisture.
- Use the dehumidifier to prevent moisture damage where books are stored.


Installing the dehumidifier properly
- Allow at least 12 inches of space on all sides of the unit for good air circulation.
- Install your dehumidifier on a floor, table, or shelf. When installing the dehumidifier on a table or shelf, make sure the table or shelf is strong enough to support the weight of the dehumidifier with a full bucket. Do not sit or stand on the dehumidifier. Secure wheels with blocks to prevent the unit from falling when installed on a table or shelf.
NOTICE: The height of a table or shelf might provide a better position from which to handle the bucket and help prevent icing of the coils due to colder air near the floor (such as in a basement).
- Lift the bucket and place it in the dehumidifier, making sure the slots on the bottom side of the bucket are positioned correctly.
- Rollers let you move the dehumidifier easily.


The cleaning of bucket
- Pull out the bucket cover.

- Brush off the residue in the bucket.
NOTICE Clean the bucket by wiping with a brush or a cloth dampened in a mild detergent solution.

- Close the cover.
NOTICE Push the tabs on the top of the bucket when installing the bucket.

Maintenance and Service
Your dehumidifier is designed to serve you year-round. It needs practically no attention. However, you should check your dehumidifier and inspect the coils annually.
You may want an Authorized Service Center to perform this annual checkup. (Cost of the inspection is the owner's responsibility.)
OR
If you are familiar with electrical appliances and their functions, listed below are instructions which would allow you to perform the inspection and maintenance for yourself.
Cleaning the front case, bucket and cabinet
Clean the front case and the cabinet with a soft cloth, warm water, and a mild detergent. Clean the grille with a vacuum attachment or brush. Do not use bleach or abrasives.
Cleaning the air filter
- Remove water bucket from the cabinet. Pull out the air filter as shown above.
- Wash air filter with warm water and a mild detergent. Rinse and dry it. Replace it in place.
Cleaning the coil
- Remove Front Grille from the cabinet as shown above.
- Brush the coil gently like in the figure. If necessary use warm water and a mild detergent. Rinse and dry thoroughly.

CAUTION : Be careful not to spray the coil with a water hose. Be careful! Sharp edges!
▲ WARNING
Electrical Shock Hazard
- Disconnect power supply cord from receptacle before performing any maintenance.
- Be careful when cleaning the coils. Fins are sharp.
Failure to follow the above precautions could result in electrical shock or personal injury.


Troubleshooting

The dehumidifier may be operating abnormally when:
| Problem Possible Causes What To Do | ||
| Dehumidifier does not start | ■ The dehumidifier power cord is unplugged. | • Make sure the dehumidifier plug is pushed completely into the outlet. |
| ■ The fuse is blown or circuit breaker is tripped. | • Check the house fuse or circuit breaker box and replace the fuse or reset the breaker. | |
| ■ Water bucket is full. | • The dehumidifier automatically turns off when this occurs. Empty the bucket. | |
| ■ Bucket is not installed. | • Make sure the bucket is in the right place. | |
| ■ In case the Room humidity is less than selected humidity setting. | • Change the humidity set to lower limits. | |
| Dehumidifier does not dry the air as it should | ■ Did not allow enough time to remove the moisture. | • When first installed, allow at least 3 or 4 days to maintain the desired dryness. |
| ■ Airflow is restricted. | • Make sure there are no curtains, blinds or furniture blocking the front or back of the dehumidifier. | |
| ■ The Humidity Control may not be set to low Humidity. | • Press the ▽ Humidity Control button to lower the humidity. | |
| ■ Doors and windows may not be closed tightly. | • Check that all doors, windows and other openings are securely closed. | |
| ■ Clothes dryer may be blowing moisture-laden air into the room. | • Install the dehumidifier away from the dryer. The dryer should be vented to the outside. | |
| ■ Room temperature is too low. | • The unit will not operate satisfactorily if the room temperature is below 65°F. (18 °C.). • The low temperature model will continuously cycle up to temperature of 42°F(6°C) | |
| Dehumidifier runs too much | ■ Area to be dehumidified is too large. | • Check with your dealer to see if the capacity is adequate. |
| ■ Doors and windows are open. | • Close all doors and windows to the outside. | |
| Frost appears on the coils | ■ Dehumidifier has been recently turned on or room temperature is below 65°F (18°C). | • This is normal. Frost will usually disappear within 60 minutes. |
| Fan noise | ■ Air is moving through the dehumidifier. | • This is normal. |
| Water on floor | ■ Drain hose connection may be loose. | • Check the hose if one is attached. |
| ■ Water bucket is not in all the way. | • See Removing and Emptying The Water Bucket. | |
| Dehumidifier operates continuously | ■ Check if the unit is operating in "ON" mode. | • Change the humidity setting. |
| ■ Room Humidity is high | • Change the humidity setting. | |
Operation

CAUTION
Installation
Operation


- Close the cover


LG Electronics Inc. will repair or at its option replace, without charge, your product if it proves to be defective in material or workmanship under normal use, during the warranty period ("Warranty Period") set forth below, effective from the date ("Date of Purchase") of original consumer purchase of the product. This limited warranty is good only to the original purchaser of the product and effective only when used in the United States, including Alaska, Hawaii, and U.S. Territories.
WARRANTY PERIOD:
LABOR: 5 Years from the Date of Purchase.
PARTS: 5 Years from the Date of Purchase.
COMPRESSOR: 5 Years from the date of purchase.
EFFECTIVE DATE OF WARRANTY:
Retain your dated Sales Receipt as evidence of your Date of Purchase. A legible copy of your sales receipt must be submitted at the time warranty service is provided.
HOW SERVICE IS HANDLED:
Carry-In service: Call 1-800-243-0000
(24 hours a day, 365 days per year) and choose the appropriate prompt. Please have the product type (Dehumidifier), model number, serial number, and postal ZIP code ready.
Visit our website at
http://www.lgappliances.com
THIS WARRANTY IS IN LIEU OF ANY OTHER WARRANTIES, EXPRESS OR IMPLIED, INCLUDING WITHOUT LIMITATION, ANY WARRANTY OF MERCHANTABILITY OR FITNESS FOR A PARTICULAR PURPOSE. TO THE EXTENT ANY IMPLIED WARRANTY IS REQUIRED BY LAW, IT IS LIMITED IN DURATION TO THE EXPRESS WARRANTY PERIOD ABOVE. LG WILL NOT BE LIABLE FOR ANY CONSEQUENTIAL, INDIRECT, OR INCIDENTAL DAMAGES OF ANY KIND, INCLUDING LOST REVENUES OR PROFITS, IN CONNECTION WITH THE PRODUCT. Some states do not allow limitation on how long an implied warranty lasts or the exclusion of incidental or consequential damages, so the above limitations or exclusions may not apply to you.
THIS LIMITED WARRANTY DOES NOT APPLY TO:
Service trips to your home to deliver, pick up, and/or install the product, instruct, or replace house fuses or correct wiring, or correction of unauthorized repairs; and damages or operating problems that result from misuse, abuse, operation outside environmental specifications or contrary to the requirements or precautions in the Operating Guide, accident, vermin, fire, flood, improper installation, acts of God, unauthorized modification or alteration, incorrect electrical current or voltage, or commercial use, or use for other than intended purpose.
The cost of repair or replacement under these excluded circumstances shall be borne by the consumer.
CUSTOMER INTERACTIVE CENTER NUMBERS:
| For the name of the nearest Authorized Service Center or Sales Dealer, or to get product, customer, or service assistance | Call 1-800-243-0000 (24 hours a day, 365 days per year) and choose the appropriate option from the menu. Please have the product type (Dehumidifier), model number, serial number, and postal ZIP code ready.Or visit our website at http://www.lgappliances.com |
TO CONTACT THE LGE CUSTOMER SERVICE CENTER BY MAIL:
P.O. Box 240007
201 James Record Road
Huntsville, AL 35824
Attn: DA Products, Building 3


- DEHUMIDIFIER OWNER'S MANUAL
- FOR YOUR RECORDS
- READ THIS MANUAL
- PRECAUTION
- SAFETY PRECAUTIONS
- READ ALL INSTRUCTIONS BEFORE USING
- WARNING
- INSTALLATION
- OPERATION
- DO NOT MODIFY POWER CORD LENGTH
- DO NOT SHARE THE OUTLET WITH OTHER APPLIANCES
- ALWAYS PLUG INTO A GROUNDED OUTLET
- UNPLUG THE UNIT IF STRANGE SOUNDS, ODORS, OR SMOKE COME FROM IT
- DO NOT USE THE SOCKET IF IT IS LOOSE OR DAMAGED
- DO NOT OPERATE WITH WET HANDS OR IN DAMP ENVIRONMENT
- VENTILATE BEFORE OPERATING DEFUMIDIFIER WHEN GAS GOES OUT
- DO NOT CLEAN THE DEHUMIDIFIER WITH WATER
- TURN OFF THE POWER AND BREAKER FIRST WHEN CLEANING THE UNIT
- CAUTION
- PRIOR TO OPERATION
- PREPARING FOR OPERATION
- USAGE
- CLEANING AND MAINTENANCE
- SERVICE
- INSTRUCTION
- SYMBOLS USED IN THIS MANUAL
- FEATURES
- ELECTRICAL SAFETY
- WARNING: THIS APPLIANCE MUST BE PROPERLY GROUNDED
- TEMPORARY USE OF AN ADAPTER
- TEMPORARY USE OF AN EXTENSION CORD
- OPERATING INSTRUCTIONS
- CONTROL PANEL HAS FOLLOWING
- AUTOMATIC SHUT OFF
- DISPOSING OF COLLECTED WATER
- EMPTY THE BUCKET MANUALLY
- ATTACH A LENGTH OF GARDEN HOSE TO THE THREADED DRAIN HOSE CONNECTION TO CARRY WATER TO THE DRAIN
- CHOOSING THE PROPER LOCATION FOR YOUR DEHUMIDIFIER
- INSTALLING THE DEHUMIDIFIER PROPERLY
- THE CLEANING OF BUCKET
- MAINTENANCE AND SERVICE
- OR
- CLEANING THE FRONT CASE, BUCKET AND CABINET
- CLEANING THE AIR FILTER
- CLEANING THE COIL
- ▲ WARNING
- ELECTRICAL SHOCK HAZARD
- TROUBLESHOOTING
- WARRANTY PERIOD
- EFFECTIVE DATE OF WARRANTY
- HOW SERVICE IS HANDLED
- CARRY-IN SERVICE: CALL 1-800-243-0000
- THIS LIMITED WARRANTY DOES NOT APPLY TO
- TO CONTACT THE LGE CUSTOMER SERVICE CENTER BY MAIL
Brand : LG
Model : LD50EL
Category : Humidifier