
C230X - Range hood EDESA - Free user manual and instructions
Find the device manual for free C230X EDESA in PDF.


| Product Type | Range Hood |
| Brand | Edesa |
| Model | C230X |
| Installation Type | Wall-mounted or under-cabinet |
| Minimum Distance from Cooktop | 60 cm (electric), 75 cm (gas or mixed) |
| Ducting Options | Upper air duct (B1) or optional rear air duct (B2); recirculation mode with carbon filter |
| Suction Speeds | Multiple speeds (highest for high vapor concentration) |
| Grease Filter Type | Self-supporting metal filter (also paper or sponge options) |
| Grease Filter Cleaning | Metallic: clean monthly by hand or dishwasher at 65°C; paper: replace monthly; sponge: wash monthly, replace every 5-6 washes |
| Carbon Filter Type | Rectangular (S1, S2, S3) or circular (V1, V2, V3) |
| Carbon Filter Replacement | Rectangular: every 6 months; circular: every 4 months |
| Light Bulb Type | Incandescent oval max 40W E14 or halogen 20W max G4 |
| Voltage | As per label inside hood (typically 220-240V) |
| Control Type | Push buttons on front panel |
| Extraction Mode | Yes (duct to outside) |
| Recirculation Mode | Yes (with carbon filter) |
| Maintenance | Disconnect power before cleaning; clean exterior with denatured alcohol or neutral detergent; replace filters regularly |
| Safety Features | Child safety warning; no flambé cooking; proper ventilation required; electrical cable replacement only by specialist |
| Included Accessories | Flange C, tap D (if provided), mounting screws |
Frequently Asked Questions - C230X EDESA
User questions about C230X EDESA
0 question about this device. Answer the ones you know or ask your own.
Ask a new question about this device
Download the instructions for your Range hood in PDF format for free! Find your manual C230X - EDESA and take your electronic device back in hand. On this page are published all the documents necessary for the use of your device. C230X by EDESA.
USER MANUAL C230X EDESA
natural_image
Simple line drawing of a rectangular container with a lid, no text or symbols presentE Montaje y modo de empleo
P Instruções para montagem e utilização
F Prescriptions de montage et mode d'emploi
GB Instruction on mounting and use
D Montage- und Gebrauchsanweisung
NL Montagevoorschriften en gebruiksaanwiizing
I Isruzioni di montaggio e d'uso
GR OΔΗΓΙΕΣ ΤΟΠΟΘΕΤΗΣΗΣ ΚΑΙ ΧΡΗΣΗΣ
PL INSTRUKCJE MONTAŻU I UŻYTKOWANIA
CZ NÁVOD K MONTÁŽI A POUŽITÍ
SK ÁVOD K MONTÁŽI A UŽITÍ
H FELSZERELÉSI ÉS HASZNÁLATI UTASÍTÁS
RU Инструкция по монтажу у эксплуатации
BG УКАЗАНИЯ ЗА МОНТАЖ И УПОТРЕБА
RO INSTRUCTII DE MONTAJ SI FOLOSIRE
Filtrograsas
Filtrogorduras
Filtre agraisse
Grease Filter
Fettfilter
Vetfilter
Filtrograssi
Φιλτρο λιπωνΦιλτρο
Self-supporting metal filter
natural_image
Technical diagram of a mechanical device with labeled components (no readable text or symbols)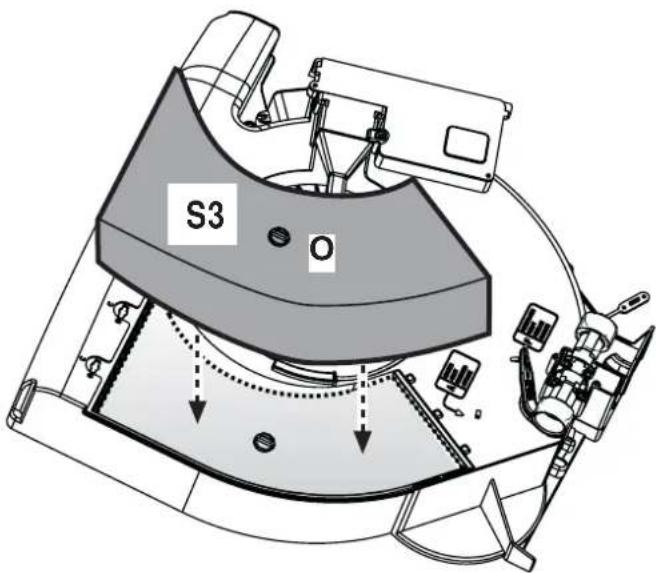
Lámpara halógena
natural_image
Line drawing of a human hand with index finger extended (no text or symbols)GB - This appliance is marked according to the European directive 2002/96/EC on Waste Electrical and Electronic Equipment (WEEE). By ensuring this product is disposed of correctly, you will help prevent potential negative consequences for the environment and human health, which could otherwise be caused by inappropriate waste handling of this product.

The symbol — on the product, or on the documents accompanying the product, indicates that this appliance may not be treated as household waste. Instead it shall be handed over to the applicable collection point for the recycling of electrical and electronic equipment. Disposal must be carried out in accordance with local environmental regulations for waste disposal.
For more detailed information about treatment, recovery and recycling of this product, please contact your local city office, your household waste disposal service or the shop where you purchased the product.
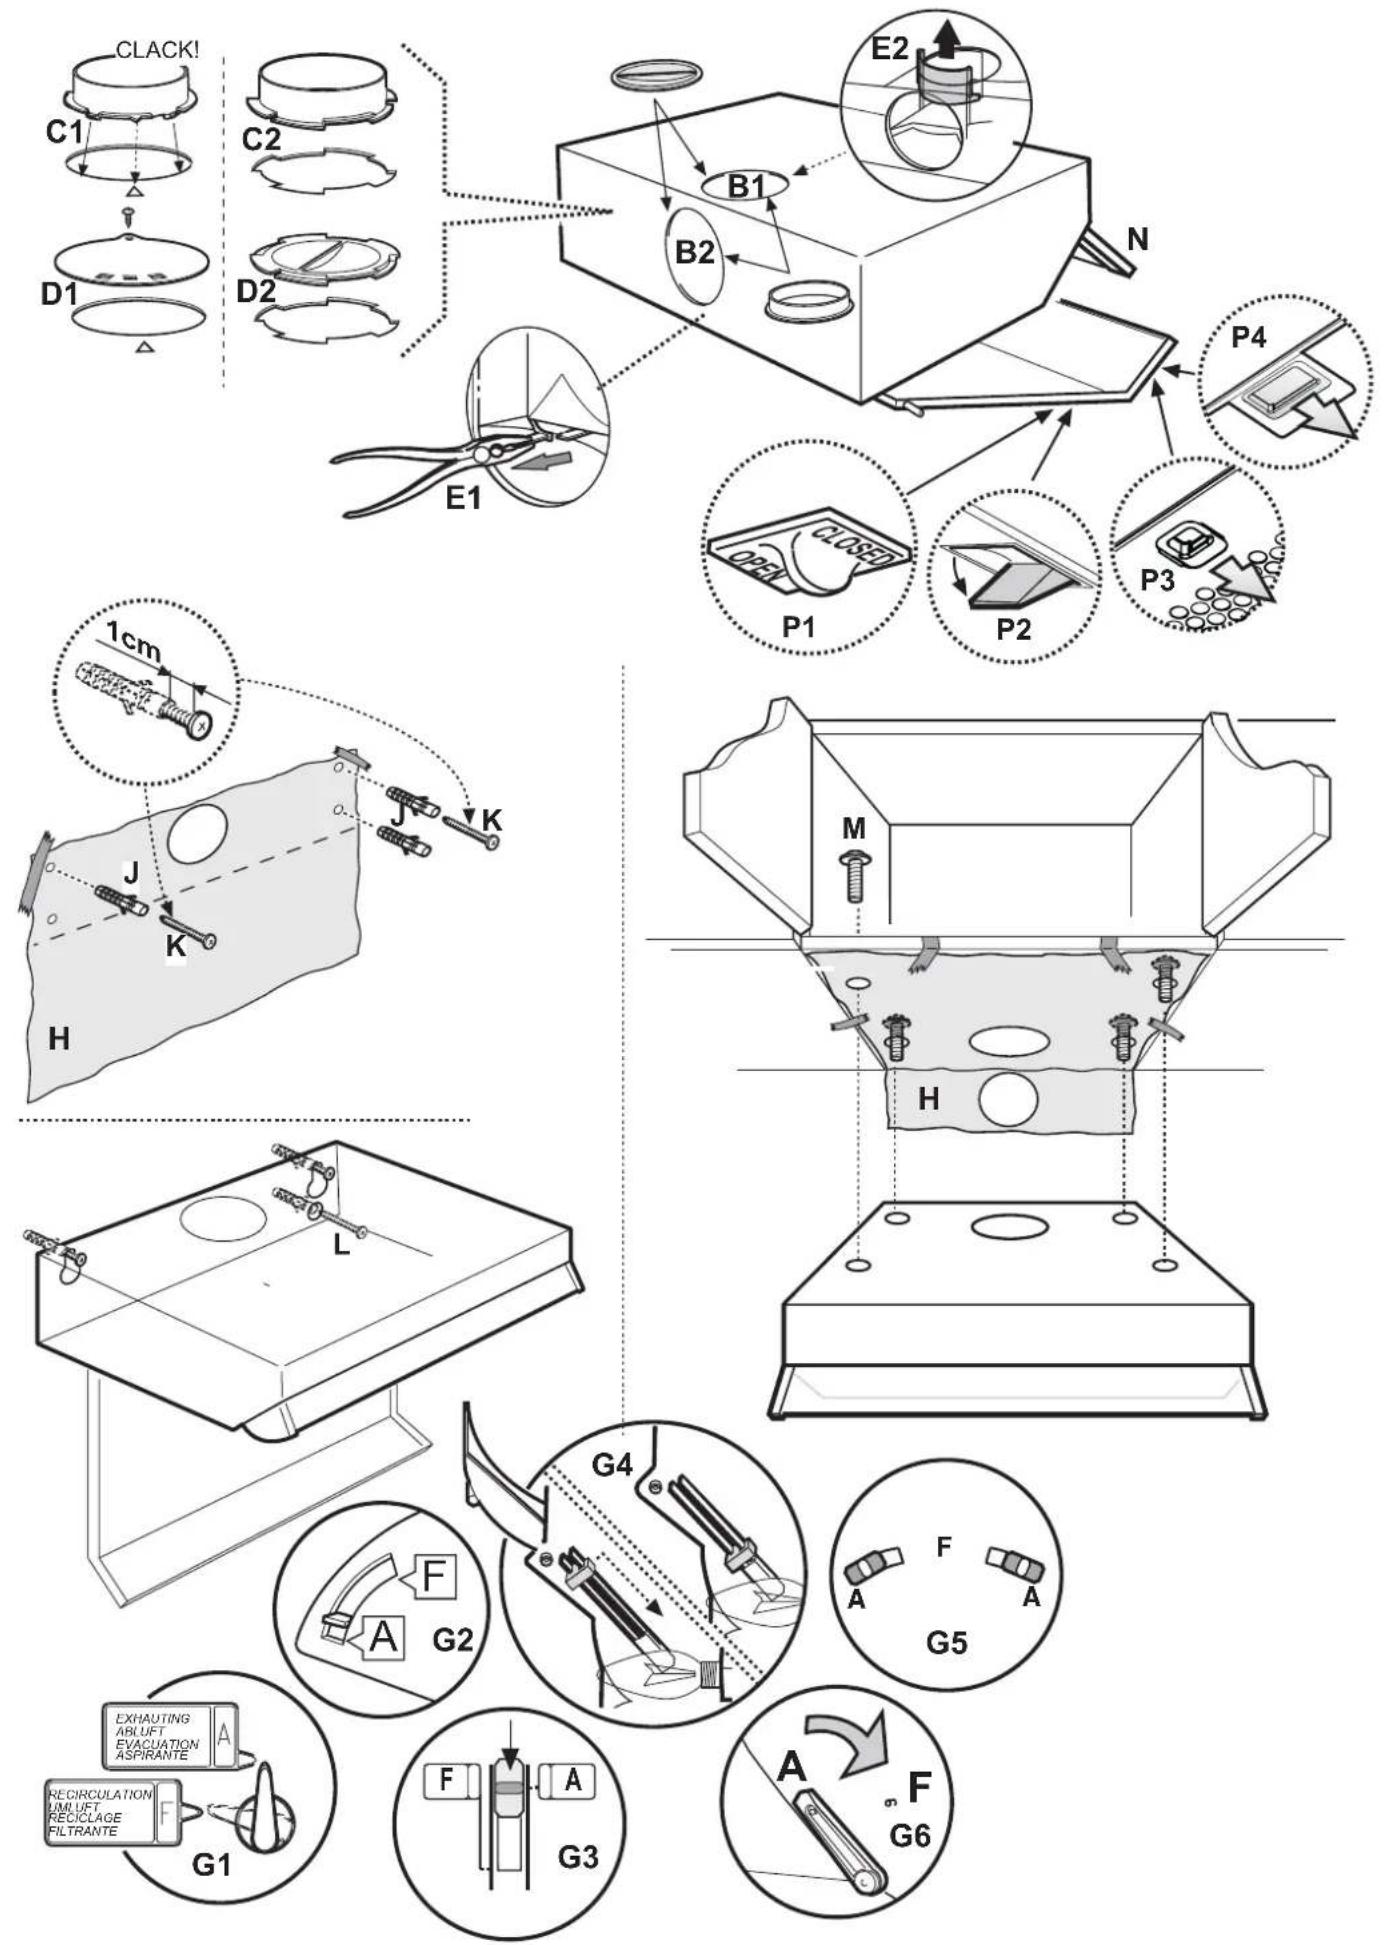
Consult the designs in the front pages referenced in the text by alphabet letters. Closely follow the instructions set out in this manual. All responsibility, for any eventual inconveniences, damages or fires caused by not complying with the instructions in this manual, is declined.
The cooker hood has an upper air duct B1 and an optional rear air duct B2*, for external fumes exit. Select the suitable air duct and apply the flange C supplied, ensure to close the unused hole duct with tap D* supplied if provided.
Caution! In some models the rear hole duct is not easily accessible, even when the tap (if mounted) is removed, in this case remove the plastic piece E1 or E2 that is blocking the hole duct, by unwinding using pliers and cutter. Check that the filter/suction selector (inside the cooker hood) G is in the suction (A) position. In the case where it is not possible to discharge the cooking fumes externally, the cooker hood may be used in the filter version by fixing a carbon filter, the fumes and vapours are recycled via the anterior grill placed above the control panel. Check that the suction/filter selector is in the filter (F) position.
The models provided without suction motor may function only in the suction version and must be connected to a peripheral suction unit (not supplied).
Installation - Do not tile, grout or silicone this appliance to the wall. Surface mounting only. Do not fix chimney flue to furniture or fly over shelves unless the chimney flue can be easily removed, in case maintenance is ever required. The cooker hood must be placed at a minimum distance of 60 cm from the cooking plane for electric cookers and 75cm for gas or mixed cookers. If the instructions for installation for the gas hob specify a greater distance, this has to be taken into account.
The cooker hood may be installed on the wall or on the base of a cabinet; if supplied, use the hole gauge H to drill the correct distance, otherwise lean the cooker hood on the wall or on the base of the cabinet and mark the holes with a pencil.
Wall mounting - Insert the wall screw anchors J in the drilled holes and the two K screws in the upper drill holes, remove the grill and hook the cooker hood to the 2 screws, finally from the inside, insert the third screw L and lock them all in.
Cabinet fixing - Affix the cooker hood with the 4 M screws from inside the cabinet.
Electrical connection - The electrical tension must correspond to the tension noted on the label placed inside the cooker hood. Connect the electrical plug, where provided, to the an easily accessible outlet in conformity with local standards in force. Where an electrical plug is not provided (for direct connection to electrical network) place a standards approved bipolar switch with an aperture distance of not less than 3mm (accessible) from the contacts.
Security advice: Only specialized technicians can replace electric cable in case of damage.
Operation - The control panel is situated on the front of the cooker hood and is equipped with various suction speeds. Use the highest speed for situations of high level vapour concentration in cooking. Always open the vapour collector N*. It is advisable to switch on the suction at least 5 minutes prior to cooking and leave it in operation for 15 minutes approximately after cooking is terminated.
Maintenance - Prior to any maintenance operation ensure that the cooker hood is disconnected from the electrical outlet.
Cleaning - The cooker hood should be cleaned regularly internally and externally. For cleaning use a cloth moistened with denatured alcohol or neutral liquid detergents. Avoid abrasive detergents. Failure to carry out the basic standards of the cleaning of the cooker hood and replacement of the filters may cause fire risks.
Grease Filter - may be one of the following types:
Paper filter must be replaced once a month or if coloured on the top side, when the coloration is evident via the holes in the grill.
Sponge filter should be washed once a month and replaced every 5/6 washes.
Metallic filter must be cleaned once a month with suitable detergents either by hand or in dishwasher (65°C).
When washed in a dish washer, the grease filter may discolour slightly, but this does not affect its filtering capacity.
In order to remove the grease filter open the grill via the P hooks and free the R1 or R2 stoppers.
The self-supporting metal filter does not include a support grill, in order to remove the filter – pull the release springs P4 backwards and slide the filter downwards.
Attention! the metal filter may discolour if washed in dishwasher but the filtering performance is unaltered.
Carbon Filter - it may be one of the following types:
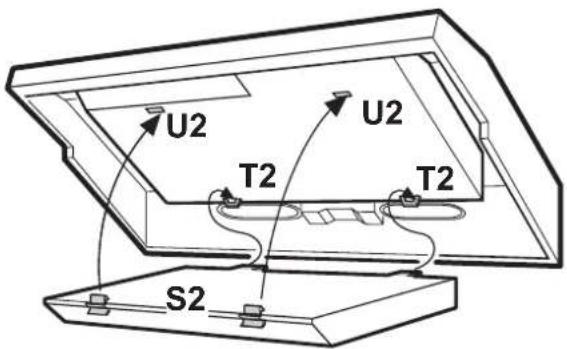
Rectangular S1 or S2' or S3: to be replaced every 6 months Mounting (S1 or S2) : insert the rear side T and hook further to the front (U).
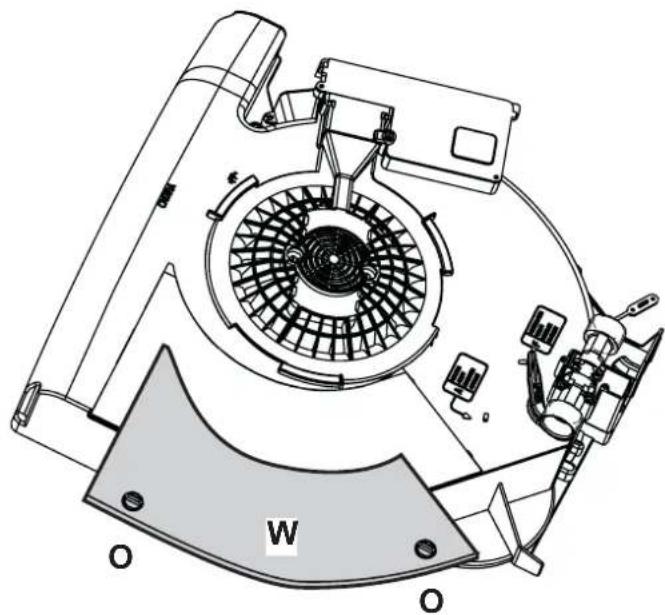
Mounting (S3): Remove the cover W by rotating the O knobs to 90°, then close the cover. Proceed in the inverse for dismounting.
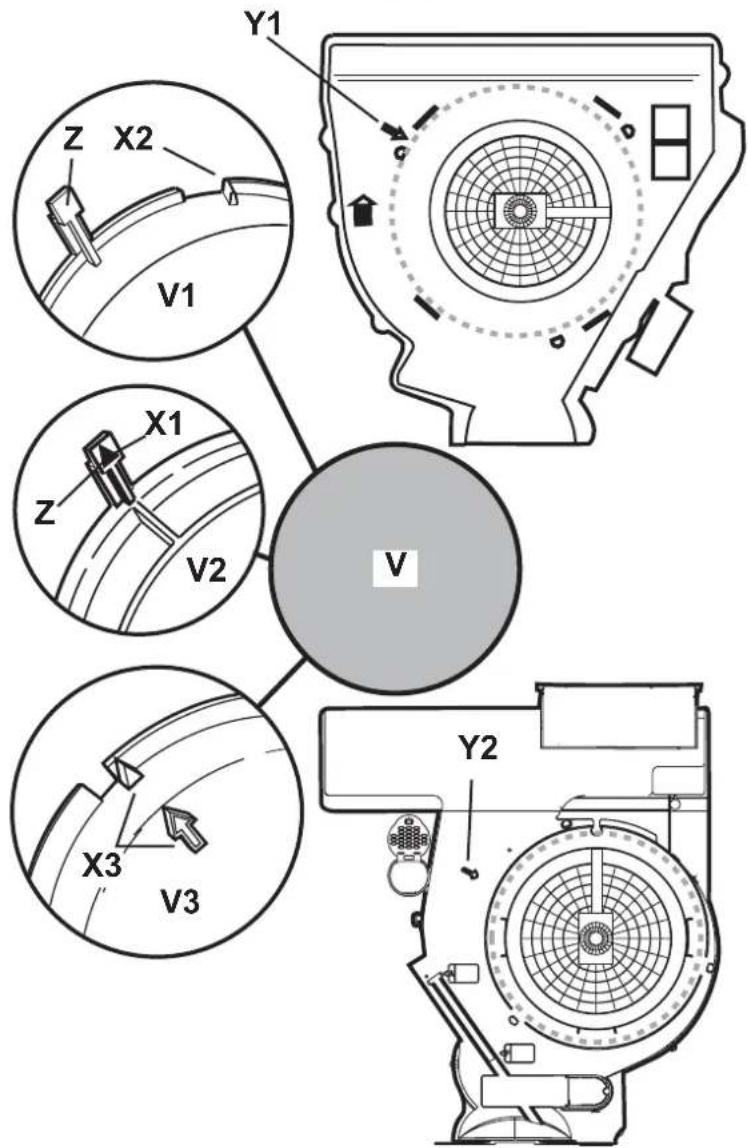
Circular (V1-V2-V3-various models): to be replaced every 4 months.
Bayonet mount position the filter in the middle of the motor protection grill covering ensuring that the reference to X1 or X2 or X3 on the carbon filter match the Y1 or Y2 references on the conveyor, then turn clockwise; in case of dismounting turn anticlockwise, if provided with a Z tape remember to gently lift first.
Replacing lightbulbs 40W - Unscrew the damaged light bulb and replace with an incandescent oval light bulb with a maximum of 40W E14. Remove the grill in order to reach the light bulb area.
Replacing the halogen bulbs - Access the light compartment – extract the lamp cover by levering it off with a small screwdriver or similar tool.
Warning! Prior to touching the light bulbs ensure they are cooled down. Replace the damaged light bulb. Only use halogen bulbs of 20W max (G4), making sure you do not touch them with your hands. Close the lamp cover (it will snap shut).
Caution - This appliance is designed to be operated by adults. Children should not be allowed to tamper with the controls or play with the appliance.
Do not use the cooker hood where the grill is not correctly fixed! The suctioned air must not be conveyed in the same channel used for fumes discharged by appliances powered by other than electricity. The environment must always be adequately aerated when the cooker hood and other appliances powered by other than electricity are used at the same time. Flambé cooking with a cooker hood is prohibited. The use of a free flame is damaging to the filters and may cause fire accidents, therefore free flame cooking must be avoided. Frying of foods must be kept under close control in order to avoid overheated oil catching fire. Carry out fumes discharging in accordance with the regulations in force by local laws for safety and technical restrictions.
Brand : EDESA
Model : C230X
Category : Range hood