
BT1208 - Washing machine BRANDT - Free user manual and instructions
Find the device manual for free BT1208 BRANDT in PDF.


| Product type | Washing machine |
| Brand | Brandt |
| Model | BT1208 |
| Capacity (max load) | 8 kg |
| Energy efficiency class | A+++ |
| Water pressure | 0.1 – 1 MPa (1 – 10 bar) |
| Maximum spin speed | 1200 rpm (estimated) |
| Temperature range | Cold – 95°C |
| Programs | Cotton, Cotton Eco, Mixed, Delicates/Wool, Handwash, Flash 25 min, Rinse, Spin |
| Options | Prewash, Intensive, Rinse plus, Easy ironing |
| Delayed start | Up to 24 hours |
| Child safety lock | Yes (key lock) |
| Lid lock | Yes, automatic during cycle |
| Anti-foam system | Yes |
| Water overflow protection | Yes |
| Detergent dispenser | 3 compartments (prewash, main, softener) plus bleach |
| Drum type | Stainless steel, with removable vanes |
| Retractable rollers | Yes, for easy mobility |
| Adjustable feet | Yes, front adjustable |
| Power supply | 220-240 V, 50 Hz (typical) |
| Energy consumption (Cotton Eco 60°C full load) | 0.985 kWh |
| Water consumption (Cotton Eco 60°C full load) | 55 L |
| Duration (Cotton Eco 60°C full load) | 190 min |
| Noise level | Not specified |
| Dimensions (H x W x D) | Not specified (typical 850 x 600 x 600 mm) |
Frequently Asked Questions - BT1208 BRANDT
User questions about BT1208 BRANDT
0 question about this device. Answer the ones you know or ask your own.
Ask a new question about this device
Download the instructions for your Washing machine in PDF format for free! Find your manual BT1208 - BRANDT and take your electronic device back in hand. On this page are published all the documents necessary for the use of your device. BT1208 by BRANDT.
USER MANUAL BT1208 BRANDT
2/ 安装程序
- 拆下洗衣機的運輸保護裝置

重要:
natural_image
Diagram of a mechanical component with a curved arrow indicating rotation, labeled '圖 10' (Figure 10), showing no text or symbols on the diagram itself.


貼士:
我強烈反對把洗衣機安裝在:
- 在潮濕,通風差的房間。
- 可以被水濺到的地方。
A 程式選挙
① 溫度設定
B 溫度設定
② 旋速設定
© 旋速設定
③ 兒童安全鎖顯示燈
D 選項和兒童安全選鈕
④ 時間顯示屏
E 延遲開始
⑤ 程式程序顯示燈
F 開始/暫停
然後:
- 旋乾前排水
natural_image
Line drawing of a laptop with an open screen showing internal compartments and arrows indicating movement (no text or symbols)
natural_image
Diagram of a mechanical device with arrows indicating motion, labeled '圖 19' (Figure 19), showing no readable text or symbols.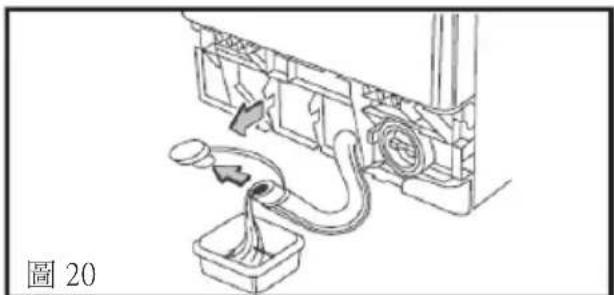
natural_image
Diagram of a mechanical device with a pipe and housing, labeled '圖 20' (Figure 20), showing no readable text or symbols.
natural_image
Technical line drawing of a mechanical assembly with a cylindrical component and directional arrows (no text or symbols)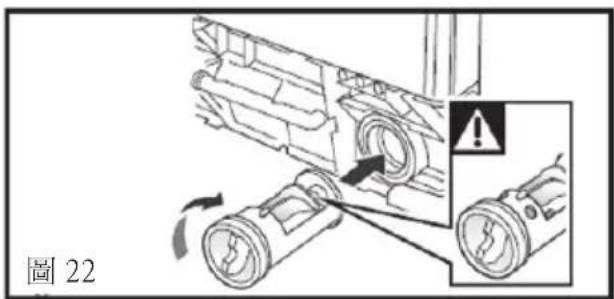
6/ 洗衣機日常保養
- 進入缸底
由滾桶移除風向標:
如有衣物掉進滾桶與風向標之間:
2/F., Shing Dao Industrial Building,
232 Aberdeen Main Road, Hong Kong
You have just acquired a BRANDT washing machine and we would like to thank you.
We have invested all our dedication and know-how in this appliance so that it would best meet your needs. With innovation and performance, we designed it to be always easy to use.
In the BRANDT product range, you will also find a wide choice of ovens, microwaves, cooking hobs, ventilation hoods, cookers, dishwashers, dryers, fridges and freezers that you can coordinate with your new BRANDT washing machine.
Visit our website www.brandt.com where you will find all of our products, as well as useful and complementary information.
BRANDT
As part of our commitment to constantly improving our products, we reserve the right to make changes to them based on technical advances to their technical and functional features and appearance.


Warning:
Before installing and using your appliance, please carefully read this Guide to and Use, which will allow you to quickly familiarise yourself with its operation.
1 / PRESENTATION OF YOUR APPLIANCE
• Description of your appliance 40
2 / INSTALLING YOUR APPLIANCE
- Removing the transport braces 42
- Setting up your appliance 44
- Connecting your appliance 45
3 / PREPARING YOUR LAUNDRY AND YOUR APPLIANCE
- Textile care codes 46
- Treating stubborn stains 47
• Preparing your laundry — 48 - Loading your laundry — 49
- Loading detergents—50
4 / PROGRAMMING YOUR APPLIANCE
• Description of the control panel ____51
- Programming a wash cycle 51
• Operations possible during a program ————53
• Examples of programs—54
- Changing a wash program—55
- Details of programs 56
- Details of options 57
- Other functions 58
• Automatic safety features—59
5 / INFORMATION CONCERNING THE NEW EU REGULATIONS ——60
6 / EVERYDAY MAINTENANCE OF YOUR APPLIANCE
- Cleaning the detergent dispenser ———62
- Cleaning the pump filter 62
- Access to the bottom of the tank——63
- Cleaning your appliance 63
- Miscellaneous maintenance 64
7 / INCIDENTS THAT MAY OCCUR 65
8 / AFTER-SALES SERVICE 68


Please read this user manual carefully before installing and using your machine so as to familiarise yourself with its operation and keep this user manual for reference purposes. This machine, which is intended for domestic use only, has been designed to wash clothing and household fabrics.
RECOMMENDED LOADS:
- The maximum capacity of the appliance is 8 kg.
SAFETY


You must observe the following instructions:
INSTALLATION:
- The water pressure must be between 0.1 and 1 MPa (1 and 10 bars).
- Do not use an extension cord, adaptor or multiple plug.
- Your electrical installation must be able to take the maximum power indicated on the identification plate and the socket must be earthed correctly.
- Use only the supply hose and new seals supplied with the appliance.
- If the power cord is damaged, only entrust the electrical work to a qualified electrician so as to steer clear of any danger.
- Do not install your device on a mat or a carpeted floor since this may impede the circulation of air around its base.
- If any incidents occur which you cannot resolve don’t intervene on the appliance, and contact the technical service of the dealer or manufacturer.
USE:
- This appliance can be used by children aged from 8 years and above and persons with reduced physical, sensory or mental capabilities or lack of experience and knowledge if they have been given supervision or instruction concerning use of the appliance in a safe way and understand the hazards involved.
– Children shall not play with the appliance. - Cleaning and user maintenance shall not be made by children without supervision.
USE (continued):
– Children of less than 3 years should be kept away unless continuously supervised.
- Do not put unwashed laundry, or landry that has been treated with stain remover, solvent or inflammable products in the machine immediately after it has been treated (fire or explosion risk).
- This washing machine is equipped with a safety to prevent any water overflow eventual.
- At the end of the cycle, be sure to shut the water tap and unplug the power cord.
ENVIRONMENT

ENVIRONMENTAL PROTECTION
This washing machine was designed in order to respect the environment.

The appliance's packaging material is recyclable.
Help recycle it and protect the environment by dropping it off in the municipal receptacles provided for this purpose. Your appliance also contains a great amount of recyclable material. It is marked with this label to indicate that the used appliances should not be mixed with other waste. The appliance recycling will be done in compliance with European Directive 2002/96/EC on Waste Electrical and
Electronic Equipment.
Contact your town hall or your retailer for the used appliance collection points closest to your home.
ENERGY SAVING
- Only program pre-washing when absolutely necessary: e.g.: for very dirty sport or work clothes, etc.
- For lightly to moderately soiled laundry, a low-temperature program is sufficient to obtain a perfect wash result.
- For lightly soiled laundry choose a short wash cycle.
– Measure the detergent according to the hardness of the water, the degree of soiling and the quantity of laundry and follow the instructions on the detergent packaging. - As soon as the cycle ends, "-0-" or "STOP" (depending on the situation) is displayed. You can program another wash cycle immediately. If you take no action this display remains visible for one hour.
After one hour with no action on your part, the display automatically switches off.
The machine will therefore use less energy. To reactivate the display, simply press one of the buttons. However, we recommend you select the "Off" position to switch the machine off.
- To avoid wasting water and energy, do not over-dry your laundry.
• DESCRIPTION OF YOUR APPLIANCE
A Control panel
B Lid opening knob (remains locked during the cycle)
C Retractable front baseboard (access to emptying filter/access to transport braces)
D Front transport brace
E Baseboard removal bolts
F Lever for placement on rollers
G Height-adjustable front feet

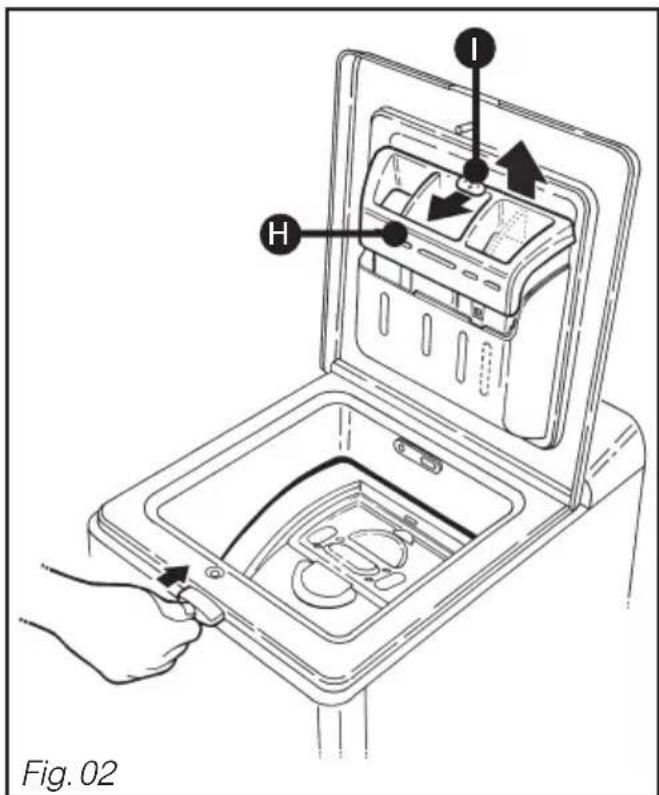
H Detergent dispenser
Detergent dispenser unlocking button
• DESCRIPTION OF YOUR APPLIANCE (continued)
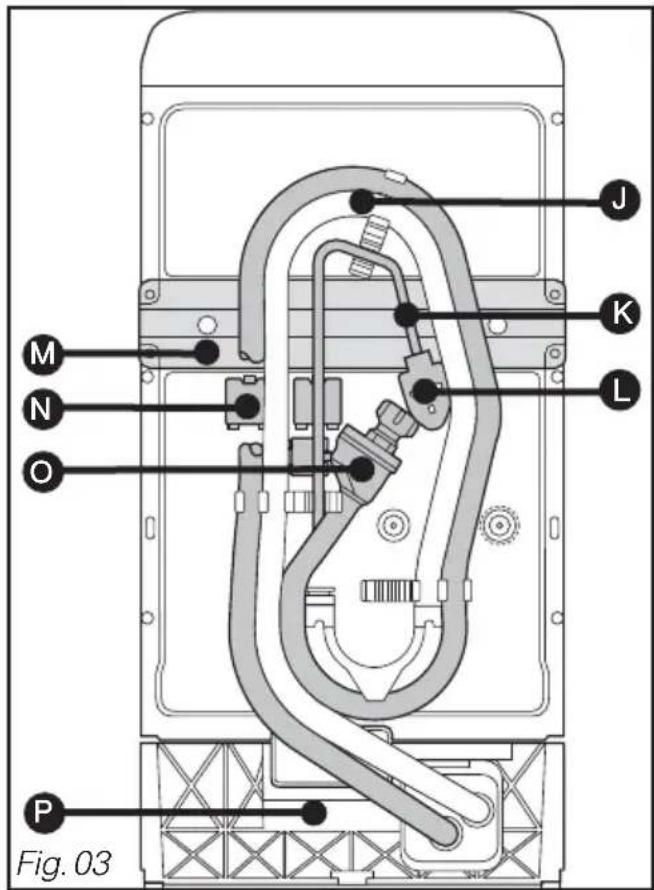
J Emptying hose
K Electrical power cord
Power cord bracing part
M Rear transport brace
N Bracing holes cover
Water intake hose (according to model)
P Nameplate (after-sales reference)
- REMOVING THE TRANSPORT BRACES

Important:
Before use, the following operations must be performed.
These operations involve removing all parts used to immobilise the tank of your appliance during transport.
These "brace removal" operations are necessary for the smooth operation of your appliance and compliance with current safety standards.
If these operations are not performed in full, this may cause serious damage to your appliance during operation.
First remove the expanded polystyrene strut located under the lid.
- Front transport brace:
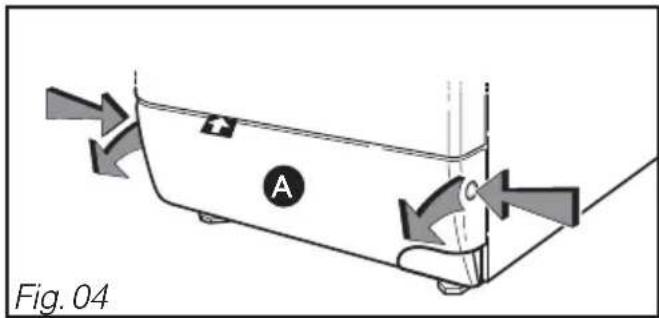
- Open by pressing on the bosses on each side of the baseboard at the same time A while pulling the baseboard towards you (Fig. 04).
- Using a 10 mm wrench, unscrew the "front" brace maintenance screw B de from red plastic (Fig. 05).
- Remove the "front" brace (Fig. 06).
- Plug the hole left by the brace using the cover provided © (Fig. 07).
- Reattach the baseboard (Fig. 07).

natural_image
Diagram of a hand operating a device with a labeled component (B), showing mechanical parts and a scroll wheel (no text or symbols present)

- REMOVING THE TRANSPORT BRACES (continued)
- Rear transport brace:
- Remove the 2 screws Did the 4 screws
E using a 10 mm tube wrench or a flat head screwdriver (Fig. 08). - Remove the brace F
- Release the power cord from the plastic part graching the transport brace.
- Plug the holes left by the brace using the remaining 2 covers H (Fig. 09) and screw the 4 screws Eck in their original position in the body.

Tip:
We recommend that you keep all parts for bracing as you will have to replace them if you need to move your machine at a later date.
All these parts, as well as those used for the entire machine are made from recyclable materials. Please consider this when disposing of them at the end of your machine's service life.

Information:
Before leaving the plant your appliance was thoroughly tested; therefore you may notice a small amount of water in the tank or in the detergent dispensers.

Information:
If you wish to place your appliance in line with your furniture units, you can break the hose attachment hooks.

Important:
Be careful not to crush the hoses.


- SETTING UP YOUR APPLIANCE
- Placement on rollers:
Your machine has retractable rollers so that you can move it easily.
To place it on rollers, turn the lever at the base of the appliance from the right to the extreme left (Fig. 10).

Important:
During operation, the machine must not rest on its rollers: do not forget to return the lever to its initial position.
- Levelling:
Your machine is equipped with two adjustable feet in front to compensate for unevenness in the floor. To adjust horizontality and stability of the appliance, proceed as follows:
- Remove the baseboard (see Fig. 04, previous pages).
- Place the machine on rollers.
- Unscrew the 2 screws used to block the feet using a TORX T20 screwdriver (Fig. 11).
- Adjust the two feet using a flat head wrench or pliers to level the appliance.
- Put the appliance back on its feet and return the lever to its original position.
- Check the stability of the machine by pressing on the lid in a diagonal direction (direction AA then direction BB) (Fig.12). There must be no visible movement of the appliance.
- When the adjustment is correct, screw the 2 screws for blocking the feet and reattach the baseboard.
- Environment:

Important:
If you place your machine next to another appliance or piece of furniture, we recommend that you always leave a space between them to allow air to circulate.

natural_image
Technical diagram of a mechanical component with a curved arrow indicating rotation (no text or symbols)
natural_image
Diagram showing a hand adjusting a mechanical component with a screw and nut, labeled Fig. 11 (no text or symbols on the diagram itself)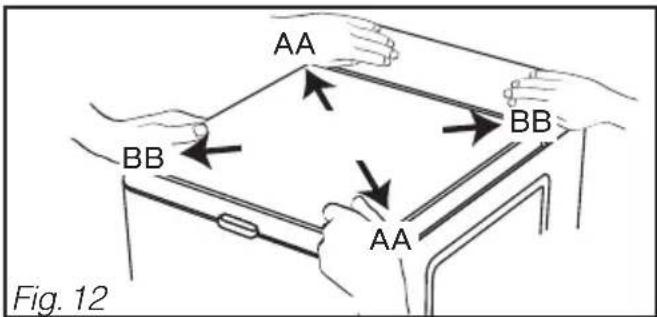

Tip:
We strongly advise against installing
your appliance:
– in a damp, poorly-ventilated room.
– in a place where it could be subject to water splattering.
- on a carpeted floor. If you cannot avoid it, take all precautions so as not interfere with air circulation at the bottom, to ensure good ventilation of the internal components.
• CONNECTING YOUR APPLIANCE
• Cold water supply (Fig. 13):
- Connect the intake hose to a valve with a threaded end ∅ 20x27 (3/4 BSP).
Check presence of the seal.
Water intake:
— Min. water pressure : 0,1 MPa or 1 bar
– Max. water pressure : 1 MPa or 10 bars
• Electrical power supply (Fig. 13):
The electrical installation must comply with the prevailing standards and the Electricity Board's regulations in the country concerned, in particular for the earth electrode.
We cannot be held liable for any incident caused by incorrect electrical installation.

Tip:
Tips for electrical installation of your
appliance:
- Do not use an extension cord, adaptor or multiple plug.
– Never remove the grounding.
- The plug must be easy to access but out of the reach of children.
In the event of uncertainty, consult your installer.
• Discharge of waste water (Fig. 13):
- Connect the emptying hose:
- either temporarily, to a sink or bathtub
- or permanently, to a ventilated siphon.
If your set-up does not have a ventilated siphon, ensure that the connection is not watertight.
In fact, to prevent waste water from returning to the machine, we strongly recommend leaving free space between the machine's emptying hose and the discharge pipe.
In any case, the emptying crosshead must be placed at a height of 0.80 m to 1.10 m in relation to the base of the machine.

Important:
Ensure the emptying hose is supported using an attachment to prevent the cross-head from coming off during emptying and causing a flood.

Important:
Your appliance complies with European directives 2006/95/CE (low voltage directive) and 2004/108/CE (electromagnetic compatibility).

To help you care for your textiles, they have a label giving the necessary information. They
are expressed in codes by the symbols below:
| WASHING | |
| Maximum temperature: 95°C- Normal mechanical action- Normal rinse- Normal spin- Reduced mechanical action- Rinse at decreasing temperature- Reduced spin | |
| Maximum temperature: 60 or 50°C- Normal mechanical action- Normal rinse- Normal spin- Reduced mechanical action- Rinse at decreasing temperature- Reduced spin- Reduced mechanical action- Rinse at decreasing temperature- Reduced spin | |
| Maximum temperature: 40°C- Normal mechanical action- Normal rinse- Normal spin- Reduced mechanical action- Rinse at decreasing temperature- Reduced spin- Greatly reduced mechanical action- Normal rinse- Normal spin | |
| Maximum temperature: 30°C- Greatly reduced mechanical action- Normal rinse- Normal spin | |
| Hand wash onlyMaximum temperature: 40°C(Some appliances are now equipped with a program that lets you machine wash this type of textile) | |
| No wash | |
| USE OF BLEACH | |||
| Cl Bleach permitted: diluted and cold | No bleach | ||
| IRON | |||
| 200 °C High setting | 150 °C Medium setting | 110 °C Low setting | No iron (no steam) |
| DRY CLEAN | |||
| A All usual solvents | P Tetrachloroethylene mineral spirits | F Mineral spirits and F113 fluorinated solvent | No dry clean, no stain remover with solvents |
| Normal process | |||
| P - Reduced mechanical action - Reduced drying temperature - No addition of water (Self-service cleaning impossible) | F | ||
| DRYING IN TUMBLE DRYER | |||
| High tumble dry Low | tumble dry | Do not tumble dry | |
• TREATING STUBBORN STAINS

Tip:
Perspiration, blood, fruit, wine and chocolate stains generally come out with biological detergents, but other stains require specific treatment before machine washing. First conduct a test on an inconspicuous part of the textile and rinse thoroughly. If you use a stain remover, always start on the outside of the stain to prevent ring marks.
CANDLE WAX: remove the excess of the stain by scraping. Then place absorbent paper on either side of the fabric and run a warm iron over the stain to melt the remaining wax.
COFFEE - TEA:
- on white cotton: blot the stain using hydrogen peroxide* before normal washing
- on coloured cotton: blot the stain using a vinegar/water solution (2 tbsp white vinegar for 1/4 litre of water) before normal washing
- on wool: blot the stain using a combination of equal parts alcohol* and white vinegar before washing the item.
SLUDGE - TAR: use Eau Écarlate* stain remover or otherwise, spread a little butter on the stain, leave to penetrate then blot with turpentine* spirits.
CHEWING-GUM: chill it using an ice cube. As soon as it is hard enough, scratch it with your nail. Remove the remaining ring using a degreasing agent*.
CHOCOLATE - FRUIT - FRUIT JUICE - WINE:
blot the stain using a vinegar/water solution (2 tbsp white vinegar for 1/4 litre of water). Rinse well and wash normally.
BALLPOINT PEN - MARKER PEN: remove as much ink as possible by blotting the stain with absorbent paper. Place a clean cloth behind the stain and blot the stain using another cloth soaked in white vinegar for synthetic and artificial fibres or 90* alcohol for other fibres (if the textile allows).
GREASE: immediately sprinkle the fabric with talc. Leave to dry and brush gently to remove the talc. Then blot using a degreasing agent such as mineral spirits*. Rinse and wash normally.
GRASS: blot the stain using white vinegar or 90* alcohol (if the textile allows) then rinse and wash.
KETCHUP - TOMATO SAUCE: prepare a solution with one part glycerine for one part hot water. Let the item soak for an hour, then wash normally.
PAINT: do not let paint spots dry. Treat them immediately with the solvent indicated on the paint pot (water, turpentine*, white spirit*). Soap then rinse.
MAKE-UP: place the stained side of the fabric on absorbent paper, then dampen the other side of the fabric with 90* alcohol if the item allows and if the stain is not greasy. Otherwise, use a degreasing agent (such as trichloroethylene*).
RUST: for slight stains, cover with salt, squeeze lemon juice on the salt and leave overnight; then rinse thoroughly and wash. For heavier stains, use a rust removal product and follow the manufacturer's instructions carefully.
BLOOD: soak the stained item as promptly as possible in cold salty water, then wash normally.
- Use of stain removers

Important:
To avoid risk of fire and explosion:
(*) if you use the products recommended in the recipes above, take care to rinse your laundry thoroughly before placing it in your machine - if you use commercial stain removers, follow the manufacturer's recommendations carefully. We remind you that, generally speaking, stains that are treated promptly are easier to remove. However, old stains that have been ironed or dried in tumble dryers cannot be removed.
• PREPARING YOUR LAUNDRY

Important:
Before the first wash, we recommend running a "COTTON 90° without pre-wash" cycle without load, using 1/2 the usual detergent quantity. This will eliminate any manufacturing residue that may be left in the machine.
- Sorting your laundry:
Refer to the textile care codes table for sorting your laundry and choose the program that best suits the labels. For mixed loads, use the program suited to the most delicate laundry. For new laundry, take the precaution of checking that the fabric does not bleed: see "Colour test" opposite.
• The colour test:
At the first wash, coloured laundry often bleeds, except if it is guaranteed colourfast. Before placing it in the machine, perform the following test:
- Take an inconspicuous part of the item.
– Dampen it using hot water. - Then press it against a white cloth.
- If the colour does not bleed, you can wash it normally in the machine.
- If the colour does bleed, wash it separately in the machine or by hand.
- Laundry loads

Important: For optimum results, do not overload the drum and do not exceed the following maximum loads :
Cotton / Colours ____ 8 kg
Mixed 3 kg
Delicates / Wool____ 2 kg
Average weight of some items of "light" dry laundry
Single sheet ____ 400 to 500 g
Double sheet 800 g
Pillowcase 200 g
Light night shirt 150 g
Child's plain weave trousers ____ 120 g
Adult's plain weave trousers ____500 g
Cotton/polyester men's shirt ____200 g
Cotton t-shirt, large size ____ 150 g
Dish towel 100 g
Tablecloth 250 g
Delicate lingerie ____ 50 g
Child's synthetic woollen items ____ 50 g
Sock 20 g
Adult's plain weave pyjamas____250 g
Average weight of some items of "heavy" dry laundry
Adult's jeans ____ 800g to 1 kg
Large bath towel ____ 700 g
Small towel 300 g
Adult's sweat pants ____ 350 g
Child's terry pyjamas____ 100 g
Bathrobe 1200 g
Sweat shirt 250 g
Quilt cover ____ 1500 g
• PREPARING YOUR LAUNDRY (continued)
- Checking your laundry

Important:
Failure to follow these recommendations can cause serious or even irreversible damage (damaged drum, torn laundry, etc.) and will void the warranty.
- Empty pockets: remove all objects such as lighters and matches, etc.
– Close zippers and press fasteners. - Remove hooks from net curtains or place your net curtains in a washing bag.
- Remove poorly-attached buttons, pins, clips.
- Place small items of laundry (ribbons, pouches, etc.) in a washing bag.
– Turn multi-layer garments inside out (sleeping bag, anorak, etc.).
– Turn knits, fabrics with embossed decoration, trousers and stitched garments inside out.
- LOADING YOUR LAUNDRY
Conduct operations in the following order:
- Opening the machine
- Check that the machine is switched off.
- Press the knob located at the front of the machine. The lid opens.
- Opening/Closing the drum
- Open the drum by pushing on the knob located on the front door (Fig. 14).
- To close them again, push the front door downwards then close the rear door on top, until it locks.

Important:
For correct locking, check that the blue
edging A the knob is visible (Fig. 15).

natural_image
Diagram of a hand inserting a component into a device panel, showing directional arrows (no text or symbols)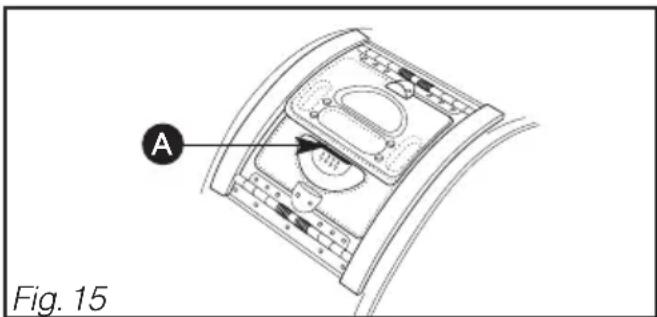
• Introduction of the laundry
To achieve the best washing performance, after sorting and unfolding, place the laundry in the drum, not piled up but spread out evenly. Mix large and small items to achieve the best spinning, so there is no imbalance.

Important:
When closing the drum, be careful not to trap laundry between the two doors.
- LOADING DETERGENTS (Fig. 16)
• Measuring the detergent
The quantity of detergent to be used depends on the hardness of the water, the degree of soiling of your laundry and the size of the load.
Always refer to the quantity recommendations given on the detergent packaging.
Warning: the recommendations of detergent manufacturers are usually for a drum filled to the maximum. Adjust your quantity in accordance with the weight of laundry in the machine.
These recommendations will prevent excessive use of detergent which causes foaming. Over-production of foam can decrease the performance of your machine and increase the wash duration and water use.
• Detergents for woollens and delicate fabrics
When washing these fabrics, we recommend using a suitable detergent (avoid putting it directly in the drum as some of these products are aggressive to metal).

① | Pre-washing compartment (powder)
② II Washing compartment (powder or liquid)
③ cl Bleach compartment
④ Fabric softener compartment
Powder detergent
Liquid detergent

Important:
- The "WASHING" compartment may contain powder and liquid; however, do not use liquid detergent for programs WITH pre-washing or WITH "delayed start" (depending on model).
- For correct filling of detergent compartments, place the lid in its maximum opening position.
— Do not exceed the MAX level.
• DESCRIPTION OF THE CONTROL PANEL

A Program selector
B Temperature setting
© Spin speed setting
D Options and Child Safety Selection buttons
E Delayed start
F Start/Pause
① Temperature display
② Spin speed display
③ Child Safety lock indicator light
④ Time display
⑤ Cycle sequence indicator lights
NB: All buttons are touch-sensitive; they do not press down. A simple touch is sufficient.
• PROGRAMMING A WASH CYCLE
| • Operations to perform | Display |
| – Choose the wash cycle best suited to the type of laundry by turning the program selectorA NB: Turning the selector to a position other than “O” switches the machine on. | The machine displays the most suitable spin speed for the program chosen as well as the duration of this program for a standard load. |
| – Choose the washing temperature best suited to the type of laundry using the temperature button .&cB NB: For a cold wash cycle, change the temperature by selecting "0" on the display 1. |  |
| – You can change the spin speed proposed using the Spin button 9 C – Or for the end of cycle: choose drain. The cycle will end with draining at 110 rpm without spin. – Or: full tank stop. Your machine will stop with a tank full of water before the final spin. |   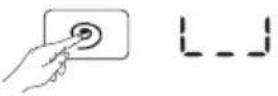 |
• PROGRAMMING A WASH CYCLE (continued)
| • Operations to perform (continued) | Display |
| - If necessary choose options using the options buttonsD(see chapter “DETAILS OF OPTIONS”).Information: You can select only the options compatible with the program chosen. | Light on: option selectedLight off: option not selectedNB: Choosing an option changes the cycle duration. |
| - Choose immediate start by pressing the “Start/Pause” button .FThecycle sequence indicator 10nts up.The program begins.NB: The duration displayed at the start of the programme is for information only. It will re-adjust a few minutes after the cycle begins following estimation of the laundry load. | Throughout the cycle, the machine indicates the current phase of the cycle...as well as the estimated time remaining until the end of the cycle.Remaining time2:10 = 2h10(hour - minutes) |
| - Or choose to delay your cycle by pressing the “Delayed Start” (+) or (-) buttonsE(refer to the chapter on "OTHER FUNCTIONS" - “Delayed start”). | A moving display (four little revolving segments) shows the period of time until the cycle starts. |
| • Indication of End of cycle | Display |
| NB: After the spin, your washing machine automatically cools the laundry and positions the drum with the opening at the top for easier access to the laundry. This operation lasts 3 minutes maximum.The display 4 then shows “StOP”, which tells you the cycle has finished.- Turn the program selector A to the “O” position. You can then open the lid and remove your laundry. | STOPDetaged star — |
| • Cancellation during programming, washing or during pause. | Display |
| - Turn the program selector A to the “O” position.NB: Cancellation means you always have to re-program from scratch.If you have cancelled during washing, if you need to drain the water, run a “Spin” program and set a suitable speed. | All displays are extinguished |
• OPERATIONS POSSIBLE DURING A PROGRAM
- Add or remove an item during the cycle (not possible during spin)
- Press the "Start/Pause" Ftton to interrupt the wash cycle.
- Add or remove the item(s) of laundry.
The time taken for the lid to unlock depends on the temperature inside the machine and, for safety reasons, this may take several minutes if interrupting a cycle at more than 40° C.
- Press the "Start/Pause" IFiton to continue the cycle.
Display
The time countdown stops. The cycle sequence and "Remaining time" lights flash alternately.
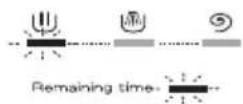
Countdown starts again and indicator lights "steady" again.

- Changing the program during the cycle
– During the cycle or during the delayed start, you can make certain program changes if needed.
To find out which program changes are possible, refer to the chapter on "CHANGING A WASHING PROGRAM".
Display
- Child safety device
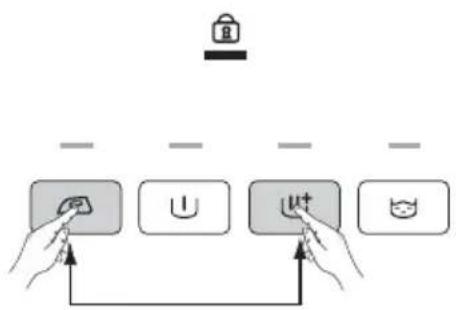
- To avoid unintended changes during a program, you have the option to activate the "Child safety" device.
To do this, press on the 1st and 3th option buttons at the same time (D e "Padlock" indicator comes on).
When the "Child safety" is activated, the buttons and program selection are locked.
- If you wish to change your program, you must first deactivate the "Child safety" device.
To do this, press on the same 2 buttons at the same time, until the "Padlock" indicator goes off.
NB: You can activate or deactivate the "Child safety" device at any time. Of course, we recommend that you activate it only after programming and launching the cycle.
Display
flowchart
graph TD
    A["Input"] --> B{Control}
    B -->|Yes| C["Output"]
    B -->|No| D["Load"]
    D --> E["Control Button"]
    E --> F["Output"]
    style A fill:#f9f,stroke:#333
    style E fill:#bbf,stroke:#333
• EXAMPLES OF PROGRAMS
To choose the most appropriate program for your load, follow the indications given on the labels attached to most textiles.
 |
● : These functions may be used alone or together – illogical combinations are impossible.
- For an explanation of the different programs, refer to the chapter on "DETAILS OF PROGRAMS".

Information:
Choosing an option changes the cycle duration, for example:
- Pre-wash option: the cycle is extended from 17 to 33 minutes.
- Extra Rinse option: the cycle is extended from 9 to 18 minutes.
• CHANGING A WASH PROGRAM
• During programing
All program changes are possible as long as you have not yet pressed the "Start/Pause" F.
• After the cycle starts
After pressing the "Start/Pause" F button, if you wish to change the type of textile (for example from "Cotton" to "Mixed" etc...), you must cancel the current program. To do this, turn the program selector A to the "O" position.
Then program your new choice and remember to confirm by pressing the "Start/Pause" button F.
NB: If you change a program without cancelling, the machine displays the following :

This indicates that the new selection will not be recorded.
However, the current cycle is not cancelled and if you return the program selector tA its original position, the cycle will resume its normal course.
• Any time during the cycle
Depending on your model, the following changes are possible without pressing the "Start/Pause" button F
- You can change the washing temperature for the same type of fabric.
NB: If the temperature reached by the washing cycle is higher than your new choice, heating of the water stops immediately and the cycle continues.
- You can change the spin speeds.
- You can select "Drain" or "Full tank stop" at any time during washing.
- You can activate the 🎨 (Rinse plus) option at any time until the start of the rinse phase (until the "Rinse" light comes on).
- You can deactivate all the options at any time during the cycle as long as their action is not already complete.
- During the period preceding the actual start of the cycle (when you have chosen to delay the wash cycle).
– All program changes are recorded during the wait period before a delayed start.
- You can change the duration of the "Delayed Start" at any time during the wait period preceding the actual start of the cycle. To do this, press the Delayed start (+) or (-) buttons E choose a new value.
NB:
– During this period, the choice of a new time cancels the previous selection. The new duration chosen is recorded as of the latest selection.
- If during this period you wish to completely cancel the "delayed start", press one of the Delayed start (+) or (-) E buttons until the "Delayed start" light goes off and the "Remaining time" light comes on. Then briefly press the "Start/Pause" button F The cycle will start immediately.
- You can activate or change the 📄 (Easy ironing), (Prewash), (Intensive) and
(Rinse plus) options at any time during the wait period before a "Delayed start".
• At the end of the cycle
When the machine displays "StOP" you can program a new cycle without returning the program selector A to the "O" position.
The machine is then ready to be reprogrammed.
• DETAILS OF PROGRAMS
The main programs offered by this machine are as follows:
- OptiA 39 min
This 40° C max program lets you wash a usual 3 Kg load of cotton and mixed items in 39 minutes «flat», guaranteeing perfect washing results and maximum energy savings.
• Cotton

This program allows you to wash all your clothes in cotton but more specifically your toweling spin for which the program has been particularly studied.
- Cotton ECO
This program will help you get the best washing performance, saving energy and water.

Important: If you are washing colours, do not exceed 60°C max.
NB: During the first minutes of this program, your washing machine automatically estimates the load of laundry placed inside. It adjusts water usage and program duration accordingly for perfect washing results. Thus the remaining time displayed may vary considerably once this measurement has been made.
• Mixed

For a load comprising RESISTANT SYNTHETICS or MIXED FIBRES.
• Delicates/Wool

For a load comprising NET, DELICATE FABRICS, FRAGILE ITEMS and "MACHINE-WASHABLE" wools.
NB: Program with low mechanical action, very low spin and agitation action adjusted to suit these fabrics.
- Handwash

For a load comprising SILK or PARTICULARLY DELICATE FABRICS.
NB: Program with a very gentle mechanical action and no intermediate spins between rinses.
The cycle ends with a very gentle, progressive spin restricted to 600 rpm.
- Flash 25 min
This program at 40° C max lets you wash a 3 Kg load of lightly soiled laundry cromprising COTTON, WHITES, COLOURS or RESISTANT SYNTHETICS.
Its duration is just 25 minutes.
- Rinse

Rinse followed by, on selection :
– spin with emptying,
– emptying only ("Draining" option),
- a full tank stop.

Important: With a "rinse only" followed by spin or "spin only", be careful to se the appropriate spin speed for the of laundry in the machine.
- Spin

This program lets you spin the laundry at the speed of your choice. It is followed by emptying.
• DETAILS OF OPTIONS
- Prewash ⏻
Specially designed for soiled laundry (mud, blood, etc.).
Cold agitation precedes a heating phase 30°C. This cold agitation helps remove the stain particles before heating.

Important:
In this case, it is necessary to also place detergent in the “|” compartment of the detergent dispenser.
- Intensive ⬤ +
This function improves washing performance and by automatically increasing the temperature of the wash water and the agitation time, it treats stubborn stains.
- Rinse plus

"Sensitive and allergic skin cycle": adds an extra rinse to the wash cycle.
- Easy ironing

Through reduced agitation and controlled cooling of the wash water, this program limits wrinkles in the laundry and makes ironing easier.

Important:
Before switching your machine on, check that the electrical power cord is connected and the water valve is open. Ensure that the drum doors and the machine lid are properly closed. In the "End of cycle" phase, when "STOP" is displayed, any action on one of the control elements (selector or buttons) lets you return to "Programming" mode.
For safety reasons, at the end of a cycle, we recommend disconnecting the power cord and shutting off the water supply valve.
• PROGRAMS FOR THE TESTS ACCORDING REGULATION DELEGATE (UE) N° 1061/2010
- Program cotton standard at 60°C : Cotton eco 60 - without option - spin max
- Program cotton standard at 40°C : Cotton eco 40 - without option - spin max
- OTHER FUNCTIONS
Your washing machine memorises your washing habits. For each new program it records the temperature, speed and the options that you most frequently use and proposes them as soon as you switch on.

Important:
When starting your appliance, it proposes the manufacturer's settings, but after a few cycles it will take into account your own settings.
- Draining

This function is for very delicate laundry and lets you eliminate spinning and go directly to the emptying phase.
- Full tank stop

This function lets you remove laundry from your machine before the spin phase or lets you defer this phase, and your laundry remains in the water to prevent it from creasing.
NB: When the machine is at full tank stop, the "Rinse" light and the remaining time light flash alternately.
The display ④ shows "00:00".


cycle sequence


Then:
— either you want to empty before spinning.
In this case, choose a spin speed suited to the type of laundry, using the "Spin" button

Press the "Start/Pause" button. Fine program will end automatically.
— or you want to empty only.
In this case, using the "Spin" button, ⑨ C choose the "Drain" function (spin speed "110").
Press the "Start/Pause" button .The program will end automatically.
- Delayed start
You can delay the start of your program by 1 to 24 hours to take advantage of preferred energy rates or to end the cycle at the time desired.
To do this, select the required duration by pressing successively on the "Delayed Start" (+) or (-) buttons until you reach the duration required.
NB: The time remaining before the start of the cycle is counted in hours up to 1 hour, then in minutes from 59 to 1 minute.

Information:
During the entire wait period, four little segments light up one after the other.
At the end of the wait period, the program starts and the machine counts the time remaining before the end of the cycle.


• OTHER FUNCTIONS (continued)
- Remaining Time Display
— During programming, the display 📋s
you the estimated duration of the program for a standard load (*).
(*) The time indicated by the machine at the start of the program may vary during the cycle :
- After estimating the load contained in the drum.
- If you change the washing temperature (even during the spin), if you add or remove options, the time will be recalculated and updated on the display.
• AUTOMATIC SAFETY FEATURES
- Lid opening safety
- As soon as the wash cycle has begun, your machine lid locks.
- As soon as the cycle ends or when the machine is at full tank stop, the lid unlocks.
- If you have programmed a "Delayed start", the lid is not locked during the wait period preceding the start of the cycle.
- If you want to open the lid during the cycle, press briefly on the "Start/Pause" button and wait at least 1 to 2 minutes so that the lid safety feature unlocks.

Important:
Depending on the moment during the cycle when you wish to open the lid, this period may be longer since a cooling period is required.
Indeed, during the cycle, to prevent the lid from unlocking, the temperature inside the machine must not exceed a certain threshold, to prevent serious burns.
— During the cycle, the display shows you the estimated time remaining until the end of the cycle at all times.
- If power is disconnected during the wash phase, when power returns the time displayed may be less than the actual remaining time. This time will be adjusted at the start of the rinse phase.
- Anti-foam safety
Your washing machine can detect excessive production of foam during the spin.
In this case, the spin stops and the machine is emptied.
The cycle then resumes, adjusting the spin speeds and possibly adding an extra rinse.
- Water safety
During operation, the water level is constantly checked to prevent any overflow.
- Spin safety
Your washing machine has a safety feature that can limit spinning if it detects that the load is poorly distributed.
In this case, your laundry may be insufficiently spun. Spread out your laundry evenly in the drum and program a new spin.
In accordance with EU regulation 1015/2010, below you will find additional product information. The purpose of this information is to provide details on the energy-saving directives to which all appliances sold in the EU must conform.
• WASHING YOUR CLOTHES
Care labels on items of clothing specify appropriate detergents, temperatures and settings.
| Type of cloth Programs | Detergent | ||
| White cotton laundry |  | Cotton20°C - 90°C max. | Detergent with a bleaching product |
| Coloured linen or cotton laundry |  | Cotton20°C - 60°C max. | Detergent for coloured laundry without a bleaching product |
| Synthetic items |  | Synthetic20°C - 60°C max. | Colour/delicate detergent |
| Delicate fabrics |  — — | Delicate/Silk20°C - 40°C max. | Detergent for delicat laundry |
| Wool | [gWTX] | Wool20°C - 40°C max. | Detergent for woollen laundry |
• PRODUCT INFORMATION
• Residual moisture of the laundry
To find the spin-drying efficiency of your appliance, consult its energy label and refer to the table below:
| Spin drying efficiency class Residual moisture D in % | |
| A (very efficient) D < 45 | |
| B | 45 ≤D < 54 |
| C | 54 ≤D < 63 |
| D | 63 ≤D < 72 |
| E | 72 ≤D < 81 |
• PRODUCT INFORMATION (continued)
- Programs for tests defined by (EU) delegated regulation 1061/2010
These programs are suitable for cleaning averagely soiled cotton cloth and are more efficient in terms of both energy and water consumption.
| Class and maximum load | Maximum load: 8 Kg | |||
| Programs * | Classe | Consumptions | Duration (in min) | |
| kWh liters | ||||
| Cotton Eco 60°C full load | A+++ 0,985 55 | 190 | ||
| Cotton Eco 60°C half load | A+++ 0,96 42 | 184 | ||
| Cotton Eco 40°C half load | A+++ 0,63 42 | 169 | ||
* Programs without option, max spin.
For energy-saving purposes, the actual washing temperature can vary from the temperature of the selected program.
- Electricity consumption in 'off' and 'left-on' modes
| Off mode: | < 0,5 W | ‘Left-on’ mode: | < 1,5 W |
• CLEANING THE DETERGENT DISPENSER
Clean the detergent dispenser regularly.
To do this:
- Push the button forwards and pull the dispenser upwards (Fig. 18).
– Hold the dispenser under the hot water tap to thoroughly clean the inside of the compartments and the water intake areas.
- For easier cleaning of the fabric softener compartment, it has a removable siphon (coloured part). Make sure you replace it correctly after cleaning.
- Then replace the entire detergent dispenser in its housing, making sure it is positioned correctly.
• CLEANING THE PUMP FILTER

Important:
If you do not clean the pump filter regularly, your machine's performance may be compromised.

Important:
First program emptying then disconnect the power supply.
To clean the pump filter:
- Remove the baseboard (Fig. 19).
- Place a flat recipient under the pump access.
- If your machine has a drain pipe, take it out by detaching the cap from the base (Fig. 20).
- Open the cap at the end of the pipe and let the water flow into the recipient (Fig. 20).
- Close the cap, making sure that it is pushed down and reattach it in the base.
- Unscrew the cap of the drainage pump filter (Fig. 21).
- Clean the filter.
- To replace it, insert it and point the small lug on the cylindrical surface upwards (Fig. 22).
- Screw the cap back on as far as it will go (Fig. 22).
- Replace the baseboard in its original position.

Important:
At the next wash, check that there is no during the filling phase.

natural_image
Line drawing of a refrigerator interior with internal compartments and arrows indicating parts (no text or symbols)
natural_image
Diagram of a mechanical component with arrows indicating motion, labeled Fig. 19 (no text or symbols on the diagram itself)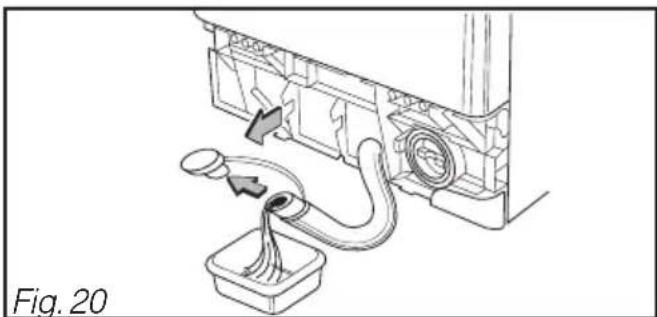
natural_image
Diagram of a device with tubing and connectors, labeled Fig. 20 (no text or symbols on diagram itself)
natural_image
Mechanical assembly diagram showing a component being inserted into a housing, with no visible text or symbols.
natural_image
Mechanical assembly diagram showing a component being inserted into a housing, with an inset highlighting a warning symbol (no text or labels present)- ACCESS TO THE BOTTOM OF THE TANK
Removing the vane from the drum:
If an item of laundry falls between the drum and the vane:
- Close the drum after emptying it.
– Turn the drum until the vane attaches.
- Unscrew and remove the 2 screws (TORX T20 recesses), the vane falls into the drum. Take the precaution of placing a towel to cushion the fall (Fig. 23).
– Turn the drum around and open it.
- Pick up the fallen part through the openings created by removal of the vane.
- To refit, insert the vane, from front to back, into its housing.
- Close the drum and turn it around.
- Hold the vane while you place the screws.

natural_image
Close-up of two white plastic electronic components with perforated surfaces, labeled 'A' and 'Fig. 23' (no text or symbols on the components themselves)• CLEANING YOUR APPLIANCE

Important:
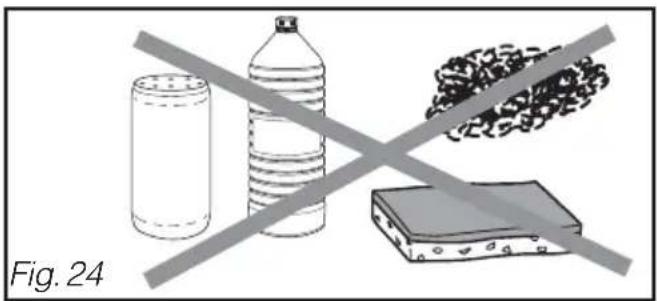
When cleaning the control panel, the drum access area and the body, use a sponge or a damp cloth and liquid soap only.
In all cases, avoid the following (Fig. 24):
- Abrasive powders.
- Metal or plastic sponges.
– Alcohol-based products (alcohol, thinners, etc.).
natural_image
Illustration showing a plastic bottle, a cylindrical container, and a textured surface with a crosshair overlay (no text or symbols)
Professional expertise for the general public
To keep your appliance in good working order, we recommend that you use Clearit household products. Clearit offers you professional products and adapted solutions for the daily upkeep of your household and kitchen appliances. You may find them in conventional retail outlets, along with a complete line of by-products and consumables.
• MISCELLANEOUS MAINTENANCE
- Upkeep of internal parts
To ensure better hygiene we recommend the following:
– Leave the lid open for a while after washing.
- Clean the plastic and rubber parts around the cavity access around once a month using a product with low bleach content. Rinse to eliminate all residue from this product.
- Run a 90°C wash cycle at least once a month.
- Periodic checks
We recommend that you check the condition of water supply and emptying hoses. If you observe the slightest cracking, do not hesitate to replace them with identical hoses available from the manufacturer or its After-Sales Service.
- Replacement of the water supply hose
When changing it, ensure it is well tightened and that there is a seal at both ends.
- Replacement of the power cord

Important:
To ensure your safety, this must be carried out by the manufacturer's after-sales service team or a qualified professional.
- Risk of freezing
If there is a risk of freezing, disconnect the water supply hose and empty the water that may be left in the emptying hose, placing the hose as low as possible in a cup.

Tip:
Certain incidents may arise when using your washing machine; here are the points to be
checked.
| Problems: Possible causes / Remedies: | |
| The cycle does not start: | - you have not pressed the “Start” button.- the appliance is not connected to the power source:- check that the plug is plugged in.- check the circuit-breaker and the fuses.- the water intake valve is closed (d01).- the machine lid is not properly closed (d07).- the pause function is activated. |
| The sensitive buttons are inactive: | - the "Child Safety" feature is activated: deactivate it by pressing the appropriate buttons. |
| The display is off: | - check that the plug is plugged in.- check whether the circuit-breaker is activated.- your machine is in "Energy savings" mode (display goes off after 1hr without action). |
| Strong vibrations during spinning: | - your machine is not properly unpacked: check that all the struts used for transport have been removed.- the floor is not horizontal.- your machine is not steady on all 4 feet: adjust the feet. |
| The load is not spun or insufficiently spun: | - you have selected a program without spin, for example "Draining".- the spin safety feature has detected poor distribution of the load in the drum: unpile the laundry and program another spin phase. |

Important:
Generally speaking, and regardless of the anomaly observed, the machine should be stopped, the power cord disconnected and the water intake valve closed.
| Problems: Possible causes / Remedies: | |
| A puddle of water forms around the machine: | Caution: First remove the plug or cut off the relevant fuse and close the water intake valve.During operation of the appliance, the constant level check prevents water from overflowing. If water comes out of the machine in spite of this, it is possible that:- the emptying cross-piece is incorrectly positioned in the discharge pipe.- the connections between the water supply hose and valve and the machine are not tight: check the presence of seals as well as tightening of connections.-NB:excess foam may have caused overflow: in this case (slight leak), try to re-program a supervised cycle with a smaller amount of detergent. If the leak reoccurs, contact the After-Sales Service. |
| The machine does not empty: | - you have programmed "Full tank stop".- the drainage pump or filter are blocked: clean these parts.- the discharge pipe is bent or flattened. |
| The lid does not open: | - the program is not yet finished: the lid remains locked for the duration of the program, and for as long as the temperature remains too high (this may take a few minutes). |
• INCIDENTS THAT YOU CAN FIX YOURSELF
Your appliance detects certain operating incidents itself and informs you via specific messages on the display. Below we explain how you can very easily fix these incidents yourself:
Messages Causes / Remedies
| d01 | Filling fault. Check that the water intake valve is open, then press the “Start” button to restart the cycle. |
| d02 | Emptying fault. Clean the pump filter (refer to the chapter on "EVERYDAY MAINTENANCE: Cleaning the filter"), then press the "Start" button again to restart the cycle. |
| d07 | Cover locking fault. Check the lid is closed then press the “Start” button again to restart the cycle. |

Important:
If you have not been able to fix one of the above incidents yourself, call the repair engineer and relay the message displayed (d01, d02, etc.) to make the repair easier.

Tip:
If you have experienced an operating problem which does not match the cases mentioned above, please proceed as follows before calling a repair engineer:
- Turn the program selector to "0" position and turn off the power supply for at least 10 seconds.
- Put the plug back in and start another wash cycle.
If the problem continues, call your repair engineer.

Important:
Do not start another wash cycle if the drum remains blocked, if you see water around your machine or if you can smell burning.
• INTERVENTIONS
Any repairs that are made to your appliance must be handled by a qualified professional authorised to work on the brand. When you call, mention your appliance's complete reference (model, type, serial number). This information appears on the manufacturer's nameplate (Fig. 25).

Fig. 25
ORIGINAL PARTS
During any maintenance work, ask that only certified original replacement parts be used.

- 2/ 安装程序
- 貼士:
- 6/ 洗衣機日常保養
- - 進入缸底
- 由滾桶移除風向標:
- BRANDT
- Warning:
- / PRESENTATION OF YOUR APPLIANCE
- / INSTALLING YOUR APPLIANCE
- / PREPARING YOUR LAUNDRY AND YOUR APPLIANCE
- / PROGRAMMING YOUR APPLIANCE
- / INFORMATION CONCERNING THE NEW EU REGULATIONS ——60
- / EVERYDAY MAINTENANCE OF YOUR APPLIANCE
- / INCIDENTS THAT MAY OCCUR 65
- / AFTER-SALES SERVICE 68
- RECOMMENDED LOADS:
- SAFETY
- You must observe the following instructions:
- INSTALLATION:
- USE:
- USE (continued):
- ENVIRONMENT
- ENVIRONMENTAL PROTECTION
- ENERGY SAVING
- • DESCRIPTION OF YOUR APPLIANCE
- • DESCRIPTION OF YOUR APPLIANCE (continued)
- - REMOVING THE TRANSPORT BRACES
- Important:
- - Front transport brace:
- - REMOVING THE TRANSPORT BRACES (continued)
- - Rear transport brace:
- Tip:
- Information:
- - SETTING UP YOUR APPLIANCE
- - Placement on rollers:
- - Levelling:
- - Environment:
- your appliance:
- • CONNECTING YOUR APPLIANCE
- • Cold water supply (Fig. 13):
- • Electrical power supply (Fig. 13):
- appliance:
- • Discharge of waste water (Fig. 13):
- • TREATING STUBBORN STAINS
- COFFEE - TEA:
- CHOCOLATE - FRUIT - FRUIT JUICE - WINE:
- - Use of stain removers
- • PREPARING YOUR LAUNDRY
- - Sorting your laundry:
- • The colour test:
- - Laundry loads
- Average weight of some items of "light" dry laundry
- Average weight of some items of "heavy" dry laundry
- • PREPARING YOUR LAUNDRY (continued)
- - Checking your laundry
- - LOADING YOUR LAUNDRY
- - Opening the machine
- - Opening/Closing the drum
- • Introduction of the laundry
- - LOADING DETERGENTS (Fig. 16)
- • Measuring the detergent
- • Detergents for woollens and delicate fabrics
- • DESCRIPTION OF THE CONTROL PANEL
- • PROGRAMMING A WASH CYCLE
- • PROGRAMMING A WASH CYCLE (continued)
- • OPERATIONS POSSIBLE DURING A PROGRAM
- - Add or remove an item during the cycle (not possible during spin)
- Display
- - Changing the program during the cycle
- - Child safety device
- • EXAMPLES OF PROGRAMS
- • CHANGING A WASH PROGRAM
- • During programing
- • After the cycle starts
- • Any time during the cycle
- - During the period preceding the actual start of the cycle (when you have chosen to delay the wash cycle).
- NB:
- • At the end of the cycle
- • DETAILS OF PROGRAMS
- - OptiA 39 min
- • Cotton
- - Cotton ECO
- Important: If you are washing colours, do not exceed 60°C max.
- • Mixed
- • Delicates/Wool
- - Handwash
- - Flash 25 min
- - Rinse
- - Spin
- • DETAILS OF OPTIONS
- - Prewash ⏻
- - Intensive ⬤ +
- - Rinse plus
- - Easy ironing
- • PROGRAMS FOR THE TESTS ACCORDING REGULATION DELEGATE (UE) N° 1061/2010
- - OTHER FUNCTIONS
- - Draining
- - Full tank stop
- - Delayed start
- • OTHER FUNCTIONS (continued)
- - Remaining Time Display
- — During programming, the display 📋s
- • AUTOMATIC SAFETY FEATURES
- - Lid opening safety
- - Anti-foam safety
- - Water safety
- - Spin safety
- • WASHING YOUR CLOTHES
- • PRODUCT INFORMATION
- • Residual moisture of the laundry
- • PRODUCT INFORMATION (continued)
- • CLEANING THE DETERGENT DISPENSER
- • CLEANING THE PUMP FILTER
- - ACCESS TO THE BOTTOM OF THE TANK
- Removing the vane from the drum:
- • CLEANING YOUR APPLIANCE
- Professional expertise for the general public
- • MISCELLANEOUS MAINTENANCE
- - Upkeep of internal parts
- - Periodic checks
- - Risk of freezing
- • INCIDENTS THAT YOU CAN FIX YOURSELF
- • INTERVENTIONS
- ORIGINAL PARTS
Brand : BRANDT
Model : BT1208
Category : Washing machine