
LMP480 - Lawn mower Draper - Free user manual and instructions
Find the device manual for free LMP480 Draper in PDF.


User questions about LMP480 Draper
0 question about this device. Answer the ones you know or ask your own.
Ask a new question about this device
Download the instructions for your Lawn mower in PDF format for free! Find your manual LMP480 - Draper and take your electronic device back in hand. On this page are published all the documents necessary for the use of your device. LMP480 by Draper.
USER MANUAL LMP480 Draper
IMPORTANT: PLEASE READ THESE INSTRUCTIONS CAREFULLY TO ENSURE THE SAFE AND EFFECTIVE USE OF THIS PRODUCT.
CE
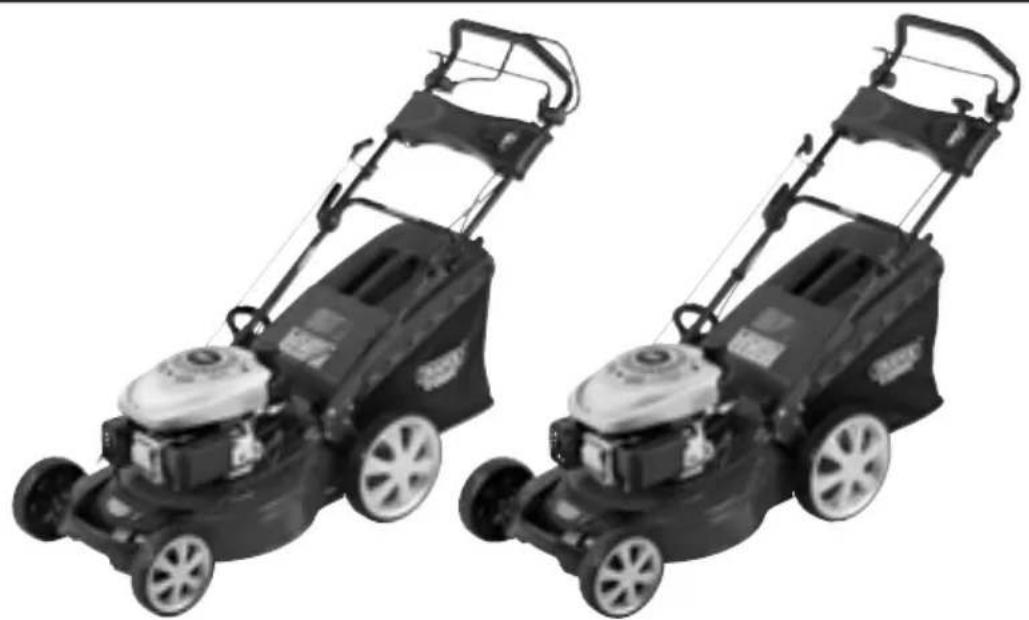
natural_image
Two black-and-white photos of a lawn mower with visible blades and wheels, no text or symbols present.DRAPER
GENERAL INFORMATION
Read all these instructions before operating this product and save these instructions.
This manual has been compiled by Draper Tools and is an integrated part of the product with which it is enclosed and should be kept with it for future references.
This manual describes the purpose for which the product has been designed and contains all the necessary information to ensure its correct and safe use. We recommend that this manual is read before any operation or, before performing any kind of adjustment to the product and prior to any maintenance tasks. By following all the general safety instructions contained in this manual, it will ensure both product and operator safety, together with longer life of the product itself.
NI photographs and drawings in this manual are supplied by Draper Tools to help illustrate the operation of the product.
Whilst every effort has been made to ensure accuracy of information contained in this manual, the Draper Tools policy of continuous improvement determines the right to make modifications without prior warning.

CONTENTS
Contents/Guarantee ....1
Specification....2
Safety instructions 3
Getting to know your lawn mower 4
Assembly 5-6
Operation and use 7-10
Maintenance....11
Explanation of symbols/pictograms 12
Disposal 13
Declaration...... enclosed

GUARANTEE
Draper tools have been carefully tested and inspected before shipment and are guaranteed to be free from defective materials and workmanship.
Should the tool develop a fault, please return the complete tool to your nearest distributor or contact Draper Tools Limited, Chandler's Ford, Eastleigh, Hampshire, SO53 1YF England.
Telephone Sales Desk: (023) 8049 4333 or Product Helpline (023) 8049 4344.
A proof of purchase must be provided with the tool.
If upon inspection it is found that the fault occurring is due to defective materials or workmanship, repairs will be carried out free of charge. This guarantee period covering parts/labour is 12 months from the date of purchase except where tools are hired out when the guarantee period is ninety days from the date of purchase. The guarantee is extended to 24 months for parts only. This guarantee does not apply to normal wear and tear, nor does it cover any damage caused by misuse, careless or unsafe handling, alterations, accidents, or repairs attempted or made by any personnel other than the authorised Draper warranty repair agent.
Note: If the tool is found not to be within the terms of warranty, repairs and carriage charges will be quoted and made accordingly.
This guarantee applies in lieu of any other guarantee expressed or implied and variations of its terms are not authorised.
Your Draper guarantee is not effective unless you can produce upon request a dated receipt or invoice to verify your proof of purchase within the guarantee period.
Please note that this guarantee is an additional benefit and does not affect your statutory rights.
Draper Tools Limited
The Draper Tools policy of continuous improvement determines the right to change specification without notice.
Stock no. 37995 37996
Part no. LMP480 LMP470
Engine DG450 DG450
Displacement 135cc 135cc
Drive type.... Self Propelled.... Hand push
Speed (no load) 2,800min ^-1 2,800min ^-1
Cutting width 460mm 460mm
Cutting heights 7 (30-75mm) 7 (30-75mm)
Collection bag capacity 60L 60L
Fuel tank capacity 1.2L 1.2L
Oil tank capacity 0.6L 0.6L
Sound pressure level 82dB(A) 82dB(A)
Sound power level 92dB(A) 92dB(A)
Single value noise level ^ 96dB(A) 96dB(A)
Vibration level 3.033m/s ^2 3.033m/s ^2
ALWAYS WEAR APPROVED EAR PROTECTION.
CAUTION: Do not touch rotating blade.
^ A-Weighted sound power level in accordance to 2000/14/EC.
LAWN MOWER SAFETY WARNINGS.
- LAWN MOWERS ADDITIONAL SAFETY WARNING:
- Keep bystanders away.
- The engine shall be stopped before carrying out adjustment, cleaning or maintenance.
- Read user instructions before operating this machine.
- The lawn mower shall not be operated without either the entire grass catcher or the guard in place.
- CAUTION: Do not touch rotating blade.
- Beware of blades. Blades continue to rotate after the motor is switched off. Use ear protection as appropriate.
- Never operate the mower if you are tired, ill or under the influence of alcohol, drugs or medication that may impair your vision, judgement or coordination.
- The blade control handle is a safety device. Never attempt to bypass its operation. Doing so makes the safety device inoperative and may result in personal injury through contact with the rotating blade. The blade control handle must operate easily in both directions and automatically return to the disengaged position when released.
- SAFE OPERATION PRACTICES FOR PEDESTRIAN-CONTROLLED ROTARY LAWN MOWERS.
1. Training.
- Read the instructions carefully. Be familiar with the controls and the proper use of the equipment.
- Never allow children or people unfamiliar with these instructions to use the lawn mower. Local regulations may restrict the age of the operator.
Never mow while people, especially children, or pets are nearby.
- Keep in mind that the operator or user is responsible for accidents or hazards occurring to other people or their property.
2. Preparation.
- While mowing, always wear substantial footwear and long trousers. Do not operate the equipment when barefoot or wearing open sandals.
- Thoroughly inspect the area where the equipment is to be used and remove all objects which can be thrown by the machine.
WARNING Petrol is highly flammable:
- store fuel in containers specifically designed for this purpose;
- refuel outdoors only and do not smoke while refuelling;
- add fuel before starting the engine. Never remove the cap of the fuel tank or add petrol while the engine is running or when the engine is hot;
- if petrol is spilled, do not attempt to start the engine but move the machine away from the area of spillage and avoid creating any source of ignition until petrol vapours have dissipated;
- replace all fuel tank and container caps securely.
- Replace faulty silencers.
Before using, always visually inspect to see that the blades, blade bolts and cutter assembly are not worn or damaged. Replace worn or damaged blades and bolts in sets to preserve balance.
- On multi-bladed machines, take care as rotating one blade can cause other blades to rotate.
3. Operation.
- Do not operate the engine in a confined space where dangerous carbon monoxide fumes can collect.
- Mow only in daylight or in good artificial light.
- Avoid operating the equipment in wet grass, where feasible.
- Always be sure of your footing on slopes. Walk, never run.
- For wheeled rotary machines, mow across the face of slopes, never up and down.
- Exercise extreme caution when changing direction on slopes. Do not mow excessively steep slopes.
- Use extreme caution when reversing or pulling the lawn mower towards you.
- Stop the blade(s) if the lawn mower has to be tilted for transportation when crossing surfaces other than grass, and when transporting the lawn mower to and from the area to be mowed.
- Never operate the lawn mower with defective guards, or without safety devices, for example deflectors and/or grass catchers, in place.
- Do not change the engine governor settings or overspeed the engine.
- Disengage all blade and drive clutches before starting the engine.
- Start the engine or switch on the motor carefully according to instructions and with feet well away from the blade(s).
- Do not tilt the lawn mower when starting the engine or switching on the motor, except if the lawn mower has to be tilted for starting. In this case, do not tilt it more than absolutely necessary and lift only the part which is away from the operator.
- Do not start the engine when standing in front of the discharge chute.
- Do not put hands or feet near or under rotating parts. Keep clear of the discharge opening at all times.
- Never pick up or carry a lawn mower while the engine is running.
- Stop the engine and disconnect the spark plug wire, make sure that all moving parts have come to a complete stop and, where a key is fitted remove the key:
- before cleaning a blockage or unclogging chute;
- before checking, cleaning or working on the lawn mower;
- after striking a foreign object. Inspect the lawn mower for damage and make repairs before restarting and operating the lawn mower;
- if lawn mower starts to vibrate abnormally (check immediately).
- Stop the engine and disconnect the spark plug wire, make sure that all moving parts have come to a complete stop and, where a key is fitted remove the key:
- whenever you leave the lawn mower;
- before refuelling.
- Reduce the throttle setting during engine shut down and, if the engine is provided with a shut-off valve, turn the fuel off at the conclusion of mowing.
- Go slow when using a trailing seat.
4. Maintenance and storage.
- Keep all nuts, bolts and screws tight to be sure the equipment is in safe working condition.
- Never store the equipment with petrol in the tank inside a building where funes can reach an open flame or spark.
- Allow the engine to cool before storing in any enclosure.
- To reduce the fire hazard, keep the engine, silencer, battery compartment and petrol compartment and petrol storage area free of grass, leaves, or excessive grease.
- Check the grass catcher frequently for wear or deterioration.
- Replace worn or damaged parts for safety.
- If the fuel tank has to be drained, this should be done outdoors.
GETTING TO KNOW YOUR LAWN MOWER
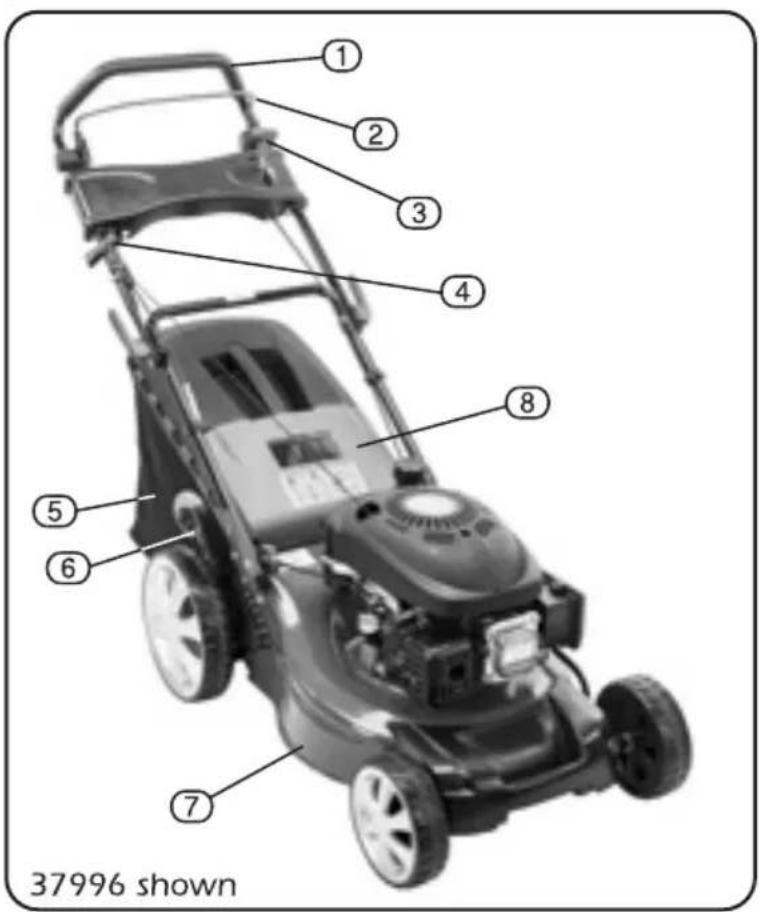
① Handle.
② Operator presence control.
③ Throttle lever.
④ Pull start cord.
⑤ Grass catcher.
⑥ Cutting height adjustment.
⑦ Deck.
⑧ Self closing guard.
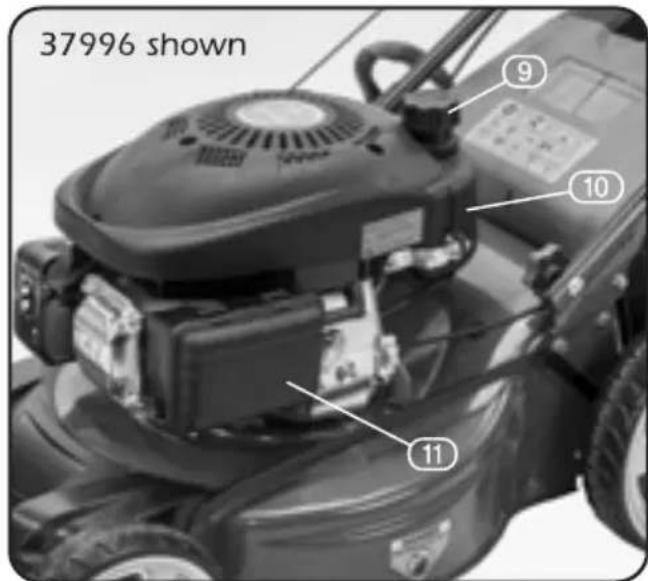
⑨ Fuel tank cap.
⑩ Fuel tank.
⑪ Air filter.
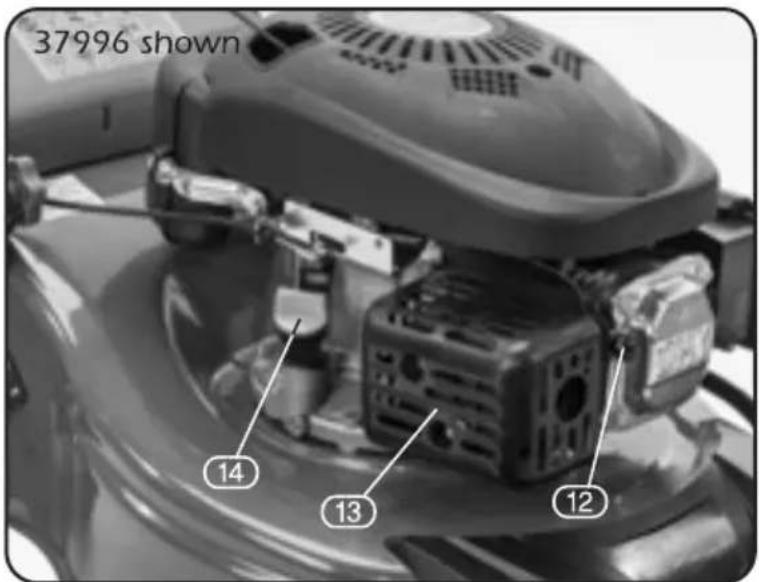
⑫ Spark plug HT lead.
⑬ Silencer (muffler).
⑭ Oil tank cap/dipstick.
NOTE:
37995 has an additional lever on the upper handle to control the engagement of the self propelled function.
- This machine shall always be used in accordance with the manufacturer's instructions laid down in this handbook.
- UNPACKING: After removing the packing material, make sure the product is in perfect condition and that there are no visible damaged parts. If in doubt, do not use the product and contact the dealer from whom it was purchased.
The packaging materials (plastic bags, polystyrene, etc.), must be disposed of in an appropriate refuse collection container. These materials must not be left within the reach of children as they are potential sources of danger.
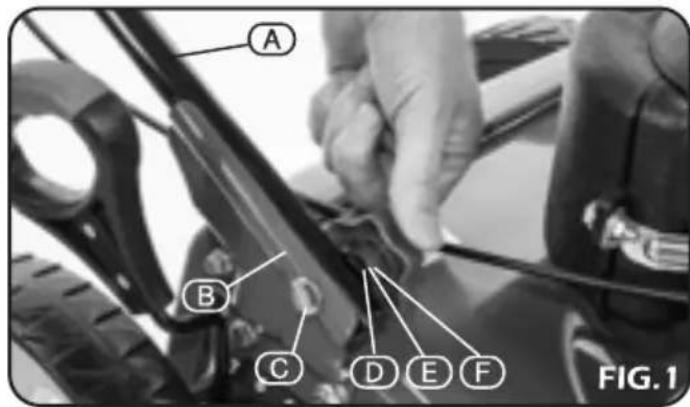
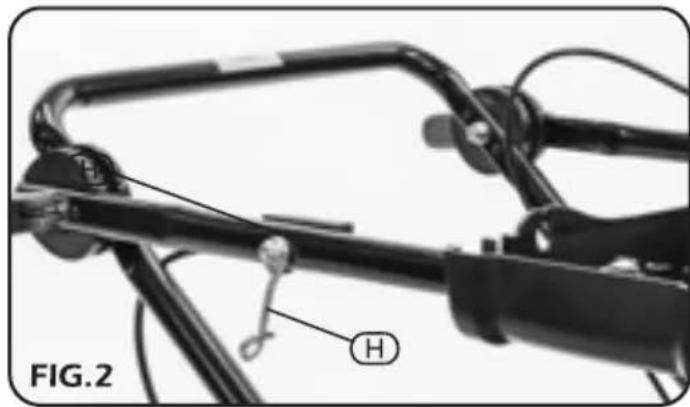
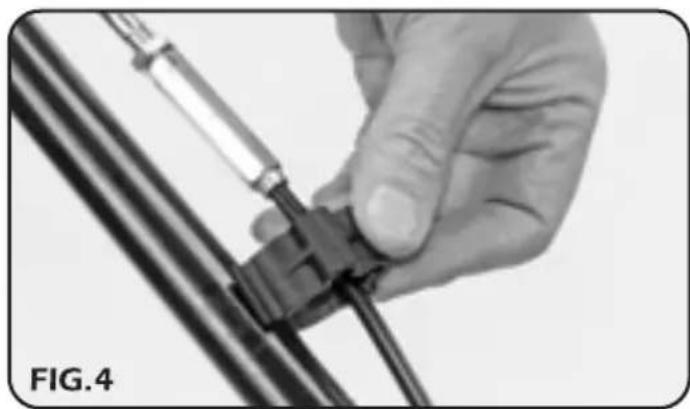
- HANDLE ASSEMBLY (Fig.1-4):
- NOTE: Disconnect the spark plug ignition lead before carrying out adjustment, servicing or maintenance.
Fit the lower sections (A) of the handle to the inner edge of mower deck (B). Using square shouldered bolt (C), washer (D), spring washer (E) and knurled nut (F). Tighten the knurled nut until secure. Ensure operating cables are not entangled before unfolding the upper handle section. To unfold the upper handle section, release the side levers and rotate the upper handle into the desired position, ensuring the pivot point teeth line up before tightening the side levers to secure.
natural_image
Mechanical linkage assembly with labeled component H, no readable text or symbols present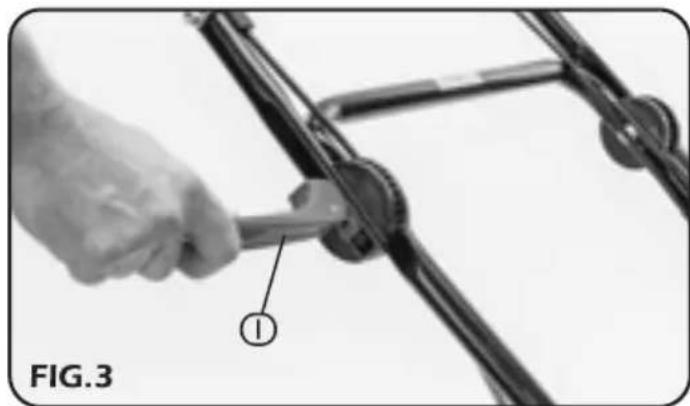
natural_image
Close-up of a hand using a tool to adjust or install a bicycle frame (no text or symbols visible)Secure cables to handles with the cable clamps supplied.
natural_image
Close-up of a hand holding a black connector with a cable, no visible text or symbolsASSEMBLY
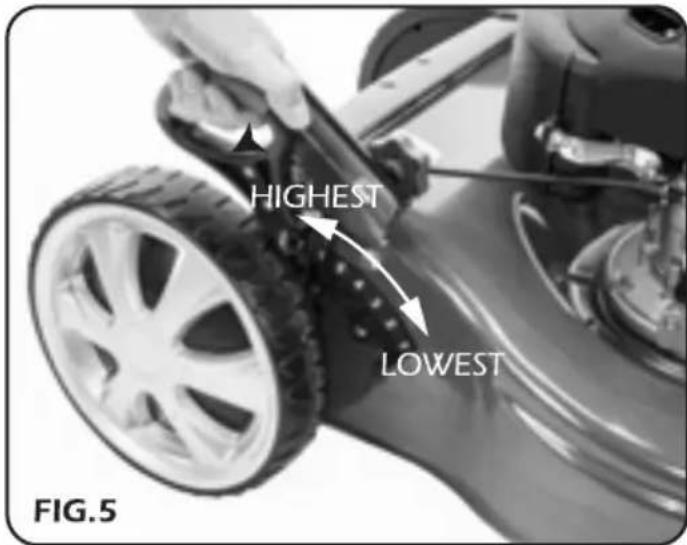
- WORKING POSITION CONTROL: (Fig.5)
Your mower is equipped with a central height adjustment lever offering 7 height positions.
- Stop mower and disconnect spark plug cable before changing mower cutting height.
- To change the height of cut, squeeze adjuster lever toward the wheel, moving up or down to selected height.
All wheels will be in the same height of cut.
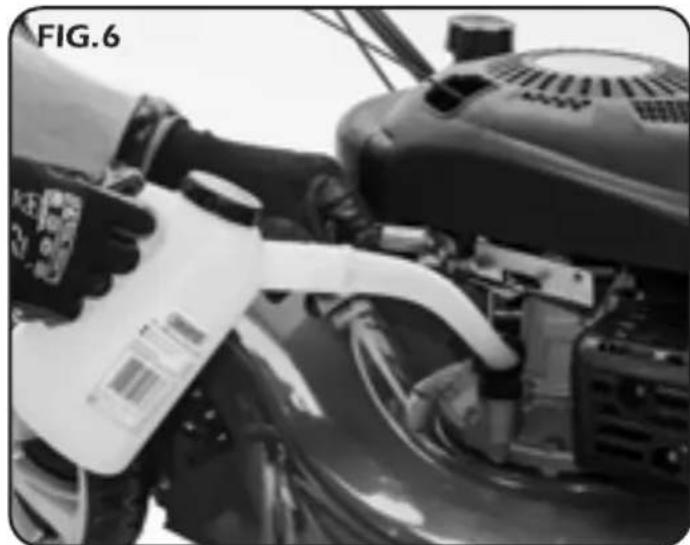
- FUEL AND LUBRICATION: (Fig.6&7)
This machine is not 2 stroke - fuel & oil must not be mixed.
This lawn mower is fitted with a air cooled 4 stroke petrol engine.
Engine oil should be a high grade ISO VG 100 (SAE 30).
IMPORTANT: The engine is supplied without any oil and must be filled before attempting to start. Failure to do so may result in permanent engine damage, which will not be covered under warranty.
Remove the oil tank cap with integral dipstick. Fill the oil tank with the aid of a funnel using approx. 600ml of oil. Replace the oil tank cap (the cap must be fully tightened to register the correct level). Top up accordingly until the max. level is achieved.
WARNING: Do not overfill. Doing so may cause the engine not to start or cause damage.
NOTE: Ensure you clean up any spilt oil.
Use only fresh. clean. good quality unleaded fuel.
WARNING: Never refuel In close proximity to naked flames, sparks or sources of ignition e.g. cigarettes.
Remove fuel filling cap and fill with fresh clean unleaded fuel. Fill so the level of the fuel comes to approximately 1 inch (2.5cm) below the lowest part of the tank neck; this allows for any fuel expansion.
natural_image
Close-up of a person using a power tool on a motorcycle engine (no visible text or symbols)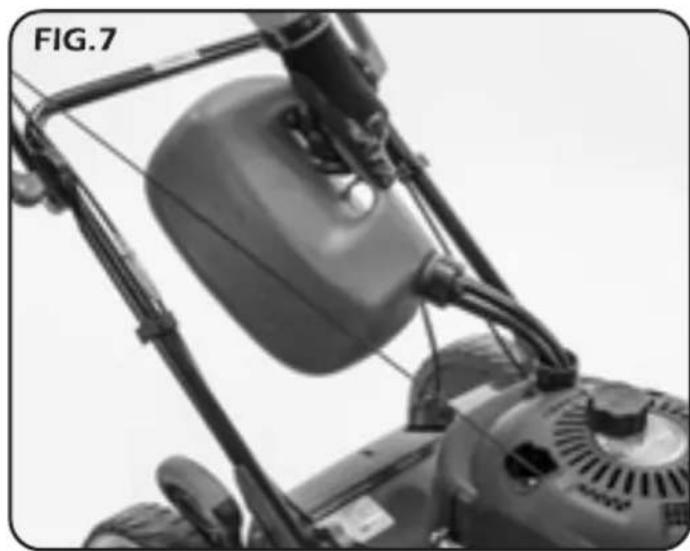
natural_image
Close-up of a lawn mower with attached frame and bucket cover (no visible text or symbols)OPERATION AND USE
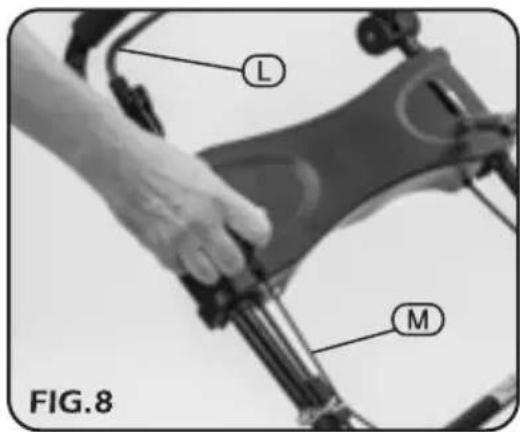
- COLD STARTING (Fig.8.):
NOTE: Move the mower at least 3M from the refuelling area before starting.
Prior to starting operate the operator presence control Ⓗ several times to ensure that the cables move freely. Be sure that the operator presence control automatically returns freely to the rest (stop) position when released.
Adjust the cutting height to its maximum (highest) setting. Set the engine choke to the on position Z, stand behind the mower and grasp the handle and engine stop lever with your left hand. Grip the starter pull cord M with your right hand and gently pull the cord with your right hand until resistance is felt, then proceed to sharply pull the cord.
- NOTE: Do not pull the starter cord to its full extent or allow it to recoil without control as this can damage the mechanism. Continue to pull the cord until the engine starts.
Once the engine has started allow it to run for a few minutes to warm up and then slowly move the choke lever to the off position ≡.
- NOTE: If the engine fails to start and a strong smell of fuel is evident, the engine may be flooded. Wait a few minutes before attempting to restart.
- WARM STARTING:
Follow the procedure for cold starting but with the choke lever in the off position ≡.
- STOPPING THE ENGINE:
To stop the engine, release the operator presence control lever.
OPERATION AND USE
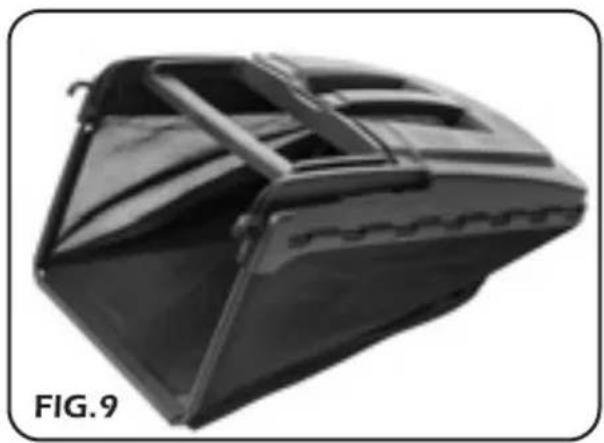
- GRASS CATCHER & SELF CLOSING GUARD (Figs.9-11):
- NOTE: Stop the engine.
- NOTE: Never operate the lawn mower with a damaged or missing self closing guard.
Some conditions dictate the necessity to mow without the collection device installed. In this situation make certain the self closing guard is down, fully covering the rear discharge chute.
Raise the self closing guard up fully and locate bag retaining tabs Ⓐ onto the mower through slots Ⓟ. Check that it is correctly positioned and the grass chute is not in any way exposed.
Poor pick-up and clogging are associated with certain situations, for example when mowing damp grass or dense area of longer grass.
Consequently set the cutting height to maximum and remove the collection device. After the initial pass make a second run with the collection device attached allowing the already cut grass to be gathered. A final pass may be necessary to achieve the desired length.
Ensure the mower blade has stopped prior to passing over non-grassed areas as it may pose a hazard. For example the blade may become damaged, bystanders injured or surrounding property damaged when crossing a gravel path by stones picked up and thrown.
- GENERAL LAWN CARE & MOWING TIPS
In hot dry conditions do not cut the grass too short as this helps it retain ground moisture.
Longer grass can help restrict weed growth.
Aerating the lawn will stimulate root growth and soil condition.
During the peak of summer the recommended schedule for lawn mowing is twice weekly (a minimum of once a week).
The lawn must be regularly attended to once the initial cut of the season has been made.
natural_image
Black plastic container with crisscross design, labeled FIG. 9 (no other text or symbols)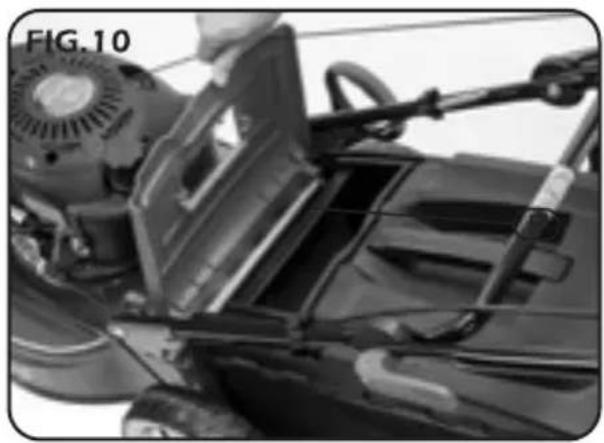
natural_image
Close-up of a mechanical component with visible parts and wiring, labeled 'FIG.10' (no readable text or symbols)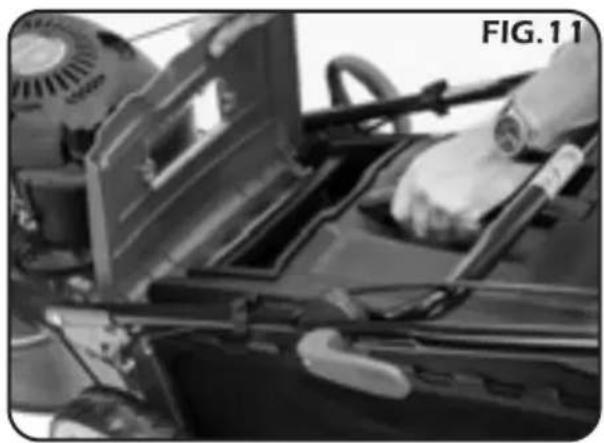
natural_image
Close-up of a hand operating a mechanical device with a hood open, no visible text or symbolsOPERATION AND USE
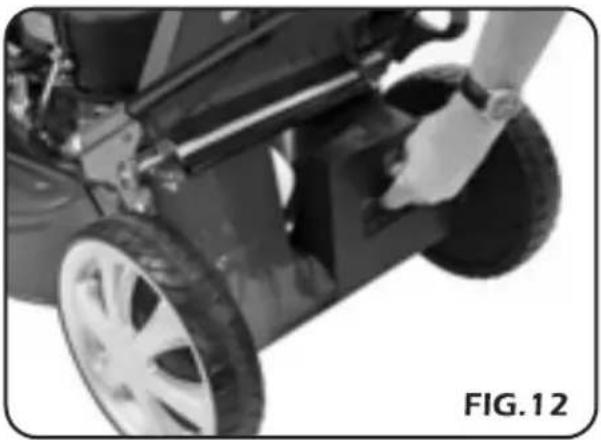
- MULCHING (Figs.12-13);
Stock No.37996 Part No.LMP470
The mulching function is attained by the removal of the grass bag and the fitting of the mulching wedge. The mulching wedge blocks the cut grass from being expelled to the rear of the mower and so it is retained in the vicinity of the cutting blade and chopped finely. This finely chopped grass is deposited back onto the lawn as you mow and acts as a natural compost/fertiliser and also aids in moisture retention of the soil.
Stock No.37995 Part No.LMP480
Benefits from an additional side discharge function. The flap on the side of the mower deck can accept the side discharge chute that is supplied with the LMP480 model and allows the mower to eject the finely cut (mulched) grass to the side.
To fit the side discharge chute, lift the side discharge cover and install the chute onto the hinge pin of the cover.
The side discharge chute will be retained under the spring pressure of the cover.
natural_image
Close-up of a small wheeled vehicle with visible wheels and suspension components (no text or symbols)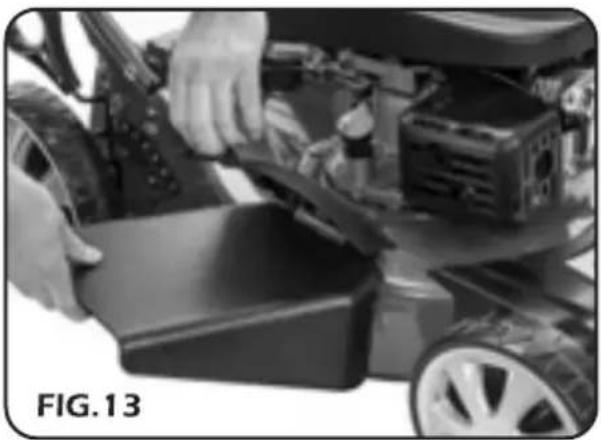
natural_image
Close-up of hands installing or adjusting a mechanical component on a vehicle chassis (no visible text or symbols)
OPERATION AND USE
- Do not leave grass cuttings on the lawn as this can lead to a build up of moss with the exception of hot dry conditions where this can aid to moisture retention. This should be monitored to avoid problems with the grass condition.
Scarifying the lawn removes moss build up.
Do not mow a wet lawn as this causes an uneven finish after the lawn has dried out, but more importantly can damage the lawn. Moving across the lawn will tear up the surface and fungus can begin to grow. Wet grass will also excessively clog the mower.
Always use a sharp blade as blunt blades tear the grass, giving a poor finish. Clean and oil the blade after each use.
If the ground is uneven take care not to 'scalp' the surface leaving bald patches.
If the lawn has not been cut for some time it is advisable to only cut approximately 13^rd it's length to avoid it going yellow. Make a second and third cut over the following week to achieve the desired length.
Empty the grass collection device thoroughly to make sure air flow is not impeded.
- NOTE:
Efficient grass collection relies on air flow through the collection device.
Grass collection efficiency will dramatically reduce when the collection device is nearing full.
Grass cuttings will be gathered more efficiently by the collection device when the conditions are dry.
Prevent grass damage when manoeuvring the mower.
Mow in different directions.
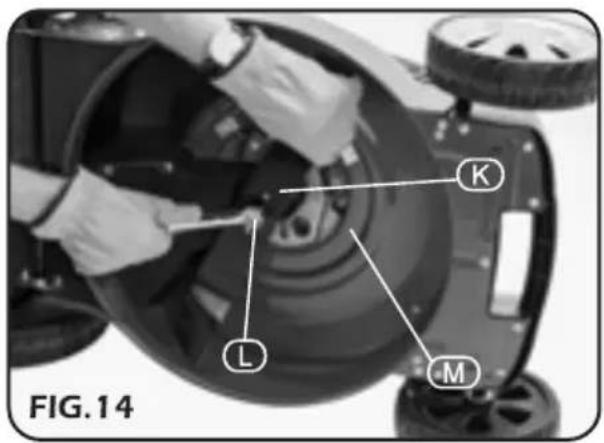
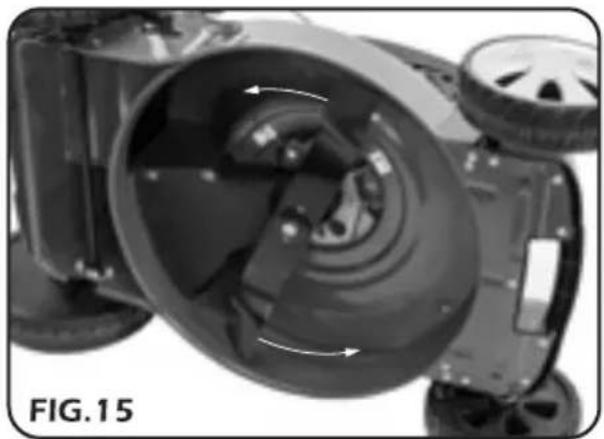
- BLADE CARE (Figs.14&15:
- CAUTION: Do not touch rotating blade.
- NOTE: Disconnect the spark plug ignition lead before carrying out adjustment, servicing or maintenance.
- NOTE: If the mower must be tipped for inspection, transport or to remove grass, ensure the air filter side of the engine faces upwards.
Wearing a protective glove, secure blade Ⓔ.
Remove retaining bolt Ⓗ anti-clockwise with the spanner provided. Take note of the orientation of the two locating plates Ⓜ.
Sharpen the blade and lightly coat with oil to inhibit the onset of oxidization.
Alternatively purchase a Draper replacement blade Stock No.46471 and lightly coat with oil to inhibit the onset of oxidization.
Install the blade onto the spindle locating the pins into the holes on the blade. Ensure the correct orientation of the blade (Fig.15).
Ensure that only replacement cutting means of the right type are used.
Keep all nuts, bolts and screws tight to be sure the appliance is in safe working condition.
natural_image
Mechanical assembly diagram showing a motor with rotating components and a highlighted circular component (no text or symbols)
MAINTENANCE AND PARTS REPLACEMENT
- NOTE:
The engine shall be stopped when carrying out maintenance and cleaning operations, when changing blades and when being transported by means other than under its own power. Disconnect the spark plug ignition lead before carrying out adjustment, servicing or maintenance.
- EVERY USE:
- Check the engine oil level and top up if required.
- Remove any grass debris from the underside of the deck, grass chute and from around the engine.
- Clear the grass catcher and check for any damage such as tears or holes.
- Check the condition and operation of safety devices and guards.
- EVERY SEASON:
- Sharpen the blade or change if damaged.
- Lubricate wheels, linkages and control cables where they meet their outer casings.

Beware of sharp blades.
Remove spark plug lead before maintenance.

ATTENTION!
Read operators manual.

Keep bystanders away.

DISPOSAL
- At the end of the machine's working life, or when it can no longer be repaired, ensure that it is disposed of according to U.K. regulations.
- Contact your local authority for details of collection schemes in your area.
In all circumstances:
■ Do not dispose with domestic waste.
■ Do not incinerate.
■ Do not abandon in the environment.
■ When decommissioning remove all subsidiary fluids for appropriate disposal.
- DRAPER TOOLS LIMITED,
Hursley Road, Chandler's Ford, Eastleigh, Hampshire. SO53 1YF. U.K.
- Helpline: (023) 8049 4344
- Sales Desk: (023) 8049 4333
- Internet: www.drapertools.com
- E-mail: sales@drapertools.com
- Sales Fax: (023) 8049 4209
- General Enquiries: (023) 8026 6355
- Service/Warranty Repair Agent
For aftersales servicing or warranty repairs, please contact the Draper Tools Helpline for details of an agent in your local area.
YOUR DRAPER STOCKIST
KCKC251113
- GENERAL INFORMATION
- CONTENTS
- GUARANTEE
- LAWN MOWER SAFETY WARNINGS.
- - LAWN MOWERS ADDITIONAL SAFETY WARNING:
- - SAFE OPERATION PRACTICES FOR PEDESTRIAN-CONTROLLED ROTARY LAWN MOWERS.
- Training.
- Preparation.
- WARNING Petrol is highly flammable:
- Operation.
- Maintenance and storage.
- GETTING TO KNOW YOUR LAWN MOWER
- NOTE:
- ASSEMBLY
- - WORKING POSITION CONTROL: (Fig.5)
- - FUEL AND LUBRICATION: (Fig.6&7)
- OPERATION AND USE
- - COLD STARTING (Fig.8.):
- - WARM STARTING:
- - STOPPING THE ENGINE:
- - MULCHING (Figs.12-13);
- Stock No.37996 Part No.LMP470
- Stock No.37995 Part No.LMP480
- - NOTE:
- - BLADE CARE (Figs.14&15:
- MAINTENANCE AND PARTS REPLACEMENT
- - EVERY USE:
- - EVERY SEASON:
- DISPOSAL
Brand : Draper
Model : LMP480
Category : Lawn mower