P280 - Tablet Micromax - Free user manual and instructions
Find the device manual for free P280 Micromax in PDF.


| Product Type | Tablet |
| Brand | Micromax |
| Model | P280 |
| Display Size | 7 inches |
| Display Resolution | 1024 x 600 pixels |
| Processor | Quad-core 1.2 GHz |
| RAM | 1 GB |
| Internal Storage | 8 GB |
| Expandable Storage | microSD up to 32 GB |
| Operating System | Android 4.4 (KitKat) |
| Battery Capacity | 3000 mAh |
| Battery Type | Li-Ion |
| Dimensions (W x H x D) | 190 x 110 x 10 mm |
| Weight | 350 g |
| Connectivity | Wi-Fi 802.11 b/g/n, Bluetooth 4.0 |
| Rear Camera | 2 MP |
| Front Camera | 0.3 MP |
| Ports | microUSB 2.0, 3.5 mm headphone jack |
| Sensors | Accelerometer |
| Power Supply | 5V/2A charger |
| Cleaning Instructions | Wipe with a soft dry cloth; avoid liquids |
| Safety Notes | Do not expose to water or extreme temperatures |
| Spare Parts Availability | Battery and screen replacements via service centers |
Frequently Asked Questions - P280 Micromax
User questions about P280 Micromax
0 question about this device. Answer the ones you know or ask your own.
Ask a new question about this device
Download the instructions for your Tablet in PDF format for free! Find your manual P280 - Micromax and take your electronic device back in hand. On this page are published all the documents necessary for the use of your device. P280 by Micromax.
USER MANUAL P280 Micromax
Welcome! You are now a proud owner of the Micromax Funbook mini which oers you a wide range of excing features for a rich and fulfilling tablet PC experience. Your Funbook mini is loaded with great features that include:
1.0 GHz Processor
- Android 4.2 (Jelly Bean)
512 MB RAM/4GB ROM
- 7Inch Touch screen
- Pinch Zoom
Wi-Fi Support
USB 2.0
0.3 MP Front Camera
• Memory card support (Expandable up to 32 GB)
- Gravity Sensor
Table of Contents
-
Welcome.... 1
-
Know Your Device....4
-
Getting Started....5
3.1 Charge the Battery....5
3.2 Insert Memory Card....6
3.3 Switch On the Device....6
3.4 Shut Down the Device....7
3.5 Lock/Unlock the Screen....7
3.6 Change the Orientation....8
3.7 Adjust Volume....9
3.8 Use the Earphone....10
3.9 Reset the Tablet....10
- Using the Touch Screen....12
4.1 Get Around....12
4.2 Touch and Hold....12
4.3 Drag an Item....13
4.4 Scroll or Swipe....14
4.5 Using the Pinch Zoom Feature ....14
4.6 Double-Tap....15
4.7 Extended Home Screen 15
4.8 Arrange and Work with Applications....16
4.9 Add Widgets....17
4.10 View Notifications....18
- Connect to Internet....19
5.1 Connect to Wi-Fi....19
5.2 Connect via Data Card....20
5.3 Connect to VPN or Ethernet....20
- Features....21
6.1 Music....21
6.2 Change the Wallpaper....21
6.3 Gallery....22
6.4 Manage Downloads....23
6.5 Manage Your Calendar....23
6.6 Settings....24
6.7 Connect with PC....24
6.8 Set the Language and Keyboard 24
6.9 View Available Storage Space 25
6.10 View Information About Device....25
- Managing Accounts....26
7.1 Why Use a Google Account ....26
7.2 Manage Accounts....26
7.3 Start Gmail....26
7.4 Google Search....27
- Download Applications From Android Market.....28
8.1 How to Download an Application....28
8.2 How to Uninstall an Application....28
Micromax P280
- Google MAPS......29
-
Troubleshooting....30
10.1 Device shuts down after startup 30
10.2 Cannot copy file or play music....30
10.3 The tablet is hanging with no response. How can I solve this? 30 -
Taking Care of Your Device....31
11.1 Recycle Your Device....31 - Disclaimers....33
- Copyrights....33
2. Know Your Device
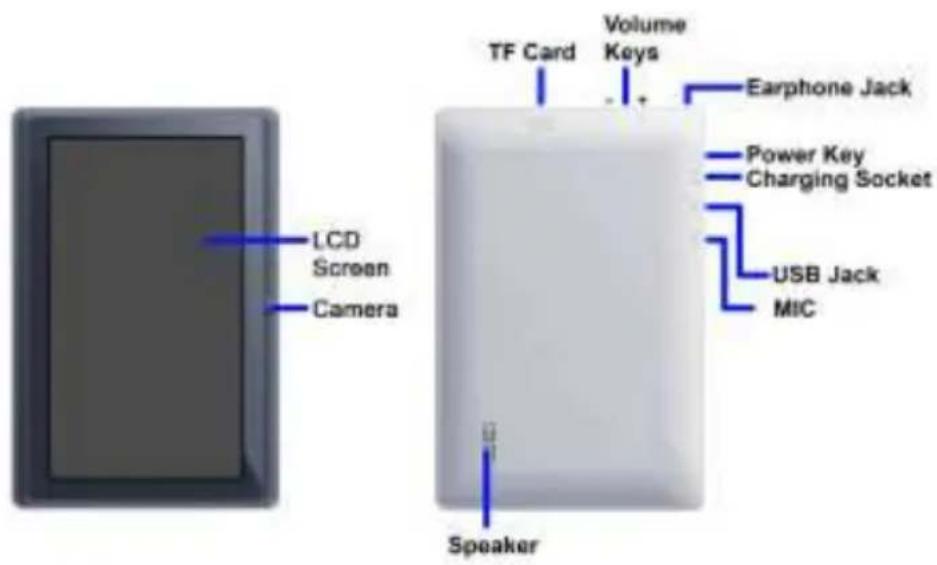
3. Getting Started
3.1 Charge the Battery
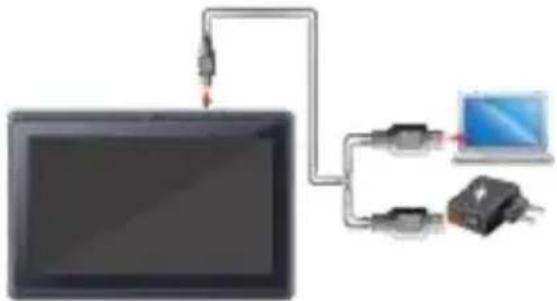
Before using the device for the rst me, it is recommended that you charge the baery. You can charge the device with the charger that comes in the packaging, or by connecng the device to a PC with a USB cable.
natural_image
Diagram showing a monitor connected to a device via cable and power lines (no text or symbols)Please charge the device in the following conditions:
If the baery power is low or if the power icon shows no power.
If the device stops responding to the Power buon i.e. the device is not geng switched on.
➢ Device automacally shuts down.
Note:
- Slight heang during charging is normal.
- Please charge the unit fully once in a month if it is not in use.
Remark:
- If the power is empty, the device will shut down automacally.
3.2 Insert Memory Card
To store additional les and applicaons, you need to insert a memory card.
To insert a memory card:
- Switch o the tablet.
- Insert the memory card into the slot as illustrated below.

natural_image
White rectangular electronic device with a small black indicator light on the left side (no visible text or symbols on body)3.3 Switch On the Device
To switch on the device, long press the power key, as illustrated in the following image.

natural_image
Illustration of a hand pressing a button on a tablet device (no text or symbols present)The system will boot and show the home screen.
3.4 Shut Down the Device
To shut down the device:
- Long press the Power key and tap Power o.
- Tap OK in the Power O conrmaon pop-up that appears.
3.5 Lock/Unlock the Screen
Short press the Power key to lock/unlock the screen.
To unlock the screen, you may set any of the following screen locking method:
▶ Slide the lock symbol towards the unlock symbol.
Provide PIN or Password, as set by you.
▶ Bring your face in front the device.
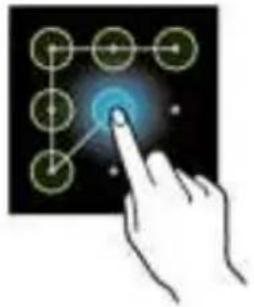
Draw a paern, as illustrated below.
natural_image
Hand interacting with a glowing blue circular icon on a dark background (no text or symbols)Slide unlock will be the default unlocking method in the tablet. To unlock the screen:
- Press the power key to wake up the screen.
- Hold and drag the lock icon towards the unlock icon.
You may be required to unlock your tablet based on the unlock method in sengs.
Note:
- You can set your unlock method from Home Screen/Applicaon Menu > choosing your desired method.

Security > Screen lock and then
3.6 Change the Orientation
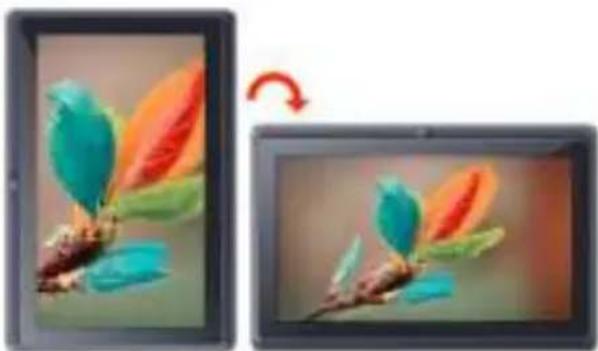
Your device has the capability to retain the orientaon of the screen in horizontal view even when rotated by 90^ , or mulples of 90^ , as illustrated in the following image.
Micromax P280
natural_image
Two-panel image showing a colorful flower with green leaves on a branch, before and after transformation (no text or symbols)3.7 Adjust Volume
You can adjust the volume of your device by using the volume keys on the right side of the tablet as shown below:

natural_image
Illustration of a hand interacting with a tablet screen (no text or symbols visible)3.8 Use the Earphone
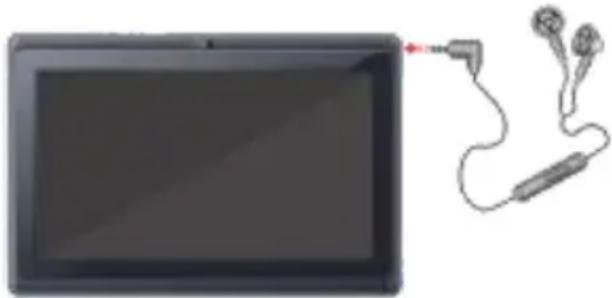
You can use the earphone to listen to music or during video calls. Please insert the earphone on the earphone socket as shown below:
natural_image
Illustration of a tablet connected to a cord with earphones (no text or symbols)3.9 Reset the Tablet
If required, you can take a backup of your data and reset factory sengs of the tablet. When you choose to reset the tablet, all data in the internal memory of the tablet gets erased; however clearing the data in the SD card is oponal.
To take a backup of your data, go to Applicaon Menu > preferences as desired.
Backup & reset > Back up my data and select your
To reset your tablet:
- Go to Applicaons Menu > Backup & reset > Factory data reset.
- If required, select the Erase SD card opon and tap Reset tablet.
- Tap Erase everything.
Note:
- Reset tablet is an irreversible acon. Once erased, data cannot be retrieved.
- Wireless conncon needs to be done again.
4. Using the Touch Screen
Use your ngers to manipulate icons, buons, menus, the onscreen keyboard, and other items on the touch screen. You can also change the screen's orientaon.
4.1 GetAround
At the boom le corner of the screen, you will nd three navigaon buons. They are always available, no maer what you are doing with your device; you can always get back to the main Home screen or return to previous screens using these buons.
| Icons | Name | Descripon |
 | Back | Takes you back to the previous screen you were working on, even if it was in a dierent applicaon. Once you are back to the Home screen, you can’t go back any further. |
 | Home | Use this key to return to the Home screen directly. |
 | Context Menu | Displays the task manager with all currently running applicaons. |
4.2 Touch and Hold
Tap and hold an item to view the list of acons based on the selected item and condion. Also, you can move an item
from the Menu screen to the Home screen using this method.

natural_image
Hand cursor clicking a blue button on a white background (no text or symbols)4.3 Drag an Item
Tap and hold an item and move your nger on the screen until you reach the target position. The item follows your nger.

natural_image
Hand cursor clicking a blue screen with a red circular icon (no text or symbols)You can generally drag items from one locaon to another on the home screen. Also, you can delete items from the home screen by holding the item and dragging it to the Remove label that becomes available only when you hold the item on the Home screen.
4.4 Scroll or Swipe
To scroll a list, slide your nger across the surface of the screen upwards or downwards (without dragging an item).

natural_image
Illustration of a hand interacting with a digital display screen, showing two states of movement (no text or symbols present)Place a nger on the screen and steadily slide your nger in the desired direcon. For example, when you are viewing a picture, to view the next picture, swipe le.
4.5 Using the PinchZoom Feature
You can open any image or web page and then use your thumb and index nger to zoom the display through the pinch gesture as illustrated in the following image.

natural_image
Illustration of a hand pressing down on a white object with red arrows, against a blue background (no text or symbols)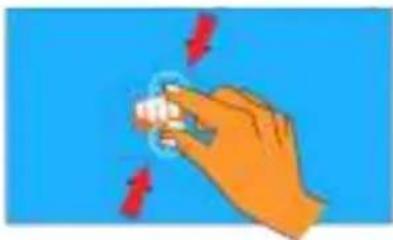
natural_image
Hand holding a small object with red arrows indicating force or movement (no text or symbols)4.6 Double-Tap
Tap quickly twice on a webpage, map, or other screen to zoom. For example, double-tap a secon of a webpage in the browser to zoom that secon. You can also double-tap to control the Camera zoom, in Maps, and in some other applicaons.

natural_image
Illustration of a hand interacting with a touchscreen device against a blue background (no text or symbols)4.7 Extended Home Screen
The Home screen consists of the 5 panels that extend beyond the display width to provide more space for adding shortcuts, widgets, and folders.

Slide your nger horizontally across the screen to scroll to the le or right side extended home screen.
4.8 Arrange and Work with Applications
To see all your apps, go to Applicaon Menu screen.
The Applicaon Menu screen displays the grid view of all your applicaons, including the ones downloaded from Android Market. You can move the app icons to any of your Home screens.
Applicaon Menu allows you to:
➢ Place an app icon on a home screen: Touch and hold any desired app icon, slide your nger and li your nger to drop the icon in place.
Explore your widgets: Tap the Widgets tab at the top of the Applicaon Menu screen.
Get more apps: Tap the icon.
To remove an app icon from the Home screen, touch and hold it, slide your nger toward the top of the screen, and drop the app over the Remove link on the home screen.
4.9 Add Widgets
Widgets allow placing applicaon shortcuts on your home screen. You can now place analog clock, calendar, and other such seconds of your tablet on the home page and access them directly! To view the list of widgets available, just tap the launcher icon on the Home screen and swipe through menu icons to the widgets screen, as shown below.

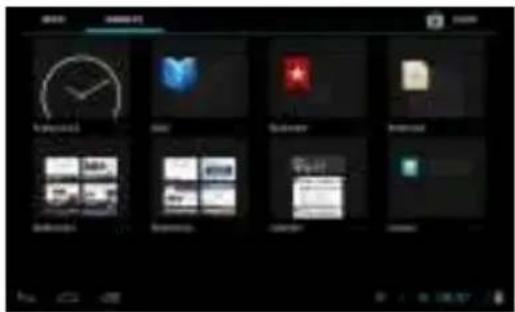
To add any widget to your home screen, tap and hold the desired widget on the widget screen and release the hold at the home screen locaon, where you want to place the selected widget. You may be asked to make further choices before the widget acvates. If there is no room where you dropped it, the widget would not get added to the Home screen.
4.10 View Notifications
Nocaon panel informs you of new messages and events. The Nocaons panel displays the current day, date, me and the baery percentage of the device. To open the nocaon panel, tap the me and signal icons in the boom right corner of the screen. You can clear all the nocaons from the nocaons panel by tapping on
icon. Tap the icon in the nocaon panel to view other opons that include:
Airplane Mode: Turn on/o the airplane mode.
Wi-Fi: Acvate or deacvate the WLAN conncon feature.
➢ Display: Adjust the screen brightness
Nocaon: Acvate or deacvate the nocaon icons to be displayed on the home screen.
Seings: Navigate to the Sengs secon.
You can tap to respond to any nocaon in the nocaon panel.

5. Connect to Internet
To enjoy various features like Browser, Email, Gmail, Android Market Applicaons, Google Search, Downloads, and so on, you need to rst congure your Internet conncon.
For this, you can go to Application Menu > and do one of the following:
➢ Enable Wi-Fi (If you have a Wi-Fi network within range with the required credentials). You can pick the available network from the list displayed.
Tap More and then conjure any one of VPN, Ethernet, or Mobile Networks.
5.1 Connected to Wi-Fi
To connect to Wi-Fi:
- Go to Applicaon Menu > to access the Sengs.
- Under Wireless & Networks, tap ON to enable Wi-Fi.
- Tap the desired Wi-Fi service from the list.
- Provide the Wi-Fi credenals for logging in.
Tap to dd your Wi-Fi manually.
➢ Tap ☐ to view the list of opons and set your preferences.
5.2 Connect via Data Card
To connect to the Internet with the data card:
- Go to Applicaon Menu >
Wireless & Networks > More. - Tap Mobile networks and then check the Data enabled option and tap the Access Point Names to select from the available list.

Note: If your data card is outside its circle, please select the Data Roaming opon.
5.3 Connect to VPN or Ethernet
You can use VPN to connect your device to the Internet.
To enable VPN:
- Go to Applicaon Menu >

Wireless & Networks > More.
-
Since VPN is a secured network, you need to rst set password for your tablet.
-
Provide the required PIN/Password.
-
Add your network/server sengs.
To enable Ethernet:
- Go to Applicaon Menu >

Wireless & Networks > More.
- Plug-in and enable Ethernet.
6. Features
6.1 Music
You can easily transfer your favorite music from a PC to your P280 and experience a world of interesting and melodious music.
Tap the Music icon from the Applicaon Menu or the home screen. Use the intuitive buons and icons in music interface to enjoy the features of your music player.
Press the tablet's volume up/down keys on the right side of the device to adjust the volume.
You can use an SD card to enhance the storage capacity for your mulmedia les such as music, photos, emails, and so on.
6.2 Change the Wallpaper
Go to Applicaon Menu >

Display > Wallpaper
Or
You can change your wallpaper by long pressing on the home screen. A list of choices will get displayed in a popup from where you can choose the locaon of your desired wallpaper. Touch and hold anywhere on a Home screen that is not occupied. A list of opons appears.
Micromax P280

Tap to choose from the following wallpaper sources:
Pictures: Choose from the pictures stored in your device.
Live Wallpapers: Choose from a list of live wallpapers.
Super-HD Player: Choose from the picture gallery stored in your device.
Wallpapers: Choose from thumbnails of built-in wallpaper images.
You can also download additional wallpapers from the Android Market.
6.3 Gallery
You can use the Gallery to view pictures, play videos, and share les.
Tap the icon in the Applicaon Menu and then tap the desired album to open and view its contents.
Note:
- To share any picture or video, tap and hold the picture(s) or video(s) that you want to share and tap the icon and share via e-mail or any other applicaon installed in your device.

6.4 Manage Downloads
Files and other items downloaded using the browser or in other way can be stored at any desired possible location of your choice.
To view and manage the list of applicaons installed on your tablet, go to Applicaon Menu >

Device > Apps.
Swipe to the le or right to view the Itered list of apps according to their category, such as Downloaded, On SD Card, and Running. You may tap any applicaon for acons, such as Move to SD card, Clear data, and Force stop.
6.5 Manage Your Calendar
The in-built calendar lets you view and edit your daily schedules. Touch the Calendar icon to access the calendar.
To change the calendar view, tap the current view (for example, "Month") at the top le corner and choose Day, Week, Month, or Agenda.
➢ Scroll vercally to view the other dates on the calendar. In the Day or Week views, spread your ngers apart or pinch them together to zoom in or out.
Tap the icon at the top right corner of the Calendar to set your calendar preferences and sengs.
You may add an account to synchronize events in the calendar. To add an account to your calendar, tap - icon at the top right corner of the Calendar and select Sengs. In the Sengs screen tap Add Account at the top-right
corner and select the account to be synchronized.
Tap icon to add an event for the selected date. You need to have an account added to the calendar before adding an event.
6.6 Settings
Go to Applicaon Menu > to access the system sengs.
You can choose sengs and preferences for:
Wireless & Networks: Turn on Wi-Fi, check data usage, and so on.
➢ Device: Set device preferences for user proles, display, storage, baery informaon, applicaons, and so on.
➢ Personal: Set preferences such as locaon services, security, language & input, backup and reset.
Accounts: Add and set account synchronizaon.
System: Sengs such as date and me, accessibility, developer opons, and view informaon about tablet.
6.7 Connect with PC
Use the USB cable to connect the device to a PC or laptop, the device will pop up the USB conneccon menu. You can start transferring les through the portable device dialog that opens.
6.8 Sett he language and Keyboard
Go to Applicaon Menu > Personal > Language & Input for keyboard, language, input methods, text to speech output, and pointer speed.
6.9 View Available Storage Space
Tap on Applicaon Menu > Device > Storage to view the details of the current storage capacity of the device, as shown in the following image:

6.10 View Information About Device
Tap Applicaon Menu > System > About tablet for viewing informaon about your P280.
7. Managing Accounts
7.1 Why Use a Google Account
Your Google Account lets you take full advantage of Google applicaons and services that you may want to use, such as Gmail, Maps, and various other applicaons.
7.2 Manage Accounts
You can set up a corporate, email, or Google account on your device.
- Go to Applicaon Menu >

Accounts > Add account.
- Select the type of account to be added (For example, Email, Gmail, etc).
- Follow the directed instrucons with valid login credenals and congure the required email account on the device.
Note:
- You may also be able to add other kinds of accounts, depending on your apps.
7.3 Start Gmail
Applicaon Menu >

You can use Gmail to read and write email from the device. All your emails are always up-to-date and available no maer where you check it from.
But Gmail is not just about email, your Gmail name and password signs you into to all Google apps and services,
including Google search, news and weather, people, market, maps, places, talk, calendar, downloads and many more.
To launch Gmail, tap the Gmail icon

n the Applicaon Menu.
The rst me you launch Gmail, you will be asked to sign-in or create an account. You can sign-in using any of your existing Gmail account(s) or create a new one.
Note:
- You need to have Internet connectivity to access Google and all the other associated features described above.
- Please refer to 'Connect to Internet' secon to know how to conjure your Internet conneccon.
7.4 Google Search
Google Search can help you nd anything you need on the web.
Touch the icon on the Applicaon Menu to access Google search.
8. Download Applications From Android Market
The Android devices oer users access to unlimited entertainment sources. You can download applicaons, games, movies, and books from the ever increasing Android market. New items get added almost daily to the market to give users a never ending fun experience.
8.1 How to Download an Application
To download applicaons, games, videos, wallpaper etc:
- Congure and acvate your Internet conneccon
- Go to Applicaon Menu > to access the Google Android Market.
- View the details and download items, as desired.
Note:
- Not all items are free of cost in the Android Market.
8.2 How to Un installed Application
To uninstall an applicaon:
- Go to Applicaon Menu > Device > Apps. List of applicaons under dierent category tabs will be displayed.
- Swipe to the le or right to view the Itered list of apps according to their category, such as Downloaded, On SD Card, and Running.
- Tap the applicaon to be uninstalled.
- Tap Uninstall.
9. Google MAPS
Google Maps is a web based service oered by Google Inc. which oers you access to various map based services. You can view various streets, landmarks and can even plan your routes with the help of Google Maps. This serves as a useful applicaon for your day-to-day usage.
Note:
- Internet conncon is required for using Google Maps. For informaon on acvang internet conncon, refer to secon 'Connect to Internet'.
- The Google Maps applicaon may not be available in every market, country or region.
- Micromax does not guarantee the accuracy of any direconal services.
- When you use the map, you use your Internet conneccon to transfer data to and from your tablet. To avoid data transfer costs, you can download and save the map to your device.
Required Sengs:
- Go to Applicaon Menu >

Personal > Locaon access.
- Enable Access to my locaon opon.
To open Google Map, go to Applicaon Menu>

and start using Google Maps.
10. Troubleshooting
101 Device shuts down after startup
Power is not enough, please charge your device.
102 Cannot copyfile or play music
➢ Please check if the conncon between the computer and the device is proper and correct.
➢ Check whether the memory storage space is already full.
▶ Check if the USB cable is not damaged.
➢ Check if USB is disconnected.
103 The tablet is hanging with no response. How can I solve this?
➢ Restart the tablet by long pressing and holding the power key.
11. Taking Care of Your Device
Your device is a product of superior design and crasmanship and should be handled with care. The following suggestions will help you protect your device:
- Do not store the device in high or cold temperature. Extreme temperatures can shorten the life of electronic devices and damage baeries.
- Keep the device dry. Precipitaon, humidity, and all types of liquids or moisture can contain minerals that will rust electronic circuits.
- Do not use or store the device in dusty, dirty areas. Its electronic components can get damaged.
- Do not drop, knock, shake or bend the device. Rough handling can break internal circuit boards and ne mechanics.
- Do not use harsh chemicals, cleaning solvents, or strong detergents to clean the device. Only use a so, clean, dry cloth to clean the surface of the device.
- Do not store your device near magnec elds or allow your device to come in contact with magnec elds for extended period of me as it may interfere with the electronic circuits and display.
- Use manufacturer approved baeries, chargers, accessories and supplies. Micromax will not be held responsible for user's safety when using unapproved accessories or supplies. This goes against the warranty rules.
- Do not aempt to repair the device by your own. Repairing the device by yourself other than our authorized service agents/centers goes against the warranty rules.
111 Recycle YourDevice
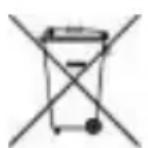
The WEEE logo (shown at the le) appears on the product (baery, device, and charger) to indicate that this product must not be disposed o or dumped with your other household wastes. You are liable to dispose of all your electronic or electrical waste equipment by relocang over to the specied collecon point for recycling of such hazardous waste.
Collecon and proper recovery of your electronic waste equipments at the me of disposal will allow us to help preserve the environment. Recycling of the electronic waste equipment will ensure safety of human health and environment. For more informaon on best pracces for disposal of electronic and electrical waste, please visit to our web site: www.micromaxinfo.com/weee.php
12. Disclaimers
- The colors and speciaons shown/menoned in the user manual may dier from the actual product. Images shown are for representaon purpose only. Other product logos and company names menoned herein may be trademarks or trade names of their respective owners.
- Images shown in this User Guide are for representaon only. Other product logos and company names menoned/used herein may be trademarks or trade names of their respective owners. Micromax keeps the right to make modicaons to the content in this user guide without any prior noce.
- The funcons explained or listed in this manual may dier from the actual funcons appearing in the tablet. In such a case, the laer shall govern. We do not guarantee the absolute accuracy of the User Guide Vis-a vis the actual tablet.
- Talk and Standby me are aected by Network preferences and individual usage paerns.
- Specicaons are subject to change without prior noce. Services and some features may be dependent on the network, or service content provider.
13. Copyrights
- All rights reserved. Reproducon, transfer, distribuon or storage of part or all of the contents in this document in any form without the prior written permission of Micromax is strictly prohibited.

- Table of Contents
- Micromax P280
- Know Your Device
- Getting Started
- Charge the Battery
- Note:
- Remark:
- Insert Memory Card
- Switch On the Device
- Shut Down the Device
- Lock/Unlock the Screen
- Change the Orientation
- Adjust Volume
- Use the Earphone
- Reset the Tablet
- Using the Touch Screen
- GetAround
- Touch and Hold
- Drag an Item
- Scroll or Swipe
- Using the PinchZoom Feature
- Double-Tap
- Extended Home Screen
- Arrange and Work with Applications
- Add Widgets
- View Notifications
- Connect to Internet
- Connected to Wi-Fi
- Connect via Data Card
- Connect to VPN or Ethernet
- Features
- Music
- Change the Wallpaper
- Or
- Gallery
- Manage Downloads
- Manage Your Calendar
- Settings
- Connect with PC
- Sett he language and Keyboard
- View Available Storage Space
- View Information About Device
- Managing Accounts
- Why Use a Google Account
- Manage Accounts
- Start Gmail
- Applicaon Menu >
- Google Search
- Download Applications From Android Market
- How to Download an Application
- How to Un installed Application
- Google MAPS
- Required Sengs:
- Troubleshooting
- Device shuts down after startup
- Cannot copyfile or play music
- The tablet is hanging with no response. How can I solve this?
- Taking Care of Your Device
- Recycle YourDevice
- Disclaimers
- Copyrights
Brand : Micromax
Model : P280
Category : Tablet