Canvas Tab P470 - Tablet Micromax - Free user manual and instructions
Find the device manual for free Canvas Tab P470 Micromax in PDF.


| Product Type | Tablet |
| Brand | Micromax |
| Model | Canvas Tab P470 |
| Display Size | 10.1 inches |
| Display Resolution | 1280 x 800 pixels |
| Processor | Quad-core 1.3 GHz |
| RAM | 2 GB |
| Internal Storage | 16 GB |
| Operating System | Android |
| Battery Capacity | 4000 mAh |
| Dimensions | 240 x 170 x 9 mm |
| Weight | 500 g |
| Connectivity | Wi-Fi 802.11 b/g/n, Bluetooth 4.0, microUSB 2.0, 3.5mm audio jack |
| Camera (Rear) | 5 MP |
| Camera (Front) | 2 MP |
| Power Input | 5V/2A via microUSB |
| Main Functions | Web browsing, video playback, gaming, e-reading, social media |
| Care and Cleaning | Wipe with a soft, dry cloth. Avoid liquids and abrasive cleaners. |
| Safety | Do not expose to moisture or extreme temperatures. Keep away from children. |
| Spare Parts and Repairability | Battery not user-replaceable. Contact authorized service center for repairs. |
Frequently Asked Questions - Canvas Tab P470 Micromax
User questions about Canvas Tab P470 Micromax
0 question about this device. Answer the ones you know or ask your own.
Ask a new question about this device
Download the instructions for your Tablet in PDF format for free! Find your manual Canvas Tab P470 - Micromax and take your electronic device back in hand. On this page are published all the documents necessary for the use of your device. Canvas Tab P470 by Micromax.
USER MANUAL Canvas Tab P470 Micromax
Adjust the Volume......8
Charging the Battery....9
Basic Features.... 11
Google™ Account....11
Home Screen 12
Application Launcher....13
Notifications....14
Toolkit 15
Gravity Sensor....16
Screen Unlocking Techniques....17
Use Google Search 21
Drag an Item....23
Scroll 23
Swipe....24
Double-tap 24
Using Pinch to Zoom 25
Using the Onscreen Keyboard....26
Task Manager....27
Calling and Messaging......28
Make a Call....28
Contacts 28
In Call Options....29
Airplane Mode 30
Send Message....30
Multimedia....31
Camera 31
Gallery 31
Music Player 32
Settings, Networks, and Applications......33
Connect to the Internet 34
Tethering & Portability....34
Pair With BT Devices 35
USB OTG (On the Go) for Data Transfer......36
Configuring E-Mail....36
Google Maps....37
Play Store....37
Troubleshooting....38
Device Specifications....39
Safety Precautions....40
Taking Care of your device....41
Recycle your Device 42
Disclaimer.... 42
Copyright...... 43
Welcome
Thank you for purchasing the Micromax P470. You are now the proud owner of the P470 tablet which offers you a wide range of exciting features designed to give you a rich and fulfilling tablet PC experience.
Understand Your Device

Insert SIM Card
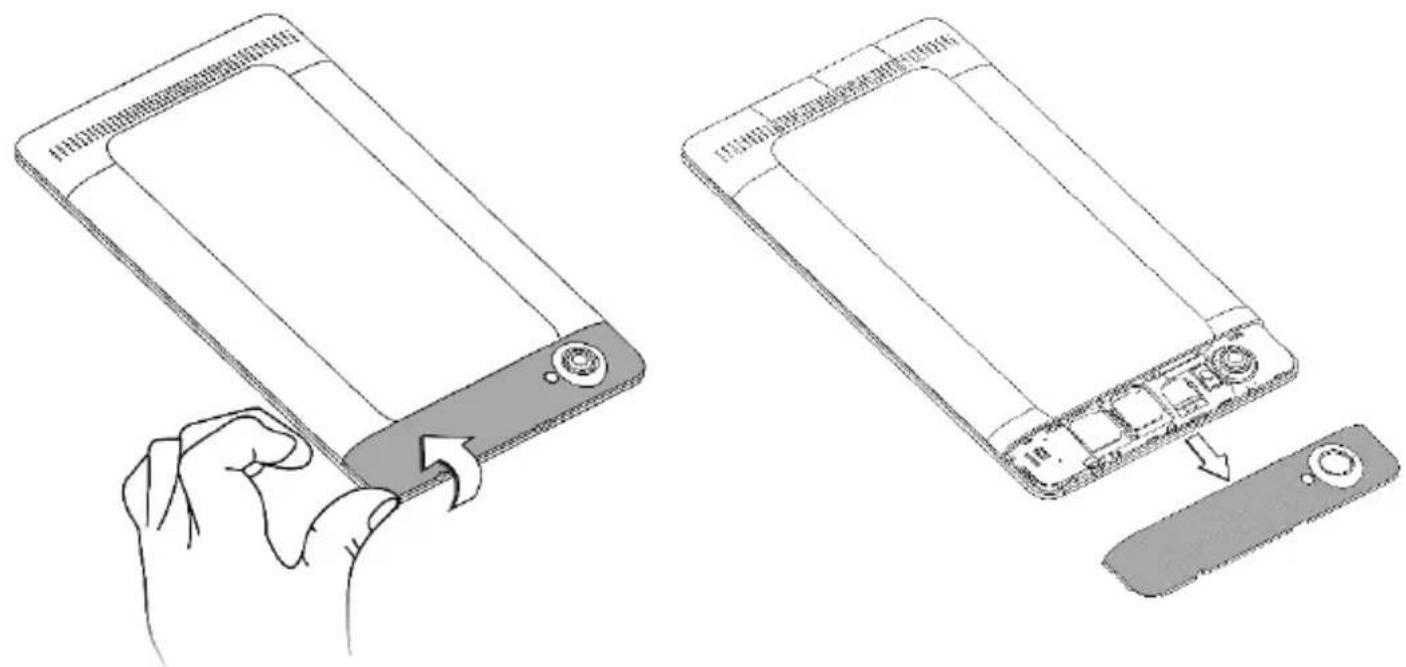
- Switch off the device and remove the rear cover as shown.
natural_image
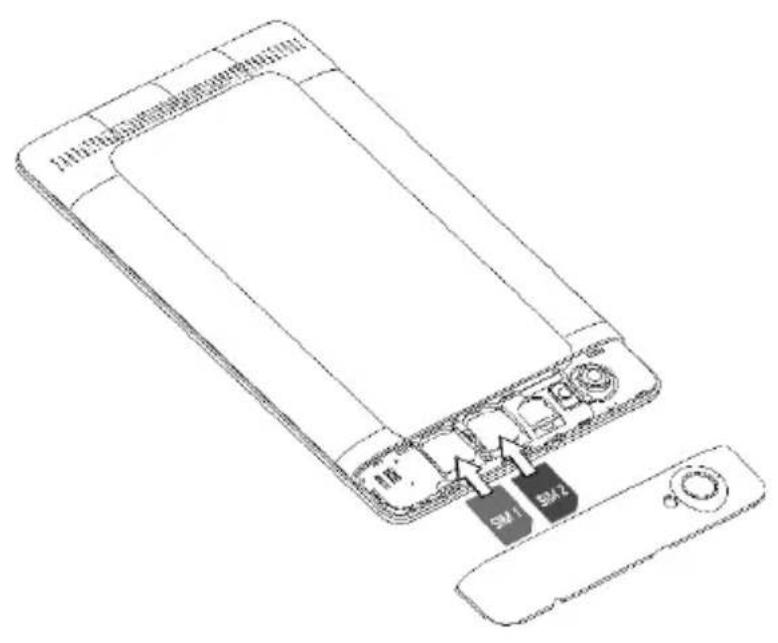
Illustration of two-step smartphone device assembly: one being held by a hand, the other showing a close-up of internal components (no text or symbols)- Insert SIM card correctly in the card slot(s), as shown:
Insert Memory Card
To store additional files and applications, you need to insert a memory card.
- Switch off the tablet and insert the memory card correctly in the slot as shown:

natural_image
Line drawing of a smartphone showing front panel, rear panel, and control panel (no text or symbols)
Use only compatible memory cards. Incompatible memory cards may damage the device and corrupt the data stored in the card.
Switch on/off the Device
natural_image
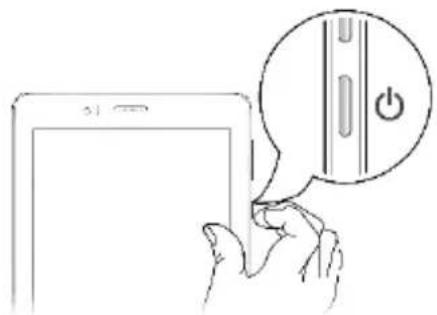
Illustration of a hand holding a tablet with a power button icon (no text or symbols)- Long press to switch on or switch off the tablet.
- Press once to turn off the screen or to wake up the screen.
- Press for 2 seconds to view quick options to turn off the tablet, switch to airplane mode, adjust the sound profiles or reboot the device.
Adjust the Volume

- Use the volume key on the right side of the device to adjust the volume.
| Onscreen Keys | Functions |
 | Opens the most recently used applications. |
 | Opens the home screen. If you are viewing the left or right extended home screen, opens the central home screen. |
 | Opens the previous screen you were working on. |
Charging the Battery
Before using the device for the first time, we recommend you to charge the battery for a minimum of 4 hours.
Please charge the device in the following conditions:
- If the battery power is low or if the power icon shows no power.
- If the device stops responding to the Power button i.e. the device is not getting switched on.
• Device automatically shuts down.

flowchart
graph LR
    A["Battery"] --> B["USB Cable"]
    B --> C["Laptop"]
    C --> D["Power Plug"]
    style A fill:#f9f,stroke:#333
    style D fill:#ccf,stroke:#333
You can charge the device with a travel adapter or connecting the device to a PC via a USB cable.
Basic Features
Google™ Account
Your Google Account lets you take full advantage of applications and services offered by Google. Configure your Google account on this device to get access to your Gmail, Google Play Store, Google Maps, and much more.
When you turn on your device for the first time, Google account setup will display, allowing you to set up your Google account.
i Internet connection is required for the Google account setup to appear.
However, you may configure your Google account at any later stage from ⬤ → ⬤ → Add account → Google. Follow the registration steps to successfully configure your mail account on the device.
If you do not have an existing Google account, you may create one from the account configuring step.
You may add various other accounts, depending on your applications.
Home Screen
You can personalize your home screen with shortcuts, widgets, wallpapers and other items. Swipe left or right on the home screen to view the next extended home screen. Your P470 has five home screens including one center home screen and four extended home screens.

natural_image
Illustration of a hand interacting with a tablet screen displaying a finger icon, with no visible text or symbols.Tap and hold to select a launcher icon and then you can rearrange, change, or remove them with ease.
Application Launcher
Application launcher or Application menu is available in the middle of the bottom pane.

natural_image
Hand interacting with a tablet device displaying app icons (no text or symbols visible)Tap 📄 to view all installed applications and widgets. In application menu, tap and hold any application/widget to take it to the
home screen; release the hold to place at any desired location on the home screen.
Widgets allow placing application shortcuts on your home screen. You can place analog clock, contacts, and other such sections of your tablet on the home page and access them directly! Tap and hold on the home screen and then select Widgets to view all available widgets.
Notifications
Notification icons inform you of new messages and events as and when it appears in the device.
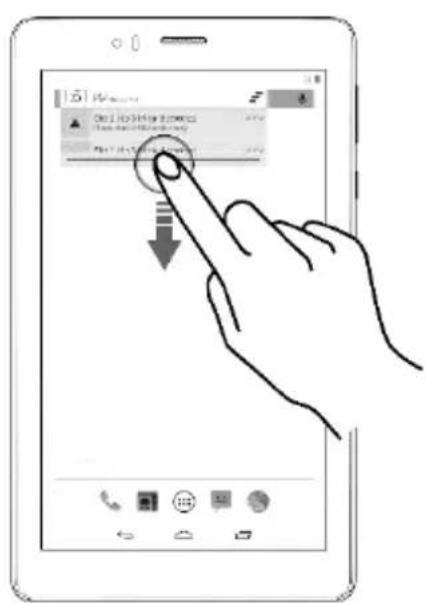


When you receive a notification, its icon appears in the status bar, along with a brief summary. You may clear each notification separately by swiping it towards the left or right, or, clear all notifications by tapping icon.
Toolkit
Toolkit gives you quick access to basic features such as Airplane Mode, Wi-Fi, Display Brightness, and many more.


Gravity Sensor
Your phone has gravity sensor to detect its orientation and adjust the display (auto-rotate) based on its position.
You can enable/disable the auto-rotate feature from the toolkit.

natural_image
Two grayscale images showing a plant on a branch, one with visible leaves and the other with visible stem and leaf (no text or symbols)Screen Unlocking Techniques
You can unlock your device using a variety of methods like Face Unlock, Voice Unlock, Pattern Unlock, PIN Unlock or Password. Slide unlock is the default unlocking method in the tablet.
To unlock the screen:
- Press the power key to wake up the screen.
- Hold and drag the lock icon towards the unlock icon.
Face Unlock | Look at your tablet to unlock itAllows you to keep your face as screen unlocking password. You need to look at your device to unlock it. |
Voice Unlock | Speak your password to unlockYou need to speak something for the device to recognize your voice and unlock the screen |
PIN | Enter your PIN to unlock your tabletYou may enter a PIN and set it as your screen unlocking password. |
Pattern | Set and draw your desired patternYou can set your own pattern by connecting the dots to prevent your tablet from unauthorized access. |
Password | Enter your password to unlockYou may enter any desired password and set it as your screen unlocking password. |
Slide | Slide from lock icon to unlock iconJust wake up the screen and slide the lock icon towards the unlock icon to unlock your device. |

You may set any desired unlocking technique from


Security → Screen lock.
You can disable all unlocking methods from your handset by selecting the None option.
Use Google Search
You can search for anything on your device or on the internet using Google Search by simply typing the search keywords. Google Search also supports voice recognition, allowing you to speak to search and using voice commands to access various sections in your handset.
Google Search is available on the home screen and also in the application menu. To use Google voice search, tap 🔒 and speak your search keywords. The tablet will return the Google search results based on your input.
Using the Touch Screen
Tap and Hold


Tap and hold an item to view the list of actions based on the selected item and condition. You can also move an item from the Apps screen to the home screen using this method.
Drag an Item
Tap and hold an item and move your finger on the screen until you reach the target position. The item follows your finger.
You can generally drag items from one location to another on the home screen. Also, you can delete items from the home screen by holding the item and dragging it to the Remove label that becomes available only when you hold the item on the Home screen.

Scroll

To scroll a list, slide your finger across the surface of the screen upwards or downwards (without dragging an item).
Swipe

Place a finger on the screen and steadily slide your finger in the desired direction. For example, when you are viewing a picture, to view the next picture, swipe left.
Double-tap
Quickly tap twice on an image, webpage, map, or other screen to zoom. For example, double-tap a section of a webpage in the browser to zoom in on that section.

natural_image
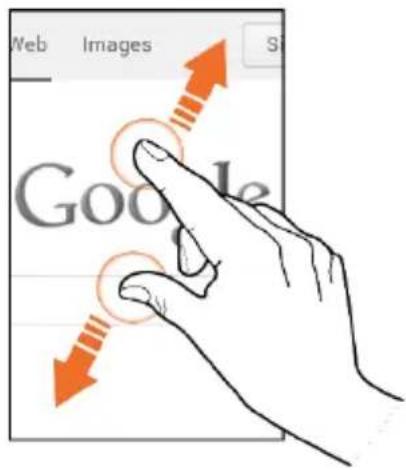
Hand pressing a button on a white surface, no text or symbols presentUsing Pinch to Zoom
You can open any image or web page and then use your fingers to zoom-in or zoom-out using the pinch gestures.

Using the Onscreen Keyboard
Some applications display the keyboard by default. In others, you will be required to tap a text field, where you want to enter text, to open the keyboard.

Task Manager
Tap the 🔒 key on the home screen to view the list of the most recently opened applications and sections. You can easily remove items from the list to free some memory and make your tablet work faster.
There are two ways to remove items from the list.

Drag an item towards left or right

Tap and hold an item and then select Remove from list
Calling and Messaging
Make a Call
Tap on the menu screen or the home screen. By default, the dialer will display a list of contacts on which calls have been made very often and the contacts which have been marked as favorites.
You can show the dialer by tapping 🐘 or view the call history by tapping . Ⓤ
Contacts
Go to


Store, use, and synchronize contact details in your contact list. You can now create contact groups or mark contacts as favorites in your phonebook.
Search for your desired contacts under any of the three tabs by tapping icon.
i Add a new contact in the contacts list by tapping
You can synchronize your contacts list with any of your account configured on this device.
To synchronize your contacts list:
-
Tap : icon from the contacts screen and then tap Accounts.
-
Select the account(s) with which contacts list is to be synchronized. You can auto-sync contacts by selecting the Auto-sync app data option.
Your contacts synchronization will be complete in a few seconds.
i
To synchronize contacts, you need to have Internet connectivity. If your Sync does not proceed as expected, check whether data option is set to ON.
In Call Options
- Press the Volume up / down keys on the right side to adjust the call volume.
- Tap : icon and select Add call option to add another person to the call.
- Tap to mute your voice so that the tablet's MIC will not transmit voice to the other end. You can resume transmitting your voice by tapping again.
- Tap " to put the call on hold. Tap the icon again to resume the call.
- Tap to listen via the speaker.
- Tap to view the dial pad.
Airplane Mode
Some locations may require you to disable all the wireless features of your device. The Airplane Mode enables you to disable all incoming and outgoing calls, Wi-Fi, and BT connections.
To activate the airplane mode:
- Press and hold the Power button and then select Airplane mode.
Or
Open the notification panel and tap the Airplane mode quick toolkit icon.
Send Message
-
Tap 🤨 on the menu screen or the home screen to go to the messaging section and then tap 🤨 + to compose a message.
-
Tap + icon to view the types of files that can be attached and tap the desired type of multimedia file.
-
Tap to select the composition text box and enter your message body in it.
-
Enter the contact name (if it exists) or enter the phone number.
-
Tap ▶ icon to send the message.
Multimedia
Camera
You can take photos and videos using your device.



flowchart
graph TD
    A["Capturing modes"] --> B["HDR mode"]
    B --> C["Capture"]
    B --> D["Recording"]
    B --> E["Camera Settings"]
    style A fill:#f9f,stroke:#333
    style B fill:#ccf,stroke:#333
    style C fill:#cfc,stroke:#333
    style D fill:#fcc,stroke:#333
    style E fill:#ffc,stroke:#333
Gallery
Go to


You can use the Gallery to view pictures, play videos and share files. Tap an album to open and view its content.
Music Player

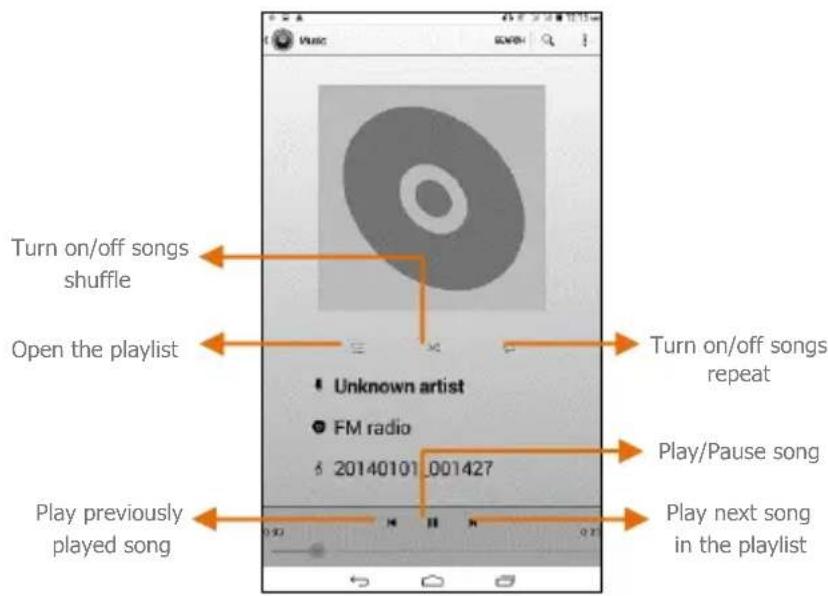
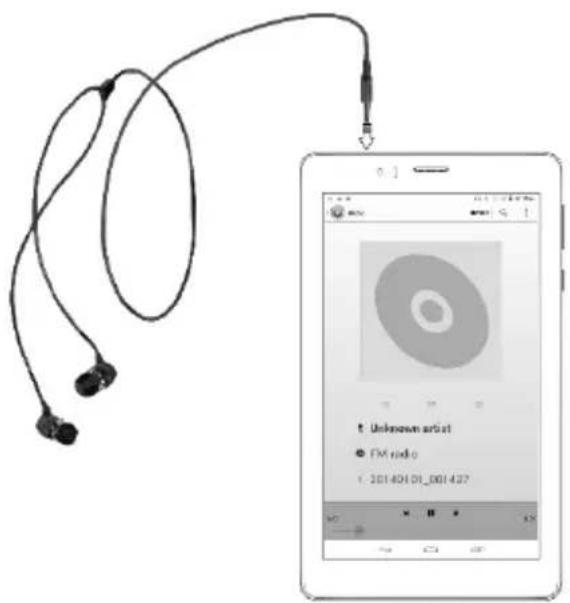

You can use an SD card to enhance the storage capacity for your multimedia files such as music, photos, and so on.
Settings, Networks, and Applications
Your tablet can connect to a variety of networks and devices, including Internet, Wi-Fi, BT, devices, such as headsets. You can also transfer files to/from your PC through the data cable.
Connect to the Internet
Connect Via SIM
Go to ⬙ → ⬤ → Dual SIM Settings → Data connection and select the SIM on which data connection is to be enabled.
You may also need to configure the access point name for the data connection to work. To configure the access point name:
Go to → More → Mobile networks → Access Point Names and select the SIM for which access point name is to be configured. Select the access point name from the list.

By default, the access point name gets configured once you insert the SIM, Or, your network provider sends the access point name settings via SMS. You may need to install these settings. If the access point names are not listed by default, please contact your network provider for the same.
Connect Via Wi-Fi
Go to → → Wi-Fi.
- If Wi-Fi is turned off, turn it on and tap Wi-Fi. Your device scans and displays the Wi-Fi networks in range.
- Tap the Wi-Fi network you want to connect to.
- If the selected Wi-Fi network is password protected, you need to enter the password and connect to it.
Tethering & Portability
You can use your device as a modem and connect your PC/laptop to the Internet. You need to have an active Internet connection on
your tablet to use these features.
Go to


→ More → Tethering & portable hotspot.
USB Tethering
- Connect your tablet with your PC/Laptop via USB cable.
- Select the USB tethering option.
- Select your tablet network as the network connection in your PC/laptop and get access to the Internet.
Wi-Fi Hotspot
- Select Portable Wi-Fi hotspot option in your tablet.
- On the other Wi-Fi enabled PC/laptop/handset, choose your tablet as a Wi-Fi network to connect with it.
- View and configure Wi-Fi hotspot settings by tapping the Set up Wi-Fi hotspot option.
i
Your mobile operator will charge you based on your data usage.
BT Tethering
- Pair your device with the BT enabled PC/laptop via BT pairing option.
- Select the BT tethering option in your device.
- On the paired PC/laptop, select the BT device (your device) and choose to connect to the internet.
Pair With BT Devices
Go to


- If BT is off, turn it on and then tap BT. Your tablet scans and displays the BT devices in range.
- Tap the ID of the other device in the list to pair with it.
- You may be prompted to confirm passkey on both devices. Tap Pair to confirm the passkey and pair the devices. On successful pairing, your tablet connects to the device.
If the device you want to pair with is not in the list, make it discoverable and then search. If your tablet stops scanning before you make the other device discoverable, tap SEARCH FOR DEVICES.
Tap Micromax P470 at the top of the scanned device list to make your P470 visible on other devices.
USB OTG (On the Go) for Data Transfer
Your device supports USB OTG, which allows you to directly transfer data between your device and a flash drive / pen drive, using an OTG cable.
Configuring E-Mail
You can check and reply to your emails from your P470 from anywhere and anytime. Apart from the Gmail account, you can configure other accounts too on this device.
- Go to ⬙ → ⬤ → Add account. Select the type of account you want to create.
- Type the email address and password in the respective fields and tap Next.
- Set account settings, as required and tap Next.
- Provide your account name and your name and then tap Next to successfully finish account configuration.
The server will check for online settings automatically and your account will be set up. If not, please check your Internet settings before proceeding.
i
Tap : icon of the tablet and then tap Refresh to refresh your emails manually.
Google Maps
Google Maps is a web based service offered by Google Inc. which offers you access to various map based services. You can view various streets, landmarks and can even plan your routes with the help of Google Maps. It comes with a navigation system (GPS required) which gives step-by-step route guidance while driving or walking. You can even download maps for offline usage. This serves as a useful application for your day-to-day usage.
Settings required for Google map access include:
- Enable location access from ⬙ → ➕ → Location.
- Go to → to start using Google Maps.
i
Internet connection is required for using Google Maps. When you use the map, you use your Internet connection to transfer data to and from your tablet.
i
The Google Maps application may not be available in every street, country or region.
i
Micromax does not guarantee the accuracy of any directional services.
Play Store
Your Android tablet lets you access unlimited entertainment sources. You can download applications, games, movies, and books from the ever increasing Play Store. New items get added almost daily to the market to give users a never ending fun experience.

natural_image
White shopping bag icon with a colorful play triangle symbol on the front (no text or symbols)To view and manage the list of all inbuilt, downloaded, and running applications go to → → Apps.
To download applications, games, movies, and books from the Play Store, go to → to access the Google Play Store. View the details and download items, as desired.
Not all items are free of cost in the Play Store.
You need to enable internet connection and configure Google account on your device to get access to the Play Store.
Troubleshooting
Device shuts down after startup
• Power is not enough, please charge your device.
Cannot copy file or play music
- Please check if the connection between the computer and the device is proper and correct.
- Check whether the memory storage space is already full.
- Check if the USB cable is not damaged.
- Check if USB is disconnected.
The tablet is hanging with no response. How can I solve this?
- Restart the tablet by long pressing and holding the power key.
Device Specifications
| Battery and Charger | |
| Voltage | 3.7V |
| Battery Capacity | 3200 mAh |
| AC-DC adaptor I/P & O/P | Input: AC : 100-240V, 50-60 HzOutput: DC: 5.0V/2.0A |
| Environmental Rating | 4°C - 40°C |
| Humidity Range | Less than 80% |
Safety Precautions

Switch off your device in any area with potential explosive atmosphere. Sparks arising out of radio frequency may cause fire or explosion. Therefore switch off your device at refueling stations, fuel depots, chemical plants or places where blasting operation is in progress. Remember to comply with legal requirements and local restrictions when using the device.

Your device's radio waves may interfere with inadequately shielded medical devices. Consult a physician or manufacturer of the medical device to know whether they are adequately shielded from external Radio Frequency. Switch off your device when regulations require you to do so.

Always keep the device and accessories out of reach of small children. Small parts such as the SIM card or micro SD card can be dismantled and swallowed by small children.

Do not place the device near electromagnetic data carriers such as credit/Debit cards. Information stored on them could be lost.

Permanent damage to hearing may occur if you use earphones at high volume for prolonged periods. Set your volume to a safe level. If you experience discomfort in your ears, reduce the volume or discontinue the use of your earphones.

Manufacturers of medical devices recommend a minimum distance of 15.3 cm (6 inches) between a wireless device and an implanted medical device such as pacemaker or cardiverter defibrillator to avoid issues arising out of radio frequency interference.

natural_image
Row of eight black-and-white icons representing various transportation and service categories (no text or symbols)The mains voltage (V) specified on the power supply unit must not be exceeded to prevent damage to the charging device. The power supply must be plugged into an easily accessible AC power socket when charging the battery.
You may only open the device to replace the battery (if not inbuilt), SIM card and micro SD card. You must not open the battery under any circumstances. All other changes to this device are strictly prohibited and will invalidate the warranty.
The device may cause interference in the vicinity of TV sets, radios and PCs.
The battery may cause damage, injury or burns if a conductive material closes the circuit of the terminals. Exercise care in handling any charged battery, particularly when placing it inside your pocket, purse or other container with metal objects. Do not dispose of batteries in fire as they may explode.
Do not use the device while driving. When you have to use the device, please use the earpiece.
Please put the device safely in the stand. Do not put it onto any passenger seat or any place from which it may fall down during collision or emergency braking.
Flight is influenced by interference caused by the device. It is illegal to use the device on the airplane. Please turn off your device during a flight.
The device must be repaired by Micromax authorized personnel only. Repairing this device by yourself other than our authorized service agents/centers goes against the warranty rules.
Taking Care of your device
Your device is a product of superior design and craftsmanship and should be handled with care. The following suggestions will help you protect your device:
- Keep the device dry. Precipitation, humidity, and all types of liquids or moisture can rust the electronic circuits. If your device gets wet, remove the battery, wipe it with a dry cloth and take it to an authorized service center.
• Do not store the device in high or cold temperature. Extreme temperatures can shorten the life of electronic devices and damage batteries. - Do not use or store the device in dusty, dirty areas. Its moving parts and electronic components can get damaged.
- Do not attempt to open the device other than as instructed in this guide.
- Do not drop, knock, or shake the device. Rough handling can break internal circuit boards and fine mechanics.
- Do not use harsh chemicals, cleaning solvents, or strong detergents to clean the device. Only use a soft, clean, dry cloth to clean the surface of the device.
- Do not store your device near magnetic fields or allow your device to come in contact with magnetic fields for extended period of time.
Recycle your Device

The WEEE logo (shown at the left) appears on the product (battery, handset, and charger) to indicate that this product must not be disposed off or dumped with your other household wastes. You are liable to dispose of all your electronic or electrical waste equipment by relocating over to the specified collection point for recycling of such hazardous waste.
Collection and proper recovery of your electronic waste equipment at the time of disposal will allow us to help preserve the environment. Recycling of the electronic waste equipment will ensure safety of human health and environment. For more information on best practices for disposal of electronic and electrical waste, please visit to our web site: www.micromaxinfo.com/weee.php.
Note: Micromax will not bear any responsibility for any incompliance with the above mentioned guidelines or improper usage of the device.
Disclaimer
- The colors, specifications, functions and graphics shown/mentioned in the user manual may differ from the actual product. In such a case, the latter shall govern. Images shown are for representation purpose only. Specifications are subject to change without prior notice. Micromax keeps the right to modify the content in this user guide without prior notice.
- Upon first use of your device, your device will send information related to your mobile, IMEI numbers, location details and other software details through SMS* automatically. This information may be used as further specified in Micromax privacy policy**.
- Talk and standby times are affected by network preferences, type of SIM cards, connected accessories and individual usage patterns. Services and some features may be dependent on the network, service/content providers, SIM cards, compatibility of the devices used and the content formats supported.
• Other product logos and company names mentioned herein may be trademarks or trade names of their respective owners.
*Operator tariff shall be applicable for SMS.
**Micromax privacy policy is available at www.micromaxinfo.com.
Copyright
All rights reserved. Reproduction, transfer, distribution or storage of part or all of the contents in this document in any form without the prior written permission of Micromax is strictly prohibited.

- Welcome
- Insert SIM Card
- Insert Memory Card
- Switch on/off the Device
- Adjust the Volume
- Charging the Battery
- Basic Features
- Google™ Account
- Home Screen
- Application Launcher
- Notifications
- Toolkit
- Gravity Sensor
- Screen Unlocking Techniques
- Use Google Search
- Using the Touch Screen
- Tap and Hold
- Drag an Item
- Scroll
- Swipe
- Double-tap
- Using Pinch to Zoom
- Using the Onscreen Keyboard
- Task Manager
- Calling and Messaging
- Make a Call
- Contacts
- In Call Options
- Airplane Mode
- Send Message
- Multimedia
- Camera
- Gallery
- Music Player
- Settings, Networks, and Applications
- Connect to the Internet
- Connect Via SIM
- Connect Via Wi-Fi
- Tethering & Portability
- USB Tethering
- Wi-Fi Hotspot
- BT Tethering
- Pair With BT Devices
- Go to
- USB OTG (On the Go) for Data Transfer
- Configuring E-Mail
- Google Maps
- Play Store
- Troubleshooting
- Cannot copy file or play music
- The tablet is hanging with no response. How can I solve this?
- Safety Precautions
- Taking Care of your device
- Recycle your Device
- Disclaimer
- Copyright
Brand : Micromax
Model : Canvas Tab P470
Category : Tablet