AIC-214 - Sorbet maker Aroma - Free user manual and instructions
Find the device manual for free AIC-214 Aroma in PDF.


| Product Type | Ice Cream Maker (Sorbetière) |
| Brand | Aroma |
| Model | AIC-214 |
| Capacity | 1.5 quarts (approx. 1.4 liters) |
| Dimensions (W x D x H) | 10 x 8 x 12 inches (approx. 25 x 20 x 30 cm) |
| Weight | 5.5 lbs (approx. 2.5 kg) |
| Power | 150W, 120V, 60Hz |
| Material | Plastic body with stainless steel inner bowl |
| Functions | Makes ice cream, sorbet, frozen yogurt |
| Operation | Electric with automatic mixing paddle |
| Freezing Method | Pre-freeze removable bowl (requires 8-12 hours freezing) |
| Safety Features | Overload protection, non-slip feet |
| Cleaning and Maintenance | Hand wash bowl and paddle; wipe motor base with damp cloth |
| Included Accessories | Freezing bowl, mixing paddle, instruction manual |
| Repairability | Spare parts available; motor unit replaceable |
Frequently Asked Questions - AIC-214 Aroma
User questions about AIC-214 Aroma
0 question about this device. Answer the ones you know or ask your own.
Ask a new question about this device
Download the instructions for your Sorbet maker in PDF format for free! Find your manual AIC-214 - Aroma and take your electronic device back in hand. On this page are published all the documents necessary for the use of your device. AIC-214 by Aroma.
USER MANUAL AIC-214 Aroma
4-Quart Ice Cream Maker
Instruction Manual
natural_image
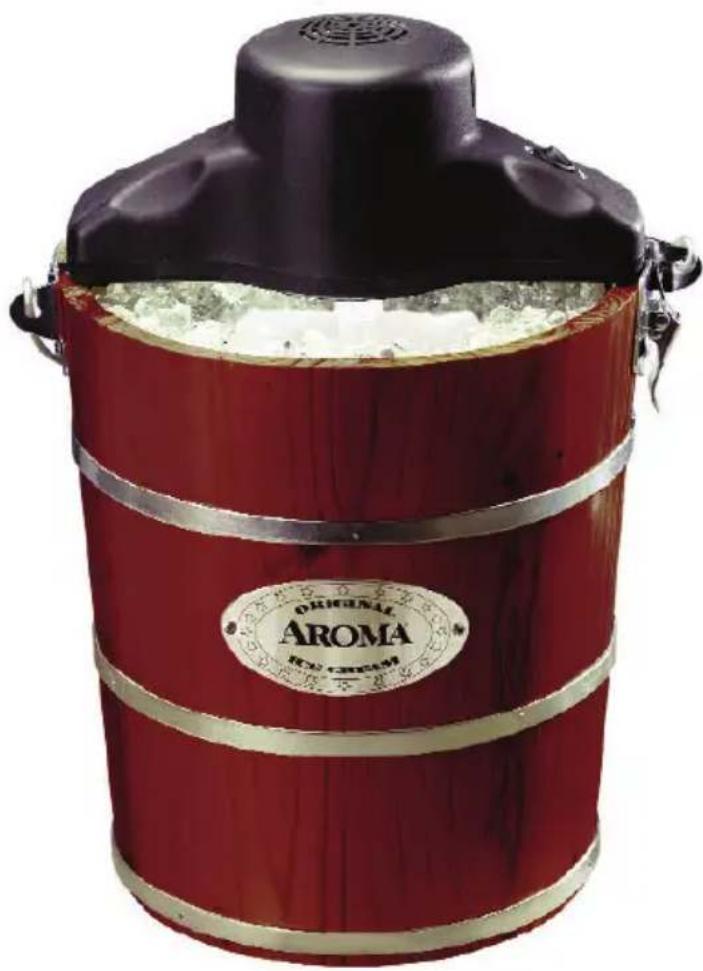
Red and beige wooden coffee maker with label, no visible text or symbols on bodyCongratulations on your purchase of the AROMA Old-Fashioned Ice Cream Maker! This convenient, easy-to-use appliance makes all of your favorite frozen treats, just the way you like them. Enjoy ice cream, frozen yogurt, sorbet and gelato custom-made to your taste!
The origin of ice cream dates back into ancient history, but the very first traditional hand-cranked ice cream churner was developed in America in the nineteenth century. With the addition of milk and the development of modern refrigeration, ice cream became the widespread sensation that it is today with thousands of varieties available to people everywhere in the world.
With the Aroma® Old-Fashioned Ice Cream maker, celebrating the great American tradition of ice cream is quick, easy and delicious. For the kids, whipping up chocolate, vanilla or strawberry recipes is a snap, with variations made easy-crumble up your favorite candy, cookie or topping and stir it in for a whole new flavor! The motorized crank does the work for you at the touch of a button, or you can take turns with the hand-crank for some good old-fashioned fun.
Use the recipes included in this manual to make timeless family recipes, or experiment to create your own unique flavors. For healthier options, try low-fat, sugar-free or non-dairy ice cream varieties.
Whatever your preference, the Aroma® Old-Fashioned Ice Cream Maker is a fun, fast and easy way to enjoy the timeless tradition of fresh, homemade ice cream.
For recipe suggestions or more kitchen solution ideas, please visit us online at www.AromaCo.com.
Please read all instructions before first use.
Published By:
Aroma Housewares Co.
6469 Flanders Drive
San Diego, CA 92121
U.S.A.
1-800-276-6286
www.aromaco.com
© 2008 Aroma Housewares Company All rights reserved.
IMPORTANT SAFEGUARDS
Basic safety precautions should always be followed when using electrical appliances, including the following:
- Important: Read all instructions carefully before first use.
- Do not touch hot surfaces. Use handles or knobs.
- To protect against electrical shock, do not immerse cords, plugs or the electric motor in water or other liquids.
- Close supervision is necessary when any appliance is used by or near children.
- Unplug from outlet when not in use, before cleaning, and before putting on or taking off parts.
- Avoid contact with moving parts. Keep fingers, hair, clothing and utensils away during operation.
- Do not operate any appliance with a damaged cord or plug, after the appliance malfunctions or has been damaged in any manner. Return appliance to the nearest authorized service facility for examination, repair or adjustment.
- The use of accessory attachments not recommended by the appliance manufacturer may cause injuries.
- Do not use outdoors.
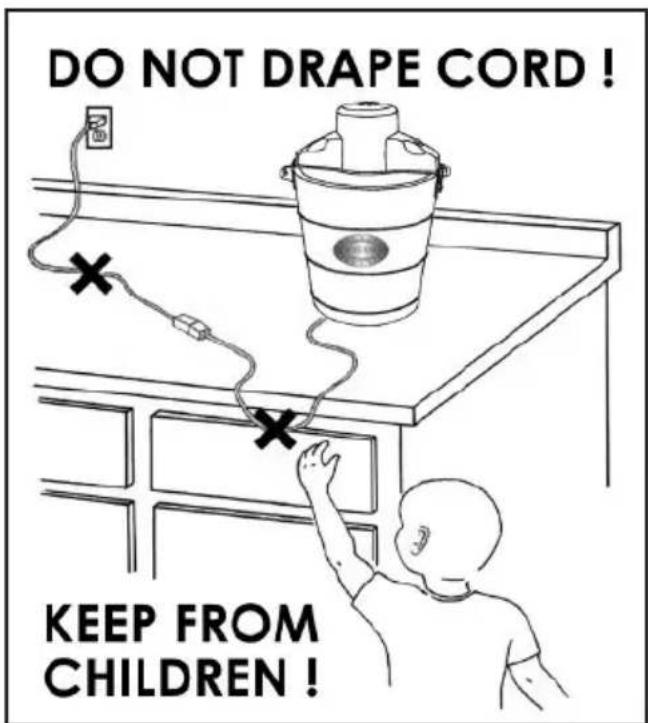
- Do not let cord hang over edge of table or counter, or touch hot surfaces.
- Do not use the appliance for other than its intended use.
- Do not place this appliance on or near a hot gas or electric burner, or in a heated oven.
- To disconnect power, press switch to "OFF" position and then remove plug from wall outlet.
- Never operate ice cream maker dry. Always have ice cream mixture in the container while plugged in.
- Do not use hot oil or liquids in ice cream maker. (Always chill mixtures before churning.)
SAVE THESE INSTRUCTIONS
SHORT CORD INSTRUCTIONS
-
A short power-supply cord is provided to reduce the risks resulting from becoming entangled in or tripping over a longer cord.
-
Longer extension cords are available and may be used if care is exercised in their use.
-
If a longer extension cord is used:
a. The marked electrical rating of the extension cord should be at least as great as the electrical rating of the appliance.
b. The longer cord should be arranged so that it will not drape over the counter top or tabletop where it can be pulled by children or tripped over unintentionally.
POLARIZED PLUG
This appliance has a polarized plug (one blade is wider than the other); follow the instructions below:
To reduce the risk of electric shock, this plug is intended to fit into a polarized outlet only one way. If the plug does not fit fully into the outlet, reverse the plug. If it still does not fit, contact a qualified electrician. Do not attempt to modify the plug in any way.
THIS APPLIANCE IS FOR HOUSEHOLD USE ONLY.
PARTS IDENTIFICATION
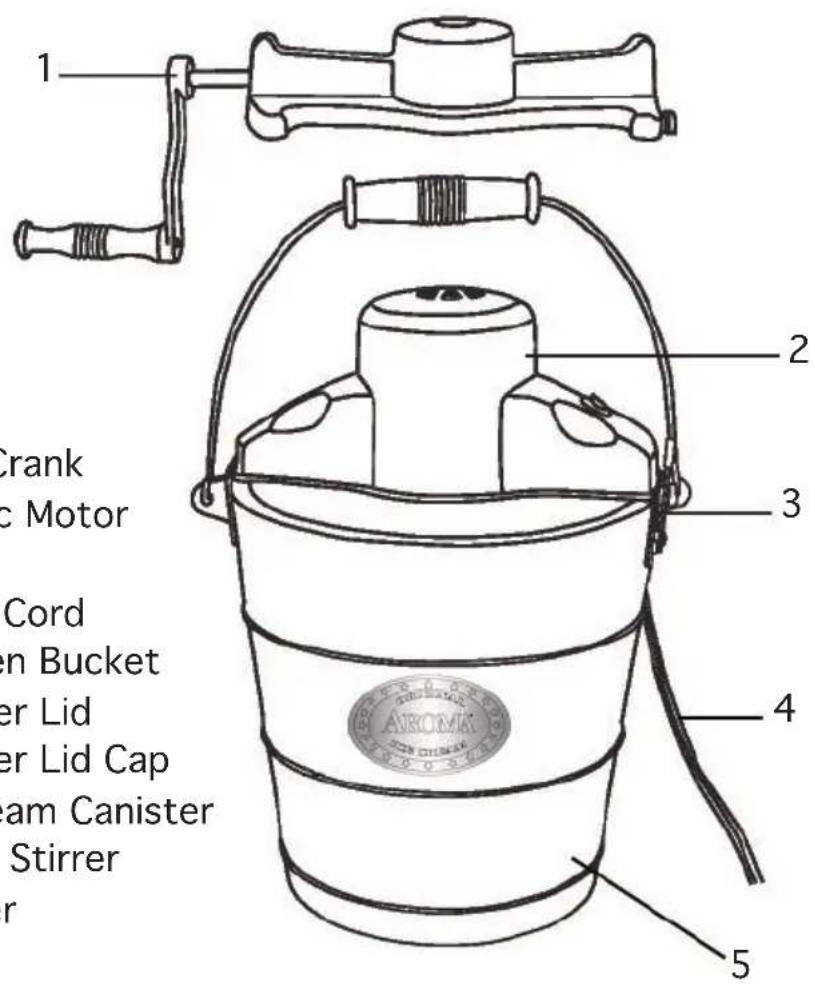
- Hand Crank
- Electric Motor
- Latch
- Power Cord
- Wooden Bucket
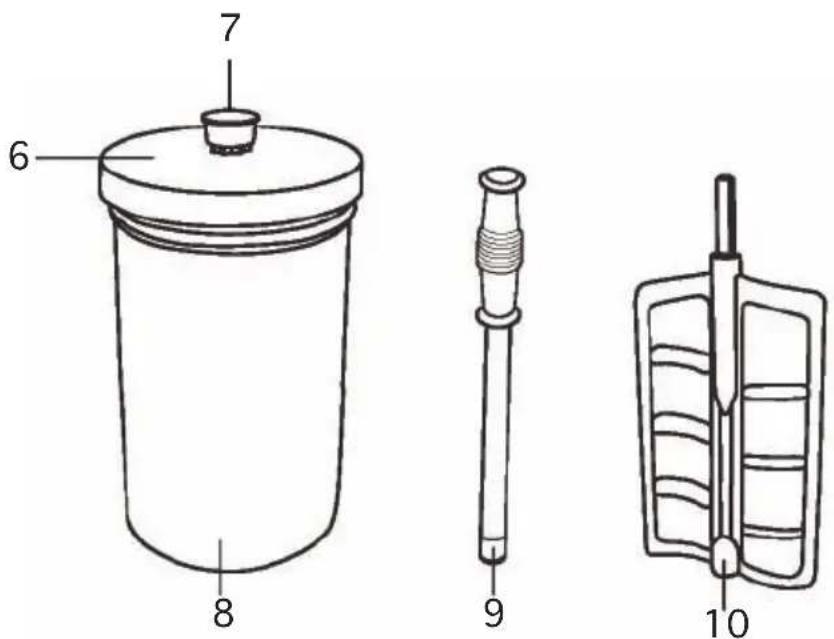
- Canister Lid
- Canister Lid Cap
- Ice Cream Canister
- Plastic Stirrer
10.Dasher
USING YOUR ICE CREAM MAKER
Before First Use:
- Read all instructions and important safeguards.
- Remove all packaging materials and make sure items have been received in good condition.
- Tear up all plastic bags, as they can pose a risk to children.
-
Wash the lid, freezer canister and all accessories in warm, soapy water.
-
Rinse and dry all parts thoroughly.
-
Wipe electric motor with a damp cloth.
-
Pour water (about 2/3 full) into the wooden bucket and leave in the sink or water-safe area for one and a half hours. This will give the wood a chance to expand so that the salt/ice mixture will not leak out during the freezing process.
-
Do not use abrasive cleaners or scouring pads.
- Do not immerse the base, cord or plug in water at any time.
To Make Ice Cream:
SEE STEP 7 IN "BEFORE FIRST USE" SECTION BEFORE BEGINNING
- Select your favorite recipe (see “Recipes” beginning on page 10 for some classic ice cream recipes); prepare ingredients per recipe instructions. Chill the mixture in the refrigerator until cold. Chill the ice cream canister in the freezer (towards the back) for at least one hour (overnight is recommended).
- Pour chilled ice cream mixture into chilled ice cream canister (fill no more than 2/3 full as mixture will expand during freezing process).
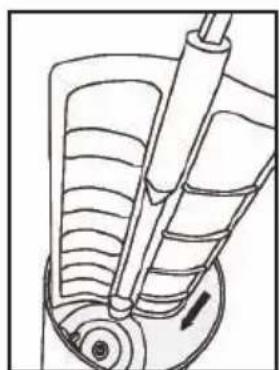
- Insert the dasher and make sure the bottom of dasher is fixed in the center of the bottom of the canister. (Figure 1)
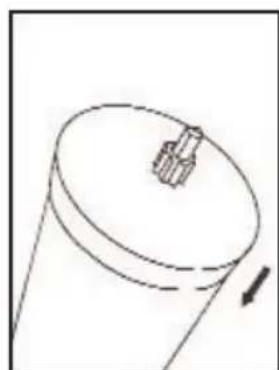
- Place the lid on the canister. (Figure 2)
natural_image
Cross-sectional diagram of a piston-cylinder engine showing internal blades and shaft (no text or labels)Figure 1
natural_image
Simple line drawing of a cylindrical object with a small protrusion and an arrow indicating direction (no text or symbols)Figure 2
USING YOUR ICE CREAM MAKER
To Make Ice Cream:
-
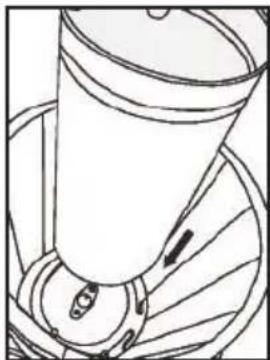
Place the canister in the wooden bucket and make sure it engages the cone in the center of the bucket. (Figure 4)
-
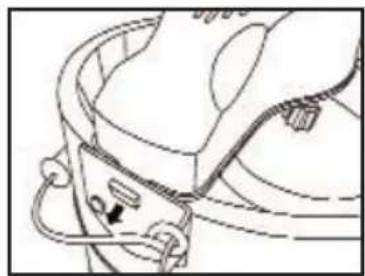
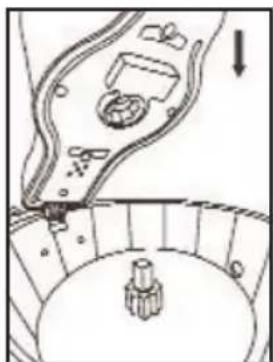
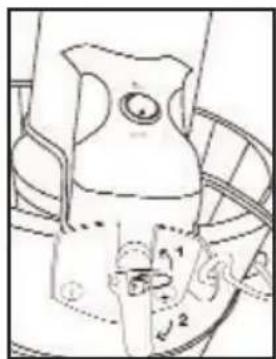
Slide the rectangular end of the hand crank or electric motor into the rectangular hole on the rim of the bucket (Figure 5a). The opposite end of the crank will drop into the open end, where the latch is (Figure 5c). Gently lift the latch so that the wire goes over the rounded end of the hand crank or motor. You may need to rotate the canister by hand so that the lid fits into the motor/hand crank (Figure 5b).
natural_image
Technical line drawing of a mechanical component with a cylindrical shaft and circular base (no text or symbols)Figure 4
natural_image
Line drawing of a mechanical device with wires and a knob (no text or symbols)Figure 5a
natural_image
Diagram of a mechanical assembly with a gear and housing, showing no text or symbolsFigure 5b
natural_image
Technical line drawing of a mechanical component with no visible text or symbolsFigure 5c
-
Plug the power cord into a working electrical outlet if you are using the electric motor.
-
Fill the wooden bucket with a small layer of ice (about 6 cups), evenly distributed around the base of the canister. Be sure that the ice you put into the bucket is broken into small, coarse pieces. You may use a mallet or hammer to break into smaller pieces, if needed. For each batch of ice cream, expect to use 1-2 medium bags of ice.
-
Cover the first layer of ice evenly with a thin layer of rock salt (about 1/2 cup).
-
Repeat steps 8 through 9, layering the ice and salt until it reaches the bottom of the drainage hole on the side of the wood bucket. Adding more ice will cause the mixture to leak out of the drainage hole.
-
Add cold water to the ice-salt mixture until the water level reaches the bottom of the drain hole.
-
As the ice melts down 2 to 3 inches, you may add more ice and more rock salt to the mixture.
-
Begin cranking with the hand crank mechanism or turn on the electric motor. As the canister turns, stir and mix the salt and ice together. Use the plastic stirrer every 10-15 minutes, or as needed, while the ice cream maker is in use.
USING YOUR ICE CREAM MAKER
To Make Ice Cream:
- Unplug and remove motor or hand crank once ice cream has churned for about 40 minutes, or once the motor has stopped (if the motor has stopped prematurely, turn it off, break up any ice blockages with the plastic stirrer and start again).
- With one hand on the canister lid to hold it in place (canister will have a tendency to float up in the ice water mixture), remove the motor or hand crank. Carefully lift the mixing canister from the wooden bucket.
- Clear the ice and salt away from the top of the ice cream canister. Wipe carefully to remove the salt and water before removing the cover.
- Take the dasher out and scrape off excess ice cream with a spatula.
- Transfer to a freezable container and freeze, or serve straight from the canister.
Helpful Hints
- For each batch of ice cream, expect to use 7-14 lbs. of ice. (1-2 medium size bags)
- Many ice cream recipes call for raw eggs. To eliminate salmonella from your egg mixture, heat it to a temperature of 160^ F, but do not boil it. This will make the ice cream safe to eat. You may also use pasteurized eggs in place of raw eggs.
- Be sure to chill mixture prior to adding to canister.
- To avoid ice cream seeping out of the canister, do not lay the canister flat when storing in a freezer.
- For ice cream recipes that require pre-cooking, it is recommended that you make the mixture a day ahead. The mixture will then be able to cool completely and expand. Pre-chilling any ice cream recipe is suggested for achieving the best results.
- Artificial sweeteners may be substituted for sugar. Use the following proportions for reference:
1 packet of sweetener = 2 tsp. sugar
6 packets = 1/4 cup
8 packets = 1/3 cup
12 packets = 1/2 cup
- The churning process should take about 40 minutes.
HOW TO CLEAN
Always unplug unit and allow to completely cool before cleaning.
- Wipe electric motor with a slightly damp cloth to remove debris.
- Clean wooden bucket with a soapy sponge thoroughly to remove the saltwater residue. Rinse and dry to ensure the salt does not corrode the metal parts.
-
Wash canister, lid, dasher and stirrer with soapy water and dry thoroughly. Do not replace the lid until the ice cream canister is completely dry.
-
Do not use harsh abrasive cleaners.
• This appliance and accessories are NOT dishwasher safe.
• Do not freeze canister when wet.
NOTES
TROUBLESHOOTING
| My ice cream turned out soft or runny. | Home-made ice cream traditionally has the consistency of a thick milkshake. If you prefer a firmer consistency, you can:Remove the dasher and place the lid and lid cap on the mixing canister. Place upright in the freezer to harden. Another option is to leave the canister in the wooden bucket, remove dasher, add cap and add more ice to the salt-ice mixture. Cover with a towel and let sit until the ice cream is firm.For fluffier ice cream, once the electric motor has finished churning, you may remove it and use the hand crank to churn the ice cream to the desired consistency.The richer the cream you use, the richer the ice cream will be. Heavy whipping cream is suggested for the creamiest, smoothest ice cream. Milk can also be substituted for cream but will alter the texture and taste of the ice cream. You might also consider using a combination of milk and cream for healthier ice cream.Recipes that call for alcohol may inhibit the freezing process. If you are using an ice cream recipe that calls for alcohol, vanilla or peppermint extract (which contain alcohol), it is best to add it during the last few minutes of the freezing cycle.Pay close attention to the amount of rock salt used during the making of your ice cream. Using too little salt may inhibit the freezing of your ice cream mixture. Read the instructions in the section titled “To Make Ice Cream” beginning on page 4 for more details. |
| The texture of my ice cream is too hard or grainy. | A hard or grainy ice cream texture may be due to one of the following causes:Be sure that once you start churning your ice cream, you DO NOT stop. Stopping for any length of time while churning can cause large ice crystals to form in the mixture, which will give your ice cream a grainy texture.Pay close attention to the amount of rock salt used during the making of your ice cream. Adding too much salt can cause the mixture to freeze too quickly, which may lead to the formation of ice crystals in your ice cream. Read the instructions in the section titled “To Make Ice Cream” beginning on page 4 for more details. |
| The salt water mixture leaked out of the wooden bucket. | Before using the ice cream maker, it is necessary to soak the wooden bucket in water for at least an hour and a half. This allows the wood to expand and prevents leaks. To do so, simply fill up the bucket (about 2/3 full) and let it sit in the sink or other water-safe area for an hour and a half. Pour out the water and the bucket is ready to use! |
TROUBLESHOOTING
| The canister or dasher jammed/ stopped turning during the churning process. | Jamming of the canister or dasher can be due to one of the following causes:Ice may have caused a blockage in the wooden bucket. Turn off the motor and make sure that the ice in the bucket is broken up into small, coarse pieces. The plastic stirrer provided can be used to break up any blockages that may occur.If the mixture has become too thick, the dasher may become stuck. The mixture in the canister should never become thicker than the consistency of soft-serve ice cream.If there are hard pieces in the mixture, such as nuts or chocolate chips, they may cause the dasher to become lodged in the canister. It is best to add any such ingredients to your ice cream after the churning process is complete. Another suggestion is to use finely chopped ingredients, such as grated chocolate in place of chocolate chips.Be sure that once you start churning your ice cream, you DO NOT stop. Stopping can cause the ice cream to harden around the edge of the canister, which will restrict the movement of the dasher and may cause it to become stuck.If the dasher becomes stuck, check to see if the mixture has frozen around the inside edges of the mixing canister. If it has, use a plastic spoon or spatula to scrape the edges of the canister. The dasher should function normally once the edges have been cleared. |
| My ice cream mixture tasted fine, but after freezing it my ice cream does not taste the same. | Actual ice cream will always taste less sweet than the mixture. You may adjust the amount of sugar in the recipe to suit your taste, keeping in mind that after the freezing process the sweetness of the ice cream will be lessened. |
| My ice cream went bad when I stored it in the freezer. | Because home-made ice cream lacks many of the preservatives that come in store-bought ice cream, it does not store as well. Usually home-made ice cream will last about one week when stored in a freezer.To keep ice cream its freshest, place it in an airtight plastic container before storing it in the freezer. |
RECIPES
Quick & Easy Chocolate Ice Cream
15 Tbsp cocoa
3 large cans of condensed milk
6 cups milk
In a large mixing bowl, combine milk and condensed milk. Dissolve the cocoa in a bit of hot water. Once dissolved, stir cocoa into the milk mixture until completely blended. Pour the entire contents of the bowl into the mixing canister and follow directions in the “To Make Ice Cream” section, pages 4-6. Do not fill the mixing canister more than 2/3 full, as the mixture will expand during freezing.
Vanilla Ice Cream
2 cups granulated sugar
1 1/2 Tbsp cornstarch
1/4 tsp salt
1 1/2 Tbsp vanilla
7 cups milk
5 eggs, beaten
2 3/4 cups heavy cream
1 1/2 cups half and half
Mix the sugar, cornstarch and salt in a large saucepan. Over medium heat, slowly stir in the milk, stirring constantly. Very slowly, add the beaten eggs and continue to stir. Reduce heat to low and cook until mixture thickens slightly. Slowly add vanilla, half and half and heavy cream. Pour into a large glass bowl and refrigerate for 2-4 hours or until mixture has chilled. Remove from refrigerator. Pour mixture into the mixing canister and follow directions in the "To Make Ice Cream" section, pages 4-6. Do not fill the mixing canister more than 2/3 full, as the mixture will expand during freezing.
RECIPES
Chocolate Ice Cream
2 2/3 cups granulated sugar
2 tsp cornstarch
1/2 tsp Salt
6 cups milk
4 eggs, beaten
6 squares semi-sweet chocolate, melted
1 1/3 cups half and half
2 cups whipping cream
2 Tbsp vanilla extract
Mix the sugar, cornstarch and salt in a large saucepan. Over medium heat, slowly stir in the milk, stirring constantly until the mixture begins to simmer. Very slowly, add the beaten eggs and continue to stir. Reduce heat to low and cook until mixture thickens slightly. Slowly stir in the melted chocolate and whisk until all chocolate is combined and mixture is smooth. Slowly add vanilla, half and half and heavy cream. Pour into a large glass bowl, cover and refrigerate for 2-4 hours or until mixture has chilled. Pour mixture into the mixing canister and follow directions in the "To Make Ice Cream" section, pages 4-6. Do not fill the mixing canister more than 2/3 full, as the mixture will expand during freezing.
Coffee Ice Cream
4 1/2 cups half and half
2 1/4 cups sugar
4 1/2 tablespoons instant coffee powder
6 cups cream
Combine all ingredients in mixing canister. Stir well until both sugar and instant coffee powder are dissolved. Freeze as instructed. Do not fill the mixing canister more than 2/3 full, as the mixture will expand during freezing.
RECIPES
Rocky Road Ice Cream
1 3/4 cups granulated sugar
1/2 tsp Salt
2 cups milk
6 squares semi-sweet chocolate
2 cups half and half
6 cups whipping cream
1 Tbsp vanilla extract
2 cups mini marshmallows
1 1/2 cups chocolate chips
1 cup chopped pecans
Mix the milk and chocolate in a large saucepan. Over medium heat, stir until the chocolate is completely melted. Remove from heat and slowly add sugar and salt, mixing well, until dissolved. Stir in the remaining ingredients except the marshmallows, pecans and chocolate chips, then cover and refrigerate for about 30 minutes or until mixture has chilled. Pour mixture into the mixing canister and follow directions in the "To Make Ice Cream" section, pages 4-6. Do not fill the mixing canister more than 2/3 full, as the mixture will expand during freezing. Add marshmallows, pecans and chocolate chips after the ice cream has finished churning and stir in evenly.
Cherries and Chocolate Ice Cream
3/4 cup chocolate shavings
3/4 cup fresh cherries, pitted and halved
6 large eggs
2 1/4 cups sugar
6 cups heavy cream
3 cups milk
Place the cherries and the chocolate shavings in separate bowls.
Cover and chill until cold. Whisk the eggs in a mixing bowl until light and fluffy, 1 to 2 minutes. Slowly mix in sugar, whisking until completely blended. Slowly add cream and milk; whisk until blended. Pour mixture into mixing canister and follow directions in the “To Make Ice Cream” section, pages 4-6. Do not fill the mixing canister more than 2/3 full, as the mixture will expand during freezing.
RECIPES
Cookie Dough Ice Cream
1 cup chocolate chip cookie dough, crumbled into small pieces
1 cup mini chocolate chips (optional)
6 large eggs
2 1/4 cups sugar
6 cups heavy cream
3 cups milk
Place the cookie dough and the chocolate chips in separate bowls. Cover and chill until cold. Whisk the eggs in a mixing bowl 1-2 minutes, until light and fluffy. Slowly mix in sugar, whisking until completely blended. Slowly add cream and milk and whisk until blended. Pour mixture into mixing canister and follow directions in the “To Make Ice Cream” section, pages 4-6. Do not fill the mixing canister more than 2/3 full, as the mixture will expand during freezing. When the mixture has finished churning, add cookie dough and chocolate chips (optional) and stir in evenly.
Peanut Butter Chocolate Chip Ice Cream
2 2/3 cups granulated sugar
2 Tbsp cornstarch
1/2 tsp salt
1 1/2 tsp vanilla
6 cups milk
4 eggs, beaten
2 cups heavy cream
1 1/3 cups half and half
1 1/2 cups chocolate chips
1 cup peanut butter or 1 cup peanut butter chips, melted
Mix the sugar, cornstarch and salt in a large saucepan. Over medium heat, slowly stir in the milk, stirring constantly. Very slowly, add the beaten eggs and continue to stir. Reduce heat to low and cook until mixture thickens slightly. Slowly stir in peanut butter and whisk until all peanut butter is combined and mixture is smooth. Slowly add vanilla, half and half and heavy cream. Pour into a large glass bowl and refrigerate for 2-4 hours or until mixture has chilled. Pour mixture into the mixing canister and follow directions in the "To Make Ice Cream" section, pages 4-6. Do not fill the mixing canister more than 2/3 full, as the mixture will expand during freezing. Stir in chocolate chips once ice cream is finished churning and stir evenly.
LIMITED WARRANTY
Aroma Housewares Company warrants this product free from defects in material and workmanship for one year from provable date of purchase in the continental United States.
Within this warranty period, Aroma Housewares Company will repair or replace, at its option, defective parts at no charge, provided the product is returned, freight prepaid with proof of purchase and U.S. \$18.00 for shipping and handling charges payable to Aroma Housewares Company. Before returning an item, please call the toll free number below for a return authorization number. Allow 2-4 weeks for return shipping.
This warranty does not cover improper installation, misuse, abuse or neglect on the part of the owner. Warranty is also invalid in any case that the product is taken apart or serviced by an unauthorized service station.
This warranty gives you specific legal rights, which may vary from state to state and do not cover areas outside the United States.
AROMA HOUSEWARES COMPANY
6469 Flanders Drive
San Diego, California 92121
1-800-276-6286
M-F, 8:30 AM - 5:00 PM, Pacific Time
Website: www.aromaco.com
- 4-Quart Ice Cream Maker
- Instruction Manual
- IMPORTANT SAFEGUARDS
- SAVE THESE INSTRUCTIONS
- SHORT CORD INSTRUCTIONS
- POLARIZED PLUG
- PARTS IDENTIFICATION
- USING YOUR ICE CREAM MAKER
- Before First Use:
- To Make Ice Cream:
- SEE STEP 7 IN "BEFORE FIRST USE" SECTION BEFORE BEGINNING
- Helpful Hints
- HOW TO CLEAN
- NOTES
- TROUBLESHOOTING
- RECIPES
- Quick & Easy Chocolate Ice Cream
- Vanilla Ice Cream
- Chocolate Ice Cream
- Coffee Ice Cream
- Rocky Road Ice Cream
- Cherries and Chocolate Ice Cream
- Cookie Dough Ice Cream
- Peanut Butter Chocolate Chip Ice Cream
- LIMITED WARRANTY
Brand : Aroma
Model : AIC-214
Category : Sorbet maker