
PN70 - Keyboard KAWAI - Free user manual and instructions
Find the device manual for free PN70 KAWAI in PDF.


| Product Type | Digital Piano |
| Keyboard | 88 weighted keys with touch sensitivity |
| Key Action | Progressive Hammer Action (PHA) |
| Polyphony | 192 notes |
| Built-in Sounds | 19 tones (Grand Piano, Electric Piano, Organ, etc.) |
| Effects | Reverb (4 types), Chorus, Brilliance |
| Metronome | Yes, with adjustable tempo and time signature |
| Pedals | 1 included (damper), optional three-pedal unit |
| Audio Output | Headphone jacks (2), Line Out (L/Mono, R) |
| MIDI | USB-MIDI, 5-pin MIDI In/Out |
| Speakers | 2 x 8W |
| Power Supply | DC 12V (included adapter) or 6 x AA batteries |
| Dimensions (W x D x H) | 1330 x 360 x 140 mm |
| Weight | 15 kg |
| Accessories Included | Music rest, damper pedal, power adapter |
| Maintenance | Wipe with a soft dry cloth; avoid solvents |
| Safety | Keep away from heat sources and moisture |
| Spare Parts | Contact Kawai authorized service centers for keys, pedals, etc. |
Frequently Asked Questions - PN70 KAWAI
User questions about PN70 KAWAI
0 question about this device. Answer the ones you know or ask your own.
Ask a new question about this device
Download the instructions for your Keyboard in PDF format for free! Find your manual PN70 - KAWAI and take your electronic device back in hand. On this page are published all the documents necessary for the use of your device. PN70 by KAWAI.
USER MANUAL PN70 KAWAI
Thank you for choosing this Kawai PN70 Digital Piano.
Your new PN70 is a high-quality instrument offering the very latest in leading-edge music technology. This manual contains valuable information that will help you make full use of your PN70's many capabilities. Please read it carefully and keep it handy for further reference.
TABLE OF CONTENTS
Page
Important Safety Instructions 3
Assembling The Stand 4
Part Names 6
Getting Started
- Basic Operations....8
- Transpose 9
- Touch Response 9
- Demonstration Songs 10
Programming Mode
- Selecting A Touch Type 11
- Tuning 12
- MIDI Channel Select 12
- Turning Sending Program Number On And Off.... 13
- Turning Multitimbre On And Off 13
- Local Control On And Off 14
- Reset 14
MIDI 15
SPECIFICATIONS.... 17
MIDI IMPLEMENTATION CHART.... 18
WARNING – When using electric products, basic precautions should always be followed, including the following:
- Read all the instructions before using the product.
- Do not use this product near water – for example, near a bathtub, in a wet basement, near a swimming pool, or the like.
- This product, either alone or in combination with an amplifier and headphones or speakers, may be capable of producing sound levels that could cause permanent hearing loss. Do not operate for a long period of time at a high volume level. If you experience any hearing loss or ringing in the ears, you should consult a hearing specialist.
- Place the AC power adaptor so that its location or position does not interfere with its proper ventilation.
- The product should be located away from heat sources such as radiators, heat registers, or other products that produce heat.
- This product should be located away from electrical motors, neon signs, fluorescent light fixtures, and other sources of electrical noise.
- The product should be connected only to the type of power supply described on the product.
- The AC power adaptor may be equipped with a polarized line plug. This is a safety feature. If you are unable to insert the plug into the outlet, we suggest that you contact an electrician to replace your outlet with a safer one.
- The power supply cord should be unplugged from the outlet when the product is left unused for a long period of time.
- Care should be taken so that objects do not fall and liquids are not spilled into the enclosure through openings.
- The product should be serviced by qualified service personnel when:
- The power supply cord or the plug has been damaged.
- Objects have fallen, or liquid has been spilled into the product.
- The product has been exposed to rain.
- The product does not appear to operate normally.
- The product has been damaged.
- Do not disassemble or attempt to modify the product.
FCC Information
This equipment has been tested and found to comply with the limits for a Class B digital device, pursuant to Part 15 of the FCC Rules. These limits are designed to provide reasonable protection against harmful interference in a residential installation. This equipment generates, uses and can radiate radio frequency energy and, if not installed and used in accordance with the instructions, may cause harmful interference to radio communications.
If this equipment does cause harmful interference to radio or television reception, which can be determined by turning the equipment off and on, the user is encouraged to try to correct the interference by one or more of the following measures:
-Reorient or relocate the receiving antenna.
-Increase the separation between the equipment and receiver.
-Connect the equipment into an outlet on a different electrical circuit from the receiver.
-Consult the dealer or an experienced radio/TV technician for help.
This instrument complies with the limits for a class B digital apparatus, pursuant to the Radio Interference Regulations, C.R.C., c. 1374.
Be sure that all parts are included before starting to assemble your unit.
PARTS PROVIDED
Side Panel (A)..... 2 pcs.
Back Panel (B) ..... 1 pc.
Pedal Board (C) ..... 1 pc.
Toe Block (D) ..... 2 pcs.
Screw (E, extra long) .. 4 pcs.
Screw (F, long) ..... 8 pcs.
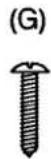
Screw (G, middle).... 3 pcs.
Screw (H, short) ..... 4 pcs.
Washer (I) ..... 4 pcs.
Spring Washer (J) ..... 4 pcs.
Round Nut (K) ..... 4 pcs.
Adjuster (L) ..... 1 pc.




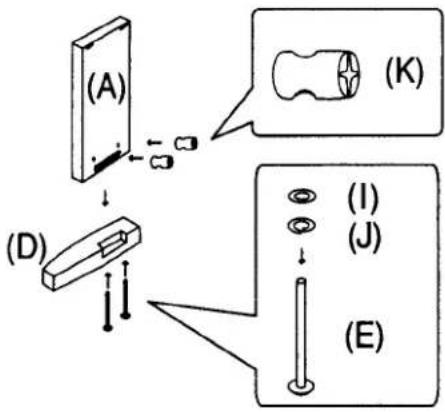
- Insert the round nuts (K) into the holes of Side Panel (A) with keeping the nut's hole vertical. Insert the screws (E) into the spring washer and washer. Put (A) to Toe Block (D) and fasten with four screws (E) from the bottom.

- Insert the adjuster (L) on Pedal Board (C). Fasten (A) and (C) with four screws (F).


- Hold (B) behind (A) and (C). Fasten (A) and (B) with four screws (H) and with three screws (G).

- Place the piano on the stand. Then, slide the piano backward to place it at the appropriate point for screws. Hold the piano on the stand so that it doesn't fall from the stand. Then fasten the piano and the stand with four long screws.
CAUTION: Be sure to secure the piano to the stand with the screws. If you fail to do so, the unit could fall from the stand causing damage or personal injury.

- Insert the pedal connection cord that comes from Pedal Board (C) into the piano's pedal jack and fasten with clamps
- Turn the adjuster (installed on the bottom of C) until it touches the floor to support the pedal board.
NOTE:
In order to put such another instrument as a sequencer or sound module on the top of the PN70, you should take the fallboard off the PN70. (See the note on page 16.)
PART NAMES
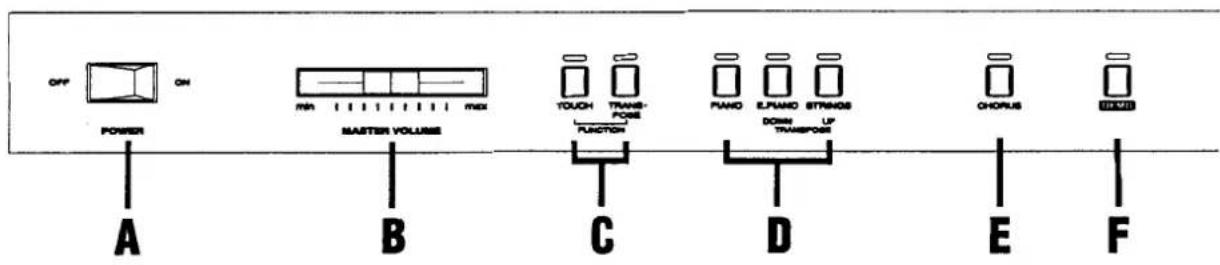
POWER BUTTON (A)
This button turns the instrument on and off. Be sure to turn off the instrument when you are finished playing.
VOLUME SLIDER (B)
Move the volume slider to the right to increase the instrument's volume. Move the slider to the left to decrease the volume.
FUNCTION SECTION (C)
Use these buttons to select a touch type, transpose the keyboard, or control other features (including MIDI functions).
TONE BUTTON (D)
Select the desired instrument by pressing the appropriate button.
EFFECT SECTION (E)
This button adds the effect (CHORUS) to any sound for greater tonal richness.
DEMO BUTTON (F)
To select and start a demo song, press this button and any key on the keyboard. This digital piano provides 12 demo songs. The song selected depends on the key you press. (Refer to page 10 of this manual for a list of the demo songs.) To stop the demonstration song, press this switch once more.
FRONT PANEL
HEADPHONES JACKS (G)
Used to connect up to two headphones to this digital piano.
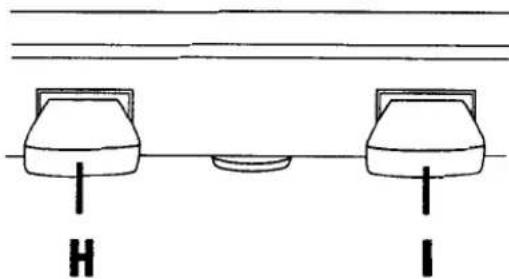
SOFT PEDAL (H)
Pressing this pedal softens the sound and also reduces its volume.
SUSTAIN PEDAL (I)
Pressing this pedal sustains the sound even after you remove your hands from the keyboard.

MIDI JACKS (J)
Use these jacks to connect with MIDI equipments.
LINE OUT JACK (K)
Connect an external amplifier and speakers.
AC ADAPTOR JACK (L)
Connect the enclosed AC adaptor to this jack.
PEDAL JACKS (M)
There are two kinds of jacks. One is for the enclosed pedals. Connect the pedal cord to this jack. The other is for the optional pedals, such as KAWAI F1. Use this jack when you use the PN70 without the stand.
REAR PANEL

1. BASIC OPERATIONS
(1) Turn on the power.
(2) Adjust the volume.
Play a note on the keyboard and adjust the volume (Moving the slider to the right raises the volume while moving to the left lowers it.)
(3) Choose a tone.
Pressing a TONE button automatically changes the sound made by the PN Piano. The LED above the selected tone button will light to indicate which tone is currently in effect.
(4) Play.
Experiment with the various tone colors.
(5) Dual
You can combine two sounds with DUAL mode. Simultaneously press two TONE buttons to hear two tone colors at once.
(6) Effect
Add an effect.
-CHORUS adds a deep richness to any sound. To activate this effect, press the CHORUS button.
NOTE:
- The PN70 can play up to 24 keys simultaneously (24-note polyphonic).
- When playing in DUAL mode or when CHORUS is on, the PN70 can play up
to 12 notes simultaneously (12-note polyphonic). When playing in DUAL mode while CHORUS is on, the PN 70 is 6-note polyphonic.
2. TRANSPOSE
(1) Press the TRANSPOSE button so that the LEDs above the STRINGS and E.PIANO button light. (When power is turned "on", the key is set to C.)
(2) While holding down the TRANSPOSE button, press the STRINGS button or the E.PIANO button. The key goes up or down by a semitone. The range of transposition is +5/-6 semitones.
NOTE:
The TRANSPOSE LED will light when any key other than C is selected.
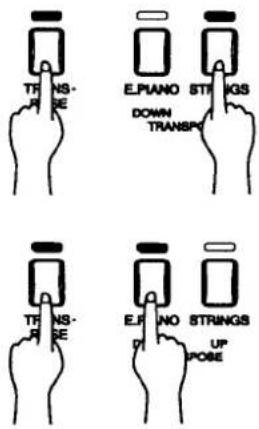
(3) To exit the TRANSPOSE function, press the TRANSPOSE button. The TRANSPOSE LED will go off and the key signature will return to C.
3. TOUCH RESPONSE
When playing a piano, the volume of the sound produced increases in direct relation to how hard a key is struck. The PN70 offers the realistic feel of an acoustic piano for practicing music. The Touch Response function simulates the standard touch of the acoustic piano when the TOUCH LED is off. When the TOUCH LED is lit, you can select other Touch Types. (Refer to the PROGRAMMING MODE section of this manual.)
This digital piano incorporates 12 demonstration songs for your listening enjoyment.
(1) Press the DEMO button. The instrument will begin to play the twelve demonstration songs in the following order.
KEY SONG
1 C.... Fantasie-Impromptu (F. Chopin)
2 C-sharp .... "Love Dreams" (F. Liszt)
3 D...."Copacabana" (Barry Manilow)
4 E-flat..... Nocturne op.9, No.2 (F. Chopin)
5 E ..... "When The Saints Go Marchin'In" (Spiritual)
6 F ....Waltz op.64, No.1 "Little Dog" (F. Chopin)
7 F-sharp .... "A Whiter Shade of Pale" (Keith Reid & Gary Brooker)
8 G .... “Turkisch March” (W. A. Mozart)
9 A-flat..... "Your Song" (Elton John)
10 A.... Etude op.10, No.3 "Song of Adieu" (F. Chopin)
11 B-flat..... Brilliant Waltz op.34, No.1 (F. Chopin)
12 B ..... "For Elise" (L. v. Beethoven)
(2) You can select a particular demonstration song (from the twelve shown above) by pressing the appropriate location key while pressing the DEMO button.
For example, the Fantasie-Impromptu (by Chopin) can be selected by holding down the DEMO button while pressing any C on the keyboard.
(3) To stop any demonstration song, press the DEMO button again.

The Programming Mode gives you access to many other useful features on your PN70. To use the Programming Mode functions, press a key on the keyboard while holding down the TOUCH and TRANSPOSE buttons. To exit the Programming Mode, release the TOUCH and TRANSPOSE buttons.
The followings are functions that can be selected through Programming Mode:
SELECTING A TOUCH TYPE (C or D or E key)
TUNING (C-sharp or E-flat key)
MIDI CHANNEL SELECT (F or G or A key)
TURNING SENDING MIDI PROGRAM NUMBER ON AND OFF (B-flat key)
TURNING MIDI MULTITIMBRE ON AND OFF (A-flat key)
MIDI LOCAL CONTROL ON AND OFF (F-sharp key)
RESET (B key)
1. SELECTING A TOUCH TYPE
Your digital piano lets you select from four different "Touch" types as follows:
NORMAL: The standard setting which produces volume in direct proportion to your force on the keys. This setting is the most similar to an acoustic piano. This digital piano automatically selects this Touch Type when the power is turned on.
LIGHT: For those still developing finger strength, such as a child, a louder sound is produced even when played with a soft touch.
HEAVY: Perfect for those with strong fingers or for practicing with a hard touch.
CONSTANT: For tone colors like organ or harpsichord, and for playing some contemporary music with the piano sound, loud sound is produced regardless of your force on the keys.
(1) To select the "LIGHT", "CONSTANT" or "HEAVY" Touch Type, press one of the following keys on the keyboard while holding down the TOUCH and TRANSPOSE switches.
Any C key: Selects the "LIGHT" Touch Type Any D key: Selects the "HEAVY" Touch Type Any E key: Selects the "CONSTANT" Touch Type
(2) Release both hands after selecting the Touch Type to exit the programming mode.
When the TOUCH LED is off, the "NORMAL" Touch Type is automatically selected. When an alternative touch type is selected using the above procedure, the TOUCH LED will light. The TOUCH button is a toggle switch. Pressing the button turns on the LED. Pressing it a second time turns off the LED.

2. TUNING
This function allows you to adjust the piano's pitch to match recordings or other instruments in an ensemble.
(1) To lower the pitch press any C-sharp key while holding down the TOUCH and TRANSPOSE buttons. To raise the pitch press any E-flat key while holding down the TOUCH and TRANSPOSE buttons.
(2) Release the both hands after finding the desired pitch. The range of tuning is +/-50 cents (100 cents = a half tone). Each press of the key will change the tuning 1.56 cents. Press the key repeatedly until you arrive at the desired pitch.
3. MIDI CHANNEL SELECT
In order to exchange MIDI information with a another MIDI instrument, you must first set the two connected instruments to the same channel.
(1) If you press any A key while holding down the TOUCH and TRANSPOSE buttons, the MIDI channel will increase by one each time you press the key. MIDI channel will progress from 1 to 16 and automatically cycle back to channel 1. If you press any G key, the channel will be set to 1 regardless of what channel is currently selected. And, if you press any F key while holding down the TOUCH and TRANSPOSE buttons, the MIDI channel will decrease by 1 each time you press the key.
(2) Release the both hands after selecting the channel. When the power is first turned on, the PN70 always selects channel 1.

4. TURNING SENDING PROGRAM NUMBER ON AND OFF
You can use 3 program numbers to transmit data of tone color. Program Number 1 transmits the data of PIANO 1, Program Number 3 transmits E.PIANO and Program Number 8 transmits STRINGS.
(1) If you press any B-flat key while holding down the TOUCH and TRANSPOSE buttons, this function is set to "off" and the PN70 does not transmit the data corresponding to the tone selected on the panel. If you press the B-flat key again while holding down the TOUCH and TRANSPOSE buttons, this function returns to "on" and you can select the tone to transmit as data.
(2) Release both hands after selecting either "on" or "off" of sending program number. When the power is first turned on, the SENDING MIDI PROGRAM NUMBER is always "on".
5. TURNING MULTITIMBRE ON AND OFF
Normally, the procedure described in the MIDI CHANNEL SELECT section is used to transmit or receive data on only one MIDI channel (any one of 1 through 16). But by turning the MULTI TIMBRE function "on", you can receive more than one MIDI channel and simultaneously play a different timbre on each channel. With this feature, you can use a sequencer such as the Kawai Q-80EX or DRP-10 to create performances with contain a variety of timbres on the digital piano. The term "Multi Timbre" is derived from this ability to play multiple timbre simultaneously.
(1) If you press any A-flat key while holding down the TOUCH and TRANSPOSE buttons, the MIDI MULTITIMBRE will be set to "on". If you press any A-flat key again while holding down the TOUCH and TRANSPOSE buttons, the MIDI MULTITIMBRE function returns to "off".
(2) Release both hands after selecting the desired setting. When power is first turned on, the MIDI MULTITIMBRE setting is always off.
NOTE:
In this MULTITIMBRE function, the PN70 uses only the channels 1, 3 and 8. The data of tone colors, PIANO 1, E.PIANO and STRINGS, are assigned to and fixed in each channel respectively, so you can't change the program numbers.
6. LOCAL CONTROL ON AND OFF
This mode is used to control whether or not the sound from the piano's keyboard will be heard.
(1) If you press any F-sharp key while holding down the TOUCH and TRANSPOSE buttons, the MIDI LOCAL CONTROL will be set to "off". If you press again any F-sharp key while holding down the TOUCH and TRANSPOSE buttons, the MIDI LOCAL CONTROL returns to "on".
(2) Release both hands after selecting the desired setting.
7. RESET
When the RESET procedure is used, most of the PN70's original factory settings (same as the one when you turn on the instrument) will be restored.
The original factory settings restored with this function are:
- MIDI Transmit Channel Channel 1
- MIDI Program Change On
- MIDI Multitimbre Off
- MIDI Local Control On
- Tuning +/-0
- Touch Type (When the TOUCH LED is flashing) LIGHT
(1) Press any B-key while holding down the TOUCH and TRANSPOSE buttons.
(2) Release both hands after following this procedure.
The term MIDI is an acronym for Musical Instrument Digital Interface, an international standard for connecting synthesizers, sequencers (digital recorders) and other electronic instruments so that they can exchange performance data.
The PN70 is equipped with two MIDI jacks for exchanging data: MIDI IN and MIDI OUT. Each uses a special cable with a DIN connector.
MIDI IN : For receiving note, program change and other data.
MIDI OUT : For sending note, program change and other data.
MIDI EXAMPLES
(1) Connection to another MIDI compatible keyboard or sound generator module
When connected as shown in the illustration, data on how the digital piano is played (which keys are struck) can be sent to another MIDI instrument. Plus, the sound from the PN70 can be layered over the sound of the other instrument.

Layering Sounds

(2) Connection to an external sequencer and sound generator module
When connected as shown in the illustration, you can record songs played on the PN70 with a sequencer, and use the module's tones (such as piano, harpsichord and other different tones) controlled by the PN70's MULTI TIMBRE function to create a multi-layer MIDI recording.
![graph TD A["PN70"] --> B["MIDI IN"] A --> C["OUT"] A --> D["MIDI IN"] E["Sound Module (GMega)"] --> F["MIDI IN"] E --> G["MIDI OUT"] E --> H["MIDI THRU"] I["Digital Sequencer (Q-80)"] --> J["MIDI IN"] I --> K["MIDI OUT"] I --> L["MIDI THRU"] M["MIDI cable"] --> A](/content/2026/05/989928/images/9ea72006c7699820a9728235cc8059fdc1b76b48e99566c4cd1847edac720035.jpg)
NOTE:
If using a sequencer or sound module and putting it on the top of the PN70, you should remove the fallboard.
(1) Open the fallboard and you see the pivot with the spring down the right side of the board.
(2) Slide the lever of the pivot inside and hold it. Then lift the fallboard up and take it off.
Keyboard 88 Keys
Touch Type 4 Types (Normal, Light, Heavy, Constant)
Max Polyphony 24 Notes
Tones 3 Tones (PIANO1, E.PIANO, STRINGS)
Effect Chorus
Other Functions Transpose, Tuning, MIDI Functions, 12 Demo Songs
Pedals 2 (Soft, Sustain)
Jacks Headphones x 2, Pedals x 2, MIDI IN/OUT, LINE OUT (L, R), DC In
Speakers 12 cm x 2 (4 3/4"), 7W x 2
Dimensions 137 x 45 x 79 (cm), 54" x 17-1/2" x 31-1/8"
Weight 39 kg (85lb.)
Power AC Adapter (12V 2A)
Specifications are subject to change without notice.
MIDI IMPLEMENTATION CHART
KAWAI DIGITAL PIANO
Date: October, 1997
MODEL: PN70
Version: 1.0
| FUNCTION | TRANSMITTED | RECEIVED | REMARKS |
| Basic Channel(Default)(Changed) | 11-16 | 11-16 | |
| Mode (Default)(Message)(Altered) | 3x********** | 11x | |
| Note Number(True Voice) | 15-113*********** | 0-1270-127 | |
| Velocity(Note ON)(Note OFF) | O: 9nH v=1-127x: 8nH v=0 | Ox | |
| After TouchKey'sChannel's | xx | xx | |
| Pitch Bend | x | x | |
| Control Change76467 | xO (Right pedal)O (Left pedal) | OOO | VolumeDamper pedalSoft pedal |
| Program ChangeTrue | O********** | O | |
| System Exclusive | O | O | |
| Common(Song Position)(Song Select)(Tune) | xxx | xxx | |
| System: Real Time(Clock)(Commands) | xx | xx | |
| Others(Local ON/OFF)(All Notes OFF)(Active Sense)(Reset) | xxOx | OOOx | |
| Notes: Value varies when transposed. 21-108 when not transposed. | |||
| Mode 1: OMNI ON, POLY Mode 2: OMNI ON, MONOMode 3: OMNI OFF, POLY Mode 4: OMNI OFF, MONO | |||
KAWAI
- TABLE OF CONTENTS
- WARNING – WHEN USING ELECTRIC PRODUCTS, BASIC PRECAUTIONS SHOULD ALWAYS BE FOLLOWED, INCLUDING THE FOLLOWING
- FCC INFORMATION
- PARTS PROVIDED
- NOTE
- PART NAMES
- POWER BUTTON (A)
- VOLUME SLIDER (B)
- FUNCTION SECTION (C)
- TONE BUTTON (D)
- EFFECT SECTION (E)
- DEMO BUTTON (F)
- FRONT PANEL
- HEADPHONES JACKS (G)
- SOFT PEDAL (H)
- SUSTAIN PEDAL (I)
- MIDI JACKS (J)
- LINE OUT JACK (K)
- AC ADAPTOR JACK (L)
- PEDAL JACKS (M)
- BASIC OPERATIONS
- TRANSPOSE
- TOUCH RESPONSE
- KEY SONG
- SELECTING A TOUCH TYPE
- TUNING
- MIDI CHANNEL SELECT
- TURNING SENDING PROGRAM NUMBER ON AND OFF
- TURNING MULTITIMBRE ON AND OFF
- LOCAL CONTROL ON AND OFF
- RESET
- MIDI EXAMPLES
- CONNECTION TO ANOTHER MIDI COMPATIBLE KEYBOARD OR SOUND GENERATOR MODULE
- CONNECTION TO AN EXTERNAL SEQUENCER AND SOUND GENERATOR MODULE
- KAWAI
Brand : KAWAI
Model : PN70
Category : Keyboard