
Callmaster 220 - Telephone TOPCOM - Free user manual and instructions
Find the device manual for free Callmaster 220 TOPCOM in PDF.


| Product Type | Corded Telephone |
| Dimensions (approx.) | 200 x 170 x 90 mm |
| Weight (approx.) | 500 g |
| Power Supply | AC adapter (9V DC, 300mA) or 2x AAA batteries (for backup) |
| Display | LCD with backlight |
| Caller ID | Yes, supports FSK and DTMF |
| Call Waiting | Yes |
| Speakerphone | Yes, hands-free |
| Redial | Last 10 numbers |
| Phonebook | Up to 50 contacts |
| Ringer Volume Control | Yes, adjustable |
| Flash Key | Yes (for call waiting) |
| Mute Function | Yes |
| Pause Key | Yes |
| Wall Mountable | Yes |
| Hearing Aid Compatible | Yes |
| Cleaning Instructions | Wipe with a soft, dry cloth. Do not use liquid cleaners. |
| Safety | Use only supplied adapter. Do not expose to moisture. |
| Spare Parts / Repairability | Contact Topcom support for replacement handset cords or batteries. |
| General Information | Designed for home or office use. Compatible with analog PSTN lines. |
Frequently Asked Questions - Callmaster 220 TOPCOM
User questions about Callmaster 220 TOPCOM
0 question about this device. Answer the ones you know or ask your own.
Ask a new question about this device
Download the instructions for your Telephone in PDF format for free! Find your manual Callmaster 220 - TOPCOM and take your electronic device back in hand. On this page are published all the documents necessary for the use of your device. Callmaster 220 by TOPCOM.
USER MANUAL Callmaster 220 TOPCOM
natural_image
White industrial device labeled 'TOPCOM Calimaster 210' with control knobs and a display screen (no readable text beyond branding)Brugsanvisning
Käyttöohjeet
Operating guide
DECLARATION OF CONFORMITY
We, TTS Nv, Grauwmeer 17, 3001 Heverlee, Belgium, declare that our product :
Product name: TOPCOM
Model type: Callmaster 220
is in conformity with the essential requirements of the R&TTE directive 1999/5/EC and carries the CE mark accordingly.
Supplementary information:
The product complies with the requirements of:
Low Voltage Directive 73/23/EEC EMC Directive 89/336/EEC
Date: 07/03/2002
Place: Heverlee, Belgium
Name: Verheyden Geert
Function: Technical Director

European contact: TTS Nv, R&D department, Research Park, Grauwmeer 17, 3001 Heverlee, Belgium. Tel : +32 16 398920 , Fax : +32 16 398939
!! Viktigt!!
To use 'Caller ID' (display caller), this service has to be activated on your phone line. Normally you need a separate subscription from your telephone company to activate this function.
If you don't have the Caller ID function on your phone line, the incoming telephone numbers will NOT be shown on the display of your telephone.
- Installation 8
- Buttons 9
- Display/LED 9
- Operation 10
4.1 Setting the language 11
4.2 Setting the Date and Time 11
4.3 Incoming calls 12
4.4 Call List 13
4.4.1 Scrolling through the Call List 13
4.4.2 Erasing numbers from the Call List 14
4.4.3 Calling a number from the Call List 14
4.5 Phone Book 15
4.5.1 Saving an entry into the Phone Book memory 15
4.5.2 Search for an entry in the Phone Book 16
4.5.3 Calling a number from the Phone Book 16
4.5.4 Erasing one entry from the Phone Book memory 17
4.5.5 Erasing all entries in the Phone Book memory 17
5. Name announcement
5.1 Recording a name 17
5.1.1 Record a name to a manually entered number 17
5.1.2 Record a name to an entry in the Call List 18
5.1.3 Record a name to an entry in the Phone Book 18
5.2 Erase a recorded name from the Phone Book entry 19
6. Outgoing messages
6.1 Recording a general outgoing message (G-OGM) 19
6.2 Recording a special outgoing message (-UGM) 20
6.3 Linking a special outgoing message ( -UGM) to a telephone number 20
6.4 Scrolling through the numbers with special outgoing message (♥-OGM) 20
6.5 Erasing the special outgoing message ( -GM)
6.6 Activating/deactivating the general outgoing message 21
TOPCOM®
Callmaster 220
- Setting the internal voice volume 21
- Voice mail 20
8.1 Warning signal Voice Mail 22
- Setting the Prefix for incoming calls 22
- Default settings (reset) 23
- MODE menu sequence 23
- Topcom Warranty 23
12.1. Warranty period 23
12.2. Warranty handling 23
12.3. Warranty exclusions
24
TOPCOM
Callmaster 220
Safety Instructions
- Only use the charger plug supplied. Do not use other chargers, as this may damage the unit.
- Do not place the unit in a damp room or at a distance of less than 1.5 m away from a water source.
- Do not use the unit in environments where there is a risk of explosions.
- Dispose of the batteries and maintain the unit in an environment-friendly manner.
Cleaning
Clean the telephone with a slightly damp cloth or with an anti-static cloth. Never use cleaning agents or abrasive solvents.
TOPCOM®
Callmaster 220
1. Installation
- Plug one end of the phone cable into the telephone line wall socket and the other end into the back of the unit "LINE" (1). To do this, you may need to disconnect your telephone line cord from your telephone set!
- Connect one end of the supplied phone cable to the telephone and the other end to the back of the Callmaster 220 "PHONE" (2).
- Plug one end of the adapter into the electric socket and the other end into the back of the phone (3).

- In case there are no electric sockets available, you can also use batteries instead of an adapter.
- Open the battery compartment at the bottom of the unit.
- Insert 6 AAA batteries (1,5V).
- Close the battery compartment.
Note (1): The battery low icon appears on the display when the battery is almost empty or when you are using an adapter only. As soon as you have replaced the empty batteries with new ones, the icon disappears.
Note (2): During power failure, only the entries in the Phone Book will be kept!
TOPCOM
Callmaster 220
2. Buttons
- Erase/Escape button ∅
- Record button 🔒
- Program/Call button ✦/C.
- Down button ▼
- Up button ▲

3. Display/LED
a) Standard display information

TOPCOM®
Callmaster 220
| INFORMATION DESCRIPTION | |
| 12:15 Time indication (24h format) | |
| 09/12 Date indication (day/month) | |
| 0123456789 Caller's telephone number | |
| Pieter Janssens Caller's name | |
| NEW This is a new call | |
| 02 The serial number of the call in the Call List | |
| The battery is almost empty. | |
| Phone Book entry indication | |
| RTP This is a repeat call | |
b) Special display information
| DISPLAY INFORMATION DESCRIPTION | |
| [X] Function deactivated | |
| [ ]Function activated | |
| Appears when the phone in parallel is Off-Hook (on when no telephone line is connected) | |
| (▪) | Symbol audible message waiting |
| [0 1] Follow number in the Phone Book memory | |
c) LED indicators
| LED DESCRIPTION | |
| - Blinks ones = new call received in the Call log | |
| - Blinks twice = new voice mail message received in the telephone network | |
TOPCOM
Callmaster 220
4. Operation
4.1 Setting the language
There are 3 display languages available. You can select the desired language as follows:
- Press and hold the Program/Call button and then press the Record button. The display shows "RESET VXXX".
- Press the Program/Call button again. The display will show the default language. To change the language, press the Record button a few times until the right language appears.
- Press the Program/Call button to confirm and to go to the next setting (see date and time setting).
Note: You can leave the program menu by pressing the Erase/Escape button ∅
4.2 Setting the Date and Time
When you have a subscription to the Caller ID service and your telephone provider sends through the date and time together with the telephone number, the clock will be set automatically.
It is also possible to set the clock manually:
-
Press and hold the Program/Call button and then press the Record button The display shows "RESET VXXX".
-
Press the Program/Call button twice. The display shows: "DD/MM HH:MM"
-
Press the Up and Down buttons to change the setting.
-
Press the Record button to move the cursor.
-
Repeat steps 3 and 4 to enter all 8 digits.
-
Press the Program/Call button to confirm the date and time settings.
Note: If you have entered a wrong date or time, the unit won't leave the date/time setting menu until you have set it correctly!
- Press the Erase/Escape ∅ button to leave the menu.
TOPCOM
Callmaster 220
4.3 Incoming calls
When you have a subscription to the Caller ID service from you telephone provider, the caller's phone number will appear on the display. Depending on the telephone network, the caller's name will also be shown on the display. If your telephone company doesn't send through the name, but you saved it in the Phone Book, the programmed name will be shown on the display (name tagging function). The Callers number will be announced through the speaker.
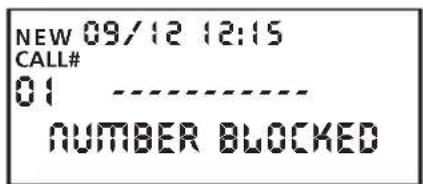
During an incoming call, the following information can appear on the display:
a) You have no subscription to the Caller ID service of your telephone company

b) You have a subscription to the Caller ID service (number only) and the caller's name has not been saved in the memory.
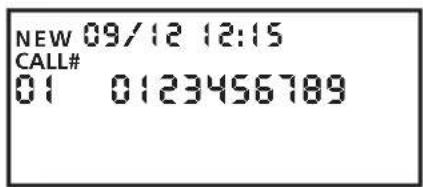
c) You have a subscription to the Caller ID service (number only) but the caller's name and number have been saved in the Phone Book. Or, Caller ID with name and number!

d) You have a subscription to the Caller ID service but the caller's number is not coming through or it's a private number.
TOPCOM
Callmaster 220
e) You have a subscription to the Caller ID service but the caller's number is not available (for ex. international calls)

4.4 Call List
The Callmaster 220 has a Call List in which you can save at least 80 incoming telephone numbers with name. The phone numbers you have received more than once, will also be saved with indication of the repeat icon 'RTP'
Every incoming number is saved in the Call List with indication of date and time.
In standby mode the number of new calls received and total calls is shown on the display, for ex. :
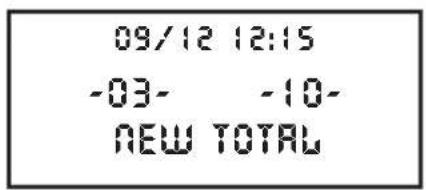
- NEW 03 - You received 3 new calls in the Call List.
- TOTAL 10 - You received 10 calls in the Call List : 3 new and 7 old (already checked) calls.
4.4.1 Scrolling through the Call List
You can scroll through the Call List by means of the Up and Down buttons ▲▼
. When you have reached the end/top of the list, 'TOP/END' appears on the display. Every time a new call comes in, 'NEW' is shown on the display. The serial number of the incoming call is shown under the indication 'CALL#' on the display. The highest number is the last call received. Number 1 is the oldest call.
TOPCOM®
Callmaster 220
For example: When you have received 4 incoming calls and you press the Down button ▼ the last call will appear on the display. If you press the Down button ▼ again, the next call will be shown.
DOWN BUTTON 1ST PRESS 2ND PRESS 3RD PRESS 4TH PRESS 5TH PRESS
CALL# CALL# 4 CALL# 3 CALL# 2 CALL# 1
DISPLAY LAST CALL 2ND 3RD OLDEST CALL TOP/END

4.4.2 Erasing numbers from the Call List
a) Erasing one number
- Select the call you wish to erase by means of the Up and Down buttons ▲▼.
- Press the Erase button ∅ once. 'CLEAR?' appears on the display.
- Press the Erase button ∅ once again to confirm or press the Up or Down button to leave the menu.
b) Erasing the entire Call List
- When you have entered the Call List, press and hold the Erase button ∅ until 'CLEAR ALL?' appears on the display.
- Press the Erase button ∅ once again to confirm or press the Up or Down button to leave the menu.
4.4.3 Calling a number from the Call List
- Select the desired telephone number by means of the Up or Down button ▲▼.
- Press and hold the Call Back button (,) until "DIALING" appears.
- Release the Call Back button Ⓞ and the number will be dialled automatically. Pick up the handset of the connected phone when you see "PICK UP HANDSET" on the display.
TOPCOM
Callmaster 220
4.5 Phone Book
You can save up to 30 names (max. 15 characters) and numbers (max. 20 digits) in the electronic Phone Book of the Callmaster 220.
4.5.1 Saving an entry into the Phone Book memory
There are 3 ways to store a number into the Phone Book:
- Manually entering a number and name into the Phone Book
- By copying from the Call List into the Phone Book
- When recording a name, the number will automatically be stored into the Phone Book (see further: 5.1. Recording a name)
4.5.1a Adding a number manually into the Phone Book
- Press the Program/Call button a few times until you see "ENTER NUMBER" on the display.
- Enter the desired telephone number by using the Up and Down buttons to select the numbers. Use the Record button to move the cursor to the right, and the Erase button ∅ to delete the last number and move the cursor to the left!
- Press the Program/Call button to confirm the number.
- "ENTER NAME" will appear on the display. Enter the name by using the Up and Down buttons to select the characters. Use the Record button to move the cursor to the right, and the Erase button ∅ to delete the last number and move the cursor to the left!
- Press the Program/Call button to confirm the name. The name and number will be stored into the Phone Book. When the memory is full, you will hear two beep sounds!
- Press the Erase button ∅ to leave the menu.
Available Characters: These are the available characters when you enter a name:
$$ \begin{array}{l} \text { A B C D E F G H I J K L M N O P Q R S T U V W X Y Z [ \backslash ] ^ {\wedge} !~\sim#} \ \% \& ^ {\prime} () ^ {*} +, -. / 0 1 2 3 4 5 6 7 8 9:; < = >? @ \end{array} $$
TOPCOM®
Callmaster 220
4.5.1b Saving a number from the Call List in the Phone Book
- Select the desired call from the Call List by means of the Up and Down buttons ▲▼
- Press the Program/Call button a few times until you see "ENTER NUMBER" on the display.
- Edit the number if necessary. Use the Record button to move the cursor to the right, and the Erase button ∅ to delete the last number and move the cursor to the left!
- Press the Program/Call button to confirm the number.
- "ENTER NAME" will appear on the display. Press the Up button ▲ Add or edit the name by using the Up and Down buttons ▲ to select the characters. Use the Record button to move the cursor to the right, and the Erase button ∅ to delete the last number and move the cursor to the left!
- Press the Program/Call button to confirm the name. The name and number will be stored into the Phone Book. When the memory is full, you will hear two beep sounds!
- Press the Erase button ∅ to leave the menu.
4.5.2 Search for an entry in the Phone Book
You can search an entry in the Phone Book by pressing the Up and Down buttons ▲▼
- Press the Program/Call button once and you will see "PHONE BOOK" on the display.
- Press the Up and Down buttons to search a number.
4.5.3 Calling a number from the Phone Book
- Search the desired telephone number you want to dial out from the Phone Book as described above (see 4.5.2).
- Press and hold the Call Back button until "DIALING" appears. Release the Call Back button and the number will be dialled automatically. Pick up the handset of the connected phone when you see "PICK UP HANDSET" on the display.
TOPCOM
Callmaster 220
4.5.4 Erasing one entry from the Phone Book memory
- Search the desired telephone number you wish to erase by means of the Up and Down buttons in the Phone Book menu (see 4.5.2).
- Press the Erase button ∅ once. 'CLEAR?' appears on the display.
- Press the Erase button ∅ once again to confirm or press the Up or Down button to leave the menu.
4.5.5 Erasing all entries in the Phone Book memory
- When you have entered the Phone Book menu, press and hold the Erase button ∅ until 'CLEAR ALL?' appears on the display.
- Press the Erase button ∅ once again to confirm or press the Up or Down button to leave the menu.
5. Name announcement
30 numbers from the Phone Book memory can be linked to a recorded name of max. 2 seconds. If you receive such a call, the caller's name will be announced out loud.
5.1 Recording a name
There are 3 ways to record a name:
- Record a name to a manually entered number
- Record a name to a number from the Call List
- Record a name to a number from the Phone Book
5.1.1 Record a name to a manually entered number
- Press the Program/Call button a few times until you see "ENTER NUMBER" on the display.
- Enter the desired telephone number by using the Up and Down buttons to select the numbers. Use the Record button to move the cursor to the right, and the Erase button ∅ to delete the last number and move the cursor to the left!
TOPCOM®
Callmaster 220
- Press the Program/Call button to confirm the number.
- "ENTER NAME" will appear on the display. Enter the name by using the Up and Down buttons to select the characters. Use the Record button to move the cursor to the right, and the Erase button ∅ to delete the last number and move the cursor to the left!
- Press the Program/Call button to confirm the name. The name and number will be stored into the Phone Book.
- "RECORD NAME" will appear on the display. Press and hold the Record button until you hear the signal. When the memory is full, you will hear two beep sounds!
- You have 2 seconds to record the name that belongs to that number.
Note: The name and number will always be stored into the Phone Book!
5.1.2 Record a name to an entry in the Call List
- Select the desired number from the Call List.
- As soon as the number appears on the display, press and hold the Record button until you hear the signal. When the memory is full, you will hear two beep sounds!
- You have 2 seconds to record the name that belongs to the number.
Note: The Call List entry to which you have recorded a name will always be stored into the Phone Book!
5.1.3 Record a name to an entry in the Phone Book
- Press the Program/Call button once and you will see "PHONE BOOK" on the display.
- Press the Up and Down buttons to search a number.
- As soon as the number appears on the display, press and hold the Record button until you hear the signal. When the memory is full, you will hear two beep sounds!
- You have 2 seconds to record the name that belongs to the number.
TOPCOM
Callmaster 220
5.2 Erase a recorded name from the Phone Book entry
- Press the Program/Call button once and you will see "PHONE BOOK" on the display.
- Press the Up and Down buttons to search a number. If a name is recorded to an entry, the recorded name will be pronounced during the search!
- As soon as the number appears on the display, press the Program/Call button a few times until you see 'RECORD NAME'.
- Press the Erase button ∅ twice to erase the recorded name from the display entry.
6. outgoing messages (OGM)
After the announcement of the name or the number, the Callmaster 220 will check whether an outgoing message has been programmed. When an OGM has been programmed, the unit will play the message to the caller.
The telephone has two outgoing messages (OGM): one general OGM (G-OGM) and one special OGM (♥OGM). The general OGM (G-OGM) will be played for each incoming call. The special OGM (♥OGM) is for specific callers and will only be played for the numbers it has been linked to (max. 16 numbers). All numbers from the Call List, the Phone Book and the Direct/Indirect memory can be linked to this special OGM.
6.1 Recording a general outgoing message (G-OGM)
- Press the Program/call button until RECORD G-OGM appears on the display.
- Press and hold the Record button
- Enter your message after the signal.
TOPCOM®
Callmaster 220
- The maximum recording time of the outgoing message is 9 seconds. Release the Record button to stop recording.
6.2 Recording a special outgoing message (♥OGM)
- Press the Program/call button until RECORD -OGM appears on the display.
- Press and hold the Record button
- Enter your message after the signal.
- The maximum recording time of the outgoing message is 9 seconds. Release the Record button to stop recording.
6.3 Linking a special outgoing message (♥OGM) to a telephone number
- Select the desired telephone number (from the Call List the Phone Book or the Direct/Indirect memory)
- Press the Program/call button and LINK TO OGM appears on the display.
- Press the Set button to link the number with teh special outgoing message.
Note: You can link up to 16 telephone numbers to the special outgoing message.
6.4. Scrolling through the numbers with special outgoing message (♥OGM)
- Press the Program/call button until REVIEW OGM appears on the display.
- Press the Up or Down button ▲ few times to scroll through the numbers which are linked to the special outgoing message.
TOPCOM
Callmaster 220
6.5 Erasing the special outgoing message (♥OGM)
- Press the Program/call button until REVIEW OGM appears on the display.
- Press the Up or Down button to select the desired number.
- Press the Erase button ∅ twice to erase the link with the number on the display.
Note: Press and hold the Erase button ∅ for 2 seconds to erase all links with the special outgoing message.
6.6 Activating/deactivating the general outgoing message
- Press the Program/call button until the status of the OGM appears on the display OGM [X] or OGM [V].
- Press the Up/ Down button to enable or disable the OGM.
7. Setting the internal voice volume
You can adjust the volume of the internal voice. There are 3 possibilities : off, low, and high. Set the switch at the back of the unit in the desired position!
8. Voice mail
!!! This function only works if your telephone company sends the Voice Mail signals together with the Caller ID information !!!
When the Callmaster 220 has received voice mail messages, the Voice Mail symbol (☐) appears on the display.
TOPCOM®
Callmaster 220
8.1 Warning signal Voice Mail
When this function is activated you will hear a warning signal every time you receive a voice mail message (beep-beep every minute). The default setting is OFF.
- Press and hold the Program/Call button and then press the Record button. The display shows "RESET VXXX".
- Press the Program/Call button - a few times until you see . (■)
- Press the Record button to turn the warning signal ON or OFF.
- Press the Program/Call button to confirm and to leave the menu.
9. Setting the Prefix for incoming calls
This function in only useful when the Callmaster 220 is connected to a telephone exchange. By setting a prefix, the prefix number will be added to each incoming number.
To set the prefix, you have to do the following :
- Press and hold the Program/Call button and then press the Record button The display shows "RESET VXXX".
- Press the Program/Call button a few times until you see 'DIAL PREFIX' appear on the display.
- Enter the desired Prefix number by using the Up and Down buttons
▲▼ to select the numbers. Use the Record button to move the cursor to the right, and the Erase button ∅ to delete the last number and move the cursor to the left!
- Press the Program/Call button to confirm the Prefix number.
TOPCOM
Callmaster 220
10. Default settings (reset)
This function allows you to erase all saved information and to reset all default settings.
- Press and hold the Program/Call button and then press the Record button The display shows "RESET VXXX".
- Press the Erase button twice to confirm.
Note: All telephone numbers saved in the Phone Book will be erased.
11. MODE menu sequence
The Mode menu has the following sequence:
Phone BOOK – ENTER NUMBER – ENTER NAME – RECORD NAME
12. TOPCOM WARRANTY
12.1. Warranty period
The Topcom units have a 24-month warranty period. The warranty period starts on the day the new unit is purchased by the consumer. The warranty has to be proven by presentation of the original bill or receipt, on which the date of purchase and the model of unit are indicated.
12.2. Warranty handling
A faulty unit needs to be returned to a Topcom service centre including a valid purchase note.
TOPCOM®
Callmaster 220
If the unit develops a fault during the warranty period, Topcom or its officially appointed service centre will repair any defects caused by material or manufacturing faults free of charge.
Topcom will at its discretion fulfil its warranty obligations by either repairing or exchanging the faulty units or parts of the faulty units.
The initial purchase date shall determine the start of the warranty period. The warranty period is not extended if the unit is exchanged or repaired by Topcom or its appointed service centres.
12.3. Warranty exclusions
Damage or defects caused by incorrect treatment or operation and damage resulting from use of non-original parts or accessories not recommended by Topcom are not covered by the warranty.
The warranty does not cover damage caused by outside factors, such as lightning, water and fire, nor any damage caused during transportation.
No warranty can be claimed if the serial number on the units has been changed, removed or rendered illegible.
Any warranty claims will be invalid if the unit has been repaired, altered or modified by the buyer or by unqualified, non-officially appointed Topcom service centres.
TOPCOM
Callmaster 220
TOPCOM
Callmaster 220
$$ A B C D E F G H i J K L M N O P Q R S T U V W X Y Z [ \backslash ] ^ {\wedge}! \sim # $$
$$ \% \& ^ {\prime} () ^ {*} +, -. / 0 1 2 3 4 5 6 7 8 9:; < = >? @ $$
TOPCOM
Callmaster 220
it's nice talking to you
www.topcom.be


- DECLARATION OF CONFORMITY
- !! Viktigt!!
- Name announcement
- Outgoing messages
- TOPCOM®
- Callmaster 220
- TOPCOM
- Safety Instructions
- Cleaning
- Installation
- Buttons
- Display/LED
- b) Special display information
- c) LED indicators
- Operation
- Setting the language
- Setting the Date and Time
- Incoming calls
- Call List
- Scrolling through the Call List
- DOWN BUTTON 1ST PRESS 2ND PRESS 3RD PRESS 4TH PRESS 5TH PRESS
- Erasing numbers from the Call List
- Calling a number from the Call List
- Phone Book
- Saving an entry into the Phone Book memory
- 4.5.1a Adding a number manually into the Phone Book
- 4.5.1b Saving a number from the Call List in the Phone Book
- Search for an entry in the Phone Book
- Calling a number from the Phone Book
- Erasing one entry from the Phone Book memory
- Erasing all entries in the Phone Book memory
- Recording a name
- Record a name to a manually entered number
- Record a name to an entry in the Call List
- Record a name to an entry in the Phone Book
- Erase a recorded name from the Phone Book entry
- outgoing messages (OGM)
- Recording a general outgoing message (G-OGM)
- Recording a special outgoing message (♥OGM)
- Linking a special outgoing message (♥OGM) to a telephone number
- Scrolling through the numbers with special outgoing message (♥OGM)
- Erasing the special outgoing message (♥OGM)
- Activating/deactivating the general outgoing message
- Setting the internal voice volume
- Voice mail
- Warning signal Voice Mail
- Setting the Prefix for incoming calls
- Default settings (reset)
- MODE menu sequence
- TOPCOM WARRANTY
- Warranty period
- Warranty handling
- Warranty exclusions
Brand : TOPCOM
Model : Callmaster 220
Category : Telephone