SA-8260 - CD Player MARANTZ - Free user manual and instructions
Find the device manual for free SA-8260 MARANTZ in PDF.


| Brand | Marantz |
| Model | SA-8260 |
| Product Type | Super Audio CD Player |
| Playable Discs | Super Audio CD (Stereo, Multi-channel, Hybrid), Audio CD, CD-R, CD-RW |
| D/A Converter | DEM (Dynamic Element Matching) Super DAC (CS4397) |
| Output Amplifier | High-speed current-feedback differential HDAM |
| Analog Outputs | 6 channels (Front L/R, Surround L/R, Center, Subwoofer) via RCA |
| Digital Outputs | Optical (TOSLINK) and Coaxial (RCA) for CD only |
| Headphone Output | 3.5mm jack, 50mW/32Ω max |
| Frequency Range (SACD) | 2 Hz – 100 kHz |
| Frequency Characteristics (SACD) | 2 Hz – 50 kHz (-3 dB) |
| Dynamic Range (SACD) | 113 dB |
| THD (1 kHz, SACD) | 0.0015% |
| Analog Output Level | 2.2 V |
| Power Consumption | 28 W |
| Power Supply | AC 120 V, 60 Hz |
| Dimensions (Main Unit) | Approx. 440 x 127 x 340 mm (17.3 x 5.0 x 13.4 in) |
| Weight (Main Unit) | Approx. 8.5 kg (18.7 lbs) |
| Remote Control | RC8260SA with CR2025 battery |
| Special Features | Text information display, Filter switch (Standard/Custom), Timer play, Program play, Random play, AMS (Automatic Music Scan) |
| Laser Type (SACD) | AlGaAs, 650 nm |
| Laser Type (CD) | AlGaAs, 780 nm |
| Accessories | Remote control, AA batteries (2), Remote connection cable, User guide, Warranty card |
Frequently Asked Questions - SA-8260 MARANTZ
User questions about SA-8260 MARANTZ
0 question about this device. Answer the ones you know or ask your own.
Ask a new question about this device
Download the instructions for your CD Player in PDF format for free! Find your manual SA-8260 - MARANTZ and take your electronic device back in hand. On this page are published all the documents necessary for the use of your device. SA-8260 by MARANTZ.
USER MANUAL SA-8260 MARANTZ
Super Audio CD Player
CAUTION
RISK OF ELECTRIC SHOCK DO NOT OPEN
CAUTION: TO REDUCE THE RISK OF ELECTRIC SHOCK, DO NOT REMOVE COVER (OR BACK) NO USER-SERVICEABLE PARTS INSIDE REFER SERVICING TO QUALIFIED SERVICE PERSONNEL
The lightning flash with arrowhead symbol, within an equilateral triangle, is intended to alert the user to the presence of uninsulated “dangerous voltage” within the product’s enclosure that may be of sufficient magnitude to constitute a risk of electric shock to persons.
The exclamation point within an equilateral triangle is intended to alert the user to the presence of important operating and maintenance (servicing) instructions in the literature accompanying the appliance.
WARNING
TO REDUCE THE RISK OF FIRE OR ELECTRIC SHOCK, DO NOT EXPOSE THIS APPLIANCE TO RAIN OR MOISTURE.
CAUTION: TO PREVENT ELECTRIC SHOCK, MATCH WIDE BLADE OF PLUG TO WIDE SLOT, FULLY INSERT.
ATTENTION: POUR ÉVITER LES CHOCS ÉLECTRIQUES, INTRODUIRE LA LAME LA PLUS LARGE DE LA FICHE DANS LA BORNE CORRESPON-DANTE DE LA PRISE ET POUSSER JUSQU'AU FOND.
LASER SAFETY
This unit employs a laser. Only a qualified service person should remove the cover or attempt to service this device, due to possible eye injury.
CAUTION : USE OF CONTROLS OR ADJUSTMENTS OR PERFORMANCE OF PROCEDURE OTHER THAN THOSE SPECIFIED HEREIN MAY RESULT IN HAZARDOUS RADIATION EXPOSURE.
IMPORTANT SAFETY INSTRUCTIONS
READ BEFORE OPERATING EQUIPMENT
This product was designed and manufactured to meet strict quality and safety standards. There are, however, some installation and operation precautions which you should be particularly aware of.
- Read Instructions – All the safety and operating instructions should be read before the product is operated.
- Retain Instructions – The safety and operating instructions should be retained for future reference.
- Heed Warnings – All warnings on the product and in the operating instructions should be adhered to.
- Follow Instructions – All operating and use instructions should be followed.
- Cleaning – Unplug this product from the wall outlet before cleaning. Do not use liquid cleaners or aerosol cleaners. Use a damp cloth for cleaning.
- Attachments – Do not use attachments not recommended by the product manufacturer as they may cause hazards.
- Water and Moisture – Do not use this product near water-for example, near a bath tub, wash bowl, kitchen sink, or laundry tub, in a wet basement, or near a swimming pool, and the like.
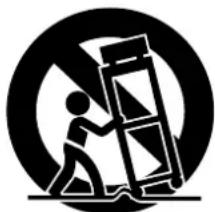
- Accessories – Do not place this product on an unstable cart, stand, tripod, bracket, or table. The product may fall, causing serious injury to a child or adult, and serious damage to the product. Use only with a cart, stand, tripod, bracket, or table recommended by the manufacturer, or sold with the product. Any mounting of the product should follow the manufacturer's instructions, and should use a mounting accessory recommended by the manufacturer.
- A product and cart combination should be moved with care. Quick stops, excessive force, and uneven surfaces may cause the product and cart combination to overturn.
natural_image
Silhouette of a person climbing a ladder inside a circle (no text or symbols)- Ventilation – Slots and openings in the cabinet are provided for ventilation and to ensure reliable operation of the product and to protect it from overheating, and these openings must not be blocked or covered. The openings should never be blocked by placing the product on a bed, sofa, rug, or other similar surface. This product should not be placed in a built-in installation such as a bookcase or rack unless proper ventilation is provided or the manufacturer's instructions have been adhered to.
-
Power Sources – This product should be operated only from the type of power source indicated on the marking label. If you are not sure of the type of power supply to your home, consult your product dealer or local power company. For products intended to operate from battery power, or other sources, refer to the operating instructions.
-
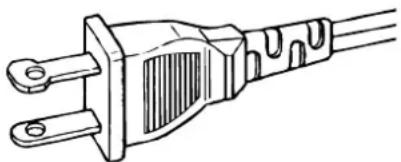
Grounding or Polarization – This product may be equipped with a polarized alternating-current line plug (a plug having one blade wider than the other). This plug will fit into the power outlet only one way. This is a safety feature. If you are unable to insert the plug fully into the outlet, try reversing the plug. If the plug should still fail to fit, contact your electrician to replace your obsolete outlet. Do not defeat the safety purpose of the polarized plug.
natural_image
Line drawing of a U-shaped electrical plug with two leads (no text or symbols)AC POLARIZED PLUG
- Power-Cord Protection – Power-supply cords should be routed so that they are not likely to be walked on or pinched by items placed upon or against them, paying particular attention to cords at plugs, convenience receptacles, and the point where they exit from the product.
- Protective Attachment Plug – The product is equipped with an attachment plug having overload protection. This is a safety feature. See Instruction Manual for replacement or resetting of protective device. If replacement of the plug is required, be sure the service technician has used a replacement plug specified by the manufacturer that has the same overload protection as the original plug.
- Outdoor Antenna Grounding – If an outside antenna or cable system is connected to the product, be sure the antenna or cable system is grounded so as to provide some protection against voltage surges and built-up static charges. Article 810 of the National Electrical Code, ANSI/NFPA 70, provides information with regard to proper grounding of the mast and supporting structure, grounding of the lead-in wire to an antenna discharge unit, size of grounding conductors, location of antenna-discharge unit, connection to grounding electrodes, and requirements for the grounding electrode. See Figure 1.
- Lightning – For added protection for this product during a lightning storm, or when it is left unattended and unused for long periods of time, unplug it from the wall outlet and disconnect the antenna or cable system. This will prevent damage to the product due to lightning and power-line surges.
- Power Lines – An outside antenna system should not be located in the vicinity of overhead power lines or other electric light or power circuits, or where it can fall into such power lines or circuits. When installing an outside antenna system, extreme care should be taken to keep from touching such power lines or circuits as contact with them might be fatal.
- Overloading – Do not overload wall outlets, extension cords, or integral convenience receptacles as this can result in a risk of fire or electric shock.
-
Object and Liquid Entry – Never push objects of any kind into this product through openings as they may touch dangerous voltage points or short-out parts that could result in a fire or electric shock. Never spill liquid of any kind on the product.
-
Servicing – Do not attempt to service this product yourself as opening or removing covers may expose you to dangerous voltage or other hazards. Refer all servicing to qualified service personnel.
- Damage Requiring Service – Unplug this product from the wall outlet and refer servicing to qualified service personnel under the following conditions:
a. When the power-supply cord or plug is damaged.
b. If liquid has been spilled, or objects have fallen into the product.
c. If the product has been exposed to rain or water.
d. If the product does not operate normally by following the operating instructions. Adjust only those controls that are covered by the operating instructions as an improper adjustment of other controls may result in damage and will often require extensive work by a qualified technician to restore the product to its normal operation.
e. If the product has been dropped or damaged in any way, and
f. When the product exhibits a distinct change in performance – this indicates a need for service.
- Replacement Parts – When replacement parts are required, be sure the service technician has used replacement parts specified by the manufacturer or have the same characteristics as the original part. Unauthorized substitutions may result in fire, electric shock, or other hazards.
- Safety Check – Upon completion of any service or repairs to this product, ask the service technician to perform safety checks to determine that the product is in proper operating condition.
- Wall or Ceiling Mounting – The product should be mounted to a wall or ceiling only as recommended by the manufacturer.
- Heat – The product should be situated away from heat sources such as radiators, heat registers, stoves, or other products (including amplifiers) that produce heat.
FIGURE 1
EXAMPLE OF ANTENNA GROUNDING ACCORDING TO NATIONAL ELECTRICAL CODE INSTRUCYIONS CONTAINED IN ARTICLE 810 - "RADIO AND TELEVISION EQUIPMENT"
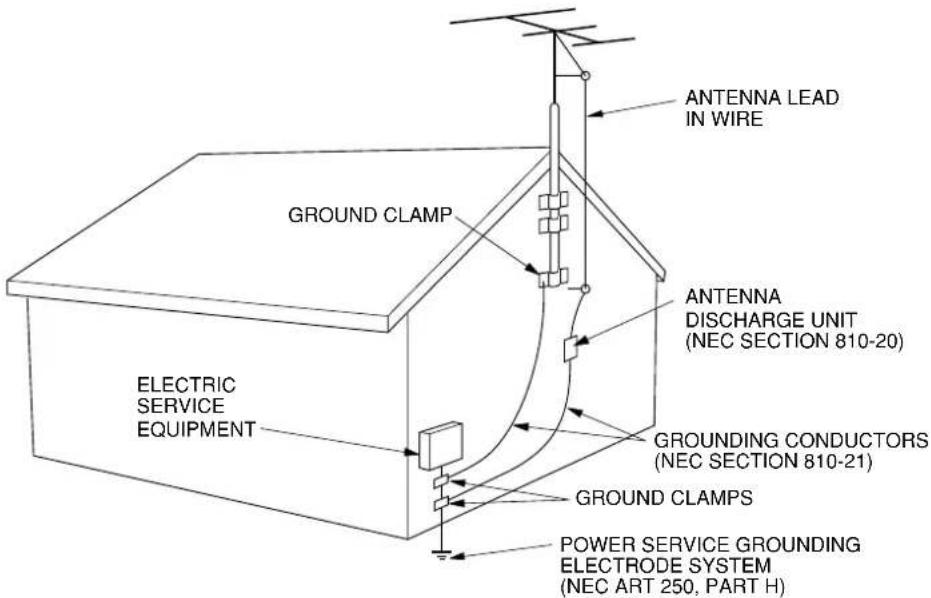
NEC - NATIONAL ELECTRICAL CODE
NOTE TO CATV SYSTEM INSTALLER:
This reminder is provided to call the CATV (Cable-TV) system installer's attention to Article 820-40 of the NEC, which provides guidelines for proper grounding and, in particular, specifies that the cable ground shall be connected to the grounding system of the building, as close to the point of cable entry as practical.
NOTE:
This equipment has been tested and found to comply with the limits for a Class B digital device, pursuant to Part 15 of the FCC Rules. These limits are designed to provide reasonable protection against harmful interference in a residential installation. This equipment generates, uses and can radiate radio frequency energy and, if not installed and used in accordance with the instructions, may cause harmful interference to radio communications. However, there is no guarantee that interference will not occur in a particular installation. If this equipment does cause harmful interference to radio or television reception, which can be determined by turning the equipment off and on, the user is encouraged to try to correct the interference by one or more of the following measures:
- Reorient or relocate the receiving antenna.
- Increase the separation between the equipment and receiver.
- Connect the equipment into an outlet on a circuit different from that to which the receiver is connected.
- Consult the dealer or an experienced radio/TV technician for help.
NOTE: Changes or modifications may cause this unit to fail to comply with Part 15 of the FCC Rules and may void the user's authority to operate the equipment.
This Class B digital apparatus complies with Canadian ICES-003.
Product Features ....2
About super audio 2
Playing CD-RW discs 2
Applicable Discs to the Unit....2
PREPARATION ....3
Compact discs ....3
Precautions 4
Using Remote Control Unit....4
Loading batteries ....4
Names of parts and their functions....5
CONNECTIONS 7
Connecting to a 2-channel (Analog / Digital) stereo amplifier/receiver 7
Connecting to an analog multi-channel amplifier/AV receiver ....8
The Speaker Setting of SACD for Multi-Channel Audio 9
OPERATION 10
Connecting the power supply 10
Normal Playback 10
Search/Skip 12
Repeat Play 12
Random Play 13
Program Play....13
AMS Play 14
About TEXT Information Display ....15
About TEXT 15
Timer Play 16
Filter Switch 16
TROUBLE SHOOTING....17
SPECIFICATIONS ....55
Product Features
This unit can playback the outstanding sound performance in Super Audio CD. This unit has the following unique features.
- D/A converter section that accurately converts DSD/CD signal into high-quality analog signal with the DEM(Dynamic Element Matching) Super DAC(CS4397).
- Low-noise low-distortion filter circuit and high-speed current-feedback-type output amplifier with the differential input type HDAM.
- Text information display function that can display disc titles, track titles etc. in Super Audio CD/CDs.
- CD-R/CD-RW discs can be played.
About super audio
The Super Audio standard is based on Direct Stream Digital (DSD) technology. This new direct-stream digital format comprises a 1-bit system that has a digital sampling frequency that is 64 times higher than that of conventional audio CD. The results are spectacular: a frequency response of over 50kHz and a 120 dB dynamic range over the entire audible spectrum. Mixed with as many of the original frequencies as possible, the audio information audible for human ears sounds much more natural.
All audible frequencies are, after all, embedded in the frequency range as emitted by the sound source. A better reproduction does not exist! For the first time your ears will relive reality.
Playing CD-RW discs
This unit can play back the CD-RW (ReWritable) discs as well as ordinary music CD and CD-R (Recordable) discs.
- The CD-R and CD-RW discs should contain properly-recorded TOC information so that they can be played back. With the CD recorder system, writing the TOC information in a disc is referred to as finalizing the disc. A disc cannot be recognized as a CD disc and played back unless it has been finalized properly. For details, please read the instruction manual provided with a CD recorder.
* TOC stands for Table Of Contents and contains information such as the total number of tracks and total playing time of the disc. - This unit can play only the discs recorded in the CD-DA format designed for music reproduction. Do not attempt to play a disc containing other data, such as a CD-ROM for PCs, on this unit.
- As the playback of a CD-RW disc necessitates partial change of the player setup, it may take longer time for reading the TOC information than when a music CD or CD-R disc is played.
Applicable Discs to the Unit
1. Super Audio CD

SUPERAUDIO CD
Stereo Multi-ch
There are three types of Super Audio CDs.
- Single-layer Disc
- Dual-layer Disc
- Hybrid-layer Disc
SACD Disc Types
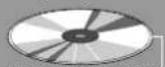
Single-layer Disc
HD layer HD layer CD layer HD layer
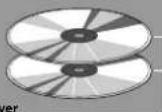
Dual-layer Disc
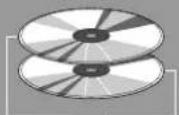
Hybrid-layer Disc
And each type may contain two areas of recorded information.
• High quality stereo area
• High quality multi-channel area
- Single Layer Disc
It can contain both high quality stereo area and high quality multi-channel area information.
- Dual Layer Disc
It can contain both high quality stereo area and high quality multi-channel area information. And a double amount of information can be stored on the disc thanks to the second layer.
- Hybrid Layer Disc
The hybrid disc may contain not only both information areas but also a second, standard CD layer, making it playable on standard CD players.
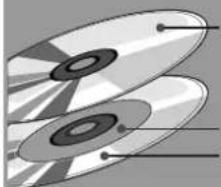
Hybrid SACD-Disc

SUPER AUDIO CD
natural_image
Abstract geometric pattern with overlapping elliptical shapes and radial lines (no text or symbols)1 CD layer that plays on any of your existing CD players
High-Density layer containing:
2 - High-Quality DSD Stereo
3 - High-Quality DSD Multi-channel
The number of tracks recorded may vary per layer. It will be shown on the display window of the unit.
2. Audio CD (CDDA)

DIGITAL AUDIO

DIGITAL AUDIO
TEXT
Audio CDs contain music tracks only.
Compact discs
The glossy side shining like a rainbow is the front side of the disc, and the side on which the label is printed is the back.
Unlike conventional turntables for playing analog discs, the SA8260 Super Audio CD Player reads the information recorded on the disc from underneath without contacting it using a beam of laser light. Therefore, the performance of a compact disc will not degrade like conventional analog records.
Handle discs carefully so as not to damage or scratch the front side.
To protect the disc, avoid placing it in the following locations:
- In direct sunlight or near a source of heat like a heater.
- In a place which is damp or dirty.
- In a place which could be exposed to rain, such as near a window.
Always keep the disc surface clean.
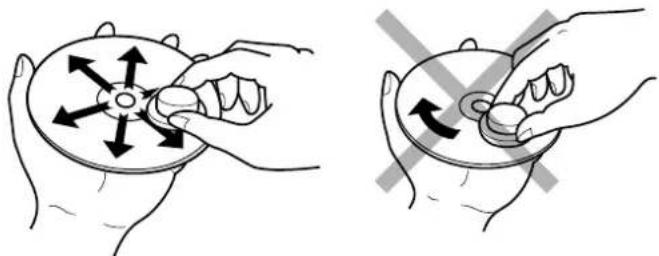
Up to six billion data units are recorded on the front side of the disc. When cleaning the disc surface, always be sure to use a special compact disc cleaner and wipe as shown below.
natural_image
Illustration of two hands holding a circular device with directional arrows indicating rotation (no text or symbols)Wipe in a radial direction. Do not wipe in circumferential direction.
- Do not use conventional record cleaner for analog records, as this will adversely affect the disc surface. Store discs properly by placing them in their disc cases.
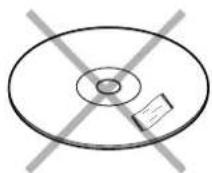
- Do not attach a piece of paper or sticker on the label side of disc.
When a disc has a piece of plastic tape or rental CD label with paste protruded from the edge or when a disc has a trace of such a sticky object, do not attempt to play the disc. If such a disc is played on the CD player, impossibility of taking out the disc or other malfunction may result.
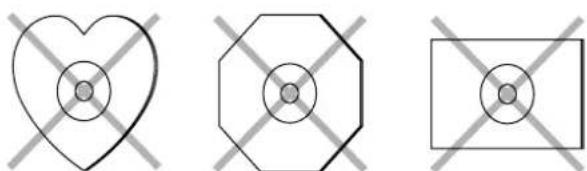
- Do not use a disc with a special shape.
Do not attempt to play a disc with a special shape such as a heart-shaped disc or octagonal disc. Otherwise the equipment malfunction may result.
natural_image
Three geometric shapes: a heart outline, an octagon with internal circles, and a rectangle with concentric circles, all crossed by gray X-bracing (no text or symbols)Precautions
- In winter, windows on a well-heated room you can see water drops on it or the window get fogged. It is called dew. Super Audis CD players have an optical lens so dew may form on it under those circumstance.
- In a room that heating has just started.
- In a high-humid room.
- When the unit is brought to a warm room from a cold place.
If dew is on the lens track information cannot be read and the unit malfunctions. So please wait about 30 minutes to play.
- The unit may interfere with a tuner and TV. If it happens set the unit with a distance from the tuner and TV.
- Noise level is far less than analog discs so noise can hardly be heard until music starts. If the volume of the amplifier is set loud, other audio components may be damaged.
- This unit can playback only Super Audio CDs and normal music CDs. The following disks cannot be played. CD-ROMs for personal computers, Game CDs, Video CDs, DVDs(Video/Audio), DTS-CDs, etc.
To prevent any accidents, please set the unit close to the power outlet so that you can unplug it quickly.
Using Remote Control Unit
Handling Batteries
Improper use of batteries may cause fluid leakage or explosion. Be careful in the following points.
- Insert batteries correctly in the +/- polarity direction as indicated on the unit.
- Do not use brand-new batteries and used batteries together.
- Dry cell batteries may generate different voltages even though their shapes are the same. Do not use different types of batteries together.
- Some batteries are rechargeable and some are not. See cautions on batteries carefully to use.
Loading batteries
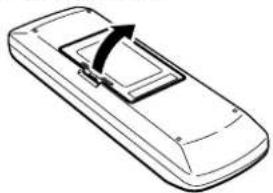
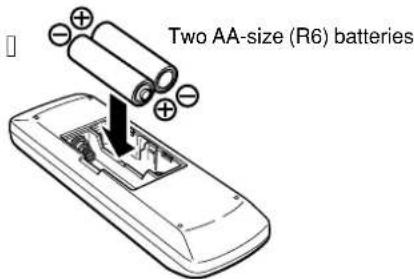
Batteries in this remote control unit have a life of approximately 1 year under normal operating conditions. If the remote control unit is not going to be used for an extended period of time, remove the batteries. Also, if you notice that the batteries are starting to run down, replace them as soon as possible.
① Remove the battery cover.
natural_image
Line drawing of a flat-screen car with a black arrow indicating the side panel (no text or symbols)② Insert the batteries with correct +/- orientation.
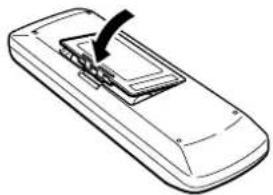
③ Close the battery cover until it clicks shut.
natural_image
Line drawing of a remote control device with a clip inserted (no text or symbols)■Remote control
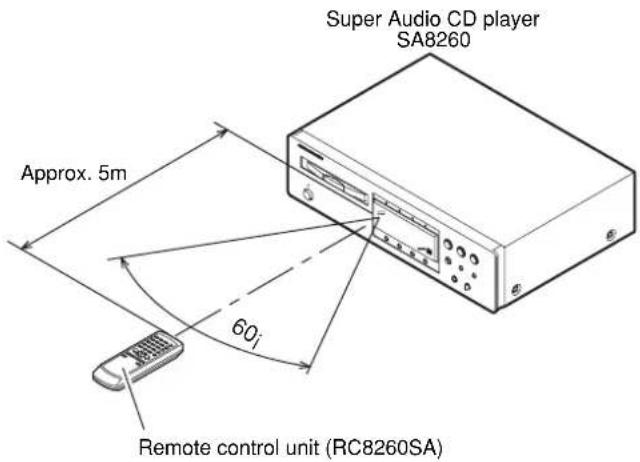
Operate the remote control unit (SA8260) within a distance of approx. 5 m from the infrared signal reception window (remote sensor) on the front of the SACD player.
Remote control operation may not be possible if the remote control unit's transmitter is not pointing in the direction of the remote sensor or if there is an obstruction between the transmitter and the remote sensor.
Remote control operating range
Names of parts and their functions
Please read the following instructions referring to the illustration on page 56.
FRONT PANEL
1 POWER switch STANDBY indicator
Press this switch to turn ON the unit, press it again to turn into STAND-BY and stand-by indicator will light.
2 DISC TRAY
3 REMOTE SENSOR
This window is to receive signals from the remote control unit.
4 DISPLAY WINDOW
This window shows status of the unit.
5 SOUND MODE button
This button is to select sound mode on a Super Audio CD. Select from Multi-Channel, Stereo and CD (if available). (See page 11)
6 TIME button
This button is to change information displayed from text information to time information when playing a disc with text. Also this button can change time information displayed. Each time it is pressed, the display changes in the following order. "track elapsed time" → "track remaining time" → "total remaining time" → "track elapsed time" (See page 11)
7 TEXT button
When a disc with text is being played, this button changes information displayed from time information to text information. (See page 15)
When a disc without text information is being played, "No Text" will be displayed.
8 DISPLAY button
This button can turn on and turn off the display window.
9 PHONES jack
This jack is to connect the headphones.
10 LEVEL
This is to adjust the headphone volume.
* In SACD multi-channel play, front L/R channels will be output.
11, (Track Skip/Search buttons)
These buttons can be used as both track skip and track search buttons. (The buttons on the main unit only.)
▶▶/▶▶ : Each time this button is pressed, the track being played is skipped forward. When this button is held down, tracks are searched forward (Fast Forward).
: When this button is pressed, the unit goes back to the beginning of the current track. If the button is pressed more times, the track being played is skipped back. When this button is held down, tracks are searched backward (Fast Rewind).
In program play, Fast Forward and Fast Rewind can be done in the playing track only.
12 II PAUSE button
Press this button to pause playback. If pressed again, the unit returns to playback.
13 ■ STOP button
Press this button to stop playback. Also this button is used to clear all programs.
14 ▶ PLAY button
Press this button to start playback.
15 ▲ OPEN/CLOSE button
Press this button to open the tray. Put on a disk label side up. Press the button again to close the tray.
16DISPLAY OFF
Press this button to turn on and off the information display window.
17CD
This indicator lights when an audio CD disc is lorded, or a hybrid SACD disc is loaded and the sound mode is in CD.
18 SACD STEREO, SACD MULTI
It indicates the sound mode when a Super Audio CD is loaded.
★ In this instruction manual, some operations can only be performed with the remote control. For operations that can be performed with buttons both on the main unit and on the remote control, the button names are shown in the □ mark. And for operations that can only be performed with buttons on the remote control, the button names are shown in the ○ mark.
■REMOTE CONTROLLER
1 POWER button
5 SOUND MODE button
6 TIME button
7 TEXT button
12 II PAUSE button
13 ■ STOP button
14 ▶ PLAY button
15 ▲ OPEN/CLOSE button
16 DISPLAY OFF button
The buttons listed above are the same to the buttons on the front panel of the main unit.
Please see the correspond items in "Front Panel" section.
19 0 - 9 (Numerical buttons)
Use these buttons to select tracks directory.
20 PROGRAM button
This button is for program play. (See page 13)
21, (Hackskip buttons)
: Each time this button is pressed, the track being played is skipped forward.
: When this button is pressed, the unit goes back to the beginning of the current track. If the button is pressed more times, the track being played is skipped back.
* Search buttons are provided separately for the remote control unit. Use 22 Search buttons for search function.
22, (Search buttons)
: While this button is pressed during playback, tracks are searched backward.
▶: While this button is pressed during playback, tracks are searched forward.
23 SCROLL/RECALL button
Use this button to scroll text while displaying text information in a disc with text.
Also, this button is to check programmed tracks for program play. (See page 14)
24 CANCEL button
Use this button to cancel a programmed track. (See page 14)
25 A-B (A-B Repeat button)
This button is to determine starting and ending points for A-B repeat play. (See page 12)
26 RANDOM button
This button is for random play. (See page 13)
27 AMS (Automatic Music Scan button)
Use this button for AMS play. (See page 14)
28 REPEAT button
This button is for repeat play. Each time this button is pressed, repeat mode changes as follows. "All Repeat" → "Track Repeat" → "Repeat Off" (See page 12)
■REAR PANEL
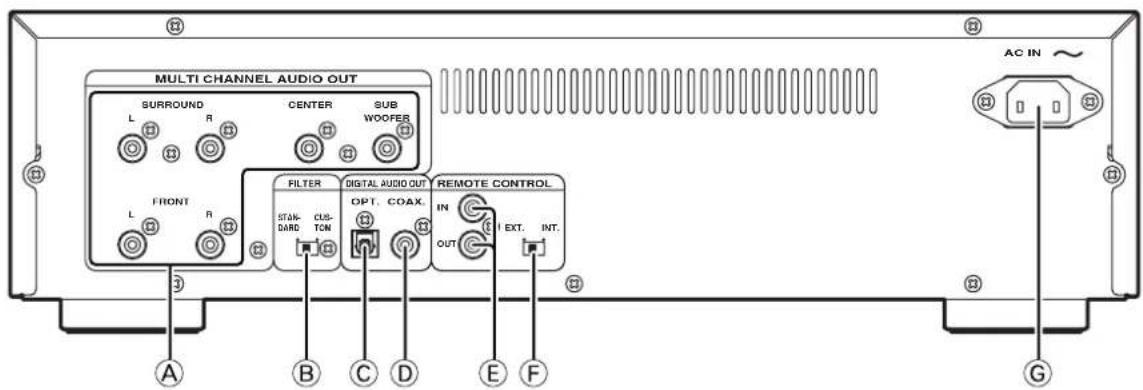
Ⓐ MULTI CHANNEL AUDIO OUT (Analog output)
FRONT L/R : Output for front speakers
SURROUND L/R : Output for surround speakers
CENTER : Output for center speaker
SUB WOOFER : Output for sub woofer
⑧FILTER STANDARD/CUSTOM
(Filter standard/custom switch)
Set this switch according to the amplifier and speakers to be connected. For more details, refer to "Filter Switch" section on page 16.
* Switching the filter setting has to be done while the unit is in stand-by mode. If the setting is switched while playing, noise may occur.
©DIGITAL OUT OPTICAL
It outputs the playing CD signal in digital format. This jack is to be connected with a recording device, amplifier, D/A converter, etc that has optical digital input using an optional square type optical digital cable.
* No signal will be output when a SACD is played.
⑭ DIGITAL OUT COAXIAL
It outputs the playing CD signal in digital format. This jack is to be connected with a recording device, amplifier, D/A converter, etc that has coaxial digital input using an optional coaxial digital cable.
* No signal will be output when a SACD is played.
EREMOTE CONTROL IN/OUT
Connecting with a remote cable, this unit can be controlled by another Marantz unit that has D-bus function.
⑤ EXT./INT. (External/Internal switch)
When using the unit as standalone, set this switch to INT. position. If this unit is connected to another Marantz unit with D-bus function and remote control sensor, set the switch to EXT. position.
* If the unit is used as standalone and the switch is set to EXT. position, remote control unit cannot be used.
©AC POWER INPUT JACK
Connect the supplied power cord to this jack and a household AC power outlet.
CONNECTIONS (Connecting to audio components – Analog/Digital)
Depending on your amplifier/receiver/Stereo System, there are various ways to connect to this player. For correct connection please refer to instruction manuals of stereo system to be connected.
Caution: Do not connect output from this unit to PHONO input of your audio system.
Connecting to a 2-channel (Analog / Digital) stereo amplifier/receiver
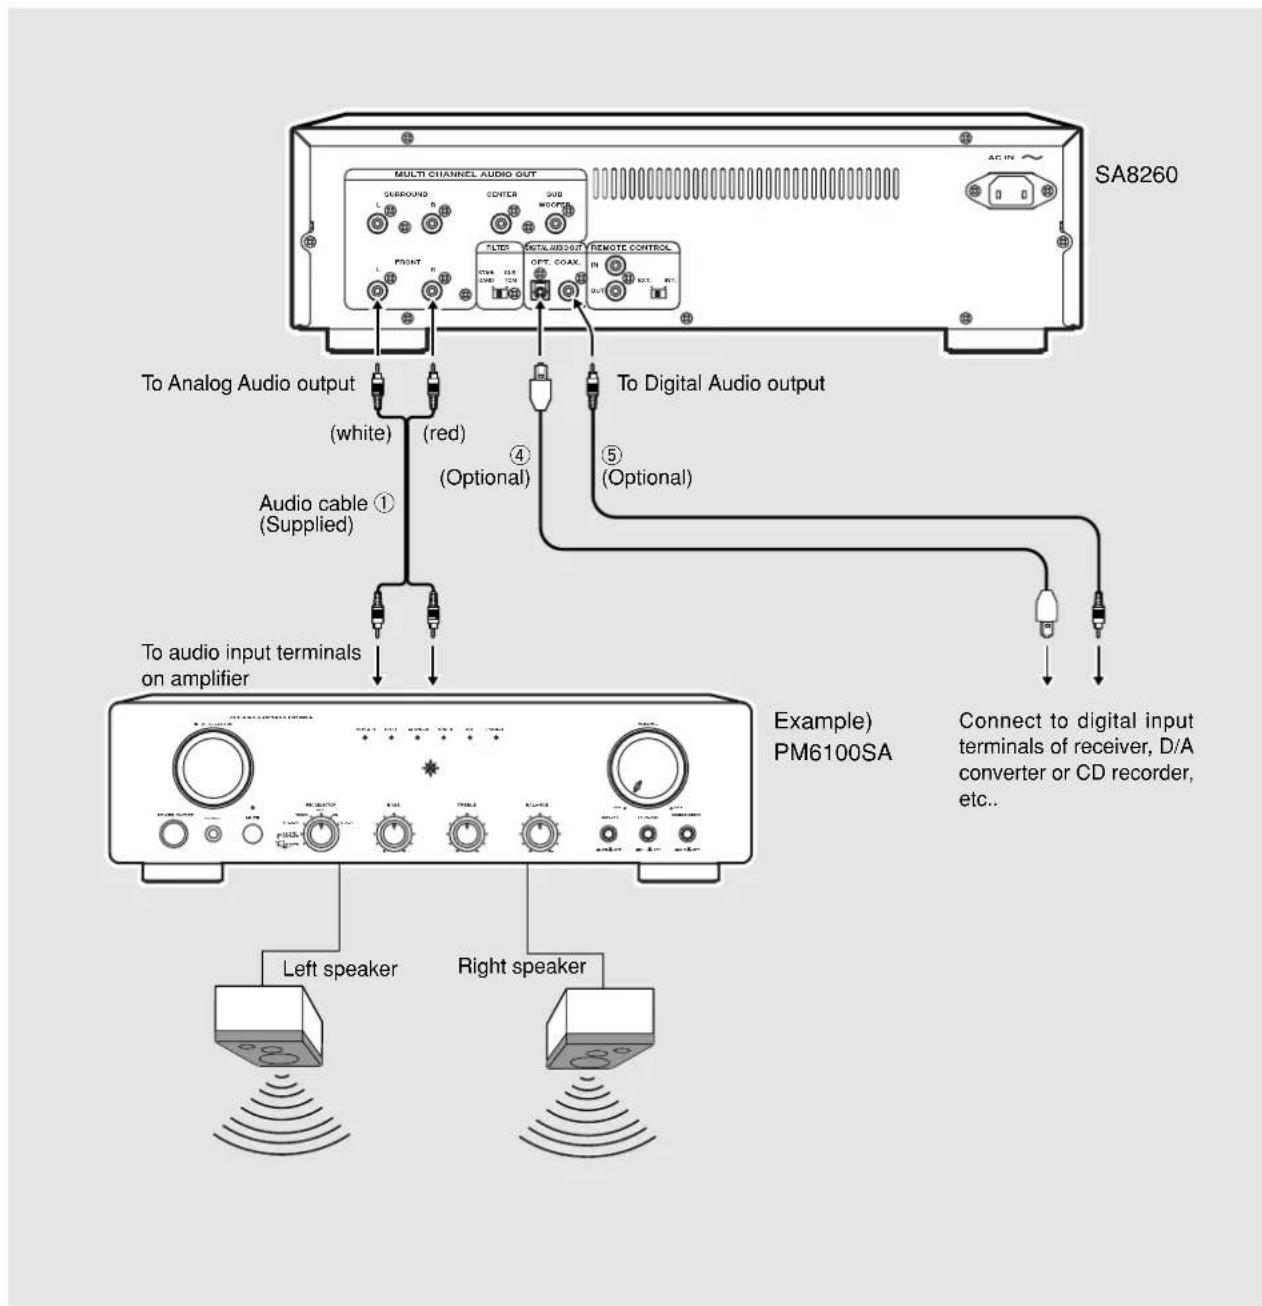
- Connect the audio cable ① to this unit's front speaker outputs and the stereo inputs on your amplifier, receiver or stereo system.
- To play a SACD disc with this connection, set the SOUND MODE to STEREO.
- Connect the optical cable ④, coaxial cable ⑤ to the digital input on your AV amplifier, D/A converter, CD-R, etc..
* Signal will be output from the digital audio out jacks (OPT./COAX.) only when a CD disc is played. When playing a SACD disc, no signal will be output.
Connecting to an analog multi-channel amplifier/AV receiver
This unit can play multi-channel recorded SACD discs. For multi-channel play, select "MULTI" with SOUND MODE button on the unit or remote.
- Connect the audio cable ① to this unit's front speaker outputs and corresponding inputs on your amplifier/receiver.
- Connect the audio cable ② to this unit's surround speaker outputs and corresponding inputs on your amplifier/receiver.
- Connect the audio cable ③ to this unit's center speaker and sub-woofer outputs and corresponding inputs on your amplifier/receiver.
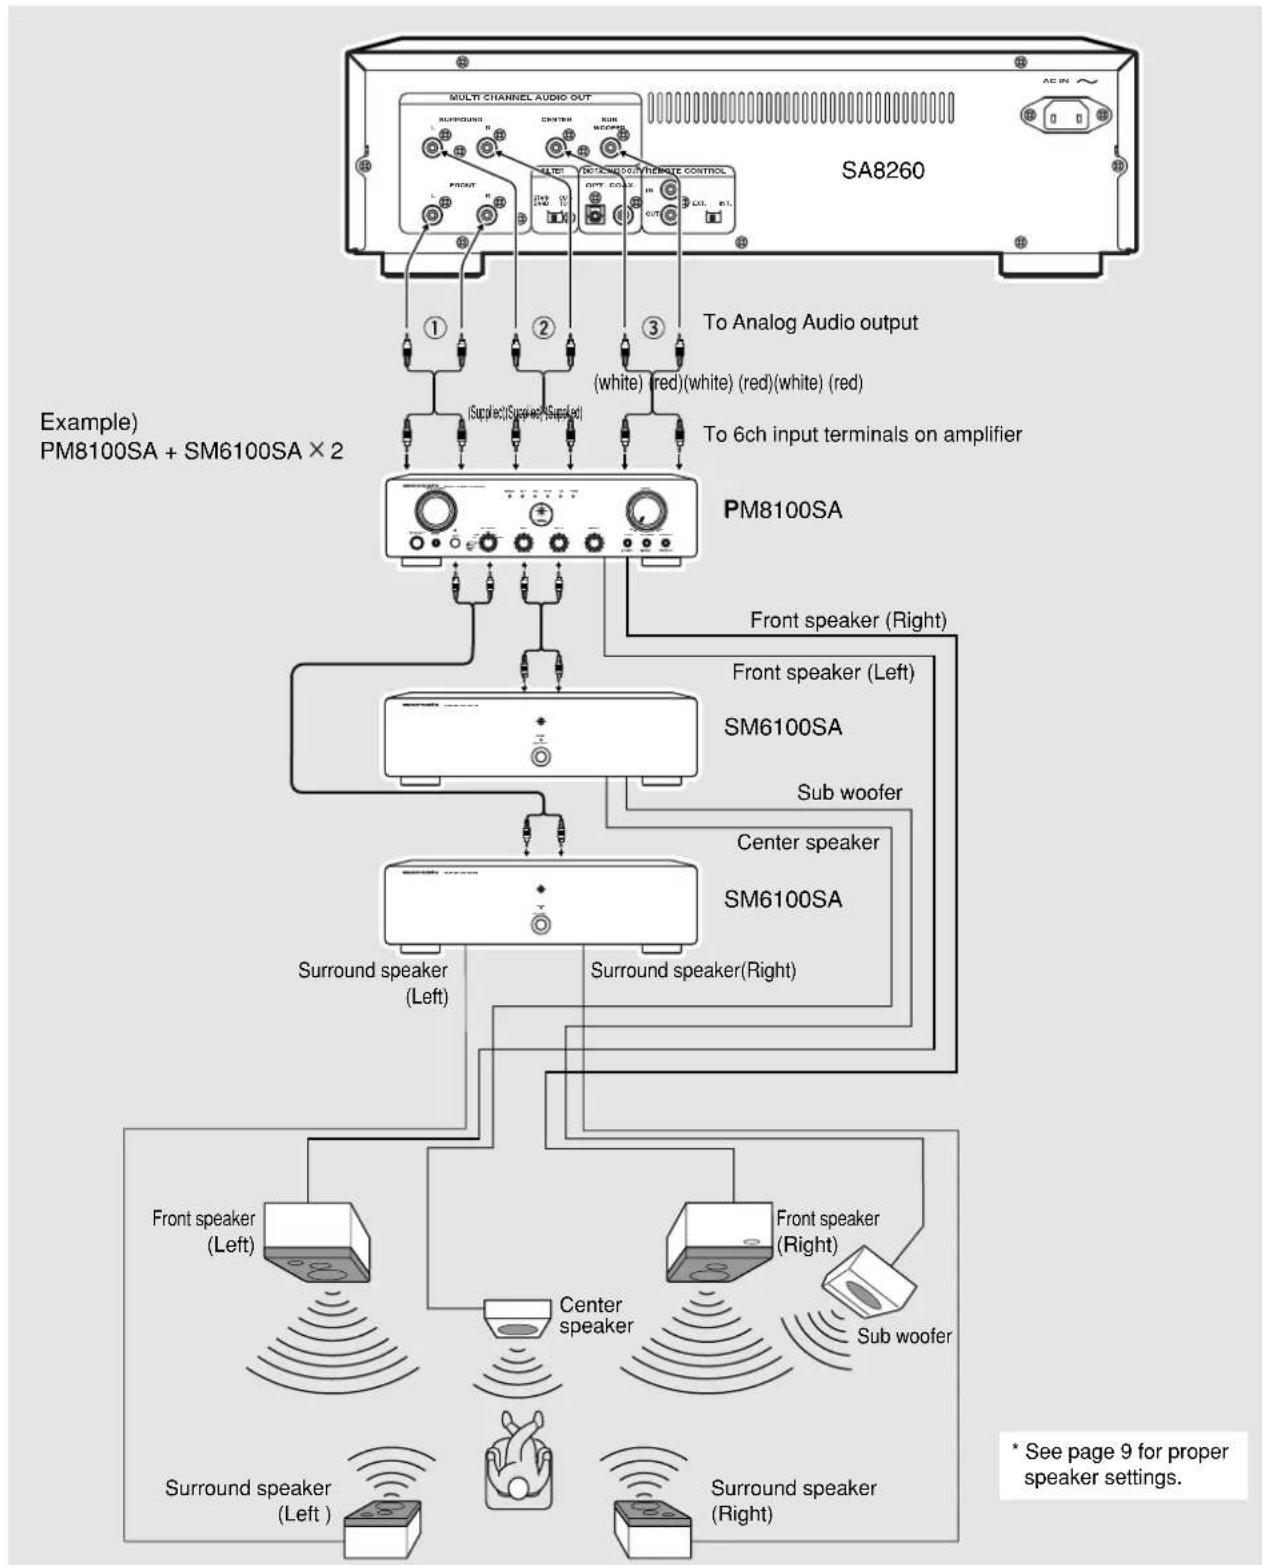
flowchart
graph TD
    A["SA8260"] --> B["To Analog Audio output"]
    B --> C["(white) red)(white) (red)(white) (red)"]
    B --> D["(supplcd)(supplcd)(supplcd)"]
    A --> E["To 6ch input terminals on amplifier"]
    E --> F["PM8100SA"]
    F --> G["Front speaker (Right)"]
    F --> H["Front speaker (Left)"]
    F --> I["SM6100SA"]
    I --> J["Sub woofer"]
    I --> K["Center speaker"]
    I --> L["SM6100SA"]
    L --> M["Surround speaker (Left)"]
    L --> N["Surround speaker (Right)"]
    M --> O["Front speaker (Left)"]
    M --> P["Front speaker (Right)"]
    N --> Q["Center speaker"]
    N --> R["Sub woofer"]
    O --> S["Surround speaker (Left)"]
    P --> T["Surround speaker (Right)"]
    style A fill:#f9f,stroke:#333
    style E fill:#ccf,stroke:#333
    style F fill:#cfc,stroke:#333
    style I fill:#fcc,stroke:#333
    style L fill:#cff,stroke:#333
    style M fill:#ffc,stroke:#333
    style N fill:#ffc,stroke:#333
    style O fill:#cfc,stroke:#333
    style P fill:#cfc,stroke:#333
    style Q fill:#cfc,stroke:#333
    style R fill:#cfc,stroke:#333
    style S fill:#cfc,stroke:#333
    style T fill:#cfc,stroke:#333
    style U fill:#fcc,stroke:#333
    style V fill:#fcc,stroke:#333
    style W fill:#fcc,stroke:#333
    style X fill:#fcc,stroke:#333
    style Y fill:#fcc,stroke:#333
    style Z fill:#fcc,stroke:#333
The Speaker Setting of SACD for Multi-Channel Audio
We recommend you to use ITU (International Telecommunication Union) speaker setting because SACD multi-channel discs are recorded and mixed down to hear the best quality sound when this setting are used.
The basic settings are 3 speakers for front and 2 for back since multi-channel discs have basically 5 channels (3 to 6 channels possible). There are some discs which has the 6^th channel for sub-woofer. The number of channels recorded is shown on the disc. When you use different sizes of speakers, please adjust the volume balances in your amplifier/surround receiver. You can also use the 5.1 channel surround setting for DVD but surround sound may present differently from the best SACD multi-channel sound presence.
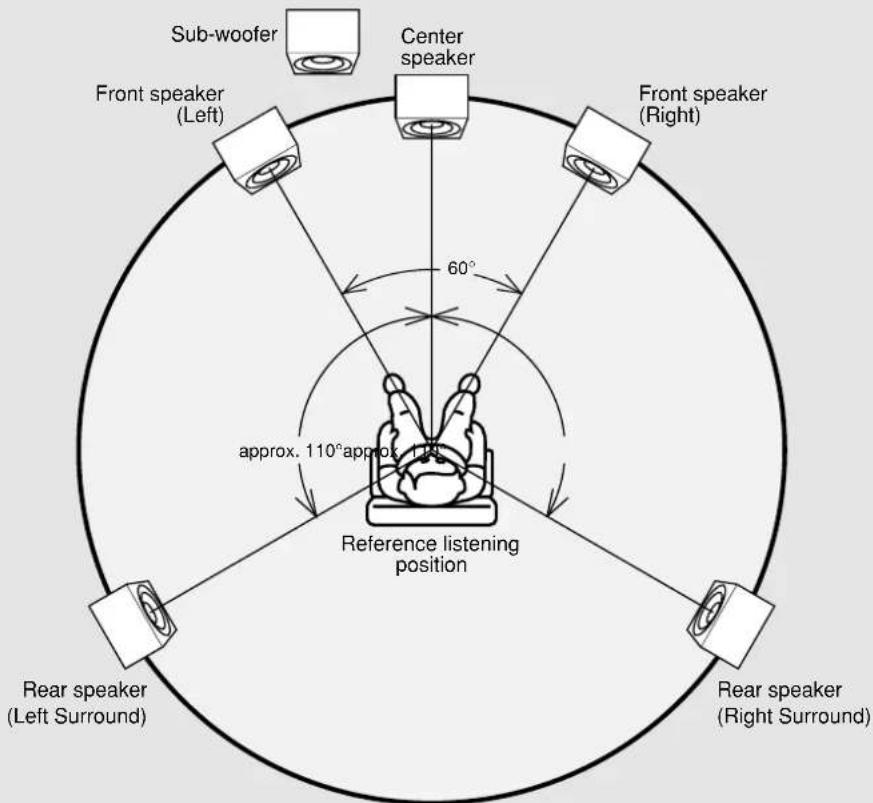
The 2-front, 1-center, and 2-surround speakers should be set on the circle from the listening point as shown above. The location of the sub-woofer in the picture is just to you a patter of settings. Sub-woofer can be located any place in your room. (See the users manual of your sub-woofer.)
★ In this instruction manual, some operations can only be performed with the remote control. For operations that can be performed with buttons both on the main unit and on the remote control, the button names are shown in the □ mark. And for operations that can only be performed with buttons on the remote control, the button names are shown in the ○ mark.
Connecting the power supply
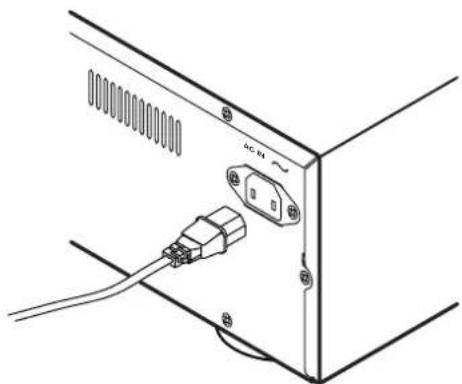
1 Plug the power cable into AC IN jack on the back panel.
natural_image
Diagram of a computer monitor rear panel showing cable and connector (no text or symbols)2 Turn on the power switch of the audio unit (amplifier, etc.) that is connected with this unit. Set the selector on the connected unit to this unit.
3 Plug the power cable into an AC outlet.
* The unit turns into stand-by mode and stand-by indicator lights.
Normal Playback
■SACD player playback
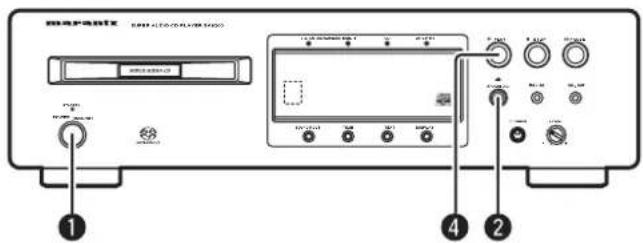
① Press POWER switch to turn on.
Display indications
SACD
② Press ▲ OPEN/CLOSE button.
The disc tray opens. Set a disc on the tray. Make sure the label side is up.
③ Press ▲ OPEN/CLOSE button.
④ Press ▶ PLAY button.
Disc type is automatically detected and playback is started. Track number and track elapsed time(minute, second) appear on the display.
* When a SACD/CD hybrid disc is loaded, SACD layer is automatically played. If you want to play CD layer, use SOUND MODE button to select CD layer.
(Exp.:Track 6, Elapsed time 2 min 8 sec)
Number of current track Minutes Seconds
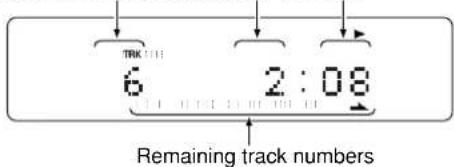
Playback automatically stops at the end of the final track.
To start playback form the first track
Press ▶ PLAY button.
To stop playback
Press ■ STOP button.
To eject disc
Press ▲ OPEN/CLOSE button to open the disc tray and take the disc off. Press the button again to close the tray.
Disc tray must be closed when the unit is not be used.
To pause playback
Press II PAUSE button.
PAUSE indicator will light and playback is paused at the point that the button is pressed. To restart playback, press ☐ PAUSE button again or press ▶ PLAY button.
To change time display
Press TIME button.
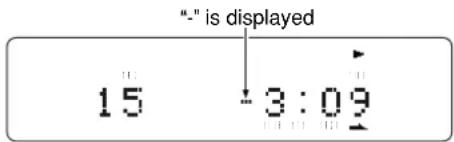
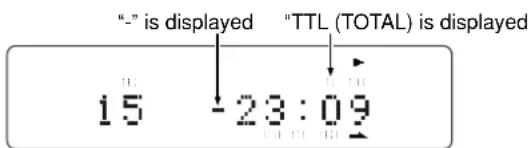
Each time TIME button is pressed, display will change in the following order. "Track elapsed time" → "Track remaining time" → "Total remaining time" → "Track elapsed time".
- Track remaining time
(The remaining playing time from the playing point to the end of the current track)
• Total remaining time
(The remaining playing time from the playing point to the end of the last track)
* If TIME button is pressed when a disc with text is played, time display is given priority and text information will not be displayed afterward. To see text information, press TEXT button.
■ Switching Sound Mode (SACD)
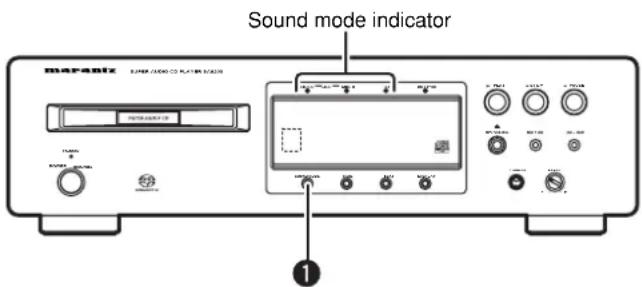
1. Press SOUND MODE button in stop mode (not playing).
The layer or area currently in is shown on the display. (CD, SACD STEREO, SACD MULTI) While selecting, sound mode indicator will flash.
SACD Multi
If SOUND MODE button is pressed again, a selectable layer or area will be shown. About 2 seconds after the layer or area will be switched to new one.
* When layer or area is switched, TOC will be read again.
* If a CD disc or SACD disc with stereo area only is loaded, sound mode cannot be changed.
* When a hybrid SACD disc that has both stereo and multi-channel areas is loaded, sound mode will be changed in the following order.
SACD multi-channel area → SACD stereo area → CD layer
* Sound mode can be selected while the tray is open. Select a desired layer or area and press ▶ PLAY button then the tray will close and playback will be started.
- Displaying the number of tracks in a SACD multi-channel disc
If SOUND MODE button is pressed once during playback, the number of channels being played will be shown.
Number of channels is displayed
SACD éch
Examples
6ch : Sub-woofer channel will be played.
5ch : Sub-woofer channel will not be played. For some discs recorded in 4ch or 3ch, "5ch" will be displayed.
4ch or 3ch : If loaded disc is made to show the channel display, 4ch or 3ch will be displayed.
* See software (disc) jacket or attached instruction for signal output terminals for 4ch or 3ch discs.
Search/Skip
■Direct Search (Specify track number to play)
Specify track number with NUMBER buttons (0-9)
3rd track : Press ③.
12th track : Press ① and then press ② (within approximately 1.5 seconds).
If the first pressed number is only in the digit of ones and not in the digit of tens, search begins approximately 0.5 second after.
If a wrong number is pressed
Press correct number again.
- If a track number that is not in the disc is specified, "No Track" will be shown on the main display. Please specify a correct track.
No Track
■Search
If buttons on the main unit or, buttons on the remote are kept pressing during playback, track search begins. Release the button when the point you want to listen to gets close.
* No sound can be heard during search.
■Track Skip ( , on the ▶/▶▶ main unit, ↓ on the remote)
To listen to a track posterior to the current track
Press ▶ button the number of times you want to proceed tracks.
To listen to a track prior to the current track
Press 📄 button go back to the beginning of the current track. Then press 🔊 button the number of times you want to go back.
- If [◀◀] button is pressed at the beginning of the first track, it jumps to the last track. If [▶▶] button is pressed in the last track, it jumps to the first track.
Repeat Play
■All track repeat
When REPEAT button is pressed, "RPT" indicator will light and all track repeat play begins.
To Return to Normal Play
Press REPEAT button two times. "RPT" indicator will disappear, repeat mode will be off and it returns to normal play mode.
* If REPEAT button is pressed when in program mode, programmed tracks are played repeatedly.
■One Track Repeat
Press REPEAT button two times when the track is being played. "RPT", "1" indicators will light and the track will be played repeatedly.
To Exit from One Track Repeat
Press REPEAT button.
■A-B Repeat
1 Press A-B button at your chosen starting point. "A-" indicator will light.
② Press A-B button again at your chosen end point. "B" indicator will light and the chosen section will be played repeatedly.
■To Exit from A-B Repeat
Press A-B button. "A-B" indicator will disappear, A-B repeat mode will be off and it returns to normal play mode.
* A-B repeat cannot be done when random play is going on.
Random Play
When RANDOM button is pressed, the unit shuffles track order and plays all the tracks in the shuffled order. It can be done in both playback and stop modes.
- The gap between tracks will be approximately 4 seconds during random play.
Random P:04
If RANDOM button is pressed when the disc tray is open and a disc is set, the tray will automatically close and random play will begin.
To Exit from Random Play and Return to Normal Play
Press RANDOM button again.
If Button is Pressed during Random Play
It jumps to the next track of the shuffled order.
If or◀Button▶is Pressed during Random Play
Search will be done only in the current track. Search does not go to the previous or next track.
To Listen to Random Play Repeatedly
Press REPEAT button once during random play. Every time the order will be shuffled.
- If RANDOM button is pressed during program play, the programmed tracks will be shuffled.
Program Play
■Program (Listen to Favorite Tracks in Favorite Order)
(Example: To program the 7th track in a disc with 15 tracks)
15 65:32
1 Press PROG button in stop mode. "PROG" indicator will flash and it goes to program mode.
Program
Blinks
0 0:00
② Choose a track to be programmed with numeric buttons on the remote or ▶▶, ▶buttons.
(Example: The 15th track is chosen and it's length is 4min30sec)
Blinks
15 4:30
Only the numbers of programmed tracks light up
③ With the sequence described in step ② above, program another track. Repeat that sequence to program all the tracks you want. You can program up to 30 tracks.
(Example: The 7th track is chosen and total length of 7th and 15th is 7min50sec)
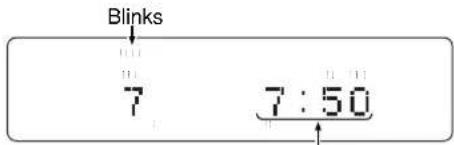
Total playing time of programmed tracks
4 When you finish programming, press PROG button or STOP button. Flashing "PROG" indicator will lights constantly. Program has been settled.
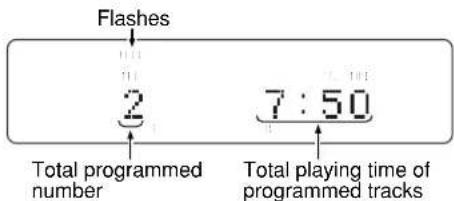
5 Press ▶ PLAY button to starts playback in programmed order.
* You can skip the sequence ④ and press ▶ PLAY button to start program play.
To Check Programmed Tracks
Press SCROLL/RECALL button while programming or program play (when "PROG" indicator is flashing or lights). Programmed tracks will be displayed in programmed order.
To Delete a Programmed Track
① Press SCROLL/RECALL button in stop mode when program has been made (when "PROG" indicator lights or flashes). Programmed tracks will be displayed in programmed order.
② When the track you want to delete appears on the display, press CANCEL button at once. The deleted track's track number indicator will disappear.
To Clear Whole Program
Press ■ STOP button two times while in program play. In stop mode, press ■ STOP or CANCEL button once. Program can also be cleared by pressing ▲ OPEN/CLOSE key to open the disc tray.
To Add Tracks to Program
Press PROG button when program is remaining ("PROG" indicator is constantly on) and in stop mode. "PROG" indicator will flash and tracks can be add to the end of program.
\* Please be careful about the following matters.
- When programming 1st to 9th tracks in a disc that has over 10 tracks by using numeric buttons. For instance, programming the 3rd track after programming the 1st track, press ③ button more than approximately 1.5 seconds after ① button is pressed.
- Likewise, when programming a track at 10th or after. For example, to program 13th track, press ③ button within approximately 1.5 seconds after ① button is pressed.
- When programming a track in a disc that has less than 9 tracks. For instance, to program the 5th track after 4th track has been programmed, press ⑤ button more than approximately 0.5 second after ④ button is pressed.
- When programming with ▶▶, and 🔍️ buttons, press the buttons repeatedly until the track you want appears. And the gap has to be less than 0.5 second.
Q&A
• How many tracks can be programmed?
Up to 30 tracks can be programmed for program play.
- Can I listen to program play repeatedly?
Press REPEAT button once. "RPT" indicator will light and program play will be repeated.
- Can I shuffle the programmed track order?
Press RANDOM button during program play or in stop mode.
AMS Play
If (AMS) button is pressed in stop mode or in playback mode, PLAY "▶" indicator will flash and the beginnings of all the tracks will be played for 10 seconds each starting from the first track. This feature is convenient to search where your favorite track is.
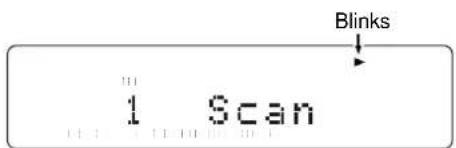
When you have found the favorite track, press AMS button again. PLAY indicator will light constantly and normal playback will begin from the current track.
* If AMS button is pressed after tracks have been programmed, only the selected tracks will be played with AMS.
About TEXT Information Display
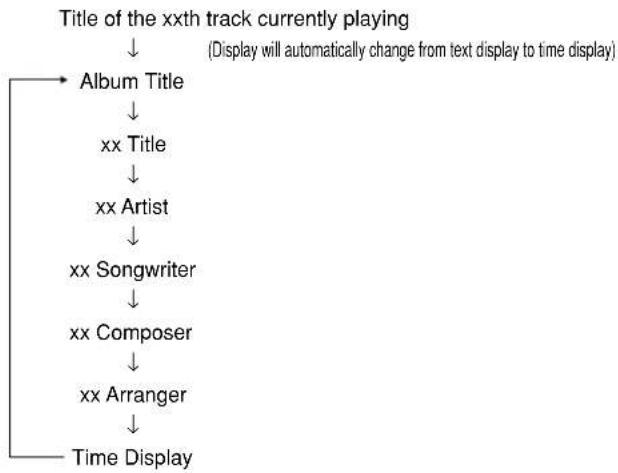
The following items of text information in a disc with text can be displayed by pressing TEXT button. Nevertheless, which items of information are recorded depends on discs so some information may not be displayed. This unit skips unrecorded information to display.
- During Playback
Each time button is pressed, text information will be displayed in the following order. In general, information of the playing track will be displayed during playback.
flowchart
graph TD
    A["Time Display"] --> B["xx Arranger"]
    B --> C["xx Composer"]
    C --> D["xx Songwriter"]
    D --> E["xx Artist"]
    E --> F["xx Title"]
    F --> G["Album Title"]
    G --> H["(Display will automatically change from text display to time display)"]
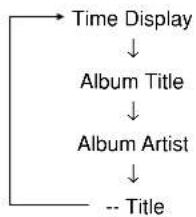
- In Stop Mode
Each time TEXT button is pressed, text information will be displayed in the following order.
flowchart
graph TD
    A["Time Display"] --> B["Album Title"]
    B --> C["Album Artist"]
    C --> D["-- Title"]
If ▶ PLAY button is pressed while -- Title is displayed, that track will be played.
The maximum number of characters to be displayed is 64 characters.
About TEXT
TEXT is a new type of music disc that contains text information like artist name, album title, music title, etc. CDs with the logos shown below and most SACDs have text information.

This text information is recorded on a area which is not used for ordinary music CDs. Therefore music CDs with text information can be played with ordinary CD player. And the text information can be displayed with players that has TEXT feature.
This unit automatically detects whether text information is recorded and shows it on the display window.
Main unit display
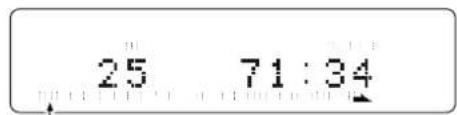
Lights up when the loaded disc has text information
Album title, track title, artist name, songwriter name, composer name, arranger name, can be displayed by operating main unit and remote control. Be noticed that those information items are not always recorded all in a disc.
- This unit can display 12 characters in one time. If information is longer than 12 characters, the display will scroll right to left.
- This unit can display only alphabets, numeric numbers and symbols. Chinese and Japanese characters cannot be displayed. If information is in Chinese and Japanese characters, the unit displays nothing.
Timer Play
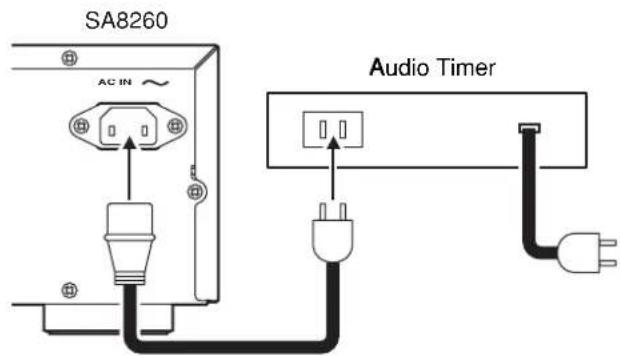
This unit can perform timer play by cooperating with your audio timer.
Connect this unit's power cord to the audio timer's power socket and the timer's power cord to power outlet.
* For connection to audio timer and it's operation, please refer to the instruction manual of your audio timer.
Setting Timer of Play On/Off
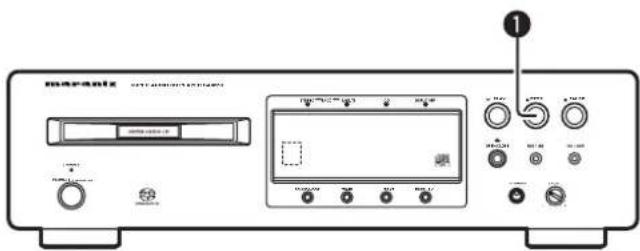
① Press STOP button for 2 seconds in stop mode.
Timer play is activated and "Timer On" will be displayed.
Timer On
* To turn off the timer, press STOP button for 2 seconds. ("Timer Off" will be displayed.)
② Load a disc and turn into stand-by mode.
* If program play has been set, program play will begin upon the timer on.
Filter Switch
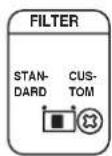
Super Audio CDs have a wide playback frequency band of 100 kHz that is beyond the audible range: this means that their signals contain ultra-high-range components that conventional CDs do not have. A conventional amplifier is often not built to reproduce signals containing these components, and when Super Audio CD signals are output in their original state, noise may be generated, the amplifier's protection circuits may be activated and/or the speakers may be damaged.
To prevent this sort of trouble from occurring, the unit incorporates a filter (STANDARD) for attenuating the ultra-high-range components, and the filter can be set STANDARD or CUSTOM using a switch on the rear panel. (This switch is set to STANDARD when the unit is shipped from the manufacturing plant.)
When the unit is to be connected with a next-generation amplifier that supports Super Audio CDs and set the switch to CUSTOM for use. This will ensure play with a wider frequency range.
* Use the switch at the STANDARD position if the unit is to be used with a regular amplifier. Otherwise, the amplifier and/or speakers may be damaged.
* Even when the unit has been connected with an amplifier that supports Super Audio CDs, change the switch to the STANDARD position when recording Super Audio CD sound on a tape deck, for instance.
* Do not change the switch setting while the unit is in standby mode. Doing so could generate electronic noise that could damage your speakers, etc.
If you think a malfunction has occurred, first check the points listed below. The problem is likely to have been caused by a simple operational error or a connection problem. If the problem cannot be corrected even after carrying out the following checks, consult your dealer or nearest Marantz sales office or service counter.
- The disc fails to rotate.
- Is the mains lead plugged in properly?
- Is the POWER switch ON?
- Is the disc placed in the correct position on the disc tray?
- Is the disc placed properly with the label side facing up?
- Is the disc dirty?
- Is the disc scratched?
- Is the disc warped?
- The disc is rotating but no sound is heard.
- Are the amplifier and speakers connected properly?
- Is the amplifier switch ON?
- Is the amplifier's volume control set at the minimum level?
- Is the amplifier's selector switch set to the correct input ("CD" or "AUX", whichever corresponds to the input jacks the SACD player is connected to)?
- The disc stops in mid-operation. The sound drops out or noise is heard.
- Is the disc dirty?
- Is the disc scratched?
- Is the disc warped?
* In the case of a CD-R or CD-RW disc, this problem may occur when the conditions under which its data was originally written were substandard or when the quality of the disc itself is poor.
- Remote control operation is not possible.
-
Is the remote control unit's transmitter pointed correctly at the remote sensor on the front of the SACD player?
Or is there an obstruction between the transmitter and the remote sensor? -
Are the batteries in the remote control unit exhausted?
-
Is there another strong light (from a window, etc.) striking the SACD player's remote sensor?
• A Super Audio CD cannot be played.
- Is the disc scratched, dirty or warped?
- Is the amplifier's input selector set to digital?
* Digital audio signal will not be output when a Super Audio CD is played.
- Some channels are not played (Super Audio CD Multi-Channel)
- Confirm the number of channels in the disc. (See page 11)
- A CD-R/CD-RW disc cannot be played.
- Is the disc placed upside down?
- Is the disc contains properly written TOC?
- Is the recorded information in an audio (CD-DA) format?
| Super Audio CD CD | ||
| Audio Characteristics | ||
| Analog output | ||
| Channels 6channels (Max.) 2channels | ||
| Frequency range 2Hz — 100kHz 2Hz — 20kHz | ||
| Frequency characteristics 2Hz — 50kHz (-3dB) 2Hz — 20kHz | ||
| Dynamic range 113dB | 100dB | |
| THD (1kHz) | 0.0015% 0.0020% | |
| wow & flutter | Precision of quartz | Precision of quartz |
| Output level | 2.2V | 2.2V |
| Digital output | ||
| output level (cinch JACK) | — | 0.5Vp-p (75Ω) |
| output level (optical) | — | -19dBm |
| Headphone output level | 50mW / 32Ω (max, Vol.) | 50mW / 32Ω (max, Vol.) |
| Optical Readout System | ||
| Laser | AlGaAs | AlGaAs |
| Wave length | 650nm | 780nm |
| Signal format | 1-bit DSD | 16-bit linear PCM |
| Sampling frequency | 2.8224MHz | 44.1kHz |
Power Supply
Input Voltage, Frequency AC 120V 60Hz
Power Consumption 28W
Operating humidity ....5 \~ 90% (without dew)
Accessories
- Remote control unit (RC8260SA)....1
Dimensions (Width × Height × Depth) 48.5 × 21.5 × 152.5mm
Net weight (without Batteries) 60g
- AA (R6) Batteries 2
- Remote connection Cable .... 1
- User's Guide .... 1
- Warranty Card .... 1 pair
Specifications subject to change without prior notice.
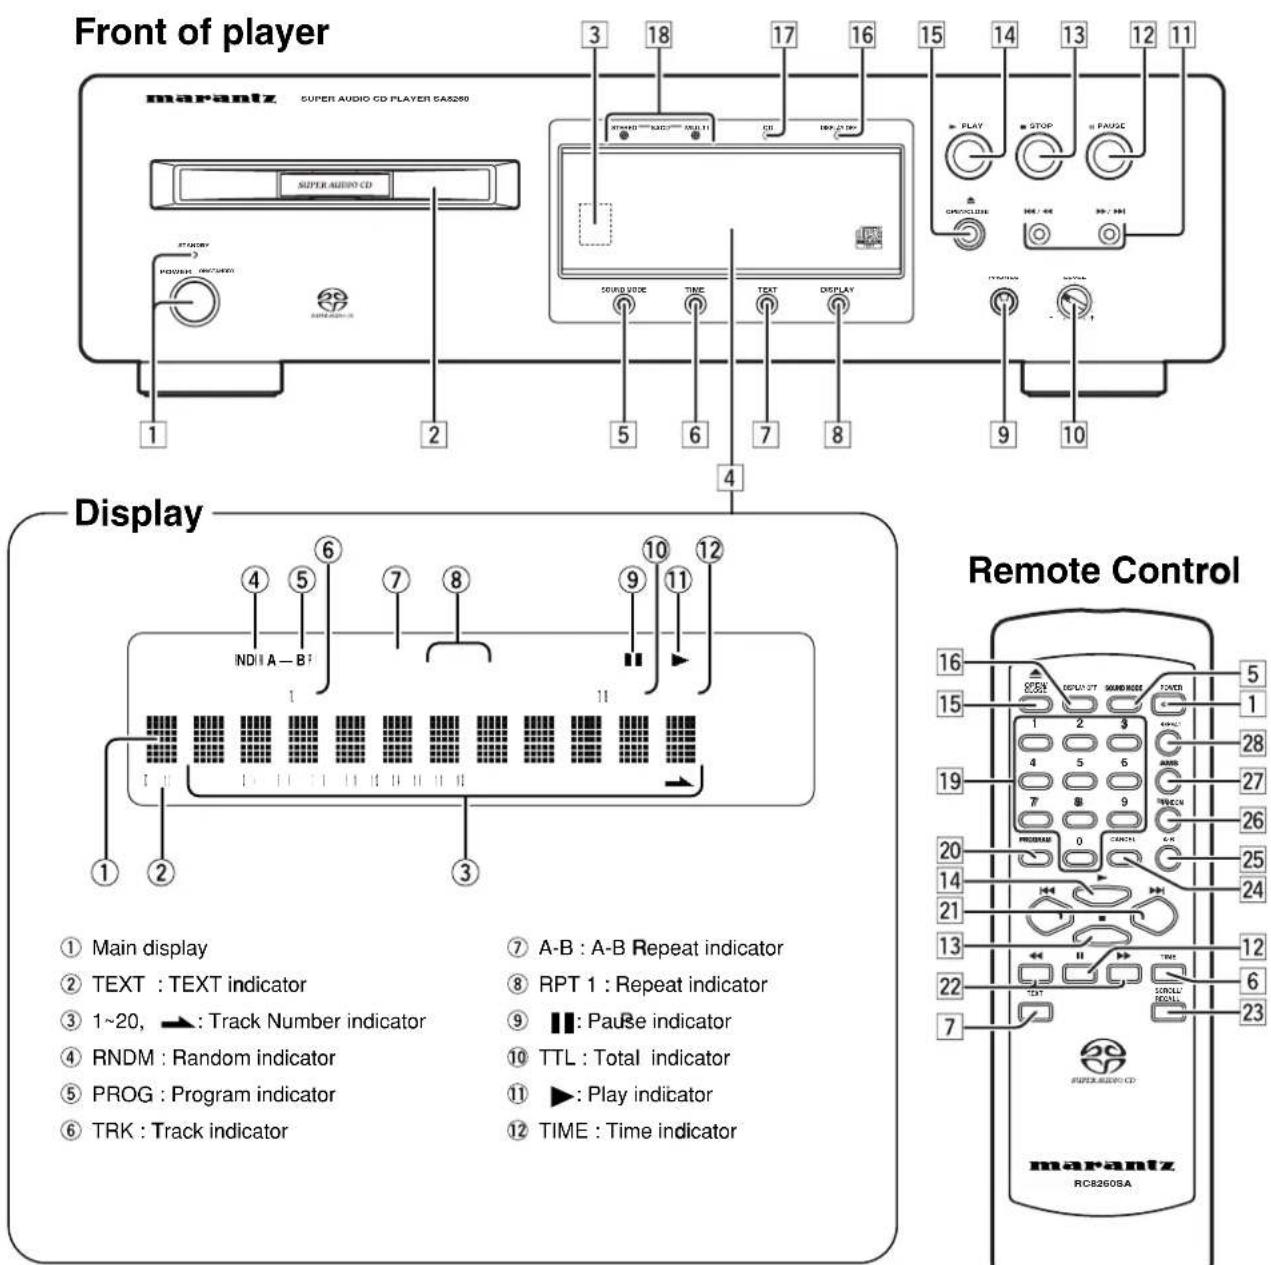
① Main display
② TEXT : TEXT indicator
③ 1\~20, ▶: Track Number indicator
④ RNDM : Random indicator
⑤ PROG : Program indicator
⑥ TRK : Track indicator
⑦ A-B : A-B Repeat indicator
⑧ RPT 1 : Repeat indicator
⑨ : Pause indicator
⑩ TTL : Total indicator
⑪ ▶: Play indicator
⑫ TIME : Time indicator
Rear of player
COUNTRY COMPANY ADDRESS
| ALGERIE Azur 2000 8, Lotissement Ben Hatadi, Alger, Algerie | ||
| ARMENIA NGYIG Ltd. 47 A/75 St. Lalaiants, 375000 Yerevan, Armenia | ||
| AUSTRALIA Jamo Australia Pty. Ltd., 24 Lionel Road, Mt. Waverley, VIC 3149, Australia | ||
| AUSTRIA | Huber & Prohaska GmbH | Taborstraße 95 / Ladestraße 1, Gebäude Hangartner, A-1200 Wien, Austria |
| BAHREIN Ambassador Stores P.O. Box 237,141, Government Avenue, Manama,Bahrein | ||
| BANGLADESH Target 1078, Ramjoy Mohanja Lane Asadgonj, Chittagong 4000, Bangladesh | ||
| BELGIUM Van der Heyden Audio N.V. Brusselbaan 278, 9320 Erembodegem, Belgium | ||
| BULGARIA | Ariescommerce GmbH | Makedonia Blvd. 16, 1606 Sofia, Bulgaria |
| CANADA | Lenbrook Industries Limited | 633 Granite Court, Pickering, Ontario |
| CHINA | Guang Chang Audio International Co., Ltd. | No.38 Yushan Road, ShiQiao, Pan Yu, Guang Dong, China |
| CYPRUS | Empire Hifi systems Ltd. | P.O. Box 5604, Nicosia, Cyprus |
| CZECH REPUBLIC | Audio International | Sokolska 41, 67902 Rajecko, OKR,Blansko, Czech Republic |
| DENMARK | Audio Nord | Dali Allé 1, 9610 Noerager, Denmark |
| DUBAI | V.V.& SONS | P.O. Box 105, Dubai, U.A.E. |
| EGYPT | Solimco | 9, El Attibaa St. Doki, Cairo, Egypt |
| ESTONIA HiFi Club Estonia | Ehte 4, 90503 Haapsalu, Estonia | |
| F.Y.R.O.M. | T.P. KODI | ul.Cedomir Kantargiev 21a, Skopje, Former Yugoslavian Republic of Macedonija |
| FINLAND | Audio Nord | Uudenmaankatu 4-6, Helsinki SF-00120, Finland |
| FRANCE | Marantz France | A division of Marantz Europe B.V., P.O. Box 301, 92 156 Suresnes Cedex, France |
| GERMANY | Marantz Deutschland | Hakenbusch 3, 49078 Osnabrück, Germany |
| GREECE | Adamco S.A. | 188, Hippocratous Street, 11471 Athens, Greece |
| HEADQUARTERS EUROPE: | Marantz Europe B.V. | Building SFF-2, P.O. Box 80002, 5600 JB Eindhoven, The Netherlands |
| HONG KONG | Marantz Asia Ltd. | Unit 1706, Metroplaza II, 223 Hing Fong Road, Kwai Fong, N.T., Kowloon, Hong Kong |
| HUNGARY | Infovox Ltd. Terez Krt.31, 1067 Budapest, Hungary | |
| ICELAND ID Electronics Ltd. Armula 38, 108 Reykjavik, Iceland | ||
| INDIA | NOVA Audio Private | 8,Punam Co-op.Society 29/30 Road#5, Union Park MUMBAI 400052, India |
| IRAN | Home Co. | 5th floor no 878 Philips Building Enghelab ave, P.O. 11365/7844 Tehran, Iran |
| IRELAND Marantz Ireland | Clonskeagh, Dublin 14, Ireland | |
| ISRAEL | Elmor Ltd. | 52 Heh Beiyar Street, Kikar Hamedina, Tel Aviv, Israel |
| ITALY | Marantz Italy | Via Casati 23, 20052 Monza (Milano), Italy, Servizio Consumatori 1678-20026, Numero Verde |
| IVORY COAST | Hifivoir | B.P. 2428, Abidjan 01, Ivory Coast |
| JAPAN | Marantz Japan Inc. | 35-1 Sagami Ohno 7-Chome, Sagamihara-shi, Kanagawa 228-8505, Japan |
| KOREA | Mk Enterprises Ltd. | 121-210, 2F Shinhan Bldg., 247-17 Seokyo-dong, Mapo-ku, Seoul, Korea |
| KUWAIT | alAlamiah Electronics Intl. | P.O. Box 8196, Salmiah 22052, Kuwait |
| LATVIA | Ace Ltd. | 61, LacPlesa Str., Riga LV 1011, Latvia |
| LEBANON | AZ Electronics S.A., 1, | P.O. Box 11 2833, Beirut, Lebanon |
| LITHUANIA | Accapella Ltd. | Ausros, Vartu G/5, Pasazo SKG., 2001 Vilnius, Lithuania |
| MALAYSIA | Wo Kee Hong Electronics Sdn. Bhd. | Suite 8.1, Level 8, Menara Genesis, No. 33, Jalan Sultan Ismail, 50250 Kuala Lumpur, Malaysia |
| MALTA | Doneo Co Ltd. | 78 The Strand, Sliema SLM07, Malta |
| MAURITIUS | SKR Electronics Ltd. | P.O. Box 685, Bell Village, Port Louis, Mauritius |
| MILITARY MARKET EUROPE | PASCO GmbH | PO BOX 1280, Sandhausen 69200, Germany |
| NETHERLANDS | Marantz Domestic Sales | A division of Marantz Europe B.V., Building SFF2, P.O. Box 80002, 5600 JB Eindhoven, The Netherlands |
| NEW ZEALAND | Wildash Audio Systems | 14 Malvern Road, Mt. Albert, Auckland, New Zealand |
| NORWAY Audio Nord | Sandkerveien 64, Oslo 0483, Norway | |
| OMAN | Mustafa & Jawad Trading CO. | P.O. Box 1918, Ruwi, Oman |
| POLAND | Philips Polska Sp. z.o.o. | Al.Jerozolimskie 195b, 02 222 Warszawa, Poland |
| PORTUGAL | Corel2 | Comércio de Electrónica Lda., Av. Luis Bívar, No 85 A, 1050 Lisboa, Portugal |
| PROFESSIONAL EUROPE | Marantz Professional Products | Kingsbridge House, Padbury Oaks, 575-583 Bath Road, Longford, Middlesex UB7 0EH, U.K. |
| PROFESSIONAL U.S.A. | Marantz Professional Products | Distributed by: Superscope Technologies Inc., 1000 Corporate Blvd. Ste.D, Aurora, Illinois |
| QATAR | Almana & Partners W.W.L. | P.O. Box 49, Doha, Qatar |
| REUNION | Vision + | 180 Rue du Marechal Leclerc, 97400 Saint Denis, Ile de la Reunion |
| ROMANIA | Nova Music Entertainment | 5, Zagazului Str. Bl.1G,apt.18, sector 1,Bucharest, Romania |
| RUSSIA | Absolute Audio | 7/2, Montazhnaya Street, 107497 Moscow, Russia |
| SAUDI ARABIA | Adawlia Univ. Electr. Apl | P.O. Box 2154, Alkhobar 31952, Saudi Arabia |
| SINGAPORE | Wo Kee Hong Distribution PTE Ltd. | 130 Joo Seng Road, #03-02 Olivine Building, Singapore 368357 |
| SLOVAKIA | Bis Audio s.r.o. | Nam. SNP 10, 96001 Zvolem, Slovakia |
| SLOVENIA | Bofex | Smartinska 152, HALA V/3, 61000 Ljubljana, Slovenia |
| SOUTH AFRICA | Coherent Imports (PTY) Ltd. | P.O. Box 1614, Alberton, 1450, South Africa |
| SPAIN | Marantz Spain | Martinez Villergas 2, Apartado 2065, Madrid 28027, Spain |
| SRI LANKA | The listening Room | Mezzanine Floor, The Landmark 385, Galle Road, Colombo - 3, Sri Lanka |
| SWEDEN | Audio Nord | Almedalsvagen 4, Gotenborg 402-23, Sweden |
| SWITZERLAND | Sound Company AG | Postfach, 8010 Zürich, Switzerland |
| SYRIA | Hamzeh & Partners | Hafez Ibrahim Str. No 117, Damascus Shalan, Syria |
| TAHITI | Covecolor | Av. Prince Hinoi, Cours de l'union sacré, P.O. Box 2334, Papeete, Tahiti |
| TAIWAN | Pai-Yuing Co. Ltd. | 6th No 148 Sung Kiang Road, Taipei 10429, Taiwan R.O.C. |
| THAILAND | MRZ Standard Co. Ltd. | 746-750 Mahachai Road, Wangburapa, Bangkok 10200, Thailand |
| TUNESIA | Societe EDEVIG | 40, Avenue du Golfe Arabe, El Menzah, 1004, Tunisia |
| TURKEY | Türk Philips Ticaret A.S. | Yukari Dudullu Organize sanayi Bolgesi, 2.Cadde no.28, 81260 Umraniye-Istanbul, Turkey |
| U.K. | Marantz Hifi UK Ltd. | Kingsbridge House, Padbury Oaks, 575-583 Bath Road, Longford, Middlesex UB7 0EH, U.K. |
| U.S.A. | Marantz America Inc. | 1100 Maplewood Drive Itasca, IL 60143, U.S.A. |
| YUGOSLAVIA | ITM Company | Omladinskih Brigada 86, 11070 Belgrade, Yugoslavia |
| EXPORT | Marantz Domestic Sales | A division of Marantz Europe BV,Building SFF2, P.O. Box 80002, 5600 JB Eindhoven, The Netherlands |
www.marantz.com
marantz® is a registered trademark.

- CAUTION
- WARNING
- LASER SAFETY
- IMPORTANT SAFETY INSTRUCTIONS
- NOTE TO CATV SYSTEM INSTALLER:
- NOTE:
- PREPARATION ....3
- CONNECTIONS 7
- OPERATION 10
- TROUBLE SHOOTING....17
- SPECIFICATIONS ....55
- Product Features
- About super audio
- Playing CD-RW discs
- Applicable Discs to the Unit
- Super Audio CD
- Audio CD (CDDA)
- Compact discs
- Precautions
- Using Remote Control Unit
- Handling Batteries
- Loading batteries
- ■Remote control
- Names of parts and their functions
- FRONT PANEL
- POWER switch STANDBY indicator
- DISC TRAY
- REMOTE SENSOR
- DISPLAY WINDOW
- SOUND MODE button
- TIME button
- TEXT button
- DISPLAY button
- PHONES jack
- LEVEL
- 11, (Track Skip/Search buttons)
- II PAUSE button
- ■ STOP button
- ▶ PLAY button
- ▲ OPEN/CLOSE button
- 16DISPLAY OFF
- 17CD
- SACD STEREO, SACD MULTI
- ■REMOTE CONTROLLER
- ■REAR PANEL
- (Filter standard/custom switch)
- CONNECTIONS (Connecting to audio components – Analog/Digital)
- Connecting to a 2-channel (Analog / Digital) stereo amplifier/receiver
- Connecting to an analog multi-channel amplifier/AV receiver
- The Speaker Setting of SACD for Multi-Channel Audio
- Connecting the power supply
- Normal Playback
- ■SACD player playback
- To start playback form the first track
- To stop playback
- To eject disc
- To pause playback
- To change time display
- - Track remaining time
- • Total remaining time
- ■ Switching Sound Mode (SACD)
- Press SOUND MODE button in stop mode (not playing).
- - Displaying the number of tracks in a SACD multi-channel disc
- Examples
- Search/Skip
- ■Direct Search (Specify track number to play)
- Specify track number with NUMBER buttons (0-9)
- If a wrong number is pressed
- ■Search
- ■Track Skip ( , on the ▶/▶▶ main unit, ↓ on the remote)
- To listen to a track posterior to the current track
- To listen to a track prior to the current track
- Repeat Play
- ■All track repeat
- To Return to Normal Play
- ■One Track Repeat
- To Exit from One Track Repeat
- ■A-B Repeat
- ■To Exit from A-B Repeat
- Random Play
- To Exit from Random Play and Return to Normal Play
- If Button is Pressed during Random Play
- If or◀Button▶is Pressed during Random Play
- To Listen to Random Play Repeatedly
- Program Play
- ■Program (Listen to Favorite Tracks in Favorite Order)
- To Check Programmed Tracks
- To Delete a Programmed Track
- To Clear Whole Program
- To Add Tracks to Program
- \* Please be careful about the following matters.
- Q&A
- AMS Play
- About TEXT Information Display
- - During Playback
- - In Stop Mode
- About TEXT
- Timer Play
- Timer On
- Filter Switch
- - The disc fails to rotate.
- - The disc is rotating but no sound is heard.
- - The disc stops in mid-operation. The sound drops out or noise is heard.
- - Remote control operation is not possible.
- • A Super Audio CD cannot be played.
- - Some channels are not played (Super Audio CD Multi-Channel)
- - A CD-R/CD-RW disc cannot be played.
- Power Supply
- Accessories
Brand : MARANTZ
Model : SA-8260
Category : CD Player