
SL-CT680V - CD Player PANASONIC - Free user manual and instructions
Find the device manual for free SL-CT680V PANASONIC in PDF.


| Product Type | Portable CD Player |
| Playback Formats | CD, CD-R, CD-RW |
| Anti-Skip Protection | 40 seconds (using digital servo) |
| Dimensions (W x D x H) | Approx. 135 x 135 x 25 mm |
| Weight (without batteries) | Approx. 200 g |
| Power Supply | DC 3 V, 2 AA batteries or AC adapter (3 V, 500 mA) |
| Battery Life (playback) | Approx. 20 hours with alkaline batteries |
| Output | Stereo headphone jack (3.5 mm) |
| Control Buttons | Play/Pause, Stop, Skip Forward/Back, Volume Up/Down, Hold, EQ |
| Additional Functions | Repeat (1 track, all, random), Intro Scan, Resume Playback |
| Included Accessories | AC adapter, stereo headphones, battery case, carrying pouch |
| Laser Type | Class 1 laser product |
| Cleaning | Clean lens with a lens cleaner; wipe exterior with a dry cloth |
| Repairability | Contact Panasonic authorized service center for repairs |
| Spare Parts Availability | Contact Panasonic for genuine spare parts |
| Environmental Conditions | Temperature: 5°C to 35°C; Humidity: 5% to 90% (no condensation) |
| Safety Certifications | CE, FCC |
Frequently Asked Questions - SL-CT680V PANASONIC
User questions about SL-CT680V PANASONIC
0 question about this device. Answer the ones you know or ask your own.
Ask a new question about this device
Download the instructions for your CD Player in PDF format for free! Find your manual SL-CT680V - PANASONIC and take your electronic device back in hand. On this page are published all the documents necessary for the use of your device. SL-CT680V by PANASONIC.
USER MANUAL SL-CT680V PANASONIC
Operating Instructions Portable CD Player
Model No.
SL-CT580V/SL-CT582V SL-CT680V
Dear Customer
Thank you for purchasing this product.
Before connecting, operating or adjusting this product, please read
these instructions completely.
Please keep this manual for future reference.

Note:
The SL-CT580V and
SL-CT680V models are
not designed for use
with a remote control.
Panasonic Consumer Electronics Company,
Division of Panasonic Corporation of North America
One Panasonic Way Secaucus, New Jersey 07094 http://www.panasonic.com
RQT7858-P
F1104TT0

The model number and serial number of this product can be found on either the back or the bottom of the unit.
Please note them in the space provided below and keep for future reference.
MODEL NUMBER
SERIAL NUMBER ____
User memo:
DATE OF PURCHASE ____
DEALER NAME
DEALER ADDRESS
TELEPHONE NUMBER
Panasonic Puerto Rico, Inc.
Panasonic Canada Inc.
5770 Ambler Drive, Mississauga, Ontario L4W 2T3 www.panasonic.ca
© 2004 Matsushita Electric Industrial Co., Ltd.
Printed in China
Troubleshooting guide
References to the remote control apply only to SL-CT582V
Before requesting service, make the following checks. If you are in doubt about some of the check points, or if the solutions indicated in the chart do not solve the problem, refer to the "Customer Services Directory" on page 3 if you reside in the U.S.A., or refer to the "Product information" on page 3 if you reside in Canada.
| No play. | ●The HOLD function is on. Cancel HOLD ( page 5, 6 ).●The batteries may be depleted ( page 4 ).●The disc isn't correctly set.●The disc is scratched or dirty. (Tracks may be skipped particularly with MP3 discs.)●There is moisture on the lens. Wait for about an hour and then try again.●The lens is dirty: clean it with a blower (recommended product: SZZP1038C). If the lens gets marked with fingerprints, gently wipe them off with a cotton swab.●The unit may not read a track properly if shaken strongly during disc reading.●If there is no data between sessions on a multi-session disc, play may not be possible.●If there is a large amount of JPEG data etc. within a MP3 file, sound may be muted and play may not be possible.●If the disc contains data with different formats, sound may be muted and play may not be possible.●If a CD-ROM format disc contains MP3 and other files, only the MP3 files will be playable. |
| No sound or there is a lot of noise. | ●Ensure the plugs are inserted firmly.●Wipe the plugs with a clean cloth.●The disc is scratched or dirty.●The sound may be interrupted or there may be noise when playing MP3 if the recording quality is poor.●The elapsed play time disappears and sound is interrupted if bumps continue repeatedly.●Separate the unit from mobile telephones. |
| Play doesn't resume from the last point stopped. | ●This doesn't work during random play.●It may not work correctly under some conditions. |
| Play doesn't start from the first track. | ●Random play modes may be on ( page 5 ).●Play resumes from where last stopped ( page 5 , Play ).(If the lid is opened while the unit is turned off, the resume function may not be cancelled.) |
| Cannot search through tracks. | You cannot search through a disc with MP3 files. |
| Cannot change the Digital Re-master mode, anti-skip mode. | If [ ◀◀◀ , - ] or [ ▶▶▶ , + ] is pressed before [RECALL, MEMORY] you cannot change the mode. |
| Digital Re-master does not work. | Depending on the type of MP3 disc recording, the effect may not appear. |
| Cannot skip albums. | You cannot skip from the last to first album, or vice versa, during play. |
| SL-CT582V ONLYThe unit malfunctions when connected to other equipment. | Be sure to connect other equipment through the remote control. If speakers are connected directly to the unit, they should have an impedance of 1 kΩ or less. |
| SL-CT582V ONLYThe remote control does not work properly. | Remove the plug and reinsert it as fully as possible.Use only the included remote control to operate the unit. |
| Radio reception is noisy. | Keep the unit away from televisions and other tuners.The AM antenna is in the unit, so noise may increase if you are holding it. |
| Cannot recharge. | You aren't using the special rechargeable batteries (page 4).You must insert two batteries before you can charge.The unit must be off before you can charge. |
| The AC adaptor becomes warm during recharging. | This is normal. |
| The batteries are taking a long time to recharge. | The batteries may take as long as 4.5 hours to recharge under some conditions. |
| Play time is short after recharging. | This may occur the first time you charge the batteries or if you haven't used them for a long time. Play time should be restored after a few recharges.The batteries can go flat if you leave the AC adaptor connected after charging is complete.If play is extremely short even after fully recharging the batteries, the batteries may have exceeded their life (Rechargeable batteries can be recharged approximately 300 times). Please purchase new nickel-metal hydride rechargeable batteries (HHR-4AGA/2B). |
| The battery indicator fails to appear or is incorrect. | The indicator does not appear when the AC adaptor is connected.The indicator may not appear correctly when using the rechargeable and dry cell batteries at the same time and under certain conditions. |
| The unit stops working. | Disconnect then reconnect all power sources (batteries and AC adaptor). |
| Power cuts off. | If you connect or disconnect the AC adaptor, the power cuts off even if batteries are inserted. |
Display
| hold | The HOLD function is on. Cancel HOLD (→page 5, 6). |
| no disc | ●You haven't inserted a disc or it isn't inserted correctly. ●You have inserted a disc this unit cannot play. |
| OPEN | The disc lid is open. |
| F | The program already contains 20 tracks. |
| 3 | Reading MP3 files. |
Supplied Accessories
Check the packing carton for these accessories.
SL-CT580V
● 1 Pair of stereo earphones: LOBAB0000182 ● 1 External battery case: RFA2666-H
SL-CT582V
- 1 Wired remote control: N2QCBD000011 ● 1 Pair of stereo headphones: LOBAD0000173 ● 1 External battery case: RFA2666-H
SL-CT680V
● 1 Pair of stereo headphones: LOBAD0000176 ● 1 External battery case: RFA2666-H
Use the numbers indicated when ordering replacements or optional accessories from your Panasonic dealer. (Product numbers correct as of November 2004. These may be subject to change.)
To order accessories in the U.S.A., refer to "Accessory Purchases" on page 3.
Caution
Discontinue use if you experience discomfort with the earphones or any other parts that directly contact your skin. Continued use may cause rashes or other allergic reactions.
■Batteries
- Do not peel off the covering on the batteries and do not use if the covering has been peeled off.
- Align the poles + and - correctly when inserting the batteries.
- Do not mix different types of batteries or old and new batteries.
- Remove the batteries if you do not intend to use the unit for a long time.
- Do not throw into a fire, short-circuit, disassemble, or subject to excessive heat.
- Do not attempt to recharge dry cell batteries.
- When carrying batteries in a pocket or bag, ensure no metal objects such as necklaces are placed together with them. Contact with metal may cause short-circuiting which can cause a fire.
- Keep out of the reach of small children. Accidental swallowing of batteries can result in stomach and intestinal damage.
■CDs
- Do not use irregularly shaped CDs.
- Do not use non-specification discs.
- Do not use CDs printed with label printers available on the market.
- Do not use CDs with labels and stickers that are coming off or with adhesive exuding from under labels and stickers.
■Listening


Do not play your headphones or earphones at a high volume. Hearing experts advise against continuous extended play.
If you experience a ringing in your ears, reduce volume or discontinue use.
Do not use while operating a motorized vehicle. It may create a traffic hazard and is illegal in many areas.
You should use extreme caution or temporarily discontinue use in potentially hazardous situations.
Even if your headphones or earphones are the open-air type designed to let you hear outside sounds, don't turn up the volume so high that you can't hear what's around you.
Sound can be deceiving. Over time your hearing "comfort level" adapts to higher volumes of sound. So what sounds "normal" can actually be loud and harmful to your hearing. Guard against this by setting your equipment at a safe level BEFORE your hearing adapts.
To establish a safe level:
- Start your volume control at a low setting.
●Slowly increase the sound until you can hear it comfortably and clearly, and without distortion.
Once you have established a comfortable sound level:
- Leave it there.
Specifications
CD Section
■Audio (CD-DA)
Sampling frequency: 44.1 kHz
No. of channels: 2 (left and right, stereo)
Frequency response:
20 Hz to 20,000 Hz (+0.5 dB to -7 dB)
Headphone output level:
RMS max. 8 mW+8 mW/
16 Ω (adjustable)
Pickup
Light source: Semiconductor laser
Wavelength: 780 nm
MP3
Supported bit rates:
(Supports variable bit rates) 32 kbps to 320 kbps (128 kbps is recommended)
Supported sampling frequency:
48 kHz/44.1 kHz/32 kHz
Maximum number of items
(total no. of albums and tracks): 999
Maximum album levels: 100
Radio section
Frequency
Radio frequency:
FM; 87.90–107.90 MHz (0.2 MHz steps) 87.50–108.00 MHz (0.1 MHz/0.05 MHz steps)
AM; 520–1710 kHz (10 kHz steps) 522–1629 kHz (9 kHz steps)
General
Power supply:
DC input
(via AC adaptor, not included): DC 4.5 V
Operational temperature range:
0 °C-40 °C (32 °F-104 °F)
Rechargeable temperature range:
5 °C-40 °C (41 °F-104 °F)
Play time:
Using on a flat stable surface at 25 °C (77 °F), EQ is off, Hold is on, Anti-skip is on POS 1 (CD-DA), recommended bit rate (MP3:128 kbps), and the Digital Re-master is off (MP3). Play times are in hours and approximate.
| Batteries used | MP3 disc | CD-DA disc | Radio (FM band) |
| 2 alkaline batteries (LR03) | 41 | 23 | 31 |
| 2 alkaline batteries (LR6) | 100 | 52 | 75 |
| 4 alkaline batteries (2 LR03+2 LR6) | 141 | 75 | 106 |
| 2 optional rechargeable batteries (HHR-4AGA/2B) | 28 | 15 | 21 |
| 2 optional rechargeable (HHR-4AGA/2B) and 2 alkaline (LR6) batteries | 128 | 67 | 96 |
Recharging time: About 3.5 to 4.5 hours ●The play time may be less depending on the operating conditions. ●Play time will be considerably reduced when playing CD-RW.
Dimensions (W×H×D)
Mass: 194.5 g (6.86 oz.) (with batteries) 172.5 g (6.09 oz.) (without batteries)
Note:
Specifications are subject to change without notice. Mass and dimensions are approximate.
IMPORTANT SAFETY INSTRUCTIONS
Read these operating instructions carefully before using the unit. Follow the safety instructions on the unit and the applicable safety instructions listed below. Keep these operating instructions handy for future reference.
1) Read these instructions. 2) Keep these instructions. 3) Heed all warnings. 4) Follow all instructions. 5) Do not use this apparatus near water. 6) Clean only with dry cloth. 7) Do not block any ventilation openings. Install in accordance with the manufacturer's instructions.
8) Do not install near any heat sources such as radiators, heat registers, stoves, or other apparatus (including amplifiers) that produce heat.
9) Do not defeat the safety purpose of the polarized or grounding-type plug. A polarized plug has two blades with one wider than the other. A grounding-type plug has two blades and a third grounding prong. The wide blade or the third prong are provided for your safety. If the provided plug does not fit into your outlet, consult an electrician for replacement of the obsolete outlet.
10) Protect the power cord from being walked on or pinched particularly at plugs, convenience receptacles, and the point where they exit from the apparatus.
11) Only use attachments/accessories specified by the manufacturer.
12) Use only with the cart, stand, tripod, bracket, or table specified by the manufacturer, or sold with the apparatus. When a cart is used, use caution when moving the cart/apparatus combination to avoid injury from tip-over.
13) Unplug this apparatus during lightning storms or when unused for long periods of time.
14) Refer all servicing to qualified service personnel. Servicing is required when the apparatus has been damaged in any way, such as power-supply cord or plug is damaged, liquid has been spilled or objects have fallen into the apparatus, the apparatus has been exposed to rain or moisture, does not operate normally, or has been dropped.

WARNING: TO REDUCE THE RISK OF FIRE, ELECTRIC SHOCK OR PRODUCT DAMAGE, DO NOT EXPOSE THIS APPARATUS TO RAIN, MOISTURE, DRIPPING OR SPLASHING AND THAT NO OBJECTS FILLED WITH LIQUIDS, SUCH AS VASES, SHALL BE PLACED ON THE APPARATUS.
CAUTION! THIS PRODUCT UTILIZES A LASER. USE OF CONTROLS OR ADJUSTMENTS OR PERFORMANCE OF PROCEDURES OTHER THAN THOSE SPECIFIED HEREIN MAY RESULT IN HAZARDOUS RADIATION EXPOSURE. DO NOT OPEN COVERS AND DO NOT REPAIR YOURSELF. REFER SERVICING TO QUALIFIED PERSONNEL.
THE FOLLOWING APPLIES ONLY IN THE U.S.A.
CAUTION:
This equipment has been tested and found to comply with the limits for a Class B digital device, pursuant to Part 15 of the FCC Rules.
These limits are designed to provide reasonable protection against harmful interference in a residential installation. This equipment generates, uses and can radiate radio frequency energy and, if not installed and used in accordance with the instructions, may cause harmful interference to radio communications. However, there is no guarantee that interference will not occur in a particular installation. If this equipment does cause harmful interference to radio or television reception, which can be determined by turning the equipment off and on, the user is encouraged to try to correct the interference by one or more of the following measures:
●Reorient or relocate the receiving antenna. - Increase the separation between the equipment and receiver. - Connect the equipment into an outlet on a circuit different from that to which the receiver is connected. - Consult the dealer or an experienced radio/TV technician for help.
Any unauthorized changes or modifications to this equipment would void the user's authority to operate this device.
This device complies with Part 15 of the FCC Rules. Operation is subject to the following two conditions: (1) This device may not cause harmful interference, and (2) this device must accept any interference received, including interference that may cause undesired operation.
Product service
- Damage requiring service—The unit should be serviced by qualified service personnel if:
(a) The AC power supply cord or AC adaptor has been damaged; or (b) Objects or liquids have gotten into the unit; or (c) The unit has been exposed to rain; or (d) The unit does not operate normally or exhibits a marked change in performance; or (e) The unit has been dropped or the cabinet damaged.
- Servicing—Do not attempt to service the unit beyond that described in these operating instructions. Refer all other servicing to authorized servicing personnel.
- Replacement parts—When parts need replacing ensure the servicer uses parts specified by the manufacturer or parts that have the same characteristics as the original parts. Unauthorized substitutes may result in fire, electric shock, or other hazards.
- Safety check—After repairs or service, ask the servicer to perform safety checks to confirm that the unit is in proper working condition.
Product information
For product information or assistance with product operation:
In the U.S.A., refer to "Customer Services Directory" below
For assistance in the continental U.S.A. in obtaining repairs please ship the product to:
Panasonic Services Company - Customer Servicenter Suite B 4900 George McVay Drive McAllen, TX 78503
In Puerto Rico contact Panasonic Puerto Rico, Inc.
Tel. (787) 750-4300 Fax. (787) 768-2910
When shipping the unit, carefully pack it and send it prepaid, adequately insured, and preferably in the original carton. Include a letter detailing the complaint and provide a daytime phone number where you can be reached.
IF REPAIR IS NEEDED DURING THE WARRANTY PERIOD, THE PURCHASER WILL BE REQUIRED TO FURNISH A SALES RECEIPT/PROOF OF PURCHASE INDICATING DATE OF PURCHASE, AMOUNT PAID, AND PLACE OF PURCHASE. CUSTOMER WILL BE CHARGED FOR
THE REPAIR OF ANY UNIT RECEIVED WITHOUT SUCH PROOF OF PURCHASE.
Also, the purchaser will be responsible for shipping the unit to the above address.
In Canada, contact the Panasonic Canada Inc. Customer Care Centre at 905-624-5505, or visit the website (www.panasonic.ca), or an authorized Servicentre closest to you.
CAUTION:
Use only car power adaptor and car stereo cassette adaptor, Model: RP-CK455 manufactured by Matsushita Electric Industrial Co., Ltd.
The socket outlet shall be installed near the equipment and easily accessible, or the mains plug or an appliance coupler shall remain readily operable.
Marking sign is located on bottom of the unit.
Panasonic Consumer Electronics Company,
Division of Panasonic Corporation of North America
One Panasonic Way Secaucus, New Jersey 07094
ONLY FOR U.S.A.
Panasonic Puerto Rico, Inc.
San Gabriel Industrial Park, Carolina, Puerto Rico 00985
Panasonic Portable Audio Products Limited Warranty
Limited Warranty Coverage
If your product does not work properly because of a defect in materials or workmanship, Panasonic Consumer Electronics Company or Panasonic Puerto Rico, Inc. (collectively referred to as "the warrantor") will, for the length of the period indicated on the chart below, which starts with the date of original purchase ("warranty period"), at its option either (a) repair your product with new or refurbished parts, or (b) replace it with a new or a refurbished product. The decision to repair or replace will be made by the warrantor.
| Product or Part Name | Parts | Labor |
| All Portable Audio Products except item listed below | One (1) Year | One (1) Year |
| Rechargeable batteries (in exchange for defective item) | Ten (10) Days | Not applicable |
During the "Labor" warranty period there will be no charge for labor. During the "Parts" warranty period, there will be no charge for parts. You must mail-in your product during the warranty period. This Limited Warranty excludes both parts and labor for batteries, antennas, and cosmetic parts (cabinet). This warranty only applies to products purchased and serviced in the United States or Puerto Rico. This warranty is extended only to the original purchaser of a new product which was not sold "as is".
Mail-In Service
For assistance in the continental U.S.A. in obtaining repairs please ship the product to:
Panasonic Services Company
Customer Servicenter
Suite B
4900 George McVay Drive
McAllen, TX 78503
For assistance in Puerto Rico call Panasonic Puerto Rico, Inc. (787)-750-4300 or fax (787)-768-2910. When shipping the unit carefully pack and send it prepaid, adequately insured and preferably in the original carton. Include a letter detailing the complaint and provide a day time phone number where you can be reached.
Customer Services Directory
Obtain Product Information and Operating Assistance; locate your nearest Dealer or Servicenter; purchase Parts and Accessories; or make Customer Service and Literature requests by visiting our Web Site at: http://www.panasonic.com/consumersupport
or, contact us via the web at:
http://www.panasonic.com/contactinfo
You may also contact us directly at:
1-800-211-PANA (7262),
Monday-Friday 9 am-9 pm; Saturday-Sunday 10 am-7 pm, EST.
For hearing or speech impaired TTY users, TTY: 1-877-833-8855
IF REPAIR IS NEEDED DURING THE WARRANTY PERIOD, THE PURCHASER WILL BE REQUIRED TO FURNISH A SALES RECEIPT/PROOF OF PURCHASE INDICATING DATE OF PURCHASE, AMOUNT PAID, AND PLACE OF PURCHASE. CUSTOMER WILL BE CHARGED FOR THE REPAIR OF ANY UNIT RECEIVED WITHOUT SUCH PROOF OF PURCHASE.
Limited Warranty Limits And Exclusions
This warranty ONLY COVERS failures due to defects in materials or workmanship, and DOES NOT COVER normal wear and tear or cosmetic damage. The warranty ALSO DOES NOT COVER damages which occurred in shipment, or failures which are caused by products not supplied by the warrantor, or failures which result from accidents, misuse, abuse, neglect, mishandling, misapplication, alteration, faulty installation, set-up adjustments, misadjustment of consumer controls, improper maintenance, power line surge, lightning damage, modification, introduction of sand, humidity or liquids, commercial use such as hotel, office, restaurant, or other business or rental use of the product, or service by anyone other than a Factory Servicenter or other Authorized Servicer, or damage that is attributable to acts of God.
THERE ARE NO EXPRESS WARRANTIES EXCEPT AS LISTED UNDER "LIMITED WARRANTY COVERAGE".
THE WARRANTOR IS NOT LIABLE FOR INCIDENTAL OR CONSEQUENTIAL DAMAGES RESULTING FROM THE USE OF THIS PRODUCT, OR ARISING OUT OF ANY BREACH OF THIS WARRANTY. (As examples, this excludes damages for lost time, travel to and from the servicer, loss of or damage to media or images, data or other memory or recorded content. The items listed are not exclusive, but are for illustration only.)
ALL EXPRESS AND IMPLIED WARRANTIES, INCLUDING THE WARRANTY OF MERCHANTABILITY, ARE LIMITED TO THE PERIOD OF THE LIMITED WARRANTY.
Some states do not allow the exclusion or limitation of incidental or consequential damages, or limitations on how long an implied warranty lasts, so the exclusions may not apply to you. This warranty gives you specific legal rights and you may also have other rights which vary from state to state. If a problem with this product develops during or after the warranty period, you may contact your dealer or Servicenter. If the problem is not handled to your satisfaction, then write to the warrantor's Consumer Affairs Department at the addresses listed for the warrantor.
PARTS AND SERVICE, WHICH ARE NOT COVERED BY THIS LIMITED WARRANTY, ARE YOUR RESPONSIBILITY.
Accessory Purchases
Purchase Parts, Accessories and Instruction Books online for all Panasonic Products by visiting our Web Site at: http://www.pasc.panasonic.com
or, send your request by E-mail to: npcparts@us.panasonic.com
You may also contact us directly at:
1-800-332-5368 (Phone) 1-800-237-9080 (Fax Only) (Monday – Friday 9 am to 8 pm, EST.)
Panasonic Services Company
20421 84th Avenue South, Kent, WA 98032
(We Accept Visa, MasterCard, Discover Card, American Express, and Personal Checks)
For hearing or speech impaired TTY users, TTY : 1-866-605-1277
Service in Puerto Rico
Panasonic Puerto Rico, Inc.
Ave. 65 de Infantería, Km. 9.5, San Gabriel Industrial Park, Carolina, Puerto Rico 00985
Phone (787)750-4300, Fax (787)768-2910
Note on CD-R and CD-RW
(CD-DA/MP3 only)
For CD-DA format, use a music disc and finalize it after recording. The unit may not be able to play some discs due to the condition of the recording.
A process performed after recording that enables CD-R/CD-RW players to play audio CD-R and CD-RW.
Playing MP3
MP3: A method of compressing data with little loss to the original sound quality.
■When creating MP3 files to play on this unit
Disc formats: ISO9660 level 1 and level 2 (except for extended formats)
![graph TD A["CD-ROM drive"] --> B["001album"] B --> C["001track.mp3"] B --> D["002track.mp3"] B --> E["003track.MP3"] F["002album"] --> G["004track.mp3"] F --> H["005track.mp3"] F --> I["004album"] J["003album"] --> K["006track.mp3"] J --> L["007track.MP3"] M["Naming tracks and albums\nPrefix with 3-…](/content/2026/05/989682/images/3d8a6e87a2c0903aaba34daf7dc6beb2b7cc547f8cf678aa6932bab7b5192ac8.jpg)
■Unit limitations
- This unit is compatible with multi-session discs but if there are a lot of sessions it takes more time for play to start. Keep the number of sessions to a minimum to avoid this. ●This unit cannot play files recorded using packet write.
- Depending on how you create MP3 files, they may not play in the order you numbered them or may not play at all.
MPEG Layer-3 audio decoding technology licensed from Fraunhofer IIS and Thomson multimedia.
Connections
References to the remote control apply only to SL-CT582V
Turn off this unit and the other equipment before connection.
Insert each plug fully. [Plug type: 3.5 mm (1/8 in.) stereo]
When the unit is connected to other equipment, adjust the volume on the connected equipment. (Product numbers correct as of November 2004. These may be subject to change.)
![graph TD A["Main unit"] --> B["■To DC IN jack"] B --> C["Car power adaptor (RP-CK455*) (not included)"] C --> D["• You can recharge the batteries with this connection."] C --> E["• Noise may occur when using the car power adaptor and listening to the radio."] F["Car audio"] --> G["Connection is not…](/content/2026/05/989682/images/a59938921d58ea4e3002b8f029c5faaab91f914a846f837636183099746d2d24.jpg)
The RP-CK455 set contains the car power adaptor and car stereo cassette adaptor. Be sure to use these together with the car audio connection.
Power Supply
• Recharging/Play time → page 2, Specifications - To save power when the unit is not to be used for a long time, unplug the AC adaptor from the household AC outlet.

"LR03, AAA, UM-4" alkaline batteries
(Lift up the ⊕ end when removing.)
●Fit the battery lid so it is secure and flush with the battery compartment. If it comes loose, it may scratch your discs.
■External battery case
You can get longer play time by attaching this case. (The unit will also work when using the case only.)

The battery indicator
This indicator appears when the unit is on.
![graph LR A["1 2:24"] --> B["Button"] B --> C["Button"] C --> D["Button"] D --> E["Button"] E --> F["Button"] F --> G["Button"] G --> H["Button"] H --> I["Button"] I --> J["Button"] J --> K["Button"] K --> L["Button"] L --> M["Button"] M --> N["Button"] N --> O["Button"] O --> P["Button"] P --> Q["Bu…](/content/2026/05/989682/images/9da4151089284c72198fd2ce6471b1fb70c8ca8a5641aab54b0ceabcdf0e90ac.jpg)
- Before play starts the battery indicator level may temporarily go down or flash although the batteries are not drained. It appears correctly once you start play. ●The battery indicator level may differ when listening to a CD or the radio. ●The battery indicator level may briefly go down when changing from CD to radio or vice versa. It appears correctly immediately afterwards.
Rechargeable batteries (not included)
Charge before initial use.

As a safety precaution this unit is constructed so it is not possible to charge ordinary batteries. For details, check with your dealer.
When charging, use only the following Panasonic Nickel-metal hydride rechargeable batteries. HHR-4AGA/2B (set of 2)
You cannot charge any other type of rechargeable/dry cell batteries.


Turn the unit off (←page 5, 6) before charging.
1 Insert in the same way as the dry cell batteries.
- The battery indicator “☐” scrolls while charging and disappears when finished.
- You can charge the batteries before they are fully discharged.
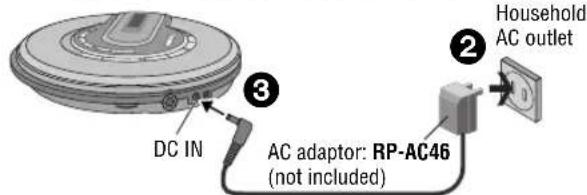
AC adaptor (not included)
The unit will also work when using the AC adaptor only. Connect the AC adaptor (→above).
Button control guide (Listening to CDs)
References to the remote control apply only to SL-CT582V
< >indicates the buttons for the remote control.
| Open lid | OPEN ▶ | Slide in direction of arrow. | Inserting/removing a disc |
| HOLD(Function lock) | HOLD ▶<→ HOLD > | Slide in direction of arrow.(Slide in opposite direction to cancel.)●The unit and remote control each have independent HOLD switches. | |
| Play | ▶/■<■/▶> | Current track number Elapsed play time of trackPress.Lights while playing MP3●Play begins from where last stopped (Resume function).(This will be cancelled if you open the lid.) | |
| Skip | ▶▶1,+<▶▶>(Forward)▶◀,−<▶◀>(Backward) | Press.●Press [|◀◀,-](Main unit)/[|◀◀](Remote control) twice consecutively to skip to the previous track during play.●You cannot use [|◀◀,-](Main unit)/[|◀◀](Remote control) to skip to any previous tracks during random and random repeat (○below) modes. | |
| SearchCD-DA | ▶▶1,+<▶▶>(Forward)▶◀,−<▶◀>(Backward) | During play, press and hold.●You can only search within the current track except for during all track repeat (○below) and regular play. | |
| Album skipMP3 | ▶▶1,+<▶▶>(Forward)▶◀,−<▶◀>(Backward) | Until the album you want appears, press and hold.Album number Number of tracks | |
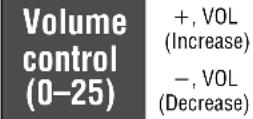
| Volume control(0–25) | +,VOL(Increase),-,VOL(Decrease) | Press. | |
| Pause | ▶/■ | Press.●Press again to restart play. | |
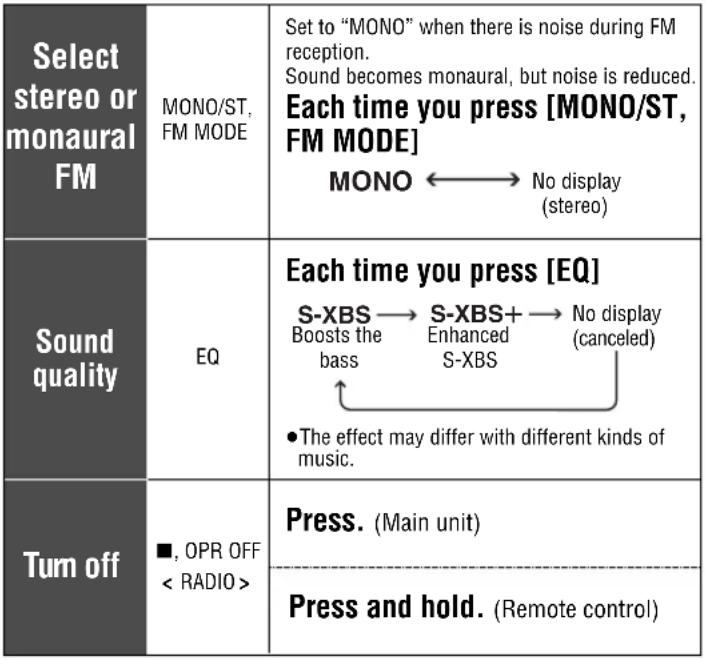
| Stop/Turn off | ■,OPR OFF<■/▶> | Press.CD-DA11 51:52Number Total play Number Number of tracks Number of albums Number of tracks●Press again to turn the unit off. (Main unit)Press and hold to turn the unit off. (Remote control)●If the unit is left in stop mode for approximately 10 minutes, it turns itself off automatically. | |
| Play modes | PLAY MODE | Each time you press [PLAY MODE]1 → RND → RNDOne track All track Random Random repeatNo display (canceled)●You cannot select “RND” while playing MP3. | |
| Album mode(Play only the tracks in a selected album)MP3 | PLAY MODE | Each time you press and hold[PLAY MODE]ALBUM MODE ←→ No display (canceled)●To select another album (○above, Album skip)●You cannot turn album mode on during program play (○right). | |
| Program play(Desired tracks only) | RECALL, MEMORY | While stopped, press [|◄◄, —] or [►►|, +] to select the track, then press [RECALL, MEMORY].CD-DAMP3Will appear after[RECALL, MEMORY] ispr-X68X]  Album Tracknumber number numberRepeat to program up to 20 tracks.■Play:Press [►/I■] (Main unit)/[■/►] (Remote control) after all desired tracks have been programmed.■Confirm tracks selected:Press [RECALL, MEMORY] during play.■Cancel:Press [■, OPR OFF]. (Main unit)Press [■/►] during play. (Remote control)(“M” disappears.) Album Tracknumber number numberRepeat to program up to 20 tracks.■Play:Press [►/I■] (Main unit)/[■/►] (Remote control) after all desired tracks have been programmed.■Confirm tracks selected:Press [RECALL, MEMORY] during play.■Cancel:Press [■, OPR OFF]. (Main unit)Press [■/►] during play. (Remote control)(“M” disappears.) |
| Anti-skip modeCD-DA | RECALL, MEMORY | The anti-skip function (ANTI-SKIP SYSTEM) reduces or eliminates skipping caused by vibration. You can change the anti-skip memory time.While stopped, each time you press and hold [RECALL, MEMORY]POS2←→ POS1Sound enhanced mode, Anti-skip enhanced mode, 10-second anti-skip 45-second anti-skipmemorymemorymemory●You cannot change the memory time for MP3. It’s a maximum of 100 seconds for MP3 recorded at 128 kbps. |
| Digital Re-master(Enjoy more natural sound)MP3 | RECALL, MEMORY | You can regenerate signal frequency lost during compression, restoring the sound to near pre-compression form.While stopped, each time you press and hold [RECALL, MEMORY]RMTR←→ No displaySound enhanced (Conserves battery life) |
| Sound quality | EQ | Each time you press [EQ](Press [EQ] twice consecutively while “3D” is displayed.)3d-1 → 3d-2 → S-XBS(3D) Sound field Enhanced Boosts theof 3D 3d-1bassNo display←S-XBS+Enhanced S-XBS(canceled)●“3d-1” or “3d-2” disappears after being selected and “3D” appears instead.●The effect may differ with different kinds of music.●Depending on the recording conditions, sound may be interrupted when switching between EQ settings.●If you select 3d-1 or 3d-2 then try playing a disc that contains both CD-ROM format and CD-DA format tracks, there will be a brief noise when the disc changes from playing the CD-ROM format track to the CD-DA format one.●You cannot select 3d-1 or 3d-2 when listening to the radio. |
Button control guide (Listening to the Radio)
References to the remote control apply only to SL-CT582V
< > indicates the buttons for the remote control.
| HOLD(Function lock) | <  | Slide in direction of arrow.(Slide in opposite direction to cancel.)●The unit and remote control each have independent HOLD switches. |
| Radio on/Change band | RADIO/BAND< RADIO > | Press.●Press again to change the band.Each time you press the button:FM AM |
| Select the station | ▶▶, +< ▶▶>(Forward)◀◀, -< ◀◀>(Backward) | Press.●Press and hold to scan the stations rapidly.●“TUNED” appears when tuned.●When “M” is displayed, press [TUNING MODE] to cancel it. | |
 | Press. | |
 | Set to “CITY” if reception is poor or if there is interference from another station.Each time you press and hold [— CITY/NOR]CITY No display (canceled) | |
Slide in direction of arrow.
Press.
Press.
Press.
 |
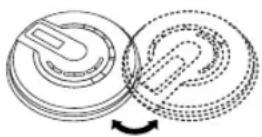
To obtain good reception AM
Try various directions to obtain optimum reception.
FM
The headphone/earphone cord is also the FM antenna, so extend it instead of leaving it coiled.
Storing stations in memory
Store the frequencies of up to 30 stations; 20 FM and 10 AM.
1 Slide [HOLD▶] in the opposite direction to the arrow to cancel. 2 Press [RADIO/BAND] to turn the tuner on and change the band. 3 Press [TUNING MODE] to display "M".

4 Press [RECALL, MEMORY].
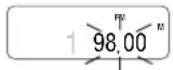
5 Do each of the following within 10 seconds.
①Press [◀◀, −] or [▶▶|, +] to select the frequency. - Press and hold to scan the stations rapidly. ②Press [RECALL, MEMORY]. ③Press [|◀◀, -] or [▶▶|, +] to select the memory number.
- Press and hold to change incrementally.

④Press [RECALL, MEMORY] to confirm the setting.
Listening to a memorized station
1 Perform steps 1 to 3 for "Storing stations in memory" (above). 2 Press [|◀◀, −] or [▶▶|, +] to select the memorized station.
- Press and hold to change incrementally.
● “TUNED” appears when tuned.
3 Adjust the volume.
Erasing a memorized station
1 Perform steps 1 to 3 for "Storing stations in memory" (⇔ left). 2 Press [|◀◀, −] or [▶▶|, +] to select the memorized station to be erased. - Press and hold to change incrementally. 3 Press [RECALL, MEMORY]. The frequency number flashes. 4 Do each of the following within 10 seconds. ① Press and hold [RECALL, MEMORY] until “- - - -” flashes. ② Press [RECALL, MEMORY].

When using overseas
Change the frequency step according to the area. 1 Press [RADIO/BAND] to switch on the power. 2 Press and hold [RADIO/BAND] until the step appears.

3 Do each of the following within 10 seconds.
① Press [|◀◀, -] or [▶▶, +] to select the step. Each time you press [|◀◀, -] or [▶▶, +]
![graph LR A["U0.2 U0.1 E"] --> B["FM 0.2 MHz, AM 10 kHz (original setting)"] A --> C["FM 0.1 MHz, AM 10 kHz"] A --> D["FM 0.05 MHz, AM 9 kHz"] B --> E C --> F D --> G](/content/2026/05/989682/images/374d4de39fe7f5f6f6a53ae72c7a725af39478cd3ecf27a44d3ba163d689b870.jpg)
② Press and hold [RECALL, MEMORY] until the frequency appears to confirm the step. ■ To return to the previous frequency step
Repeat the above procedure.
- Changing the step erases the stations you stored in memory.

- OPERATING INSTRUCTIONS PORTABLE CD PLAYER
- MODEL NO
- SL-CT580V/SL-CT582V SL-CT680V
- DEAR CUSTOMER
- NOTE
- USER MEMO
- TROUBLESHOOTING GUIDE
- REFERENCES TO THE REMOTE CONTROL APPLY ONLY TO SL-CT582V
- DISPLAY
- SUPPLIED ACCESSORIES
- CHECK THE PACKING CARTON FOR THESE ACCESSORIES
- SL-CT580V
- SL-CT582V
- SL-CT680V
- CAUTION
- BATTERIES
- CDS
- LISTENING
- SPECIFICATIONS
- CD SECTION
- AUDIO (CD-DA)
- PICKUP
- MP
- RADIO SECTION
- FREQUENCY
- GENERAL
- IMPORTANT SAFETY INSTRUCTIONS
- WARNING: TO REDUCE THE RISK OF FIRE, ELECTRIC SHOCK OR PRODUCT DAMAGE, DO NOT EXPOSE THIS APPARATUS TO RAIN, MOISTURE, DRIPPING OR SPLASHING AND THAT NO OBJECTS FILLED WITH LIQUIDS, SUCH AS VASES, SHALL BE PLACED ON THE APPARATUS
- THE FOLLOWING APPLIES ONLY IN THE U.S.A
- PRODUCT SERVICE
- PRODUCT INFORMATION
- PANASONIC SERVICES COMPANY - CUSTOMER SERVICENTER SUITE B 4900 GEORGE MCVAY DRIVE MCALLEN, TX
- IF REPAIR IS NEEDED DURING THE WARRANTY PERIOD, THE PURCHASER WILL BE REQUIRED TO FURNISH A SALES RECEIPT/PROOF OF PURCHASE INDICATING DATE OF PURCHASE, AMOUNT PAID, AND PLACE OF PURCHASE. CUSTOMER WILL BE CHARGED FOR
- DIVISION OF PANASONIC CORPORATION OF NORTH AMERICA
- ONLY FOR U.S.A
- PANASONIC PORTABLE AUDIO PRODUCTS LIMITED WARRANTY
- LIMITED WARRANTY COVERAGE
- MAIL-IN SERVICE
- CUSTOMER SERVICES DIRECTORY
- HTTP://WWW.PANASONIC.COM/CONTACTINFO
- IF REPAIR IS NEEDED DURING THE WARRANTY PERIOD, THE PURCHASER WILL BE REQUIRED TO FURNISH A SALES RECEIPT/PROOF OF PURCHASE INDICATING DATE OF PURCHASE, AMOUNT PAID, AND PLACE OF PURCHASE. CUSTOMER WILL BE CHARGED FOR THE REPAIR OF ANY UNIT RECEIVED WITHOUT SUCH PROOF OF PURCHASE
- LIMITED WARRANTY LIMITS AND EXCLUSIONS
- ACCESSORY PURCHASES
- SERVICE IN PUERTO RICO
- NOTE ON CD-R AND CD-RW
- (CD-DA/MP3 ONLY)
- PLAYING MP
- WHEN CREATING MP3 FILES TO PLAY ON THIS UNIT
- UNIT LIMITATIONS
- CONNECTIONS
- TURN OFF THIS UNIT AND THE OTHER EQUIPMENT BEFORE CONNECTION
- POWER SUPPLY
- LR03, AAA, UM-4" ALKALINE BATTERIES
- EXTERNAL BATTERY CASE
- THE BATTERY INDICATOR
- RECHARGEABLE BATTERIES (NOT INCLUDED)
- AC ADAPTOR (NOT INCLUDED)
- BUTTON CONTROL GUIDE (LISTENING TO CDS)
- BUTTON CONTROL GUIDE (LISTENING TO THE RADIO)
- SLIDE IN DIRECTION OF ARROW
- PRESS
- TO OBTAIN GOOD RECEPTION AM
- FM
- STORING STATIONS IN MEMORY
- LISTENING TO A MEMORIZED STATION
- ERASING A MEMORIZED STATION
- WHEN USING OVERSEAS
Brand : PANASONIC
Model : SL-CT680V
Category : CD Player