
LDD-2249 - Television DENVER - Free user manual and instructions
Find the device manual for free LDD-2249 DENVER in PDF.


| Product Type | LED TV |
| Screen Size | 22 inches (approximately 55 cm) |
| Resolution | 1366 x 768 pixels (HD ready) |
| Refresh Rate | 60 Hz |
| Aspect Ratio | 16:9 |
| Brightness | 200 cd/m² (typical) |
| Contrast Ratio | 1000:1 (typical) |
| Viewing Angle | 170° horizontal / 160° vertical |
| Dimensions (without stand) | Approximately 505 x 300 x 40 mm (W x H x D) |
| Weight (without stand) | Approximately 2.5 kg |
| Power Consumption (typical) | 30 W |
| Power Consumption (standby) | < 0.5 W |
| Power Supply | AC 100-240V, 50/60 Hz |
| Energy Efficiency Class | A+ (EU energy label) |
| Tuner | DVB-T2/C/S2 (depending on region) |
| Inputs | HDMI x 2, USB x 1, AV (Composite) x 1, Component (Y/Pb/Pr) x 1, VGA x 1, Earphone out x 1, Coaxial out x 1 |
| Audio Output | 2 x 3W speakers |
| Remote Control | Infrared remote included |
| VESA Mount | 100 x 100 mm |
| Cleaning | Use a soft, dry cloth. Do not use harsh chemicals. |
| Safety | Do not expose to water or extreme temperatures. Keep ventilation slots clear. |
| Spare Parts | Remote control and power cable available from Denver support. |
| Repairability | Designed for professional repair. Do not disassemble. |
Frequently Asked Questions - LDD-2249 DENVER
User questions about LDD-2249 DENVER
0 question about this device. Answer the ones you know or ask your own.
Ask a new question about this device
Download the instructions for your Television in PDF format for free! Find your manual LDD-2249 - DENVER and take your electronic device back in hand. On this page are published all the documents necessary for the use of your device. LDD-2249 by DENVER.
USER MANUAL LDD-2249 DENVER
natural_image
Line drawing of a flat-screen computer monitor with a circular base (no text or symbols)Instruction Manual
Contents
| Caution | 1 |
| Safety Information | 2 |
| Accessories | 3 |
| Technical Specification | 3 |
| Product Introduction | 4 |
| Front View | 4 |
| Rear View | 4 |
| Connections | 5 |
| Remote Control | 6-7 |
| Basic Operation | 8 |
| OSD Menu | 9-15 |
| 1. Channel menu | 9-10 |
| 2. Picture menu | 11 |
| 3. Sound menu | 12 |
| 4. Time menu | 13 |
| 5. OPTION menu | 14 |
| 6. HOTEL mode 15 | |
| Multimedia Operation 16-18 | |
| DVD Operation | 19-25 |
| Simple Troubleshooting 26 | |
Caution
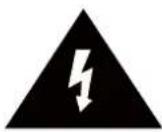
The lightning flash with arrowhead symbol, within an equilateral triangle is intended to alert the user to the presence of un-insulated “dangerous voltage” within the products enclosure that may be of sufficient magnitude to constitute a risk of electric shock to the persons.

The exclamation point within an equilateral triangle is intend to alert the user to the presence of important operating and maintenance (servicing) instructions in the literature accompanying the appliance.
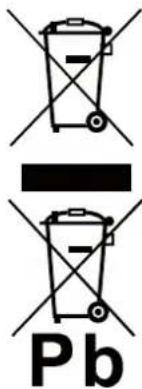
Correct disposal of this Product
(Waste Electrical & Electronic Equipment (WEEE)
Your product is designed and manufactured with high quality materials and components which can be recycled and reused.
This symbol means that electrical and electronic equipment, at their end-of-life should be disposed of separately from your household waste.
Please dispose of this equipment at your local community waste collection/recycling center.
In the USA there are separate collection systems for used electrical and electronic products. Please help us to conserve the environment we live in!

This unit complies with European safety and electrical interference directives.
Safety Information
To ensure reliable and safe operation of this equipment, please read carefully all the instructions in this user guide, especially the safety information below.
Electrical safety
- The TV set should only be connected to a mains supply which matches that stated on the label on the mains adaptor. - To prevent overload, don't share the same mains supply socket with too many other items of equipment.
- Do not place any connecting wires where they may be stepped on or tripped over.
- Do not place heavy items on the leads, which may damage them.
- Hold the Mains plug, not the wires, when removing from a socket.
- During a thunderstorm or while leaving the TV for long periods, disconnect the aerial (if outdoor) and mains adaptor from the supply.
- Do not allow water or moisture to enter the TV or mains adaptor. Do NOT use in wet or moist areas such as Bathrooms, steamy kitchens or near swimming pools.
- Pull the plug out immediately, and seek professional help if:
- the mains plug or cable is damaged.
- liquid is spilt onto the set, or if it is accidentally exposed to water or moisture.
- anything accidentally penetrates the ventilation slots.
- the set does not work normally.
- Do NOT remove the safety covers. There are no user serviceable parts inside. You may invalidate the warranty. Qualified personnel only are permitted to service this apparatus.
- To avoid battery leakage, remove exhausted batteries from the remote control handset, or when not using for along period.
- Do NOT break open or throw exhausted batteries on a fire.
Physical safety
- Do NOT block ventilation slots in the back cover. You may place the TV in a cabinet, but ensure at least 5cm (2") clearance all around the unit.
- Do NOT tap or shake the TV screen, you may damage the internal circuitry. Take good care of the remote control, do not drop it or allow it to come into contact with liquids.
- To clean the TV use a soft dry cloth. Do NOT use solvents or petrol based fluids. For stubborn stains, you may use a damp soft cloth with diluted detergent.
Accessories

natural_image
Stack of three blank white sheets with no text or symbolsUser's Manual
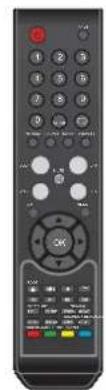
Remote control
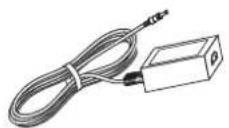
Mains adapter Mains cable
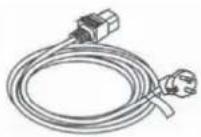
* Note: The configuration of the components may look different from the following illustration
Technical Specification
- TV-System PAL BG/DK/I SECAM BG/DK
- Screen Size 22inch(diagonal)
- Resolution 1920x1080
- Aerial input 75 Ω (unbalanced)
- Audio output power 2x3W
- Power Consumption DC 12V---5A 60W
Product Introduction
Front View
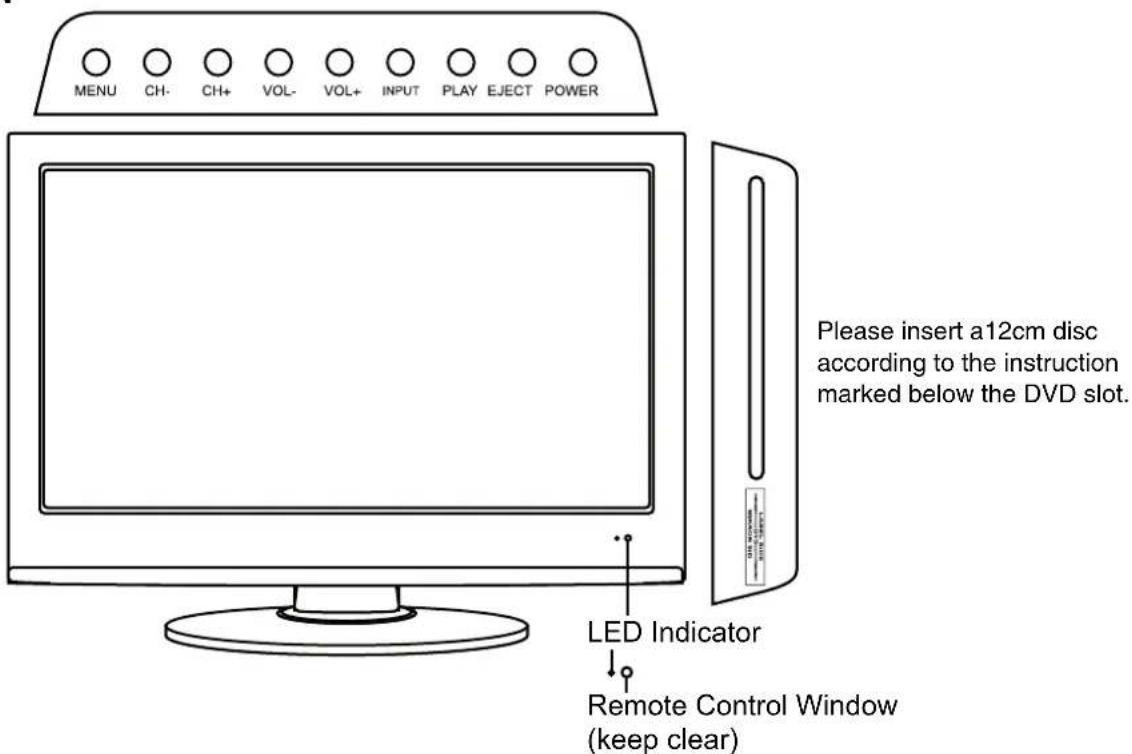
1). (IR) Infrared Receiver: Receives IR signals from the remote control. (Power on/Standby)LED Indicator: Press POWER to turn on and off.
Indicator on(Red)
Standby mode
Indicator on
Power on mode
The effective receiving range for the signal is 5-8 metres from the front of the remote control window, and 30^ to the left or right side and 20^ above or below the remote control window.
2). The functions of the buttons are described as bellows:
MENU: Press to display the OSD menu, press again to exit the menu.
CH+/-: Press to scan through channels.
VOL+/-: Press to adjust the volume.
INPUT: Press to display the input source menu.
PLAY: Play/pause the disc playing.
EJECT: Eject the disc.
POWER: Turn on/standby the TV set.
Connections
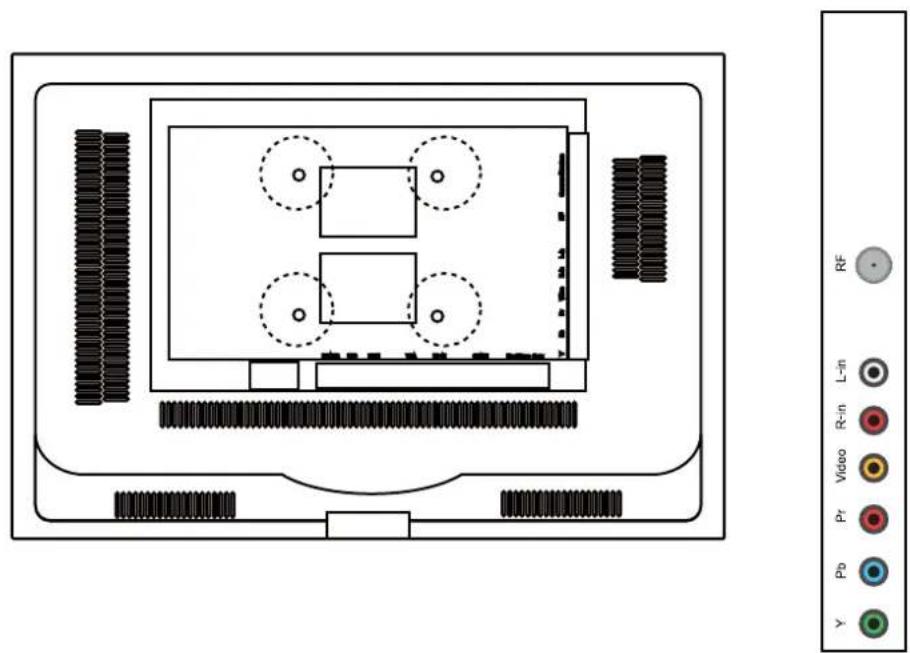

POWER: Connect to the mains adaptor.
USB: Connect to USB device for multimedia
HDMI: Connect it to the HDMI of DVD or other equipment.
VGA: For PC display. Connect it to the D-Sub 15 pins analog output connector of the PC.
PC-IN: Connect it to the audio output terminal of PC.
SCART: Connect them to the SCART video output terminal of DVD.(used in component source)
Headphone: Connect it to your headphone or other audio equipment.
COAX: Output to audio amplifier
RF: Connect antenna or cable 75 Ohm coaxial to receive TV signal.
R/L in: Connect them to the audio output terminal of DVD.(shared with YPbPr)
VIDEO: Connect it to video output terminal of DVD.
YPbPr: Connect them to the YPbPr video output terminal of DVD.(used in component source)
Remote Control
The remote control is using Infra-Red(IR). Point it towards the front of the LCD TV. The remote control may not work correctly if it is operated out of range or out of angle.
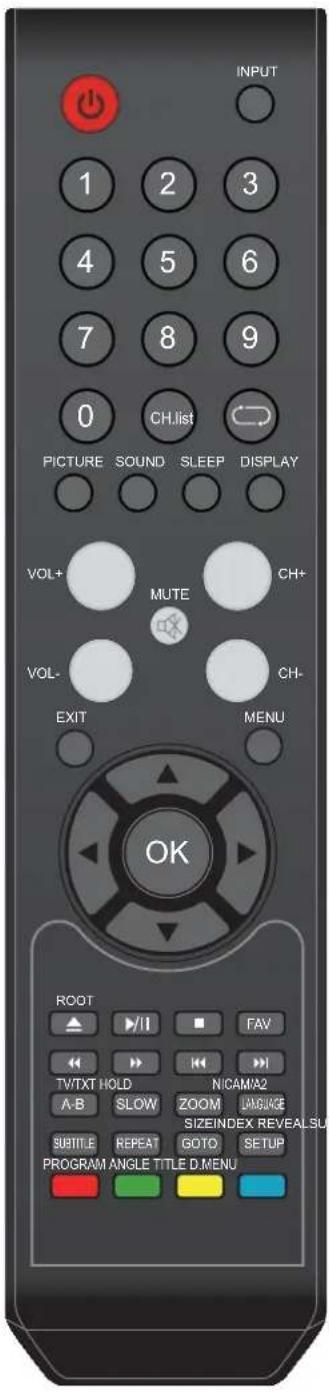
POWER : Turn on/standby the TV.
INPUT : Source select.
0-9, -/-- : Choose channel.
: Go to program you latest program.
CH/LIST: Display the programs list.
PICTURE: Select the picture mode.
SOUND : Select the sound mode.
SLEEP: Time shutting down.
DISPLAY: Display playing status
CH+/-: Scan the channel.
VOL+/-:Volume up/down.
MUTE: Silence status.
EXIT: Exit from the current menu.
MENU : TV system menu.
▲▼ Cursor up/down keys in OSD menu
◀▶ Cursor left/right keys in OSD menu
OK: Comfirm button
ROOT: Come back to the home page.
TV/TXT: Teletext on/off
HOLD: Hold or carry on the current subpage
NICAM/A2:NICAM/A2 select.
SUBPAGE: Go to subpage
INDEX: Direct recall of page 100
SIZE: Press to see top half of page double size, Press again to see the bottom half of page double size.
Press again for normal size
REVEAL: Reveal any hidden text, for example-quiz answer.
PROGRAM: Edit the program and play.
ANGLE: Select DVD picture angle.
D.MENU: DVD play list/Disc menu.
TITLE: DVD title.
Remote Control
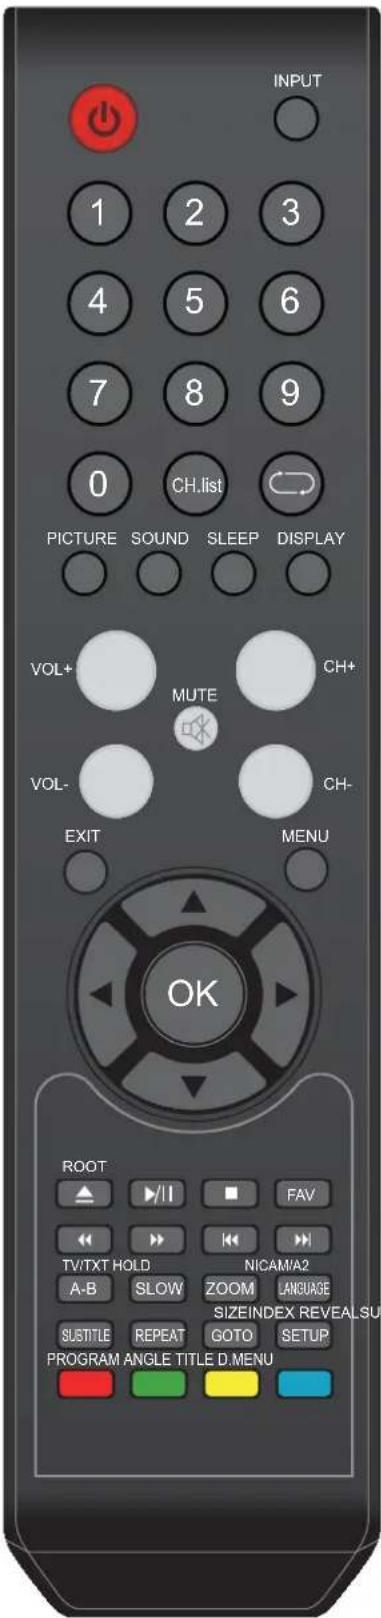
▲ : Load/eject DVD disc.
▶II : Play/Pause program
■ : Stop program
← : fast reverse
: fast forward
: previous chapter
: next chapter
A-B: Select and play the preferable paragraph of DVD program by pressing this key twice at the beginning and end of it.
SLOW: Play DVD programs at slow speed.
ZOOM: Adjust picture size in USB mode.
LANGUAGE: Select DVD disc language.
SUBTITLE: Turn on/off the subtitle display in DTV mode and DVD mode.
REPEAT : Repeat playing the title or chapter.
GOTO : Play your favorite title/chapter/track.
SETUP: DVD system setup.
COLOUR BUTTONS : Short cuts-follow the coloured links in the text.
Basic Operation
Power on/off
- Connect to the power supply with a power cord and an adaptor.
- -To turn on the TV
Press POWER button on the TV or remote control.
-To turn off the TV
Press POWER button on the TV or remote control.
Input Source select
Press INPUT button on the TV set or remote control to display input source menu, and use CH+/- button on the TV set or ∧/∨ button on remote control to select the input source, press OK button on the remote control to enter.
Note: Before you select the input source, make sure the connections are prepared.
| Input Source |
| ATV |
| AV |
| SCART |
| YPBPR |
| DVD |
| VGA |
| HDMI |
| USB |
Basic OSD Menu operation
Press MENU button to display the OSD menu as below:
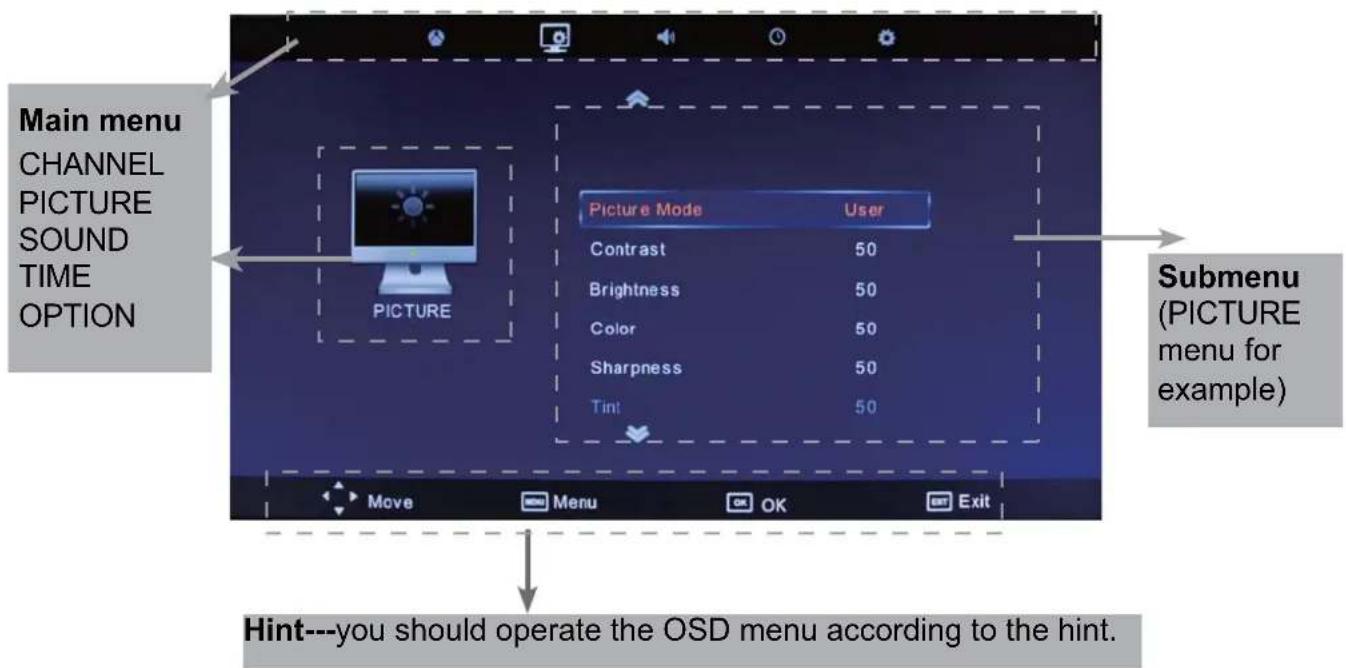
Use < > button to select the main menu, and press button to enter the submenu. In the submenu, use button to select the function item, press < / > button to adjust/setup, or press OK button to enter the submenu.
* (Press MENU button to return to the upper menu.)
* (Press EXIT button to exit the menu display.)
Note1: Only when you input the suitable signal, the relevant items can be activated Note2: Please operating the OSD menu according to hint on the bottom of the banner.
OSD Menu
1. CHANNEL menu
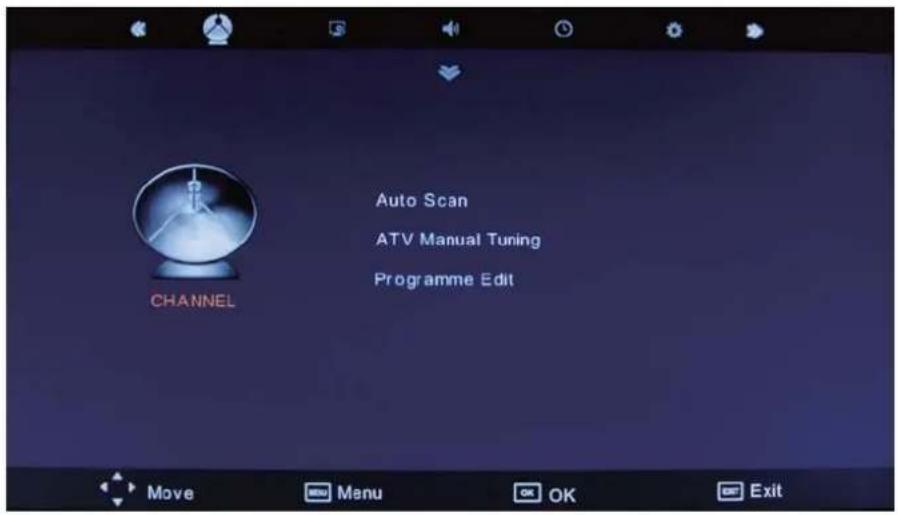
Description
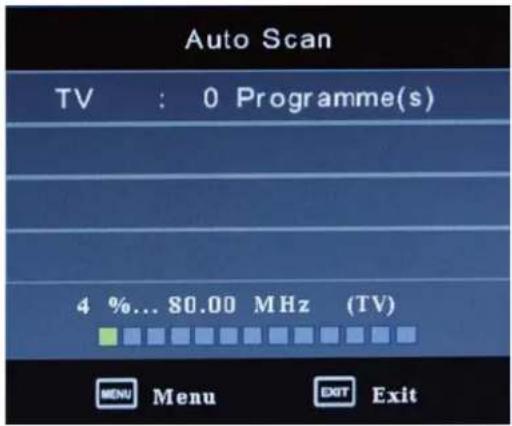
Auto Tuning
Press OK button to start auto tuning.
You could press MENU/EXIT button to exit the process of tuning, there will be a hint on the screen, and you should press < button to confirm, or press > button to cancel the operation.
ATV Manual Tuning
Press OK button to enter the ATV Manual Tuning menu.
Storage to: Select a Channel for storing the programme.
System: Select the color & sound system.
Current CH: Select the the channel for edit.
Search: Press < / > button to manual search.
Fine Tune: Press < / > button to fine-tune.
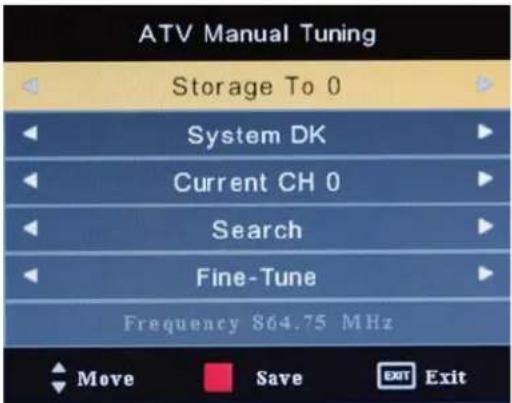
OSD Menu
Programme Edit
Press OK button to enter the Programme Edit menu as the following picture.
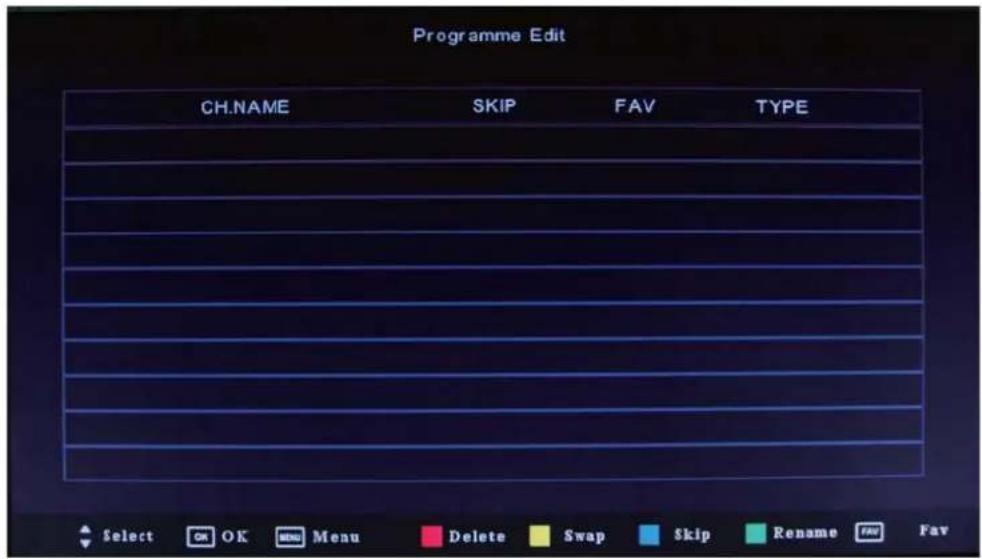
Delete: Select a channel and press RED button to delete.
Swap: Select a channel, and press YELLOW button to highlight the channel, then you can use ∧ and ∨ buttons to select the channel you want to be swapped, press OK button to confirm.
Skip: Select a channel and press the BLUE button to label the channel, as long as the channel has a skip label it will be skipped when searching through the channels with the CH+/- buttons.
Rename: Select an channel and press the GREEN button to change the name of the channel by ∧ ∨ < > buttons.
Fav: Select a channel, and press FAV button on the remote control to set/cancel the channel as the favourite channel.
OSD Menu
2. PICTURE menu
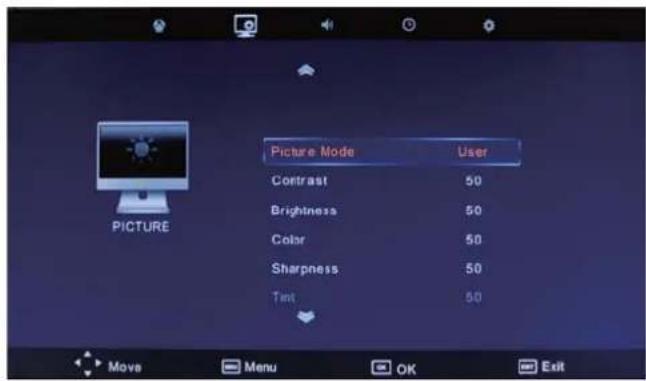
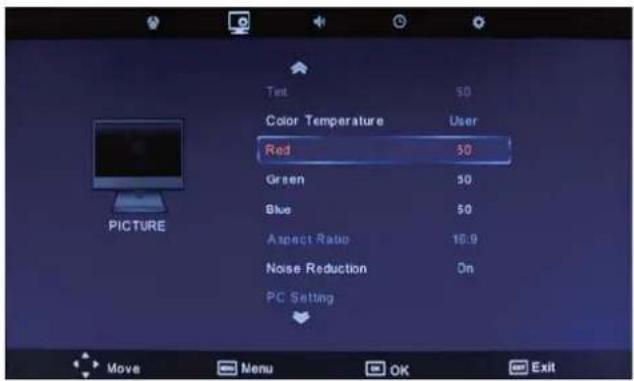
Description
Picture Mode: Choose from Standard, Dynamic, User and Mild.
Note: Contrast, Brightness, Color and sharpness are only available and can be adjusted in the User mode option in the Picture Mode Settings.
Contrast: Controls the difference between the brightest and darkest regions of the picture.
Brightness: Controls the overall brightness of the picture.
Color: Control the color.
Sharpness: Increase this setting to see crisp edges in the picture; decrease it for soft edges.
Tint: Controls the tint (NTSC mode only).
Color Temperature: Choose from Medium, Cool, Warm and User.
Note: RED, GREEN and BLUE are only available and can be adjusted in the User mode option in the Color Temperature Settings.
Aspect Ratio: Select the picture display mode in the screen.
Noise Reduction: Turn on/off the function for reduce the noise of the TV signal.
PC Setup: Change the PC settings in the PC mode.
OSD Menu
3. SOUND menu
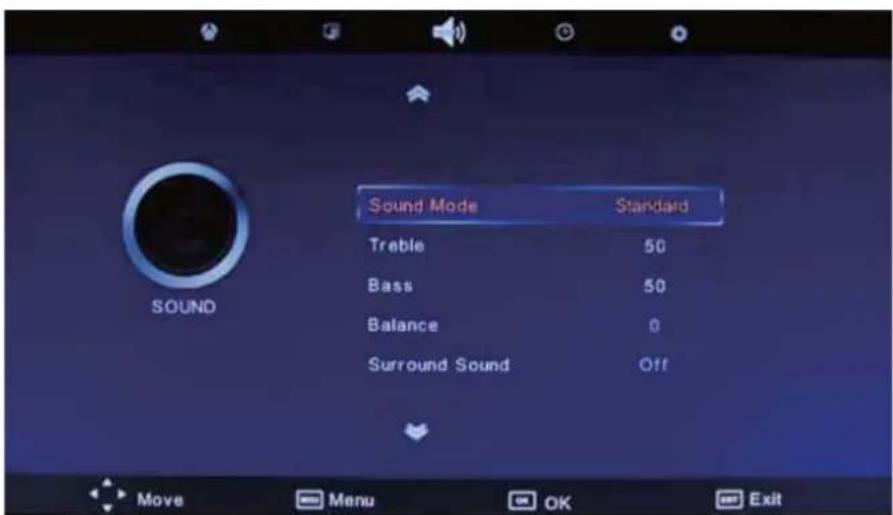
Description
Sound Mode: Allows you to select among: Standard, Music, Movie, Sports and User.
Treble(Can be adjusted when the sound mode is User): Controls the relative intensity of higher pitched sounds.
Bass (Can be adjusted when the sound mode is set to User): Controls the relative intensity of lower pitched sounds.
Balance: To adjust the balance of the left and right sound track, or turn off the volume of the left and right sound track.
Surround Sound: Turn on/off the surround sound function.
OSD Menu
4. TIME menu
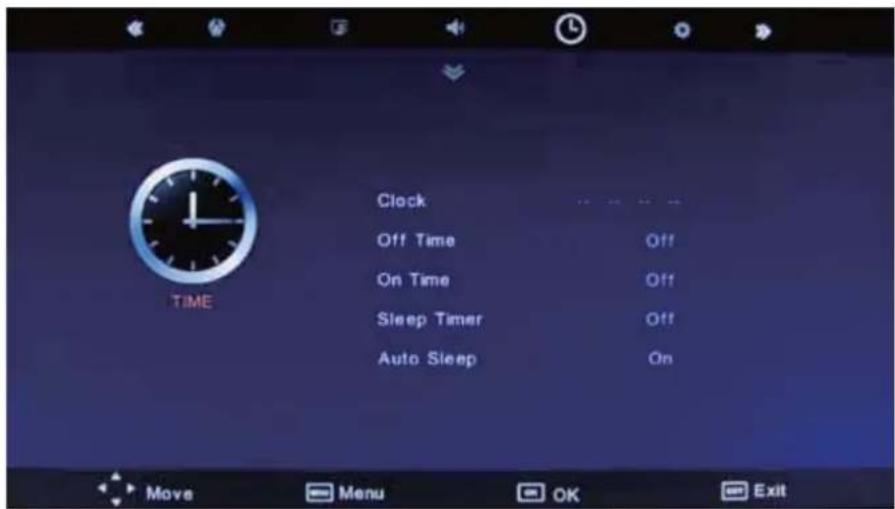
Description
Clock: Use the < and >buttons to select the position, and use the ∨ and ∧ buttons to set the time.
Off Time: Press OK button to enter the submenu, you could set the time when the TV set will be turned off automatically, you could also set the frequency.
On Time: Press OK button to enter the submenu, you could set the time when the TV set will be turned on automatically, you could also set the frequency, volume and program.
Sleep Timer: Allows you to setup the sleep timer among: 10min, 20min, 30min, 60min, 90min, 120min, 180min, 240min and off.
Auto Sleep: Turn on/off the auto standby function.
OSD Menu
- OPTION menu
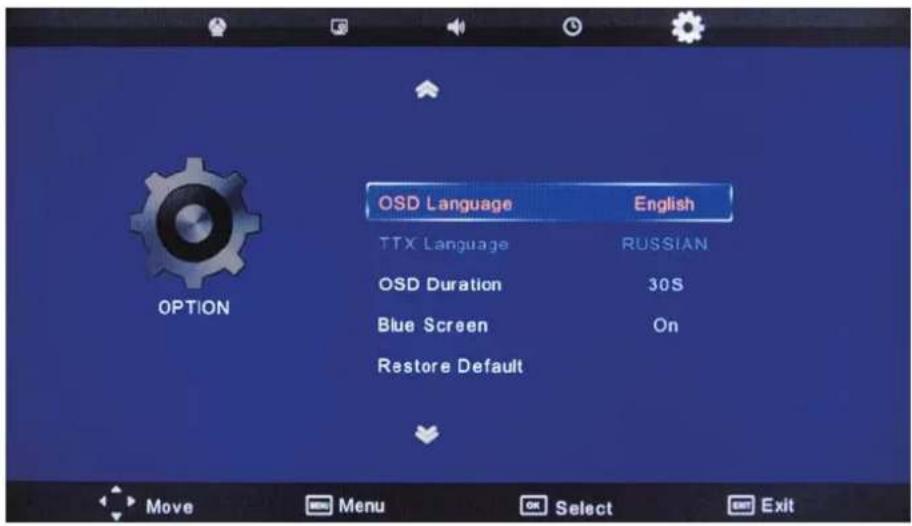
Description
OSD Language: Allows you to select menu language.
TTX Language: Allows you to select teletext language.
OSD Duration: Allows you to select the time for the OSD display on the screen.
Blue Screen: Turn on/off the blue screen function when there's no signal.
Restore Dafault: Press OK button to restore factory default.
OSD Menu
6.HOTEL mode
Press MENU and enter 2580 for hotel menu
| Hotel Lock | ON |
| Lock Channel | OFF |
| Set Source | ATV |
| Channel Number | 0 |
| Picture Lock | OFF |
| Key Lock | OFF |
| Max Volume | 100 |
| Source Lock | |
| Clear Lock | |
| DataBase Export | |
| Database Import |
Hotel Lock: Press Left/right and set Hotel Lock On/Off. When Hotel Lock is ON, Lock Channel-Source Lock can be used as below.
Clear Lock: To clear hotel lock, press Left/Right and then clear the lock setting.
Lock Channel: Channel menu lock. Press Left/Right, and set Lock Channel ON/OFF. When it is ON, TV source channel menu can't be chosen.
Set Source: Set starting source, press Left/Right and choose starting source.
Channel Number: Set starting program number. When Set Source is on ATV, press Left/Right to set program.
Picture Lock: Picture option lock, press Left/Right and set Picture Lock ON/OFF. When it is ON, Picture menu of main menu will not be chosen.
Key Lock: Key lock, press Left/right and set Key Lock ON/OFF. When it is ON, all keys except for Power can't be used.
Max Volume: Set maximum volume. Press Left/Right and set the maximum volume of TV. After that, the maximum volume adjustment scope is the set value.
Source Lock: Source lock, press Select to enter Source Lock page. On this page, press Left/Right and set the source desired to be locked ON.
| Source Lock | |
| ATV | OFF |
| AV | OFF |
| SCART | OFF |
| YPBPR | ON |
| DVD | ON |
| VGA | OFF |
| HDMI | ON |
| USB | OFF |
DataBase Export: Data export. Press Left/right, if USB interface is not connected to USB device, export fail message box. Connecting USB flash disk, the message box of Export Succeed pops up after 2-3 seconds, USB flash disk will automatically produce DATABASE.bin file.
DataBase Import: Data import. Press Left/Right, if USB interface is connected to USB device with the exported file as above, the import succeeds after 2-3 seconds and it will be automatically restarted. Import Fail shows if there are not effective files inspected.
Multimedia Operation
Basic Operation
1). Press the INPUT button on the remote control to display the input source menu, select Media source by the < / > buttons, and press OK button to enter the Multimedia menu seen below.
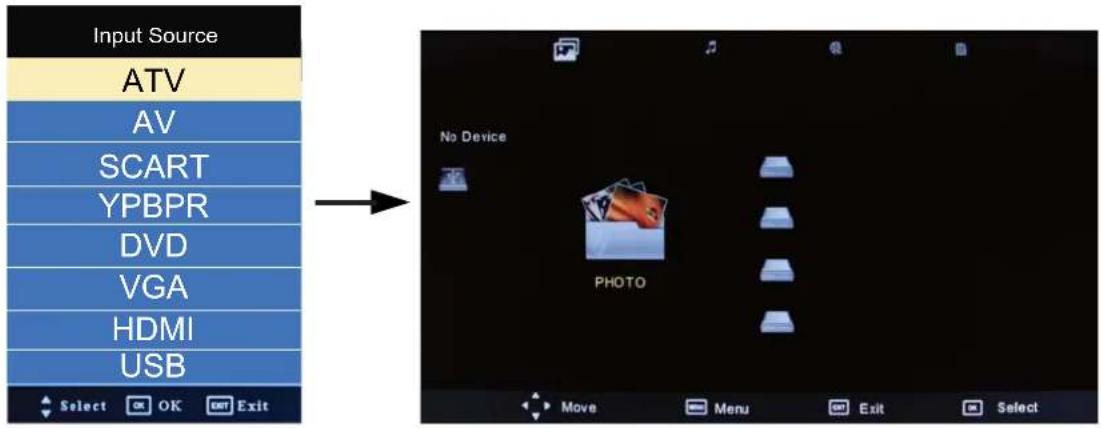
2). Insert USB device, you will find the name of the device display on the screen.
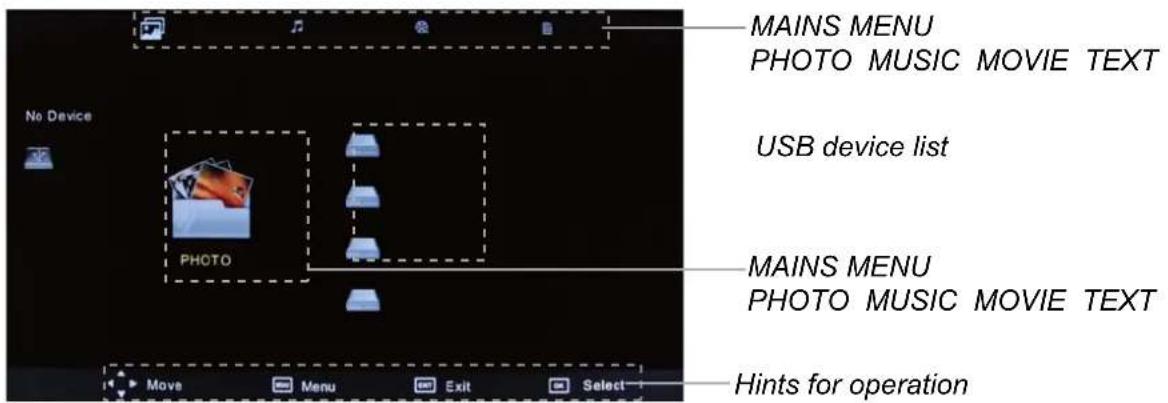
3). Press ◀ /▶ button to select the kind of the files in the device you want to program from PHOTO, MUSIC, MOVIE and TEXT. Press ▲ /▼ button to select the device and press OK button to enter.
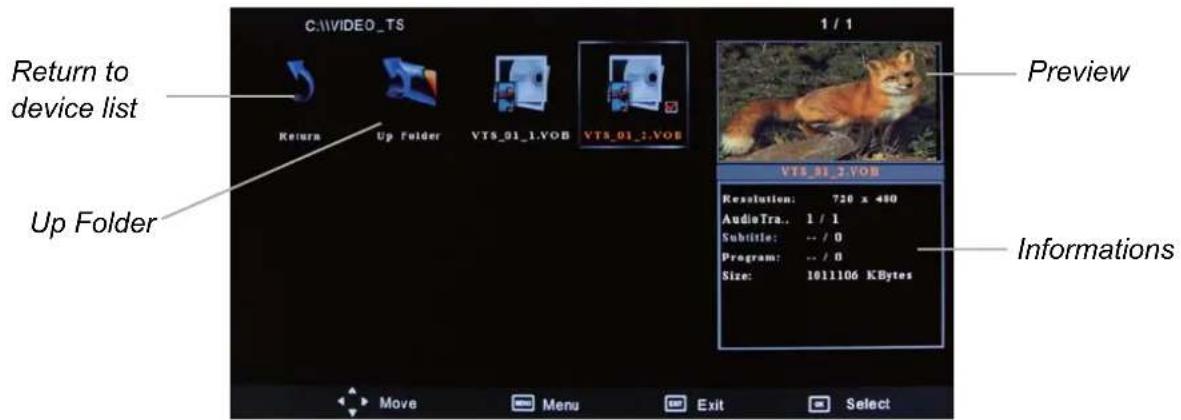
Press ◀/ ▶ / ▲ / ▼ buttons to move, and press OK button to select the file or unfold the folder, Then press ▶ button to program the files (be signed) you select or the files in the fold you select, You can display the option table on the bottom of the screen by DISPLAY/INFO button, press ■ button to hide. Press ■ button to stop and exit the full screen program.
Multimedia Operation
1. Photo
Play the photo
natural_image
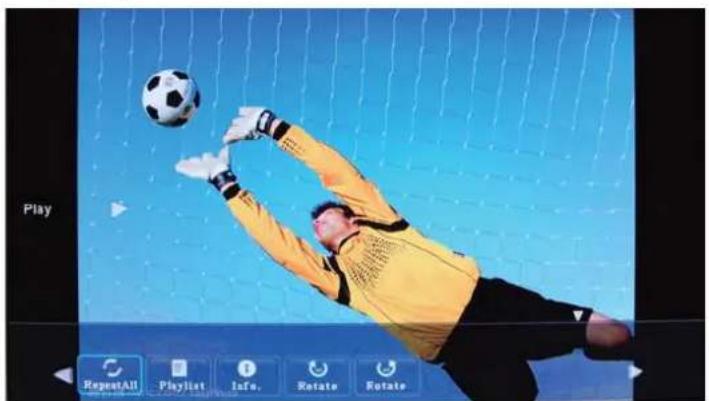
Soccer goalkeeper in action, mid-swing with ball against blue sky background (no text or symbols on player or background)Press ◀/▶ button to select the option on the table, and press OK button to change.
Repeat: Select the repeat mode from Repeat All, Repeat 1, Repeat None.
Playlist: Display the playlist on the screen, and you can select the photo by ▼/▲ button, and press OK button to program. Press ◀/▶ button to return to the options table.
Info: Display the information of the photo.
Rotate: Rotate the photo clockwise/counterclockwise.
2. Music
Play the music
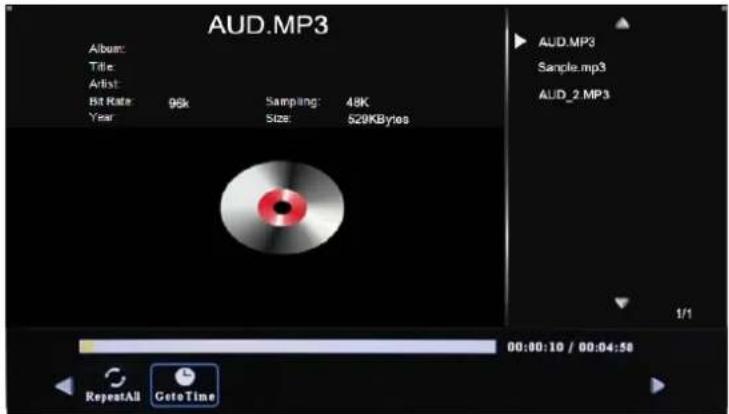
Press ◀/▶ button to select the option on the table, and press OK button to change.
Press ▼/▲ button to select the music, and press OK button to program.
Repeat ALL: Select the repeat mode from Repeat All, Repeat 1, Repeat None.
Goto Time: Program the movie form the time you set.
Multimedia Operation
3. Movie
Play the movie
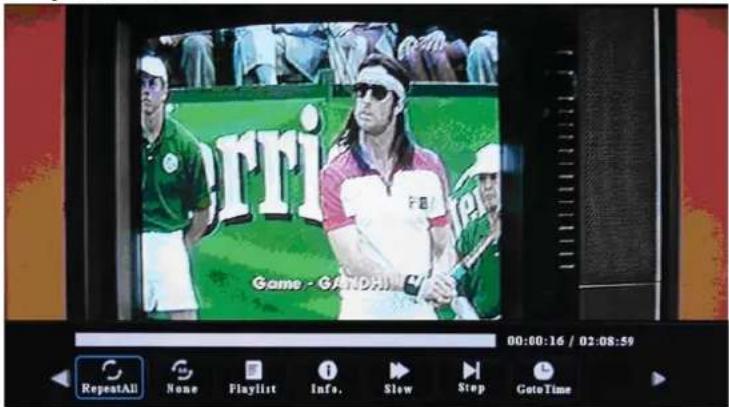
Press ◀/▶ button to select the option on the table, and press OK button to change.
Repeat ALL: Select the repeat mode from Repeat All, Repeat 1, Repeat None.
Set A-B: Select and play the preferable paragraph of the program by setting A and B at the beginning and end, and there will be a sign on the left screen, press OK button again to cancel.
Playlist: Display the playlist on the screen.
Info: Display the information of the movie.
Slow: Play the programs at slow speed, press ▶ button to cancel.
Step: Step the programs by OK button, press |▶ button to cancel.
Goto Time: Program the movie form the time you set.
4. Text
Play the text
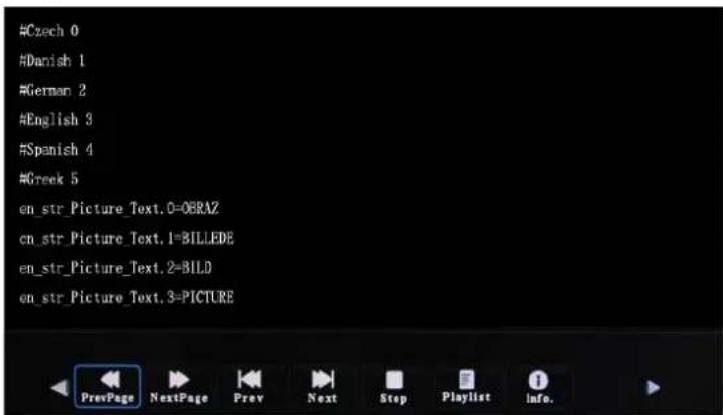
Press ◀/▶ button to select the option on the table, and press OK button to change.
Prev/Next page: Turn to previous/next page of the text.
Prev./Next: Turn to previous/next file.
Stop: Stop auto turning pages.
Playlist: Display the playlist on the screen.
Info: Display the information of the text.
DVD operation
Press the Power button on the player or the remote controller, then press TV/AV/DVD button to enter DVD mode. At this time "Read" appears on the TV screen. If there is no disc in the DVD player, after press ▶II button, "No disc" will be displayed on the screen.
Place a disc
Insert a disc with the mirror side facing you. It will be load automatically. Press ▲/EJECT button on set or remote control to eject the disc from DVD loader.
Play
The contents of each disc menu vary according to how the disc was authored and what features are included. The disc menu will be turned on for you to select, when Menu button is pressed. Also play and pause can be switched with the Pause button on the remote. Different play modes are offered, such as menu play, sequence play etc.
Menu Play
- Compatible with DVD.
- If the disc is a DVD, ROOT MENU will appear on the screen.
- When a DVD disc is loaded, you can press Arrow buttons to highlight the menu item you want to choose
- Return when playing: When a DVD disc is playing, press Menu button, and you can return to Root Menu.
Title Play
- Compatible with DVD discs only.
- During DVD playback, press Title button to display the DVD title content.
- Press the Arrow buttons to highlight the title you want to choose, and press Enter; also you can press numeric buttons to choose.
- The DVD player begins with the chapter 1 of the chosen title.
Sequence Play
- Compatible with DVD, CD, HD-CD, WMA, Digital Audio disc /JPEG discs.
Program Play
- Compatible with DVD, CD, HD-CD, WMA, Digital audio disc/JPEG discs.
- The Program Playback option allows you to enter the order in which you want chapters or tracks to play, maximum to 16.
-
According to the highlight, use the Numeric buttons to enter the chapters / tracks in the order you want them to play. Then press Play or use Arrow buttons to highlight the "PLAY" item and press Enter. The chapters / tracks will play in the programmed order. You can program maximum 16 titles / chapters / tracks.
-
According to the Direction Indicator on the menu, you can press Arrow buttons to highlight where you want to enter.
- During Program Playback, if program button is repressed, the program order and the contents will be displayed on the screen, and the Program Playback will be stopped; also you can press Stop and Play to resume normal playback.
- Notes:
To clear the program order, use Arrow buttons to highlight the "CLEAR" item, then press Enter. To modify the program order, use Arrow buttons to highlight the item you are changing and enter the new chapter / track you want to program directly.
- The program indicator in the screen, and the playing chapter / track illuminate.
Additional operation
Selecting Tracks
- Compatible with DVD, CD, HD-CD, WMA, Digital audio disc/JPEG discs.
- When playing a DVD disc, press Numeric buttons on the menu or title page to select tracks; During DVD playback, you can input desired title numbers directly.
- As for CD, HD-CD, discs, press Numeric buttons directly to select tracks.
- When playing WMA, Digital audio disc / JPEG discs, press Numeric buttons to select different tracks on current track list.
Skipping Tracks
- Compatible with DVD, CD, HD-CD, WMA, Digital audio disc/JPEG discs.
- To skip forward to the beginning of the next title / chapter / track on a disc, press Next on the remote or the right side of the player.
- To skip backward to the beginning of the preceding title / chapter / track on a disc, press Prev on the remote or the right side of the player.
Multispeed Fast forward/backward Motion Play
- Compatible with DVD, CD, HD-CD, WMA, Digital audio disc.
- Press the Fast forward/backward button on the remote during play to search through a disc.
Multispeed Fast forward/backward has four speeds:×2, ×4, ×8, ×20. With each consecutive press of the button, the search speed increases. If you press the button five times, Multispeed Fast forward/backward cycles back to normal play.
- During DVD play, when Multispeed Fast/Motion gets to the beginning of the next title / chapter, it resumes normal play.
Multiphase Slow Motion Play
- Compatible with DVD, CD, HD-CD
- Multiphase Slow has six speeds: 1/2, 1/3, 1/4, 1/5, 1/6, 1/7 of the normal speed play when press Slow button consecutively in playing discs.
- When press Play button or press the slow button seven times, it goes to normal station.]
Freeze Frame
- Compatible with DVD, CD, HD-CD, WMA, Digital audio disc.
- During CD, HD-CD, WMA or Digital audio disc / JPEG playback, press Pause once to freeze playback; Press Play button to resume normal playback.
Using the Repeat Feature
- Compatible with DVD, CD, HD-CD, WMA, Digital audio disc/JPEG discs.
- While a disc is playing, press Repeat button once, and the repeat banner appears to show current repeat mode.
a) In CD, HD-CD, WMA, or Digital audio disc / JPEG sequence playback mode.
Press Repeat button again to turn on repeat mode. Press the button again on the remote to turn to the next repeat mode. There are three repeat options: Off, Track Repeat, and Disc Repeat. With each consecutive press of the button, the repeat mode switches. If you press the button four times, repeat mode cycles back to Off.
b) In DVD playback, press Repeat button again to turn on repeat mode. There are three repeat options: Off, Chapter Repeat, and Title Repeat. With each consecutive press of the button, the repeat mode switches. If you press the button four times, repeat mode cycles back to Off.
c) In WMA, Digital audio disc / JPEG playback, press Repeat button again to turn on repeat mode. There are four repeat options: Off, Track Repeat, Directory Repeat, and Disc Repeat. With each consecutive press of the button, the repeat mode switches. If you press the button five times, repeat mode cycles back to Off.
Repeat a Specific Segment on the Disc that You Define
- Compatible with DVD, CD, HD-CD, WMA, Digital audio discs.
- During the normal or fast motion playback, press the A-B button once, and "REPEAT A-" will appears on the screen. This indicates the start of the loop to be repeated.
- During the normal of fast motion playback, press A-B again, and "REPEAT A-B" will appear on the screen. It indicates the end of the loop.
- Looping will run from set point A to set point B until you turn off Repeat.
- Press A-B again to cancel A-B loop mode.
- When playing a CD disc, you can repeat a specific segment only in one track. When the next track begins, A-B Repeat turns off automatically.
- When playing a DVD disc, you can repeat a specific segment only in one title.
Using the Search Feature
- Compatible with DVD, CD, HD-CD discs.
- You can use Search feature to select a title / chapter / track number or go to a specific point in a title. First, press Search button on the remote controller to bring up the search menu and enter the edit state; Secondly, press Arrow buttons to highlight the title / chapter / track number or the time option; Thirdly, use Numeric buttons to enter the title / chapter / track you want to play or the elapsed time you want to go to in that title; At last, press Enter button to start playback. For example, entering 01:23:56 will start playback one hour, twenty-three minutes and fifty-six seconds into the title.
3. Notes
a) This feature does not work in Program Play mode.
b) When playing WMA, Digital audio disc / JPEG discs, Search Feature does not work.
Changing the Soundtrack or Language
- Compatible with DVD, CD, HD-CD, WMA, Digital audio disc.
- Press the LANGUAGE button to display current soundtrack.
A) Press the button to switch soundtracks.
b) Press the button again on the remote to turn to next soundtrack.
- When playing a CD, HD-CD, WMA, or Digital audio disc, there are three: Stereo (L/R), L/L, and R/R.
- When playing a DVD disc, press LANGUAGE button to display current language, press the button again to turn to next language if the disc has different languages.
Subtitles
- Compatible with DVD.
- Press the Subtitle button on the remote once, and the subtitle info banner appears.
- When a DVD is recorded with subtitles, you can use the Subtitle feature to view the subtitles on-screen. By default, subtitles are off. The info banner will display Subtitle Off.
- To display subtitles, press the Subtitle button again. The default language with its responding serial number will be displayed in the info banner and subtitles will be displayed in that language. With each consecutive press of the Subtitle button, the subtitle switches. For example, "Language Icon: [1 English DTS 6CH] or [Off]" (the availability of the subtitles are disc-dependent). To turn subtitles off, press the Subtitle button until Subtitle Off is displayed.
Mute the Audio Output
- Compatible with DVD, CD, HD-CD, WMA, Digital audio disc/JPEG discs.
- Pressing the Mute button allows you to reduce sound to an inaudible level, and the icon of "MUTE" will be displayed on screen. Press the button again or press the Vol +/- button to return to the normal condition.
- If the player playback disc without sound, please try to press Mute button to resume.
Zoom In the Video Image
- Compatible with DVD, JPEG discs.
- The Zoom Function allows you to resize the video image.
- Press Zoom repeatedly to activate the function and choose the required zoom factor: Zoom 2, Zoom 3, Zoom 4, Zoom 1/2, Zoom 1/3, Zoom 1/4, Zoom Off.
Digital audio disc Play
- Compatible with Digital audio disc disc.
- The set will search the directory of the disc automatically, after that, the directory will appear on the screen.
- Then the set will play the MP3 automatically according to the directory listed.
- You can use the direction button to change the directory.
System operation
System operation will define the setting of the set, these definition will be stored until you change them again.
General Steps of Setup Menu
- Press SETUP button of the remote control, the main menu will appear on the screen, and the system will be pause.
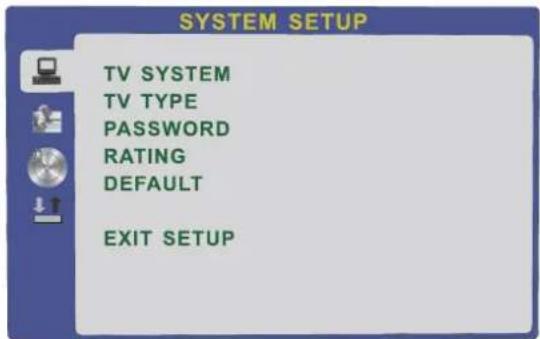
- Press the CH+/- buttons to highlight the icon of the desired page, then press the ◀▶ button to activate that page; For example, if you want to setup the video page, press to highlight the video icon, the video page will be displayed on the screen.
- Press the CH+ button to highlight the desired option. Press Enter or press ▶ button to select the choices of that option appear on the right.
- Press the CH+/- buttons to highlight the Exit Setup option, then press Enter or Setup again to exit Setup Menu.
- When launching the setup routine, the pressing of the following buttons will turn off the setup menu, while the choices that have been changed will be saved: Subtitle, F.F, F.R, Vol +/-, PBC, Title, Return, Play/Pause, Stop, Next, Prev, Slow, R, Zoom, Display, Program, Repeat, A-B, language, Mute, Setup.
Menu specification
1.SYSTEM SETUP
The system setup options are illustrated below:
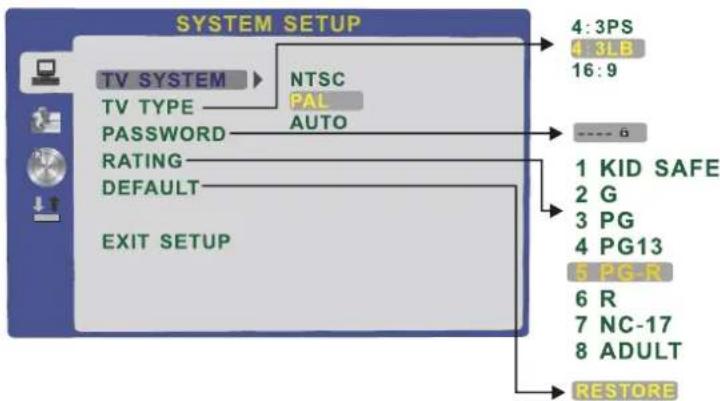
-TV SYSTEM: According to the Color System of the TV, you can choose the TV System..
-PASSWORD: The password option is initialized as locked, and you cannot set the ratings limit or change the password. In order for the Ratings feature work, the password mode must be turned on. If you want to set the ratings limit, you will need to enter the default password, which is 0000, then press Enter to confirm. To change the password, you will be prompted for the old password, then be prompted for a new. Enter a 4-digit number (this is your password).
-RATING: The Rating feature is a rating limit system, like movie ratings. It works with DVD discs that have been assigned a rating. This helps you control the types of DVDs that your family watches.
There are 8 level of selection, from KID SAFE to ADULT, Adult is the "play all"selection.
2. LANGUAGE SETUP
The language setup options are illustrated below:
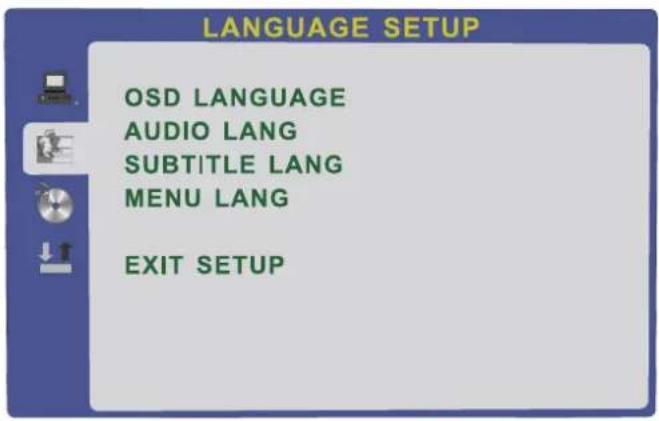
-OSD LANGUAGE: The OSD will display in the language you choose.
-AUDIO LANG: If the disc you are playing has the language you choose, it will output audio in that language.
-SUBTITLE LANG: If the disc you are playing has the language you choose, it will displays subtitles in that language.
-MENU LANG: If the disc you are playing has the language you choose, it will displays menu in that language.
3. AUDIO SETUP
The audio setup options are illustrated below:
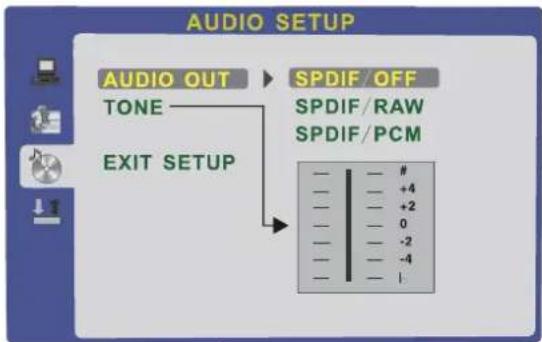
-Highlight the AUDIO OUT option, and press the CH+/- buttons to choose the audio output mode you prefer. Press Enter to confirm; There are 3 optional audio output modes: SPDIF /OFF, SPDIF / RAW, and SPDIF/ PCM.
-TONE: Use the CH+/- button to move the scroll and adjust the tone.
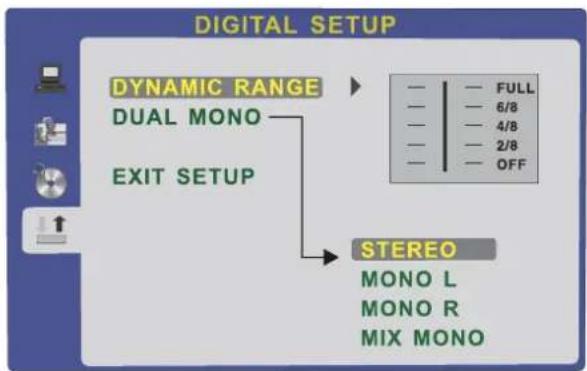
4. DIGITAL SETUP
The video setup options are illustrated below:
-DYNAMIC RANGE : Use the CH+/-arrow button to move the scroll and adjust the dynamic range.
-DUAL MONO: Choose the mode of the audio output. Three are four modes: STEREO, MONO L, MONO R, MIX MONO.
Simple Troubleshooting
If the display fails or performance dramatically deteriorates check the Display in accordance with the following instructions. Remember to check the peripherals to pinpiont the source of the failure.
If the display still fails to perform as expected, connect your helpline for assistance.
No power
- Check all connections to the TV.
- Press either the power button or the Standby button on the Remote control.
No picture or sound
- Ensure that the TV is plugged in and the power is on.
- Ensure that the aerial is connected.
- Try a different programme.
Poor picture quality
- Check the aerial connections.
- Check that the channel is tuned in properly.
- Adjust the picture settings: brightness, colour, sharpness, contrast, hue.
- Make sure that the TV is not located close to electrical appliances that may emit radio frequency interference.
No colour
- Adjust the colour setting.
- Check that the programme is broadcast in colour.
- Check that the cannel is tuned properly.
TV does not respond to remote control
- Check that there are no obstructions between the remote control and the unit.
- Check that the remote control is within range of the unit.
- Check that the batteries in the remote control and not weak or exhausted.
This TV is for household use and registered as harmless on electromagnetic waves.
Therefor, you can use it in every location as well as residential areas.
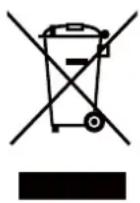
Electric and electronic equipment and included batteries contains materials, components and substances that can be hazardous to your health and the environment, if the waste material (discarded electric and electronic equipment and batteries) is not handled correctly.
Electric and electronic equipment and batteries is marked with the crossed out trash can symbol, seen below. This symbol signifies that electric and electronic equipment and batteries should not be disposed of with other household waste, but should be disposed of separately.
As the end user it is important that you submit your used batteries to the appropriate and designated facility. In this manner you make sure that the batteries are recycled in accordance with legislature and will not harm the environment.
All cities have established collection points, where electric and electronic equipment and batteries can either be submitted free of charge at recycling stations and other collection sites, or be collected from the households. Additional information is available at the technical department of your city.
ALL RIGHTS RESERVED
COPY RIGHT DENVER ELECTRONICS A/S

www.denver-electronics.com
- Contents
- Caution
- Correct disposal of this Product
- Safety Information
- Electrical safety
- Physical safety
- Accessories
- Technical Specification
- Product Introduction
- Connections
- Remote Control
- Basic Operation
- Power on/off
- Input Source select
- Basic OSD Menu operation
- OSD Menu
- CHANNEL menu
- Description
- Auto Tuning
- ATV Manual Tuning
- Programme Edit
- PICTURE menu
- SOUND menu
- TIME menu
- 6.HOTEL mode
- Multimedia Operation
- Photo
- Music
- Movie
- Text
- DVD operation
- Place a disc
- Play
- Menu Play
- Title Play
- Sequence Play
- Program Play
- Additional operation
- Selecting Tracks
- Skipping Tracks
- Multispeed Fast forward/backward Motion Play
- Multiphase Slow Motion Play
- Freeze Frame
- Using the Repeat Feature
- Repeat a Specific Segment on the Disc that You Define
- Using the Search Feature
- Notes
- Changing the Soundtrack or Language
- Subtitles
- Mute the Audio Output
- Zoom In the Video Image
- Digital audio disc Play
- System operation
- General Steps of Setup Menu
- Menu specification
- 1.SYSTEM SETUP
- LANGUAGE SETUP
- AUDIO SETUP
- +4
- DIGITAL SETUP
- Simple Troubleshooting
- No power
- No picture or sound
- Poor picture quality
- No colour
- TV does not respond to remote control
Brand : DENVER
Model : LDD-2249
Category : Television