
LED-3255DVBT - Television DENVER - Free user manual and instructions
Find the device manual for free LED-3255DVBT DENVER in PDF.


| Product Type | LED TV |
| Screen Size | 32 inches (diagonal) |
| Resolution | 1366 x 768 (HD Ready) |
| TV System | PAL BG/DK/I, SECAM BG/DK/L/L' |
| Aerial Input | 75 Ω (unbalanced) |
| Audio Output Power | 2 x 8W |
| Power Consumption | 75W (100-240V~50/60Hz) |
| Remote Control Type | Infrared (IR) |
| Remote Control Range | 5 meters |
| Remote Control Angle | 30° horizontal, 20° vertical |
| Remote Control Batteries | 2 x 1.5V AAA |
| Inputs | HDMI x3, SCART, YPbPr (via converter cable), VGA, PC Audio, AV (shared with YPbPr), USB, CI slot |
| Outputs | Headphone (3.5mm), Coaxial (SPDIF) |
| USB Multimedia Support | Photo, Music, Movie, Text |
| PVR Recording | Yes (via USB, DTV mode) |
| Teletext | Yes (ATV mode) |
| Electronic Program Guide | Yes (DTV mode) |
| Hotel Mode | Yes |
| Accessories Included | Remote control, batteries, AV cable, YPbPr converter cable, user manual |
| Cleaning | Soft dry cloth; for stubborn stains, damp cloth with mild detergent |
| Safety & Compliance | CE, WEEE, RoHS |
Frequently Asked Questions - LED-3255DVBT DENVER
User questions about LED-3255DVBT DENVER
0 question about this device. Answer the ones you know or ask your own.
Ask a new question about this device
Download the instructions for your Television in PDF format for free! Find your manual LED-3255DVBT - DENVER and take your electronic device back in hand. On this page are published all the documents necessary for the use of your device. LED-3255DVBT by DENVER.
USER MANUAL LED-3255DVBT DENVER
32" hd ready led tv with atv and mpeg-2 dvb-t + c.i
+ usb input + PVR function
Model NO.: LED-3255DVBT
natural_image
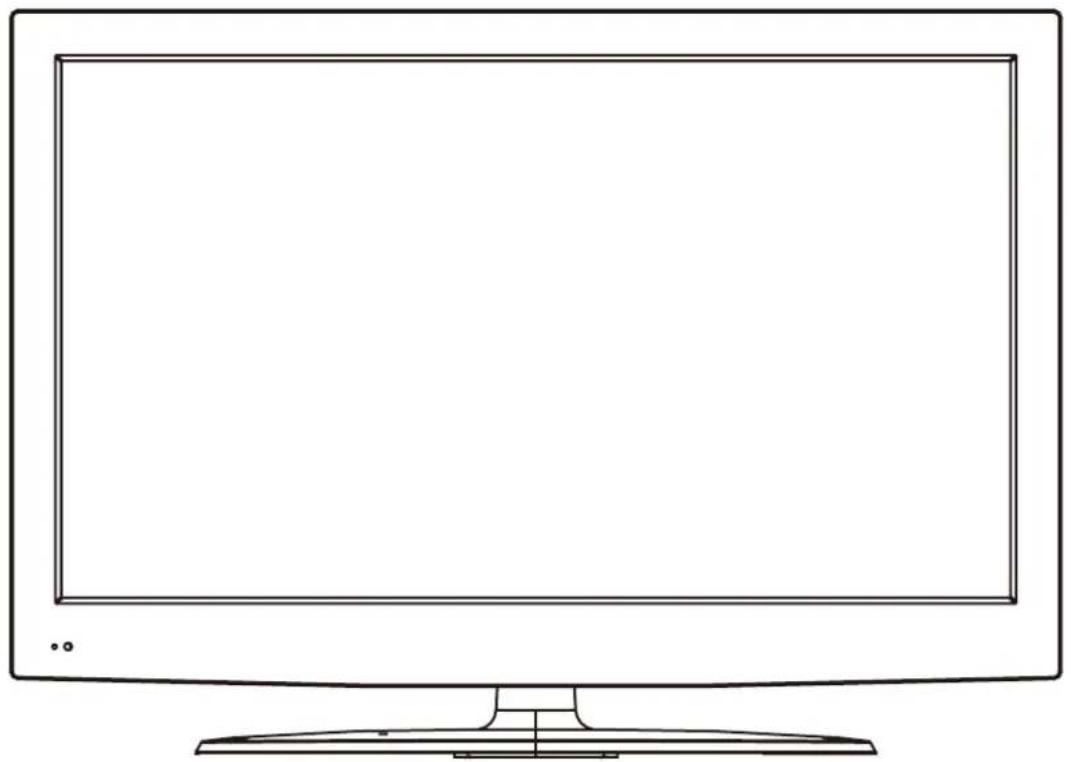
Line drawing of a flat-screen computer monitor with a blank screen and stand (no text or symbols)Instruction Manual
Contents
| Caution | 1 |
| Safety Information | 2 |
| Accessories | 3 |
| Technical Specification | 3 |
| Product Introduction | 4 |
| Front View | 4 |
| Rear View | 4 |
| Connections | 5 |
| Remote Control | 6-7 |
| Basic Operation | 8 |
| OSD Menu | 9-16 |
| 1. CHANNEL menu | 9-10 |
| 2. PICTURE menu | 11 |
| 3. SOUND menu | 12 |
| 4. TIME menu | 13 |
| 5. OPTION menu | 14 |
| 6. LOCK menu | 15-16 |
| Hotel mode | 16 |
| Multimedia Operation | 17-19 |
| Recording Operation | 20-22 |
Simple Troubleshooting 23
Caution
The lightening flash with arrowhead symbol, within an equilateral triangle is intended to alert the user to the presence of un-insulated “dangerous voltage” within the products enclosure that may be of sufficient magnitude to constitute a risk of electric shock to the persons.

The exclamation point within an equilateral triangle is intend to alert the user to the presence of important operating and maintenance (servicing) instructions in the literature accompanying the appliance.
Correct disposal of this Product
(Waste Electrical & Electronic Equipment (WEEE)
Your product is designed and manufactured with high quality materials and components which can be recycled and reused.
This symbol means that electrical and electronic equipment, at their end-of-life should be disposed of separately from your household waste.
Please dispose of this equipment at your local community waste collection/recycling centre.
In the USA there are separate collection systems for used electrical and electronic products. Please help us to conserve the environment we live in!

This unit complies with European safety and electrical interference directives.
Safety Information
To ensure reliable and safe operation of this equipment, please read carefully all the instructions in this user guide, especially the safety information below.
Electrical safety
- The TV set should only be connected to a mains supply which matches that stated on the label on the mains adaptor. - To prevent overload, don't share the same mains supply socket with too many other items of equipment.
- Do not place any connecting wires where they may be stepped on or tripped over.
- Do not place heavy items on the leads, which may damage them.
- Hold the Mains plug, not the wires, when removing from a socket.
- During a thunderstorm or while leaving the TV for long periods, disconnect the aerial (if outdoor) and mains adaptor from the supply.
- Do not allow water or moisture to enter the TV or mains adaptor. Do NOT use in wet or moist areas such as Bathrooms, steamy kitchens or near swimming pools.
- Pull the plug out immediately, and seek professional help if:
- the mains plug or cable is damaged.
- liquid is spilt onto the set, or if it is accidentally exposed to water or moisture.
- anything accidentally penetrates the ventilation slots.
- the set does not work normally.
- Do NOT remove the safety covers. There are no user serviceable parts inside.
You may invalidate the warranty. Qualified personnel only are permitted to service this apparatus.
- To avoid battery leakage, remove exhausted batteries from the remote control handset, or when not using for along period.
- Do NOT break open or throw exhausted batteries on a fire.
Physical safety
- Do NOT block ventilation slots in the back cover. You may place the TV in a cabinet, but ensure at least 5cm (2") clearance all around the unit.
- Do NOT tap or shake the TV screen, you may damage the internal circuitry. Take good care of the remote control, do not drop it or allow it to come into contact with liquids.
- To clean the TV use a soft dry cloth. Do NOT use solvents or petrol based fluids. For stubborn stains, you may use a damp soft cloth with diluted detergent.
Accessories
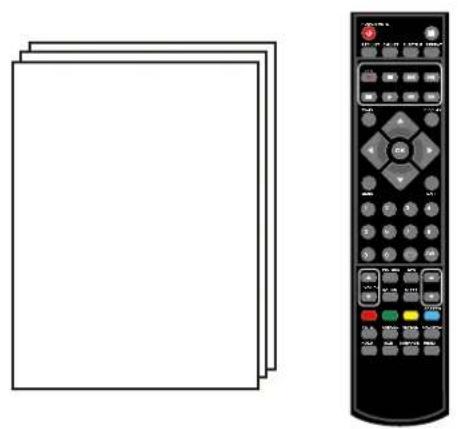
User's Manual Remote control
Batteries
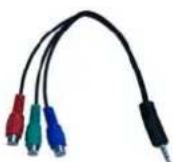
Converter cable for YPBPR video
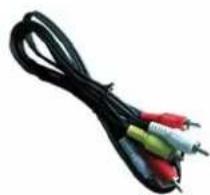
natural_image
Coiled black audio/video cable with three colored connectors (red, yellow, green) against white backgroundAV cable
* Note: The configuration of the components may look different from the following illustration
Technical Specification
- TV System
- Screen Size
- Resolution
- Aerial input
- Audio output power
- Power Consumption
PAL BG/DK/I SECAM BG/DK/L/L'
32 inch (diagonal)
1366X768
75 Ω (unbalanced)
2x8W
100-240V\~50/60Hz 75W
Remote Control
| Type | infrared |
| Control distance | 5m |
| Control angle | 30°(horizontal) |
| Batteries | 2 x 1.5V, size AAA |
Product Introduction
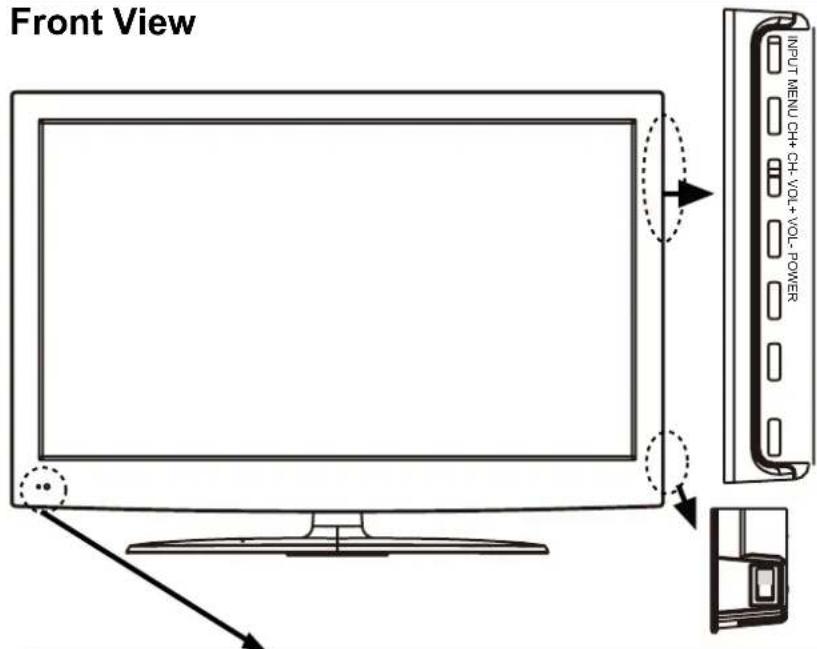
INPUT:
Display the input source menu.
MENU:
Display/exit the OSD menu.
CH+/-:
Scan through channels.
VOL+/-:
Adjust the volume.
POWER:
Turn on/standby the TV set.
SWITCH:
Turn on/off the power supply.
LED indicator ○ ○ Remote Control window(keep clear)
(IR) Infrared Receiver: Receives IR signals from the remote control.
(Power on/Standby) LED indicator: Press POWER to turn on and off.
Indicator on(Red)
Standby mode
Indicator on(Off)
Power on mode
The effective receiving range for the signal is 5-8 metres from the front of the remote control window, and 30^ to the left or right side and 20^ above or below the control window.
Rear View
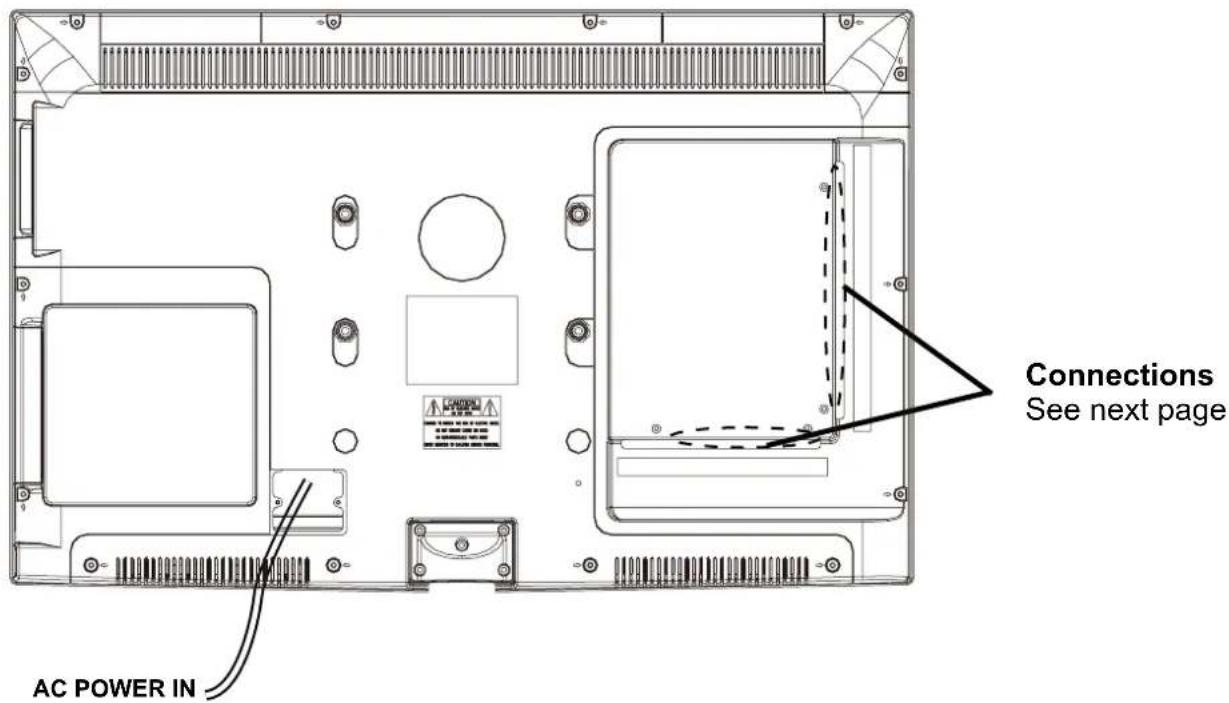
Connections

Ω Headphone: Connect Headphone
CI:CI slot (pay as you view card slot)
COAX: Output to audio amplifier
RF: Connect to antenna or cable source
(AUDIO)L/R IN:Audio signal input for AV(Shared with YPbPr)
Video: Connect to the video output of external devices
YPbPr: Connect to the YPbPr output on external devices with the converter cable.

USB: Connect to USB device for multimedia
HDMI1/2/3: Connect to the HDMI socket of your DVD or Satellite Box
SCART: Connect to the scart input / output of external devices
PC audio: PC audio input
VGA: Connect to the PC VGA output to display PC graphics
AC POWER IN: Connect to power supply
Remote Control
The remote control is using Infra-Red(IR). Point it towards the front of the LED TV. The remote control may not work correctly if it is operated out of range or out of angle.
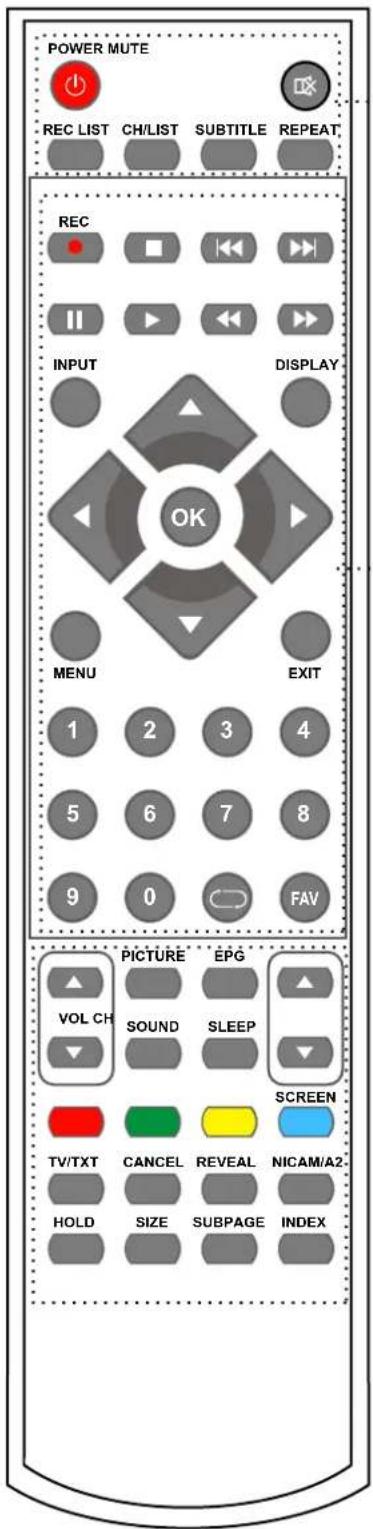
POWER: Turn the TV on/standby.
MUTE: Press to mute the sound, press again or press VOL+ to unmute.
REC LIST: Record List.
CH/LIST: Display the programs list.
SUBTITLE: Turn on/off the subtitle display in DTV mode.
REPEAT: Repeat playing the title or chapter.
PVR function
REC ● : Press to start record the program in DTV mode.
■ : Stop program.
◀◀ : Previous chapter.
▶▶ : Next chapter.
II : Pause program.
▶ : Play program.
◀ : Fast reverse.
▶▶ : Fast forward.
INPUT: Press to display the input source menu.
DISPLAY: Press to display the current mode's information.
MENU: System setup menu.
EXIT: Exit the OSD menu.
FAV: Display the favorite program list.
NUMBER BUTTONS
Press0-9 to select a TV channel directly when you are watching TV.

Return to the previous channel viewed.
CURSOR KEYS OK/◄/►/
Allows you to navigate the on-screen menus and adjust the system settings to your preference.
Remote Control
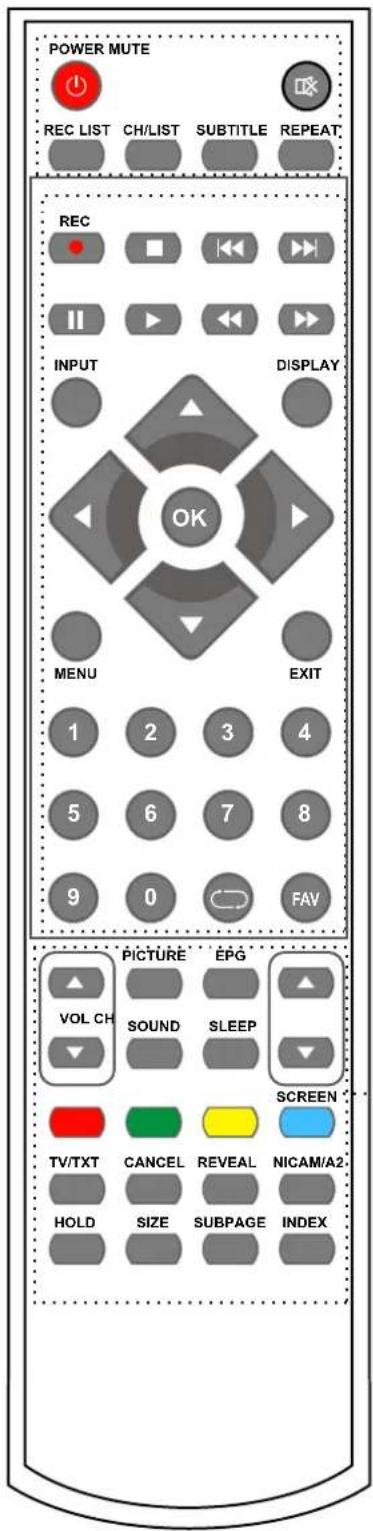
CH▲/▼: Scan through channels.
VOL▲/▼: Adjust the volume.
PICTURE: Select the picture mode.
EPG: To show the Electronic Program Guide during no-menu state only in DTV mode.
SOUND: Select the sound mode.
SLEEP: Standby timer.
SCREEN: Turn on/off the screen.
TV/TXT: Turn off/on the Teletext display.
CANCEL: Cancel the Teletext display.
REVEAL: Reveal any hidden text.
NICAM/A2: TV Nicam/A2 select.
HOLD: Hold or carry on the current subpage.
SIZE: Press to see top half of page double size, Press again to see the bottom
half of page double size. Press again for normal size.
SUBPAGE: Press to enter subpages, pressagain to cancel.
INDEX: Go to index.
Colour buttons: Short cuts-follow the coloured links in the text.
Basic Operation
Power on/off
- Connect to the power supply with the power cord.
- -To turn on the TV
Press POWER button on the TV or remote control.
-To turn off the TV
Press POWER button on the TV or remote control.
Input Source select
Press INPUT button on the TV set or remote control to display input source menu, and use CH+/- button on the TV set or ∧/∨ button on remote control to select the input source, press OK button on the remote control to enter.
Note: Before you select the input source, make sure the connections are prepared.
| Input Source |
| DTV |
| ATV |
| SCART |
| YPBPR |
| PC |
| HDMI1 |
| HDMI2 |
| HDMI3 |
| AV |
| USB |
| Move OK Select EXIT Quit |
Basic OSD Menu operation
Press MENU button to display the OSD menu as below:
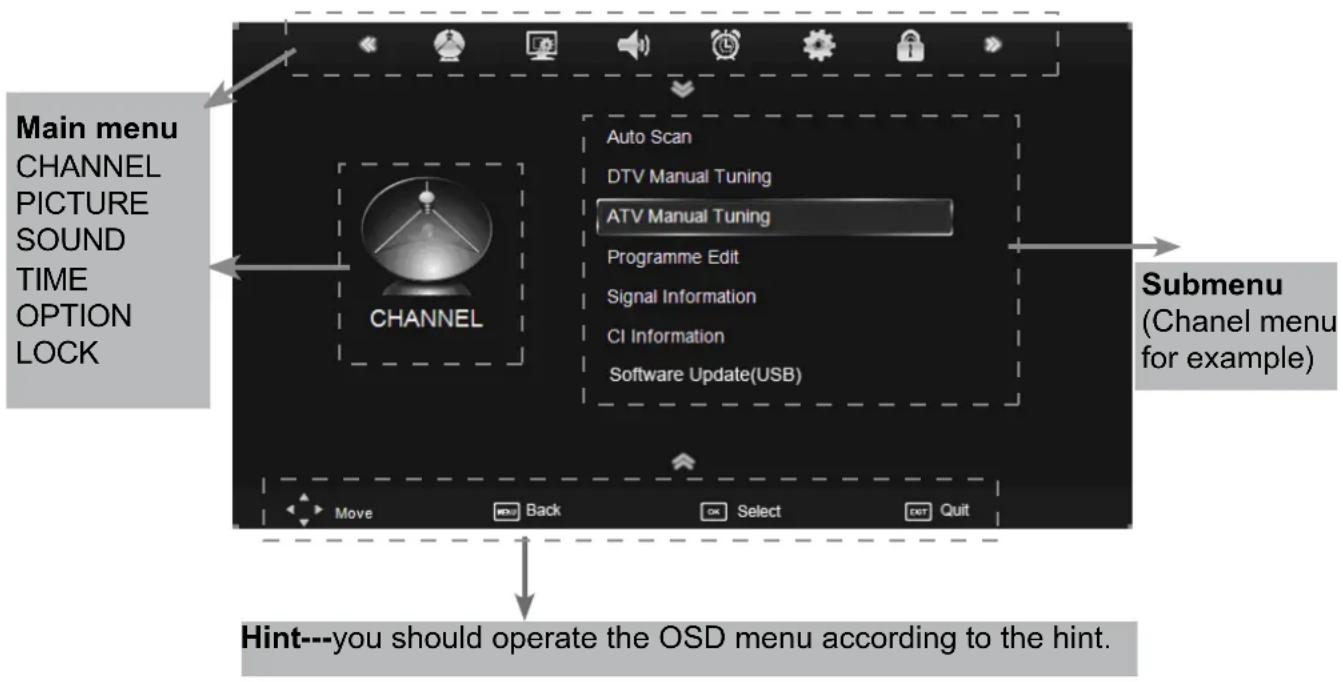
Use K > button to select the main menu, and press button to enter the submenu.
In the submenu, use ∧ ∨ button to select the function item, press < / > button to adjust/setup, or press OK button to enter the submenu.
* (Press MENU button to return to the upper menu.)
* (Press EXIT button to exit the menu display.)
Note1: Only when you input the suitable signal, the relevant items can be activated Note2: Please operating the OSD menu according to hint on the bottom of the banner.
OSD Menu
1. CHANNEL menu
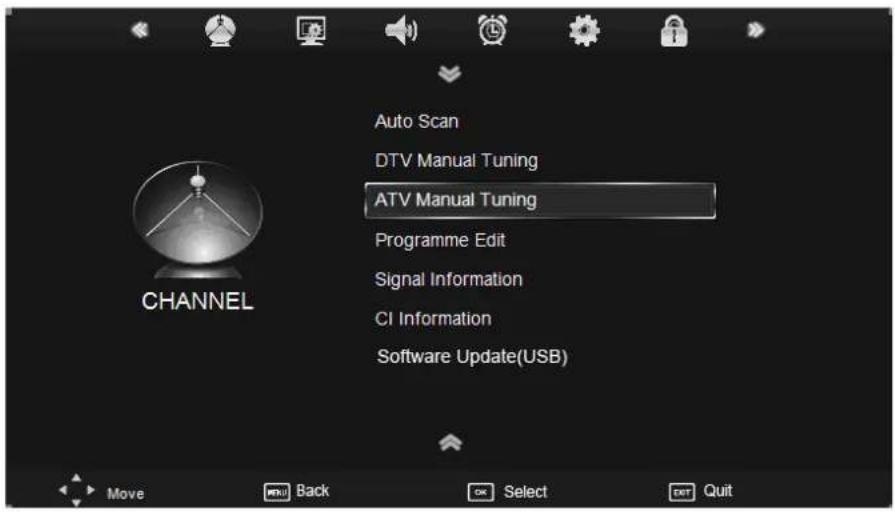
Description
Auto Scan
Press OK button to enter the hint menu, and select the Country and Tune Type mode for the TV, then press OK button to start auto tuning.
LCN: Press > to select on/off.
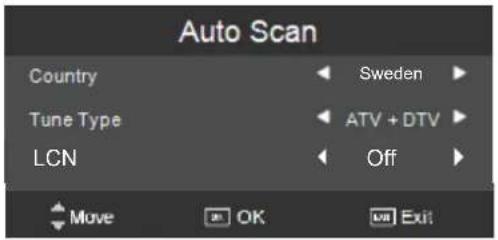
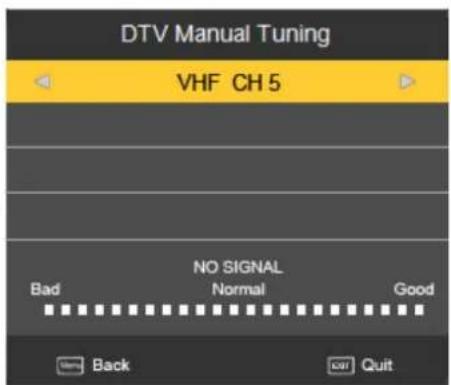
DTV Manual Tuning
Press OK button to enter the DTV Manual Tuning menu, select a DTV channel, and press OK button to start searching.
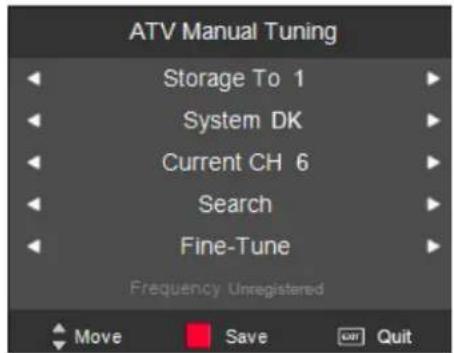
ATV Manual Tuning
Press OK button to enter the ATV Manual Tuning menu.
Storage To: Select a position for storing the program.
System: Select a TV system for searching.
Current CH: Select the channel you want to manual tuning.
Search: Press < / > button to manual search.
Fine-Tune: Press < / > button to fine-tune.
Frequency: Display the current frequency.
Note: Press RED button to save all the setups you have changed.
OSD Menu
Programme Edit
Press OK button to enter the Program Edit menu as the following picture.
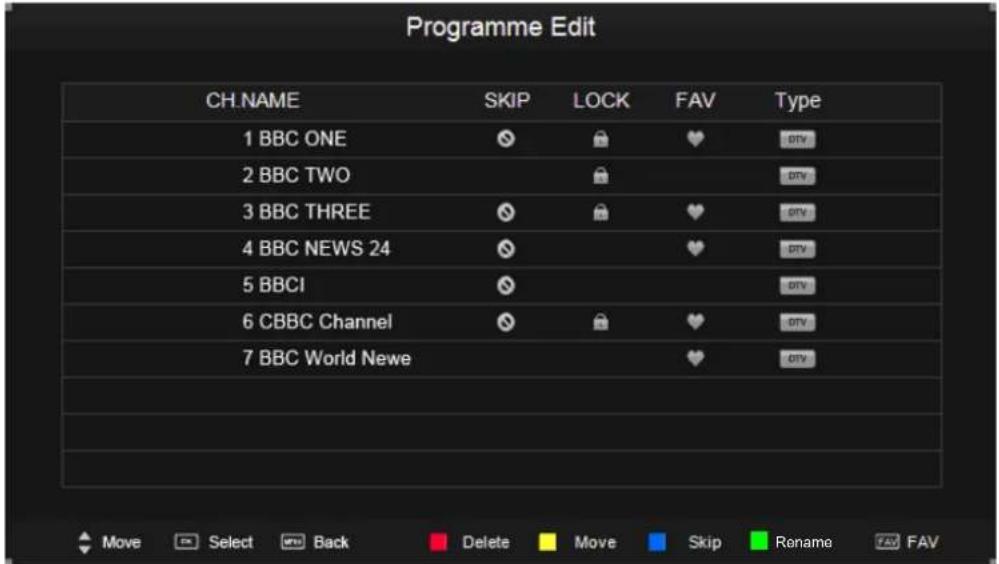
Delete: Select a channel and press RED button, "Delete" will appear on the right of the program edit menu next to the channel you have chosen, then press RED button again, the program will be deleted. However if you decide not to continue to delete press the menu button to quit.
Move: Select an channel, and press YELLOW button, then you can use ∧ and ∨ buttons to change the position of the program, press YELLOW again to confirm the change. Press menu to exit and it will automatically save the current set.
Skip: Select a channel and press the BLUE button to label the channel, as long as the channel has a skip label it will be skipped when searching through the channels with the CH+/- buttons.
Rename: Select an ATV channel and press the GREEN button to change the name of the channel by ∧ ∨ < > buttons
FAV: Select a program, press FAV button to set or delete the program as the favorite channel.
Signal Information
Display the signal information in DTV mode.
CI Information
Please contact your "pay perview" provider who can supply a viewing card and cam unit with instructions for their use.
Software Update(USB)
Press OK button to enter the menu, and update the software by the USB device.
OSD Menu
2. PICTURE menu
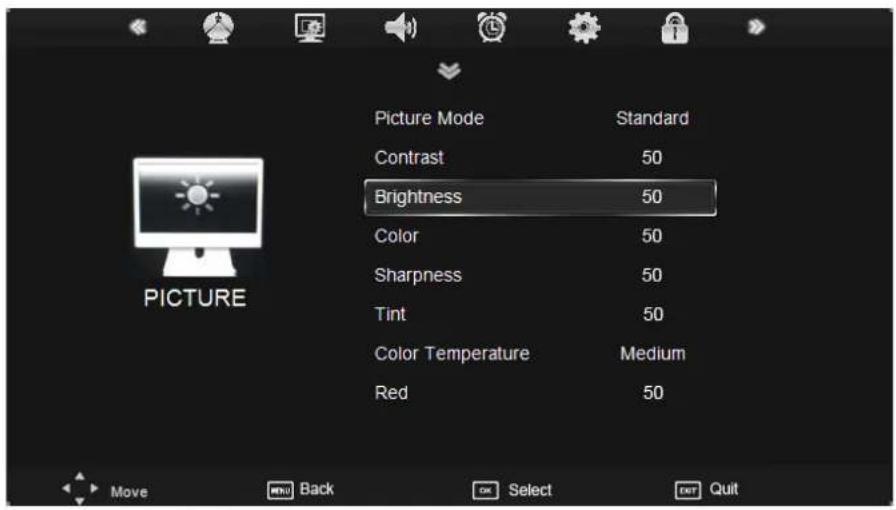
Description
Picture Mode: Choose from Standard, Dynamic, User and Mild.
Note: Contrast, Brightness, Color and sharpness are only available and can be adjusted in the User mode option in the Picture Mode Settings.
Contrast: Controls the difference between the brightest and darkest regions of the picture.
Brightness: Controls the overall brightness of the picture.
Color: Control the color.
Sharpness: Increase this setting to see crisp edges in the picture; decrease it for soft edges.
Tint: Controls the tint (NTSC mode only).
Color Temperature: Choose from Medium, Cool, User and Warm.
Red: Controls the red colour of the picture.
Green: Controls the green colour of the picture.
Blue: Con trols the blue colour of the picture.
Aspect Ratio: Choose from 4:3, 16:9, Zoom1, Zoom2, Just Scan and Panorama.
Note: The aspect ratio modes you can select according to the input source.
Noise Reduction: Choose interference noise modes form Off, Low, Middle, High and Default.
Screen(PC mode only): Press OK button to enter the submenu to adjust Horizontal / Vertical position, Size or Phase of the picture.
OSD Menu
3. SOUND menu
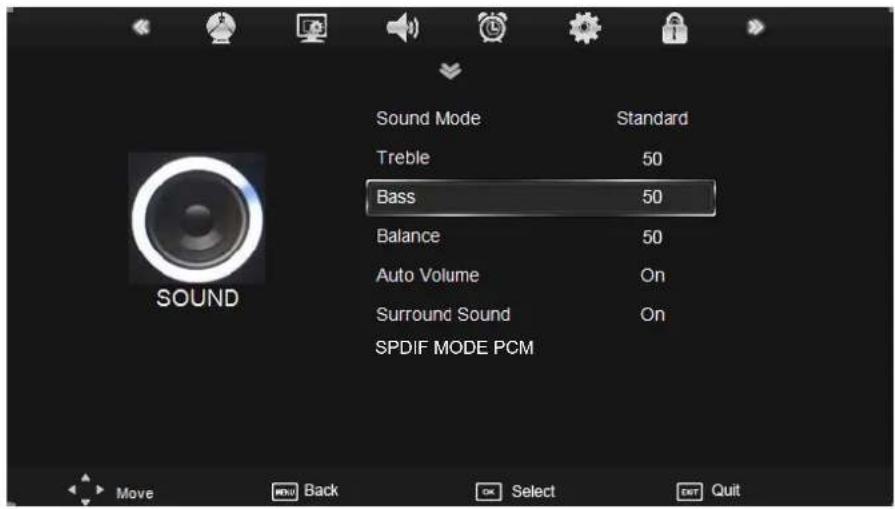
Description
Sound Mode: Allows you to select among: Standard, Music, Movie, Sports and User.
Treble(Could be adjusted when the sound mode is User): Controls the relative intensity of higher pitched sounds.
Bass (Can be adjusted when the sound mode is set to User): Controls the relative intensity of lower pitched sounds.
Balance: To adjust the balance of the left and right sound track, or turn off the volume of the left and right sound track.
Auto Volume: Control the volume of the program automatically when you turn on the function by selecting "On".
Surround Sound: Turn on/off the surround sound function by selecting "off"/"surround".
SPDIF MODE: Allows you to select among: Off, PCM and Auto.
OSD Menu
4. TIME menu
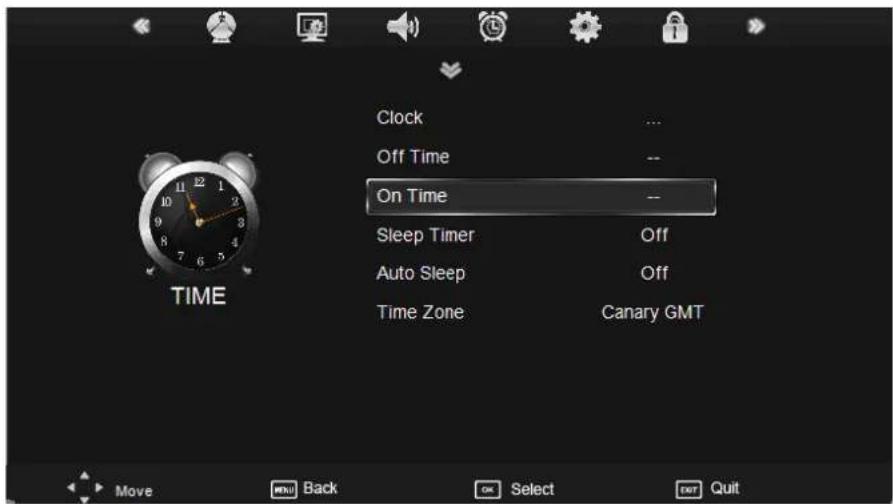
Description
Clock: Use the < and >buttons to select the position, and use the ∨ and ∧ buttons to set the time.
Note: User can not change time manually during DTV mode, for time is from signal source directly.
Off Time: Press OK button to enter the submenu, you could set the time when the TV set will be turned off automatically, you could also set the frequency.
On Time: Press OK button to enter the submenu, you could set the time when the TV set will be turned on automatically, you could also set the frequency, volume and program.
Sleep Timer: Allows you to setup the sleep timer among: 10min, 20min, 30min, 60min, 90min, 120min, 180min, 240min and off.
Auto Sleep: Turn on/off the auto standby function.
Time Zone: Allows you to select the time zone.
OSD Menu
5. OPTION menu
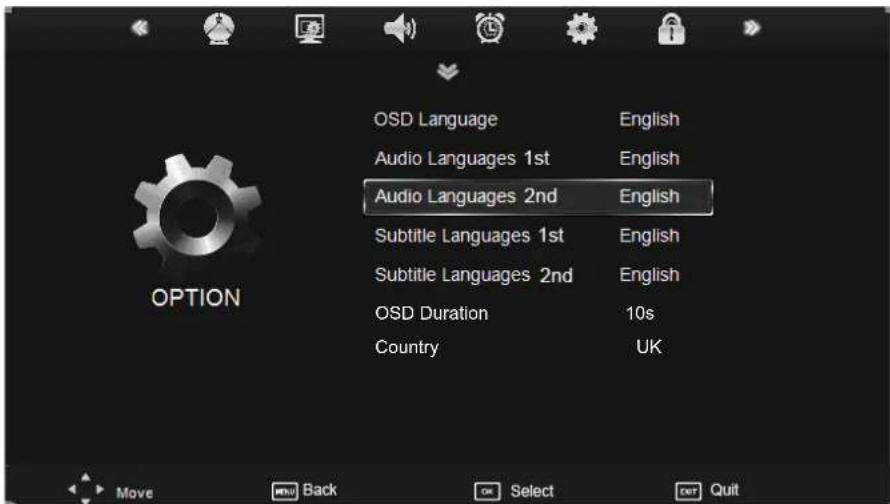
Description
OSD Language: Allows you to select menu language.
Audio Language 1st/2nd (can be selected in DTV mode): Allows you to select first and second audio language.
Subtitle Language 1st/2nd (can be selected in DTV mode): Allows you to select first and second subtitle language.
OSD Duration : Allows you to setup the time of the menu display on the screen among: 5s, 10s, 15s, 20s, 25s, 30s, 35s, 40s.
Country: Display the current Country, and you should select the Country when you want to auto tuning.
Restore Factory Default: Press OK button to restore factory default.
OSD Menu
6. LOCK menu
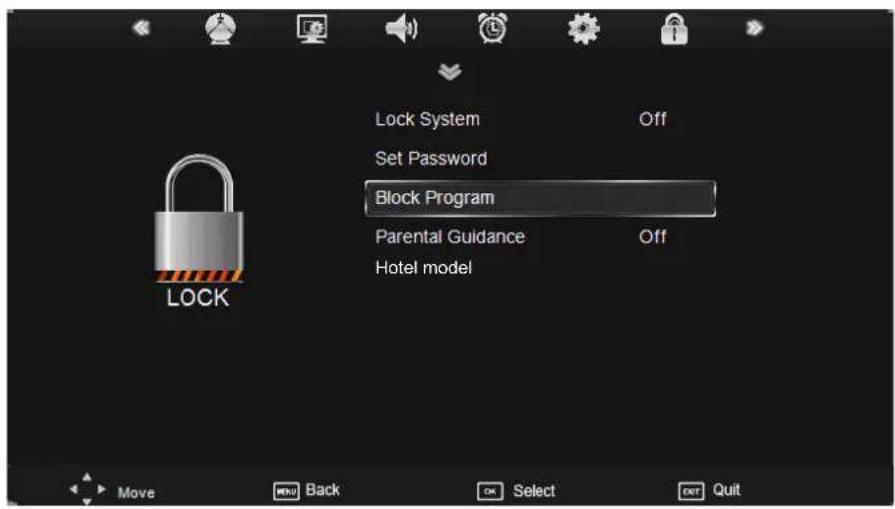
Description
Lock System: Turn on/off the Lock System function.
Note: You should enter the code to operate the menu.(original code is 0000)
Set Password: Set pin code. If the Pin code has been changed you must enter the present code.
New : Enter the new password.
Confirm: Enter the new password.
Block Program: Lock the channel, you have to enter the code to view the channel. Use and buttons to select the channel, and press the GREEN button on the remote control to
lock the channel or canel.
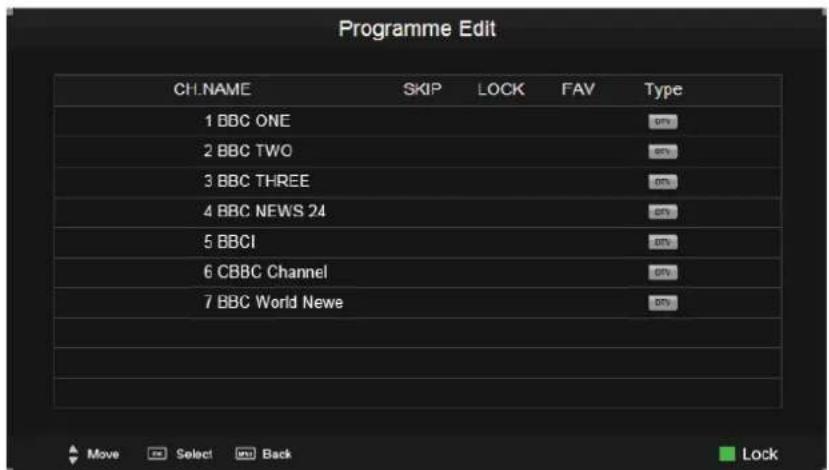
Parental Guidance: Allows you to select the Parental Guidance mode.
OSD Menu
Hotel Mode
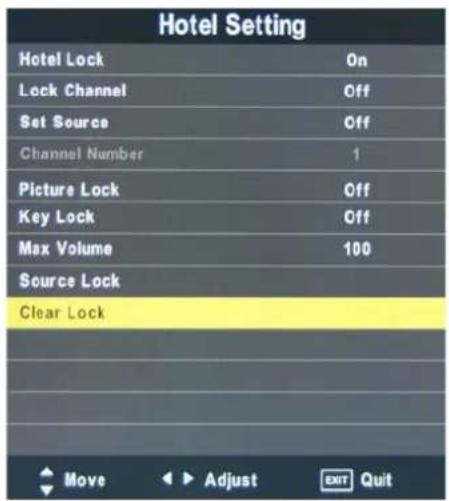
Hotel Lock : Press ▲ and ▼ to select Hotel Lock and press ▶ to select the ON or OFF.
Lock Channel : If current SOURCE LOCK is TV, press ▲ and ▼ select CHANNEL LOCK and then use ▶ to select the ON or OFF. When choosing on, in channel menu, user can not operate the singal channel receiving, channel editing and so on.
Set Source: Press ▲ and ▼ to select Set Source and press ▶ button to select the source for the initial input source.
Channel Number: If Set Source is TV / DTV Radio or DTV Video, press ▲ and ▼ button select Channel Number and then use ▶ to select the program number.
Picture Lock: Press ▲ and ▼ to select Picture Lock, if Picture Lock is On, the picture menu will not be shown.
Key Lock: Press ▲ and ▼ select Key lock and then use ▶ to lock the buttons on the TV set.
Max Volume: Press ▲ and ▼ select Max Volume and then use ▶ to select the max volume of the sound.
Source Lock: Press ▲ and ▼ to select Source Lock and press ▶ to select the source for prohibiting any external input.
Note: The current using channels can not be locked.
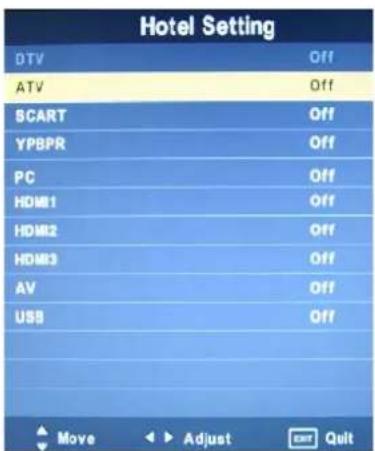
Clear Lock : Press ▲ and ▼ to select Clear Lock and press ▶ to cancel all the settings of lock, it means set all the locks to OFF; preset channel to OFF, max volume to 100.
Multimedia Operation
Basic Operation
1). Press the INPUT button on the remote control to display the input source menu, select USB source by the ◀ / ▶ buttons, and press OK button to enter the Multimedia menu seen below.
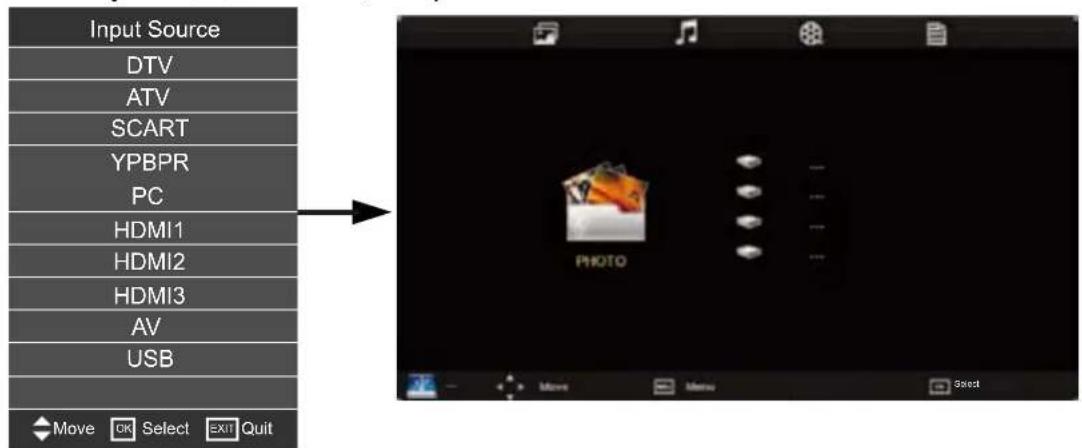
2). Insert USB device, you will find the name of the device display on the screen.
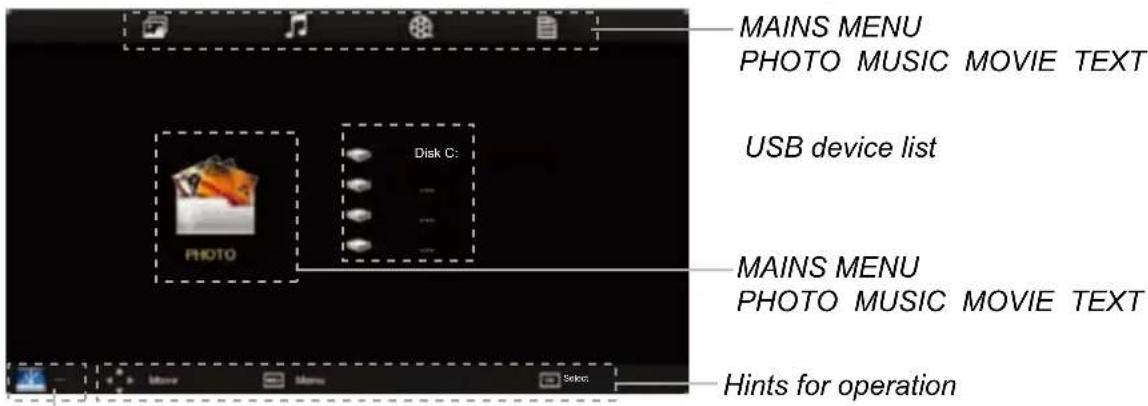
Hints and informations of USB device
3). Press to select the kind of the files in the device you want to program from PHOTO, MUSIC, MOVIE and TEXT. Press ∧/button to select the device and press OK button to enter.
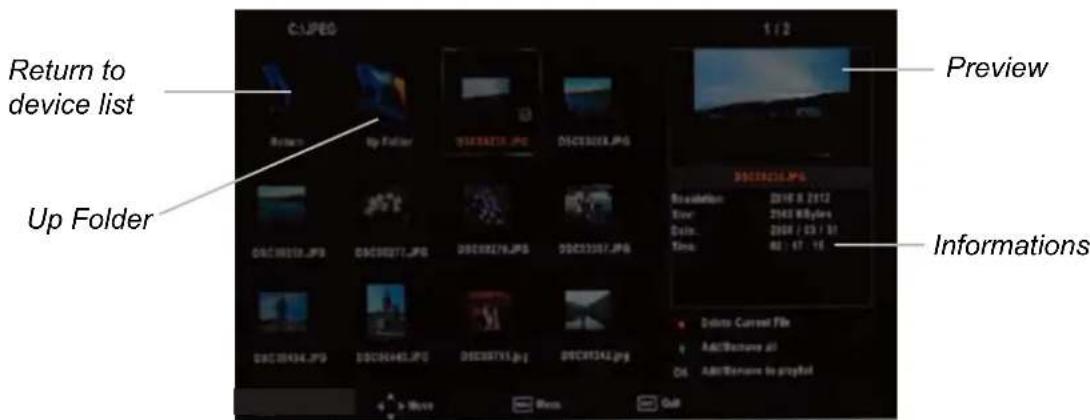
Press / ∧/∨ buttons to move, and press OK button to select the file or unfold the folder, Then press ▶ button to program the files (be signed) you select or the files in the fold you select, You can display the option table on the bottom of the screen by OK button, press ■ button to hide. Press ■ button to stop and exit the full screen program.
Multimedia Operation
1. Photo
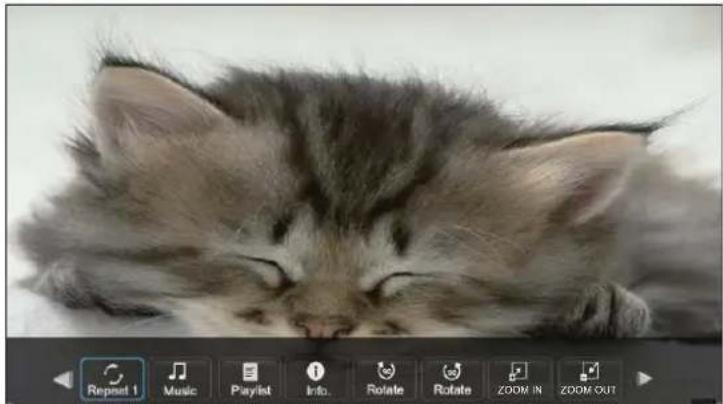
Play the photo
natural_image
Close-up photo of a fluffy kitten sleeping on a keyboard (no text or symbols visible)Press </> button to select the option on the table, and press OK button to change.
Repeat: Select the repeat mode from Repeat All, Repeat 1, Repeat None.
Music: Play/pause the music program (you can only play or pause the music you have programmed).
Playlist: Display the playlist on the screen, and you can select the photo by button, and press OK button to program. Press </>button to return to the options table.
Info: Display the information of the photo.
Rotate: Rotate the photo clockwise/counterclockwise.
Zoom Out/In: Zoom out/in the photo.
Move View: Move the photo in Zoom in mode.
2. Music
Play the music
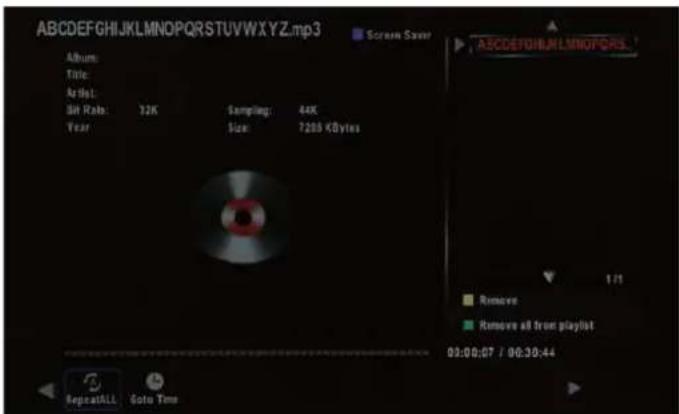
Press </> button to select the option on the table, and press OK button to change.
Press button to select the music, and press OK button to program.
Repeat: Select the repeat mode from Repeat All, Repeat 1, Repeat None.
Goto Time: Program the music form the time you set.
Press OK button to display the time table, and select the position by <//> button, set the time by the number buttons, select "OK" and press OK button to search.
Screen Saver: Press BLUE button to enter the Screen Saver mode, press again to exit.
Multimedia Operation
3. Movie
Play the movie
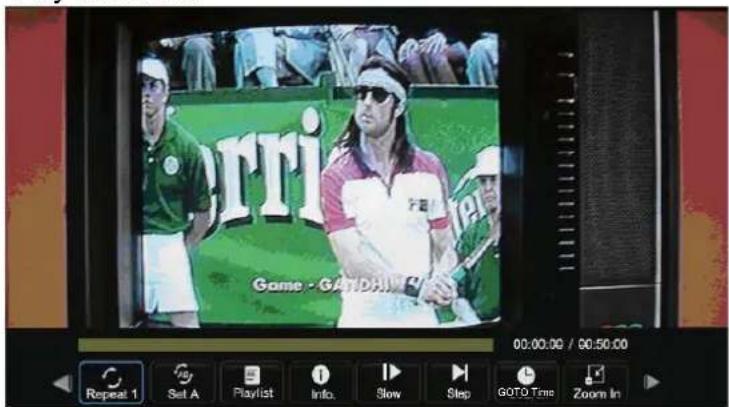
Press <//> button to select the option on the table, and press OK button to change.
Repeat: Select the repeat mode from Repeat All, Repeat 1, Repeat None.
Set A-B: Select and play the preferable paragraph of the program by setting A and B at the beginning and end, and there will be a sign on the left screen, press OK button again to cancel.
Playlist: Display the playlist on the screen.
Info: Display the information of the movie.
Slow: Play the programs at slow speed, press ▶/play button to cancel.
Step: Step the programs by OK button, press ▶/play button to cancel.
Goto Time : Program the movie form the time you set.
Zoom out/in: Zoom out/in the movie screen.
Aspect Ratio: Select the aspect ratio of the screen display.
Move View: Move the photo in Zoom in mode.
4. Text
Play the text
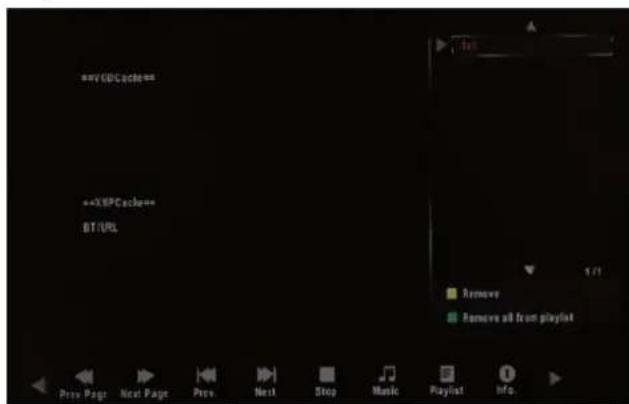
Press </> button to select the option on the table, and press OK button to change.
Prev/Next page: Turn to previous/next page of the text.
Prev./Next: Turn to previous/next file.
Stop: Stop auto turning pages.
Music: Play/pause the music program.
Playlist: Display the playlist on the screen.
Info: Display the information of the text.
Recording Operation
PVR settings
Press the MENU button, and select CHANNEL menu.
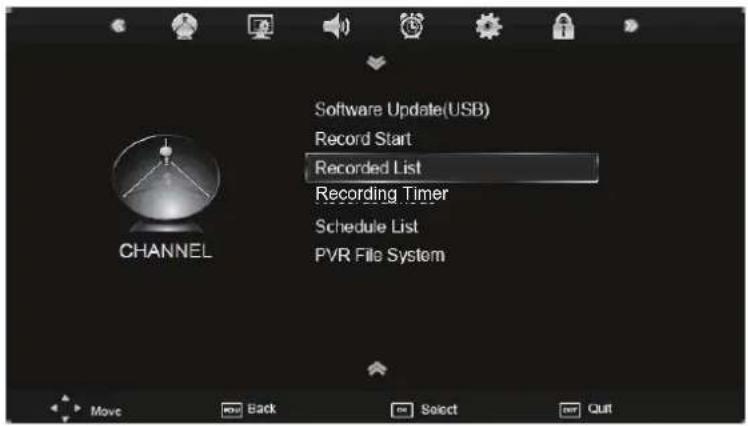
1). Recorded List
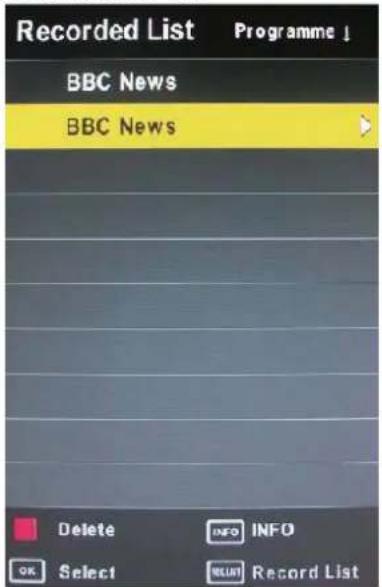
Display the recorded list
Recorded list: Display the Recorder List menu, and changed the mode of program.
INFO: Display the information of the program you recorded.
RED button: Delete the program you select.
2). Recording Timer
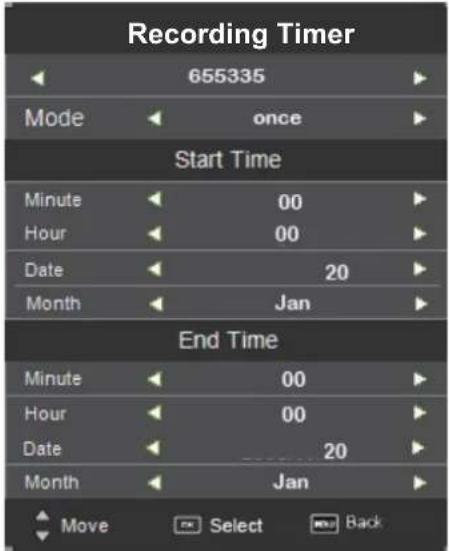
Set the Recording Timer
The TV will record the program automatically according to your settings.
TITLE: Display the name of the recording program.
MODE: Select the record mode.
Start Time: Set the start recording time.
End Time: Set the end recording time.
Press OK button to save the setting and exit the menu.
Recording Operation
3). Schedule List
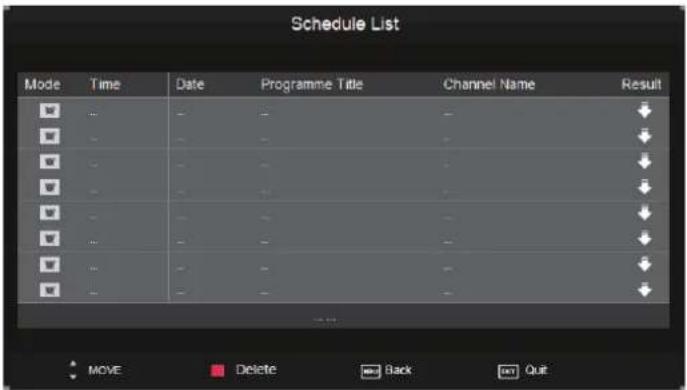
Display the recorder shedule
Note: a. Could't add shedules which have existent on the list;
b. Could't add shedules when the list is full, you have to delete some schedules;
c. You could delete a schedules by RED button on the remote control.
4). PVR File System
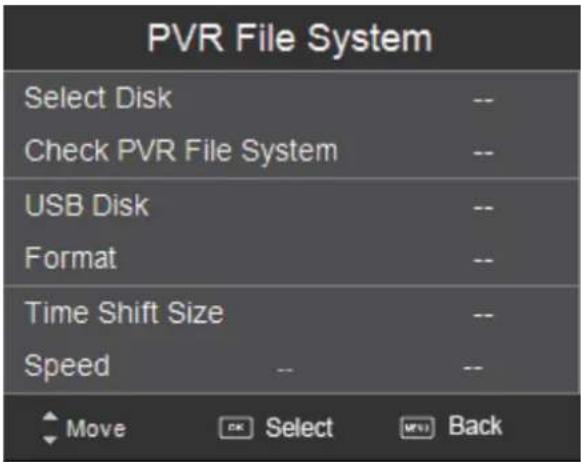
Setup the PVR File system before you start recording.
Select Disk: Select the device for the Record files.
Check PVR File System
USB Disk: Display the USB state.
Format: Format the USB device for PVR operating.
Time Shift Size: Display the size of the USB device (The device has been formatted).
Speed: Display the speed of the USB device (The device has been formatted).
Recording Operation
5) Record Start
When you finish the settings above, you could start recording by select Record Start in the menu and press OK button in DTV mode. (You can also start recording by press the ● button on the remote control)
Record buttons
● Recording: Press to enter the recording mode.
II PAUSE: Press to enter the timeshift mode.
Recording list: Press to display the recording list.
■Stop: Press to stop recording.
Recording menu
When you press ● REC button, the screen will display the recording menu as below:

Full mode

Simple mode
Note: a. You could change the mode of Recording menu by Exit button.
b. Press STOP button to exit the recording mode.
c. Press PLAY button to play the program you are recording from the beginning.
d. Press Recording list button to display the Recorder list, and you could play the program you selected. The recording will be going on, and the Recording menu will display when you exit the Recorder list.
Timeshift
Press PAUSE button to enter the Timeshift mode, and the picture will be paused, the recording will begin.
Note: a. You could change the mode of Timeshift menu by Exit button.
b. Press STOP button to exit the Timeshift mode.
c. Press PLAY button to play the program you are recording from the beginning.
Playback
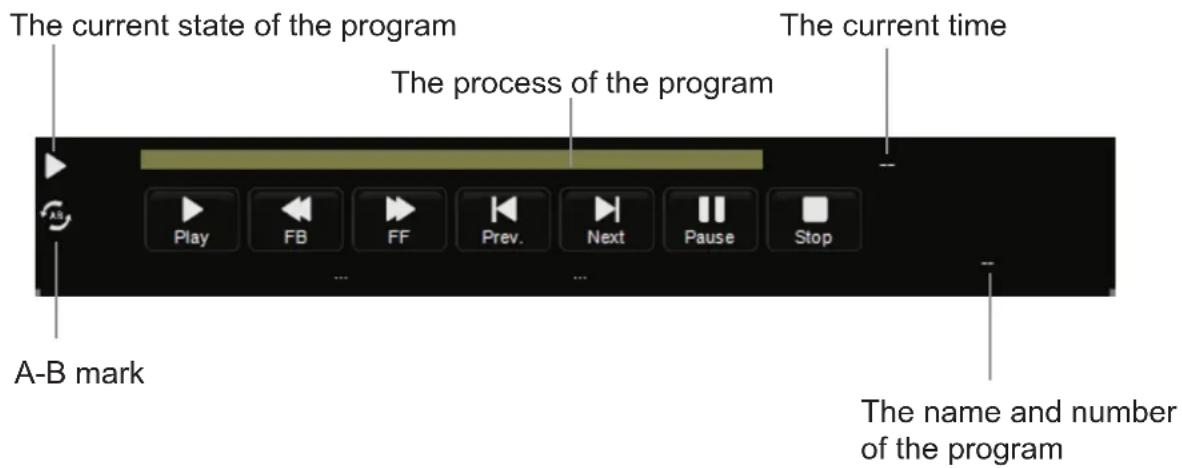
Trouble shooting
- Do not use other functions that are not mentioned in this user's manual.
- In case a problem occurs with your TV, please take the following steps first.
- If you still have the problem, turn the power off and contact your dealer or an authorized service center.
| noitcAmelborP | |
| The screen does not appear. | Is the power plug pulled out? Insert the power plug.Press the power button of the remote control. |
| The screen appears tooslowly after the power is turned on. | This problem occurs for a brief time in the process ofimage elimination processing in order to hide temporary screen noisethat occurs when the power is turned on. But if the screen does notcome after 1 minute contact your dealer or an authorized servicecenter. |
| Screen is too bright or too dark. | Perform brightness adjustment or Contrast adjustment. |
| Screen is too large or too small. | Adjust the screen size. |
| Stripes appear on the screenand it shakes. | Stop using wireless telephones, hair driers and electric drills. |
| The screen does not move. | Press the PAUSE button. Check if the Pause button is pressed onexternal equipment. |
| Screen appears, Voice is not heard | 1. Press the "MUTE"button.2. Increase the sound level by pressing volume adjustment button.3. Check if sound terminal of external input is connected properly.4. Check if audio cables are connected properly.5. Select and check the other input.If the sound still does not work and the other channels are thesame after you have done as the above, contact your dealer oran authorized service center. |
| Remote control does not work | 1. Check if main power is On.2. Check that the batteries of the remote controller were loadedproperly.3. Check to see if any obstacle exists between the TV andthe remote control , then remove it, if any.4. If the batteries have no power, replace them with two newbatteries. |
- This TV is for household use and registered as harmless on electromagnetic waves.
• Therefore, you can use it in every location as well as residential areas.
Electric and electronic equipment and included batteries contains materials, components and substances that can be hazardous to your health and the environment, if the waste material (discarded electric and electronic equipment and batteries) is not handled correctly.
Electric and electronic equipment and batteries is marked with the crossed out trash can symbol, seen below. This symbol signifies that electric and electronic equipment and batteries should not be disposed of with other household waste, but should be disposed of separately.
As the end user it is important that you submit your used batteries to the appropriate and designated facility. In this manner you make sure that the batteries are recycled in accordance with legislature and will not harm the environment.
All cities have established collection points, where electric and electronic equipment and batteries can either be submitted free of charge at recycling stations and other collection sites, or be collected from the households. Additional information is available at the technical department of your city.
- Contents
- Caution
- Correct disposal of this Product
- Safety Information
- Electrical safety
- Physical safety
- Accessories
- Technical Specification
- Product Introduction
- INPUT:
- MENU:
- POWER:
- SWITCH:
- Connections
- Remote Control
- Basic Operation
- Power on/off
- Input Source select
- Basic OSD Menu operation
- OSD Menu
- CHANNEL menu
- Description
- Auto Scan
- DTV Manual Tuning
- ATV Manual Tuning
- Programme Edit
- Signal Information
- CI Information
- Software Update(USB)
- PICTURE menu
- SOUND menu
- TIME menu
- OPTION menu
- LOCK menu
- Hotel Mode
- Multimedia Operation
- Photo
- Music
- Movie
- Text
- Recording Operation
- PVR settings
- 1). Recorded List
- 2). Recording Timer
- Set the Recording Timer
- 3). Schedule List
- 4). PVR File System
- 5) Record Start
- Record buttons
- Recording menu
- Timeshift
- Playback
- Trouble shooting
Brand : DENVER
Model : LED-3255DVBT
Category : Television