
TFD-3250DVBT - Television DENVER - Free user manual and instructions
Find the device manual for free TFD-3250DVBT DENVER in PDF.


| Product Type | 32-inch Widescreen LCD TV with DVD Player and DVB-T |
| Screen Size | 32 inches (diagonal) |
| Display Technology | LCD |
| Power Supply | AC 100-240V, 50/60Hz |
| Speaker Output | 2 x 6W |
| TV Systems | PAL, SECAM (B/G, D/K, I) |
| Audio Systems | NICAM, FM Stereo |
| Built-in DVD Player | Yes (supports DVD, SVCD, VCD, CD, HD-CD, WMA, JPEG, Digital Audio) |
| Tuner Type | DVB-T (terrestrial digital) and Analog |
| Inputs | RF, VGA, VIDEO, S-VIDEO, YPbPr (component), SCART1 (CVBS/RGB), SCART2 (CVBS), HDMI1, HDMI2 |
| Audio Inputs | Audio R/L (for VIDEO/S-VIDEO), PC Audio (for VGA), YPbPr Audio R/L |
| Channel Search | Auto and Manual |
| Program Edit | Delete, Copy, Move, Skip channels |
| Sleep Timer | Yes |
| Teletext | Supported (FLOF, TOP, Normal) |
| Remote Control | Full function remote with TV, DVD, DVB-T, and Teletext controls |
| Safety | Laser class warning; do not open case; disconnect before cleaning; avoid water exposure |
| Cleaning Instructions | Disconnect from power; use soft damp cloth; no chemical solvents on screen |
| Energy Saving | Auto shut-down; standby mode (red LED) |
| Accessories Included | Remote control, power cable, user manual |
Frequently Asked Questions - TFD-3250DVBT DENVER
User questions about TFD-3250DVBT DENVER
0 question about this device. Answer the ones you know or ask your own.
Ask a new question about this device
Download the instructions for your Television in PDF format for free! Find your manual TFD-3250DVBT - DENVER and take your electronic device back in hand. On this page are published all the documents necessary for the use of your device. TFD-3250DVBT by DENVER.
USER MANUAL TFD-3250DVBT DENVER
32" Wide Screen LCD TV with DVD player & DVB-T
TFD-3250DVBT(UT)
natural_image
Line drawing of a flat-screen monitor with a circular base (no text or symbols)USER'S MANUAL
ALL RIGHTS RESERVED
COPY RIGHT DENVER ELECTRONICS A/S
CE
www.denver-electronics.com
Before using your TV, please read this instruction completely, and keep this manual for future reference.
Carefully observe and comply all warnings, cautions and instructions placed on the unit or described in the operating instructions or service manual.
The lightening flash with arrowhead symbol, within an equilateral triangle, is intended to alert the user to the presence of un-insulated “dangerous voltage” within the products enclosure that may be of sufficient magnitude to constitute a risk of electric shock to the persons.

The exclamation point within an equilateral triangle is intend to alert the user to the presence of important operating and maintenance (servicing) instructions in the literature accompanying the appliance.

natural_image
Symbol of a trash bin crossed with a diagonal line, representing waste sorting or disposal (no text or labels)Correct disposal of this Product
Waste Electrical & Electronic Equipment (WEEE)
The crossed out “Wheelie bin” is intended to show that this appliance must not be placed with ordinary household waste at the end of its useful life. To prevent possible harm to the environment or human health from uncontrolled waste disposal, please keep separate from other household waste and recycle it responsibly to promote the sustainable reuse of material resources.
Household users should contact either the retailer where you purchased the product, or their local government office for details of where and how you can take this item for environmentally safe re-cycling.
Business users should contact their supplier and check the terms and conditions of the purchase contract. This product must not be mixed with other commercial wastes for disposal

-
THIS LABEL IS ATTACHED TO THE PLACE AS ILLUSTRATED TO INFORM THAT THE APPARATUS CONTAINS A LASER COMPONENT.
-
THE WARNING LABEL INFORMING OF RADIATION IS PLACED INSIDE THEN UNIT. AS SHOWN IN THE ILLUSTRATION. TO WARN AGAINST FURTHER MEASURES ON THE UNIT. THE EQUIPMENT CONTAINS A LASER RADIATING LASER RAYS ACCORDING THE LIMIT OF LASER PRODUCT OF CLASS

This unit complines with European safety and electrical interference directives.
-The apparatus shall not be exposed to dripping or splashing and that no objects filled with liquids, such as vases, shall be placed on apparatus.
- Mains plug is used as the disconnect device. It shall remain readily operable and should not be obstructed during intended use. To be completely disconnected the apparatus from supply mains, the main plug of the apparatus shall be disconnected from the mains socket outlet completely.
- The mains plug of apparatus should be connected to a mains socket outlet with a protective earthing connection.
- Warning: excessive sound pressure from earphones and headphones can cause hearing loss.
Safety Information
 | Do not place the TV on an unstable surface, it may tip over and cause injury or damage to the LCD screen. |
 | Do not place the TV in a cabinet where airflow is restricted, ensure the ventilation holes are not covered to prevent overheating. Do NOT cover the DC mains adaptor, this will feel warm to the touch and must be allowed to radiate the heat. |
 | Do not use the TV in wet or damp conditions, if water or liquids are allowed to enter the case, disconnect the power and call the Technical Help line. Do not handle the TV or Power adaptor with wet hands. |
 | During an Electrical storm or when going on holiday, disconnect from the mains supply and aerial (if external or rooftop). |
 | Do not place heavy objects on the mains lead or DC supply lead, do not place where they can be stepped on, cut or damaged. If the leads do become damaged please call the Technical Help Line for advice. |
 | Do not drop or damage the TV. If the casing becomes damaged it may cause a safety issue, Do not open the case or Power adaptor, you risk a severe electric shock, injury or death. Do not drop objects into the TV ventilation slots or DVD disc slot. Should an object enter the TV, contact the Technical Help Line for advice. |
 | Do not place the TV near heat sources such as radiators or direct sunlight. |
 | Cleaning the TV. Disconnect from the supply before cleaning. Do NOT use petrol based or chemical cleaning fluids. You may wipe with a soft damp cloth. For stubborn sticky dirt use a dilute detergent solution. |
 | LCD Screen. Do NOT use chemical solvents on the screen surface, sticky finger marks must only be removed with a dilute detergent solution. Occasionally one or two bright dots may be seen on the screen, this is not considered a fault. |
Caution 1
Safety Information----2
Product Feature 4
Getting Started 5
Front View ----5
Rear View----6
Remote Control----7
Basic operation----8
Menu operation----9
Search Menu 9
Picture Menu 11
Sound Menu 11
Timer Menu----12
Setup Menu 12
Screen Menu 13
Source Menu 13
DVD operation----14
System operation----18
DVB operation----20
Simple Troubleshooting----28
Product Feature
- Inputs : VGA, RF, VIDEO, SVIDEO, YPbPr, SCART1, SCART2, HDMI1, HDMI2
- Audio input: Audio R/L, PC Audio, YPbPr Audio R/L
- Support TV mode: PAL, SECAM B/G, D/K, I
- Support NICAM and FM Stereo
- Search TV: Auto/Manual
- Auto-shutting down
- Program exchange and edit
- Speaker output 2x6W
- Power(AC 100-240V 50/60Hz)
Front View
Insert the disc with the mirror side facing towards you
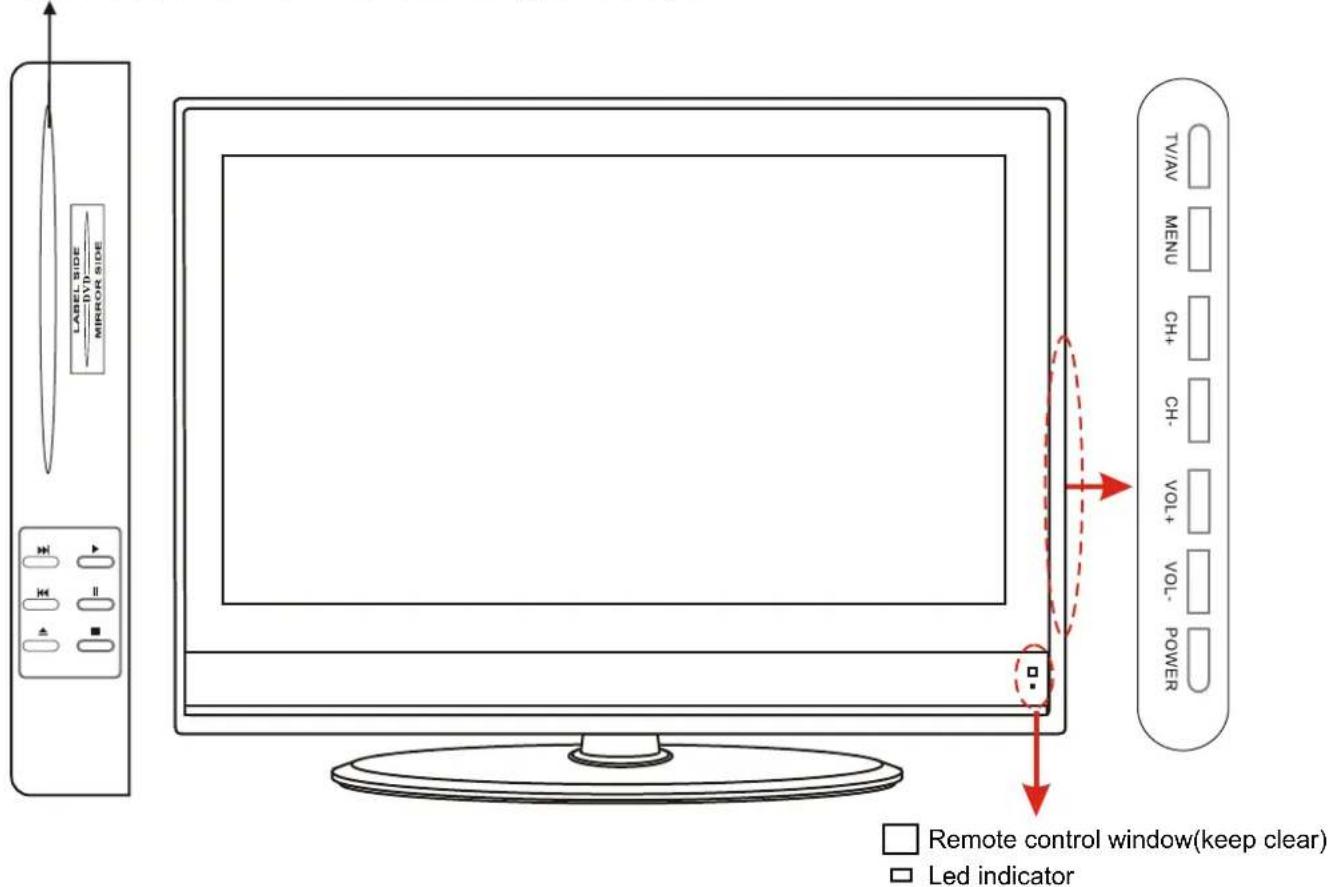
- (IR) Infrared Receiver: receiver IR signals from the remote control. (Power on/standby)LED Indicator: press POWER to turn on and off.
Indicator on(Red)
Standby mode
Indicator off
Power on mode
The effective receiving scope for the signal is 5-8 meters from the front of the remote control window, and 30^ to the left or right side and 20^ above or below the control window.
2 The functions of the buttons are described as bellows:
TV/AV: Press to display the input source menu
MENU: Press to display the OSD menu, Press again to exit the menu.
CH+/-: Press to scan through channels.
VOL+/- : Press to adjust the volume.
Power: Turn on/standby the TV set.
▶ PLAY: Play DVD program.
II PAUSE: Pause DVD program.
■ STOP: Stop DVD program.
NEXT: DVD next chapter.
PREV: DVD previous chapter.
▲ Eject : Load/eject the disc.
Rear View
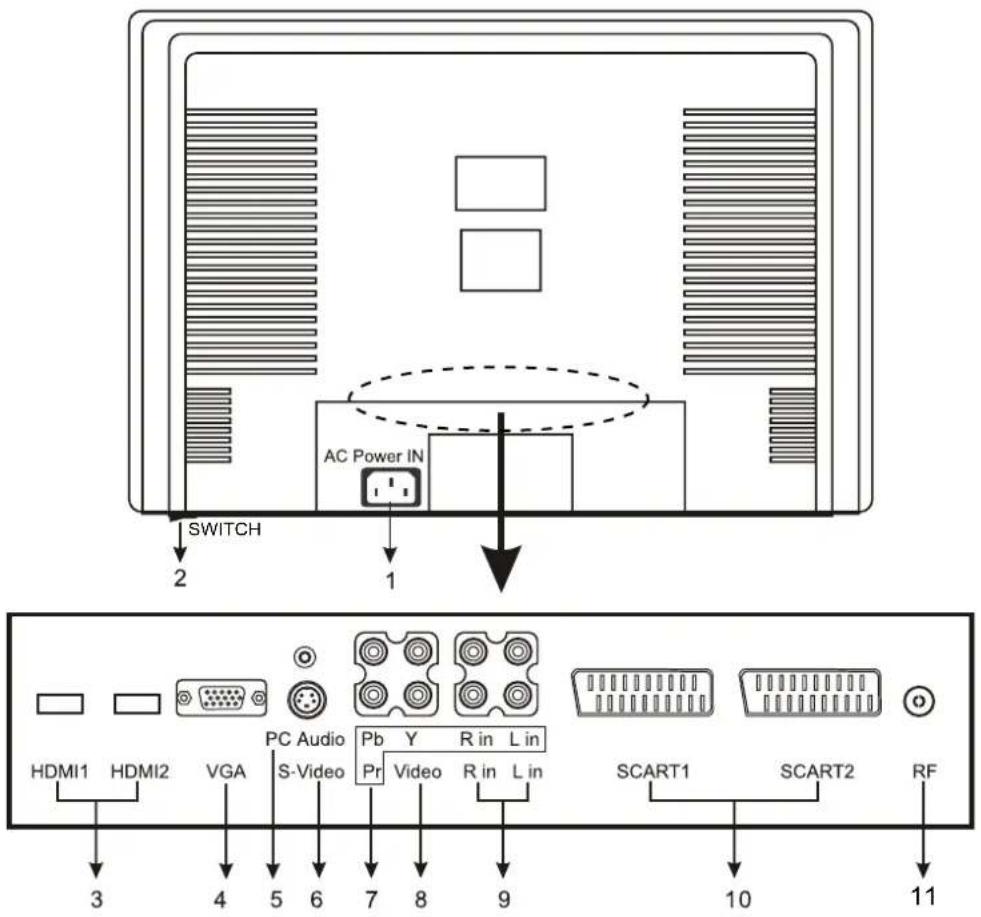
- AC POWER IN: Connect to an earth 100-240V 50/60Hz AC outlet with the Power Cable.
- SWITCH: Turn on/off the AC power.
- HDMI1/2: Connect it to the HDMI of DVD or other equipment.
- VGA: For PC display. Connect it to the D-Sub 15 pins analog output connector of the PC.
- PC AUDIO IN: Connect it to the audio output terminal of PC.
- S-VIDEO: Connect it to S-Video output terminal of DVD.
- YPbPr: Connect them to the video output terminal of DVD.
L/R in: Connect them to the audio output terminal of DVD.
- VIDEO: Connect it to video output terminal of DVD.
-
L/R in: Connect them to audio output terminal of DVD(with VIDEO/S-VIDEO).
-
SCART1/2: Connect them to the composite terminal of DVD.
SCART1 support CVBS and RGB signal inputs.
SCART2 only support CVBS signal input.
- RF: Connect antenna or cable 75 Ohm coaxial to receive TV signal.
Getting Started
Remote Control
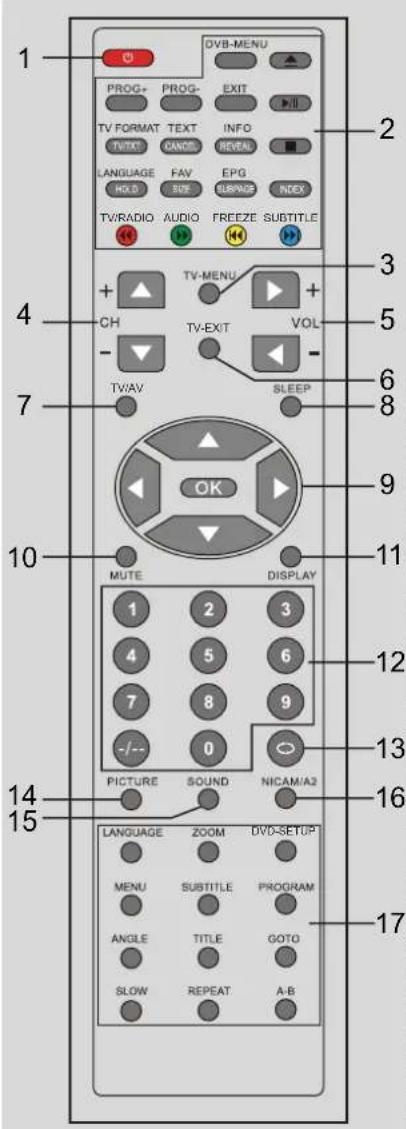
-
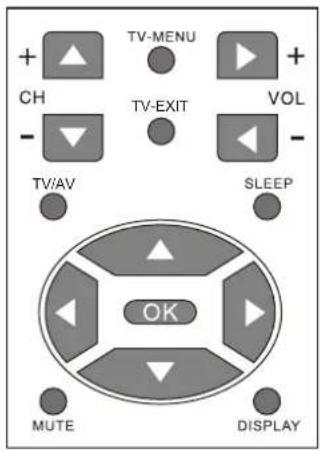
POWER: Turn the TV on or turn it standby
-
TV-MENU: TV system menu
-
CH+/-: Channel up/down
-
VOL+/-: Volume up/down
-
TV-EXIT: Exit from the OSD menu
-
TV/AV: Source select
-
SLEEP: Time shutting down
-
▲▼◀▶ : Cursor buttons for OSD operation
OK: Confirmation
-
MUTE: Silence status or cancel
-
DISPLAY: Display the current mode, of DVD information.
-
0-9, -/--: Choose channel
-
Do to play the latest program
-
PICTURE: Select picture mode
-
SOUND: Select sound mode
-
NICAM/A2
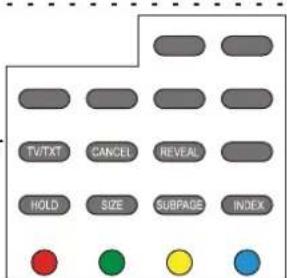
2 buttons for TELETEXT
TV/TXT: Teletext on/off
MIX: Display Teletext on top of the normal TV picture
CANCEL: Turn off the Teletext display
REVEAL: Reveal any hidden text, for example-quiz answer
HOLD: Hold or carry on the current subpage
SIZE: Press to see top half of page double size, Press again to see the bottom half of page double size, Press again for normal size
INDEX: Direct recall of page 100
SUBPAGE: Go to subpage
COLOUR BUTTONS: Short cuts-follow the coloured links in the text
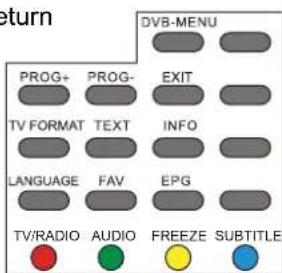
2 buttons for DVB operation
DVB-MENU: To display the main menu on the screen or return to the screen from a menu screen
PROG+/-: DVB program up/down
EXIT: To return to the previous menu and screen
TV FORMAT: To change the picture mode
TEXT: To view the teletext broadcasting program
INFO: Means information, to display brief information concerning the current channel you are viewing
LANGUAGE: To select audio language.
FAV: Means favorite, to display the favorite channel list defined by you.
EPG: To show the Electronic Program Guide during no-menu state only.
TV/RADIO: Disc menu change between TV and Radio
AUDIO: To select Audio L/R
FREEZE: Catch the current picture.
SUBTITLE: To switch the dialog at the bottom of the screen
2 buttons for DVD operation
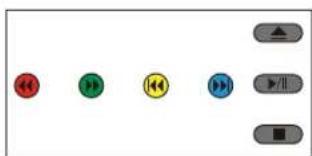
▲ : Load/eject DVD disc
▶ : Play/pause DVD program
■ : Stop DVD program
◀ : DVD fast reverse
▶ : DVD fast forward
: DVD previous chapter
▶: DVD next chapter
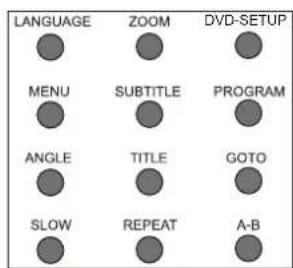
17 buttons for DVD operation
LANGUAGE: Select DVD disc language
ZOOM: Adjust picture size in DVD mode
SUBTITLE: Turn on/off the DVD subtitle display
GOTO: DVD search, Tracks or Chapters
SETUP: DVD system setup
MENU: DVD play list/Disc menu
ANGLE: Select DVD picture angle
TITLE: DVD title
PROGRAM: Edit the program and play
SLOW: play DVD programs at slow speed
REPEAT: Play the title or chapter once again
A-B: Select and play the preferable paragraph of DVD program by pressing this key twice at the beginning and end of it.
Basic buttons on remote control(page 7)

Basic buttons on TV set (page 5)
Power: Turn the TV on/standby
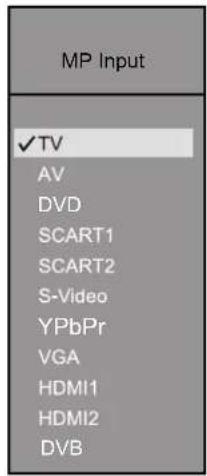
TV/AV: Press the button to display the source menu(see the right picture)
CH+/-:Press to scan through channels.
To scan quickly through channels, press and hold down either channels.
VOL+/-: Press to adjust the volume.
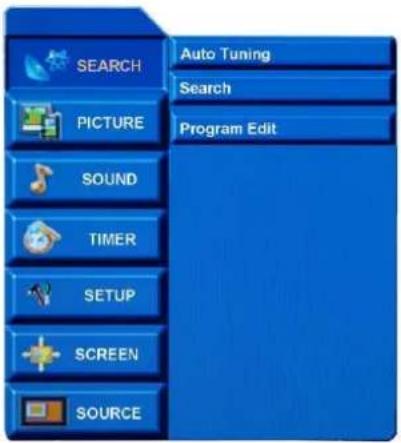
▲▼◀▶ : They are used in OSD menu. When the screen display the OSD menu, Press ▲▼ buttons to select the main menu you like: SEARCH, PICTURE, SOUND, TIMER, SETUP, SCREEN, SOURCE. Press ▶ button to enter the menu, and press ▲▼ buttons to select a submenu, press ▶ button to enter it, or press ◀▶ buttons to adjust/ select.
(you can also use "P+/- V+/-" buttons on the TV set to operation the OSD MENU)
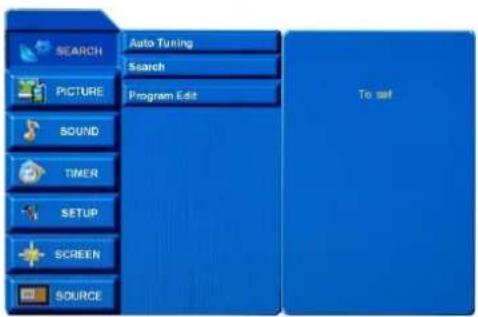
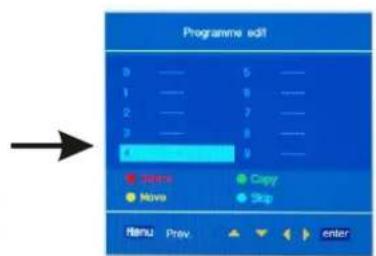
press ▶ button
Picture 1
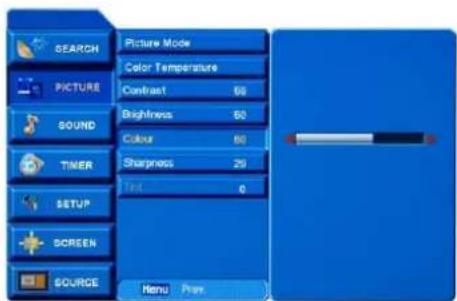
press ◀▶ button
Picture 2
SEARCH MENU(in TV mode)
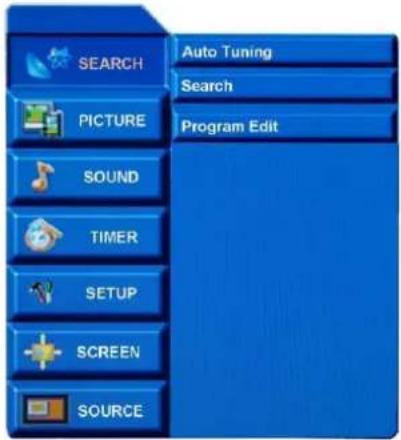
Press TV-MENU button to display the OSD menu, press ▲/▼ button to select the menu "SEARCH", press ▶ button to enter the menu, then you can use ▲/▼ buttons to select the submenu: Auto Tuning, Search, Program Edit.
Press TV-MENU button to return to the main menu, press ▶ button to enter the submenu.
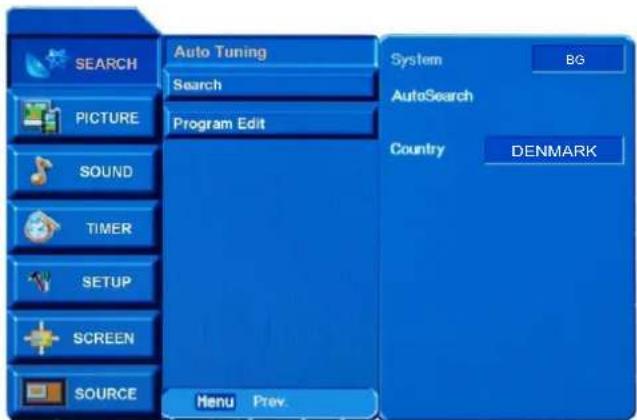
Auto Tuning
Press ▲ /▼ button to select "Auto Tuning" press ▶ button to enter it.
SYSTEM: It is decided by the item "Country"
Country: Press ▲ /▼ button to select "Country", press ◀ /▶ button to select the country as your requirement.
Press OK button to confirm and exit the menu.
AutoSearch: Press ▲ /▼ button to select "AutoSearch", press ▶ button to start Auto search.
When it is Auto searching, you can press TV-MENU button to stop and return to the preview menu.
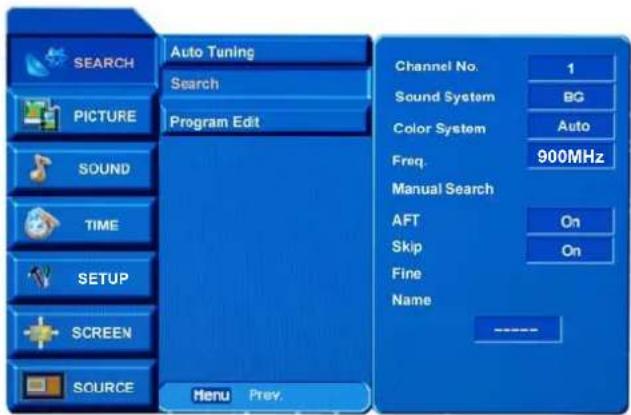
Search
Press ▲ /▼ button to select "Search" press ▶ button to enter it:
Channel No.: Press ▲ /▼ button to select "Channel No.", press ◀ /▶ button to select a channel No.
Sound System: Press ▲ / ▼ button to select "Sound System", press◀/▶ button to select sound system of the program.
Color System: Press ▲ /▼ button to select "Color System", press ◀/▶ button to select color system of the program.
Freq.: Display the current channel's frequency.
Manual Search: Press ▲ /▼ button to select "Manual Search", press ◀ /► button to search backward/forward.
AFT: Press ▲ /▼ button to select " AFT ", Press ◀ /► button to turn on/off Automatic Frequency Control.
Skip: Press ▲ /▼ button to select "Skip", Press ◀/▶ button to turn on/off the function of skip, when the function is turned on, the current channel will be skipped when you scan channels with CH+/- button.
Fine: Press ▲ /▼ button to select "Fine", press ◀/▶ button to fine tuning when the signal of the current channel is weak.
Name: Press ▲ /▼ button to select "Name", press◀/▶ button to select the position of the word, press ▲ /▼ button to select the letter you want.
Press OK button to confirm and return to preview menu.
flowchart
graph LR
    A["SEARCH"] --> B["Auto Tuning"]
    B --> C["Search"]
    C --> D["Program Edit"]
    D --> E["To set"]
    E --> F["Programme edit"]
    F --> G["0 — 5 —"]
    F --> H["1 — 6 —"]
    F --> I["2 — 7 —"]
    F --> J["3 — 8 —"]
    F --> K["4 — 9 —"]
    K --> L[" decreases Copy"]
    K --> M["Move Skip"]
    K --> N["Menu Prev. ▲ ▼ ▶ enter"]
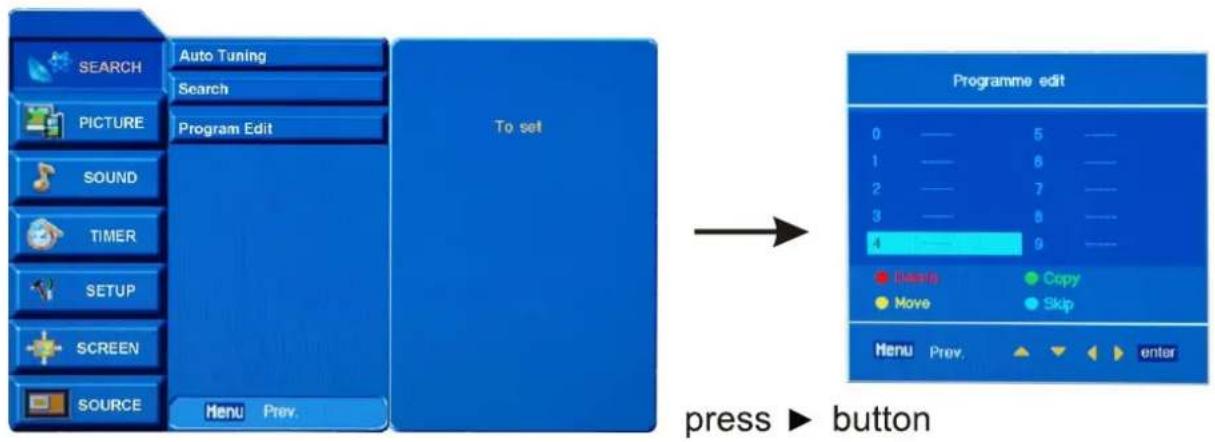
Program Edit
Press ▲/▼ button to select "Program Edit", press ▶button, the screen will display the Programme edit menu.
Delete: Use ▲▼◀▶ buttons to select the channel you want to delete, press OK button to confirm, then press the RED button on the remote control, and the color of the channel will change to red. Press the RED button again to delete, or press TV-MENU button to cancel.
Copy: Use ▲▼◀▶ buttons to select the channel you want to copy, press OK button to confirm, then press the GREEN button on the remote control, and the color of the channel will change to green, then use ▲▼◀▶ buttons to select the channel you want to be copied, and press the GREEN button again to copy, press TV-MENU button to cancel.
Move: Use ▲▼◀▶ buttons to select the channel you want to move, press OK button to confirm, then press the YELLOW button on the remote control, and the color of the channel will change to yellow, then you can use ▲▼◀▶ buttons to change the position of the channel you want, press the YELLOW again to move, press TV-MENU button to cancel.
Skip: Use ▲▼◀▶ buttons to select the channel you want to skip, press OK button to confirm, then press the CYAN button on the remote control, and the color of the channel will change to cyan(means this program is skipped), then press the CYAN button again to cancel.
PICTURE MENU
Press TV-MENU button to display the OSD menu, press ▲/▼ button to select the menu "PICTURE", press ▶ button to enter the menu, then you can use ▲/▼ buttons to select the submenu: Picture Mode, Color Temperature, Contrast, Brightness, Color, Sharpness, Tint(in NTSC mode). Press TV-MENU button to return to the main menu, press ▶ button to enter the submenu.
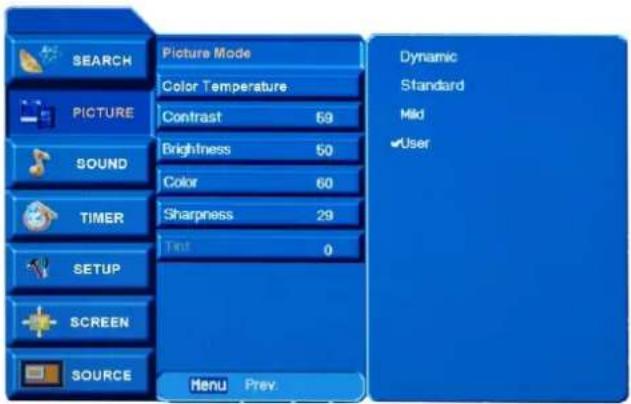
Press ▲ /▼ button to select the menu press ▶ button to enter it. Press OK button to confirm and return to preview menu Picture Mode: Press ▲ /▼ button to select picture mode. Dynamic, Standard, Mild, User. Color Temperature: Press ▲ /▼ button to select Color temp. Cool, Normal, Warm.
Press ▲/▼ button to select the menu Press OK button to confirm and return to preview menu. Contrast: Press ◀/▶ button to adjust the contrast. Brightness: Press ◀/▶ button to adjust the brightness. Color: Press ◀/▶ button to adjust the color. Sharpness: Press ◀/▶ button to adjust the Sharpness. Tint: Press ◀/▶ button to adjust the tint. (only used in NTSC mode).
SOUND MENU
Press TV-MENU button to display the OSD menu, press ▲/▼ button to select the menu "SOUND", press ▶ button to enter the menu, then you can use ▲/▼ buttons to select the submenu: Sound Mode, Balance, Treble, Bass. Press TV-MENU button to return to the main menu, press ▶ button to enter the submenu.
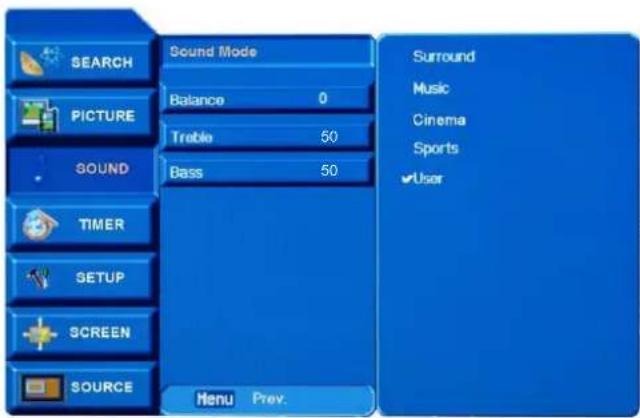
Press ▲/▼ button to select the menu press ▶ button to enter it. Press OK button to confirm and return to preview menu. Sound Mode: Press ▲/▼ button to select sound mode. Surround, Music, Cinema, Sports, User.
Press ▲/▼ button to select the menu Press OK button to confirm and return to preview menu. Balance: Press ◀/▶ button to adjust the balance. Treble: Press ◀/▶ button to adjust the treble. Bass: Press ◀/▶ button to adjust the bass.
TIMER MENU
Press TV-MENU button to display the OSD menu, press ▲/▼ button to select the menu "TIMER", press ▶ button to enter the menu, then you can use ▲/▼ buttons to select the submenu: Clock, Off timer, On timer. Press TV-MENU button to return to the main menu, press ▶ button to enter the submenu.
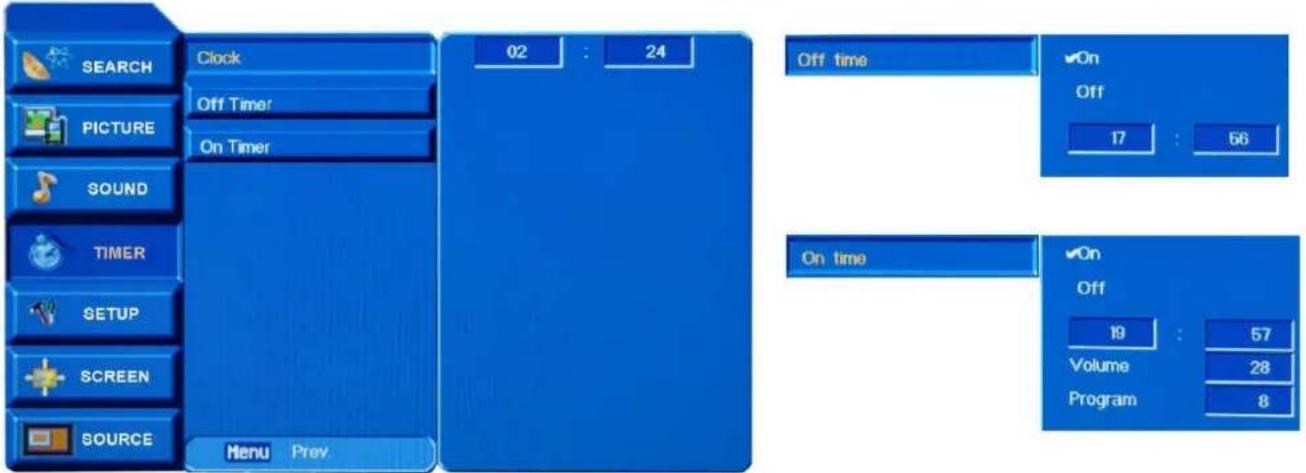
Clock current time: Press ▲/▼ button to select the "Clock", press ◀ /▶ button to select hour or minute, press ▲/▼ button to setup the time.
Off timer: Press ▲/▼ button to select the "Off timer", press ▶ button to enter it, Press ▲/▼ button to select "on", and press ▶ button to enter the time setup item, use ◀▶▲▼ buttons to setup the time you want the TV to be turned off.
On timer: Press ▲/▼ button to select the "On timer", press ▶ button to enter it, Press ▲/▼ button to select "on", and press ▶ button to enter the setup item, use ◀▶▲▼ buttons to setup the time, volume and program you want the TV to be turned on.
Press OK button to confirm and return to preview menu.
SETUP MENU
Press TV-MENU button to display the OSD menu, press ▲/▼ button to select the menu "SETUP", press ▶ button to enter the menu, then you can use ▲ /▼ buttons to select the submenu: Language, Keypad lock, Blue Screen OSD Transparent, TTX Language Group.
Press TV-MENU button to return to the main menu, press ▶ button to enter the submenu.
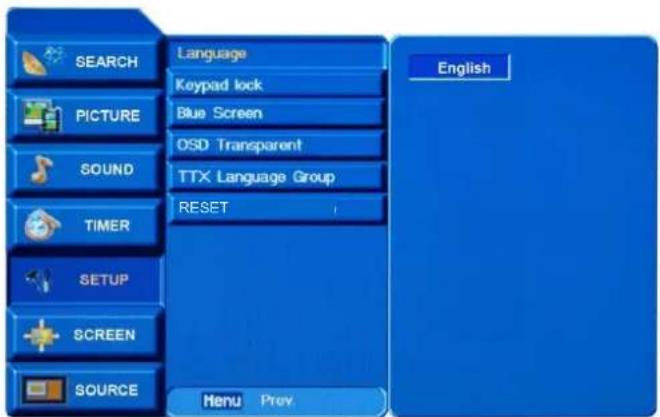
Language: Press ▲/▼ button to select the "Language", press ◀/▶ button to select OSD language you like.
Keypad Lock: Press ▲/▼ button to select the "Keypad Lock", press ▶ button to enter. To lock the keypad by pressing ▲/▼ button to select "off", and it will be turned on by selecting "On".
Blue Screen: Press ▲/▼ button to select the "Blue Screen", press ▶ button to enter, turn on/off the blue screen function by select "On"/"Off".
OSD Transparent: Press ▲ / ▼ button to select the "OSD Transparent", press ◀ / ▶ button to adjust the OSD menu picture's transparent.
TTX Language Group: Press ▲/▼ button to select the " TTX Language Group", press ▶ button to enter, press ▲/▼ button to select the Teletext language.
RESET: Press ▲ / ▼ button to select the "RESET", press ▶ button to enter, press ▶ again to reset.
Press OK button to confirm and return to preview menu.
SCREEN MENU
Press TV-MENU button to display the OSD menu, press ▲/▼ button to select the menu "SCREEN", press ▶ button to enter the menu, then you can use ▲/▼ buttons to select the submenu:
TV, AV, SCART, S-VDEIO mode: Aspect, Noise Reduction
HDTV(YPbPr) source: Aspect, Noise Reduction, H.Position, V.Position
VGA source: Auto sync, Manual config., VGA/XGA mode, Aspect
HDMI source: Aspect, H.Position, V.Position.
Press TV-MENU button to return to the main menu, press ▶ button to enter the submenu.
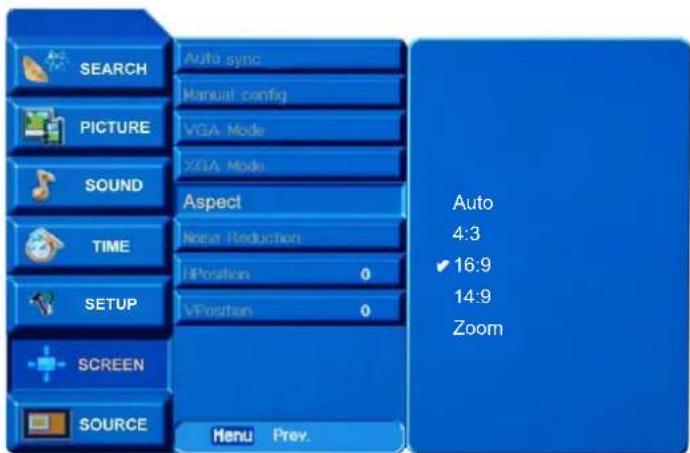
Auto sync: Press ▲ / ▼ button to select "Auto sync" press ▶ button to auto config.(in VGA source)
Manual config.: Press ▲/▼ button to select "Manual config.", press ▶ button to enter, and press ▲/▼ button to select Phase, Clock, H.Position, press ◀/▶ button to adjust.(in VGA source)
VGA/XGA mode: Press ▲/▼ button to select "VGA /XGA mode", press ▶ button to enter, and press ▲/▼ button to select the definition.(in VGA source)
Aspect: Press ▲/▼ button to select "Aspect", press ▶ button to enter, and press ▲/▼ button to select the ratio of the screen.
Noise Reduction: Press ▲ / ▼ button to select "Noise Reduction", press ◀ / ▶ button to turn on/off the noise reduction function.
H/V Position: Press ▲/▼ button to select "H/V Position", press ◀/▶ button to adjust the picture's position.
Press OK button to confirm and return to preview menu.
SOURCE MENU
Press TV-MENU button to display the OSD menu, press ▲/▼ button to select the menu "SOURCE", press ▶ button to enter the menu.
Press TV-MENU button to return to the main menu, or press ▶ button to enter the submenu.
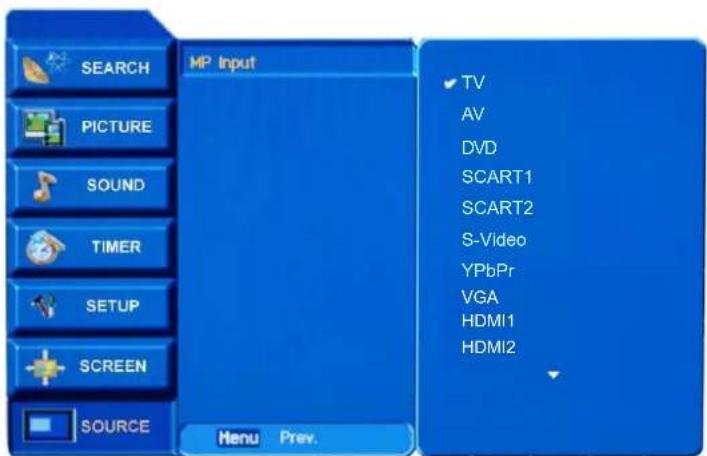
press ▶ button to enter the submenu:
MP Input: Press▲/▼ button to select "MP Input", press ▶ button to enter, press ▲/▼ button to select the input source.
Press OK button to confirm.
Press the Power button on the TV or the remote control, then press the TV/AV button to select DVD mode. If there is no disc in the DVD player the screen will show "NO DISC".
Place a disc
Insert a disc with the mirror side facing towards you. If the disc is double sided, place the title you want to play facing you.
Do not touch the playing surface.
Hold the disc around the outside with your fingers and place the disc into the slot. The player will automatically draw the disc into the player.
To "EJECT" the disc, press the "EJECT" button on the TV or the ▲ button on the remote control.
Play
The contents of each disc vary, as to how the disc was authored and what features are included. Some discs start playing as soon as they have been read, some need "Play" selecting in the Menu. Different play modes are offered, such as Menu Play, Sequence Play and other modes.
Menu Play
- Compatible with DVD, SVCD or VCD2.0.
- If the disc is a DVD, ROOT MENU will appear on the screen. If it is SVCD or VCD 2.0, please press the MENU button to see the menu.
- When a DVD disc is loaded, press the Arrows buttons to highlight the menu item you want to choose. With SVCD or VCD 2.0, press the numeric buttons to select a track to play.
- Return to Menu when Playing: When playing a DVD disc press the Menu button to return to the "ROOT" menu. When playing a SVCD or VCD, and PBC is "on" press the Menu or Return button to return to the disc menu.
Title Play
- Compatible with DVD discs only.
- During DVD playback, press TITLE button to display the DVD title content.
- Press the Arrow buttons to highlight the title you want to choose, and press Enter; also you can press numeric buttons to choose.
- The DVD player begins with the chapter 1 of the chosen title.
Sequence Play
- Compatible with DVD, SVCD, VCD, CD, HD-CD, WMA, Digital Audio disc /JPEG discs.
- When a SVCD or VCD disc is loaded and PBC is "on", press the MENU button once switches the PBC "off". The player can now playback in sequence mode. To turn the PBC back on press the MENU button again.
- Except for SVCD or VCD discs, when in stop state, press the Play button, the player will play in the "Sequence" mode. This is for all compatible discs.
Program Play
- Compatible with DVD, SVCD, VCD, CD, HD-CD, WMA, Digital Audio disc /JPEG discs.
- The Program Playback option allows you to enter the order in which you want chapters or tracks to play, maximum to 16.
- Program Menu: If PBC is on, this operation will turn PBC off while the chapters / tracks play in programmed order.
- According to the highlight, use the Numeric buttons to enter the chapters / tracks in the order you want them to play. Then press Play or use Arrow buttons to highlight the "PLAY" item and press Enter. The chapters /tracks will play in the programmed order. You can program maximum 16 titles / chapters / tracks.
- According to the Direction Indicator on the menu, you can press Arrow buttons to highlight where you want to enter.
-
During Program Playback, if program button is repressed, the program order and the contents will be displayed on the screen, and the Program Playback will be stopped; also you can press Stop and Play to resume normal playback.
-
Notes: To clear the program order, use Arrow buttons to highlight the "CLEAR" item, then press Enter.
To modify the program order, use Arrow buttons to highlight the item you are changing and enter the new chapter / track you want to program directly.
- The program indicator in the screen and the playing chapter / track illuminate.
Additional operation
Selecting Tracks
- Compatible with DVD, SVCD, VCD, CD, HD-CD, WMA, Digital Audio disc /JPEG discs.
- When playing a DVD disc, press Numeric buttons on the menu or title page to select tracks; During DVD playback, you can input desired title numbers directly.
- During sequence playback of a SVCD or VCD disk, press the numeric buttons to select tracks. (During Program Playback and when the PBC is on, you can only press Prev / Next button to select)
- As for CD, HD-CD, discs, press Numeric buttons directly to select tracks.
- When playing WMA, Digital Audio disc/JPEG discs, press Numeric buttons to select different tracks on current track list.
Skipping Tracks
- Compatible with DVD, SVCD, VCD, CD, HD-CD, WMA, Digital Audio disc /JPEG discs.
- To skip forward to the beginning of the next title / chapter / track on a disc, press Next on the remote or the right side of the player.
- To skip backward to the beginning of the preceding title / chapter/track on a disc, press Prev on the remote or the right side of the player.
Multispeed Fast/Slow Motion Play
- Compatible with DVD, SVCD, VCD, CD, HD-CD, WMA, Digital Audio disc /JPEG discs.
- Press the Multispeed Fast/Slow button on the remote during play to search through a disc. Multispeed Fast/Slow has four speeds: x2, x4, x8, x20. With each consecutive press of the button, the search speed increases. If you press the button five times, Fast Multispeed Fast/Slow cycles back to normal play.
- During DVD play, when Multispeed Fast/Slow gets to the beginning of the next title / chapter, it resumes normal play; During SVCD or VCD play with PBC on, when Fast Forward Play gets to the beginning of the next track, it resumes normal play.
Multiphase Slow Motion Play
- Compatible with DVD, SVCD, VCD, CD, HD-CD, WMA, Digital Audio disc/JPEG discs.
- Multiphase Slow has six speeds: 1/2, 1/3, 1/4, 1/5, 1/6, 1/7 of the normal Speed play when pressing the "SLOW" button consecutively when playing discs.
- When you press Play or the "Slow" button 7 times the player returns to normal play.
Freeze Frame
- Compatible with DVD, SVCD, VCD, CD, HD-CD, WMA, Digital Audio disc/JPEG discs.
- During CD, HD-CD, WMA or MP3 / JPEG playback, press Pause once to freeze playback; Press the button again to resume normal playback.
Using the Repeat Feature
- Compatible with DVD, SVCD, VCD, CD, HD-CD, WMA, Digital Audio disc /JPEG discs.
- While a disc is playing, press REPEAT button once and the repeat banner appears to show current repeat mode.
a) In SVCD, VCD, CD, HD-CD, WMA, or Digital Audio disc/JPEG sequence playback mode. Press REPEAT button again to turn on repeat mode. Press the button again on the remote to turn to the next repeat mode. There are three repeat options: Off, Track Repeat and Disc Repeat. With each consecutive press of the button, the repeat mode switches. If you press the button four times, repeat mode cycles back to Off.
b) In DVD playback, press Repeat button again to turn on repeat mode. There are three repeat options: Off, Chapter Repeat and Title Repeat. With each consecutive press of the button, the repeat mode switches. If you press the button four times, repeat mode cycles back to Off.
c) In WMA, Digital Audio disc/JPEG playback, press Repeat button again to turn on repeat mode.
There are four repeat options: Off, Track Repeat, Directory Repeat, and Disc Repeat. With each consecutive press of the button, the repeat mode switches. If you press the button five times, repeat mode cycles back to Off.
Using the Display Feature
- Compatible with DVD, SVCD, VCD, CD, HD-CD, WMA, Digital Audio disc
-
Loadng and playing DVDs (two pages)
-
Press DISPLAY button once to show the first page:
- "Disc Type, Title * / * (the playing title / total titles), Chapter * / * (the playing chapter / total chapters), Elapsed Time of the Disc".
- Press the button again to show the second page:
- "Language */* (the serial number of playing language / the amount of optional languages) or Off, Language Type, Audio Type, Subtitle */ * (the serial number of playing subtitle /the amount of optional subtitles) or Off, Angle */ * (the serial number of playing angle / the amount of optional angles) or Off".
-
Press the button for the third time, the display menu fades out.
-
Loading and playing SVCD discs (two pages)
-
Press Display button once to show the first page:
- "Disc Type, Track */ * (the playing track / total tracks), Mute, PBC, Repeat Mode, Elapsed Time of the Playing Track".
- Press the button again to show the second page:
- "Language * / * (the serial number of playing language/ the amount of optional languages) or Off, Language Type, Audio Type, Subtitle * / * (the serial number of playing subtitle / the amount of optional subtitles) or Off".
-
Press the button for the third time, the display menu fades out.
-
Loading and playing VCD
-
Press Display button once to show the first page:
- "Disc Type, Track */ * (the playing track / total tracks), Mute, PBC, Repeat Mode, Elapsed Time of the Playing Track".
-
Press the button again, the display menu fades out.
-
Loading and playing CD, HD-CD, WMA, Digital Audio disc / JPEG discs
-
Press Display button once to show the first page:
- "Disc Type, Track * / * (the playing track / total tracks), Mute, Repeat Mode, Elapsed Time of the Playing Track".
- Press the button again, the display menu fades out.
Using the Search Feature
-
Compatible with DVD, SVCD, VCD, CD, HD-CD discs.
-
You can use Search feature to select a title/ chapter/track number or go to a specific point in a title. First, press SEARCH button on the remote controller to bring up the search menu and enter the edit state. Secondly, press Arrow buttons to highlight the title / chapter/ track number or the time option; Thirdly, use Numeric buttons to enter the title / chapter/ track you want to play or the elapsed time you want to go to in that title. At last, press ENTER button to start playback. For example, entering 01:23:56 will start playback one hour, twenty-three minutes and fifty-six seconds into the title.
-
Notes
a) This feature does not work in Program Play mode.
b) If PBC is on, it will turn off automatically when Search Playback starts.
c) When playing WMA, Digital Audio disc / JPEG discs, Search Feature does not work.
Changing the Soundtrack or Language
-
Compatible with DVD SVCD, VCD, CD, HD-CD, WMA, Digital Audio disc /JPEG discs.
-
Press the LANGUAGE button to display current soundtrack.
a) Press the button to switch soundtracks.
b) Press the button again on the remote to turn to next soundtrack.
-
When playing a SVCD or VCD disc, there are five soundtracks: Stereo (L/R), L/L, R/R, L/L Auto A/D Detect, and R/R Auto A/D Detect. With each consecutive press of the button, the soundtrack switches. If you press the button six times, soundtrack cycles back to Stereo.
-
When playing a CD, HD-CD, WMA, or Digital Audio disc disc, there are three: Stereo (L/R), L/L, and R/R.
-
When playing a DVD or SVCD disc, press LANGUAGE button to display current language, press the button again to turn to next language if the disc has different languages.
Subtitles
- Compatible with DVD, SVCD discs.
- Press the SUBTITLE button on the remote once, and the subtitle info banner appears
- When a DVD or SVCD is recorded with subtitles, you can use the Subtitle feature to view the subtitles on-screen. By default, subtitles are off. The info banner will display Subtitle Off.
- To display subtitles, press the SUBTITLE button again. The default language with its responding serial number will be displayed in the info banner and subtitles will be displayed in that language. With each consecutive press of the SUBTITLE button, the subtitle switches.
For example, "Language Icon: [1 English DTS 6CH] or [Off]" (the availability of the subtitles are disc-dependent). To turn subtitles off, press the Subtitle button until Subtitle Off is displayed.
Mute the Audio Output
- Compatible with DVD, SVCD, VCD, CD, HD-CD, WMA, Digital Audio disc /JPEG discs.
- Pressing the Mute button allows you to reduce sound to an inaudible level, and the icon of "MUTE" will be displayed on screen. Press the button again or press the Vol +/- button to return to the normal condition.
- If the player has no sound, check that the "Mute" is not on.
Zoom In the Video Image
- Compatible with DVD, SVCD, VCD, JPEG discs.
- The Zoom Function allows you to enlarge the video image.
- Press Zoom repeatedly to activate the function and choose the required zoom factor: Zoom 2, Zoom 3, Zoom 4, Zoom 1 /2, Zoom 1 /3, Zoom 1/4, Zoom Off.
Repeat a Specific Segment on the Disc that You Define
- Compatible with DVD, SVCD, VCD, CD, HD-CD, WMA, Digital Audio disc.
- During normal or fast playback, press the A-B button once. REPEAT "A" appears on the screen. This indicates the start point of the loop.
- Press A-B again, REPEAT A-B will be shown, this indicates the end point of the loop.
- The segment will now be repeated until you press the "REPEAT" button again to turn off the feature.
- Press A-B again to cancel the loop points.
- When playing a SVCD, VCD, or CD disc, you can repeat a specific segment only in one track. When the next track begins, A-B Repeat turns off automatically.
- When playing a DVD disc, you can repeat a specific segment only in one title.
Digital Audio Disc
- Compatible with Digital Audio discs
- The player will search the disc directory automatically and display the contents on screen.
- The player will then start to play the first track, of the selected directory.
- To change directories use the direction buttons.
Disc Care
About Disc Terms
Title
Generally, pictures or music compressed on a DVD are divided into several sections, "title"
Chapter
The smaller section unit of picture or music in a DVD under the title, usually one title is comprised of one or more chapters and each of them is numbered for easy searching, but some discs may not have a recording chapter.
Track
A segment of picture or music on a CD, Each track is numbered for searching.
Care of Disc
Video disc contains high-density compressed data that needs proper handling.
-
Hold the disc with fingers by outer edge and/or the center spindle hole. Do not touch the discs surface.
-
Do not bend or press the disc.
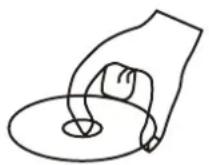


- Do not expose the disc to direct sunlight or heating sources, Stere discs in cabinet vertically, and in dry condition.
Prevent exposure to:
Direct sunlight
Heat or exhaust from a heating device
Extreme humidity
Clean the disc surface with a soft, dry cleaning cloth, Wipe the disc surface gently and radically from center toward the outer edge.
Do not apply thinner, alcohol, chemical solvent, or sprays when cleaning. Such cleaning fluids will permanently damage the disc surface.
System operation
System operation will define the setting of the set; these definitions will be stored until you change them again.
General Steps of Setup Menu
- Pause or Stop the player. Press DVD-SETUP on the remote control. The main menu will be shown, as below.
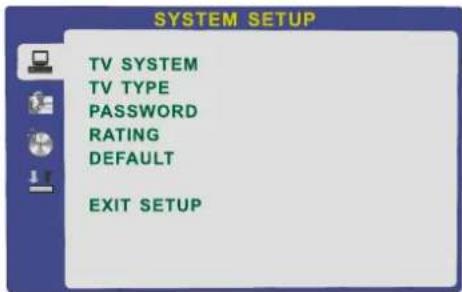
- Press the buttons to select the Icon of the desired section, e.g. "TV System" and press to open that section.
- Press to select the desired feature and again press to open that section.
- Press to select the desired feature and then press "OK" to select the new setting.
5 To exit the menu, press "DVD-SETUP" or ▼ to select EXIT SETUP and then press "OK" When launching the setup routine, the pressing of the following buttons will turn off the setup menu, while the choices that have been changed will be saved.
Menu specification
1. SYSTEM SETUP
The system setup options are illustrated below:
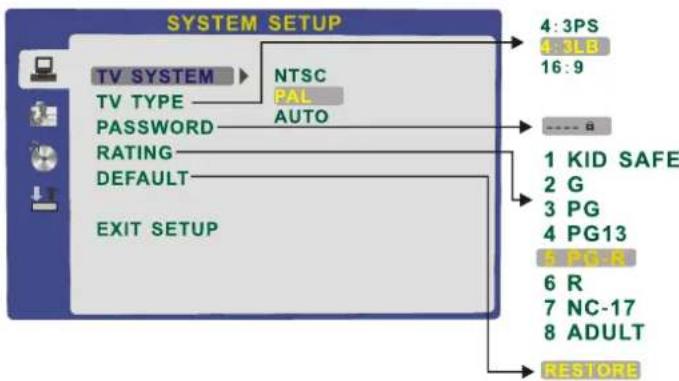
TV SYSTEM
According to the Colour system of your TV, normally this is set to either AUTO or PAL.
PASSWORD
The password option is initialized as locked. You cannot set the ratings limit or change the password. To enable these features you must unlock the Password. The default password is "0000". Using the ▲▼ button, move the highlight to "PASSWORD", press the ▶ button and enter "0000". You will see the padlock symbol open. You may now change the RATING or put in a new password number.
If the Lock symbol is BLUE you must press the ▶ button to enter the lock field, the lock symbol will change to YELLOW, you may now enter a new 4 digit number. Please remember or write down the new Password and keep safe.
RATING
The Rating feature is a rating limit feature, like movie ratings. This helps you to control what DVD the family watches. There are 8 levels of selection, from KIDS SAFE to ADULT. Adult is the "play all" selection.
2. LANGUAGE SETUP
The language setup options are illustrated below:
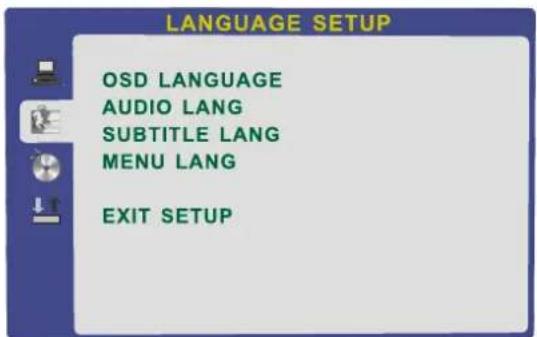
- OSD LANGUAGE: The OSD will display in the language you choose.
- AUDIO LANG: If the disc you are playing has the language you choose, it will output audio in that language.
- SUBTITLE LANG: If the disc you are playing has the language you require you may select this either in the Menu or using the "SUBTITLE" button on the Remote control.
You may also switch this OFF.
- MENU LANG: If the disc you are playing has the language you require you may select this.
3. AUDIO SETUP
The audio setup options are illustrated below:
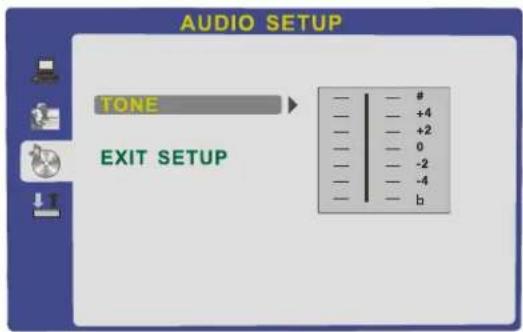
- TONE: Use the button to move the scroll and adjust the tone.
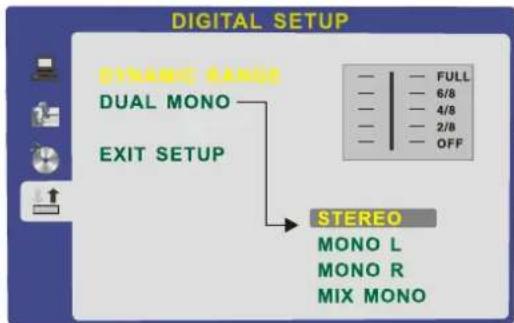
4. DIGITAL SETUP
The video setup options are illustrated below:
- DYNAMIC RANGE: Use the ▲▼ button to move the scroll and adjust the dynamic range.
- DUAL MONO: Choose the mode of the audio output. There are four modes: STEREO, MONO L, MONO R, MIX MONO.
Basic operation
NOTE:
-In this manual, the OSD (On Screen Display) maybe different from your TV's because it is just example to help the TV operation.
-Be sure to select the DVB source before operation.
ENTER MAIN MENU
Press the DVB-MENU on the remote control to bring up the main menu on the screen and press it again to return to the previous menu or return to TV viewing.
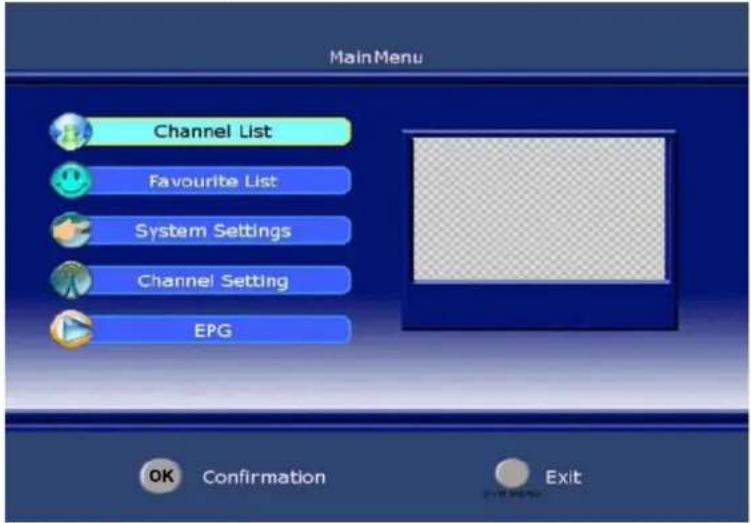
- Press ▲ button select each menu.
- Press ▶ button and then use ▲▼ button to select and adjust the available menus.
- Press DVB-MENU or ◀ button to return to previous menu and press TV-EXIT to return to TV viewing
- Press OK to confirm your settings
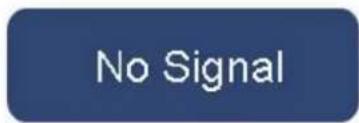
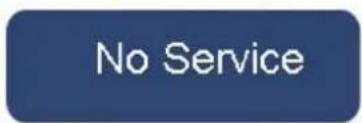
NO SIGNAL OR NO SERVICE
There is no signal or service input
Channel List
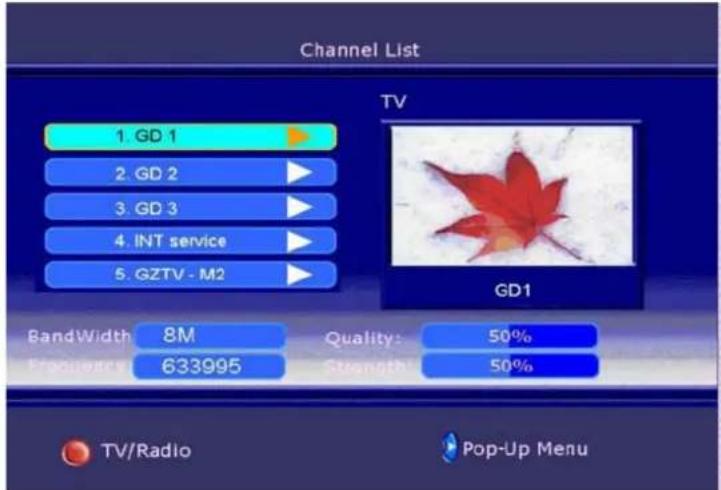
- Press the DVB-MENU on the remote control to bring up the main menu on the screen and use ▲▼ to select the Channel List menu.
- Press the OK to confirm your selection and there will a Channel List menu on the screen as below:
DVB operation
3.There is a channel list of DVB in this menu, also you can refer to the Band Width/ Quality/ Frequency and Strength of channel.
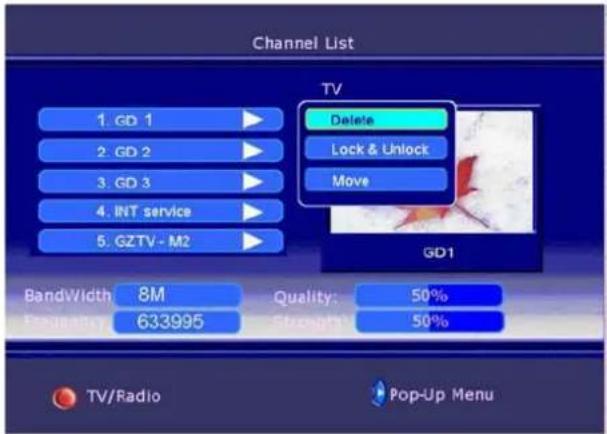
4. Using the ▶ select channel which you like, and press that allow you to delete/ move/ Lock & Unlock it.
Delete
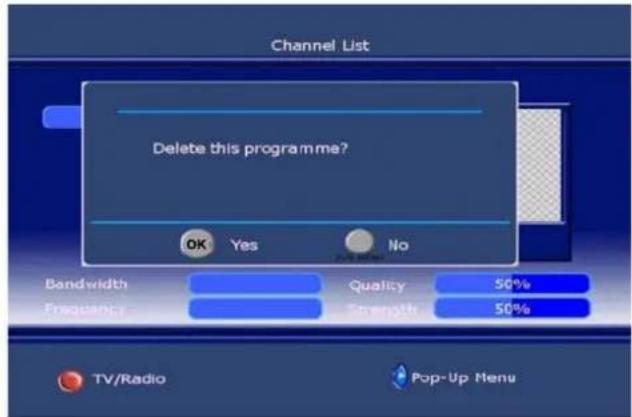
- Press ▲▼ to select the delete item and press OK to confirm it. There is a delete menu on screen as below:
-Press OK to delete the channel and press DVB-MENU to return to previous menu.
-If you want to restore the channel that have been deleted, you should to search again.
Lock & Unlock
-Press ▲▼ to select Lock & Unlock item and press OK to confirm it. There is a pin code menu on screen as below.
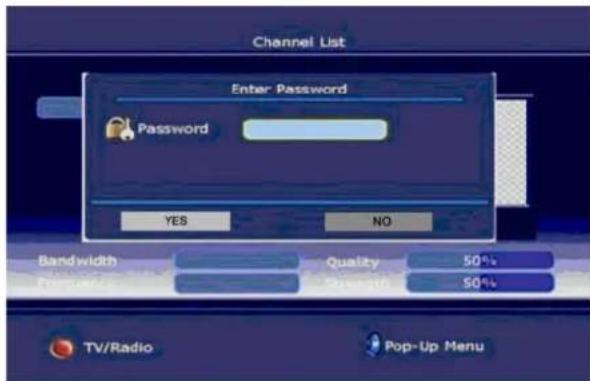
-Press the number buttons directly to input the pin code that made up six number, and the initial is: 888888. You can change it in System Setting.
-If Lock is already set, enter the pin code as requested.
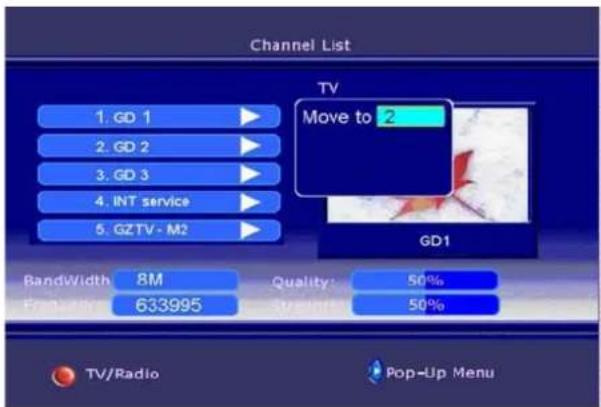
Move
This function allows you to change the order of channel in the list.
DVB operation
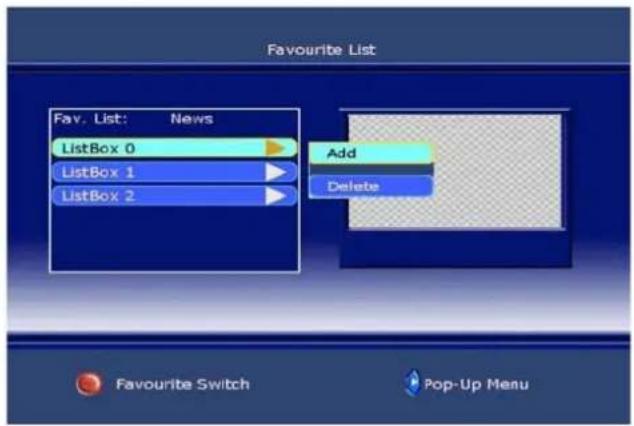
Favorite List
- Press the DVB-MENU on the remote control to bring up the main menu on the screen and use ▲▼ to select the Favorite List menu.
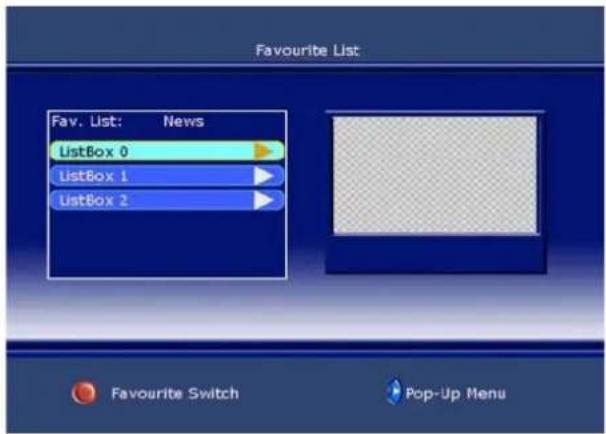
- Press the OK to confirm your selection and there have a Favorite List menu on screen as below
- Press ▶ that you can continue add or delete the favorite channel.
-
Use the ▲▼ to select add item and then press OK to confirm it, there have a Channel list menu display on the right, you can use ▲and OK to select one of them to your favorite list.
-
Press DVB-MENU to return to previous menu, then press OK to TV viewing.
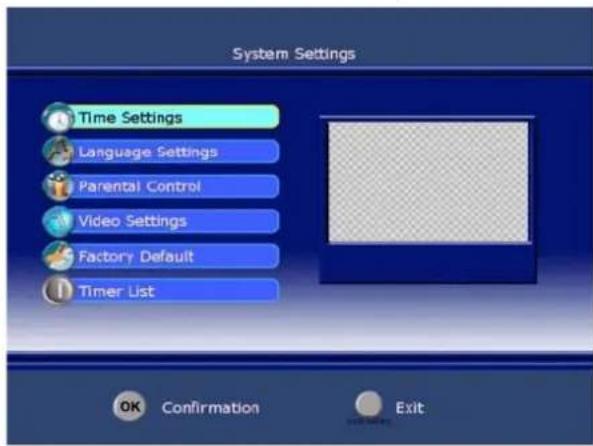
System Settings
- Press the DVB-MENU on the remote control to bring up the main menu on the screen and use ▲▼ buttons to select the System Settings menu.
- Press the OK button to confirm your selection and there is a System Settings menu on screen as below:
Time Settings
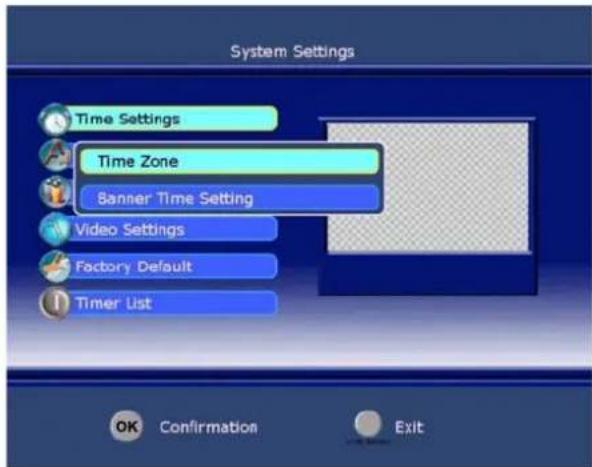
- Use the ⬆ select Time Setting item and then press OK to confirm it
Time Zone
Press ▲▼ to select Time Zone, then press OK to confirm it, you can select the option of GMT+0---8.
Banner Time Setting
This function allows you to set the time of banner display, you can Press ▲ select banner time options:
1 secs/ 3 secs / 5secs/ 7 secs/ 9 secs.
DVB operation
Language Settings
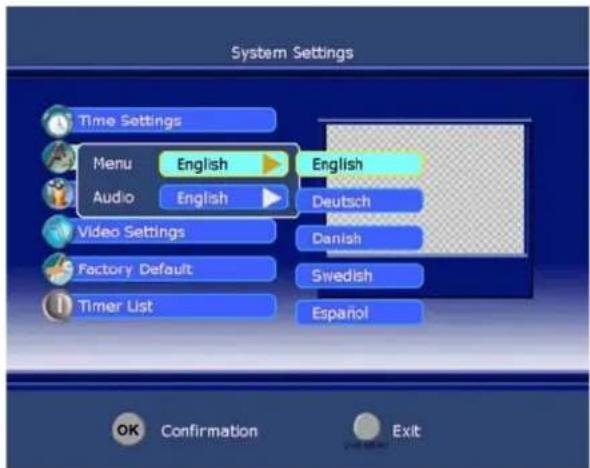
- Use the ▲o Select Language Setting item and then press OK to confirm it
Menu language
This function allows you to set the language of OSD display, you can Press ▲to select the options: English/Deutsch/Danish/ Swedish/ Español.
Audio language
This function allows you to set the language of audio, you can Press ▲to select the options: English/ Deutsch/ Danish/ Swedish/ Espanol.
Parental Control
-Use the ▲to select Parental Setting item and then press OK to confirm it, enter code 888888
-If the lock is already set, enter the pin code as requested.
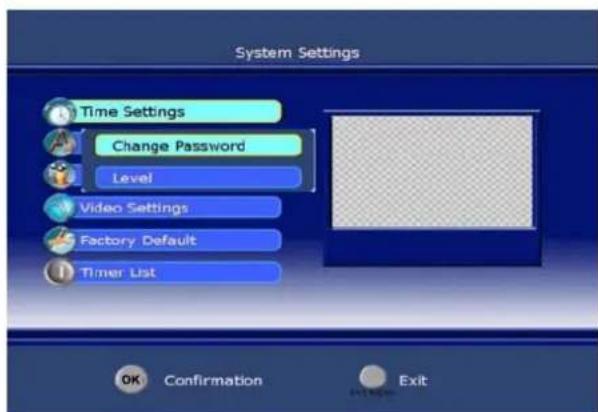
Chang Password
This function allows you to change the pin code, you should to input a new pin code twice and press OK to confirm it Level
You can Press ▲ select an age bracket options: Off/ 6/ 10/ 14/ 18.
DVB operation
Video Settings
-Use the to select Video Settings item and then press OK to confirm it.
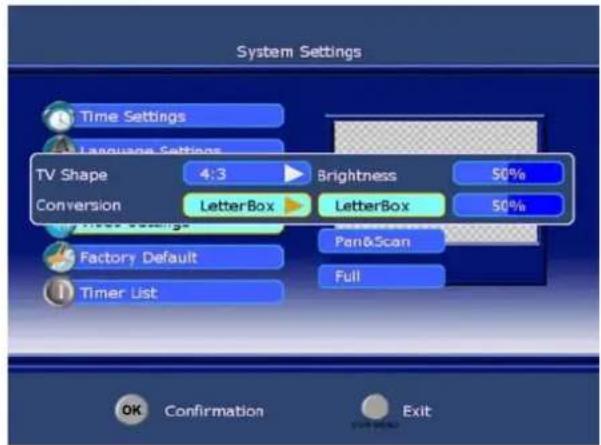
TV Shape
This function allows you to select the proper picture proportion to match the source's image, you can select one of 4 : 3 and 16: 9.
Conversion
This function allows you to select the wide screen mode options: Full / Vert. Cut/ Pillarbox / LetterBox / Pan&Scan.
Brightness
Press the ◀▶ to adjust the value of brightness.
Saturation
Press the ◀▶ to adjust the value of saturation.
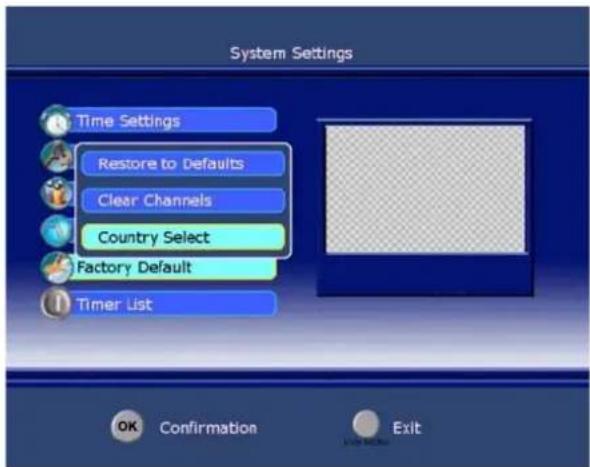
Factory Default
Use the ▲ to select Factory Default item and then press OK to confirm it
Restore to Defaults
Press OK to enter the restore to defaults menu and use OK to do it else use DVB Menu to return to previous menu Clear Channels
Press OK to enter the clear channels and use OK to do it else use DVB Menu to return to previous menu.
Country Select
Press OK to enter the country select menu and use ▲▼ to select country that one of Default / France / Australia.
DVB operation
Timer List
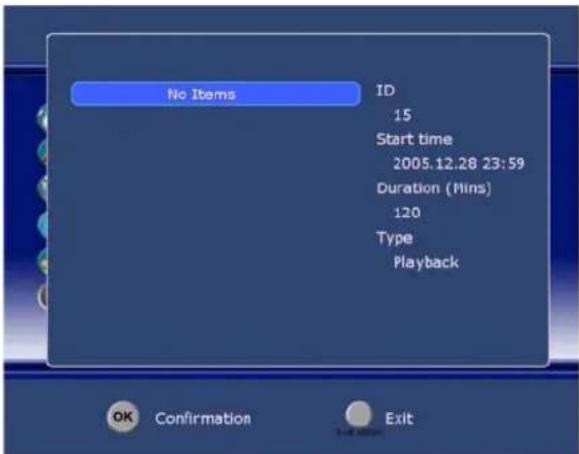
-Use the ▲o▼ select Timer List item and then press OK to confirm it
This function allows you booking the TV program, press OK to enter the setting menu:
Event Id
Press ▶ and then use ▲ to select event id options: 1/2/3/4/5.
Channel
Press OK and then use ▲▼ to select channel which you want to book from channel list
Event type
Press ▶ and then use ▶ to select event type options: ONCE/ DAILY/ WEEKLY.
Start Time
Press the ◀▶ to select the move cursor and input the number directly to set the begin time of channel which you have booked
Start date
Press the ◀▶ to select the move cursor and input the number directly to set the begin date of channel which you have booked.
Duration
Input the number directly to set the last time of the channel which you have booked.
Status
Press ▶ and then use ▶ to select options: ON/ OFF.
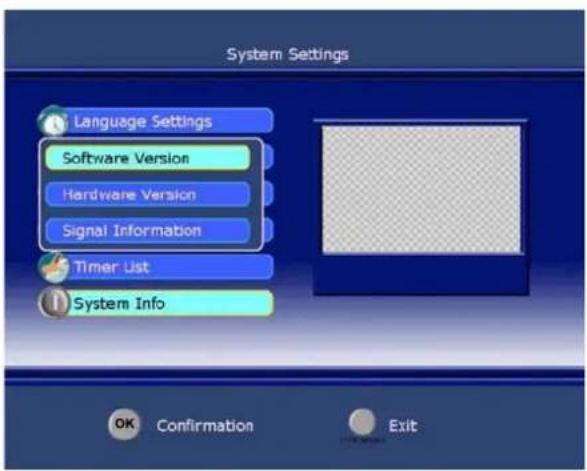
System Info
-Use the ▲o▼ select System Info item and then press OK to confirm it
Software Version
-Use the ▲▼ to select Software Version item and then press OK to refer to the version of software.
Hardware Version
-Use the ▲▼ to select Hardware Version item and then press OK to refer to the version of hardware.
Signal Information
-Use the ▲▼ to select Signal Information item and then press OK to refer to the signal quality and strength of signal
DVB operation
Channel Setting
- Press the DVB-MENU on the remote control or on the front panel to bring up the main menu on the screen and use ▲ Select the Channel Setting menu.
- Press the OK to confirm your selection and there have a Channel Setting menu on screen.
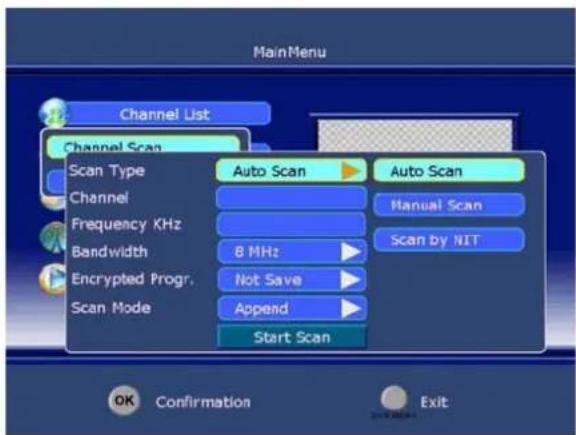
Channel Scan
Use the ▲ to select Channel Scan item and then press OK to confirm it.
Scan Type
Press ▶ and then use ▲ to select one of the search type options: Auto Scan/ Manual Scan/ Scan By NIT
Channel
Input the number directly to select the channel number, but the range of channel is 1 --- 69.
Frequency KHz
This function let you know the frequency accordance the channel.
Bandwidth
Press ▶ and then use ▲ to select one of the band width options: 7M/8M.
Encrypted Progr.
Press ▶ and then use ▶ to select one of the encrypted service options: Save/ Not Save.
Scan Mode
Press ▶ and then use ▲ select one of the update mode options: Append/ Replace.
Start Scan
Press OK to start scan.
Sort Channels
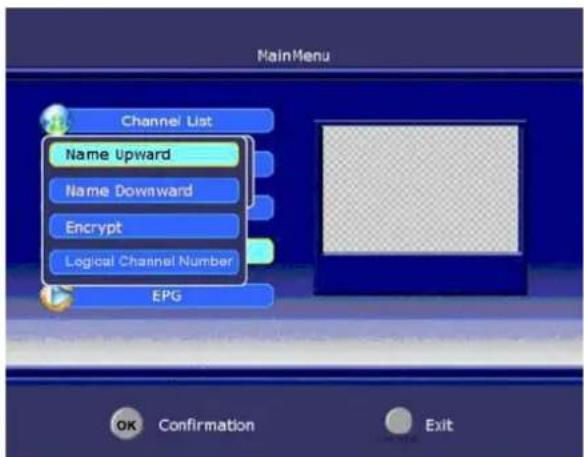
-Use the ▲ Select Sort Channel item and then press OK to confirm it
Name Upward
Press OK to rise to the channel list by name.
Name Downward
Press OK to drop the channel list by name.
DVB operation
Encrypt
Press OK to sort the channel list by encrypting.
Logical Channel Number
Press OK to sort the channel list by logical channel number.
EPG
- Press the DVB-MENU on the remote control or on the front panel to bring up the main menu on the screen and use ▶ select the EPG menu.
- Press the OK to confirm your selection and there have a EPG menu on screen as below.
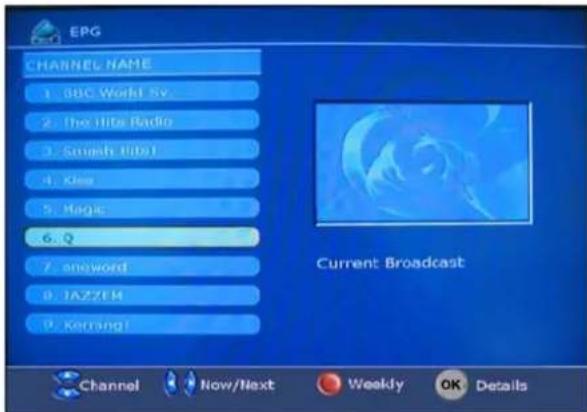
3.This function let you know the detailed information of the channel, that can predict the time of the program playing.
4. You can book channel pressing OK, and the operation of it is the same as Book setting.
TELETEXT Operation
TEXT
Press this button to enter Teletext signal. Press it again the background of teletext will become transparent and press it once more to exit teletext mode and return to normal TV viewing.
Press these buttons to access directly to the corresponding color pages displayed at the lower parts of the teletext screen.
PAGE SELECTION.
Press buttons to select the preceding or following page.
You also can enter page number(three digital) directly using the number buttons to select the page, and if you press a wrong number during input, you must complete the three digital number and re-enter the correct page number.
Press ◀▶ buttons to select the subpage of one page.
In DVB-T mode
The BLUE button and the SUBTITLTE button have the same function.
If the display fails or the performance dramatically, check the display in accordance with the following instructions. Remember to check the peripherals to pinpoint the source of the failure. If the display still fails to perform as expected, contact the dealer for assistance.
| SYMPTOM | DEALING METHOD | |
| NO POWER | Check the power connection.Pull the plug out, wait for 60 seconds, then reconnect the power and open the set | |
| NO PICTURE | Check the antenna connection.Try other TV channel due to the TV station problem.Modify the brightness or contrast setting. | |
| NO SOUND | Increase the volume.Check that if the set is on the mute state or not.Check the voice setting condition.Check the voice mode setting condition. | |
| ABNORMAL COLOR | Check the antenna connection | |
| NO RESPONSE OF THE REMOTE CONTROL | Check the effect of the batteries, if needed, please replace the batteries or clean the remote sensor window.The distance between the set and the remote control should be less than 6 meters. | |
| The SCREEN FLASH IN VGA MODE | The parameter is too big.Please use safety mode when restart the PC, and set the parameter of the monitor according to the instruction. | |
| SOME INTERFERE IN THE VGA MODE | Please modify parameter of the monitor according to the instruction. | |
| CLEAN THE TV SET | Please pull the plug out when clean the LCD screen. Using soft, clean cloth to wipe it off. If need to clean further, please use dry cloth, don't use naphtha or other thinner liquid. | |
| COLOR SPOT | For this product using high definition LCD panel, and this panel having it is special character, there exist some color spots, so it normal when the user find few color spots it not a quality problem.The standard to inspect this panel are all the same which is out of the scope to replace the product. | |
| DVD | ||
| Will not accept disc | DVD not selected | Select DVD with TV/AV button |
| Screen shows "NO DISC" | Disc placed incorrectly | Disc must have mirror side facing you if single sided. |
| Disc damaged or dirty | Inspect disc. If damaged you must discard.If dirty see "Disc care' page 17 | |
| Picture "Freezes" or breaks up | Disc damaged or dirty. | See "Disc care" page 17 |
| Certain disc functions not highlighted | Disc may not support required feature | Read disc information |
Instructions on environment protection

Do not dispose of this product in the usual household garbage at the end of its lifecycle; hand it over at a collection point for the recycling of electrical and electronic appliances. The symbol on the product, the instructions for use or the packing will inform about the methods for disposal.
The materials are recyclable as mentioned in this marking. By recycling, material recycling or other forms of re-utilization of old appliances, you are making an important contribution to protect our environment.
Please inquire at the community administration for the authorized disposal location.
ALL RIGHTS RESERVED
COPY RIGHT DENVER ELECTRONICS A/S
CE
www.denver-electronics.com
- 32" Wide Screen LCD TV with DVD player & DVB-T
- TFD-3250DVBT(UT)
- USER'S MANUAL
- Correct disposal of this Product
- Safety Information
- Product Feature
- Front View
- Rear View
- Getting Started
- buttons for TELETEXT
- buttons for DVB operation
- buttons for DVD operation
- Auto Tuning
- Search
- Program Edit
- PICTURE MENU
- SOUND MENU
- TIMER MENU
- SETUP MENU
- SCREEN MENU
- SOURCE MENU
- Place a disc
- Play
- Menu Play
- Title Play
- Sequence Play
- Program Play
- Additional operation
- Selecting Tracks
- Skipping Tracks
- Multispeed Fast/Slow Motion Play
- Multiphase Slow Motion Play
- Freeze Frame
- Using the Repeat Feature
- Using the Display Feature
- Using the Search Feature
- Changing the Soundtrack or Language
- Subtitles
- Mute the Audio Output
- Zoom In the Video Image
- Repeat a Specific Segment on the Disc that You Define
- Digital Audio Disc
- Disc Care
- About Disc Terms
- Title
- Chapter
- Track
- Care of Disc
- System operation
- General Steps of Setup Menu
- Menu specification
- SYSTEM SETUP
- TV SYSTEM
- PASSWORD
- RATING
- LANGUAGE SETUP
- AUDIO SETUP
- DIGITAL SETUP
- Basic operation
- NOTE:
- ENTER MAIN MENU
- NO SIGNAL OR NO SERVICE
- Channel List
- DVB operation
- Delete
- Move
- Favorite List
- System Settings
- Time Settings
- Time Zone
- Banner Time Setting
- Language Settings
- Menu language
- Audio language
- Parental Control
- Chang Password
- Video Settings
- TV Shape
- Conversion
- Brightness
- Saturation
- Factory Default
- Restore to Defaults
- Country Select
- Timer List
- Event Id
- Channel
- Event type
- Start Time
- Start date
- Duration
- Status
- System Info
- Software Version
- Hardware Version
- Signal Information
- Channel Setting
- Channel Scan
- Scan Type
- Frequency KHz
- Bandwidth
- Encrypted Progr.
- Scan Mode
- Start Scan
- Sort Channels
- Name Upward
- Name Downward
- Encrypt
- Logical Channel Number
- EPG
- TELETEXT Operation
- TEXT
- PAGE SELECTION.
- In DVB-T mode
- Instructions on environment protection
Brand : DENVER
Model : TFD-3250DVBT
Category : Television