
PTCD56UBWD - DJ Equipment Pyle - Free user manual and instructions
Find the device manual for free PTCD56UBWD Pyle in PDF.


| Product Type | DJ Turntable / CD Player with Bluetooth |
| Model | PTCD56UBWD |
| Brand | Pyle |
| Dimensions | 15.4 x 12.6 x 5.5 inches |
| Weight | 10.8 lbs |
| Power Supply | 120V/60Hz |
| Power Consumption | 30W |
| Turntable Speed | 33 1/3, 45, 78 RPM |
| Disc Formats Supported | CD, CD-R, CD-RW |
| USB Playback | Yes, MP3 from USB drives |
| Bluetooth | Built-in, streaming from devices |
| Pitch Control | ±10% and ±16% |
| Outputs | RCA line out, headphone jack |
| Stylus | Replaceable ceramic stylus |
| Maintenance | Clean with soft dry cloth; do not use solvents |
| Safety | Do not expose to moisture; unplug during storms |
| Spare Parts | Contact Pyle customer service for replacement parts |
| Reparability | Refer to qualified technician; no user serviceable parts |
| General Information | Combines turntable, CD player, and Bluetooth for versatile DJ setups |
Frequently Asked Questions - PTCD56UBWD Pyle
User questions about PTCD56UBWD Pyle
0 question about this device. Answer the ones you know or ask your own.
Ask a new question about this device
Download the instructions for your DJ Equipment in PDF format for free! Find your manual PTCD56UBWD - Pyle and take your electronic device back in hand. On this page are published all the documents necessary for the use of your device. PTCD56UBWD by Pyle.
USER MANUAL PTCD56UBWD Pyle
natural_image
Orange vintage gramophone with open lid and metal frame (no visible text or symbols)
CAUTION
RISK OF ELECTRIC SHOCK

DO NOT OPEN
CAUTION: TO REDUCE THE RISK OF ELECTRIC SHOCK, DO NOT REMOVE THE COVER (OR BACK). NO USER-SERVICEABLE PARTS INSIDE. REFER ALL SERVICING TO QUALIFIED SERVICE PERSONNEL.

The lightning bolt with an arrowhead within a triangle indicates the presence of non-insulated dangerous voltage within the product enclosure that may be of sufficient magnitude to constitute a risk of electric shock to persons.

The exclamation point within a triangle indicates the presence of important operating and maintenance (servicing) instructions in the literature accompanying the unit.
WARNING:
- TO REDUCE THE RISK OF FIRE OR ELECTRIC SHOCK, DO NOT EXPOSE THIS UNIT TO RAIN OR MOISTURE.
- To avoid any damage, do not force the cover into position.
CAUTION!

Visible and invisible laser radiation when open and with interlocks disabled. Avoid direct exposure to
beam.
ACCESSORIES INCLUDED
- Remote control
- User manual
PARTS / BUTTONS
MAIN UNIT

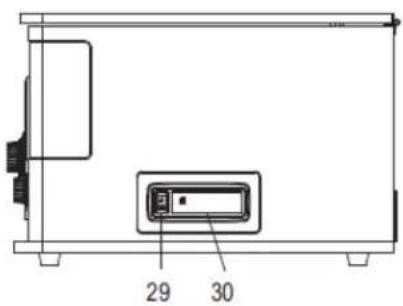
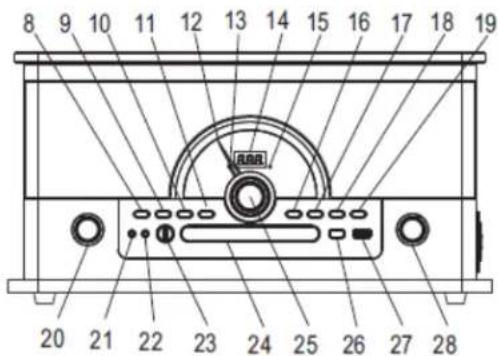

- Turntable platter
- 45 rpm adapter
- Tone arm
- Lift lever
- Speed selector
- Auto-stop (ON/OFF) switch
- Tone arm rest
- Programme button
- Mode bottom
- Delete button
- Record button
- Frequency pointer
- Power light
- LED display
- Bluetooth light
- Backward button
- Forward button
-
Stop/USB button
-
Play/Pause/Pair button
- Function selector
- Headphone jack
- Aux In jack
- FM/AM/BT switch
- CD door
- Turning knob
- CD door Open/Close button
- USB port
- Volume knob
- Cassette eject / Fast-forward (FF) button
- Cassette door
- RCA line-out (L)
- RCA line-out (R)
- Dual voltage switch
- FM antenna
- AC power cord
REMOTE CONTROL
Before use remote control, you have to install two "AAA" battery (not included)
- CD door OPEN/CLOSE button
- STOP/CD/USB button
- RECORD button
- PLAY/PAUSE button
- BACK-button
- PROGRAMME button
- NUMBER button
- DELETE button
- FOLDER+ button
- NEXT+ button
- FOLDER-button
- MODE button
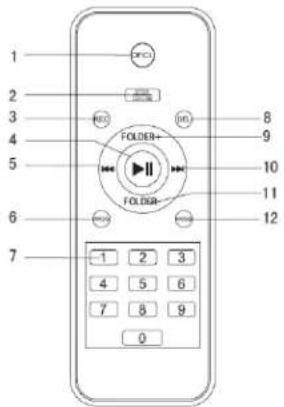
Remark: When the battery runs low, the distance at which the remote control will operate is greatly reduced and you will need to replace the battery.
USING THE REMOTE CONTROL
- To use the remote control, point it at the remote sensor and press the button gently but firmly. Since the remote control range is reduced when the unit is used at an angle, try to aim it directly at the remote sensor.
- Do not expose the remote sensor to strong light (direct sunshine or artificial light) and make sure that there are no obstacles between the remote sensor and the remote control.
GETTING STARTED
CONNECTING THE AC POWER CORD
Remark: As this product is dual voltage 110/220V, before connecting the AC power cord, please check the voltage at back of the unit which voltage it was set.
- Unwind the AC power cord and connect it to a household 110V\~60HZ or 220V\~60HZ AC outlet.
OPERATING THE RADIO
AM/FM TUNER
- Set the FUNCTION selector (20) on the RADIO position.
- Select the desired frequency with the BAND SWITCH(23)
- Tune in to the desired radio station by turning the Tuning control knob (25).
- Adjust the volume +/- (28) to the desired level.
- Set the FUNCTION selector (20) on OFF position to turn off the radio.
Hints for best reception:
- AM: The receiver has a built-in AM antenna. If AM reception is weak, slightly turning or changing the position of the unit will usually improve the AM reception.
- FM: The receiver has a built-in FM antenna (34) hanging at the rear cabinet. This wire should be fully unravelled and extended for best reception.
Before use, please make sure to:
- Remove the stylus protector.
- Ensure the tone arm is free to move from the tone arm rest. Lock the tone arm in place again when not in use.
Listening to records
- Set the FUNCTION selector (20) on the PHONO position and lift the turntable dust cover
- Place a record on the turntable, over the central spindle. Place the EP adapter over the central spindle when playing 17cm EP records.
- Set the Speed selector (5) to 33, 45 or 78 rpm depending on the record.
- Lift the tone arm from the tone arm rest by using the Lift lever (4) and slowly move it over the record. The Turntable platter (1) will start turning.
- Place the tone arm (3) on the desired position of the record.
- Gently lower the tone arm onto the record to start playing.
- When the record is finished the tone arm will automatically stop. Lift the tone arm from the record and put it back on the rest.
- To stop manually, lift the tone arm from the record and return it to the rest.
Note: Do not stop or turn the platter manually.
Moving or jarring the turntable without securing the tone arm clamp could result in damage to the tone arm.
Replace the protective cap on the stylus when not in use.
AUTO-STOP SWITCH OPERATION
Certain types of records may have an auto-stop area outside the pre-set limit, so the turntable may stop before the last track finishes. If this occurs, set the AUTO-STOP switch (6) to the OFF position. This allows the record to play to the end, but please note that it will not stop automatically. You must manually raise the tone arm and place it back in the rest and then turn the power OFF to stop the turntable from spinning.
LINE-OUT CONNECTION
You can connect this unit to an external stereo system or amplifier by connecting the RCA LINE-OUT jacks (31,32) to the auxiliary input jacks on your stereo or amplifier with RCA cables (not included).
Note: The unit's Volume Control (28) will not adjust the volume when line-out jacks are in use.
USING HEADPHONES (NOT INCLUDED)
Plugging your headphones into the Headphone jack (21) will allow you to listen in private.
PLEASE READ THIS IMPORTANT INFORMATION BEFORE USING YOUR HEADPHONES
- Avoid extended play at a very high volume as it may impair your hearing.
- If you experience ringing in your ears, reduce the volume or shut off your unit.
- Keep the volume at a reasonable level even if your headset is an open-air type designed to allow you to hear outside sounds. Note that excessively high volume may still block outside sounds.
WARNING! Risk of hearing impairment
- Set the volume on the playback device to low before connecting the headphones to the sound source.

- Avoid excessive volume, particularly over extended periods or frequent use. Excessive volume can result in permanent hearing impairment.
LOADING AND UNLOADING COMPACT DISCS
- Set the FUNCTION selector (20) to CD mode.
- Open the disc compartment by pressing the CD door Open/Close button (26).
- When the disc compartment has opened, carefully place the CD in the compartment with the label facing up. Position smaller discs in the central depression in the compartment.
- Close the disc compartment. When the compartment is fully closed, the disc will automatically start turning. The total number of tracks on the CD will appear on the LED display and will play automatically.
- Press the PLAY/PAUSE button (19) again to pause playback.
- To stop playback, press the STOP button(18).
SKIPPING TRACKS
Selecting a different track during playback
- Press the BACKWARD/FORWARD button(16,17). The track number appears on the display.
- Release the button on the desired track number; the unit will start playing the selected track.
SKIP MODE FOR MP3 DISCS
- Press the FOLDER + /- buttons on the remote control to change the album number.
- Press the BACK/NEXT buttons on the remote control to change the track number.
- When the desired track has been selected, press the PLAY button to start playback.
REPEAT CD PLAY
- When playing a CD, if you wish to listen to the same track repeatedly, press the MODE button (9), the LED display will show "ONE"
- To play the entire disc over and over again, press MODE twice, the LED display will show "ALL"
- To cancel repeat play, press the STOP button.
PROGRAMMED DISC PLAY (CD)
You cannot enter programs while playing a CD. Press the STOP button and then follow the instructions below.
- Press the unit's PROGRAMME button (8), the second indicator light (count from left hand side) on LED display will flash.
- Press the unit's BACKWARD/FORWARD button (16, 17). to select the location in which the track should be stored i.e. track 03.
- Press the PROGRAMME button. The first programmed selection is now stored in the programme memory.
Listening to programmed tracks
Press the PLAY/PAUSE button. The CD will start playing at the beginning of the first programmed track.
To clear the programmed memory: if the disc is playing, press the STOP button.
RECORDING FROM CD
You can record your favourite CD songs in MP3 format and store them on a memory device via the USB port.
- Set the FUNCTION button (20) on CD mode.
- Insert the USB flash drive into the USB slot. Press the RECORD button (11). "REC" will flash on the display for around 3 seconds and then show "ONE". Press the BACKWARD/FORWARD button (16, 17) to record ONE track or ALL and then press the RECORD button to confirm.
- Press the BACKWARD/FORWARD button (16, 17) to select the track and then press the RECORD button to confirm. "REC" and "track No." will be alternately displayed to indicate the track is being recorded to USB.
-
Press the STOP button to stop recording.
-
Note: CD recording must be synchronised. Press the STOP button to confirm.
Attention: Some original CDs may not be recordable as they are copy-protected.
You can record your favourite MP3 songs in MP3 format and store them on a memory device via the USB port.
- Set the FUNCTION button to CD mode and insert the MP3 disc in the CD compartment.
- Insert the USB flash drive into the USB slot. Press the RECORD button (11). "REC" will flash on the display for around 3 seconds and then show "ONE". Press the BACKWARD/FORWARD button (16, 17) to record "ONE" track, or "FOL" or "ALL". Press the RECORD button to confirm.
- "REC", "FOL name" and "number of total track" will be alternately displayed, indicating that it is being recorded to USB.
- Press the STOP button to stop recording
You can record your favourite vinyl songs in MP3 format and store them on a memory device via the USB port.
- Set the FUNCTION button (20) on PHONO mode.
- Insert the USB flash drive into the USB slot. Press the RECORD button (11). "REC" will flash on the display for around 3 seconds and then, "REC" and "PHO" will be alternately displayed to indicate that it is being recorded to USB.
- Press the STOP button to stop recording.
- Set the FUNCTION button (20) on RADIO mode.
- Insert the USB flash drive into the USB slot. Press the RECORD button (11). the second indicator light (count from left hand side) on LED display will flash for 3 second and then become solid to indicate that it is being recorded to USB.
- Press the STOP button to stop recording.
RECORDING FROM CASSETTE
- Set the FUNCTION button (20) on TAPE mode.
- Insert the tape into the compartment. The cassette will play automatically.
- Insert the USB flash drive into the USB slot. Press the RECORD button (11). "REC" will flash on the display for around 3 seconds and then, "REC" and "TAP" will be alternately displayed to indicate that it is being recorded to USB.
- Press the STOP button to stop recording.
RECORDING FROM AUX
- Set the FUNCTION button (20) on AUX mode.
- Connecting your external audio device.
- Insert the USB flash drive into the USB slot. Press the RECORD button (11). "REC" will flash on the display for around 3 seconds and then "REC" and "TAP" will be alternately displayed to indicate that it is being recorded to USB.
- Press the STOP button to stop recording.
OPERATING THE USB
After loading the USB, the total number of tracks / files will be shown on the display and play automatically. Press the STOP button to stop playing.
Remark: Please note that the unit can only read FAT32 format USB drives with less than 32GB.
- Set the FUNCTION selector (20) on TAPE position and then insert the tape into the compartment. The cassette will play automatically.
- Press and hold the FF button until you reach the desired position on the tape.
- Release the FF button to the 'PLAY' position to start playback.
- Eject the cassette tape after use.
- Set the FUNCTION selector (20) on BT position and set BAND SWITCH (23) to BT position at the same time. The BT indicator (15) will flash.
- Press the PAIR button (19) on the unit. The pairing indicator will flash quickly. When pairing, remain within 10 metre of the unit.
- Using the native controls on your Bluetooth device, select the network name Pyle Audio in your Bluetooth settings to pair. Bluetooth version 2.1 +EDR, with a range of 30+ feet.
- When successfully paired and connected, a beep will issue from the unit and the "BT" indicator (15) will stop flashing and become solid.
- After initial pairing, the unit will stay paired unless unpaired manually by the user or erased due to a reset of the device. If your device should become unpaired or you find it is unable to connect, repeat the above steps.
- After pairing to a Bluetooth Device, use the controls on the remote, the unit, or the native controls on the connected Bluetooth Device to play, pause or skip a selected track.
- Audio played through the connected Bluetooth Device will now be heard through the speakers.
AUXILIARY INPUT
- Set the FUNCTION button (20) on AUX position and then use an audio cable (not included) with a 3.5 mm stereo plug on each end of the cable.
- Plug one end of the cable into the AUX-IN jack (22) on the back of the unit ("Aux" will be displayed) and the other end into the Line-out jack or Headphone jack of your external audio device to be able to listen to the external source through that system's speakers.
- The volume level can now be controlled through the main unit. Operate all other functions on the auxiliary device as usual.
Note:
If the Line-Out jack of your external device is connected, you only need to adjust the system's volume control. If your external device's Headphone jack is connected, you may need to adjust the volume control on both your external device and this system to achieve the desired volume.
TROUBLESHOOTING GUIDE
| Problem | Possible cause | Solution |
| The unit does not respond (no power) | The unit is disconnected from the AC outlet.The AC outlet has no power. | Connect to the AC outlet.Try the unit on another outlet. |
| No sound | Volume not adjusted.Wrong source selected.No device installed.Device not turned ON.Volume set too low. | Adjust the volume level.Select the correct source.Insert a correct device.Turn ON the device.Press the Volume + button to turn the sound level up. |
| The CD player does not work | Disc is inserted upside down.Disc is dirty.Disc is scratchedDisc is warped.A non-standard disc is inserted (DVD/ VCD) | Insert the disc correctly.Wipe the disc clean with a soft cloth.Use a new disc.Use a new disc.Use a new disc. |
| Noise or sound distorted on FM broadcast | Station not tuned properly for FM.The FM wire antenna is not fully extended. | Retune the FM broadcast station.Fully extend the FM wire antenna. |
| Sound is distorted | Volume level is set too high. | Decrease the volume. |
| Unit becomes warm after extended play at high volume. | This is normal. | Turn the unit off for some time or lower the volume. |
Specifications
AMPLIFIER
Output power.... 2W+2W
Frequency response.... 60 TO 20,000 Hz
GRAMOPHONE
Motor....DC servo motor
Drive system.....Belt drive
Speed.... 33-1/3 rpm, 45 rpm and 78 rpm
Wow & Flutter....Less than 0.3% (WTD)
SNR ...... More than 35 dB
Cartridge type......Ceramic stereo cartridge
Output level....1 KHz -500 mV
SPEAKER SYSTEM
Impedance....4 ohm
Power consumption....25W
Dimensions (LxDxH) 18.5" x 15.0" x 9.6"
Standard accessories......Instruction manual
Remote control
Don't discard electrical and electronic appliances with regular waste.
• Take them to an official collection point.
- Some components may be hazardous to health and the environment.

- CAUTION
- RISK OF ELECTRIC SHOCK
- DO NOT OPEN
- WARNING:
- ACCESSORIES INCLUDED
- PARTS / BUTTONS
- REMOTE CONTROL
- USING THE REMOTE CONTROL
- GETTING STARTED
- CONNECTING THE AC POWER CORD
- OPERATING THE RADIO
- AM/FM TUNER
- Hints for best reception:
- Before use, please make sure to:
- Listening to records
- AUTO-STOP SWITCH OPERATION
- LINE-OUT CONNECTION
- USING HEADPHONES (NOT INCLUDED)
- PLEASE READ THIS IMPORTANT INFORMATION BEFORE USING YOUR HEADPHONES
- WARNING! Risk of hearing impairment
- LOADING AND UNLOADING COMPACT DISCS
- SKIPPING TRACKS
- SKIP MODE FOR MP3 DISCS
- REPEAT CD PLAY
- PROGRAMMED DISC PLAY (CD)
- Listening to programmed tracks
- RECORDING FROM CD
- RECORDING FROM CASSETTE
- RECORDING FROM AUX
- OPERATING THE USB
- AUXILIARY INPUT
- Note:
- TROUBLESHOOTING GUIDE
- Specifications
- GRAMOPHONE
- SPEAKER SYSTEM
Brand : Pyle
Model : PTCD56UBWD
Category : DJ Equipment