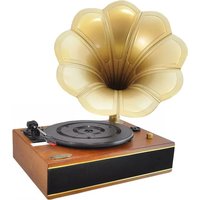
PNGTT1R - DJ Equipment Pyle - Free user manual and instructions
Find the device manual for free PNGTT1R Pyle in PDF.


| Product Type | DJ Turntable |
| Brand | Pyle |
| Model | PNGTT1R |
| Drive System | Belt Drive |
| Speeds | 33 1/3, 45, 78 RPM |
| Platter | Aluminum die-cast with slip mat |
| Tonearm | Static balanced S-shaped tonearm with adjustable counterweight |
| Stylus | Diamond tipped, replaceable |
| Pitch Control | ±10% with quartz lock |
| Outputs | RCA line out, USB (for PC recording) |
| Dimensions | 17.5 x 12.5 x 5.5 inches |
| Weight | 11 lbs |
| Power Supply | AC 120V, 60Hz (US plug) |
| Power Consumption | 20W |
| Features | USB recording to PC, headphone output, start/stop button, removable hinge cover |
| Maintenance | Clean stylus with brush; platter dust cover; keep away from magnets |
| Safety | Place on stable surface; avoid moisture; unplug during cleaning |
| Spare Parts | Replacement stylus (model: PYLE-STYLUS), belt |
| Repairability | User-replaceable stylus and belt; other repairs by qualified technician |
| General Information | Designed for DJ performance and home listening; compatible with standard vinyl records |
Frequently Asked Questions - PNGTT1R Pyle
User questions about PNGTT1R Pyle
0 question about this device. Answer the ones you know or ask your own.
Ask a new question about this device
Download the instructions for your DJ Equipment in PDF format for free! Find your manual PNGTT1R - Pyle and take your electronic device back in hand. On this page are published all the documents necessary for the use of your device. PNGTT1R by Pyle.
USER MANUAL PNGTT1R Pyle
Classic Horn Phonograph/Turntable With USB-to-PC Connection and Aux-In

PYLE®PRO
VINTAGE
www.pyleaudio.com

natural_image
Line drawing of a vintage gramophone with a decorative fan blade (no text or symbols)MODEL:PNGTT1
Operating Instructions Manual
CAUTION
TO PREVENT FIRE OR SHOCK HAZARD, DO NOT USE THIS PLUG WITH AN EXTENSION CORD, RECEPTACLE OR OTHER OUTLET UNLESS THE BLADES CAN BE FULLY INSERTED TO PREVENT BLADE EXPOSURE. TO PREVENT FIRE OR SHOCK HAZARD, DO NOT EXPOSE THISAPPLIANCE TO RAIN OR MOISTURE.

The lightning flash with arrowhead symbol, within an equilateral triangle is intended to alert the user to the presence of uninsulated 'dangerous voltage' within the product's enclosure that may be of sufficient magnitude to constitute a risk of electric shock to persons.
CAUTION
RISK OF ELECTRIC SHOCK DO NOT OPEN
WARNING: TOREDUCETHE RISK OF ELECTRIC SHOCK DO NOT REMOVE COVER (OR BACK), NO USER SERVICEABLE PARTS INSIDE REFER SERVICING TO QUALIFIED SERVICE PERSONNEL.

The exclamation point within an equilateral triangle is intended to alert the user to the presence of important operating and maintenance (servicing) instructions in the literature accompanying the appliance.
IMPORTANT SAFETY INSTRUCTIONS
1.) Read these instructions.
2.) Keep these instructions.
3.) Heed all warnings.
4.) Follow all instructions.
5.) Do not use this apparatus near water.
6.) Clean only with dry cloth.
7.) Do not block any ventilation openings. Install in accordance with the manufacturer's instructions.
8.) Do not install near any heat sources such as radiators, heat registers, stoves, or other apparatus (including amplifiers) that produce heat.
9.) Do not defeat the safety purpose of the polarized or grounding type plug. A polarized plug has two blades with one wider than the other. A grounding type plug has two blades and a third grounding prong. The wide blade or the third prong is provided for your safety. If the provided plug does not fit into you outlet, consult an electrician for replacement of the obsolete outlet.
10.) Protect the power cord from being walked on or pinched particularly at plugs, convenience receptacles, and point where they exit from the apparatus.
11.) Only use attachments / accessories specified by the manufacturer.
12.) Unplug this apparatus during lightning storms or when unused for long periods of time.
13.) Refer all servicing to qualified service personnel. Servicing is required when the apparatus has been damaged in any way, such as power-supply cord or plug is damaged, liquid has been spilled or objects have fallen into the apparatus, the apparatus has been exposed to rain or moisture, does not operate normally, or has been dropped.
14.) This appliance shall not be exposed to dripping or splashing water and no object filled with liquids such as vases shall be placed on the apparatus.
15.) Do not overload wall outlet. Use only power source as indicated.
16.) Use replacement parts as specified by the manufacturer.
17.) The product may be mounted to a wall only if recommended by the manufacturer.
18.) Upon completion of any service or repairs to this product, ask the service technician to perform safety checks.
PREPARATION FOR USE
UNPACKING AND SET UP
- Carefully remove the unit from the display carton and remove all packing material from the unit.
- Unwind the AC power plug and extend it to its full length.
- Place the unit on a stable, level surface, convenient to an AC outlet, out of direct sunlight, and away from sources of excess heat, dust, moisture, humidity, or strong magnetic fields.
- Connect the plug to your AC outlet.
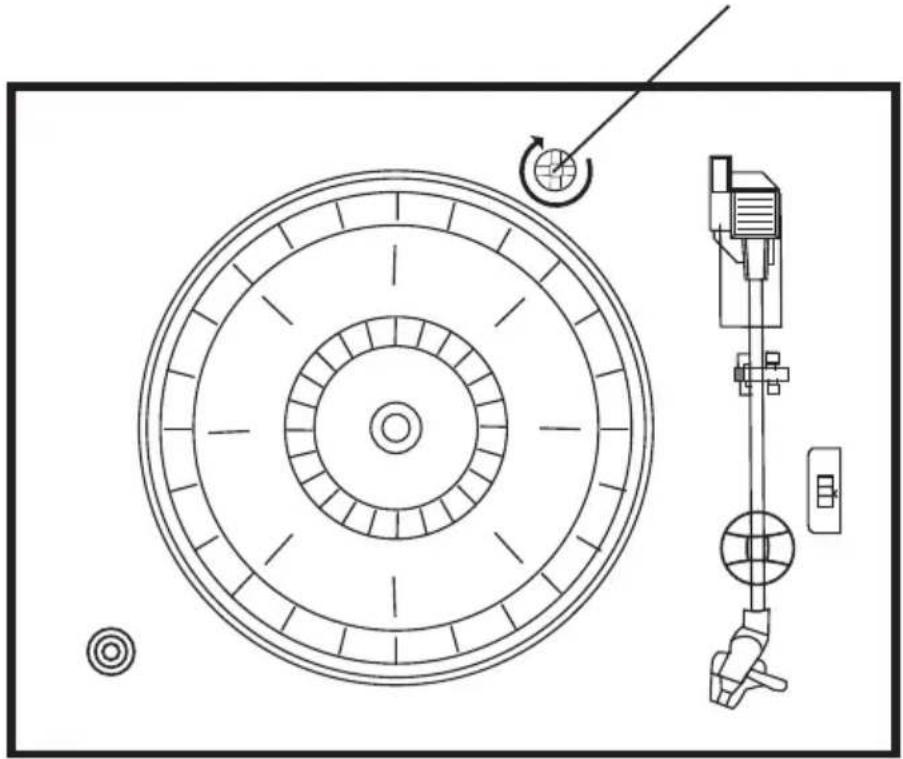
- Raise the lid to expose the phonograph. The phonograph has been secured for shipment with a transit screw. Use a coin or screwdriver to turn the transit screw clockwise. This will allow the turntable to “float”.
TRANSIT SCREW
natural_image
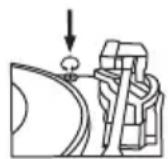
Technical diagram of a circular mechanical component with concentric rings and a vertical assembly (no text or labels)- Remove the opaque white plastic stylus cover from the phonograph stylus by sliding it in the direction of the arrow. Discard the stylus cover.
- Remove the twist-tie that was used to secure the tone arm during shipment.
- Release the tone arm lock lever.
- Connect the plug to your AC outlet.

POWER SOURCE
This product is designed to operate on 120V 60Hz AC only. Attempting to operate this system from any other power source may cause damage to the system, and such damage is not covered by your warranty.
NOTE: You will note that this system is equipped with domestic standard AC power 2-pin plug. If this plug does not fit into your existing AC outlet, do not try to defeat this safety feature by filing the wide blade to make it fit into your outlet. If this plug will not fit into your outlet, you probably have an outdated non-polarized AC outlet. You should have your outlet changed by a qualified licensed electrician.

IMPORTANT: Raising And Lowering The Lid
To open the lid, raise it as far as it will go until the lid support bracket ‘locks’ in the open position. To close the lid, lift it upward slightly until the lid support bracket ‘unlocks’, and then gently lower the lid.
TO AVOID DAMAGING THE CABINET OR THE LID, NEVER FORCE THE LID CLOSED. ALWAYS RAISE THE LID TO RELEASE THE LID SUPPORT BRACKET.
PROTECT YOUR FURNITURE
This model is equipped with non-skid rubber ‘feet’ to prevent the product from moving when you operate the controls. These‘feet’are made from non-migrating rubber material specially formulated to avoid leaving any marks or stains on your furniture. However certain types of oil based furniture polishes, wood preservatives, or cleaning sprays may cause the rubber ‘feet’ to soften, and leave marks or a rubber residue on the furniture. To prevent any damage to your furniture we strongly recommend that you purchase small self-adhesive felt pads, available at hardware stores and home improvement centres everywhere, and apply these pads to the bottom of the rubber ‘feet’ before you place the product on fine wooden furniture.
LOCATION OF CONTROLS AND INDICATORS
FRONT PANEL

1) SPEAKER
2) VOLUME control.
3) Turntable.
4) TOM ARM

4) PC-USB SLOT.
5) PH-AUX SWITCH.
6) AUX IN SOCKET(L/R)
7) LINE OUT SOCKET(L/R)
8) AC POWER LINE PLUG
PHONOGRAPH
1) Turntable.
2) 45 RPM Adapter.
3) Transit Screw.
4) Cue Lever.
5) Speed Selector (33 &45 &78 RPM).
6) Tone Arm Lock.
7) Tone Arm with Stylus.

AUX IN OPERATION
1) Set the PH-AUX switch to AUX position. Rotate the volume control to desert level.
2) Insert the audio cable (not included) into the matching "AUX IN" (L/R) socket of the unit, operate A as usual and through the speaker of the unit, we can hear the sound exported from A.

LINE OUT OPERATION
This system includes a set of sLnEs(OUR) which allow you to record from the Radio or phonograph of this system to an external recording device such as a cassette recorder. Mini-Disc, etc. In any play mode, insert the audio cable(not include) into the matching”L(INR)Ubcket of the unit, operate the unit as usual, and through the speakers of B, we can hear the sound exported from the unit.

PLAYING TURNTABLE
This system includes a full-size, 3-speed, belt-drive turntable. You can play 33, 45, and RPM records.
1) Set the PC-AUX switch to PH position. Insert the PC-USB line into the Computer. Rotate the volume control to desert level.
2) Make sure that you have removed the stylus cover from the stylus and have released the Tone Arm Lock that secured the tone arm to the tone arm rest.
3) Set the turntable Speed Selector to the appropriate speed, 33, 45, or 78 RPM. If you are playing 45 RPM singles, place the 45 RPM adapter on the centre spindle.
4) Place your record on the centre spindle.
5) Raise the CUE lever to lift the tone arm off its rest. Move the tone arm to the edge of the record. The turntable starts automatically. Use the CUE lever to gently lower the tone arm onto the record.
6) When the tone arm reaches the end of the record it automatically returns to the tone arm rest and the record player stops.
7) To turn the system 'off', switch the PH-AUX selector to the AUX position.
NOTE: Do not turn or stop the turntable manually. Moving or jarring the Turntable without securing the Tone Arm clamp could result in damage to the Tone Arm.
IMPORTANT!!
• TO PROTECT THE TURNTABLE FROM DAMAGE DURING TRANSPORTATION, A SILVER TRANSIT SCREW IS LOCATED AT THE UPPER RIGHT OF THE TURNTABLE PLATFORM.
- BEFORE PLAYING, PLEASE USE A SCREWDRIVER TO TURN THE TRANSIT SCREW IN CLOCKWISE DIRECTION (SCREW GOING DOWN) COMPLETELY TO UNLOCK THE TURNTABLE.
- TO LOCK THE TURNTABLE AGAIN FOR TRANSPORTATION, PLEASE TURN THE SCREW IN COUNTER-CLOCKWISE DIRECTION.

AUX IN/PHONO RECORDING
- Set the PH-AUX switch to PH or AUX in position, playback the tacks on the AUX or PHONO.
- Install the Audacity software using the included disc.
3、Set the computer before record:
1) Set the volume control attribute record(R) mixer:AK5371 YES and then adjust the volume to max..
2) After open the Audacity, choose Edit → preferences enter the Audacity preferences, choose Recording → Device(AK5371);
3) then choose quality → Default sample format → 16-bit;
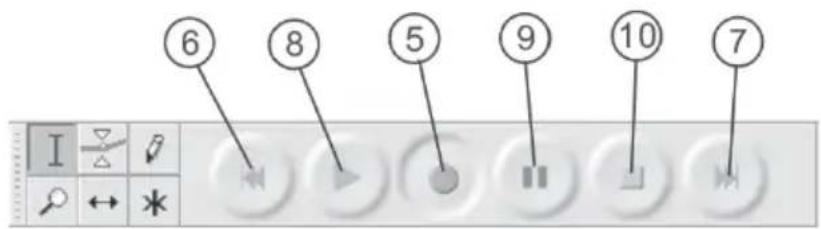
4) choose Interface again, the language to choose the ENGLISH, choose OK to sure all sets. and press the SKIP TO START, PLAY, RECORD, PAUSE, SKIP TO END button of the Audacity soft to set you want RECORD the tracks.
4、After recording, you can edit the record and export to WMV format.
Audacity and USB Connection
It supports Window 95 /Windore XBP/Ahindwertsista
with the EMS memory more than 128MB and Audacity takes space of 5MB.
INSTRUCTION FOR PC RECORDING
- Software installation
1.1) Insert the CD disk into drive of PC, and read it;
1.2) Open the software, double press the file"Audacity.exe then"press next to go forward;

1.3) Choose I accept the agreement, and press "NEXT" to go forward;

1.4) Press next to go forward;“

1.5) Choose the desitination location, and press to go forward;

1.6) Press next to go forward;“ ”
1.7) Waiting for installation finished, and press finish to end the installation;“
1.8) Choose the language as user's need;
- Recording:
2.1) Open the software;

2.2) Choose Edit menu, then choose Preferences ;"

2.3.Audacity Preferences
![Audioify Preferences Audio 1/0 | Quality | File Format | Spectrogram | Histogram | Select Color | Keyboard | Playbox Device: Microsoft Sound Mapping - Output Recording Device: Microsoft Sound Mapping - Input Channels: 2 (Users) Play other tracks while recording see one Software Florthrough: Play new track while recording it) Audio Track Disks, 44100Hz 32.66 Real Audio Track Disks, 44100Hz 32.66 Real SSS USB Audio Device Cancel Disk space remains for recording 5 hours and 30 minutes Project site: 44100 Cursor: 210 276281 min sec [Shop-To-Off]](/content/2026/05/1069204/images/6669284a5f6d59785e38cba5fc1b9c1e81764b18acd582760169d4189cff07c6.jpg)
NOTE: you need to check your computer audio properties, the sound recording should be selected sss usb Audio Device" as below."

2.4. Adjust the output and input volume.
Output Volume Input Volume

2.5. Select the record button • to record the disc, the left and right tracks will show on the interface;
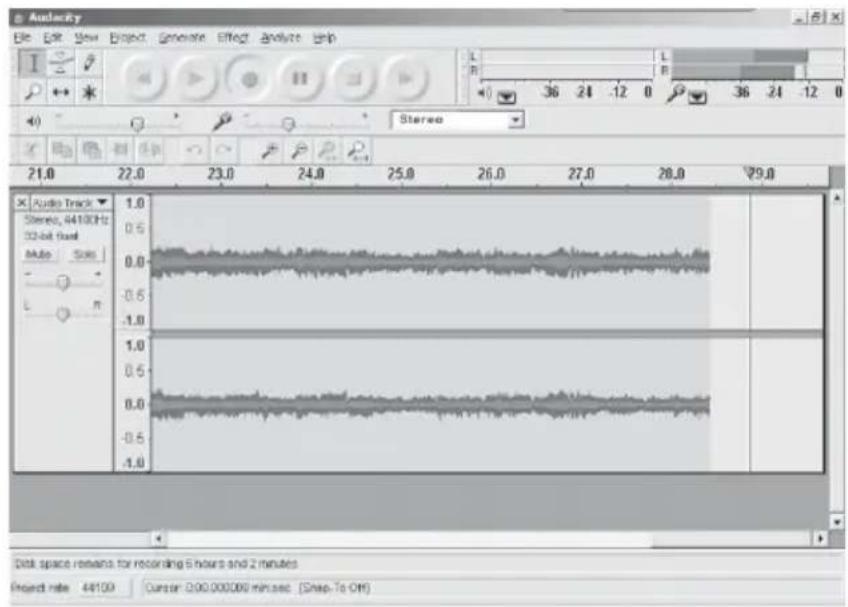
2.5.1 Press this button •, start recording.
2.5.2 ⑥ Click the ◀button to skip to start;
2.5.3⑦ Click the▶ button to skip to end;
2.5.4⑧ Click the▶ button to play;
2.5.5⑨ Click the Ⅱ button to pause the record play,
2.5.6⑩ Click the ■ button to stop the recording.
-
Export the Music Files for WAV, MP3, Format.
-
Once you have finished recording, you should save your music to the computer.
- Click File menu and move down to Export as WAV format, MP3 format or Ogg Format.
- Click on any format to save the music. and you will be asked for the file name of the music recording.
- Note: Audacity does not export MP3 files directly, you should download the LAME MP3 encoder. Alink to find LAME MP3 can be found at http://audacity.sourceforge.net
If do not see the sund waves on the Interface, when recording please adjust the line in volume as follows;
Specific Steps as follows:
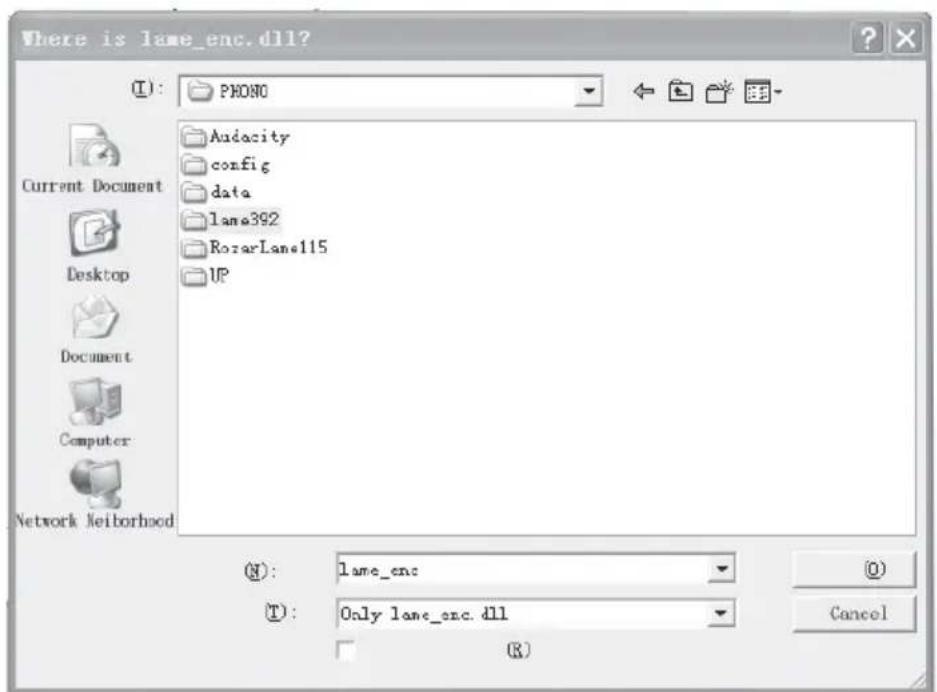
3.1) Download"lame-enc.dll"file, and install it to the software list.
3.2) Open the "Audacity" software, click Main Menu. Select "edit", "Parameter", "File Formats", and dick the "Searcher"

3.3) After opened, it will come to the following menu, click"YES" to go to "Llame-enc. dll", and find the file"s location.

3.4) After you find the "lame-enc.dl" file, open it and dick "Y" to finish the installation.
THE TURNTABLE DRIVE BELT IS FACTORY FITTED – USE THESE INSTRUCTIONS ONLY IF THE TURNTABLE FAILS TO REVOLVE....
STEP 1
Use a screwdriver to remove the black iron C-clip and lift the turntable off the phonograph mechanism.
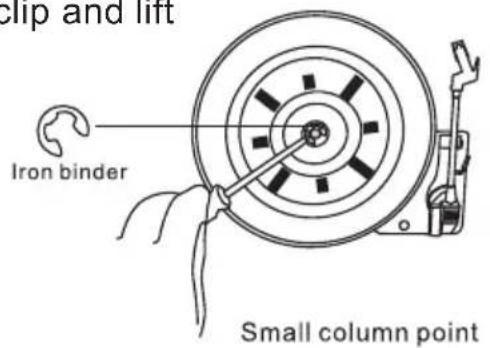
STEP 2STEP 2
Retrieve the dropped black rubber turntable drive belt and replace it around the column on the bottom of the turntable, then pull it out gently without overstretching and hook the band around the small column point at the edge of the turntable, as shown in the diagram.

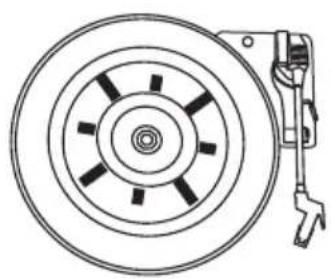
STEP 3STEP 3
To fix the turntable back onto the phonograph mechanism, make sure the column point is positioned over the correct place on the phonograph mechanism, while placing the axis of the turntable in the hole on the phonograph mechanism, as shown in the diagram.

STEP 4
Gently turn the turntable until a 'pop' sound is heard, which indicates the repositioning of the rubber band. Replace the C-clip to secure the turntable.
natural_image
Technical line drawing of a mechanical component with concentric circles and a handle (no text or symbols)

- Classic Horn Phonograph/Turntable With USB-to-PC Connection and Aux-In
- PYLE®PRO
- VINTAGE
- www.pyleaudio.com
- MODEL:PNGTT1
- Operating Instructions Manual
- CAUTION
- IMPORTANT SAFETY INSTRUCTIONS
- PREPARATION FOR USE
- UNPACKING AND SET UP
- POWER SOURCE
- IMPORTANT: Raising And Lowering The Lid
- PROTECT YOUR FURNITURE
- LOCATION OF CONTROLS AND INDICATORS
- FRONT PANEL
- PHONOGRAPH
- AUX IN OPERATION
- LINE OUT OPERATION
- PLAYING TURNTABLE
- IMPORTANT!!
- AUX IN/PHONO RECORDING
- Audacity and USB Connection
- INSTRUCTION FOR PC RECORDING
- 1.4) Press next to go forward;“
- 1.5) Choose the desitination location, and press to go forward;
- THE TURNTABLE DRIVE BELT IS FACTORY FITTED – USE THESE INSTRUCTIONS ONLY IF THE TURNTABLE FAILS TO REVOLVE....
- STEP 1
- STEP 2STEP 2
- STEP 3STEP 3
- STEP 4
Brand : Pyle
Model : PNGTT1R
Category : DJ Equipment