
VX4025 - Receiver JENSEN - Free user manual and instructions
Find the device manual for free VX4025 JENSEN in PDF.


| Product Type | AV Receiver |
| Brand | Jensen |
| Model | VX4025 |
| Power Output | 100W per channel (8 ohms, 20Hz-20kHz, 0.08% THD) |
| Number of Channels | 5.1 |
| Frequency Response | 20Hz - 20kHz ±1dB |
| Signal-to-Noise Ratio | 100dB |
| Inputs | 4x HDMI, 2x Optical, 2x Coaxial, 1x RCA Audio, 1x Phono (MM) |
| Outputs | 1x HDMI ARC, 1x Subwoofer Pre-out, 1x Headphone |
| Tuner | FM/AM with 30 presets |
| Bluetooth | Yes, version 4.2 |
| Dimensions (W x H x D) | 430 x 150 x 320 mm |
| Weight | 8.5 kg |
| Power Consumption | 400W (standby: 0.5W) |
| Power Supply | AC 120V/60Hz (or 230V/50Hz depending on region) |
| Remote Control | Included (RC-1010) |
| Cleaning Instructions | Wipe with a soft dry cloth; do not use solvents. |
| Safety Certifications | UL, CE, FCC Class B |
| Spare Parts Availability | Contact Jensen support for service parts. |
| Warranty | 2 years limited |
Frequently Asked Questions - VX4025 JENSEN
User questions about VX4025 JENSEN
0 question about this device. Answer the ones you know or ask your own.
Ask a new question about this device
Download the instructions for your Receiver in PDF format for free! Find your manual VX4025 - JENSEN and take your electronic device back in hand. On this page are published all the documents necessary for the use of your device. VX4025 by JENSEN.
USER MANUAL VX4025 JENSEN
Complete operation manual is online at www.jensenmobile.com
Note: There is no operation manual in this package

What's in the Box
The following items are supplied with the VX4025:
- VX4025 Head Unit
- Trim Ring
- Hardware Bag
• Power/Speaker Output Harness - Remote Control
• External Microphone
• Installation / Quick Start Guide
Tools and Supplies
The following tools and supplies are needed to install the VX4025:
- Torx type, flat-head and Philips screwdrivers
- Wire cutters and strippers
- Tools to remove existing radio (screw driver, socket wrench set or other tools)
• Electrical tape - Crimping tool
• Volt meter/test light - Crimp connections
• 18 gauge wire for power connections
• 16 – 18 gauge speaker wire
WARNING! Never install this unit where operation and viewing could interfere with safe driving conditions.
Steering Wheel Control (SWC) Ready
The recommended SWC Interface is the PAC SWI-RC steering wheel control adapter.
SWI-RC installation hints:
- Set "Radio Select Switch". Set the SWI-RC to position 7 - "Pioneer/Sony/Other".
- Programming - Use the Pioneer/Sony/Other radio function mapping order for Jensen branded head units.
- When programming the SWI-RC, if a function is not supported (or not desired), then the function MUST be skipped as per the PAC SWI-RC instructions.
- The SWC functions MUST also be programmed in the correct order per the PAC SWI-RC radio function mapping order instructions.
Disconnect the Battery
- To prevent a short circuit, be sure to turn off the ignition and remove the negative (-) battery cable prior to installation. NOTE: If the VX4025 is to be installed in a car equipped with an on-board drive or navigation computer, do not disconnect the battery cable. If the cable is disconnected, the computer memory may be lost. Under these conditions, use extra caution during installation to avoid causing a short circuit.
Replacing the Fuse
- When replacing the vehicles Radio fuse always use the proper rated replacement fuse. Using a fuse with an improper rating could damage the unit and cause a fire.
ISO-DIN Installation
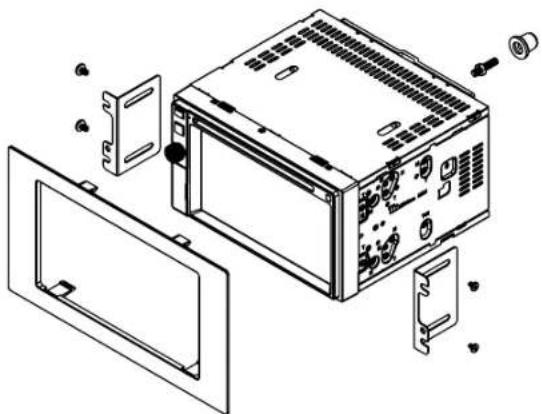
The VX4025 is designed to fit into a 2.0 DIN dashboard opening. The unit has threaded holes in the chassis side panels which may be used with the original factory mounting brackets of some Toyota, Nissan, Mitsubishi, Isuzu, Hyundai and Honda vehicles to mount the radio to the dashboard. Please consult with your local car stereo specialty shop for assistance on this type of installation.
- Remove the existing factory radio from the dashboard or center console mounting. Save all hardware and brackets as they will be used to mount the new radio.
- Remove the factory mounting brackets and hardware from the existing radio and attach them to the new radio.
CAUTION! Do not exceed M5 X 6MM screw size. Longer screws may damage components inside the chassis. - Place the radio in front of the dashboard opening so the wiring can be brought through the mounting sleeve. Follow the wiring diagram carefully and make certain all connections are secure and insulated with wire nuts or electrical tape. After completing the wiring connections, plug the connector into the mating socket on the rear of the chassis. Turn the unit on to confirm operation (vehicle ignition switch must be "ON"). If the unit does not operate, re-check all wiring until the problem is corrected.
- Mount the new radio assembly to the dashboard or center console using the reverse procedure in step 1 above. CAUTION! Be careful not to damage the car wiring.
natural_image
Exploded view diagram of a computer tower case showing internal components and casing (no text or labels)NOTE: It is the end-users responsibility to install and operate this unit in a manner in accordance with local, state and federal laws. The PARKING BRAKE wire MUST BE CONNECTED as directed in the manual.
Using the Cosmetic Trim Ring
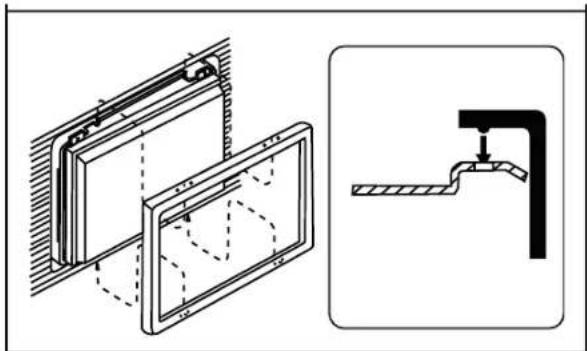
A cosmetic trim ring is supplied with the head unit for installation flexibility. This unit will fit into most import dashes with little or no modification to the dash board/cavity. Some US domestic vehicle dashes will accept a Double-DIN chassis, but there is usually a small gap between the radio and dash piece after installation is complete. In this case, use the trim ring to conceal any gaps that may be present.
natural_image
Technical diagram showing two mechanical components with dashed alignment lines, one with a pipe and the other with a handle (no text or symbols)NOTE: For proper operation of the CD/DVD player, the chassis must be mounted within 30° of horizontal. Make sure the unit is mounted within this limitation.
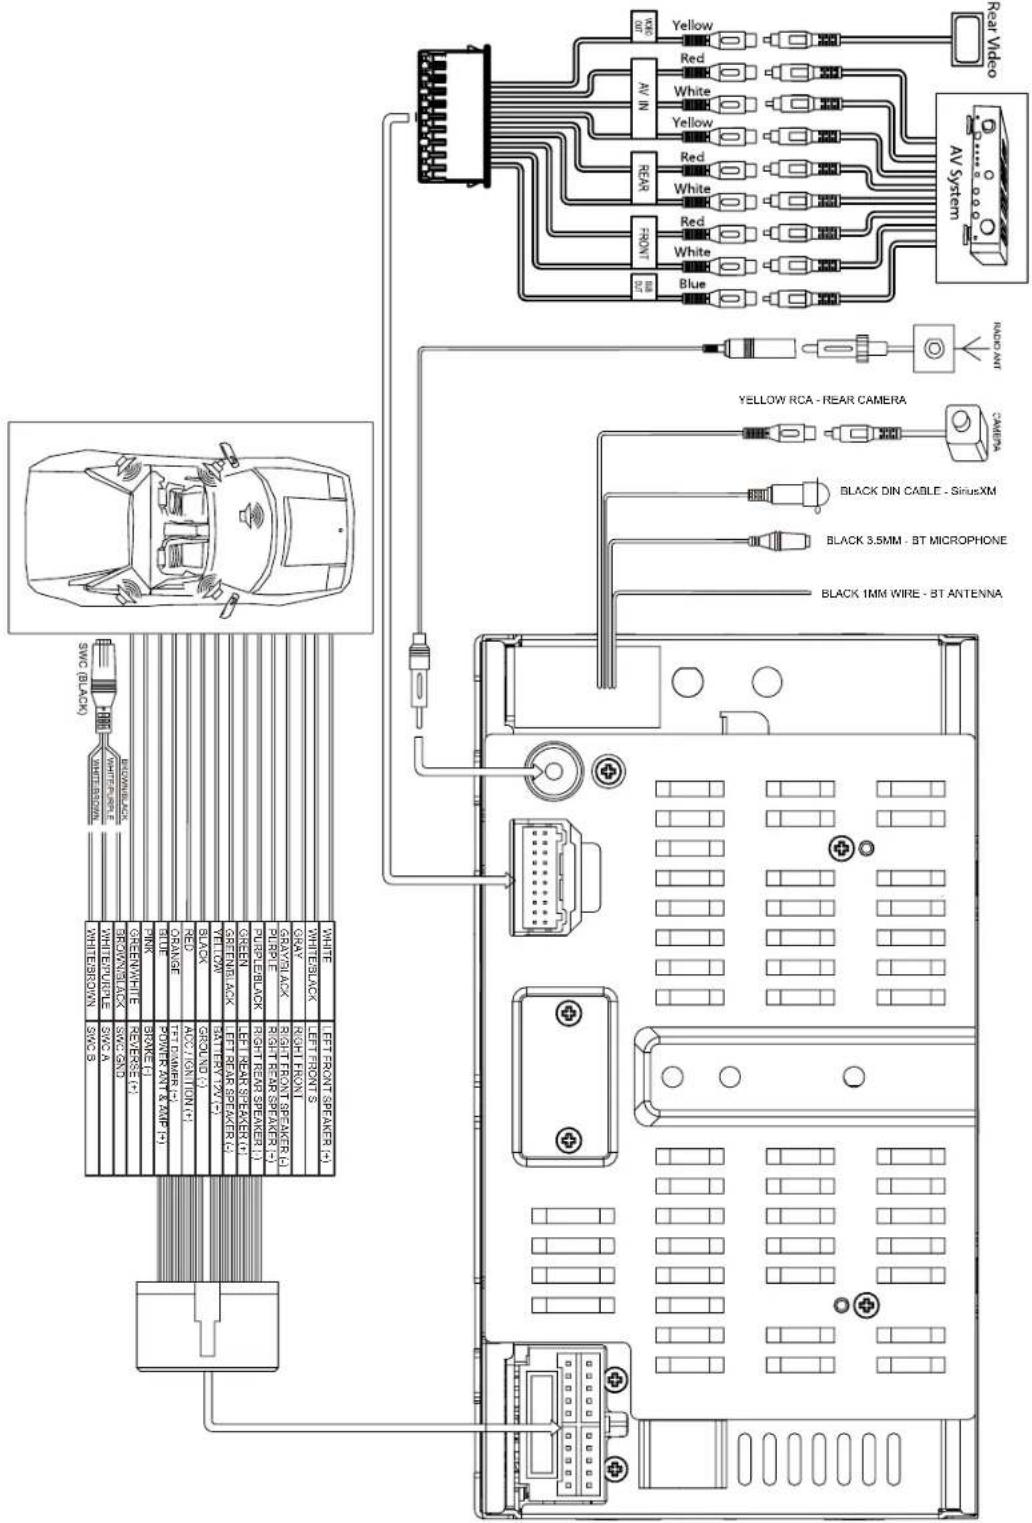
Wiring Diagram
CAUTION! IMPORTANT: Incorrect wiring connections can damage the unit. Follow the wiring instructions carefully, or have the installation handled by an experienced technician.
Need Help? For technical assistance, call the Jensen customer support line at 1-800-323-4815.
Some vehicles may not support all SWC functions. Professional installation is recommended.
QUICK START GUIDE
Turning the Unit ON or OFF
Press the front panel volume knob to turn the unit ON. Press and hold the volume knob > 1 second to turn the unit OFF.
Selecting an Audio/Video Source, Phone, Steering Wheel Controls, Backup Camera or Pandora
To select a source:
- Press the front panel MENU button or touch the SRC icon to view the Main Source Menu
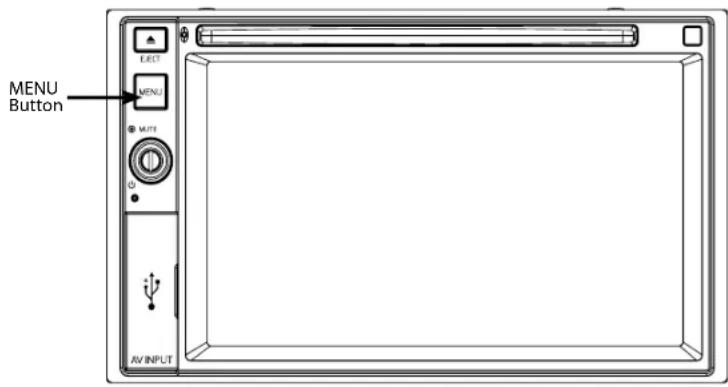
- Touch the desired source icon on one of the two main menu screens. Screen 1 of 2: Disc, Radio, USB, AV-IN1, Settings, Phone or Camera. Touch Next at the bottom of the screen to access Screen 2 of 2: Steering Wheel Controls (SWC), AV-IN2, Pandora or SiriusXM (SXM).
Volume Adjustment / Turn On Volume
To increase or decrease the volume level, rotate the rotary encoder knob. The unit's front panel screen will display the volume level for 2 seconds. The volume level ranges from 0 to 50. To set the Turn-On volume, press and hold the rotary encoder knob 1 second while the green volume bar is displayed after setting the desired volume level. You will hear 2 beeps to confirm the new Turn-On volume level.
Audible Beep Confirmation
An audible beep tone confirms each function selection. The beep tone can be disabled through the Setup menu.
Muting the Audio
Press the front panel volume knob (☐) to mute the audio from the unit. Mute icon is displayed on the LCD screen. Press the front panel volume knob again to restore the audio volume to its previous level. Adjusting the volume or using any of the audio setup features cancels the mute function.
Equalizer Controls
Equalizer (EQ): Adjustment can be made after entering one of the audio/video sources (Disc, Radio, USB, AV-IN or SXM). Touch the Equalizer (EQ) icon to view the Equalizer Control Screen to select a desired preset setting (Optimal, Classic, Rock, Jazz, Techno or Pop), Flat setting, custom User setting, make adjustments to the audio Balance and Fader levels or to turn the Loudness option ON or OFF. Touch the SRC icon to return to the current source.
Voxx Electronics Corporation
Hauppauge, NY 11788
Technical Assistance: 800-323-4815
www.jensenmobile.com © 2015 Printed in China
- Complete operation manual is online at www.jensenmobile.com
- Note: There is no operation manual in this package
- What's in the Box
- Tools and Supplies
- Steering Wheel Control (SWC) Ready
- SWI-RC installation hints:
- Disconnect the Battery
- Replacing the Fuse
- ISO-DIN Installation
- Using the Cosmetic Trim Ring
- Wiring Diagram
- QUICK START GUIDE
- Turning the Unit ON or OFF
- Selecting an Audio/Video Source, Phone, Steering Wheel Controls, Backup Camera or Pandora
- Volume Adjustment / Turn On Volume
- Audible Beep Confirmation
- Muting the Audio
- Equalizer Controls
Brand : JENSEN
Model : VX4025
Category : Receiver