
BTC-406REC - DJ Equipment BRIGMTON - Free user manual and instructions
Find the device manual for free BTC-406REC BRIGMTON in PDF.


| Product Type | DJ Controller/Recorder |
| Brand | Brigmton |
| Model | BTC-406REC |
| Dimensions | 200 x 150 x 50 mm |
| Weight | 0.8 kg |
| Power Supply | USB 5V DC or 9V DC adapter (not included) |
| Connectivity | USB (for PC/Mac), Bluetooth 5.0, 3.5mm stereo line in/out |
| Main Functions | Mixing, recording, Bluetooth playback, audio streaming |
| Recording | Direct to USB flash drive or SD card (up to 32GB) |
| Controls | Rotary knobs, faders, transport buttons, volume control |
| Display | LED indicators for power, Bluetooth, recording status |
| Material | Plastic housing with metal knobs |
| Color | Black |
| Compatibility | Windows, macOS, iOS, Android (Bluetooth) |
| Software | Compatible with Virtual DJ, Mixxx, Traktor (via USB MIDI) |
| Accessories Included | USB cable, user manual |
| Maintenance | Clean with a soft dry cloth; avoid solvents |
| Safety | Keep away from water, heat, and direct sunlight |
| Spare Parts & Repairability | Contact Brigmton support for replacement knobs, faders, or boards |
| General Information | Designed for home and small event DJ use; not intended for professional live sound |
Frequently Asked Questions - BTC-406REC BRIGMTON
User questions about BTC-406REC BRIGMTON
0 question about this device. Answer the ones you know or ask your own.
Ask a new question about this device
Download the instructions for your DJ Equipment in PDF format for free! Find your manual BTC-406REC - BRIGMTON and take your electronic device back in hand. On this page are published all the documents necessary for the use of your device. BTC-406REC by BRIGMTON.
USER MANUAL BTC-406REC BRIGMTON
natural_image
Abstract curved white shape on white background, no text or symbols presentBRIGMTON
surfing technology
natural_image
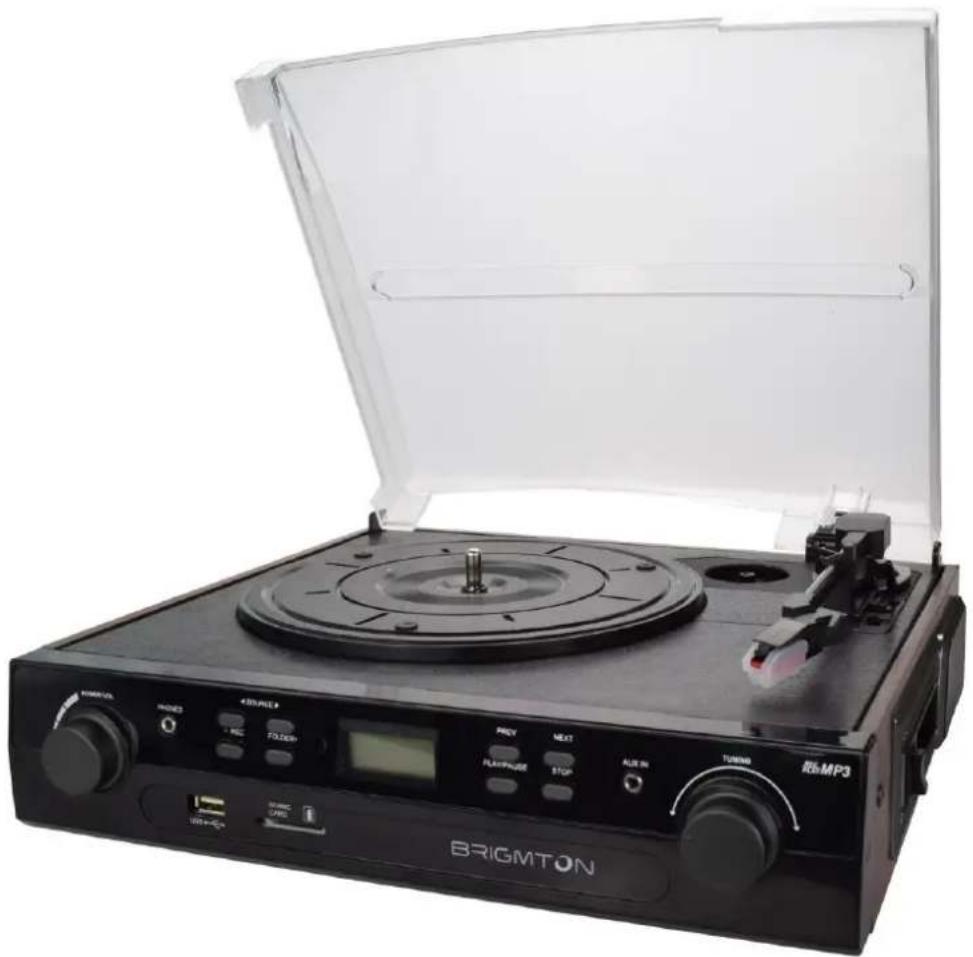
Black BRIGMTON radio with open lid and control knobs, no visible text or symbols on device bodynatural_image
Abstract curved white shape on white background, no text or symbols presentBRIGMTON
surfing technology
natural_image
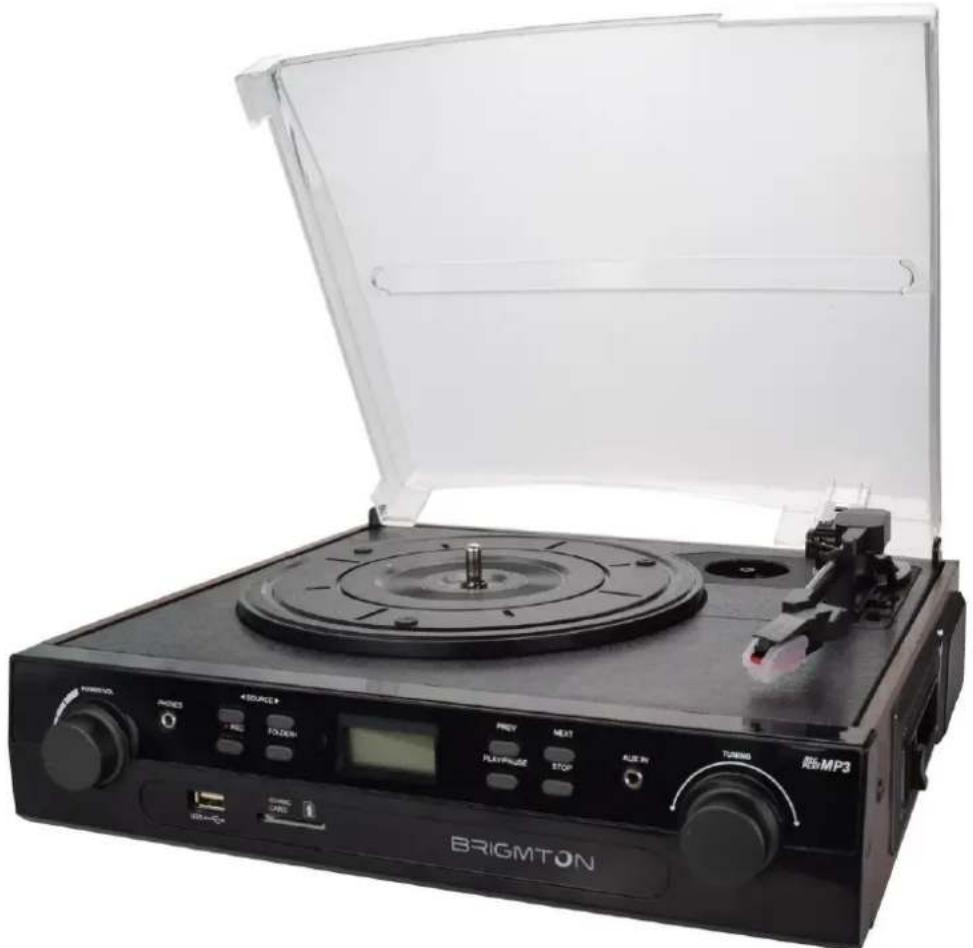
Black BRIGMTON radio with open lid and control knobs, no visible text or symbols on device bodyINSTRUCTION MANUAL
RECORDING TURNTABLE-USB-CASSETTE
BTC-406REC
SECURITY
- Read Instructions: All safety and operating instructions should be read before operating the machine
- Retain Instructions: The instructions should be retained for future reference.
- Heed Warnings: All warnings on the appliance and in the operating instructions should be adhered to.
- Follow Instructions: All operating and use instructions should be followed.
- Water and moisture: The appliance should not be used near water; for example, near a bathtub, kitchen sink, laundry tub, in a damp or near a swimming pool basement, and the like.
- Ventilation: The appliance should be situated so that its location or position does not interfere with proper ventilation. For example, the appliance should not be situated on a bed, sofa, rug or similar surface that may block the ventilation openings; or placed in a built-in installation such as a bookcase or cabinet that may impede the flow of air through the ventilation openings.
- Heat: The appliance should be situated away from heat sources such as radiators, heaters, stoves or other apparatus (including amplifiers) that produce heat.
- Power Sources: The appliance must be connected to a power supply of the type described in the operating instructions or as marked on the appliance.
- Grounding or Polarization: Precautions should be taken so that the grounding or polarization means of an appliance is not defeated.
- Power Cord Protection: Power supply cords should be routed so they are not walked on or pinched by items placed upon or against them, paying particular attention to cords at plugs, receptacles, and the point where they exit from the appliance.
- Plug Protection: The unit is equipped with an attachment plug having overload protection. This is a safety feature. See Instruction Manual for replacement or resetting of protective device. If you need to replace the plug, make sure the service technician has used a replacement plug specified by the manufacturer that has the same overload protection as the original plug.
- Non-use Periods: The power cord of the appliance should be disconnected from the outlet when not in use for a long period of time.
- Object and Liquid Entry: Care should be taken so that objects do not fall and liquids are not spilled into the enclosure through openings.
-
Damage Requiring Service: The appliance should be serviced by qualified service personnel when:
-
The power cord or plug has been damaged
- Have Debris or liquid has been spilled into the appliance
- The appliance has been exposed to rain
- The appliance does not appear to operate normally or exhibits a marked change in performance
- The appliance has been dropped or the cabinet damaged.
- Servicing: The user should not attempt to service the appliance beyond that described in the operating instructions. All other servicing should be referred to qualified service personnel.
When using electrical appliances, basic safety precautions should always be followed.
-
Children should be supervised to ensure they do not play with the appliance.
-
Do not leave the appliance unattended while connected to the network electric.
-
To reduce the risk of electric shock, do not use outdoors or on wet surfaces.
-
Do not immerse in water or any other liquid.
-
Unplug from the outlet when not in use.
-
Do not unplug by pulling the cable. To unplug, grasp the plug, not the cord.
- Do not use a power cord or plug damaged.
- Do not use if the unit has been dropped or damaged in any way.
- Repairs to electrical equipment should only be performed by a qualified electrician. Improper repairs may place user at serious risk.
- Place the unit in a place free from vibrations and away from heat sources.
- Do not leave the unit plugged in for long periods of time.
- Do not use with wet hands.
- Do not put any object into openings.
- Keep free of dust, dirt, etc.
- Do not use this unit for anything other than its intended use.
- Never place the unit on or near the speakers an acoustic coupling occurs.
CONTROLS
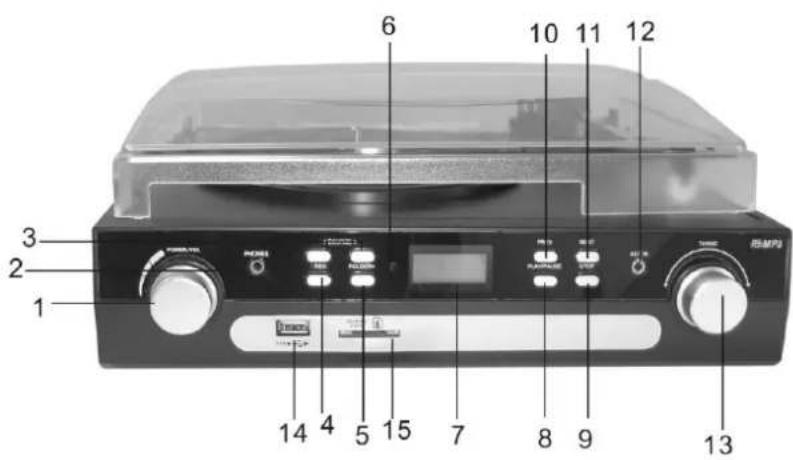
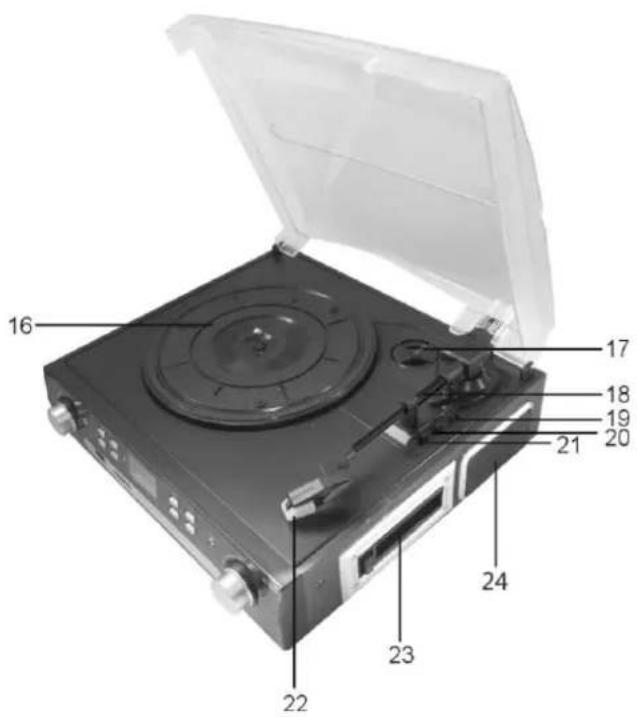
- Power/Volume knob 13. Tuner knob
- Headphone jack 14. USB socket
- Source key 15. SD/MMC socket
- REC key 16. The big platter
- FOLDER+ key 17. 45rpm adapter
- IR Receive 18. Tone arm set
- LCD Display 19. Play/pause lift lever
- PLAY/PAUSE key 20. Speed switch
- STOP key 21. Diamond cartridge
- PREV key 22. Tape slot
- Full range dynamic stereo
- NEXT key speakers
- Aux in jack
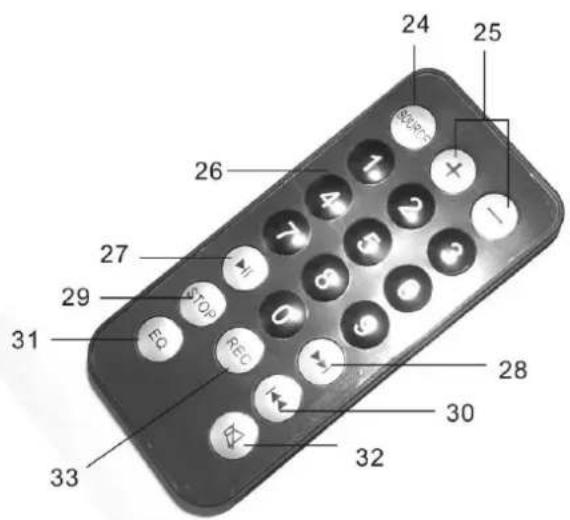
- SOURCE key
- Volume +/- key
- Tracks/Channel NO key
- PLAY/PAUSE key
- NEXT key
- STOP key
- PREV key
- EQ key
- Mute key
- RECORD key
CONNECTION
- Connect the power cord to AC outlet 240V/50Hz, Press the "Power/Volume" key a little longer around 3s then POWER will ON.
- Press the SOURCE Key to PHONO, TAPE, AUX IN, USB&SD or TUNER function. Now your system is ready to play the music.
FM/AM OPERATION
- Press the "SOURCE" key to TUNER mode, then choose needed band (AM, FM and FM stereo) by BAND switch.
- Search stations: Rotate the TUNER knob to choose request station, or press PREV/NEXT keys to choose idea stations. User can also press one of the two keys a little longer around 1.5s then the model will search automatically and it would stop at a clearest station, or press the PLAY/PAUSE key then the model will search automatically and it would save at the clearest station.
- Record Radio: Firstly insert memory device (USB flash disk or SD/MMC card). When Radio is working, press the REC key on front control board of the unit, now recording works will begin. To finish the work just need to press the STOP key.
Note: When you insert both USB flash disk and SD Card, the recorded file will be saved into the latter inserting device.
PHONO OPERATION
-
Press the "SOURCE" key to PHONO position. Then put a record on the Platter lightly. In certain circumstances, 45 RPM adapter is needed;
-
Select the speed of record: 33 1/3, 45, 78rpm according to vinyl to played.
-
Remove the stylus guard and push the lift lever upward to raise the tone arm from the arm park, and then move the cartridge holder over the record gently, now the platter will run automatically (default set of Auto/Manual stop switch at ON position). Then put down the lever, the tone arm would drop and touch record surface gently. Now users can enjoy their favorite sons.
-
Select the auto/manual stop control: The turntable will stop automatically while the song on the record finished when the switch at ON position. The other side it will always play when it is at OFF position, this may helps to play some long recorded vinyl which can not be played to the end by normal way.
-
Rotate the volume control knob to get desired sound level.
-
Push the arm lift lever up to raise the arm, now platter will still running but play will pause. To continue the play, user just need to put down the lever.
-
Record vinyl: Firstly insert memory device (USB flash disk or SD/MMC card). When turntable is working, press the REC key on front control board of the unit, now recording works will begin. To finish the work just need to press the STOP key.
Note: Recorded file in mp3 format with 128bit.
-
Press the "SOURCE" key to TAPE position
-
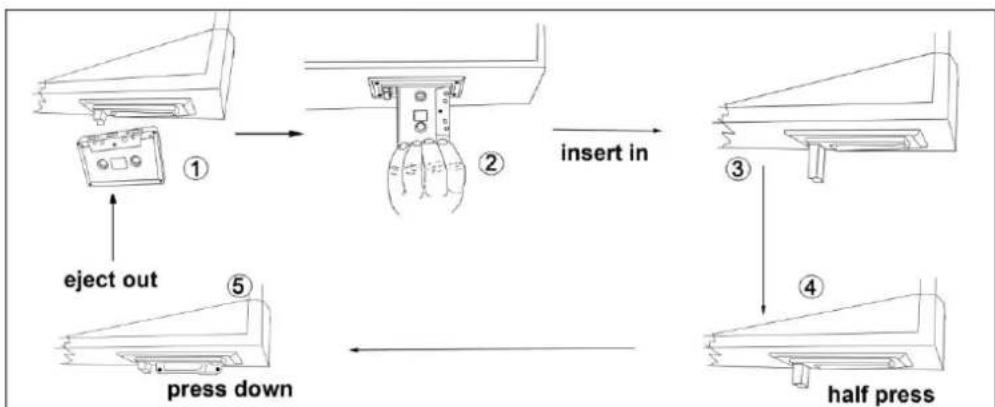
Insert a pre-recorded cassette tape into tape slot, with the exposed side facing right. By pushing, the cassette will slide into the tape mechanism and play start automatically.
Note: one end of tape will remain visible.
-
Adjust volume control to your desired sound level.
-
Depress the eject button completely in, the tape will be ejected from the slot.
-
Press the eject button half way to fast forward of the tape you are listening.
-
The tape will stop automatically when it comes to its end.
-
Record Cassette: Firstly insert memory device (USB flash disk or SD/MMC card). When Cassette is working, press the REC key on front control board of the unit, now recording works will begin. To finish the work just need to press the STOP key.
flowchart
graph TD
    A["Printer with ① eject out"] --> B["Inserting a device"]
    B --> C["Insert in: press down"]
    C --> D["Insert in: half press"]
    D --> E["Insert in: insert in"]
AUX IN JACK
- The external sound sourcing can be played and recorded through the device.
- The external sound sourcing can be recorded to the USB flash disk or SD through the sockets.
- Record Aux in: Firstly insert memory device (USB flash disk or SD/MMC card). When Aux in is working, press the REC key on front control board of the unit, now recording
works will begin. To finish the work just need to press the STOP key.
Note: to enjoy the function, user need to select the "SOURCE" to AUX IN position.
USB/SD PLAYING
- Be sure power is on, insert USB flash disk or Mp3 player into USB port and/or insert MEMORY CARD (SD/MMC) into SD socket.
- Set SOURCE key to USB&SD position
- The device supports for Mp3 and WMA formats. During play status, press PLAY/PAUSE button once to halt playing, press it again to continue.
- Press PREV once to play the preview song, hold down continuously to speed up selecting backward. Press NEXT once to play next one, holds down continuously to speed up selecting forward.
- EQ Function: You can press "EQ" button to choose different sound effects. Normal, POP, ROCK, JAZZ, CLASSIC.
- FOLDER+: By pressing this button, it can switch the stored music files (the music which you have stored in memory devices) and the recorded music files (the music which is recorded from turntable, cassette and aux in).
- Press STOP to end up the play.
- The turntable can be connected to amplifier or speakers by 3.5mm HEADPHONE jack, and you can get the 3.5mm to RCA audio converter to other audio jack.
- Private listen of earphone also can be realized through this jack.
HOW TO REPLACE THE NEEDLE
To replace the needle, please refer to the instructions below.
Removing the needle form the cartridge
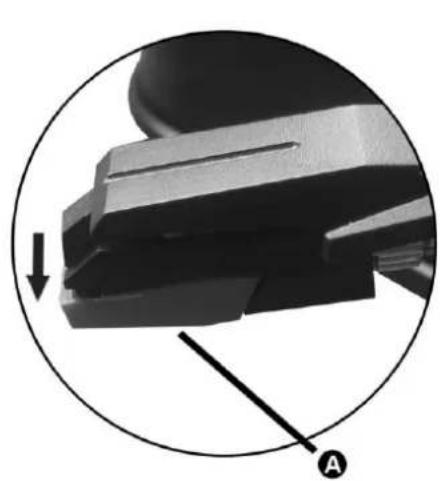
- Place a screwdriver at the tip of the needle heads hell and push downwards in the direction shown in sketch "A"
- Remove the needle head shell by pulling it forwards and pushing downwards.
Inserting the needle
natural_image
Close-up of a mechanical component with a circular arrow and labeled point A (no text or symbols beyond labels)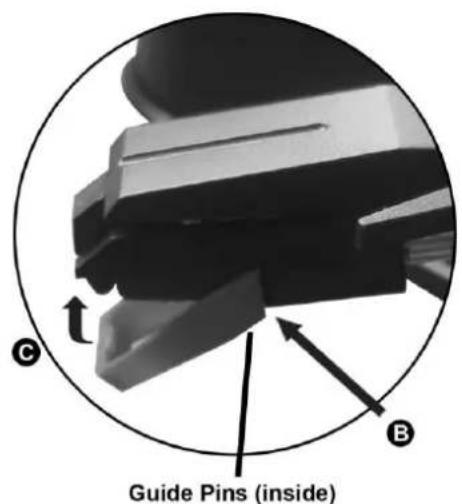
-
Hold the tip of the needle head shell and insert it by pressing in the direction illustrated by "B"
-
Push the needle head shell upwards in the direction illustrated by "C" until the needle locks into the tip position.
"Features can change without notice"
BRIGMTON
surfing technology
IMPORTED
FERSON ELECTRÓNICA, S.A.
CIF: A-41111881
SANTA CLARA DE CUBA 12
SEVILLA
ESPAÑA
DECLARATION OF CONFORMITY
Ferson Electrónica, S.A. declares under our responsibility that the equipment meets the requirements indicated in the following directives:
EMC DIRECTIVES
EN 55013: 2013
EN 55020: 2007/A11: 2011
EN 55022: 2010
EN 55024: 201
EN 61000-3-2:2006+A2:2009
EN 61000-3-3: 2013
Description of apparatus:
BRIGMTON Model BTC-406REC
Portable Turntable
CE
BRIGMTON
surfing technology
Brand : BRIGMTON
Model : BTC-406REC
Category : DJ Equipment