
PDCT3 - Compass Pyle - Free user manual and instructions
Find the device manual for free PDCT3 Pyle in PDF.


| Product Type | Digital Compass |
| Brand | Pyle |
| Model | PDCT3 |
| Language | English |
| Power Source | 3V Battery (CR2032 or equivalent) |
| Compass Accuracy | ±5 degrees |
| Compass Resolution | 1 degree |
| Compass Calibration | Manual calibration required |
| Compass Auto Shut-off | After approx. 2 minutes |
| Stopwatch Precision | 1/100 second |
| Stopwatch Maximum Time | 10 hours |
| Stopwatch Memory | 30 Lap/Split records + Fastest Lap |
| Thermometer Range | -10°C to +50°C |
| Calendar | Perpetual with day of week |
| Alarm | Snooze alarm (3 repeats, 5-minute intervals) |
| Time Format | 12/24 hour selectable |
| Temperature Units | °C/°F selectable |
| Backlight | Yes (button B) |
| Battery Low Indicator | Yes |
| Magnetic Distortion Alert | "Err" display |
| Declination Adjustment | East/West, adjustable angle |
| Care Instructions | Keep away from magnetic objects; avoid direct sunlight for accurate temperature |
| Battery Installation | Remove battery cover with coin; positive side up |
| Safety Warning | Recalibrate if "Err" appears; avoid use near metal/magnets |
Frequently Asked Questions - PDCT3 Pyle
User questions about PDCT3 Pyle
0 question about this device. Answer the ones you know or ask your own.
Ask a new question about this device
Download the instructions for your Compass in PDF format for free! Find your manual PDCT3 - Pyle and take your electronic device back in hand. On this page are published all the documents necessary for the use of your device. PDCT3 by Pyle.
USER MANUAL PDCT3 Pyle
flowchart
graph TD
    A["START"] --> B["SPLIT / LAP1"]
    B --> C["SPLIT / LAP2"]
    C --> D["RESET"]
    D --> E["STOP"]
    E --> F["Hold"]
- "Split time" refers to an elapsed time required to cover a distance from the start to a given point. (Fig. 1)
- "Lap time" refers to an elapsed time required to cover a given section of the whole distance. (Fig. 1)
RECALL LAP/SPLIT MEMORY: C-A-A-A-C-C

flowchart
graph TD
    A["RECALL FASTEST LAP"] --> B["RECALL LAST SPLIT / LAP"]
    B --> C["RECALL SECOND SPLIT / LAP"]
    C --> D["RESET"]
    D --> E["RETURN TO NORMAL MODE"]
    E --> F["RECALL FIRST SPLIT / LAP"]
    F --> G["Art No.: PYLE_SPORTS-PDCT3"]

    subgraph A
        H["LA 1 0006 62 FAS"]
        I["LA 3 00 12 59 0004298"]
    end

    subgraph B
        J["LA 2 002 180 0004298"]
    end

    subgraph C
        K["LA 0 0000 0000000"]
        L["Hold"]
    end

Features
Electronic Compass
- 3-mode display showing a compass arrow direction, numeric and cardinal readouts
- with highly accuracy of + / - 5 degree and a resolution of 1 degree
- a magnetic distortion alerts "Err" when external magnetic interference is occur
- automatic shut-off
Professional Stopwatch with 30 Lap/Split memory
- 1/100 sec precision stopwatch
- Display in hours, minutes, and seconds up to a maximum of 10 hours
• Total 30 Memories for 29 Lap/Split and 1 Fastest Lap - Fastest Lap Calculation
Thermo Alarm Clock
• Perpetual calendar with day of week
- Snooze alarm clock
- Thermometer (-10 degree °C to +50 degree °C)
· 12/24 hr, °C/°F selectable
• Max/Min memory for Thermometer
Important notes
Compass
- The compass must not be used near a metal or magnetic object like any other compass.
- Whenever error message "Err" is continuously displayed, please calibrate the compass again.
- Please hold the compass as horizontal as possible to get a precise direction.
Temperature
- The temperature displayed is the temperature of the case inside. Hence, it is influenced by your body temperature.
- To display the actual temperature, the watch must be taken off the hand for about 15 to 30 minutes and must not be exposed to direct sunlight.
Battery Installation
Remove the battery cover from the bottom of the computer using a small coin. Install the 3V battery with the positive(+) pole facing the battery cover and replace the cover.
Should the LCD show irregular figures, take out the battery and install again. This will clear and restart the computer's microprocessor.

Display Icons & Keys Illustration

Icons:
▲ - Heading Direction
- Alarm ON / OFF
z^z - Alarm Snooze
- Battery Low
COMP- Compass mode
sw -Stopwatch mode
time - Time mode
- Stopwatch memory recall
- Afternoon
- Left Direction
- Right Direction
°C - Temperature in Celsius
*F - Temperature in Fahrenheit
max-Maximum memory
max- Minimum memory
To turn on and display different mode
Press button D to turn on and press button D again to switch to different modes.

Light
Press button B to turn on the light.
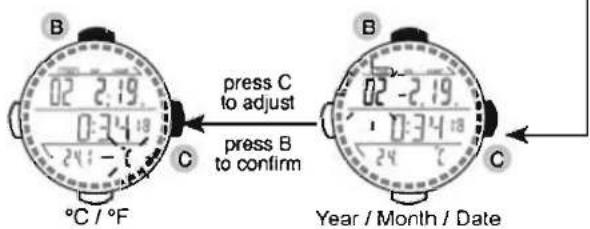
Clock, Calendar and °C / °F selection
- Press button D to enter the Clock mode
- To set time and date, press and hold button B to enter time setting mode.
- The "24 Hr" digits will then start to flicker, press button C to select 12 Hr or 24 Hr hour format and press button B to confirm. Right after the confirmation, the hour digits will start to flicker.
- Repeat the process until you get a desire value of hour, minute, year, month, date and ^ / ^ and then the day of week will be automatically calculated and displayed.

Snooze Alarm Setting
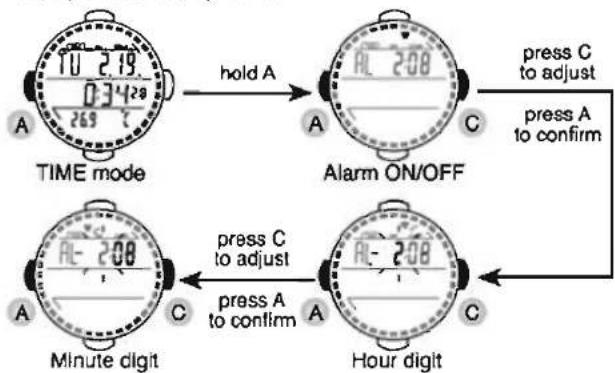
- To set alarm, in Clock mode, press and hold button A to enter alarm setting mode.
- The alarm on/off symbol ( ) will then start to flicker, press button C to select alarm on ( ) or alarm off and press button A to confirm. Right after the confirmation, the hour digits start to flicker.
- To set the hour digits, press button C to adjust to desire value and then press button A to confirm. Right after the confirmation, the minute digits will start to flicker.
- To set the minute digits, press button C to adjust to desire value and then press button A to confirm.
- For a snooze alarm ( z^2 ), it will alarm for 1 minute and repeat for 3 times with an interval of 5 minutes each.
- To read alarm time, in Clock mode, press button A to select alarm display or date display format.
flowchart
graph TD
    A["TIME mode"] -->|hold A| B["Alarm ON/OFF"]
    B -->|press C to adjust| C["Hour digit"]
    B -->|press A to confirm| D["Minute digit"]
    D -->|press C to adjust| E["Hour digit"]
    D -->|press A to confirm| F["Minute digit"]
Date and Alarm Time display

Temperature Memory Recall and Reset
- To recall maximum and minimum temperature, in Clock mode, press button C.
- To reset the memory, press and hold button C right after the calling.

flowchart
graph LR
    A["TIME mode"] -->|press C| B["Maximum and minimum temperature memory"]
    B -->|hold C| C["Maximum and minimum temperature memory reset"]
The Digital Compass
- Press button D to enter the Compass mode
- Keep the compass in horizontal level and pointing the direction by "▲".
• The compass will show the direction by 3 different ways.
(1). Precise direction pointing by "▲" in degree and cardinal readout, e.g. South East (SE) 135°
(2). Precise direction of North (■■), South (■ ■ ■), East (■) and West (■) by the ring.
(3). Relative Left hand side (◀) e.g. North East (NE) to the pointing (▲) Relative Right hand side (▶) e.g. South Wet (SW) to the pointing (▲)
- For Power Saving, the compass will automatically stop measurement around 2 minutes with full direction dots on. To start the measurement again, press button A.


Example: Determination of North
You may symbolize the icon — as the "TIP" of an needle, which always points to the north, and icon — as the "TAIL" of the needle, which always points to the south. No matter the current compass's orientation is, the NORTH and SOUTH can easily be identified by — and —.
Compass Calibration and Environmental Interference
- It is important to know all digital compasses works with Earth's magnetic field and is very sensitive to different environments where the earth magnetic fields is distorted, such as interference by closing to heavy metal, home appliance, computer and high power cable...etc.

• To keep a high accurate heading information, you must calibrate the compass when
(1) the magnetic distort message "Err" is continuously displayed
(2) the numeric heading information with an error more than 10 degree
(3) the unit is used for the first time in a vehicle so as to separate the earth's field from the interference.
Malfunction
Problem
| Incorrect Compass Reading | Wrong Calibration or the environment of operation is changed.Do the Calibration again with correct instruction stated in the user manual. |
| "Err" display in Compass Mode | External Magnetic Interference, such as heavy metal, home appliance, computer and high power cable, etc..Escape from the interference or re-calibration again. |
| Incorrect Temperature Reading | Interference from direct sunlight, air conditioner or Heater vent.Move the unit away from the interference. |
| Display readout fades and incorrect readings | Poor battery or bad contacts.Take out battery and install again or install a new battery. |
| Black Display | Temperature too hot, or display exposed to direct sunlight too long. |
| Display shows irregular figures | Take out battery and install again. |
How to Calibrate the Compass
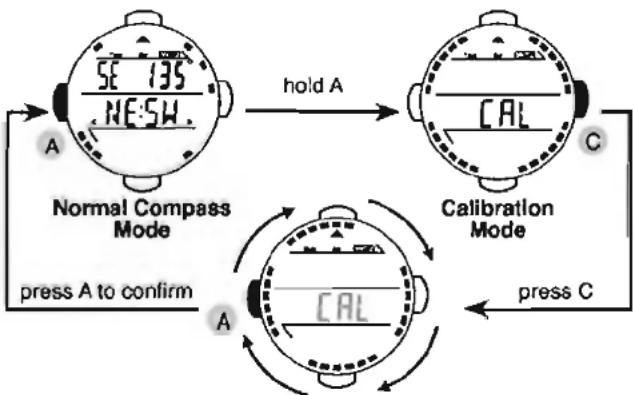
- Press button D to the Compass mode.
- Press and hold button A to enter calibration mode "CAL" and then press button C to start. The ring will then display and turn.
- Turn the unit clockwise in two circles on a level surface where it is free from unnecessary metal plate, home appliance, computer and high power cable...etc., The circles do not need to be perfect circles, but must be completed in the same direction. It is also important that each circle takes a minimum of 20 seconds but less than 1 minute to complete.
- Right after the calibration, press button A to confirm.
- Failure to do a correct calibration can result in inaccurate headings. Perform a new calibration again if a heading is suspected.
flowchart
graph TD
    A["Normal Compass Mode"] -->|hold A| B["Calibration Mode"]
    B -->|press C| C["Calibration Mode"]
    C -->|press A to confirm| A
    style A fill:#f9f,stroke:#333
    style B fill:#ccf,stroke:#333
    style C fill:#cfc,stroke:#333
After the ring move, turn the unit clockwise in two circles
Enter Declination angle for the true North
- Declination refers to the measured difference between the magnetic North and the North of the map. The local declination is given on the map margin either as easterly plus declination (E) or as westerly minus declination (W). When orienteering, the map direction is corrected by subtracting the plus declination and adding the minus declination.
- To input the value, press and hold button A to enter calibration mode "CAL" first and press button A again to enter declination setting mode "dEC".
- Right after entering the declination setting mode, a letter "E" start to flicker. Press button C to select the direction East-E or West-W and then press button A to confirm.
- An angle digits will then start to flicker. To set the angle to be offset, press button C to adjust to desire value and then press button A to confirm.
- As the declination setting will affect the direction directly, for a serious and final confirmation, press button C to turn the function "On" and then press button A again to confirm.
- In order to understand the declination effect, let us quote an example, the current direction is N 10 degree.
If the declination angle is set to E 30 degree, the final direction will change to NE 40 degree or
If the declination angle is set to W 30 degree, the final direction will change to NW 340 degree

And the declination angles for major world cites are listed as follow:
| City | Declination Angle | City | Declination Angle |
| Anchorage | 22^ | Calgary | 18^ |
| Atlanta | 4^ | Chicago | 3^ |
| Bombay | 1^ | Denver | 10^ |
| Boston | 16^ | Jerusalem | 3^ |
| London | 4°W | Rio De Janeiro | 21°W |
| Little Rock | 3°E | San Francisco | 15°E |
| Livingston, MT | 14°E | Seattle | 19°W |
| Munich | 1°E | Shanghai | 5°W |
| New York City | 14°W | Toronto | 11°W |
| Orlando | 5°W | Vancouver | 20°E |
| Oslo | 2°W | Washington DC | 10°W |
| Paris | 2°W | Waterbury, CT | 14°W |
Professional Stopwatch
- Press button D to enter the stopwatch mode
- Press button A to start / stop the stopwatch
- Reset the stopwatch
- Press button A to stop the stopwatch
- Hold button C to reset to zero
- Lap / Split selection and record
- Press button B to select lap "LA" and split "SP" display
- Press button C to record the lap / split memory when the stopwatch is counting
- Lap / Split memory recall
- Press button A to stop counting
- Press button C to enter lap / split memory recall mode. The memory icon "■" and the fastest lap "FIS" will be displayed.
- Press button A to read different lap / split memories
- Press button C to exit the memory recall mode

For your reference, you can follow the following methods to take different measurements:
STANDARD MEASUREMENT : A-A-C.

flowchart
graph TD
    A["START"] --> B["STOP"]
    B --> C["RESET Hold"]
    C --> D["End"]
ACCUMULATED ELAPSED TIME MEASUREMENT : A-A-A-A-C.

flowchart
graph TD
    A["START"] --> B["STOP"]
    B --> C["RESET"]
    C --> D["LA 0 0000 00 12058"]
    D --> E["LA 0 0000 00 12058"]
    E --> F["LA 0 0000 00 12058"]
    F --> G["LA 0 0000 00 12058"]
    G --> H["LA 0 0000 00 12058"]
    H --> I["LA 0 0000 00 12058"]
    I --> J["LA 0 0000 00 12058"]
    J --> K["LA 0 0000 00 12058"]
    K --> L["LA 0 0000 00 12058"]
    L --> M["LA 0 0000 00 12058"]
    M --> N["LA 0 0000 00 12058"]
    N --> O["LA 0 0000 00 12058"]
    O --> P["LA 0 0000 00 12058"]
    P --> Q["LA 0 0000 00 12058"]
    Q --> R["LA 0 0000 00 12058"]
    R --> S["LA 0 0000 00 12058"]
    S --> T["LA 0 0000 00 12058"]
    T --> U["LA 0 0000 00 12058"]
    U --> V["LA 0 0000 00 12058"]
    V --> W["LA 0 0000 00 12058"]
    W --> X["LA 0 0000 00 12058"]
    X --> Y["LA 0 0000 00 12058"]
    Y --> Z["LA 0 0000 00 12058"]
    Z --> AA["LA 0 0000 00 12058"]
    AA --> AB["LA 0 0000 00 12058"]
    D --> AC["STOP"]
    AC --> AD["A"]
    AC --> AE["C"]
- Features
- Electronic Compass
- Professional Stopwatch with 30 Lap/Split memory
- Thermo Alarm Clock
- Important notes
- Compass
- Temperature
- Battery Installation
- Display Icons & Keys Illustration
- Icons:
- To turn on and display different mode
- Light
- Clock, Calendar and °C / °F selection
- Snooze Alarm Setting
- Temperature Memory Recall and Reset
- The Digital Compass
- Compass Calibration and Environmental Interference
- How to Calibrate the Compass
- Enter Declination angle for the true North
- Professional Stopwatch
Brand : Pyle
Model : PDCT3
Category : Compass