ICPS-2U-SU-N-H - Thin client Black Box - Free user manual and instructions
Find the device manual for free ICPS-2U-SU-N-H Black Box in PDF.


| Product Type | Thin Client |
| Brand | Black Box |
| Model | ICPS-2U-SU-N-H |
| Form Factor | 2U Rackmount |
| Dimensions (W x D x H) | 19 x 14 x 3.5 inches (approx.) |
| Weight | 12 lbs (approx.) |
| CPU | Intel Celeron or equivalent (approx.) |
| RAM | 4 GB DDR4 (typical) |
| Storage | 16 GB eMMC or SSD |
| Operating System | Windows 10 IoT Enterprise or Linux |
| Network | 2 x Gigabit Ethernet |
| USB Ports | 4 x USB 3.0, 2 x USB 2.0 |
| Video Output | 1 x VGA, 1 x DisplayPort |
| Power Supply | 100-240V AC, 50-60 Hz, external power adapter |
| Power Consumption | 30W (typical) |
| Cooling | Fanless or low-noise fan |
| Mounting | 19-inch rack included |
| Management | Remote management via Web interface |
| Security | TPM 2.0, secure boot, Kensington lock |
| Operating Temperature | 0°C to 40°C |
| Humidity | 10% to 90% non-condensing |
| Maintenance | Routine cleaning with dry cloth; no internal user-serviceable parts |
| Warranty | 2 years limited |
| Included Accessories | Power adapter, mounting brackets, quick start guide |
Frequently Asked Questions - ICPS-2U-SU-N-H Black Box
User questions about ICPS-2U-SU-N-H Black Box
0 question about this device. Answer the ones you know or ask your own.
Ask a new question about this device
Download the instructions for your Thin client in PDF format for free! Find your manual ICPS-2U-SU-N-H - Black Box and take your electronic device back in hand. On this page are published all the documents necessary for the use of your device. ICPS-2U-SU-N-H by Black Box.
USER MANUAL ICPS-2U-SU-N-H Black Box
Set up vibrant, real-time digital displays easily and affordably. All-in-one, plug-and-display unit works right out of the box.
natural_image
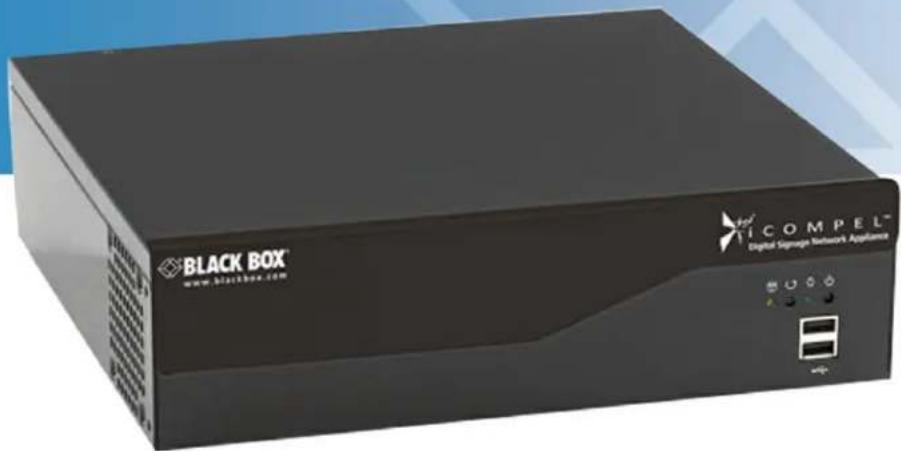
Exterior view of a black Box Digital Signage Network Appliance device (no signage text on body)Federal Communications Commission and Industry Canada Radio Frequency Interference Statements
This equipment generates, uses, and can radiate radio-frequency energy, and if not installed and used properly, that is, in strict accordance with the manufacturer's instructions, may cause interference to radio communication. It has been tested and found to comply with the limits for a Class A computing device in accordance with the specifications in Subpart B of Part 15 of FCC rules, which are designed to provide reasonable protection against such interference when the equipment is operated in a commercial environment. Operation of this equipment in a residential area is likely to cause interference, in which case the user at his own expense will be required to take whatever measures may be necessary to correct the interference.
Changes or modifications not expressly approved by the party responsible for compliance could void the user's authority to operate the equipment.
This digital apparatus does not exceed the Class A limits for radio noise emission from digital apparatus set out in the Radio Interference Regulation of Industry Canada.
Trademarks Used in this Manual
Black Box and the Double Diamond logo are registered trademarks of BB Technologies, Inc.
Any other trademarks mentioned in this manual are acknowledged to be the property of the trademark owners.
All rights reserved. No parts of this work may be reproduced in any form or by any means - graphic, electronic, or mechanical, including photocopying, recording, taping, or information storage and retrieval systems - without the written permission of the publisher.
Products that are referred to in this document may be either trademarks and/or registered trademarks of the respective owners. The publisher and the author make no claim to these trademarks.
While every precaution has been taken in the preparation of this document, the publisher and the author assume no responsibility for errors or omissions, or for damages resulting from the use of information contained in this document or from the use of programs and source code that may accompany it. In no event shall the publisher and the author be liable for any loss of profit or any other commercial damage caused or alleged to have been caused directly or indirectly by this document.
Printed: January 2012
We're here to help! If you have any questions about your application or our products, contact Black Box Tech Support at 724-746-5500 or go to blackbox.com and click on "Talk to Black Box."
You'll be live with one of our technical experts in less than 30 seconds.
Table of Contents
1. Welcome to Black Box Digital Signage 10
1.1 Tems you need to know 10
1.2 Logging on 12
1.3 Using the web interface 12
1.3.1 Drag and drop file upload 14
2. Creating Digital Signage....19
2.1 Using Schedules 19
2.1.1 Creating a Schedule.... 20
2.1.2 Schedule entries 21
2.1.3 Overriding the schedule 24
2.2 Using Layouts 25
2.2.1 Manage Layout Page 25
2.2.2 Adding a new Layout 26
2.2.3 Editing a Layout 26
2.2.4 Layout properties 26
- Adding a soundtrack to a Layout.... 27
2.2.5 Interaction Properties 27
2.3 Using Zones 27
2.3.1 The Layout editor 28
2.3.2 Editing a Zone 30
2.3.3 Editing a Zone's properties 31
2.4 Using Playlists 33
2.4.1 Adding Media item files to a Playlist 35
2.4.2 Adding Special items to a Playlist 35
2.4.3 Adding folders to a playlist 36
2.4.4 Playing content items to test them 36
3. Understanding Media Types....39
3.1 Media managed by iCOMPEL 39
3.1.1 Text 39
3.1.2 News feeds 40
3.1.3 Clocks 42
3.1.4 Tables 42
3.1.5 RS-232 outputs 45
3.2 Media run from disk 46
3.2.1 File Manager 46
- Using Files and Folders....46
- Uploading content files....47
- Editing content files.... 48
3.2.2 Video 48
3.2.3 Text files 49
3.2.4 Images and photos....50
3.2.5 Audio 50
3.2.6 Presentations 51
3.2.7 HTML web pages 52
3.2.8 Adobe Flash 53
3.2.9 Folder Play 53
- Folder Play properties.... 54
3.3 Media from external sources 55
3.3.1 TV 55
3.3.2 Radio 56
3.3.3 Live Video 57
3.3.4 Multicast Video (IPTV)....57
3.3.5 External Web Pages 58
3.4 Media item properties 60
3.4.1 Movie properties 60
3.4.2 Image properties 61
3.4.3 Text properties 61
3.4.4 HTML properties 62
3.4.5 Newsfeed properties 63
3.4.6 Common properties 64
- Duration 64
- Position and Size 64
- Opacity 64
- Time validity 64
- Conditional Play....65
- Ad hoc properties....66
3.5 Playlist Commands 66
3.5.1 Rendezvous Point and Advance commands....66
3.5.2 Change Layout command 67
3.6 Colors 68
3.7 Fonts 69
- Enhancing your displays....71
4.1 Synchronizing Playlist displays between Zones....71
4.1.1 Automatic captioning....71
4.1.2 Displaying Video-on-demand using a sub-playlist 72
4.1.3 Other uses for Advance To commands 73
4.2 Using Interactivity 74
4.2.1 Designing interactive layouts 76
4.2.2 General purpose input/output (GPIO) 76
4.2.3 Touch screens 77
4.2.4 Configuring touch screen actions 77
- Layout 78
- Zone 78
4.2.5 Click on touch 78
4.3 Using the RS-232 interface port 79
4.4 Displaying part of a Movie or Web page 79
4.5 Mitigating plasma screen burn 79
4.6 Screen Background 80
- Ad hoc Content......83
5.1 Enhanced Ad hoc Access Control 85
5.1.1 Remote Keypad Control....88
5.2 Additional Ad hoc 89
5.3 Ad hoc from Center....91
5.4 Making Ad hoc Changes 92
5.5 Managing Ad hoc Items 93
5.6 Creating Ad hoc User Accounts 95
5.7 Ad hoc Pages 96
5.7.1 Managing Ad hoc Pages....97
5.7.2 Editing Ad hoc Pages 98
5.8 Ad hoc Folder Play 99
5.9 Ad hoc Media Folder....100
5.10 Changing Ad hoc Content 101
5.11 Ad hoc Theming 104
- Sharing content using Layout Packages 107
6.1 Layout packages 107
6.1.1 Creating a Layout package.... 107
6.1.2 Copying a Layout package.... 108
6.1.3 Installing a Layout package.... 108
6.1.4 Layout package conflicts 108
6.1.5 Layout package information.... 109
- Channels and Signage Networks....111
7.1 Channel Roles 113
7.2 Channel Content Servers 113
7.3 Publishing 114
7.3.1 Configuring the Publisher 115
7.3.2 Publishing a Channel 117
7.3.3 Multi-channel publishing.... 118
7.4 Subscribing 119
7.4.1 Configuring a Subscriber 120
7.4.2 Updating Subscription.... 122
7.5 Channel Ad hoc 122
- Player and System Status 124
8.1 Player status 124
8.2 System status.... 124
8.3 Conditional Play status 125
8.4 TV & Radio Status 126
8.5 Screen Snapshot 126
- Setup 128
9.1 Getting connected 128
9.2 User options 128
9.3 Player setup 130
9.3.1 Audio 130
9.3.2 Screen 130
9.3.3 Players 133
9.3.4 RS-232 Outputs 133
9.3.5 Interactivity 135
9.3.6 TV Rebroadcaster 137
9.3.7 International settings 138
9.4 System setup 139
9.4.1 Users 139
9.4.2 Date and Time 140
9.4.3 Network 141
- Network Ethernet....141
- Network 3G Modem....142
- Wireless 143
- Network Interface Order 145
- Network Tests....145
9.4.4 TV & Radio 146
- Analog TV and Radio.... 146
- Digital TV and Radio.... 146
- Using multicast streaming TV 147
9.4.5 HTTP proxy 147
9.4.6 Security 148
- Firew all status....150
- LDAP settings....150
- LDAP tests....153
9.4.7 Reporting & Remote Setup.... 153
9.4.8 Feature Keys 155
9.4.9 Player Local Information.... 155
9.5 Backing up your Player 156
9.6 Software update.... 157
9.6.1 Manual 157
9.6.2 Automatic 158
9.6.3 Status 158
9.7 Reboot system.... 159
- Troubleshooting....161
10.1 Support snapshot 161
10.2 Connection troubleshooter 161
- Technical Reference 164
11.1 Energy Saving 164
11.2 Optimizing playback performance.... 165
11.3 RS-232 technical reference.... 165
- Glossary 168
Index
171
Part

Welcome to Black Box Digital Signage
1. Welcome to Black Box Digital Signage
Welcome to the iCOMPEL user guide.
There is plenty of information here to help you get started using your iCOMPEL.
You can browse through the Table of Contents or the PDF bookmarks, use the Index at the end of the guide, or use the Adobe Reader search facility to find any term.
Use these links to find out more about:
- Important terms 40a quick introduction to the specific terminology used in digital signage
- The iCOMPEL user interface 1-2 how you work with your signage system
- Creating digital signage 197 getting started with your displays
- Enhancing your digital signage using additional features to get more from your system
- Ad hoc features and overrides 83 allowing limited local content control
- iCOMPEL status 124 and regular maintenance tasks - keep your iCOMPEL running smoothly
- Managing Digital Signage Networks [11] - controlling a network of iCOMPEL at multiple sites
1.1 Terms you need to know
The iCOMPEL uses a number of specific words and phrases that you'll need to understand to get the best out of the system. Here's a list of the most common terms to help you get started quickly.
iCOMPEL
An iCOMPEL is a digital signage player that connects to a Screen, like a computer does to a monitor. When connected to a local area network (LAN) the signage player can be can be managed and updated from your desktop using a web browser.
Screen
A Screen is the hardware that shows the output of the iCOMPEL. It is attached to the iCOMPEL, but is not the same as the monitor for your computer. The Screen is usually an LCD panel or LCD TV. It could also be a projector or plasma screen, although plasma screens are not typically recommended for digital signage systems.
Schedule
Your iCOMPEL is designed to run continuously. You control which Layouts are displayed on what days and at which times by creating a Schedule. The Schedule may be something like this:
- Layout A runs from 4.00 pm to 6.00 pm, Mondays to Fridays
- Layout B runs from 2.00 pm to 8.00 pm, Saturdays and Sundays
- Layout C runs at all other times, throughout the week
More about Schedules... 19
Layout
A Layout is the arrangement of all the different display areas (Zones) that are displayed together. Your Layout may include video in one Zone, scrolling text in another, a sequence of still images in a third Zone and full-screen zone behind the others showing your background image. Your audience sees everything in your Layout, so take care to design Layouts that are attractive and engaging. More about Layouts... 25
Zone
Your Layout is made up of a number of rectangular areas called Zones, each of which can display Media items. A Layout can have any number of Zones, of any size, in any location, including overlapping other zones. Generally you need different Zones for different media types - typically one for a promotional video, one for scrolling text, another for your organization's name or logo, and so on, though some media types can share the same Zone. Each Zone displays a sequence of Media items which are arranged into a Playlist. More about Zones...27
Playlist
A Playlist is a sequence of Media items that you have chosen to be displayed in a Zone. Each Zone has its own Playlist which runs continuously, and is independent of all the other Playlists. If you wish, you can synchronize the display between two Playlists, so that for example, a scrolling text message starts to play at the same time as a related promotional video or image. More about Playlists... 33
Media items (content)
You can use your iCOMPEL to display a wide range of Media items. These include fixed and scrolling text, movies, images, Flash animations, web pages and RSS feeds. To display a media item, you need to add it to a Zone's Playlist. If your digital signage uses sound, be aware that Audio content and Video with Audio are all treated differently: they are added to the Soundtrack for the Layout, and not to the Playlist for a Zone. More about Media items... 39
Ad hoc
Ad hoc allows specific users to change specific elements of a display on an Ad hoc basis. For example, a signage layout may be designed at a head office, then distributed to each store (this will be covered later) but each store manager can logon and change the welcome message in their store only, without changing the rest of the layout and change the messaging on the other stores.
You can allow other people to make minor changes to some parts of your digital signage, by creating special Ad hoc items and allowing limited access to special pages where those items appear. For example, in a hotel lobby you can define an Ad hoc text area for meeting room details, and allow the hotel's receptionist access to this area only so they can update the details every day. More about Ad hoc items... 83
Administrators and Ad hoc users
You are the Administrator of an iCOMPEL if you have access to the entire iCOMPEL system; can create Layouts and Schedules, and arrange items in Playlists. If you only have access to a specific page which allows you to alter a limited number of specific items, you are an Ad hoc User.
iCOMPEL Channels
You can set up multiple iCOMPEL players to display the same Layouts in a Channel. A Channel has one Publisher iCOMPEL, where Layouts are designed, and one or more Subscriber iCOMPEL players which simply display the Layouts from the Publisher. The Schedule for the Publisher iCOMPEL is then the Schedule for all the iCOMPEL that subscribe to the Channel. You can even configure a number of Channels into a Digital Signage Network.
The iCOMPEL players in a Channel can be in different areas of one site (e.g. different floors of a shopping mall) or on different sites (e.g. different branches of a retail chain). You can give Ad hoc user access to individuals at different sites so they can make limited changes to the display at their location only. More about Digital Signage networks...107
1.2 Logging on
Logging on to the iCOMPEL
- Ensure that the iCOMPEL is connected to the network.
- Open a web browser such as Mozilla Firefox, Google Chrome, Microsoft Internet Explorer or Apple Safari on a computer on the same network as the iCOMPEL.
- In your web browser's address bar, type in the name or the IP address of the iCOMPEL and press the Enter key. If you do not know the IP address of the iCOMPEL, restart the iCOMPEL and towards the end of the boot screen, the Ethernet IP address is displayed.
- When prompted, enter your username and password. The factory-set default values for these are remote and 9999 respectively.
- You are now on the iCOMPEL home page and have full control over it.
You can add a browser bookmark or favorite for the iCOMPEL home page for easy retrieval in future.
For more help, see Getting connected.128
1.3 Using the web interface
The iCOMPEL is controlled and managed using the built in website, with each page broadly responsible for a particular feature of the iCOMPEL, such as layout design, playlist creation, channel publishing and managing user accounts. You can access this web interface through your web browser by typing in the iCOMPEL IP address into the address bar.
The Home page
This is the first page you see after logging onto the iCOMPEL, and contains thumbnails of the current playing Layout, as well as other recently used Layouts.
Layout thumbnail view
This shows you what the iCOMPEL is currently playing. Clicking on a Layout thumbnail displays the Layout Editor for the Layout.
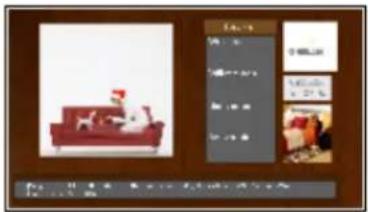
Layout Thumbnail view
Layout icons view
This shows you the arrangement of Zones in the Layout. Each Zone is represented by a different rectangle, and the colors indicate the Media players enabled for the Zone. Clicking a Zone takes you directly to the playlist editor for the selected zone in the Layout.
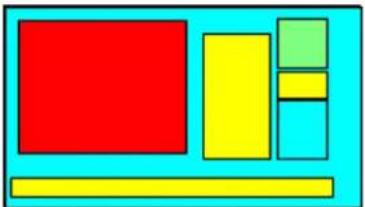
natural_image
Abstract geometric composition with red, yellow, cyan, and green rectangles (no text or symbols)Layout icons view
The Menu bar can be used to access the playlist for all the other Layouts.
The Menu bar
The Menu bar lets you select the web interface page you need, based on the feature you want to work with.
| Home | Media | Playlists | Layouts | Schedules | Channels | Ad hoc Entry | Status | Setup | Help |
You can change the behavior of the Menu bar on the UI Options 128 page. Click on Help and select UI Options from the drop down menu.
Using tabbed pages
Many options in the iCOMPEL user interface are split into use tabbed pages.

Example of Tabbed pages
To select the options on the tabbed page, click the tab, for example Add Schedule.
Action buttons
You can perform common actions with Action buttons.


Example of Action buttons
These actions include Audition (preview), Delete, Rename, Copy and Edit (usually edit properties)
Items that show the Reorder icon can be dragged around to change their location - to reorder items in a playlist, for example.
Command buttons
Some general commands also use buttons that are common across many pages of the iCOMPEL interface.
Save All Changes
The Save All Changes button
Activate Schedule and Layouts
The Activate Schedule and Layouts button
For more information about moving and importing files, see Drag and drop file upload 14
1.3.1 Drag and drop file upload
Drag and Drop allows you to simply drag files from your desktop PC and drop them straight on to a Zone's Playlist 33 for a file manager 46 within the iCOMPEL. If your browser supports drag and drop, a message will appear over the playlist or the files and folders tab indicating where you can drop files.
To drag and drop files, select one or more files on your computer then click and hold down the left mouse button. While holding the mouse button down, move the cursor to where you want to drop the files - typically the playlist or the files & folders tab - and release the mouse button to drop the files. What happens will depend on your target location:
Please note that a folder cannot be dragged in; you must go inside the folder to drag the files over.
Playlists
As your mouse hovers over the playlist, you'll see gaps opening up between the items in the list, showing where you can drop your file.
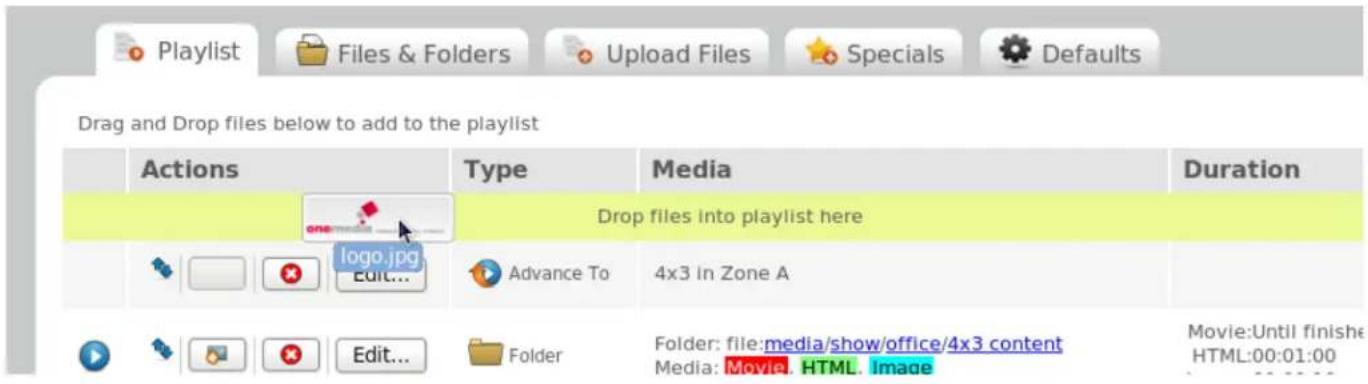
Once you drop the files, you'll see a green upload progress bar as the file is uploaded to the iCOMPEL. Files that are uploaded quickly such as small images may not display a progress bar.
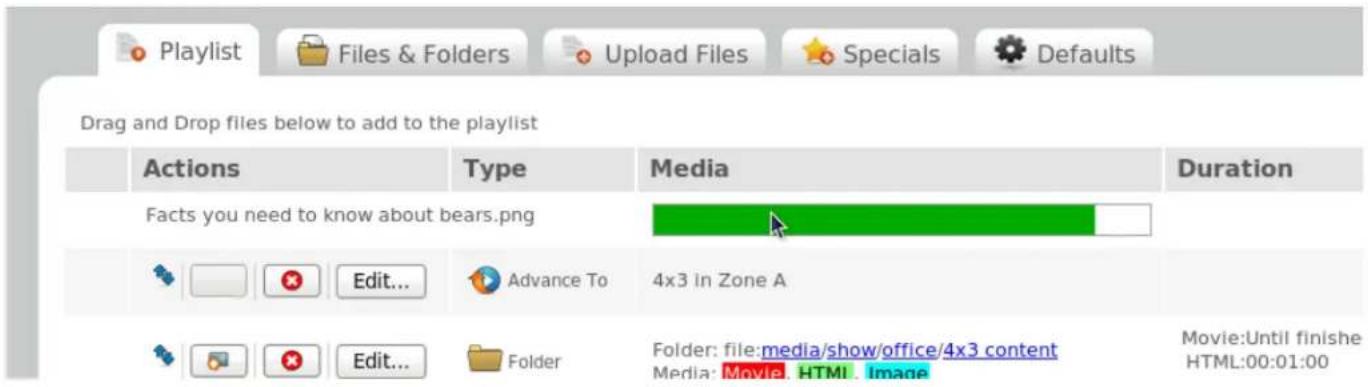
Files are uploaded to a folder based on the current Layout and Zone name. For example if you upload a file 'trees.jpg' to a layout 'Bears' into a Zone named 'Images' then the file will be stored as media/Bears/Images/trees.jpg.
You can also drop files into a Folder Play folder by dropping the file into that folder.
| Drag and Drop files below to add to the playlist | ||||
| Actions | Type | Media | Duration | |
| Edit... | Advance To | 4x3 In Zone A | ||
| Edit... | Folder | Folder: file:media/show/office/4x3 content Media: Movie, HTML, Image Drop here to upload to file:/media /show/office/4x3 content/ logo.jpg | Movie:Until finished HTML:00:01:00 Image:00:00:10 | |
| Edit... | Advance To | 16x9 in Zone A | ||
If you try to upload media that is not supported in the playlist, then you will receive an error message telling you so. Once the media is uploaded, a new item will appear in the playlist. You can edit it right away.
Files and Folders
The other place to drop files is in the Files & Folders tab within the iCOMPEL. This includes:
- The Files & Folders page found under the Media menu.
- The Files & Folders tab found on the Zone Edit page.
- Ad hoc users can also drag files into their Media Folder page.
Dragging onto a Files & Folders tab works similarly to dragging into playlists. Either drag files into the current folder by dropping over the existing files:
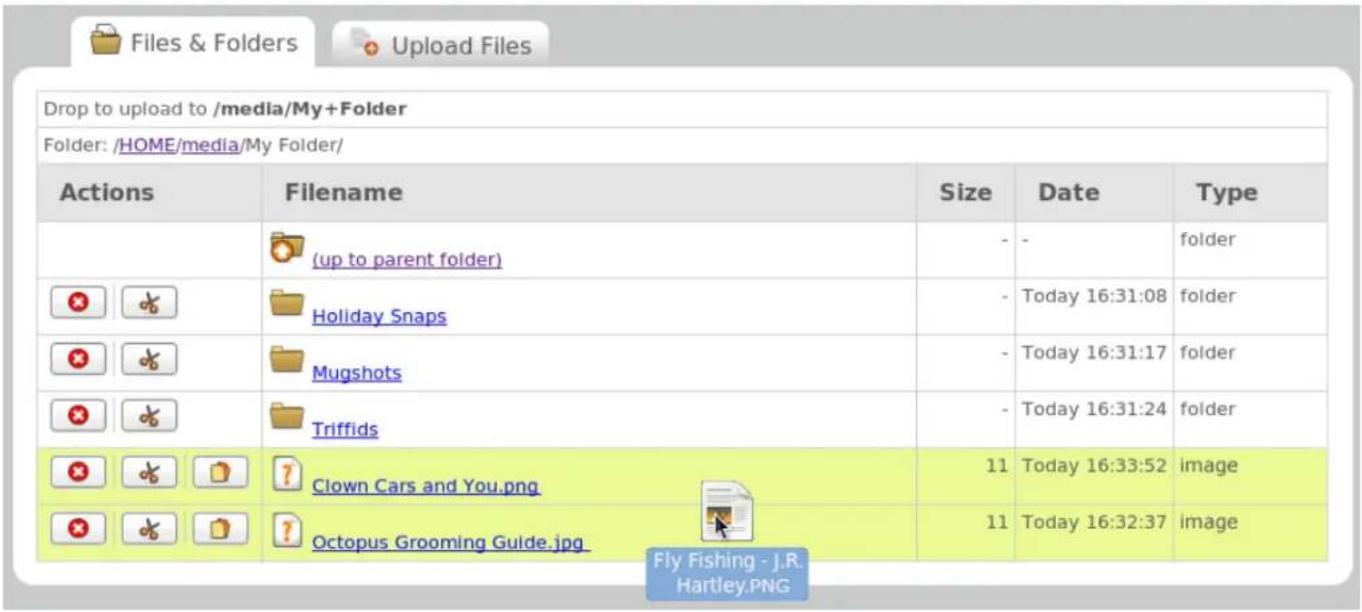
Or drop into a folder within the current one:
| Drop to upload to /media/My+Folder/Trifflds | ||||
| Folder: /HOME/media/My Folder/ | ||||
| Actions | Filename | Size | Date | Type |
| (up to parent folder) | - | - | folder | |
| Holiday Snaps | - | Today 16:31:08 | folder | |
| Mugshots | - | Today 16:31:17 | folder | |
| Trifflds | - | Today 16:31:24 | folder | |
| Clown Cars and You. pngYellow Plants.PNG | 11 | Today 16:33:52 | image | |
| Octopus Grooming Guide. jpg | 11 | Today 16:32:37 | image | |
Supported Browsers
Dragging and dropping is a new feature that requires features that are new to more modern browsers.
| Operating System | Supported Browsers & Minimum Versions |
| Windows (any) | Mozilla Firefox 6.0.2, Google Chrome 14 |
| Mac OS X | Mozilla Firefox 3.6.19, Google Chrome 14.0, Apple Safari 5.0.6 |
| Linux | Firefox 6.0.2 |
This table assumes you have the latest browser version. Opera and current versions of Internet Explorer do not support this feature yet. Other versions have not been tested and are not guaranteed to work.
Limitations
- You can select multiple files to upload at once but you cannot upload folders. Empty files may be ignored as well.
- If you upload a file to a place where there is already a file with the same name, the existing file will be overwritten.
- Some Files and Folder pages are filtered so that only media that can be selected for a playlist (e.g. images, movies etc.) will be shown. In this case you can still upload, but unless your media matches the type of file required by the playlist, you will not see it listed.
Part

Creating Digital Signage
2. Creating Digital Signage
This section describes how to create your digital signs. If you are new to the iCOMPEL see Terms you need to know before you begin.
The details in this section apply equally to creating content for a stand-alone iCOMPEL and for creating content for a channel publisher[11]
Click on the links below for more information on:
Schedules 19
Layouts 25
Zones 27
Playlists 33
Files and Folders 46
Media types 39
Enhancing your digital signage 71
2.1 Using Schedules
Your iCOMPEL is designed to run continuously. You control which Layouts ^25 are displayed on what days and at what times by creating a Schedule. A Schedule always contains at least one Schedule Entry ^21 , which defines at least one iCOMPEL action that often specifies which Layout to display. A Schedule Entry does not necessarily specify a Layout change, it could specify some other action, for example switching the Audio to Mute.
The Schedule Entries define periods of time during which actions occur. The program of Schedule Entries is based on a one-week cycle. The Default Schedule Entry defines the Layout that appears, or the actions that occur, when no other Schedule entry is active.
The iCOMPEL always displays the Schedule with the most recent start time. Once a Schedule starts running it continues until another Schedule is set to begin. If there is only one Schedule it runs indefinitely.
A Schedule might have a Schedule Entry playing Layout X running from 4:00 pm to 6:00 pm, Mondays to Fridays; another Schedule Entry playing Layout Y running from 2:00 pm to 8:00 pm on Saturdays and Sundays; and the default Schedule Entry, playing Layout Z running at all other times.
Whenever you make a change to a Schedule or Layout, remember to click the Activate Schedule and Layouts button to implement your changes.
You can temporarily interrupt a Schedule by using a Schedule Override ^24 .
The Schedules page
This lists all the Schedules that have been configured for this channel. Click on Schedules in the Menu bar and select Manage Schedules from the drop down menu, and click the Add Schedule tab. By clicking the Add Schedule box you will be able to add a new Schedule and define its properties.
You can use the Copy button to copy a Schedule, and the Delete button to permanently delete a Schedule. Deleting a Schedule does not delete any associated Layouts.
You can view and modify the Schedule contents by clicking the Edit button. You can change the name of a Schedule on the Properties tab. Each Layout change in a Schedule is defined by a Schedule Entry.
2.1.1 Creating a Schedule
To display content on your iCOMPEL, you need to create at least one Schedule. Additional Schedules can be created if required.
Adding a Schedule
- From the menu bar, select Schedules, then Manage Schedules.
- To add a new Schedule click the Add Schedule tab.
- Type in a name for the Schedule.
- Enter the date and time for the Schedule to start. This setting is not shown for the first Schedule you create.
- Select the Layout for the Schedule.
- Click the Add Schedule button.
Schedule Settings
You can define the following settings for a Schedule:
Schedule Name
A unique name for the Schedule.
Valid From
The date and time to start running this Schedule.
Any schedules that have 'Valid From' older than the current time will not start as they are in the past. However, if all the schedules have Valid From time in the past then the most recent Schedule is used.
Valid Until
The Valid Until setting can be:
- Superseded. The Schedule will play until a more recent Schedule that satisfies other conditions becomes eligible.
- Valid Date. The Schedule will stop on the specified date, and a more eligible Schedule will be selected. If no eligible Schedule is found, then the current Schedule will continue playing.
A schedule will start on the 'Valid From' time provided there is not another schedule that best matches the conditions. The Schedule will run until it is either superseded or until a 'Valid Until' time.
Show Layout
The Layout to show when this Schedule is started. You can change this by editing the Schedule.
2.1.2 Schedule entries
A Schedule Entry is a set of one or more actions for the iCOMPEL to perform at specified times. The actions that a Schedule Entry can specify are displaying a Layout, switching a Screen on or off, switching Audio on or off, or performing an Advance To command. Schedule Entries repeat over a weekly cycle. A program of Schedule Entries make up a Schedule.
The first Schedule Entry, which is created automatically whenever you create a new Schedule, is the Default Schedule Entry, and it does not have a start and end time. The Default Schedule Entry defines the default states for all the possible actions including which Layout is displayed when no other Schedule Entry is active.
You can use Schedule Entries to create a complex sequence of actions, displaying different Layouts at different times of the day and different days of the week, switching the display on and off, or repeating actions at specified intervals.
Example Schedule
In this example, the screen is turned on to show the Showroom Layout from 08:45 until 18:00 on Mondays to Fridays, with the Active Layout (which may be a news broadcast) being shown every hour for 10 minutes. At all other times the screen is turned off. This is achieved with a Schedule made up of three Schedule Entries.
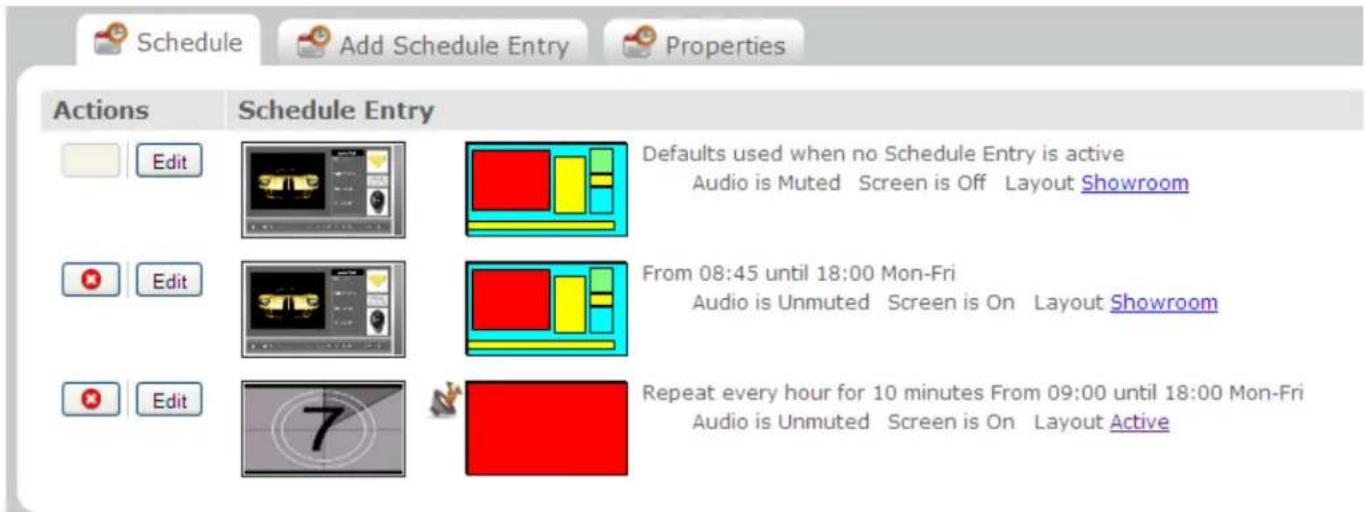
Schedule made up of three Schedule Entries
In the first Schedule Entry, the defined actions have the screen turned off and the audio soundtrack muted. This Schedule Entry is playing the Showroom Layout, even though the screen is off.
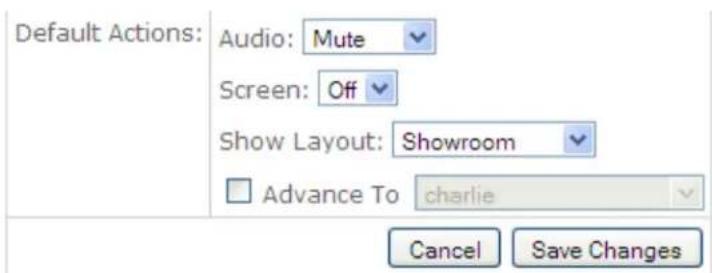
Details of first Schedule Entry
In the second Schedule Entry, the screen is on and the Showroom Layout is playing.

Edit
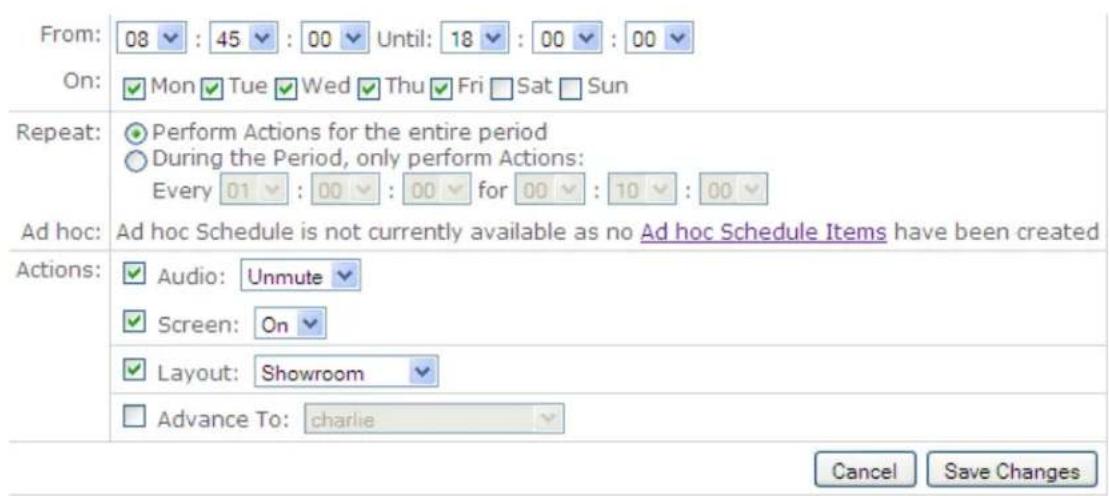
Details of second Schedule Entry
In the third Schedule Entry, the screen is on and a different Layout is shown every hour for 10 minutes.

Edit
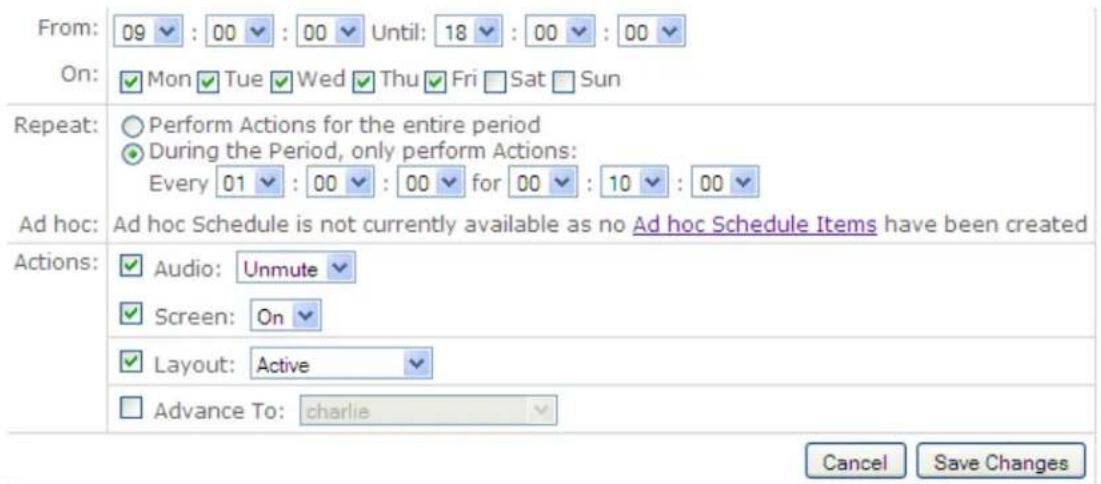
Details of third Schedule Entry
Schedule Entry settings
You can define the following settings for a Schedule Entry:
Period
Defines the time window during which the specified Actions ^23 are to be applied. The time window starts at From time and ends at the Until time, and is applied on the specified days of the week.
All times values are expressed in hours : minutes : seconds, and values are selected using the drop down lists.
The time setting 00:00:00 means midnight. If both the From and Until times are midnight, the specified action runs all day. To set up a time period that runs from before midnight one day through to the following day, you need to set up separate Schedule Entries (one ending at midnight, one commencing from midnight).
Repeat
Use this option to restrict the Schedule Entry to a repeating time window within the overall Period.
The minimum Repeat For duration is 30 seconds. Repeat Every must be at least 30 seconds more than the Repeat For setting.
To set up a repeating Schedule of, for example, three Layouts lasting 10 minutes each, you would give the Layouts start times 10 minutes apart, repeat intervals of 30 minutes, and durations of 10 minutes each.
Ad hoc
You can define the Schedule Entry as an Ad hoc Schedule Item. This means that an Ad hoc user ^95 can change the Period and Repeat settings for this Schedule Entry. A typical use for this might be to show information during the lunch hour at staff canteens on different sites. The Lunchtime Layout itself does not change between schools but the time that lunch starts does. The Ad hoc user would be able to set the times for the lunch hour on their site, which might differ from the times at other sites. More about Ad hoc content... ^71
Schedule Entry Actions
You can specify an Action to take place whenever the Schedule Entry begins. You can set the following actions when you create a Schedule Entry:
- Audio - mute or unmute the Audio soundtrack for the Layout. If the Audio is muted, then no sound is heard.
- Screen - switch the Screen on or off. You may wish to switch off a screen at times when your building is unoccupied. This means you can allow the iCOMPEL to run continuously and to start displaying content automatically when the building is next open.
- Layout - select the Layout for the Schedule Entry
- Advance To - synchronizes the display across different Zones. More about synchronizing the display... ^71
The Advance To action is not enabled if there are no Rendezvous Points defined.
Including a Layout in a Schedule Entry
You can show a particular Layout at a specific time of day by creating a Schedule Entry for those times and specifying the Layout. To add a Layout to a Schedule Entry follow these steps:
- Either:
- select Schedules, then Manage Schedules, and click Edit for the Schedule you want to add an Layout to.
or
- select Schedules, then the name of the Schedule you want to add a Layout to.
-
Select the Add Schedule Entry tab.
-
Use the drop-down lists to enter the start and end times for the Schedule Entry, and select or clear the check-boxes for the days of the week. More about Schedule Entry settings... 22
-
Select the Layout name from the drop-down list, and select any other Schedule Entry Actions... ^23
-
Click Add Schedule Entry.
-
On the Schedule page, click Save Changes.
-
Click Activate Schedules and Layouts to make your changes live.
Changing the Layout in a Schedule Entry
To change the Layout in a Schedule Entry follow these steps:
-
Either:
-
select Schedules, then Manage Schedules, and click Edit for the Schedule you want to work with. or
-
select Schedules, then the name of the Schedule you want to work with.
-
Click Edit for the Schedule Entry you wish to change.
- Enter or change the start and end times for the Schedule Entry, and select or clear the check-boxes for the days of the week.
- Select the Layout name from the drop-down list, and select any other Schedule Entry Actions... ^23
- Click Save Changes.
- Click Activate Schedules and Layouts to make your changes live.
2.1.3 Overriding the schedule
You may need to override the current Schedule at certain times, for example to display special instructions in an emergency, or to show a special event from a TV broadcast feed. You can create a Schedule Override 24 which temporarily replaces the current Schedule. This stops the current Schedule and displays a different Layout until you restore the Schedule by clicking the Activate Schedule and Layouts button.
When an override is in effect, the normal Schedule is not run. Although channel subscriptions take place, they are not activated until you click the Activate Schedule and Layouts button to return to the normal Schedule.
Creating an Override
To create a Schedule Override, follow these steps.
- From the menu bar, select Schedules, then Manage Schedules.
- Click the Add Override tab.
- Type in a name for the Override. The Override name should be descriptive, for example, Emergency Instructions, or Special TV Event.
- Select the Layout for the Override, and click Add Override.
Activating an Override
To activate an Override, follow these steps:
- From the menu bar, select Schedules, then Manage Schedules.
- Click the Override tab.
- Click the Activate button for the Override you want to use.
The override Layout is displayed immediately, and continues to be displayed until you re-activate the normal Schedule by clicking Activate Schedule and Layouts.
Override settings
An Override specifies the Audio, Screen settings and Layout that is shown while the Override is active.
2.2 Using Layouts
A Layout is an arrangement of various different display areas, called Zones ^27 , that are displayed together. Your Layout may include video in one Zone, scrolling text in another Zone, and a sequence of still images in a third Zone. You may also have a Zone that is the same size as the Layout that contains a background image, on which all the other Zones are superimposed. Your audience sees everything in your Layout, so you need to take care to design Layouts that are appealing and effective.
By default, the iCOMPEL names the Zones for each Layout on the screen in the order in which they were created - Zone A, B, C and so on. These can be changed to more descriptive names such as Background or Main Video as desired. You can change the relative display positions of the 27 Zones in a Layout.
Each Zone can display Media items 39 of different types, according to the media player or players that have been enabled for the Zone.
The iCOMPEL Screen Background 80 is visible in any part of the Layout that is not covered by a Zone. You can define the color or image for the screen background independently of any Layout.
2.2.1 Manage Layout Page
The Layout page shows all the Layouts available on this iCOMPEL. For each Layout you can see a thumbnail image (if the Layout has been used), a diagram of the Layout's Zones, the name and description of the Layout, and if applicable, the names of the Schedules that use the Layout, the names of any Rendezvous Point 71 for Change Layout commands and a link to the Ad hoc Page for the Layout. There are also icons to show if an audio Soundtrack is enabled

and if touch-screen interactivity is enabled

Click the name of the Layout, or click the thumbnail, to open the graphical Layout editor ^28 , or to work with the Layout's properties ^26 . Click a Zone in the Layout diagram to go directly to the Playlist ^33 for the Zone.
There are also the following action buttons for each Layout:

Audition a Layout (preview on the Screen, or preview a web page in a browser where appropriate)

Rename a Layout

Edit a Layout26
Note: You cannot delete a Layout that is being used by a Schedule, even if that Schedule is not currently active. If the Layout is in use, the name of the Schedule using it is shown in the notes alongside the Layout.
You can reduce the number of Layouts that are displayed by applying a filter. Click Filter and enter the name or part of the name of a Layout, and click Apply. Click Show All in the Filter dialog to clear the filter.
2.2.2 Adding a new Layout
To add a new Layout, follow these steps
- From the menu bar, select Layouts, then Manage Layouts.
- To add a new Layout, click the Add Layout tab.
- Type in a name for the new Layout and click Add.
- Scroll to your new Layout in the Layouts list and click Edit.
- Use the graphical Layout editor (GLE) ^28 to add one or more Zones and to set the properties for each Zone.
Remember to click Save all Changes, otherwise your changes are lost when you leave this page.
Editing a Layout 26 More about Zones 27 More about Playlists 33
2.2.3 Editing a Layout
The Layout page lets you create a Layout, add Zones to a Layout and change the arrangement of Zones, and lets you edit the content and behavior of individual Zones. More on Editing Zones... [30]
The Layout page has three tabs: Zones 28, 26, 74, Layout Properties , and Interaction , and two floating toolbars, Zone List 30 and Zone Properties .
You can use the Zone List 30 to select a specific Zone and to change the display order of Zones.
The Zones tab displays the graphical Layout editor 28
To edit a Layout, follow these steps
- From the menu bar, select Layouts, then Manage Layouts.
- Click the Edit button for the Layout you wish to edit.
- In the Select Action pop-up dialog, click Edit Layout or click the name of a Zone to start editing that Zone directly 30 .
2.2.4 Layout properties
You can define the following properties for a Layout.
Description
You may enter a free text description of the Layout. The description is displayed on the Layouts page.
Layout Ad hoc Page
If enabled, the Ad hoc Page will be created automatically when this Layout contains Ad hoc Items and deleted when it does not. Ad hoc Items are added or removed from the Ad hoc Page as they are added or removed from the Playlist of any Zone in this Layout.
Soundtrack
The Soundtrack is a special type of Zone used for playing Audio tracks from files or external sources. You can only have one Soundtrack for each Layout. Select this checkbox to enable a Soundtrack.
Editing Layout properties
To edit a Layout's properties, follow these steps:
- From the menu bar, select Layouts, then Manage Layouts.
-
Click the Edit button for the Layout you wish to edit.
-
In the Select Action pop-up dialog, click Edit Layout.
-
Click the Layout Properties tab, which allows you to:
-
enter a description for the Layout.
- enable this Layout's Ad hoc Page
- enable plasma screen mitigation for the Layout
-
add a Soundtrack to the Layout
-
Click the Interaction tab to set touch screen interaction properties 74.
- Click Save all changes to make your changes permanent.
See also Editing a Zone's properties
2.2.4.1 Adding a soundtrack to a Layout
To add a Soundtrack to a Layout's properties, follow these steps
- From the menu bar, select Layouts, then Manage Layouts.
- Click the Edit button for the Layout you wish to edit.
- In the Select Action, pop-up dialog click Edit Layout.
- Click the Layout Properties tab.
- Click the checkbox for Include Soundtrack.
- Click Save all Changes.
The Default Media setting defines whether the soundtrack uses the sound files in the Media/Default folder. You can change the files in this folder.
2.2.5 Interaction Properties
The Interaction allows the user to define how this Layout will respond to Touch screen and general purpose Input/Output events.
Please refer to the following sections for more information:
Layout Interaction events 78
Click on Touch 78
NOTE some options on this page may require a feature unlock key.
2.3 Using Zones
Your Layout is made up of a number of defined rectangular areas known as Zones. Each Zone can display Media items 39. You can decide on the number of Zones in your Layout, their sizes, and where they are placed. It is often convenient to use different Zones for different media types, with one for scrolling text, one for a promotional video, and so on. However, any Zone can display any media type as long as the appropriate media player 39 has been enabled for that Zone.
Each Zone can display a sequence of media items that you have chosen and arranged into a Playlist 33.
Editing a Zone 30
Editing a Zone's properties 31
2.3.1 The Layout editor
You can create and manage the Zones in a Layout directly using the graphical Layout editor. From the menu bar, select Layouts, then click the Layout you want to edit. Then select the Zones tab
The Zones tab on the Layouts page is a graphical editor that you can use to adjust the position and size of each Zone in the Zones Tab directly, using your mouse.
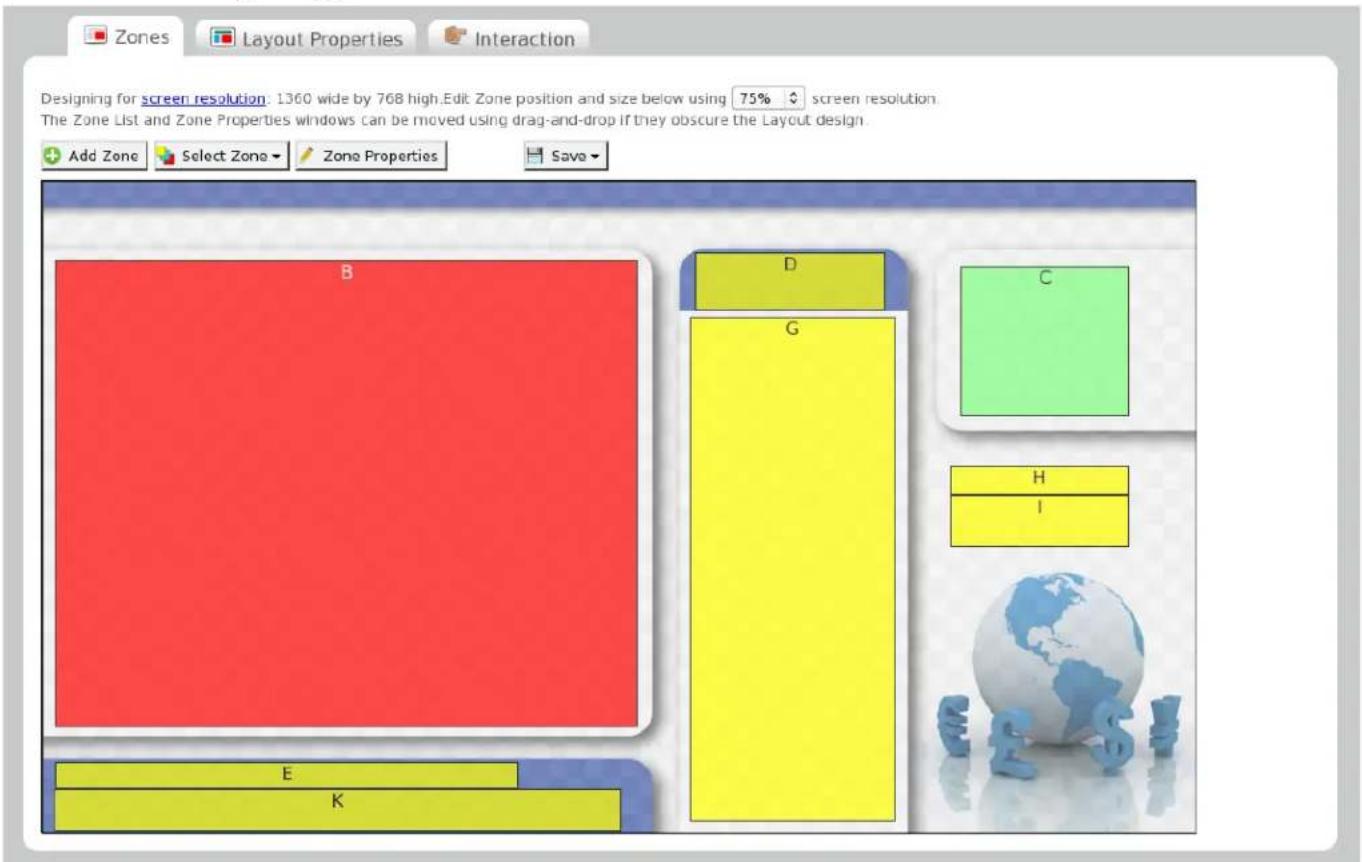
The graphical Layout editor
By default, the Zones tab displays the Layout at 75% of the currently defined Screen resolution (not the monitor of your PC). You can change this by using the Scaling drop down at the top of the page. It may be helpful to expand your browser to full-screen view.
In the graphical Layout editor each Zone is displayed in a color indicating the Media player enabled for the Zone:
• Red - Movie player (for example, Zone B above)
• Light green - HTML player (for example, Zone C above)
• Light blue - Image player
- Yellow - Text player (for example, Zone G above)
To select a Zone, click it once with your mouse. The selected Zone is shown with handles (such as Zone B in the illustration above). To move the Zone click and hold the mouse button and drag the Zone. To resize the Zone, click it once then click and drag one of the handles.
When you select a Zone to edit it, it appears in the foreground, all its drag handles are visible, and it can be easily manipulated.
Zones in this editor are displayed with a slight transparency e.g. to aid in aligning with background images. The opacity of a Zone on this page is no indication of how it will appear on screen when being played.
Saving your layout
Your changes to the layout are not saved until you press the save button. Here you have two choices: an be moved using drag-and-drop if they obscure the Layout c
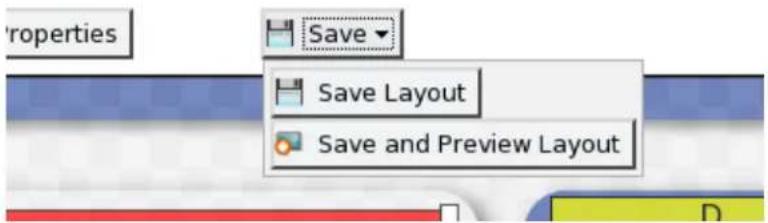
Pressing the Save button reveals the Save options
- Save Layout - Simply saves the current layout.
- Save and Preview Layout - Saves the layout and causes the layout to be previewed on the display device.
Zone context menu
| Move to FrontMove to Back |
| Make Full Screen |
| Delete |
| Edit Playlist |
| Save all Changes |
| Edit overlapping Zone A |
Zone context menu
Right-click a Zone to display a context menu with common functions, including editing access to other Zones that may be hidden by this Zone.
You display Media items 39 in a Zone by adding them to a Playlist
Editing a Zone 30
Editing a Zone's properties 31
2.3.2 Editing a Zone
To edit a Zone's properties, select it, then press the Zone Properties button.
You can either simply click on a Zone to select it or use the Select Zone dropdown to select a Zone.
Select Zone
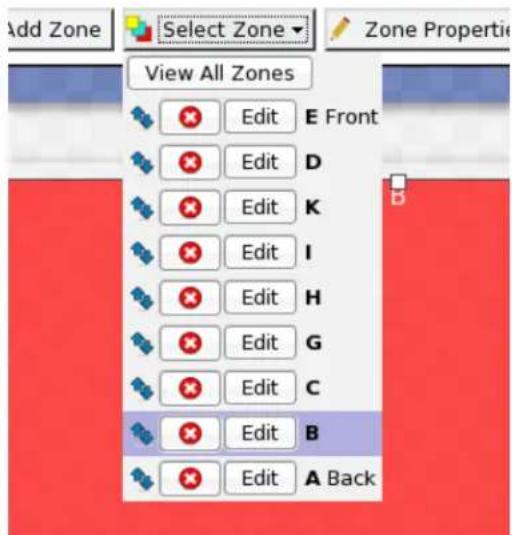
Select Zone list
Clicking on the Select Zone button will show a list of zones in the current layout. The currently selected zone is highlighted.
The Edit button will select a zone and close the select zone panel. Alternatively the panel can be closed by clicking the Select Zone button again or elsewhere on the page.
Adding and deleting a Zone
Click the Add Zone button to add a new Zone.
After you create a Zone, edit the Zone's properties 31 and then open the Playlist for the Zone to add media items to display.
To delete a Zone, click the Delete button for that Zone on the Select Zone list.
Changing the display order of Zones
You may wish to change the display order of zones - i.e. the order in which they are shown on the screen. For example, you may wish for a background image to be at the back of a layout and content to be shown at the front.
This is achieved either by opening the Select Zone menu and dragging zones by its zone name, or by using the context menu and selecting the appropriate 'Move' option from the list.
Editing a hidden Zone
Sometimes a Zone can be completely hidden by another Zone. To edit a Zone that's hidden, either click Edit next to the Zone on the Zone list dialog, or right-click the top Zone, and select edit for the required Zone from the context menu.
2.3.3 Editing a Zone's properties
A Zone's properties consist of:
- The Zone name
• The media types it plays
• Zone size and position
• Other assorted properties
When you've selected a Zone within the layout editor, pressing the Zone Properties button will show a popup dialog that will allow you to set the properties of the selected Zone:
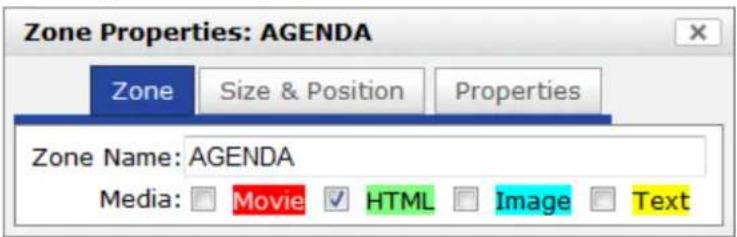
The Zone properties Dialog box
You can move the dialog around the screen by dragging it by its title bar. You can close it again by pressing the close button on its top right.
The Zone properties have been grouped into tabs - you can select a tab by clicking the name.
Zone Tab
Zone Name
By default, zones are given letters to identify them. If you wish, you can instead give them names that will remind you of what the zone is for. For example Clock, Movies or Newsfeed.
The Zone Name is shown everywhere within the web interface when you are on a page specific to a zone e.g. the playlist edit page.
Media
Select the check box or boxes for the Media type or types allowed in this Zone. See more on Understanding Media Types...
Save All Changes and Edit Playlist
This button will save all changes to the layout and take you to the playlist editor page 33 for that zone.
Size & Position Tab
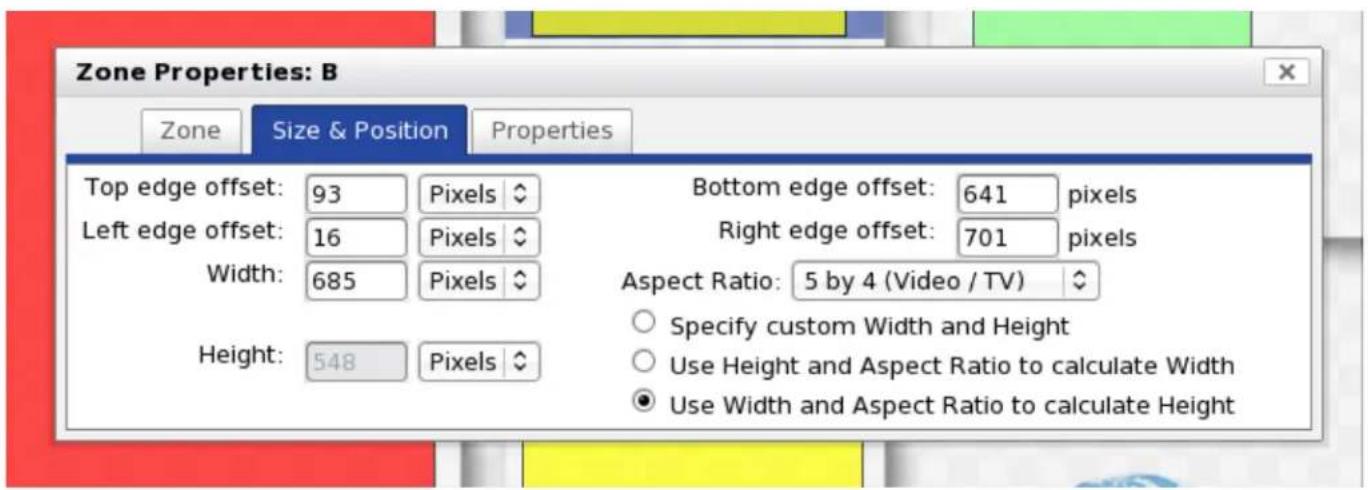
Position
The position values are expressed in Pixels or in Percentages, and all measurements are taken from the top edge or the left edge of the screen. Remember that if you use Pixels for positioning, the Zone may appear in a different position on two screens with different resolutions.
Size
Size values are given in Pixels or Percentages. If you enter a value with its units, such as 225px, the unit type is adjusted automatically.
Aspect Ratio
When working with Movie or image enabled Zones, you can select either Use Height and Aspect Ratio or Use Width and Aspect Ratio to determine the Zone size. Select from the Aspect Ratio drop-down to automatically adjust the Zone size to preserve the height-to-width ratio for common video and image formats. You can only use Aspect Ratio when Height and Width are specified in Pixels.
Properties Tab
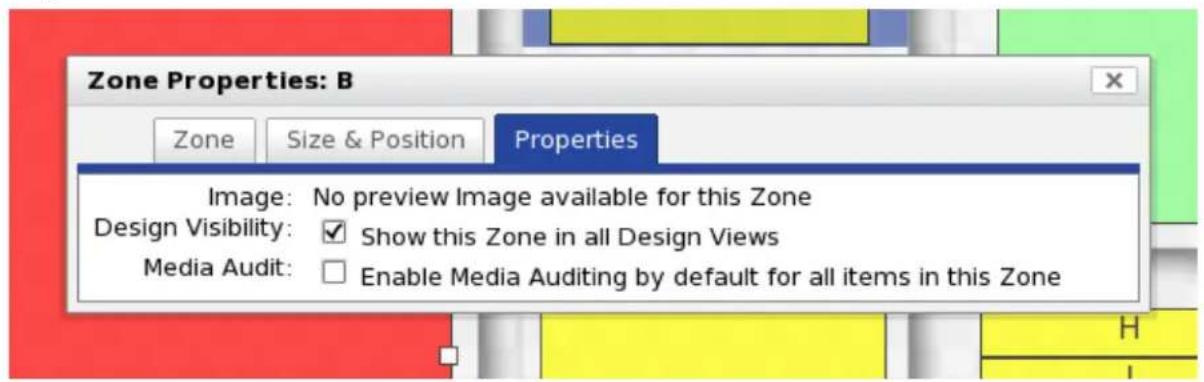
Image
If the Zone is set to show images, then the first image item in the playlist can be shown in the Zone instead of the standard colored area. This is useful e.g. to preview background images and align other Zones to them.
This option will not be available if this zone does not play images or has no images.
Design Visibility
This check box defines whether the Zone is shown in the Layout Icon views Zones. If a Zone covers other Zones, you can clear this checkbox so that it is not shown in the thumbnails, making it easier to edit the other Zones.
Media Audit
This checkbox determines whether or not items in this Zone's Playlist are by default logged for Media Auditing. This setting can be overridden on a per item basis in the Playlist.
For more information see Reporting ^153
Changing the size or position of a Zone
To select a Zone, click the Edit button for the Zone in the Zone List, or click on the Zone in the Layout itself.
Use your mouse to move the Zone by dragging it. You can change the size of the Zone by clicking and dragging one of the sizing handles indicated by small white squares on the edge of the Zone.
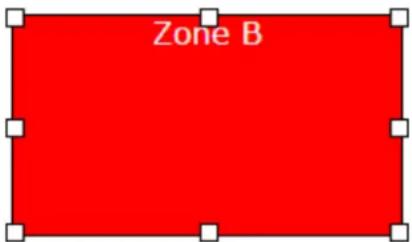
Zone showing sizing handles
You can control the size and position of a Zone more precisely using the Zone Properties ^31 dialog. Use the Zone Properties dialog to select the Media players for a Zone, and to edit the Playlist ^33 for a Zone (where you add Media items ^39 )
2.4 Using Playlists
A Playlist is a sequence of Media items that you have chosen for display in a Zone. Each Zone has its own Playlist which runs continuously, and is independent of all the other Playlists. A Soundtrack also has its own Playlist.
Playlists play their content in a continuous loop. After the last item has been played, the first item starts playing again. It is possible that the media file you specified may no longer be available, and if so it may be skipped.
A Playlist can contain:
- individual content files, such as images, or movies, or text. More on adding individual item files to a Playlist... ^35
- folders, containing multiple individual items, displayed by the Folder Play 531 mechanism More on adding folders to a Playlist... 36
- certain types of content known as Special Items, such as a Newsfeeds, TV Stations, Tables, and Clocks. More on adding Special Items to a Playlist... 35
- various Ad hoc Items that can be updated directly by local users
The Playlist page
The Playlist page is divided into a number of tabs:
- Playlist - lists the media items that make up the Playlist.
- Files & Folders - for navigating between folders, moving files between folders, and adding files to the Playlist.
- Upload Files - for copying files to the iCOMPEL, and creating new folders.
- Specials - for adding Special items to the Playlist, that include all items other than files and folders.
- Defaults - to control the default settings for various types of media items, used when they are first created. These can be modified later. Changing the default values does not affect existing items.
You can set the Playlist Add Item property on the Options page [128] to control whether a new item is added to the bottom (default) or top of a Playlist.
Your browser may support dragging and dropping ^14 files straight from your desktop or file explorer into a playlist.
Playlist tab
The Playlist tab displays a list of all the media items in the Zone or Soundtrack. Each item is played in turn for the specified Duration.
If graphical Layout editing is enabled you can change the order of the media Items by Dragging and Dropping ( ) the rows
There are also the following action buttons for each item:

Audition an Item (preview on the Screen)

Delete an Item
tem's properties
File & Folders
You can use the Folder & Files tab to navigate between Folders and to find items or folders to add to the Playlist. Add an item by clicking the Add button Add alongside it. See Using Files and Folders 46 for more information
Upload Files
You can use the Upload Files tab to upload new media files, and to create new sub-folders.
See Uploading content files for more information.
Specials
Use the Specials tab to add iCOMPEL specific media items to the Playlist.
See Adding Special items to a Playlist for more information.
Defaults
You can use this tab to define the default media item properties for each Media type this Zone or Soundtrack supports. The default properties are used when the media item is first added to a Playlist, and you can change them as needed for each item.
See Edit Playlist item properties for more information.
NOTE: Changing the default properties does not affect media items already added to a Playlist.
2.4.1 Adding Media item files to a Playlist
Before you can add individual media item files to a Playlist, you need to upload them to the iCOMPEL. (Some types of media, such as live TV or website feeds, do not need to be uploaded.) See Using Files and Folders 46 to learn about uploading and managing media item files.
The type of media file that you can add to a Playlist depends on the type of media that the Zone is able to play. See Understanding Media Types for further details.
To add an item to a Playlist, follow these steps:
- From the menu bar, select Playlists, then select the Layout and the Zone.
- Select the Files and Folders tab.
- Click the name of a Folder to display the items in it.
- Click the Add button alongside the item you want to add to the Playlist.
- Select the Playlist tab to view the Playlist. If necessary, adjust the order of the items in the Playlist.
2.4.2 Adding Special items to a Playlist
Various special items can be added to a Zone's Playlist. Special items include text, Newsfeeds, live video, web pages, clocks, and tables as well as control elements for touch screen and other kinds of interaction, if these are supported by your display.
The iCOMPEL only allows you to add Special items that are supported by the media player enabled for the Zone. For example, you can only add a Newsfeed if the Zone is enabled for the Text player, and you can only add a live video special item if the Zone is enabled for the Movie player.
Some special items such as newsfeeds 40,258,les, and TV stations need to be set up before you can add them to a Playlist. Other special items, such as directly entered text 39,5842, external web pages, and clocks do not need to be set up in advance.
To add a Special item to a Playlist, follow these steps:
- From the menu bar, select Playlists, then select the Layout and the Zone.
- Select the Specials tab.
- Click the Add button alongside the Special item you want to add to the Playlist. Depending on the item in question, you may need to add text or select properties.
- Select the Playlist tab to view the Playlist. If necessary, adjust the order of the items in the Playlist.
2.4.3 Adding folders to a playlist
If you add a Folder to a Playlist, the iCOMPEL treats the Folder as an item in the Playlist. You can define the way the items inside the Folder are displayed, see Folder Play 53 for more details.
Before you can add a Folder to a Playlist, make sure that it contains the media items you want to use. See Using Files and Folders to learn about uploading and managing media item files.
To add a Folder to a Playlist, follow these steps:
- From the menu bar, select Playlists, then select the Layout and the Zone.
- Select the Files and Folders tab.
- Click the Add button alongside the Folder you want to add to the Playlist.
- Select the Playlist tab to view the Playlist. If necessary, adjust the order of the items in the Playlist.
2.4.4 Playing content items to test them
There are various ways of playing content items to test them:
- Activate a Layout and view it on the Screen. This is useful if you want to see the complete run of all items, and you can easily view the Screen.
- Audition Layouts, Playlists or individual items on the Screen. This is useful if you want to see individual items, and you can easily view the Screen.
- Take a snapshot of the Screen and view it in your web browser. This is useful if you want to see the current status of the display but cannot easily view the Screen.
- Preview an item in your web browser. This is useful if you want to see one particular item but cannot easily view the Screen.
Activate a Layout and watch it on the Screen
To activate a Layout and view it on the Screen, follow these steps:
-
Select Layouts from the menu bar, and then Manage Layouts.
-
Locate the layout you want to preview and click the audition button on the far left to play the layout on the display.
To return to what what previous being played, click Activate schedules and Layouts
Audition Layout, Playlist or item on the Screen
To audition a Layout on the Screen, follow these steps:
-
Select Layouts from the menu bar, and then Manage Layouts.
-
Click the Audition button for the Layout you want to view. The Layout is shown on the Screen until you click Activate Schedules and Layouts. Alternatively, click on a Zone in the Layout preview, and then click the audition button for the item you want to view.
Take a Screen snapshot
To take a screen snap shot, follow these steps:
-
Select Status from the menu bar, then Player Status.
-
Select the Screen Snap Shot tab. The iCOMPEL automatically takes a screen snap shot and displays it in your web browser. Video content may appear as a solid black rectangle.
-
Optionally, select the Refresh... check box and click Apply.
Previewing in the web browser
In normal operation the iCOMPEL outputs to a signage display. It is often the case that the player is managed from a desktop away from the display.
The iCOMPEL allows you to take a snapshot of your new content to view at your desktop without having to activate and fully deploy the new content.
To choose your web browser to preview the new content, follow these steps:
- Select Help from the menu bar, and then UI Options
- On the My Options tab, set the Audition method to web preview
- Click Save Changes
-
Select Layouts from the menu bar, and then Manage Layouts.
-
Click the Preview button for the Layout you want to view.
Note: The signage display will go black for a moment while the snapshot is taken, then revert to the current Layout. The snap shot is displayed in a new browser window (or browser tab).
Part
[Non-Text]
Understanding Media Types
3. Understanding Media Types
You can use various types of digital content with your iCOMPEL.
Media players
Content is often referred to as Media. There are five basic media player types that can be enabled for a Zone which are:
• Movie player (content types include video 48 55 57 57 live video and multicast video (IPTV)
- HTML player (content types include web pages ^58 , Flash ^52 , and tables ^42 ),
• Images and photos player (images) ^50
- Text player (content types include text ^39 , and RSS newsfeeds ^40 , Clocks ^42 )
You must enable the correct media player for the Zone in order to display the media.
In addition to these players, you can add audio to the Layout using the Soundtrack player (audio 50 radio 56), and presentation can be played by exporting them to video using the 'Save as video' feature. in PowerPoint 2010
iCOMPEL behavior and media types
Understanding the ways that different types of content items are managed by the iCOMPEL can help you know how to add and manage different types of media items.
- Items directly managed by the 391COMPEL include: Newsfeeds 401, Clocks 421, Tables 421, directly entered Text 391 and RS-232 output signals 45
- Items displayed from files on the 46 COMPEL hard disk 46 include: Video 48, Text files 49, Images and photos 50, Audio 50, PowerPoint 51, Flash files 52, and Folder play 53
- Items that are run from external sources ^55 include: TV ^55 , radio ^56 , live video ^57 , multicast video ^57 and web pages ^58
3.1 Media managed by iCOMPEL
Some types of media are managed directly by the iCOMPEL. These include:
Clocks 42
Tables 42
Text 39
RS-232 output items 45
Ad hoc content items are also managed by the iCOMPEL.
3.1.1 Text
Player Type
Text
This section deals with text items entered directly on the iCOMPEL.
For other uses of text see:
Text files 49
Newsfeeds 40
Text characteristics
- Text can be added to a Playlist and shown in a Zone on the Screen.
-
The text can be either scrolling or stationary, and can scroll either horizontally or vertically.
-
Stationary text can be shown for a fixed period of time, or shown indefinitely.
- If text is scrolling, you must set the speed at which it moves across the screen. You cannot set a fixed time limit for scrolling text.
- Text can have a transparent background, but the text must be static unless it is being shown over a video Zone. This option is not available on all models of iCOMPEL.
Adding text directly
To add text directly, follow the steps for adding Special items to a Playlist 35 . After you add the text, it appears on the Playlist. Use the arrows to adjust the position of the text in the Playlist, as necessary. Click Edit to edit the text properties 61 as required
3.1.2 News feeds
| Player Type | Text |
Supported formats
RSS 0.91 and 2.0 (must say 'RSS' or 'XML')
A news feed is a form of online content, usually providing news headlines or brief reports, supplied by a broadcaster or news agency, that you can subscribe to. News feeds are often provided free of charge, and usually don't require usemames or passwords. Some News feed providers have their own terms of use that may restrict the use of their feeds in Digital Signage Networks. News feed providers include The BBC, CNN, Reuters, Associated press, major online newspapers, and many other organizations.
News feeds generally use the RSS (Really Simple Syndication) technology, normally indicated by the symbol. This makes subscribing very easy.
Although News feeds are derived from an external source, your iCOMPEL treats them in the same way as directly entered text. You can easily add news feeds to your iCOMPEL, and display them as fixed or scrolling text using a text Zone in your Layouts
News feeds page
Select Media, then News feeds from the menu bar to open the news feeds page.
To view or modify news feed properties, click the Edit button . Edit...
To remove a news feed, press the Delete button.
NOTE: You can only delete a news feed that is not in use. If a news feed is in use, the Delete button is disabled. To find out which items are using a News feed, click the Edit button and see the items listed under the Used By property. To create a new news feed, click the Add Newsfeed tab.
Additional Requirements
The iCOMPEL must have access to the Internet (or the network where the RSS feed is hosted)
Adding a News feed
To subscribe to a news feed, follow these steps
-
Use a web browser on your PC to find the feed you want to subscribe to.
-
Click the link to the feed, or click the RSS button.
-
Copy the web address for the news feed from the Address bar in the browser.
- On the iCOMPEL, select Media, then Newsfeeds from the menu bar to open the Newsfeeds page, and select the Add Newsfeed tab.
- Enter a logical name for the feed (for example UK Sport Headlines), and then paste the news feeds' web address you copied earlier.
- Click Add.
- Optionally use the Edit button to display and edit the news feed properties
Adding a news feed to a Playlist
Before you can add a news feed to a Playlist you need to subscribe to a news feed as described above.
To add a news feed to a Playlist, follow the steps for adding Special items to a Playlist 35.
After you add the news feed, it appears on the Playlist. Use the arrows to adjust the position of the news feed in the Playlist, as necessary. Click Edit to edit the properties as required. You may be able to show the headlines only, details only or both. You may also want to show the headline in one Zone and the details in another Zone and use Zone synchronization to keep the displays aligned.
News feed item properties
When you create or edit a News feed, you can set the following properties:
Name
You must specify a name for every News feed and the name must be unique.
RSS News feed URL
Type in the web address (URL) used to access the News feed. This must include the protocol, for example, http://. An example of a correctly formatted news feed address would be http://www.bbc.co.uk/travelnews/tpeg/en/pti/pti_rss.xml
Refresh interval
The frequency at which the iCOMPEL checks for changes to the News feed. This frequency is expressed in days, hours, minutes and seconds.
Maximum Age
The length of time that news items should continue to be displayed if the iCOMPEL cannot connect to the News feed URL. This length of time is expressed in days, hours, minutes and seconds.
Authentication
Some News feeds require authentication, such as a username and password. If the News feed you are connecting to requires authentication details, enter them here.
Proxy
If you are connecting to the News feed through a proxy server, enter the details here.
Note: Before you can access a News feed through a proxy, you must first create a Proxy entry (using the HTTP Proxy page) and then set each News feed to use the Proxy.
3.1.3 Clocks
Player Type
Text
You can display a digital clock, showing the date and time in any one of a variety of formats, in any Zone that supports Text.
Earlier versions of the iCOMPEL supported clocks in HTML Zones. If you already have HTML clocks in your Layout you can continue to use them.
Adding a Clock to a Playlist
To add a clock to a Playlist, follow the steps for adding Special items to a Playlist 35. After you add the Clock, it appears on the Playlist.
In the Playlist tab, click Edit to edit the properties as required.
Clock Properties
Once added you can use the clock options to determine what clock data is displayed, and the format for dates and times, as well as selecting the time Zone.
Display content
Select whether date, time, or both are displayed and in which order.
Day of week format
Select the way the day of the week is shown.
Date, month, time, hour format
Select the way the Date, Month, Time and Hour are shown.
The term Locale Appropriate means that the iCOMPEL uses the date or time formats used in the language and country you selected on the International settings page.
Time zone
Select the appropriate time Zone for the clock display.
Other settings include:
Duration 64
Position and Size properties 64
Time validity 64
Fonts 69
Colors 68
3.1.4 Tables
Player Type
HTML
Tables are a convenient way of displaying static data on the iCOMPEL. Tables can also be used as the basis for Ad hoc entries that are controlled by local users. For example, you may create a table that shows room allocations for a conference center. The iCOMPEL creates Tables directly, using HTML. This means that Tables can only be displayed in Zones that permit HTML content.
Tables page
Select Media, then Tables from the menu bar to open the Tables page.
To view or modify Table properties, click the Edit button. The only properties of a Table that can be changed are the data values in the Table cells (through the Table Values 44 tab), and the formatting of the Table cells (through the Table Styles 4 page.
To rename an existing Table, click the rename button and type in a new name.
To copy a Table, click the Copy button and type in a new name.
To remove a Table, press the Delete button.
NOTE: You can only delete a Table that is not in use. If a Table is in use, the Delete button is disabled. The items that are using a Table are listed under the Used By property.
To create a new Table, click the Add Table tab.
Additional requirements
The maximum size for a Table supported by the iCOMPEL is 19 rows by 39 columns.
NOTE: You cannot change the size of a Table after you create it.
Ad hoc Tables
To create an Ad hoc Table, first create a Table, then use the Ad hoc Items page and add a new Ad hoc Table Item that references this Table.
NOTE: If you copy an Ad hoc Table, the copied table is not an Ad hoc table.
Adding a Table
To add a Table, follow these steps:
- Select Media, then Tables from the menu bar, then select the Add Table tab.
- Enter a descriptive name for the Table
- Enter the number of rows and columns for the Table. The maximum size for a Table supported by the iCOMPEL is 19 rows by 39 columns. You cannot change the size of a Table after you create it.
- Click Add
Editing Table data and styles
To edit data in a Table, follow these steps:
- Select Media, then Tables from the menu bar, then click the Edit button.
- To edit the information displayed, select the Values 44 tab. Make any changes and click Save Changes.
- To edit style of the table select the Styles 44 tab. Make any changes and click Save Changes.
- To edit Ad hoc, select the Ad hoc tab. Make any changes and click Apply.
You can choose how input is handled. The choices are:
- Default Value - The Ad hoc user cannot change the cell value.
-
Override with any value - The Ad hoc user can enter any value in the cell.
-
Override with Integer between 'lower limit' and 'upper limit' - The cell value is restricted to integers between the lower limit and upper limit (both inclusive). Only shown if the User Interface Policy is set to Detailed.
- Override with text of maximum length 'maximum length' - The cell value is restricted to the maximum length. Only shown if the User Interface Policy is set to Detailed.
-
Override with text matching - Only shown if the User Interface Policy is set to Detailed.
-
Regular Expression - The cell value must match the regular expression that is provided.
- Feedback Message - The message that an Ad hoc user will see if the cell value does not match the regular expression provided.
There are many websites and books that provide information about using Regular Expressions.
For example: http://www.regular-expressions.info/
Values tab
Use this page to display or update the values entered in the Table. If this is an Ad hoc Table, then these values are defaults that are used until overridden by an Ad hoc User. Cells can be blank
NOTE: the Save All Changes button must be pressed to store changes.
Style tab
This page allows the user to view and modify the Table formatting. This includes the border width and color, column width, and the font and color for each cell.
Border Width
Controls the width, in pixels, of the border surrounding each cell.
Setting this value to zero will disable the border. The maximum value is 100 pixels.
Border Color
Specifies the color of the border.
Column Width
Specifies whether the column width should automatically adjust to best fit its content or should be a maximum width. The width is expressed as a percentage.
Font
Select the font family, size, and style to apply.
Text Color
Select the color to use for text
Background Color
Select the color to use for the cell background text
Horizontal Alignment:
Allows the text to be positioned to the left, center or right of the cell
Vertical Alignment:
Allows the text to be positioned to the top, center or bottom of the cell
Whitespace Handling
Determines how spaces, tabs and new lines (collectively termed white space) are displayed. The default is Display multiple spaces as single space and multiple new lines as single new line, which will effectively ignore any white space in the cell value. To display the text with white space as entered, select the Display spaces and new lines as entered option.
Apply To
When editing the Cell settings, these settings can be applied to:
- The current cell only
- All the cells in the row, or in the column
- All cells from the current cell to the bottom-right cell
Adding Tables to a Playlist
To add a Table to a Playlist, follow the steps for adding Special items to a Playlist 35.
3.1.5 RS-232 outputs
You can add an RS-232 output item to a Playlist. When the item is reached in a Playlist, the iCOMPEL sends a character string to an external device, via the iCOMPEL RS-232 port.
An example of a external device action that could be triggered by an RS-232 output signal would be switching on the lighting in a room where the Screen is situated at the start of each working day.
For more information see the RS-232 Outputs 18 Section.
Creating an RS-232 output item
To create an RS-232 output item, follow these steps:
- From the menu bar select Setup, then Player Setup, then RS-232 Outputs.
- Select the Add Item tab.
- Create an RS-232 item:
- Enter a name for the item
- Under Perform Enabled Actions when, select the Executed in a Playlist option
- Select the check box for Enable Send RS-232 String Action
- Enter the character string
- Click Add
Adding an RS-232 output item to a Playlist
To add an RS-232 output item to a Playlist, follow these steps:
- From the menu bar, select the Layout and Zone where you want to add the command to the Playlist.
- Select the Specials tab.
- Select the Send RS-232 Item
-
Click Add.
-
In the Playlist, use the arrows to adjust the position of the RS-232 item in the Playlist, as necessary.
- Click Edit to adjust the interaction properties 74 if required.
3.2 Media run from disk
Some types of media are run from files on the iCOMPEL disk. General information on using files and folders for media files is in the following sections:
Using Files and Folders 46
Uploading content files 47
Editing content files 48
Supported file types include:
Video 48
Text files 49
Images and photos 50
Audio 50
Presentations 51
HTML pages and Adobe Flash 52
Folder Play 53
3.2.1 File Manager
You can use Files and Folders on your iCOMPEL to manage the storage of certain types of Media items 39. You can display individual Media item files by adding them to the Playlist 33 for a Zone 1
You can also play all the files in a Folder by adding the Folder to a Playlist ^36
When you use Ad hoc items you need to designate an Ad hoc media folder 100 for Ad hoc users to access.
The following topics are related:
Uploading Content 47
Editing Content Files 48
Displaying Content 36
Your browser may also support dragging and dropping 14 files straight into files and folders.
3.2.1.1 Using Files and Folders
You can use the Files and Folders page to browse the file system on the iCOMPEL.
The File & Folders tab lists all files in the currently selected folder and provides access to folder (directory) and file manipulation operations. To change the current folder, click on a folder name.
NOTE: You cannot carry out any folder and file operations on iCOMPEL system folders.
Folder operations
The following operations are supported for folders:
Delete the folder.
Move or rename the folder.
File operations
The following operations are supported for files:
Delete the file.
Move or rename the file.
Copy the file.
3.2.1.2 Uploading content files
There are different methods available for adding content files to the iCOMPEL:
• using the File Manager page
• using the Files and Folders pages of a Playlist
• using FTP (file transfer protocol)
Uploading files using the File Manager
The Upload Files tab allows you to:
- Upload new media files to the current folder.
- Create new sub-folders of the current folder.
Uploading files
You should always add your content files to the Media folder, or to sub-folders of the Media folder.
To upload files, follow these steps:
- From the menu bar, select Media, then Files and Folders.
- If necessary, create a sub-folder 47 for the content files you wish to add.
- Click the Upload Files tab.
- Click Browse and navigate to the file you want to upload.
- Click Upload.
- Repeat these steps for each file.
Creating a folder
To create a folder, follow these steps:
- Navigate to the folder that you want to use as the parent of the new folder.
- Click the Upload Files tab.
- Type a name for the new folder in the Folder name field and click Create Folder.
- The iCOMPEL creates the new folder that is automatically selected as the current folder.
Uploading files using FTP
Note: On some networks and systems, FTP may be disabled for security reasons. If you have difficulty using FTP, please speak to the person responsible for running your network, as you may need to have specific read/write permissions to use FTP. In addition to network permissions for FTP, iCOMPEL users other than the Administrator must have FTP access enabled on the iCOMPEL itself.
You can use FTP with two copies of Windows Explorer, as described below, or by using a suitable FTP client.
- Open two copies of Windows Explorer, or an equivalent file manager program on your PC.
- In the first copy of Windows Explorer, navigate to the folder with the content you want to upload to the iCOMPEL.
- In the second copy of Windows Explorer, type ftp:// followed by the IP address of your iCOMPEL, for example ftp://192.168.0.254 More on finding the IP address of your signage player... [128]
- When prompted, enter your usual iCOMPEL username and password. You can now see the list of folders on the iCOMPEL. The root folder you see using FTP depends on the home folder defined for you on the iCOMPEL.
- Make sure that you add your files and folders to the Media folder only. If you delete any files from other folders, you may render the iCOMPEL unusable.
- Create a suitable folder structure by adding new folders under the media folder. It is often useful to create a separate folder for each Layout, and a sub-folder for each Zone, for example media/Layout_reception/Zone_A and media/Layout_reception/Zone_B and so on.
- Drag-and-drop or copy-and-paste your folders and files between the two copies of Windows Explorer from your PC to the Media sub-folders on the iCOMPEL.
- You may also rename and delete files on the iCOMPEL. To download files from the iCOMPEL, just drag-and-drop or copy-and-paste from the Media sub-folders to your PC.
The FTP page does not refresh itself automatically. Use the F5 key or the Refresh button on your browser to refresh the page.
You cannot move files from one folder to another in FTP. You need to download a file to your PC and then upload it to another FTP folder. Alternatively, use the File Manager page on the iCOMPEL to move files.
3.2.1.3 Editing content files
You cannot edit any files while they are on the hard drive of the iCOMPEL. All files must be downloaded to a local computer, edited with appropriate software, saved, and then uploaded to the iCOMPEL.
When you upload edited content you may be prompted to overwrite the existing file, and if so, click OK.
3.2.2 Video
You can play various video formats on the iCOMPEL, using a Zone that is enabled for Movie type content. For some models of iCOMPEL best performance, we recommend having only one Movie enabled Zone in each Layout.
The following table shows the video formats supported on the iCOMPEL.
| Player Type | Movie |
| Supported formats | Notes |
| MPEG-1 | Good performance but poor resolution. |
| MPEG-2 | Best combination of performance and resolution but large file size. |
| MPEG-4 | Small file size but high processing load. May slow down some models. |
| AVI | Best image quality but extremely high processing load. May overload some models. |
| QuickTime (.MOV) | Apple Mac format. Can have very high processing load. May overload some models. |
| VOB | Same as MPEG-2. |
Preferred format
The same video clip in the different formats has different file sizes and places different processing loads on the iCOMPEL when played. The iCOMPEL has a smaller processor than most Microsoft Windows PCs, so it is more important to use a format that is easier to decode than one that has smaller file sizes. MPEG-2 is the preferred format as it requires less decoding by the processor. Wherever possible, you should convert other formats to MPEG-2 before uploading them to the iCOMPEL.
Adding video to a Playlist
Before you can add a video file to a Playlist, you must upload it to the iCOMPEL. See Uploading content files 47 for details of how to do this.
To add a Video file to a Playlist, follow the steps for adding Media item files to a Playlist [35]. After you add the video file, it appears on the Playlist. Use the Edit button to view and adjust the Video file properties as necessary.
Additional Movie properties 60
3.2.3 Text files
The iCOMPEL text player supports the use of text files (*.txt) as well as text added directly through the iCOMPEL user interface. It does not support the use of any word-processor formatted files such as Microsoft Word (*.doc), or Adobe Acrobat (*.pdf).
Adding text using a text file
Before you can add a text file to a Playlist, you must upload it to the iCOMPEL. See Uploading content files 47 for details of how to do this.
To add a text file to a Playlist, follow the steps for adding Media item files to a Playlist 35. After you add the text file, it appears on the Playlist. Use the Edit button to view and adjust the text file properties 61 as necessary.
You can also add text directly to the iCOMPEL. For more details see Text... [39]
3.2.4 Images and photos
| Player Type | Image |
| Supported formats | Notes |
| PNG | Recommended. Good quality, supports transparency. |
| JPG | Recommended. Edges can blur, does not look good when shown on a large screen |
| GIF | Can look very grainy, only supports 256 colors but does support transparency |
| BMP | Large file size but no loss of quality. |
Notes
Large images may take several seconds to appear and may slow down the performance of the iCOMPEL. You should always resize an image to match the size of the Zone before uploading it to the iCOMPEL.
Animated GIFs
Animated GIFs are not supported as image files on the iCOMPEL. If you want to use an animated GIF, you must first embed it into an HTML page.
Adding images to a Playlist
Before you can add an image file to a Playlist, you must upload it to the iCOMPEL. See Uploading content files 47 for details of how to do this.
To add a Image file to a Playlist, follow the steps for adding Media item files to a Playlist ^35 . After you add the Image file, it appears on the Playlist. Use the Edit button to view and adjust the Image file properties as necessary.
3.2.5 Audio
| Player type | Audio Soundtrack |
| Supported formats | Notes |
| MP3 | RECOMMENDED. Good performance. |
| WAV | Similar quality to MP3 but much larger file sizes |
| WMA | Windows Media Audio format but works on iCOMPEL. |
Audio files are added to the Playlist for the Layout's soundtrack, and not to the Playlist for a Zone.
Adding Audio to a Layout
Before you can add an audio file to a Layout you must upload it to the iCOMPEL. See Uploading content files 47 for details of how to do this.
Audio files can only be added to Layouts which have Soundtracks. See the adding a Soundtrack to a layout 27 topic for more details.
Edit the Playlist for a Soundtrack
To edit the Playlist for a Soundtrack, follow these steps
- From the menu bar, select Layouts, then Manage Layouts.
- Click the Edit button for the Layout you wish to edit.
- In the Select Action pop-up dialog, click Edit Playlist for Soundtrack.
- Click on the Files and Folders tab, and navigate to the audio file you wish to add. Click the Add button next to the file you wish to add to the Playlist.
An alternative way of getting to edit the Playlist for the Soundtrack Zone is to click the Soundtrack icon next to the Layout thumbnail on the Layouts page.
Audio properties
When you add an Audio file to a Playlist, you can set the following properties.
Volume
You can set the volume for an Audio item. The value on the Properties page is a percentage of the Master Volume level, which is configured on the Audio setup page 50. The default setting is 75% of the Master Volume level.
See also
Duration 64
Time validity 64
3.2.6 Presentations
| Player type | Presentation (as Video) |
| Supported formats | Notes |
| PPT, PPTX (save as WMV video) | Microsoft Office PowerPoint 2010 |
Apple Keynote (save as MOV video)
Presentations often have complex animations, timings and graphics, so to ensure the presentation is displayed correctly on your signage, saving them as video or another format ensures that every detail is faithfully reproduced.
Use one of the following methods to convert your presentation:
- Image slide show - use if slide transitions and animation effects are not important
- Flash animation - supports slide transitions and animation effects, but complex and fast animation may appear choppy. Creates a small file
- Video - best option if high quality, complex animations and transitions are needed, but can create large files
Convert to an image slideshow
To convert a presentation to an image slideshow follow these steps:
- In Microsoft Office PowerPoint 2010, select File | Save & Send | Change file type.
- Choose an image file type supported by the iCOMPEL (PNG is recommended, but JPG, TIF and BMP are supported)
- When you are prompted to save every slide, confirm and save the presentation as individual slides in their own folder.
Convert to a Flash animation
There are various third-party commercial products that can convert a Microsoft Office PowerPoint presentation to a Flash animation with varying degrees of complexity. The free OpenOffice suite of software will open a Microsoft Office PowerPoint presentation and allow you to export it as a Flash file but without slide transitions or animations.
Convert to a video
If using PowerPoint 2010:
- Select File | Save & Send | Create a Video.
- Choose a profile - Computer and HD displays is likely to be the best for the iCOMPEL
- When prompted, choose the location where the video will be saved.
If not using Microsoft PowerPoint 2010 there are various third-party commercial products that can convert PowerPoint to video. While some products are specifically designed for converting PowerPoint presentations to video files, others are more general screen capture applications, which can be useful if you want to include mouse movement or provide a voice-over.
Add the converted presentation to a Playlist
Before you can add your converted presentation to a Playlist, you must upload it to the iCOMPEL. See Uploading content files for details of how to do this.
To add the file to a Playlist, follow the steps for adding Media item files to a Playlist [35]. After you add the file it will appear in the Playlist. Use the Edit button to view and adjust the Image, Video or Flash file properties as necessary.
3.2.7 HTML web pages
| Player Type | HTML |
| Player Notes | Uses the WebKit engine to display web pages and other HTML content |
The iCOMPEL can display HTML content, either from a local HTML file or from a website where entire web pages and parts of pages can be used.
Adding an HTML file to a Playlist
Before you can add an HTML file to a Playlist, you must upload it to the iCOMPEL. See Uploading content files ^47 for details of how to do this.
To add an HTML file to a Playlist, follow the steps for adding Media item files to a Playlist 35 . After you add the HTML file, it appears on the Playlist. Use the Edit button to view and adjust the HTML file properties as necessary.
3.2.8 Adobe Flash
| Player Type | HTML |
| Supported Formats | Comments |
| .SWF Version 11 | The iCOMPEL uses Adobe Flash Player version 11. |
Requirements
Complex Flash files that run smoothly on a desktop PC may not run smoothly on some models of iCOMPEL because of the processor speed.
Flash files give no indication to the iCOMPEL that they are finished. You need to set a maximum duration when you add the item to a Playlist to force the iCOMPEL to move on to the next item.
Adding a Flash file to a Playlist
Before you can add a Flash file to a Playlist, you must upload it to the iCOMPEL. See Uploading content files 47 for details of how to do this.
To add a Flash file to a Playlist, follow the steps for adding Media item files to a Playlist [35]. After you add the Flash file, it appears on the Playlist. Use the Edit button to view and adjust the Flash file properties as necessary.
3.2.9 Folder Play
Folder Play is the term for playing all the contents of a folder automatically, by adding the folder rather than individual files to the Playlist. The files in the folder are played in sequence according to the order of their file names. You can add or delete items from a folder in a Playlist even while it is being played.
Optionally, you may play the files in the folder in a random order (shuffle play) rather than in sequence, and you can also ensure that all files played randomly are seen for the same amount of time. You may also limit the number of items played from the folder.
Folder play properties 54
Adding a Folder
To add a Folder to a Playlist, see: Adding folders to a Playlist 36
File name order in Folder Play
Your iCOMPEL plays the files in a folder in the order of their file names. The iCOMPEL recognizes the natural order of numbers (1, 2, 3, ...10, 11...21, and so on) and the alphabetical order of letters. The iCOMPEL sorts numbers before letters and is case-sensitive, so '1' comes before 'A' which comes before 'a'.
Viewing items from a Folder in your web browser
When you create a Folder of items, you may wish to view individual items to test them. To view a single media item in your web browser, follow these steps:
- Select Media from the menu bar and then select Files and Folders.
-
Navigate through the folders and files to the content item you want to see.
-
Click the item to display it in your web browser.
Some items such as videos may take a considerable time to download and display. Some media items may not be supported on your PC.
3.2.9.1 Folder Play properties
You can define the following properties for a Folder Play:
Management
When Ad hoc Management is enabled, the iCOMPEL plays the media files in the specified Ad hoc Folder, and if this directory contains no suitable media files the iCOMPEL plays the contents of the Media Folder instead.
An Ad hoc User may modify files in the Ad hoc Folder using the Media Folder page 100 in the Ad hoc Customization section.
If the iCOMPEL is a Subscriber ^[11] , then only media files in the Media Folder are replaced during Subscription. Media in the Ad hoc Folder is left unchanged. This mechanism allows local media content to be used by the Subscriber.
Item selection
You can determine how media items are selected from files in a folder:
- Play all Items - the iCOMPEL plays every supported media item in the folder for the specified duration. The media items are selected sequentially (alphabetically based on filename or randomly, depending on the Select Items setting).
- Play only the first n items - the iCOMPEL plays the first n media items. Media items are sorted alphabetically based on filename then picked sequentially or randomly, depending on the Select Items setting. This option means some items are not played.
- Play all Items in groups of n items - the iCOMPEL plays all items in a random order, but ensures that each media item is played the same number of times, by stepping through each group of items in turn.
Example
You can combine Folder Play properties to create sequences that meet specific requirements. For example, you may wish to set up a Playlist that showed a sequence of music videos in a fixed order, and between each video show two randomly selected advertisements followed by a corporate logo for a fixed time.
To create this sequence of folders, follow these steps.
-
Create three folders on the iCOMPEL as follows:
-
Music
- Advertisements
-
Logo
-
Upload videos into the Music folder. Rename the video files as necessary to create the play order you want (for example, 'A Summer in the city.mpg, B Be my girl.mpg', and so on).
-
Upload the advertisements into the Advertisements folder.
-
Upload the logo into the Logo file.
-
Create a Playlist as follows:
-
Add the Music folder to the Playlist, limit 1.
- Add the Advert folder to the Playlist with memory, limit 2.
- Add the Corporate logo image as an individual file, duration 10 seconds.
Item Synchronization
The Item Synchronization ^71 option allows one Zone (the Master) to control the media items shown in one or more other Zones (Slave Zones). For further details see Automatic captioning ^71
Specifying Custom Item Duration
You can specify a custom duration for any items played as part of a Folder Play. This can be done by adding the term - duration-x just before the file extension, where x is replaced by the duration in seconds. For example: logo-intro-duration-17.swf means that the item plays for 17 seconds.
Custom duration only applies to items in folders, and has no effect when the Item is directly added to the Playlist.
3.3 Media from external sources
Some types of media are run directly from external sources. these include:
TV 55
Radio 56
Live video 57
Multicast video (IPTV) 57
External web pages 58
3.3.1 TV
| Player type | Movie |
| Supported Formats | Notes |
| Digital TV | Broadcast digital TV, where available.ATSC digital cable and over-the-air, where available. |
| Analog TV | Broadcast TV, where available. |
| Requirements | iCOMPEL with TV tuner card |
Before you can use TV with your iCOMPEL you must ensure that you are set up correctly. This includes:
• TV antenna connected to the TV socket on the iCOMPEL.
- TV tuner card in the iCOMPEL tuned to digital transmitter (see Setting up Digital TV 146).
- Analog TV station name and number pairs (see Setting up analog TV ^146 )
Adding TV to a Playlist
To add TV broadcast to a Playlist follow the steps for adding Special items to a Playlist[35]. After you add the TV broadcast, it appears on the Playlist. Use the Edit button to view and adjust the TV item properties as necessary, for example to display TV subtitles.
TV properties
Subtitles
Select the check box to display subtitles if they are available.
Volume
Enter the volume as a percentage of the maximum volume if you have enabled the soundtrack for this Layout.
See also:
Displaying part of a movie or web page 79
Movie properties 60
Duration properties 64
Opacity 64
Position and size properties 64
Time validity 64
3.3.2 Radio
| Zone type | Soundtrack |
| Supported format | Notes |
| Digital TV Radio | Digital TV radio stations, where available. |
| Requirements | iCOMPEL with Digital TV tuner card |
Before you can use radio with your iCOMPEL, you must ensure that you are set up correctly. This includes:
• TV antenna connected to the TV socket on the iCOMPEL.
- TV tuner card in the iCOMPEL tuned to a digital transmission (see Setting up Digital TV 146).
Adding Radio to a Layout's soundtrack
To add Radio broadcast to a Layout's soundtrack, follow the steps for adding Special items to a Playlist 35 . After you add the Radio broadcast, it appears on the Playlist. Click Edit to edit the Audio properties as required.
Radio properties
Volume
Enter the volume as a percentage of the maximum volume
See also:
Duration properties 64
Time validity 64
3.3.3 Live Video
| Player type | Movie |
| Supported Formats | Notes |
| S-VideoComposite Video | Including: cameras, DVD players, set-top boxes, etc. |
| Requirements | iCOMPEL with TV tuner card |
Before you can use Live video with your iCOMPEL, you must ensure that you are set up correctly. This includes:
- Either an S-Video or Composite video cable connected to the relevant socket on the iCOMPEL TV Tuner card.
- A working output device connected to the cable.
Adding live video to a Playlist
Before you can add live Video in to a Playlist you need to configure your TV Tuner ^[146] to recognize the video source as a TV input.
To add live Video to a Playlist, follow the steps for adding Special items to a Playlist 35 . After you add the live Video, it appears on the Playlist. Use the arrows to adjust the position of the live Video in the Playlist, as necessary. Click Edit to edit the live Video properties as required.
Live video properties
Volume
Enter the volume as a percentage of the maximum volume, if you have enabled the soundtrack for this Layout
See also:
Displaying part of a movie or web page 79
Movie properties 60
Duration properties 64
Opacity 64
Position and size properties 64
Time validity 64
3.3.4 Multicast Video (IPTV)
| Technical notes | |
| Player type | Movie |
| Supported formats | Notes |
| MPEG-2 transport stream in UDP | Network Multicast Stream |
| Requirements | Additional Multicast Stream-in feature key required (Part Number: ICOMP-IN). |
Before you can use Multicast Video with your iCOMPEL, you must ensure that you are set up correctly. This includes:
- An IGMP aware network infrastructure that has allows multicast streaming.
- A device to stream video onto the network.
- A network cable connecting the iCOMPEL to the network.
Adding multicast video to a Playlist
Before you can add live Video in to a Playlist, you need to configure your TV Tuner[146] to recognize the video source as a TV input
To add Multicast Video to a Playlist, follow the steps for adding Special items to a Playlist [35]. After you add the Multicast Video, it appears on the Playlist. Click Edit to edit the Multicast Video properties as required.
Multicast video properties
Subtitles
Select the check box to display subtitles if they are available.
Volume
Enter the volume as a percentage of the maximum volume, if you have enabled the soundtrack for this Layout
See also:
Displaying part of a movie or web page 79
Movie properties 60
Duration properties 64
Opacity 64
Position and size properties 64
Time validity 64
3.3.5 External Web Pages
| Player type | HTML |
| Supported formats | Notes |
| HTML | The iCOMPEL uses WebKit for Linux. WebKit is used by Apple Safari and Google Chrome browsers. JavaScript in a web page is supported Flash files in a web page are supported ActiveX is not supported |
Note: HTML pages always have a white, non-transparent background.
Requirements
Much web content is designed to be interactive and read at close range making it unsuitable for digital signage applications. It is possible to create web content specifically for digital signage using large fonts and no hyperlinks.
To display a web page, your iCOMPEL must have access to the Internet or the network where the web page is hosted. The iCOMPEL displays a web page in an HTML enabled Zone in exactly the same way that a web browser displays a web page. (The iCOMPEL uses a version of the Mozilla Firefox browser to do this.)
The only difference between the iCOMPEL and a regular web browser is that web content that requires a specific downloaded plug-in, or requires a specific operating system, is not displayed. For example, the iCOMPEL does not display ActiveX content on a web page.
You can use a copy of Mozilla Firefox to preview the appearance of a web page on the iCOMPEL.
There is no way to interact with the web page that is being displayed. If the web page requires a username and password to log in, you must include that in the page URL in the format protocol://username:password@site.
Adding external web pages to a Playlist
To link an external web page to a Playlist, follow these steps:
- Using a web browser, select the page you want to link to and copy the whole web address (URL). It is sometimes possible to use the URL for a specific frame or image on a web page to display just that item.
- In the iCOMPEL, select the Layout and Zone you want to add the page to.
- Select the Specials tab.
- Paste the URL from the website into the External web page text box.
- Click Add.
- In the Playlist, use the arrows to adjust the position of the item in the Playlist, as necessary.
- Use the Edit button to view and adjust the item properties as necessary.
It is possible to display part of a web page only.
Saving web pages to disk
As an alternative to connecting to the Internet and displaying a web page directly from an external source, you can save it and store it on the iCOMPEL.
Once you store a web page in this way, you lose the connection to the original page. Any updates to the original page are not reflected in your stored copy of the page.
If you wish to store a page in this way, you must select the Web page, complete option from the Save as command in your web browser, to make sure you store not only the web page but also all its associated files. Your web browser creates a folder that contains any images, script files, or data files used by the page. This folder has a name in the format [pagename]_files, where [pagename] is the name of the HTML page.
You must upload both the HTML page and the associated _files folder to the iCOMPEL in order to display a stored page.
To add a stored HTML page to a Playlist, follow the steps for adding Media item files 35 to a Playlist. After you add the HTML page file, it appears on the Playlist. Use the Edit button to view and adjust the HTML page file properties as necessary.
Auto-refresh
Some web pages are designed to auto-refresh. In these cases, the web page tells the iCOMPEL browser to reload the page at regular intervals. Pages that auto-refresh can be added to a Playlist with an indefinite duration and you can be sure that they always show the latest information.
Pages that do not auto-refresh may show out-of-date information and need to be reloaded periodically. To do this, add the pages to a Playlist with a fixed duration, as this forces the iCOMPEL to reload the page periodically.
You can determine whether a page is designed to auto-refresh by examining the HTML code for the page and searching for the following HTML tag:
3.4 Media item properties
There are different Playlist properties for each type of media item. To edit the properties for a Playlist item, click the

Edit button alongside the item.
Properties that only apply to one type of media content are included in the main topic for that type of content. Properties that are common to several types of media content are described here.
For details of Playlist properties for each item type, see the following sections:
Text properties 61
Newsfeed properties 40
Movie properties 60
HTML properties 62
Image properties 50
Audio properties 50
Clock properties 42
Folder Play properties 54
Duration properties 64
Position and Size properties 64
Partial display of movie 60
Opacity 64
Time validity 64
Conditional Play 65
Ad hoc properties 66
3.4.1 Movie properties
The following properties apply to Movie items:
Subtitles
If you select the Display subtitles checkbox, the iCOMPEL shows subtitles on top of the video, if they are available.
Volume
Enter the volume as a percentage of the maximum volume.
Movie size/TV size
You can use a Zone as a 'window' that shows only part of a movie by displaying part of a movie or web page ^[79] . The movie width and movie height Properties are the size of the whole movie, while Top Edge offset and Left Edge set the position of your 'window' on top of the movie.
NOTE: This option is only visible if you have set the User Interface Policy to Detailed or Expert on the UI Options ^[128] page.
See also:
Duration properties 64
Opacity 64
Position and Size properties 64
Time validity 64
3.4.2 Image properties
When you add an image to a Playlist, you can set the following properties:
Mode
You can set the image display mode to one of these options:
- Fit to Zone stretches the image size to exactly fit the specified width and height of the Zone. This may distort the image because it changes the image aspect ratio.
- Letterbox shows the entire image but preserves the original aspect ratio. Any space in the Zone not covered by the image (the letterbox area) shows the Letterbox Color you set.
- Crop preserves the image aspect ratio, but may cut off the edges of the image to display within the specified width and height of the Zone.
The aspect ratio of an image is the relationship between its height and its width.
Letterbox color
If you select Letterbox mode as the image display mode, the letterbox area is the area between the Zone edge and image edge. The Letterbox area is shown in the Letterbox color you set.
See also:
Duration 64
Position and Size 64
Opacity 64
Time validity 64
3.4.3 Text properties
These properties apply to directly entered text, Newsfeeds, Text files and Clocks:
Text style
You can specify the amount of time the text item should be shown for, or the speed and direction for scrolling text.
The speed of the text is displayed in pixels per second.
NOTE: For best results, set the speed in multiples of 60, for example 60, or 120.
Font
Select the typeface, size and style of the Font to use. For more information see Fonts 691
Text color (foreground)
You can use the Pick Color button to set the text color.
See Colors for more information.
Background color
You can use the Pick Color button to set the background color.
See Colors for more information.
Horizontal and vertical alignment
You can set the horizontal and vertical alignment properties for text. These Properties are dependent upon the text movement direction.
Margins
You can set margins (blank space) around the edges of a block of text. The margin values are expressed in pixels, and must be zero or greater.
White space
The white space settings determine how spaces, tabs and line breaks (new lines) are displayed. The White space option is available for text files but not for directly entered text. Choose from the following options:
- Display multiple spaces as single space and multiple newlines as single newline - this option ignores any white space in the text.
- Display spaces and newlines as entered this option displays the text with any white space you entered.
Character set
You can select a character set if the text file does not explicitly specify one. The character set option is available for text files but not for directly entered text.
The iCOMPEL can display text files in the following character sets:
• DOS Latin (1 and US)
• Macintosh OS (Western and Eastern Europe)
• Microsoft Windows (Western and Eastern Europe)
- Unicode
- UTF-8
3.4.4 HTML properties
The following properties apply to HTML media items:
Volume
Enter the volume as a percentage of the maximum volume, if you have enabled the soundtrack for this Layout.
Web page size
You can use a Zone as a 'window' that shows only part of a movie by displaying part of a movie or web page. The width and height Properties are the size of the whole web page, while Top Edge offset and Left Edge set the position of your 'window' on top of the web page.
NOTE: This option is only visible if you have set the User Interface Policy to Detailed or Expert on the UI Options[128] page.
Opacity
Sets how transparent the zone is, from 1 which is fully transparent to 100% which is opaque
Zoom
Enables the Zone to zoom in on the HTML content. Smaller than 100% zooms out (to get the whole web page in a small zone for example) or larger than 100% zoom in, to fill the zone with part of a web page.
Page Background
Enables the HTML content to have a transparent background, for example to view the content of the zone behind such as a background zone.
Note: Adobe Flash hosted in a HTML zone will not play correctly with this option enabled.
Page services
If enabled, this option will allow the HTML media to access the following services on the player:
- Send instructions to the player interface, including the ability to Change Layout, Advanced to a Rendezvous Point and obtain a listing of media files to play.
- Display any files stored on the media folder.
This setting must be enabled for certain player widgets. Please see the appropriate documentation for more information.
See also:
Duration properties 64
Opacity 64
Position and Size properties 64
Time validity 64
3.4.5 Newsfeed properties
The characteristics of the news feed can be changed once it has been added to the playlist.
Click the Edit button in the playlist, then on the Media tab:
Newsfeed:
Selects the news feeds to display on the iCOMPEL display
Fields
Enables the display to include the Title and Description of the news feeds as well as the new content itself, if required
On the Style tab:
Item selection
Select the number and sequence of the items to be shown.
Item synchronization
Set whether this feed is the Master (gives synchronization instructions) or Slave (follows received synchronization instructions) (see Synchronizing Playlist displays between Zones) [71]
Other characteristics of the RSS feed are described in the following sections:
See also:
Text properties 61
Opacity 64
Position and Size properties 64
Time validity 64
3.4.6 Common properties
The following properties are common to most or all of the Media items
3.4.6.1 Duration
You can set the duration for the display of an item in a Playlist. The options are:
• display the item indefinitely
• display the item for a fixed period (in hours, minutes and seconds)
3.4.6.2 Position and Size
You can override the position and size settings for a Zone by changing the position and size settings for a single media item.
NOTE: This setting is only visible if you have set the User Interface Policy to Detailed or Expert on the UI Options[128] page or if the property has already been enabled for a given item.
Override Position and Size settings for Playlist item
To override the position and size settings for an item, follow these steps:
-
Click to set the properties for a Playlist item.
-
Under Position and Size, select Use custom Position and size, and enter the:
-
Left Edge and Top edge offsets for the top left corner for this item
- Width and Height value for this item
3.4.6.3 Opacity
You can control whether an item is transparent, partly transparent or completely opaque by adjusting the opacity level. If the opacity is set to 100, the item is completely opaque, and you cannot see any of the items underneath it. If the opacity is set to 1, the item is almost completely transparent (invisible). Take care with this property, as very low values can make an item very hard to see.
If an image file contains an alpha-channel (which contains transparency information), the alpha-channel values override the Opacity setting.
More details on Opacity... 68
3.4.6.4 Time validity
Time Validity lets you control when individual Playlist items can be shown in a Playlist. For example, you may have adverts that you only want to play on certain days of the week, or you may wish to show a traffic report after 5pm. Outside the times you specify, the item is skipped when its turn comes in the Playlist.
The iCOMPEL tests the Time validity when a media item starts to play, but does not continue to check it while an item is playing, so an Item may be playing outside its valid time. The iCOMPEL ignores Time Validity when you audition a media item or a single Zone.
NOTE: This setting is only visible if you have set the User Interface Policy to Detailed or Expert on the UI Options[128] page or if the property has already been enabled for a given item.
Adding time validity to a Playlist item
Click to set the properties for a Playlist item.
Select one of the following options to set time validity for the item:
| Date Range | The date range includes the two dates selected, to select a single day set both dates to the same day. |
| Days | Set the day(s) of the week on which the item is displayed. |
| Time Period | Set the times of day during which the item is displayed. |
Time Validity is not used when you are previewing an individual Playlist item or Zone. It is used when you audition the whole Layout or when the Layout is playing as part of a Schedule.
3.4.6.5 Conditional Play
The Conditional Play property lets you control if an item can be played based on Player Local Information (PLI). Please refer to the Player Local Information 1section for more information.
NOTE: This property is only visible if you have set the User Interface Policy to Detailed or Expert on the UI Options[128] page or if the property has already been enabled for a given Playlist item or Schedule.
NOTE: Any change in PLI will be checked to see if currently playing items should still be played.
Adding conditional play to a Playlist item
- Click to set the properties for a Playlist item.
- For 'Conditional Play' property select the required option:
A. Always Play (default). This Item is always played unconditionally.
B. Play if Player Local Information contains (...). This setting evaluates the following condition, and will play the item only if the condition is satisfied.
If Play if Player Local Information contains (...) is selected, then please enter:
- Player Local Information item name
- Kind of operation.
- List of values for evaluating the condition.
These changes will be applied when the Schedule is next Activated.
3.4.6.6 Ad hoc properties
The following properties may apply to directly entered text, Newsfeeds, Radio, TV and Tables that are set to be Customizable or Ad hoc.
Item type
Click the Save Changes and change Item Type button to save any existing changes to the Item and to navigate to a page where it is possible to change the Item's type.
The options are:
- Fixed to the value specified by the Layout Designer
- Customizable
- Ad hoc (with the option to create a new Ad hoc from the existing Item if so desired).
Ad hoc Entry
The Label used by the Layout's Ad hoc Page to refer to this item.
Ad hoc Item Name
Uniquely identifies an Ad hoc Item on the iCOMPEL.
Customization Scope
For directly entered text the option exists to be Ad hoc From Center which means that in a Channel, changes made on the Publisher iCOMPEL to this Item's override value will be applied to each Subscriber iCOMPEL as well.
Customization Status
Indicates if this Item is currently displaying its default value or if it has been overridden by an Ad hoc User.
Used by Layouts
Lists the Layouts that use this Ad hoc Item.
NOTE: Ad hoc Item Name and Used by Layouts are only available to Ad hoc Items that are not Customizable Items.
3.5 Playlist Commands
The following commands can be used to alter what is playing:
Rendezvous Point and Advance To commands 66
Change Layout command 67
3.5.1 Rendezvous Point and Advance commands
Each Playlist is a sequence of items that operates independently. Even if two Playlists have a sequence items of exactly equal lengths you cannot rely on the display between different Zones to be completely synchronized. Instead, the iCOMPEL offers a manual synchronization mechanism using Rendezvous Points and Advance To (Rendezvous Point) commands.
When an Advance To command is encountered in the playlist, the command is passed on to either all Zones or a single specified Zone in the current Layout. If the receiving Zone (or Zones) contain the Rendezvous Point name, then the playlist immediately starts playing from the item immediately following the Rendezvous Point entry. If a Playlist does not contain Rendezvous Point, the command is ignored.
Advance To commands and Rendezvous Points share the same identifying names. As you can place the same Rendezvous point in multiple Playlists for different Zones, one single Advance To command can trigger actions in several different Zones. You can also program other actions on the iCOMPEL, such as GPIO 76 for Touch screen events, to trigger Advance to commands.
Rendezvous Point names are not case sensitive.
Adding Rendezvous Points
To add a Rendezvous Point to a Playlist, follow these steps:
- Select the Playlist where you want to add the Rendezvous Point.
- Click the Specials tab.
- Type in a name for the Rendezvous Point in the text box. You can enter any text for the name, except for a name beginning auto.
- Click Add.
- In the Playlist, make sure the Rendezvous Point appears at the correct position (immediately before the item you want to be launched by the Advance To command).
- If necessary, repeat these steps to create additional Rendezvous Points in other Playlists.
Adding an Advance To Command
To add an Advance to command to a Playlist, follow these steps:
- Select the Playlist where you want to add the command.
- Click the Specials tab
- Select the Rendezvous Point by name from the list in the Advance To Rendezvous Point section.
- Click Add
- In the Playlist, make sure the Advance to command appears at the correct position (immediately before the item that you want to synchronize).
Advance To Properties
All Zones
Specifies which Zones the Advance To will be sent to.
3.5.2 Change Layout command
Unlike the Advance to command, the Change Layout command launches a different screen Layout, which may have a noticeably different arrangement of Zones. If you want to implement a simple change of the Layout, then using an Advance to command would bring a quick result. However, it is difficult to implement a complex change using the Advance to command. Change Layout displays a different Layout entirely, but it does take longer to refresh the Screen.
The Change Layout command is available on the Specials tab for Playlists.
3.6 Colors
You can set the colors to be used for fonts, backgrounds, and other items on the iCOMPEL using this page.
A Color item is defined by a unique name, a color value, and an opacity setting. Color values are expressed as either RGB (Red, Green, Blue) or Hex (Hexadecimal) values. When you change the color value or the opacity value for a Color item, all the visual elements that use the Color item are updated. You must click the Activate Schedules and Layouts button to apply your changes. You can define more than one Color item with the same color values.
To add a new Color item, click the Add Color tab.
To change the properties of a Color Item click the Edit Edit button and modify the settings as required.
To delete a Color item click the Delete button. If the Color item is in use you cannot delete it. To find out where the Color item is being used, click the Edit button and check the Used By tab.
Color items for new Layouts and Tables
When you create a new Layout or a new Table, the iCOMPEL automatically creates new Color items. For Layouts these are Color items for the text foreground and background, and the letterbox background, and for Tables these are Color items for the text foreground and background.
The Color items are named in the format
• Text foreground Holidays: Text
• Text background Holidays: Background
• Letterbox Holidays: Letterbox
You can modify the properties for these Color items as needed.
Color properties
Name
You must specify a name for a Color item, and the name must be unique.
Color value
To specify a Color Value you must specify either:
- Separate Red, Green and Blue (RGB) values for the color. Each of the three color values can range from 0 to 255. More on Finding the RGB values for a color... [69]
- A Hex (hexadecimal) value, representing the Red, Green and Blue values (in this order) expressed in hexadecimal (base 16).
Opacity
The Opacity value determines how transparent a color is, with 0 being completely transparent (invisible) and 100 being completely opaque (solid).
Adding colors
You need to know the Red, Green, Blue (RGB) values or the Hexadecimal (Hex) value for your color to add it to the iCOMPEL color palette. More on Finding the RGB values for a color... [69]
To add a color, follow these steps:
-
From the menu bar, select Media, then Colors, and click the Add Colors tab.
-
Enter a distinctive logical name (for example, Corporate Blue)
- Enter either the RGB values or the Hex value.
- Click Add.
Finding the RGB Values for a Color
Here is an easy method for finding the RGB values for a color you want to use on your iCOMPEL.
- On a Microsoft Windows PC, click Start, then Programs (or All Programs), then Accessories, and select Paint.
- Open an image that includes the color you want to use.
- Use the Pick Color tool (shaped like an eye-dropper) to select a pixel in the image that is the color you want the RGB values for.
- Select Colors, then Edit Colors, then Define Custom Colors.
- The RGB values for this color are given in the Red, Green and Blue boxes. Make a note of these values to use in the iCOMPEL.
3.7 Fonts
The iCOMPEL has a collection of standard fonts that are suitable for most purposes. To view the installed fonts, select Media, then Fonts from the menu bar, and then click the Font Families tab.
The Font Families tab shows details of all the fonts available on the iCOMPEL, including user-installed fonts. The Font Files tab lists details of all user installed fonts.
If you need to use specific fonts, you can add your own font files. The iCOMPEL supports TrueType Font (*.TTF or *.TTC) and OpenType (*.OTF) format font files on the iCOMPEL.
If you are distributing content in a Channel[11], you must install your additional fonts on every Subscriber iCOMPEL
Adding a font file
To add a font file, follow these steps:
- From the menu bar, select Media, then Fonts, and click the Add Fonts tab.
- Browse to the font file you wish to add.
- Click Add.
- After you add a font file, you must restart the iCOMPEL. Follow the prompts to restart.
Previewing a font
To preview a font, click the Audition button. This interrupts the current Layout display and shows a test message on the screen. You can change the test message using the Font Options tab.
Part
IV
Enhancing your displays
4. Enhancing your displays
This section describes how to enhance your digital signs. This information applies equally to creating signs for a standalone iCOMPEL, and to creating signs for a channel publisher.
Select a topic below for more information about:
Synchronizing Playlist displays between Zones 71
Automatic captioning 71
Using Advance to commands 66
Displaying Video-on-demand using a sub-playlist 72
Interactivity 74
Using the RS-232 port 79
Using General Purpose Input-Output (GPIO) 76
Using Touch screens 77
Displaying part of a movie or website 79
Mitigating screen burn for plasma screens 79
Setting the screen background 80
4.1 Synchronizing Playlist displays between Zones
It is possible to synchronize the display between two Playlists in different Zones. This can be used, for example, to display video or images in one Zone and related text captions in another Zone.
The simple way to do this is by using Automatic captioning. A more complex and more powerful method is by using Advance to commands.
4.1.1 Automatic captioning
To implement synchronization between two or more Zones you need to designate one Playlist as the Master (Primary) Playlist, and one or more other Playlists as Slave (Secondary) Playlists. You add named targets into each Slave Playlist, known as Rendezvous Points, and add an identically named command to the Master Playlist, known as an Advance To command. When the Master Playlist reaches the Advance To command, the iCOMPEL forces all the Slave Playlists to start playing the first item in the Playlist after the Rendezvous point.
Automatic captioning relies on two sets of files having corresponding file names, so that they are displayed together. For example the video file named Marketing_Highlights_01.mpg and the text file named Marketing_Highlights_01.txt are displayed at the same time.
To set up automatic captioning between a Zone with Video content (the Video Zone) and the corresponding Zone with text content (the Text Zone) you need to follow separate steps as follows:
Setting up the Video Zone for automatic captioning
To set up a Video Zone for automatic captioning, follow these steps:
- Put all the videos into one folder on the iCOMPEL.
- Click on the video Zone to open its Playlist for editing.
- Select the Files and Folders tab.
- Click on the Add button alongside the name of the Folder with the videos to add it as a folder-play item.
- Select the Playlist tab.
- Click the Edit button for the folder.
-
For the Item Synchronization option, select Master.
-
Click the Save Changes button.
Setting up the Text Zone for automatic captioning
Before you begin this procedure, create a text file with a caption for each video file. The text file must have the same name as the video file. For example, for a video file named Marketing_Highlights_01.mpg you must create a text file named Marketing_Highlights_01.txt with the caption you want to display.
To set up a Text Zone for automatic captioning, follow these steps:
- Place all the text files into a folder on the iCOMPEL. This can be the same folder that contains the video files.
- Click on the text Zone to open its Playlist for editing.
- Select the Files and Folders tab.
- Click on the Add button alongside the name of the Folder with the videos to add it as a folder-play item.
- Select the Playlist tab.
- Click the Edit button for the folder.
- For the Item Synchronization option, select Slave - track changes to Master.
- Ensure that the duration is set to Play indefinitely and that the text style is set to Show indefinitely.
- Click the Save Changes button.
4.1.2 Displaying Video-on-demand using a sub-playlist
You can use the Ad hoc mechanism ^83 to configure the iCOMPEL to show videos on-demand (in response to a button-click) by using a series of Advance to commands ^66 . The same mechanism can also be used to set up images or any other media type to be displayed on-demand.
Sub-playlists
You can create a loop, or sub-playlist, by inserting both a Rendezvous Points at the beginning of a sequence of items, and an Advance To command at the end of the sequence in the same Playlist. This means that the items in the sequence are displayed in a continuous loop indefinitely, or until another Advance To command from somewhere else instructs the iCOMPEL to break out of the loop.
An example of the sequence of items in a Playlist is as follows:
Rendezvous Point Start
Default Movie item
Advance To Start
Rendezvous Point Option1
Option1 Movie Item
Advance To Start
Rendezvous Point Option2
Option2 Movie item
Advance To Start
In this case, the Default Movie item would play in a continuous loop, until an Advance To command from an Ad hoc page caused the Playlist to advance to Rendezvous Point Option1 or Option2. At the end of the Option1 or Option2 item, the Playlist would return to Rendezvous Point Start.
Creating a Sub-Playlist list
To create a sub-playlist loop, follow these steps:
- Click on a Zone to edit its Playlist.
- Click on the Specials tab.
- Type the name of the loop into the Rendezvous Point text box (use as descriptive a name as possible).
- Click the Add button to add the Rendezvous Point to the Playlist.
- Add the items that must appear in the sub-playlist in the usual manner. If you want a sub-playlist to play just once then insert an image at the end with an indefinite duration.
- In the Specials tab, select the Rendezvous point by name from the Advance To Rendezvous Point list and click the Add button.
- Make the Layout live by adding to a Schedule, and clicking the Activate Schedules and Layouts button.
You are now able to switch between Playlists by adding options to an Ad hoc Page and then selecting them, as explained in the next section.
Add Advance To commands to an Ad hoc Page
To add an Advance to command to an Ad hoc page, follow these steps:
- Select Manage Ad hoc items, and click the Add Item tab.
- Add an Advance To item by typing in a name and clicking the Add button. Repeat this action to create an advance to action for each Rendezvous point.
- Select Manage Ad hoc pages, and click the Add Pages tab.
- Create a new page with a name such as Movie control.
- Add the Ad hoc items for each Rendezvous point to the Ad hoc page.
- In the Properties tab, select the users who are allowed to call the commands.
- Click Apply Changes.
4.1.3 Other uses for Advance To commands
Other uses of Advance to commands:
There are a number of mechanisms for moving to a named Rendezvous point. They include:
- An Advance To command executed in any currently playing Playlist (including its own Playlist).
- An Advance To command delivered over the iCOMPEL player's Ethernet port in the form of an XML message posted to the HTML TCP port.
- You can add Advance to commands to Schedule Entries and to Ad hoc pages.
- Transitions of binary input lines (delivered via the RS-232 port). These events can be configured to create Advance To commands. (See Using the RS-232 interface 9 )
- Touch events derived from an attached touch sensitive overlay panel. (see Using Touch screens 77)
Any Playlist that receives an Advance To command interrupts the media it is currently playing and re-starts the Playlist at the media item following the Rendezvous point identified by its name.
A named Rendezvous Point can only occur once in a Playlist. However, there are no limits to the number of Advance To commands and Rendezvous points in a Layout.
4.2 Using Interactivity
You can configure the iCOMPEL to respond to inputs from an external source. These external inputs are known as Events 74 and they may be caused by:
- someone pressing or releasing a defined area on a USB Touch Screens
- someone passing a detector or stepping on a pressure mat that generates a General Purpose Input/Output (GPIO) signal (received through an RS-232 port)
- someone pressing a button on a Remote Keypad (Infra-red controller)
The way the iCOMPEL responds may include:
- executing a Change Layout command 67
- executing an Advance to command
These responses are known as Actions 74 , and they may occur immediately, or after a defined time delay (timeout) period. Together, the combination of an input event and an action in response to it is known as an interaction.
Events
You can specify actions for a Layout or a Playlist when any of the following events take place:
- when the Touch Screen is Pressed or Released.
- when a Positive or Negative voltage is received as a GPIO signal.
- when a Programmable Button (A, B, C, D) is pressed on a Remote Keypad.
You can also specify time-delayed (Timeout) actions for the following Timeout events:
- a specified number of seconds after the last Touch or GPIO event was received by the Layout or Playlist.
- if a Touch or GPIO Input event has not occurred within a specified number of seconds after the Layout started playing.
Actions
The following Actions are common to all Events:
- Change to specified Layout when the event (or Timeout) is received.
- Advance to Rendezvous Point when event (or Timeout) is received.
- Pass Event to other Zones or the Layout as required. The event is ignored by this Zone or Layout.
Additionally Playlist Touch and GPIO Interactions can have the action:
- No Action specifies that the event should not be passed to other Zones.
Playlist Touch Interactions can have the action:
- Pass to web page. If the current Zone supports HTML, then Touch Events can be passed directly to the currently shown web page. If there is no web page showing, the Event is treated as if the selection is No Action.
Layout and Playlist Interaction
You can specify interaction behavior for both the Layout and the Playlist for different purposes.
Interactions defined within the Playlist have the following properties:
- they are processed if the currently playing item in the Playlist is touched.
- the last encountered interaction item is active. This allows complex behavior to be executed by defining multiple interaction items in the same Playlist.
Layout interactions have the following properties:
- they are applied if no Playlist interaction item is processed, which means that Layout interactions can be considered default interactions.
• they may be applied regardless of the screen location touched.
It is easier to review Layout interaction behavior since all components are presented on the same web page.
Interaction Processing
The way the iCOMPEL processes an event depends upon the source of the event, and on which interaction items are currently active.
The iCOMPEL processes interactions for Touch Screen events as follows:
- The iCOMPEL creates a list of all Zones that are showing items which are directly underneath the touched screen location.
- The iCOMPEL processes this list in depth order, starting with the front-most (top) Zone.
- If the iCOMPEL reaches a Zone that has an active Touch action interaction item, (which is not Pass Event to other Zones) then the iCOMPEL executes the specified action and stops processing.
- If the iCOMPEL does not encounter a suitable action in any Zone, it performs the Touch action defined for the Layout
An RS-232 Input Event is processed as follows:
- The iCOMPEL creates a list of all Zones that are showing items which are directly underneath the touched screen location.
- If the iCOMPEL reaches a Zone that has an active RS-232 input interaction item, (which is not Pass Event to other Zones) then the iCOMPEL executes the specified action and stops processing.
- If the iCOMPEL does not encounter a suitable action in any Zone, it performs the RS-232 action defined for the Layout
A Remote Keypad Button Event is processed as follows:
- The iCOMPEL creates a list of all Zones that are showing items which are directly underneath the touched screen location.
- If the iCOMPEL reaches a Zone that has an active Remote Keypad Button interaction item, (which is not Pass Event to other Zones) then the iCOMPEL executes the specified action and stops processing.
- If the iCOMPEL does not encounter a suitable action in any Zone, it performs the Remote Keypad action defined for the Layout
Passing Touch Events to HTML Pages
If the current Zone supports HTML, then Touch events are passed directly to the currently shown HTML page. Using this technique allows rich interactive applications to be built using HTML content on stored web pages. You cannot create interactions with live web pages displayed directly from an external source.
When developing HTML applications, it is likely that a number of files are required. In order for the iCOMPEL to keep track of these files during Channel Publishing and Layout Package creation, you must use a specific file structure.
The application must be initiated from a single HTML file, which is added to the Playlist. This file can simply redirect to other files as required. All additional files required for the application must be placed in a single subdirectory named [pagename]_files, where [pagename] is the name of the initiating HTML file (without its extension). This directory must exist in the same directory as the initiating HTML file. All required content must be placed in the _file subdirectory only and not in additional sub-directories or other locations.
4.2.1 Designing interactive layouts
You can design Layouts that respond to user input in various ways.
- send an Advance To command 66 to play a specific item or start a Playlist
- change the current Layout 67
- change the size and position of a Zone
• display hidden Zones - send a signal to another device using the RS-232 port
The following sections offer some general guidance on developing interactive Layouts.
Developing a storyboard
Advance planning is particularly important when designing a Layout that offers choices and options to users. A storyboard is the name given in the film industry for a plan based on a series of sketches of individual scenes. Many customers have reported that creating a storyboard for an interaction sequence can be very useful. The storyboard may be a series of sketches of screen Layouts, or more simply may be in the form of a flowchart. The important factor is to have a detailed plan of all the possible outcomes of different interactive events.
Providing material for optional actions
You must make sure that you have collected and uploaded all the media files you require for any possible scenarios controlled by interaction events. You need to create Playlists for Zones, and create Advance To commands and Rendezvous points in those Playlists, before you start creating your interaction events.
Trade-offs between options for changing the display
You can change the display in response to an interaction either by changing the size and show/hide properties of a Zone or by using a Change Layout command. Each method has advantages and disadvantages.
| Method | Advantages | Disadvantages |
| Change Zone Size and Show/Hide properties | Very fast transition | Continues using existing media players |
| Use Change Layout command | Resets all media players | Slower, visible transition |
4.2.2 General purpose input/output (GPIO)
The iCOMPEL can respond to changes in voltages generated by a general purpose input/output device such as a motion sensor or a pressure mat. These inputs are received through the RS-232 port. It can also send output signals.
For more details see the RS-232 reference page ^165
Control line outputs
The iCOMPEL has the ability to control the output state of the RS-232 DTR and RTS lines. The lines are controlled by RS-232 Output Items that must be created and may appear in Playlists. The RS-232 Output Items can assign the state of one or both RS-232 output lines and optionally a string of characters to be output. The RS-232 Output Items are given names in order to make the intended usage clearer in the iCOMPEL configuration.
Each RS-232 Input Item may then be included in a Playlist and used to generate an iCOMPEL Advance To 71 or Change Layout 67 command on a user defined transition of the line. The Advance To or Change Layout commands can be configured to change the media being played by the iCOMPEL.
Control line Inputs
The iCOMPEL RS-232 port has 4 input lines that may be used to take in binary events such as contact closure or signals from other devices. The available lines are:
- Clear To Send (CTS)
• Data Carrier Detect (DCD)
• Data Set Ready (DSR) - Ring Indicator (RI)
The lines do not affect the operation of the RS-232 Send and Receive strings.
4.2.3 Touch screens
The iCOMPEL Touch Screen feature allows you to install a touch sensitive panel (connected to the iCOMPEL through a USB port) over a display being driven by the same iCOMPEL media player. When a user touches the overlay panel the iCOMPEL can respond in a number of different ways, for example by acting on Advance to 66 for Change Layout commands.
You can use the iCOMPEL web interface to configure the response to Touch Screen input. The response can be configured at one or both of the following two levels:
Touch Screen Physical Interface
The iCOMPEL supports USB touch-screen overlays that report absolute X/Y coordinates, key up and key down events. This interface is via USB into the iCOMPEL.
There is no support for a mouse-like device that sends relative movements, since this requires an on-screen cursor.
Calibration of the Touch Panel
From the menu bar select Setup, then Player Setup, then Interactivity. Select the Touch Screen tab and click Calibrate.
For further details see Interactivity reference. ^135
4.2.4 Configuring touch screen actions
You can configure actions in response to touch screen actions either at the Layout level, or at the Zone level. The iCOMPEL passes the touch event to the Zone immediately under the location that was touched, and if that Zone does not handle the touch action it passes it to the next Zone beneath it until it reaches a Zone that can handle it. If there is no Zone that can handle the touch action, or if the touch event was over part of Layout not covered by a Zone, it is passed to the Layout.
Layout sensitivity
In Layout sensitive mode the iCOMPEL is sensitive to a touch anywhere on the touch panel. The iCOMPEL can react by changing a Layout or following an Advance to command to a new position within any of the Playlists associated with any of the Zones in the current Layout.
Zone and Playlist sensitivity
In Zone and Playlist sensitive mode, the iCOMPEL reacts differently to touch on different parts of the screen that correspond to Zones in the current Layout. The iCOMPEL response may also vary according to the item from the Zone's Playlist that is currently active.
If touch is enabled for a Zone that is displaying an HTML page, touch events are passed to the HTML player for handling. This can allow a user to navigate web pages using links embedded in the displayed HTML page.
4.2.4.1 Layout
From the menu bar, select Layouts, and the Layout you want to configure, then select the Interaction tab.
On the Interaction tab, you can select the action in response to a touch screen event.
The settings may include:
- Whether a touch response is required for this Layout at the Layout level or not
- Whether the touch response is Change Layout command or an Advance to command, and the Layout changed to, or the Zones receiving the Advance to command
- Whether it is the touch or release operation that causes the action
- If using a Layout Change, which other Layout to move to
- The time after which this Layout will revert to another Layout in the absence of a touch event.
4.2.4.2 Zone
To configure touch actions for a Zone, you must either:
- Include an On Touch Advance To command in the Playlist of the appropriate Zone.
- Include an On Touch Change Layout command in the Playlist of the appropriate Zone.
- Play an HTML page in the Zone.
To configure these items, use the Specials Tab of the Playlist editor for the appropriate Zone to add the appropriate Playlist items.
You can include more than one On Touch Advance to or On Touch Change Layout command in the Playlist of the appropriate Zone. Each On Touch command overrides the previous one. This allows the reaction to a touch event to change throughout the Zone's Media Playlist.
If the Zone is displaying an HTML page, it is normal not to have the Zone reactive to touch events since the On Touch event will take precedence over the HTML player. Only Left Mouse Button Up and Down events are passed to the HTML player. To use HTML navigation, either omit any On Touch Playlist items or use the Interact Clear (Special Tab in the Playlist editor) to de-activate any previous On Touch items.
4.2.5 Click on touch
You can determine whether there is audio feedback when a Touch Screen is clicked (pressed).
To play an audio file, then enable Click on Touch and specify the Audio file to play. No sound is played when the setting is No Click on Touch.
Volume
Volume is expressed as a percentage of the Master Volume level. The Master Volume Level is specified on the Audio page in the Setup menu.
If this entry is blank, then 75% of the Master Volume level is used.
Audio File selection
The File and Folders section lists all audio files in the currently selected folder and provides access to folder (directory) navigation.
To change the current folder, click on a folder name.
To play a specified Audio file, ensure the Use Sound radio button is selected next to the required Audio file.
NOTE: This section is only shown when Click on Touch is selected.
4.3 Using the RS-232 interface port
Most products in the iCOMPEL range have a single RS-232 port presented on a 9 way D type plug.
Sending user defined RS-232 strings at specific events or at Playlist positions. The strings must be defined as their byte values expressed as separated hexadecimal nibble pairs. E.g. 3a 3b 3c 0d 0a. It is up to the user/installer to create the strings in accordance with the needs of the attached device. Sending of RS-232 strings is unaffected by the state of any of the RS-232 control lines.
Receiving strings over RS-232
The most recently received string is reported by the iCOMPEL in the Items Tab of the RS-232 Outputs page. Receiving strings over RS-232 is unaffected by the state of any of the RS-232 control lines.
4.4 Displaying part of a Movie or Web page
It is possible to display only part of a web page or part of a movie. You can use this feature to show a specific area of a web page without resizing it.
You can also use this feature to crop a movie designed for a 16x9 (widescreen) format to a 4x3 (standard) format. This avoids resizing the Zone, which would alter the aspect ratio and distort the image.
Displaying part of a movie
To display only part of a Movie, follow these steps:
- From the menu bar, select Setup, then UI Options.
- For the User Interface Options, select Detailed or Expert.
- Select the Layout and Zone for the Playlist including the Movie and click Edit.
- Under Movie Size, select Show part of Movie, and enter the left and top edge offsets for the top left corner of the part of the Movie that you wish to show in the Zone and enter values for Movie Width and Height.
Displaying part of a web page
To display only part of a web page, follow these steps:
- From the menu bar, select Setup, then UI Options.
- For the User Interface Options, select Detailed or Expert.
- Select the Layout and Zone for the Playlist including the HTML page and click Edit.
- Under Web Page Size, select Show part of Web Page, and enter the left and top edge offsets for the top left corner of the part of the web page that you wish to show in the Zone and enter values for Web Page Width and Height.
4.5 Mitigating plasma screen burn
Plasma screens can suffer from screen burn if parts of the screen always show the same image. This means that an impression of the image can become burnt into the screen. Screen burn is less likely on LCD panels. Many plasma screens have their own built-in burn mitigation features and these should be activated. If, however, you wish to take further steps to mitigate the problem then you need to either change the background image or the Layout at regular intervals and/or use the plasma burn mitigation mechanism built into the iCOMPEL.
Any Layout on the iCOMPEL can have plasma burn mitigation enabled. This will cause the Zones within the Layout to change location at regular intervals. The Zones can flip position horizontally, vertically or be set to 'orbit' around the screen. If you choose to activate burn mitigation and all your Zones are included, you cannot exclude any Zones.
Activating Plasma Burn Mitigation
From the menu bar, select the Layout, and then select the Layout Properties tab.
For the Plasma Burn Mitigation option, select the Enable Mitigation check box, and then select the scheme and the time interval.
The available schemes are:
- Mirror Layout Zones Left to Right - the iCOMPEL automatically swaps the positions of Zones along a central vertical axis
- Mirror Layout Zones Top to Bottom - the iCOMPEL automatically swaps the positions of Zones along a central vertical axis
- Orbit Zones in Layout - the iCOMPEL automatically rotates Zones around a central point.
When the iCOMPEL moves Zones according to one of these schemes, all Playlists are restarted.
Objective
The overall objective in plasma burn mitigation is to avoid leaving any one pixel on the screen at the same color and intensity for extended periods of time, as this may cause the screen to be permanently affected at that point. Digital signage Layouts are generally more static than broadcast TV, and so present a greater potential danger for plasma screen burn. The objective is to move static Zones of the image to other locations at regular intervals.
Layout Design
If your Screen is a plasma screen you need to be aware of the danger of screen burn and design your Layouts accordingly. The Layout must be useful to people using it wherever the Zones are placed.
Here are some notes to help you design your Layout:
- If the background image has features that relate to the Zones above it, for example a box that makes a frame around scrolling text, or words that must always be seen, then this type of feature has to move in conjunction with the foreground Zone above it.
- To make a background image move in conjunction with the various Zones above it, break the background up into a number of Zones that together cover the whole screen area, and break the background image up into matching rectangles. The parts of the background image are added to the individual Playlist for each individual Zone.
- Make sure that foreground Zones retain their position relative to the background Zones by positioning them so that the center of the foreground Zone is exactly above the center of the background Zone.
4.6 Screen Background
When switching between layouts, the iCOMPEL can show a colored background or image. This background is also displayed between any areas of a Layout that are not covered by Zones.
Setting the color to black is not recommended because this makes fault finding more difficult.
Changing the Screen Background
To adjust the Screen Background, follow these steps:
- From the menu bar, select Media, then Screen Background.
- Select either Solid color or Image.
- If you select Solid Color, then select a color. More information on Colors... 68
- If you select Image, then browse the file system for an image. More information on Files and Folders... 461 If you want the image to behave like a splash screen, set a time delay.
- Click Save Changes and Activate Schedule and Layouts.
Screen background page
Use this page to specify an image or color to be shown while the iCOMPEL is transitioning between Layouts.
To display a solid color background, select Solid Color and pick a color.
To display an image, select Image. You can then use the folder display to select the image file you want to use. You can also define the length of time that the image is displayed for by delaying when the new Layout should be displayed, by using the Layout Activation options. For example, selecting Activate new Layout after 10 seconds means that your chosen image is displayed for 10 seconds before the new Layout starts.
Click Save Changes and Activate Schedule and Layouts to apply your changes.
Part

Ad hoc Content
5. Ad hoc Content
Ad hoc allows you to delegate limited responsibility for content, so staff local to the display can control a specified amount of content on their own display. This is particularly useful where several iCOMPEL players share content in a Channel, but need customized content on each.
As content designer you retain overall control, but iCOMPEL has the flexibility to deliver locally-specific content at multiple sites, controlled by people at each location. Carrying out basic content changes is a quick and easy, browser-based operation.
Local control is important in a wide range of application areas:
- In an office, a secretary or office administrator can display welcome messages for visitors, or display staff information
- On a university campus with multiple displays, different information may need to be delivered to different faculties about upcoming events, room allocations etc.
- In the retail sector, store information and special offer details will vary from branch to branch
- In health care, patient information and other details will vary in different hospitals or GP practices in the same health authority area
As content designer, you control how much access is allowed at each site, and you can still maintain control of key parts of the display to ensure a consistent design appearance and maintain a uniform identity for your organization.
The Ad hoc Environment
- The Ad hoc user, usually at the display location, has limited access and can update or change specified content items
- Ad hoc entry is where Ad hoc users log in via a web browser, access pages that are available to them, and make their changes
- Ad hoc media folders contain all the media files that the Ad hoc user can use when updating or changing content
What is Ad hoc Content?
As content designer you can delegate local responsibility for several different types of content:
- Text
- Tables
Newsfeeds - TV channels, Radio Stations and Streaming TV
- Folders
Ad hoc users can be allowed to update ordinary content that has been marked as customizable in a specific Playlist, or items that are created separately and added to Layouts like other content items. See Ad hoc Folder Play ^99
As well as giving access to this basic content, you can also allow Ad hoc users to:
- Change complete Layouts
- Change time Schedules for Displays
■ Perform Schedule overrides - Synchronize content
Delegating Centralized Control
Where standard Ad hoc allows you to delegate control of a display by local staff members on site, you can also delegate control of a Digital Signage Network using a Channel. In this case certain items can be designated as Ad hoc from Center. This means that the Ad hoc user updates the permitted item on the publisher, and the changes are in turn published from each subscribing iCOMPEL when subscribers poll the publisher for the latest updates.
- The system has built-in security, and no user can make Ad hoc changes unless the customizable item exists on an Ad hoc page and the user has permission to access that page.
See Ad hoc from center 91
5.1 Enhanced Ad hoc Access Control
Generating Ad hoc content is quick and easy. As a content designer, you can make specific content available for editing by Ad hoc users, as it is created, in most cases simply by clicking a button.
Alternatively, you can work with an existing design and allocate content for Ad hoc access as required.
Whichever route you choose, the overall time taken for generating display content is minimized, displays can be up and running quickly, and Ad hoc users can be working with the system productively with minimum delay.
Typical Ad hoc content includes:
- Text items
- Tables
Newsfeeds
TV channels - Folders
Automatic and Manual Ad hoc Modes
Automatic Ad hoc
Automatic Ad hoc makes creating content easier, as it eliminates many of the configuration and setup tasks. The Layout automatically creates a single Ad hoc Page, which contains all Playlist Items in the Layout which are marked as Ad hoc. As Ad hoc items are added to or removed from the Playlist in the Layout, they are automatically added or removed from the Layout Ad hoc Page.
You have full control over Ad hoc Page properties, including which users are authorized to make changes. However, it is not possible to add or remove existing Ad hoc Items, or to reference items marked as Ad hoc in different Layouts. This makes automatic ad hoc unsuitable for cases where the same Ad hoc Item is to be used by multiple Layouts.
Automatic Ad hoc is the default setting for all newly-created Layouts. The setting is enabled from the Layout Properties tab page on the individual Layout page. Click on the name of the layout on the Home page, and open Layout Properties in the Layout page.
Manual Ad hoc
Manual Ad hoc gives you complete responsibility for creating and managing all Ad hoc Pages and Ad hoc Items within them. You need to add Ad hoc Items to one or more Layout Playlist and one or more Ad hoc Page, as required.
An Ad hoc Item must be created from the Ad hoc Item web page before it can be added to a Playlist. Similarly, the Ad hoc Page must be created from the Ad hoc Page web page - and one or more Ad hoc Items added to it - before it can be used by Ad hoc users.
In Manual Ad hoc mode, you can create Ad hoc Pages which contain Ad hoc Items which have been added to multiple Layout Playlists. This is useful, for example, if the same Ad hoc welcome message is to be shown on multiple Layouts.
Creating Ad hoc Content as You Build Your Design
- Create your Layout in the normal way.
-
From the Home page, click on Layouts and select Manage Layouts from the drop down menu.
-
Click the Add Layout tab, insert a layout name and click Add.
- Locate your new layout in the alphabetical list on the Layouts page, and click Edit.
- Create the Zones you require and click Save.
- Select Save all changes and edit Playlist from the drop down menu.
Text Items
- On the Zone Page relating to the Zone you are working with, click the Specials tab and enter the text you wish to be displayed.
- To make the content accessible to Ad hoc users - so they can enter their own text if required - click the box Content of this item can be customized using this Layout's Ad hoc Entry Page.
- Click Add.
You will also need to select whether the item has one of the following:
- A Local Customization Scope (which only affects the display from a single iCOMPEL)
- A remote (Ad hoc from Center ^91 ) Customization Scope (which affects all the iCOMPEL in a Channel)
Tables
- From the Menu bar, select Media, then Tables.
- Click the Add Table tab, and create a new table by giving it a name and specifying the number of columns and rows.
- Click Add.
- From the Menu bar, select Media, then Manage Ad hoc items, and click the Add Item tab. For the option Allow Ad hoc user to override values for Table, select the table name from the drop down list, and then click Add.
- The iCOMPEL displays a reminder warning that the Ad hoc table needs to be added to a Playlist and also added to an Ad hoc page.
- If you click on the link to your table, each cell is described as being Ad hoc, and is editable. Clicking on an Edit Cell button gives your override options.
More on tables... 42
Newsfeeds
- From the Home page, click on Playlists.
- Select the Layout and Zone you need to access, from the drop down menu.
- Click Edit in the appropriate Zone page, and then click Save Changes and Change Item Type. Here you are given four options, the first two of which are:
- Content of this item is controlled by the Layout Designer
- Content of this item can be customized using this Layout's Ad hoc Entry Page
- The first of these is the default, but by clicking the button against the second option, you give Ad hoc users the ability to choose different newsfeeds - e.g. finance, traffic and travel, 24-hour news etc.
TV Channel or Radio Station
- From the Menu bar, click on Playlists and select the Layout and Zone you need to access from the drop down menu.
- Click Edit in the appropriate Zone page.
-
Click Save Changes and Change Item Type. Here you are given four options, the first two of which are:
-
Content of this item is controlled by the Layout Designer
- Content of this item can be customized using this Layout's Ad hoc Entry Page
The first of these is the default, but by clicking the button against the second option, you give Ad hoc users the ability to control which streaming TV channel or radio station is shown on their display.
Ad hoc content can be created using either Automatic or Manual modes. Automatic is quick and easy, but gives you greater control and flexibility. See Automatic and Manual Ad hoc Modes above.
Converting an Existing Design to Ad hoc Content
The iCOMPEL gives users the flexibility to create Ad hoc content while Layouts are being created, or afterwards when the design has been completed. To create Ad hoc content in an existing design, the process is the same as in each case above.
As Automatic Ad hoc is the default setting, you will need to switch this feature off when working with an existing design. See Automatic and Manual Ad hoc Modes above.
Creating Ad hoc Pages
These are the web interface pages that are seen by Ad hoc users on their Home screen when they log on. Ad hoc users do not have access to any other pages in the iCOMPEL user interface, only to the Ad hoc pages that you create for them. These pages display the text fields that they are allowed to change, or the commands they are allowed to issue. To create Ad hoc pages:
- Click on Media in the Menu bar, select Design Pages from the drop down menu, and then go to Manage Ad hoc Pages.
- Click on the Add Page tab, and enter a name for the page. This should be sufficiently descriptive so your Ad hoc users can easily identify it.
- Click Add.
- Select the new page from the alphabetical list. Click Add, and the Add Item tab is preselected.
- Click in the box and select the item required from the drop down options.
- Repeat this procedure for all the items required for the page.
- Select the Properties tab and add any instructions for Ad hoc users in the User Guidance Message text field.
- Select which users will be allowed access.
- Click Save Changes.
Adding Ad hoc Items to a Playlist
- Click on Playlists and select the Layout and Zone where you want to add the file.
- Click on the Specials tab.
- Select an Ad hoc item from one of the drop down lists, ensuring that the box next to it is checked, which designates it Ad hoc.
- Click Add to insert the item and it will be displayed in the list of items in the new Playlist.
5.1.1 Remote Keypad Control
Remote Keypad Buttons
For convenience and ease of use, Ad hoc users can control their local iCOMPEL using an infra-red remote keypad. This enables them to change content at the touch of a button instead of having to access the iCOMPEL via their web browser.
The remote keypad has the following controls:
- Volume up and down. Adjusts the master volume level in 10% divisions.
- Station up and down. Controls the Ad hoc TV and radio stations being played. The user can scroll up and down the list of available stations
- Programmable buttons A, B, C and D. Each can be programmed for a specific Rendezvous Point or Layout
When any buttons are used, a message appears in the top right of the screen to indicate status.
Configuring Programmable Buttons
Buttons on the remote keypad are each programmed according to which Layout they are to control. From the Menu bar go to Layouts and select which Layout you wish to be controlled by the remote keypad.
Clicking the Interaction tab opens a page which includes panels for each of the four programmable buttons on the keypad. Each panel has three radio buttons:
- No default Button Action - the default setting when buttons are not programmed
- When button is pressed Advance to Rendezvous Point - when checked, this allows you to assign a Rendezvous Point for Ad hoc users to select. In this panel there is also a box where you can choose which Zones the Ad hoc user can control
- When button is pressed change to Layout - this allows you to assign a Layout for this button, so Ad hoc users can then switch to this whenever they wish
To Make TV or Radio Stations available to Ad hoc Users
- From the Menu bar, select Media, then Manage Ad hoc items.
- Click the Add Item tab. For the option Add Ad hoc Item of Type, select TV or Radio from the drop-down, and then click Add.
- In the Ad hoc Item property Allowed Choices, select either:
- All Available TV or Radio Stations, to allow Ad hoc users to select from any configured TV or radio station on the iCOMPEL.
- Only Selected TV or Radio Stations, which gives Ad hoc users their own list to choose from.
- In the Ad hoc Item property Default TV or Radio Station, select the default from the drop-down list.
Status
The Remote Keypad Tab contains a status message indicating if the infra-red receiver is connected or not. The receiver must be connected for the Remote Keypad Buttons to function.
5.2 Additional Ad hoc
Additional Ad hoc features allow for greater customization of Layout content. This is particularly useful in a Channel, where a network of iCOMPEL all play the same content.
Using Additional Ad hoc, multiple iCOMPEL in a Channel can each show different content, controlled by Ad hoc users locally. This allows an organization to maintain a consistent appearance or brand image across a number of sites, while allowing local users to upload their own content and change the Layouts and Playlists to which they have been given access.
The content types that can be used with Additional Ad hoc include:
- Folder Play
- Layout
Schedule - Schedule Override
■ Advance to
Folder Play allows you to add a Folder to a Playlist and give Ad hoc users permission to up load their own content into the Folder. For example, different GP practices with iCOMPEL in the same Channel could carry different local information about late night dispensing chemists. See Folder Play .54
Ad hoc Layouts allow the Ad hoc user to select a Layout for a specific time slot in the Schedule. Typically, if an organization published a Channel with a Layout for each department, an Ad hoc user in each department could select the right Layout for that location.
An Ad hoc Schedule allows the Ad hoc user to set the time when a Layout should appear on the display. So if a lunch hour Layout has been scheduled, but times vary at different locations, local Ad hoc users can set their times accordingly.
An Ad hoc Schedule Override allows the Ad hoc user to display one of a selection of pre-defined Layouts and not have this interrupted by any other Layout changes in the Schedule. This can be used to show a special TV event or display an emergency message without interruption.
Ad hoc Advance To
This gives an Ad hoc user on-demand control in several areas, including content selection. For example, this might be useful in a foyer where a iCOMPEL is showing a corporate video in a continuous loop. Ad hoc Advance To allows a local user to switch to live TV if required. To set up an Ad hoc Advance To command:
- From the Menu bar, click on Help, select UI Options, and set the User Interface Policy to Detailed or Expert.
- Click on Playlists and select the Layout and Zone where you want to add the Advance To command.
- Select the Specials tab, add a new rendezvous point to the Playlist and give it a name.
- Add one or more default media items to the Playlist.
- Under the Specials tab, select the Advance To item that has the same name as the rendezvous point you created in the previous step and add it to the Playlist. This forces the Playlist to loop back to the start again, regardless of what may follow.
- Add another rendezvous point to the Playlist.
-
Add the required on-demand media item/s to the Playlist.
-
Add the Advance To item that has the same name as the second rendezvous point to the Playlist. This forces the second part of the Playlist to loop continuously. If you want to revert back to the default media item, omit this step.
- On the Ad hoc Items page, create an Ad hoc Advance To item and select the names of the two rendezvous points you have created.
- Add these items to an Ad hoc Page.
- Log in as an Ad hoc user, browse to the page you have created, select the Advance To that you wish to test and click Save. If the Playlist is playing at the time, then play will jump to the start of the Playlist under the selected rendezvous point.
For more details on the Advance To command see Synchronizing Playlist displays between Zones 71.
Ad hoc Schedule Overrides
The iCOMPEL gives you the flexibility to allow Ad hoc users to override the current display schedule at any time. Typical applications could include:
- Displaying special staff instructions in the event of an emergency
- Showing a special event from a TV broadcast feed
■ Displaying information for staff members
Content designers create the override by selecting the layout they wish to implement. This can then be activated directly, or made available for Ad hoc users to select.
Schedule overrides temporarily replace the current Schedule until the original Schedule is reactivated.
Creating an Override
- From the Menu bar, select Schedules, then Manage Schedules.
- Click the Add Override tab.
- Type in a descriptive name for the override, e.g. Emergency instructions or Special TV event. Select the Layout for the Override.
- Click Add Override.
Making Overrides Available to Ad hoc Users
- From the Menu bar, select Media, then Manage Ad hoc items.
- Click the Add Item tab.
- For the option Add Ad hoc Item of type, select Schedule Override from the drop down menu. Type in a name and then click Add.
- In the Allowed Choices panel, select one of the following:
- All Available Schedule Overrides, which allows Ad hoc users to select from any configured Schedule Override on the iCOMPEL
- Only Selected Schedule Overrides, which allows you to access selected Schedule Overrides for Ad hoc users to choose from
5.3 Ad hoc from Center
This allows Ad hoc changes on a publisher ^114 iCOMPEL, to be published to subscribing iCOMPEL when these subscribers poll the publisher for updates.
Because it uses Ad hoc to update content, this differs from changing a media item on the publisher and letting the normal subscribe process update content for subscribers. Users do not need to edit a Layout, and only the Ad hoc entry page is visible on the publisher iCOMPEL.
Subscriber iCOMPEL may not check for updates to the main Channel often enough if there are frequent content changes. However, the iCOMPEL can be set to check for Update From Center Ad hoc items more frequently if required. Subscriber checks and Update From Center checks run independently.
Update from Center can be used for Ad hoc Text and Schedule Override items.
Ad hoc Schedule Override
When a user selects an Ad hoc from Center Schedule Override on the publisher, the selected override runs on both the publisher and subscribers.
To restore the original Schedule on the iCOMPEL, either select Normal Schedule from the Ad hoc page.
Using Update From Center
When you create an Ad hoc item 85 to be used with Ad hoc from Center, you can set the item's scope as follows:
| Local | (Default) Ad hoc text items behave as normal. Ad hoc users can log in and change the contents for each iCOMPEL. |
| Remote | This Ad hoc item will only be visible to Ad hoc users on the Publishing iCOMPEL. Changing the Ad hoc item here causes the Ad hoc item to be updated on all Subscribers as well as the Publisher. |
Update From Center Polling Interval
On a Subscriber iCOMPEL, the Channel Management page shows the Update From Center Poll Interval option. This determines how often the subscriber iCOMPEL will poll the publisher for changes in update from center actions.
If Update From Center changes are made on the publisher, subscribing iCOMPEL are updated within this time period.
5.4 Making Ad hoc Changes
To make an Ad hoc change:
- Log into the iCOMPEL as an Ad hoc user.
- Click the Ad hoc page you want to edit.
- Make the changes to the item(s) shown on the page.
- If the item is currently playing, click Show Now and Save Changes. The change takes effect immediately.
- If the item is not playing, click Save changes. The prompt warns that changes will not update media currently showing on the screen. Changes take effect when it next appears.
5.5 Managing Ad hoc Items
The Ad hoc Items page allows you to create, delete and set properties for Ad hoc items. In the Menu bar, go to Media, and then select Manage Ad hoc Items.
To create a new Ad hoc item, select the Add Item tab. Select the item type from the box, and give the item a unique name. See Enhanced Ad hoc Access Control .85
To delete an Ad hoc item, click the Delete button. When the delete symbol is not shown, the item is in use and cannot be deleted. To check which items are in use, click the Edit button Edit... and view the Used By Layouts and Used by Ad hoc Pages information.
Setting Properties for Ad hoc Items
When you create a new Ad hoc item, you can also set a range of properties, depending on the item. Item types available are:
■ Advance To
- Layout
Newsfeed
Schedule
■ Schedule Override
- Text
TV
In most cases you are presented with a list of allowed choices. There are two exceptions:
Schedule Override and Text have the additional option of Customization Scope, which governs where Ad hoc content is customized and displayed.
Text also has a range of Ad hoc Input options, which allows you to control what text a user can enter in the Default Text and Ad hoc User page. Options are:
- Rich text - no validation is performed
- Plain text - an Ad hoc user will not be able to customize the color or styling of the rendered text
- Integer between - boxes are provided for you enter the lower and upper integer limits (both inclusive) for Ad hoc content. This option is only shown if the User Interface Policy is set to Detailed
- Plain text of maximum length - this limits the maximum length of plain text. This option is only shown if the User Interface Policy is set to Detailed
- Plain text matching - this option is only shown if the User Interface Policy is set to Detailed
- Regular Expression - The Ad hoc content must match the regular expression that is provided
- Feedback Message - This is the message that an Ad hoc user will see if the text does not match the regular expression provided
There are many websites and books that provide information about using Regular Expressions.
For example: http://www.regular-expressions.info/javascript.html
Default Text
Default text is used until a user makes any changes using a suitable Ad hoc Data Entry page. The default text must be compatible with the selected Ad hoc input mode.
Customization Scope
Ad hoc items that support Ad hoc From Center display this option. There are two levels of functionality:
- Local - this denotes that Ad hoc user changes only affect this iCOMPEL.
- Remote - changes made to this Ad hoc item on the Publisher iCOMPEL are also applied to each Subscriber iCOMPEL.
Customization Status
This indicates if an Ad hoc item is currently displaying the default value, or has been overridden by an Ad hoc user.
Used-by properties
This lists all the Layouts and Ad hoc pages where an Ad hoc item is being used.
5.6 Creating Ad hoc User Accounts
If you want Ad hoc users to update Ad hoc content on a Subscriber iCOMPEL in a Channel, you must create an Ad hoc user account for them first. If users are responsible for Ad hoc from Center content, you must also create a user account for them on the Publisher iCOMPEL.
Creating an Ad hoc User Account
- From the Menu bar, select Setup, go to System, and select Users.
- Click on the Add User tab.
- Enter a username and a password. Then click Add User.
- On the Users page, check that the new user has permission for Ad hoc access.
- Click Edit against the new user account and select the correct permissions for the user. As well as Ad hoc, permission options here include Activate Channel and Publish Channel. If the user requires access to an Ad hoc Media Folder, click on the Media Folder box and select the folder name from the drop down list.
- When you finish making your changes, click Save Changes.
5.7 Ad hoc Pages
These are dedicated web interface pages that are available to Ad hoc users when they log on using their web browsers. Ad hoc users do not have access to any other pages in the iCOMPEL user interface, only the Ad hoc pages you create for them. These pages display the text fields that they are allowed to change, or the commands they are allowed to issue. Some Ad hoc users may have access to an Ad hoc media folder, which contains all the items that they can choose from when updating or changing content.
Layout Ad hoc Pages are enabled for all newly-created Layouts by default. This means that when customizable or Ad hoc items are added to a Layout, an Ad hoc page for that Layout will be generated containing all the customizable and Ad hoc items within it. More on Layout Ad hoc Pages .26
You can also create Ad hoc pages that are not directly associated with a specific Layout:
- From the Home page, select Help, and click on UI Options from the drop down menu.
- Click the Detailed or Expert buttons.
- Click on Media and select Design Pages and Manage Ad Hoc Pages.
- Click the Add Page tab, give the page a unique name and click Add.
5.7.1 Managing Ad hoc Pages
To view or modify an Ad hoc Page, click on Media on the Menu bar and go to Manage Ad hoc Items in the drop down
menu. Then click the Edit button . Edit...
To delete an Ad hoc Page, follow the same procedure and click the Delete button
To add a new Ad hoc Page, select Media on the home page, then go to Design Pages on the drop down menu, and select Manage Ad Hoc Pages. Click the Add Page tab, give the new page a unique name, and then click Add.
- Layout Ad hoc Pages cannot be deleted, only disabled via the Layout Properties tab
5.7.2 Editing Ad hoc Pages
This page is used to manage the properties and Ad hoc Items on a selected Ad hoc Page. These settings control which Users can view and change Ad hoc Items, and how the page is presented to the User.
From the Menu bar, click on Media, and select Design Pages from the drop down menu. Go to Manage Ad hoc Pages and click the Edit box against the page you wish to edit.
The Ad hoc page lists all the items that have been added to the page, and an Ad hoc user can make changes to these. Click the Ad hoc Entry Page link to navigate to the Data Entry page.
To remove an Ad hoc item from a page click the Delete button

Note: this is not available on layouts that automatically manage ad hoc pages.
Where multiple items are listed, you can use these buttons to adjust the order of items on the Data Entry Page:

moves the item to the top

moves the item up one place

moves the item down one place

moves the item to the bottom
To add an Ad hoc Item to this Page, select the Add Item tab.
- This is not available on layouts that automatically manage ad hoc pages.
- Only one Ad hoc Schedule Override Item can be added to an Ad hoc Page
Label is the text that is shown next to this Ad hoc Item on the Data Entry page.
Properties Tab
Page Name is used to uniquely identify the Ad hoc Page to the user, and is shown in the title section when showing the Data Entry page. Page names should be kept short where possible, and every page must have a unique name.
User Guidance Message is shown on the Data Entry page, and is typically used to help the user when entering values. This item is optional.
Users allowed to Enter Data lists the users who have permission to view and make changes to the Data Entry page.
- Users with Layout Manager Access permission are able to view and modify all Ad hoc Data Entry pages
5.8 Ad hoc Folder Play
As content designer, you can add a Folder to a Playlist and then give Ad hoc users permission to upload their own content into that folder.
This capacity for local changes is valuable in many different application areas. A good example is the education sector where an education authority may publish a layout that contains a Zone dedicated to showing student artwork, then each school that has an iCOMPEL subscribed to that channel can then upload its own images into the Ad hoc folder, so the content is unique at each site.
Channels are not required for ad hoc folder play however, and the same principles applies to a standard alone iCOMPEL.
Ad hoc folders must contain at least one default item that is shown until content is uploaded. If the channel is republished, any content that has been uploaded locally remains in place unless the folder has been removed from the Playlist.
Adding an Ad hoc Folder to a Playlist
- In the Menu bar under Playlists, select the Layout and Zone where you want to add the folder. Select the Files and Folders tab.
- Click the Add button alongside the Folder you want to add to the Playlist. A message will confirm that this has been done.
- Select the Playlist tab, and If necessary, adjust the order of the items.
- Click the relevant Edit button again, check the Management box, and click Save Changes. The iCOMPEL creates a default_files sub-folder in the folder you added to the Playlist. Any content that is put into the folder is shown on the display. If it is empty, content in the sub-folder is shown.
5.9 Ad hoc Media Folder
Designated specifically for Ad hoc users, these are the only media folders Ad hoc users can access.
To allow Ad hoc media to be used, you must add it to the Playlist for a Zone, and then enable it for the Ad hoc user. If suitable material is available in the folder, the iCOMPEL plays it in preference to any other. If no suitable media is available, the iCOMPEL plays the content of the default folder for that playlist instead.
A folder must be configured for the given user to uploaded content to. If you see the message No Media Folder has been configured for this user, you must set a Media Folder for this user in the Users page ^139 .
You can use the Files and Folders page to browse the file system, and several options are available.
Folder Operations
File operations
5.10 Changing Ad hoc Content
Ad hoc users can only make changes to specified items of Ad hoc content that they have been given permission to change. These are presented on Ad hoc pages. To change Ad hoc content:
- In the Menu bar click Home and select Ad hoc Entry from the drop down menu.
- Select the Ad hoc page for the content you want to change.
- Make the necessary changes.
- Click the Show Now and Save Changes button, and then click Activate Schedule and Layouts.
- If the Ad hoc Item is currently showing on the display your change is visible immediately. If the item is not showing, changes will be visible the next time your item is shown.
Several change options are available:
| Text and Tables | Change the text that is scrolling across the screen, or change text in a table |
| TV Stations | Change the TV station that may be showing on the screen. |
| News Feeds | Change the source for a news ticker that may be showing on the screen: e.g. from political to sports news. |
| Media Folders | Manage media items (typically still images held in a folder) that are being displayed: e.g. show a collection of artwork or photos. |
| Screen Layouts | Change the entire screen display. Pick the one you want to show from a list of layout options. |
| Event Scheduling | Change the time at which certain changes are made to the display: e.g. Alter the time when meal menus are shown. |
| Advance To (On Demand) | Activate events on demand: e.g. show videos on demand by selecting them from a list. |
Making changes
Text and Tables
- In the Menu bar, click on Media, go to Design Pages, and select Manage Ad hoc Pages.
- Click on the Edit box next to the relevant page name.
- Click on the text or table item name, and make your changes. Be careful to follow any instructions that may appear on the left of the text box.
- Click Save.
- To remove text from the screen, delete all the text in the text box and click Save. If the text is scrolling vertically on the screen, pressing the Enter key in the text box will create line breaks.
TV Station
- In the Menu bar, click on Media, go to Design Pages, and select Manage Ad hoc Pages.
- Click on the Edit box next to the relevant page name.
- Select a TV Channel from the drop down list of options, and click Save. The iCOMPEL may not be showing TV at the time of the change, but when the time comes, it will show the new channel.
Newsfeed
-
In the Menu bar, click on Media, go to Design Pages, and select Manage Ad hoc Pages.
-
Click on the Edit box next to the relevant page name.
-
Locate the feed that you wish to change by name (there may be more than one).
-
Open the drop down Newsfeed selection list, select one and click Save. If the newsfeed that you want is not on the list, forward a request to the Administrator. There are many newsfeeds available covering a wide variety of topics.
Media Folders
From the Menu bar, select Ad hoc Entry and go to Media Folder. The contents of a folder are shown on this page. The files, typically images, will have been programmed to be displayed sequentially.
To view a file, click its name.
Note: If the file is a video, it may not play on your PC if you do not have the appropriate software. By uploading, deleting and renaming the files, you can customize what is shown on the screen.
- To upload a file from your PC: Select the file and click Open, then click the Upload button. When the upload is complete, the file will appear in the listing and be shown on the screen in due course.
- To remove a file from the iCOMPEL: Press the Delete button alongside the file name in the listing. If you delete all files in the folder, then default media may reappear on the screen.
- To rename a file on the iCOMPEL: Click the Cut (scissor) button alongside the file name, enter a new file name, then click the Move File button.
The files in the folder are programmed to play in either a sequential or random order. If sequential, then it is in alphabetical order of file name - numbers first (0-9) followed by upper case letters (A-Z) and finally lower case letters (a-z). You can customize the order of play by renaming the files which is best done prior to uploading to the iCOMPEL.
Screen Layouts
From the Menu bar, select Ad hoc Entry then on the appropriate page name. Select a Layout from the drop down list of options, and click Save.
Note: This assumes that an ad hoc layout item has previously been created and added to that user ad hoc page.
Event Scheduling
-
From the Menu bar, select Ad hoc Entry and then on the appropriate page name.
-
Locate the event that you wish to reschedule by name.
-
Input the required time period using the drop down hours, minutes and seconds lists, and select a new start and/or end time for an event.
-
Tick the days of the week on which this event takes place.
-
Click Save.
If the current time falls within the new time span, the event will trigger immediately unless another event began more recently than the new start time for this event.
If an event exists to switch the audio on or off and you need the iCOMPEL to be silent for a particular occasion then just re-program the audio off event to start at the current time. Remember to reset the audio off event back to its original time once the occasion has passed. Similarly, you could switch the display back on for an after-hours occasion.
After any of the above changes are made, simply close the browser to log out.
Advance To (On Demand)
With the right permissions in place, Ad hoc Users can be allowed to change display content on demand. This is achieved using Rendezvous Points and Advance To commands.
- From the Menu bar, go to Media and select Manage Ad hoc Items.
- From this list, look at the Types column, find the Advance To item you require, and click the Edit box beside it.
- In the box under the item name, check the boxes for the Allowed Choices you require.
- Under this is a warning that the item must be added to at least one Ad hoc page. Click on this Page link, and in the Ad hoc pages list, click the Edit box against your target page.
- Click the Add Item tab, and select the relevant Advance To item from the drop down list.
- Click Add.
The Advance To item you have created will now appear in the relevant page when accessed via the Ad hoc entry Homepage, with the allowed choices of Rendezvous Points in a drop down box beside it.
5.11 Ad hoc Theming
Ad hoc theming is a way to change how the iCOMPEL user interface appears to an Ad hoc user. It allows you to customize the page header and the text or ticker that appears on the page.
This could be used to include a company logo in a page to make it consistent with a brand identity. Or it could be used to provide a translation of pages in a language not already supported on the iCOMPEL.
Currently the theme applies only to Ad hoc users on the iCOMPEL or those on a iCOMPEL subscribing via a channel. Themes are not currently stored in layout packages.
To access the Ad hoc theme page, click on Media and select Manage Ad hoc Theme. Two tab options are available:
■ Properties
- Strings
Properties allows you to set the basic options for the theme:
Ad hoc Theme Disabled/Enabled Turns the customized interface on and off for Ad hoc users
Header text color and Header background color specify the color of the text and its background in the page header.
Page Logo lets you choose a logo to use in the page. A list of files is presented, and any suitable image files appear with a button next to them so you can select which image you require. The Alignment button lets you choose which side of the page the logo appears. The page title will appear opposite it.
Strings
This tab allows you to provide either translations or alternative text for all the headers, boxes, instructions and warnings that appear in three Ad hoc areas:
- Homepage
- Ad hoc Edit Pages
■ Media Folder
In each of these three areas, the default text is shown next to a box where the replacement text can be entered. For example, the Homepage section has the three headers Home, Ad hoc Pages and Media Folder.
To translate or make changes to text, type in the new wording in the box, and click Save Changes.
Part
VI
Sharing content using Layout Packages
6. Sharing content using Layout Packages
A Layout Package is a single file which contains all the media and control files required to fully install one or more Layouts on another iCOMPEL.
Layout Packages can be stored on DVDs, memory sticks or file servers and can also be sent by e-mail. This allows easy distribution of content.
Transferring Layouts from one iCOMPEL to another is a three-step process:
- Create the Layout Package 107 and include selected Layout(s) on the first iCOMPEL.
- Copy the Layout Package from the first iCOMPEL to the second.
- Install the Layout(s) from the Layout Package 108 file on to the second iCOMPEL.
6.1 Layout packages
This page allows you to create, delete and install Layout Packages on an iCOMPEL. The Layout Packages tab lists all Layout Packages available to the iCOMPEL. The following actions are available for each Layout Package:
- The Delete button removes the Layout Package from the machine. This only removes the Layout Package file - it does not remove any media or any Layouts contained in the Layout Package that you have already installed
- Press the Information button to view Layout Package content 109
- The Install button copies the Layouts and media contained in the Package to the iCOMPEL. If any items in the Layout Package already exist on this iCOMPEL but have different values, a prompt asks you how to handle these conflicting items [108]
To create a new Layout Package use the Create tab 107
The Status tab displays prompts and progress information about the current Install or Create Layout Package operation. This tab page is only shown if a Layout Package operation is underway, or has been previously completed.
Layout package properties
- Name - used as a unique identifier of the new Layout Package. The name must be specified and can only contain the characters [a-z or A-Z], numbers [0-9] or a space.
- Description - an optional description which is included in the Layout Package.
- Include Layouts - select the Layouts to be included in the Layout Package. At least one Layout must be selected.
6.1.1 Creating a Layout package
To create a Layout package:
- Finalize the Layout or Layouts that you wish to include in the Layout Package.
- From the Menu bar, select Layouts, then Layout Packages.
- Click the Create tab. Enter a suitable name and optionally a description for the new Layout Package. Check at least one Layout to include in this Layout Package.
Note that Layouts referenced by Change Layout commands from Layouts that are checked will also be included. - Click Create Layout package. The Status tab will then be shown.
- Wait for the Layout Package creation process to complete. You can click the link to the Layout Package file name to download it to your computer.
- Send copies of the Layout Package ZIP file to those who need them.
Note: There is a 2GB size limit to Layout Packages ZIP files. Because a 40 minute MPEG-2 encoded video film can be 2GB in size, you may need to exclude large video media files before creating your Layout Packages.
6.1.2 Copying a Layout package
Copying a Layout Package to the iCOMPEL
- From the Menu bar, click on Layouts, and then select the Layout Packages tab.
- Click the Browse... button, and select the Layout Package file from your desktop computer.
- Click the Upload button to copy the file to the iCOMPEL. A progress bar will be shown while the copy is taking place.
- Once complete, the Layout Package will be shown in the list.
i Layout Packages will always have the file extension .ZIP. Files that do not have this file extension will not be shown in the Layout Package page.
Copying a Layout Package from the iCOMPEL
To copy a Layout Package from the iCOMPEL to your desktop computer, click on the link in the Filename column.
Using FTP to copy a Layout Package
Layout Package files can also be copied to and from a iCOMPEL by using an FTP client (for example Internet Explorer) on a desktop computer. Browse to the /HOME/package folder on the iCOMPEL.
6.1.3 Installing a Layout package
To create a Layout package:
- Obtain the Layout Package ZIP file that contains the Layouts that you want to import.
- From the Menu bar, select Layouts, then Layout Packages and upload the ZIP file from your PC.
- Click the Install button to import the contents into the iCOMPEL.
- If there are existing items on the iCOMPEL that have the same name as an item in the Layout Package but are not identical, you will receive a prompt asking how to deal with any conflicts 108 .
6.1.4 Layout package conflicts
When you install a Layout Package, the iCOMPEL merges items in the package (including Layouts, Special Items, Ad hoc Items, Ad hoc Pages and media files) with existing items. Conflicts occur when an item in the package is identical to an existing item, but has different property values.
You can handle conflicts in one of three ways:
- Do Not Copy. Where items are in conflict, then keep the existing iCOMPEL items unchanged. This is equivalent to not copying any conflicting items or files from the Layout Package. All non-conflicting items are installed as expected.
- Copy and Replace. Replace conflicting local items with items from the Layout Package. This option will permanently overwrite local items.
- Copy but Keep Both Items. During the Install process, items in the Layout Package are renamed to avoid conflicts with local items. A message is shown in the Status tab indicating the new item names or filenames.
You may specify different conflict actions for media files and Layout and Special Items.
In some cases, selecting Copy and keep both items may cause additional items to be in conflict. For example, if an Ad hoc Text item is in conflict and is contained in a Layout that exists locally, but is identical, and you choose the Copy but keep both items option, the Ad hoc Text item is renamed. This causes the Layout in the Layout Package to be modified to reference the newly renamed Ad hoc Text item. This in turn causes a Layout conflict, since the local Layout and the modified Layout are now different. Additional secondary conflicts are shown on a separate line within the Conflict Details section.
Click the Install Layout Package button to proceed with the Install, or the Cancel Install button to stop the installation process.
6.1.5 Layout package information
This page lists the contents of a Layout Package.
This includes:
■ Details of the originating iCOMPEL
- A list of the Layouts included in the package
- A list of the Special Items included in the package
- A list of other Additional Settings, such as color items and special fonts
- A list of the media item files in the package.
This information may help you resolve any Layout package conflicts 108 where items in the package you are installing have the same names as items already on your iCOMPEL.
Part
VII
Channels and Signage Networks
7. Channels and Signage Networks
Channels provide an easy way to display the same content at multiple locations by setting up a Digital Signage Network of iCOMPEL players. A collection of iCOMPEL players that all play the same content on their Screens is known as a Channel.
Components of a Channel
A Channel has three parts:
• A Publisher 14COMPEL.
- The Channel Content Server[113] (CCS). This is the way the contents of the Channel are delivered to the subscribing iCOMPEL players.
• One or more Subscriber11@OMPEL players
The Publisher iCOMPEL publishes content to the CCS, and each Subscriber iCOMPEL polls the CCS for the most up-to-date content. On small networks, the Publisher iCOMPEL can act as the CCS. The contents of the Channel come from the Publisher and are distributed via the CCS to the Subscribers.
- Some iCOMPEL players are sold as 'Subscriber only', and cannot be used to publish content.
What's Sent in a Channel?
The contents of a Channel is a collection of Schedules with all their associated Layouts and Media. When you publish a Channel all the Schedules, Layouts and Media content are included. Items not currently transferred via a channel are:
- Any custom fonts you may have installed
- User records, including Ad hoc users
If your content relies on either of the above, you will need to ensure they're present on each of the subscribers.
Using a Channel
First you need to assign a channel role ^113 to each iCOMPEL that will be a member of the channel. One iCOMPEL will be the Publisher and the rest will be Subscribers. You will also need to decide the best way to get the content from the Publisher to the Subscribers. This is covered in the Channel Content Server ^113 section. Then you will need to create the signage content on the publisher. When producing content for a signage network you need to take into account:
- Are the Subscriber iCOMPEL players powerful enough to show the content? Some content such as high resolution movies, or Flash items that require a faster CPU, may not be shown on lower end models at the same quality as with high end models
- Check the resolution of the screens attached to each iCOMPEL. Ideally the displays should all be set to the same resolution. Otherwise, you will need to take into account that the content will be cropped when displayed at lower resolutions
Once you are happy with the content, and are ready to publish this across all boxes, simply press the Publish button that appears at the top of each screen on the publishing iCOMPEL. After a period, the Subscriber iCOMPEL players will discover that the channel contents has been updated, and start showing the new content.
- Changes made on a Publisher iCOMPEL will not be published to a channel until you publish them ^[117]
You may be interested in adding Ad hoc content ^[122] to your Channel - this will let you have content that differs on a per iCOMPEL basis. For example, if you have iCOMPEL players on different sites, you may wish to allow local users to add messages local to them. Or, if you have iCOMPEL players outside a room, you may wish to show the timetable for that room. Subscribers will need to have user logins with the appropriate Ad hoc permissions to be able to update content.
You may also wish to manage and publish more than one channel from your publisher. This is achieved using Multi-channel publishing ^[18]
Software Version Compatibility
It is recommended that the publishing iCOMPEL and each subscribing iCOMPEL should run the same software version. However, a subscribing iCOMPEL running Version 7 software can subscribe to Channels created on a Publishing iCOMPEL running Version 5.2.3.
- Each Subscribing iCOMPEL with a lower software version than the publisher iCOMPEL will fail to subscribe to the channel if the channel contains features that it does not support.
See the following topics for more details about managing Channels:
• Channel Roles 113
• Publishing 114
• Channel Content Server ^113
- Subscribing 119
• Multi-Channel publishing ^118
7.1 Channel Roles
In a Channel, we define roles that determine how the iCOMPEL behaves. There are three distinct roles:
| Role | Explanation |
| Stand-alone | The iCOMPEL is not part of a Channel, and its content is used for this iCOMPEL only. |
| Publisher114 | The iCOMPEL is part of a Channel, and its content is used by one or more other iCOMPEL players which are subscribers |
| Subscriber119113 | The iCOMPEL is part of a Channel, and downloads its content from a Channel Content Server |
Setting the Channel Role
- Select Channels from the menu bar, then Manage Channels.
- Select from one of the three possible roles, and click Change role to apply your changes.
- If the new role is Publisher[114] or Subscriber, then you'll need to tell the iCOMPEL how to publish or subscribe its content i.e. the Channel Content Server[113]
- Certain models are pre-configured as 'Subscriber-only', and cannot be configured as Channel Publishers.
- It is not possible to change the role of the iCOMPEL if it is a Channel Publisher, and there is more than one Channel defined. You must delete all but one Channel to proceed.
7.2 Channel Content Servers
A Channel Content Server (CCS) receives and stores Channel contents from a Publisher iCOMPEL. Each Subscriber iCOMPEL polls the CCS for the latest Channel contents.
Deciding what to use as a Channel Content Server
How you publish your Channel depends on the number of iCOMPEL players in the Channel and the network they are connected to.
| How published | Description | When would you use this? |
| On the publishing iCOMPEL | Channel files are stored on the publishing iCOMPEL itself and are available to subscribers via HTTP, HTTPS or FTP. | Typically when you only have a small number of subscribers (less than five), that will not slow the publisher down.This method requires no extra hardware. |
| Using a USB memory stick | Channel files are published on to a USB memory stick (not included). This stick is then taken to each Subscriber which automatically reads the Channel from it.This process has to be done each time the Channel is updated. | This would be useful when your iCOMPEL players are not connected to any network or you don't want the Channel to be published through the network. |
| Using an external server | The publishing iCOMPEL uploads the Channel content via FTP to a separate server which then makes the files available to the subscribers, either via FTP, HTTP or HTTPS. | An external server is recommended for Channels with a larger number of iCOMPEL players, or when there are larger media files in the Channel.This method takes the load from the publisher iCOMPEL; it does not require any special FTP or web server to function, and you tie this into your existing server hardware or web host. |
- HTTPS is recommended rather than HTTP when transferring channel content.
Network and Bandwidth Considerations
Network-based Channels will require both the Publisher and Subscriber to be able to connect to the CCS either via a local network or the internet.
A network-based Channel will not work if there is a problem with network connectivity, or if the supplied credentials for either the Publisher or Subscriber for an external server are incorrect.
How much bandwidth will be used will depend on the Layouts and media being used as well as the number of iCOMPEL players subscribing to the Channel. If there are large media files such as videos, then they will need to be transferred and this can increase the time it takes for the subscribing iCOMPEL to begin playing the Channel. However, once the media is downloaded, it will not need to be downloaded again and only new or updated items will be transferred.
Subscribers will also periodically check the publishing source for updates to the Channel. If your Channel does not update frequently, then you decrease the rate at which the subscribers check for new content. On the other hand if you do this, it will take longer for the subscribers to notice when the Channel has changed.
7.3 Publishing
Manual and Automatic Options
Content can be published either manually or automatically. In automatic mode, the currently active Channel is always published at the specified time of day. In manual mode, Channels are published from a Channel publishing page.
After you have published Channel contents to a file store or Channel Content Server (CCS) ^[113] you can configure another iCOMPEL to subscribe to the Channel. The Subscriber ^[119] iCOMPEL must be able to access the CCS over a network.
You create the Channel contents on the Publishing iCOMPEL, and you can create additional Channels that contain different Schedules. For more information see Multi-channel publishing ^[118]
To set up an iCOMPEL as a Publisher you must first change its role [13]You must then configure the channel settings for the Publisher to function correctly.
7.3.1 Configuring the Publisher
Once you have set the Channel role 113 and decided which Channel Content Server to use, you need to configure the publishing iCOMPEL.
When you have set the Channel role, you will be taken to the Manage Channel page. Alternatively, you can click on Channels in the Home Page Menu bar, then Manage Channels.
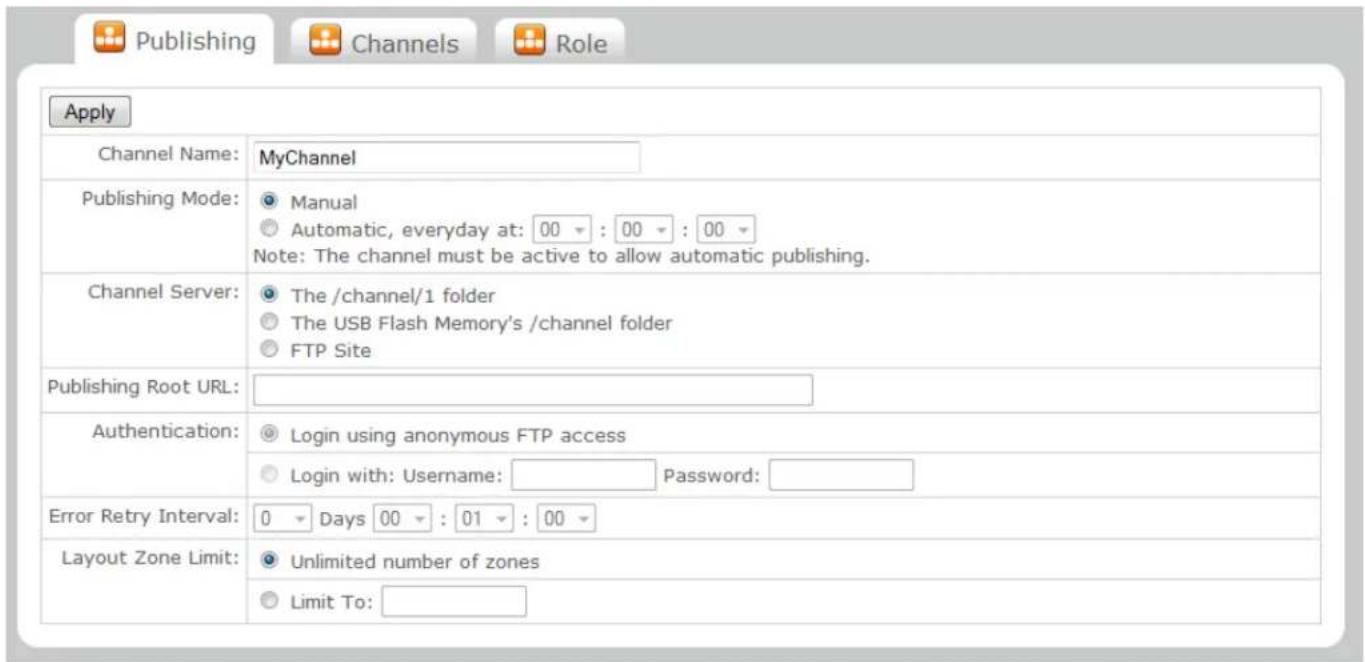
The Publisher Configuration Tab
You can then fill in the settings for this Publisher and press Apply to save them.
If you're using FTP to publish, then the iCOMPEL will attempt to log into the FTP server using the supplied server name and optional username and password to test. Screen messages will notify you if this is successfully achieved or not.
Explanation of the settings
| Name | Description | |
| Channel Name | This is the identifier for the Channel and will appear at the top of the page in the Subscriber and Publisher iCOMPEL when that Channel is active. You can type in anything here - a brief description of the channel content would be very useful for reference. | |
| Publishing Mode | Manual: the user will publish the Channel from a Channel publishing page orAutomatic: the Channel will be published at specified time every day (The Channel must be active to allow automatic publishing). | |
| Channel Server | This radio box lets you select how the channel is published. | |
| Option | Description | |
| The iCOMPEL /channel/N folder | The Channel is published to a folder within the publishing iCOMPEL. Subscribers can then access the content via FTP, HTTP or HTTPS. | |
| The USB Flash Memory's /channel folder | The Channel is published to the folder /channel on a USB storage device attached to the publishing iCOMPEL. | |
| FTP Site | Channel content is uploaded to an FTP site. You will need to enter any username and password that you have for this. | |
| Publishing Root URL | If you are publishing via FTP, then this text box will be enabled for you to enter the address and subdirectory for the server. A valid FTP URL begins with ftp:// followed by the host name or address followed by the full folder path in which to place the Channel contents. Examples of valid FTP URLs:ftp://example.com/mychannel/ftp://192.168.0.23/channel/ftp://somehost/a/b/c/The publishing iCOMPEL will attempt to create the relevant folders on the FTP server if they do not exist, but this will fail if the login name and password do not have the appropriate write access for this server. | |
| Authentication | If publishing via FTP, you need to select whether the destination server requires authentication or not. If it does, then you should select the Login with option and enter the username and password. | |
| Error Retry Interval | If you are publishing the Channel via FTP and the iCOMPEL fails to connect to the FTP server, then the iCOMPEL will wait for this period of time before trying to publish again. You can set the days, hours, minutes and seconds between attempts. | |
| Layout Zone Limit | Optionally, you can limit the number of Zones in any published layouts. If this is set then you will not be allowed to publish any layouts containing more Zones than this value.This setting would be useful if, for example, you were publishing to a number of less powerful subscribing iCOMPEL players and wanted to ensure you will not overload them. | |
Calculating required disk space
Most digital media content, with the exception of video files, does not require large amounts of storage. If your Layouts do not include any video files, then a disk space allowance of 1GB to 2GB should be sufficient.
If your Layouts include video files, you must increase this allowance by at least 2GB per hour of standard quality video. Higher quality video may require even more disk space.
You can see the size on the Status page of the Publisher iCOMPEL after publishing. A Subscriber iCOMPEL requires at least twice the disk space because it stores the Channel twice - once for subscribing purposes and again for displaying.
7.3.2 Publishing a Channel
Once the Channel role 113 is set to Publish; the iCOMPEL is configured accordingly, and the Schedule is satisfactory, you are ready to begin publishing. Click on Channels in the Menu bar, and go to Publish Channel. This will take you to the following page:
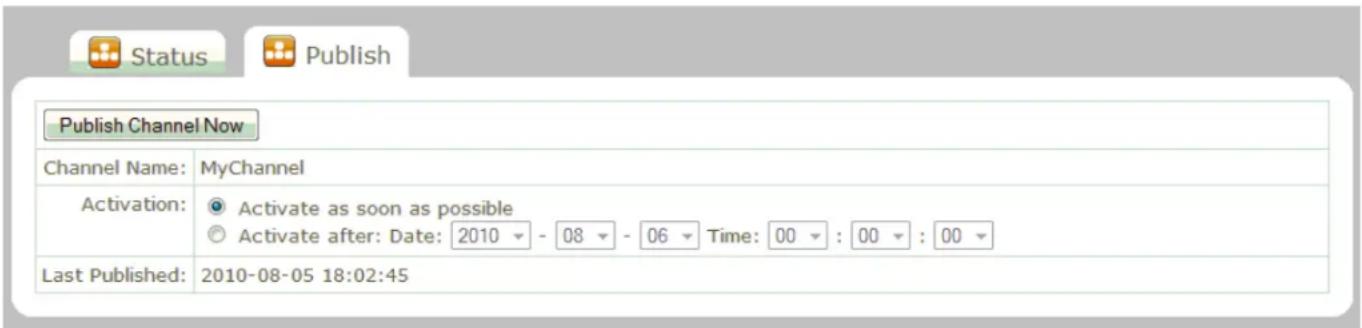
The publish tab
If you are publishing to a USB memory stick, then you will need to insert that into the iCOMPEL before you click the publish button. You can simply press Publish Channel Now to begin the publish process or you can set a time in the future to activate this channel.
Alternatively, you could use the Activate after option. This will immediately start the Channel publishing as per the Activate as soon as possible option, but the subscribers will not show the updated channel contents until the chosen date. Activate after is useful to ensure that all the subscribers start showing the Channel content at the same time rather than as soon as they can copy it across. A slow network with many large media files in the channel could lead to a large difference in when each subscriber completes downloading the Channel content.
The Publishing Process
What happens next depends on how the Publisher is configured:
To an iCOMPEL or External Server
If the Publisher is configured to publish the Channel to itself or an external FTP site, then the copying process will begin. A progress bar will be displayed showing how much of the upload is complete. The next time the subscribing iCOMPEL players check the Channel, they will download the Channel contents.
To a USB Storage Device
You will need an empty USB flash drive to publish to, and this will need to be large enough to store your Channel content. All Channel content will be stored on the drive, so if there are large movie files or images, this will need to be taken into account. Once the Channel is ready for publishing, insert the USB drive into any of the USB ports on the iCOMPEL and publish as above. The Channel will be copied to it and a status bar will display progress. When it is complete, you can remove the drive and download the data to subscribing iCOMPEL players.
Publishing Completed
However the content is distributed, this page will confirm that it was successfully published, or alert you that there were errors in the process.
Updating Content
If you change the Schedule on the Publisher and wish to re-publish it, simply repeat this process. The subscribing iCOMPEL players will be polling to look for updated content. If you are using a flash drive, content will be updated the next time you insert the memory stick into the subscriber iCOMPEL.
A banner is displayed when the Publisher contents have been changed but not published:
Schedule or Layout changes have been made since the channel was last Published.
Clicking the link in this banner will take you to the Channel Publishing page as above.
7.3.3 Multi-channel publishing
You can publish more than one Channel from a Publisher iCOMPEL. Although Schedules are unique to each Channel, Layouts and contents may be shared by more than one Channel.
Remember that the iCOMPEL always publishes the currently Active Channel only, the name of which is displayed at the top of each screen on the Publisher iCOMPEL and the Subscriber iCOMPEL. As suggested previously, it is therefore helpful to give the Channel a useful name.
Adding new Channels
- From the Menu bar, select Channels, then Manage Channels.
- Click the Add Channel button.
- After the iCOMPEL creates the new Channel, click the Activate button for it.
- Create all the content for the new Channel.
- Follow the usual steps to Publish the Channel 114
Deleting a Channel
Before you can delete a Channel, you must make sure it is not Active by activating a different Channel.
Select Channels, then Manage Channels and click the Activate button for a Channel you do not want to delete. You can then click the Delete button for the Channel you wish to remove. When you delete an inactive channel, only its schedule is deleted. All other media and content for that channel stays on the iCOMPEL.
Working with multiple channels
You must Activate a Channel before you can work with it or publish it. To change to a different Channel on the Publisher iCOMPEL select Channels, then Manage Channels and click the Activate button for the Channel you want to select.
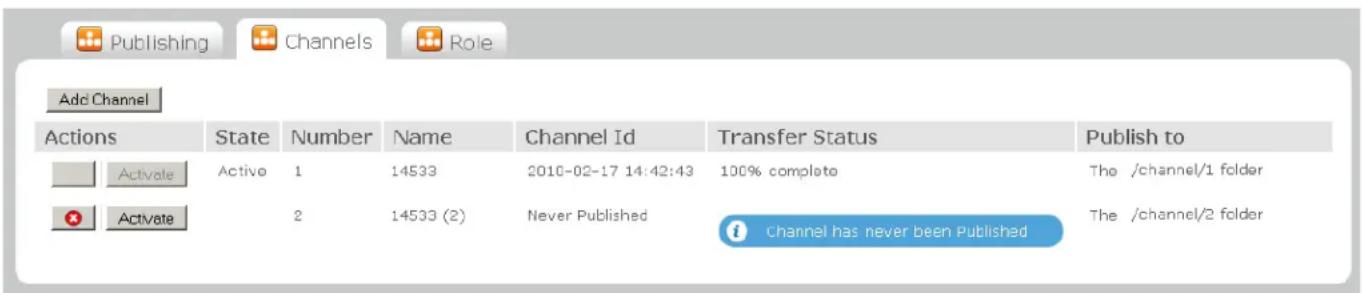
Multi channel selection screen
7.4 Subscribing
You can use an iCOMPEL as a Subscriber. This means that the iCOMPEL receives all its content (other than Ad hoc content 83) from a Channel Content Server (CCS) or from a USB device To use an iCOMPEL as a Subscriber, you must first change its role 113
- You can log in to a Subscriber iCOMPEL and make changes (other than Ad hoc changes) but these are removed the next time the Channel is re-published.
7.4.1 Configuring a Subscriber
Once an iCOMPEL is configured with the role of Subscriber, its subscription settings can be configured. The subscription configuration page is available by clicking on the menu item Channels then Manage Channels.
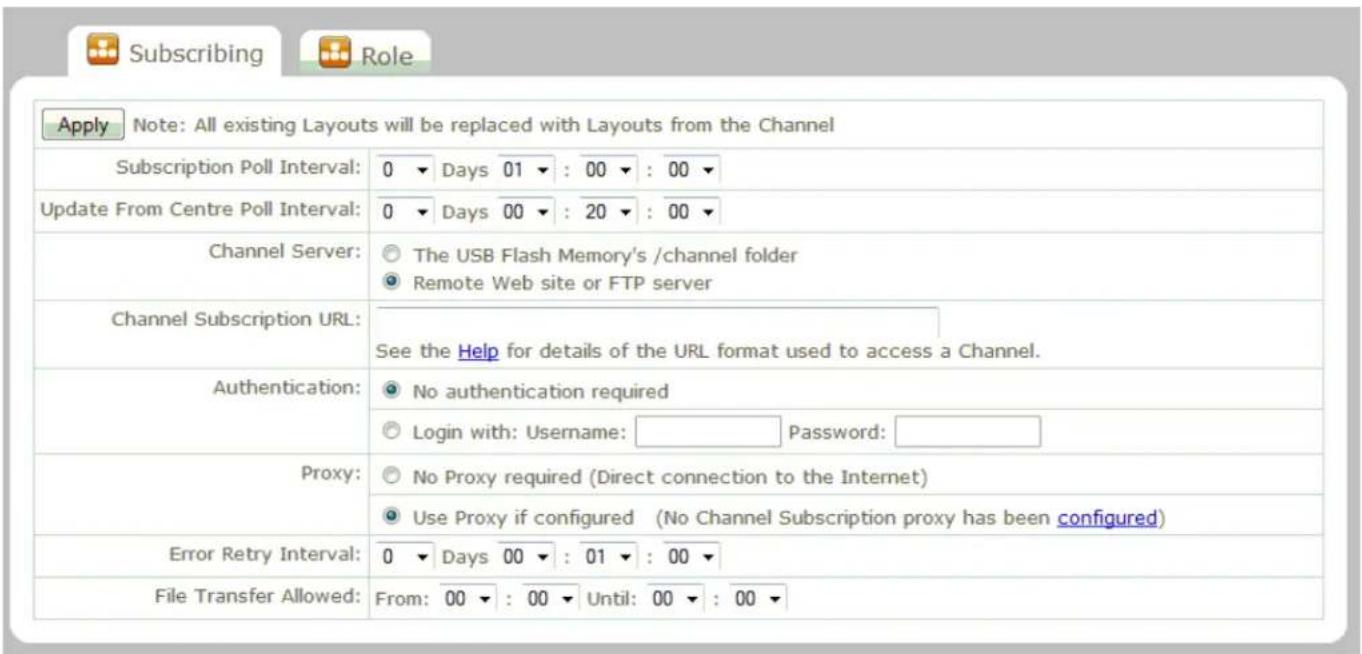
The channel subscriber configuration page
Once you fill in the details on this page and press Apply, the iCOMPEL will begin subscribing to the Channel and periodically check for updates.
Subscription Poll Interval
This determines how often the Subscriber iCOMPEL checks for new content on the Channel Content Server. This process is called polling.
- You will need to set this value so the iCOMPEL polls often enough to pick up Channel changes, but not so often that the network or Channel Content Server becomes overwhelmed with requests.
Update From Center Poll Interval
This sets the poll interval for checking on changes to any Ad hoc from center[91] items. As above, caution is needed when selecting the poll interval. However, these updates require less bandwidth and you could set this to poll more often.
Channel Server
This option is for determining the Channel Content Server 113 or where the channel is being published from. The following two options are available:
| The USB Memory stick's /channel folder | The channel is being published via a USB Memory Stick |
| Remote Web site or FTP server. | The channel is being published via an external server or an iCOMPEL |
Channel Subscription URL
If your channel content server is not a USB device, then this option needs to be filled in to tell the subscriber where to find the channel. What you put in here depends on where the content is being published:
| Where Published | Channel Subscription URL format |
| The Channel is published on an iCOMPEL running Version 9, 8, 7, or Version 6 software: | The required URL is of the form:http://data/channel/Whereis the host name or IP address of the iCOMPEL to subscribe to andis the channel number. You can find out the channel number for a given publisher by visiting itpublishing configuration page and looking at the option namedChannel Serveron the page.You can also specify the protocol for connecting to the iCOMPEL publisher. Allowed protocols are HTTP, HTTPS and FTP.FTP urls differ slightly and are of the form:ftp://channel/Example subscription URLs:https://192.168.1.54/data/channel/1http://iCOMPEL9038/data/channel/2ftp://iCOMPEL9038/channel/2ftp://192.168.1.54/channel/5 |
| If the Channel has been published on an FTP site | If you wish your channel to be retrieved via FTP, then you can use the same URL as used to publish the channel on the publishing iCOMPEL.Your Channel Content Server might also be configured to serve the uploaded channel files via HTTP or HTTPS. The particular URL you would use depends on the setup of the server and the folder it was serving up. |
Authentication
If required, enter the username and password for the Channel Server. If this is a Publisher iCOMPEL, you must provide a valid administrator name and password.
Proxy
If required, select a proxy server for accessing the Internet.
Error Retry Interval
Set the time interval for retrying a Channel update if an update is incomplete or interrupted.
File Transfer Allowed
You can set the times during which file transfer is allowed. For example, if Channel updates typically involve large files that may slow down your network, you may choose to allow file transfers at times when other network activity is low.
7.4.2 Updating Subscription
Once the Subscriber iCOMPEL is subscribed to a Channel, the Subscriber will continue to poll the Channel automatically at the required interval, without any further intervention.
You can also manually prompt the iCOMPEL to poll the Channel for updates. Go to Channels, Subscribe Channel and select Poll Channel Now.
Updating a Subscription via USB Flash Drive
The Channel contents must be published[11] to the memory stick you are using. You then plug this into the iCOMPEL for the Channel to be updated. The iCOMPEL will detect that the memory stick has been inserted and read the Channel contents. If the Channel has changed since it was last read by the iCOMPEL, the iCOMPEL player's contents will be updated.
While the Channel update is occurring, a message will appear on the top left corner of the display detailing the status of the subscription. When the subscription is complete, a message will inform you that the USB device can be removed:
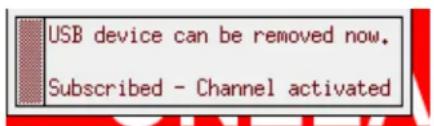
USB subscription complete message
7.5 Channel Ad hoc
Using Ad hoc content ^83 within a Channel enables you to allow users to show custom content on their local iCOMPEL while still showing your Channel.
Ad hoc content is created in the same way as normal as part of a Scheduled Layout. Local users can then log into their local subscribing iCOMPEL with an Ad hoc user account 95 and change this content.
Ad hoc from Center
Ad hoc From Center ^91 functionality is similar to regular Ad hoc, in that it allows a user to log in via a simplified user interface to change an element of the signage quickly and easily. However, instead of a user being able to log into a Subscriber iCOMPEL, the changes are made on the Publisher and broadcast within the Channel to the Subscribers.
When configuring the Subscribers [120] , the centrally-updated polling interval can be set to a higher rate than the regular Channel polling rate, so that Ad hoc from center updates arrive at the Subscribers more quickly.
Part

Player and System Status
8. Player and System Status
The Status menu gives you access to information about the player and the system.
Player status 124
System status124
Conditional Play Status 125
TV & Radio Status (126) TV hardware is present)
8.1 Player status
The Player Status page provides details about what the iCOMPEL is playing now, and what content has been played recently. These pages automatically refresh as new content is played.
The data on CPU usage is particularly useful as it can show which media item (or combination of items) is causing excessive load on the CPU. To determine which media is causing a spike in CPU usage, see the Zone CPU usage graphs to establish which Zones are using most memory. It may not be a single item of media that causes a high load, but a combination of different items being displayed at the same time.
An indicator on the Home page shows the average of the total CPU load over the last 60 seconds. Samples are taken every second, and represent an average over the preceding second. If there is an average of 90% or more CPU usage over the last 60 seconds, a warning message is shown on the Home page.
Playing now tab - displays a CPU usage graph for each Zone. These, along with the CPU Load graph can be used to determine which media, or combination of media, is causing a high overall CPU load.
Played recently tab - displays a list of recently displayed Layouts, and also recently-implemented Advance To commands.
Screen Snapshot tab - displays a snapshot of the main Screen display. This can be refreshed periodically as required, although very frequent refreshing is not recommended since it may result in a temporary loss of quality in the currently playing media.
CPU Load tab - shows a graph of processor load. This graph takes about ten seconds to complete. Values of 90% and above imply that the processor is heavily loaded and video may not be playing smoothly as a result. You may wish to change the media type, or change the order of items in Zones, to avoid CPU overload.
8.2 System status
The System Status page provides information about the iCOMPEL environment. The following information is available on tabbed pages:
- Temperature over the last 24 hours
- Temperature over the last 30 days
- Configuration status
- Hardware configuration
Disk Temperature for the last 24 hours
This graph shows how the disk temperature has changed over the last 24 hours. Red blocks indicate that it has become too hot. Should the disk temperature exceed 50^ C for more than 5 minutes, the iCOMPEL will shut itself down.
Disk Temperature for the last 30 Days
This graph shows how the disk temperature has changed over the last 30 days.
Status
| Feature | Description |
| iCOMPEL Uptime | How long this iCOMPEL has been running since last restart |
| Ethernet Receive | Inbound network traffic and number of errors |
| Ethernet Transmit | Outbound network traffic and number of errors |
| System Disk | User inaccessible space used and available |
Hardware
| Feature | Description |
| Model | The iCOMPEL model |
| CPU | Speed and type of the iCOMPEL processor. |
| Available Memory | The amount of memory installed. |
| TV Card | The model of TV card installed. |
| TV Card Features | TV card features available to the iCOMPEL |
8.3 Conditional Play status
The Conditional Play Status page gives a summary of all Playlist items or Schedules that have the Conditional Play property set.
The page displays details of the items that have been configured to play conditionally along with the result of Conditional Play condition, based on the current Player Local Information (PLI) values. If there are items that depend on Player Location Information but those PLI names are missing in a given player, an action message is displayed along with a link to add the missing name.
The rest of the page is split into two tabs, one each for Conditional Playlist items and Conditional Schedules.
Each tab page gives the details of the PLI name on which the item depends, the operation that should be executed to decide if the item plays, the values that the item contains and the current values in PLI.
All the required items are hyperlinked, so you can jump directly to the page you need to access.
8.4 TV & Radio Status
For iCOMPEL that have TV hardware, this page will be present in the status menu and will provide information about how the TV card(s) are being used.
TV Hardware State
The first line TV Hardware State currently has three possible values:
| Not in use | The TV hardware is not currently being used anywhere in the iCOMPEL. |
| Rebroadcasting | The iCOMPEL is currently using the TV hardware to rebroadcast ^137 a TV or radio station.As well as signal status, the current channel used to rebroadcast is displayed, along with bandwidth information. |
| In use by movie player | TV hardware is in use. Either to preview/audition TV and radio media or as part of a playing layout.As well as the signal status, the current Channel and type (i.e. TV or radio) is shown. |
Signal Status
If the hardware is being used, the state of the TV/radio signal is shown as either Good, Acceptable or Bad.
8.5 Screen Snapshot
This page displays a snapshot of the main Screen display. This can be refreshed periodically as required, although very frequent refreshing is not recommended since it may result in a temporary loss of quality in the currently playing media.
Part
IX
Setup
9. Setup
The Help menu gives you access to page specific help and this user guide. You can also set User options [128] to match your preferences.
The Setup menu gives you access to settings for the iCOMPEL web interface, the iCOMPEL itself, and the system.
System setup 139
Player setup 130
You should maintain regular backups of the media content files and settings that you use for your iCOMPEL. See Backing up your iSOMPEL for more details.
9.1 Getting connected
Follow these steps to log in to your iCOMPEL:
- Make sure that the iCOMPEL is connected to your network. You may need to speak to the person responsible for managing your network.
- Make sure that the iCOMPEL is connected to a power supply, and if it is connected to a Screen make sure that some content is showing. (If the iCOMPEL output is not being displayed, please refer to the troubleshooter ^[161] ).
- Open a web browser (such as Microsoft Internet Explorer or Mozilla Firefox) on a computer that is connected to the network and in the Address bar type in either the IP address of the iCOMPEL or its local Address.
- In the browser, you are prompted for a username and password. (If you are not prompted for a username and password, please refer to the troubleshooter[161]). The factory-set default username is remote and factory-set default password is 9999.
- If the username and password are correct, then you can now see the iCOMPEL home page in the browser. You are now connected to the iCOMPEL. (If the iCOMPEL home page is not being displayed, please refer to the troubleshooter[161].)
- Add the current page as a bookmark in your browser for easy access in the future.
Finding the IP address of your iCOMPEL
To find out the IP address of the iCOMPEL, either consult the person who manages your network, or disconnect the iCOMPEL from the power supply for a few seconds and reconnect it. After a few seconds the iCOMPEL displays its IP address on the Screen.
9.2 User options
Use the Help | UI options page to set a number of user interface options.
Changes to My Options apply only to you, while changes to Shared Options apply to all users, including Ad hoc users.
Remember to click Save Changes if you make any changes to options on this page.
My Options
Each user can set these options for themselves.
User Interface Policy
Select one of the following options:
- Productive makes it easier to locate common features by reducing the number of advanced and expert features that are displayed.
- Detailed displays both common and advanced features.
- Expert displays common show expert features in addition to advanced features. Take care if you use this mode.
Audition Method
Select one of the following options:
- For On Screen, the media is shown on the iCOMPEL screen.
-
For Web Preview, the media is shown on a web page as a screen snapshot. The iCOMPEL creates a screen snapshot by following these steps:
-
Turning off the Screen off and muting the audio, so that the new media is not displayed to the public.
- Running the Audition media command.
- Waiting for the media to start playing.
- Creating a screen snapshot.
- Running the Activate Schedule and Layouts command to restart the current Schedule.
- Switching the Screen on and restoring the audio to its original level.
Web Preview is very useful for testing new media on the iCOMPEL when the user is not able to easily view the iCOMPEL screen. Because Web Preview turns off the screen and mutes the audio, it is also useful when new media should not be seen before its addition to the Schedule.
Either the Audition () or Preview () button is shown whenever auditioning can be used.
Playlist Add item
Defines where new Items are added to a Playlist. The following options are available:
- At Top - items are added to the top of a Playlist.
- At Bottom - items are added to the bottom of a Playlist.
Screen Thumbnail
Specifies when the Screen Thumbnail should be regenerated. The following options are available:
- Screen thumbnail is updated each time the web page is shown.
- Screen thumbnail is updated every few seconds.
Setting this option may prevent smooth text scrolling.
Shared Options
These options apply to all Users.
Additional Title
The Title will appear on every iCOMPEL Web page and makes it easier to identify the iCOMPEL from others if there is more than one on the network.
Check the Show Additional Title checkbox, and enter the Title text.
9.3 Player setup
You can configure the settings for the following aspects of your iCOMPEL:
Audio 130
Screen 130
Players 133
RS-232 Outputs 133
Interactivity 135
International 138
9.3.1 Audio
This page is for setting and testing input and output audio levels and determining the Audio mute status.
The Master Volume level adjusts the overall output volume of the iCOMPEL. The Input Level adjusts the level of the equipment connected to the input source.
The Status page indicates if the currently active Schedule has muted or unmuted (enabled) audio.
The Test button on the Test page will send a variety of audio test signals.
Note: Running the test program will stop the currently playing media.
Settings
Master Volume
Sets the master output volume and is expressed as a percentage of maximum (100%) output level.
Note: The media item volume setting is specified in terms of percentages of the master volume level. That is, a media item volume setting of 100% will output at the level specified in the master output volume.
Input Level
Adjusts the input level and is expressed as a percentage, where 100% implies no reduction in input audio level.
9.3.2 Screen
These pages are for setting and testing the Screen resolution and orientation and obtaining Screen information (if available).
The Settings page allows changing of the screen settings.
The Status page displays a summary of the Extended Display Identification Data (EDID) information obtained from the screen and the status of all connectors.
The Test page provides access to various test images.
Note: Changing the orientation or Layout Canvas Size will require a restart of the iCOMPEL.
The iCOMPEL has a user definable setting called the Layout Canvas Size.
The Layout Canvas Size:
- Sets the size of the canvas that Layout's are rendered on.
- Sets the design size for the Layout Editor tool.
- Is used as the resolution for the screen if the iCOMPEL cannot learn the screen's resolution automatically.
Best practice for a layout designer is to:
- Decide on the desired output resolution they wish their content to be played at, typically 1360 x 768 or 1920 x 1080.
- Set the Layout Canvas Size to match that desired output.
- Choose or design layouts to fit the Layout Canvas Size.
- If in a channel then all screens should be set to the same Layout Canvas Size.
The iCOMPEL will attempt to configure its screen by Plug and Play, using timings obtained from the screen's EDID information; if the screen's provided timings do not include a mode of the same size as the layout canvas size, the iCOMPEL will scale the layout to fit the screen's best available resolution. You can see the chosen resolution on the Status tab.
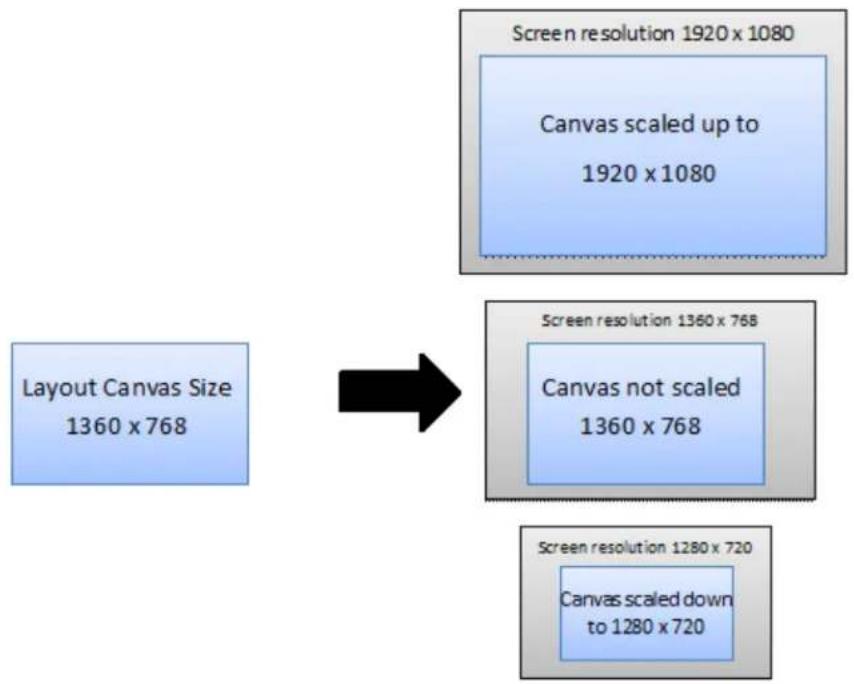
flowchart
graph TD
    A["Layout Canvas Size 1360 x 768"] --> B["Canvas scaled up to 1920 x 1080"]
    B --> C["Screen resolution 1360 x 768"]
    C --> D["Canvas not scaled 1360 x 768"]
    D --> E["Screen resolution 1280 x 720"]
    E --> F["Canvas scaled down to 1280 x 720"]
Layout Canvas is automatically scaled to fill the screen that is plugged into the player
If the iCOMPEL is unable to obtain timings from the screen's EDID information, the iCOMPEL will output a mode at the same resolution as the layout canvas size, using the fallback timings. This can occur because, for example, your screen is connected via a VGA extender or distribution amplifier that does not support EDID or DDC.
Note: Only plug one screen into the iCOMPEL at a time.
Settings
Layout Canvas Size
When designing Layouts this size is used to limit where Zones can be placed and is used used by the iCOMPEL to draw the Layouts that are being played.
The iCOMPEL will choose the most appropriate resolution available from the attached screen to allow output at the Layout Canvas Size.
Valid width values are whole numbers from 640 to 2000.
Valid height values are whole numbers from 480 to 2000.
Orientation
The orientation determines picture orientation on the Screen. The following settings are available:
- Landscape - Top edge at top. This is the default display and will apply to most screens. It corresponds to 0 degrees of rotation.
- Portrait - Left edge at top. This setting corresponds to 90 degrees of rotation.
- Portrait - Right edge at top. This setting corresponds to 270 degrees of rotation.
- Landscape - Bottom edge at top. This setting corresponds to 180 degrees of rotation.
Fallback Timings
These settings are only used if the iCOMPEL cannot obtain resolution settings from the screen using Plug and Play. Fallback timings should only ever be necessary for VGA screens as all digital interfaces mandate Plug and Play support in their specifications.
VESA CVT Timings
The width and height values are taken from the Layout Canvas Size; all other timing information is calculated using the VESA standard CVT formula.
Always use Normal Blanking for CRT screens. Try Reduced Blanking for Flat screen displays.
Custom Timings
This allows you to provide custom timing information, and is for advanced users only.
The width and height values are taken from the Layout Canvas Size.
9.3.3 Players
This page allows you to adjust the settings for the various iCOMPEL player types.
This page has one tab:
- HTML Player. Allows configuration of HTML player settings, including Proxy use and Trust Adobe Flash.
Click the Save Player Settings button to apply changes.
Note: When any player settings are saved, the iCOMPEL restarts to apply the changes.
HTML Player
HTTP Proxy
Specifies whether an HTTP Proxy is used to access external Web Pages resources.
If certain Web Pages are not accessed through the proxy, then enter the address of the server or servers hosting these pages in the No Proxy For entry.
Note: If this option is enabled, an HTTP Proxy must also be created on the HTTP Proxy page.
Trust Local Flash
Choose Allow disk based flash to read local data and communicate with internet if your Flash content requires cross-domain access to data or needs to read local files.
Choose Restrict disk based flash from reading local data and accessing cross-domain urls otherwise.
XML Web Services External URL Access
The XML Web Services has a feature that allows arbitrary access to External URLs.
Choose Allow XML web services to access external sites to allow the HTML Player to access external sites.
Choose Do not allow XML web services to access external sites otherwise.
9.3.4 RS-232 Outputs
The RS-232 interface can be used to send RS-232 Strings from the iCOMPEL to RS-232 enabled devices, and to set the voltage on various RS-232 control outputs.
A RS-232 Item collects defines one or more of the following properties:
- The voltage level for the two RS-232 output lines
- Transmit the specified RS-232 String using the specified RS-232 Configuration
- When this Item is to be Executed
This Page is split into three tabs:
- Items shows all RS-232 Items, and provides access to test, modification and deletion actions. The Update button will store changes.
- Add RS-232 Item will add a new RS-232 Item.
- Configuration provides access to RS-232 Configuration options, including baud rate, data bits, stop bits, and parity. This configuration information should match the settings of any connected RS-232 equipment. Save Configuration button will store changes.
RS-232 Items can be executed when encountered in a Playlist or can be automatically executed in one of the following conditions:
- Screen is muted or unmuted
• Audio is muted or unmuted
- A specified Layout starts or completes
The condition is specified when the Item is created and can not be changed. NOTE: only one RS-232 Item can be created for each of the above conditions.
Press Edit to modify the Item properties and to view which Playlists refer to this Item.
Unused Items can be Deleted by using the button.
RS-232 Items are published as part of a Channel. If the iCOMPEL is a Channel Publisher or Subscriber, then you can locally override both the Channel Configuration and / or the String for any Channel RS-232 Items
The Update button will set the specified properties.
The Last Response section details the response received the last time this Item was executed. Press the Execute RS-232 String button to execute the RS-232 Item immediately and display any response String.
RS-232 Item
Name
A name which uniquely identifies this RS-232 Item.
Send RS-232 String Action and RS-232 String
Check Send RS-232 String Action to send the specified RS-232 String. Clearing this setting will result in no RS-232 String being sent - although all other enabled Actions are executed.
The RS-232 String is expressed in hexadecimal format. For example: 9F 80 60 3F 00 BE
DTR (Data Terminal Read) / RTS (Ready To Send) Action
If enabled then sets the specified RS-232 Output line to the specified voltage level. If cleared, then the specified RS-232 Output line is unchanged.
Use Local Override
If enabled, then this will send the specified Local Override RS-232 String, rather than the default RS-232 String.
The Local Override entry can be left blank to specify that no RS-232 String is to be sent.
Note: This section is only shown if Send RS-232 String is enabled, and the iCOMPEL is either a Channel Subscriber or a Channel Publisher.
Add RS-232 Item
Name
A name which uniquely identifies this RS-232 Item. The Name must be specified and must be unique.
Perform Enabled Actions
Specifies if the RS-232 Item should be executed when encountered in a Playlist or automatically when the specified Schedule condition is met.
Note: With the exception of Add to Playlist, only one RS-232 Item can be created for each of the above conditions.
Send RS-232 String Action and RS-232 String
Check Send RS-232 String Action to send the specified RS-232 String. Clearing this setting will result in no RS-232 String being sent.
The RS-232 String is expressed in hexadecimal format. For example: 9F 80 60 3F 00 BE
DTR (Data Terminal Read) / RTS (Ready To Send) Action
If enabled then sets the specified RS-232 Output line to the specified voltage level. If cleared, then the specified RS-232 Output line is unchanged.
Configuration
Bits per Second
Select the Baud rate in bit per second from the drop down list. The iCOMPEL currently supports rates between 110 and 460800.
Data Bits
The number of data bits to use. Select from either 7 or 8.
Stop Bits
The number of stop bits to use. Select from either 1 or 2.
Parity
The number of stop bits to use. Select from Odd or Even.
Use Local Override
If enabled, then this will use the specified Local Override settings rather than the default Channel settings.
Note: This section is only shown if the iCOMPEL is either a Channel Subscriber or a Channel Publisher.
9.3.5 Interactivity
The iCOMPEL can programmed to respond to inputs from:
- USB Touch Screens
• RS-232 modem control inputs - Remote Keypad Buttons
This page allows these inputs to be enabled and configured.
NOTE Some features may depend on installed feature keys.
Touch
Status
The Status field indicates the current state of the Touch system. It can indicate that:
- No Touch Screen is connected
- Touch Screen is connected, but is not Calibrated
- Touch Screen is available
The Touch Screen is only usable when the latter Status is displayed.
Touch Screen Calibration
Once a Touch Screen is connected, it needs to be calibrated before use.
To calibrate a screen, the follow these steps:
- Click Perform Touch Calibration on the Web Page.
- Move to the Touch Screen.
- Carefully press in the center of each of the 3 crosshairs as they appear in turn.
-
Press on the 'press to finish' message then appears in the center of the screen.
-
Return to the browser.
-
Adjust the Drag Threshold (see below) as appropriate.
It is possible to cancel the calibration process by clicking Cancel Touch Calibration on the Calibrating Touch Screen web page. The calibration process is canceled after 60 seconds of inactivity, or if a Layout is Activated, or any item is Auditioned.
If the calibration process is not successfully completed, then the iCOMPEL will revert to either a previously successful calibration setting or to an uncalibrated state.
Name
The Name field will appear when a Touch Screen is connected and Calibrated.
Drag Threshold
When a Touch Screen is Pressed and Released the screen coordinates of the 2 events are slightly different. The Drag Threshold is the minimum number of screen pixels difference between the Press and the Release for the Action to be considered a Press-Drag-Release, rather than a Press-Release. This is particularly useful when passing the Touch events to a displayed web page, where typically a Press-Release is required.
The first time calibration is performed the difference between the press and release events for the 3 calibration crosshairs are used to estimate a drag threshold. It may be necessary to adjust this value based on the media to be displayed and the intended users.
RS-232 Inputs
The iCOMPEL can respond to voltage changes on the following RS-232 Inputs:
- Clear To Send (CTS)
• Data Carrier Detect (DCD)
• Data Set Ready (DSR) - Ring Indicator (RI)
Click on Edit to view and edit the properties for a particular RS-232 Input.
The editable properties are:
- Enabled: Indicates the availability of the Input for use on the iCOMPEL
- Name: The name to use for this Input when referencing it else where in the iCOMPEL
In addition, there are 2 informational properties:
- Current Level: Indicates the current state of the Input (Positive or Negative Voltage)
• Used By: Indicates which Zones in which Layouts on the iCOMPEL use this particular Input
Remote Keypad Buttons
The iCOMPEL can respond to button presses on a infra-red controller or remote keypad. The keypad features the following buttons:
• Volume up and down
- Station up and down
- Four programmable buttons: A, B, C, D
Volume Up and Down
The volume up and down buttons adjust the Master Volume level 130 up and down in 10% divisions.
A message should appear in the top right of the screen to indicate the new volume.
Station Up and Down
The station up and down buttons apply to any actively playing Ad hoc TV and radio stations. The station up and down buttons transform the Ad hoc item as if an Ad hoc User had selected the next station up or down (respectively) in that Ad hoc Item's list of available stations. A message should appear in the top right of the screen to indicate the new stations being changed to or to indicate that no Ad hoc TV or radio stations are playing.
Programmable Buttons
The four programmable buttons (A, B, C, D) can be used to provide Interactivity ^74 to Layouts and Playlists. A message should appear in the top right of the screen if the button has no programmed Interactivity at that moment in time.
Status
The Remote Keypad tab contains a message indicating if the supported infra-red receiver is connected or not. The receiver must be connected for the remote keypad buttons to function.
9.3.6 TV Rebroadcaster
This page allows you to configure the Digital TV Rebroadcaster.
The digital TV Rebroadcaster receives Digital TV & Radio stations, and retransmits them as Streaming TV and Radio stations. You must tune stations using the Digital TV & Radio page first. You can then retransmit any station from the list as a multicast Streaming station.
Status
Normal status
The streaming station is the TV or Radio station being rebroadcast. This name matches the name on the Digital TV & Radio page, while the name visible in streaming announcements is indicated by the announced as field.
Destination is the URL this stream is being rebroadcast to, for entering into PC clients, or to iCOMPEL players where you have chosen not to use the announcement feature.
The Multicast TTL is the 'distance' the multicast stream propagates through multicast-capable routers. It should be at least 1, to indicate that the stream will make it onto the Ethernet, and should be increased by one for each multicast router the stream should pass through. Consult your network administrator for more information.
The streaming announcements address is the address that the iCOMPEL sends SAP announcements to. If this address is entered in another iCOMPEL player's Streaming TV & Radio page, that iCOMPEL offers the station being rebroadcast as a Streaming station under the 'Announced as' name.
If the system has not yet tuned, you see Not Yet Tuned displayed. Otherwise, last tuned at tells you when the Rebroadcaster last retuned, while the tuned frequency is the current transponder frequency - it should match the frequency shown for your chosen station in the Digital TV & Radio page.
Error status
The Rebroadcaster retunes if it is struggling to hold onto a signal. If this happens, last tuned at is updated to the most recent retune, and the number of times returned increases. You see a glitch on receivers every time the Rebroadcaster retunes.
A 'second with no signal' is a full second in which there is no decodable signal available. These generally indicate that the aerial has been unplugged. The last no signal error time is the time of the last reported second with no signal.
A transport stream discontinuity is a sign of poor signal; it indicates that there have been parts of the stream lost in transmission. Discontinuities may show up on receivers as glitches or dropouts in the picture, or squeals in the sound.
Settings
When the rebroadcaster is disabled, the TV card is available for the iCOMPEL to use as normal, and no stations are rebroadcast by this iCOMPEL. When it is enabled, the TV card is not available for the iCOMPEL to use (thus Analog TV, Digital TV & Radio, composite capture and S-Video capture are not possible), but one Digital TV or Radio station may be streamed over IP multicast.
The only setting you will normally need to change is the Digital TV or Radio station. Select the station you wish to stream from the list - if the station you wish to stream is not present, return to the Digital TV & Radio Settings page and rescan.
The stream name is included in SAP announcements; other iCOMPEL players with a Streaming feature key installed will offer this channel in their list of streaming channels. The default is to use the station name as found in the tuning data, but you may set this to a custom name if you wish; for example, you could set it to 'iCOMPEL TV' to allow all Layouts to refer to the same channel, regardless of what you configure here.
Advanced Settings for Network Administrators
These properties can only be modified if the User Interface Policy is set to Detailed. Please visit the Options page to set this mode.
The SAP announcement address is the address this iCOMPEL sends details of the streaming channel to. The default of 224.2.127.255 is specified in the SAP standard; iCOMPEL players with the Streaming feature key are shipped with this address configured.
The multicast destination is specified as a multicast IP, UDP port and multicast TTL. The default multicast IP is generated from the iCOMPEL serial number, within the organization-local space; change it if it conflicts with other multicast devices. Similarly, the default UDP port of 4900 has been chosen to reduce the number of conflicts you will see. If another device uses the same multicast IP and port number as this iCOMPEL, streaming is corrupted; if the multicast IPs match, but the port numbers are different, the receiving iCOMPEL will have reduced performance, but will still function correctly.
The default TTL of 31 is supposed to limit itself to your site only. It can be changed as needed to fit in with your multicast routing.
9.3.7 International settings
This page allows you to choose language and country preferences for the screen output.
These are used by the HTML player to provide a preferred language and locale to websites and by the text clock to determine the locale appropriate date and time formats.
Note This is different from the language and localization settings of the Web page user interface, which are determined by the browser settings.
9.4 System setup
You can configure the settings for the following aspects of your iCOMPEL:
Users 139
Date and Time 140
Network 141
TV & Radio 146
HTTP proxy147
Security 148
Reporting 153
Licensing
9.4.1 Users
The Users page allows you to add user accounts to the iCOMPEL and manage existing accounts.
You cannot delete the account of the currently logged in user.
Settings
User Name
The name used to login with, for example remote, or chef. This name may only use letters or numbers (such as joe or shift1) and must be unique.
Full Name
A more descriptive name for the user.
Password
The user's password.
Note: Passwords cannot be retrieved by the Administrator. If a user forgets their password, change it to a new one.
Note: We strongly recommend that you change the factory-supplied default passwords, especially if the iCOMPEL is to be accessed over the Internet.
Permissions
Indicates which iCOMPEL functions the user will have access to. Click the appropriate check boxes to grant the permissions:
| Ad hoc | Access to data entry Ad hoc Pages96 (not the Ad hoc content design pages) and permission to read, write and modify files in the Media Folder using the Ad hoc Media Folder100 web page.If this permission is enabled, then the Media Folder setting should be set to a named directory, and not All Folders. |
| FTP Read Only | Ability to only read files in the Media Folder and all sub-folders via FTP. |
| FTP Read-Write | Read, write, and delete files in the Media Folder and all sub-folders via FTP. |
| Status Monitor | Access to Player Status and System Information web pages only. |
| System Settings | Access to the Setup menu pages and Fonts page |
| Layout Manager | Access Layout management, Schedule, Ad hoc content design, Newsfeeds, Tables, Colors, and Files & Folders pages. |
| Layout Editor | Access specific Layouts that the user has been explicitly given permission to edit. Permission is granted on the Properties tab of a Layout. |
| Publish Channel | Allows the user to publish the active channel. |
| Activate Channel | Allows the user to activate channels. |
| XML Control | Access to the XML message interface allowing non-browser based control of the iCOMPEL only. (Does not allow access to Web pages.) |
| Subscribe Channel | Allows read-only access to published channel data using HTTPS or HTTP protocols. |
Media Folder
The Media Folder is used as the FTP home folder and the Ad hoc media folder.
Users are not able to access any folders above the specified Media Folder when they log in via FTP or through the Ad hoc Media Folder web page.
9.4.2 Date and Time
Use the Date and Time page to specify the iCOMPEL date and time.
The iCOMPEL date and time can be set from either:
- Network Time Protocol (NTP). This method is preferred since it ensures the iCOMPEL time is always correct, but relies on availability of an external NTP server and a network connection.
- Windows Compatible Network Time Protocol. This method is required if the NTP server is a Windows server. Windows servers are less accurate time keepers then the Internet time servers and will be rejected unless this option is selected. This disables the 'peer distance exceeded' requirement that Windows Servers do not adhere to.
- Local System Clock. This mode relies on the internal clock, and may be used if the iCOMPEL is not able to use NTP. However, the internal clock may drift, leading to an inaccurate date or time.
If the Network Time Protocol or Windows Compatible Network Time Protocol option is selected, then the status of each configured NTP Server is shown on the Status tab.
Note: The NTP server will only adjust the iCOMPEL date and time if the NTP reported time and the Local System Clock time are within a few minutes of each other. If the difference is more than a few minutes, reboot the iCOMPEL, and it will synchronize fully on boot.
Click the Save Changes button to remember any changes.
Note: You must reboot the iCOMPEL when any changes are made, otherwise you may observe problems with media playback.
Settings tab
Time method
Either Network Time Protocol or Local System Clock as detailed above.
Time Zone
Enter the Time Zone for the iCOMPEL location.
Local System Clock Settings
If the time method is Local System Clock, select the current clock date and time. The date entry is shown as year - month - day.
Network Time Protocol (NTP) settings
Provide the URLs of up to 3 network time servers.
Status tab
Shows the status of the listed network time servers.
9.4.3 Network
These pages allows the user to configure the available Network options.
9.4.3.1 Network Ethernet
Use the Network page to configure the network settings for the iCOMPEL.
Click the Save Changes button to store changes. Note: the iCOMPEL must be rebooted for changes to take effect.
Note: The iCOMPEL displays its active IP address in large text on the splash screen during the boot up process.
Ethernet tab
Ethernet Type
- DHCP (Dynamic Host Configuration Protocol). The iCOMPEL attempts to collect an IP address and other network information from the DHCP server, eliminating the need to manually assign permanent IP addresses. This option requires that there is a DHCP server on your network.
- Static. You must manually assign an IP address to this iCOMPEL, and must manually configure other network settings.
Note: The iCOMPEL is set for DHCP by default. If no DHCP server is found, then the iCOMPEL sets itself to IP address 169.254.1.1
Host name set by DHCP
If your DHCP server supports this, then you can modify the DNS host name entry for this iCOMPEL. This enables users to address the iCOMPEL by its name, as well as by its IP address.
IP address
If you are using the Static mode, you must specify an IP address for the iCOMPEL in this entry. If you are using DHCP, this entry is ignored.
The IP address must be unique on your network.
Netmask
The Netmask (also known as a subnet mask) is used to tell how much of an IP address identifies the sub-network the host is on and how much identifies the host.
Typically the Netmask is 255.255.255.0 for a class C IP address.
Default Gateway
The IP address of the gateway (usually a router) on the same sub-network as the iCOMPEL that is used by the iCOMPEL to access Internet web sites, RSS Newsfeeds, Channel Servers, and so on.
DNS Search Path
Provide the search path to the Domain Name Server (DNS), if required.
DNS nameserver 1 / 2 / 3
Provide the IP addresses of up to three DNS name servers.
Ethernet Status tab
The Status tab displays the current Ethernet and DNS settings.
9.4.3.2 Network 3G Modem
Use the Network page to configure the 3G Modem settings for the iCOMPEL.
Click the Save Changes button to store changes. Note: the iCOMPEL must be rebooted for changes to take effect.
3G Modem tab
3G Modem Enable
- Disable 3G network. 3G modem will not be used.
- Enable 3G network. The iCOMPEL will use the 3G modem as its default network connection.
PPP Authentication
If your 3G network requires you to authenticate, provide the Username and Password.
PIN
If your 3G network requires you to set a PIN, provide the PIN.
Access Point Name
If your 3G network requires you to provide an Access Point Name (APN), provide it here.
3G Status tab
The 3G Status tab displays the model of the 3G modem.
The IP address and any DNS search path will be shown if the 3G Modem is connected to the 3G network.
9.4.3.3 Wireless
This tab is for managing how the iCOMPEL connects to wireless networks.
The iCOMPEL will only connect to a wireless network if:
- Wireless is enabled.
- The wireless network settings have been defined.
- The wireless network is in range.
If multiple networks are defined, there is no preference as to which network the iCOMPEL will attempt to connect to.
The current state of the wireless can be seen on the Network Status tab, the Defined Networks tab will show the state of each network next to the network name.
Tasks
• Enabling or Disabling Wireless 143
• Connecting to a Wireless Network 143
• Change Wireless Network Details 144
• Enabling or Disabling a Wireless Network 144
- Removing a Wireless Network Definition ^145
- Connecting to a Specific Wireless Network 145
Enabling or Disabling Wireless
The tab Enable/Disable has a radio button for enabling or disabling the wireless interface.
Select either Disabled or Enabled then press the Save button to turn it on or off.
Connecting to a Wireless Network
The tab Add New Network is for entering details of wireless networks.
Visible Networks
When the wireless network interface is enabled, a list of visible networks is presented with a radio button next to each of them.
To connect to one of these, simply select the radio button next to the name. If a network password/key is required, enter it in the Key field. Since the network is visible, the key type is determined automatically.
Press Save to save the new network details.
Other Networks
If the network is not visible or in range, then select Other and type in the SSID of the wireless network into the adjacent text field. The Key Type field will need to be set so that any password/key can be used properly.
As with the visible networks, the Key field will require filling in if required.
Press Save to save the new network details.
IP/DNS Settings
For both visible and other wireless networks, there is a choice of using either DHCP or static IP settings. These fields are set in the same manner as the Ethernet page.
If wireless is enabled and not currently connected to any wireless network and the newly defined network is in range, then the iCOMPEL will attempt to connect to the network.
Editing wireless network details
The Defined Networks tab contains a list of defined wireless networks, the Edit button next to each network name will show a form for changing the network details. Press Save Changes to update the details.
Disabling or Enabling a wireless network
The Defined Networks tab has a button next to each network name - either Disable or Enable depending on whether the network is enabled or disabled. Pressing this button will enable or disable the network as appropriate. The wireless interface will not attempt to connect to this network if it is disabled.
Removing a wireless network
The button next to each network name on the Defined Networks will delete that wireless network definition when clicked. You will be prompted for confirmation first.
If the iCOMPEL is currently connected to that network, then the connection to it will be lost.
Connecting to a specific wireless network
The Connect button next to each network definition on the Defined Networks tab will force the iCOMPEL to attempt to connect to that network if wireless is enabled.
Any existing wireless network connection will be stopped.
This will not be permanent - if the iCOMPEL is restarted or the wireless network connection is lost, the iCOMPEL may connect to a different defined network.
9.4.3.4 Network Interface Order
Currently the iCOMPEL supports three network interfaces:
- Wireless 143
• 3G Modem142 - Ethernet 141
This page allows the user to specify the order in which the interfaces are tried. If an interface cannot be used (e.g. Wireless cannot find any Access Points in range) then the next preferred interface will be tried.
To set the order, use the arrow buttons to move the interface up and down in the list. The item at the top of the list is tried first, the next one down second and so on.
9.4.3.5 Network Tests
Tests tab
The Tests tab allows you to carry out connectivity tests from your iCOMPEL to your network.
These include:
- Ping test
- Trace route test
- DNS lookup test
9.4.4 TV & Radio
These pages allow the user to configure the available TV and Radio stations.
9.4.4.1 Analog TV and Radio
Analog TV
This tab lists the available analog TV channels and allows you to select the channel frequency and edit the description field.
Click the Save Changes button to preserve any changes to the Channel frequency or Description fields
To remove a channel, delete the text in its description field, and press the Save Changes button.
Each channel can be shown on the main Screen by pressing the Audition button.
Note: When you audition a Station, the main Screen stops showing the Scheduled Layout.
Channel
The channel number to receive.
Description
A short channel description, for example ITV, BBC One. Delete the text in this entry to remove the channel.
9.4.4.2 Digital TV and Radio
Digital TV and Radio
The Scan for Digital TV Channels button on the Settings tab starts an automatic scan for new Digital TV Stations. The automatic tuning process takes between 2 and 20 minutes, during which time the progress is shown on Screen and in the web page.
Once the tuning has completed, click the Use New Channels button to store the channel list or click the Do not Use New Channels button to revert to the original channel list.
Note: While scanning for new digital channels, the main Screen stops showing the Scheduled Layout and instead shows tuning progress information.
A list of all tuned digital TV and radio Stations is shown the Status tab. To Audition a TV or Radio station, press Audition ( ).
Note: When you audition a Station, the main Screen stops showing the Scheduled Layout.
Status
The Status tab lists all the Digital TV and Radio channels found by the iCOMPEL.
Settings
The Settings tab shows the Scan for Digital TV Channels button, and after a scan shows the Use New Channels and the Do not Use New Channels buttons. It also shows a progress bar while the scan is taking place.
9.4.4.3 Using multicast streaming TV
It is not always physically possible for an iCOMPEL to receive a TV broadcast signal directly. An alternative is to deliver TV signals as a set of Multicast streams using the local network.
Note: Using Multicast TV requires an additional feature unlock key.
How Streaming Works
A Streaming Transmit Servers converts analog or digital TV signals to Multicast IP packets. The iCOMPEL is able to receive and decode an IP multicast stream (it can function as a streaming Client), and can place the TV image into a Zone on the iCOMPEL output along with other information in other Zones.
All the routers and switches on the local network between the Streaming Transmit Server and each Streaming Client iCOMPEL must support Multicast streaming. The network itself must also have sufficient capacity to allow Multicast streaming.
Note: There may be copyright issues involved in re-broadcasting material onto a local network.
Streaming TV and Radio
Use this tab to modify and view streaming TV settings.
The Settings tab allows you to add, remove and modify the multicast addresses used to receive the TV streams. The Status tab shows the current channels, and allows channel Preview. Up to six multicast address can be specified.
Note: Using Multicast TV requires an additional feature unlock key.
Announcement Multicast Addresses
Specifies the address to receive Service Advertising Protocol (SAP) packets on. Valid addresses are between 224.0.0.0 and 239.255.255.255.
Tests
This tab allows you to test the TV card features.
Properties
This tab allows you to configure the TV system in use.
Click the Save Changes and Restart the iCOMPEL button to apply changes.
Note: When you save changes, the iCOMPEL restarts to apply them.
TV System
Select the country to configure the iCOMPEL to support the Analog and Digital Terrestrial television system of that country.
9.4.5 HTTP proxy
Use the HTTP Proxy page to configure the details of proxy servers used to access Internet resources. Please discuss the need to use a proxy with your Network Administrator.
To use a proxy for accessing an Internet Resource, you must perform both of the following actions:
- Enter HTTP Proxy configuration details using the HTTP Proxy settings page.
- Request the iCOMPEL use a proxy configuration when accessing an Internet resource.
When creating an HTTP Proxy configuration, you must specify how the Proxy configuration is used. The following options are available:
- Accessing external Web Pages using the HTML Player
- Channel Subscription downloads channel content from a Publisher iCOMPEL
- Newsfeed when downloading Newsfeed articles.
Once a HTTP Proxy has been created, you may enable usage of a proxy, as follows:
- For the HTML Player, enable proxy usage in the Player Setup page.
- For a Channel Subscription proxy, enable usage in the Channel Setup page.
- For a Newsfeed proxy, enable usage on an individual Newsfeed basis from the Newsfeed page.
- For a Reporting proxy, enable usage in the Reporting Setup page.
- For a Software Update proxy, enable usage in the Software Update Setup page.
The proxy configuration is stored on this iCOMPEL, and is not transferred in a Channel.
Note: Newsfeeds and Channel Subscription do not support use of Microsoft NTLM authentication. We recommend changing the Windows proxy to allow Digest authentication.
Note: You must restart the iCOMPEL when you make any changes to the HTTP Proxies.
When an HTTP Proxy needs to be added, the Add HTTP Proxy tab requires a number of settings
Server Address
The address of the proxy server.
Server Port
The port to connect to on the proxy server. By default, this is 3128.
Username
If the proxy server requires authentication then enter the username.
Password
If the proxy server requires authentication then enter the password.
Use this Proxy for
Indicates the resources for which the proxy may be used.
9.4.6 Security
Use the Security page to set various security related details to minimize the risk of unauthorized access to the iCOMPEL. The following settings can be controlled:
Firewall
Firewall Service Settings
The iCOMPEL firewall can be used to prevent anyone from attacking the iCOMPEL from an unknown computer. If their IP address does not match one of up to eight IP addresses or address ranges, then access is denied.
Tick the Restrict access to the Allowed IP Addresses only box to enable the iCOMPEL Firewall IP address filtering.
Enter up to eight IP addresses of the computers that are allowed access to the iCOMPEL in the Allowed IP Addresses: boxes. If you need to provide access to more than eight IP addresses, then it is possible to specify a range of them as shown in the following examples:
• To allow all IP addresses between 192.168.1.0 and 192.168.1.255, type: 192.168.1.0/24
• To allow all IP addresses between 192.168.0.0 and 192.168.255.255, type: 192.168.0.0/16
WARNING: If you do not enter your own IP address, then you are locked out of the iCOMPEL when the firewall takes effect after a reboot. The iCOMPEL will, however, warn you if your IP address is missing from the list.
FTP Service settings
FTP access to the iCOMPEL allows someone to download the content from the iCOMPEL or to upload content that might be inappropriate. With a working knowledge of the XML interface, they could also alter the Playlists and other settings. FTP is not a very secure connection since the passwords are sent unencrypted. The advantage of having the FTP service, however, is that it allows legitimate users to upload multiple content files more quickly than is possible via the HTTP service.
You may wish to change the FTP port to different port number either to make it more difficult for an attack to succeed, or to use port redirecting or to comply with corporate security policy. It may also be desirable to have an alternate port available.
The Enable FTP checkbox enables or disables the FTP service.
The FTP Ports entry allows you to specify up to two different ports to accept FTP connections on. The default FTP port is 21.
Once an FTP connection has been made, the two machines make a second connection to each other on a different port known as the passive port. Some corporate firewalls require that the passive port number fall within a certain range. Some may require a different passive port number for every iCOMPEL. If this is the case then you must set the range of passive port numbers in accordance with the corporate firewall.
The Passive Port Range allows an upper and lower port limit to be specified.
It is possible to restrict the rate at which files are transferred to the iCOMPEL via FTP. While this is not a security issue, it is important to prevent files from being transferred to the iCOMPEL at such a high rate that the video player starts to stammer.
As a rule of thumb:
- If people are likely to be watching the Screen while large files are being transferred to the iCOMPEL, then restrict the transfer rate to 2500.
- If large files are only transferred when no one is watching the screen, then the transfer rate can be much higher, say 10000.
HTTP Service settings
This tab page allows you to select which protocols (HTTP or HTTPS) are allowed to access the iCOMPEL Web user interface. It is not possible to manage the player without either HTTP or HTTPS.
HTTP is more secure than FTP since the passwords are encrypted. HTTPS is a more secure form of HTTP because everything is encrypted.
HTTP and HTTPS access is restricted by managing the user account names and passwords. See the User Account Settings page for more information.
Select either HTTP only, HTTPS only or HTTP and HTTPS from the Supported Protocols drop down menu.
The standard port for HTTP access is port 80 and the standard port for HTTPS access is port 443.
You may wish to change these to different port numbers either to make it more difficult for an attack to succeed, to use port redirecting or to comply with corporate security policy. It may also be desirable to have one or more alternate ports available.
SSH Service settings
An SSH connection to the iCOMPEL allows access to the deeper levels of the device. Most users never need SSH, but it is occasionally essential for support and maintenance purposes so it cannot be disabled. SSH access is restricted by managing the master iCOMPEL password below.
It is desirable to change the SSH port to a different number to make it more difficult for an attack to succeed. It may also be desirable to have an alternate port available.
The standard port for SSH access is 22. You can specify a maximum of two ports to accept SSH connections.
WARNING: If you change the SSH port number, then you should make a note of it and keep it safe.
Master password
The Master iCOMPEL password is required for SSH access to the deeper levels of the iCOMPEL. This is not the same password used to access the web pages of the iCOMPEL. It may be desirable to change this password, but you must know the existing password to do so. Please contact Black Box Technical Support at +1 (724) 746-5500 or info@blackbox.com for the Master Password.
LDAP
See LDAP settings 150
LDAP Expert
This option is only visible if you have set the User Interface Policy to Expert on the UI Options ^128 page.
Expert users may use these fields to enter LDAP XML Settings and Passwords.
Firewall Status
See Firewall status 150
LDAP Tests
See LDAP Tests 153
9.4.6.1 Firewall status
This page shows information about the firewall on the iCOMPEL.
Understanding this information requires a good working knowledge of IP networking and network security.
The Chain PLAYER-INPUT section details the rules governing connections made to the iCOMPEL on various protocols.
The IP address from which a connection is made is checked against the Chain PLAYER-INPUT-ADDRESSES rule set.
Any connections made from an IP address that is not allowed by the security settings are dropped.
All connections from allowed addresses are passed through to the Chain PLAYER-INPUT-PORTS rule set.
The IP port to which a connection is made is checked against the Chain PLAYER-INPUT-PORTS rule set.
Any connections made to a port that is not allowed by the security settings are dropped.
The Pkts (Packets) and Bytes columns shows the volume of traffic that is accepted or rejected by each rule.
An unusually high number of Pkts on a 'DROP' line indicate a possible attack on the iCOMPEL.
9.4.6.2 LDAP settings
The iCOMPEL security model allows users that have been authenticated to use features of the iCOMPEL according to assigned permissions.
In LDAP the iCOMPEL considers a user to have permission if an LDAP filter matches entries in the directory.
Typically a LDAP filter will check that a user is a member of a group.
Configuration
The Enable LDAP checkbox allows must be enabled for the iCOMPEL to use LDAP.
You must enter the Primary LDAP server hostname and port and choose the Server Encryption'
The Server Encryption can be one of:
- None (LDAP) - no encryption - passwords are sent in the clear - standard LDAP port is 389.
- SSL (LDAPS) - all communications with the LDAP server are encrypted - standard LDAP port is 636.
- TLS (LDAP over TLS) - all communications with the LDAP server are encrypted - standard LDAP port is 389.
The Certification Authority (CA) Certificate is required when SSL or TLS encryption is used. The certificate is required to be in PEM format.
Note: Microsoft Active Directory does not support LDAP over TLS and by default LDAPS requires additional configuration of the Active Directory server.
Fallback user
The Fallback User can always login to the iCOMPEL and perform management tasks, even when LDAP authentication is not working.
Enter the Fallback User Username and Password that you wish to use to manage the iCOMPEL in the event of problems with the LDAP setup.
Recommendation: Use a very strong password for the Fallback User password.
Bind
Select Allow Anonymous Bind to use anonymous binding to the LDAP server. Otherwise select Bind using DN: and fill in the Bind Username and Bind Password.
For example the Bind Username is a Distinguished Name (DN) like: cn=Manager,dc=yourdomain,dc=com.
FTP User
The information in this section is used to authenticate users and give them permission to gain FTP Read/Write access to the iCOMPEL.
You will need to know how to find the user object in the directory that corresponds to the username given to FTP.
Set the Login Username Attribute to attribute that will contain the username given to FTP.
Active Directory Note: Typically this is the 'sAMAccountName' attribute.
Posix Scheme Directory Note: Typically this is the 'uid' attribute.
Enter the LDAP filter that will match a user object in the directory into the User Filter field. Use '%s' where you wish the filter to contain the username of the user that is logging in.
Recommendation: If possible add checks for group membership to control which users can access FTP on the iCOMPEL.
Active Directory Example: (&(sAMAccountName=%s)(objectclass=user)(memberOf=CN=iCOMPEL ftp access, OU=Security Groups, DC=yourdomain, DC=com)).
Posix Scheme Directory example: (&(uid=%s)(objectclass=posixAccount))
The Scope can be set to One Level or Subtree and will limit how LDAP search for the user object starting from the Base DN.
HTTP User
The information in this section is used to authenticate users to use the Web Interface of the iCOMPEL. Permissions are setup in the next section.
You will need to know how to find the user object in the directory that corresponds to the username given to HTTP.
Set the Login Username Attribute to attribute that will contain the username given to HTTP.
Active Directory Note: Typically this is the 'sAMAccountName' attribute.
Posix Scheme Directory Note: Typically this is the 'uid' attribute.
Enter the LDAP filter that will match a user object in the directory into the User Filter field. Use '%s' where ever you wish the filter to contain the username of the user that is logging in.
Active Directory Example: (objectclass=user).
Posix Scheme Directory example: (objectclass=posixAccount)
The Scope can be set to One Level or Subtree and will limit how LDAP search for the user object starting from the Base DN'.
The Display Name Attribute is used in the iCOMPEL banner as the User:'.
Active Directory Note: Typically this is the 'displayName' or 'sAMAccountName' attribute.
Posix Scheme Directory Note: Typically this is the 'cn' or 'uid' attribute.
HTTP Permissions
After a user has been authenticated to access the iCOMPEL web interface via HTTP, the iCOMPEL will check the permissions that the user has.
There are four permissions that will need setting up:
| Monitor Access | Access to Player Status and System Information web pages only. |
| System Settings | Access to the Setup menu pages and Fonts page. |
| Layout Manager Access | Access Layout management, Schedule, Ad hoc content design, Newsfeeds, Tables, Colors, and Files & Folders pages. |
| XML Control Access | Access to the XML message interface allowing non-browser based control of the iCOMPEL only. No Web pages can be accessed with this permission setting. |
Set Monitor Access Filter, System Settings Filter, Layout Manager Filter and XML Control Filter to LDAP filters that match if the user has been granted the corresponding permission. Use '%s' everywhere you wish the users username to be written into the filter.
Typically the filter checks that the user is a member of a group.
Active Directory Example: Set the Filter Attribute: to dn and use this filter:
((objectClass=group)(member=%s)(distinguishedName=CN=player monitor,OU=Security Groups,DC=yourdomain,DC=uk))
Posix Scheme Directory Example: Set the Filter Attribute: to uid and use this filter:
(&(objectClass=posixGroup)(memberUid=%s)(cn=monitor))
The 'Scope' can be set to 'One Level' or 'Subtree' and will limit how LDAP search for the user object starting from the 'Base DN'.
Ad hoc users
Click the button to add an Ad hoc user and to set the filters for them as required.
9.4.6.3 LDAP tests
The LDAP tests will test the current LDAP settings and give you feedback on any issues.
Recommendation: Always test any change to the LDAP settings before rebooting the iCOMPEL.
Running the tests
To run a test enter the Test Username to use in the tests and click the Test LDAP settings button.
Test results
The test results are displayed in two parts: a table showing the status of each step and a detailed log.
When everything is setup correctly and a valid iCOMPEL username is used, the status will show as Passed. The permissions that the user has are also shown.
Check that the permissions are what is expected and change the LDAP setting if necessary to fix the problem.
The following table shows which of the LDAP settings need checking when a problem occurs. Also check the Log Messages for details on the problems.
| Test | Checks |
| Bind to LDAP server | Configuration and Bind sections |
| Search for FTP user | FTP User section |
| FTP Read/Write Access | FTP User section User Filter |
| Search for HTTP user | HTTP User section |
| Find HTTP user | HTTP User section |
| Search for group membership | HTTP Permissions section |
| Ad hoc Permissions | Ad hoc Users section |
9.4.7 Reporting & Remote Setup
This page allows you to configure how the iCOMPEL reports status information to a iCOMPEL Deployment Manager.
Reports can be sent using the HTTP protocol or over a VPN connection to the iCOMPEL Deployment Manager.
When a VPN is used, the iCOMPEL Deployment Manager is able to control the iCOMPEL Web Interface and optionally can SSH to the iCOMPEL.
If the iCOMPEL is reporting using HTTPS or over a VPN connection it can be configured to report its setup files to the iCOMPEL Deployment Manager and to accept updated setup files from it.
Note: Some features may depend on installed feature keys.
Click the Save Changes button after making changes.
The Status tab shows the reporting status.
Reporting Settings
Reporting
Determines if the iCOMPEL should send status information to a iCOMPEL Deployment Manager.
Reporting Options
Indicates what information a iCOMPEL should send to a iCOMPEL Deployment Manager. The following option is available: Include a Screen Thumbnail with each report. When checked, this option will send a screen thumbnail with the status. Checking this option will increase the bandwidth required for each status report.
Media Auditing
Indicates that the iCOMPEL media audit information should be sent to a iCOMPEL Deployment Manager. The following options are available:
'Do not send media audit logs to the iCOMPEL Deployment Manager' - do not send any media audit information.
'Send media audit logs every' - send the media audit information periodically. For example every hour.
'Send media audit logs every day at' - send the media audit information once a day at a particular time. For example 02:00 every day.
Reporting Interval
Specifies how frequently the iCOMPEL should send status information. The minimum interval is 5 seconds.
Report to iCOMPEL Deployment Manager via HTTP
Specifies the protocol, network address and port (optional) of the iCOMPEL Deployment Manager to send status information to.
Report to iCOMPEL Deployment Manager via a VPN
Specifies the network address and optionally port of the iCOMPEL Deployment Manager VPN to send status information to. When the Allow SSH access via VPN option is the checked the iCOMPEL Deployment Manager is allowed to SSH to the iCOMPEL.
Authentication
Enter the username and password of a iCOMPEL Deployment Manager user. The iCOMPEL Deployment Manager user must have the Accept Report user permission enabled.
Proxy
Enable proxy access if the Web site should be accessed through a proxy server.
Note: To access the iCOMPEL Deployment Manager through a proxy, you must first create a Reporting Proxy entry (using the HTTP Proxy page 147)
Remote Setup Settings
If the iCOMPEL is reporting using HTTPS it can be configured to report its setup files and receive updates to them from the iCOMPEL Deployment Manager.
If the iCOMPEL is reporting over a VPN connection it can also donate its setup files to the iCOMPEL Deployment Manager which will provide them as updates to every iCOMPEL that has been configured (on the iCOMPEL Deployment Manager) to receive them.
Categories
Select the Categories for which the iCOMPEL will report, donate and accept updates for.
Note: The Channel category is not available for Remote Setup when the iCOMPEL is configured as a Publisher[111].
The iCOMPEL Deployment Manager help pages contain a guide on how to configure and use Remote Setup in more detail as this feature can be managed from it.
9.4.8 Feature Keys
Certain features beyond the normal capabilities of the iCOMPEL are licensed. This page allows you to view currently installed feature keys and to add new feature keys.
The Licensing tab shows a summary of all installed feature keys, while the Status tab shows all currently licensed features.
The Add License tab allows you to add new feature keys.
NOTE: The iCOMPEL must be rebooted for newly installed features to become available.
9.4.9 Player Local Information
Overview
This page allows meta-data to be added, deleted or modified. This meta-data is contained in Player Local Information items which are used by the following features:
• Conditional Play: the meta-data can be used to control which Playlist items or Schedules play.
- Reporting: All player meta-data are reported to the iCOMPEL Deployment Manager when iCOMPEL Deployment Manager reporting is enabled.
- Localize HTML pages: Web pages can query the meta-data to localize their output.
- Configure Digital Signage Weather Widget: The current location can be specified for the Digital Signage Weather Widget.
Potential uses for Player Local Information
The list below illustrates how Player Local Information may be used:
- The content designer can design content for a Channel and yet make each iCOMPEL/s play specific content. For example, if a company has branches in different locations, the company can create a weather location in ISO format and use Digital Signage Widgets to display location specific weather.
- Conditional Play can be used to control the media and schedule for individual iCOMPELs with a single Channel. For example, a chain store could create content for all stores, publish to a single site, have all subscribers download the content and yet play content in each store based on customer profiles visiting particular stores (using Conditional Play for Playlist items), and/or the opening hours of that store (using Conditional Play for one or more Schedules).
- Player Local Information is also reported to iCOMPEL Deployment Manager and can be used for effective asset tracking. For example, each player can store its address, asset tracking id and if there is a problem, it is easy to determine the location of the player based on iCOMPEL Deployment Manager reports.
NOTE: Any change in Player Location Information can have an immediate effect on the currently playing item.
9.5 Backing up your Player
Use the Backup & Restore page to create Backup files (on a USB storage device) that contain all the media content and settings from the iCOMPEL.
These Backup files can be stored and later restored onto this iCOMPEL or another.
To create a Backup file:
- Insert the USB storage device on which you wish the Backup file to be created.
- From the menu bar, select Setup, then Maintenance and Troubleshooting, then Backup & Restore.
- Click the Create Backup tab
- Follow the links to the folder in which you wish to create the backup file (creating folders as needed).
- Click the Create Backup button.
- Wait for the Backup to finish being created.
- Remove the USB storage device.
To restore a Backup file:
- Insert the USB storage device which contains the Backup file that you wish to restore.
- From the menu bar, select Setup, then Maintenance and Troubleshooting, then Backup & Restore.
- Locate the Backup you wish to restore.
- Click the correct Restore Backup button.
- Wait for the restore to complete and the iCOMPEL to reboot.
- Remove the USB storage device.
If you wish to restore media content onto a different iCOMPEL that does not have the Backup & Restore page, then there are two other methods available:
- Using the Channel Manager - use this method for a player that is part of a Signage Network, or to transfer iCOMPEL media content between networked systems.
- Using Layout Packages - use this method to create convenient files that can be stored, or transferred to a different iCOMPEL.
Backing up and Restoring your iCOMPEL using the Channel Manager
To backup your iCOMPEL using Channel Manager, follow these steps:
-
Use Channel Manager to Publish the iCOMPEL in Backup mode.
-
Wait for the process to complete.
-
Connect to the iCOMPEL using FTP 47 and download the entire channel folder to your PC.
To restore your iCOMPEL using Channel Manager, follow these steps:
-
Connect to the iCOMPEL using FTP 47 and upload the channel folder from your PC.
-
Use Channel Manager to subscribe the iCOMPEL to http://127.0.0.1/data/channel using the username and password that you use to log into the iCOMPEL.
- Wait for the process to complete.
Backing up and Restoring your iCOMPEL using Layout Packages
There is an effective size limit of 2GB for a Layout Package ZIP file. This means that you may need to save large files, such as movies separately, and not include them in your Layout Packages.
To backup your iCOMPEL using Layout Packages, follow these steps:
- From the menu bar, select Layouts, then Layout Packages.
- Click the Create tab and create a new Package that contains every Layout.
- Wait for the process to complete.
- Click the link to download the new Package as a ZIP file to your PC.
To restore your iCOMPEL using Layout packages follow these steps:
- From the menu bar, select Layouts, then Layout Packages and upload the ZIP file from your PC.
- Click the Install button to unpack the ZIP file.
- Wait for the process to complete.
9.6 Software update
Updates are supplied as 'OPF' files. An update will contain new software that will, once installed, bring the iCOMPEL up to a new version of software.
Please contact Black Box Technical Support at +1 (724) 746-5500 or info@blackbox.com for availability of iCOMPEL updates.
Note: It is not possible to install an earlier software version than the one currently installed. The currently installed version is shown highlighted.
Never turn off the power to the iCOMPEL while it is installing an Update. It can take 30 minutes to install a large update.
To access the Software Updates page, select Setup from the menu bar, then Maintenance and Troubleshooting, and Software Updates.
The Software Updates page has three tabs:
- Update status - shows the current state of iCOMPEL software updates
- Settings - allows you to choose your preferred update method (manual or automatic)
- Manual update - allows you to find, download and install the latest software update.
9.6.1 Manual
Manual Update tab
This tab allows you to upload OPF files to update the iCOMPEL.
After uploading the OPF file, follow the on screen instructions.
9.6.2 Automatic
Settings tab
This tab allows you to configure the Software Update manager.
Update Mode
Select the update mode you wish to use:
- Automatically download and install updates - The iCOMPEL automates all the steps necessary to keep itself up to date.
- Check for new updates but do not download or install them - The iCOMPEL checks for new updates and shows the results on the Status tab.
- Turn off automatic update - Updates to the iCOMPEL software must be completed manually by the user.
Reboot Allowed
Set the days and time of day that the iCOMPEL may be rebooted to install an update.
Download Allowed
Set the days and times of day that the iCOMPEL may be checked for updates and download them.
Update Server URL
Enter the URL of the update server. This is the address of the web site that contains update information.
Check Interval
Set a check interval in hours and minutes.
Checking is the process of logging on to Update Server, determining whether a new update is available or not and initiating the copying of the new update if required by the Update Mode. The Check Interval is the frequency of, or time between, successive checks.
Authentication
If required, enter the Username and Password to gain access to the Update Server.
Proxy
If a proxy server is required to contact the Update Server URL, then enable this setting and ensure that a Proxy has been configured for Software Update in the HTTP Proxy page.
9.6.3 Status
Update Status tab
The first part of this tab shows the results from the last installation of an update. The second part shows the status of the automatic software update manager.
9.7 Reboot system
This page allows you to reboot this iCOMPEL.
Select Yes from the drop-down list and click Reboot.
The iCOMPEL can be powered down by simply switching off the power, but a proper reboot is required after a software update file has been placed on the iCOMPEL.
Part

Troubleshooting
10. Troubleshooting
Your iCOMPEL requires little maintenance.
The internal software for your iCOMPEL is updated from time to time by Black Box Network Services. To make sure your iCOMPEL receives all the necessary updates see Software updates. ^157
The following topics can help you resolve certain problems that may occur with your iCOMPEL.
Software update157
Reboot system 159
Support snapshot 161
Support logs 161
10.1 Support snapshot
Please follow the on-screen instructions to create a Support Snapshot, if you are asked to do so by the support representative.
The Extras tab includes a number of diagnostic tools that you may be asked to use by the support representative to help diagnose and resolve problems with your iCOMPEL.
10.2 Connection troubleshooter
If you are having difficulties connecting to your iCOMPEL, check the steps in the following table:
| Task | Comment |
| There must be network cables connecting the iCOMPEL to your PC. | Use either a network cable connecting your PC to your LAN and one connecting the iCOMPEL to the LAN, or a crossover cable connecting your PC directly to the iCOMPEL. Make absolutely sure that you are using a crossover cable. |
| If you are using a laptop connect it to mains power. | If your laptop is running on battery power, and the battery is low, the networking circuits may have been shut down. You may need to reboot your laptop and the iCOMPEL. |
| If you are using a crossover cable, you should turn off any wireless networking. | Your laptop may have a switch to turn wireless networking on and off. Otherwise, look for an icon on your desktop, or in your Control Panel (for Windows PCs). |
| If you are using a crossover cable, your PC must not be configured to work through a proxy. | In Internet Explorer, selectTools>InternetOptions>Connections>LAN Settingsandclearthe checkbox for the Use a proxy server... option. In Firefox, selectTools>Options..>Connection Settingsandselectthe checkbox for the Direct connection to the Internet option. |
| Reboot the iCOMPEL and the PC. | |
| During iCOMPEL boot sequence look for an ok message (in green) for the eth0 parameter. | If you see a [Fail] message (in red) for the eth0 parameter this usually means that the iCOMPEL has found nothing to connect with at the other end of the cable. |
| During iCOMPEL boot sequence look for the IP address on the screen. | A No Cable message means that the cable is missing or faulty or that there is another device on the network with the same IP address. The address 169.254.1.1 either means that DHCP could not be found or you are using a crossover cable. |
| The iCOMPEL must have completed its boot sequence. | The screen connected to the iCOMPEL should be showing the default Layout and content. |
| The yellow LEDs on all applicable network sockets should be on or flashing. | Check the yellow light (if present) on the socket that the network cable plugs into on your PC, on the iCOMPEL and any hubs or routers in the path from the PC to the iCOMPEL (if applicable). |
| You should know the IP address of your PC. | To find the IP address of a Windows PC, click on Start>Run, type cmd and click OK, type ipconfig and press Enter. Your PC displays its IP address. |
| Make sure that the IP addresses of the iCOMPEL and PC are in the same sub-net. | You may need to consult your Network Administrator for further advice. |
| You should try to ping the iCOMPEL from the PC. (Some networks do not allow pings.) | On a Windows PC click on Start>Run, type cmd and click OK, type ping followed by a space and then the IP address of the iCOMPEL and press enter. After a few seconds you should see a message that includes the phrase (0% loss). The yellow LED on the network socket of the iCOMPEL should flash during the ping. |
| You should be able to access the iCOMPEL with your web browser. | In your web-browser (e.g. Internet Explorer) type the IP address of the iCOMPEL into the address bar and press Enter. When prompted enter the username and password for the iCOMPEL. The home page of the iCOMPELshould appear in the browser. |
| Make sure your web browser is not showing a cached version of the iCOMPEL web page. | In Internet Explorer, select File>Work offline> and clear the check box, and also select Tools>Internet Options> and clear the history, then press F5. |
| If you are using a crossover cable then you should not be prompted to dial up to the Internet. | If you are using Internet Explorer and you cannot prevent the PC from dialing out for an Internet connection then install the Firefox browser on your PC and use it to access the iCOMPEL. |
| You should be able to connect to the iCOMPEL using FTP. | In Internet Explorer, type ftp:// followed the IP address of the iCOMPEL into the address bar and press Enter. When prompted enter the same username and password. In Firefox, type ftp:// followed by the username, a colon (:), the password, the at symbol (@) and then the IP address of the iCOMPEL. e.g. ftp// remote:9999@192.168.1.2. You should see a list of folders including media. |
Part
XI
Technical Reference
11. Technical Reference
This section contains technical reference topics not covered elsewhere:
Drag and drop file upload 14
Minimizing energy consumption 164
Processor limitations 165
RS-232 reference 165
11.1 Energy Saving
Digital Signage players are designed to run 24/7. To reduce the energy consumption, you may wish to shut part of or the entire system down during certain times of the day. There are three possible approaches:
- Make the iCOMPEL put the Screen into stand-by mode (iCOMPEL continues to run).
- Make the iCOMPEL switch the Screen off via an RS-232 cable (iCOMPEL continues to run).
- Use a timer switch to shut down both the iCOMPEL and the Screen.
Switch Screen to Stand-by mode
To make the iCOMPEL put the Screen into stand-by mode immediately, follow these steps:
- Log into the iCOMPEL and select Schedule then Manage Schedules from the Menu bar.
- Click the Edit button for the current running Schedule.
- Click the Edit button for the current Schedule Entry.
- Set Screen to Off and click the Save Changes button.
To make the iCOMPEL put the Screen into stand-by mode at other times, create Schedule Entries ^21 which have the Screen set to Off whenever the Screen is not needed.
Switch Screen off with RS-232 Cable
To make the iCOMPEL switch the Screen off with an RS-232 cable follow these steps:
- Obtain the RS-232 codes to switch the screen on and off from the Screen manufacturer.
- Connect an RS-232 cable from the iCOMPEL to the Screen.
-
Select Setup, then Player setup then RS-232 outputs from the Menu bar.
-
Select the Add item tab, and create separate RS-232 items containing the correct commands to switch the screen on and off. Click the Add button to save each command.
-
You are now able to add these commands to a Playlist as Special Items 35, by selecting them for the Send RS-232 Item option.
Switch off equipment with timer switch
You cannot damage an iCOMPEL by cutting off its power supply. However, you should not cut off the power supply while you are updating the software of the iCOMPEL.
To switch off equipment with a timer switch, follow these steps:
- Obtain a timer switch for the power circuit(s) that supply the iCOMPEL and Screen(s).
- Program the timer switch(es) to turn power on and off at the desired times.
- Plug the iCOMPEL and Screen power cables into the timer switch(es).
11.2 Optimizing playback performance
Some types of media should be reviewed in order to optimize playback performance.
- Display of MPEG-2 Video at reasonable (up to 10 Mbps) rates is no problem, as this will typically use less than half the processing power budget.
- Images, especially digital photos, should be resized before uploading onto the iCOMPEL - ideally so that they match the size of the Zone.
- Scrolling Text uses relatively little processing time provided it does not take up more than 30% of the screen area.
- Animations (typically in Flash or HTML with embedded JavaScript) have no upper limit to their processing requirements and can overwhelm the iCOMPEL players processing resources. If this occurs, the Animation will typically run slow but other Zones will continue as normal.
11.3 RS-232 technical reference
The pin assignment of the RS-232 9 way D-Plug is as follows:
| Pin | Direction | RS-232 Name | Quiescent State |
| 1 | Input to iCOMPEL | DCD | Hi impedance |
| 2 | Input to iCOMPEL | RxD | Hi impedance |
| 3 | Output from iCOMPEL | TxD | -ve Voltage level |
| 4 | Output from iCOMPEL | DTR | -ve Voltage level |
| 5 | Sig. GND | ||
| 6 | Input to iCOMPEL | DSR | Hi impedance |
| 7 | Output from iCOMPEL | RTS | -ve Voltage level |
| 8 | Input to iCOMPEL | CTS | Hi impedance |
| 9 | Input to iCOMPEL | RI | Hi impedance |
Electrical Interface
For historical reasons, The RS-232 standard uses a variety of terminology to describe its signal status, i.e.
- Lowered = Negated = Logic 1 = -ve voltage = Off = Marking
- Raised = Asserted = Logic 0 = +ve voltage = On = Spacing
The iCOMPEL uses voltage level in order to describe line status since this is the only explicit identification.
Inputs have:
• hysteresis (generally of about 0.5V)
• a threshold level of about +1.5V
- an input impedance of about 5K Ohms connected to Gnd (defaults to a -ve voltage state with nothing attached)
- an acceptable input range of +/-15V
Outputs have:
- a voltage swing ranging from +/-5V to +/-12V (depends on hardware)
- a source current drive capability of about 15ma (with output current limiting) (can drive LEDs/PIR modules and provide a voltage for contact closure applications).
Part
XII
Glossary
- Glossary
| Ad hoc | an override to a display Schedule, often managed locally by Ad hoc users, which is restricted to a specific Zone and/or content type. Ad hoc users control Ad hoc content or Ad hoc items, which are kept in Ad hoc media folders, and displayed on Ad hoc pages |
| Ad hoc from center | an Ad hoc Schedule override which is managed and sent by a remote publisher iCOMPEL to one or more specific subscriber iCOMPEL players |
| Administrator | or System Administrator. A member of an organization's management team with overall control over a digital signage network |
| Advance To | a command which interrupts the display in a zone and starts a new event or advances to a predetermined Rendezvous Point |
| Audition | the process of accessing and displaying content |
| Browser | the tool normally used to access web content, which is also used to log a PC on to a iCOMPEL |
| Channel | a system of connected electronic displays sharing Schedules and content with one publisher iCOMPEL and one or more subscriber iCOMPEL players |
| Content | an item of digital media or text that is displayed in a Zone as part of a Playlist |
| Content designer | a personnel member with responsibility for generating material for use in displays, such as layout design and content. This could include text and graphic content. The content designer may also have a level of Administrator responsibility |
| Default | standard or factory settings that are in place before changes are made by the iCOMPEL user |
| Digital signage | a form of electronic display showing a combination of text, graphics, and still and moving images |
| Digital Signage Network | a system of multiple iCOMPEL players |
| Display | the overall content being shown on the screen, rather than its layout or zone configuration |
| Drop down | a Menu bar item or box that reveals - or drops down - multiple action choices or values, which can then be selected by the user |
| Event | the input that causes a display to change when it works interactively (see Interactivity below), is referred to as an Event |
| File | items such as graphic images or textual information that can be used in digital signage displays |
| Folder | a location where files and other information can be stored |
| HTML (Hyper Text Mark-up Language) | the HTML format is widely accepted as the standard mark-up language for web pages |
| Interactivity | iCOMPEL can run predetermined fixed schedules in the different zones within a layout. However content can also be dictated by external stimuli such as floor pressure pads, the incorporation of a touch screen display, or changing content using a remote keypad |
| IPTV (Internet Protocol Television) | the delivery of television services, often across a network, via the Internet - as opposed to traditional broadcast technology, satellite or cable reception |
| Layout | the combination of a background image and one or more display areas (Zones) and that can be shown simultaneously on a Screen |
| Log on | the process of connecting with or interrogating a iCOMPEL via a PC using a Web browser |
| Media | dynamic content such as streaming video, TV, radio and news ticker information is referred to as media |
| Menu bar | on the iCOMPEL Home page, items such as Home, Media, Playlists etc. are contained in the Menu bar |
| iCOMPEL | a physical device which controls the visual display on one or more Screens. Also known as an iCOMPEL. Sometimes referred to as a network appliance. |
| Network | an interconnected group of devices - such as computers or iCOMPEL - working together |
| Newsfeed | online content usually providing headlines or brief information, typically general news, share prices or sports results (see Ticker) |
| Override, schedule | users can override or interrupt a schedule when necessary, for example to display special instructions in the event of an emergency, or to show a special event from a TV broadcast feed |
| Page | the iCOMPEL interface is made up of different pages, accessed via the Menu bar on the Home page. Ad hoc users have their own dedicated pages for their limited-level access |
| PDF (Portable Document Format) | an open standard which represents documents in a format independent of application software, hardware and operating systems |
| Playlist | a series of digital media content items displayed in a Zone |
| Properties, item | refers to the specific characteristics of a display item - such as the font and type size of text, the format of images or the duration of an item in a playlist |
| Publish | to distribute Channel Schedules to multiple subscriber iCOMPEL players for display on their associated Screens |
| Publisher | iCOMPEL that distributes Channel Schedules to multiple subscriber iCOMPEL |
| Remote keypad | a programmable hand-held device for local control of displays, this can be used to switch between layouts, or control TV or radio output |
| Rendezvous Point | this may be added to a Playlist as part of an Advance To command, or may be used in multiple Playlists to ensure synchronization between them |
| Schedule | a plan or timetable for displaying Layouts at specific times |
| Screen | the hardware on which a display appears |
| Standalone | an iCOMPEL that is neither a publisher nor a subscriber |
| Streaming video | video which is delivered to the end user, 'live' i.e. direct from the video provider |
| Subscribe | iCOMPEL that show a Schedule from a publishing iCOMPEL Subscribe to that device |
| Subscriber | an iCOMPEL that displays a channel Schedule received from a publisher |
| Table | text constrained in columns and rows, typically a timetable or similar listed information |
| Text | information in written form |
| Touch screen | an interactive screen with touch-sensitive areas on its surface, so users can access information on demand |
| Upload | transfer information, such as text or pictures, from a PC to a iCOMPEL for use in a display |
| User account | the means of granting users access to digital signage, based on user names, passwords and individual permissions |
| Video | moving images, typically in the form of a TV transmission, moving digital images or film |
| Web interface | the use of a Web browser to establish contact with a iCOMPEL |
| Web page | screens accessed via a Web browser - either generated by a iCOMPEL or on the Internet |
| Zone | a single display area in a Layout |
Index
- A -
accounts 139
action 74
ad hoc 10, 83, 89, 91, 95, 96, 99, 100, 104, 168
ad hoc content 83, 89, 91, 96, 99, 100
ad hoc folder 83, 89, 99, 100
ad hoc from center 83, 91, 168
ad hoc item 83, 96
ad hoc media folder 83, 99, 100
ad hoc page 83, 96
ad hoc theme 104
ad hoc theming 104
ad hoc user 83, 95
adding files to playlists 35
adding folders to playlists 36, 53
adding special items to playlists 35
advance to 66,72
advanced features 71
Analog Radio 146
Analog TV 146
analog TV setup 146
audio 27,50,130
automatic captions 71
automatic colors 68
-B-
background color 68
backup 107, 156
backup media 107
-C-
captioning 71
captions 71
CCS 113
Change layout command 67
Change Layout media item 67
channel 10, 168
channel content server 113
channels 111, 113, 114, 118, 119
character set 61
click on touch 78
clocks 42
colors 68, 80
Conditional Play 65
Conditional Play status 125
conflict 108
conflict layout package 108
connecting 128
connection problems 161
connections 161
contact 12
content 19, 39, 46, 47, 55, 168
content types 39
control line inputs 76
control line outputs 76
copying layout package 108
create Layout Package 107
creating Layout Package 107
-D-
date setup 140
designing layouts 76
Detailed Commands 67
DHCP 141
Digital Radio 146
digital signage 168
digital signage network 168
digital signage networks 111, 113, 114, 118, 119
Digital TV 146
digital TV setup 146
directly entered text 39
disk temperature 124
display 19
Display Device 10
display part of movie 79
display part of web page 79
display screen 130
displaying content 36
displays 71
duration 64
·E·
edit item properties 60
editing a zone 30
editing files 48
energy 164
energy consumption 164
enhanced features 71
ethernet 141
event 74
-F-
fallback user 150
Feature Keys
Applying 155
files 35, 46, 47, 48
firewall 148, 150
flash 52
folder play 36,53
folder play example 54
folder play properties 54
folders 36, 46, 53
font files 69
fonts 69
foreground color 68
FTP 113, 148
- G -
glossary 168
GPIO 76
graphical editor 28
graphical layout editor 28
-H-
HTML page 79
HTML pages 58
HTML player 133
HTTP 147, 148, 150
HTTP proxy 147
- | -
images 50
inputs 76
installing layout package 108
interaction action 74
interaction event 74
interactivity 74, 76, 135
interface options 128
international settings 138
IP TV 57
item duration 64
item properties 60
-L-
layout 10, 19, 21, 25, 26, 27, 28
layout editor 28
layout package conflict 108
layout package information 109
layout packages 107
layout properties 26
layouts 36
LDAP 148, 150, 153
LDAP tests 153
letterbox color 68
live video 57
loading content 47
loading files 47
log in 12, 128
log on 12
- M -
maintenance 107
master password 148
master volume 130
media 19, 39, 40, 42, 45, 46, 48, 49, 50, 51, 52, 55,
56, 57, 58
media backup 107
Media items 10
media player 133
media players 39
media types 39, 46, 55
menu bar 12
minimizing energy use 164
movie 79
movie player 133
movie properties 60
multicast setup 146, 147
multicast video 57
multi-channel 118
-N-
network setup 141
networks 111, 113, 114, 118, 119
newsfeeds 40
NTP 140
-0-
opacity 64, 68
OpenType 69
optimizing playback 165
options 128
OTF 69
outputs 76
override 19,24
- P -
package conflict 108
photographs 50
photos 50
plasma burn mitigation 31
plasma screen burn 79
Player 133, 168
player setup 128, 130
player status 124
playlist 10, 168
playlists 33, 35, 60
position 64
PowerPoint 51
presentation player 133
presentations 51
processor limitation 165
processor load 165
properties 54, 60, 64
proxy server 147
publish 111, 113, 114, 118
publisher 10, 168
-R-
radio 56
reboot 159
rebroadcast 137
recover 107
recover media 107
reference 164
rendezvous point 66,72
Reporting 153
resolution 130
restore 156
RGB color values 68
roles 111, 113, 118
rotating zones in a layout 79
RS-232 45, 79, 133, 135, 165
RS-232 content 45
RS-232 inputs 135
RS-232 interface 79
RS-232 outputs 133
RS-232 technical reference 165
RSS 40
-s-
saving energy 164
schedule 10, 19, 20, 21, 24, 25, 168
schedule entry 21
screen 130
screen background 80
screen burn 79
screen resolution 130
screen snapshot 124
security 148, 150, 153
setup 128, 130, 133, 135, 137, 138, 139, 140, 141, 146
size 64
software updates 157
soundtrack 27,31
special items 35
SSH 148
standalone 168
status 124
streaming setup 146
streaming TV 137
sub-playlist 72
subscribe 111, 113, 118, 119
subscriber 10, 168
support 161
support snapshot 161
synchronization 54, 66, 71
synchronize playlists 71
system 139, 140, 141, 146
system setup 128, 139
system status 124
-T-
tables 42
testing content 36
text 39, 49, 61
text properties 61
time setup 140
time validity 64
time zone 140
touch screen 135
touch screens 77, 78
troubleshooting 161
TrueType 69
TTF 69
TV 55,137
TV setup 146
- U -
updates 157
uploading content 47
uploading files 47
user accounts 139
user interface 12
user options 128
users 139
using 12
- V -
video 48
video-on-demand 72
volume 130
- W -
web interface 12
web page 79
web pages 58
- Z -
zip files 107
zone 10, 25, 26, 27, 28, 30, 31, 168
zone list 30
zone properties 31
Black Box Tech Support: FREE! Live. 24/7.
Tech support the way it should be.

natural_image
Black and white photo of a smiling woman wearing a headset, with no visible text or symbols.Great tech support is just 30 seconds away at 724-746-5500 or blackbox.com.

BLACK BOX®
NETWORK SERVICES
About Black Box
Black Box Network Services is your source for an extensive range of networking and infrastructure products. You'll find everything from cabinets and racks and power and surge protection products to media converters and Ethernet switches all supported by free, live 24/7 Tech support available in 30 seconds or less.
© Copyright 2012. All rights reserved. Black Box® and the Double Diamond logo are registered trademarks of BB Technologies, Inc. Any third-party trademarks appearing in this manual are acknowledged to be the property of their respective owners.
ICOMP, rev. 3 (build: V9.0.3 (28967))


- Federal Communications Commission and Industry Canada Radio Frequency Interference Statements
- Trademarks Used in this Manual
- Table of Contents
- Welcome to Black Box Digital Signage 10
- Creating Digital Signage....19
- Understanding Media Types....39
- System setup 139
- Part
- Welcome to Black Box Digital Signage
- Terms you need to know
- iCOMPEL
- Screen
- Schedule
- Layout
- Zone
- Playlist
- Media items (content)
- Ad hoc
- Administrators and Ad hoc users
- iCOMPEL Channels
- Logging on
- Logging on to the iCOMPEL
- Using the web interface
- The Home page
- Layout thumbnail view
- Layout icons view
- The Menu bar
- Using tabbed pages
- Example of Tabbed pages
- Action buttons
- Command buttons
- Drag and drop file upload
- Playlists
- Files and Folders
- Supported Browsers
- Limitations
- Creating Digital Signage
- Using Schedules
- The Schedules page
- Creating a Schedule
- Adding a Schedule
- Schedule Settings
- Schedule Name
- Valid From
- Valid Until
- Show Layout
- Schedule entries
- Example Schedule
- Schedule made up of three Schedule Entries
- Details of first Schedule Entry
- Details of second Schedule Entry
- Details of third Schedule Entry
- Schedule Entry settings
- Period
- Repeat
- Schedule Entry Actions
- Including a Layout in a Schedule Entry
- Changing the Layout in a Schedule Entry
- Overriding the schedule
- Creating an Override
- Activating an Override
- Override settings
- Using Layouts
- Manage Layout Page
- Adding a new Layout
- Editing a Layout
- Layout properties
- Description
- Layout Ad hoc Page
- Soundtrack
- Editing Layout properties
- Adding a soundtrack to a Layout
- Interaction Properties
- Using Zones
- The Layout editor
- The graphical Layout editor
- Saving your layout
- Pressing the Save button reveals the Save options
- Zone context menu
- Editing a Zone
- Adding and deleting a Zone
- Changing the display order of Zones
- Editing a hidden Zone
- Editing a Zone's properties
- The Zone properties Dialog box
- Zone Tab
- Zone Name
- Media
- Save All Changes and Edit Playlist
- Position
- Size
- Aspect Ratio
- Image
- Design Visibility
- Media Audit
- Changing the size or position of a Zone
- Using Playlists
- A Playlist can contain:
- The Playlist page
- Playlist tab
- File & Folders
- Upload Files
- Specials
- Defaults
- Adding Media item files to a Playlist
- Adding Special items to a Playlist
- Adding folders to a playlist
- Playing content items to test them
- Activate a Layout and watch it on the Screen
- Audition Layout, Playlist or item on the Screen
- Take a Screen snapshot
- Previewing in the web browser
- [Non-Text]
- Understanding Media Types
- Understanding Media Types
- Media players
- iCOMPEL behavior and media types
- Media managed by iCOMPEL
- Text
- Text characteristics
- Adding text directly
- News feeds
- Supported formats
- News feeds page
- Additional Requirements
- Adding a News feed
- Adding a news feed to a Playlist
- News feed item properties
- Name
- RSS News feed URL
- Refresh interval
- Maximum Age
- Authentication
- Proxy
- Clocks
- Player Type
- Adding a Clock to a Playlist
- Clock Properties
- Display content
- Day of week format
- Date, month, time, hour format
- Time zone
- Tables
- Tables page
- Ad hoc Tables
- Adding a Table
- Editing Table data and styles
- Values tab
- Style tab
- Border Width
- Border Color
- Column Width
- Font
- Text Color
- Background Color
- Horizontal Alignment:
- Vertical Alignment:
- Whitespace Handling
- Apply To
- Adding Tables to a Playlist
- RS-232 outputs
- Creating an RS-232 output item
- Adding an RS-232 output item to a Playlist
- Media run from disk
- File Manager
- Using Files and Folders
- Folder operations
- File operations
- Uploading content files
- Uploading files using the File Manager
- Uploading files
- Creating a folder
- Uploading files using FTP
- Editing content files
- Video
- Preferred format
- Adding video to a Playlist
- Text files
- Adding text using a text file
- Notes
- Animated GIFs
- Adding images to a Playlist
- Adding Audio to a Layout
- Edit the Playlist for a Soundtrack
- Audio properties
- Volume
- Presentations
- Convert to an image slideshow
- Convert to a Flash animation
- Convert to a video
- Add the converted presentation to a Playlist
- HTML web pages
- Adding an HTML file to a Playlist
- Adobe Flash
- Requirements
- Adding a Flash file to a Playlist
- Folder Play
- Adding a Folder
- File name order in Folder Play
- Viewing items from a Folder in your web browser
- Folder Play properties
- Management
- Item selection
- Example
- Item Synchronization
- Specifying Custom Item Duration
- Media from external sources
- TV
- Adding TV to a Playlist
- TV properties
- Subtitles
- Radio
- Adding Radio to a Layout's soundtrack
- Radio properties
- Adding live video to a Playlist
- Live video properties
- Adding multicast video to a Playlist
- Multicast video properties
- External Web Pages
- Adding external web pages to a Playlist
- Saving web pages to disk
- Auto-refresh
- Media item properties
- Movie properties
- Movie size/TV size
- Image properties
- Mode
- Letterbox color
- Text properties
- Text style
- Text color (foreground)
- Horizontal and vertical alignment
- Margins
- White space
- Character set
- HTML properties
- Web page size
- Opacity
- Zoom
- Page Background
- Page services
- Newsfeed properties
- Newsfeed:
- Fields
- Common properties
- Duration
- Position and Size
- Override Position and Size settings for Playlist item
- Opacity
- Time validity
- Adding time validity to a Playlist item
- Conditional Play
- Adding conditional play to a Playlist item
- Ad hoc properties
- Item type
- Ad hoc Entry
- Ad hoc Item Name
- Customization Scope
- Customization Status
- Used by Layouts
- Playlist Commands
- Rendezvous Point and Advance commands
- Adding Rendezvous Points
- Adding an Advance To Command
- Advance To Properties
- All Zones
- Change Layout command
- Colors
- Color items for new Layouts and Tables
- Color properties
- Color value
- Adding colors
- Finding the RGB Values for a Color
- Fonts
- Adding a font file
- Previewing a font
- IV
- Enhancing your displays
- Synchronizing Playlist displays between Zones
- Automatic captioning
- Setting up the Video Zone for automatic captioning
- Setting up the Text Zone for automatic captioning
- Displaying Video-on-demand using a sub-playlist
- Sub-playlists
- Creating a Sub-Playlist list
- Add Advance To commands to an Ad hoc Page
- Other uses for Advance To commands
- Other uses of Advance to commands:
- Using Interactivity
- Events
- Actions
- Layout and Playlist Interaction
- Interaction Processing
- Passing Touch Events to HTML Pages
- Designing interactive layouts
- Developing a storyboard
- Providing material for optional actions
- Trade-offs between options for changing the display
- General purpose input/output (GPIO)
- Control line outputs
- Control line Inputs
- Touch screens
- Touch Screen Physical Interface
- Calibration of the Touch Panel
- Configuring touch screen actions
- Layout sensitivity
- Zone and Playlist sensitivity
- Layout
- Zone
- Click on touch
- Audio File selection
- Using the RS-232 interface port
- Receiving strings over RS-232
- Displaying part of a Movie or Web page
- Displaying part of a movie
- Displaying part of a web page
- Mitigating plasma screen burn
- Activating Plasma Burn Mitigation
- Objective
- Layout Design
- Screen Background
- Changing the Screen Background
- Screen background page
- Ad hoc Content
- The Ad hoc Environment
- What is Ad hoc Content?
- Delegating Centralized Control
- Enhanced Ad hoc Access Control
- Automatic and Manual Ad hoc Modes
- Automatic Ad hoc
- Manual Ad hoc
- Creating Ad hoc Content as You Build Your Design
- Text Items
- Tables
- Newsfeeds
- TV Channel or Radio Station
- Converting an Existing Design to Ad hoc Content
- Creating Ad hoc Pages
- Adding Ad hoc Items to a Playlist
- Remote Keypad Control
- Remote Keypad Buttons
- Configuring Programmable Buttons
- To Make TV or Radio Stations available to Ad hoc Users
- Status
- Additional Ad hoc
- Ad hoc Advance To
- Ad hoc Schedule Overrides
- Making Overrides Available to Ad hoc Users
- Ad hoc from Center
- Ad hoc Schedule Override
- Using Update From Center
- Update From Center Polling Interval
- Making Ad hoc Changes
- Managing Ad hoc Items
- Setting Properties for Ad hoc Items
- Default Text
- Used-by properties
- Creating Ad hoc User Accounts
- Creating an Ad hoc User Account
- Ad hoc Pages
- Managing Ad hoc Pages
- Editing Ad hoc Pages
- Properties Tab
- Ad hoc Folder Play
- Adding an Ad hoc Folder to a Playlist
- Ad hoc Media Folder
- Changing Ad hoc Content
- Making changes
- Text and Tables
- TV Station
- Newsfeed
- Media Folders
- Screen Layouts
- Event Scheduling
- Advance To (On Demand)
- Ad hoc Theming
- Strings
- VI
- Sharing content using Layout Packages
- Layout packages
- Layout package properties
- Creating a Layout package
- Copying a Layout package
- Copying a Layout Package to the iCOMPEL
- Copying a Layout Package from the iCOMPEL
- Using FTP to copy a Layout Package
- Installing a Layout package
- Layout package conflicts
- Layout package information
- VII
- Channels and Signage Networks
- Components of a Channel
- What's Sent in a Channel?
- Using a Channel
- Software Version Compatibility
- Channel Roles
- Setting the Channel Role
- Channel Content Servers
- Deciding what to use as a Channel Content Server
- Network and Bandwidth Considerations
- Publishing
- Manual and Automatic Options
- Configuring the Publisher
- Calculating required disk space
- Publishing a Channel
- The Publishing Process
- To an iCOMPEL or External Server
- To a USB Storage Device
- Publishing Completed
- Updating Content
- Multi-channel publishing
- Adding new Channels
- Deleting a Channel
- Working with multiple channels
- Subscribing
- Configuring a Subscriber
- Subscription Poll Interval
- Update From Center Poll Interval
- Channel Server
- Channel Subscription URL
- Error Retry Interval
- File Transfer Allowed
- Updating Subscription
- Updating a Subscription via USB Flash Drive
- Channel Ad hoc
- Ad hoc from Center
- Player and System Status
- Player status
- System status
- Disk Temperature for the last 24 hours
- Disk Temperature for the last 30 Days
- Conditional Play status
- TV & Radio Status
- TV Hardware State
- Signal Status
- Screen Snapshot
- IX
- Setup
- Getting connected
- Finding the IP address of your iCOMPEL
- User options
- My Options
- User Interface Policy
- Audition Method
- Playlist Add item
- Screen Thumbnail
- Shared Options
- Additional Title
- Player setup
- Audio
- Settings
- Master Volume
- Input Level
- Screen
- The Layout Canvas Size:
- Layout Canvas Size
- Orientation
- Fallback Timings
- VESA CVT Timings
- Custom Timings
- Players
- HTML Player
- HTTP Proxy
- Trust Local Flash
- XML Web Services External URL Access
- RS-232 Outputs
- RS-232 Item
- Send RS-232 String Action and RS-232 String
- DTR (Data Terminal Read) / RTS (Ready To Send) Action
- Use Local Override
- Add RS-232 Item
- Perform Enabled Actions
- Configuration
- Bits per Second
- Data Bits
- Stop Bits
- Parity
- Interactivity
- Touch
- Touch Screen Calibration
- Drag Threshold
- RS-232 Inputs
- Volume Up and Down
- Station Up and Down
- Programmable Buttons
- TV Rebroadcaster
- Normal status
- Error status
- Advanced Settings for Network Administrators
- International settings
- System setup
- Users
- User Name
- Full Name
- Password
- Permissions
- Media Folder
- Date and Time
- Settings tab
- Time method
- Local System Clock Settings
- Network Time Protocol (NTP) settings
- Status tab
- Network
- Network Ethernet
- Ethernet tab
- Ethernet Type
- Host name set by DHCP
- IP address
- Netmask
- Default Gateway
- DNS Search Path
- DNS nameserver 1 / 2 / 3
- Ethernet Status tab
- Network 3G Modem
- 3G Modem tab
- 3G Modem Enable
- PPP Authentication
- PIN
- Access Point Name
- 3G Status tab
- Wireless
- Tasks
- Enabling or Disabling Wireless
- Connecting to a Wireless Network
- Visible Networks
- Other Networks
- IP/DNS Settings
- Editing wireless network details
- Disabling or Enabling a wireless network
- Removing a wireless network
- Connecting to a specific wireless network
- Network Interface Order
- Network Tests
- Tests tab
- TV & Radio
- Analog TV and Radio
- Analog TV
- Channel
- Digital TV and Radio
- Digital TV and Radio
- Using multicast streaming TV
- How Streaming Works
- Streaming TV and Radio
- Announcement Multicast Addresses
- Tests
- Properties
- TV System
- HTTP proxy
- Server Address
- Server Port
- Username
- Use this Proxy for
- Security
- Firewall
- Firewall Service Settings
- FTP Service settings
- HTTP Service settings
- SSH Service settings
- Master password
- LDAP
- LDAP Expert
- Firewall Status
- LDAP Tests
- Firewall status
- LDAP settings
- Fallback user
- Bind
- FTP User
- HTTP User
- HTTP Permissions
- Ad hoc users
- LDAP tests
- Running the tests
- Test results
- Reporting & Remote Setup
- Reporting Settings
- Reporting
- Reporting Options
- Media Auditing
- Reporting Interval
- Report to iCOMPEL Deployment Manager via HTTP
- Report to iCOMPEL Deployment Manager via a VPN
- Remote Setup Settings
- Categories
- Feature Keys
- Player Local Information
- Overview
- Potential uses for Player Local Information
- Backing up your Player
- To create a Backup file:
- To restore a Backup file:
- Backing up and Restoring your iCOMPEL using the Channel Manager
- Backing up and Restoring your iCOMPEL using Layout Packages
- Software update
- Manual
- Manual Update tab
- Automatic
- Update Mode
- Reboot Allowed
- Download Allowed
- Update Server URL
- Check Interval
- Status
- Update Status tab
- Reboot system
- Troubleshooting
- Support snapshot
- Connection troubleshooter
- XI
- Technical Reference
- Energy Saving
- Switch Screen to Stand-by mode
- Switch Screen off with RS-232 Cable
- Switch off equipment with timer switch
- Optimizing playback performance
- RS-232 technical reference
- Electrical Interface
- Outputs have:
- XII
- Index
- - A -
- -B-
- -C-
- -D-
- ·E·
- -F-
- - G -
- -H-
- - | -
- -L-
- - M -
- -N-
- -0-
- - P -
- -R-
- -s-
- -T-
- - U -
- - V -
- - W -
- - Z -
- Black Box Tech Support: FREE! Live. 24/7.
- BLACK BOX®
- NETWORK SERVICES
- About Black Box
Brand : Black Box
Model : ICPS-2U-SU-N-H
Category : Thin client