MediaFlyer Express MFLY-X01 - Thin client Black Box - Free user manual and instructions
Find the device manual for free MediaFlyer Express MFLY-X01 Black Box in PDF.


| Product Type | Thin Client |
| Brand | Black Box |
| Model | MediaFlyer Express MFLY-X01 |
| Processor | Intel Celeron N2807 (dual-core, 1.58 GHz) |
| Memory (RAM) | 4 GB DDR3L (expandable to 8 GB) |
| Storage | 16 GB eMMC flash |
| Operating System | Windows 10 IoT Enterprise |
| Dimensions (W x D x H) | 5.5 x 4.7 x 1.2 in (140 x 120 x 30 mm) |
| Weight | 0.5 kg (1.1 lb) |
| Power Supply | 12V DC, 2.5A (30W external adapter) |
| Video Outputs | 1x VGA, 1x DisplayPort |
| USB Ports | 4x USB 3.0, 2x USB 2.0 |
| Network | 10/100/1000 Ethernet |
| Audio | 1x headphone/microphone combo jack |
| Main Functions | Remote desktop, virtualization, web browsing, multimedia playback |
| Maintenance | Clean exterior with a soft, dry cloth; avoid liquids |
| Safety Certifications | CE, FCC, RoHS |
| Spare Parts Available | Power adapter, mounting bracket, VESA plate |
| Repairability | User-replaceable memory; other components require professional service |
| Energy Efficiency | Fanless design, typical power consumption < 15W |
Frequently Asked Questions - MediaFlyer Express MFLY-X01 Black Box
User questions about MediaFlyer Express MFLY-X01 Black Box
0 question about this device. Answer the ones you know or ask your own.
Ask a new question about this device
Download the instructions for your Thin client in PDF format for free! Find your manual MediaFlyer Express MFLY-X01 - Black Box and take your electronic device back in hand. On this page are published all the documents necessary for the use of your device. MediaFlyer Express MFLY-X01 by Black Box.
USER MANUAL MediaFlyer Express MFLY-X01 Black Box
Get your company's message out less expensively than with traditional print or broadcast advertising. Its easy deployment and "no learning curve" Web-managed interface allows your digital signage to be up and running in no time at all.
Features pre-defined layouts, enables you to easily build your own layouts, offers social media integration, is simple for anyone to connect, and can be managed via the Web.
Trademarks Used in this Manual
Black Box and the Double Diamond logo are registered trademarks of BB Technologies, Inc.
Mac, Safari, and iTunes are registered trademarks of Apple, Inc.
Google and YouTube are registered trademarks of Google, Inc.
Intel Atom is a registered trademark of Intel Corporation.
Internet Explorer, PowerPoint, and Windows are registered trademarks of Microsoft Corporation.
Firefox is a registered trademark of Mozilla Corporation.
nVidia is a registered trademark of nVidia Corporation.
Realtek is a registered trademark of Realtek Semiconductor Corporation.
Twitter is a registered trademark of Twitter, Inc.
UL is a registered trademark of Underwriters Laboratories, Inc.
Flickr is a registered trademark of Yahoo! Inc.
Any other trademarks mentioned in this manual are acknowledged to be the property of the trademark owners.
We're here to help! If you have any questions about your application or our products, contact Black Box Tech Support at 724-746-5500
or go to blackbox.com and click on "Talk to Black Box."
You'll be live with one of our technical experts in less than 30 seconds.
Federal Communications Commission and Industry Canada Radio Frequency Interference Statements
This equipment generates, uses, and can radiate radio-frequency energy, and if not installed and used properly, that is, in strict accordance with the manufacturer's instructions, may cause interference to radio communication. It has been tested and found to comply with the limits for a Class A computing device in accordance with the specifications in Subpart B of Part 15 of FCC rules, which are designed to provide reasonable protection against such interference when the equipment is operated in a commercial environment. Operation of this equipment in a residential area is likely to cause interference, in which case the user at his own expense will be required to take whatever measures may be necessary to correct the interference.
Changes or modifications not expressly approved by the party responsible for compliance could void the user's authority to operate the equipment.
This digital apparatus does not exceed the Class A limits for radio noise emission from digital apparatus set out in the Radio Interference Regulation of Industry Canada.
2.1 Introduction....7
2.2 What's Included 7
2.3 Hardware Description 7
2.3.1 Front Panel....7
2.3.2 Back Panel 8
- Hardware Installation 9
- Software: Getting Started....10
4.1 MFLY-X Concepts....10
4.2 Content Formats Supported....11
4.3 The MFLY-X User Interface 12
4.4 Content Management in MFLY-X 13
4.5 Assigning Content to MFLY-X Screens 15
4.6 Scheduling Screen Changes 16
4.7 Splitting the Screen with Layouts 19
4.8 Smart Playlists....22
4.8.1 Smart Playlists—An Introduction....22
4.8.2 Creating a Smart Playlist 22
4.9 Creating Slides Using Templates 24
- Hardware Management 27
- User Permissions 28
6.1 Permissions, Tags, and Smart Playlists....28
6.2 Groups 28
Appendix. Troubleshooting: Frequently-Asked Questions....29
1. Specifications
Agency Compliance — CE, CB, FCC, UL ^® , CCC, 8SMI, Gost, VCCI, PSE
Audio — Analog or HDMI using Realtek® ALC888S
CPU — Intel Atom ^® 330, dual-core, 1.6 GHz FSB 533
HDD — 160 GB
Network — 10/100/1000 Mbps
RAM — 1 GB
Video — nVidia ^® MCP7A-ION
Wi-Fi — 802.11 b/g
User Controls — (1) Power button; (1) Suspend button
Connectors — Video: (1) HDMI female, (1) DVI-I female;
Audio: (1) HDMI female, (2) 3.5-mm stereo jack ([1] front, [1] back);
Wired network: (1) RJ-45 jack;
Wireless network: (1) reverse TNC for antenna;
Peripherals: (6) USB Type A female: (2) front, (4) back;
Memory card: (1) slot for MS/SD/MMC (supports SD/SDHC/MS/MS Pro/MMC);
Microphone: (1) 3.5-mm jack;
Power: (1) DC input
Indicators — Power, Sleep, Light bar, HDD LED
Power — External : 100–240 VAC, 50/60 Hz, 1.5 A;
Input: 19 VDC, 3.42 A;
Output: 65 W
Size — 5.3"H x 7.4"W x 1"D (13.5 x 19 x 2.5 cm)
Weight — 1 lb. (0.45 kg)
2. Overview
2.1 Introduction
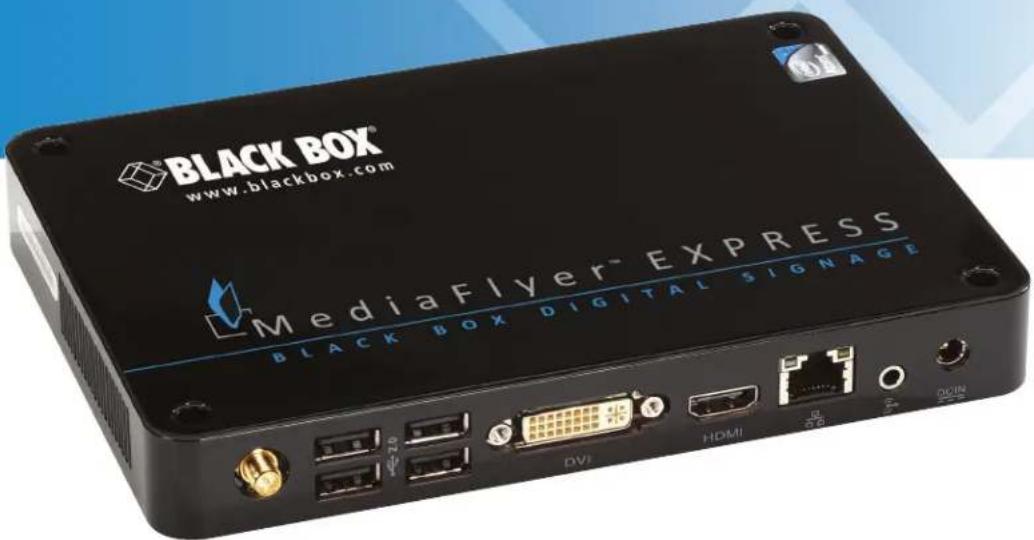
The MediaFlyer Express is a network appliance that helps you make the most of your digital signage applications. It's easy to deploy and use. It features predefined layouts, enables you to build your own layouts, offers social media integration, is simple for consumers to connect, and can be managed via the Web.
2.2 What's Included
Your package should include the following items. If anything is missing or damaged, contact Black Box Technical Support at 724-746-5500 or info@blackbox.com.
• MediaFlyer Express unit (nettop computer) • Power supply
- Software (pre-installed on nettop) • Power card
- Quick Start Guide
- HDMI cable
- VESA mounting plate
- Ethernet cable
- Stand mounting plate
- DVI to VGA adapter
- This user's manual
- Subscription card*
*Subscription length based on SKU ordered.
2.3 Hardware Description
2.3.1 Front Panel
Figure 2-1 shows the front panel of the MediaFlyer Express. Table 2-1 describes its components.
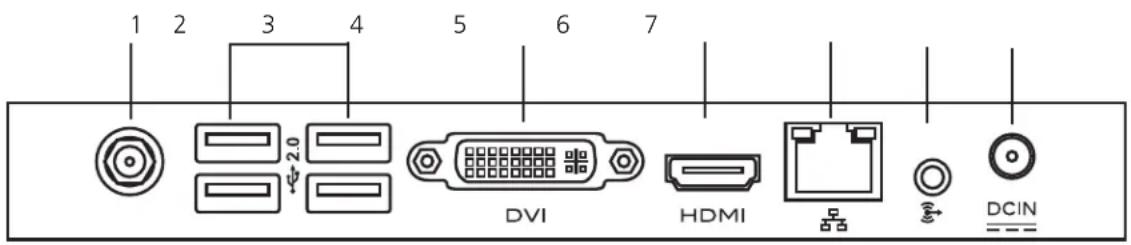
Figure 2-1. Front panel.
Table 2-1. Front-panel components.
| Number Component | Description | |
| 1 Reverse TNC | Connects to Wi-Fi antenna | |
| 2 | (4) USB 2.0 Type A ports | Link to peripherals |
| 3† | (1) DVI connector | Connects to monitors with DVI input (VGA monitors with included adapter) |
| 4 (1) HDMI connector | Connects to monitors with HDMI input | |
| 5 (1) RJ-45 connector Links to Ethernet | ||
| 6 (1) Line Out connector | Links to analog audio out | |
| 7 (1) Power | DC power in | |
†Can be used for VGA monitors with included adapter.
2.3.2 Back Panel
Figure 2-2 shows the back panel of the MediaFlyer Express. Table 2-2 describes its components.
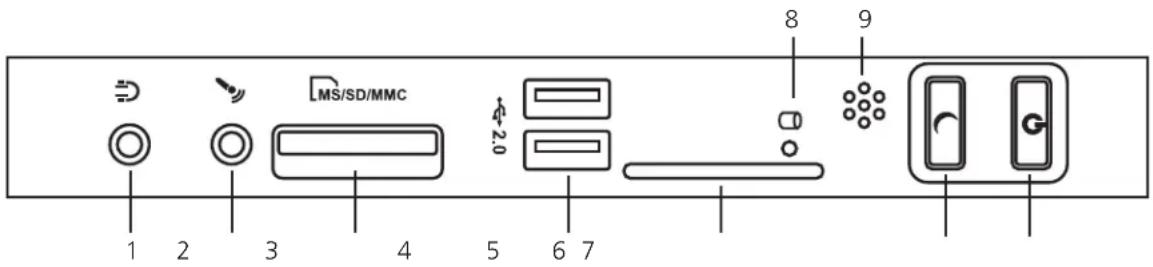
Figure 2-2. Back panel.
Table 2-2. Back-panel components.
| Number Component Description | ||
| 1 Audio connector Links to earphones or screen's audio in | ||
| 2 Audio connector Links to microphone | ||
| 3 Memory card slot Works with SD/SDHC/MS/MS Pro/MMC | ||
| 4 (2) USB Type A connectors Links to peripherals | ||
| 5 Light bar Lights the front panel | ||
| 6 | Suspend button/LED | Toggles suspend/shows status |
| 7 | Power button/LED | Toggles power/shows status |
| 8 HDD LED | Indicates HDD activity | |
3. Hardware Installation
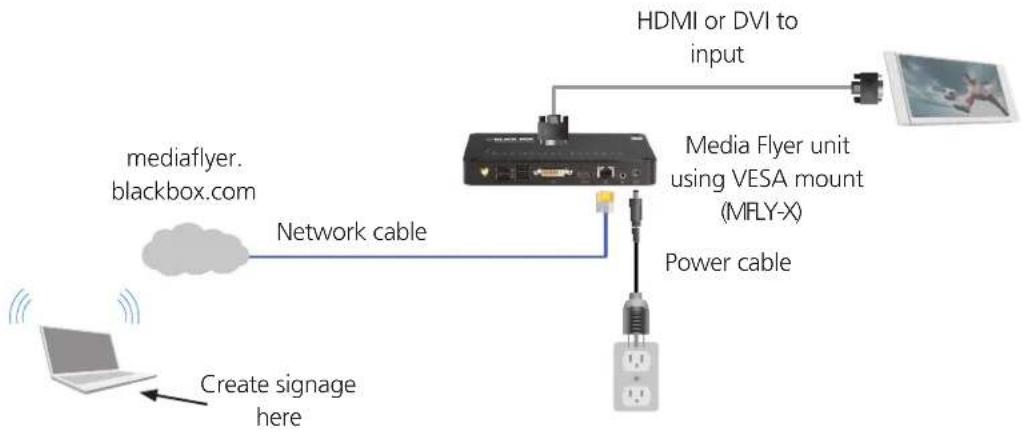
- Plug in the MediaFlyer Express components.
- Connect the components to your displays.
- Connect the components to the network.
flowchart
graph TD
    A["mediaflyer. blackbox.com"] -->|Network cable| B["Video Unit"]
    B -->|HDMI or DVI to input| C["Video Camera"]
    B -->|Power cable| D["Power Cable"]
    B -->|Media Flyer unit using VESA mount (MFLY-X)| E["Power Cable"]
    F["Create signage here"] --> B
Figure 3-1. Hardware installation.
4. Software: Getting Started
Once you've connected the hardware, you are ready to log into the software.
Using a computer with an Internet connection, go to:
mediaflyer.blackbox.com
That's where you'll go to log in and manage your MediaFlyer Express system. You'll use this a lot, so you might want to bookmark it.
NOTE: There's no "www" there, it's not the same place as the main Black Box Web site.
The MediaFlyer Express uses several up-to-date Web technologies, so we recommend using a browser like Firefox ^® , Chrome, or Safari ^® . If you have to use Internet Explorer ^® , try to use a recent version. Internet Explorer 8 or higher should work fine.
If someone in your organization has sent you an invitation to join MFLY-X, you'll have a link in the e-mail that will enable you to sign up and get started. If you're the first person in your organization logging in for the first time, you'll need to start by creating an account. There's a link in the login box that will let you do that, and it will then lead you through the steps to create your organization identity on the MFLY-X system and to register your MFLY-X hardware. It should be fairly self-explanatory, so we won't cover it here.
4.1 MFLY-X Concepts
Here are the basics of the MFLY-X model:
- MFLY-X systems belong to organizations. An organization might be a company, a family, a museum, or a school, for example.
- Users also belong to organizations. A user may be a member of several organizations at once, and each organization may have many users. Users can control the MFLY-X systems of any organizations of which they are a member.
- Organizations can have one or more sites. A site is a location, such as an office in a particular town.
- Organizations own and manage content sources. Content can come from anywhere on the Internet, and on the MFLY-X website you specify. Alternatively, you can upload content to the MFLY-X servers, from where it can be retrieved by any MFLY-X systems in your organization. It can be of many different types including, for example, images, movies, web pages, PDF files, RSS feeds, webcams, or static information (text) pages. We refer to these generically as sources.
- Content sources can be grouped into playlists. A playlist is like a slideshow, a sequence of different sources, each of which appears for a specified duration. Playlists can contain a mixture of different source types. A playlist is also considered to be a source, so playlists can contain other playlists.
- A source can be in more than one playlist. If you've created a source that reads the RSS feed of headlines from a particular newspaper, for example, you could include it in a playlist called "Global news," and one called "National news."
- Displays are told to show a particular source by assigning that source to the display. The most common example is to assign a playlist to a display. The same source can be on multiple displays, or you can have a different source assigned to each and every display.
- A screen schedule lets you define what should be shown on a display and when, using a calendar-type view. You can assign a schedule to a display, so you don't have to change things manually on a regular basis.
- A screen layout lets you put several sources on the screen at once by dividing the display into two or more areas. You can have a slideshow in the top part of the screen and a news ticker below it.
4.2 Content Formats Supported
The goal of MFLY-X is to make it easy to get your content onto your screens. You may have software that you already use to create content. MFLY-X can display PowerPoint® presentations, PDF documents, Web pages, movies, photos, and RSS feeds, to name just a few. You may decide that you want to reformat content for use on your MFLY-X screen, but you can get started using the tools you already know. Below is a list of the supported content types at the time of this writing:
Table 4-1. Supported content types.
| Icon Format Type Access Method | ||
 | Video files (more info on video formats and codecs) Both link and upload | |
 | Bitmapped images in JPEG, GIF, PNG, BMP, or TIFF formats Both link and upload | |
 | Web pages Link only | |
 | PowerPoint presentations in both PPT and PPTX format Upload only | |
 | PDF documents Both link and upload | |
 | Flash Both link and upload | |
 | RSS feeds Link only | |
 | RSS tickertape Link only | |
 | Photocast feeds Link only | |
 | iCal format calendars (for example, from Google * Calendar Link only | |
When your content is in MFLY-X, the icon will change to reflect whether you have linked or uploaded your content. Compare the difference in the icons below.

Image icon for an uploaded file.

Image icon for a file linked by its URL.
4.3 The MFLY-X User Interface
Once you've logged into MFLY-X, you'll see a screen similar to this:
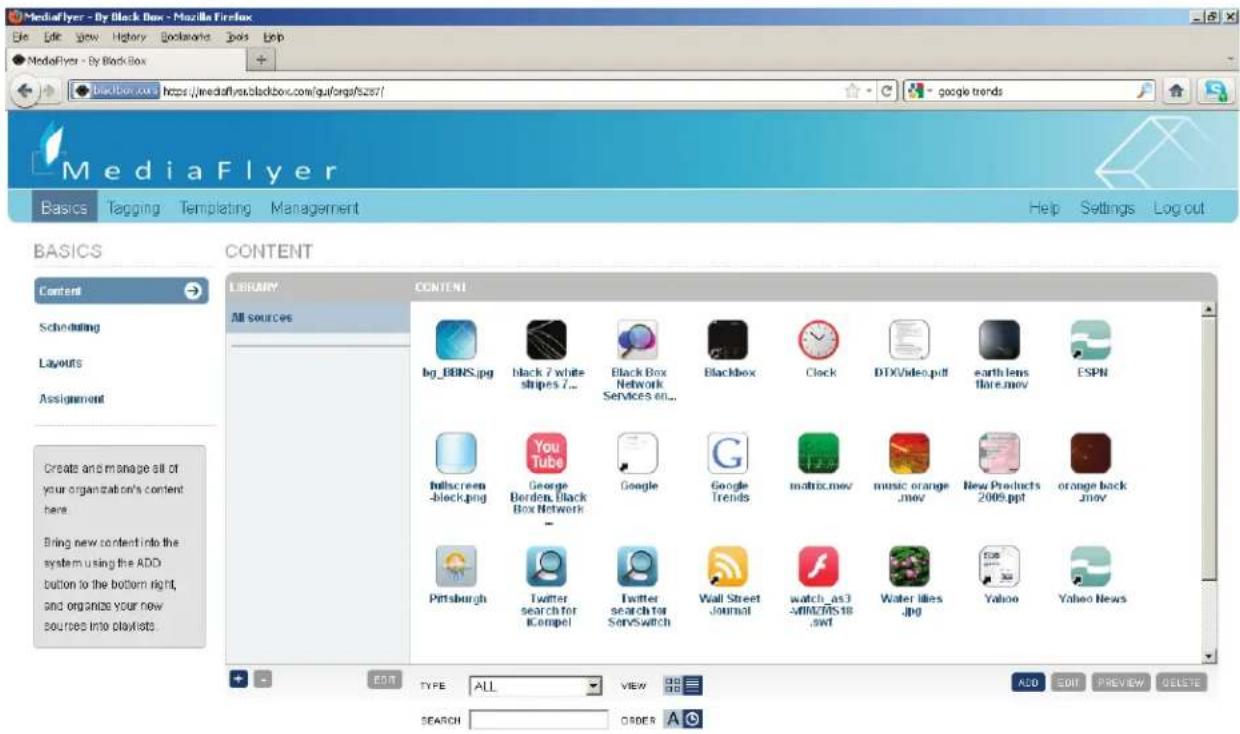
Figure 4-1. Opening screen.
At the top you see the overall section headings: Basics, Tagging, Management, etc.
- Basics describes how to add content, organize and schedule it, and put it on your displays. You'll spend most of your time here.
- Tagging lets you add keyword tags to your content and your displays so you can use them later.
- Management enables you to control various aspects of your organization's MFLY-X account and systems: your hardware, user accounts, and so forth.
Within these sections, the interface is divided into several panes based around simple tasks. In the Basics section, for example, you can see a menu on the left showing Content, Scheduling, Layouts, and Assignment.
4.4 Content Management in MFLY-X
This section describes how to tell MFLY-X about your content and arrange it into playlists.
The User Interface Overview
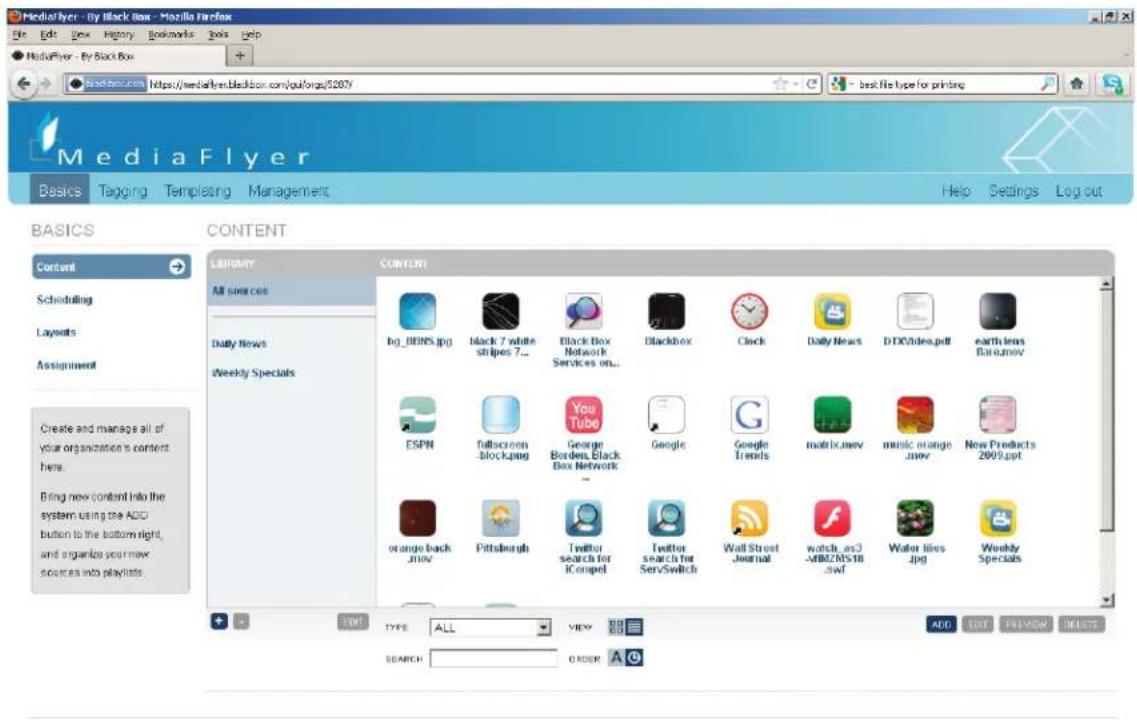
Figure 4-2. User interface screen.
This is the content management pane of the MFLY-X Web site interface. Here you can add and organize your content. On the left is the Library column, which shows a list of your Playlists. In the main part of the pane, you can see an icon-based view of all your sources (or, if a playlist is selected on the left, the entries in that playlist, shown in the order that they will be played.
The icons will, if possible, be shown as a thumbnail preview, and if not, then as an icon representing the type of source. For a full description of the icons and what they mean, see the Content Formats article. As your content library grows larger, you may want to find particular items quickly. You can find an item by typing part of its name into the search box at the bottom of the pane, and you can show only sources of a particular type by using the pull-down "Type" selector.
The other buttons at the bottom enable you to select the ordering of your sources in the display—either alphanumerically, or in reverse chronological order (so the newer items appear first)—and switch between an icon-based view as shown in Figure 4-2 and a list view.
Adding New Sources
You can add new sources by clicking on the "ADD" button in the bottom right of the view. Choose from four main options when adding new sources:
- Upload to MFLY-X—Your files are stored on our servers where they can only be accessed by your MFLY-X hardware.
-
Bookmark a URL—You can enter the URL of a file or page on the Internet or your local Web server, and the MFLY-X hardware will download it directly from the URL when required.
-
Create a smart playlist—This is a playlist that is created and updated automatically based on certain rules. You could create one that contained all sources with the word "News" in their name, for example.
- Other Web services—You can access content already stored on common Web services such as Flickr® and YouTube®. Over time, we plan to integrate with many other services this way.
You can try it now. If you have a photo on your PC, for example, or a PDF file, try uploading it to MFLY-X. You can always delete it later. As you've seen in the Content Formats page, some source types need to be handled in particular ways. For instance, PowerPoint files must be uploaded to our servers if you want them to appear on your MFLY-X box, because the server converts them to a format that the MFLY-X hardware can understand. Similarly, RSS feeds, by their very nature, are live data and only work when bookmarked by their URL.
Previewing Sources
Select any content item and click "Preview" to bring up a window showing the content. This works for playlists, videos, Flash, Web pages, images, and so on. This is helpful if you are trying to remember exactly which version of the presentation you've uploaded, or want to see how the items in a playlist might work together.
CAUTION: The Preview function doesn't work in Internet Explorer ^® 6 or 7.
Managing Playlists
A playlist is a ordered slideshow of content, with each item being displayed for a given duration. You can put multiple sources into a playlist as a way of creating a running order for when they appear on a screen.
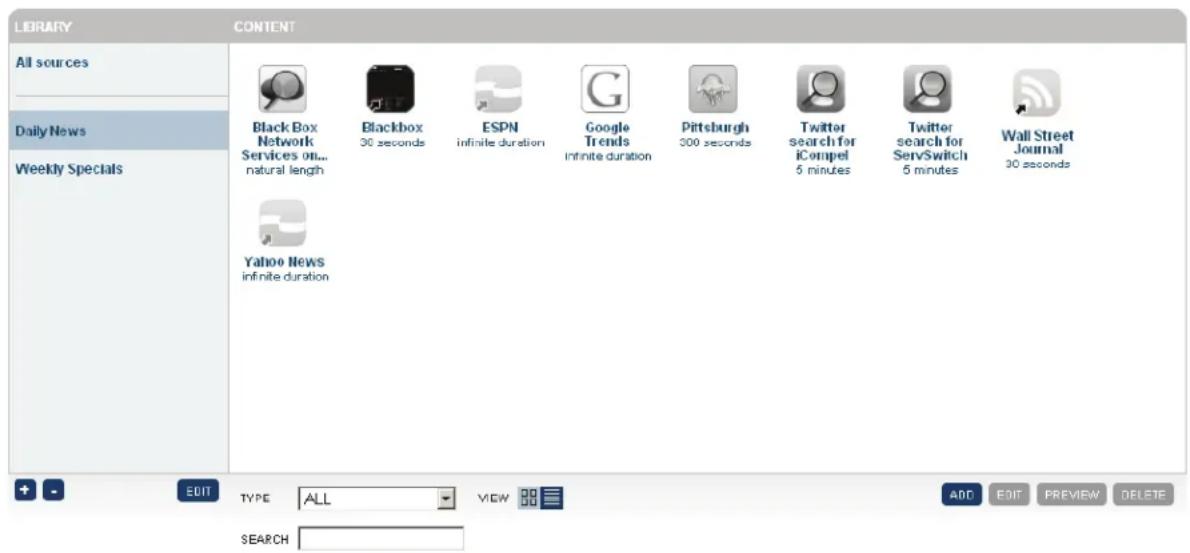
Figure 4-3. Content Management screen.
To create a new playlist, click the "+" button at the bottom of the Library column. To delete a playlist, select it in the Library column and press the "-" button. To modify a playlist's name or other attributes, select it in the Library column and then press the "EDIT" button under the column, or double-click on the playlist in the column.
To add items to a playlist, go to the "All Sources" view, find the source you want in the main panel, and drag it onto the playlist you want in the Library column. When you do this, the source is added to the end of the playlist with its default duration—for things like images that don't have an intrinsic duration of their own, this defaults to 30 seconds, but you can change it.
To edit the playlist's order and the duration of entries, select the playlist in the Library column so you can see all the entries in it, as shown in Figure 4-3. In this view, you can drag items around to change their order of playback, and you can edit the duration of items using either the "EDIT" button or double-clicking on the entry. You can select multiple items at once using ctrl-click on Windows® and command-click on the Mac®, or you can select a sequence of items by clicking on the first item, then shift-clicking on the last item.
Sources versus Playlist Entries
When you look at the entries in a playlist, you'll notice that the icons are not in full color, but in black and white. This is to remind you that you are looking at a playlist entry and not at the source itself. Often this distinction is fairly unimportant, but there is one situation where you will definitely want to remember it: When you edit or delete a source itself, then all uses of that source are affected, but if you edit or delete a playlist entry, then you affect only the presence of the source in that playlist. So, for example, if you delete an image from a playlist, the image is still in MFLY-X and can be used again—it just won't be a part of that playlist. If, however, you delete the image source from "All sources," then it is totally removed from MFLY-X and from all the playlists it appears in.
4.5 Assigning Content to MFLY-X Screens
Once MFLY-X knows about your content, the process of putting it into a screen is simple. In the Basics screen, choose the Assignment pane. To put a piece of content onto a display, simply drag the icon for the content onto the icon for the display.
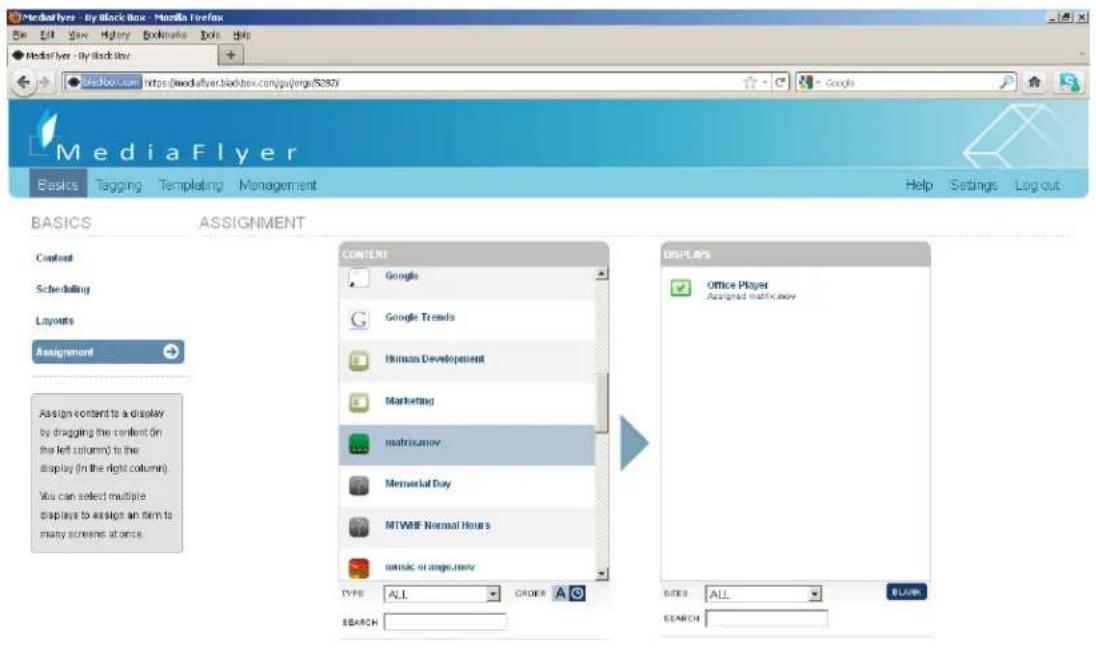
Figure 4-4. Assignment screen.
This works the same way whether the source is a simple one, such as an image, or a more complex one, such as a playlist or schedule. It also works whether the display is on your local network or on the far side of the world.
You can use Ctrl-click on Windows, or Cmd-click on a Mac, to select several displays before you start dragging. Then, when you drop the source onto one of them, it will be assigned to all of them at once.
4.6 Scheduling Screen Changes
You can schedule assignments of content to screens so that they happen automatically on particular days or at certain times of day. Once you've created a schedule, you can assign it to a screen in just the same way as a playlist.
To do this, you select the Scheduling screen. See Figure 4-5.
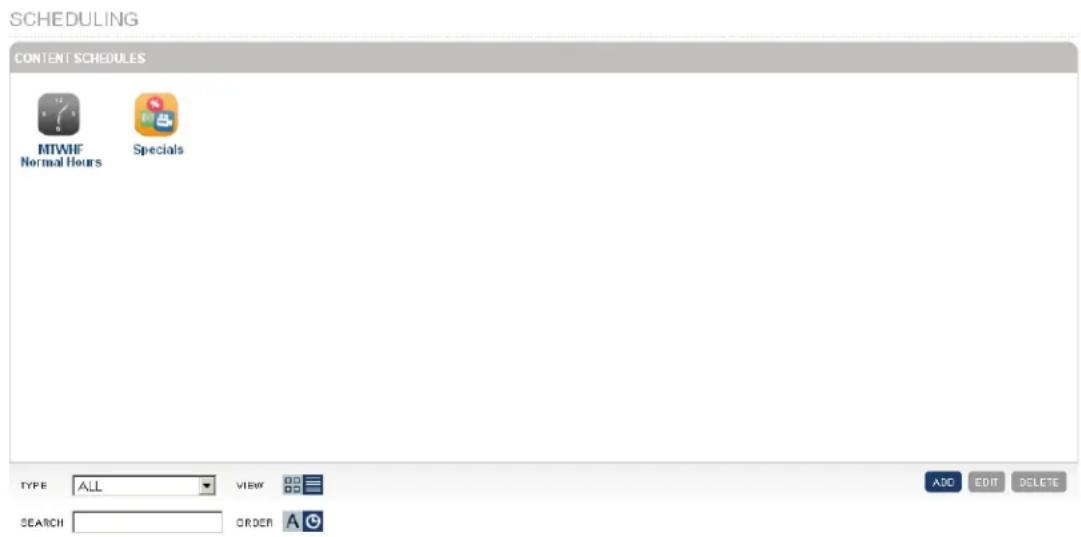
Figure 4-5. Scheduling screen.
Click the "ADD" button in the bottom right to create a schedule, and follow the links to give your schedule a name. Then you'll see a calendar style view of the week. See Figure 4-6.
SCHEDULE EDITOR
| SundayMay 29, 2011 | MondayMay 30, 2011 | TuesdayMay 31, 2011 | WednesdayJun 01, 2011 | ThursdayJun 02, 2011 | FridayJun 03, 2011 | SaturdayJun 04, 2011 | |
| 08:00 | |||||||
| 08:30 to 09:30black 7 white stripes 7 stars mov | 08:30 to 09:30black 7 white stripes 7 stars mov | 08:30 to 09:30black 7 white stripes 7 stars mov | 08:30 to 09:30black 7 white stripes 7 stars mov | 08:30 to 09:30black 7 white stripes 7 stars mov | |||
| 09:00 | 09:30 to 10:30matrix mov | 09:30 to 10:30matrix mov | 09:30 to 10:30matrix mov | 09:30 to 10:30matrix mov | 09:30 to 10:30matrix mov | ||
| 10:00 | 10:30 to 11:30Google Trends | 10:30 to 11:30Google Trends | 10:30 to 11:30Google Trends | 10:30 to 11:30Google Trends | 10:30 to 11:30Google Trends | ||
| 11:00 | 11:30 to 12:30ESPN | 11:30 to 12:30ESPN | 11:30 to 12:30ESPN | 11:30 to 12:30ESPN | 11:30 to 12:30ESPN | ||
| 12:00 | 12:30 to 13:30earth lens flare mov | 12:30 to 13:30earth lens flare mov | 12:30 to 13:30earth lens flare mov | 12:30 to 13:30earth lens flare mov | 12:30 to 13:30earth lens flare mov | ||
| 13:00 | 13:30 to 14:30Black Box Network Services on Flickr | 13:30 to 14:30Black Box Network Services on Flickr | 13:30 to 14:30Black Box Network Services on Flickr | 13:30 to 14:30Black Box Network Services on Flickr | 13:30 to 14:30Black Box Network Services on Flickr | ||
| 14:00 | 14:30 to 15:30Daily News | 14:30 to 15:30Daily News | 14:30 to 15:30Daily News | 14:30 to 15:30Daily News | 14:30 to 15:30Daily News | ||
| 15:00 | 15:30 to 16:30DTX Video pdf | 15:30 to 16:30DTX Video pdf | 15:30 to 16:30DTX Video pdf | 15:30 to 16:30DTX Video pdf | 15:30 to 16:30DTX Video pdf | ||
| 16:00 | 16:30 to 17:00 | 16:30 to 17:00 | 16:30 to 17:00 | 16:30 to 17:00 | 16:30 to 17:00 | ||
| 17:00 | |||||||
| 18:00 |
Figure 4-6. Calendar view of week.
You can use the "ADD" button, or click and drag out a time during a day, and a window will appear that enables you to specify the start and end times, the source to be displayed during that period (see Figure 4-7), and whether you want the assignment to happen just on that one day, or whether it should repeat periodically, for example, every day, or once a week.
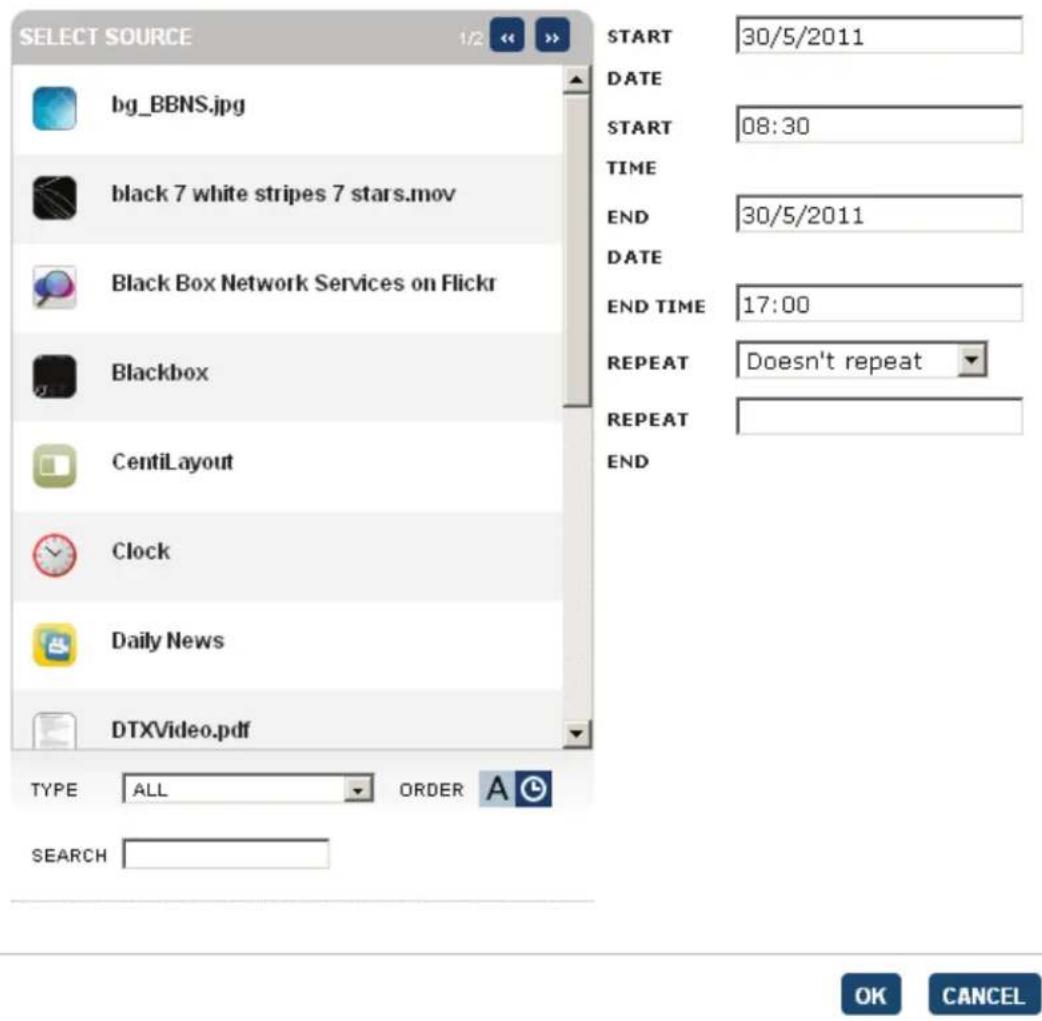
Figure 4-7. Select source screen.
When you've finished creating your schedule, you can click one of the top-level section tabs to return to the main control panes. The schedule will appear on your Assignment screen and you can drag and drop it onto the screens where it's needed, just like any conventional source or playlist.
During periods when nothing is specified in the schedule, the screen will blank, and, if your display permits it, will go into standby mode. This is very useful for saving power overnight or when a building is unoccupied.
4.7 Splitting the Screen with Layouts
Layouts enable you to put two or more items of content on a screen at once. For example, you can use most of the screen to show a slideshow, while having a news ticker scroll across the top or the bottom.
To set up a layout, click "Basics" and then "Layout." Click the "Add" button to start the process. See Figure 4-8.
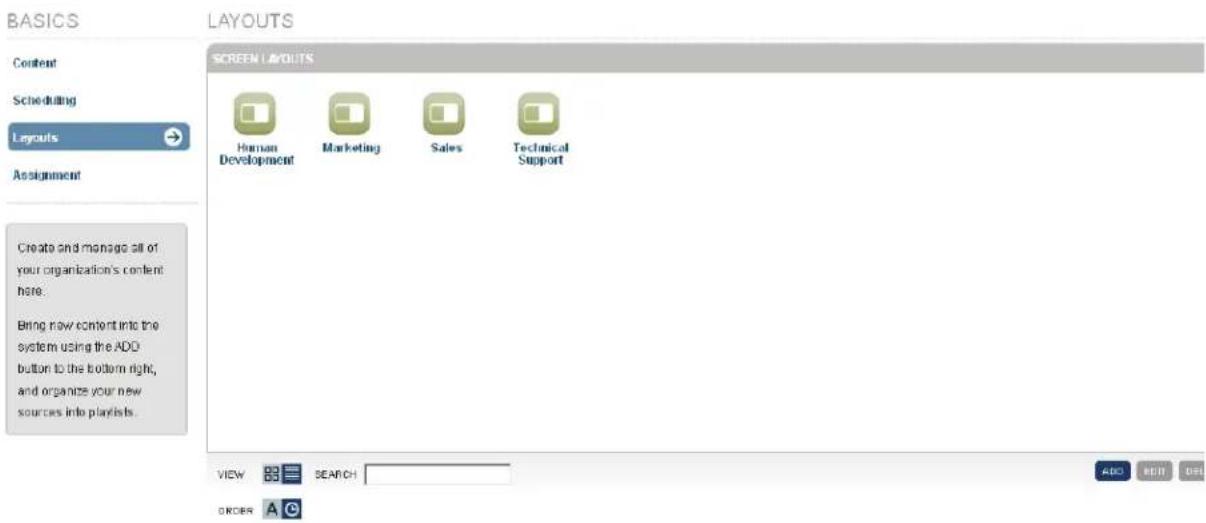
Figure 4-8. Layouts.
Give your layout a name and then choose how you want to split the screen. See Figure 4-9.
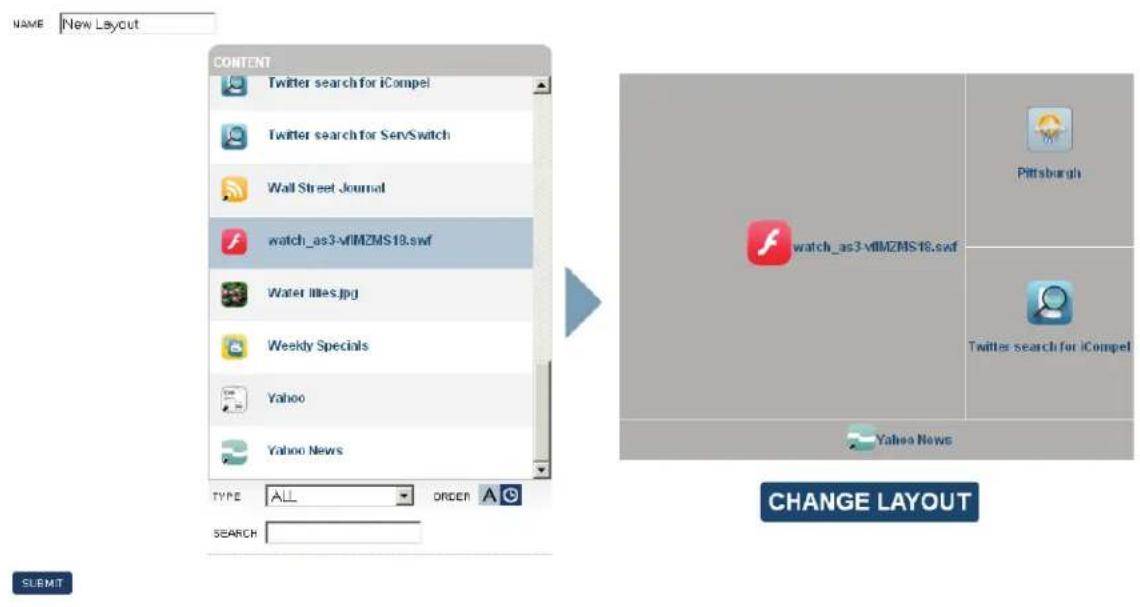
Figure 4-9. Split screen.
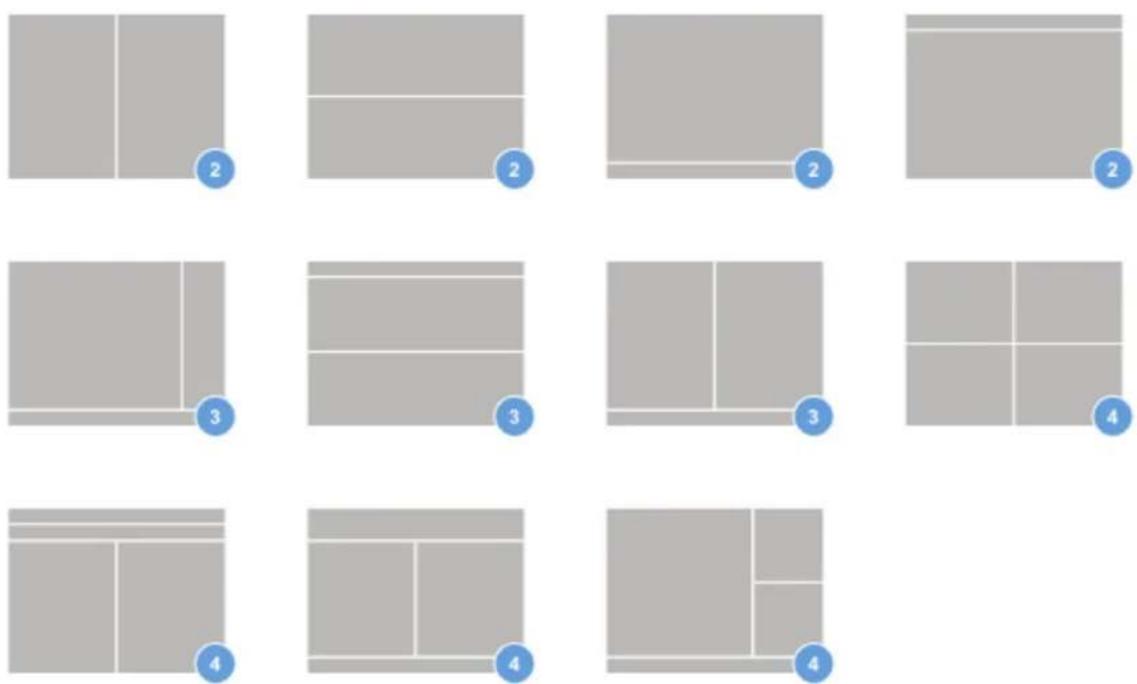
MFLY-X offers the following options for splitting your display screen:
natural_image
Grid of 12 gray rectangular blocks with blue circular annotations labeled 2, 3, and 4 (no text or symbols on blocks)Figure 4-10. Display screen splitting options.
Table 4-2. Options for splitting a display screen.
| Number of screen partitions shown in Figure 4-10 Description |
| 2 (first screen in the first row of screens shown above) Vertical half-split |
| 2 (second screen in the first row of screens shown above) Horizontal half-split |
| 2 (third screen in the first row of screens shown above) Simple ticker at bottom |
| 2 (fourth screen in the first row of screens shown above) Simple ticker at top |
| 3 (first screen in the second row of screens shown above) Simple ticker plus sidebar |
| 3 (second screen in the second row of screens shown above) Complex horizontal feed layout |
| 3 (third screen in the second row of screens shown above) Simple ticker plus sidebar |
| 4 (fourth screen in the second row of screens shown above) Quad split |
| 4 (first screen in the third row of screens shown above) Complex feed layout |
| 4 (second screen in the third row of screens shown above) Vertical half-split, simple tickers at top and bottom |
| 4 (third screen in the third row of screens shown above) Uneven triple split, simple ticker at bottom |
Each gives you two or more regions of the screen into which you can put content. That includes playlists, smart playlists, videos, HTML pages—all the usual options except schedules. You can schedule your displays to show a layout (once you create a layout, it acts just like other content items and can be included in schedules), but you can't put a schedule in a layout.
After you choose how you want to divide the pixels, simply drag and drop content items from left to right to define the layout.
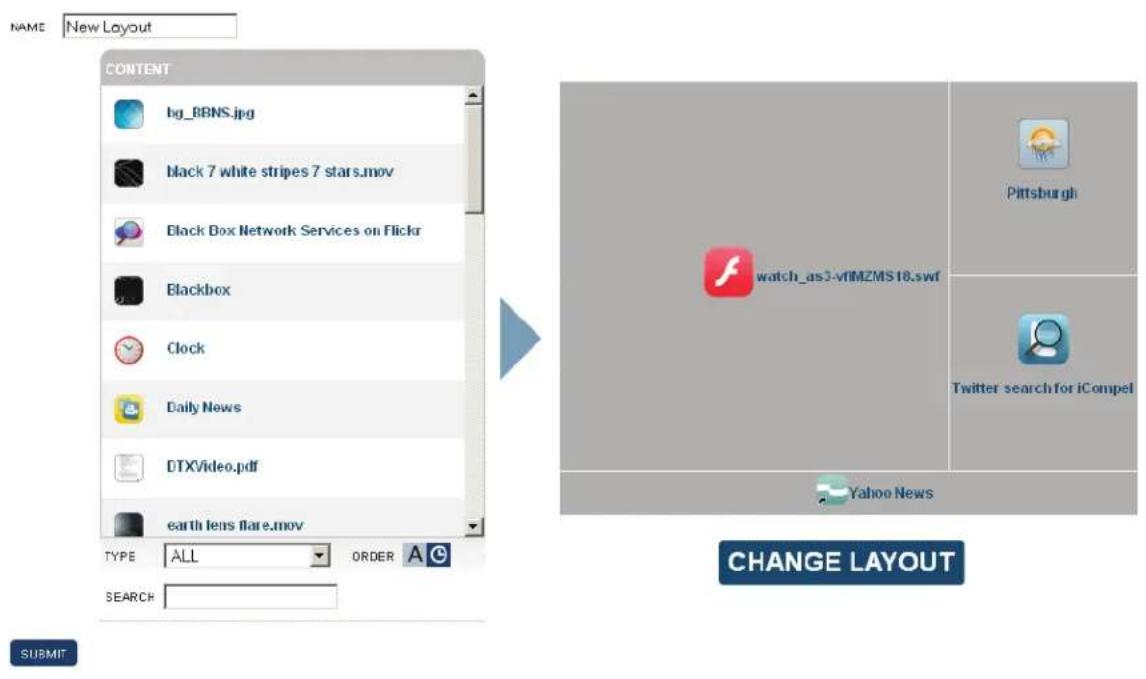
Figure 4-11. Layout style.
The MFLY-X also has content scaling options. For example, suppose you have a high-resolution version of your company logo that exactly fills your display. You decide to use that in the main part of one of the "simple ticker" layouts. Because the display allocates some of the pixels to a ticker, the logo no longer fills the screen completely (and its aspect ratio is different, too). There is an option for this situation: After you finish your layout and save it, go to your logo, double-click it and set "Expand and crop to fill screen" against the Scaling option under the Meta tag. You can see these options in our Advanced use screencast.
Some layouts have long, thin horizontal sections designed just for tickers. There's nothing to stop you from putting other content there, except that it will look either very small or very stretched (depending on its natural aspect ratio and the options you choose for content scaling).
To save and use your Layout, click "Submit" and then use the Assignment page to display it on one or more screens. As mentioned earlier, you can also use layouts within schedules.
4.8 Smart Playlists
Smart Playlists are a powerful way to manage content. They are effectively filters that automatically choose a subset of your content and output it. When assigned to a display, the display shows the items according to their default durations.
4.8.1 Smart Playlists—an Introduction
Think of a smart playlist as a way of deciding whether a particular piece of content should display on a given display. Additional options enable you to specify things such as the order, but that's the basic concept. If you use iTunes ^® , SmartPlaylists might sound familiar: in MFLY-X, they behave just like playlists in iTunes with the "live updating" option selected.
If you've only got a small number of displays, or a relatively small content library, smart playlists might not be necessary. Use smart playlists to manage a large library of content or a large number of displays.
4.8.2 Creating a Smart Playlist
Smart playlists can be assigned to displays, and included in schedules. A smart playlist is logically a piece of content in its own right, so you create them under Basics > Content > Add. If you've already created one and you want to edit it, just double click.
Other than the name box, the options are all explained below. Smart playlists have some general settings and then some filters—the general settings define how the playlist behaves, then the filter conditions define which content will be displayed on which displays.
Smart Playlist Settings
You can find these under "Edit smart playlist." See Table 4-3.
Table 4-3. Edit smart playlists.
| Action Description | |
| Start with: Choose “All sources” or one of your playlists. | Only content within the chosen playlist will be output by the smart playlist.NOTE: You can start from one of your existing smart playlists. This gives you the ability to combine groups of filter conditions into more complex queries (if you need to). |
| Order | Alphabetically—self explanatoryCreation date—self explanatoryRandom—all items of content are output in a random sequence, regardless of their memberships in other playlists.Random, but not in child playlists—plays items in the order defined in your playlists, but randomizes the order of those playlists. For example, you might have several story-telling playlists that contain an ordered series of images. Use this option to ensure that the stories always make sense while playing the stories in a random order. |
| Match | Refers to the filter conditions defined below:All filters—content is output only it it meets all of the criteria. Imagine a logical “AND” between each filter creation.Any filter—content is output if it meets at least one of the criteria (just like a logical “OR.”) |
Filter Conditions
You can find this under "Define Filters." Get started by clicking "Add additional filter; each condition has a button next to it that removes that condition. See Table 4-4.
Table 4-4. Filter conditions.
| Condition Description | |
| Content tagged with... Only content tagged with the specified tag is output. | |
| Content not tagged with... Content with the specified tag is not output. | |
| Content name contains... Content is output if its name contains the specified terms(s). | |
| Content and display share any tag | Content is output on a display if any of its tags match any of the tags on the display. |
| All content tags also present on display | Content is output on a display only if all of its tags are also present on the display. |
| Content is tagged with display's site name | Content is output on a particular display only if its tags include the name of the display's site. See Managing Hardware. |
| Content type is... Only content of the specified type is output. | |
| Content type is not... Content is only output if its type is different from the type specified. | |
| Content is not tagged Content is only output if it has no tags at all. | |
You might want your smart playlist to behave the same for every display—if so, just choose filtering choices that relate only to the content. Then, only properties of the content are considered when deciding whether it gets output. Tagging your displays and organizing them into sites can seem complicated, but it will save effort if you have a large number of displays.
4.9 Creating Slides Using Templates
Slides offer a quick way to get a simple message on a screen in a way that's:
- Editable
- Attractive and can be branded (for example, with your logo)
- Simpler and quicker to keep up-to-date than PowerPoint or PDF slides
This is perfect for situations where you want to let non-technical users edit on-screen words without having to upload files, assign things to displays, or use PowerPoint.
NOTE: PowerPoint and PDFs are fully supported by MFLY-X. Use these if you have complicated information to display.
Start by setting up a template
Slides are based on templates. You can have one template and several slides based on it. Each slide inherits its visual appearance from its template, but has completely independent text. See Figure 4-12.
Click "Templating," then "Templates" to get started.
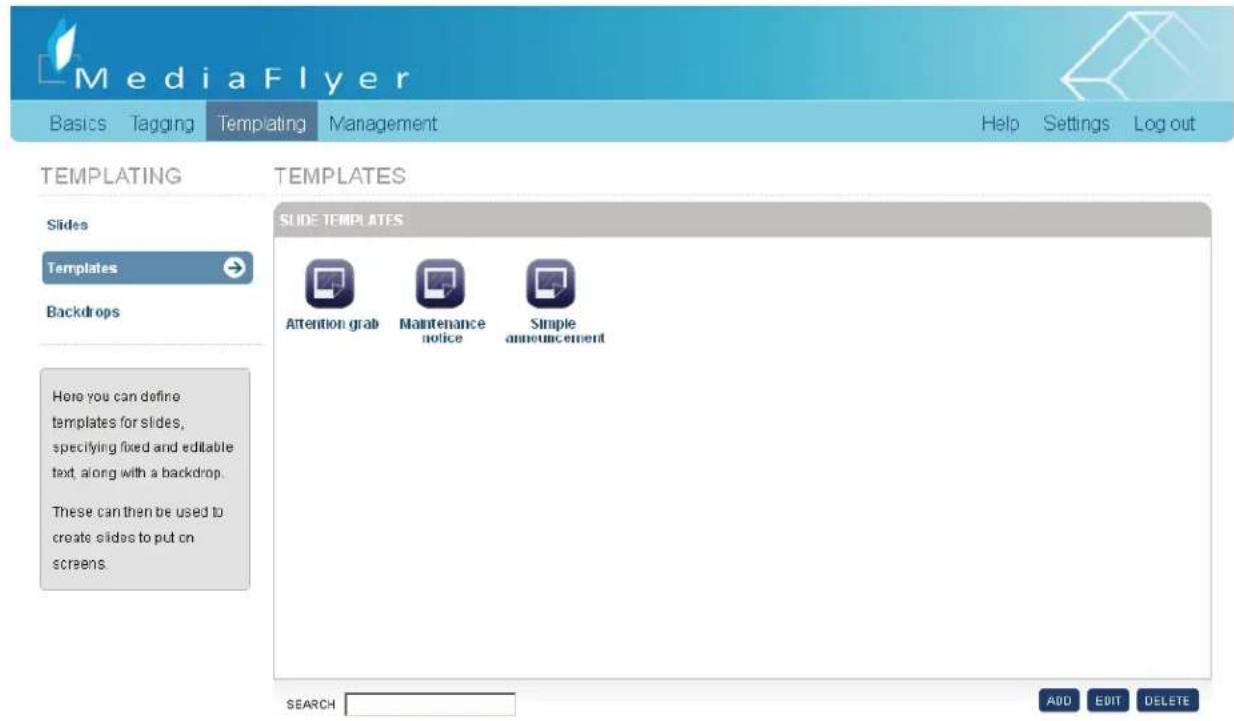
Figure 4-12. Templating screen.
Templates are based on a backdrop. MFLY-X has many generally useful backdrops, but you can also upload your own. Use the Upload button under Templates > Backdrops. Read the note on screen resolutions when considering uploading your own backdrops.
Select a backdrop from the menu on the right, and then use the "Add Fixed Text" and "Add Editable Text" buttons to place text into the central editing pane. See Figure 4-13.
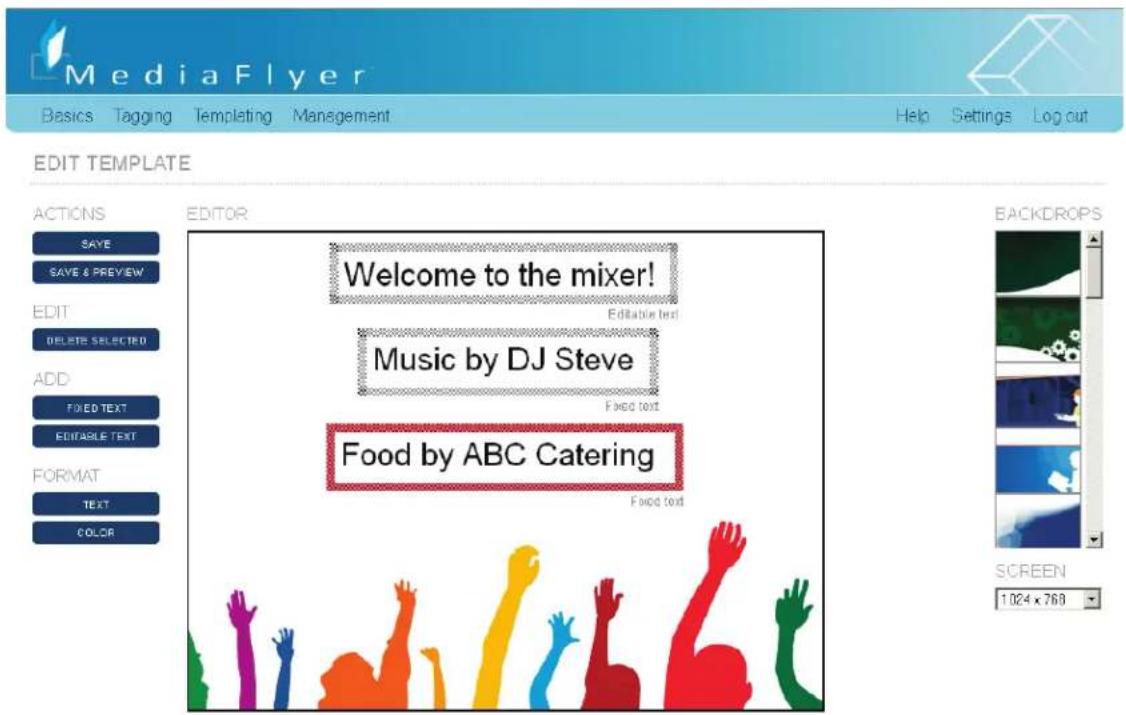
Figure 4-13. Edit Template screen.
Table 4-5. Buttons on the Edit Template screen.
| Button Description | |
| Save Saves any changes to the template back to MFLY-X. | |
| Save and Preview | Save any changes to the template back to MFLY-X, then shows an image preview of how the slide might look on your screen. |
| Delete selected Removes the current text object (highlighted in red). | |
| (Add) fixed text | Fixed text is the same on every slide. For example, it might be your company name or a standard announcement. In Figure 4-13, “Food by ABC Catering” and “Music by DJ Steve” are fixed text, whereas “Welcome to the mixer!” is editable text. |
| (Add) editable text | Editable text fields are placeholders for the text to be used once slides are created. In the example shown in Figure 4-13, “Welcome to the mixer!” is an editable text field—you can fill in the day's message using this placeholder. |
| (Format) text Enables you to change the size of the selected text object (highlighted in red). | |
| (Format) color | Launches a color selection box to let you choose the color for the selected text (highlighted in red). |
Text objects can be moved and resized by clicking and dragging within the central edit area. Double-click them to change the words.
A note about screen resolutions
The screen size selector at the bottom right is intended to enable you to design a template with a screen size in mind. When using normal software to create slides, the target screen is usually your own screen or a projector driven by your own PC. When using MFLY-X, the situation is different: The screen isn't connected to your computer. The screen isn't associated with the slide until you assign it using MFLY-X, and you could put the same slide on very different screens.
Design slides with the resolution set as closely as possible to that of the screens you intend the content to be displayed on. Do the same for images you use as backdrops.
Click "Save" and preview at any time to see a simulation of your slide on a screen of the chosen size.
The MediaFlyer Express unit might not have exactly the same fonts as your Web browser, so the final display might be different.
Think ahead about line breaks. Extend your (editable) text boxes as far as you are prepared for text to run (see "Welcome to the Mixer!" and "Food by ABC Catering" in the screenshot)—don't just leave them tightly cropped to the name of the field.
Create slides based on the templates
After you set up and save your template, click Templating > Slides, then "Add" to build slides based on it. MFLY-X prompts you for a name and a choice of template, then shows a screen similar to the one shown in Figure 4-14.
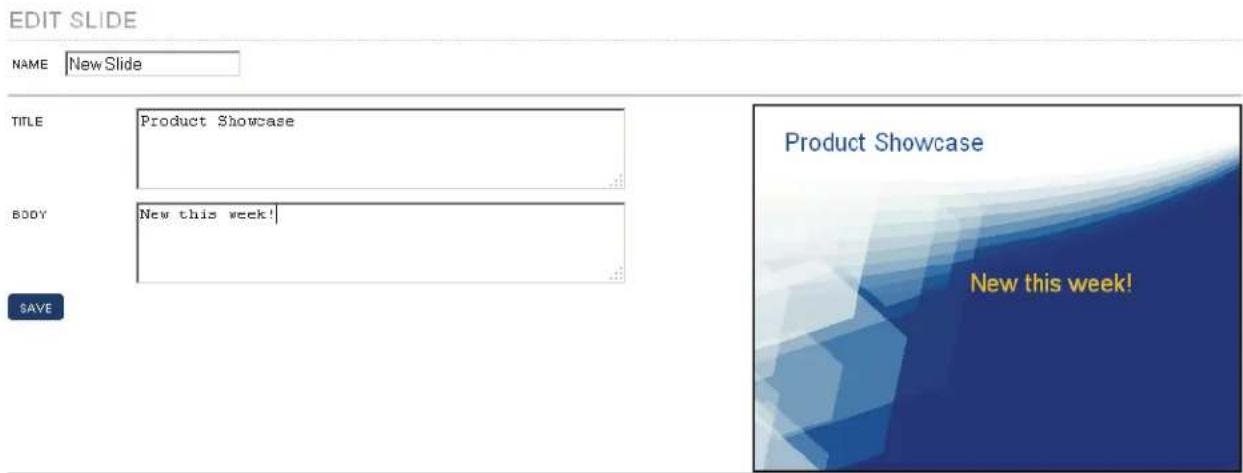
Figure 4-14. Edit Slide screen.
Your editable fields have been turned into entry boxes, into which you can put messages or information. The slide preview to the right updates as you do.
Create as many slides as you need, all based on one template. In the example, three slides were created to allow staff to edit the details of new products while the screen continues to show the product showcase.
Assign slides to displays
After you create slides, assign them to displays just like any other content item. You can put them in schedules or playlists.
Let people edit the text
Anyone who has the right permissions can log in, double-click the slide and then edit the words, without changing the layout, formatting, or branding of the content. Displays open immediately to reflect changes when slides are saved.
5. Hardware Management
The Hardware Management pane (Management > Hardware) enables you to see the status of your MFLY-X hardware and manage how it is distributed across your organization.
Managing your sites
Your organizations can have multiple sites. They might be offices in different cities or different faculties in a university. Each site will typically have its own local-area network, with several MFLY-X connected screens and one or more MediaFlyer Express boxes.
Your sites are shown in the left-hand column of the top pane. You can create, delete, and rename them using the buttons at the bottom of the column. You can specify that displays are at a particular site by dragging them to the site in the same way that you dragged sources onto playlists earlier.
Double-click a display's icon to configure certain aspects such as its resolution, or whether it is in portrait mode, in which case the content should be rotated.
Checking the status of your MFLY-X system
The MFLY-X system is designed so that you only need to plug in the hardware, connect it to your network that's already connected to the Internet, and power it on. If something goes wrong, any issues should be visible in this pane. Here we show the various states for your MediaFlyer Express box.
NOTE: To display the hardware icons updates, refresh the MFLY-X web page.
Display Status
The MediaFlyer Express unit that you connect to your displays, appears in one of the following three states described in Table 5-1.
Table 5-1. Icons and states.
| Icon Description | |
| Green The MediaFlyer is operating normally and showing a source. | |
| Gray | The MediaFlyer is operating normally but has been turned off either using the “blank” feature or it is showing a Screen Schedule with no content schedule for display currently. |
| Red | The MediaFlyer cannot currently be seen from the MFLY-X Web site, and any operations you carry out will not take effect until the issue is resolved. |
NOTE: When a Media Flyer is shown as not being reachable, either the MFLY-X pod is pwered off, or it cannot connect to the Internet.
To power off a screen, simply select the screen in the Content Assignment panel on the Web site and click the "BLANK" button.
6. User Permissions
MFLY-X uses a very simple hierarchy. By default, everyone in an organization has permission to do anything, but in some situations this is not ideal.
To make it simple to manage, we defined some permission levels that you can assign to users. Table 6-1 shows the permission levels available, with the most privileged at the top.
Table 6-1. User permission levels.
| Level Description | |
| Edit the organization and users | The user can add and edit users, and organization-wide settings such as enabling detailed playback reporting. |
| Edit and add hardware The user can install, remove, and reconfigure any MFLY-X hardware settings. | |
| Assign to all screens The user can assign any content to any screen in a given organization. | |
| Edit all sources The user can modify and delete any sources in that organization. | |
| Restricted assignment | The user can assign content only to screens for which they are the designated controller. |
| Restricted source editing | The user can create new sources, and edit and modify only sources they created. |
At each level, users automatically inherit the permissions of lower levels: they are cumulative. For example, a user set to the "Edit all sources" level can modify any source in an organization, but only assign things to screens they control. (This is inherited from "Restricted Assignment." If the user is to be allowed to assign to any screen, he would need to be upgraded to "Assign all screens."
Only users in the “Edit the organization and users’ level” level of permissions can control other users’ permissions. However, users at this permission level can’t adjust their own permission to be lower.
Editing permissions
Editing user permissions is simple. In the MFLY-X interface, go to the Management screen on the top bar, then select "Users." Here, you will see a view of all the users in the organization. Double-clicking on a user (as long as you have suitable permissions), will let you edit that user's details, including adjusting their permission level.
To adjust who controls a screen, double-click on a screen's icon, go to the Meta panel in the edit dialog, and set the controller to the appropriate user. Screens can be controlled by "No controller," a user account, or a group (see Section 6.1).
6.1 Permissions, Tags, and Smart Playlists
The one place where the user permissions need to be carefully observed is when Smart Playlists are assigned to screens. One common Smart Playlist people use is “Select all content in the organization with tags that match these specified.” If this is assigned to a screen, then even if other users couldn’t otherwise assign to that screen, their content with matching tags will appear there.
If you don't want this to happen, you must ensure that your Smart Playlist doesn't select from all sources in the organization, but instead uses an existing Playlist of content to which others can't have access.
6.2 Groups
Each user account can be a member of zero or more groups. Adding, editing, and removing user groups is similar to content management: use "+" "-" and edit under the list of groups. Drag and drop users into the groups just as you would add content into a playlist.
To allow one screen to be controlled by more than one user, set the screen's controller to a group. Then add users to that group and remember that each user requires at least "restricted assignment" permissions.
Appendix: Troubleshooting: Frequently Asked Questions
Q. What sort of screens can I use with Media Flyer?
You can use anything with a DVI, HDMI or, through the use of adapters, VGA connection, including computer monitors, projectors, plasmas, and LCDs. The maximum resolution supported is 1920 x 1200 at 60 Hz and 24-bit color.
Q. Can each screen show different content?
Yes! You can control the content being shown on any display, anywhere in your organization, individually. Or you can set any number of your displays to show the same thing. And you can do it from anywhere!
Q. Why not just use Windows PCs to drive the screens?
Running PCs to do this is high maintenance. They require software licenses and virus-protection that must be kept up-to-date. Configuration can also be complex. In general, it would normally require a technical expert to get a PC-based system up and running and maintained on an ongoing basis. Media Flyer is designed for people who just want to put their stuff on the walls, so we've adopted a plug-and-play approach. Our kit requires no software installation and isn't vulnerable to viruses. You just plug it together and manage the content on your screens through our Web service.
Q. Can I connect the screens wirelessly?
Customers often have more issues than they expect when setting up any wireless network. We recommend standard CAT5 wiring, but please contact us if 3G or Wi-Fi is a key requirement for you.
Q. Do we need special cabling for a Media Flyer system?
No—the existing networking cable found in most modern buildings is perfect for Media Flyer, and you can choose whether to integrate it with your main network (as we do) or keep the system on a network of its own.
Q. What happens if my Internet connection goes away?
The Media Flyer pod caches content locally and will normally keep playing the material it was last asked to play until the connection comes back.
Q. I like Media Flyer but want it customized for our particular application and integrated with our existing business information systems. Is this possible?
Yes! We offer customization and modification on a contract basis. You should also take a look at our developer documentation if you'd like to consider doing this in-house. For more information, contact Black Box Technical Support at 724-746-5500 or info@blackbox.com.
Black Box Tech Support: FREE! Live. 24/7.
Tech support the way it should be.

natural_image
Black and white photo of a smiling woman wearing a headset, with blue background (no text or symbols visible)Great tech support is just 30 seconds away at 724-746-5500 or blackbox.com.

BLACK BOX®
NETWORK SERVICES
About Black Box
Black Box Network Services is your source for an extensive range of networking and infrastructure products. You'll find everything from cabinets and racks and power and surge protection products to media converters and Ethernet switches all supported by free, live 24/7 Tech support available in 30 seconds or less.
© Copyright 2011. All rights reserved.
MFLY-X, rev. 1


- Get your company's message out less expensively than with traditional print or broadcast advertising. Its easy deployment and "no learning curve" Web-managed interface allows your digital signage to be up and running in no time at all.
- Trademarks Used in this Manual
- Federal Communications Commission and Industry Canada Radio Frequency Interference Statements
- Specifications
- Overview
- Introduction
- What's Included
- Hardware Description
- Front Panel
- Back Panel
- Hardware Installation
- Software: Getting Started
- MFLY-X Concepts
- Content Formats Supported
- The MFLY-X User Interface
- Content Management in MFLY-X
- The User Interface Overview
- Adding New Sources
- Previewing Sources
- Managing Playlists
- Sources versus Playlist Entries
- Assigning Content to MFLY-X Screens
- Scheduling Screen Changes
- Splitting the Screen with Layouts
- Smart Playlists
- Smart Playlists—an Introduction
- Creating a Smart Playlist
- Smart Playlist Settings
- Filter Conditions
- Creating Slides Using Templates
- Start by setting up a template
- A note about screen resolutions
- Create slides based on the templates
- Assign slides to displays
- Hardware Management
- Managing your sites
- Checking the status of your MFLY-X system
- Display Status
- User Permissions
- Editing permissions
- Permissions, Tags, and Smart Playlists
- Groups
- Appendix: Troubleshooting: Frequently Asked Questions
- Black Box Tech Support: FREE! Live. 24/7.
- BLACK BOX®
- NETWORK SERVICES
- About Black Box
Brand : Black Box
Model : MediaFlyer Express MFLY-X01
Category : Thin client