
XWR100 - Router VIZIO - Free user manual and instructions
Find the device manual for free XWR100 VIZIO in PDF.


| Product Type | Router |
| Brand | VIZIO |
| Model | XWR100 |
| Dimensions (H x W x D) | 6.7 x 4.3 x 1.2 inches |
| Weight | 0.5 lb |
| Power Supply | AC 100-240V, 50/60Hz |
| Wireless Standard | IEEE 802.11a/b/g/n/ac |
| Frequency Band | Dual-band 2.4 GHz and 5 GHz |
| Ports | 4 x Gigabit Ethernet LAN, 1 x Gigabit Ethernet WAN |
| Antenna | 2 external antennas |
| Encryption | WPA2 / WPA3 |
| Functions | Parental controls, guest network, firewall, QoS |
| Setup | Web interface or mobile app |
| Operating Temperature | 0°C to 40°C |
| Maintenance and Cleaning | Unplug before cleaning; use a dry, lint-free cloth. Avoid liquids. |
| Safety | Keep away from water and heat sources. Do not disassemble. |
| Spare Parts and Repairability | No user-serviceable parts. Contact VIZIO support for assistance. |
| General Information | Designed for home or small office networking. |
Frequently Asked Questions - XWR100 VIZIO
User questions about XWR100 VIZIO
0 question about this device. Answer the ones you know or ask your own.
Ask a new question about this device
Download the instructions for your Router in PDF format for free! Find your manual XWR100 - VIZIO and take your electronic device back in hand. On this page are published all the documents necessary for the use of your device. XWR100 by VIZIO.
USER MANUAL XWR100 VIZIO
XWR100 Dual-band HD Wireless Internet Router
Congratulations on your new VIZIO XWR100 Dual-band HD Wireless Internet Router. For maximum benefit of your router, please read these instructions before making any adjustments. We hope you will experience many years of enjoyment from your new router.
For assistance, please call 877-MYVIZIO (877-698-4946) or e-mail us at www.VIZIO.com.
We recommend you register your VIZIO Router. When you complete the Quick Setup App just click the product registration link to register your router online. For peace of mind and to protect your investment beyond the standard warranty, VIZIO offers on-site extended warranty service plans. These plans give additional coverage during the standard warranty period. Visit our website or call us to purchase a plan.
Table of Contents
Introduction
Features
Opening the Package
Package Contents
System Requirements
Finding a Location for Your Router
Wall-Mounting Placement
Basic Controls and Connections
Front LEDs
Rear Panel Connections
Setting Up Your Router
What You Need
Setup Steps
Connecting to the wireless network
Connecting to the wired network
Accessing USB Storage
Via the Router Settings App
Via your computer network
Via your DLNA-compatible device
Changing Advanced Router Settings
INTERNET Menu
ROUTER Menu
WIRELESS Menu
Wireless Security Information
Troubleshooting
Troubleshooting Tips
Telephone & Technical Support
Specifications
Legal notices
Warranty Information
Chapter 1 Introduction
Features
- Optimized for VIZIO VIA-enabled products
- Ideal for streaming HD video and audio
• 802.11n Simultaneous dual-band wireless
• Supports WPS, WEP and WPA wireless security - Integrated 4-port 10/100 switch connects up to 4 wired Internet devices, including internet-enabled Blu-ray players, HDTVs, DVRs, and computers
• USB 2.0 port connects a USB hard drive for central access to photos, videos and more - Wall-mountable
Your VIZIO router can host three simultaneous secure wireless networks for your Internet devices and computers. Follow the instructions the came with your device(s) to connect to one of the three wireless networks on your router. The default network names are VIZIO HD, VIZIO, or Classic but if you changed the names, look for those names on your device.
| Network Name (SSID) | VIZIO HD VIZIO Classic | ||
| Ideal Usage | Optimized for HD video streaming, this network typically has good coverage for most homes and operates at 5GHz. | Supports all types of data, this network can give you greater coverage while operating at 2.4GHz. | Support older wireless device with a slower speed at 2.4Ghz. |
| Security Type | WPA2 Personal WPA Personal WEP 64bits |
Opening the Package
Your router and its accompanying accessories are carefully packed in a cardboard carton that has been designed to protect it from transportation damage. Once you have opened the carton, check that your router is in good condition and that all of the contents are included.
IMPORTANT: Save the carton and packing material for future shipping.
Package Contents
• VIZIO XWR100 Dual-band HD Wireless Internet Router
- Ethernet cable
- Power Adapter
- Quick Setup Guide
System Requirements
- Broadband Internet connection such as a cable or DSL modem with an Ethernet (RJ45) connection
- At least one computer with a network adapter
• TCP/IP networking protocol installed on each computer
• Extra Ethernet (RJ-45) cable - Internet browser (such as Internet Explorer, Firefox, or Safari)
Finding a Location for Your Router
Here are some things you should consider when deciding on a proper location for your router:
- Place your router as close as possible to the center of your wireless network devices. Your connection will be stronger the closer your devices are to your router. Typical indoor operating range is up to 200 feet.
- Avoid placing your router near devices that may emit "noise", including microwave ovens, refrigerators, and metal cabinets. If your signal seems weak, make sure that objects are not blocking the signal's path between your device and your router.
- For proper ventilation, you must allow at least 4 inches (10 cm) on all sides of your router.
- Avoid installing your router in places with high humidity, dust, or smoke so you do not shorten the service life of the electronic components.
- Read this user manual carefully before setting up your router.
Wall-Mounting Placement
Your router has two wall-mount slots on the bottom panel.

natural_image
Black and white photo of a black wireless router device (no visible text or symbols)Note: VIZIO is not responsible for damages incurred by insecure wall-mounting hardware.
- Choose a wall that is within reach of an electrical outlet and is smooth and sturdy.
- Drill two holes 6 inches (152 mm) apart into the wall.
-
Insert a screw into each hole leaving 0.12 inches (3 mm) of the screw head exposed.
-
Line up the wall-mount slots on the bottom of your router with the screws and slide the router down until the screws fit snugly into the wall-mount slots.
Chapter 2 Basic Controls and Connections
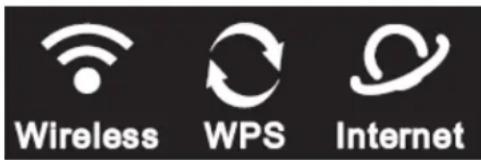
Front LEDs
Wireless
- Lights when wireless is enabled.
- Flashes when your router is sending or receiving data over the network.
WPS (Wi-Fi Protected Setup)
- Lights when your router is setting up using WPS. Your router supports one WPS session at a time so wait until the LED stops flashing before setting up another WPS device.
- Turns off if there is an error during the WPS setup process. Make sure your device(s) support WPS, and then try again.
• See WPS (Wi-Fi Protected Setup) for information on connecting via WPS.
Internet
- Lights when there is a working Internet connection.
- Flashes to indicate network activity over the Internet port.
Rear Panel Connections
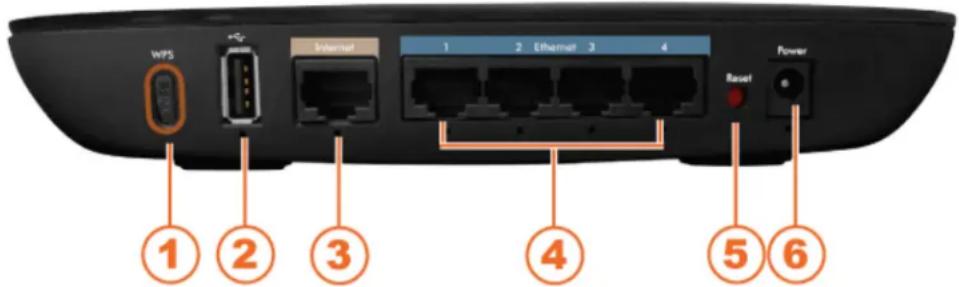
- WPS (Wi-Fi Protected Setup) Button—Use to automatically configure wireless security for your wireless network if you have devices that support WI-FI Protected Setup. See WPS (Wi-Fi Protected Setup) for information on connecting via WPS.
- USB—Connect a USB storage device to this port.
- Internet—Connect your high-speed cable or DSL Internet service to this port.
- Ethernet 1, 2, 3, 4—Connect your router to computers on your wired network and other Ethernet devices to these ports. The LED under the port lights when, your router is connected to the device. The LED flashes when there is network activity over that port.
- Reset—Press and hold for approximately ten seconds to reset your router to factory default settings. If you created any custom settings, including a login name and password, they will be erased and replaced with the factory default settings.
- Power—Connect the power adapter to this port. The LED under the port lights when your router is on. The LED flashes when your router goes through a self-diagnostic mode during boot-up.
Chapter 3 Setting Up Your Router
What You Need
- Your VIZIO Router, Power Adapter, and Ethernet cable (included)
- High-speed Internet connection and access to your Internet modem (contact your local provider if you need help with this)
• Additional Ethernet cable (usually provided with your Internet modem)
• A computer to run the Quick Setup App
Setup Steps
- Unplug the power cable from your high-speed Internet modem.
- Connect one end of the Ethernet cable (included) to the number 1 port on your router (Figure 1).
- Connect the other end to the Ethernet port on your computer (Figure 2).
- Connect an Ethernet cable from your high-speed Internet modem into the Internet port on your router (Figure 3).
- Plug the power back into your high-speed Internet modem. Wait 30 seconds and power on your router with the included power adapter. Your router will automatically turn on.
- Wait 30 seconds for your router to fully connect and open an Internet browser window (such as Internet Explorer, Firefox, or Safari). Type http://vizio.home (or 192.168.1.1) in the browser window and press Enter (Figure 4). The Quick Setup App will automatically start.
- Click ACCEPT and CONTINUE.
- From here you can:
a. Click Print to print your configuration.
b. Click EDIT SETTINGS to make changes to the Network Name, Security Type, Security Key, and Network Status.
c. Click Manual Settings to make changes to the advanced settings of your router.
d. Click EXIT to close the Router Settings App.
If you have not successfully connected you will see this screen. Follow the steps on-screen to resolve the issue or click the link at the bottom of the screen to enter your user name and password if you have a DSL modem using PPPoE.


![VIZIO INTERENT CONNECTION NOT DETECTED Prepare check your Internet Connection 1. Make sure the Ethernet cable is connected from your high-speed internet modem to the internet port on the back of your VIDEO router Modem Vizio HD Wireless Internet Router 2. Unplug the power cable from both your modem and VIDEO router 3. Wait 10 seconds, then plug the power back into the modem 4. Wait for the modem fully connectible Internet (usually there is an indicator light that will turn child when ready or wait about a minute), then plug the power to your VIDEO router 5. When play're ready to proceed, click the Ruby button below. Retry [If you have a DSL modems using PPPUE, click here to cardgas] Help Language Manual Setting © 2010 All rights reserved](/content/2026/05/988253/images/1db70ef1e40cd96fefdd9cc7a94a3d7841db3d6f07234321d06c16560637f8af.jpg)
Connecting to the wireless network
Computers with wireless network adapters, including VIZIO Internet-enabled Blu-ray players, VIZIO VIA-enabled TVs, and computers can now use the network. Follow the instructions the came with your devices to connect to one of the three wireless networks on your router. The default network names are VIZIO HD, VIZIO, or Classic but if you changed the names, look for those names on your device.
Connecting to the wired network
Computers with wired network adapters, including VIZIO Internet-enabled Blu-ray players, VIZIO VIA-enabled TVs, and computers can now use the network. Connect an Ethernet cable (not supplied) from the Ethernet port on your device to an open port on the back of your router.
Chapter 4 Accessing USB Storage
Your router's USB port connects to a USB storage device, so you can access your files from any computer on the network. All of the files on the storage device are shared with all of the computers on the network.
Your VIZIO router is a DLNA server, which means you can automatically access the music, photo, and video files stored on the connected USB storage device through a DLNA-compliant device in your home.
Note: The USB storage device must be formatted for NTFS or FAT.
There are three ways to access the files on your USB storage device: from the Router Settings App, by browsing your computer's network, or through a DLNA-compatible device to (media files only).
Via the Router Settings App
- Make sure your computer has a working wired or wireless connection to your router.
- Connect an external USB hard drive or USB flash drive to the USB port on the back of your router.
- Type http://vizio.home (or 192.168.1.1) in the browser window and press Enter. The Router Settings App will automatically start and the name of your USB device will be displayed in the USB Network Media field.
- Click the name of your device to begin browsing the files stored on it.
Via your computer network
- Make sure your computer has a working wired or wireless connection to your router.
- Connect an external USB hard drive or USB flash drive to the USB port on the back of your router.
- On your computer (Windows or Mac), browse your network for the name of the USB storage device.
Via your DLNA-compatible device
- Make sure your computer has a working wired or wireless connection to your router.

- Connect an external USB hard drive or USB flash drive to the USB port on the back of your router.
- On your DLNA-compatible device, refresh the network list and look for the VIZIO Digital Media Server.
- Browse the server to locate and play your media files.
Chapter 5 Changing Advanced Router Settings
INTERNET Menu
Internet Address
Optimize Video Streaming
Parental Controls
Internet Speed Test
ROUTER Menu
Router IP
Firmware Version
Firewall
Router Auto Login
USB Network Media
Restart Router
WIRELESS Menu
Edit Settings
WPS (Wi-Fi Protected Setup)
Advanced
After setting up your router with the Quick Setup App, you can start using your router. If you are experienced in setting up and modifying wired and/or wireless networks and would like to change settings on your router, use the web-based Router Settings App on the computer that is connected to your router. With the Router Settings App you can:
• View settings and router status
- Set up a firewall to work with specific applications (port forwarding)
- Set up and modify security features
- Set up a user name and password for your router
- Reset your router
- Update your firmware
• Perform many more advanced functions...
Caution: These are advanced settings that should only be modified by those experienced in setting up and modifying wired and/or wireless networks.
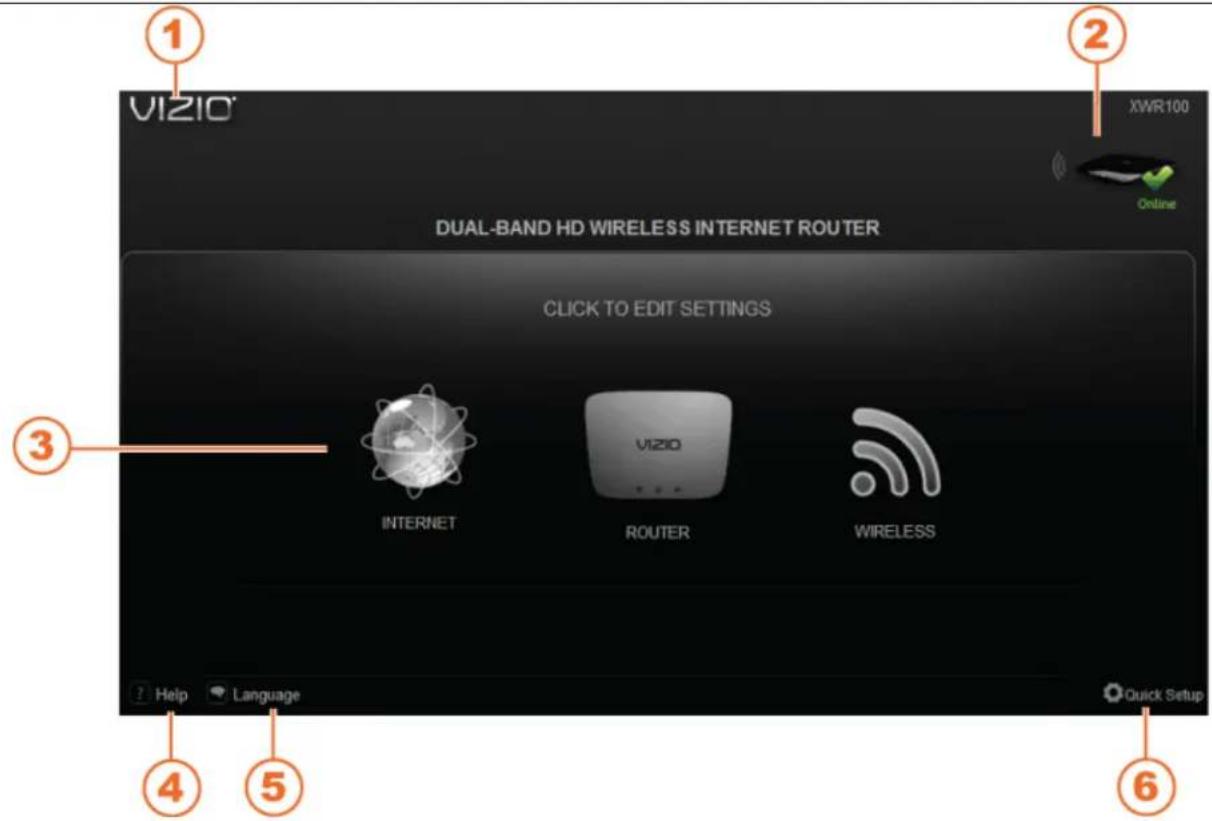
- VIZIO—Click to go back to the Home page.
- Internet Status—Green check indicates a working Internet connection. Red X indicates no working Internet connection.
- Settings—Click an icon to open its menu and adjust settings.
- Help—Click to open the User Manual.
- Language—Click to change the language of the Router Settings App. Choose from English, Français, or Spanish.
- Quick Setup—Click to go back to the Quick Setup App.
To access the Router Settings App:
- On the computer that is connected to your router, open an Internet browser window (such as Internet Explorer, Firefox, or Safari).
- Type http://vizio.home (or 192.168.1.1) in the browser window and then press Enter. The Router Settings App will open.
- Click INTERNET, ROUTER, or WIRELESS to open its menu.
INTERNET Menu
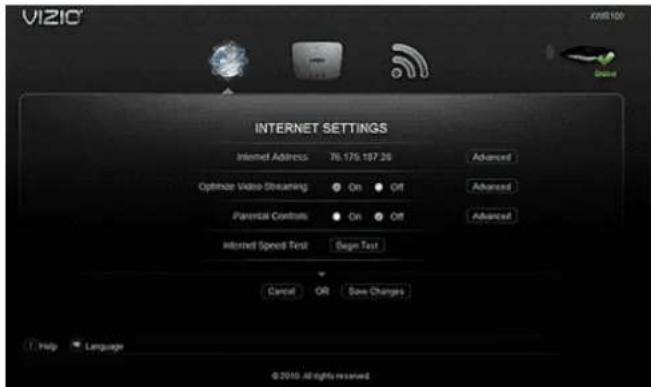
The Internet menu allows you to customize your Internet settings.
Internet Address
Your router's IP address, as seen from the Internet is displayed here. To make changes, click Advanced. A new menu will be displayed showing the advanced options available for the Internet Address. Click Save Changes to keep any changes you made to the router settings or click Cancel to cancel your changes.
ADVANCED OPTIONS
Configuration
- Select Automatic Configuration – DHCP to have your router set the Internet settings automatically (recommended).
- Select Static IP to manually enter settings if you are required to use a permanent IP address to connect to the Internet. Select PPPoE if you use a DSL line that requires PPPoE (check with your ISP). Enter the PPPoE user name and password.
Internet IP Address: This is your router's IP address, as seen from the Internet. Contact your ISP to get the IP Address to enter in the spaces provided.
Subnet Mask: This is your router's Subnet Mask, as seen by other users on the Internet (including your ISP). Do not change the Subnet Mask unless you have a specific reason to do so. Contact your ISP to get the Subnet Mask to enter in the spaces provided.
Default Gateway: This is your ISP servers IP address. Contact your ISP to get the Gateway Address to enter in the spaces provided.
DNS 1 - 2: A Domain Name Server (DNS) is a server on the Internet that translates URLs into IP addresses. If you selected Static IP in the Configuration drop-down box, then you will need to contact your ISP to get at least one DNS (Domain Name System) Server IP Address to enter in the spaces provided.
MTU: MTU is the Maximum Transmission Unit and specifies the largest packet size permitted for Internet transmission. Select Manual to manually enter the largest packet size that is transmitted or select Auto to have your router select the best MTU for your Internet connection.
MAC ADDRESS CLONE: Every computer hardware device, including the network adapter of your computer has a unique number called a MAC address. Some ISPs require you to register this address with them in order to access the Internet. If you

do not wish to re-register the MAC address with your ISP, you may assign the MAC address you have currently registered with your ISP to your router with the MAC Address Clone feature.
- On/ Off: Select Onto enable MAC Address cloning or Off to disable MAC Address cloning.
• MAC Address: Enter the MAC Address registered with your ISP. - Clone My PC's MAC: Click this button to clone the MAC address of the computer you are using.
DDNS: DDNS lets you assign a fixed host and domain name to a dynamic Internet IP address. It is useful when you are hosting your own website, FTP server, or other server behind your router. First sign up for DDNS service with a DDNS service provider (for example www.dyndns.org or www.TZO.com) and then select the corresponding option. Select Off if you do not want to use this feature.
TIME SETTING: Select your time zone from this drop-down menu. Select the checkbox to automatically adjust for daylight saving time.
Optimize Video Streaming
Select On to enable automatic optimized video streaming to your VIZIO Internet Apps enabled devices. Add other non-VIZIO device to the list by:
- Entering their MAC address in the New Media Device MAC Address field and then click Add.
- Clicking Connected Device and selecting the device from the list.
Click Save Changes to keep any changes you made to the router settings or click Cancel to cancel your changes.

Parental Controls
Your router allows you to control when the computer or device can access the Internet. Select On to enable parental control settings or Off to disable parental settings.
To set policy and access time:
- Click Advanced. A new menu will be displayed showing the advanced options available for the Parental Controls.
- Enter a unique policy name.
- Choose whether you want to Deny or Allow Internet access during the days of the week and times of the day you set in the next step.
- Check the checkbox by each day you want Internet access denied or allowed.
- Select the start times and end times using the drop down box. The hour is in 24 hour format (e.g. 13:00 equals 1:00pm).
-
Check the Apply checkbox to turn Parental Controls on for that policy or leave it unchecked to turn it off.
-
Click Edit and select from a list of computers to block or allow access.
-
Click Save Changes to keep any changes you made to the router settings or click Cancel to cancel your changes.

- Click Delete to remove that policy.
- Click More to add more policies.
Internet Speed Test
Click Begin Test to test the speed of your Internet connection. Here's approximately what the results mean:
- 1Mb–3Mb: Ideal for Standard Definition streaming
- 3Mb – 10Mb: Ideal for High Definition streaming
• 10Mb +: Ideal for Multiple High Definition streaming
ROUTER Menu

Your routers current settings are displayed. The Router menu allows you to customize your router settings such as changing the LAN settings, updating the firmware, and accessing a connected USB device.
Router IP
Your router's IP address, as seen from your local network, is displayed here. To make changes, click Advanced. A new menu will be displayed showing the advanced options available for the Router IP. Click Save Changes to keep any changes you made to the router settings or click Cancel to cancel your changes.
ADVANCED OPTIONS
Router IP: This is your router's IP address, as it appears on your local network.
Subnet Mask: This is your router's Subnet Mask.
URL Address: This is the URL of the Quick Setup App.
DHCP Server: If you already have a DHCP server on your network, or if you don't want a DHCP server, then select Off (it's On by default). The remaining DHCP features will be unavailable.
DHCP Reservation: Select to assign a fixed local IP address to a MAC address. A new window will open.
- To automatically add a client, select Select Clients from DHCP Tables, click Select next to the client you want to add, and then click Add Clients.
- To manually add a client and assign an IP address, select Manually Add Client from the drop-down box, then enter the Client Name, IP address, and MAC address. Click Add to add the IP address.
• To remove a client from the list, click Remove next to the client you want to remove.
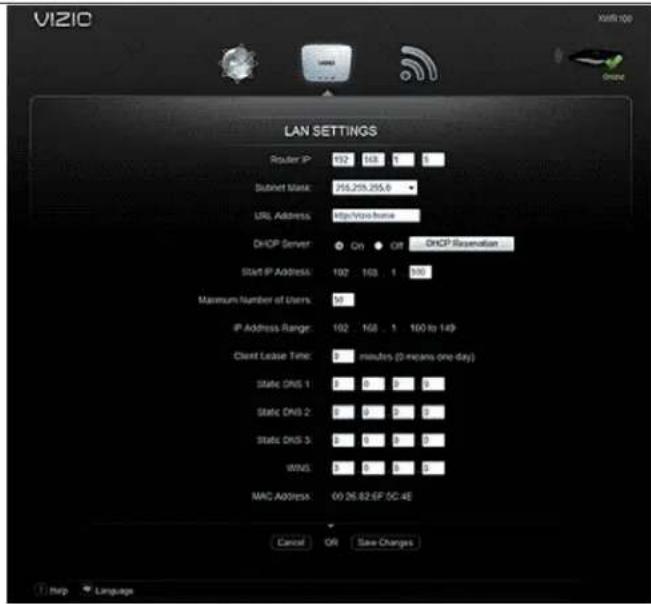
Start IP Address: Enter a value for the DHCP server to start with when issuing IP addresses. Because your router's default IP address is 192.168.1.1, the Starting IP Address must be 192.168.1.2 or greater, but smaller than 192.168.1.253.
Maximum Number of Users: Enter the maximum number of computers that can be assigned an IP address by the DHCP server. The default is 50 and cannot exceed 155.
IP Address Range: This displays the range based on the Start IP address and the Maximum Number of Users selected.
Client Lease Time: This is the amount of time a network user will be allowed to be connected to (or "lease") your router with their current dynamic IP address. Enter the amount of time, in minutes, that the user will be connected to this dynamic IP address. The default is 0 minutes, which means one day. When time expires, the user will be automatically assigned a new dynamic IP address.
Static DNS 1-3: The Domain Name System (DNS) is how the Internet translates domain or website names into Internet addresses or URLs. Contact your ISP to get at least one DNS Server IP Address to enter in the spaces provided. You can enter up to two DNS Server IP Addresses. Your router will use these for quicker access to functioning DNS servers.
WINS: The Windows Internet Naming Service (WINS) manages each computer's interaction with the Internet. If you use a WINS server, enter that server's IP Address here. Otherwise, leave these spaces blank.
Firmware Version
Your router's current firmware version is displayed here. To make changes, click Advanced. A new menu will be displayed showing the advanced options available for the Firmware Version. Click Save Changes to keep any changes you made to the router settings or click Cancel to cancel your changes.
FIRMWARE UPGRADE
- Click Check Latest Firmware. If new firmware is available a link is displayed above the button.
- Click the link to download the firmware to your computer.
- Click Browse and locate the file location you downloaded to your computer.
- Click Start Upgrade.
Caution: Do not upgrade your firmware unless you are experiencing problems with your router or the new firmware has a feature you want to use.
FACTORY DEFAULT
Select this option to return your router to factory default settings. All
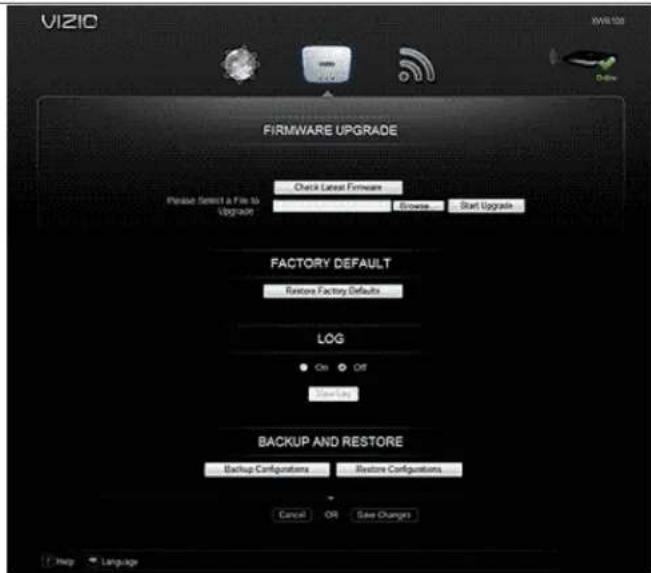
settings you have made, including your login user name and password, will be lost when the factory default settings are restored.
LOG
Your router keeps track of all traffic for your Internet connection. Select On to start monitoring traffic between the Internet and the network, otherwise leave it set to Off. Select View Log to view the log data.
BACKUP AND RESTORE
Select Backup Configurations to save your router's current configuration, allowing you to restore it later if your settings are lost or changed. Follow the onscreen instructions to back up your configuration.
Select Restore Configurations to restore your router to a saved configuration. Follow the onscreen instructions to restore the configuration.
Firewall
A firewall can filter out various types of unwanted traffic on your local network. The firewall is set to On by default. Select Off to disable firewall protection. To make changes, click Advanced. A new menu will be displayed showing the advanced options available for the Firewall setting.
PORT FORWARDING
Port Forwarding allows you to customize port services for common applications. When users send these types of requests to your network via the Internet, your router will forward those requests to the appropriate servers (computers). Before using forwarding, you should assign static IP addresses to the designated servers. Click Save Changes to keep any changes you made to the router settings or click Cancel to cancel your changes.
Application Name: Select a pre-configured application, or enter a unique name (up to 12 characters).
External Port: Enter the external port numbers.
Internal Port: Enter the internal port numbers.
Protocol: Select the protocol used for this application, either TCP or UDP.
To IP Address: For each application, enter the IP address of the computer that should receive the requests.
On: For each application, select On to enable port forwarding.
Click MORE to add more applications.

PORT TRIGGERING
Port Triggering allows you to watch outgoing data for specific port numbers. Your router remembers the IP address of the computer that sends the matching data, so when the requested data returns through your router, the data is pulled back to the correct computer. Click
Save Changes to keep any changes you made to the router settings or click Cancel to cancel your changes.
Application Name: Enter a unique name for the trigger (up to 12 characters).
Triggered Range: Enter the Start and End port numbers of the Triggered Range. Check with the Internet application documentation for the port number(s) needed.
Forward Range: Enter the Start and End port numbers of the Forwarded Range. Check with the Internet application documentation for the port number(s) needed.
On: For each application, select On to enable port triggering.
Click MORE to add more applications.

FI REWALL
Configure a firewall that can filter out various types of unwanted traffic on your router's local network.
SPI Firewall Protection: Select Enable to use firewall protection or Disable to turn off firewall protection.
Internet Filter:
- Filter Anonymous Internet Requests: Select to make it more difficult for outside users to access your network.
- Filter Multicast Multicasting: Select to allow multiple transmissions to specific recipients at the same time. Your router will allow IP multicast packets to be forwarded to the appropriate computers.
- Filter Internet NAT Redirection: Select to prevent a local computer from using a URL or Internet address to access the local server.
- Filter IDENT (Port 113): Select to keep port 113 from being scanned by devices outside of your local network.
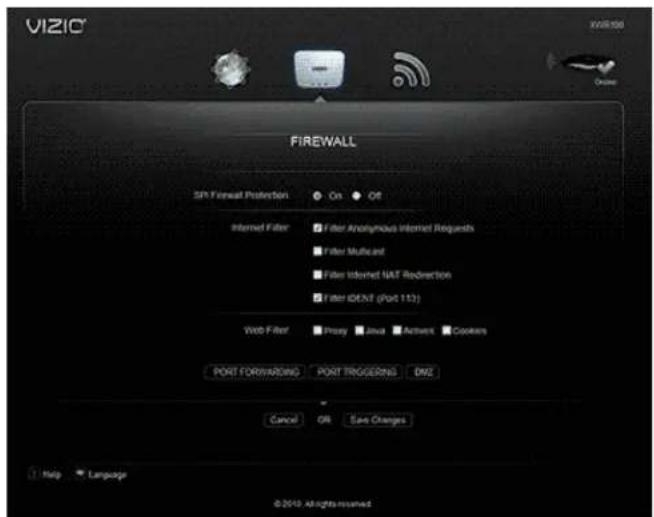
Web Filter: Select Proxy, Java, ActiveX, and Cookies to filter those web protocols. You can select as many options as you would like filtered.
DMZ
DMZ allows one network computer to be exposed to the Internet for activities such as Internet gaming and videoconferencing. DMZ hosting forwards all the ports at the same time to one computer. Port Forwarding is more secure because you select the ports you want opened, while DMZ hosting opens all the ports of one computer, exposing the computer to the Internet. You should disable the DHCP client function of the computer whose port is being forwarded and assign it a new static IP address assigned because its IP address may change when using the DHCP function. Click Save Changes to keep any changes you made to the router settings or click Cancel to cancel your changes.
On/ Off: Select On to allow computers on the Internet to access a local computer.
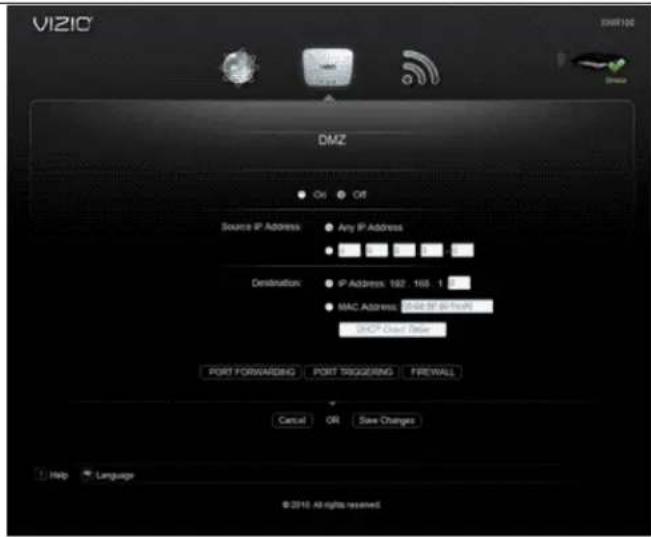
Source IP Address: Select Any IP Address or manually enter a specific source IP address of the computer you want to allow access from the Internet.
Destination: Select IP Address or MAC Address and enter the IP address of MAC address of the local computer you want to expose.
DHCP Client Table: Select DHCP Client Table to view computers and other devices that have been assigned IP addresses by your router. To copy the MAC address of a computer to the DMZ screen, click Select.
Router Auto Login
Your router is set to automatically login to the Router Settings App. Select Off to prevent your router from automatically logging in and then click Advanced to set a user name and password. A new menu will be displayed showing the advanced options available for the Router Auto Login setting. Click Save Changes to keep any changes you made to the router settings or click Cancel to cancel your changes.
WEB ACCESS
Username and Router Password: Create a user name and password that must be entered before the Router Settings App will open. Re-enter the password for confirmation. You can select the Show Password checkbox to see the password instead. You will now be prompted to enter the username and password each time the Router Settings App opens. If you forgot your username or password, press and * hold the reset button on the back of your router for 10 seconds to restore your router to default settings.
Access via: HTTP is the standard communications protocol used on the Internet and is the default option. Select HTTPS to encrypt data for increased security.
Access via Wireless: Select On to allow access to the Router Settings App via a wireless connection. Select Off to disable access, especially if you are using your router in a public domain and guests have access to the wireless connection.

REMOTE ACCESS
Remote Management: To access your router remotely from the Internet, select On. This is set to Off by default.
Access Via: Select HTTP or HTTPS communications protocols for remote access from the Internet.
Remote Upgrade: Select On to be able to upgrade the firmware remotely from the Internet. This is set to Off by default.
Allowed Remote IP Address: Select Any IP Address or manually enter an Internet IP address to allow remote access to the web-based utility from the Internet.
Remote Management Port: Enter the port number that will provide outside access to your router's web-based utility.
USB Network Media
Your router's USB port connects to a USB storage device, so you can access your files from any computer on the network. All of the files on the storage device are shared with all of the computers on the network. See Accessing USB Storage for more information on accessing your USB storage device.
Restart Router
Click Restart Router to do a software restart of your router.
WIRELESS Menu
Your current wireless settings are displayed. Select Advanced to make changes to the wireless network settings. Select EDIT SETTINGS to change the Network Name (SSID), Security Type, Security Key, or Network Status. Select WPS to set up your wireless devices using WI-FI Protected Setup.
Edit Settings
NETWORK NAME (SSID)
Each wireless network has a unique name or SSID. Your three wireless networks have default names which you can customize. If you change the name, consider using something unique to make sure it is not the same as other wireless networks that your router may detect in the area. Do not use personal information that can be visible to other users in your area searching for wireless networks.
SECURITY TYPE
Select from WPA2 Personal, WPA Personal, WEP 128bit, or WEP 64bit. See the Security Mode Chart above for more information.
SECURITY KEY
Enter a new security key that users must enter to gain access to your wireless network. The key must be between 8 and 63 characters.

NETWORK STATUS
Check the box to keep that network available in your list of wireless networks or uncheck it to disable it and remove it from the list of wireless networks.
WPS (Wi-Fi Protected Setup)
If you have a device that supports Wi-Fi Protected Setup there are three ways to connect via WPS. Use the method that applies to the device you are configuring.
PUSH BUTTON METHOD
Use this method if the device you are configuring has a WPS button.
- Press the WPS button on the device you are configuring.
- Click the WPS button on the Router Settings App. After you have successfully connected a Success message will be displayed.
- Click Back to return to the main menu.
DEVICE PIN METHOD
Use this method if device you are configuring has a WPS Setup PIN number.

- Enter the PIN number from the device you are configuring in the field on this screen.
- Click the Sync button. After you have successfully connected a Success message will be displayed.
- Click Back to return to the main menu.
ROUTER PIN METHOD
Use this method if your client device asks for your router's PIN number.
Enter the PIN number listed on this screen and on the Quick Setup Guide. The wireless device will connect to your router using that PIN.
Advanced
A new menu will be displayed showing the advanced options available for the Advanced Wireless Settings. Choose a Network Name from the drop down list to change the settings for that network.
WIRELESS MAC FILTER
Enter MAC addresses in the spaces provided to prevent or permit wireless devices with those addresses from accessing the wireless network. Click Wireless Client List to add MAC addresses by choosing them from a list of clients detected by your router. Click MORE to add more addresses.
NETWORK SETTINGS
Network Mode
- 5 GHz: Select the wireless mode used by the network. Choose from Disabled, Mixed, Wireless-A Only, or Wireless-N Only.
- 2.4 GHz: Select the wireless mode used by the network. Choose from Disabled, Mixed, Wireless-G Only, Wireless-B Only, or Wireless-BGN.
Network Name (SSID): Each wireless network has a unique name or SSID. Your three wireless networks have default names which you can customize. If you change the name, consider using something unique to make sure it is not the same as other wireless networks that your router may detect in the area. Do not use personal information that can be visible to other users in your area searching for wireless networks.
Channel Width
- 5 GHz: Select Auto (20MHz or 40MHz) for best performance in a network using Wireless-A and Wireless-N (5 GHz) devices. Select 40MHz only for a channel width of 40 MHz and select 20MHz only for a channel width of 20 MHz.
- 2.4 GHz: Select Auto (20MHz or 40MHz) for best performance in a network using Wireless-B, Wireless-G and Wireless-N (2.4 GHz) devices. Select 40MHz only for a channel width of 40 MHz and select 20MHz only for a channel width of 20 MHz.
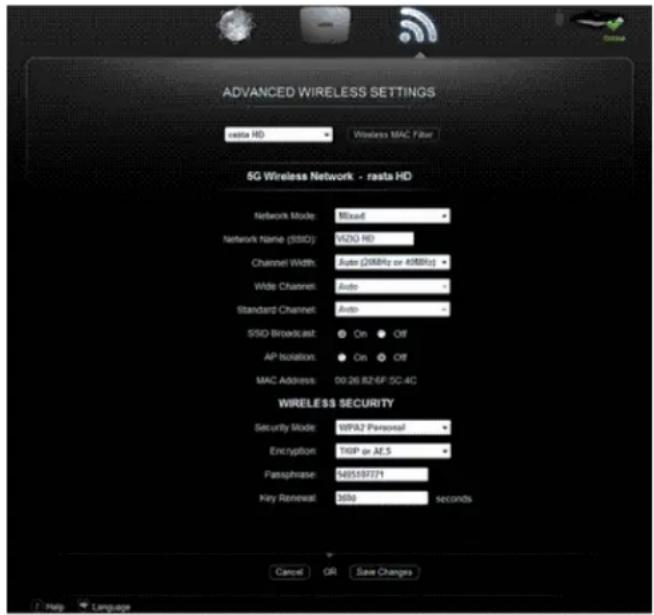
Wide Channel
- 5 GHz: Select 40MHz only or Auto (20MHz or 40MHz) to have this setting be available for your primary Wireless-N (5GHz) channel. Select Auto if you are not sure which channel to select.
- 2.4 GHz: Select 40MHz only or Auto (20MHz or 40MHz) to have this setting be available for your primary Wireless-N (2.4GHz) channel. Select Auto if you are not sure which channel to select.
Standard Channel
- 5 GHz: Select the channel for Wireless-A and Wireless-N (5GHz) networking. If you selected 40MHz only or Auto (20MHz or 40MHz) for Channel Width, then the Standard Channel will be a secondary channel for Wireless-N (5GHz). Select Auto if you are not sure which channel to select.
- 2.4 GHz: Select the channel for Wireless-B, Wireless-G, and Wireless-N (2.4GHz) networking. If you selected 40MHz only or Auto (20MHz or 40MHz) for Channel Width, then the Standard Channel will be a secondary channel for Wireless-N (2.4GHz). Select Auto if you are not sure which channel to select.
SSID Broadcast: Hide your network name (SSID) so people who are not on your network cannot see it in their list of available networks.
AP Isolation: This isolates all wireless clients and wireless devices on your network from each other. Wireless devices will be able to communicate with your router but not with each other.
WIRELESS SECURITY
Security Mode: Choose from WEP, WPA Personal, WPA Enterprise, WPA2 Personal, WPA2 Enterprise, RADIUS, and Disabled. Use the highest level of encryption supported by your network equipment.
| Security Type | Description Level of Security | |
| WPA Wi-Fi | Protected Access | WPA/WPA2 is more secure than WEP, because WPA/WPA2 uses dynamic key encryption. |
| WEP | Wired Equivalent Privacy | WEP may be the only option available on some older devices that do not support WPA. |
| RADIUS | Remote Authentication Dial-In User Service | Only use when a RADIUS server is connected to your router |
Encryption: Choose from TKIP and AES to select an encryption method.
Passphrase: Enter a new passphrase that is between 8 and 63 characters.
Key Renewal: Enter a Key Renewal period that tells your router how often it should change the encryption keys. The default Key Renewal period is 3600 seconds.
Chapter 6 Wireless Security Information
Wireless networking, like any radio signal that travels through the air, can be intercepted by other devices. Here's how you can protect the information that travels over your wireless network:
1. Change the default wireless network name (SSID)
The name of your wireless network is called a Service Set Identifier (SSID) and was set by the factory. Your VIZIO router has three SSIDs (see Features for information about your SSIDs). Consider changing the network name to something unique to make sure it is not the same as other wireless networks that your router may detect in the area. Do not use personal information because others with will be able to see that when searching for a wireless network.
2. Set a username and password
From the factory no username or password is set to open the Router Settings App. To keep your router safe from hackers, set a username and password. See Router Auto Login for information on setting a username and password.
3. Hide your Network Name (SSID)
Hide your network name (SSID) so people who are not on your network cannot see it in their list of available networks. To hide your SSID:
a. Select the Wireless menu option.
b. Click Advanced.
c. Select the Off button next to SSID Broadcast.
d. Click Save Changes.
General Network Security Guidelines
- Password-protect all computers on the network and individually password protect sensitive files.
- Change passwords on a regular basis.
• Install anti-virus software and personal firewall software. - Disable file sharing (peer-to-peer). Some applications may open file sharing without your consent and/or knowledge.
Additional Security Tips
- Keep your router away from exterior walls and windows.
- Use strong passphrases that are at least eight characters in length. Combine letters and numbers to avoid using standard words that can be found in the dictionary.
Chapter 7 Troubleshooting
If your router fails or the performance changes dramatically, check the FAQ and Troubleshooting solutions below or check the support section on VIZIO.com. If your router still fails to perform as expected, e-mail us at techsupport@vizio.com or call us at 1-877-MYVIZIO (698-4946).
Troubleshooting Tips
If your router fails or the performance changes dramatically, check the FAQ and Troubleshooting solutions below or check the support section on VIZIO.com. If your router still fails to perform as expected, e-mail us at techsupport@vizio.com or call us at 1-877-MYVIZIO (698-4946).
Be sure to restart your network in this sequence:
- Turn off and unplug the modem, turn off your router, and shut down the computer.
- Plug in and turn on the modem, wait two minutes.
- Turn on your router and wait one minute.
- Turn on the computer.
Make sure the Ethernet cables are securely plugged in.
- The INTERNET light on your router will be lit if the Ethernet cable to your router from the modem is plugged in and the modem and router are turned on.
- For each computer that is connected to your router and turned on, the corresponding LED under the port in the back will be lit (1, 2, 3, or 4).
Make sure the computer network settings are correct.
- Configure your computer to obtain IP and DNS addresses automatically via DHCP whenever possible.
- Some cable modem ISPs require you to use the MAC address of the computer registered on the account. If so select, use Copy My PC's MAC in your router's MAC Address Clone section of the Advanced Internet Menu. You must be using the computer that is registered with the ISP. Click Save Changes to save your settings. Restart the network in the correct sequence.
| Issue Solution | |
| My computer cannot connect to the Internet | Make sure that your router is powered on. The LED under the power port in the back should be white and not flashing.If the Power LED is flashing, power off your network (modem, router, and computers). Power on each device in the following order:1. Cable or DSL modem2. Router3. ComputerCheck the cable connections. The computer should be connected to one of the ports numbered 1-4 on your router, and the modem must be connected to the Internet port on your router. See Setup Steps for detailed instructions on connecting the cables.There may be third-party firewall software on the computer. Trying turning the firewall off to see if that is blocking Internet access. Make sure you properly configure the software to allow access to the Internet. Refer to the instructions that came with your firewall software. |
| My computer cannot connect to the wireless network. | Make sure the name of your wireless network (SSID) is the same on both the computer and your router.Make sure your computer uses the same security method (WPA2, WPA, or WEP) as your router.Make sure you have correctly typed the Security Key.If you don’t see your network name listed in Available Networks, move your computer closer to your router. Refresh the list of Available Networks. If you see your network name listed then you have a range or interference problem. See Finding a Location for Your Router. |
| I don’t see my Network Name (SSID) in the list of available networks. | Move your computer closer to your router. Refresh the list of Available Networks. If you see your network name listed then you have a range or interference problem. See Finding a Location for Your Router.Make sure that you are broadcasting your Network Name (SSID). See Network Settings. |
| I keep losing my wireless Internet connection. | Move your computer closer to your router. Refresh the list of Available Networks. If you see your network name listed then you have a range or interference problem. SeeFinding a Location for Your Router. |
| How to I change the settings on my router? | 1. Open an Internet browser window (such as Internet Explorer, Firefox, or Safari).2. Typehttp://vizio.home(or 192.168.1.1) in the browser window, and then press Enter. The Quick Setup App will open. |
| I am prompted for a username and password every time I open a web browser. | Here's how you get rid of the prompt:1. ClickToolsand then clickInternet Options.2. Click theConnections tab.3. SelectNever dial a connection.4. ClickOK. |
| There isn't an Ethernet port on my modem. | The modem is a dial-up modem for traditional dial-up service. To use your router, you need a cable/DSL modem with an Ethernet port and high-speed Internet connection. |
| I cannot use the DSL service to connect manually to the Internet. | After you have setup your router, it will automatically connect to your Internet Service Provider (ISP), so you no longer need to connect manually. |
| The DSL telephone line does not fit into my router's Internet port. | Your router does not replace your modem. You still need your DSL modem to use your router. SeeSetup Stepsfor detailed instructions on connecting the cables. |
| There isn't a coaxial port on my router. | Your router does not replace your modem. You still need your DSL modem to use your router. SeeSetup Stepsfor detailed instructions on connecting the cables. |
Telephone & Technical Support
Products are often returned due to a technical problem rather than a defective product that may result in unnecessary shipping charges billed to you. Our trained support personnel can often resolve the problem over the phone. For more information on warranty service or repair, after the warranty period, please contact our Support Department at the number below.
Customer support and quality service are integral parts of VIZIO's commitment to service excellence.
For technical assistance contact our VIZIO Technical Support Department via email or phone.
Web: www.vizio.com
Email: techsupport@vizio.com
(877) 698-4946 Fax: (949) 585-9563
Hours of operation: Monday - Friday: 6 am to 9 pm
Saturday – Sunday: 8 am to 4 pm
Please have your VIZIO model number, serial number, and date of purchase available before you call.
VIZIO
Address:
39 Tesla
Irvine, CA 92618, USA
Telephone: (949) 428-2525 Fax: 949-585-9514
Specifications
| Model XWR100 | |
| Transmit Power | 802.11b: 17dBm802.11g: 54 Mbps - 13dBm802.11a: 54 Mbps - 13dBm802.11gn HT20: MCS15/7- 11dBm802.11gn HT40: MCS15/7- 8.5dBm802.11an HT20: MCS15/7 - 11dBm802.11an HT40: MCS15/7 - 11dBm |
| Receive Sensitivity | 802.11b: 11Mbps:- 86dBm802.11g: 54 Mbps:- 75dBm802.11a: 54 Mbps:- 74dBm |
| Modulation Type | 802.11b: CCK,DQPSK,DBPSK802.11g: 64 QAM, 16 QAM,QPSK, BPSK802.11a: 64 QAM, 16 QAM,QPSK, BPSKHT20,HT40: 64 QAM, 16 QAM,QPSK, BPSK |
| Antenna 4 internal antenna | |
| Operating Channels | 2.4GHz: 11b/g/n for North America5GHZ: 11a/n for North America |
| Standard IEEE 802.11 | a/b/g/n, 802.3u, USB |
| Power | |
| Voltage Range 110~240Vac at 50/60 Hz | |
| Power 12 Vdc 1.5 A | |
| Environmental Conditions | |
| Operating | Temperature: 41°F ~ 105.8°F (0°C~40°C)Relative Humidity: 10~80% noncondensing |
| Dimensions 7.98 × 5.87 | × 1.3 inches (202.79 × 149 × 32.97 mm) |
| Net Weight .66 lbs. (0.3 kg) | |
| Gross Weight 1.1 lbs. (0.5 kg) | |
| Certifications FCC, CE, UL (Power Adapter) | |
* Product specifications may change without notice or obligation.
Legal notices
FCC Statement
This device complies with Part 15 of the FCC Rules. Operation is subject to the following two conditions: (1) This device may not cause harmful interference, and (2) this device must accept any interference received, including interference that may cause undesired operation.
This product has been tested and complies with the specifications for a Class B digital device, pursuant to Part 15 of the FCC Rules. These limits are designed to provide reasonable protection against harmful interference in a residential installation. This equipment generates, uses, and can radiate radio frequency energy and, if not installed and used according to the instructions, may cause harmful interference to radio communications. However, there is no guarantee that interference will not occur in a particular installation. If this equipment does cause harmful interference to radio or television reception, which is found by turning the equipment off and on, the user is encouraged to try to correct the interference by one or more of the following measures:
• Reorient or relocate the receiving antenna
- Increase the separation between the equipment or devices
- Connect the equipment to an outlet other than the receiver's
- Consult a dealer or an experienced radio/TV technician for assistance
FCC Caution: Any changes or modifications not expressly approved by the party responsible for compliance could void the user's authority to operate this equipment.
FCC Radiation Exposure Statement
This equipment complies with FCC radiation exposure limits set forth for an uncontrolled environment. This equipment should be installed and operated with minimum distance 20 cm between the radiator and your body. To maintain compliance with FCC RF exposure compliance requirements, please avoid direct contact to the transmitting antenna during transmitting. This transmitter must not be co-located or operating in conjunction with any other antenna or transmitter, except the built-in collocated transmitters. The availability of some specific channels
and/or operational frequency bands are country dependent and are firmware programmed at the factory to match the intended destination. The firmware setting is not accessible by the end user.
Operation of the device in the range of 5.15-5.25 GHz is only for indoor usage to reduce the potential for harmful interference to co-channel mobile satellite systems; the maximum antenna gain of 3 dBi permitted (for devices in the band 5.7-5.8 GHz) to comply with the e.i.r.p. limits specified for point-to-point and non point-to-point operation as appropriate, as stated in section A9.2(3).
Safety Notices
- Caution: To reduce the risk of fire, use only No.26 AWG or larger telecommunication line cord.
- Do not use this product near water, for example, in a wet basement or near a swimming pool.
- Avoid using this product during an electrical storm.
• There may be a remote risk of electric shock from lightning.
WARNING: This product contains lead, known to the State of California to cause cancer, and birth defects or other reproductive harm. Wash hands after handling.
Industry Canada Statement
This Class B digital apparatus complies with Canadian ICES-003 and RSS210.
Operation is subject to the following two conditions:
- This device may not cause interference and
- This device must accept any interference, including interference that may cause undesired operation of the device.
To reduce potential radio interference to other users, the antenna type and its gain should be so chosen that the EIRP is not more than required for successful communication.
Industry Canada Radiation Exposure Statement
This equipment complies with IC radiation exposure limits set forth for an uncontrolled environment. This equipment should be installed and operated with minimum distance 20 cm between the radiator & your body.
This transmitter must not be co-located or operating in conjunction with any other antenna or transmitter, except the built-in collocated transmitters.
Restrictions in the 5 GHz Band
The device for the band 5150-5250 MHz is only for indoor usage to reduce potential for harmful interference to cochannel mobile satellite systems.
The maximum performance for wireless is derived from IEEE Standard 802.11 specifications. Actual performance can vary, including lower wireless network capacity, data throughput rate, range and coverage. Performance depends on many factors, conditions and variables, including distance from the access point, volume of network traffic, building materials and construction, operating system used, mix of wireless products used, interference and other adverse conditions.
Covers units purchased as new in United States and Puerto Rico Only
VIZIO provides a warranty to the original purchaser of a new Product against defects in materials and workmanship for a period of one year of non-commercial usage and ninety (90) days of commercial use. If a Product covered by this warranty is determined to be defective within the warranty period, VIZIO will either repair or replace the Product at its sole option and discretion.
To obtain warranty service, contact VIZIO Technical Support via email: TechSupport@VIZIO.com or via phone at 877 MY VIZIO (877.698.4946) from 6:00AM to 9:00PM Monday through Friday and 8:00AM to 4:00PM Saturday and Sunday, Pacific Time, or visit www.VIZIO.com. PRE-AUTHORIZATION MUST BE OBTAINED BEFORE SENDING ANY PRODUCT TO A VIZIO SERVICE CENTER. Proof of purchase in the form of a purchase receipt or copy thereof is required to show that a Product is within the warranty period.
Parts and Labor
There will be no charge for parts or labor during the warranty period. Replacement parts and units may be new or recertified at VIZIO's option and sole discretion. Replacement parts and units are warranted for the remaining portion of the original warranty or for ninety (90) days from warranty service or replacement, whichever is greater.
Type of Service
Defective Products must be sent to a VIZIO service center to obtain warranty service. VIZIO is not responsible for transportation costs to the service center, but VIZIO will cover return shipping to the customer. PRE-AUTHORIZATION IS REQUIRED BEFORE SENDING ANY UNIT IN FOR WARRANTY SERVICE. Product returns to VIZIO's service centers must utilize either the original carton box and shipping material or packaging that affords an equal degree of protection. Replacement boxes and material may be available from, or required by, VIZIO and may be provided free of charge in some cases. VIZIO Technical Support will provide instructions for packing and shipping the covered Product to the VIZIO service center.
Limitations and Exclusions
VIZIO's limited warranty only covers defects in materials and workmanship. This warranty does not cover, for example: abuse, accident, cosmetic damage, normal wear and tear, improper installation or operation, improper voltage supply or power surges, damages from shipping, acts of God, lack of reasonable use, misuse, modifications or alterations, as well as installation and set-up issues or any repairs attempted by anyone other than by a VIZIO authorized service center. Products with unreadable or removed serial numbers, or requiring routine maintenance are not covered. This one year limited warranty does not cover Products sold "AS IS", "FACTORY RECERTIFIED", or by a non-authorized reseller.
THERE ARE NO EXPRESS WARRANTIES OTHER THAN THOSE LISTED OR DESCRIBED ABOVE. ANY IMPLIED WARRANTIES, INCLUDING ANY IMPLIED WARRANTY OF MERCHANTABILITY AND FITNESS FOR A PARTICULAR PURPOSE, SHALL BE LIMITED IN DURATION TO THE PERIOD OF TIME SET FORTH ABOVE. VIZIO'S TOTAL LIABILITY FOR ANY AND ALL LOSSES AND DAMAGES RESULTING FROM ANY CAUSE WHATSOEVER INCLUDING VIZIO'S NEGLIGENCE, ALLEGED DAMAGE, OR DEFECTIVE GOODS, WHETHER SUCH DEFECTS ARE DISCOVERABLE OR LATENT, SHALL IN NO EVENT EXCEED THE PURCHASE PRICE OF THE PRODUCT. VIZIO SHALL NOT BE RESPONSIBLE FOR LOSS OF USE, INFORMATION OR DATA INCLUDING THAT CONTAINED IN OR STORED ON ANY DEVICE RETURNED TO VIZIO, WORK STOPPAGE, COMPUTER FAILURE OR MALFUNCTION, FAILURE OF OTHER EQUIPMENT OR COMPUTER PROGRAMS TO WHICH THE PRODUCT IS CONNECTED, COMMERCIAL LOSS, LOST REVENUE OR LOST PROFITS, OR OTHER INCIDENTAL OR CONSEQUENTIAL DAMAGES. SOME STATES DO NOT ALLOW LIMITATIONS ON HOW LONG AN IMPLIED WARRANTY LASTS OR THE EXCLUSION OF INCIDENTAL OR CONSEQUENTIAL DAMAGES, SO THE ABOVE LIMITATIONS OR EXCLUSIONS MAY NOT APPLY TO YOU. THIS WARRANTY GIVES YOU SPECIFIC LEGAL RIGHTS, AND YOU MAY ALSO HAVE OTHER RIGHTS, WHICH VARY FROM STATE TO STATE. THIS LIMITED WARRANTY IS SUBJECT TO CHANGE WITHOUT NOTICE. CHECK www.VIZIO.com FOR THE MOST CURRENT VERSION.
© 2010. All rights reserved. The V, VIZIO, VIZIO XVT, VIZIO VIA, TruLED, 240Hz SPS, Slim Line, Smooth Motion, Where Vision Meets Value
- XWR100 Dual-band HD Wireless Internet Router
- Table of Contents
- Chapter 1 Introduction
- Features
- Opening the Package
- Package Contents
- System Requirements
- Finding a Location for Your Router
- Wall-Mounting Placement
- Chapter 2 Basic Controls and Connections
- Front LEDs
- Wireless
- WPS (Wi-Fi Protected Setup)
- Internet
- Rear Panel Connections
- Chapter 3 Setting Up Your Router
- What You Need
- Setup Steps
- Connecting to the wireless network
- Connecting to the wired network
- Chapter 4 Accessing USB Storage
- Via the Router Settings App
- Via your computer network
- Via your DLNA-compatible device
- Chapter 5 Changing Advanced Router Settings
- INTERNET Menu
- Internet Address
- ADVANCED OPTIONS
- Configuration
- Optimize Video Streaming
- Parental Controls
- Internet Speed Test
- ROUTER Menu
- Router IP
- Firmware Version
- FIRMWARE UPGRADE
- FACTORY DEFAULT
- LOG
- BACKUP AND RESTORE
- Firewall
- PORT FORWARDING
- PORT TRIGGERING
- FI REWALL
- Internet Filter:
- DMZ
- Router Auto Login
- WEB ACCESS
- REMOTE ACCESS
- USB Network Media
- Restart Router
- WIRELESS Menu
- Edit Settings
- NETWORK NAME (SSID)
- SECURITY TYPE
- SECURITY KEY
- NETWORK STATUS
- PUSH BUTTON METHOD
- DEVICE PIN METHOD
- ROUTER PIN METHOD
- Advanced
- WIRELESS MAC FILTER
- NETWORK SETTINGS
- Network Mode
- Channel Width
- Wide Channel
- Standard Channel
- WIRELESS SECURITY
- Chapter 6 Wireless Security Information
- Change the default wireless network name (SSID)
- Set a username and password
- Hide your Network Name (SSID)
- General Network Security Guidelines
- Additional Security Tips
- Chapter 7 Troubleshooting
- Troubleshooting Tips
- Be sure to restart your network in this sequence:
- Make sure the Ethernet cables are securely plugged in.
- Make sure the computer network settings are correct.
- Telephone & Technical Support
- Legal notices
- FCC Statement
- FCC Radiation Exposure Statement
- Safety Notices
- Industry Canada Statement
- Industry Canada Radiation Exposure Statement
- Restrictions in the 5 GHz Band
- Parts and Labor
- Type of Service
- Limitations and Exclusions
Brand : VIZIO
Model : XWR100
Category : Router