
Mow MJ407E - Lawn mower Snow Joe - Free user manual and instructions
Find the device manual for free Mow MJ407E Snow Joe in PDF.


| Product Type | Corded Electric Lawn Mower |
| Brand | Snow Joe |
| Model | Mow MJ407E |
| Cutting Width | 14 inches |
| Motor Power | 12 Amp |
| Voltage | 120 V AC, 60 Hz |
| Weight | 30 lbs (approx.) |
| Cutting Height Adjustment | 5-position single lever (1-3 inches) |
| Grass Bag Capacity | 10 gallons (approx.) |
| Deck Material | Polyethylene / Plastic |
| Handle Type | Folding handle for compact storage |
| Safety Features | Safety switch, blade brake, and cord retention |
| Cord Length | Not specified; requires extension cord (14 AWG recommended) |
| Mulching Capability | Mulching plug included |
| Side Discharge | Not available (mulch or bag only) |
| Blade Type | Steel blade, 14-inch |
| Wheel Size | Front: 7 inches; Rear: 8 inches (approx.) |
| Recommended Lawn Area | Up to 1/4 acre |
| Maintenance | Keep blade sharp; clean deck after use; check bolts |
| Warranty | 2-year limited warranty |
| Certifications | ETL listed |
Frequently Asked Questions - Mow MJ407E Snow Joe
User questions about Mow MJ407E Snow Joe
0 question about this device. Answer the ones you know or ask your own.
Ask a new question about this device
Download the instructions for your Lawn mower in PDF format for free! Find your manual Mow MJ407E - Snow Joe and take your electronic device back in hand. On this page are published all the documents necessary for the use of your device. Mow MJ407E by Snow Joe.
USER MANUAL Mow MJ407E Snow Joe
IMPORTANT! Safety Instructions
All Operators Must Read These Instructions Before Use
Always follow these safety guidelines. Failure to do so may result in serious bodily injury or death.
General Safety WARNINGS!
When using electric lawn mowers, basic safety precautions should always be followed to reduce the risk of fire, electric shock, and personal injury, including the following:
⚠ WARNING: Risk of injury could occur if the lawn mower is operated without the catcher assembly attached.
⚠ WARNING: The use of any other accessory or attachment might increase the risk of injury.
⚠ WARNING: To reduce the risk of injury, inspect catcher assembly frequently and replace with recommended replacement if there are signs of wear or deterioration.
Before using the mower, take the time to familiarize yourself with the controls, especially how to stop the mower in an emergency. Only allow individuals who have a thorough understanding of these instructions and operation of the mower to use the mower. Never allow children to operate the mower.
Retain this manual for future reference and reread it at the start of each mowing season.
FOR DOUBLE-INSULATED LAWN MOWERS
- Only use identical replacement parts when servicing the mower.
- Polarized Appliance Connections reduce the risk of electric shock. This mower has a polarized plug (one blade is wider than the other) and will require the use of a polarized extension cord. There is only one way the mower's plug will fit into a polarized extension. If the plug does not fit fully into the extension cord, reverse the plug. If the plug still does not fit, obtain a correct polarized extension cord. A polarized extension cord will require the use of a polarized wall outlet. There is only one way the plug will fit into a polarized wall outlet. If the plug does not fit fully into the wall outlet, reverse the plug. If the plug still does not fit, contact a qualified electrician to install the proper wall outlet. Do not change the equipment plug, extension cord receptacle, or extension cord plug in anyway.
⚠️ Contact with moving parts may cause entanglement,
dismemberment, or other serious bodily injury. Always keep body parts (i.e.: hands, feet) at a distance from moving parts. Ensure all covers and guards are securely in place before use.
Hot surfaces (i.e.: the motor) may ignite flammable or combustible items and cause a fire or explosion resulting in serious injury. Keep the mower at a distance from flammable or combustible items until surfaces that are hot have completely cooled. Do not store mower near flammable or combustible items.
A damaged blade or worn blade nut may break off the mower assembly and cause serious injury. Replace the damaged blade or blade nut before using the mower.
FOR ALL LAWN MOWERS
- Avoid dangerous conditions. Do not use the mower in the rain or when the grass is damp or wet.
- Always keep children and spectators at a safe distance from the mower during operation and as the machine cools down.
- Always wear personal safety gear (i.e.: glasses, rubber gloves, protective footwear and dust mask) and proper clothing when using the mower. Loose clothing, long hair or jewelry may get caught in the moving parts.
- Do not use lawn mower for any purpose except that for which it is intended.
- Ground fault circuit interrupter (GFCI) protection should be provided on the circuit(s) or outlet(s) to be used for the lawn mower. Receptacles are available having built-in GFCI protection and may be used for this measure of safety.
- To prevent electric shock use only with an extension cord suitable for outdoor use, such as SW, SOW, STW, STOW, SJTW, or SJTOW.
EXCEPTION: This warning does not apply to a battery operated lawn mower.
-
Ensure the extension cord set is in good condition. When using an extension cord, be sure to use one heavy enough to carry the current your product will draw. For lengths less than 100 feet, No. 14 AWG extension cord should be used. An under sized cord will cause a drop in line voltage resulting in loss of power and overheating.
-
To reduce the likelihood of disconnection of lawn mower cord set during operation:
i) Make a knot as shown in Figure 1, or
ii) Use one of the plug-receptacle retaining straps or connectors described in this manual. Know Your Lawn Mower.
SAVE THESE INSTRUCTIONS
Method of securing cord set
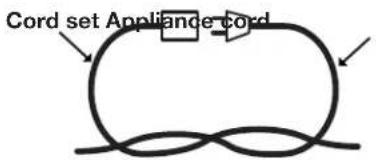
(A) Tie cord as shown

natural_image
Simple line drawing of a resistor connected in series with two leads (no text or symbols)(B) Connect plug and receptacle
Figure 1
- Do not abuse the cord. Never pull lawn mower by cord or yank it to disconnect from receptacle. Keep cord from heat, oil, and sharp edges.
EXCEPTION: This statement does not apply to a cordless battery-operated lawn mower.
- Do not force the mower. It will do the job better and safer at the rate for which it was designed.
- Do not over extend yourself while operating the mower. Keep proper footing and balance at all times.
- Always be alert and watch what you are doing. Use common sense. Do not operate lawn mower when you are tired.
- Disconnect lawn mower – from the power supply when not in use, before servicing, or when changing accessories such as blades, and the like.
- When not in use, the lawn mower should be stored indoors in a dry, secure location. Keep out of the reach of children.
- Maintain lawn mower with care – Keep cutting edges sharp and clean for best and safest performance.
Follow these instructions for lubricating and changing accessories.
Inspect lawn mower cord periodically and if damaged, have it repaired by an authorized service facility. Inspect extension cords periodically and replace if damaged. Keep handles dry, clean, and free from oil and grease.
- Keep guards in place and in working order.
- Keep blades sharp.
- Keep hands and feet away from cutting area.
- Objects struck by the lawn mower blade can cause severe injuries. The lawn should always be carefully examined and cleared of all objects prior to each mowing.
- If lawn mower strikes a foreign object, follow these steps:
i) Stop lawn mower. Release the Start/Stop switch.
ii) Unplug power cord.
iii) Inspect for damage.
iv) Repair any damage before restarting and operating the lawn mower.
- Use identical replacement blades only.
IMPORTANT!
Safety Instructions for Walk-Behind Mowers
GENERAL OPERATION
- Read, understand, and follow all instructions on the machine and in the manual(s) before starting.
- Do not put hands or feet near or under the machine. Always stay clear of the discharge opening.
- Only allow responsible adults, who are familiar with the instructions, to operate this machine.
-
Clear the area of objects such as rocks, wire, toys, etc., which could be thrown by the blade. Stay behind the handle when the engine (motor) is running.
-
Be sure the area is clear of bystanders before operating. Stop machine if anyone enters the area.
-
Do not operate machine barefooted or while wearing sandals. Always wear substantial footwear.
-
Do not pull machine backward unless absolutely necessary. Always look down and behind before and while moving backward.
-
Never directly discharged material toward anyone. Avoid discharging material against a wall or obstruction.
-
Do not operate machine without the entire grass catcher, discharge guard, rear guard, or other safety protective devices in place and working.
-
Never leave a running machine unattended.
-
Stop the engine (motor) and wait until the blade comes to a complete stop before cleaning the machine, removing grass catcher, or unclogging the discharge guard.
-
Operate machine only in daylight or good artificial light.
-
Do not operate machine when you are tired or under the influence of alcohol or drugs.
-
Never operate mower in wet grass. Always be sure of your footing; walk; never run.
-
Disengage the drive system, if so equipped, before starting the engine (motor).
-
If the machine should start to vibrate abnormally, stop the engine (motor) and check for the cause immediately. Vibration is generally a warning of trouble.
-
Always wear eye protection when operating machine.
SLOPE OPERATION
Slopes are a major factor related to slip and fall accidents, which can result in severe injury. Operation on all slopes requires extra caution. If you feel uneasy on a slope, do not mow it.
- Mow across the face of slopes; never up and down. Exercise extreme caution when changing direction on slope.
- Watch for holes, ruts, bumps, rocks, or other hidden objects. These may cause an unexpected slip or fall.
- Do not mow on wet grass or excessively steep slopes. Poor footing could cause a slip and fall accident.
- Do not mow near drop offs, ditches, or embankments. You could lose your footing or balance.
CHILDREN
Tragic accidents can occur if the operator is not alert to the presence of children. Children are often attracted to the machine and the mowing activity. Never assume that children will remain where you last saw them.
- Keep children out of the mowing area and under the watchful care of a responsible adult other than the operator.
- Be alert and turn mower off if a child enters the area.
- Never allow children to operate the machine.
- Use extra care when approaching blind corners, shrubs, trees, or other objects that may block your view of a child.
SERVICE
GENERAL SERVICE
- Keep all nuts and bolts tight.
- Never tamper with safety devices. Regularly check to ensure they are in place and working properly.
- Keep the mower free from grass, leaves, or other debris buildup.
- If you strike a foreign object, stop and inspect the machine. Repair, if necessary, before starting.
- Never make any adjustments or repairs with the engine (motor) running. Always unplug electric mowers before adjusting, cleaning, or repairing.
- Check the grass catcher components and the discharge guard frequently and replace with manufacturer's recommended parts, when necessary.
- Mower blades are sharp. Wrap the blade or wear gloves, and use extra caution when servicing them.
- Maintain or replace safety and instruction labels, as necessary.
SYMBOLS
| SYMBOLS | DESCRIPTIONS |
 | CPSC Danger label |
 | Safety alert |
 | Read the operator's manual |
 | Severing of toes or fingers-rotary mower blade. |
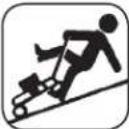 | Slip on slope |
 | Thrown objects and rotating line can cause severe injury |
 | Keep bystanders/children away |
 | Wear eye and hearing protection. For protection against injury wear ear defenders and safety goggles. |
 | Double insulation |
Know Your Lawn Mower
Read this owner's manual and safety rules carefully before operating the mower. Compare the illustration below to the mower in order to become familiar with the location of the various controls and adjustments. Save this manual for future references.
- Switch
- Hand Grip
- Power Button
- Upper Handle
- Lower Handle
- Handle Knob
- Motor Housing
- Wheels
- Discharge Chute
- Discharge Cover
- Height Adjustment Lever
- Chute Cover
- Grass Catcher Hook
- Grass Catcher Bag
- Mulch Plug
- Cable Clip

Technical Data
- Voltage - 120V/60Hz
- Rated Input - 12A
- Cutting Width - 20" (508 mm)
-
Grass collection capacity - 15.06 gallons/57 ltrs
-
No load Speed - 3600 rpm
- Weight - 57.32 lbs/26 kg
- Cutting Heights - 1.75" - 3.75" (45mm - 95 mm)
- Wheels Size - 7" (front)/8" (rear)
Assembly
Parts List
- Mulch plug
- Grass catcher bag
- Manual
- Discharge Chute
Note:
- Carefully remove the parts from the box.
- Inspect the parts carefully in order to verify that no breakage or damage occurred during shipping.
- Do not discard the packing material until all parts have been examined.
Assembling the Handle (Fig. 2)
- Remove any packing material which may be between the upper and lower handles for Sahipping purposes.
- Pull up and back on the upper handle to raise the handle into the operating position. Make sure the lower handle is seated securely into the handle mounting bracket.

- Align the holes (C) between the upper handle (4) and lower handles (5). Insert the bolts (B) and tighten them with the wing nuts (C) provided. (Fig. 2)
- Secure the lower handle to the bracket with the handle knob on each side. (Fig. 2)
Installing the Grass Catcher Bag (Fig. 3)
- UNPLUG THE POWER CORD, AND WAIT FOR BLADE TO COME TO A COMPLETE STOP.
- Lift the chute cover. (1)
- While holding up the cover (1), place the grass catcher bag hanger hooks (2) into the opening on the chute cover (1) to allow the hanger hooks to attach to the rod (3) which secures the chute cover.

NOTE: For optimal performance empty grass bag often during use. A full grass bag will inhibit performance of the mower and collection of grass clippings.
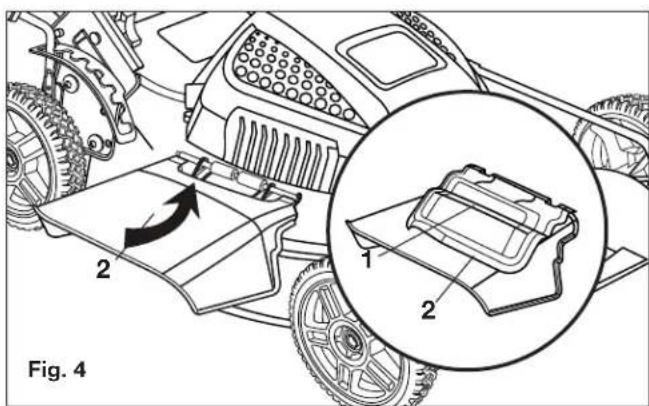
Install the Side Discharge Chute (Fig. 4)
This mower has 3 different functions-mulch, side discharge, and rear bag. If you wish to discharge the clippings rather than mulch, perform these steps.
- UNPLUG THE POWER CORD, AND WAIT FOR BLADE TO COME TO A COMPLETE STOP.
- Lift the side discharge cover (1).
- Align the grooves on the discharge chute (2) with the pins on the underside of the discharge cover (1).
- Lower the discharge chute until the hooks on the mower deck are secured in the openings in the discharge chute (2).
- Release the side discharge cover (1).
Installation or Removal of the Mulch Plug (Fig. 5)
- UNPLUG THE POWER CORD, AND WAIT FOR BLADE TO COME TO A COMPLETE STOP.
- To remove the mulch plug lift the chute cover (1) and pull out on the handle.
- The mulch plug (2) is inserted on an angle so it will require some force when removing.

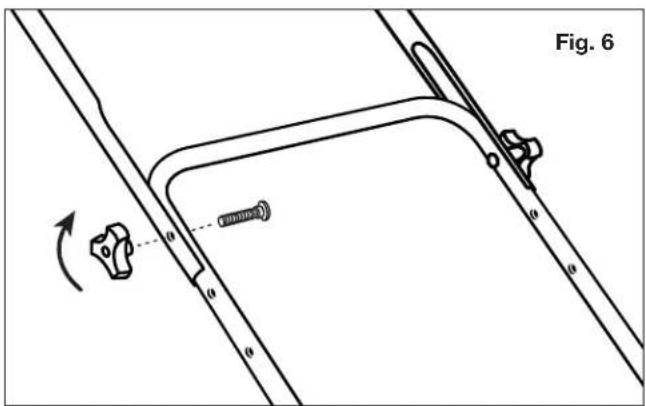
Adjust the Upper Handle Height (Fig. 6)
- Loosen the upper handle knob.
- Adjust the handle to the most comfortable of the 3 positions.
- Tighten the upper handle knob as tight as you can.
Operating
Starting/Stopping the Mower (Fig. 7)
Carefully follow the illustration below, in order, when starting or stopping the mower.
- For the proper operation of this lawn mower, you need to push the lever release to your left exposing the switch control lever, then the lawn mower can be operated by holding the switch control lever to the hand grip.
- To stop the lawn mower, release the switch control lever.

⚠ WARNING: The operation of any mower can result in foreign objects being thrown into the eyes, which can cause severe eye damage. Always wear safety glasses while operating the mower and while performing any adjustments or repairs.
⚠ WARNING: Ensure that other people and pets remain at least 50 ft. (15m) away when the mower is in use.
Inspect the Cutting Area
Remove all stones, sticks, wire, bones, and other debris that might be thrown by the rotating blades.
Adjust the Cutting Height (Fig.8)
- Simply depress the lever towards the wheel and move to desired position. This sets all wheels to the same position.
- To raise the height, pull the height adjustment lever from the current stop position towards the back of the mower.
- To lower the height, push the height adjustment lever from the current stop position towards the front of the mower.

7-Position Height Adjustment:
- 1-3/4 in. 5. 3 in.
- 2 in. 6. 3-1/4 in.
- 2-1/4 in. 7. 3-3/4 in.
- 2-1/2 in.
⚠ WARNING: Do not mow a slope that has an angle of greater than 15^ (a rise of approximately 2-1/2 ft. [75 m] every 10 ft. [3m]). Mow a cross the face of a slope, and never up and down.
Mowing Tips
NOTE: A sharp blade will greatly enhance the performance of the mower, especially when cutting high grass.
Be sure to check the blade and to sharpen it at least once per year, as described in the Maintenance section
- Verify that the lawn is free of stone, sticks, wires and other objects that could damage the blades or the motor.
These objects could be accidentally thrown by the mower in any direction, and could cause serious personal injury to the operator and to others.
- In order to prevent electric shock, do not operate the mower in damp or wet conditions.
- Do not mow in circle. Travel back and forth across the lawn.
- When cutting thick grass, reduce walking speed in order to allow for a more effective cut and a proper discharge of the clippings. For a healthy lawn, always cut off one-third or less of the total length of the grass. The average lawn should be approximately 1-1/2 to 2 in. (3.8 to 5 cm) long during cool month, and more than 2 in. (5cm) long during hot months. If there is growth, the lawn should be cut in the fall.
Mulching Tips
NOTE: INSPECT THE AREA WHERE THE MOWER IS TO BE USED AND REMOVE ALL THE STONES, STICKS, WIRES AND OTHER DEBRIS THAT MIGHT BE THROWN BY THE ROTATING BLADE.
- Release the switch to turn the mower off when crossing any graveled area (stone can be thrown by the blade).
- Set mower to the highest cutting height when mowing on uneven ground or in tall weeds.
- For effective mulching, do not cut wet grass, because it tends to stick to the underside of the deck, preventing proper mulching of grass clippings. New or thick grass may require a narrower cut. The ground speed should be adjusted to the condition of the lawn. If mowing has been delayed and the grass has been allowed to grow longer than 4 in. (10 cm), mow the lawn twice in order to reduce the grass to the maximum of 3 -1/4 in. (8.3 cm).
- Walk at a steady pace. Overlap the cutting rows. Do not let the grass get too tall. If the grass gets too long, start at the highest cutting position and work down to the desired cutting height.
⚠ WARNING: If you strike a foreign object, stop the motor and disconnect the power cord. Thoroughly inspect the mower for any damage. Repair any damage before operating the mower.
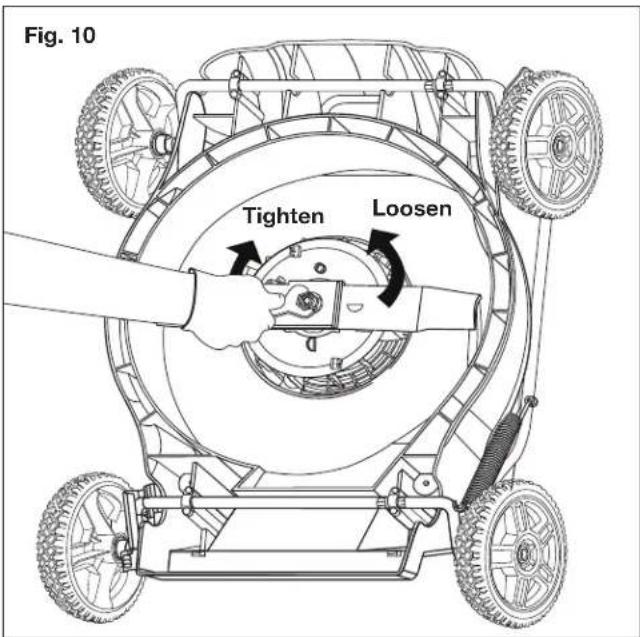
Cutting Blade Replacement (Fig. 9 & Fig. 10)
⚠ WARNING: Always protect your hands by wearing heavy gloves and/or wrapping the cutting edges with rags or other materials when performing any maintenance on the blades.
- Release the switch lever to turn the mower OFF, wait for the blade to come to a complete stop.
- While wearing leather padded gloves, wedge a block of wood between the blade and the mower deck in order to prevent the blade from turning when the nut is being removed.
- Using a 15-mm wrench or socket, loosen the blade nut (1) "COUNTERCLOCKWISE" to loosen it and "CLOCKWISE" to tighten it.
- Remove the blade nut (1), the square washer (2), and the blade (3).

- To re-install the blade, position the blade with the cutting edges toward the ground. Assemble the blade, the square washer, and the blade nut as shown in the following. Using a 15-mm wrench or socket, turn the blade nut "CLOCKWISE" to secure the blade.
NOTE: Be sure to replace the parts in the exact order in which they were removed. When installing the cutting blade, verify that it is installed with the curved ends pointing toward the mower deck.
Clean the Mower
⚠ WARNING: To reduce the risk of electric shock, do not expose the mower to water.
The underside of mower deck should be cleaned after each use as grass clippings, leaves, dirt and other debris will accumulate causing rust and corrosion.
Remove any buildup of grass and leaves on or around the motor cover (do not use water). Wipe the mower clean with a dry cloth occasionally.
- If debris build up on the underside of the unit while using, stop the motor and disconnect it from the power supply. Tilt the mower forward, or on its side, and scrape it clean with an appropriate tool.
Storage
The following steps should be taken to prepare the lawn mower for storage.
- Make certain the power is disconnected.
- Clean mower as instructed in previous section.
- Inspect and replace/sharpen blade, if required. Refer to the Maintenance section.
- Store mower in a dry, clean area. Do not store next to corrosive materials, such as fertilizer and rock salt.
- Wipe extension cord to remove any foreign substances such as oil or stains. Replace extension cord if cut or damaged in any way.
- Wind the cord in a series of equal loops to prevent it from tangling.
- Store mower indoors, in a cool, dry place, out of reach of children. Do not cover lawn mower with a solid plastic sheet. Plastic coverings trap moisture around the mower causing corrosion.
- The handle may be folded away completely for storage.
- Loosen the handle knobs on the sides of the handle, and fold the upper handle down.
- Loosen the handle knobs, pull outwards on each side of the lower handle, and lift the sides of the lower handle past the edges of the handle mounting brackets. Fold the lower handle forward. Make sure not to bend or kink the power cord.
Service
- When servicing the mower, use only replacement parts that are available from the manufacturer. In order to obtain replacement parts, call the toll-free helpline. The use of parts that do not meet the original equipment specifications may lead to improper performance, and may compromise safety.
- Before cleaning, repairing, or inspecting, verify that the blade and all moving parts have come to a complete stop and remove power cord.
- Keep the handles dry, clean, and free of oil and grease.
- In order to reduce the risk of fire, keep the motor free of grass, leaves, and debris build-up.
- Frequently check the blade and motor mounting bolts for proper tightness. Visually inspect blade for damage (e.g.: bent, cracked, or worn).
- For best and safest performance, maintain the mower with care. Keep the mower blade sharp and clean. Mower blades are sharp, and can cut. Wrap the blades or wear gloves, and use extra caution when servicing.
- Keep all nuts, bolts, and screws tight in order to be sure that the equipment is in safe working condition.
- Never tamper with safety devices. Check them regularly for proper operation.
- After striking a foreign object, stop the motor and remove power cord. Thoroughly inspect the mower for any damage. Repair any damage before operating the mower.
- Lawn mower components are subject to wear and damage, which could expose moving parts or allow objects to be thrown. As a safety precaution, frequently check components and replace those that show signs of wear or damage.
- When it is not in use, store the mower indoors in a dry area, and out of the reach of children.
Support
If your Lawn Mower requires service or maintenance, please call 1-866-766-9563 for assistance.
Model and Serial Numbers
When contacting the company or reordering parts, you will need to provide the model and serial numbers of your product. These are found on the decal affixed to the housing or handle of your mower. Copy these numbers into the space provided below.


A Two-Year Full Warranty for residential use in the United States and Canada

General Conditions:
Snow Joe, LLC warrants this product to the original purchaser for two years against defects in material or workmanship when used for normal residential purposes. Snow Joe, LLC will repair any defect in material or workmanship, and repair or replace any defective part, subject to the conditions, limitations, and exclusions set forth herein. Such repair or parts replacement will be free from charge to the original purchaser except noted below.
The duration of the warranty applies only if the product is put to personal use around the household or residence. If the product is put to any business use, commercial or industrial, then the duration of this warranty is 90 days from the date of original purchase. If any product is rented or leased, the duration of the warranty is 90 days from the date of original purchase.
It is the owner's responsibility to perform correctly all maintenance, and minor adjustments explained in the owner's manual.
Electric Products:
To obtain a replacement electric powered unit or repair the existing electric powered unit, you must return the complete unit and postage prepaid to: Snow Joe Return Center, 86 Executive Avenue, Edison, NJ 08817.
Gasoline / Battery Products:
Limitations
- Batteries are warranted only for the period of 12 months after the date of purchase on a prorated basis. Rechargeable batteries will be replaced free from charge during the first 90 days. After the initial 90 days, batteries will be replaced at prorated cost to the customer
- Idlers, cables, and electrical components are warranted to the original purchaser for use at household or residence for a period of two years
Exclusions
- Snow Joe brand engines are covered under this warranty. All other engines and engine accessories are covered only by the engine manufacturer's warranty and are not covered by this warranty
- Parts used that are not genuine Snow Joe parts are not covered by this warranty
- Damages resulting from misuse, alteration, improper assembly, improper adjustment, neglect, or accident which requires repair is not covered under this warranty
- Belts, augers, and tines are not covered under warranty – belts, augers, and tines wear out and can be purchased at www.snowjoe.com or by calling 1-866-766-9563
Snow Joe, LLC may from time to time change the design of its products. Nothing contained in this warranty shall be construed as obligating Snow Joe, LLC to incorporate such design changes into previously manufactured products, nor shall such changes be construed as an admission that previous designs were defective.
This warranty is intended to cover product defects only. Snow Joe, LLC is not liable for indirect, incidental, or consequential damages in connection with the use of the Snow Joe Products covered by this warranty. This warranty does not cover any cost or expense incurred by the purchaser in providing substitute equipment or service during reasonable periods of malfunction or non-use of this product, while waiting for completion of repairs under this warranty. Some states do not allow exclusions of incidental or consequential damages, so the above exclusions may not apply in all states. This warranty may gives you specific legal rights in your state.
If you wish to contact Snow Joe, please direct inquiries to the:
Customer Service Department
Snow Joe Center
86 Executive Avenue
Edison, NJ 08817
Customers who have purchased Snow Joe products exported from the United States and Canada should contact their Snow Joe Distributor (Dealer) to obtain information applicable for your country, province, or state. If for any reason, you are not satisfied with the distributor's service, or if you have difficulty obtaining warranty information, contact your Snow Joe seller. If in the event your efforts are unsatisfactory, please write to the Snow Joe Center at the above address.
If you have any questions about your product warranty, please call 1-866-SNOW-JOE or visit us online at www.snowjoe.com.


- IMPORTANT! Safety Instructions
- All Operators Must Read These Instructions Before Use
- General Safety WARNINGS!
- FOR DOUBLE-INSULATED LAWN MOWERS
- FOR ALL LAWN MOWERS
- Method of securing cord set
- Figure 1
- Follow these instructions for lubricating and changing accessories.
- IMPORTANT!
- Safety Instructions for Walk-Behind Mowers
- GENERAL OPERATION
- SLOPE OPERATION
- CHILDREN
- SERVICE
- GENERAL SERVICE
- Know Your Lawn Mower
- Technical Data
- Assembly
- Parts List
- Note:
- Assembling the Handle (Fig. 2)
- Installing the Grass Catcher Bag (Fig. 3)
- Install the Side Discharge Chute (Fig. 4)
- Installation or Removal of the Mulch Plug (Fig. 5)
- Adjust the Upper Handle Height (Fig. 6)
- Operating
- Starting/Stopping the Mower (Fig. 7)
- Inspect the Cutting Area
- Adjust the Cutting Height (Fig.8)
- 7-Position Height Adjustment:
- Mowing Tips
- Mulching Tips
- Cutting Blade Replacement (Fig. 9 & Fig. 10)
- Clean the Mower
- Storage
- Support
- Model and Serial Numbers
- A Two-Year Full Warranty for residential use in the United States and Canada
- General Conditions:
- Electric Products:
- Gasoline / Battery Products:
- Limitations
- Exclusions
Brand : Snow Joe
Model : Mow MJ407E
Category : Lawn mower