
BWM1409W - Washing machine BAUMATIC - Free user manual and instructions
Find the device manual for free BWM1409W BAUMATIC in PDF.


| Product Type | Freestanding Washing Machine |
| Brand | Baumatic |
| Model | BWM1409W |
| Color | White |
| Loading Type | Front Load |
| Capacity (kg) | 9 kg |
| Maximum Spin Speed (rpm) | 1400 rpm |
| Energy Efficiency Class | A+++ (estimated) |
| Annual Energy Consumption (kWh) | Approx. 174 kWh |
| Annual Water Consumption (L) | Approx. 10,000 L |
| Noise Level Washing/Spinning (dB) | Approx. 54/76 dB |
| Number of Programs | 15 (Cotton, Synthetics, Delicates, Quick, etc.) |
| Features | Child lock, Delay Start, Overflow protection, Foam control |
| Dimensions (H x W x D) (mm) | 850 x 600 x 550 |
| Weight (kg) | 68 kg |
| Power Supply | 220-240 V, 50 Hz |
| Power Consumption (W) | 2000 W (max) |
| Water Inlet Pressure (MPa) | 0.05 - 0.8 MPa |
| Water Connection | Cold water only |
| Drain Hose Length (m) | 1.5 m |
| Power Cord Length (m) | 1.5 m |
| Spare Parts Availability | Parts available via Baumatic service centers |
| Repairability Index | 7.5 / 10 (estimated) |
Frequently Asked Questions - BWM1409W BAUMATIC
User questions about BWM1409W BAUMATIC
0 question about this device. Answer the ones you know or ask your own.
Ask a new question about this device
Download the instructions for your Washing machine in PDF format for free! Find your manual BWM1409W - BAUMATIC and take your electronic device back in hand. On this page are published all the documents necessary for the use of your device. BWM1409W by BAUMATIC.
USER MANUAL BWM1409W BAUMATIC
BWM1409W 60 cm 9 kg Freestanding washing Machine
INSTRUCTION MANUAL

natural_image
Simple line drawing of a fish with fins and tail, no text or symbols presentUSER MANUAL FOR YOUR BAUMATIC
BWM1409W
60 cm 9 kg
Freestanding
washing machine

NOTE: This User Instruction Manual contains important information, including safety & installation points, which will enable you to get the most out of your appliance. Please keep it in a safe place so that it is easily available for future reference; for you or any person not familiar with the operation of the appliance.
GS 25/05/10
Contents
| Environmental note | 4 | |||||||||||
| Important safety information | 5-6 | |||||||||||
| Specifications | 7 | |||||||||||
| Description of the appliance | 8 | |||||||||||
| C o n t r o l | p | a | n | e | l | |||||||
| L C D d i s p l | a | y | ||||||||||
| Detergent drawer | 11-12 | |||||||||||
| Preparing the wash cycle | 12-14 | |||||||||||
| Preparing your garments for washing 12-13 | ||||||||||||
| A selection of wash care symbols 13 | ||||||||||||
| Detergents and conditioners | 14 | |||||||||||
| Wash program table | 15 | |||||||||||
| Wash program guidance | 15-16 | |||||||||||
| Selecting a wash program | 16-23 | |||||||||||
| Descriptions of the wash programs 16-22 | ||||||||||||
| E n d o f c y c l e | ||||||||||||
| Pausing a wash program | 22 | |||||||||||
| Changing a wash program | 22 | |||||||||||
| Delay start feature | 22-23 | |||||||||||
| C h i l d l o c k | ||||||||||||
| Maintenance and cleaning | 23-30 | |||||||||||
| I n d a i l y u s e | ||||||||||||
| Control panel and washing machine cabinet 24 | ||||||||||||
| D e t e r g e n t d r a w | ||||||||||||
| The washing machine drum 24-25 | ||||||||||||
| D o o r 25 | ||||||||||||
| 95° maintenance wash 25 | ||||||||||||
| Cleaning the drain pump filter 25-26 | ||||||||||||
| Cleaning the water inlet filter 26 | ||||||||||||
| Winter storage 26-27 | ||||||||||||
| R e m o v i n g s t a i n | ||||||||||||
| S t a i n r e m o v a l | ||||||||||||
| S t a i n r e m o v a l | ||||||||||||
| Poor wash results 29-30 | ||||||||||||
| I n s t a l l a t i o n | ||||||||||||
| Removing the transit bolts 30-31 | ||||||||||||
| Locating your washing machine 31 | ||||||||||||
| Connecting to the mains water supply 32 | ||||||||||||
| Connecting to the water outlet 33 | ||||||||||||
| Levelling the appliance 34 | ||||||||||||
| P o w e r s u p p l y | ||||||||||||
| Before first use maintenance wash 35 | ||||||||||||
| Error code failure system 36-37 | ||||||||||||
| General troubleshooting 37-38 | ||||||||||||
| Contact details 39 | ||||||||||||
Environmental note
This appliance is marked according to the European directive 2002/96/EC on Waste electrical and Electronic Equipment (WEEE). By ensuring this product is disposed of correctly, you will help prevent potential negative consequences for the environment and human health, which could otherwise be caused by inappropriate waste handling of this product.
The symbol accompanying the product, indicates that this appliance may not be treated as household waste. Instead it shall be handed over to the applicable collection point for the recycling of electrical and electronic equipment.

Disposal must be carried out in accordance with local environmental regulations for waste disposal.
For more detailed information about treatment, recovery and recycling of this product, please contact your local city office, your household waste disposal service or the shop where you purchased the product.

natural_image
Symbol of a trash bin crossed with a diagonal line, no text or numbers presentImportant safety information

Your safety is of the utmost importance to Baumatic. Please make sure that you read this instruction booklet before attempting to install or use the appliance. If you are unsure of any of the information contained in this booklet, please contact the Baumatic Advice Line.
General Safety
- Repairs to your appliance must only be carried out by a Baumatic engineer or one of its authorised service agents. Any attempt by an inexperienced person to repair the appliance, could result in injury or damage to your washing machine.
- If you notice that the mains cable is damaged. The appliance must not be used. The same applies if you notice that the worktop, control panel or base area is damaged. As this could allow access to the internal components of the machine.
- The appliance should be turned off and isolated from the mains supply, before either cleaning or maintenance work is attempted.
- The mains cable must not be used to pull the plug out of the electrical socket.
- The machine should not be sprayed with water.
- The glass of the porthole door may become hot during the higher temperature wash programs.
- The machine should be allowed to cool before carrying out an emergency drain or cleaning the drain filter.
- It is possible for small animals to chew either the mains cable or water hoses, which could cause an electric shock hazard.
Installation
- The installation instructions contained within this user manual should be followed.
- It is obligatory for the completed installation to comply with all relevant building regulations and local water authority requirements.
Before the first use of the appliance, we advise that a 95 degree cotton wash is completed. No garments should be placed inside the machine; however a small amount of detergent must be used.
During Use
- It is recommended that the appliance is unplugged and the water supply is turned off after the machine is used.
- This appliance is only designed to wash normal domestic washloads. If you use your washing machine in any other way or it is incorrectly used, then Baumatic accepts no liability for any damage that might be caused and any guarantee will be void.
- No attempt should be made to alter or modify the specifications of this appliance.
- The detergents that you place in this appliance should be suitable for automatic washing machines. With regards to dosage levels, the detergent manufacturer's recommendations should be followed.
- You should not wash garments that have been in contact with flammable materials.
- Your washing machine should not be used for dry cleaning.
- If you use either dyes or bleaching agents inside this machine, then you should consult with the manufacturer of these products to make sure they are suitable for use in your washing machine. Baumatic cannot be held responsible for any damage that may result.
Child Safety
- Your washing machine should only be used by adults. You should not allow children in the area of the machine unsupervised. You should not let them touch the controls or play with the appliance.
- It could be possible for a child or pet to gain access to the washing machine through the porthole door. Therefore please check the drum before using the appliance.
○ Any packaging that is removed from the machine should be kept away from children.
- All detergents should be kept out of a child's reach and in a safe place.
Specifications
- 18 wash programs
- 9 kg wash load
- 1400 rpm maximum spin speed
- LED display
- Delay start
- Digital countdown indicator
- Open door indicator
- Water supply indicator
- Wash phase indicator
- Tilted drum
- Air bubble washing system
- 488 mm porthole and 180° opening
- Antibacterial surface
- Failure detection system
- Imbalance control system
- Overflow protection
- Foam protection
○ Adjustable feet - Direct drive system
- Safety door lock
Appliance dimensions
| Height: | 850 | mm | |
| Width : | 600 | mm | |
| Depth: | 645 | mm |
Ratings
| E | n | e | r | g | y | e | f | f | i | c | i | e |
| Wash | performance | class | A | |||||||||
Water extraction performance class A
For future reference please record the following information which can be found on the rating plate and the date of purchase which can be found on your sales invoice. The rating plate for your washing machine will either be located on the right hand side of the cabinet or behind the porthole door.
Model Number
Serial Number
Date of Purchase ....
Description of the appliance

Accessories
| Drain hose | Inlet hose | Spanner | Instruction manual | Transit hole cover |
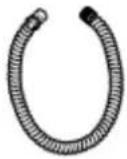 | 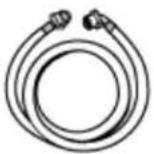 | 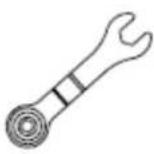 | 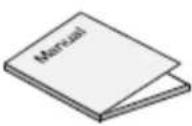 |  |
Control panel
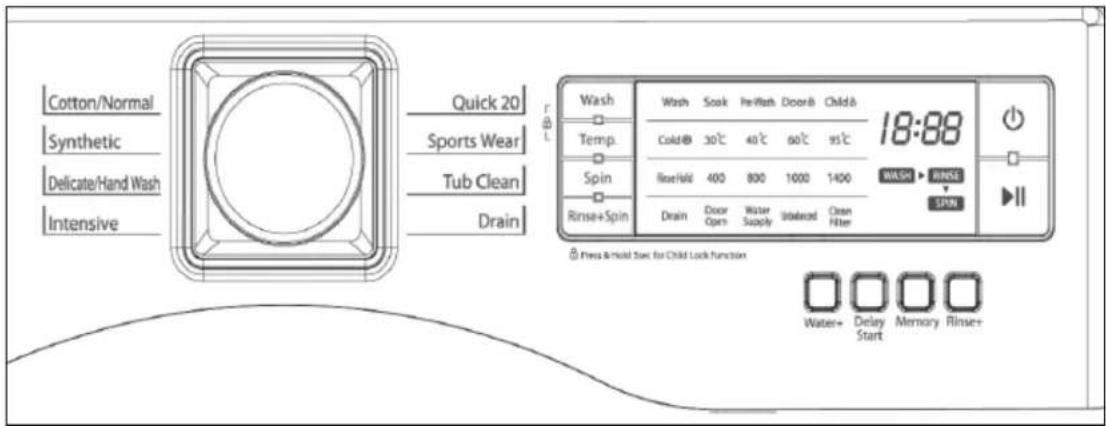

1) Power button. Press this button to turn the power on or off.
2) Start/ pause button. Operation and temporary stop is repeated as it is pressed. When you want to do program while it is in use, press this button, then select the program you want to change to, and then press this button again.
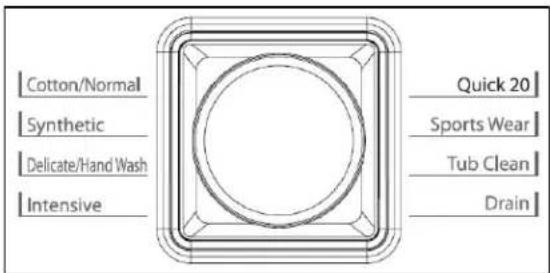
3) Wash program selection knob. You can select the cycle you want by rotating the knob to choose from 8 options around the outside.
4) Temperature button. This button can be used to adjust the temperature of the water according to the type of load that needs cleaning. As the button is pressed, the temperature of the water can be selected through the following options:
$$ C o l d \rightarrow 3 0 ^ {\circ} C \rightarrow 4 0 ^ {\circ} C \rightarrow 6 0 ^ {\circ} C \rightarrow 9 5 ^ {\circ} C $$
5) Spin button. By pressing this button, the spin speed can be chosen. You can set the spin speed by rpm through the following options:
$$ \text { Rinse Hold } \rightarrow 4 0 0 \rightarrow 8 0 0 \rightarrow 1 0 0 0 \rightarrow 1 4 0 0 $$
6) Wash button. You can select the cycle you want by using this button. The light of the chosen cycle will glow after selection. As the button is pressed, the wash cycle is chosen through the following options:
$$ W a s h \rightarrow S o a k \rightarrow P r e - w a s h $$
7) Rinse + Spin button. You can select the rinse and spin cycle by pressing this button.
8) Water + button. You can press this button to add an extra 6 litres of water to the rinse section of any wash cycle, to increase the rinse performance without lengthening time it takes to complete.
9) Delay start button. This button can be used to delay the start of the wash cycle from between 1 - 12 hours.
10) Memory button. You can use this button to recall a cycle that you have previously programmed the washing machine to remember.
11) Rinse + button. You can press this button to introduce an additional rinse, which will help to remove traces of detergent residue.
LCD display
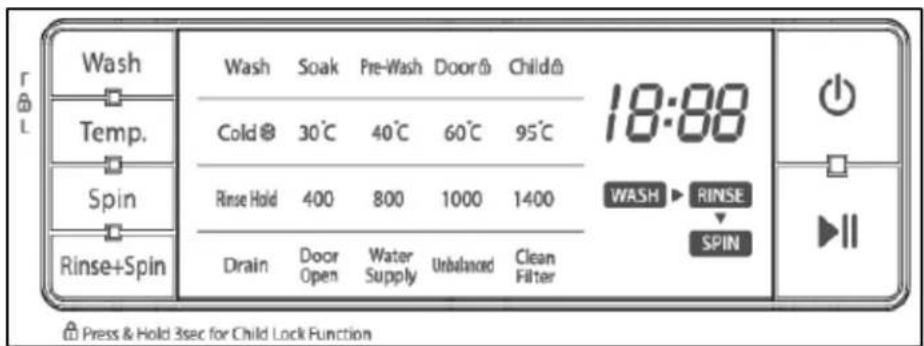
Wash cycle progress indicator
This lights when a wash cycle is in progress, to indicate what stage of the wash cycle the appliance has reached from:
$$ W a s h \rightarrow R i n s e \rightarrow S p i n $$
Wash display
This lights the wash functions that have been selected such as a pre-wash or a soak.
Wash program temperatures
This light indicates which wash temperature has been selected.
Spin speeds
This light indicates whether a spin speed has been selected.
Child lock
This light indicates that the Child Lock has been switched on.
Door lock
This light indicates that the automatic door lock has been activated as the cycle is in progress.
Timer display
This indicates how long is left of the wash cycle that is in progress.
Digital display
This indicates whether there is an imbalance, or the door is open by lighting the relevant icon.
Warning display
These lights indicate when there is a minor error, for example "Door Open", "Unbalanced" or the filter needs cleaning.
Detergent drawer

Main wash section

This compartment should have detergent placed in it (you should also put a water softening agent in this section, if you use one). The detergent will be added to the drum at the start of the main wash program.
Conditioner section

This compartment should be used for liquid conditioners (fabric softener, starch). They will be added to the wash load during the final rinse.
Pre wash section

This compartment should have detergent placed in it, if you are going to select a pre-wash before the main wash cycle.
Preparing the wash cycle
Preparing your garments for washing
- Your washing should be sorted out, according to the fabric type and the wash care symbol that is printed on the garment's wash care label (see separate section on wash care symbols).
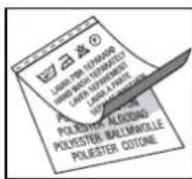
- Your washing should also be sorted out according to the degree of soiling.
- Check all pockets on a garment to make sure that they are empty.
○ Remove any detachable metal items (badges, paperclips, safety pins etc).

- Zips should be closed, duvet covers and pillow cases should be buttoned up and any loose straps should be tied up. This will help to prevent other garments from getting damaged during the wash.

natural_image
Line drawing of a hand holding a small object, possibly a device or tool, with no visible text or symbols.- Woollens and knitted coloured fabrics should be turned inside out before being washed in the appliance.
o Small delicate items (tights, baby socks) should be placed in either a washing net or a zipped pillow case.
o Curtains should be handled with particular care. All plastic hooks or metal strips must be removed before being washed in the appliance.
○ Coloured items and whites should be washed in separate wash cycles.
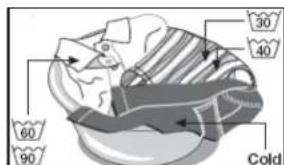
- New garments often contain an excess of dye, therefore it is advisable to wash them separately for their first wash.
o Garments should be unfolded and shook out before being placed inside the machine.
A selection of wash care symbols
I. Washing
boiling temp. 95°C

normal temp. 60°C

normal temp. 40°C

Do not wasch!

delicate
manual
II. Dry cleaning



Do not clean!


III. Spin dryer
normal
low
high
Do not dry!


IV. Ironing
110°C
150°C
200°C
Do not iron!


Select a programme taking into account the care labels indications.
- The wash care symbols should be used to help you to select the most suitable wash program. They will also help you to sort your laundry into different loads, depending on the fabric type and the highest temperature which the garment can be washed at.
Detergents and conditioners
The amount of detergent that you need to use in your appliance, will depend on
- The degree of soiling. Lightly soiled garments in general require less detergent.
- The size of the wash load. A smaller wash load will require a reduction in the amount of detergent.
- The hardness of your tap water. The harder your water is, then the more detergent you will need to use. The detergent manufacturers normally give guidance as to how much extra detergent should be used, depending on the hardness of the water.
Liquid detergent
If you are using liquid detergent, then in the majority of cases the liquid should be placed inside the dosing device supplied by the detergent manufacturer and placed inside the drum. All instructions on the detergent packaging should be followed.
Water softening agents
If your tap water is hard, then it may be prudent to utilise a water softening agent. This will help to ensure that the appliance does not become clogged with hard water deposits. You may also find that it will allow you to lessen the amount of detergent that you are using.

When using any detergent or water softening agent, the recommendations of the manufacturers should be followed.
Wash program table
| Program | Fabric type temp. | Option | P/Maximum Load | |
| Cotton/ Normal | First check if laundry is machine washable (white cotton, linen towel and sheets).Colourfast garments (shirts, night dresses, pyjamas, and lightly soiled white cottons, underwear). | 60°C (Cold, 30°C, 40°C, 95°C). | Pre-wash + rinse | 9kg |
| Synthetic Polyamide, acrylic, polyester 30°C (Cold, 40°C). | Pre-wash + rinse | Less than 3kg. | ||
| Delicate/ handwash | Delicate laundry easily damaged (silk, curtains). | Cold | Less 3kg. | |
| Intensive Heavy soiled clothes (blue- jeans, climbing clothes, ruck sack, sports wear). | 60°C (Cold, 30°C, 40°C, 95°C). | Pre-wash + rinse | Less than 3kg | |
| Quick 20 Coloured laundry which is lightly soiled. | Cold | Less 3kg. | ||
| Sports wear | Lightly soiled fast and thin laundry. | Cold (Cold, 30°C, 40°C). | Pre-wash + rinse | |
| Tub clean Use to clean (and dry). Cold Dry | Without | load. | ||
| Drain Drain water in drum to outside. | ||||
Pre Wash: If the laundry is heavily soiled, the pre-wash option is recommended. This option is available for cotton and synthetic wash programs. You should place detergent in the pre-wash compartment of the detergent drawer, as well as in the main wash compartment.
Rinse+: Will introduce an additional rinse, which will help to remove traces of detergent residue.
Water+ : Will add an extra 6 litres of water to the rinse section of any cycle to provide better rinse performance without adding any time to the wash cycle.
Wash program guidance
○ A wash program option can only be selected if the program table advises that it is possible with the wash cycle you have selected.
- The washing machine automatically selects a temperature for a particular wash program. However it is possible to alter the temperature by using the temp button. All temperatures will not be available on certain wash programs.
- The washing machine automatically selects a spin speed for a particular wash program. However it is possible to alter the spin speed by using the spin button. All spin speeds will not be available on certain wash cycles.
- Important: You should make sure that the selected spin speed is appropriate for the garments that you are washing.
- Important: Before opening the door of the appliance, you MUST spin the clothes and drain the water. See the section called "Spin only".
- The active phases will appear at the top of the LED display, as the wash program progresses.
- The LCD display shows an approximate time for the selected wash cycle. Please note that factors external to the machine, e.g. the temperature of your water supply, your water pressure etc. can affect the time it takes for a wash cycle to complete.
Selecting a wash program
Cotton program
- Put the laundry into the drum and then close the door. The maximum load size is 9kg for a cotton wash.
- In the detergent drawer, put detergent into the main wash and pre-wash compartments.
- Put detergent into the pre wash compartment only if you want to use the pre-wash option.
- Softener should be poured into the middle compartment of the detergent drawer; the level should be below the 'MAX' level.
- If you want to use bleach, then you should put it into the main wash compartment with your detergent.
- Press the power button (1), the LCD display will show “---” and all the program lights will come on.
- If you press the start/pause button (2) next without selecting a program, the cotton/normal wash will be selected as the default program.
-
Alternatively you can use the wash program selection knob (3) to select the cotton program.
-
A wash temperature of 40^ C, with an 800 rpm spin will be selected automatically by the appliance.
- You can use the temp button (4) to adjust the wash temperature, 'cold', 30°C, 40°C, 60°C and 95°C wash temperatures are available.
- You can use the spin button (5) to adjust the spin speed.
- You can use the wash button (6) to select a pre-wash or soak to a cycle. You can also press the rinse button (11) to include a rinse.
* Press the start/pause button (2), the door will lock and after a few seconds you will hear the machine start to fill with water. The machine will automatically use the appropriate amount of water by sensing the weight of your laundry.
Synthetic program
- Put the laundry into the drum and then close the door. The maximum wash load size is below 3kg for the synthetic program.
- In the detergent drawer, put detergent into the main wash and pre-wash compartments.
- Put detergent into the pre wash compartment only if you want to use the pre-wash option.
- Softener should be poured into the middle compartment of the detergent drawer; the level should be below the 'MAX' level.
- If you want to use bleach, then you should put it into the main wash compartment with your detergent.
- Press the power button (1), the LCD display will show “---” and all the program lights will come on.
- Use the wash program selection knob (3) to select the synthetic program.
- A wash temperature of 30^ C, with an 800 rpm spin will be selected automatically by the appliance.
-
You can use the temp button (4) to adjust the wash temperature; 'cold', 30°C and 40°C wash temperatures are available.
-
You can use the spin button (5) to adjust the spin speed. A 1400 rpm spin speed is not available with the synthetic wash program.
- You can use the wash button (6) to select a pre-wash or soak and the rinse button (11) can be pressed to program a rinse.
* Press the start/pause button (2), the door will lock and after a few seconds you will hear the machine start to fill with water.
Delicate/ handwash program
- Put the laundry into the drum and then close the door. The maximum wash load size is below 3kg for the delicate program.
- In the detergent drawer, put detergent into the main wash compartment.
- Softener should be poured into the middle compartment of the detergent drawer; the level should be below the 'MAX' level.
- If you want to use bleach, then you should put it into the main wash compartment with your detergent.
- Press the power button (1), the LCD display will show “---” and all the program lights will come on.
- Use the wash program selection knob (3) to select the delicate program.
- A wash temperature of 'cold', with a 400 rpm spin will be selected automatically by the appliance. The wash temperature of 'cold' is not adjustable for the delicate wash program
- You can use the spin button (5) to adjust the spin speed. 1400 and 1000 rpm spin speeds are not available with the delicate wash program.
- You can use the rinse button (11) to select the rinse cycle option.
* Press the start/pause button (2), the door will lock and after a few seconds you will hear the machine start to fill with water.
Intensive program
- Put the laundry into the drum and then close the door.
- Put detergent into the main wash and pre-wash compartments in the detergent drawer. Softener should be below the 'MAX' level.
- Put detergent into the pre-wash compartment only if you want to add pre-wash.
- When you want to use bleach, put it into the main wash compartment with detergent.
- Press the power button (1). The LED shows only “----” and all program lights will turn on.
- Select the intensive program using the program selection dial (3). The machine will set a washing temperature of 60°C and a spin speed of 1000rpm. If you want to change the washing temperature (4), the spin speed (5) or add wash options (pre-wash or soak) (6) or a rinse (11), then press each button accordingly.
- Press the start-pause button (2). The door will lock and the machine will supply wash water depending on the weight of the laundry. The appliance will then begin washing.
Quick 20 program
- Put the laundry into the drum and then close the door. The maximum wash load size is below 3kg for the Quick 20 wash program.
- In the detergent drawer, put detergent into the main wash compartment.
- Softener should be poured into the middle compartment of the detergent drawer; the level should be below the 'MAX' level.
- If you want to use bleach, then you should put it into the main wash compartment with your detergent.
- Press the power button (1), the LCD display will show “---” and all the program lights will come on.
-
Use the wash program selection knob (3) to select the Quick 20 program.
-
A wash temperature of 'cold', with an 800 rpm spin will be selected automatically by the appliance.
* Press the start/pause button (2), the door will lock and after a few seconds you will hear the machine start to fill with water.
Sports wear program
- Put the laundry into the drum. Put detergent and softener into the detergent drawer. Softener should be below 'MAX' level. Then close the door.
- Put detergent into the pre-wash compartment only if you want to add pre-wash.
- When you want to use bleach, put it into the main wash compartment with detergent.
- Press the power button (1) and the LED will show only “---” and all program lights will turn on.
- Select the sports wear program using the program selection dial (3). The washing temperature will be automatically set at 'cold' with a spin speed of 800 rpm.
- You can alter the temperature of the water by pressing the temperature button (4). Only 'cold', '30°C' and '40°C' are selectable.
o Press the start/pause button (2) and the door will lock. The wash water supplied will be influenced by the weight of the laundry. The appliance will then begin washing.
Spin only
o Put the laundry into the drum and then close the door.
- Press the power button (1), the LCD display will show “---” and all the program lights will come on.
- Select the spin speed (5) that you require by pressing the spin button.
- The water temperature is set to 'cold' automatically.
* Press the start/pause button (2), the door will lock and after a few seconds you will hear the machine start to spin.
Wash only
- Put the laundry into the drum and put detergent and softener into the detergent drawer. Then close the door.
- Press the power button (1) and the LED will show only “---”.
- Select the wash course you want by pressing the wash button (6). The temperature will automatically be set to 'cold'.
- Press the start-pause button (2) and the washer will be operated with a locked door and supplied water.
Drain
- Press the power button (1), the LCD display will show “---” and all the program lights will come on.
- Use the wash program selection knob (3) to select the drain program.
* Press the start/pause button (2), the door will lock and after a few seconds you will hear the machine start to drain.
* IMPORTANT: Please note that the appliance will not spin on this particular wash cycle.
Tub clean program
o Press the power button (1) and the LED will show only “---”.
- Select the tub clean program using the program selection dial (3). The machine will automatically set a soak program and a spin speed of 400 rpm and a 'cold' water temperature.
Rinse + Spin program
- Put your laundry into the drum. Put softener into the detergent drawer and close the door. The softener level should be below the 'MAX' level.
o Press the power button (1). The LED will display only “---”. - Press the rinse + spin button (7) and an 800 rpm spin speed with a 'cold' water temperature will be automatically selected. If you want to change the spin speed, press the spin button (5). You can also alter the water temperature using the temperature button (4).
- Press the start/pause button (2) and the washer begin operating after the door is locked.
End of cycle
- At the end of a wash cycle, the door lock light will remain lit for a couple of minutes.
- IMPORTANT: You should not attempt to open the porthole door until the door lock light has gone out.
- When the door lock light has gone out and you hear the door lock disengage, you can open the porthole door and remove the laundry.
Pausing a wash program
- If you want to pause a wash program temporarily, you should press the start/pause button (2).
- When you want to restart the wash cycle, press the start/pause (2) button again.
Changing a wash program
- If you want to change a wash program once the wash cycle is already in progress, you should first press the start/pause button (2).
- Use the wash program selection knob (3) to change the wash program to the one that you require.
- IMPORTANT: Changing the wash program will cancel any spin or temperature alterations that you have made and any program options that you have selected. You will need to make the spin/temperature alterations again and re-select any program options that you require.
Delay start feature
Your appliance has a delay start feature, which allows you to delay the start of a wash cycle until a later time.
- Put the laundry into the drum and close the door.
- Put the detergent into the main wash compartment and prewash compartment in the detergent drawer. Softener should be below the 'MAX' level. Only put detergent into the prewash compartment if you want to add a prewash to your cycle.
- When you want to use bleach put this in the main wash compartment with the detergent.
o Press the power button (1) and the LED display will show "---". - Press the delay start button (9). If you press the start/pause button (2) next without selecting a program, the cotton wash is selected as a default wash cycle.
○ Alternatively you can select a wash using the wash program selection dial (3) and you can also alter the temperature (4) and spin speed (5) by pressing the relevant buttons. - Select the time delay you require by pressing the time delay button (9). You can choose between 2 to 12 hours and the displayed time will show the program's finishing time. The finishing time may vary depending on your selected temperature.
- Press the start/pause button (2). The time delay LED should light.
- The delicate, quick-20, tub-clean and drain programs cannot be selected using the time delay function. You also cannot add clothes during a time delay cycle.
Child lock
Your appliance has a child lock option, if this is set, it will mean that nobody can affect the operation of the wash program once it has started.
To activate the child-lock, press and hold the wash button (6) and the temperature button (4) at the same time for approximately three seconds.
- Follow the same steps to deactivate the child-lock.
Maintenance and cleaning
In daily use
Once a wash cycle has completed, you should pull out the detergent drawer slightly, so it can dry out.
- Leave the porthole door ajar for a short while after a wash cycle has completed. This should help to prevent stagnant smells and to protect the door seal.
- Close the water tap.
- We suggest that you disconnect the appliance from your mains supply, when it is not in use.
Control panel and washing machine cabinet.
IMPORTANT: Do not use any abrasive cleaner or household polish on either the control panel or operating parts.
○ Wipe over the control panel and the external surface of the machine using a brand new damp cloth with warm water.
- If you ever spill any liquid detergent or conditioner from the detergent drawer onto the washing machine cabinet, then these should be cleaned up immediately as they could be corrosive.
Detergent drawer
Occasionally the detergent drawer should be cleaned, to remove any detergent residue that has built up.


o Pull the detergent drawer out as far as it will go, press down the catch in the middle section of the drawer and then pull the drawer out.
- Wash the detergent drawer in warm, soapy water. For ease of cleaning, you can remove the upper part of the fabric softener compartment.
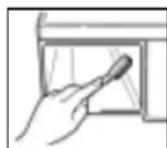
o Detergent can also accumulate inside the detergent drawer recess, so you should also clean this out using a brush
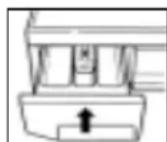
Once you have finished cleaning the detergent drawer and recess, you should slide the drawer back into its original position.
The washing machine drum
The drum of your washing machine is constructed from stainless steel. However if there are objects that can rust placed inside the drum, then it is possible for the drum to become stained.
IMPORTANT: Do not use a descaling agent, iron/steel wool or scouring agents to clean the drum of your appliance.
- Remove any rust stains on the drum with an appropriate stainless steel cleaning agent.
Door
- You should regularly check to see if any deposits have formed, or there are any foreign bodies inside or underneath the rubber door gasket. This sits inside the opening of the porthole door.
95° maintenance wash
Approximately once a month, you should complete a 95° maintenance wash, this is a wash cycle which you run without clothing placed in the drum but still using detergent. This helps prevent the build-up of bacteria inside of the drum and the rest of the appliance.
- Place detergent in the main wash section of the detergent drawer. Ideally you should use a power or liquid detergent that contains bleach.
- Select a 95° cotton wash.
* Press the start/pause button (2), the door will lock and after a few seconds you will hear the machine start to fill with water.
- At the end of the wash cycle, you should leave the porthole door open for a short period of time.
Cleaning the drain pump filter
IMPORTANT: Switch off your washing machine and disconnect the plug from your mains supply.
You should clean out the filter approximately every ten washes. If the drain pump filter is not cleaned regularly, then your appliance may find it difficult to pump out water efficiently.
- You should regularly check to see if any deposits have formed, or there are any foreign bodies in the drain pump filter.
○ Locate the drain pump filter flap that is on the base of the appliance in the front right hand corner.

natural_image
Simple line drawing of a hand holding a curved object above a rectangular block, with an arrow pointing to the right (no text or symbols)- Use a coin to open the drain pump filter flap.
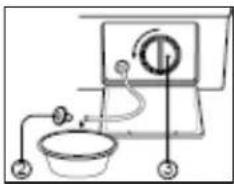
o Pull out the bail tube that is to the left of the drain pump filter. Place the end of the tube into an adequately sized bowl and then remove the cap from the end of it.
When water no longer runs out of the bail tube, you can turn the drain pump filter cover anti-clockwise. This will allow you to remove the drain pump filter from its housing.
- Remove any debris from the drain pump filter by running it under a tap.
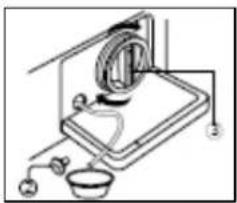
○ After cleaning, reinsert the drain pump filter into its housing. Tighten the drain pump filter by turning it clockwise, you should keep tightening it until you cannot turn it any further.
natural_image
Diagram of a scientific apparatus with a rotating coil and connected components (no text or labels)- Reinsert the cap into the end of the bail hose, making sure that it is securely in place. Slide the bail hose back into its original position and then close the drain pump filter flap.
IMPORTANT: If you are draining water from the bail hose and drain pump filter in an emergency. You should take care coming from the machine mid-cycle could be hot. Especially if the water is being drained in the middle of one of the hotter wash cycles.
Cleaning the water inlet filter
- Clean the filter when water leaks from the water inlet.
○ Always pull the power plug out before cleaning.
- Turn off the water supply to the washer and separate the inlet hose.
o Pull the inlet filter out. Remove the dirt from the inlet filter with a brush and replace.
Winter storage
- You should install your appliance in a location where it will not be subjected to freezing temperatures.
- If you are going to store your appliance in a location where the temperature will drop below freezing in winter, then you should follow the table below.
| To winterize the washer To use the washer again | |
| Turn off the water supply.Disconnect and drain the water inlet hoses.Run the washer on a drain and spin setting for one minute.Unplug the power supply cord. | Flush the water pies and hoses.Reconnect the water inlet hoses.Turn on the water supply.Reconnect the power supply cord. |
Removing stains
Garments that are covered in stains, grease or are heavily soiled may need to be pre-washed or soaked before being placed inside of the washing machine.
- Soaking helps to remove protein-type stains, like blood, milk or grass.
o Pre-washing helps to loosen soil before the main wash.
Stain removal rules
- Use warm water for soaking or pre-washing stained laundry. Hot water can set stains.
o Most stains are easier to remove when they are fresh.
Before treating any stain try to establish; what kind of stain it is, how old the stain is, what the fabric type is and whether the fabric is colourfast (check the care label to find this out). - Washing and drying can fix some stains.
- When bleach is recommended, use a mild fabric bleach that is safe for the fabric.
- If you need to use a stain remover, put the stained area face down on a paper towel or white cloth. Apply the stain remover to the back of the stain. This forces the stain off the fabric, instead of through it.
Stain removal guide
| STAIN | TO | REMOVE |
| Blood Rinse im | mediately in COLD water. | |
| If the stain remains, soak in cold water with an enzyme wash. | ||
| Chewing gum | Use ice in a plastic bag to harden the gum. | |
| Scrape off what you can and then sponge with white spirit. | ||
| Chocolate/ Cocoa | Sponge with COLD water and then soak in an enzyme pre-wash. | |
| If stains persist, rub in a little detergent and then rinse in cold water. | ||
| Coffee Blot up | quickly and then rinse out in COLD water. | |
| Rub in a little detergent and then machine wash at the maximum temperature allowed according to the wash care label. | ||
| Cream/Milk Ice cream | Rinse in COLD water and wash normally. | |
| If the stain is still apparent, sponge with white spirit. | ||
| Deodorant Rub | the affected area with white vinegar and then rinse out in COLD water. | |
| Sponge with white spirit. | ||
| Treat stiffened areas with an enzyme pre-wash. | ||
| Egg Soak in a | COLD enzyme pre-wash, rinse and wash normally. | |
| Fabric softener | Rub the affected area with a bar of soap and then wash normally. | |
| Fruit stains Treat as soon as possible by sponging with COLD water. | ||
| Rub a little detergent on the stain and then wash normally. | ||
| Grass Sponge | with white spirit. | |
| Rub in an enzyme pre-wash and then wash normally. | ||
| Grease and oil | Lay the affected area facedown on an absorbent cloth. Using white spirit or dry cleaning fluid, work on the back of the stain. Wash normally. | |
| Iron or rust Apply lemon juice and salt, and then place in the sun. Wash normally. | ||
| Lipstick Sponge | with white methylated spirit and wash normally. | |
| Mildew Wash in WARM water and detergent. | ||
| Moisten area with lemon juice, dry in the sun and wash normally. | ||
| If the stain persists and the fabric is suitable, use a mild fabric bleach. | ||
| Mud Brush off | any dry mud. Rinse in COLD water. | |
| If the stain persists, rub in a little detergent and wash normally. | ||
| Oil based paint | Scrape off any fresh paint and then sponge off with non flammable dry cleaning fluid and wash normally. | |
| Water based paint | Treat whilst still wet, rinse in WARM water and wash normally. | |
| Scorch marks | Dampen a cloth with hydrogen peroxide, lay it over the affected area and press with a fairly hot iron. | |
pre-
Poor wash results
natural_image
Illustration of a kitchen appliance with a washing machine, paint bucket, and cleaning tools (no text or symbols)
My garments are looking grey and there are limescale deposits present in the drum of my washing machine.
- There is not enough detergent being added.
- The incorrect detergent is being used.
o Stains are not being pre-treated. - The correct wash program or wash temperature was not selected.

I have followed the advice given above, but my garments are still coming out with grey stains on them.
- The garments are soiled with oils, ointments or grease and were washed without enough detergent.
o The wash temperature selected was too low.
o Fabric conditioner has come into contact with the garments. If this happens try to wash out these stains as quickly as you can and try to avoid getting conditioner on the garments in future.

he final rinse, I can still see foam.
- Modern detergents can result in there still being foam in the final rinse, this does not mean that the washing is not being rinsed properly.

There is white residue on my garments when I remove them from the appliance.
Modern detergents can contain insoluble contents; white residue after a wash cycle is not necessarily a sign of the garments being insufficiently rinsed by the washing machine.
- You should shake out the garment or brush it off. In future possibly turn the garment inside out before it is washed. You may wish to move from a powder detergent and switch to a liquid detergent instead.
Installation

IMPORTANT: THIS INSTALLATION MUST BE COMPLETED BY A SUITABLY QUALIFIED PERSON. BAUMATIC ONLY SANCTION THE INSTALLATION GIVEN IN THIS INSTRUCTION MANUAL. YOU SHOULD KEEP THE TRANSIT PACKAGING, IN CASE YOU NEED TO TRANSPORT THE MACHINE IN THE FUTURE.
Removing the transit bolts
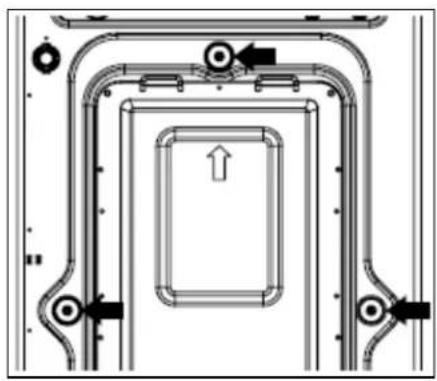
IMPORTANT: Before installing or operating the washing machine, YOU MUST remove the transit bolts that hold the drum in position whilst the appliance is being transported.
natural_image
Technical diagram of a mechanical assembly with nested components and directional arrows (no text or symbols)○ On the rear of the appliance, identify the 4 transit bolts.
natural_image
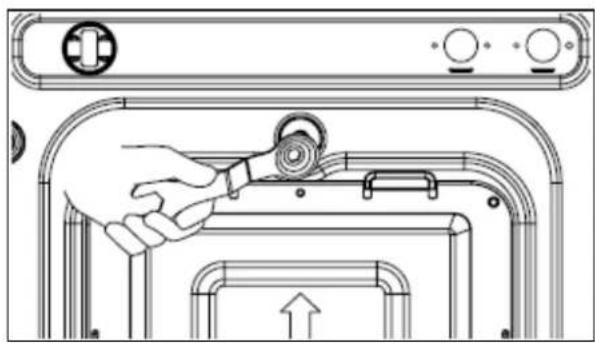
Line drawing of a hand operating a device with control panel and scroll (no text or symbols)○ Using the spanner supplied, unscrew the 4 transit bolts.
- You should keep the 4 transit bolts and spanners, in case you need to transport the appliance elsewhere in future.
natural_image
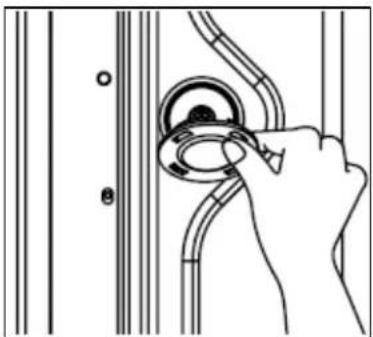
Hand inserting a circular component into a pipe fitting (no text or symbols visible)- Cover the holes that you removed the transit bolts from, using the 4 transit covers supplied.
Locating your washing machine
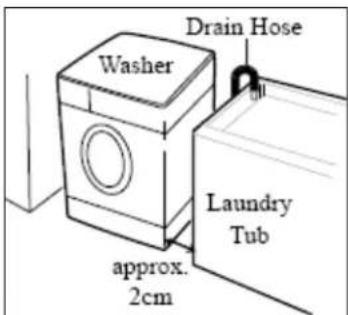
Before commencing installation, check the location where you intend to install the appliance. You should make sure that you have everything in place that is necessary for the correct installation.
Do not place or store your washing machine in a location where the ambient temperature could fall below 0^ C, otherwise the water in it could freeze up.
o Never place or store laundry products on top of the appliance.
○ Install the washer on a flat, solid floor. If the washer is installed on an uneven or suspended floor, it could cause excessive noise and severe vibration, which may result in the malfunction of the appliance.
- You should also level off the washing machine, using the adjustable feet on the base of the appliance.
There should be a gap of 2 cm either side of the washing machine; a 10 cm gap should be left behind the appliance.
Connecting to the mains water supply
IMPORTANT: The washing machine should never be connected to the water mains using an existing inlet hose, YOU MUST utilise the inlet hose that is provided with the appliance.
Your appliance should only be connected to a cold water supply.
For an ordinary tap
1 Pull down the collar of the inlet hose to separate it from the water tap adapter.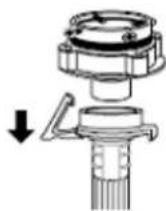 | 2 Loosen the four screws slightly in order to fit the adapter onto the water tap. | 3 Fit the water tap adapter onto the water tap and tighten the four screws evenly, whilst pushing up the adapter so that the rubber seal can stick to the water tap tightly.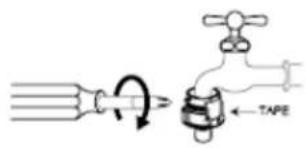 |
4 Remove the tape, and tightly screw connector B into connector A.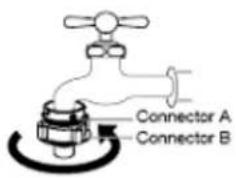 | 5 Connect the inlet hose to the water tap adapter by pulling down the collar on the end of the hose.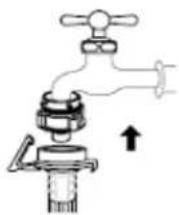 | 6 Connect the other end of the hose to the water inlet on the rear of the washer by turning it clockwise until it is tight.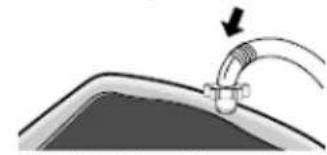 • Check that the rubber seal is present inside the inlet hose adapter on this end of the hose. • Check that the rubber seal is present inside the inlet hose adapter on this end of the hose. |
For a screw-shaped tap
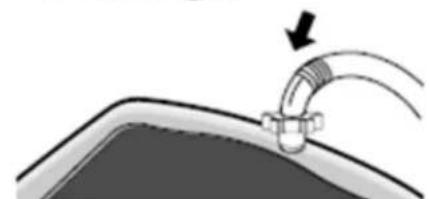
① Connect the inlet hose to your mains water supply. The rubber seals must be present on both of the connectors. Otherwise there may be a leak.

② Connect the other end of the hose to the water inlet on the rear of the washer by turning it clockwise until it is tight.
natural_image
Diagram of a pipe being inserted into a container with an arrow indicating flow direction (no text or symbols)- Check that the rubber seal is present inside the inlet hose adapter on this end of the hose.
Connecting to the water outlet
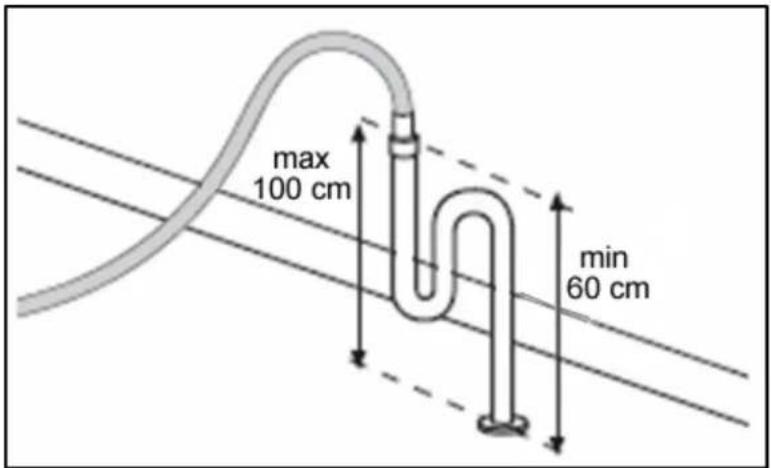
√ Secure the drain hose, so that it cannot move whilst the washing machine is in use.
√ Place the end of the drain hose on your drain pipe. Push it a short way down into your drain pipe.
√ IMPORTANT: Do not insert the drain hose too deeply into the water pipe, as this may cause siphoning.
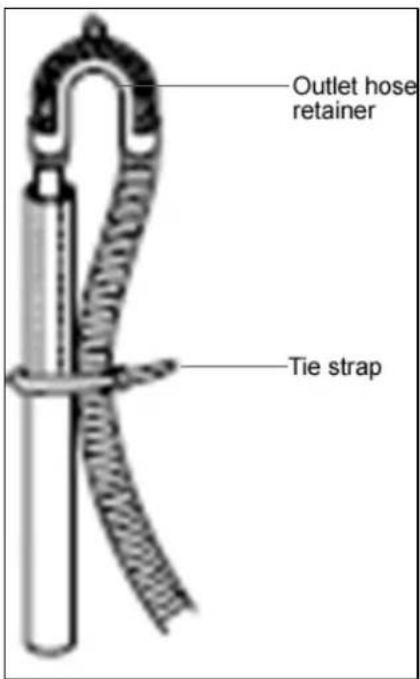
√ Utilise the outlet hose retainer and tie strap to keep the outlet hose in position when the appliance is on a wash cycle.
Levelling the appliance
√ Place the washing machine on a solid and level floor surface.
√ DO NOT PLACE THE WASHING MACHINE ON A CARPET OR A SUSPENDED FLOOR.
① If the washer is installed on an unsuitable floor, it could make considerable noise, vibrate and cause a malfunction.

On a slope

Not strong enough
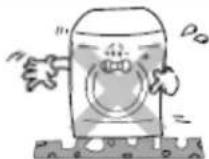
Uneven floor
② Adjust the level of the washing machine using the adjustable legs.
- Please check if there is any gap between the four adjustable legs and the floor.
- Turn the adjustable legs using the enclosed spanner, adjust the level of the machine and make sure that it is stable.
- Adjust the fixing nuts tightly so that the washer maintains the adjustment.

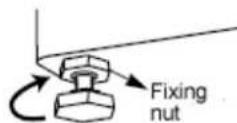
③ Make sure that the washing machine does not move when you press down the four corners of the washer's top plate.

natural_image
Illustration of a hand washing a large washing machine (no text or symbols visible)IMPORTANT: There should be no instability of the machine when the adjustable legs have been set to the correct level.
Power supply

√ IMPORTANT:The electrical socket must still be accessible once the appliance is installed.
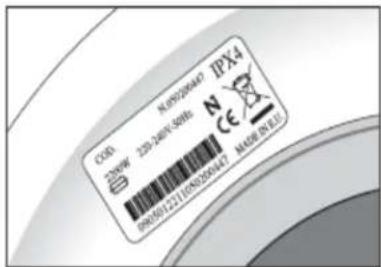
√ Consult the rating plate, located on the inner rim of the porthole door or the right hand side of the cabinet BEFORE making the electrical connections. Ensure that the voltage reaching the plug, is the same as that on the rating plate.
√ DO NOT REMOVE THE RATING PLATE AS THE INFORMATION ON IT IS IMPORTANT.
√ The moulded plug that is supplied with the appliance must be placed into an earthed and insulated socket.
√ Broken or damaged power leads must only be replaced by a suitably qualified person. A power lead of a similar type must be used in replacement.
√ IMPORTANT: We do not recommend that this appliance is connected to an extension lead.
Before first use maintenance wash
- When your washing machine has been correctly installed, we recommend that you perform a maintenance wash cycle, without any clothing being placed inside of the drum.
- This will check that all aspects of the installation are correct; it will also remove any deposits that may have been left on the drum by the manufacturing process.
- Select a 95°C cotton wash.
○ A small quantity of detergent should be used during this maintenance wash.
Error code failure system
If your appliance senses that it is not operating correctly, then an error code may appear on the LCD display.
The following error codes can possibly be remedied by the customer and the steps outlined below should be followed.
BEFORE COMPLETING ANY MAINTAINEANCE ON THE APPLIANCE, IT SHOULD BE DISCONNECTED FROM YOUR POWER SUPPLY.
| PROBLEM | CHECK POINT |
| The washer will not operate at all. | Is there a power failure?Is the power cord correctly connected to the electrical outlet?Did you turn on the power?Did you press the Start/Pause button?Is there the correct amount of laundry in the washer? |
| Water is not suppliedError displayFE | Did you connect the inlet hose and open the water tap?Is the inlet hose or the water tap frozen?Is the water supply shut off?Is there any foreign matter blocking up the inlet hose filter? |
| The washer will not drainError displayFE | Is the drain hose frozen or blocked by dirt?Is the drain hose kinked or deformed?Is the end of the drain hose immersed in water?Is there excessive dirt inside the drain filter? |
| The washer will not spinError displayFE | Are the clothes in the drum collected on one side?Is the washer installed on an uneven floor or is there serious vibration?Is the door open? (The lamp "LE" will light up in this case.) |
| The washer will stop during spinning .Spinning is insufficient.Error displayPFE | Is the filter of the drain pump clogged?Is the drain pump operating?Did you use the proper amount of detergent?Is the drain hose placed higher than 1m above floor? |
| Vibrating and too noisy | Is the washer installed on an uneven floor?Have all the transit bolts removed? |
- If IE, LE, OE or UE are displayed on the LED display, you should turn the appliance off using the POWER button and then switch it back on again using the POWER button.
- If PFE is displayed on the LED display, you should turn the appliance off using the POWER button, switch it back on again using the POWER button, press the SPIN button and then press the START/PAUSE button.
natural_image
Illustration of a classic office telephone with keypad and keypad (no text or symbols)If a fault code reappears after following the above advice and clearing the fault code. You should turn the washing machine off using the POWER button. Disconnect the appliance from your mains supply. Then arrange for an engineer to attend the appliance. You should contact the Baumatic Customer Care Department on (0118) 933 6911.

IF AN ENGINEER ATTENDS DURING THE GUARANTEE PERIOD AND FINDS THAT A FAULT HAS BEEN CAUSED BY AN ITEM ON THE ERRO CODE LIST, WHICH COULD HAVE BEEN CLEARED BY THE CUSTOMER. THEN YOU MAY BE LIABLE FOR THE COST OF THE SERVICE CALL.
General troubleshooting
Water under the washing machine
- Tighten the drain pump filter.
- Check the drain and inlet hose and make sure that they are fully tightened.
Washing machine vibrates during the spin cycle
- Check that the transport locking devices have been removed (see installation instructions).
○ Make sure that the washing machine is installed on a flat and level floor.
- Ensure that all four feet are resting firmly on the floor, by pressing down on each corner and making sure that the appliance is stable. If it is unstable then follow the "Locating your washing machine" and "Leveling the appliance" sections.
Poor spin results
- Clean the drain pump (see "Cleaning the drain pump filter" section).
Water in the detergent drawer
Although there will be some water residue left in the detergent drawer after a wash cycle has completed. If the drawer is full of water then you may need to clean the detergent drawer.
IMPORTANT: Your appliance has an unbalance control system. If this system detects that the washload is unevenly distributed inside the drum. Your washing machine will try to redistribute the load before spinning. If after several attempts it is unable to redistribute the washload, then the appliance will either spin at a slower speed or skip the spin cycle and proceed to the drain section of the wash cycle.
Uneven load distribution can be caused by too large a wash load or too small a wash load. It can also occur if a single item if washed inside the appliance.

IMPORTANT: If your appliance appears not to be operating correctly, then you should disconnect it from your mains supply and then contact the Customer Care Department on telephone number (0118) 933 6911.
DO NOT ATTEMPT TO REPAIR THE APPLIANCE YOURSELF.
Please note that if an engineer is asked to attend whilst the product is under guarantee and finds that the problem is not the result of an appliance fault, then you may be liable for the cost of the call out charge.
The appliance must be accessible for the engineer to perform any necessary repair. If your appliance is installed in such a way that an engineer is concerned that damage will be caused to the appliance or your kitchen, then he will not complete a repair.
This includes situations where appliances have been tiled in, sealed in with sealant, have wooden obstructions placed in front of the appliance, like plinths. Or any installation other than the one specified by Baumatic Ltd. has been completed.
Please refer to the conditions of guarantee that appear on the warranty card that you receive with the appliance.
IMPORTANT: Baumatic Ltd. operates a policy of continuous improvement and reserves the right to adjust and modify its products without prior notification.
Baumatic®
United Kingdom
Baumatic Ltd., Baumatic Buildings, 6 Bennet Road, Reading, Berkshire RG2 0QX United Kingdom
Sales Telephone
(0118) 933 6900
Sales Fax
(0118) 931 0035
Customer Care Telephone
(0118) 933 6911
Customer Care Fax
(0118) 986 9124
Spares Telephone
(01235) 437244
Advice Line Telephone
(0118) 933 6933
E-mail:
sales@baumatic.co.uk customercare@baumatic.co.uk spares@baumatic.co.uk technical@baumatic.co.uk
Website:
www.baumatic.co.uk
Republic of Ireland
Service Telephone
1-890 812 724
Spares Telephone
091 756 771
Czech Republic

- INSTRUCTION MANUAL
- USER MANUAL FOR YOUR BAUMATIC
- BWM1409W
- cm 9 kg
- Freestanding
- washing machine
- Environmental note
- Important safety information
- General Safety
- Installation
- During Use
- Child Safety
- Specifications
- Appliance dimensions
- Ratings
- Control panel
- LCD display
- Wash cycle progress indicator
- Wash display
- Wash program temperatures
- Spin speeds
- Child lock
- Door lock
- Timer display
- Digital display
- Warning display
- Detergent drawer
- Main wash section
- Conditioner section
- Pre wash section
- Preparing the wash cycle
- Preparing your garments for washing
- A selection of wash care symbols
- Detergents and conditioners
- Liquid detergent
- Water softening agents
- Wash program guidance
- Selecting a wash program
- Cotton program
- Synthetic program
- Delicate/ handwash program
- Intensive program
- Quick 20 program
- Sports wear program
- Spin only
- Wash only
- Drain
- Tub clean program
- Rinse + Spin program
- End of cycle
- Pausing a wash program
- Changing a wash program
- Delay start feature
- Maintenance and cleaning
- In daily use
- Control panel and washing machine cabinet.
- The washing machine drum
- Door
- 95° maintenance wash
- Cleaning the drain pump filter
- Cleaning the water inlet filter
- Winter storage
- Removing stains
- Stain removal rules
- Poor wash results
- Removing the transit bolts
- Locating your washing machine
- Connecting to the mains water supply
- For an ordinary tap
- For a screw-shaped tap
- Connecting to the water outlet
- Levelling the appliance
- Power supply
- Before first use maintenance wash
- Error code failure system
- General troubleshooting
- Water under the washing machine
- Washing machine vibrates during the spin cycle
- Poor spin results
- Water in the detergent drawer
- Baumatic®
- United Kingdom
- Sales Telephone
- Sales Fax
- Customer Care Telephone
- Customer Care Fax
- Spares Telephone
- Advice Line Telephone
- E-mail:
- Website:
- Republic of Ireland
- Service Telephone
- Czech Republic
Brand : BAUMATIC
Model : BWM1409W
Category : Washing machine