
GC45 - Security Camera UNIDEN - Free user manual and instructions
Find the device manual for free GC45 UNIDEN in PDF.


| Product Type | Security Camera |
| Brand | Uniden |
| Model | GC45 |
| Dimensions (Camera) | 2.8 x 2.8 x 1.6 inches (71 x 71 x 41 mm) |
| Weight (Camera) | 0.4 lbs (180 g) |
| Power Supply | DC 5V 1A via micro USB adapter |
| Power Consumption | Max 5W |
| Connectivity | Wi-Fi 802.11 b/g/n, 2.4 GHz |
| Video Resolution | 1080p Full HD (1920 x 1080) |
| Field of View | 110 degrees diagonal |
| Night Vision | Up to 30 ft (10 m) with IR LEDs |
| Audio | Two-way audio with built-in microphone and speaker |
| Motion Detection | PIR sensor with adjustable sensitivity |
| Storage | MicroSD card up to 128 GB (not included), cloud storage optional |
| Water Resistance | IP65 (indoor/outdoor use) |
| Mounting | Magnetic base or wall mount screws included |
| App Support | Uniden Solo app (iOS/Android) |
| Compatibility | Amazon Alexa, Google Assistant |
| Operating Temperature | -4°F to 122°F (-20°C to 50°C) |
| Maintenance | Clean lens with soft dry cloth; avoid harsh chemicals |
| Safety Tips | Ensure firmware is updated; use strong Wi-Fi password |
| Spare Parts | Power cable and mounting screws available from Uniden |
| Repairability | Not user-serviceable; contact technical support |
| Warranty | 1-year limited warranty |
Frequently Asked Questions - GC45 UNIDEN
User questions about GC45 UNIDEN
0 question about this device. Answer the ones you know or ask your own.
Ask a new question about this device
Download the instructions for your Security Camera in PDF format for free! Find your manual GC45 - UNIDEN and take your electronic device back in hand. On this page are published all the documents necessary for the use of your device. GC45 by UNIDEN.
USER MANUAL GC45 UNIDEN
natural_image
Three black wireless cameras with attached antennas, displayed side by side (no visible text or symbols)© 2016 Uniden America Corporation
Irving, Texas
Issue 1, September 2016
Printed in China
CUSTOMER CARE
At Uniden ^® , we care about you!
If you need assistance, please do NOT return this product to your place of purchase.
Quickly find answers to your questions by:
- Reading this owner's manual.
- Visiting our customer support website at www.uniden.com.
CONTENTS
Customer Care 2
GETTING STARTED....5
FEATURE LIST....5
WHAT'S INCLUDED....6
GETTING TO KNOW THE UDR780HD SYSTEM ....7
HARDWARE....7
UDR780HD Monitor 7
UDR780HD Camera 8
SET UP THE HARDWARE....9
Monitor....9
Camera....9
install Cameras....10
MONITOR SCREEN 10
GENERAL SETTINGS....20
Camera Setup Screen 23
Recording Setup Screen 25
System Settings Screen 28
Motion Detection Settings Screen....33
Network Setup Screen.... 34
Firmware Upgrade Screen 38
UDR780HD Operation Basics....40
MANUALLY RECORDING LIVE VIDEO (NOT SCHEDULED) ...... 40
PLAYING BACK RECORDED VIDEO....40
ADDING NEW CAMERAS 41
Pair Cameras 42
UDR780HD BASIC OPERATION 42
MAINTAINING YOUR SYSTEM....45
UPGRADING YOUR UDR780HD MONITOR FIRMWARE...... 45
TAKING CARE OF YOUR HARDWARE 45
Monitor 45
Cameras 45
MANAGING RECORDED FILES 45
Copying Files from the SD Card to your Computer....45
SOLVING PROBLEMS 46
INTERFERENCE 47
SPECIFICATIONS 49
Compliance Information....53
RF Exposure Information....53
FCC Part 15 Compliance 53
IC Compliance 53
One-Year Limited Warranty....54
Uniden surveillance products are not manufactured and/or sold with the intent to be used for illegal purposes. Uniden expects consumer's use of these products to be in compliance with all local, state and federal law. For further information on video surveillance and audio recording legal requirements, please consult your local, state and federal law.
© 2016. All rights allowed by law are hereby reserved.
GETTING STARTED
FEATURE LIST
• 850nm IR LED distance up to 10m
• 7" TFT LCD Digital panel (1024 x 600)
- Two-way audio
- Scan function
- PIR- or motion detection-triggered recording
- Manual recording
- Touch screen operation
• Schedule recordings from Sunday to Saturday
• SD card external storage, up to 128GB supported (8GB Class 10 included)
• One LCD monitor can pair four cameras
• Monitor : 5v DC 2A Power adaptor (+/-5%)
• Camera: 9v DC 600mA (+/-10%)
• RF range: 984 feet [300 meters (Line of sight)]
- New recording indicator/ Memory card full indicator
- Quad view
• PIR trigger and Video motion detect alert
• Night vision up to 40 feet
- Direct connection to router for remote access to live and recorded video
- No monthly fee
WHAT'S INCLUDED
You should have the following items:
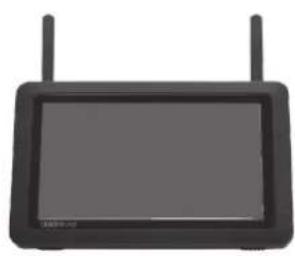
natural_image
Front view of a black rectangular electronic device with two antenna ports (no visible text or symbols)(1) UDR780HD Monitor
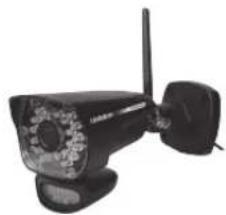
natural_image
Black and white photo of a surveillance camera with antenna and dual ports (no visible text or symbols)(2) UDRC58HD Camera with stand
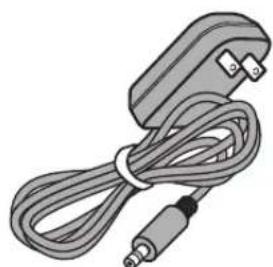
natural_image
Illustration of a cable with connectors and a plug, no text or symbols present(2) 9V 600mA Power Adapter (Camera)
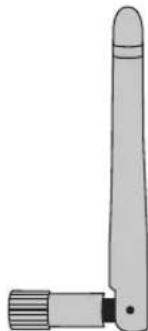
natural_image
Simple line drawing of a right-angle antenna with a base and top section (no text or symbols)(2) Antenna (may be attached to camera)
Not Shown:
• (1) 5V 2A Power Adapter (Monitor)
• (1) Ethernet (RJ45) Cable
- 8G SD Card
• (1) 3.7V 2000mA Battery (Monitor)
• Mounting Hardware (2 sets)
- Quick Start Guide
Images may vary slightly from product.
If any items are missing or damaged, visit our website at www.uniden.com for assistance. Never use damaged products!
GETTING TO KNOW THE UDR780HD SYSTEM
HARDWARE
UDR780HD MONITOR
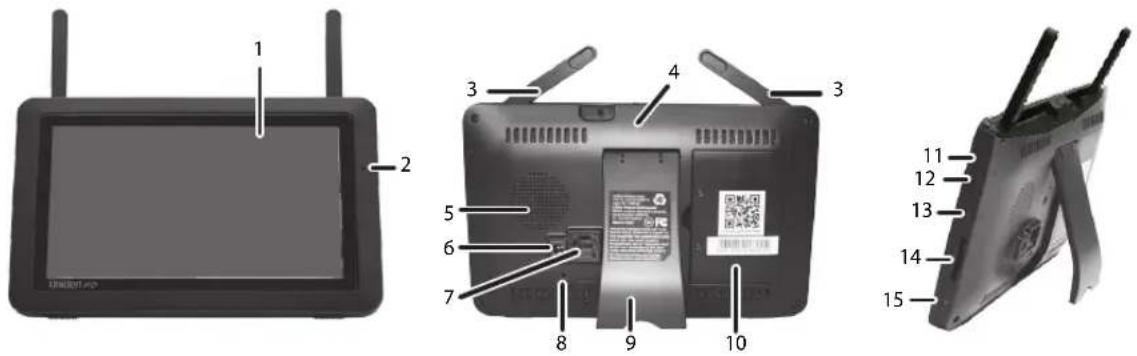
| No. | What it is |
| 1LCD | Screen: Displays video from the camera(s) or system operation interface. |
| 2 | Microphone |
| 3 | Wireless Antenna |
| 4 | Power Button/ Scan Button: Press and hold about 5 seconds to turn the receiver on/off.Press and release while the unit is powered on to turn Scan mode on/off. |
| 5 | Speaker |
| 6 | Power Port: Connert to a local power outlet using the included power adapter. |
| 7 | Ethernet Port (RJ45): Connect the receiver to your router using the included Ethernet cable to enable smartphone / tablet connectivity. |
| 8 | Reset: Using a paper clip or other thin object, push the reset button to restore the system to its default settings. |
| 9 | Receiver Stand |
| 10 | Battery Cover |
| 11 | Volume Up |
| 12 | Volume Down |
| 13 | Talk. Press and hold to talk through the camera. Release to listen for a response. |
| 14 | SD Card Slot. Insert SD card for recording videos. |
| 15 | Blue LEDFlashing - Battery power is low |
UDR780HD CAMERA
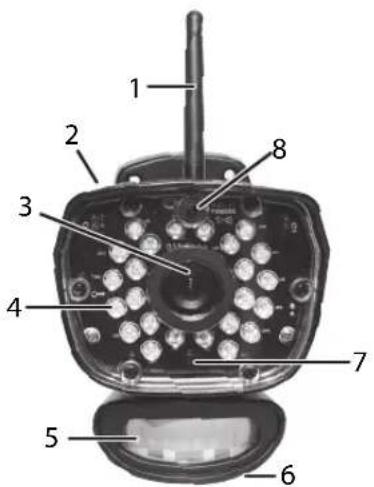
| No. What it is | |
| 1Camera Antenna: Sends and received signals to/from the monitor. | |
| 2 Pair Button: The pair button is located on the back of the camera. It is used to pair the camera with monitor. | |
| 3Camera Lens: Catches the video in front of the lens and transmits video from camera to monitor. | |
| 4 Light Sensor: Sense brightness for changing between daytime and nighttime vision | |
| 5 IR LEDs. Infrared LEDs provide viewing in low/ no light conditions. | |
| 6Speaker: Produces the sound transmitted from the monitor. (Under camera) | |
| 7PIR Sensor: Detects motion in front of the lens and emits detection signal to transmitter. | |
| 8Microphone: Transmit audio to monitor. |
SET UP THE HARDWARE
MONITOR
- Flip out the stand on the back of the monitor and position the antennas.
- Connect the 5V AC adapter to the power input on the rear of the monitor. Connect the other end of the adapter to a 120 volt AC (standard indoor) power outlet.
The monitor comes with a partial charge. Plug it in and let it charge for a full 8 - 9 hours before using it.
-
Press and hold the POWER button on the top of the monitor for 3 - 4 seconds to power it up.
-
The monitor displays the Uniden Guardian screen for a few seconds and then transitions to the LIVE view.
The screen remains dark until the cameras are powered up.
CAMERA
General
The UDRC58HD cameras included with your monitor are weatherproof and have an IP65 rating. Water can be sprayed on them and they will still work; however, the cameras cannot be submerged.
Although the cameras can be exposed directly to the rain, it is recommended that, if they are used outdoors, they be mounted under some type of cover like a patio overhang or eave. As rainwater drops start to dry on the camera glass, it can create spots that will reflect the light from the infrared LEDs used for night vision, thus causing lower quality video.
Also, as dust, grime, and cobwebs accumulate on the camera glass, they can reflect light from the infrared LED and might lower video quality. Periodically clean the lens glass with a soft cloth.
Placement Considerations
Consider the following when placing cameras:
- The clearest line-of-sight between the camera and monitor is best.
— Walls, especially brick and concrete, shorten the transmission distance.
— Placement next to windows allows better transmission.
- Optimized motion detection range is 6 - 18 feet for the camera. The farther away an object is, the less accurate the motion detection.
- Avoid having a direct light source in the view of the camera, including street lights, ceiling or floor lamps, spotlights in the driveway, etc.
- Rainfall, pool water ripples/reflections, tree/shrub leaves blowing in the wind - and the shadows they create - can generate motion detection false alarms.
INSTALL CAMERAS
When you are positioning the camera, bring the monitor along; it's much easier to get the camera into the right position when you have the display handy.
The monitor's battery will last about 2 hours on its own.
- Install the antennas (if needed), position the camera where you want it, plug it into power, and check video on the monitor. Move the camera if the view is not what you want.
- Hold the base of the camera stand where you want to mount it and mark the location of the screw holes.
- Use the included screws and anchors to attach the base to the wall or ceiling.
- Tug gently on the stand to make sure it is securely in place.
MONITOR SCREEN
The UDR780HD monitor's screen has 3 main parts:
• Live View area. The main screen area displays live video from the camera(s).
- Pop Out Menu Tab. Tap this tab to display 4 menus that let you manage the UDR780HD system. See page 17 for details.
- Icon bars. Icons display on the top and bottom of the monitor screen. See page 13 for icon details.
Viewing Modes
The Live View area displays live video from the cameras. Each camera can display in its own section of the screen or on the full screen. The number of cameras that display depends on how many cameras are turned on (see page 24).
There are 3 viewing modes:
• Multi-Channel mode (Dual or Quad).
If you have 2 cameras turned on, video displays in Dual mode.
If you have 3 or 4 cameras cameras turned on, video displays in Quad mode.
DUAL MODE QUAD MODE
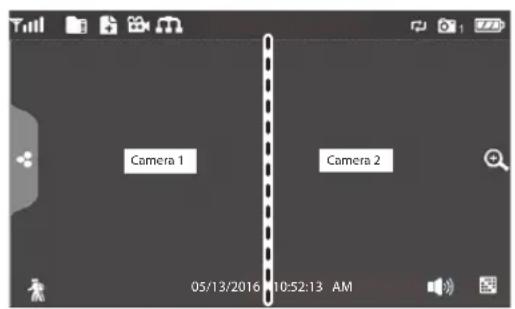
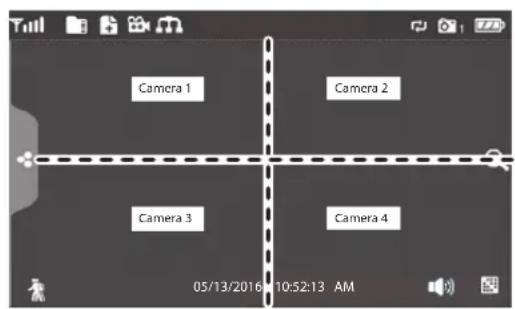
- Single Channel mode displays one camera at a time on full screen. From Dual or Quad channel mode, tap the center of a channel's screen to display that channel in full screen. Press to change between the channels. Tap the center of the image to return to the previous mode.
Channel Cycling Modes
There are two ways to cycle between channels - Scan and Auto Sequence.
With Scan mode, the monitor's screen and speakers are off until a camera detects motion. That camera then displays at full screen (sound and video on) until there has been no motion for 15 seconds. After that, the monitor screen turns off again. Quickly press and release POWER to turn Scan mode on and off.
In Auto Sequence mode, each channel displays automatically in sequence in full screen. Access this mode from Single channel mode. Tap ☐ to turn on Auto Sequence mode; SEQ displays. Tap SEQ to turn it off and return to Dual mode.
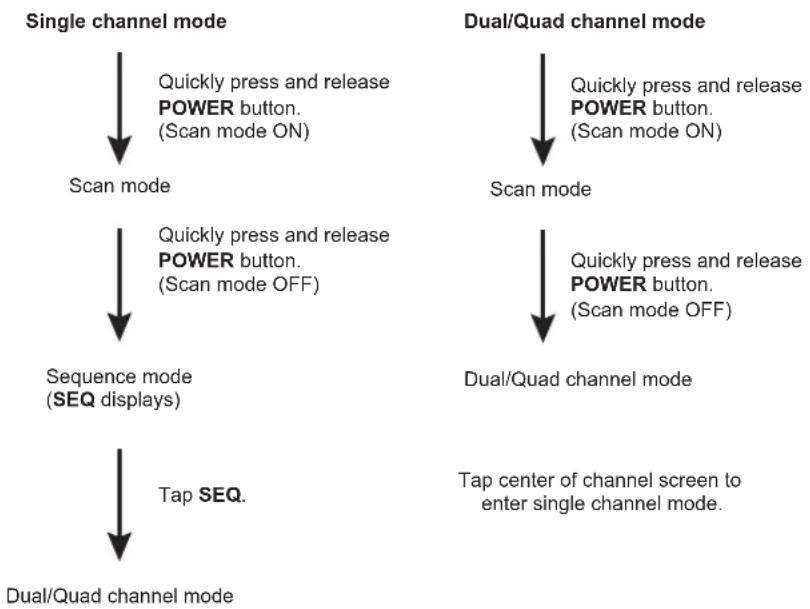
flowchart
graph TD
    A["Single channel mode"] --> B["Scan mode"]
    B --> C["Sequence mode (SEQ displays)"]
    C --> D["Dual/Quad channel mode"]
    D --> E["Tap center of channel screen to enter single channel mode."]

    F["Dual/Quad channel mode"] --> G["Scan mode"]
    G --> H["Dual/Quad channel mode"]
    H --> I["Tap center of channel screen to enter single channel mode."]

    style A fill:#f9f,stroke:#333
    style F fill:#f9f,stroke:#333
    style G fill:#f9f,stroke:#333
    style H fill:#f9f,stroke:#333
UDR780HD OPERATION
Your UDR780HD monitor operates through a series of screens that let you choose groups of operations. For example, when you tap PLAYBACK in the pop-up menus, you can view recorded files. Tapping GENERAL SETTINGS lets you set up how your system will operate (i.e., camera setup, recording schedule, motion detection sensitivity, etc.).
LIVE VIEW SCREEN
The Live View screen is the monitor's main screen that displays video from your camera(s). You can have the system display a single camera or you can set the screen to display all of them. You can also set the screen to cycle between all live video feeds. Tap the icon to change the Live screen video displays.
UDR780HD LIVE SCREEN ICONS
Different icons display on the monitor screen depending on what is going on with your cameras. This image shows an example of what could be on your screen (the video image is removed to make it easier to see the icons). A table follows of possible icons and their definitions.
Live Screen Icon Example
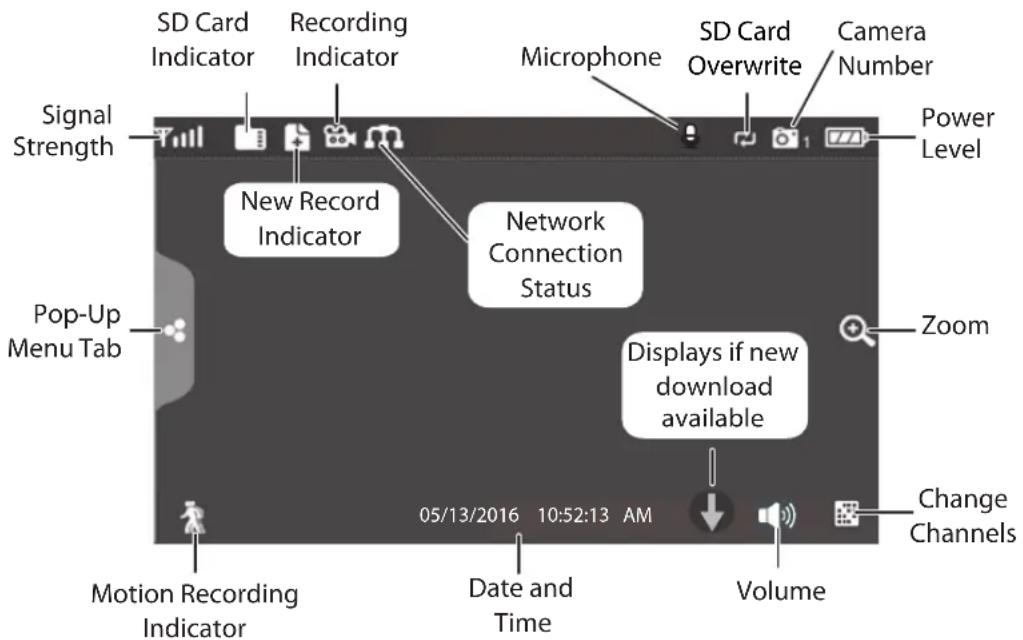
NOTE: Icons on the screen display in BLUE. Icons that display will vary according to system configuration.
What the Icons Mean
| UDR780HD Icon What it does | |
SIGNAL INDICATOR | Shows how strong the camera's signal is. Signal ranges from 4 bars down to 0 bars (out of range). |
SD CARD | This graphic displays if an SD card is inserted into the monitor.If blue, recording space is available.If red, the SD card is full.Tap this icon to view recorded files. |
NEW RECORD INDICATOR | New recordings are saved on the SD card. |
RECORDING INDICATOR | When this icon flashes red, it indicates that recording is in progress. |
NETWORK STATUS INDICATOR | Green - System is connected to the internet and the monitor is connected with internet mode.Yellow - System is connected to internet and the monitor is connected with intranet mode.Red - Connection has failed or system is not connected to a network. |
| TIME STAMP | Current date/time in month/day/year, hour/minute/second format. |
SD CARD OVERWRITE | Displays if the SD card is allowed to overwrite files when it is full. (See page 27.) |
CHANNELINDICATOR | Displays the current channel number you are currently viewing. If viewing multiple cameras at once, the camera indicator will appear above each video display. |
BATTERY INDICATOR | Indicates the LCD monitor's battery life:Flashing Red - Low batteryBlue - Full batteryFlashing Blue - Charging |
ZOOM INDICATOR [IMAGE] [IMAGE] | When you tap this icon on the screen, the monitor breaks the screen image into 5 areas. Tap the area you want to see in Zoom. That area displays in 2X size and the magnifying glass icon changes to the arrows icon (Tap the arrows icon to exit Zoom mode. |
VOLUME INDICATOR | The Volume Indicator displays when you tap + or – to raise or lower the volume while in single channel display. It indicates current audio volume.displays when the volume is off (mute). |
TALK BACKINDICATOR | Displays when TALK is pressed. Press and hold TALK on the side of the monitor to talk back through the camera. Release TALK to wait for a reply. |
NEW DOWLOAD | Displays if new firmware is available. |
SEQUENCEINDICATOR | Displays when the monitor is in auto switch mode; it will change channels automatically. |
CHANGE CHANNEL | Tap this icon to manually change channels. See page 11. |
MOTION RECORDING INDICATOR | Indicates motion detection status.Blue - Automatic recording OFF. Press BLUE icon to record. Icon turns RED.Red - Automatic recording ON. Press RED icon to stop recording. Icon turns BLUE. |
POP-UP MENU TAB | Tap to access the pop up menu system. |
UDR780HD SCREEN DESCRIPTIONS
OVERVIEW
This section describes the UDR780HD pop-up menu screens in detail. These pop-up menus enable you to:
- Play back recorded video files
- Set alarms
- Set the brightness level for each camera connected (single channel display only)
- Set up cameras for recording, motion detection, and other system and network requirements.
Tap and the pop-up menus display.
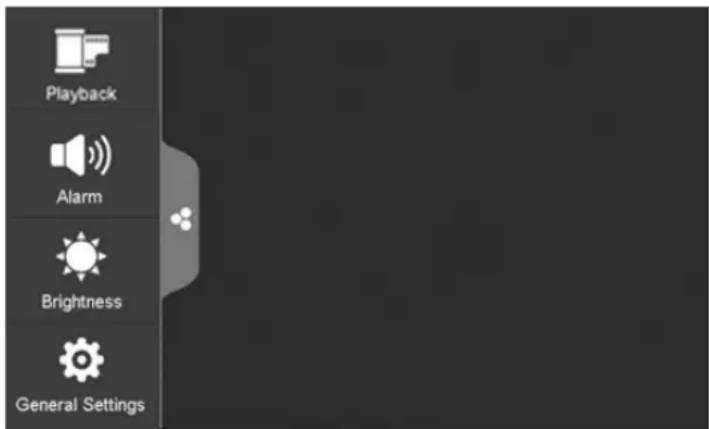
PLAYBACK
Manage recorded files with this screen. You can see what recorded files you have, play them, and delete them.
- Tap The following screen displays.
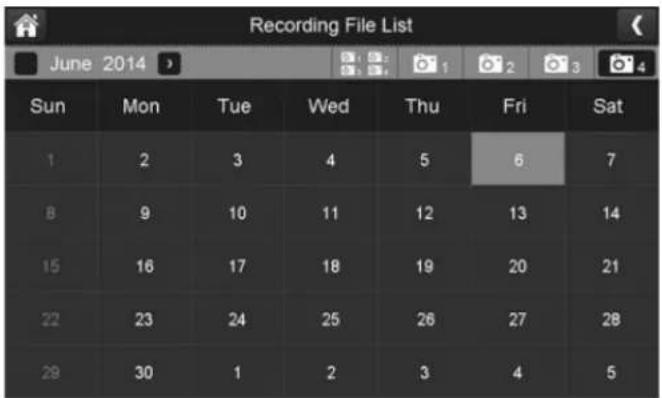
- Days that are highlighted have recorded files. Tap the day you want to review and a list of recordings for that day displays.
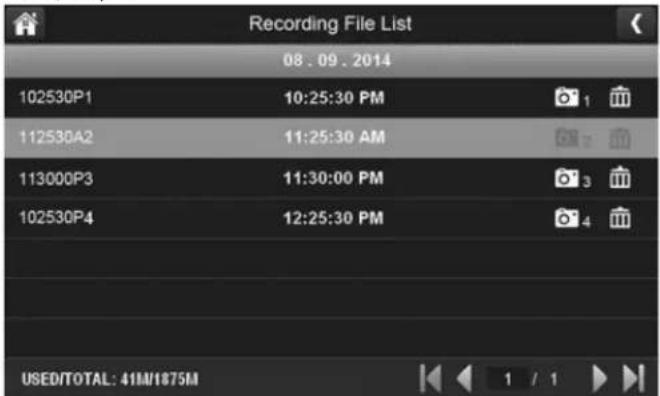
- Tap the record you want and it plays, with a control bar across the bottom of the screen.
- When the file finishes, the monitor displays the Recording File List screen again.
- Tap the icon to delete the file if desired.
ALARM
When motion triggers the camera to begin recording, the monitor sounds an alarm tone. This screen lets you determine how loud that tone will be.
- Tap . The following screen displays.
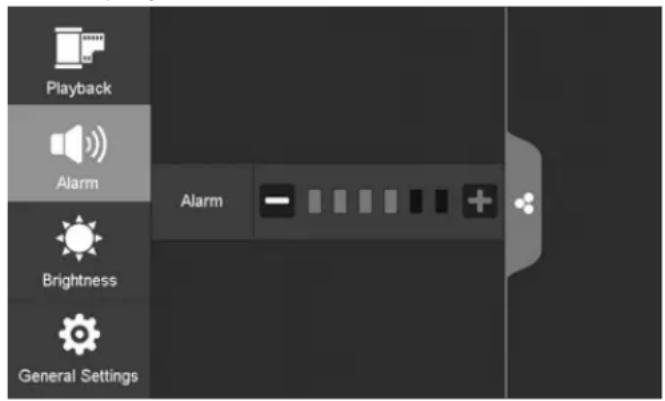
- Tap + or - to increase or decrease the alarm volume. Tap when you are finished.
BRIGHTNESS
This feature allows you to set each camera's brightness level from single camera mode.
- Tap . The following screen displays.
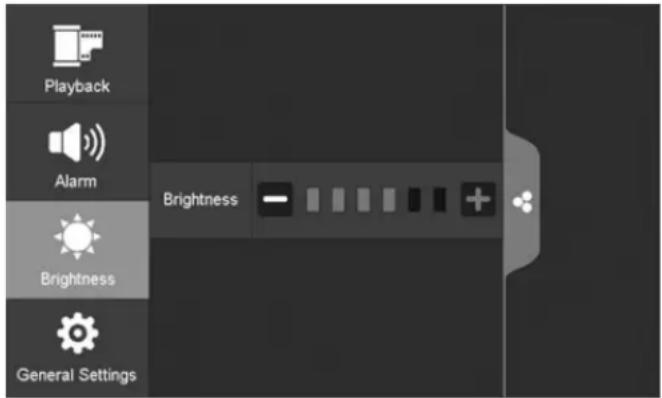
- Tap + or - to increase or decrease the selected camera's brightness. Tap when you are finished.
GENERAL SETTINGS
The General Settings screen contains 6 subsections, each of which may contain sub-screens. These sub-screens let you set features about your system. You can turn cameras on and off, establish a specific schedule for specific cameras to record, set the date and time, and motion detection sensitivity, among other features. The rest of this section provides details using these screens.
Tap the following icons as they appear on the screens:
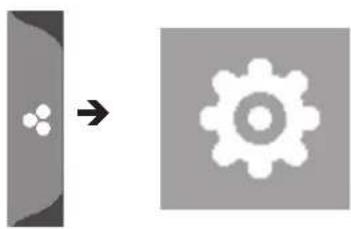
natural_image
Two abstract icons: one with a cluster of dots on the left, another with a gear symbol on the right (no text or symbols)This screen should display:
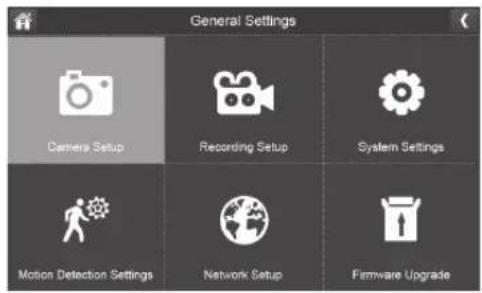
| Main Screen Sub-Screens What it Does | ||
| Camera Setup(see page 23) | Pairing (see page 23) | This system comes with cameras already paired. Use Pairing to assign these cameras to different channels or to pair additional new cameras to the monitor. |
| ON/OFF(see page 24) | Makes the cameras visible to the monitor. | |
| Resolution(see page 25) | Adjusts the video quality of each camera. | |
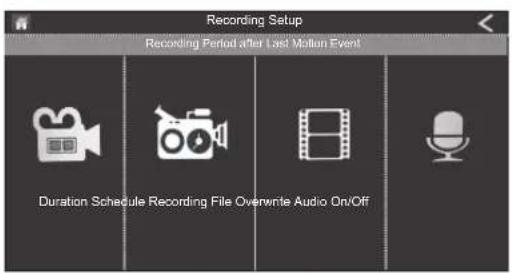
| Recording Setup(see page 25) | Duration(see page 26) | Set the length of time the camera records once motion sensitivity tiggers the camera to record.Choices are 15 seconds, 30 seconds, or 1 minute (Default - 15 seconds) |
| Schedule Recording(see page 26) | Set up a schedule for pre-determined recording times and lengths. | |
| File Overwrite(see page 27) | Overwrites the oldest recorded data on the SD card once the card is full. | |
| Audio On/Off (see page 28) | Turns microphones on or off for each camera. | |
| System Settings(see page 28) | Date & Time(see page 29) | ·Time Setting. Set the current time (including Daylight Savings Time).·Time Zone. Set the time zone for your UDR780HD system. |
| Time Zone(see page 30) | ·Set the time zone for your UDR780HD system.·Enable/Disable Daylight Savings Time | |
| Language(see page 31) | Changes language setting for the monitor. | |
| Default Settings(see page 31) | Restores the UDR780HD to default settings. | |
| Format Memory Card(see page 32) | Reformats the SD card and deletes all existing data. | |
| Information(see page 32) | Displays firmware information for the monitor and each camera. | |
| Motion Detection Settings(see page 33) | A single screen lets you set motion detection sensitivity for each camera. It also lets you determine which viewing areas for each camera should be masked from motion detection. | |
| Network Setup(see page 34) | Advanced Setup (see page 35) | Set up Dynamic or Static IP address |
| Reset Password (see page 36) | Reset U Guard app password to the default (000000). | |
| Information(see page 37) | Displays information about your network and the monitor's unique UID number. | |
| Firmware Upgrade(see page 38) | Lets you select how you want to upgrade your firmware (from SD card or from server). | |
CAMERA SETUP SCREEN
The Camera Setup screen lets you:
- Pair cameras
• Turn cameras on and off - Adjust the resolution
Pairing
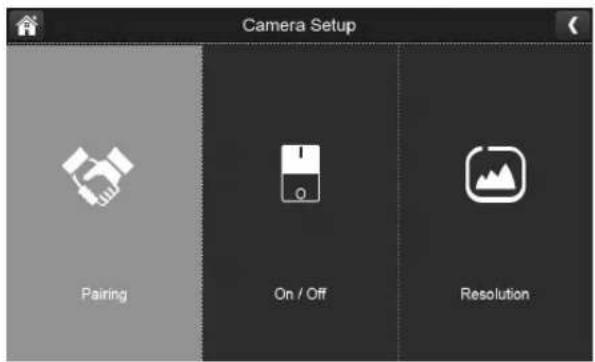
Your cameras are paired to the monitor at the factory to channels 1 and 2. When you add a new camera to your system, you have to "introduce" the camera and monitor to each other so they can communicate.
You can also use this procedure to add an accessory camera or to move a camera from one channel to a different channel.
Some things to know about pairing cameras:
- If a camera is already assigned to the selected channel, the pairing operation overwrites that camera link with the new one.
- Only pair one camera at a time! The monitor links to the first camera it detects. If two or more cameras are in pairing mode, you can't control which camera the monitor will detect first.
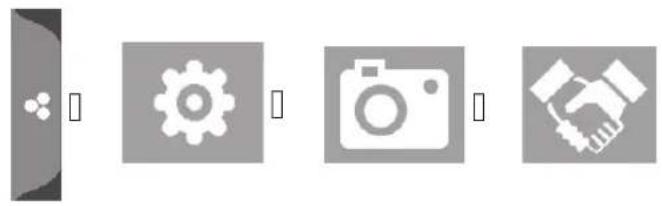
Tap the following icons as they appear on the screens:
This screen should display:
natural_image
Four gray icons representing different functions: folder, gear, camera, and handshake (no text or symbols)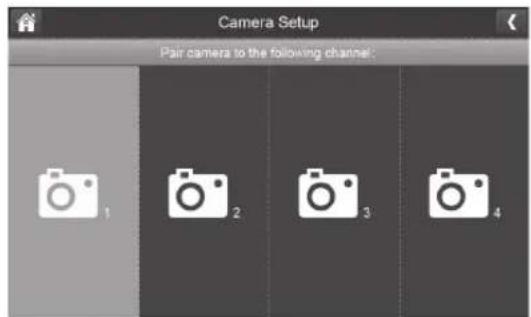
-
Tap Pairing on the Camera Setup screen.
-
Tap the channel number you want to pair the camera to.
-
A message displays with instructions to press the PAIR button on the camera. A 30-second countdown begins. Press and release the PAIR button on the back of the camera (see page 8).
You must press the PAIR button on the back of the camera during the 30-second countdown; otherwise, the camera will not be paired.
- The system displays live video 3 seconds after the camera is successfully paired.
On/Off
When you add a camera to your system, pair up the camera with the monitor and the system will automatically turn it on.
Tap the following icons as they appear on the screens:
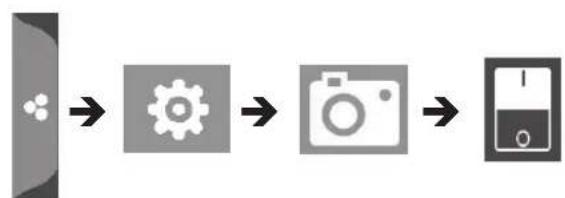
flowchart
graph LR
    A["Printer Icon"] --> B["Gear Icon"]
    B --> C["Camera Icon"]
    C --> D["Computer Disk Icon"]
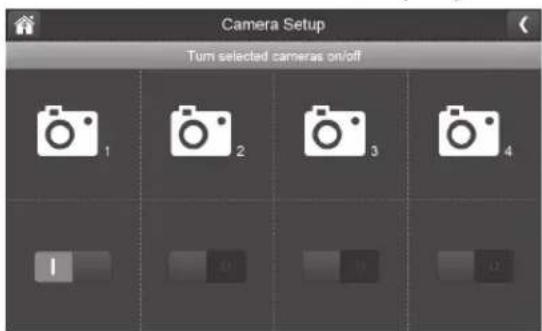
This screen should display:
-
Tap the switch bar under the camera you want to turn on or off.
-
The switch bar indicator turns green when the camera is on. It is greyed out when the camera is off.
Although the camera is turned off, it is still powered. The monitor will not receive video signals from that camera.
- Tap to return to the previous screen.
Resolution
Tap the following icons as they appear on the screens:
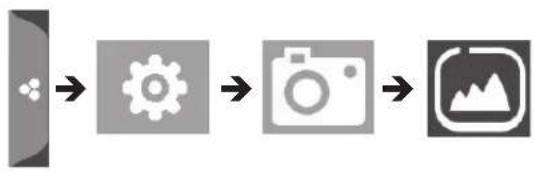
flowchart
graph LR
    A["Input"] --> B["Gear Icon"]
    B --> C["Camera Icon"]
    C --> D["Mountain Icon"]
This screen should display:
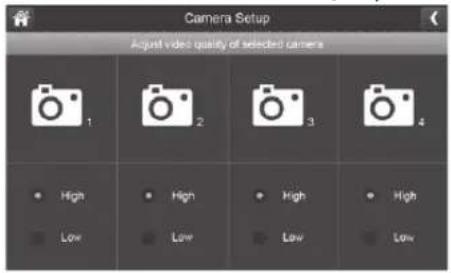
- Tap High or Low to set the resolution for each camera (High - 1080; Low - 720p).
- Tap to return to the previous screen and tap it again to return to the General Settings screen.
Use the Recording Setup screen to:
- Set the length of time the system will automatically record when something triggers motion sensitivity.
-
Schedule a set time and duration to automatically record from a specific camera.
-
Set up file retention requirements
- Turn camera's sound on or off for recording
Tap the following icons as they appear on the screens:
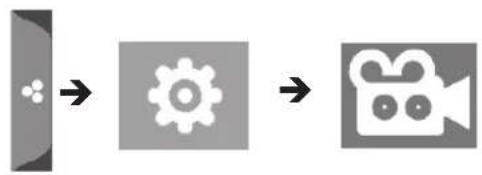
flowchart
graph LR
    A["Gear Icon"] --> B["Gear Symbol"]
    B --> C["Video Camera Icon"]
This screen should display:
Duration
You can set how long the camera keeps recording after motion detection triggers it. The options are 15 seconds, 30 seconds, or 1 minute. (Default = 15 seconds)
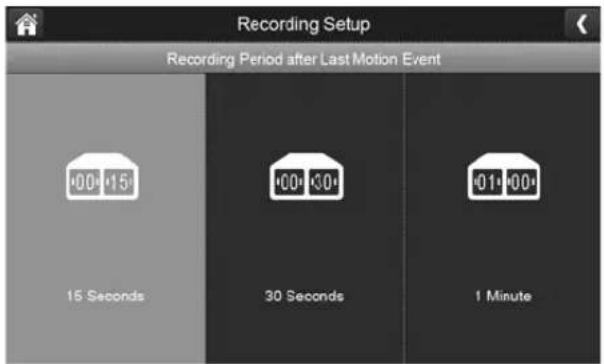
- Tap the duration you wish to set.
- Tap to return to the previous screen.
Schedule Recording
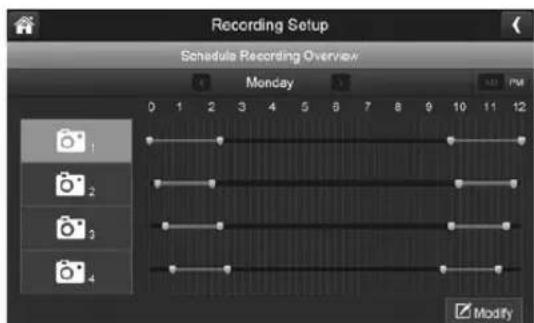
This feature lets you set up a block of time for a camera to record on a weekly schedule. You can set up multiple cameras to record at the same time and the recording times can overlap between cameras.
Total recording time is limited to the space available on the SD card. If you set the SD card to delete the oldest files when it is full (see page 27), the system continues recording; otherwise, recording stops until space is available.
- Tap the Schedule Recording Overview screen displays.
- Tap MODIFY in the lower left corner. The Schedule Recording Setup screen displays.
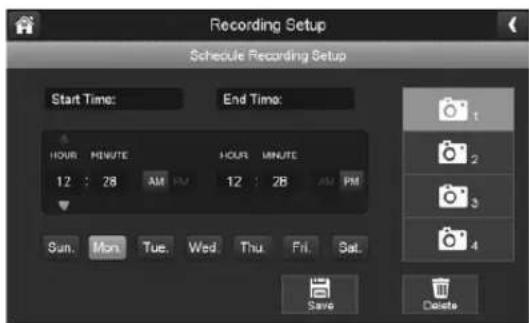
- Select a camera. If you want more than one camera to record at the same time, select both cameras.
-
Set the recording start and end times.
-
Tap the/PM block to toggle between them.
- Tap the hour and minute boxes separately and tap the up and down arrows to set the start and end times in HH:MM format.
-
Tap the days for which this recording schedule applies.
-
Tap SAVE. The system returns to the Schedule Recording Overview screen with the recording period indicated.
- Tap MODIFY again to set up another recording session to schedule.
Scheduled recordings are broken up into 5 minute file sizes. For example, if you record a 12 minute event, you will have two 5-minute recordings plus one 2-minute recording.
- Tap to return to the previous screen.
File Overwrite
This feature lets you set the system to automatically overwrite the oldest files once the SD card is full. This will allow you to continue recording. If you do not allow overwrite, recording stops when the SD card is full.
- Tap to access the File Overwrite function. The following screen gives you the option of allowing File Overwrite (tap YES) or, if File Overwrite is on, cancelling it (tap NO).
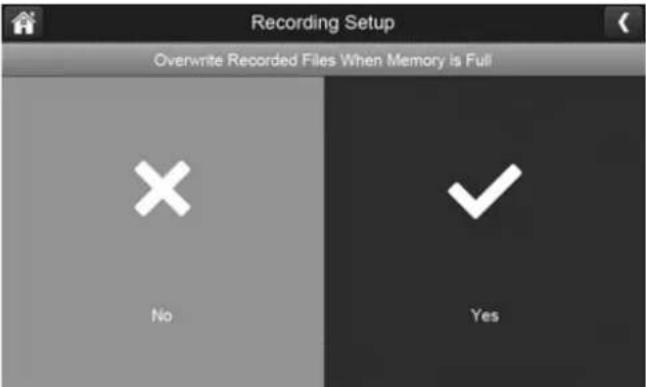
- Tap return to the previous screen and again to return to the General Settings screen.
Audio On/Off
This feature lets you turn the microphone on or off for any camera.
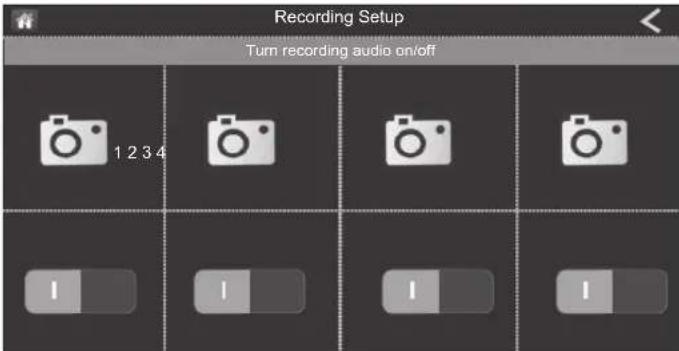
Toggle the ON/OFF button under the desired camera.
SYSTEM SETTINGS SCREEN
Use these setting options to configure your system:
- Date and Time
- Time Zone
- Language
- Default Settings
- Format Memory Card
• Information
Tap the following icons as they appear on the screens:
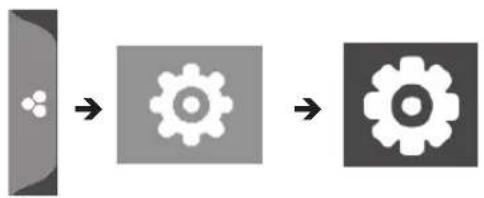
flowchart
graph LR
    A["Icon"] --> B["Gear Icon"]
    B --> C["Product"]
This screen should display:
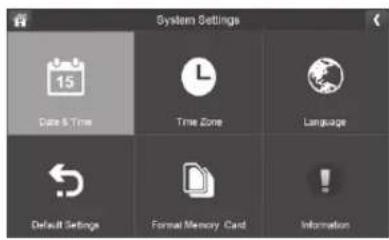
Date and Time
- Tap to access the
Date & Time screen.
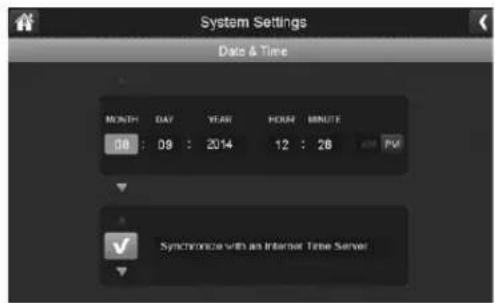
- Tap the up or down arrow to set the month, day, and year.
- Tap the up or down arrow to set the time.
- Tap tAM/PM block to toggle between them.
- Tap the up or down arrows to set the correct hour and minute.
- Tap Synchronize with an internet time server if you want the internet clock to set your time automatically.
You must keep your system connected to your wireless network using the Ethernet cable in order to synchronize with the internet time server.
- Tap to return to the previous screen.
Time Zone
Time Zone allows you to set the time zone your monitor is in. Your system will know that your request refers to the time zone the monitor is in. [Default = (GMT-5:00) Eastern Time (USA & Canada)].
- Tap The Time Zone screen displays.
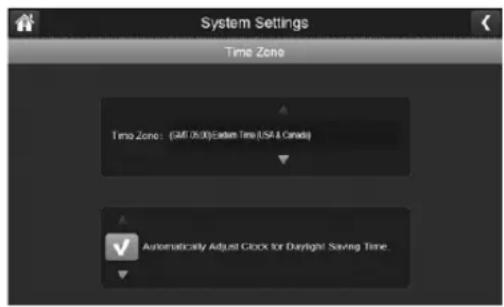
- Scroll up and down to your camera's time zone and then tap it. The most commonly used time zones for this system are:
• GMT-05:00 - Eastern Time (Default)
• GMT-06:00 - Central Time
• GMT-07:00 - Mountain Time
• GMT-08:00 - Pacific Time
• GMT-09:00 - Alaska Time
• GMT-10:00 - Hawaii-Time
-
Tap the next option to turn Daylight Savings Time on or off.
-
Tap to return to the previous screen.
Language
Tap is set the language used on your system. Options are English, Español, and Français.
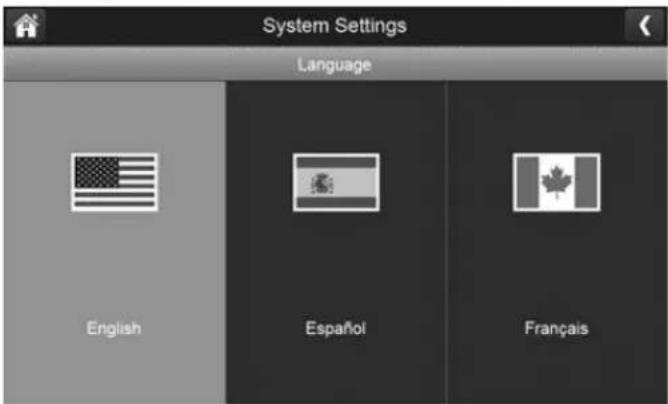
- Tap the language you want your system to use.
- Tap . The system returns to the previous screen and automatically changes over to the requested language; no reboot is necessary.
Default Settings
- Tap to return your system to the original default settings.
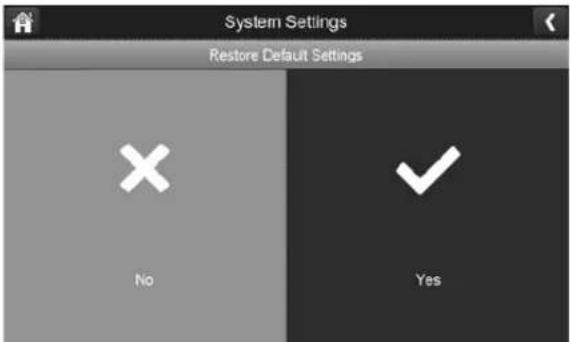
-
Tap YES on the Restore Default Settings screen.
-
Tap OK to confirm the reset.
-
Tap to return to the previous screen.
Format Memory Card
Formatting the memory card erases all data stored on the card. (Default = NO)
- Tap to reformat your SD card.
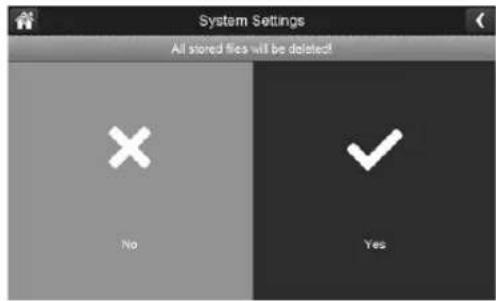
- Tap YES on the All stored files will be deleted! screen (Default = NO). A confirmation screen displays. Tap YES to it.
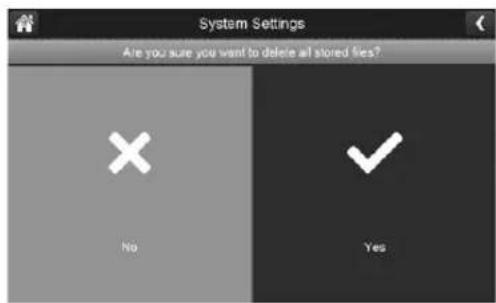
- A progress bar displays on the screen. After formatting is complete, a Format OK message displays and the system returns to the System Setting screen.
Information
This screen lists the firmware information of the monitor and all cameras paired to it.
- Tap to display the screen.
- Tap to return to the previous screen.
- Tap to return to the General Settings screen.
MOTION DETECTION SETTINGS SCREEN
Video motion detection settings control how strong the motion needs to be to trigger recording. This screen also lets you mask off any areas in the image for the camera to ignore. For example, you may have trees in the image area that would set off motion detection if there is a breeze.
Tap the following icons as they appear on the screens:
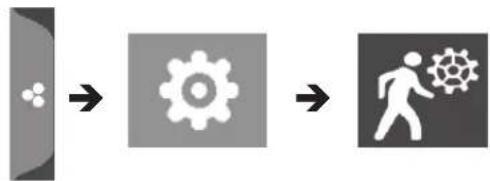
flowchart
graph LR
    A["Simple icon"] --> B["Gear Icon"]
    B --> C["Person walking with Gear Icon"]
This screen should display:
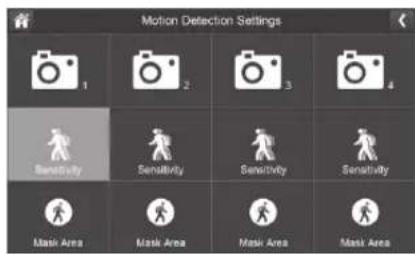
Sensitivity
This selection allows you to set the camera's motion detection sensitivity levels to High, Low, or Off.
- Tap . The following screen displays.
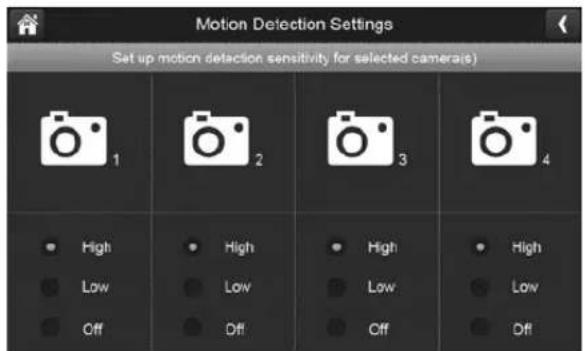
- Tap High, Low, or Off to set sensitivity.
- Tap to return to the previous screen.
Mask Area
Use this selection to mask off any parts of the viewing area you do NOT want to be included for motion detection.
Note: the video image is removed to make it easier to see the masking grid.
- Tap 📁. The Mask Area screen displays, superimposed over the image from that camera.
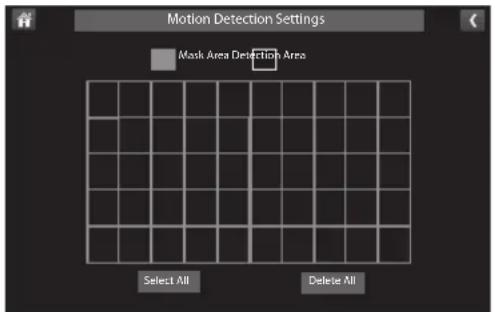
- Tap the squares that cover the areas of the image you do not want affected by motion detection.
- When you are finished, tap to return to the Motion Detection Settings screen.
- Tap to return to the General Settings screen.
NETWORK SETUP SCREEN
This selection lets you determine your network connection type, reset the APP password, and review your network details.
Tap to see the
Network Setup screen and option.
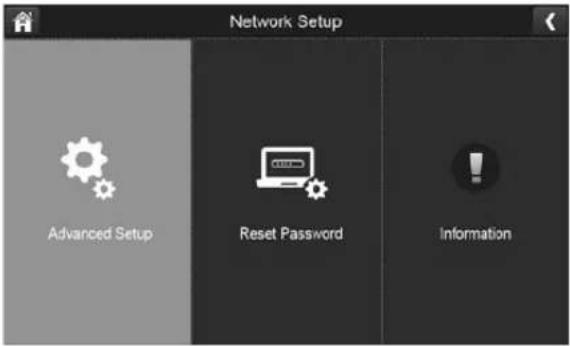
Advanced Setup
- Tap to display the
Advanced Setup screen.
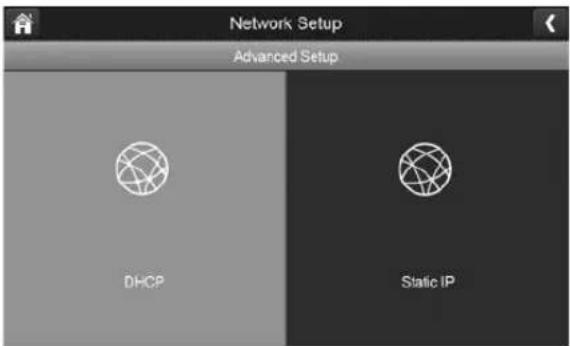
- Tap on your selection and fill in the fields requested. Tap SAVE.
DHCP Static IP
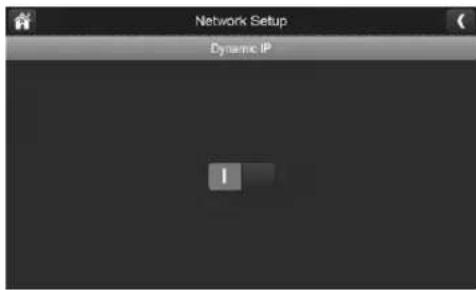
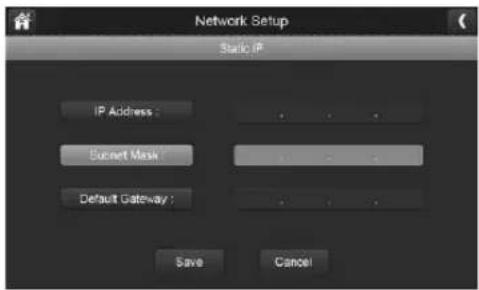
- Tap on your selection and fill in the fields requested.
DCHP is the most common connection. Your router will automatically assign an IP address to your UDR780HD system. Static IP is for those that have the ability to specify an IP address for their system.
- Reboot the monitor when prompted.
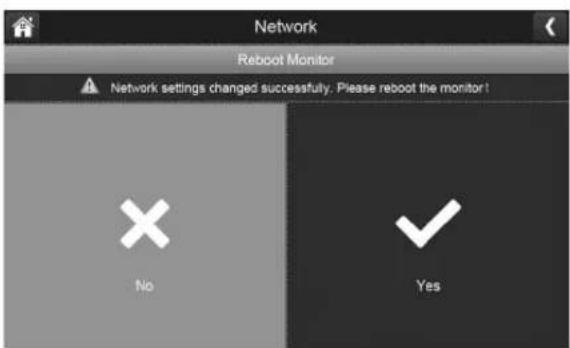
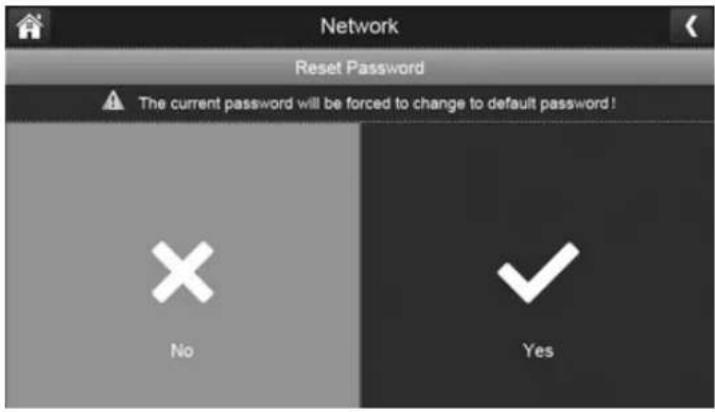
Reset Password
The Reset Password feature resets the Uniden U Guard app's password to the default (000000).
Tap YES; the Reset Password screen displays again. Tap 📋 return to the Network Setup screen.
Tap to return to the General Settings screen.
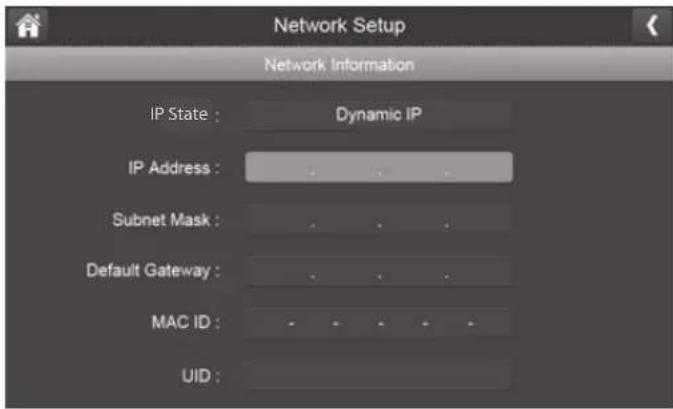
Information
This screen displays current IP information when the system is connected to the internet.
Tap to display the Information screen, then tap to return to the Information screen.
Tap to return to the General Settings screen.
FIRMWARE UPGRADE SCREEN
Tap the following icons as they appear on the screens:
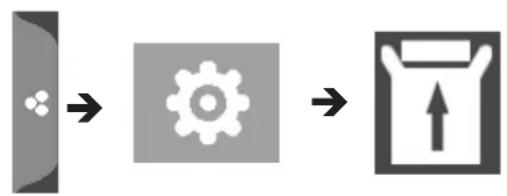
flowchart
graph LR
    A["Gear Icon"] --> B["Gear Symbol"]
    B --> C["Upload Icon"]
This screen should display:
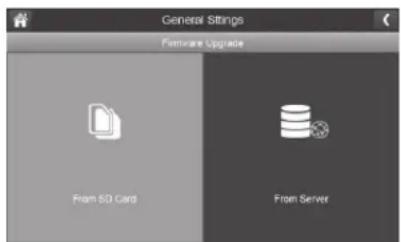
Upgrade from SD Card
- Tap to upgrade the firmware through the SD card. A confirmation screen displays. Tap YES.
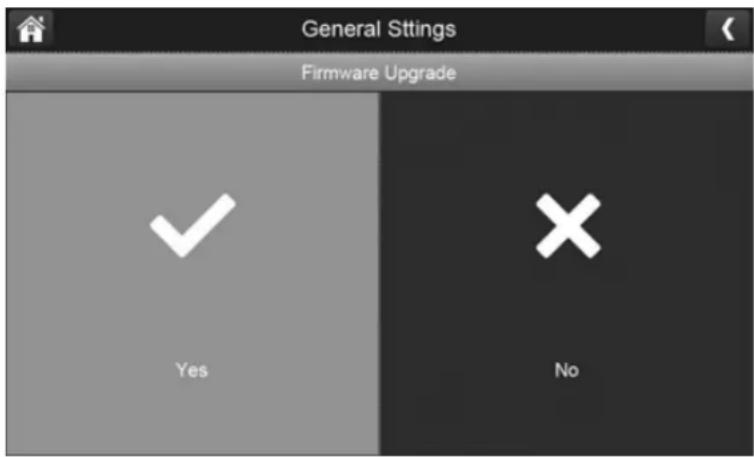
- A warning screen displays, indicating that AC power must be connected. After verifying that AC power is connect, a progress screen displays.
CAUTION: The monitor MUST be plugged into AC power before you begin the upgrade. If it is not, the monitor will freeze and must be reset (see page 47).
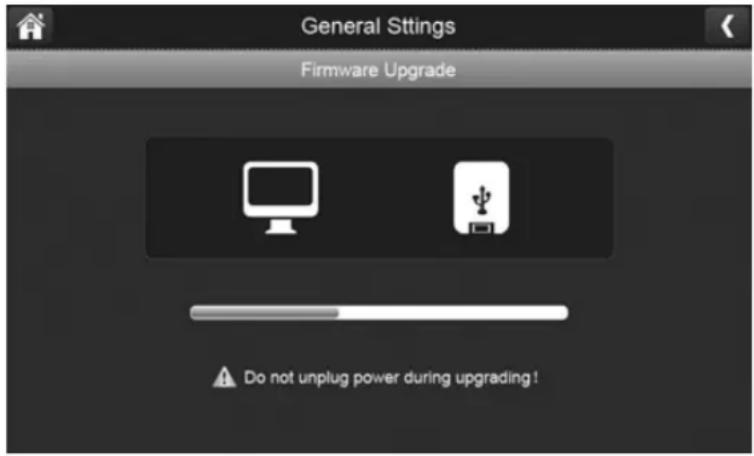
- When the update is complete, the monitor displays Firmware Upgrade Successful and automatically reboots.
Upgrade from Server
- Use the Ethernet cable (provided) to connect your monitor to your router.
- Tap to upgrade the firmware through the Server.
-
A confirmation screen displays. Tap YES.
-
The system checks to see if new firmware is available. If new firmware is available, the monitor installs it and automatically reboots.
UDR780HD OPERATION BASICS
This section gives you instructions on how to perform the most commonly used actions for the UDR780HD. There is also a table of other actions you might find useful.
MANUALLY RECORDING LIVE VIDEO (NOT SCHEDULED)
- From a single-channel mode Live View screen, tap the blue for the camera to begin recording. The icon blinks and turns red while recording.
- Tap it again to stop recording. The icon stops blinking and turns blue.
You can record from all cameras at the same time. However, you must manually activate recording on each camera. Repeat the steps above for each camera.
There are two ways to access recorded video files. You can either tap the SD card icon ( ) on the Live View screen or you can tap the Playback pop-up menu ( ). Either way, the following screen displays.
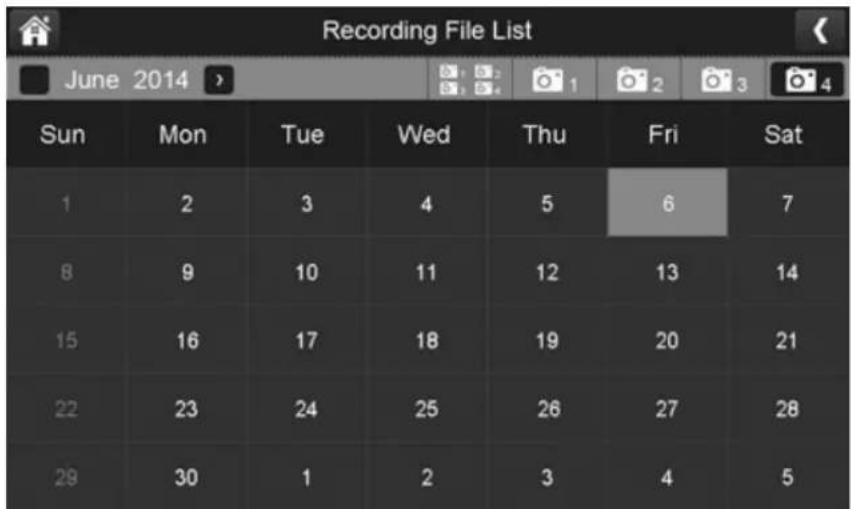
- Tap on the highlighted day containing the recording you want to view or on a specific camera to only view that camera's recordings. The Recording File List screen displays those recordings.
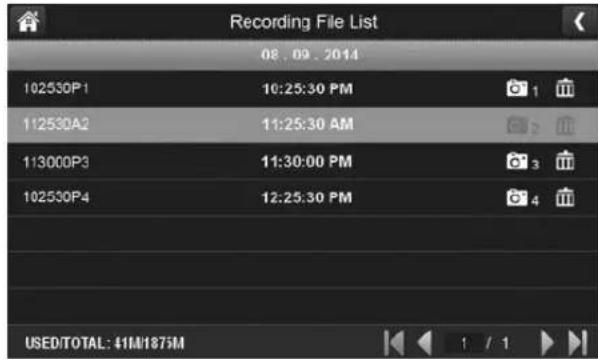
If you tap on a day that is not highlighted, there will be no action taken at all.
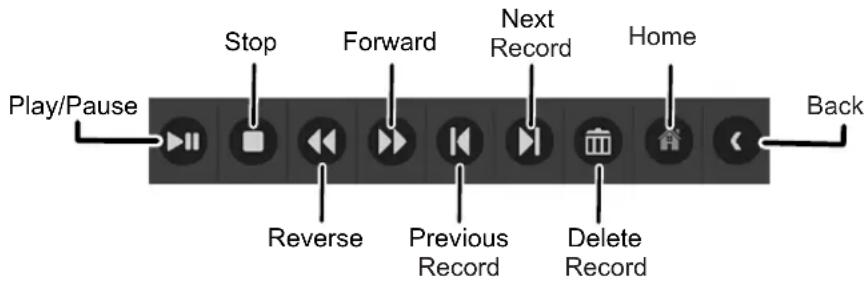
- Tap on the recording you want to view. It begins playing. Control icons display across the bottom of the screen (see page 19).
- Tap on any area of the screen that does not have control icons to bring up the playback progress bar. Tap any area again to close it.
While playback progress is visible, you can fast forward/rewind by dragging the playback bar forwards or backwards.
On the playback progress bar, tap the double arrow to skip forward or backwards about 10 seconds. Tap the arrow and bar to skip to the next or previous video.
- When playback ends, tap to return to the Recording File List.
ADDING NEW CAMERAS
Your monitor supports a total of four active cameras at a time; your UDR780HD comes with two cameras already paired to your monitor. When you add a camera, you have to pair it to the monitor (that is, you have to "introduce" the camera and monitor to each other so they can communicate).
- If a camera is already assigned to the channel you want to assign the new camera to, the monitor overwrites the existing camera link with the new one.
- Only pair one camera at a time! The monitor links to the first camera it detects. If two or more cameras are in pairing mode, you can't control which camera the monitor will detect first.
PAIR CAMERAS
- From the Pairing Camera screen (see "Pairing" on page 23), tap the camera image you want to pair. A processing icon displays for a 30 second countdown.
- During the 30 second countdown, quickly press and release the Pairing button on that camera (see "Pairing" on page 23).
- The system automatically adjusts the Live View screen accordingly.
UDR780HD BASIC OPERATION
| To do this... From monitor, do this... | |
| Manually start/stop recording video | 1. Tap the blueicon on the monitor screen.The icon turns red and flashes, indicating that recording has started.2. Tap the icon again to stop recording. The icon turns blue. |
| Set up automatic recording schedule | 1. From General Settings/Recording Setup, tapicon.The Schedule Recording Overview screen displays.2. Tap MODIFY to view the Recording Setup screen.(See”Schedule Recording” on page 26.) |
| Delete recording schedule | 1. From General Settings/Recording Setup, tapicon.The Schedule Recording Overview screen displays.2. Select the day you want to modify and tap MODIFY to view the recording schedule for that day (See page 26.)3. Select the camera(s) whose schedule you want to delete. Enter the schedule (or part of a schedule) you want to delete and tap DELETE. |
| Watch recorded video 1. From the main screen, tap the pop out menu tab and then tap The Recording File List displays the recorded files.2. Tap the day you want to view, and then tap the file.3. The video begins playing (see page 17). | |
| Delete recorded videos | 1. From the Recorded File List, tap con.2. Tap YES to confirm deletion. |
| Take snapshots Download Uniden's U | Guard app to take and manage snapshots of recorded video. |
| View snapshots Download Uniden's U | Guard app to take and manage snapshots of recorded video. |
| Delete snapshots Download Uniden's | U Guard app to take and manage snapshots of recorded video. |
| Change password (mobile device only) | Go to Network Setup/Reset Password (see page 36) to change the U Guard app password. |
| Reset password (Resets the app password) | 1. From General Settings/Network Setup, tap 2. Tap YES to confirm the change.3. The app returns to the default password (000000). |
| Hear audio from camera | From the Live View screen, tap . Sound is now audible through the monitor.Tap the icon again to turn sound off. |
| Change channels (view a different camera) | 1. Tap theicon.2. The next channel displays. |
| the camera's signal status icon shows no bars | 1. Make sure the camera is plugged in.2. Make sure that the camera's antenna is attached and the monitor's antenna is extended.3. Make sure the camera is paired to the correct channel.4. Re-pair the camera and monitor. |
| the camera won't pair with the monitor | 1. Make sure the camera is plugged in.2. Press and release the pairing button quickly. Do not press and hold the pairing button. |
MAINTAINING YOUR SYSTEM
UPGRADING YOUR UDR780HD MONITOR FIRMWARE
We are ready to help you upgrade your monitor firmware if necessary. Go to www.uniden.com and search for the UDR780HD product page. Follow the instructions there.
CAUTION: The monitor MUST be plugged into AC power before you begin the upgrade. If it is not, the monitor will freeze and must be reset (see page 47).
TAKING CARE OF YOUR HARDWARE
MONITOR
Keep the screen clean by wiping it with a microfiber cloth to remove fingerprints, dust, etc.
CAMERAS
When dust and grime builds up on the camera lens and glass, it affects night vision capability. The infrared light reflects off of the dust and grime, limiting the camera's "vision." Use a microfiber cloth to regularly clean the cameras or when night vision video is cloudy or unclear.
MANAGING RECORDED FILES
Over time, your SD card will fill up with recorded files. If there are files you need to keep, transfer them to your computer for storage and remote viewing. Otherwise, reformat your SD card every 4 to 6 weeks (see page 32).
COPYING FILES FROM THE SD CARD TO YOUR COMPUTER
- Remove the SD card from the monitor. Insert it into the SD card adapter (included).
- Insert it into your computer's SD card slot.
- Navigate to the SD card and locate your files.
- Copy them to the computer. These files can now be deleted from the SD card or the SD card can be formatted.
SOLVING PROBLEMS
If you have any trouble with your system, try these simple steps. If you are still having a problem with your camera, check the manual that came with your camera. If you still have a question, visit the Uniden website at www.uniden.com for assistance.
| If... Try.. | |
| The motion sensor won’t respond to movement. | Increasing the sensitivity of the motion sensor (see page 33).Checking the masking pattern (see page 34). |
| The motion sensor goes off when there’s nothing there. | Decreasing the sensitivity of the motion sensor (see page 33).Checking placement considerations (see page 10). |
| I can’t play my video clips in another program. | For MAC: Download another video payer such as Elmedia player.For PC: Video will play in players such as Windows Media Player if an H.264 CODEC plug-in is installed. |
| I schedule a recording, save the schedule, and the recording does not happen at the scheduled time. | Check the settings on the Schedule Recording Setup screen (see page 26.)Ensure that the system time is set to the current time.Make sure that the SD card is inserted into the monitor and there is still memory available on that card. |
| The camera’s signal status icon shows no bars. | making sure the camera is plugged in.making sure the camera is paired to the correct channel.re-pairing the camera and monitor.moving the camera closer to the monitor; it might be out of range.making sure the camera is turned on in Camera Setup (see page 24). |
| The camera’s signal status icon shows one or two bars or the video quality is poor. | See page 9 for tips on improving video quality. |
| The camera won’t pair with the monitor. | making sure the camera is plugged in.pressing and releasing the pairing button quickly. Do not press and hold the pairing button.Check if other cameras in the area are also in Pairing mode.Disconnect power to other cameras. |
| When I power up my monitor and cameras for the first time, they seem to be on but there is no picture on the screen. | verifying that the cameras are turned on (see page 24).verifying that the monitor is displaying a channel with a camera assigned to it. |
| The monitor picture has frozen. | Using a blunt object like an unbent paper clip to press RESET on the back of the monitor to reset the monitor. The monitor turns off. Press POWER to turn it back on. |
| I cannot remotely access my recorded files. | Verify that the monitor is connected to the internet.Verify that the time zone is set correctly for the monitor.If you are away from your system, you will need someone to verify these items for you. |
INTERFERENCE
This equipment has been tested and found to comply with limits for a Class B digital device, pursuant to Part 15 of the FCC rules and ETSI (EN) 300328. These limits are designed to provide reasonable protection against harmful interference in residential installations. This equipment generates, uses, and can radiate radio frequency energy, and if not installed and used in accordance with the instructions, may cause harmful interference to radio communications.
However, there is no guarantee that interference will not occur in a particular installation. If this equipment does cause interference to radio or television equipment reception, which can be determined by turning the equipment off and on, the user is encouraged to try to correct the interference by one or more of the following measures:
- Reorient or relocate the receiving antenna.
- Move the equipment away from the monitor.
- Plug the equipment into an outlet on a circuit different from that to which the monitor is connected.
- Consult the dealer or an experienced radio/television technician for additional suggestions.
CAUTION! Any changes or modifications to this equipment not expressly approved by the party responsible for compliance could void your authority to operate the equipment.
SPECIFICATIONS
| Camera Specifications | |
| Image Sensor - ok 1/2.7 inch FHD Single chip CMOS Image Sensor | |
| Effective Pixel Area 1920 (H) x 1080 (V) | |
| Image Processing Format H.264 | |
| Image Resolution / Frame Rate | Full High Definition 1080p (FHD) @10fps / High Definition 720p @ 24fps |
| Lens 3.6mm F1.8 | |
| Low Light Resolution <8~15 lux | IR on |
| Low Light Solution 24 IR LEDs, 1 low light sensor | |
| Night Vision Up to 40 feet | |
| IR cut filter Yes | |
| Viewing Angle / Field of View 92° | |
| Automatic Gain Control Auto | |
| Automatic Electric Shutter (AES) Speed | 1/10~1/270100 Second |
| White Balance Auto | |
| Power Requirement 9V 600mA DC +/-10% | |
| Power Consumption 240mA W/O IR, 540mA with IR | |
| Operating Temperature Range | +14°F to 122°F (-10°C to +50°C) |
| Operating Humidity Range 0%~ | 85% |
| Dimensions | 8.3 x 3.2 x 3.6 in (211 x 82 x 93mm) |
| Environment Rating IP65 | |
| RoHS Compliance (Hazardous Substances) | Yes |
| FCC ID SJ8UDRC58 | |
| IC ID 7644A-UDRC58 | |
| Camera Housing Material Metal | |
| Monitor Specifications | |
| Display Size / Type 7" TFT LCD Panel | |
| Resolution 1024 x 600 | |
| Viewing Angle H:120° V:140° | |
| Response Time Ton (Rise): 10ms Toff (Fall): 15ms | |
| Power Requirement 5V/2A DC +/-10% | |
| Power Consumption 750mA (Typical) 250mA (Charging current) | |
| Battery Type/Capacity 3.7V 2000mAh | |
| Hours of Battery Operation | 2 hr |
| Operating Temperature Range | 0~40°C |
| Operating Humidity Range | 0~85% |
| Dimensions 10.25 x 6.02 x .75 in, 260.5 x 153 x 19 mm | |
| Regulation Compliance | FCC Part 15C 247/IC RSS210 |
| RoHS Compliance (Hazardous Substances) | Yes |
| FCC ID SJ8-UDR780HD | |
| IC ID 7644A-UDR780HD | |
| Recording/Display | ||
| Remote viewing via Android/iOS Yes | ||
| Remote viewing to live and recorded video | Yes | |
| 2-Way Audio Yes | ||
| Record to SD Card Yes | ||
| Multiple Camera Recording Yes | ||
| Dual motion detection recording Yes | ||
| Scheduled Yes | ||
| Cameras supported Yes | ||
| Digital zoom Yes | ||
| Recording capacity at maximum 720p 1080p | ||
| 1 GB | 1.2 hrs 1 hrs | |
| 2 GB | 2.5 hrs 2.2 hrs | |
| 4 GB | 4.9 hrs 4.3 hrs | |
| Included 8 GB | 10 hrs 8.6 hrs | |
| 16 GB | 19.8 hrs | 17.1 hrs |
| 32 GB | 39.7 hrs | 34.3 hrs |
| 64 GB | 79.5 hrs 68.5 hrs | |
| 128 GB | 159.0 hrs 137.0 hrs | |
COMPLIANCE INFORMATION
RF Exposure Information
The antenna used for this transmitter must be installed to provide a separation distance of at least 20 cm (7.9") from all persons and must not be collocated or operating in conjunction with any other antenna or transmitter.
FCC Part 15 Compliance
This device complies with Part 15 of the FCC rules. Operation is subject to the following two conditions: (1) This device may not cause harmful interference, and (2) this device must accept any interference received, including interference that may cause undesired operation.
Changes or modifications not expressly approved by the party responsible for compliance could void your authority to operate the equipment.
This device complies with Industry Canada license-exempt RSS standard(s). Operation is subject to the following two conditions: (1) this device may not cause interference, and (2) this device must accept any interference, including interference that may cause undesired operation of the device.
Changes or modifications not expressly approved by the party responsible for compliance could void your authority to operate the equipment.
One-Year Limited Warranty
Important: Evidence of original purchase is required for warranty service.
WARRANTOR: Uniden America Corporation ("Uniden") ELEMENTS OF WARRANTY: Uniden warrants, for one year, to the original retail owner, this Uniden Product to be free from defects in materials & craftsmanship with only the limitations or exclusions set out below.
WARRANTY DURATION: This warranty to the original user shall terminate & be of no further effect 12 months after the date of original retail sale. The warranty is invalid if the Product is (A) damaged or not maintained as reasonable or necessary, (B) modified, altered, or used as part of any conversion kits, subassemblies, or any configurations not sold by Uniden, (C) improperly installed, (D) serviced or repaired by someone other than an authorized Uniden service center for a defect or malfunction covered by this warranty, (E) used in any conjunction with equipment or parts or as part of any system not manufactured by Uniden, or (F) installed or programmed by anyone other than as detailed by the owner's manual for this product.
STATEMENT OF REMEDY: In the event that the product does not conform to this warranty at any time while this warranty is in effect, warrantor will either, at its option, repair or replace the defective unit & return it to you without charge for parts, service, or any other cost (except shipping & handling) incurred by warrantor or its representatives in connection with the performance of this warranty. Warrantor, at its option, may replace the unit with a new or refurbished unit.
THE LIMITED WARRANTY SET FORTH ABOVE IS THE SOLE & ENTIRE WARRANTY PERTAINING TO THE PRODUCT & IS IN LIEU OF & EXCLUDES ALL OTHER WARRANTIES OF ANY NATURE WHATSOEVER, WHETHER EXPRESS, IMPLIED OR ARISING BY OPERATION OF LAW, INCLUDING, BUT NOT LIMITED TO ANY IMPLIED WARRANTIES OF MERCHANTABILITY OR FITNESS FOR A PARTICULAR PURPOSE. THIS WARRANTY DOES NOT COVER OR PROVIDE FOR THE REIMBURSEMENT OR PAYMENT OF INCIDENTAL OR CONSEQUENTIAL DAMAGES. Some states do not allow this exclusion or limitation of incidental or consequential damages so the above limitation or exclusion may not apply to you.
LEGAL REMEDIES: This warranty gives you specific legal rights, & you may also have other rights which vary from state to state. This warranty is void outside the United States of America & Canada.
PROCEDURE FOR OBTAINING PERFORMANCE OF WARRANTY: If, after following the instructions in the owner's manual you are certain that the Product is defective, pack the Product carefully (preferably in its original packaging). Disconnect the battery from the Product & separately secure the battery in its own separate packaging within the shipping carton. The Product should include all parts & accessories originally packaged with the Product. Include evidence of original purchase & a note describing the defect that has caused you to return it. The Product should be shipped freight prepaid, by traceable means, to warrantor at:
Uniden America Service
C/O Saddle Creek
743 Henrietta Creek Rd., Suite 100
Roanoke, TX 76262
- CUSTOMER CARE
- CONTENTS
- GETTING STARTED....5
- GETTING TO KNOW THE UDR780HD SYSTEM ....7
- UDR780HD Operation Basics....40
- MAINTAINING YOUR SYSTEM....45
- SOLVING PROBLEMS 46
- SPECIFICATIONS 49
- Compliance Information....53
- One-Year Limited Warranty....54
- GETTING STARTED
- FEATURE LIST
- WHAT'S INCLUDED
- Not Shown:
- GETTING TO KNOW THE UDR780HD SYSTEM
- HARDWARE
- UDR780HD MONITOR
- UDR780HD CAMERA
- SET UP THE HARDWARE
- MONITOR
- CAMERA
- General
- Placement Considerations
- INSTALL CAMERAS
- The monitor's battery will last about 2 hours on its own.
- MONITOR SCREEN
- Viewing Modes
- Channel Cycling Modes
- UDR780HD OPERATION
- LIVE VIEW SCREEN
- UDR780HD LIVE SCREEN ICONS
- UDR780HD SCREEN DESCRIPTIONS
- OVERVIEW
- PLAYBACK
- ALARM
- BRIGHTNESS
- GENERAL SETTINGS
- CAMERA SETUP SCREEN
- Pairing
- Some things to know about pairing cameras:
- On/Off
- Resolution
- Duration
- Schedule Recording
- File Overwrite
- Audio On/Off
- SYSTEM SETTINGS SCREEN
- Date and Time
- Time Zone
- Language
- Default Settings
- Format Memory Card
- Information
- MOTION DETECTION SETTINGS SCREEN
- Sensitivity
- Mask Area
- Note: the video image is removed to make it easier to see the masking grid.
- NETWORK SETUP SCREEN
- Advanced Setup
- Reset Password
- FIRMWARE UPGRADE SCREEN
- Upgrade from SD Card
- Upgrade from Server
- UDR780HD OPERATION BASICS
- MANUALLY RECORDING LIVE VIDEO (NOT SCHEDULED)
- ADDING NEW CAMERAS
- PAIR CAMERAS
- MAINTAINING YOUR SYSTEM
- UPGRADING YOUR UDR780HD MONITOR FIRMWARE
- TAKING CARE OF YOUR HARDWARE
- CAMERAS
- MANAGING RECORDED FILES
- COPYING FILES FROM THE SD CARD TO YOUR COMPUTER
- SOLVING PROBLEMS
- INTERFERENCE
- COMPLIANCE INFORMATION
- RF Exposure Information
- FCC Part 15 Compliance
- One-Year Limited Warranty
Brand : UNIDEN
Model : GC45
Category : Security Camera