
NSW-R2 - Headphones Gembird - Free user manual and instructions
Find the device manual for free NSW-R2 Gembird in PDF.


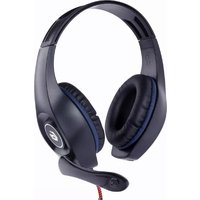
| Product Type | Wireless Over-Ear Headphones |
| Brand | Gembird |
| Model | NSW-R2 |
| Connectivity | Bluetooth 5.0 |
| Wireless Range | Up to 10 meters |
| Driver Diameter | 40mm |
| Frequency Response | 20Hz - 20kHz |
| Impedance | 32Ω |
| Sensitivity | 105dB |
| Battery Type | Built-in Lithium-ion |
| Battery Capacity | 300mAh |
| Charging Time | 2 hours |
| Playback Time | Up to 12 hours |
| Microphone | Built-in omnidirectional |
| Controls | On-ear buttons (volume, track, call) |
| Weight | 180g |
| Dimensions (folded) | 160 x 80 x 190 mm |
| Material | Plastic and synthetic leather |
| Color | Black |
| Included Accessories | USB charging cable, audio cable, user manual |
| Cleaning | Wipe with dry cloth |
| Safety | Do not expose to moisture or extreme temperatures |
| Spare Parts | Ear cushions available |
| Repairability | Not user-serviceable; contact support |
Frequently Asked Questions - NSW-R2 Gembird
User questions about NSW-R2 Gembird
0 question about this device. Answer the ones you know or ask your own.
Ask a new question about this device
Download the instructions for your Headphones in PDF format for free! Find your manual NSW-R2 - Gembird and take your electronic device back in hand. On this page are published all the documents necessary for the use of your device. NSW-R2 by Gembird.
USER MANUAL NSW-R2 Gembird
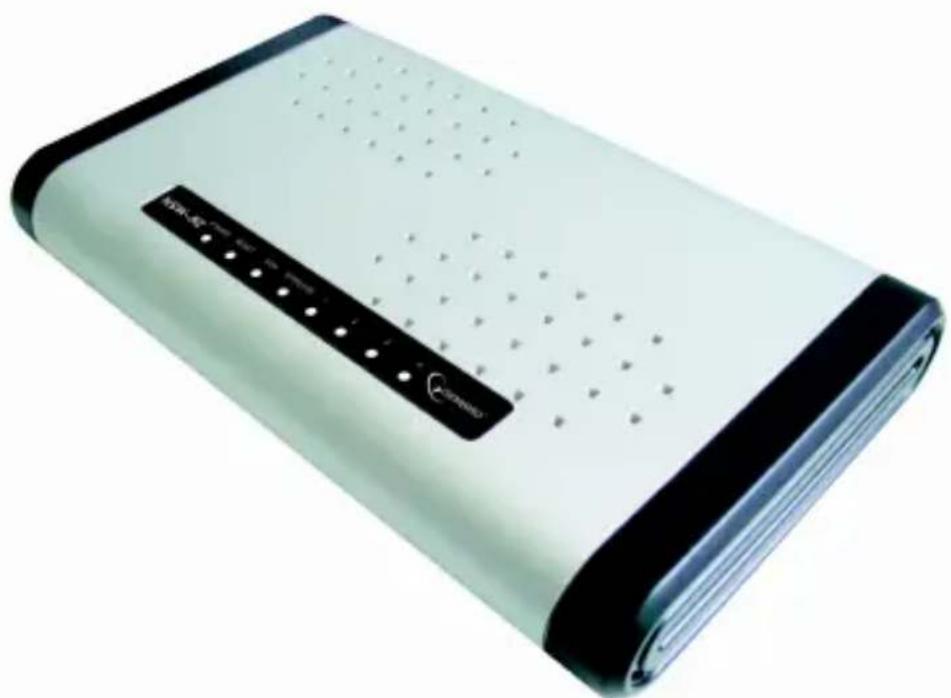
NSW-R2 802.11b/g 54M wireless router User manual
natural_image
Exterior view of a white electronic device with black and white casing, no visible text or symbols on the body.DISCLAIMER
· We spared no efforts to make sure that the information in this manual is correct and complete. However no liability is accepted for any errors or omissions. Gembird Electronics reserves the right to change the specifications of the hardware and software described in this manual without prior notice.
- No part of this manual may be reproduced, transmitted or translated in any language in any form, by any means, without the prior written permission of Gembird Electronics Ltd.
·Gembird Electronics makes no warranties for damages resulting from corrupted or lost data due to a mistaken operation or malfunction of the product, the software, personal computers or peripheral devices.
Gembird® is a registered trademark of GMB Tech (Holland) bv. Other names or products not mentioned above may be registered trademarks or trademarks of their respective owners.
Chapter 1 Introduction
Congratulations on your purchase of this outstanding Wireless Router. The Wireless Router integrates 4-port switch, firewall, NAT-router and Wireless access point (AP). This product is specifically designed for Middling and Small Corporation needs. It will allow you to connect your network wirelessly better tan ever, sharing Internet Access, files and fun, easily and securely. it is easy to configure and operate for even non-technical users. Instructions for installing and configuring this product can be found in this manual. Before you install and use this product, please read this manual carefully for full exploiting the functions of this product.
The Wireless Router complies with the IEEE802.11g/b standards so that the data transmission rate is up to 54Mbps. In the most attentive wireless security, The Wireless Router provides multiple protection measures. It can be set to turn off wireless network name (SSID) broadcast so that only stations that have the SSID can be connected. The router provides wireless LAN 64/128-bit WEP encryption security, and WPA/WPA2 authentication, as well as TKIP/AES
encryption security.
1.1 Features
Designed for versatility and performance, the WR3104 router provides the following:
- Complies with IEEE802.11g, IEEE802.11b, IEEE802.3, IEEE802.3u standards
- All-in-one Internet-sharing Router, 4-port Switch, and Wireless-G (802.11g) Access Point
- Shares a single Internet connection and other resources with Ethernet wired and Wireless-G clients
• Supports DHCP/Static IP/PPPoE Client
• Supports PPPoE Auto-connect and Auto-disconnect
• Built-in DHCP server to automatically assign and manage LAN IP addresses - Wireless data rates up to 54Mbps -- 5 times as fast as Wireless-B (802.11b), but also interoperable with Wireless-B devices (at 11Mbps)
• Supports 64/128-bit WEP encryption security
• Supports wireless LAN ACL (Access Control List) filtering
• Supports WPA/WPA2 and WPA-PSK/WPA2-PSK authentication and TKIP/ AES encryption security.
- Operates in the 2.4GHz frequency range.
- Transmission Distance: indoor up to 120m, Outdoor up to 360m, it is limited by an environment.
- Built-in powerful firewall engine, Prevent hacker's attacking and controlling your computer
• Supports IP Filter, URL Filter, Port Filter, and MAC Address Filter
• Supports Time Schedule
• Supports MAC Address and IP Address Binding
• Supports MAC Address CLONE
• Supports Static Route
- Supports WDS
• Supports Dynamic DNS
- Supports UPnP
• Supports Virtual Server
• Supports Special Application
• Supports DMZ host
• Supports VPN Passthrough for IPSec, PPTP and L2TP Protocols
• Supports TCP/IP, PPPoE, DHCP, ICMP, NAT, SNTP, ARP Protocols
• Supports Web-based interface for Remote and Web Management
• Supports firmware upgrade
• Supports Security Logs
1.2 Environments
• Dimensions: 202 (L)X120 (W)X31 (H)mm
- Unit Weight: 324g
• Power Input: 5V DC, 2A
• Consumption: 13.5W(Max)
- Storage Temperature: -40^ C 70^ C
- Operating Temperature: -10^ C 50^ C
• Storage Humidity: 5% \~95% RH Non-condensing
- Operating Humidity: 10% \~90% RH Non-condensing
1.3 Package
- Broadband Router
- Power Adapter
- User manual
1.4 System Requirement
- DSL/Cable Modem
• One 10M or 100M, 10/100M Ethernet Card on PC - TCP/IP network protocol for each PC
- RJ45 Twisted-pair
- Microsoft IE4.0 (or Netscape Navigator 4.0) or later
Chapter 2 Hardware Installation
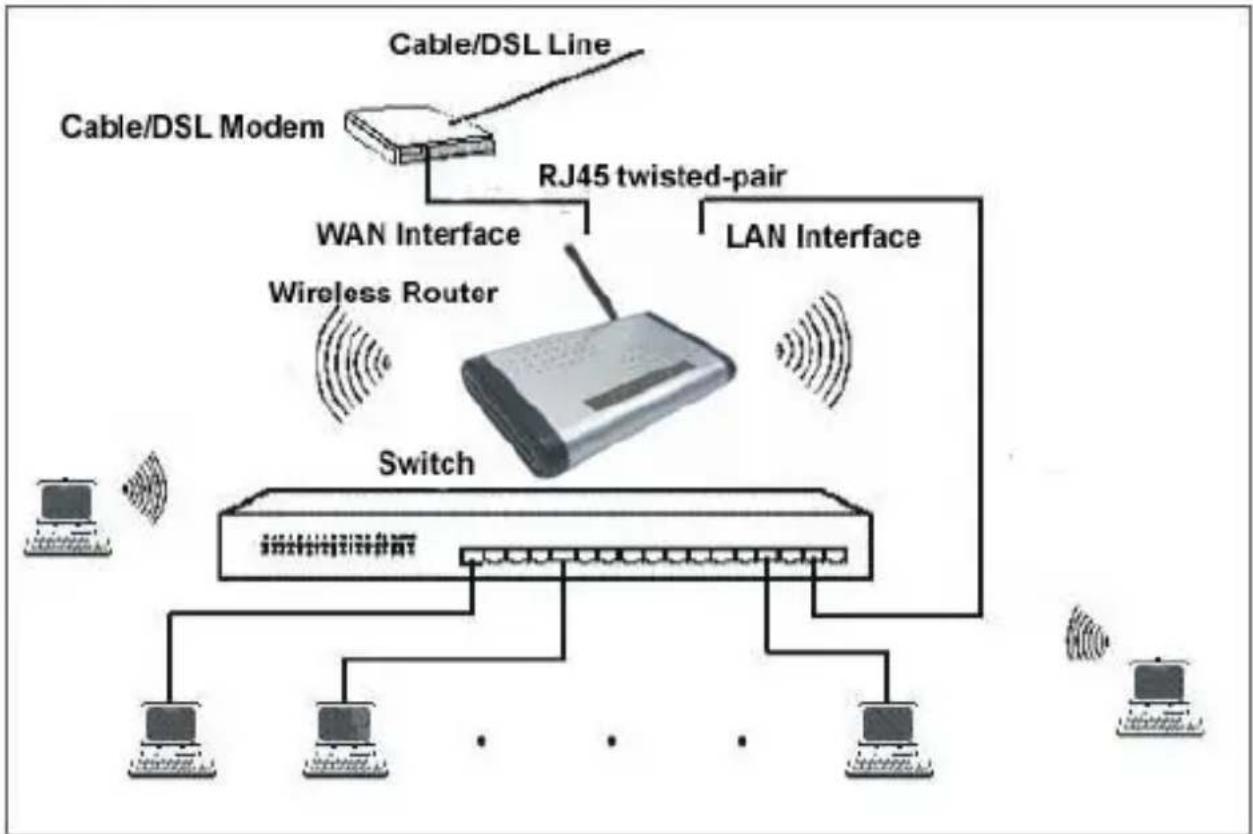
2.1 Typical Installation
Multifunction Broadband Router connection:
flowchart
graph TD
    A["Cable/DSL Line"] --> B["Cable/DSL Modem"]
    B --> C["RJ45 twisted-pair"]
    C --> D["LAN Interface"]
    D --> E["Switch"]
    E --> F["Computer"]
    E --> G["Computer"]
    E --> H["Computer"]
    E --> I["Computer"]
    style A fill:#f9f,stroke:#333
    style B fill:#ccf,stroke:#333
    style C fill:#cfc,stroke:#333
    style D fill:#fcc,stroke:#333
    style E fill:#cff,stroke:#333
    style F fill:#ffc,stroke:#333
    style G fill:#ffc,stroke:#333
    style H fill:#ffc,stroke:#333
    style I fill:#ffc,stroke:#333
1
- Make sure all devices, including your PCs, modem, and Router, are powered down.
3 2. Locate an optimum location for the router. The best place is usually near the center of the area in which your PC(s) will wirelessly connect.
4 3. Adjust the direction of the antenna.
- Using an Ethernet network cable, connect the LAN or Ethernet network port of the cable or DSL modem to the
Router's WAN port.
6 5. Connect the PC(s) and each Swtich/Hub on your LAN to the LAN ports on the router.
7 6. Power on the cable or DSL modem, and power on the PC you wish to use to configure the Router.
87. Connect the included power adapter to the Router. And connect the other end of the adapter to an electrical outlet.
2.2 LED indicators

- POWER (green)
The LED illuminates when the router is powered on.
- RUN (green)
The LED is flickering when the router is working.
- WAN (green)
The Link/Act LED serves two purposes. If the LED is continuously illuminated, the Router is successfully connected to a device through the corresponding port. If the LED is flickering, the Router is actively sending or receiving data over that port.
- LED 1,2,3,4 (green)
The Link/Act LED serves two purposes. If the LED is continuously illuminated, the Router is successfully connected to a device through the corresponding port. If the LED is flickering, the Router is actively sending or receiving data over that port.
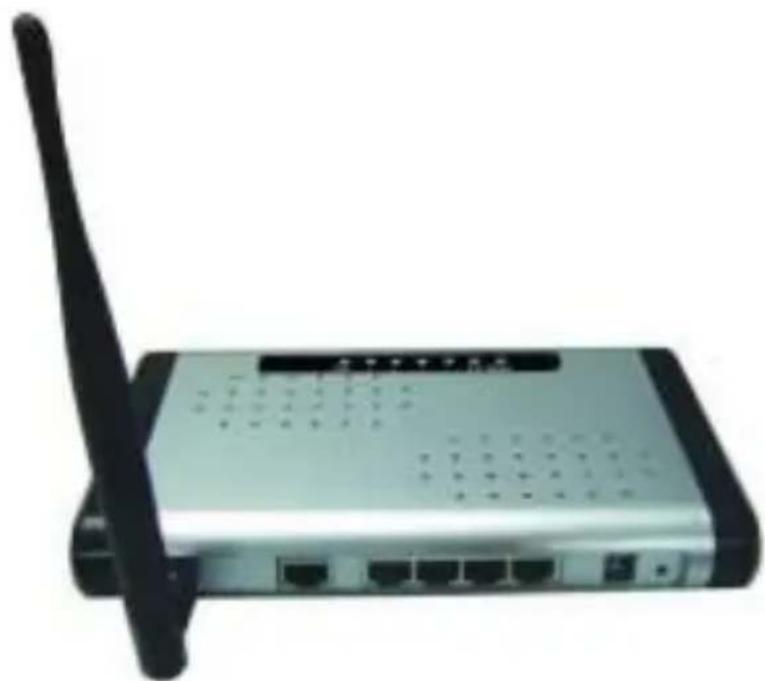
2.3 Back Panel Features
natural_image
Exterior view of a wireless router device with a black antenna and network ports (no visible text or symbols)• LAN (1,2,3,4)
10/100Mbps RJ45 Auto-sensing .
These four LAN ports are where you will connect networked devices, such as PCs, print servers, remote hard drives, and anything else you want to put on your network. if you connect this product with the Hub(or Switchboard) correctly, the Router's corresponding LED and the Hub's(or the Switchboard's) must be illuminates.
- WAN
10/100Mbps RJ45 port.
The WAN port is where you will connect Cable/DSL Modem or other LAN.
- RESET
The Reset Button for clear the Router's data and restore the factory default config.
- 12V DC
Power inlet.
- ANTENNA
One wireless antenna.
Chapter 3 Network Setting and Software Installation
3.1 TCP/IP Configuration
- Click Start button and choose Settings, then click Control Panel.
- Double click Network icon and select Configuration tab in the Network window.
- Click Add button to add network component into your PC.
- Double click Protocol to add TCP/IP protocol.
- Select Microsoft item in the manufactures list. Add choose TCP/IP in the Network Protocols. Click OK button to return to Network window.
- The TCP/IP protocol shall be listed in the Network window. Double click TCP/IP to set the TCP/IP protocol.
- Select Obtain an IP address automatically in the IP Address tab.
- Click OK to complete the install procedure and restart your PC to enable the TCP/IP protocol.
3.2 IP Setting
The following instruction set up the computer running windows 2000/XP.
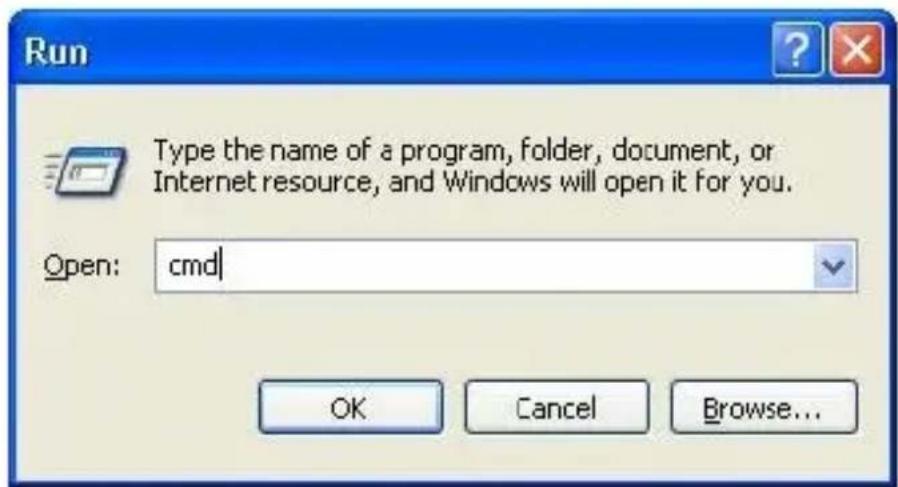
- Click on Start and select Run.
1 2. Type cmd then click OK button.
1 3. From the Command Prompt, enter ipconfig. It will return your IP Address, subnet mask, and default gateway.
![Microsoft Windows 2000 [Version 5.00.2195] (C) Copyright 1985-2000 Microsoft Corp. D:\>ipconfig Windows 2000 IP Configuration Ethernet adapter Local Area Connection: Connection-specific DNS Suffix . : IP Address. . . . . . . . . . . . . : 192.168.16.174 Subnet Mask . . . . . . . . . . . . : 255.255.255.0 Default Gateway . . . . . . . . . . : 192.168.16.1 D:\>](/content/2026/05/987519/images/16ff79cd3feb82f5bc729e745d2e1b7553dd766472a6167f20c960ee4840dde7.jpg)
1 4. Type exit to close the command prompt.
Make sure you take note of your computer's Default Gateway IP Address. The Default Gateway is the IP Address of the Router. By default, it should be 192.168.16.1
3.3 Wizard Setup
You may run Wizard Setup to quickly set up your router.
This product provides Web based configuration scheme, that is,
configuring by Netscape Communicator or Internet Explorer. Take example for Microsoft Internet Explorer.
- Activate your browser, select Tools , point to Internet option ,click connections tab , select never dial a connection. Click LAN Settings button.
![Internet Properties General Security Privacy Content Connections Programs Advanced To set up on Internet connection, disk Setup. Disk-up and Virtual Private Network settings Add... Remove Settings Choose Settings if you need to configure a proxy server for a connection. Never did connection Choose network or network connection Save the option connection Cancel OK Select Output Platform security above the Info Local Area Network [LAN] settings LAN Settings do not apply to disk-up connections. Choose Settings above for disk-up settings. LAN Settings... OK Cancel Apply](/content/2026/05/987519/images/ca0b5be0bebebb8d937efd1ca7bc79c7ce631c649fd76be22ecd20ae38d2ba85.jpg)
1 2. Nothing should be checked. Click OK button.
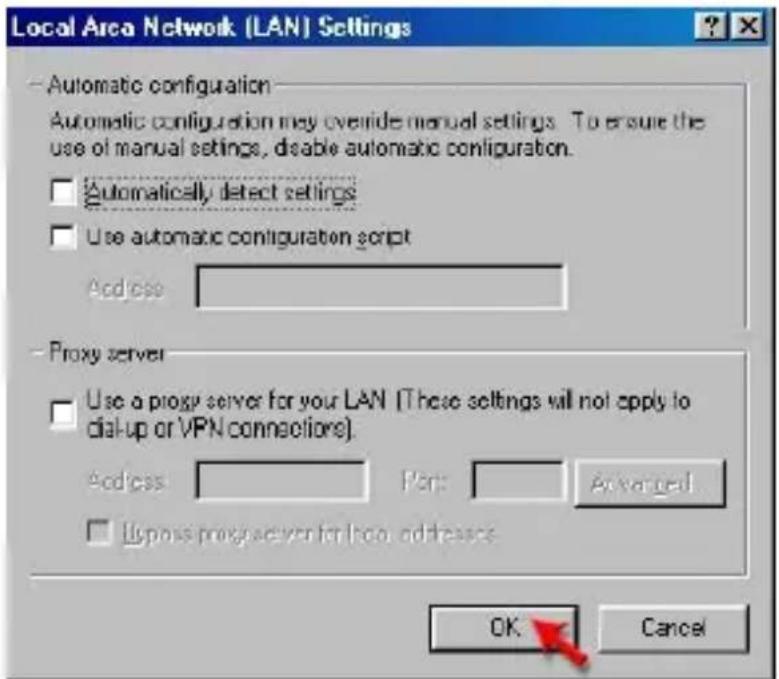
1 3. Click the OK button on the Connections tab, close the dialog box.
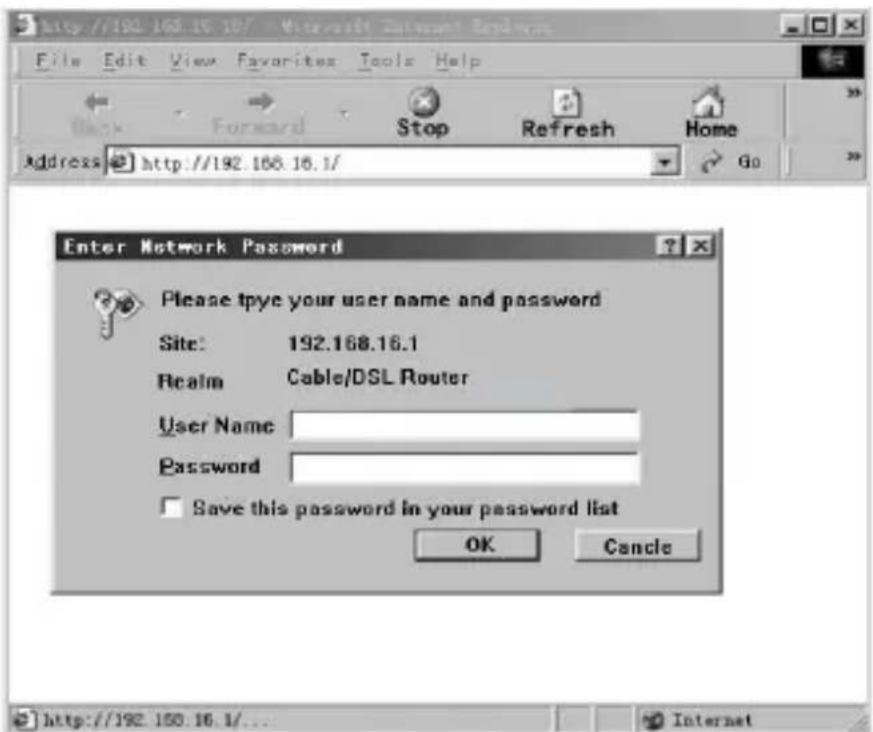
2 4. Type http://192.168.16.1 in your web browser and press Enter, Key in the user name and password (if you use it first, you can type the factory default setting .User name is admin and password is admin), click on the OK button.
- The Router's Web-based Utility will appear, Click Setup.
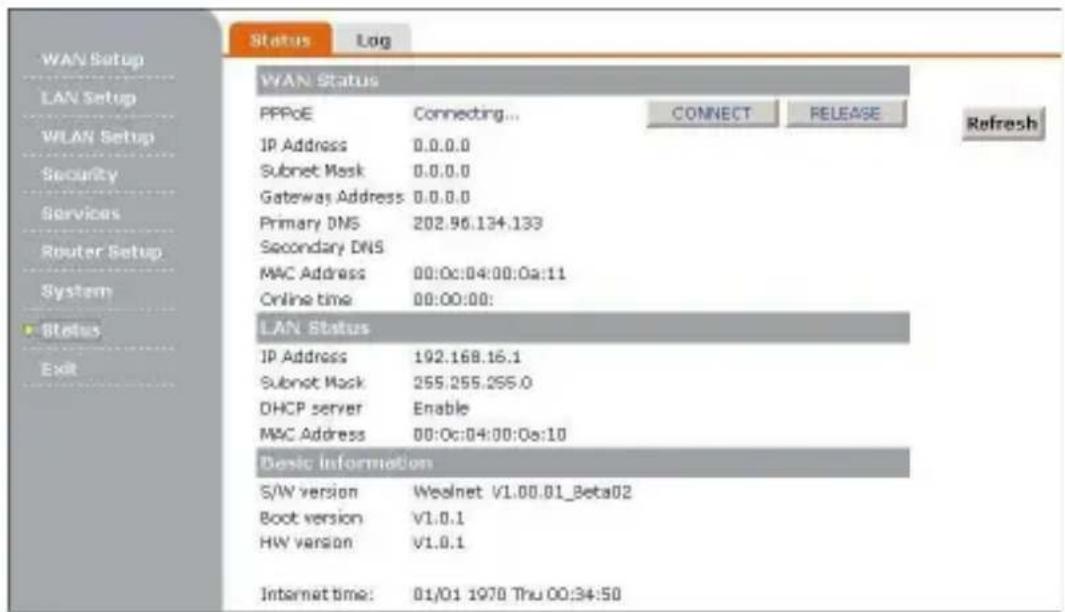
- Click WAN Setup to setting the parameters (Please referent below
3.5)
3.4 Status
This option provides the current status of the device.
3.4.1 Status
You can use the Status screen to see the connection status for the router's WAN/LAN interfaces, firmware version numbers.
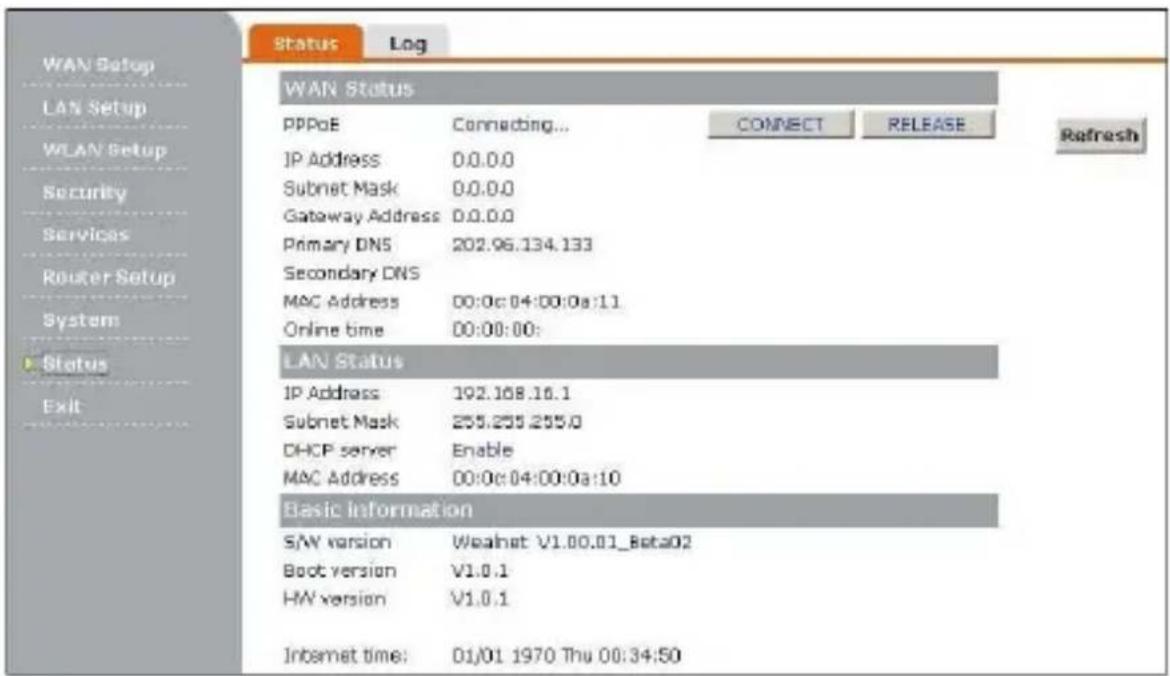
3.4.2 System Log
System log displays any illegal attempts to access your network
![WAN Setup LAN Setup WLAU Setup Security Services POLDER Setup System Status Exit Log Information [1970-01-01 00:00:01: System initialization complets, version: F..01.1_Beta01] [1970-01-01 00:00:01: Restart all services! [1970-01-01 00:00:02: WD has started, not-3] [1970-01-01 00:00:02: DHCP service reg started! [1970-01-01 00:00:04: T,y to ge, system size! [1970-01-01 00:00:02: DEF Raley has started! [1970-01-01 00:00:03: Enable IF/HAL BIND DICTION! [1970-01-01 00:00:02: To loop from ARP proof enabled! [1970-01-01 00:00:03: WAB wodes dynamic 7PI! [1970-01-01 00:19:45: Clean all firewall rule and net table! [1970-01-01 00:19:46: System nodes gateway! [1970-01-01 00:19:48: Firewall SFI start! [1970-01-01 00:15:48: Festival to ping from assets host! [1970-01-01 00:19:53: Clean all firewall rule and net table! [1970-01-01 00:19:53: System home: gateway! [1970-01-01 00:19:54: Firewall SFI start! [1970-01-01 00:19:53: Festival to ping from assets host! [1970-01-01 00:19:53: Clean all firewall rule and net table! [1970-01-01 00:26:23: System node: gateway! [1970-01-01 00:26:23: Firewall SFI start! Internet time: 01/01 1970 Thu 26:35:37](/content/2026/05/987519/images/d9461769788a1f3d357d596f4bc0d586e0a7b9bd13a281f82beeba7f3d8e1568.jpg)
3.5 WAN Setup
The Router provides three connection Mode: Static IP Address, Dynamical IP address, and PPPoE. Specify the WAN connection Mode required by your Internet Service Provider, then click OK Button to provide detailed configuration parameters for the selected connection Mode. Proceed to the instructions for the connection type you are using.
3.5.1 Dynamic
Most Broadband ISPs assign their clients with a different IP address each time they log on. If this is the case with your ISPs, Select DHCP.
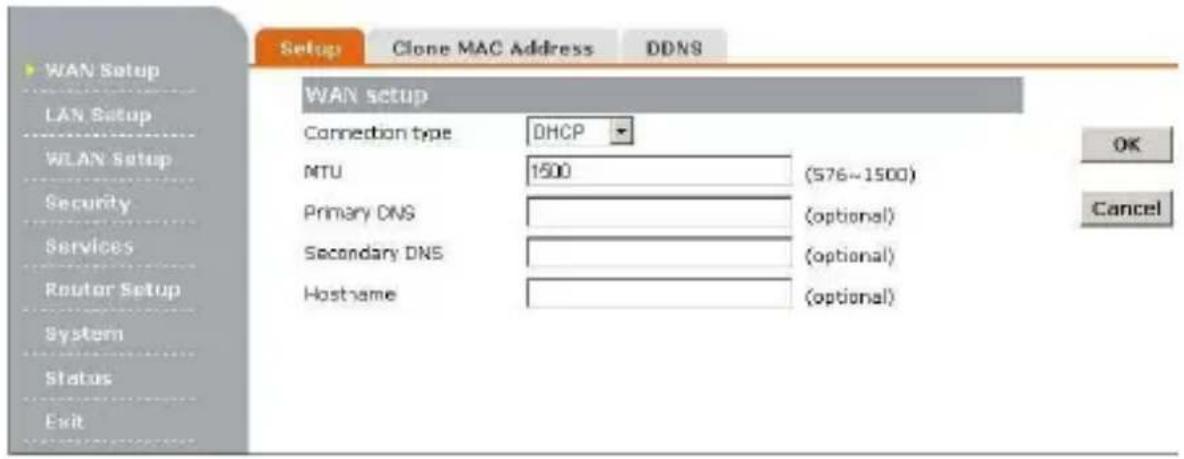
MTU: Maximum Transmission Unit-you may need to change the MTU for optimal performance with your specific ISP. 1500 is the default MTU
Primary DNS : Enter Primary DNS IP address assigned by your ISP, this is optional.
Secondary DNS: Enter the Secondary DNS IP address assigned by your ISP, this is optional.
HostName: The Host Name is optional but may be required by some ISPs.
3.5.2 Static
If your ISP assigns you a fixed IP address, select Static IP.
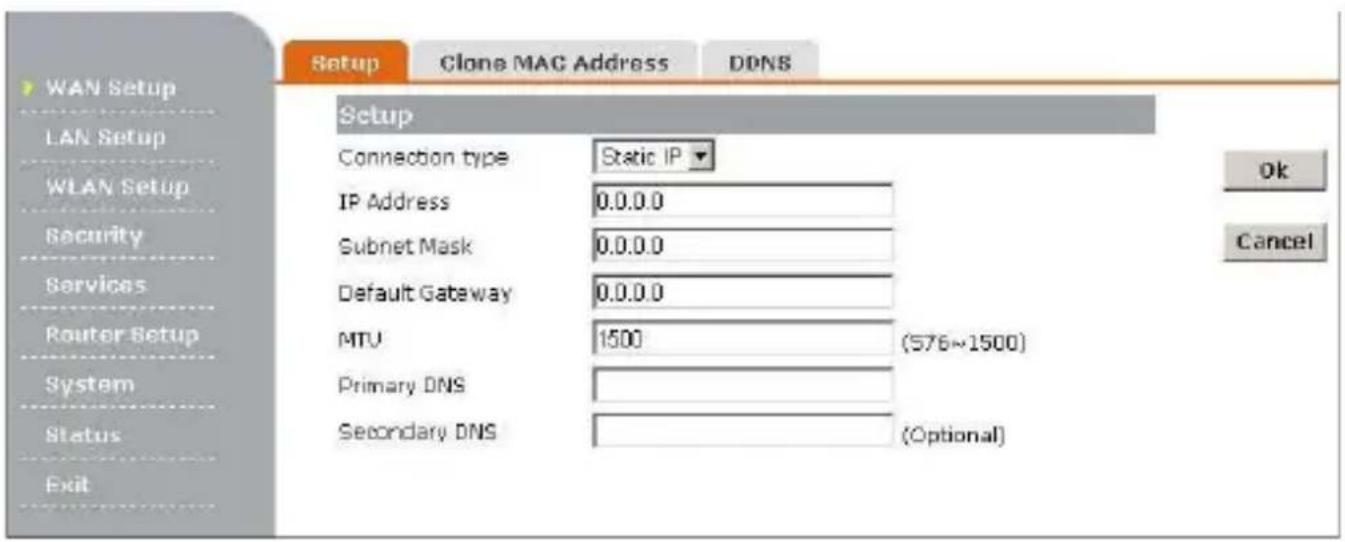
IP Address: Enter the IP address assigned by your ISP.
Subnet Mask: Enter the Subnet Mask assigned by your ISP.
Default Gateway: Enter the Gateway assigned by your ISP.
MTU: Maximum Transmission Unit-you may need to change the MTU for optimal performance with your specific ISP. 1500 is the default MTU
Primary DNS : Enter the Primary Server IP address assigned by your
ISP.
Secondary DNS: Enter the Secondary DNS IP address assigned by your ISP, this is optional.
3.5.3 PPPoE
If you are connected to the Internet through a DSL line, check with your ISP to see if they use PPPoE. If they do, select PPPoE
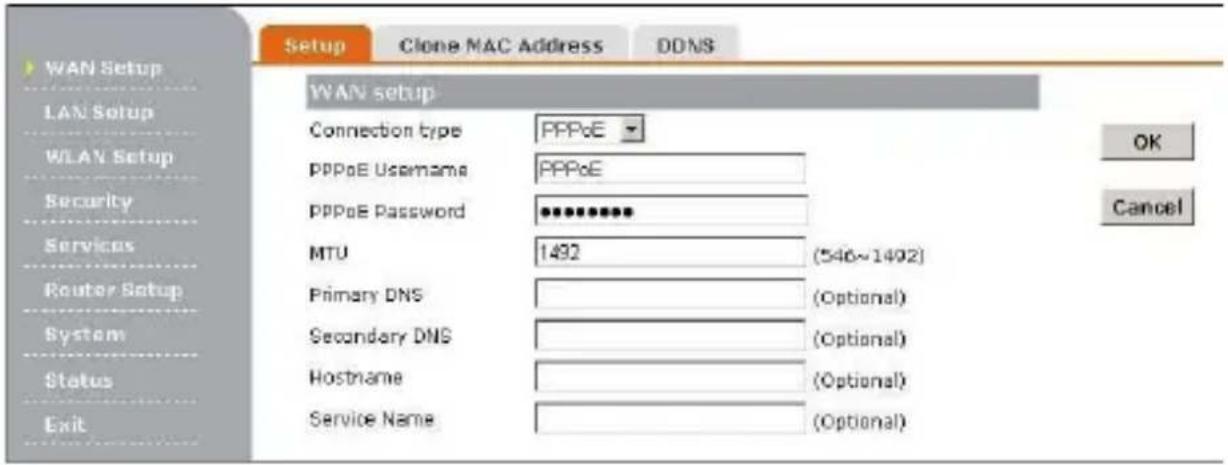
PPPoE Username: Enter your PPPoE user name.
PPPoE Password: Enter your PPPoE password.
MTU: Maximum Transmission Unit-you may need to change the MTU for optimal performance with your specific ISP. 1492 is the default MTU
Primary DNS : Enter Primary DNS IP address assigned by your ISP, this is optional.
Secondary DNS: Enter the Secondary DNS IP address assigned by your ISP, this is optional.
HostName: The Host Name is optional but may be required by some ISPs. Service Name: The Service Name is optional but may be required by some ISPs.
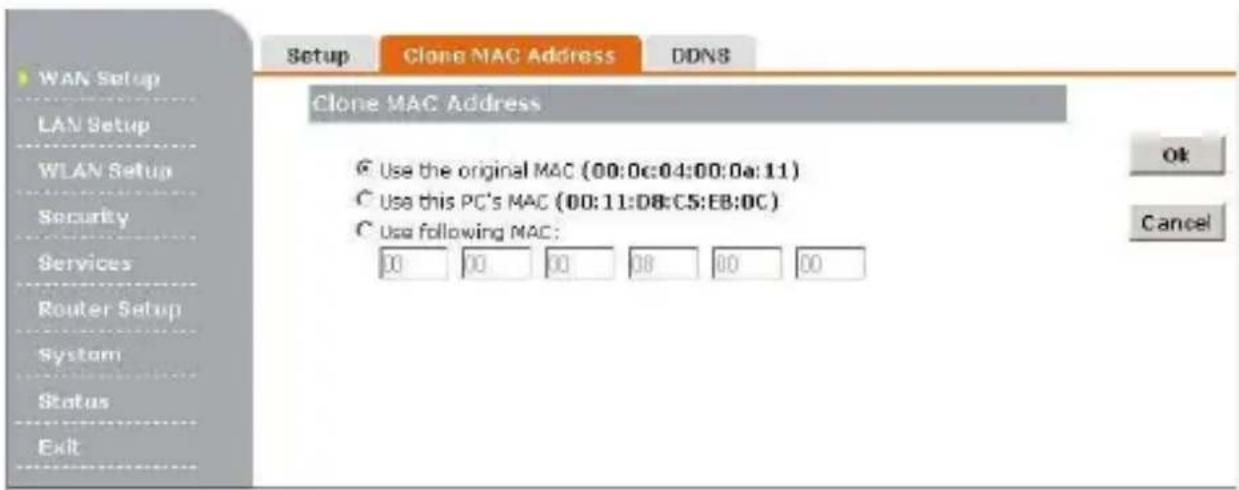
3.5.6 Clone MAC Address
The default MAC address is set to the WAN's physical interface MAC address on the Router. It is not recommended that you change the default MAC address unless required by your ISP.
3.5.8 DDNS
The Router offers a DDNS feature. DDNS lets you assign a fixed host and domain name to a dynamic Internet IP address. It is useful when you are hosting your own website, FTP server, or other server behind the Router.
Before you can use this feature, you need to sign up for DDNS service at DDNS service provider, dyndns.org, tzo.org or 3322.org.
IF you do not want to use this feature, keep the default setting, Disable.
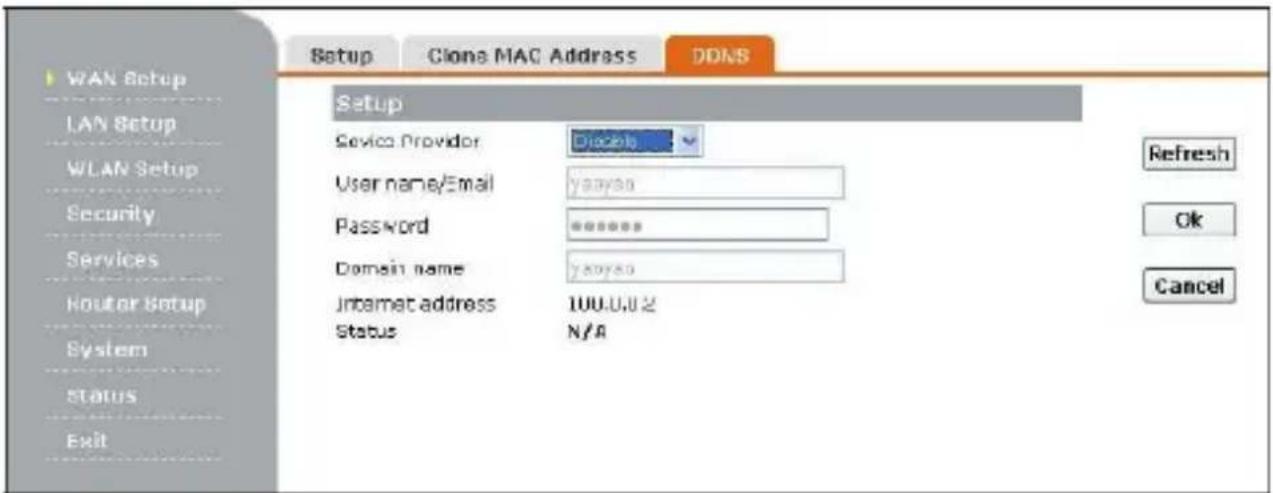
- Select the DDNS Service Provider from the down-list frame.
1 2. Enter Name, Password, and Domain name.
2 . Click OK button to save it.
3.6 LAN Setup
3.6.1 LAN Setting
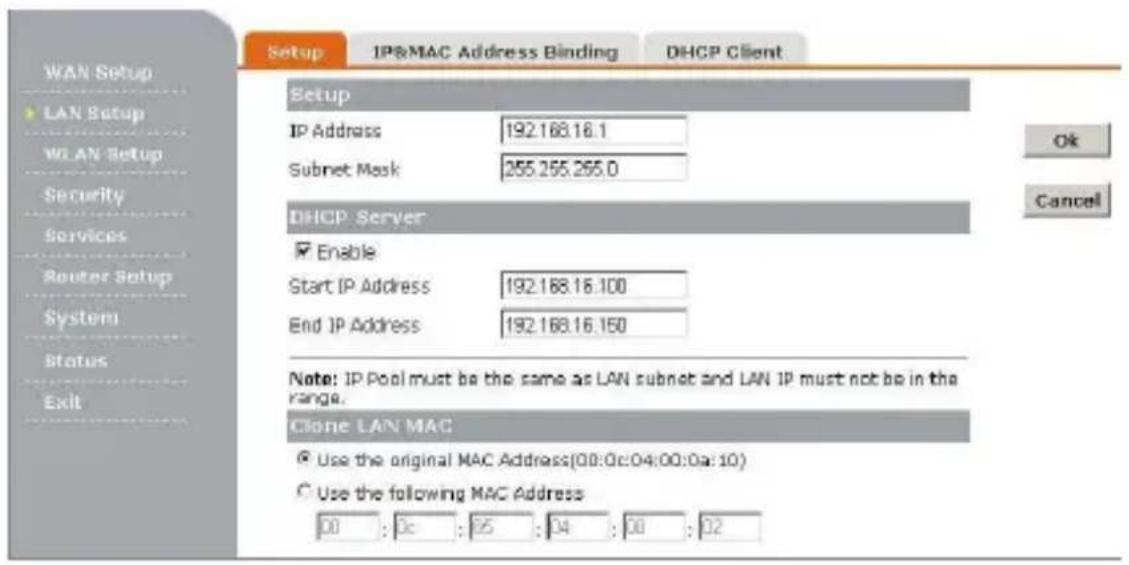
IP Address and Subnet Mask: The value refer to your internal network settings. Unless you have specific internal needs, these should be no reason to change the value.
DHCP Server: The settings of TCP/IP environment include Host IP, Subnet Mask, Gateway, and DNS configurations. It is not a simple task to correctly configure all the computers in your LAN environment. Fortunately, DHCP provides a rather simple approach to handle all these settings. This product supports the function of DHCP server. If you enable this product's DHCP server and configure you computers
as automatic IP allocation mode, when your computer is powered on, it will automatically load the proper TCP/IP settings from this product.
Starting IP Address: Enter a value for the DHCP server to start with when issuing IP addresses. This value must be 192.168.16.2 or greater, because the default IP address for the Router is 192.168.16.1.
End IP Address: Enter a value for the DHCP server to end with when issuing IP addresses. This value must be greater the IP pool Starting Address.
Clone LAN MAC: The default MAC address is set to the LAN's physical interface MAC address on the Router. If you need to change the LAN's MAC address, you can use this option.
3.6.2 IP&MAC Address Binding
The Router provides IP&MAC Address Binding. The computer that has the same MAC in the list will obtain a specific IP address.
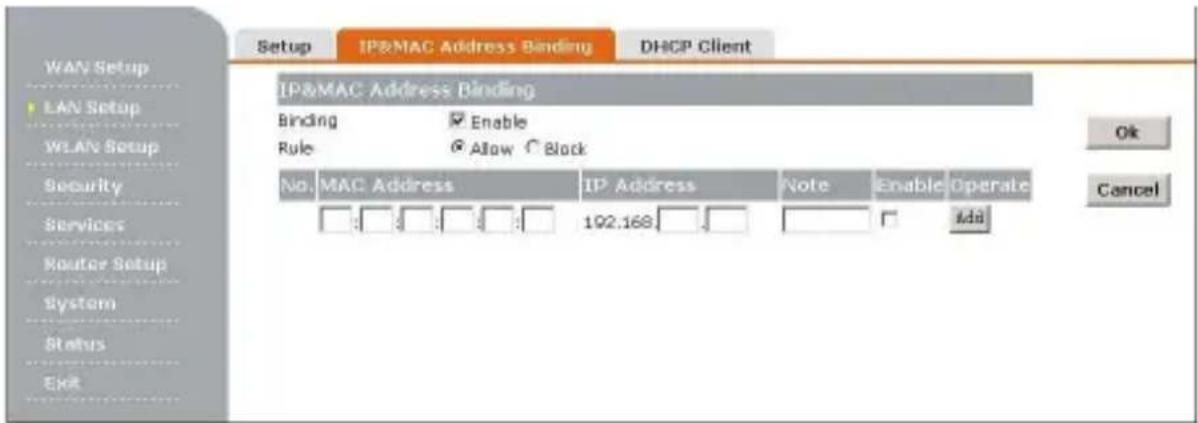
Enable: Click Enable checkbox, the IP&MAC address Binding will enabled.
Allow: When you select Allow, the router will allow all LAN PC to access the Internet. And the computer that has the same MAC in the list will obtain a specific IP address.
Block: When you select Block, the router will only allow the computer that has the same MAC and IP Address in the list to access the Internet.
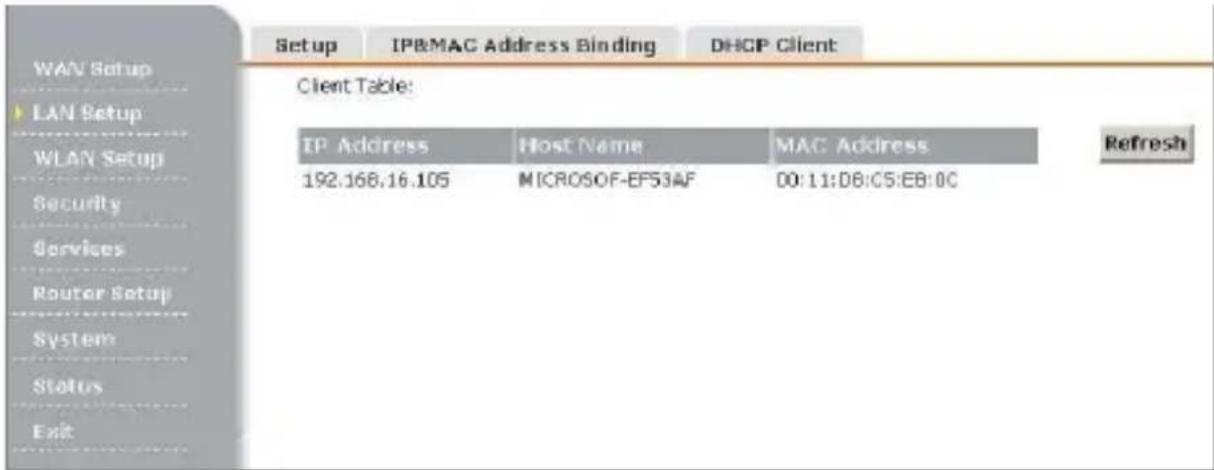
3.6.3 DHCP Clients
The Table lists the information about the hosts which have obtain an IP address from this route's DHCP server.
3.7 WLAN Setup
Wireless Access Point builds a wireless LAN and can let all PCs equipped with IEEE802.11g and 802.11b wireless network adaptor connect to your Intranet.
1 3.7.1 Basic Settings
The basic settings for the wireless network are set on this page. You can set parameters that are used for the wireless stations to connect to this router.
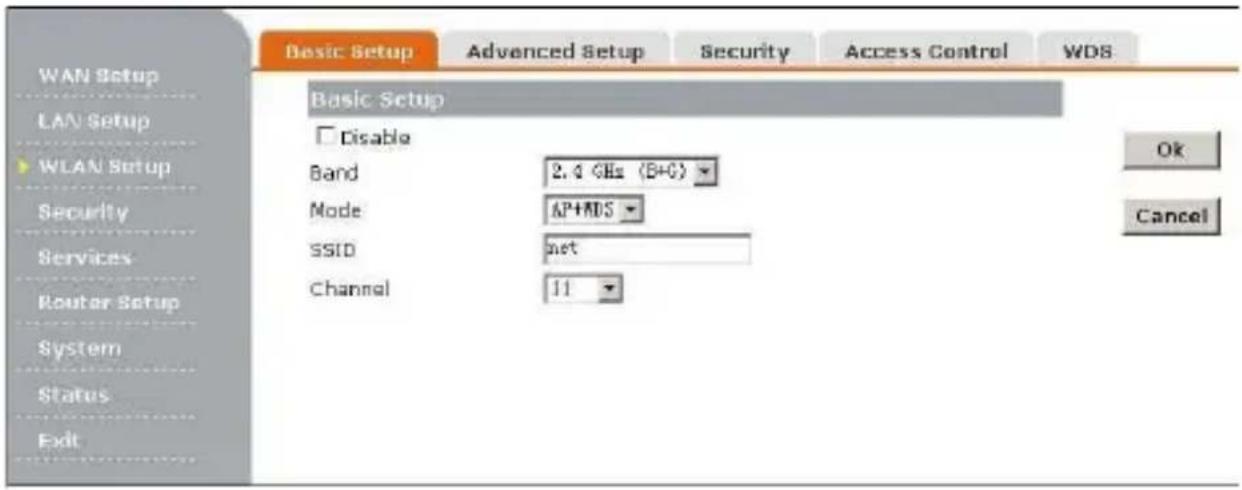
Band: The options are 2.4GHz(B+G), 2.4GHz(B), and 2.4GHz(G).
Select the desired wireless Band.
2.4 GHz(B+G)- Both 802.11g and 802.11b wireless stations can connect to the router.
2.4 GHz( B)- Only 802.11b wireless stations can connect to the router.
2.4 GHz( G)- Only 802.11g wireless stations can connect to the router.
Mode: The options are AP, WDS, and AP+WDS, Select the desired wireless Mode.
SSID: An SSID is the name of a wireless local area network (WLAN).
All wireless devices on a WLAN must employ the same SSID in order
to communicate with each other. SSIDs are case sensitive text strings. The SSID is a sequence of alphanumeric characters (letters or numbers). SSIDs have a maximum length of 32 characters. The default SSID is wealnet, but it is recommended strongly that you change your network name (SSID) to a different value.
Channel: This field determines which operating frequency will be used. It is not necessary to change the wireless channel unless you notice interference problems with another nearby access point. All devices in the same wireless LAN should use the same channel.
3.7.2 Advanced Setup
These settings are only for more technically advanced users who have a sufficient knowledge about wireless LAN. These settings should not be changed unless you know what effect the changes will have on your Access Point.
![WAN Setup LAN Setup WLAN Setup Security Services Router Setup System Status ExR Basic Setup Advanced Setup Security Access Control WDS Advanced Setup Authentication Type Open System Shared Key Auto Fragment Threshold 2346 (298-2346) RTS Threshold 2347 (0-2347) Beacon Interval 100 (20-1024 ms) Data Rate Auto Preamble Type Long Preamble Short Preamble Broadcast SSID Enabled Disabled [APP] Enabled Disabled 802.11g Protection Enabled Disabled RF Output Power 100% 50% 25% 10% 5% Note: "Always" may have compatibility issue. "Auto" will only work with Realtek product.](/content/2026/05/987519/images/eee6c1ae367ea6db3e33e6e2ebd4eb92a3db72d3137ddb7995493dff9f020dc5.jpg)
Authentication Type: You can select one of the following authentication types:
Open System: Select 802.11 Open System authentication
Shared Key: Select 802.11 Shared Key authentication
Auto: Select Shared key or Open System authentication type automatically based on the wireless station request.
Fragment Threshold: The fragmentation threshold is a way of limiting the size of packets (frames) transmitted over the network. If a packet exceeds the fragmentation threshold set here, the fragmentation function will be activated and the packet will be sent as multiple 802.11 frames. The default is 2346.
RTS Threshold: The RTS threshold specifies the packet size of a request to send (RTS) transmission. This helps control traffic flow through the access point, especially one with a lot of clients. The default is 2347.
Beacon Interval: Beacon frames are transmitted by an access point at regular intervals to announce the existence of the wireless network. The default behavior is to send a beacon frame once every 100 milliseconds (or 10 per second).
Date Rate: indicate rates that the access point will advertise to the
network for the purposes of setting up communication with other APs and client stations on the network. It is generally more efficient to have an AP broadcast a subset of its supported rate sets.
Preamble Type: It defines the length of CRC block in the frames during the wireless Communication. "Short Preamble" is suitable for heavy traffic wireless network. "Long Preamble" provides much communication reliability.
SSID Broadcast: The router automatically transmit their network name (SSID) into open air at regular intervals (every few seconds). This feature of the Routernet is intended to allow clients to dynamically discover and roam between WLANs. However, this feature also makes it easier for hackers to break into your home network. Because SSIDs are not encrypted or otherwise scrambled, it becomes easy to grab one by snooping the WLAN looking for SSID broadcast messages coming from the router or AP. Knowing your SSID brings hackers one step closer to a successful intrusion. So you should disable this feature to improve the security of your WLAN. Once your wireless clients are manually configured with the right SSID, they no longer require these broadcast messages.
IAPP: Inter-Access Point Protocol (IAPP) is being standardized by
IEEE 802.11F as well as the IETF SEAMOBY WG. IAPP enables seamless, authenticated fast handoff between 802.11 Access Points.
RF Output Power: There are five options: 100%, 50%, 25%, 10%, 5%
1 3.7.3 Security
The wireless station will be able to connect the router without encryption. It is recommended strongly that you choose this optional to encrypt your wireless network. The Security Mode are None, Wep, and WPA/WPA2/Mixed. You have to setup the same security parameters both on your router and wireless client devices.
![WAN Setup LAN Setup WLAN Setup Security Services Router Setup System Status Exit Basic Setup Advanced Setup Security Access Control WDS Security Setup Encryption Methoded None Authentication Use 802.1x(RADIUS) RADIUS Server Port [812] IP Address Password Ok Cancel](/content/2026/05/987519/images/24810ddeeefb2f5eb7fd9631fe483f433635bf15375b0dc9f058f9c082f753fc.jpg)
Security Setup
Encryption Method: you can select None, WEP,
WPA/WPA2/Mixed.
Authentication: Remote Authentication Dial-In User Service (RADIUS) is a client/server protocol and software that enables remote access servers to communicate with a central server to authenticate dial-in users and authorize their access to the requested system or service. Click the checkbox to Use 802.1x.
Radius Server
Port: Enter the port that Radius Server used, the default value is 1812.
IP Address: Enter the IP Address of Radius Server.
Password: Set encryption keys. Commonly used in Wi-Fi Protected Access and WEP.
3.7.3.1 WEP
WEP is a protocol that adds security to wireless local area networks (WLANs) based on the 802.11b standard. WEP was designed to give wireless networks the equivalent level of privacy protection as a comparable wired network.
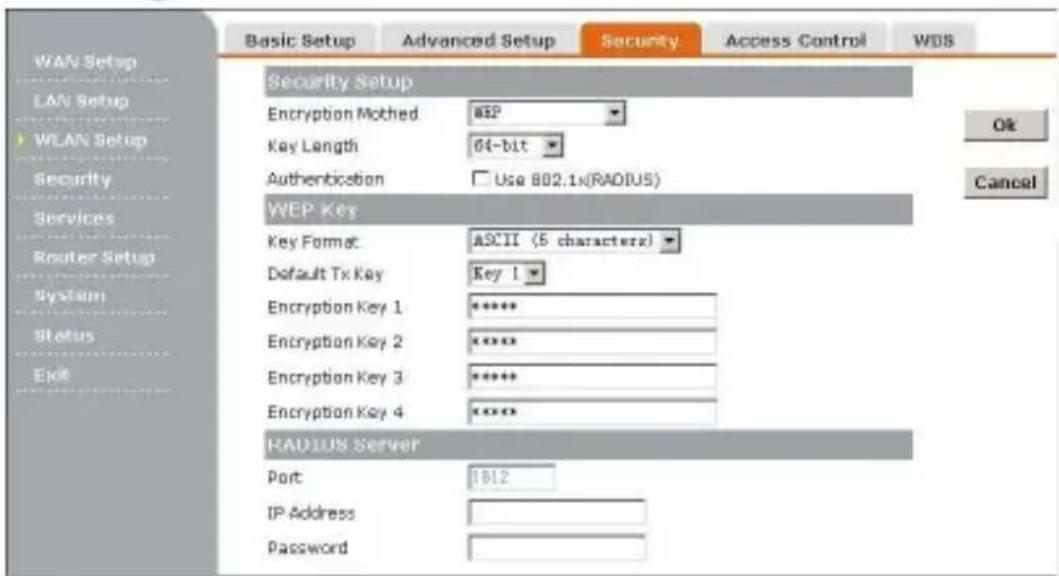
Key Length: Select 64 bits 10 hex digits or 128 bits 26 hex digits to encrypt data.
Key Format: You may select to select ASCII Characters or Hexadecimal Digits (in the "A-F", "a-f" and "0-9" range) to be the WEP Key.
Default Tx Key: Select one of the four keys to encrypt your data. Only the key you select it in the Default Tx Key will take effect.
KEY1\~KEY4: The WEP keys are used to encrypt data transmitted in the wireless network. For 64 bits 10 hex digits, you can enter 10 hexadecimal digits(any combination of 0-9, a-f, A-F). For 128 bits 26 hex digits, you can enter 26 hexadecimal digits(any combination of 0-9, a-f, A-F).
3.7.3.2 WPA/WPA2/Mixed
WPA/WPA2-PSK provides significantly stronger wireless data encryption than WEP.
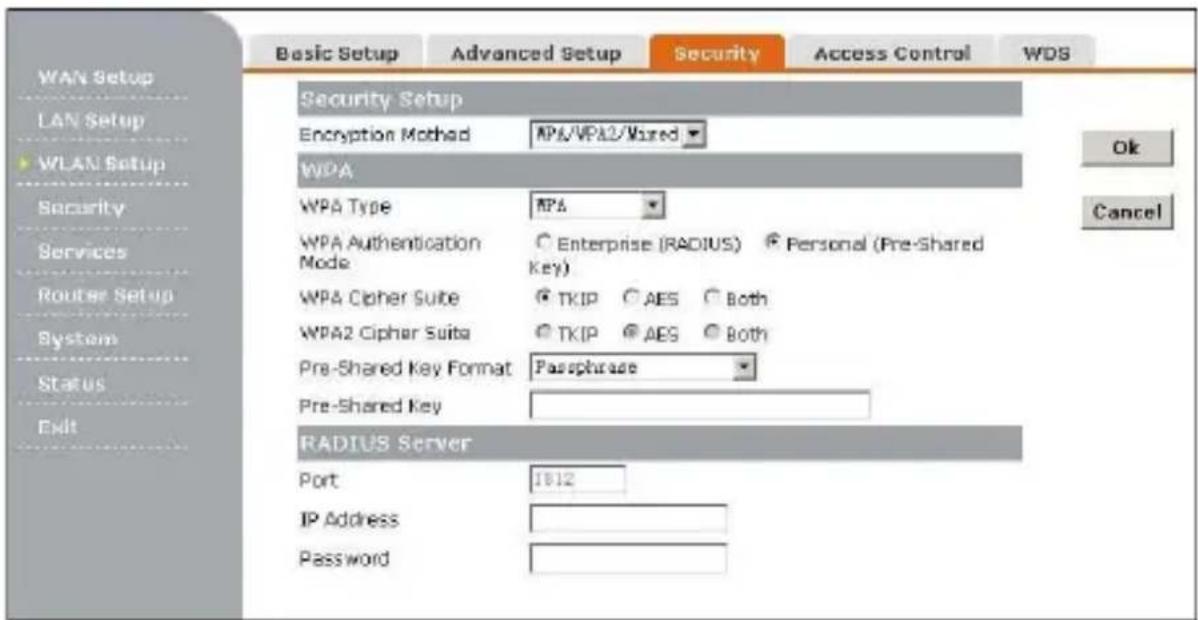
WPA Type: Enter the P Address of Radius Server.
WPA Authentication Mode: Keys can be managed using two different mechanisms. WPA can either use an external authentication server (e.g., RADIUS) and EAP just like IEEE 802.1X is using or pre-shared keys without need for additional servers. Wi-Fi calls these "WPA-Enterprise" and "WPA-Personal", respectively. Both mechanisms will generate a master session key for the Authenticator (AP) and Supplicant (client station).
WPA Cipher Suite: You can select either TKIP, AES or Both as
Encryption.
WPA2 Cipher Suite: You can select either TKIP, AES or Both as Encryption.
Pre-Shared Key Format: You can select PASSPHRASE or HEX(64 CHARACTERS).
Pre-Shared Key: Pre-shared key(PSK) is a method to set encryption keys. Commonly used in Wi-Fi Protected Access and WEP.
1 3.7.4 Access Control
The Wireless MAC Address Filtering feature allows you to control wireless stations accessing the router, which depend on the station's MAC addresses.
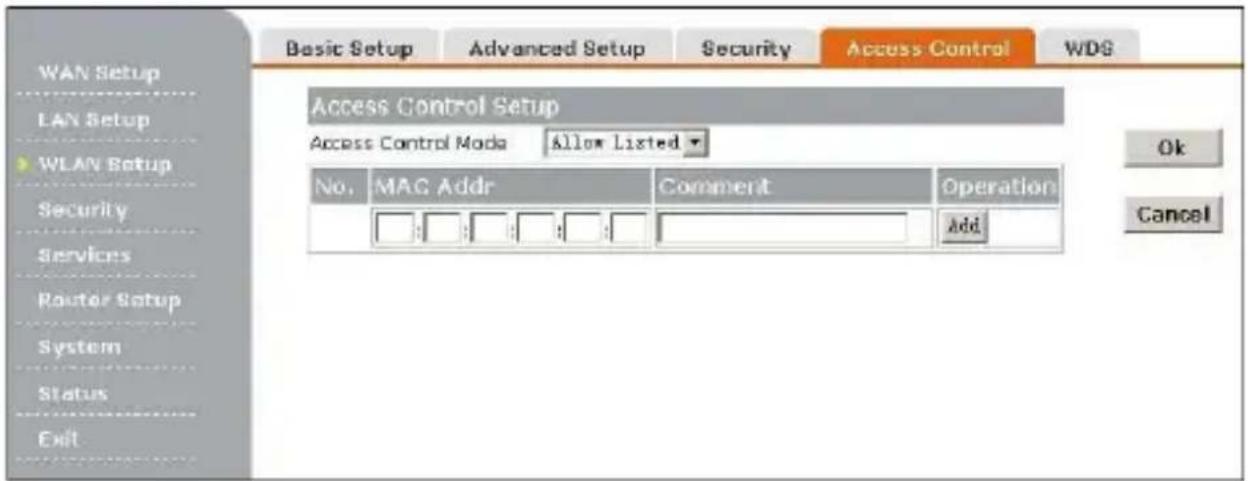
Access Control Mode: If you choose 'Allowed Listed', only those
clients whose wireless MAC addresses are in the access control list will be able to connect to your Access Point. When 'Deny Listed' is selected, these wireless clients on the list will not be able to connect the Access Point.
1 3.7.5 WDS
Wireless Distribution System uses wireless media to communicate with other APs, like the Ethernet does. To do this, you must set these APs in the same channel and set MAC address of other APs which you want to communicate with in the table and then enable the WDS
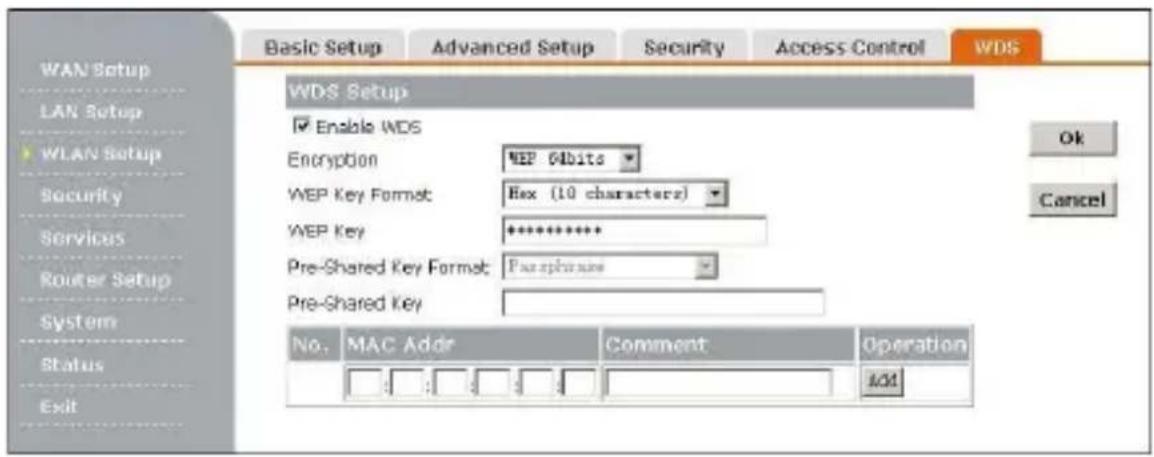
Encryption: You may select WEP 64bits, WEP 128bits, WPA (TKIP), WPA (AES).
WEP Key Format: You may select to select ASCII Characters or Hexadecimal Digits (in the "A-F", "a-f" and "0-9" range) to be the WEP Key.
WEP Key: Set key to encrypt your data
Pre-Shared Key Format: You can select PASSPHRASE or HEX(64 CHARACTERS).
Pre-Shared Key: Pre-shared key(PSK) is a method to set encryption keys. Commonly used in Wi-Fi Protected Access and WEP.
3.8 Security
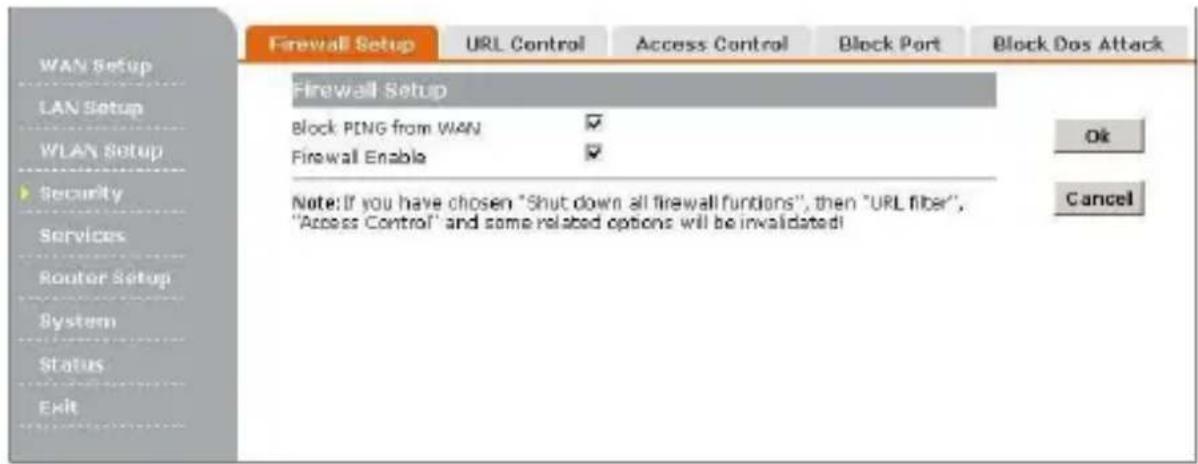
3.8.1 Firewall
The router provides extensive firewall protection by restricting connection parameters to limit the risk of intrusion and defending against a wide array of common hacker attacks. However, for applications that require unrestricted access to the Internet, you can configure a specific client/server as a demilitarized zone (DMZ).
3.8.2 URL Control
To configure the URL Filtering feature, use the table as flow to specify the web sites (www.somesite.com) or web URLs containing the keyword you want to filter on your network.
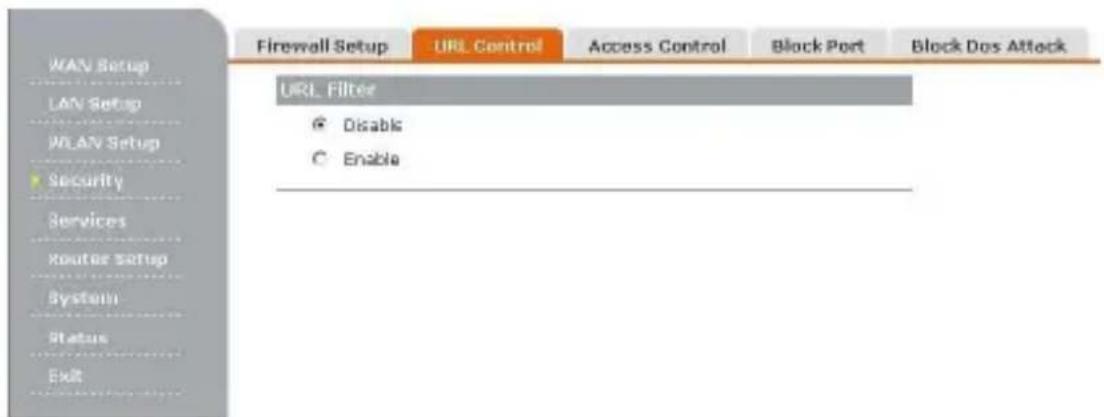
- Click Enable button, the URL Filter Table will change, then click Add button. The dialog box will appear as follow.
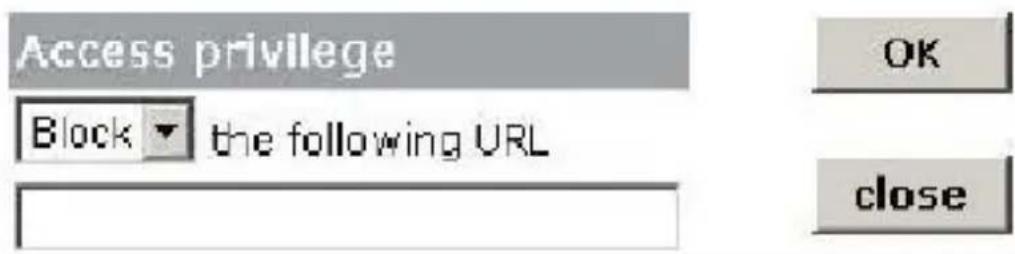
1 2. Select Block or Allow the URL.
2 3. Type the Web sites.
3 4. Click OK button. The text to be blocked will appear in the URL Filter Table.
3.8.2 Access Control
You can filter Internet access for local clients based on IP addresses, application types, (i.e., HTTP port), and time of day.
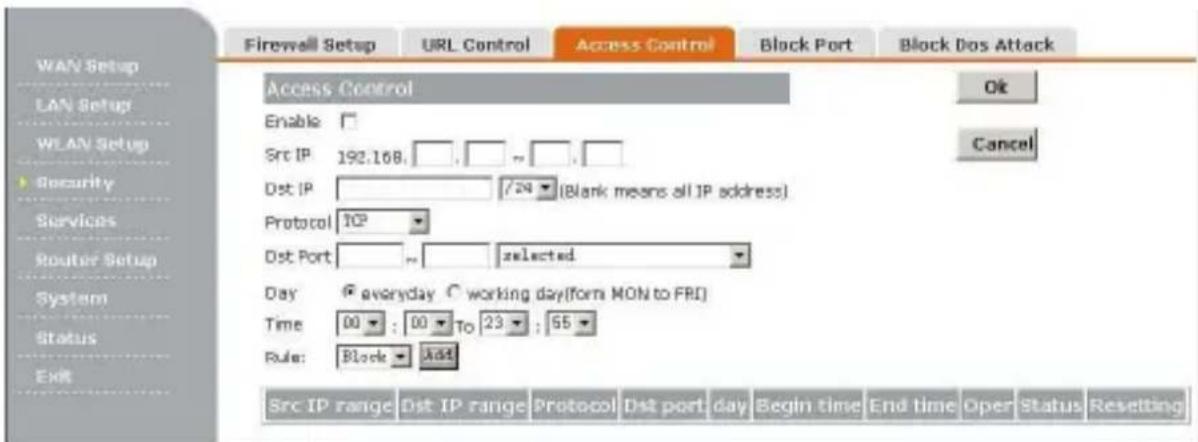
Enble: If this function is enabled, the list will be allowed or blocked
access to the Internet.
Src IP: The IP address of the LAN computer that will be control to the Internet.
Dst IP: The IP address of the Internet that will be control.
Protocol: Select the protocol type, there are five options: TCP, UDP, TCP/UDP, IGMP, ALL.
Dst Port: The single port or port range that will be control to the Internet.
Rule: There are two options, Block and Allow option. If you select Block, the Router will block the list to access the Internet. If you select Allow, the Router will allow the list to access the Internet.
Click Add button to add the list to the table.
When finished making your change on this tab, click the Ok button to save this changes, or click the Cancel button to undo your changes.
3.8.3 Block Port
This page is used to filter or block ports form Internet access by Port Range
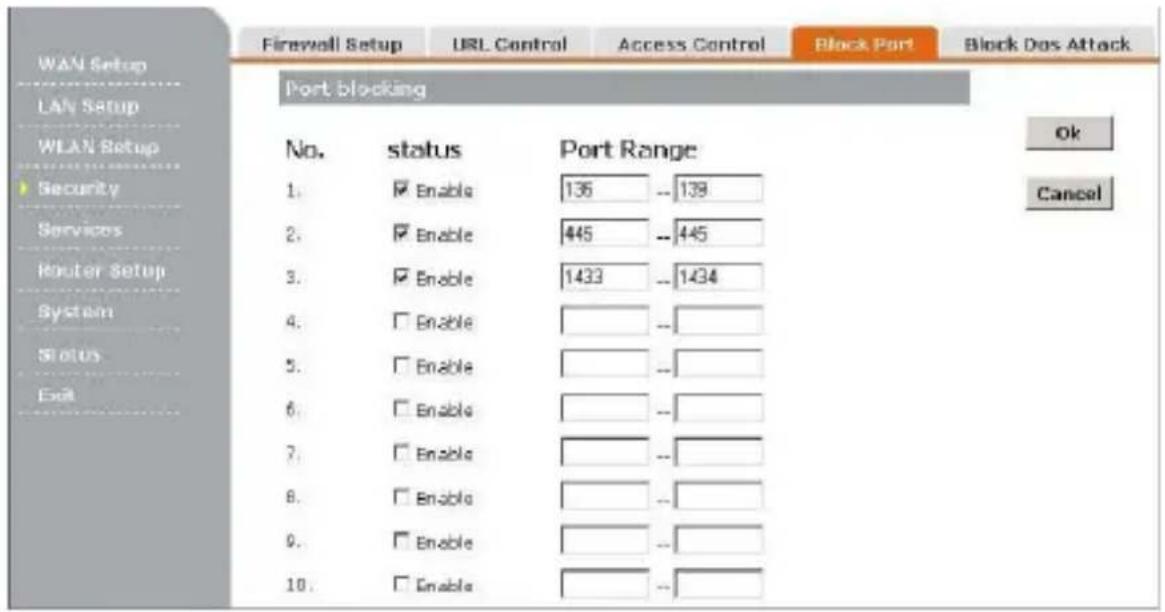
1 1. Enter the port numbers you want to filter in the Port Range fields.
- Click Enable checkbox for each filter you want the Gateway to use.
- When finished making your change on this tab, click the Ok button to save this changes, or click the Cancel button to undo your changes.
3.8.4 Block Dos Attack
This page used to Block Dos attack.
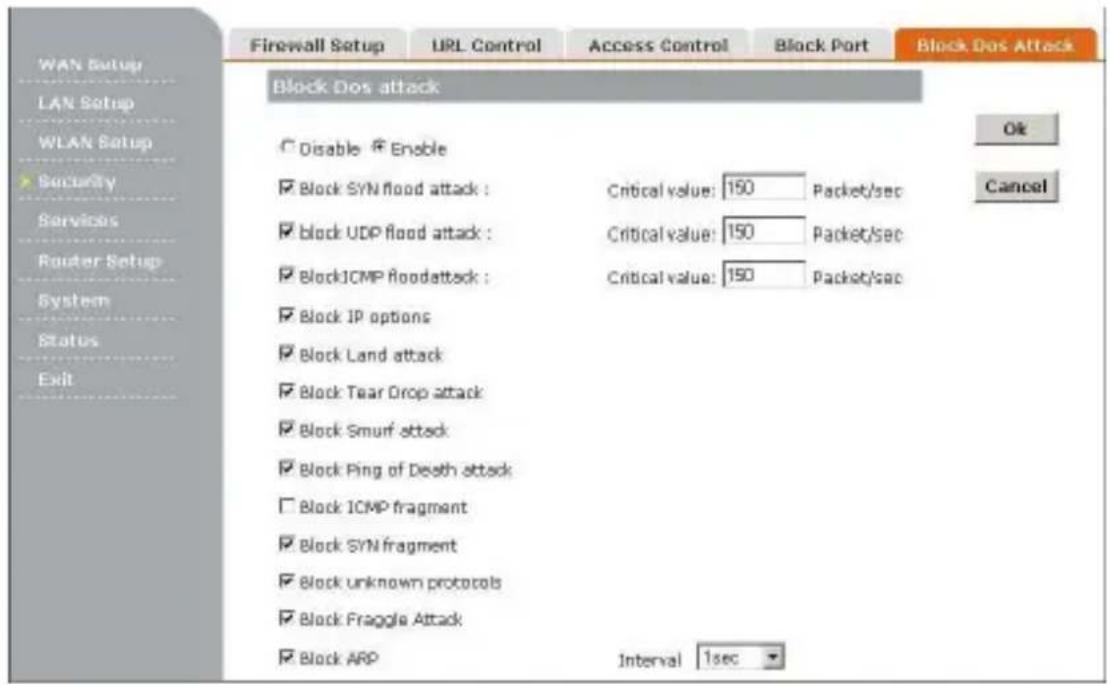
1 1. Click each Block attack checkbox for each filter you want the Gateway to use.
- Select Enable button to Block Dos Attack.
- When finished making your change on this tab, click the Ok button to save this changes, or click the Cancel button to undo your changes.
3.9 Services
3.9.1 Virtual Server
If you configure the router as Virtual Server, remote users accessing services such as Web or FTP at your local site via public IP addresses can be automatically redirected to local servers configured with private IP address. In other words, depending on the requested service (TCP/UDP port number), the router redirects the external service request to the appropriate server.
Before using Virtual Server, you should add a static IP address to the designated PC.
The following will allow you to open a single port or a range of ports.
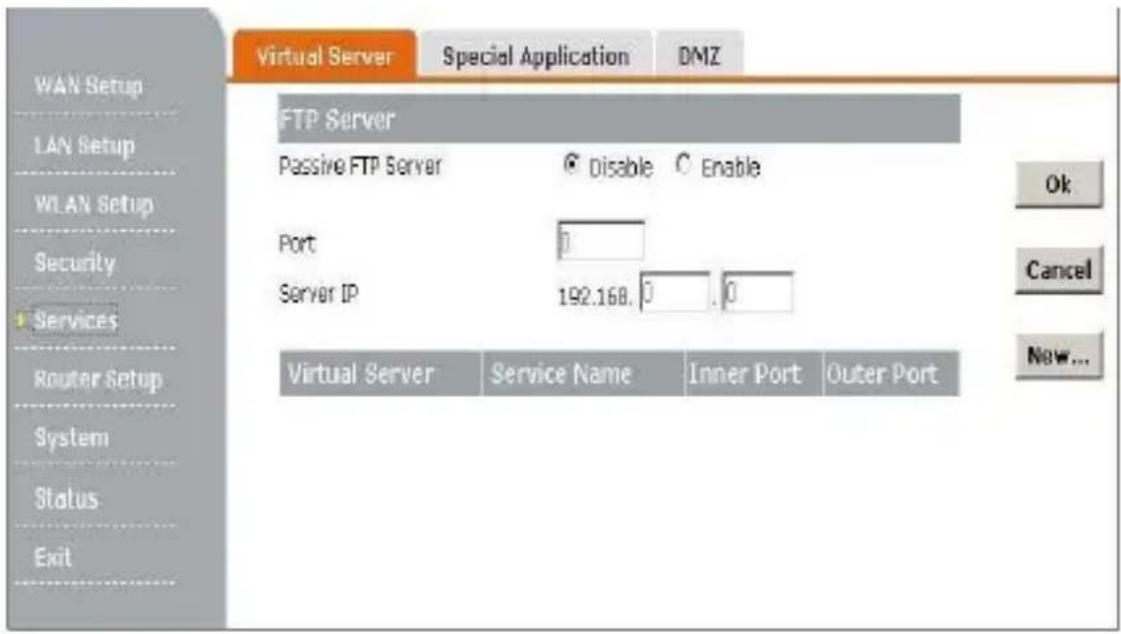
- Click New button. The Virtual Server dialog box will appear as follow.
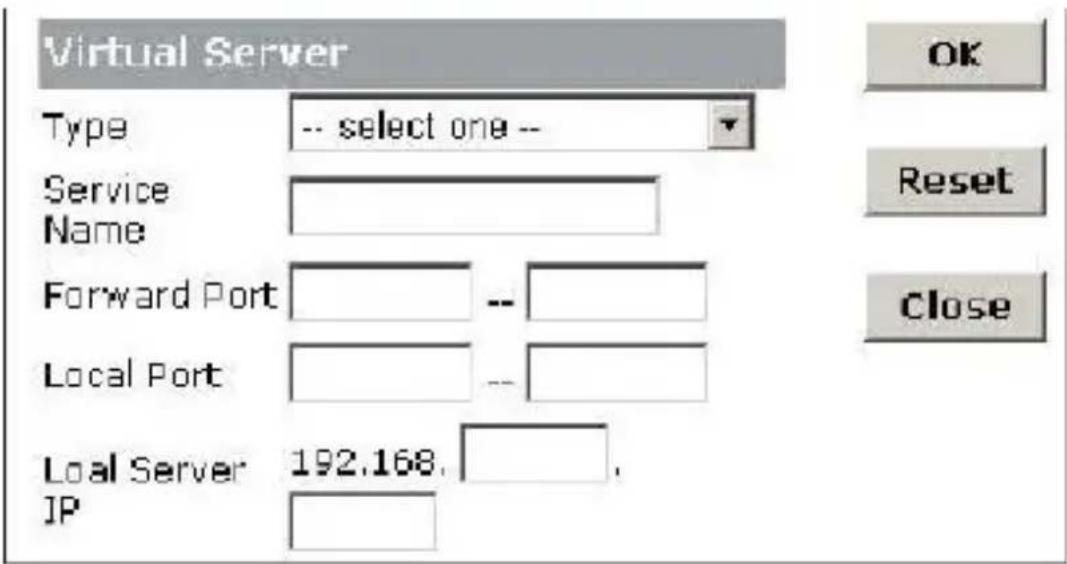
1 2. Enter the Service Name, Forward Port, Local Port, and Local Server IP Address.
2 3. Click OK button to add the setting in the list and close the dialog box.
3.9.2 Special Application
Some applications require multiple connections, such as Internet gaming, video conferencing, Internet telephony and others. These applications cannot work when Network Address Translation (NAT) is enabled. If you need to run applications that require multiple connections, specify the port normally associated with an application in the Trigger Port field, then enter the Forward ports associated with the trigger port to open them for inbound traffic.
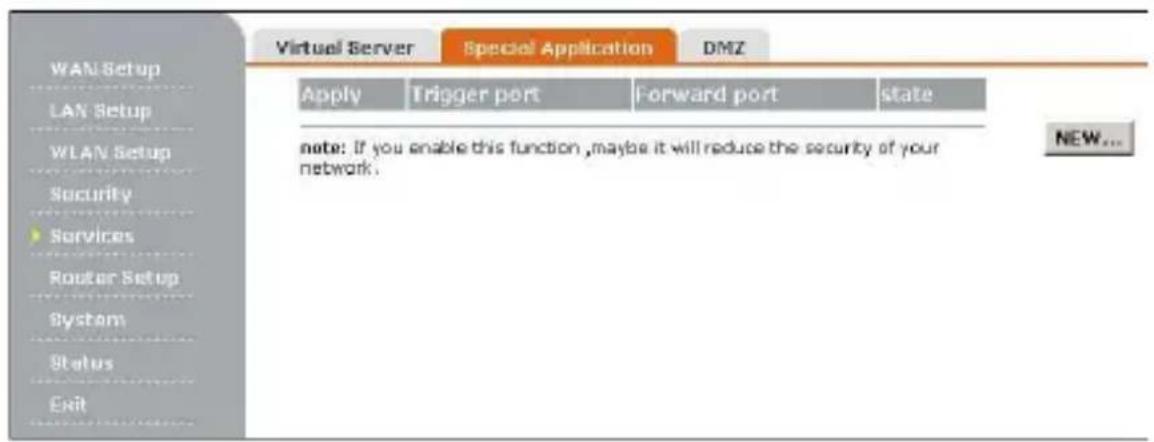
- Click New button. The Port Triggering dialog box will appear as follow.
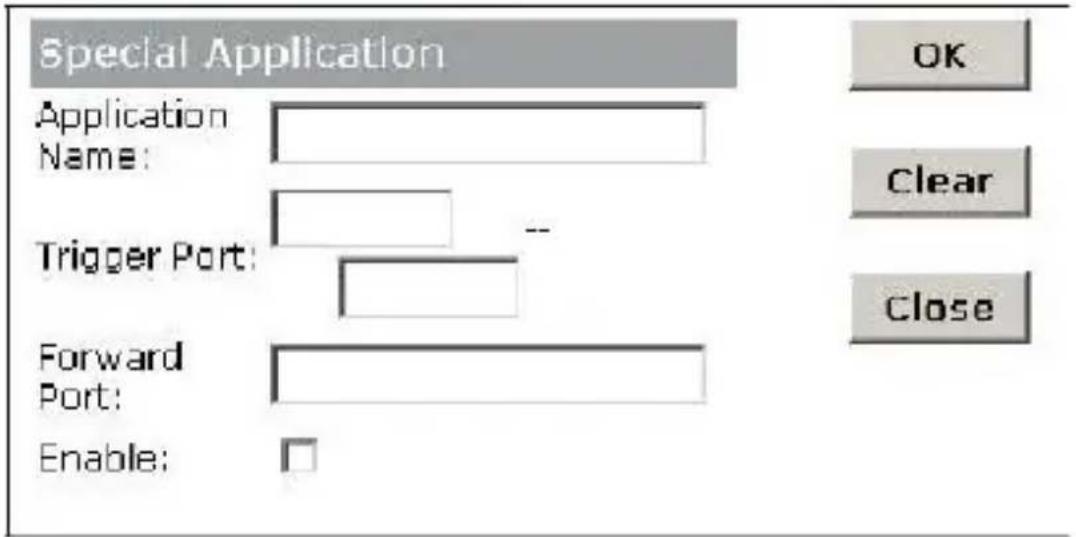
1 2. Enter the Application Name, Trigger Port, Forward Port.
2 3. Click Enable frame button.
3 4. Click OK button to add the setting in the list and close the dialog box.
3.9.3 DMZ
If you have a client PC that cannot run Internet application properly from behind the NAT firewall or after configuring the Virtual Server, then you can open the client up to unrestricted two-way Internet access.
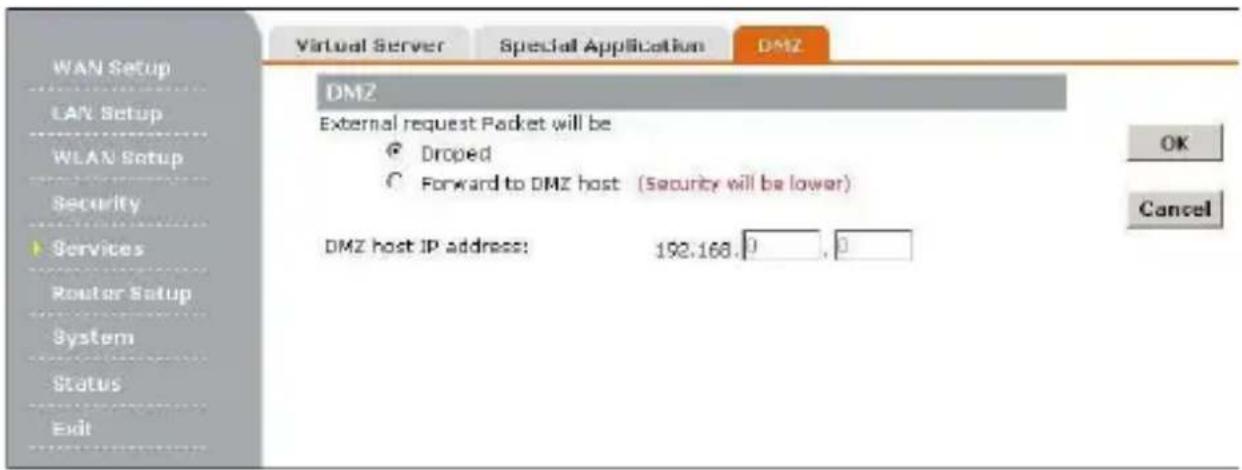
Set Forward to DMZ host, Enter the IP address of a DMZ host to DMZ Host IP Address. Adding a client to the DMZ (Demilitarized Zone) may expose your local network to a variety of security risks, so only use this option as a last resort.
3.10 Route Setup
Static Route
A static route is a pre-determined pathway that network information must travel to reach a specific host or network.
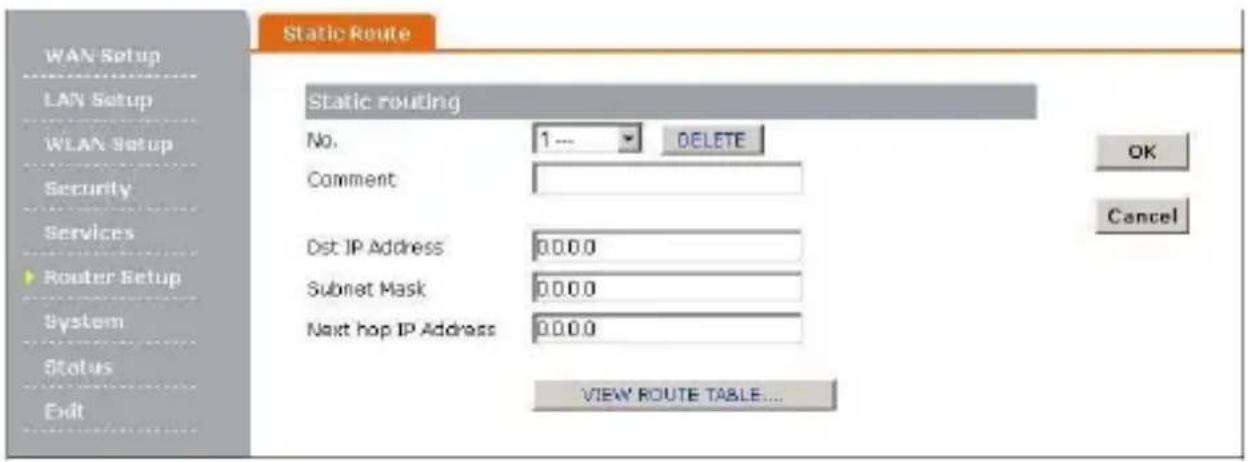
1 1. Select a number form drop-down menu.
2 2. Enter Destination IP address, Subnet Mask, and Next hop IP Address.
3. Click OK button to save the setting.
View Route Table
The routing table displays the current routing information in system.
| Routing table | ||||
| Destination: IP address | Subnet music | Next hop address | hopping number- | interface |
| 152 303.16 0 | 235.253.259.0 | * | 0 | LAN |
| 157.0.0.0 | 255.0.0.0 | * | 0 | Io |
3.11 System
3.11.1 Management
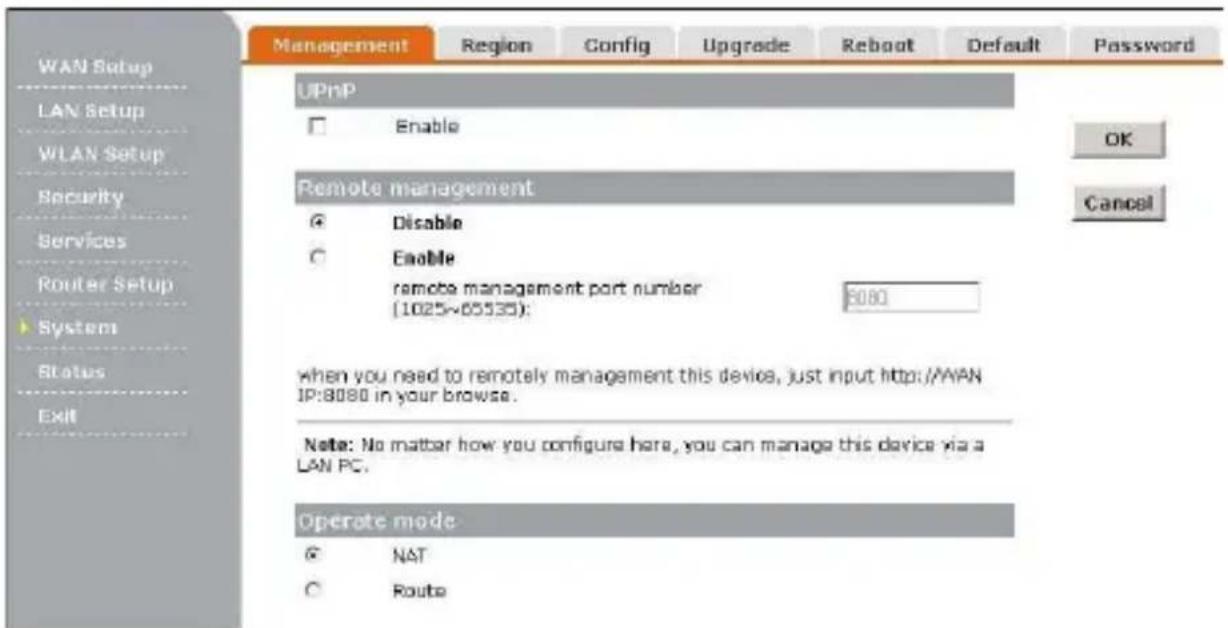
UPnP: UPnP (Universal Plug and Play) allows automatic discovery and configuration of equipment attached to your LAN. UPnP is by supported by Windows ME, XP, or later.
Remote management: This feature allows you to manage the router from a remote location, via the Internet. To Enable Remote Management, Click the Enable radio button, then enter the port number you will use to remotely access the Router. The default port
is 8080. Finally click OK button to save it.
Operate mode: Select the Router's operate mode, NAT or Route.
1 3.11.2 Region
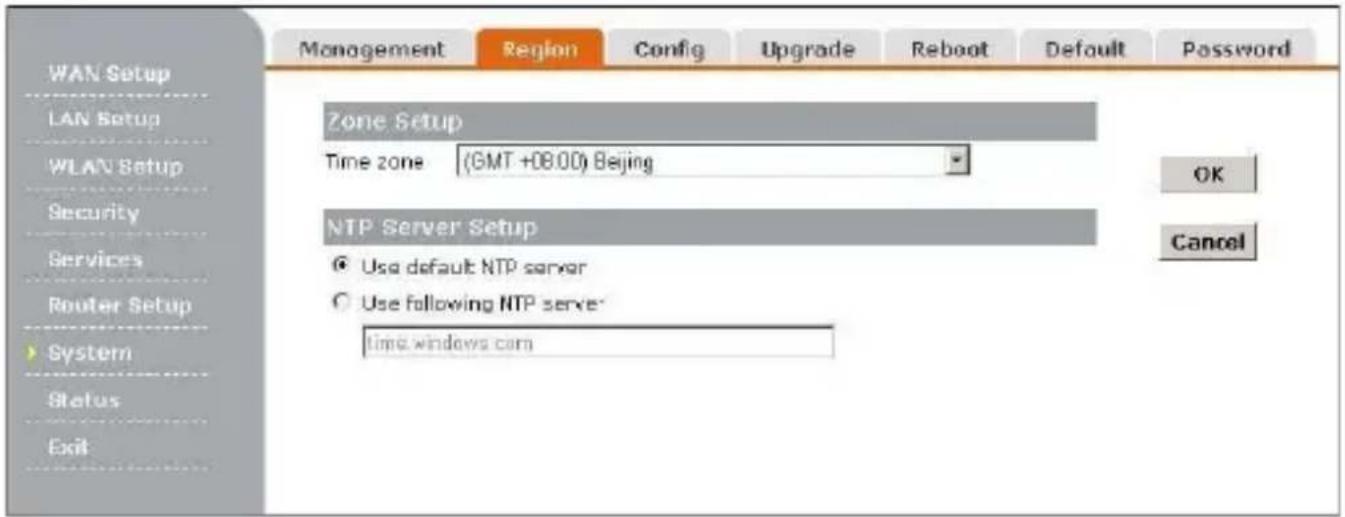
3.11.3 Config
Backup Settings
Click Backup button, you can get the router's settings and store it in your local computer.
Restore Settings
Click Browse button, select the file you backup before from your local computer, then click Restore button, the router goes to the former settings.
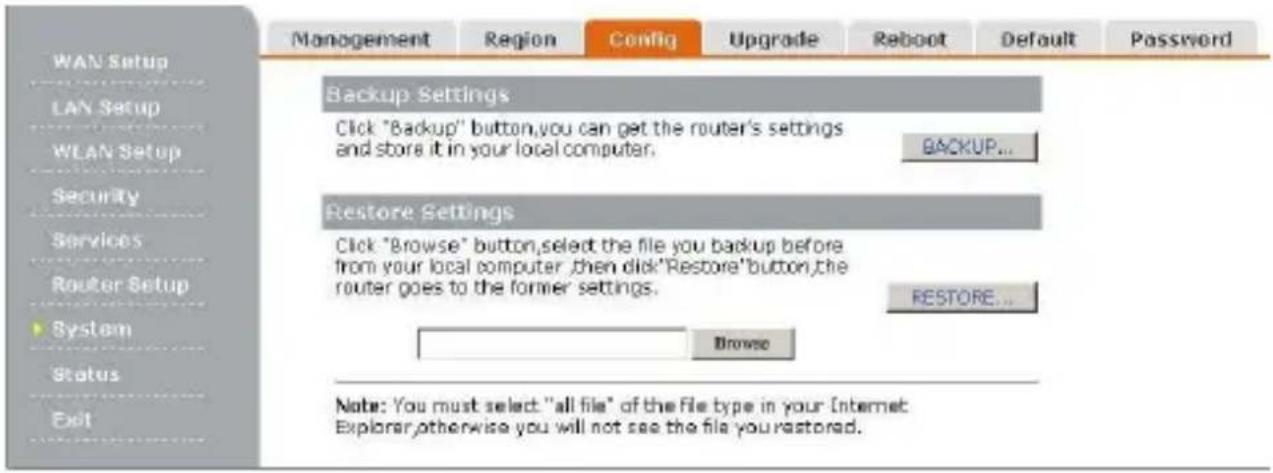
3.11.4 Upgrade
You can upgrade the firmware of the Router here.
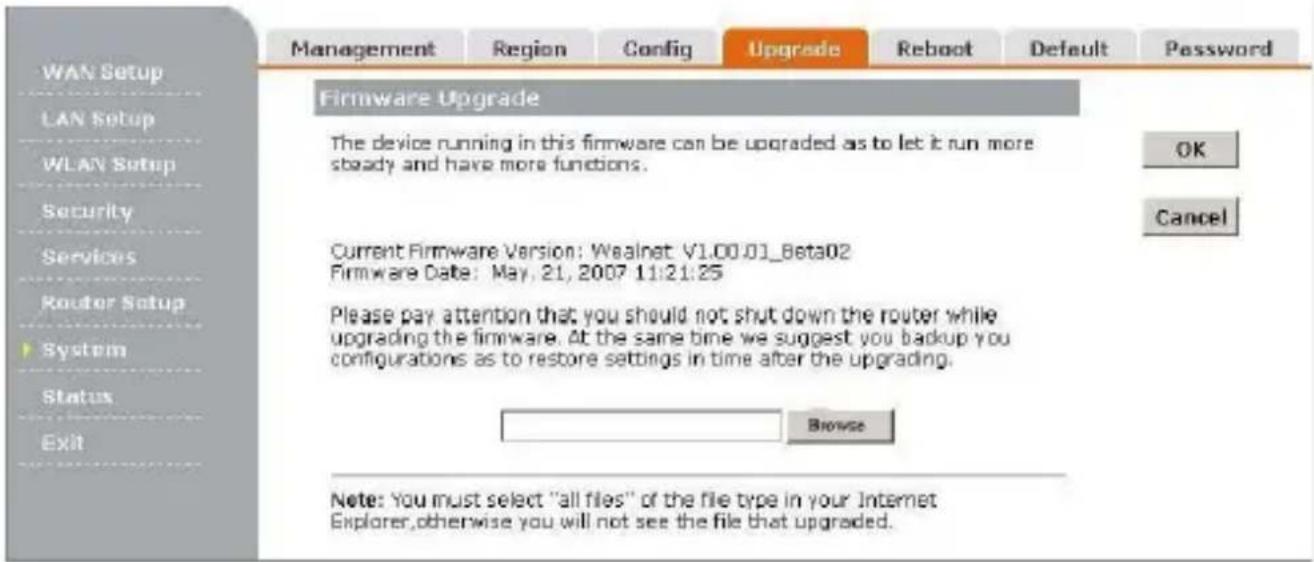
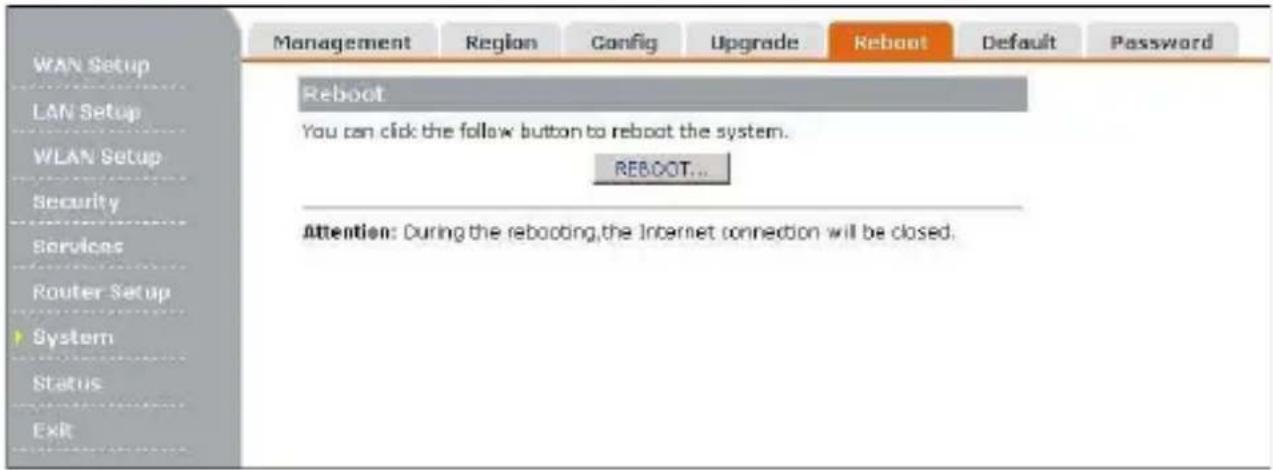
3.11.5 Reboot
You can click the Reboot button to restart the Router.

GEMBIRD®
Wireless Router
3.11.6 Default
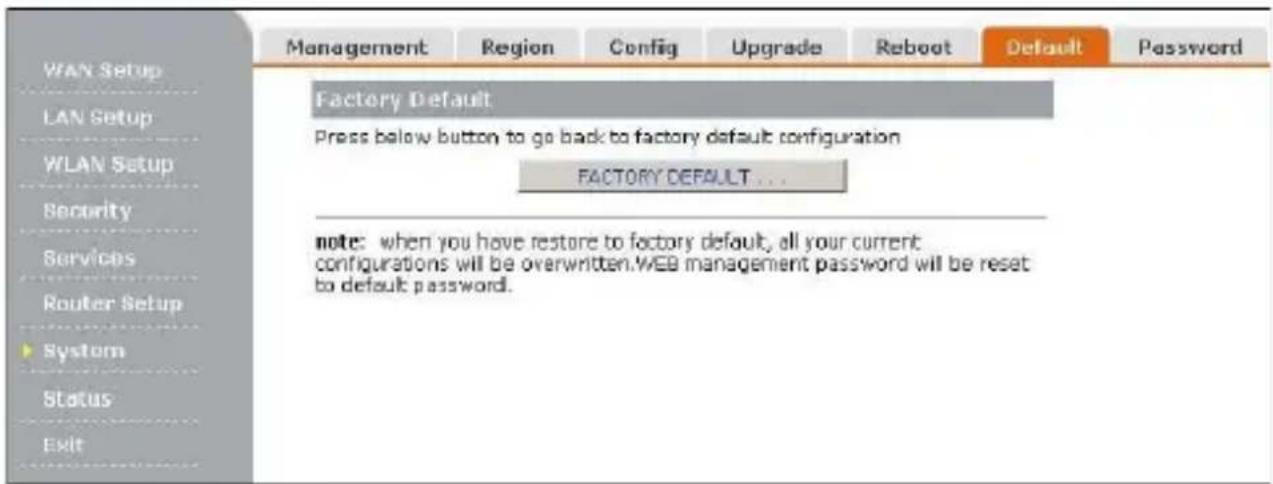
Click Factory Default button, the router's settings will be restored factory default config, at the same time and the administrator web password will restore to the default password.
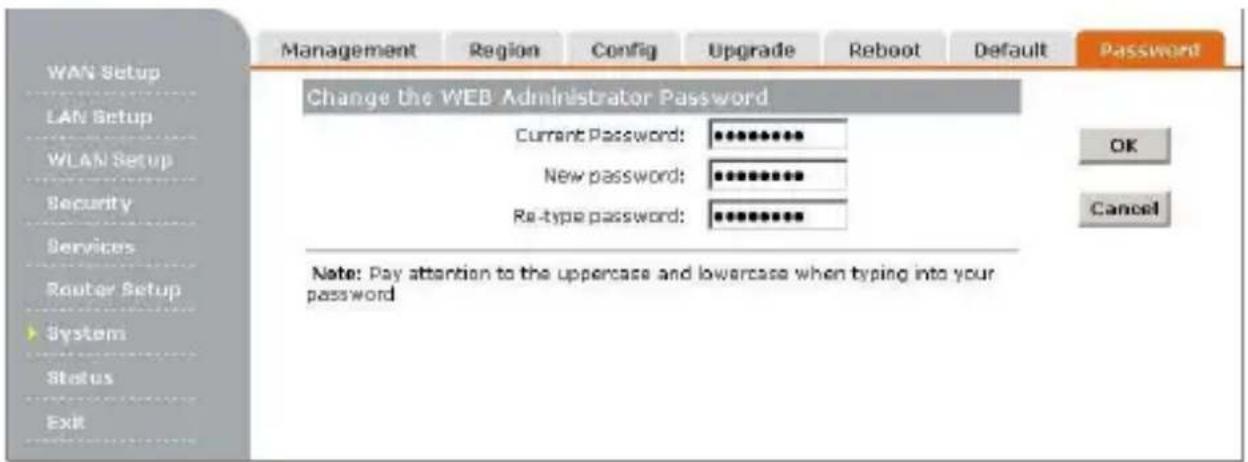
3.11.7 Password
To ensure the Router's security, you will be asked for your password when you access the Router's Web-based Utility. The default user name is admin and password is admin.
This page will allow you to change the User name and User passwords.
3.12 Resetting the router The router has a reset button at the rear panel of the device. For some circumstances you might need to reset the router. Please follow these steps:
- Leave the device powered on, do not disconnect the power
- Press the reset button and hold
- Keep the button pressed about 5 seconds
- Release the button.
The Router will then automatically reboot itself.
If the Router locks up, simply power it down for 3 to 5 seconds by
removing the power cable from the Router's Power Port.


- NSW-R2 802.11b/g 54M wireless router User manual
- DISCLAIMER
- Chapter 1 Introduction
- Features
- Environments
- Package
- System Requirement
- Chapter 2 Hardware Installation
- Typical Installation
- LED indicators
- - LED 1,2,3,4 (green)
- Back Panel Features
- • LAN (1,2,3,4)
- - WAN
- - RESET
- - 12V DC
- - ANTENNA
- Chapter 3 Network Setting and Software Installation
- TCP/IP Configuration
- IP Setting
- 4. Type exit to close the command prompt.
- Wizard Setup
- Status
- Status
- System Log
- WAN Setup
- Dynamic
- Static
- PPPoE
- Clone MAC Address
- DDNS
- LAN Setup
- LAN Setting
- IP&MAC Address Binding
- DHCP Clients
- WLAN Setup
- 3.7.1 Basic Settings
- Advanced Setup
- 3.7.3 Security
- Security Setup
- WPA/WPA2/Mixed.
- Radius Server
- WEP
- WPA/WPA2/Mixed
- 3.7.4 Access Control
- 3.7.5 WDS
- Security
- Firewall
- URL Control
- Access Control
- Block Port
- Block Dos Attack
- Services
- Virtual Server
- Special Application
- DMZ
- Route Setup
- Static Route
- View Route Table
- System
- Management
- 3.11.2 Region
- Config
- Backup Settings
- Restore Settings
- Upgrade
- Reboot
- GEMBIRD®
- Wireless Router
- Default
- Password
Brand : Gembird
Model : NSW-R2
Category : Headphones