
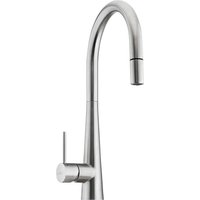
Venice VE520FMB - Faucet Oliveri - Free user manual and instructions
Find the device manual for free Venice VE520FMB Oliveri in PDF.


| Product Type | Kitchen Faucet |
| Brand | Oliveri |
| Model | Venice VE520FMB |
| Height | 15.7 inches (400 mm) |
| Spout Reach | 8.3 inches (210 mm) |
| Spout Type | High arc, swivel 360° |
| Handle Type | Single lever, side mount |
| Material | Brass body |
| Finish | Chrome (polished) |
| Weight | 3.5 lbs (1.6 kg) |
| Flow Rate | 1.8 GPM (6.8 L/min) at 60 psi |
| Cartridge Type | Ceramic disc |
| Installation Type | Deck mount, single hole |
| Number of Holes Required | 1 |
| Connection Size | 3/8 inch compression |
| Valve Type | Quarter-turn ceramic |
| Warranty | Lifetime limited warranty on finish and function |
| Compliance | ASME A112.18.1, NSF 61, AB1953 |
| Maintenance | Wipe with damp cloth; avoid abrasive cleaners |
| Spare Parts | Cartridge and handle replacement kits available |
Frequently Asked Questions - Venice VE520FMB Oliveri
User questions about Venice VE520FMB Oliveri
0 question about this device. Answer the ones you know or ask your own.
Ask a new question about this device
Download the instructions for your Faucet in PDF format for free! Find your manual Venice VE520FMB - Oliveri and take your electronic device back in hand. On this page are published all the documents necessary for the use of your device. Venice VE520FMB by Oliveri.
USER MANUAL Venice VE520FMB Oliveri
This Oliveri tap is manufactured to standard AS/NZ5 3718.
This product complies with the Lead Free requirements of the National Construction Code Volume 3.
| MAX OPERATING PRESSURE: | 5 bar (500kPa) |
| RECOMMENDED OPERATION PRESSURE: | 1.5-5 bar (150-500kPa) |
| MAX HOT WATER TEMPERATURE: | 65°C |
| RECOMMENDED HOT WATER TEMPERATURE: | 50°C |
Where water pressure exceeds 500kPa, a pressure reducing device is required to be installed. Note that water pressure overnight can reach 150% of the daytime pressure.
Note: Installation of aerators containing flow regulators: Upon re-installation, the aerator should be tightened with an aerator key to prevent removal by hand.
Note: Ceramic Cartridges: Warranty claims will not be honoured where the ceramic cartridge has malfunctioned due to the presence in the water supply of:
- Copper tube pieces, sand, dirt or stones
- Thread tape
- Other objects not normally present in potable water supplies.
Do not remove the cartridge from the body as it has been pressure tested and tightened to a specific torque.
Before attempting any work involving mains water supply lines, ensure the water supply is shut off.
Stop valves (preferably with filters) must be used when installing your Oliveri mixer to allow isolation (not supplied with mixer). Failure to do so where required will void warranty.
This mixer tap is already pre-assembled and tested. Do not disassemble, as this may void the warranty.
This mixer tap must be installed in accordance with these instructions.
Oliveri Solutions Pty Ltd ABN 12 007551 886
51 Naweena Rd, Regency Park SA 5010 P 08 8348 6444 E sales@oliveri.com.au
Issue Date 28/11/2023 Revision Number. V2.0
Venice

Goose Neck Mixer
VE520FCR / VE520FMB / VE520FBN
CARE & MAINTENANCE
Clean with a soft cloth and warm soapy water as necessary - rinse and dry after cleaning. Under no circumstances should abrasive or acid based cleaning products be used.
WARRANTY
| PRODUCT | COMPONENT | DOMESTIC USE | COMMERCIAL USE |
| Kitchen Tapware Venice | Cartridge | 10 years replacement parts, 1 year labour | 7 years replacement parts, 1 year labour |
| Body | 7 years replacement parts, 1 year labour | 1 years replacement parts, & labour | |
| Finish (chrome) VE520FCR | 7 years replacement parts, 1 year labour | 1 year replacement parts & labour | |
| Finish (Other) VE520FBN, VE520FMB | 5years replacement parts, 1 year labour | 1 year replacement parts & labour |
Subject to the terms contained in the full warranty information available at https://oliveri.com.au/service-and-warranty, where a genuine manufacturing defect arises within the warranty period Oliveri will, at its election, repair the defect or replace the product.
This warranty does not cover against normal wear and will be voided if the product is misused or not installed in accordance with these instructions. Note: Fitting spout-attached devices, including water filters, to this mixer will void warranty.
Our goods come with guarantees that cannot be excluded under the Australian Consumer Law. You are entitled to a replacement or refund for a major failure and for compensation for any other reasonably foreseeable loss or damage. You are also entitled to have the goods repaired or replaced if the goods fail to be of acceptable quality and the failure does not amount to a major failure.
SERVICE
If the problem represents a danger, or damage to property may occur, immediately shut off the water supply. If the mixer tap requires servicing, please contact your plumber (preferably the one who installed it). Most problems occur due to contaminated supply lines or water pressure exceeding 500kPa. Unscrew and clean the spout aerator periodically - especially if you notice a drop in water pressure.
If the Plumber/ Installer is satisfied that the problem is not due to poor installation, contact Oliven's nominated Warranty Service Agent for assistance on:
Ph: (08) 8348 6444 (choose the after sales service & warranty option)
Email: warranty@oliveri.com.au
For full warranty information visit: https://oliven.com.au/service-and-warranty
If a warranty service call finds that the spout does not have a genuine manufacturing fault, our Warranty Service Agent reserves the right to pass on any call-out fee to the householder.

Issue Date 28/11/2023 Revision Number: V2.0

INSTALLATION INSTRUCTIONS
General Note: This product is to be installed by a licenced plumber. Installation must comply with the AS/NZS 3500 series of Standards, Plumbing Code of Australia and applicable plumbing codes and regulations.
Pressures & Temperatures
Maximum Hydrostatic Pressure: 500kPa. Note: AS/N2S 3500.1 Subclause 3.3.4 (Maximum pressure within buildings) states: "The maximum static pressure at any outlet, other than a fire service outlet, within a building shall not exceed 500kPa. Note: Pressures above 500kPa can cause damage from water hammer, reduced life of appliances, taps and fittings, and cause excessive noise in the system." Minimum Hydrostatic Pressure: 150kPa. Note: This Product may not be suitable for use with low pressure/gravity feed water supplies or with some continuous flow/instantaneous hot water systems. The maximum operating temperature for the Mixer Tap is 65°C. The recommended maximum delivery temperature is 50°C.
Please ensure that the lines are flushed prior to installation as contaminates in the water can damage the ceramic disc cartridge, flow regulator and affect the performance of the mixer.
- Remove product from packaging and check for damage, if the product is damaged do not install and return to store of purchase.
- The WELS compliant aerator has been pre-assembled into the mixer outlet. To comply with WELS the flow regulator must remain in place.
- Ensure product is complete as per exploded drawing.
- A single 35mm hole is required in the mounting surface.
- The maximum mounting surface thickness cannot exceed 37 mm.
- Ensure bench sealing washer (A) is in place on base of Mixer. Screw the Mixer Tails (C) into base of the Mixer being careful to avoid damage to the o-ring seals, the Mixer Tails are colour coded, red for hot and blue for cold, the Mixer base inlet holes are stamped with "H" for hot and "C" for cold. Hand tighten only.
- Screw Threaded Rod (D) into base of Mixer.
- Feed the Mixer Tails (C) through the mounting surface, each end alternately and position the mixer on the mounting surface ensuring the Sealing Washer (A) is positioned correctly.
- Feed Mixer Tails, each alternately through Stabiliser Plate (D) if supplied.
- Slide Rubber Horse Shoe (E) onto Threaded Rod (D) followed by Metal Horse Shoe Plate (F).
- Using Lock Nut (G), tighten the Mixer to mounting surface with supplied tool (H).
- Connect Mixer tails to mains water 1/2" stop cock Tighten to 10Nm, Do NOT overtighten.
- Ensure the Mixer Tails are not kinked, bent, stretched or twisted when assembling to the mains water supply. The Mixer Tail connection between the Mixer and the water supply must have a natural curve (minimum bend radius 30 mm).
- Ensure Mixer tails are installed indoors, above-ground, and remain accessible - do not bury, submerge, install behind a wall, floor or ceiling. Do not not expose to abrasions, corrosive agents or the like. Test for leaks: If a leak occurs, retighten slightly.
- It is recommended that In-Line Filters be installed to ensure a cleaner flow of water to the Mixer.
N.B The Mixer Tails should be positioned towards the user and the Fixing Bolt to the back.
TO THE CONSUMER
- The Mixer is only to be cleaned with warm soapy water and a soft cloth.
- Under no circumstances should any abrasive, cream or acid-based cleaning agents be used, as these types of cleaners can damage the finish, cartridge, seals and Mixer aerator.
- Venice
- CARE & MAINTENANCE
- SERVICE
- INSTALLATION INSTRUCTIONS
- Pressures & Temperatures
- Please ensure that the lines are flushed prior to installation as contaminates in the water can damage the ceramic disc cartridge, flow regulator and affect the performance of the mixer.
- N.B The Mixer Tails should be positioned towards the user and the Fixing Bolt to the back.
- TO THE CONSUMER
Brand : Oliveri
Model : Venice VE520FMB
Category : Faucet