
Dimâge Scan Dual I - To scan MINOLTA - Free user manual and instructions
Find the device manual for free Dimâge Scan Dual I MINOLTA in PDF.


| Brand | Minolta |
| Model | Dimâge Scan Dual I |
| Product Type | Film Scanner |
| Scan Type | 35mm film (slides and negatives) |
| Optical Resolution | 2400 dpi |
| Color Depth | 36-bit (12 bits per channel) |
| Scan Area | Up to 36 mm x 24 mm (full frame 35mm) |
| Interface | SCSI (SCSI-2) |
| Light Source | LED |
| Dimensions (W x D x H) | Approx. 166 x 123 x 95 mm |
| Weight | Approx. 1.2 kg |
| Power Supply | External AC adapter (DC 9V, 1.5A) |
| Power Consumption | Approx. 8W |
| Operating System Compatibility | Windows 95/98/ME/2000, Mac OS 9 |
| Included Software | Minolta Scan Utility, Adobe Photoshop Plug-in |
| Autofocus | Yes |
| Auto Exposure | Yes |
| Multi-Sample Scanning | Yes (for noise reduction) |
| Film Holder | Included (strip film and slide mount holder) |
| Maintenance | Clean the scanning glass with a soft, dry cloth; avoid dust. |
| Safety | Use only the specified power adapter; do not disassemble. |
Frequently Asked Questions - Dimâge Scan Dual I MINOLTA
User questions about Dimâge Scan Dual I MINOLTA
0 question about this device. Answer the ones you know or ask your own.
Ask a new question about this device
Download the instructions for your To scan in PDF format for free! Find your manual Dimâge Scan Dual I - MINOLTA and take your electronic device back in hand. On this page are published all the documents necessary for the use of your device. Dimâge Scan Dual I by MINOLTA.
USER MANUAL Dimâge Scan Dual I MINOLTA
natural_image
Black and white photo of a MINGDA DSLR camera with lens, displayed against a filmstrip background (no text or symbols on the camera body)
natural_image
Black-and-white photo of a parrot with open mouth, framed by filmstrip border (no text or symbols)
natural_image
Black-and-white illustration of a stylized building with circular windows and trees, no visible text or symbolsWindows Version
Thank you for purchasing the Minolta Dimâge Scan Dual. The Dimâge Scan Dual is a dual format film scanner capable of scanning 35mm and, with the optional AD-10 APS Adapter, Advanced Photo System film.
This manual has been designed to help you understand the operation of your scanner. To realize all the benefits of your scanner, please read this manual thoroughly.
Your scanner has been packaged with the DS Dual twain driver software for Adobe Photoshop™/ Adobe PhotoDeluxe™. Before using the Minolta Dimâge Scan Dual, we recommend you have a working knowledge of the PC and its operating conventions. Familiarity with the mouse and Windows® menus and commands is necessary before operating the Minolta Dimâge Scan Dual driver software.
This manual does not instruct in the basic use of the PC, the Windows ^® 95, Windows ^® 98, or Windows NT ^® operating systems, Adobe Photoshop ^™ , or Adobe PhotoDeluxe ^™ .
MS, MS-DOS, Microsoft, Windows ^® , Windows ^® 95, Windows 98 ^® , and Windows NT ^® are registered trademarks of the Microsoft Corporation.
Adobe ^® , Photoshop ^™ , and Adobe PhotoDeluxe ^™ are registered trademarks of Adobe Systems Inc.
Corel Draw ^TM is a trademark of the Corel Corporation.
Other corporate and product names are the trademarks and registered trademarks of their respective companies.
- Changes or modifications not approved by the party responsible for compliance could void the user's authority to operate the equipment.
- This manual may not be copied in part or whole without prior written permission from Minolta Co., Ltd. ©1997 Minolta Co., Ltd.
- Every necessary caution has been taken to ensure the accuracy of this instruction manual. Please contact us if you have any questions, find any errors, or notice missing information.
- Minolta is not responsible for loss, damage, or other results occurring during the operation of this product.

This mark certifies that this product meets the requirements of the EU (European Union) concerning interference causing equipment regulations. CE stands for Conformité Européenne.
Film Scanner: Dimâge Scan Dual

Tested to comply with FCC standards.
FOR HOME OR OFFICE USE
This device complies with Part 15 of the FCC Rules. Operation is subject to the following conditions: (1) This device may not cause harmful interference, and (2) this device must accept any interference received, including interference that may cause undesired operation.
To meet FCC regulations, the SCSI cables used with this scanner must be equipped with ferrite cores.
This Class B digital apparatus meets all the requirements of the Canadian Interference-Causing Equipment Regulations.
Tested by the Minolta Corporation
101 Williams Drive
Ramsey, New Jersey 07446
USA
Please read and understand each caution before using this product.

CAUTION
To avoid fire or electric shock:
- Only use the voltage specified for this unit.
- Do not expose this unit to liquids.
- Do not insert metal objects into this unit.
- Do not touch the cord or plug if your hands are wet.
- Unplug this unit when it is not in use.
Improper use of the power cord may result in fire or electric shock.
- Insert the plug securely into an electrical outlet.
- Do not pull on the cord. Grasp the plug when removing the power cord from an outlet.
- Do not scratch, twist, modify, heat, or place a heavy object on the power cord.
- Do not connect the ground to a gas pipe, telephone ground, or a water pipe. Improper grounding can result in electric shock.

This product must have sufficient ventilation while in use. Blocked ventilation ducts may cause the unit to overheat, increasing the risk of fire.
- Do not use or store this product in dusty or very humid areas.
If there is smoke, a strange smell, or any other unusual conditions, shut down and unplug the unit, then contact a Minolta Service Facility.
Do not attempt to disassemble this product. It contains high-voltage circuits. Take the product to a Minolta Service facility for repairs.

Unexpected damage may occur if this unit is left unattended near young children.
The following contents should be included in this package.
- Minolta Dimâge Scan Dual
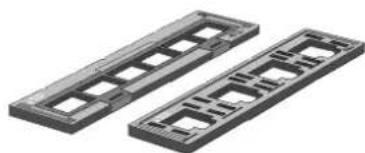
- 35mm Slide and Negative holders
- SCSI cable SC-11
- AC power cord
- DS Dual installer CD ROM
- Instruction Manuals (2)
- Warranty card
- Photoshop LE CD ROM
natural_image
Two black plastic rectangular components with square cutouts, shown side by side (no text or symbols)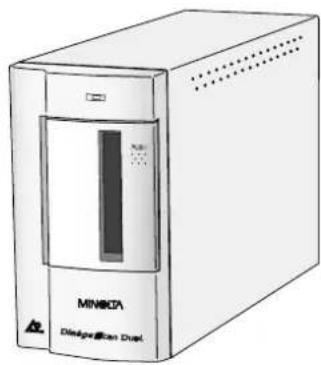
natural_image
Illustration of a Minikota designator rack unit (no text or symbols on the device body)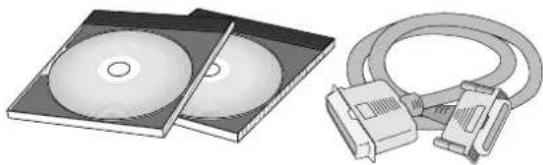
natural_image
Illustration of two optical discs and a USB cable, no text or symbols present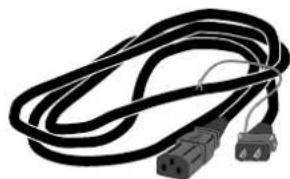
natural_image
Coiled black electrical circuit breaker with two terminal connectors (no text or symbols visible)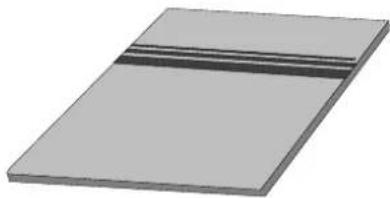
natural_image
3D rendering of a rectangular electronic component with two horizontal bands (no text or symbols)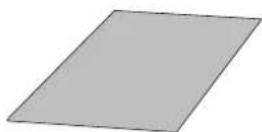
System Requirements
CPU: IBM PC/AT compatible with a 486SX-25 MHz processor or better. A
Pentium is recommended to obtain all the benefits of this software.
- Support cannot be provided for custom or home built machines.
Operating System: Windows 95, Windows 98, or Windows NT
Memory: A minimum of 8 MB application RAM in addition to the requirements for the OS and Adobe Photoshop (or PhotoDeluxe). 32 MB of RAM is recommended to obtain all the benefits of this software. 60 MB of available hard disk space.
SCSI Board: The following Adaptec SCSI boards are recommended for this device:
AHA-1520B AHA-1540CP AHA-2940J AHA-2940U AHA-2940AU AHA-2910B AVA-2902E AVA-1505AE*
* Applicable for use with Windows 95 only.
- Support will not be provided for malfunctions or problems caused by the use of untested SCSI boards.
Monitor: High Colour (16 bit) VGA monitor and video card or better.
Other: Photoshop 3.0.5, Photoshop 4.0.1, Photoshop 5.0.1, PhotoDeluxe (ver. 1.0 and 2.0), Corel DRAW (ver 7 and 8), and Corel Photopaint (in Corel DRAW) have been fully tested for use with the TWAIN driver software.
- Use TWAIN 32 to acquire images into Corel Draw and Photopaint. Using CorelScan to access the DS_Dual driver software may cause sizing errors.
TABLE OF CONTENTS
FOR PROPER AND SAFE USE 1
PACKAGE CONTENTS 2
SYSTEM REQUIREMENTS 2
TABLE OF CONTENTS 3
NAMES OF PARTS 4
SCANNER SETUP
Setting the SCSI ID 6
Connecting the Hardware 7
Installing the Software 10
STANDARD OPERATION
Launching the Software 16
Standard Control Window - Names of Parts 18
Preview Window - Names of Parts 19
Preferences Dialog Box - Names of Parts . . . . . . . . . . . . . . . . . . . . . . . . . . . . . . . . . . . . . . . . . . . . . . . . . . . . . . . . . . . . 20
Setting the Preferences .....21
Loading the Film Holder 23
Inserting the Film Holder into the Scanner 25
Setting the Film Type 26
Prescan 26
Selecting the Usage Mode .....27
Orienting the Image 29
Variation Dialog Box - Names of Parts 32
Image Correction - Variation 33
Scanning and Saving the Image 34
PRECISION OPERATION
Precision Operation - Startup 36
Precision Control Window - Names of Parts 37
Loading and Prescan 38
Orienting the Image 39
Setting the Resolution 40
Resolution Notes 41
Scan Settings - Save and Load 42
Histogram Dialog Box - Names of Parts 43
Image Correction - Histogram 44
Tone Curve Dialog Box - Names of Parts 48
Image Correction - Tone Curve 49
Scanning and Saving the Image 52
SCANNING APS FILM
Launching the Software 54
Setting the Film Type 55
Setting the APS Preferences ....56
APS Adapter - Names of Parts 57
Loading the APS Adapter 57
Inserting the APS Adapter into the Scanner 58
Index Scan 59
Prescan and Image Correction 60
Scanning the Image 61
Quitting the APS Window 62
APPENDIX
Trouble-Shooting 64
User Technical Support 65
Installing Adobe PhotoDeluxe 66
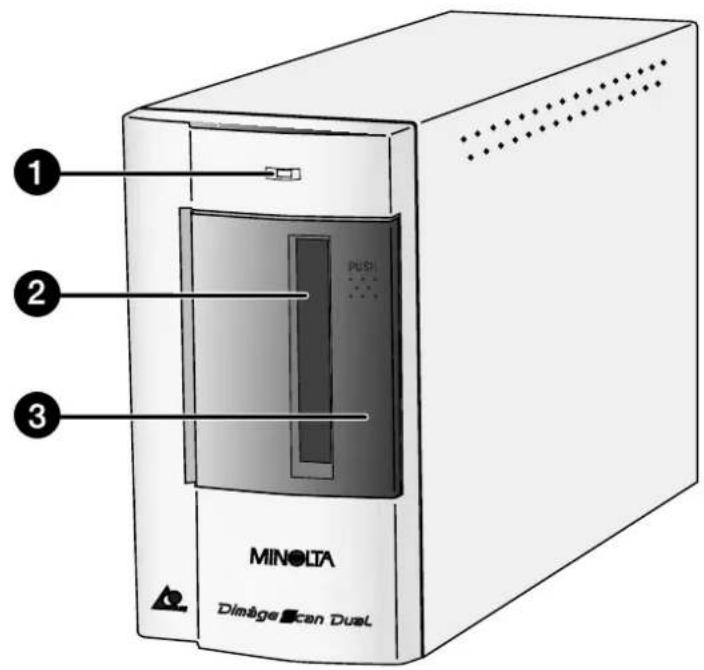
- Indicator lamp
- Film slot
- Film door
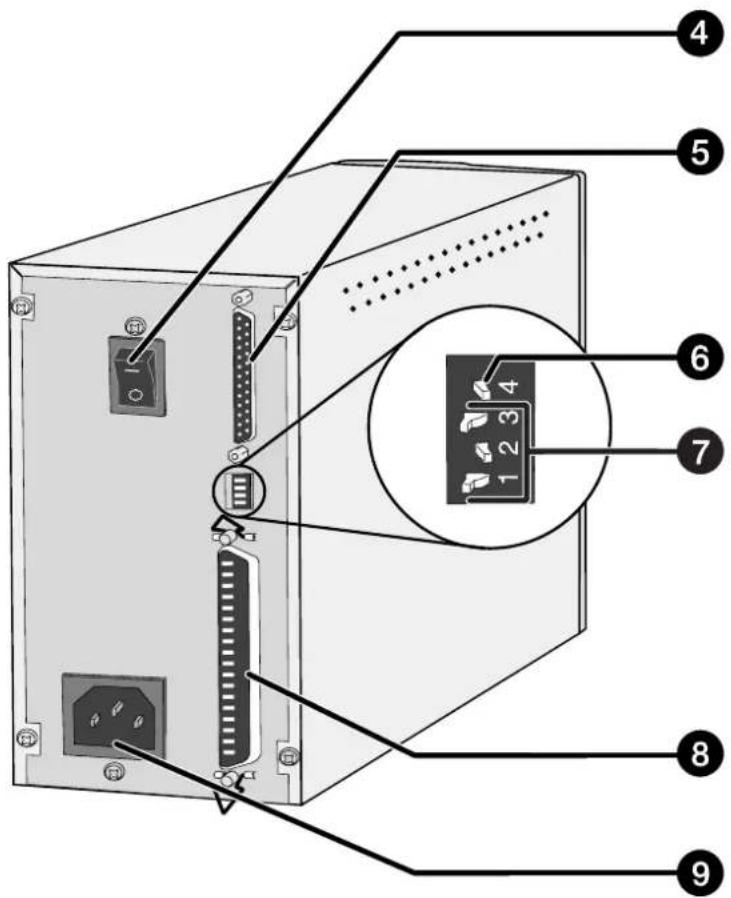
- Power switch
- SCSI port - DB25
- Terminator power switch
- SCSI ID switches
- SCSI port - SCSI-1
- AC socket
SCANNER SETUP
SETTING THE SCSI ID
A SCSI ID is a unique address you assign to each SCSI device connected to your PC. The SCSI ID range of your PC is from 0 to 7. Do not use a SCSI ID for more than one SCSI device.
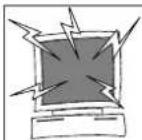
Turn off the PC and all the devices in the SCSI chain down before changing SCSI IDs, connecting, or disconnecting SCSI cables. Hardware damage may occur if this precaution is not followed.
Setting the SCSI ID
- Turn off the PC and all connected SCSI devices.
- Determine which SCSI IDs are not being used.
-
Using a pointed object, set the switches to an unused SCSI ID.
-
The Dimâge Scan Dual's SCSI ID is factory preset to 5. If 5 is not occupied, there is no need to change the SCSI ID.
- Two operating SCSI devices in the same SCSI chain cannot share a SCSI ID.
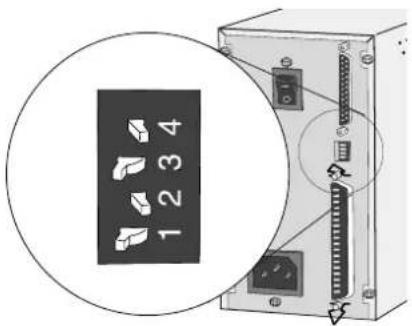
SCSI ID Dip Switch Settings
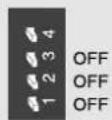
0
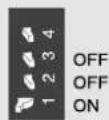
1
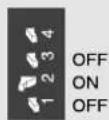
2
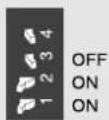
3
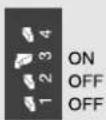
4
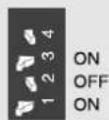
5
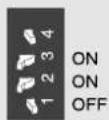
6
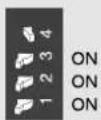
7
CONNECTING THE HARDWARE
Connecting the SCSI Cable
The SCSI cable SC-11 (DB25-to-SCSI-1) has been packaged with the Dimâge Scan Dual. See your dealer if you require a different SCSI cable.
• To meet FCC regulations, the SCSI cables used with this scanner must be equipped with ferrite cores.
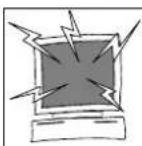
BEFORE YOU BEGIN... TURN THE COMPUTER AND ALL CONNECTED DEVICES OFF.
- Place the scanner on a level surface.
- Plug the SCSI cable SC-11 into the SCSI port on the rear of the PC.
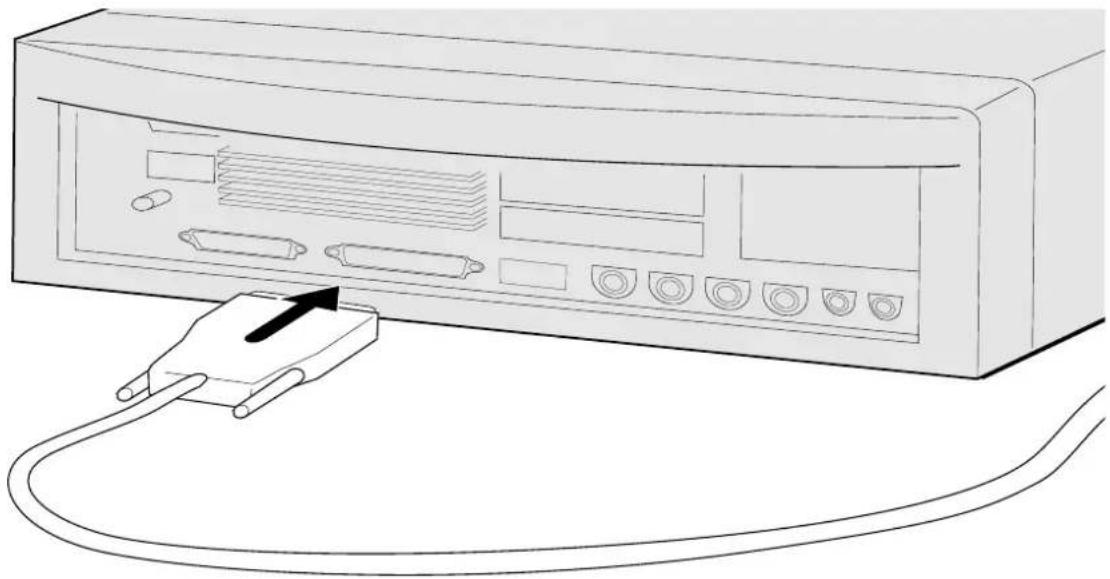
natural_image
Line drawing of a computer interface with ports and cables, no text or symbols present- Plug the other end of the SCSI cable) into the back of the scanner.
- Either SCSI port can be used, there is no dedicated in or out port.
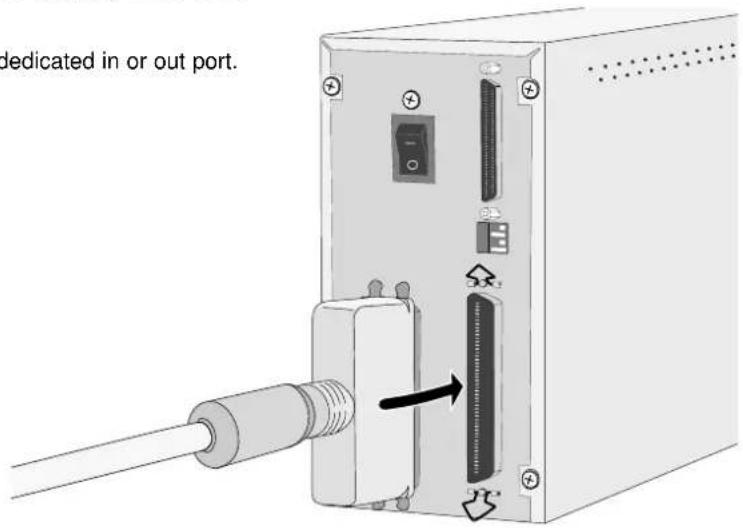
CONNECTING THE HARDWARE
If there are other devices in your SCSI chain...
- Plug the SCSI cable from the next device in your SCSI chain into the open port on the back of the scanner.
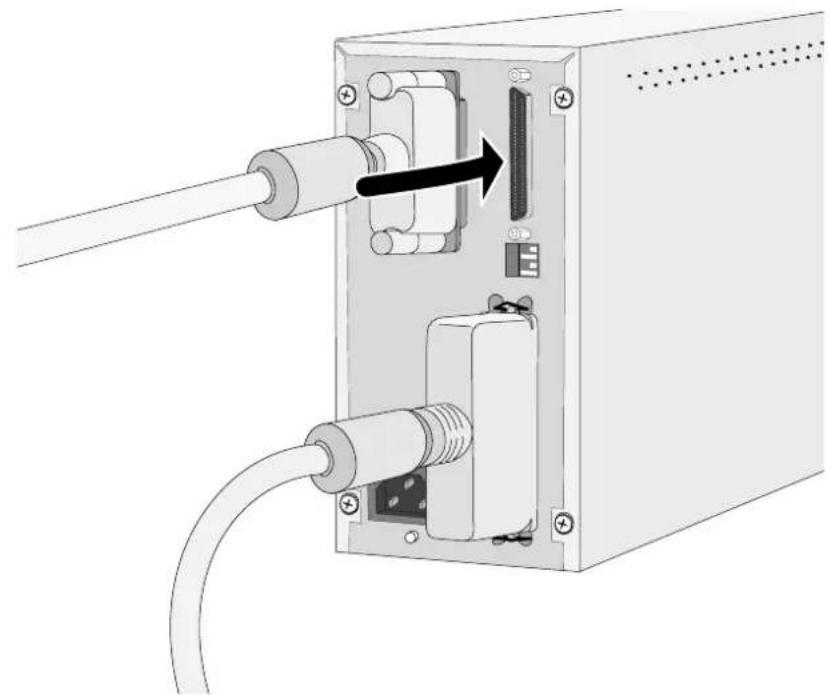
natural_image
Diagram of an electronic device showing cable connection to a power box with internal components (no text or symbols)- Plug the power cord into the scanner's AC socket, then plug it into a grounded outlet.
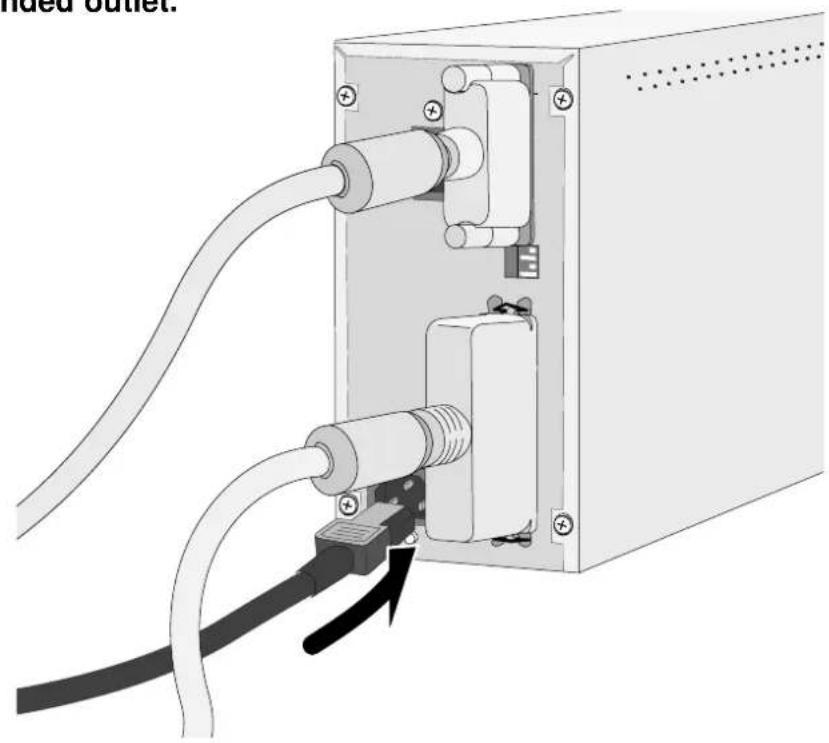
natural_image
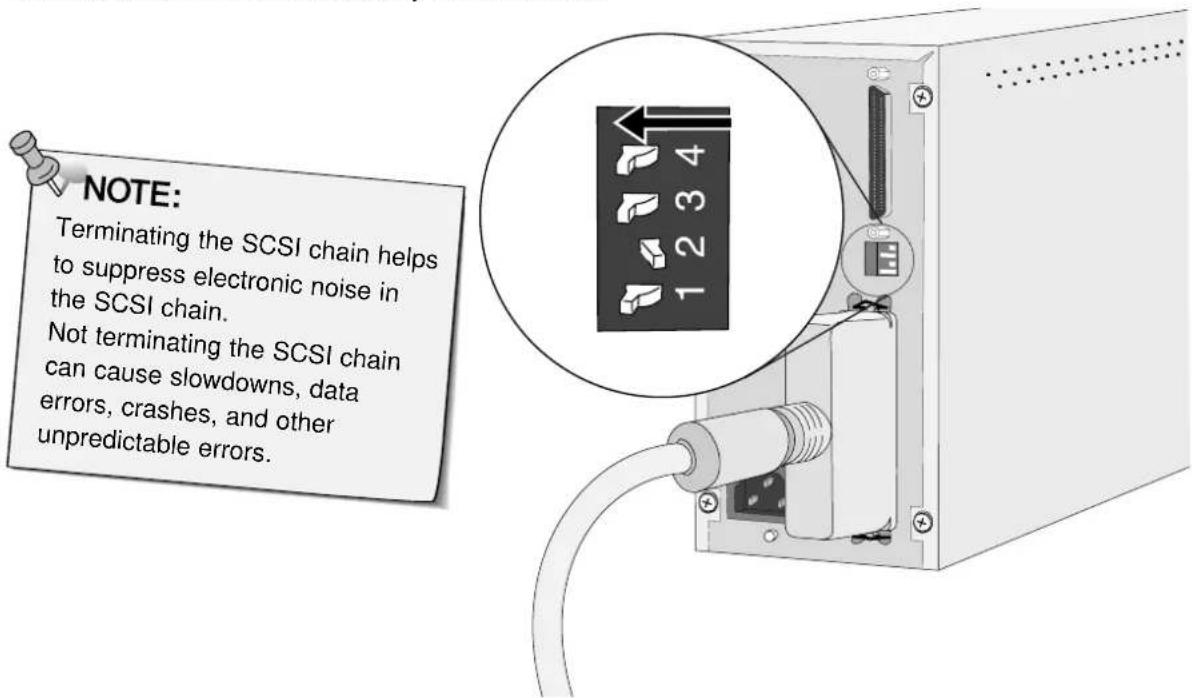
Diagram of an outdoor power supply unit with cable and connector, no text or symbols presentIf the Dimâge Scan Dual is the last or only device in your SCSI chain...
4. Turn the terminator power switch (switch 4) to ON.
- An external terminator is not necessary with this scanner.
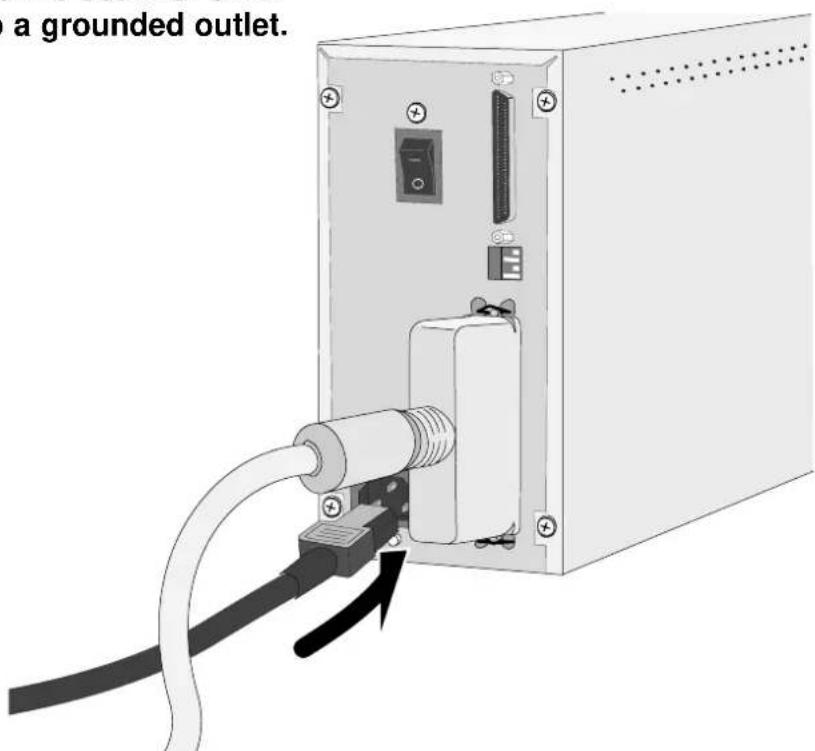
5. Plug the power cord into the scanner's AC socket, then plug it into a grounded outlet.
INSTALLING THE SOFTWARE
Dimâge Scan Dual for Windows Setup installs the Twain and Twain_32 driver software into the drive and folder you select.
Photoshop, PhotoDeluxe, Corel DRAW, or Corel PhotoPaint should be installed before you launch this installer.
- The appearance and/or wording of some dialog boxes may vary depending on the version of Windows running on your machine.
-
The install instructions assume drive D is the CD ROM drive.
-
Turn on the Dimâge Scan Dual, then turn on your PC.
-
Start Windows.
This step varies with your specific operating software...
Windows 95
• The New Hardware Found dialog box will appear.
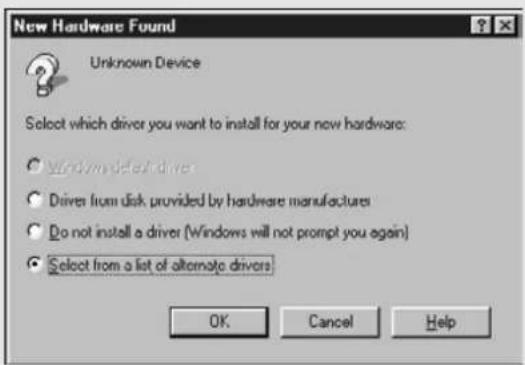
- Click on Cancel.
- This dialog box may appear several times. Repeat step 3 until the dialog box no longer appears.
Windows 95 Release 2 (OSR2) and Windows 98
• The Device Wizard dialog box will appear.
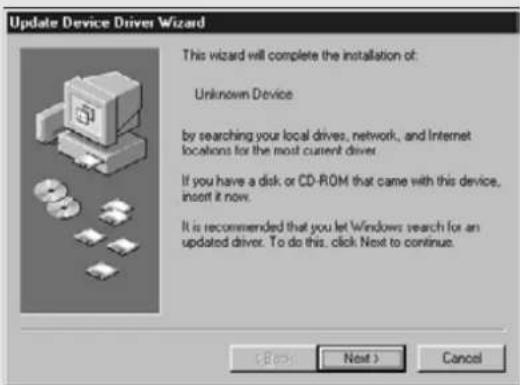
- Click on Next until the Unknown Device window appears...
then click on Finish.
- This dialog box may appear several times. Repeat step 3 until the dialog box no longer appears.
Windows NT
- Select Start > Settings > Control Panel, then double-click on the SCSI Adapters icon. Confirm that Minolta #2882 appears as a connected device for your SCSI board.
- If Minolta #2884 does not appear, turn the system off and check all the connections. Repeat the procedure.
INSTALLING THE SOFTWARE
- Insert the Dimâge Scan Speed CD-ROM into the CD-ROM drive.
- Select Run from the Start menu.
The Run dialog box will appear.
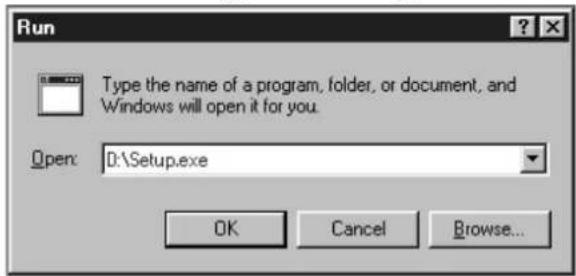
6. Select D:\ENGLISH\Setup.exe from the Open drop-down list, then click on . OK
- If your CD-ROM drive is not the D drive, replace the D with the appropriate designation for your CD-ROM drive.
The installer flash will appear.
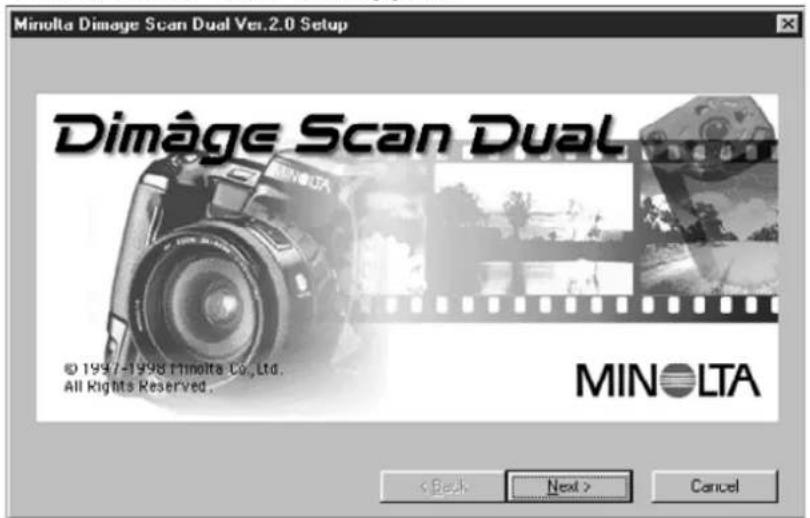
- Click on . Next >
Continued on the following page.
The Welcome dialog box will appear.
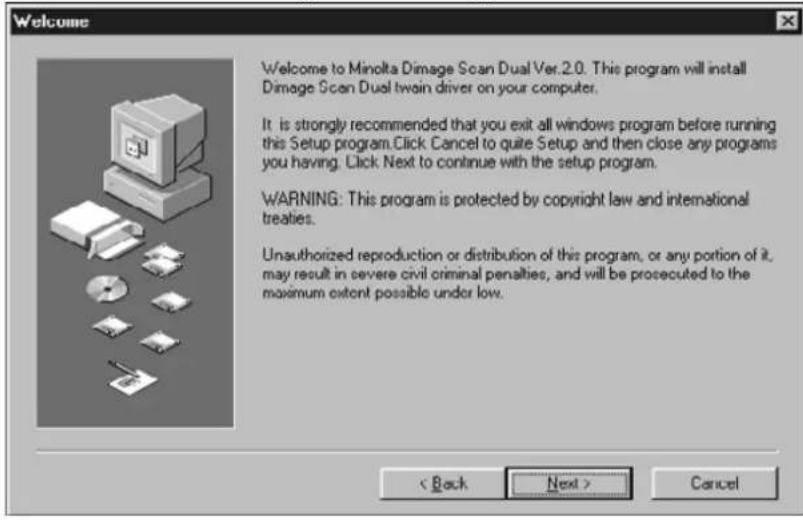
8. Click on . Next >
The Software License Agreement will appear.
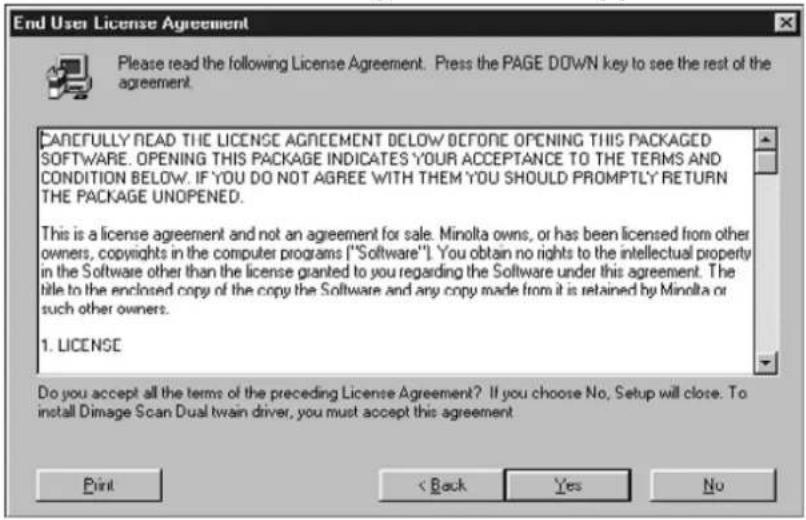
9. After reading the agreement, click on . Yes
- If you do not agree to the conditions stated in the End-User License Agreement, click on No and the software will not be installed.
The Setup Options dialog box will appear.
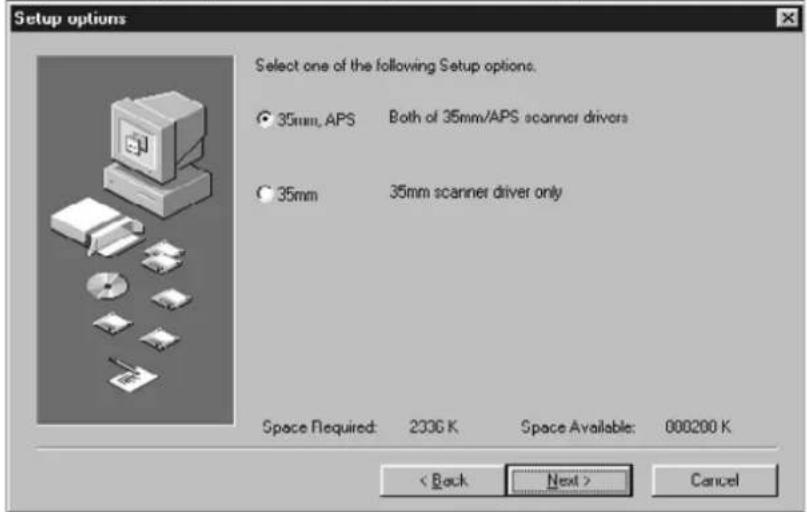
10. Select the desired option, then click on
The Select Program Folder dialog box will appear.
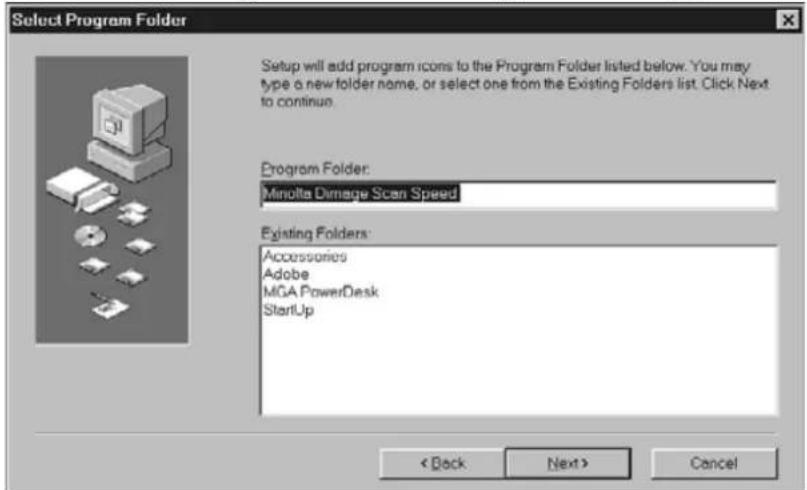
11.Click on
- Setup will begin.
Continued on the following page.
The Setup Successful dialog box will appear.
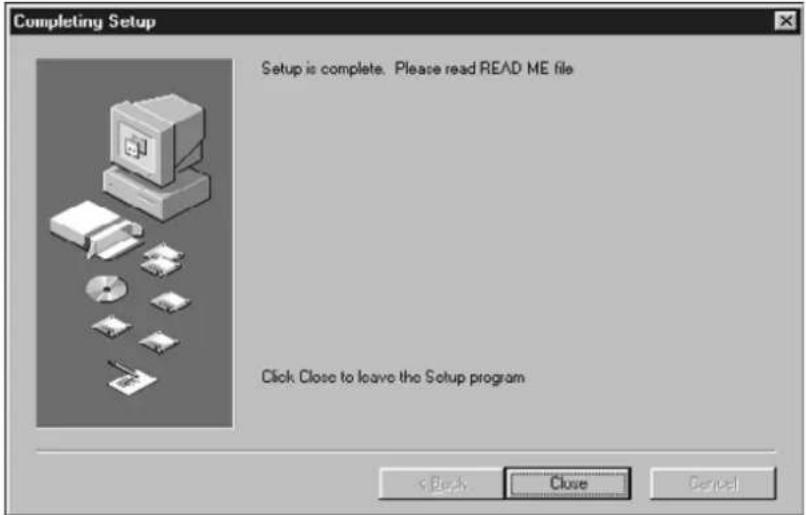
- Click on . Close
The following dialog box will appear.
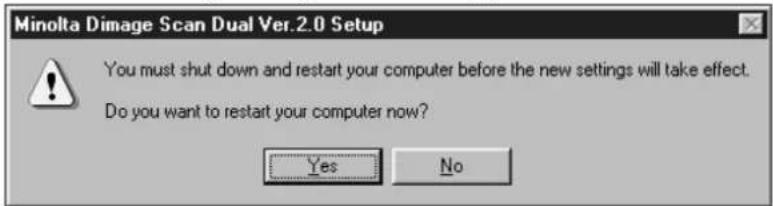
- Click on Yes
Dimage Scan Dual for Window Setup has placed the following files onto your computer.
DSDual.ds
DSDual.du
DSDual.hlp
dsd tw.ini
Twain.dll
Twain_32.dll
Twunk_16.exe
Twunk_32.exe
readme.txt
Please read the Read Me file before proceeding with this manual.
STANDARD OPERATION
SCAN FLOW
Launch the Software
Set the Preferences
Load the Film Holder
Insert the Film Holder
Specify the Film Type
Prescan
Select the Output Mode
Orient the Image
Correct the Brightness, Contrast, and Colour
Scan
Save
LAUNCHING THE SOFTWARE
The following instructions detail the import procedure for Adobe Photoshop. Refer to the online manual to import images into Adobe PhotoDeluxe.
- Turn on the Minolta Dimâge Scan Dual, then turn on your PC.
- Launch Adobe Photoshop.
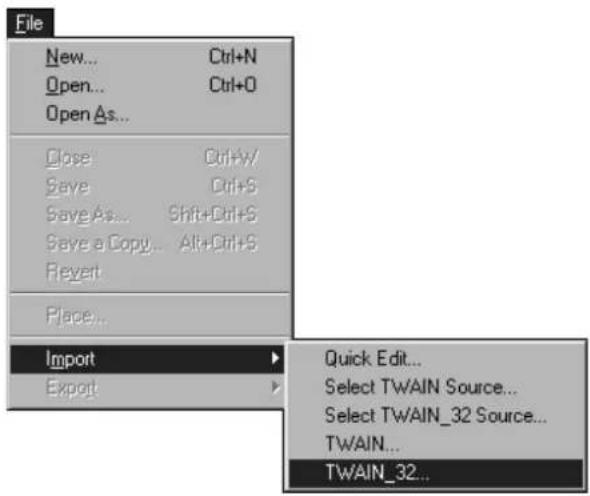
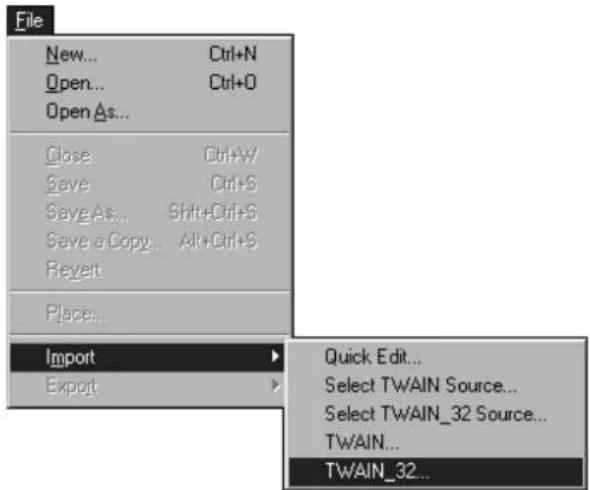
- Select File > Import > Select Twain_32 Source
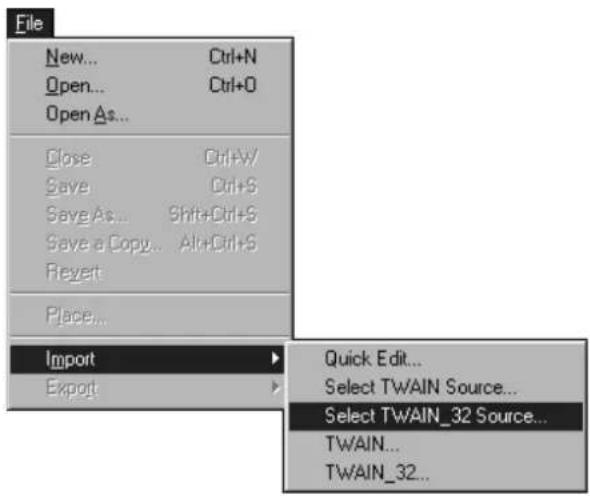
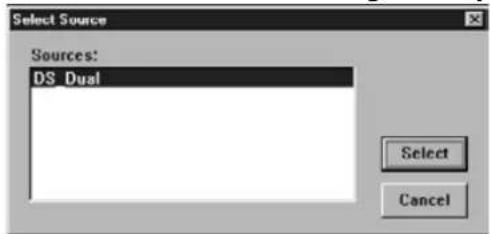
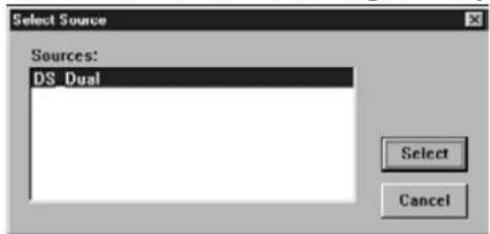
- Select DS_dual, then click on Select
The Select Source dialog box appears.
- Select File > Import > Twain-32
The setup screen will appear.
The Dimâge Scan Dual's standard control and preview windows appear after initialization is complete (approx. 2 min.).
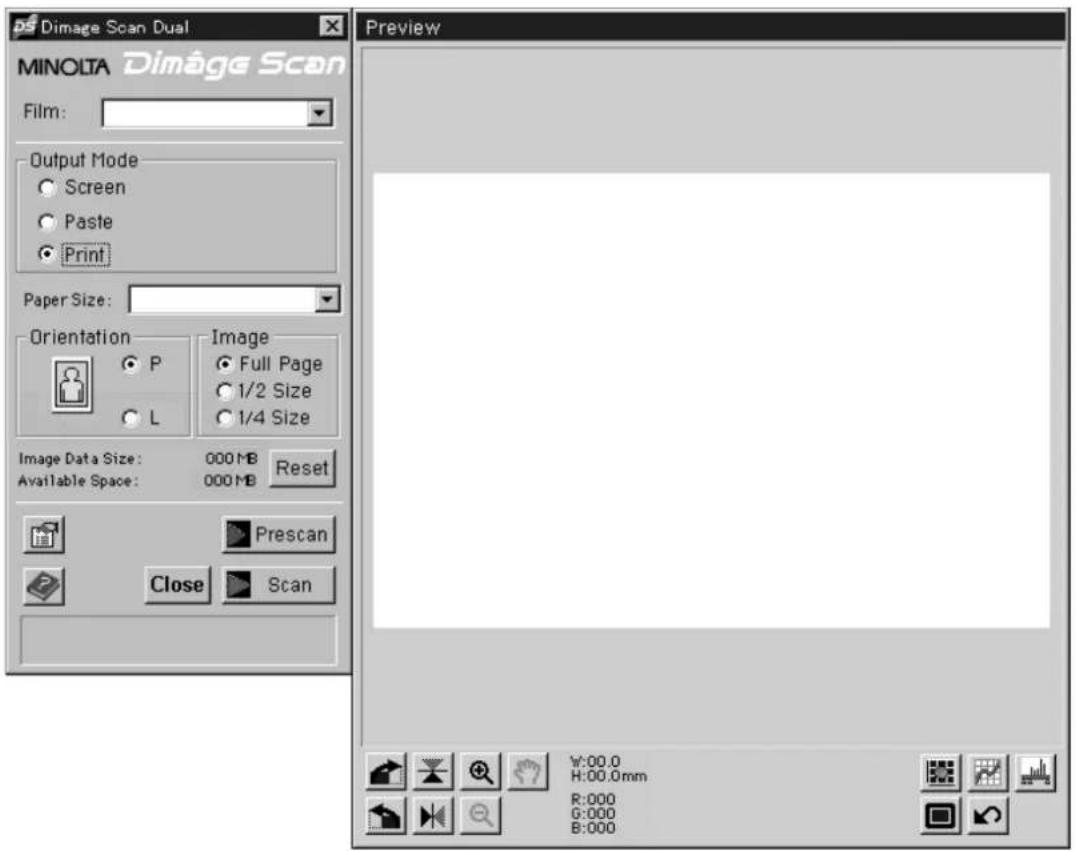
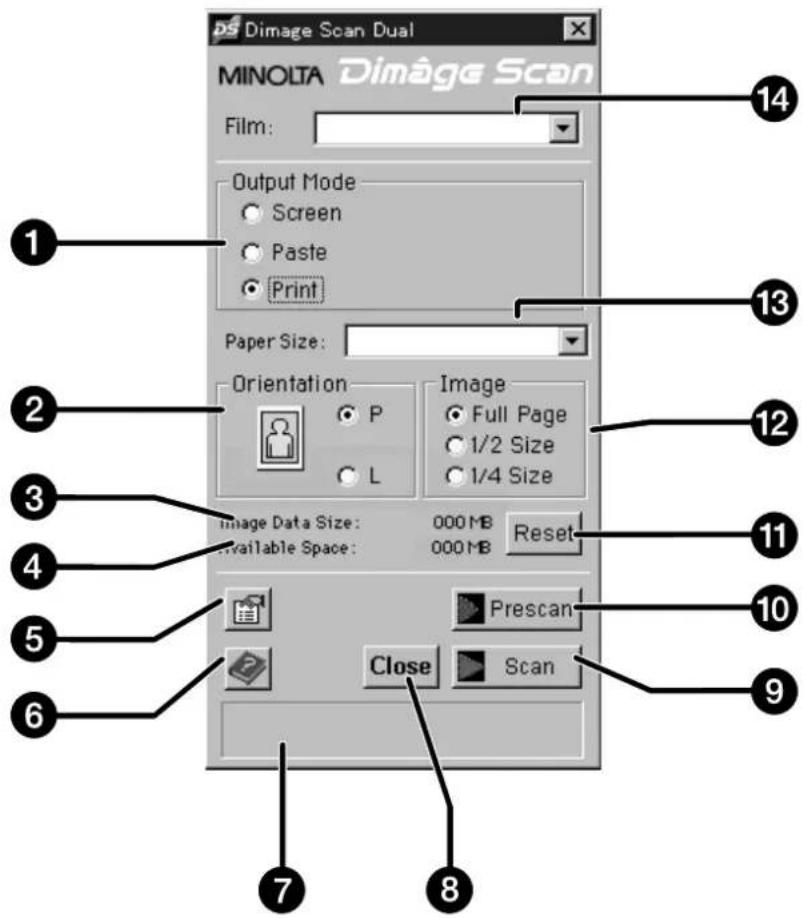
- Image use option buttons
- Image orientation option buttons
- File size
- Saving drive storage capacity
- Preference button
- Help button
-
Status window
-
Exit button
- Scan button
- Prescan button
- Reset button
- Relative image size option buttons
- Image/Paper size list box
- Film type list box
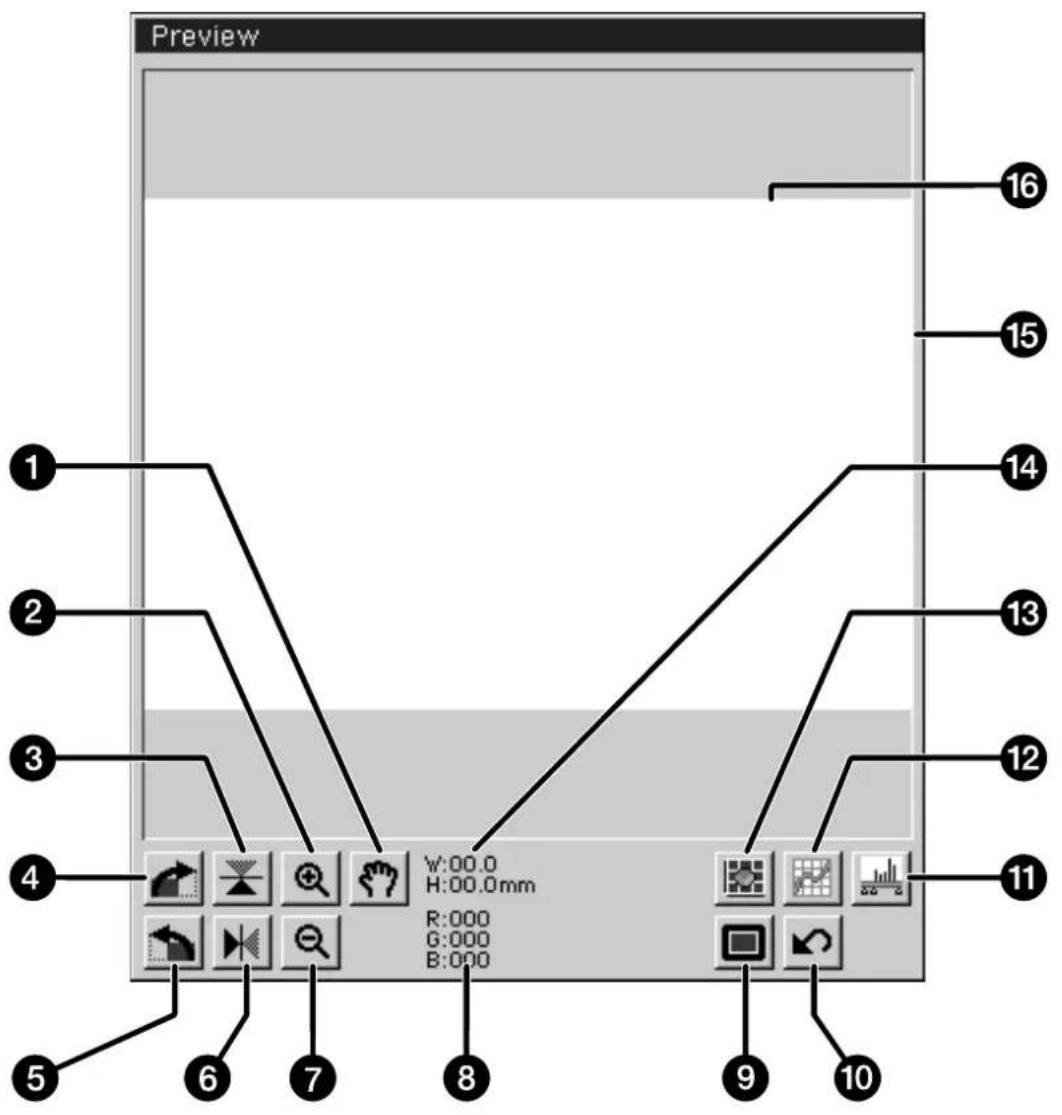
- Grab button
- Enlarge button
- Flip vertical
- Rotate 90^ right
- Rotate 90° left
- Flip horizontal
- Reduce button
-
RGB values under cursor
-
Full-screen display button
- Revert to prescan settings button
- Histogram button
- Curves button
- Variations button
- Cropping frame dimensions
- Cropping frame
- Preview window
1. Click on

The Preferences dialog box will appear.
![Preference Scanner Control Standard Precision Default Value Input Resolution: dpi Output Resolution: dpi Unit: Available in precision mode Auto Expose with Positive Film Close driver after scanning Background Color: Modify 35mm Film Settings Preview Size: Auto Detect Scratch disk name: [-c-] OK Cancel Help 12 11 10 9 8 7 6 5](/content/2026/05/987038/images/64e2b263f32a41774a30aee7612d4f849a8fd524bb7cdb35c071929a13457e13.jpg)
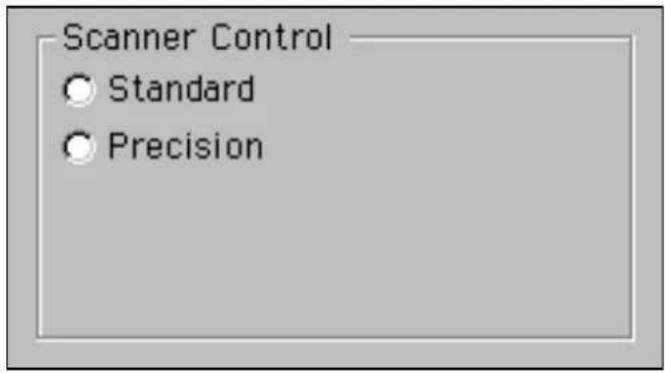
- Scanner control option buttons
- Close driver after scan checkbox
- Auto expose positive film checkbox
- Background colour modify button
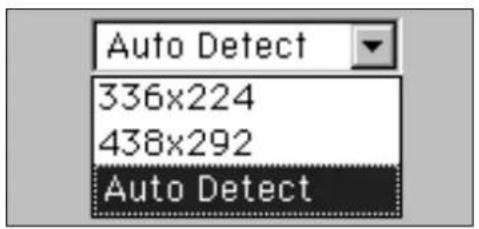
- Preview window size list box
-
Scratch disk list box
-
Unit list box
- Output resolution list box
- Input resolution list box
- Help button
- Cancel changes button
- OK Button
SETTING THE PREFERENCES
- Click on the Standard option button.
- Click on this checkbox if you want to use the auto-exposure system when scanning slides.
- You will obtain better scans from underexposed slide film when this checkbox is selected.

- Select the desired preview window size from the drop-down list.
- Select the saving directory.
• The number of options depends on the number of drives connected to your system.
![Scratch disk name: [-c-] [-a-] [-c-] [-d-]](/content/2026/05/987038/images/c67833698e22b25b7fc870101e7957eb1d192449321ec76103a5bf0fd8778e32.jpg)
- Click on the "Close driver after scanning" checkbox to automatically shut down the driver software after scanning.
Continued on the following page.
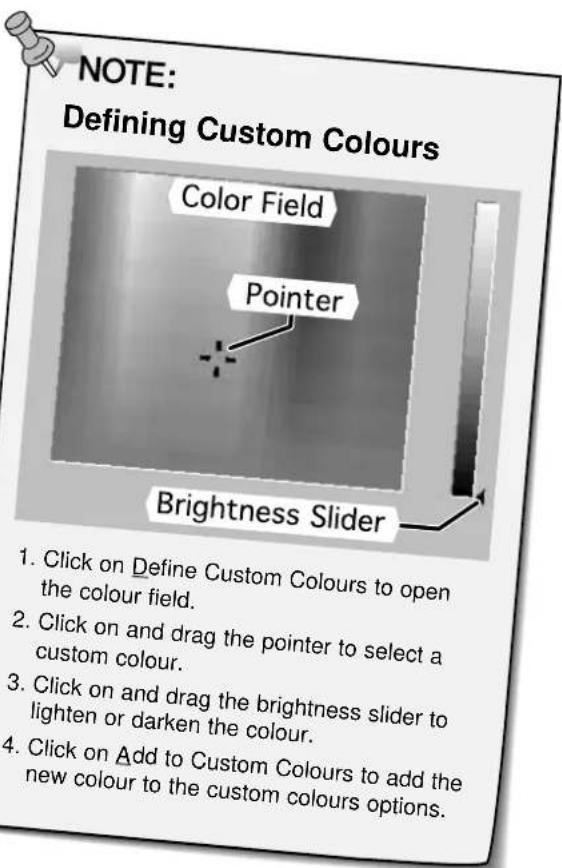
- Click on to change the background colour of the full screen display.
- The colour chip displays the background colour currently selected.
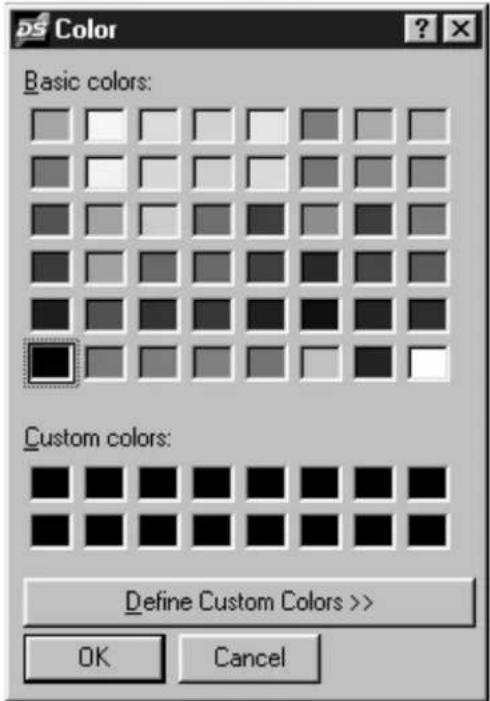
The Colour Palette dialog box will appear.
- Click on the desired background colour, then click on . OK
- Click on to accept the new preference settings.
LOADING THE FILM HOLDER
Using the included 35mm negative and slide holders, the Minolta Dimâge Scan Dual can scan mounted or unmounted...
• 35mm colour negatives • 35mm colour slides
- 35mm black & white negatives • 35mm black & white positives
Advanced Photo System negatives and slides can also be scanned using the optional AD-10 APS Adapter. See page 57.
Loading the Negative Holder
1. Open the film holder.
2. Place the film in the film holder emulsion side down.
• The film holder will accept film strips up to 6 frames long.
- Brush dust off the film before placing it into the film holder.

NOTE:
The frame numbers and text are backwards when the film's emulsion side is up.
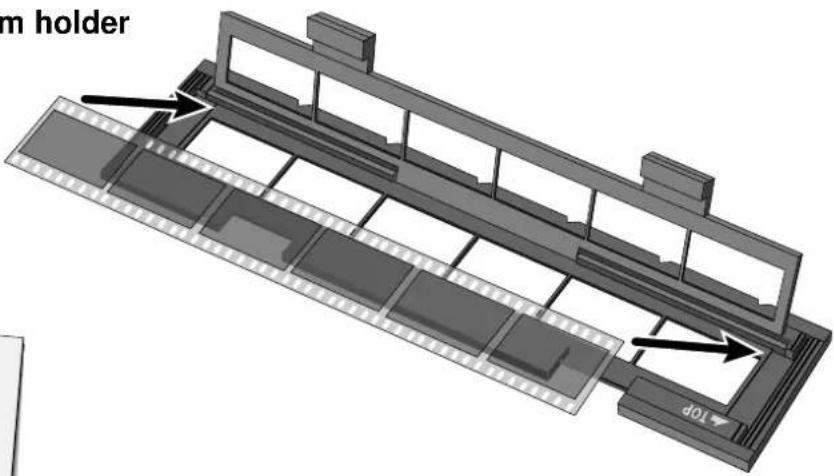
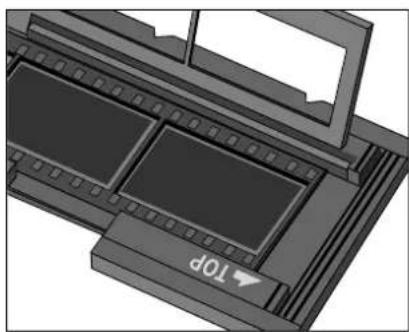
3. Align the frames within the scanning windows.
4. Snap the film holder closed.
natural_image
3D mechanical assembly diagram showing layered components with a labeled '10p' component (no readable text or symbols beyond the label)Loading the Slide Holder
Insert slides into the slide holder emulsion side down.
- Brush dust off the slide before placing it into the film holder.
- Slide mounts must be thicker than 1 mm and thinner than 2 mm to fit into the slide holder.
- Orient the slides horizontally, not vertically.
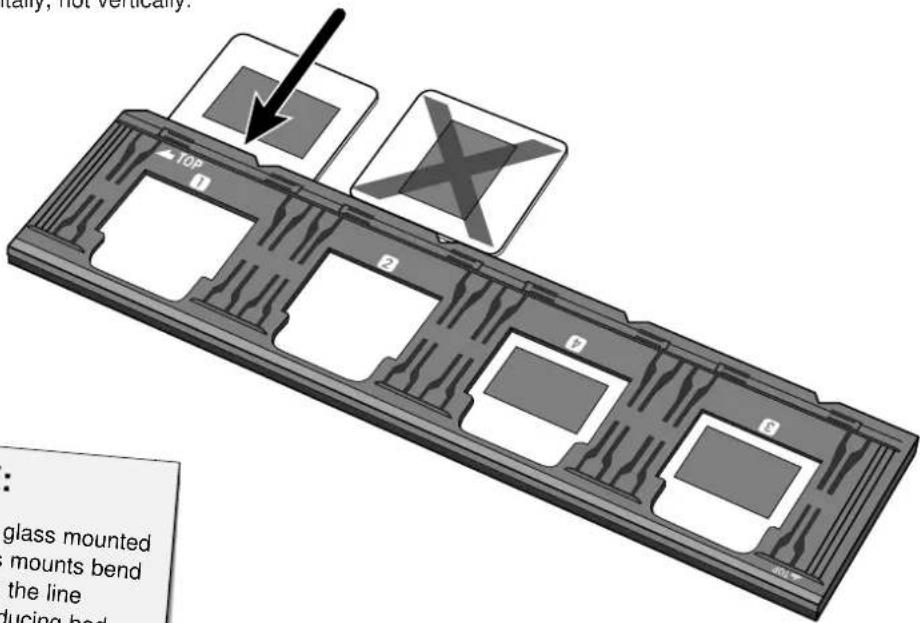

NOTE:
Do not scan glass mounted slides. Glass mounts bend the light from the line scanner, producing bad results.
INSERTING THE FILM HOLDER INTO THE SCANNER
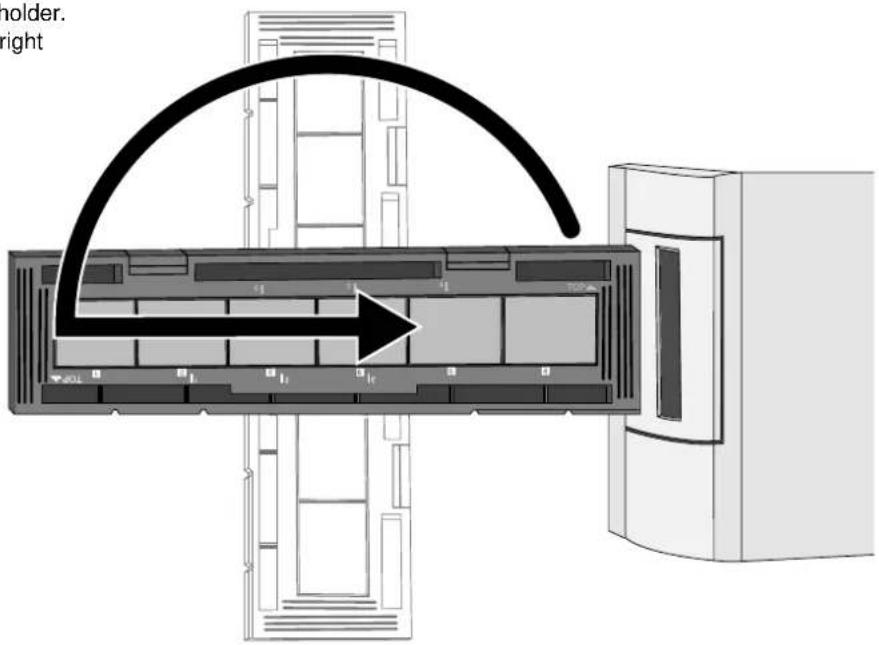
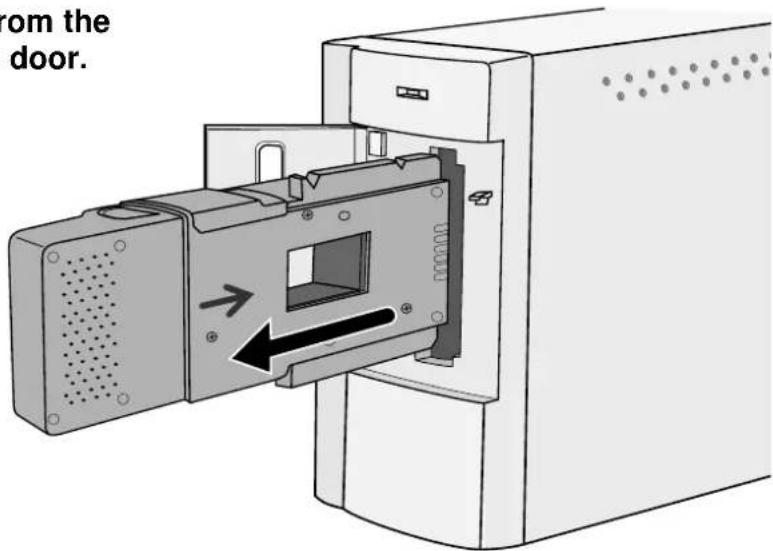
The notches in the film and slide holders identify the position of the scanning windows. Push the holder in all the way in to scan the last frame on that side of the film holder. Remove, flip, then reinsert the film holder to scan the frames on the other side of the holder.
Insert the negative holder into the scanner's film slot to scan frames 1, 2, or 3.
- Frames 1 or 2 with the slide holder.
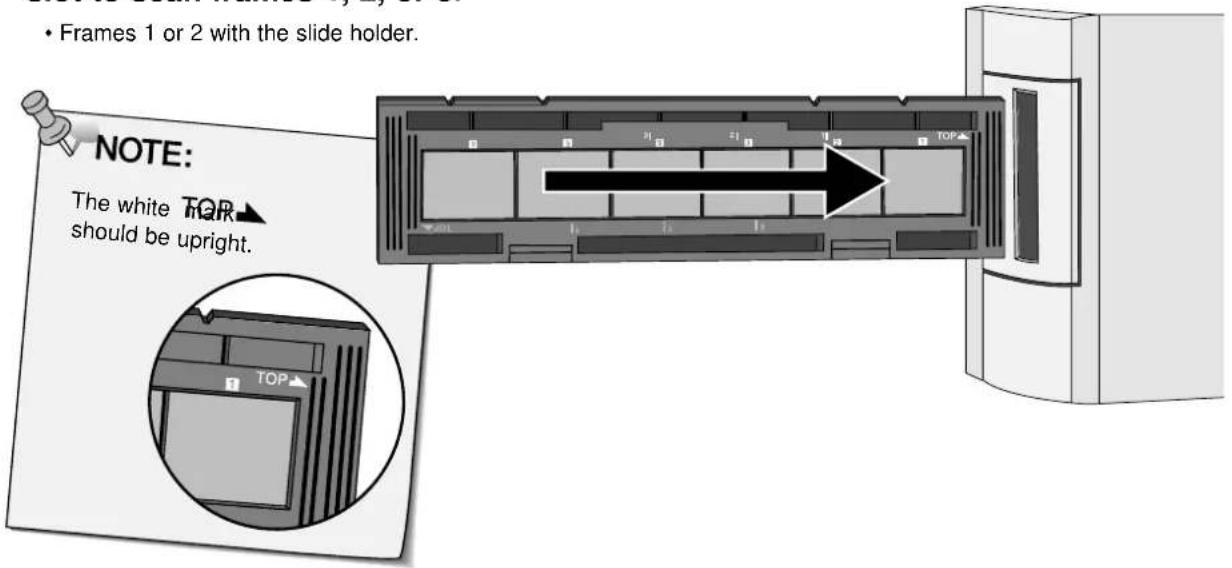
Remove, flip, then reinsert the negative holder to scan frames 4, 5, or 6.
- Frames 3 or 4 with the slide holder.
• The blue TQR should be upright
SETTING THE FILM TYPE / PRESCAN
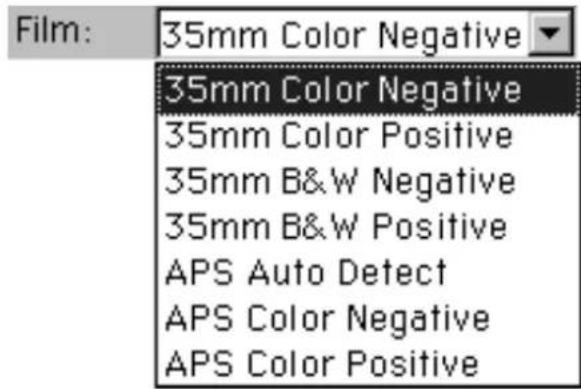
Setting the type of film you are scanning is necessary to accurately reproduce the image. When 35mm film is being scanned, select colour negative, colour positive, black & white negative, or black & white positive. Refer to pages 54-62 when you are scanning Advanced Photo System film.
Select the type of film you are scanning from the film type drop-down list.
- The selected film type will be displayed in the film type window.
- Refer to pages 54-62 if you are scanning an APS film type.
Film:
35mm Color Negative

35mm Color Negative
35mm Color Positive
35mm B&W Negative
35mm B&W Positive
APS Auto Detect
APS Color Negative
APS Color Positive
Prescan
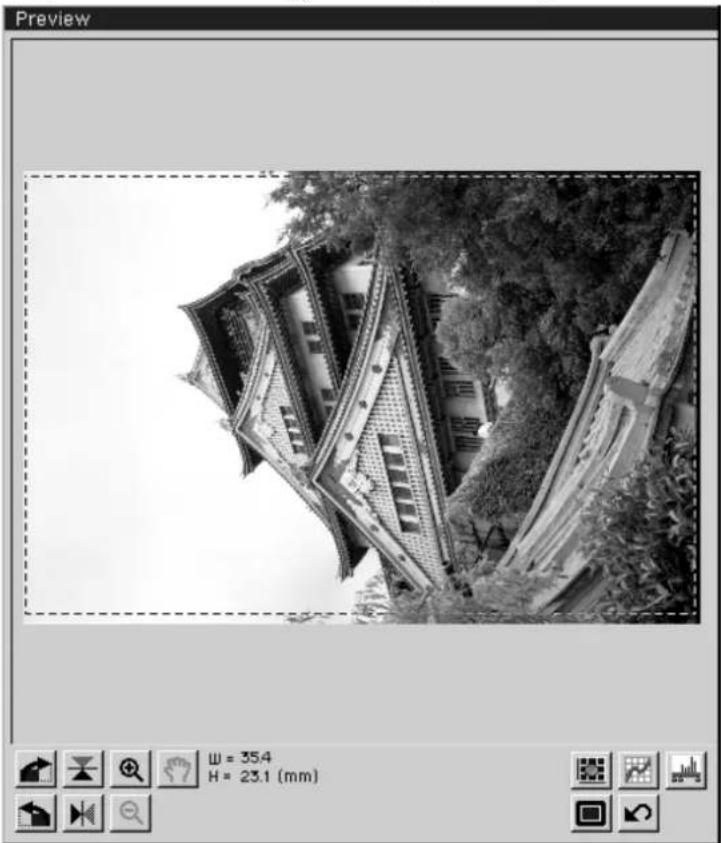
Click on to preview the image.
• The indicator lamp blinks slowly (0.5 Hz) during prescan.

NOTE:
Press the option key when clicking on to improve the colour accuracy of the prescan image.
• The film will be prescanned twice. The first scan will set the exposure. The second prescans the image.
The prescanned image will appear in preview window.
natural_image
Black-and-white photo of traditional Chinese-style architecture with tiled roofs and greenery, no visible text or symbols.- The Preview and Control windows can be moved to any convenient location on the screen. Grab the title bar to move the preview or control windows.
SELECTING THE USAGE MODE
Standard mode has three image usage options to simplify operation of the Dimâge Scan Dual for beginners.
Screen – Image will be viewed on a monitor (image data base or home page).
Paste – Image will be imported into a word processing document.
Print – Image will be printed or modified using Photoshop or PhotoDeluxe.
1. Click on the option button for the desired usage mode.
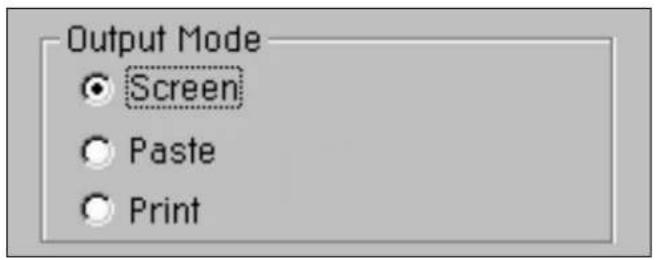
Screen
2. Select the desired image size from the image size drop-down list.
- When selected, your image will be scanned at a 96 dpi resolution.
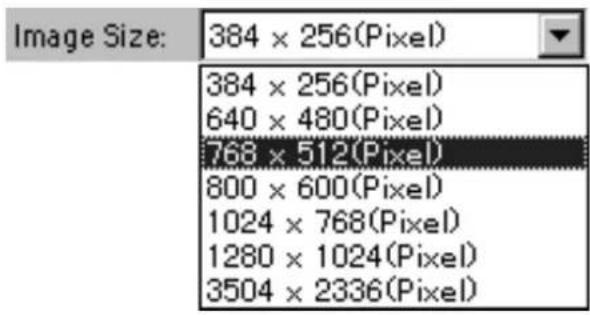
The table below lists the display size for each image size in the drop-down list for monitors with a screen resolution of 72 dpi.
| Image Size (pixels) | Approx. File Size Image Size | |
| 384 x 256 263K | 4.83 x 3.56 in. | |
| 640 x 480 907K | 8.89 x 6.67 in. | |
| 768 x 512 1.2MB | 10.67 x 7.11 in. | |
| 800 x 600 1.4MB | 11.11 x 8.33 in. | |
| 1024 x 768 2.3MB | 14.22 x 10.67 in. | |
| 1280 x 1024 3.9MB | 17.78 x 14.22 in. | |
| 3504 x 2336 24.2MB | 48.67 x 32.44 in. |
Continued on the following page.
Paste
- Select the word processing document's paper size from the paper size drop-down list.
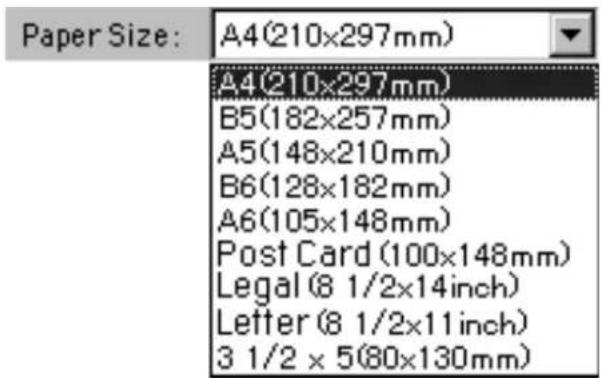
- Click on the landscape (horizontal) or portrait (vertical) print orientation option button.
- Image orientation only affects the orientation of the prescan and scanned images. Set the correct paper orientation in your printer driver and word processing application.
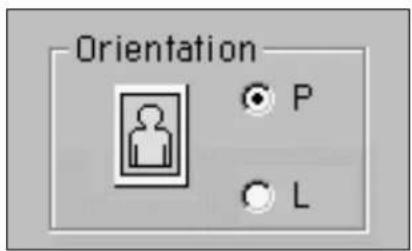
-
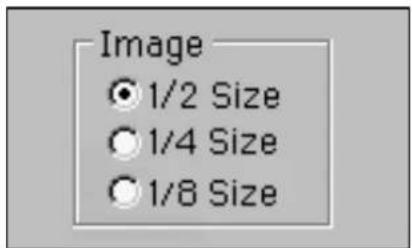
Click on the desired image size option button.
-
The actual size of the image depends on the paper size selected in step 2.
- The image will be scanned at a resolution of 96 dpi.
- The page orientation icon changes according to the image size selected.
- Select a paper size from the paper size drop-down list.
- Image orientation only affects the orientation of the prescan and scanned images. Set the correct paper orientation in your printer driver.
-
Click on the landscape (horizontal) or portrait (vertical) print orientation option button.
-
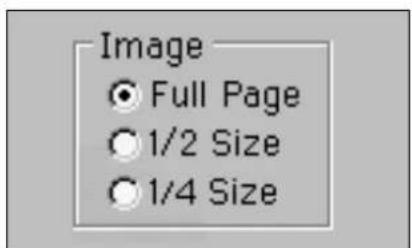
Click on the desired image size option button.
-
The actual size of the image depends on the paper size selected in step 2.
- The image will be scanned at a resolution of 180 dpi.
ORIENTING THE IMAGE
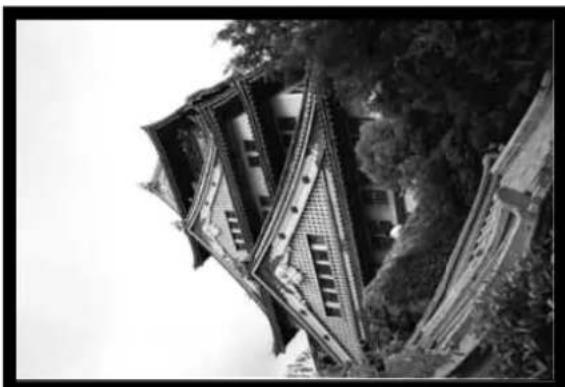
Rotate
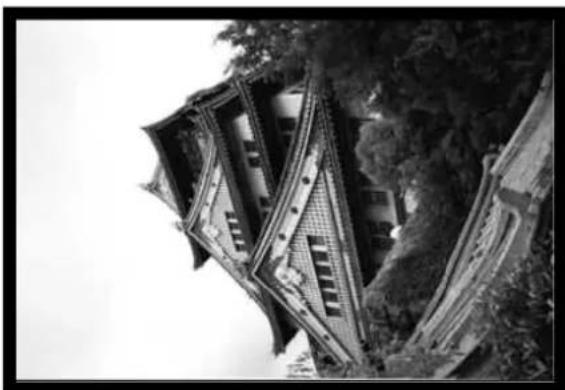
Click on the and buttons to correct the orientation of your image before scanning. Changes will be reflected in the preview image.
- Click on view the image inside the cropping window full screen.
Click on rotate the image 90° clockwise.
natural_image
Black-and-white photo of traditional Chinese architectural eaves with lattice windows, partially obscured by trees (no visible text or symbols)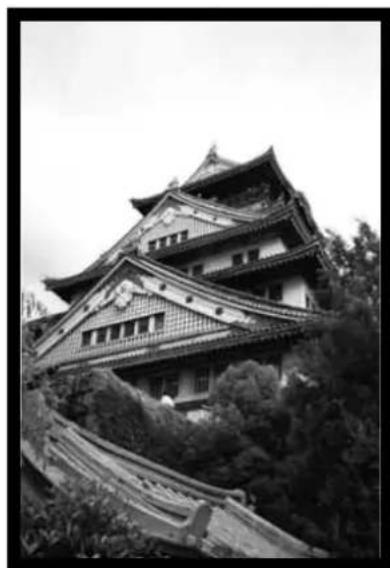
natural_image
Black-and-white exterior view of a traditional multi-tiered Japanese-style building with tiled roofs and balconies, surrounded by trees (no visible text or symbols)Click on to rotate the image 90° counter-clockwise.
natural_image
Black-and-white photo of traditional Chinese architectural eaves with tiled roofs and wooden beams, partially obscured by tree foliage (no text or symbols visible)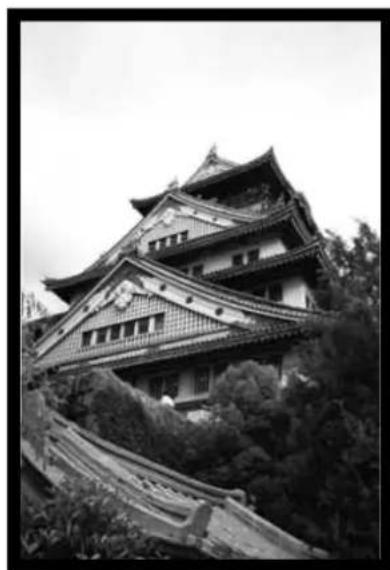
natural_image
Black-and-white exterior view of a traditional Chinese multi-tiered building with tiled roofs and a sloped roof, surrounded by trees (no visible text or symbols)Continued on the following page.
ORIENTING THE IMAGE
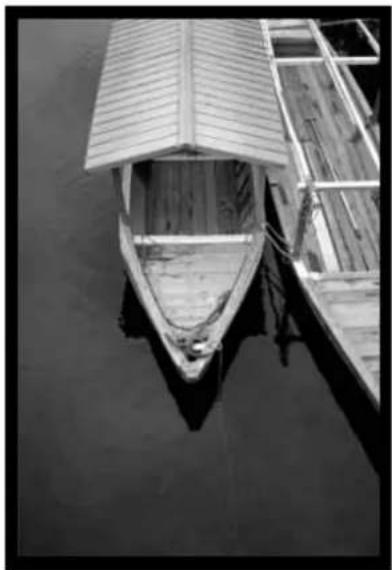
Flip
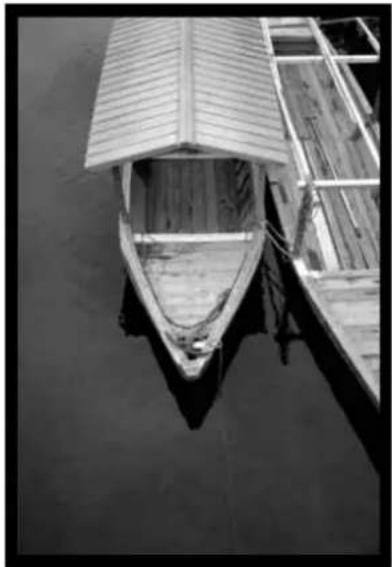
The and buttons let you flip the image left to right or top to bottom before scanning. Changes will be reflected in the preview image.
- Click on view the image inside the cropping window full screen.
Click on to flip the image top to bottom.
natural_image
Black-and-white aerial view of a small boat with a wooden roof on calm water, docked at a wooden pier (no text or symbols visible)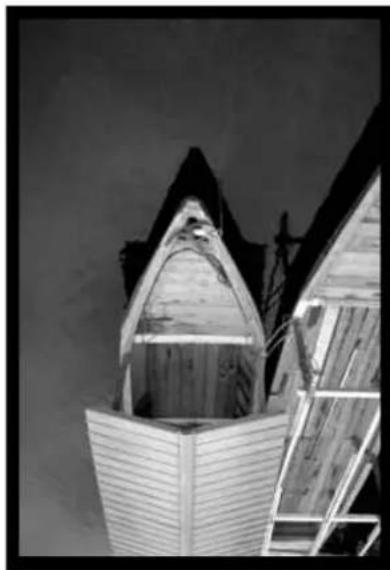
natural_image
Black-and-white photo of a modern building with wooden roof and large windows, no visible text or symbols• The image is upside down compared to the original prescan.
Click on to flip the image left-to-right.
natural_image
Black-and-white photo of a small boat docked at a wooden pier, with no visible text or symbols.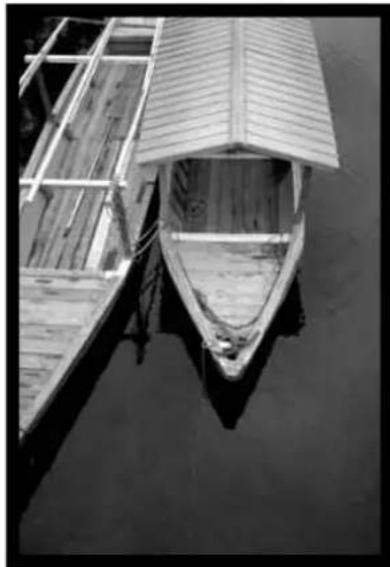
natural_image
Black-and-white aerial view of a wooden boat docked at a pier, with no visible text or symbols.• Image is backwards compared to the original scan.
Cropping
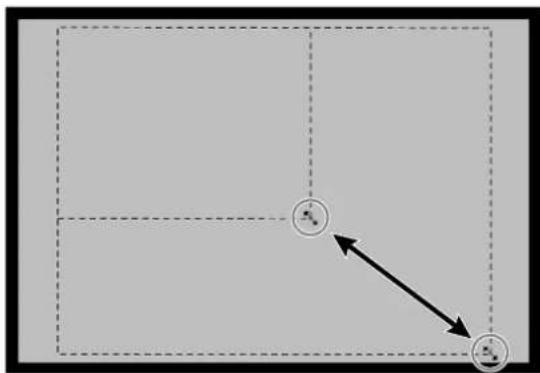
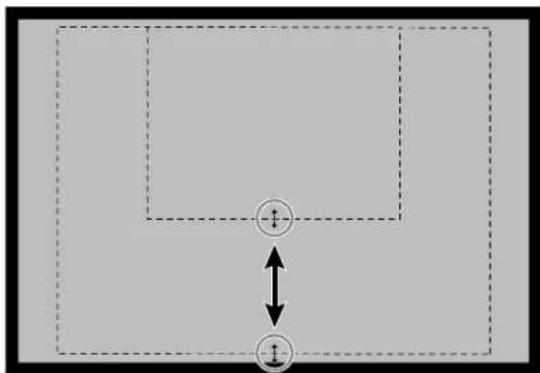
The cropping frame is the box surrounding the image area you want to scan. The height to width ratio of the scan area is fixed in standard mode. Use precision mode when you want to change the height to width ratio of the scanning area.
- Click on to view the image inside the cropping window full screen.
To enlarge or reduce the size of the cropping frame...
Click on the corners and drag...
flowchart
graph TD
    A["Input Node 1"] --> B["Output Node 2"]
    style A fill:#f9f,stroke:#333
    style B fill:#bbf,stroke:#333
or click on sides and drag.
flowchart
graph TD
    A["Input Node 1"] --> B["Output Node 2"]
    style A fill:#f9f,stroke:#333
    style B fill:#ccf,stroke:#333
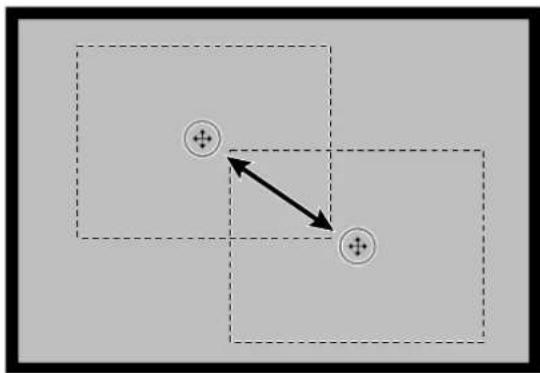
To move the cropping frame...
Click on the inside of the cropping frame and drag.
natural_image
Two overlapping squares with circular symbols and arrows, no text or labels presentVARIATION DIALOG BOX – NAMES OF PARTS
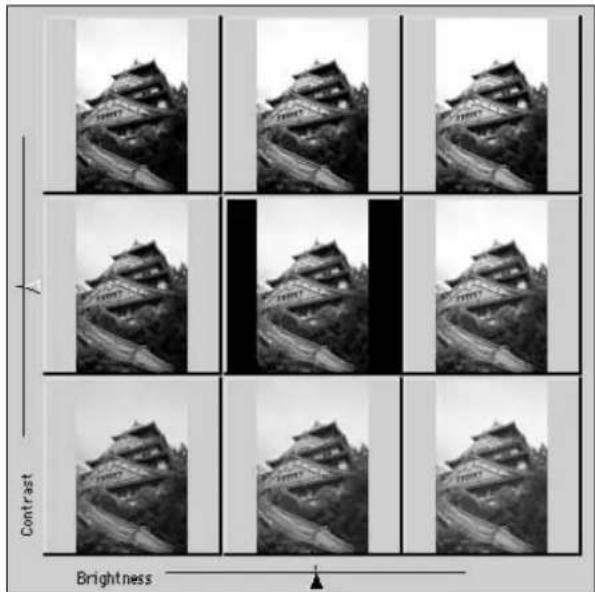
The variation dialog box lets you quickly correct the brightness and contrast of your image by clicking on simulations that represent varying amounts correction to your image. Correct the colour by clicking on the colour you want to add to your image.
- Click on view a full screen display of the control and preview windows.
1. Click on in the preview window.
The Variation dialog box will appear.
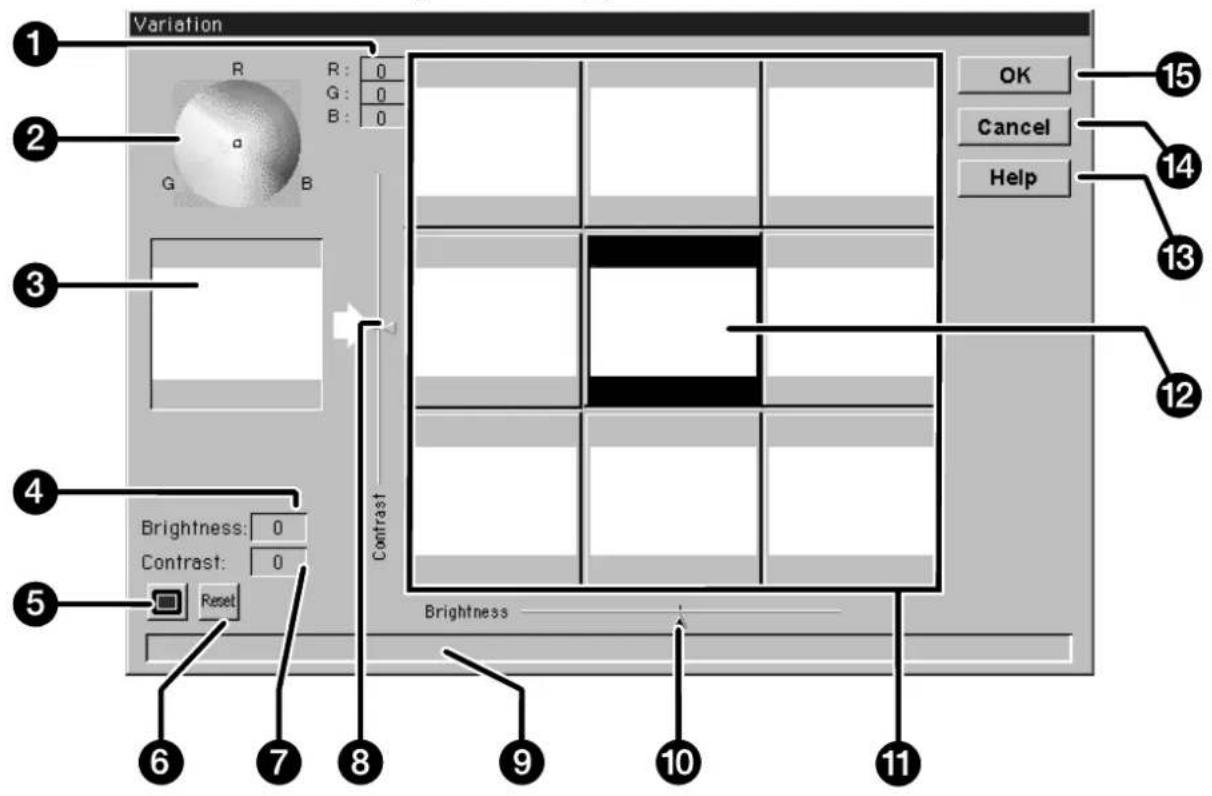
- RGB levels
- Colour picker
- Control image
- Brightness Level
- Full-screen display button
- Reset button
- Contrast level
-
Contrast-level slider
-
Status window
- Brightness slider
- Image simulation windows
- Preview image
- Help button
- Cancel button
- OK button
Adjusting the Brightness and Contrast
The image simulation windows map contrast and brightness changes to the preview image. The windows display a one step change in the brightness and contrast, but up to 10 steps (+/-) can be applied. The current colour, brightness, and contrast changes are automatically applied to the preview image
2. Click on the appropriate window or move the sliders to increase or decrease the contrast and/or brightness.
- The changes are automatically applied to the preview image.
• Additional contrast and brightness simulations will be mapped around the center image.
Adjusting the Colour
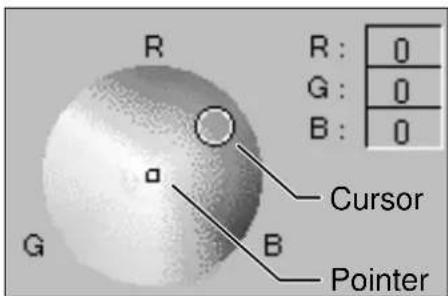
The colour picker consists of a colour map and a pointer. Adjust the colour of your image +/- 20 points in any direction by clicking on any colour tone within the colour map. Colour corrections at the edge of the colour map are more saturated (stronger). Colour corrections closer to the center are less saturated. Colour corrections are automatically applied to all of the image simulations.
3. Place the colour correction you want to apply to your image within the the cursor, then click the mouse button.
• The pointer will move to the new position on the colour map.
- The RGB correction values are displayed to the right of the colour picker.
4. Click on to apply the changes to your scan.
- Click on to cancel all corrections and start over.
- Click on to close the variations window without applying any corrections.
SCANNING AND SAVING THE IMAGE
When you have finished making all the desired adjustments to the image, you are ready to scan the film.
1. Click on

Scan
- The cursor will change to an hourglass and a progress bar will appear.
- To cancel the scan, click on or press the escape key until the
Cancelling Operation message box appears.
Do not remove the film holder until the scan is finished. Interfering with the scanner during scan could result in image distortion.
2. Click on to exit the Dimâge Scan Dual driver software. The image will be opened in your photo application software.
- The driver window will automatically close after each scan if "Close driver after scanning" was selected in the preferences dialog box.
3. Save the image using the instructions from your photo application software.
- Remove the film holder from the scanner.

NOTE:
Multiple images can be scanned before closing the software if Photoshop is the host software.
PhotoDeluxe, Corel DRAW and Corel Photopaint can only acquire one image at a time.
PRECISION OPERATION
SCAN FLOW
Launch the Software
Set Preferences
Load the Film Holder
Insert the Film Holder
Specify the Film Type
Prescan
Orient the Image
Set the Resolution
Correct the Brightness, Contrast, and Colour
Scan
Save
Launch the Software
- Turn on the Minolta Dimâge Scan Dual, then turn on your PC.
-
Launch Adobe Photoshop.
-
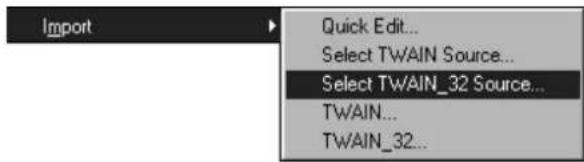
Select File > Import > Select TWAIN_32 Source...
• The select source dialog box will appear.
-
Click on DS_Dual, then click on Select.
-
Select File > Acquire > TWAIN_32.
- The Minolta Dimâge Scan Dual control and preview windows appear after initialization is complete.
Set the Preferences
-
Click on to open the preferences dialog box.
• The preferences dialog box will open. -
Click on the Precision mode option button.
-
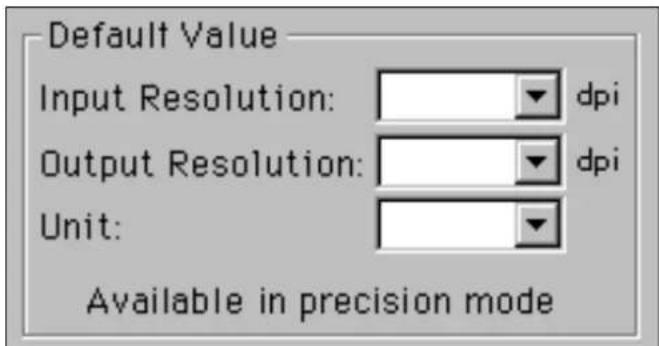
Specify the default input resolution, output resolution, and units settings from the drop-down lists.
- Click on to accept the new preference settings.
PRECISION CONTROL WINDOW – NAMES OF PARTS
The precision mode control window will appear with the preview window.
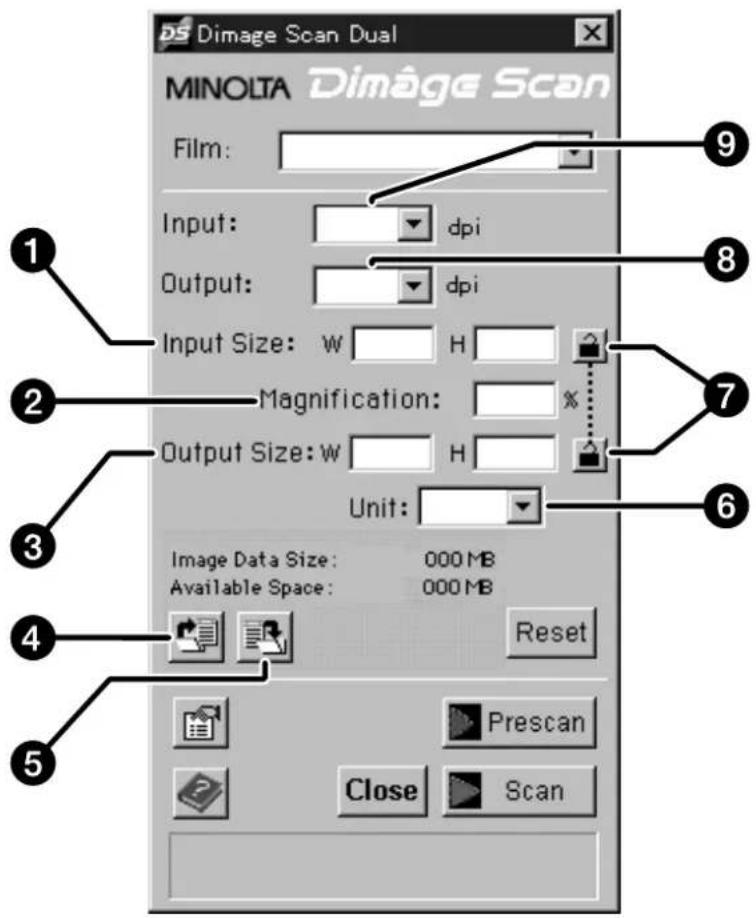
- Input size text box
- Magnification window
- Output size text box
- Load scan settings button
-
Save scan settings button
-
Units list box
- Lock buttons
- Output resolution list box
- Input resolution list box
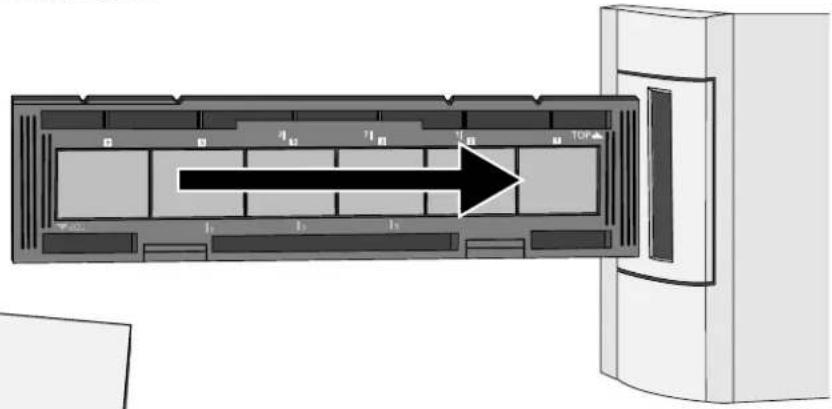
Load and insert the film holder.
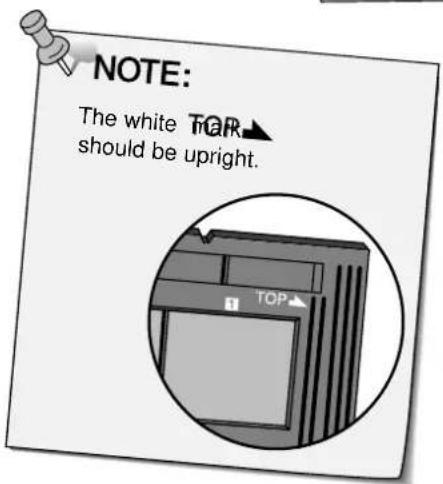
Specify the film type.
Film:
35mm Color Negative

35mm Color Negative
35mm Color Positive
35mm B&W Negative
35mm B&W Positive
APS Auto Detect
APS Color Negative
APS Color Positive
Click on
- The indicator lamp blinks slowly (0.5 Hz) during prescan.

NOTE:
Press the option key when clicking on to improve the colour accuracy of the prescan image.
• The film will be prescanned twice. The first scan will set the exposure. The second prescans the image.
ORIENTING THE IMAGE
Rotate, flip, and crop the image as desired.
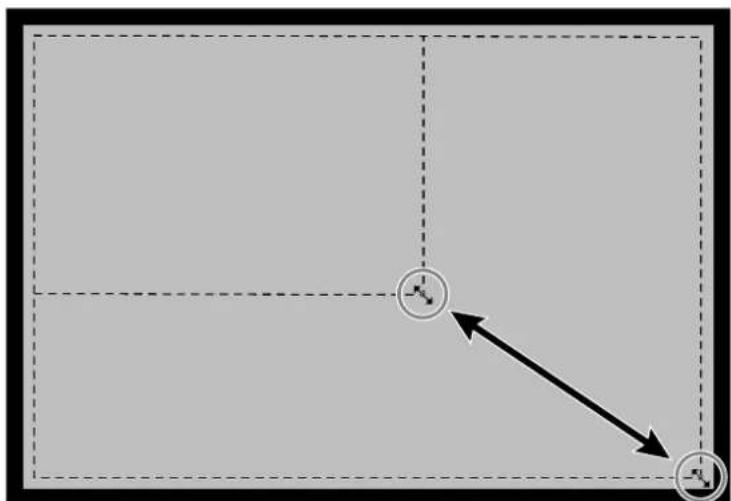
Click on the corners of the cropping frame to resize the scan area proportionally.
flowchart
graph TD
    A["Input Node"] --> B["Output Node"]
    style A fill:#fff,stroke:#000
    style B fill:#fff,stroke:#000
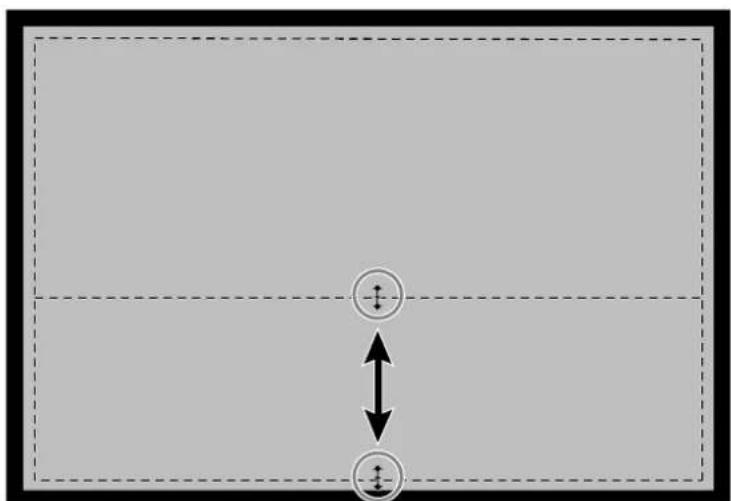
Click on the sides of the cropping frame to resize the scan area non-proportionally.
natural_image
Pure diagram of a horizontal bar with two circular symbols and bidirectional arrows, no text or labels present.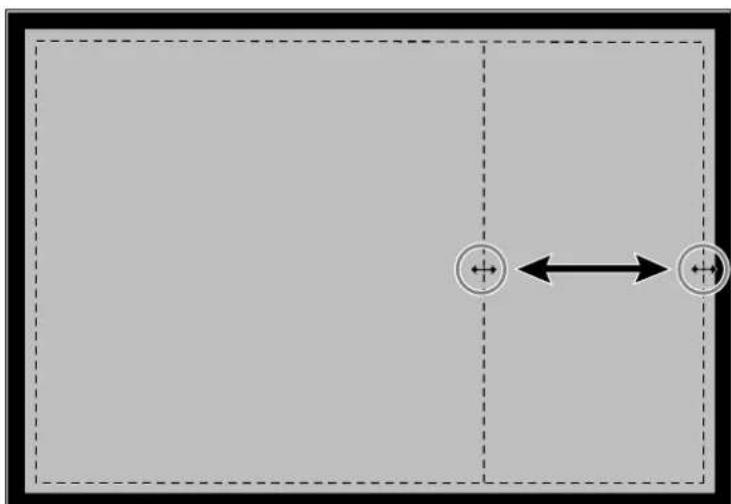
natural_image
Pure diagram of two circular symbols with bidirectional arrows inside a dashed rectangular frame (no text or labels)SETTING THE RESOLUTION
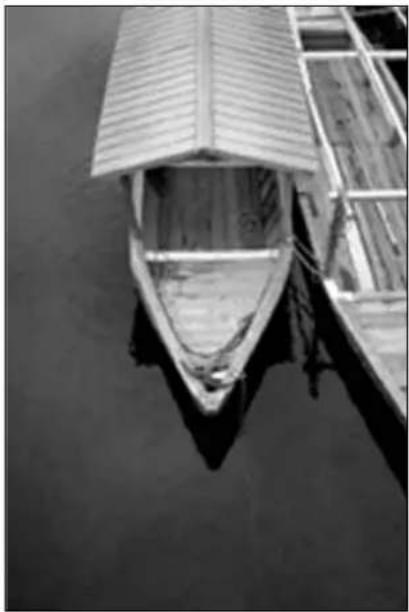
Image resolution is the number of pixels per inch (ppi or dpi) that represent your scanned image. Image size and resolution determine the size of your image file. Lower input resolutions result in shorter scan times. Higher input resolutions make larger output sizes and higher output resolutions possible.
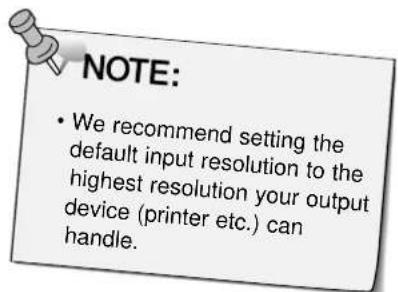
The rule to follow when scanning is, "bigger is better". We recommend you set the output resolution to the highest value your output device (printer, monitor, etc.) can handle. The input resolution will vary with the size of the scan area, magnification, and output size.
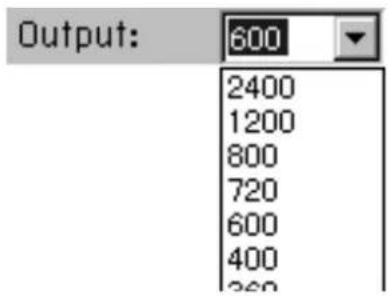
1. Select the desired output resolution from the output resolution drop-down list.
- Values can also be entered directly to the output resolution list box.
- This menu is dimmed and cannot be accessed when the units menu is set to pixels.
2. The dimensions of the cropping frame are displayed in the input size text boxes.
- Values can also be entered directly to the input size list boxes.
- The values will change if a different unit of measure is selected.
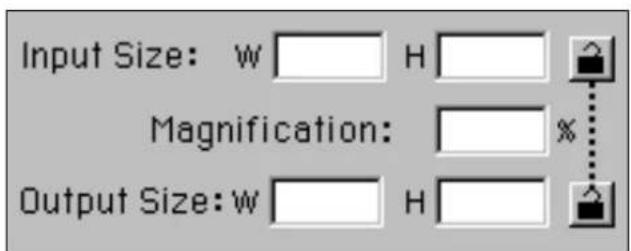
3. Enter the desired output size (maximum 3 digits).
- The output size is limited by the maximum resolution of the scanner.
- The values will change if a different unit of measure is selected.
- The output size windows are dimmed when the units menu is set to pixels.
4. The input resolution list box displays the lowest input (scan) resolution necessary to achieve the desired output size and resolution.
- Input scan resolutions can also be selected from the drop-down list or entered directly into the input resolution list boxes.
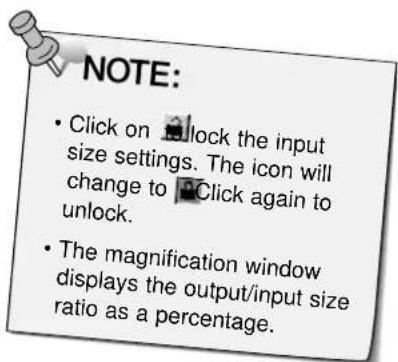
RESOLUTION NOTES
Resolution and Output Size
Output resolution is determined by hardware. The Dimâge Scan Dual driver software automatically determines the correct scan resolution to obtain the desired output size and resolution.
To determine the final dimensions of a displayed or printed image yourself, multiply the dimensions of the scan area by the scan resolution (input resolution), then divide by the resolution of the output device (output resolution).
Resampling Up
Resampling up occurs when pixel values are interpolated to create an output resolution higher than the input resolution value. Resampling up generally results lower image quality.
Users of the Dimâge Scan Dual need to be aware of resampling because image corrections entered in the driver software are applied after the image has been scanned and sent to the CPU. Resampling up will occur when the scanner's output resolution is set higher than the input resolution at magnification greater than 100.
Incorrectly Scanned Image Correctly Scanned Image
natural_image
Black-and-white aerial view of a small boat with a wooden roof canopy on calm water, no visible text or symbols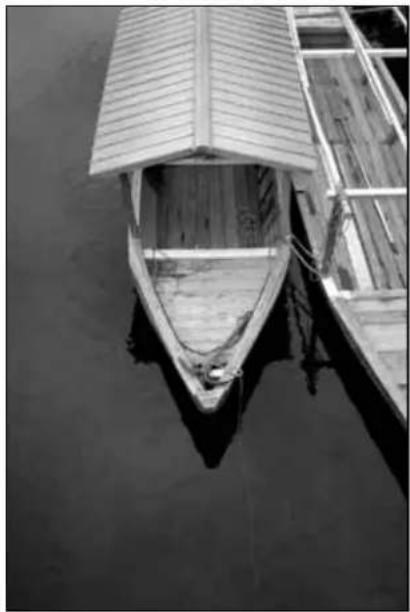
natural_image
Black-and-white aerial view of a wooden boat with a roof canopy on calm water, casting shadows (no text or symbols visible)SCAN SETTINGS – SAVE AND LOAD
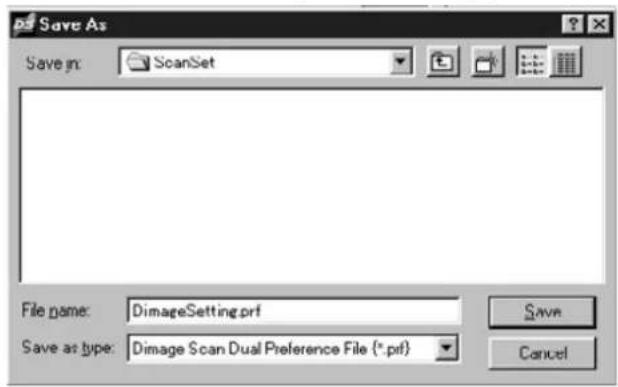
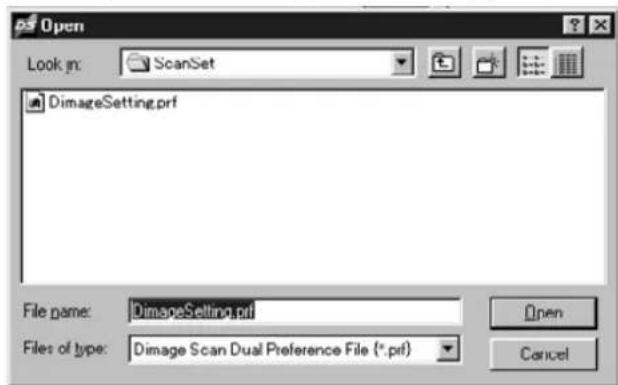
The button in the precision control window saves the resolution, scan area, magnification, and units settings to a data file. The button lets you retrieve those settings and apply them to a new image
Saving Scan Settings
1. Click on

- The resolution, scan area, magnification, and units settings are saved to a data (dat) file.
2. Enter a file name and the location to save the file, then click on Save.
The save file dialog box will appear.
Loading Scan Settings
1. Click on

2. Select the data file you want to use, then click on Open.
- The settings in the selected file are applied to the current image.
The open file dialog box will appear.

NOTE:
The scan settings files for colour and black and white film are not interchangeable.
HISTOGRAM DIALOG BOX – NAMES OF PARTS
The histogram dialog box displays the frequency of occurrence of the 256 levels of brightness for each of the colour channels that make up the image area inside the cropping frame. Level 0 is minimum brightness. Level 255 is maximum brightness. The midtones fall in-between.
- The histograms represent the red, green, and blue brightness levels for the control image. Click on and hold to view the histograms for the preview image.
Click on in the preview window.
The Histogram dialog box will appear.
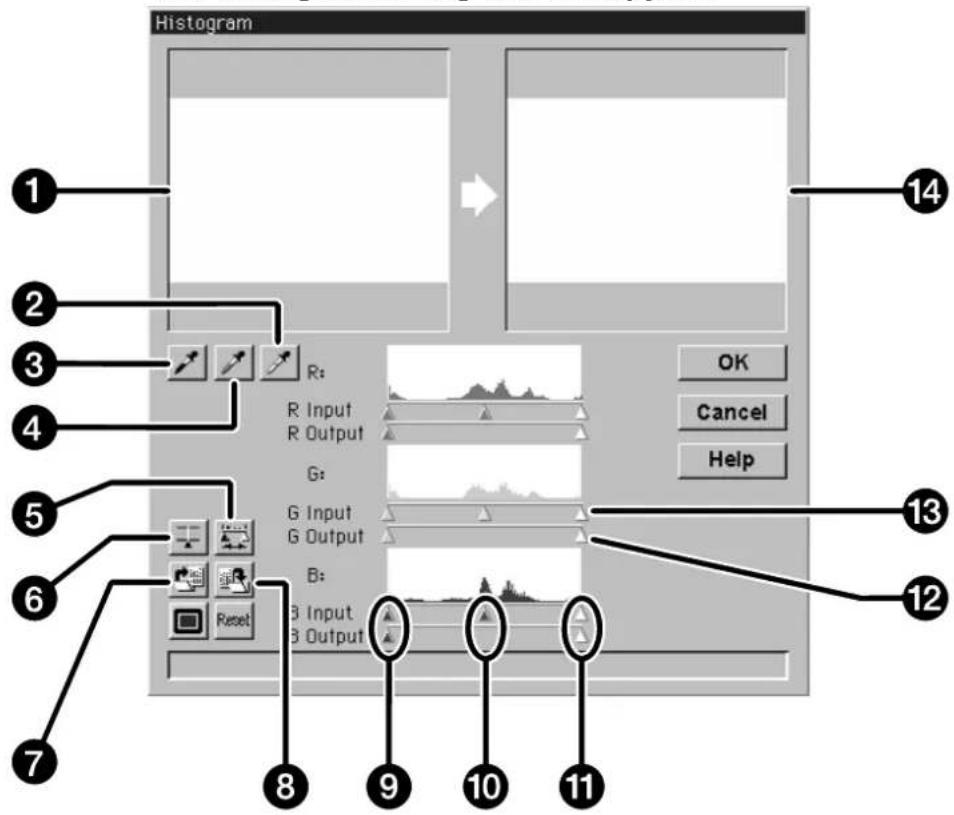
- Control image
- White point button
- Black point button
- Gray point button
- Output histogram button
- RGB synchro button
-
Load settings button
-
Save settings button
- Shadow sliders
- Midtone slider
- Highlight sliders
- Output level sliders
- Input level sliders
- Preview image
Continued on the following page.
IMAGE CORRECTION – HISTOGRAM
Setting the White, Black, and Gray Points
Properly setting an image's white and black points will usually correct the colour cast and midtone distribution.
• Changes are automatically applied to the preview image.
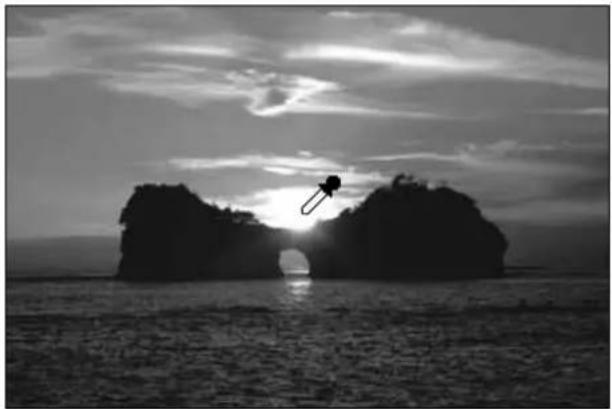
- Click on , then click on the tone in the control image that should be scanned as the brightest neutral white in your image.
• The cursor will change to
- The RGB brightness values of the selected tone will be changed to 255.
natural_image
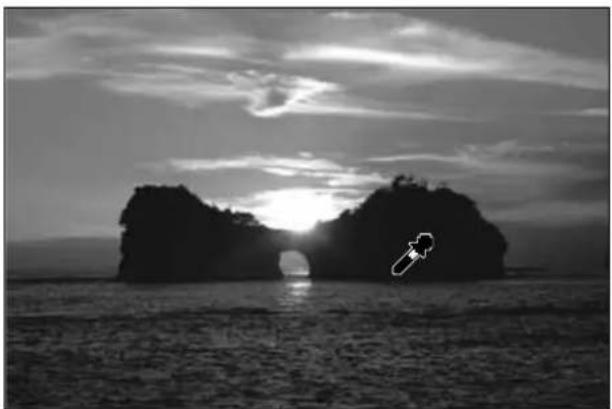
Silhouette of a person jumping over a large arch bridge between two rocky cliffs at sunset (no text or symbols)- Click on 📂 then click on the tone in the control image that should be scanned as the darkest neutral black in your image.
• The cursor will change to
- The RGB brightness values of the selected tone will be changed to 0.
natural_image
Silhouette of two large rock formations under a bright sun over water, with a small white arrow icon in the bottom right corner (no text or symbols)- Click on , then click on the tone in the control image that should be scanned as middle gray.
• The cursor will change to
- The RGB brightness values of the selected tone will be changed to 127.

NOTE:
Setting the gray point is not necessary for most images.
IMAGE CORRECTION – HISTOGRAM
Using the Histogram Sliders - RGB Synchro
When RGB synchro is selected, moving the levels sliders remaps the pixel values without changing the colour balance. Correcting the highlight and shadow values with the histogram sliders, may produce better results on images without neutral highlights or shadows.
If the histogram contains large flat line areas...
1. Click on
- Changes applied to one colour channel will be reflected in the other two.
2. Click on and move the input level highlight and shadow sliders to the edges of the flat line area.
- Changes are automatically applied to the preview image.
- Values to the right of the highlight slider will be scanned as pure white (level 255). Values to the left of the shadow slider will be scanned as pure black (level 0).
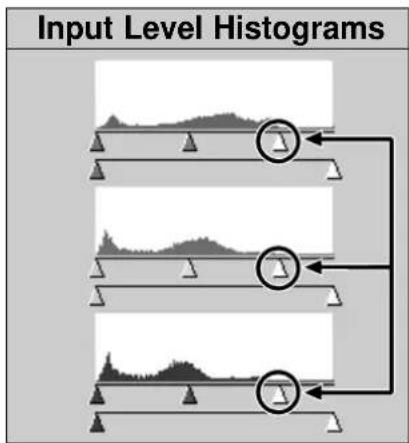
Input level highlight sliders moved to the edge of the flat line area.
3. Click on and slide the output level sliders until the preview image has the desired image contrast.
- Click on to view the control and preview images full screen.
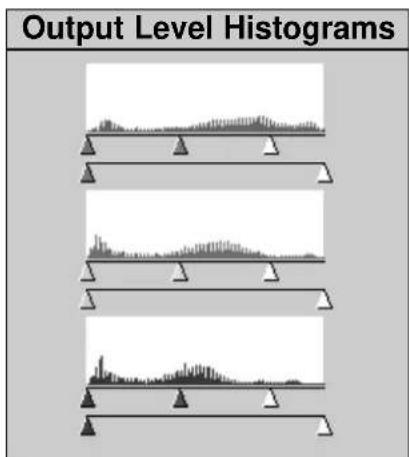
4. Click on and hold to view the output level histograms.
histogram
| Category | Value | | -------- | ----- | | Top | 100 | | Top | 95 | | Top | 90 | | Top | 85 | | Top | 80 | | Top | 75 | | Top | 70 | | Top | 65 | | Top | 60 | | Top | 55 | | Top | 50 | | Top | 45 | | Top | 40 | | Top | 35 | | Top | 30 | | Top | 25 | | Top | 20 | | Top | 15 | | Top | 10 | | Bottom | 100 | | Bottom | 95 | | Bottom | 90 | | Bottom | 85 | | Bottom | 80 | | Bottom | 75 | | Bottom | 70 | | Bottom | 65 | | Bottom | 60 | | Bottom | 55 | | Bottom | 50 | | Bottom | 45 | | Bottom | 40 | | Bottom | 35 | | Bottom | 30 | | Bottom | 25 | | Bottom | 20 | | Bottom | 15 | | Bottom | 10 | | Bottom | 5 |Pixel values have been spread to better utilize the brightness range.
Continued on the following page.
Adjusting Individual Colour Channels
Changing the slider positions for individual channels affects the colour balance of the output image.
-
Click on to deselect RGB Synchro.
-
Click on and move the R, G, and B sliders to the desired locations.
-
Changes are automatically applied to the preview image.
- Click on to view the control and preview images full screen.
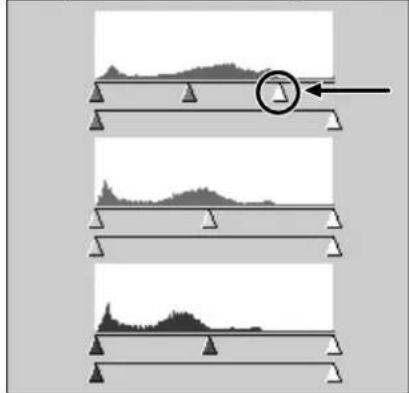
Input Level Histograms
natural_image
Diagram showing three sequential stages of a structural beam with triangular supports and a circular arrow indicating a specific point (no text or symbols present)The red input level highlight slider is moved to the edge of the red flat line area.
- Click on and hold to view the output level histograms.
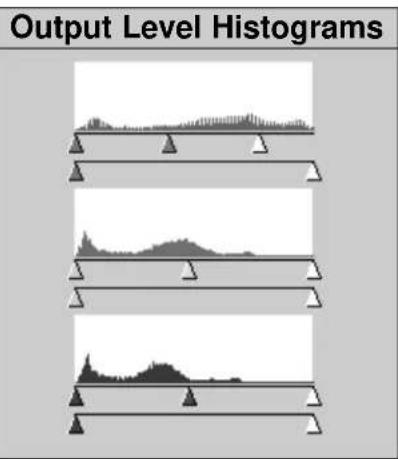
Only the red pixel values have been remapped. Remapping the values of a single colour channel usually affects the colour balance.
Applying or Cancelling Corrections
Click on to apply or to cancel Cancel the corrections.
IMAGE CORRECTION – HISTOGRAM
The button in the histogram dialog box lets you save the histogram settings to a data file. The button lets you retrieve those settings and apply them to a new image
Saving Histogram Settings
1. Click on

- The histogram settings are saved to a data (dat) file.
- Enter a file name and the location to save the file, then click on . Save
The save file dialog box will appear.
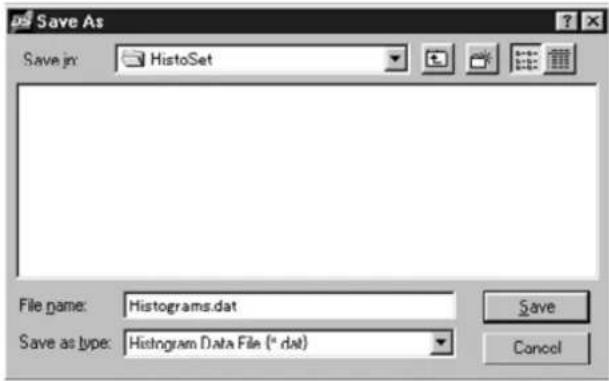
Loading Histogram Settings
1. Click on

- Select the data file you want to use, then click on Open.
- The settings in the selected file are applied to the current image.
The open file dialog box will appear.
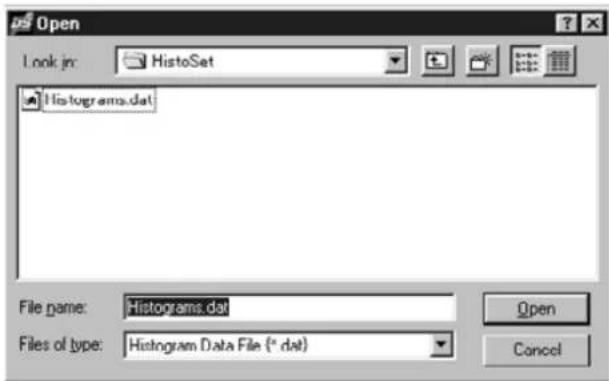

NOTE:
The histogram settings files for colour and black and white film are not interchangeable.
TONE CURVE DIALOG BOX – NAMES OF PARTS
The tone curve dialog box displays correction curves for the prescanned image. Here you can control the brightness, contrast, and colour of the output image.
Click on in the preview window.
The Tone Curve dialog box will appear.
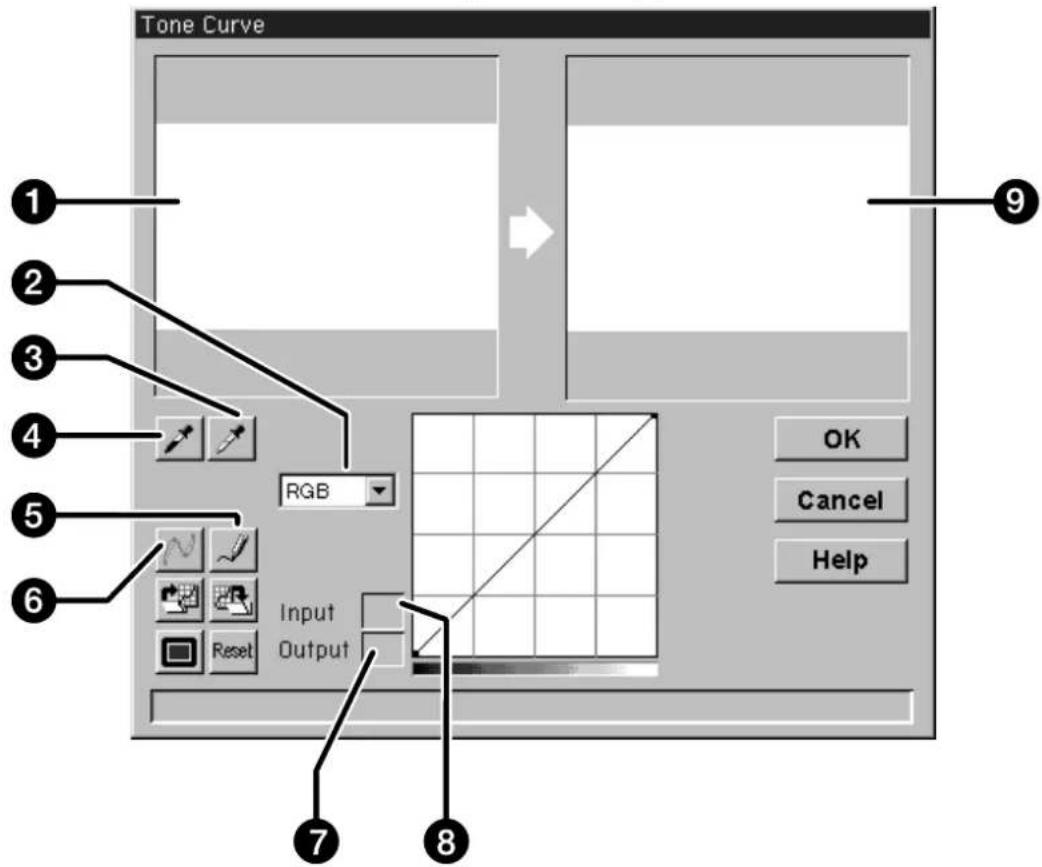
- Control image
- Colour channel list box
- White point button
- Black point button
-
Free curve
-
Calculate button
- Output brightness value
- Input brightness value
- Preview image
IMAGE CORRECTION – CURVES
Setting the White and Black Points
Properly setting an images white and black points will usually correct the colour cast and midtone distribution.
• Changes are automatically applied to the preview image.
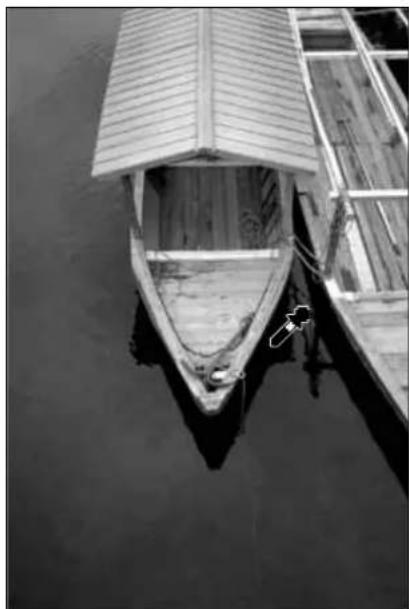
- Click on , then click on the tone in the control image that should be scanned as the brightest neutral white in your image.
- The cursor changes to ⚙ - The RGB brightness values of the selected tone will be changed to 255.
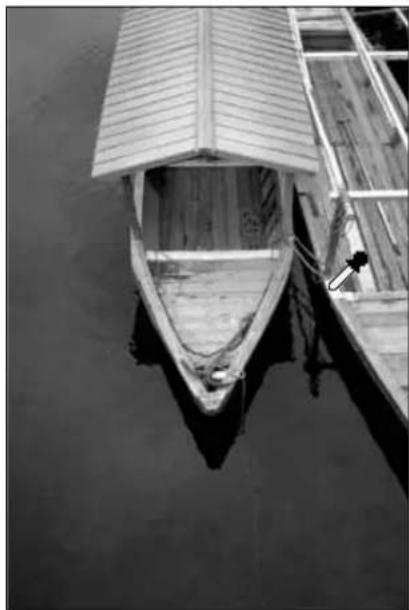
natural_image
Aerial black-and-white view of a small boat docked at a wooden pier, with no visible text or symbols.- Click on , then click on the tone in the control image that should be scanned as the darkest neutral black in your image.
- The cursor changes to ⚙ - The RGB brightness values of the selected tone will be changed to 0.
natural_image
Black-and-white aerial view of a small boat with a wooden roof and dock, casting clear reflections on calm water (no text or symbols visible)Continued on the following page.
Correcting the Tone Curves
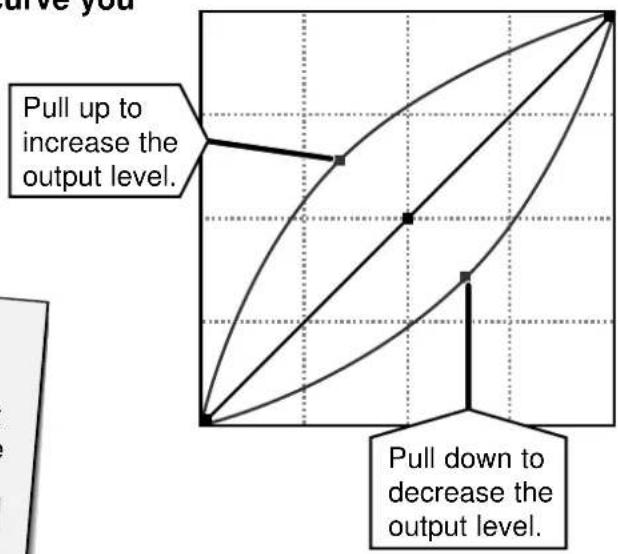
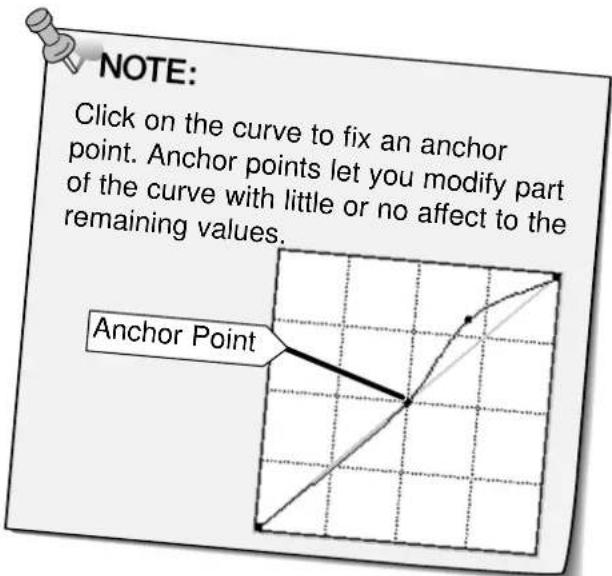
Changing the shape of a correction curve changes the output brightness level for each corresponding input brightness level. Changing the shape of the red, green, or blue curves affects colour balance of the image. Changes to the RGB curve affect the image contrast and brightness.
- Select the channel you want to adjust from the colour channel drop-down list.
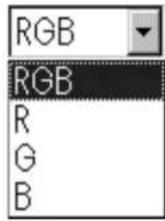
- Click on and drag the portion of the curve you want to change.
• Changes are automatically applied to the preview image.
flowchart
graph TD
    A["Pull up to increase the output level."] --> B["Curve 1"]
    C["Pull down to decrease the output level."] --> D["Curve 2"]
    B --> E["Point 1"]
    D --> F["Point 2"]
    E --> G["End"]
    F --> H["End"]
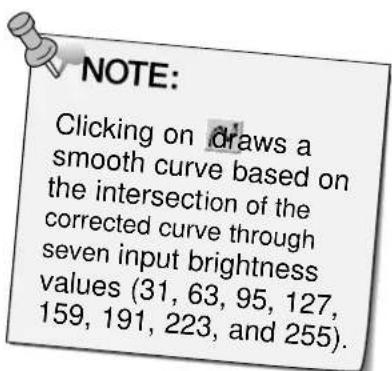
Click on to draw a correction curve freehand. Click on to smooth out the final correction curve.
Applying or Cancelling Corrections
Click on to apply or to cancel Cancel the corrections.
The button in the tone curve dialog box lets you save the tone curve settings to a data file. The button lets you retrieve those settings and apply them to a new image
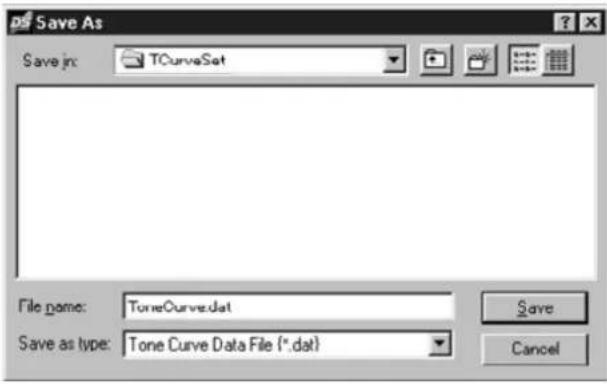
Saving Tone Curve Settings
1. Click on

- The tone curve settings are saved to a data (dat) file.
- Enter a file name and select the location to save the file, then click on Save.
The save file dialog box will appear.
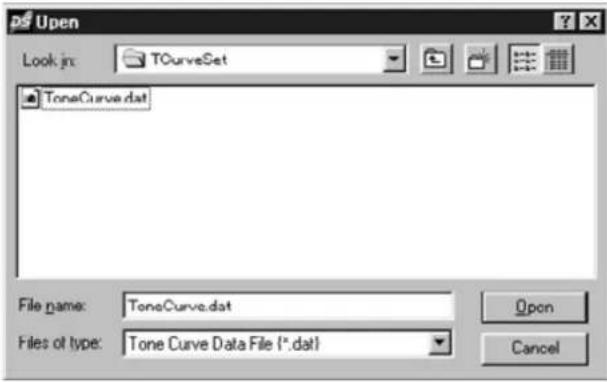
Loading Tone Curve Settings
1. Click on

- Select the data file you want to use, then click on Open.
- The settings in the selected file are applied to the current image.

NOTE:
The tone curve settings files for colour and black and white film are not interchangeable.
The open file dialog box will appear.
SCANNING AND SAVING THE IMAGE
When you have finished making all the desired adjustments to the image, you are ready to scan the film.
1. Click on

Scan
- The cursor will change to an hourglass and a progress bar will appear.
- To cancel the scan, click on or press the escape key until the
Cancelling Operation message box appears.
Do not remove the film holder until the scan is finished. Interfering with the scanner during scan could result in image distortion.
2. Click on to exit the Dimâge Scan Dual driver software. The image will be opened in your photo application software.
- The driver window will automatically close after each scan if "Close driver after scanning" was selected in the preferences dialog box.
3. Save the image using the instructions from your photo application software.
- Remove the film holder from the scanner.

NOTE:
Multiple images can be scanned before closing the software if Photoshop is the host software.
PhotoDeluxe, Corel DRAW and Corel Photopaint can only acquire one image at a time.
SCANNING APS FILM
SCAN FLOW
Launch Software
Specify APS Film Type
Set Preferences
Load and Insert APS Adapter
Select Frame(s) to Prescan from Index Print
OR
Index Scan
Select Frame(s) to Prescan
Prescan
Orient and Crop
Correct the Contrast, Brightness and Colour
Scan
Save
LAUNCHING THE SOFTWARE
- Turn on the Minolta Dimâge Scan Dual, then turn on your PC.
- Launch Adobe Photoshop.
- Select File > Import > Select Twain_32 Source
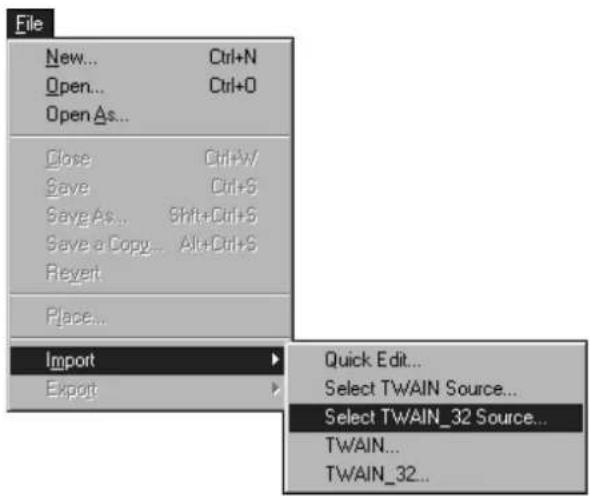
- Select DS_dual, then click on Select
The Select Source dialog box appears.
- Select File > Import > Twain_32
The Dimâge Scan Dual's standard control and preview windows appear after initialization is complete (approx. 2 min.).
Select an APS film type from the film type drop-down list.
- APS Auto Detect will identify the APS film type automatically.
- The selected film type will be displayed in the film type list box.
- The optional AD-10 APS Adapter is required to scan APS film with the Dimâge Scan Dual.
The APS control and index windows will appear.
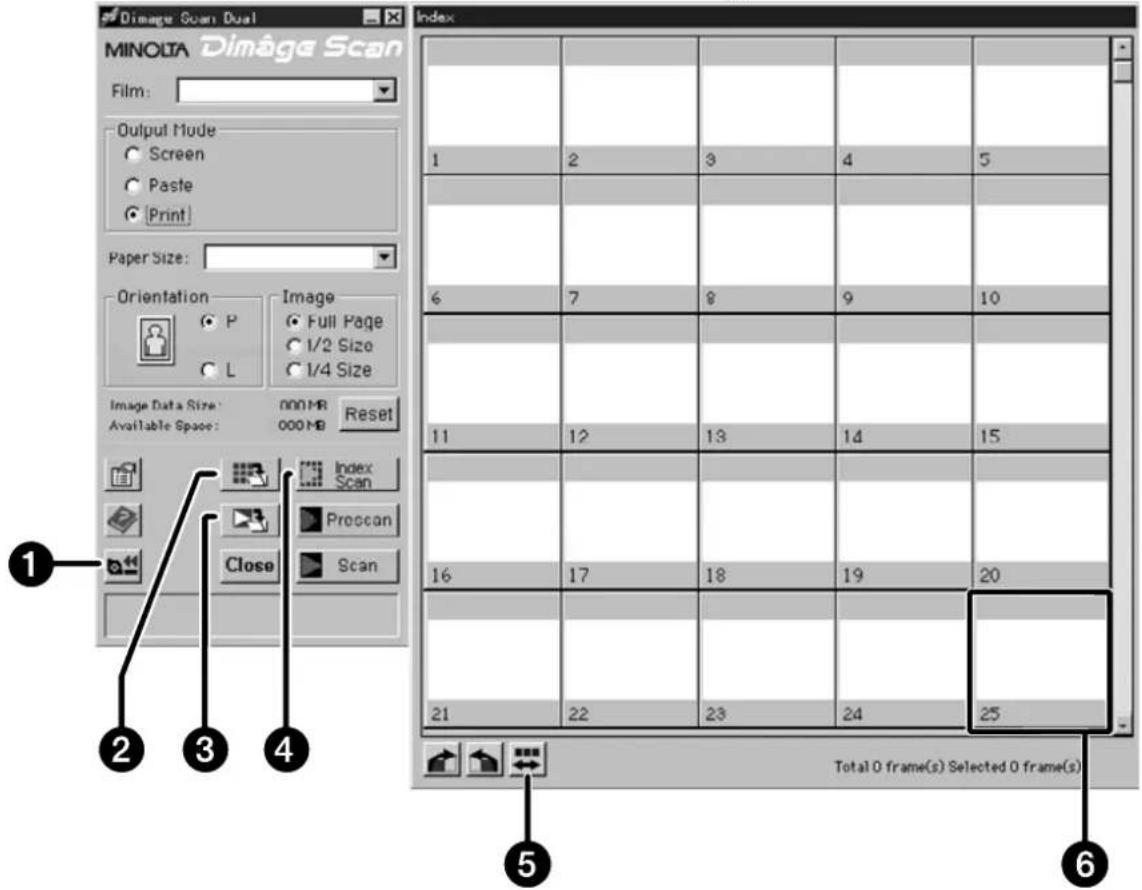
- Rewind button
- Index scan button
- Save index button
- Reverse frame order
- Scan & Save button
- Image box
1. Click on

The APS Preferences window will open.
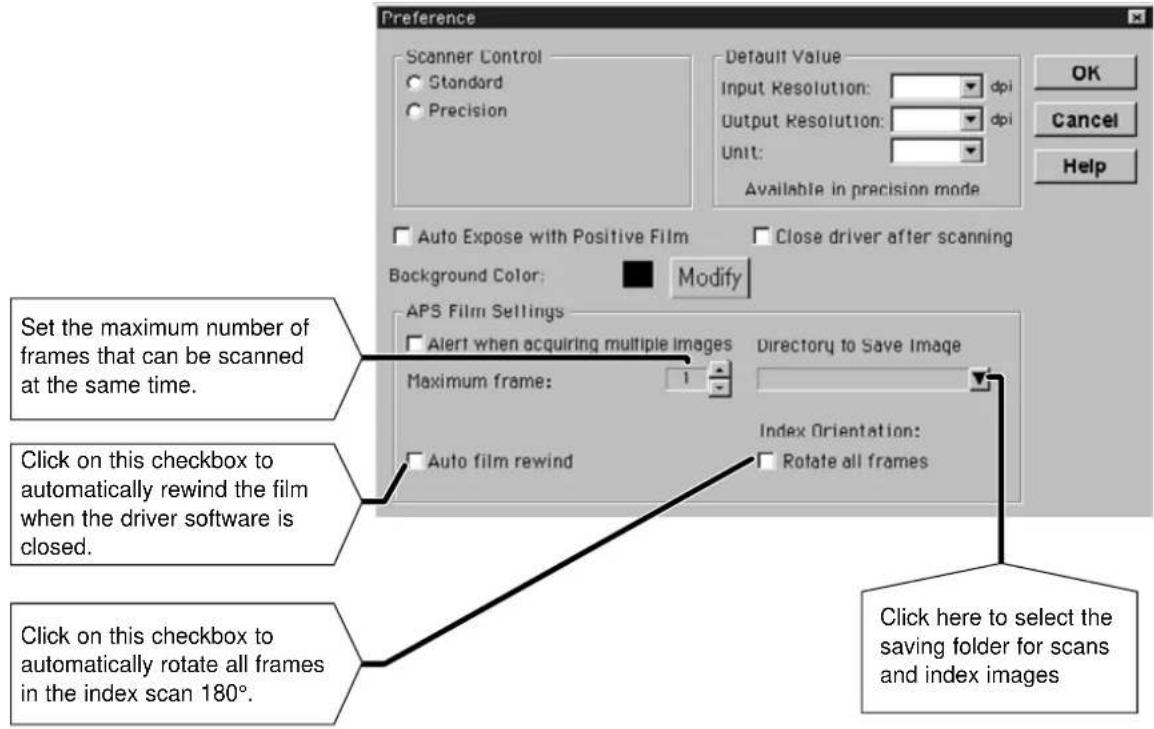
- Set the preferences as desired (pages 20 and 21), then click on . OK
APS ADAPTER
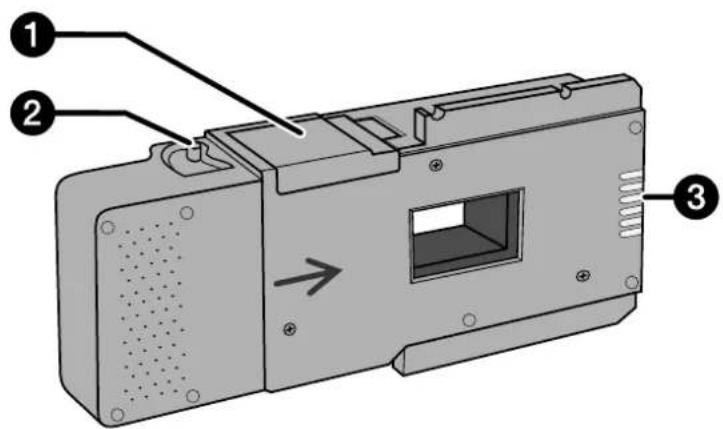
The AD-10 APS Adapter is an optional accessory. The Dimâge Scan Dual can not scan Advanced Photo System film (IX-240 type) without the AD-10 APS Adapter.
Names of Parts
- Film-chamber door
- Film-chamber release
- Scanner contacts*
* Do not touch
Loading the APS Adapter
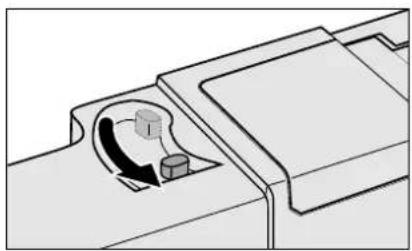
- Slide the film-chamber release as shown.
• The film-chamber door will open.
natural_image
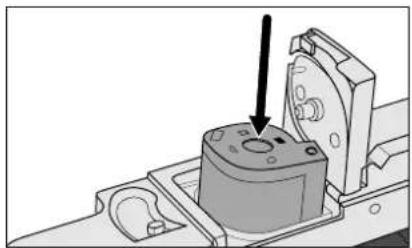
Technical line drawing of a mechanical component with a curved arrow indicating rotation (no text or symbols)- Insert the film cassette into the film chamber with the VEI on top.
- Only load cassettes with the ■ark current.
natural_image
Mechanical assembly diagram showing a component with a black arrow pointing to a circular feature (no text or symbols present)- Close the film-chamber door.
- The film-chamber door will not close if the ■ark is not current. Forcing the door shut could damage the cassette.
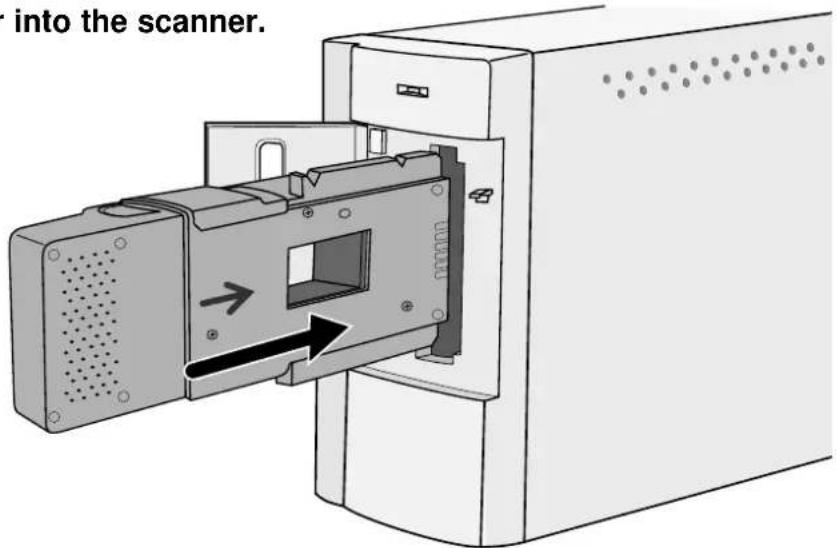
INSERTING THE APS ADAPTER INTO THE SCANNER
- Press to unlock,...
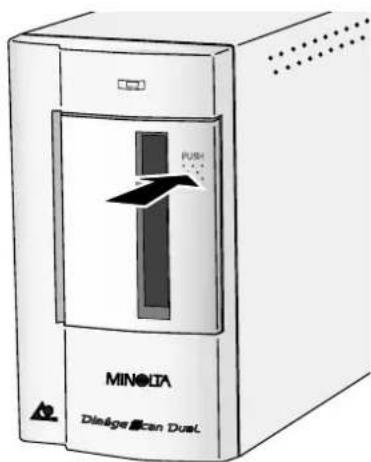
then open the scanner's film door.
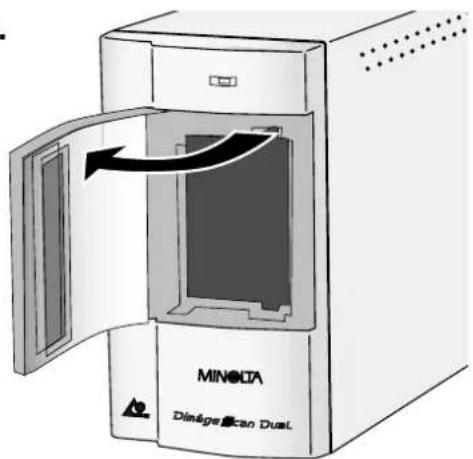
- Insert the APS Adapter into the scanner.
INDEX SCAN
Index scan performs a low resolution scan of each image on the cassette and displays them in the index window. The time required for an index scan will vary, depending on the performance of your machine.
If you don't want to index scan the entire roll, select the frame number of the image you want to scan from the index print provided by your photofinisher. Click on the appropriate image box in the index window to select an image for prescanning or scanning.
Click on
- All frames on the cassette will be scanned and opened in the Index window.
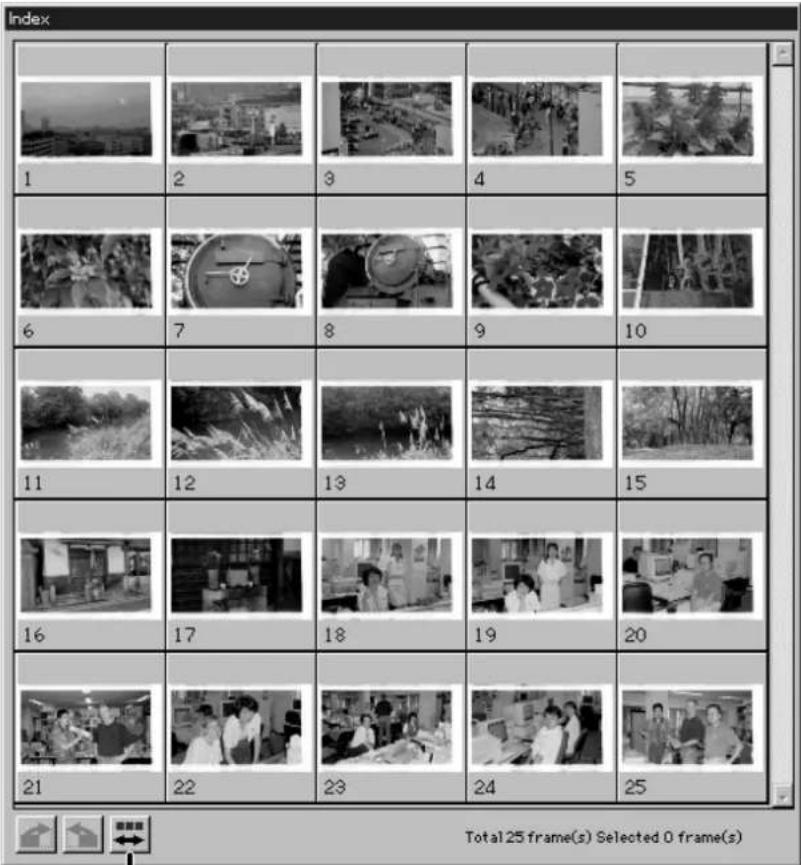

NOTE:
• To cancel the index scan, press the escape key until the Cancelling Index Scan message box appears.
• The completed index scans will appear in the index window.
- Frames that have not been index scanned can still be selected for prescanning and scanning.
Click here to reverse the display order.
PRESCAN AND IMAGE CORRECTION
- Click on an image or an image box, then click on Prescan. The image will be prescanned, then opened in the Preview window.

NOTE:
Press the option key when clicking on to improve the colour accuracy of the prescan image.
• The film will be prescanned twice. The first scan will set the exposure. The second prescans the image.
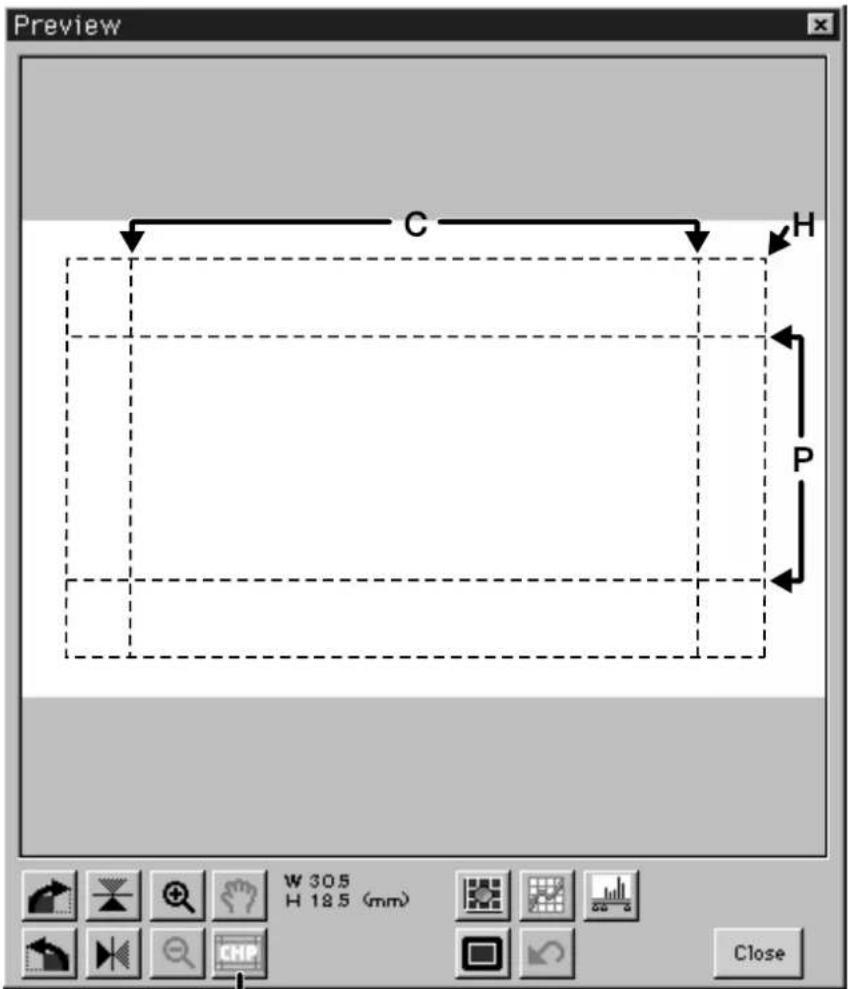
Click here to specify an APS format (C, H, or P) trimming area. Available in Precision mode only.
-
Orient and crop the image as desired.
-
Apply contrast, brightness, and colour corrections.
• See pages 27-33 for Standard mode corrections.
• See pages 39-51 for Precision mode corrections.
- Click on to return to the index window.
1. Click on an image to select it for scanning.
- Selected images are surrounded by a dark gray frame.
natural_image
Black-and-white cityscape photo showing buildings and water, no visible text or symbols- Press the control key while clicking to select additional frames for scanning.
- Press the control key while clicking to deselect an image.
natural_image
Black-and-white photo of a crowded indoor space with people walking and sitting (no visible text or symbols)
natural_image
Black-and-white photo of an industrial facility interior with machinery and storage tanks (no visible text or symbols)
natural_image
Black-and-white cityscape photo showing industrial buildings and structures (no visible text or symbols)
- Press the shift key while clicking to select all the frames between the current frame and the last frame selected.
natural_image
Black-and-white photo of a crowded indoor space with people walking and sitting (no visible text or symbols)
natural_image
Interior view of a factory or workshop with machinery and no visible text or symbols
natural_image
Black-and-white cityscape photo showing industrial buildings and roads (no visible text or symbols)
2. Click on to scan the selected image(s).
- The scan is cancelled if more than the number of frames set for multiple acquire are selected. See Setting APS Preferences on page 56.
- Adobe PhotoDeluxe, Corel DRAW and Corel Photopaint can only acquire one image at a time.
- The image will be opened in your photo application software when the Dimâge Scan Dual's driver software is closed.
NOTE:
Click on to save the index as an image file.
• The image will be saved in JPEG format.
- Click on to rewind the film into the cassette.
- This step is not necessary when the auto rewind option in the APS preference window is selected.
- Remove the APS adapter from the scanner and close the film door.
- Click on to exit the Dimâge Scan Dual driver software.
- The driver window will close automatically after each scan if "Close driver after scanning" was selected in the Preferences dialog box..
- Open the APS adapter's film chamber door and remove the cassette.
NOTE:
Multiple images can be scanned before closing the software if Photoshop is the host software. PhotoDeluxe, Corel DRAW and Corel Photopaint can only acquire one image at a time.
APPENDIX
SYMPTOM or MESSAGE SOLUTION
| The computer will not start up after connecting the scanner. | Shut down the computer and all the devices in your SCSI chain, then check the SCSI cables, SCSI ID connection, power cord, and SCSI ID. |
| DS Dual does not appear in the Select Source drop-down menu. | Make sure the driver software has been installed. |
| “Could not establish connection with scanner.” | Indicator lamp is off - Turn the Dimâge Scan Dual on, then restart your system.Check that the SCSI ID is not being used by another SCSI device. |
| “Setting up now. Remove the film holder.” | Remove the film holder and click on OK. |
| Indicator lamp blinking rapidly (8Hz). | Scanner door opened during setup. Close scanner door. |
| “Set film properly...” | Load film into the film holder. |
| “Set 35mm film holder properly.” | Set the correct film type. |
| “Set APS film holder properly.” • Set the correct film type. | |
| “Could not recognize the film type.” | Set the film type manually. |
| “Insufficient Memory” • Increase the memory requirements for the host application.If you have scanned multiple images, close and relaunch the host application. In some cases it may be necessary to shut down and restart the computer. | |
| “Setting up now. Remove the film holder.” appears when the film holder is not loaded. | Contact a Minolta Service Facility to change the fluorescent lamp. |
USER TECHNICAL SUPPORT
Please contact your dealer for information regarding installation, SCSI-2 interface recommendations, or application compatibility. If you dealer is unable to help you., contact us toll free.
Technical Support
1-800-808-4888
Monday - Friday 8:30 - 5:00 (EST)
Minolta corporation
101 Williams Dr.
Ramsey, NJ 07446
(201) 825-4000
Please have the following information ready when calling Minolta Technical Support.
Make and Model of your computer:
Available application RAM:
Operating System version:
Other connected SCSI devices and their SCSI ID numbers:
DS Dual driver version number:
Symptoms:
Messages that appear on the screen when the problem occurs:
Frequency of occurrence:
Determining the version number of your driver software:
Place the cursor on MINOLTA at the top of the standard or precision mode control panels. The version number will be displayed in the status window.
NOTES
- CAUTION
- To avoid fire or electric shock:
- The following contents should be included in this package.
- System Requirements
- TABLE OF CONTENTS
- SCANNER SETUP
- STANDARD OPERATION
- PRECISION OPERATION
- SCANNING APS FILM
- APPENDIX
- SETTING THE SCSI ID
- SCSI ID Dip Switch Settings
- CONNECTING THE HARDWARE
- Connecting the SCSI Cable
- If the Dimâge Scan Dual is the last or only device in your SCSI chain...
- Turn the terminator power switch (switch 4) to ON.
- Plug the power cord into the scanner's AC socket, then plug it into a grounded outlet.
- INSTALLING THE SOFTWARE
- This step varies with your specific operating software...
- Windows 95
- Windows 95 Release 2 (OSR2) and Windows 98
- Windows NT
- Select D:\ENGLISH\Setup.exe from the Open drop-down list, then click on . OK
- Click on . Next >
- After reading the agreement, click on . Yes
- Select the desired option, then click on
- 11.Click on
- SCAN FLOW
- LAUNCHING THE SOFTWARE
- Click on
- SETTING THE PREFERENCES
- The Colour Palette dialog box will appear.
- LOADING THE FILM HOLDER
- Loading the Negative Holder
- Open the film holder.
- Place the film in the film holder emulsion side down.
- NOTE:
- Align the frames within the scanning windows.
- Snap the film holder closed.
- Loading the Slide Holder
- Insert slides into the slide holder emulsion side down.
- INSERTING THE FILM HOLDER INTO THE SCANNER
- Insert the negative holder into the scanner's film slot to scan frames 1, 2, or 3.
- Remove, flip, then reinsert the negative holder to scan frames 4, 5, or 6.
- SETTING THE FILM TYPE / PRESCAN
- Select the type of film you are scanning from the film type drop-down list.
- Film:
- Prescan
- Click on to preview the image.
- SELECTING THE USAGE MODE
- Click on the option button for the desired usage mode.
- Screen
- Select the desired image size from the image size drop-down list.
- Paste
- ORIENTING THE IMAGE
- Rotate
- Flip
- Cropping
- VARIATION DIALOG BOX – NAMES OF PARTS
- Click on in the preview window.
- Adjusting the Brightness and Contrast
- Click on the appropriate window or move the sliders to increase or decrease the contrast and/or brightness.
- Adjusting the Colour
- Place the colour correction you want to apply to your image within the the cursor, then click the mouse button.
- Click on to apply the changes to your scan.
- SCANNING AND SAVING THE IMAGE
- Scan
- Click on to exit the Dimâge Scan Dual driver software. The image will be opened in your photo application software.
- Save the image using the instructions from your photo application software.
- Launch the Software
- Set the Preferences
- PRECISION CONTROL WINDOW – NAMES OF PARTS
- SETTING THE RESOLUTION
- Select the desired output resolution from the output resolution drop-down list.
- The dimensions of the cropping frame are displayed in the input size text boxes.
- Enter the desired output size (maximum 3 digits).
- The input resolution list box displays the lowest input (scan) resolution necessary to achieve the desired output size and resolution.
- RESOLUTION NOTES
- Resolution and Output Size
- Resampling Up
- SCAN SETTINGS – SAVE AND LOAD
- Saving Scan Settings
- Enter a file name and the location to save the file, then click on Save.
- Loading Scan Settings
- Select the data file you want to use, then click on Open.
- HISTOGRAM DIALOG BOX – NAMES OF PARTS
- Click on in the preview window.
- IMAGE CORRECTION – HISTOGRAM
- Setting the White, Black, and Gray Points
- Using the Histogram Sliders - RGB Synchro
- If the histogram contains large flat line areas...
- Click on and move the input level highlight and shadow sliders to the edges of the flat line area.
- Click on and slide the output level sliders until the preview image has the desired image contrast.
- Click on and hold to view the output level histograms.
- Adjusting Individual Colour Channels
- Applying or Cancelling Corrections
- Saving Histogram Settings
- Loading Histogram Settings
- TONE CURVE DIALOG BOX – NAMES OF PARTS
- IMAGE CORRECTION – CURVES
- Setting the White and Black Points
- Correcting the Tone Curves
- Saving Tone Curve Settings
- Loading Tone Curve Settings
- Select an APS film type from the film type drop-down list.
- APS ADAPTER
- Names of Parts
- Loading the APS Adapter
- INSERTING THE APS ADAPTER INTO THE SCANNER
- INDEX SCAN
- Click on
- PRESCAN AND IMAGE CORRECTION
- Click on an image to select it for scanning.
- Click on to scan the selected image(s).
- USER TECHNICAL SUPPORT
- NOTES
Brand : MINOLTA
Model : Dimâge Scan Dual I
Category : To scan