
DiMAGE Scan Elite II - To scan MINOLTA - Free user manual and instructions
Find the device manual for free DiMAGE Scan Elite II MINOLTA in PDF.


| Product Type | 35mm Film Scanner |
| Brand | Minolta |
| Model | DiMAGE Scan Elite II |
| Optical Resolution | 3200 dpi |
| Bit Depth | 48-bit (16 bits per channel) |
| Film Types Supported | 35mm positive/negative film, slides (mounted or strips) |
| Dimensions (W x D x H) | Approx. 240 x 140 x 120 mm |
| Weight | Approx. 1.8 kg |
| Power Supply | AC adapter (DC 12V, 0.6A) |
| Interface | USB 1.1 |
| Scan Area | 24 x 36 mm (frame) |
| Light Source | Cold cathode fluorescent lamp |
| Software Included | DiMAGE Scan Utility, Adobe Photoshop Elements (optional) |
| Maintenance | Clean film holder with anti-static brush; use compressed air for external parts |
| Safety | Class 1 LED product (no laser); use only specified AC adapter |
| Spare Parts & Repairability | Limited availability; contact Minolta service centers |
| Supported Operating Systems | Windows 98/ME/2000/XP; Mac OS 9/X |
Frequently Asked Questions - DiMAGE Scan Elite II MINOLTA
User questions about DiMAGE Scan Elite II MINOLTA
0 question about this device. Answer the ones you know or ask your own.
Ask a new question about this device
Download the instructions for your To scan in PDF format for free! Find your manual DiMAGE Scan Elite II - MINOLTA and take your electronic device back in hand. On this page are published all the documents necessary for the use of your device. DiMAGE Scan Elite II by MINOLTA.
USER MANUAL DiMAGE Scan Elite II MINOLTA
The essentials of imaging
www.minoltaeurope.com
natural_image
Filmstrip-style collage showing a dog, butterfly, sunflower, and flower (no text or symbols)DiMAGE Scan Elite II
BEFORE YOU BEGIN ....4
FOR PROPER AND SAFE USE......6
GETTING STARTED 8
CHECKING THE PACKAGE CONTENTS..8
INSTALLING THE UTILITY SOFTWARE....9
About TWAIN drivers and plug-ins .....10
Windows 98/98SE/
2000 Professional/Me/XP 10
Macintosh 12
INSTALLING ADOBE PHOTOSHOP
ELEMENTS 14
Windows 98/98SE/
2000 Professional/Me/XP 14
Macintosh 17
NAMES OF PARTS 19
CONNECTING THE AC ADAPTOR .....19
CONNECTING THE SCANNER CABLE..20
IEEE 1394 cable....20
USB cable....20
Disconnecting the cable with Windows ....21
EASY SCAN UTILITY ......22
- LAUNCHING THE EASY SCAN UTILITY 22
Windows 22
Macintosh 22
- LOADING THE FILM HOLDER .....23
Loading the 35mm film holder – FH-U1 ...23
Loading the slide mount holder - SH-U1 .24
Loading the APS adaptor AD-10
(sold separately) 24
- INSERTING THE FILM HOLDER.....25
Inserting the film holder FH-U1 or SH-U125
Inserting the APS Adaptor AD-10 ......26
-
SPECIFYING THE FILM TYPE .....26
-
MAKING AN INDEX SCAN .....27
-
SELECTING THE IMAGE TO BE
SCANNED 27
- SPECIFYING THE USE OF THE SCANNED
IMAGE 27
- CHOOSING DIGITAL ICE/ROC/GEM PRO-
CESSING 28
- CONFIRMING THE SCANNER
SETTINGS....28
- SCANNING AND SAVING THE IMAGE.....28
Turning off the scanner 29
STANDARD SCAN UTILITY .....30
- LAUNCHING THE STANDARD SCAN UTILITY ....31
WINDOWS LAUNCHING THE STANDARD
SCAN UTILITY ....31
Launching the utility with Photoshop
Elements....31
Launching the utility software ....31
MACINTOSH LAUNCHING THE STANDARD
SCAN UTILITY 32
Launching the utility in
Photoshop Elements ......32
Launching the utility software ....32
- SETTING UP THE SCANNER .....33
MAIN WINDOW....33
SETTING SCANNER PREFERENCES ...34
-
LOADING THE FILM HOLDER......36
-
SETTING THE FILM FORMAT AND
TYPE 36
- INDEX SCAN......37
INDEX TAB 37
MAKING AN INDEX SCAN ....38
RESIZING THE UTILITY WINDOW .....38
SELECTING INDEX THUMBNAILS......38
ROTATING OR FLIPPING THE INDEX
FRAMES....39
FIT-TO-WINDOW BUTTON 40
REVERSING THE FRAME ORDER......40
SAVING THE INDEX THUMBNAILS .....40
SAVING AN INDEX FILE 41
LOADING AN INDEX FILE....41
- MAKING A PRESCAN....42
PRESCAN TAB....42
MAKING A PRESCAN....43
CROPPING THE IMAGE....43
Auto cropping 43
Manual cropping 44
PRESCANNING THE CROPPED
IMAGE 45
FIT-TO-WINDOW BUTTON 45
ROTATING OR FLIPPING THE IMAGE ...46
ZOOMING 47
GRAB BUTTON....47
AUTO EXPOSURE 48
AE area selection 48
AE lock 49
POINT AF (AUTOFOCUS) 49
MANUAL FOCUS ....50
CROPPING APS IMAGES ....51
OTHER DISPLAYS IN THE PRESCAN
WINDOW....51
Frame number ....51
RGB display....51
7. IMAGE CORRECTION....52
IMAGE CORRECTION TAB 52
TONE CURVES AND HISTOGRAM .....53
RGB and CMYK 54
COMPLEMENTARY COLOUR ....54
SELECTING THE TONE-CURVE COLOUR
CHANNEL 54
CHANGING THE TONE CURVES .....55
CHANGING THE TONE CURVES BY
FREEHAND....55
A QUICK GUIDE TO TONE-CURVE COR-
RECTIONS 56
About the tone curve 56
Bringing out detail in the shadows .....56
Increasing the contrast of an image......57
Correcting colour with tone curves.....57
WHITE, BLACK, AND GRAY POINT COR-
RECTIONS 58
Setting the white and black-point values..59
HISTOGRAM CORRECTION....60
Auto setting....60
Manual setting 60
Colour corrections with the histogram.....61
BRIGHTNESS/CONTRAST/COLOUR
CORRECTIONS 62
Auto setting....62
VARIATION CORRECTIONS ......64
Colour-balance variation....64
Brightness & Contrast variation......64
Saturation variation....65
SELECTIVE-COLOUR CORRECTIONS..66
UNSHARP MASK....66
CANCELLING IMAGE CORRECTIONS ..67
Undoing an image correction 67
Redoing a cancelled image correction .....67
Resetting all image corrections 67
MAKING SNAPSHOT THUMBNAILS......67
SAVING AND LOADING IMAGE
CORRECTIONS 68
Saving an image-correction Job....68
Loading an image-correction Job ....68
COMPARING PRE/POST-CORRECTION
IMAGES....68
DIGITAL ICE, ROC, AND GEM
CORRECTIONS 69
DIGITAL ICE ^3 SYSTEM
REQUIREMENTS......69
DIGITAL ICE 70
DIGITAL ROC ....71
DIGITAL GEM....72
8. SCAN SETTINGS....74
SCAN-SETTING DIALOG BOX....74
USING JOB FILES 75
Job Categories ......76
INPUTTING SCAN SETTINGS
MANUALLY....77
Resolution and output size....78
Example:
setting the scanner output by pixels.....78
Example: setting the scanner output by print
size and output resolution .....79
SAVING A JOB FILE 80
DELETING A JOB FILE 80
9. MAKING THE FINAL SCAN .....81
When using the utility through an image-processing application ....81
When using the utility software only......81
File types 82
CUSTOM WIZARD 83
Quitting the Standard Scan Utility .....85
APPENDIX....86
IEEE 1394 AND USB INTERFACES .....86
IEEE 1394 AND USB 86
DISCONNECTING WITH THE COMPUTER
AND SCANNER ON....86
When using the USB cable or when using
IEEE 1394 cable with Windows 2000/XP.86
When using the IEEE 1394 cable with
Windows Me 87
COLOUR MATCHING......88
SETTING THE OUTPUT COLOUR SPACE88
OUTPUT COLOUR SPACE....89
SETTING THE MONITOR ICC PROFILE 90
Scanner colour profiles....91
INSTALLED FILES AND FOLDERS .....92
JOB FILE LIST ......93
35mm film 93
APS 94
TECHNICAL SPECIFICATIONS......95
TROUBLESHOOTING .....96
USER TECHNICAL SUPPORT......97
WARRANTY AND PRODUCT REGISTRA-
TION 97
INDEX....98

BEFORE YOU BEGIN
Thank you for purchasing the Minolta DiMAGE Scan Elite II. This highly advanced, but easy-to-use dual-format digital film scanner is able to scan both 35mm and Advanced Photo System film (with the optional AD-10 APS adaptor). Please read this manual thoroughly to achieve the best results from your scanner.
The instructions in this manual assume you have a working knowledge of your computer's operating system. Familiarity with the mouse, and standard operating-system menus and commands is necessary before operating the DiMAGE Scan Elite II.
This manual does not give instruction in the:
- basic use of personal computers.
- use of Windows 98, Windows Me, Windows 2000 Professional, Windows XP, or Mac OS 8.6 to 9.2.1.
- use of Adobe Photoshop Elements, or other image processing software.
The examples in this manual use Windows software. The appearance of the screens may differ from the examples when using Macintosh or other Windows operating systems.
- Microsoft, Windows, Windows 98, Windows 2000, Windows XP and Windows Me are registered trademarks of the Microsoft Corporation.
• Macintosh, Apple, Power Macintosh, Mac OS, ColorSync, FireWire are registered trademarks of Apple Computer, Inc. - Adobe and Photoshop are registered trademarks of Adobe Systems Incorporated.
- CorelPhotoPaint is a trademark of the Corel Corporation.

- Paint Shop Pro is the copyright of Met's Corporation.
Digital ICE3, Digital ICE, Digital ROC, Digital GEM are trademarks or registered trademarks, and technology of Applied Science Fiction, Inc. in U.S.A.
- Other corporate and product names are the trademarks and registered trademarks of their respective companies.
- This manual may not be copied in part or whole without the prior written permission of Minolta Co., Ltd. ©2001 Minolta Co., Ltd.
- Every necessary caution has been taken to ensure the accuracy of this instruction manual. Please contact Minolta if you have any questions.
- Minolta is not responsible for any loss or damage caused from the operation of this product.
CE
This mark certifies that this product meets the requirements of the EU (European Union) concerning interference causing equipment regulations. CE stands for Conformité Européenne.
Film Scanner: DiMAGE Scan Elite II

Tested to comply with FCC standards.
FOR HOME OR OFFICE USE
This device complies with Part 15 of the FCC Rules. Operation is subject to the following conditions: (1) This device may not cause harmful interference, and (2) this device must accept any interference received, including interference that may cause undesired operation. To meet FCC regulations, the IEEE1394 cable used with this scanner must be equipped with ferrite cores.
This Class B digital apparatus complies with Canadian ICES-003.
Tested by the Minolta Corporation, 101 Williams Drive Ramsey, New Jersey 07446, U.S.A.
The sound pressure level is less than 70dB according to ISO 3744 or ISO 7779.

As an ENERGY STAR Partner, Minolta has determined that this product meets the ENERGY STAR guidelines for energy efficiency.

FOR PROPER AND SAFE USE
Please read and understand each caution before using this product.

WARNING
Take the product to a Minolta Service Facility when repairs are required.
Basic operation:
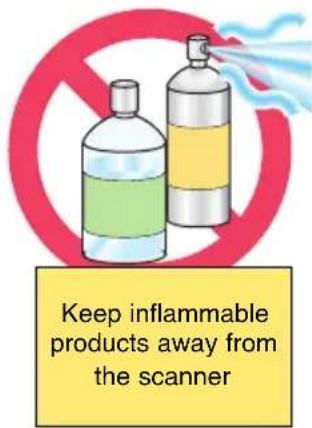
- Do not use the product near inflammable gases or liquids such as gasoline, benzine, or paint thinner. Do not use inflammable products such as alcohol, benzine, or paint thinner to clean the product. The use of inflammable cleaners and solvents may cause an explosion or fire.
natural_image
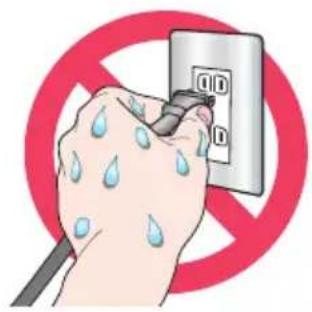
Illustration of a hand using a power outlet to clean water, enclosed in a red prohibition symbol (no text or symbols on the diagram itself)- Do not operate this product or handle the power cord with wet hands. Do not place a container with liquid near the product. If liquid comes in contact with the product, immediately unplug the unit. The continued use of a product exposed to a liquid may cause damage or injury through fire or electric shock.
natural_image
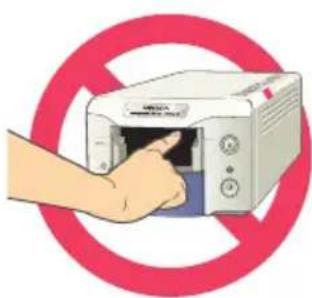
Hand inserting a printer into a device against a red prohibition symbol (no text or symbols on the device itself)- Do not insert hands, inflammable objects, or metal objects such as paper clips or staples through the front door of this product. It may cause damage or injury through fire or electric shock.
Discontinue use if an object enters the product.
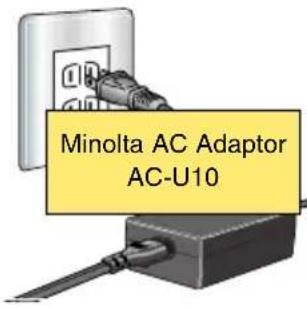
Power supply:
- Use only the specified AC adaptor (Delta Electronics ADP-20LB REV:B) within the voltage range indicated on the adaptor unit. An inappropriate adaptor or current may cause damage or injury through fire or electric
shock.
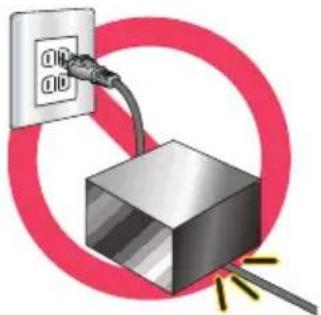
natural_image
Illustration of a wall socket connected to a cube with a cable, enclosed in a red circular frame (no text or symbols)- Do not damage, twist, modify, heat, or place heavy objects on the power cord. A damaged cord may cause damage or injury through fire or electric shock.
- When unplugging the unit, do not pull on the power cord. Hold the plug when removing the cord from an outlet.
natural_image
Illustration of a kitchen with a pipette and a red prohibition symbol (no text or symbols)Additional warnings:
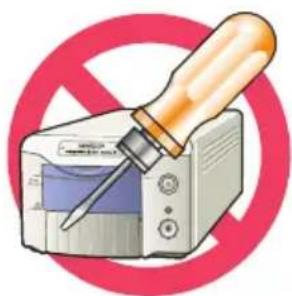
- Do not disassemble this product. Electric shock may cause injury if a high-voltage circuit inside the product is touched. Take the product to a Minolta Service Facility when repairs are required.
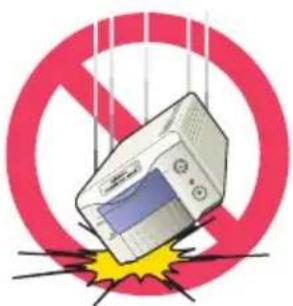
natural_image
Illustration of a vintage kitchen appliance with a red prohibition symbol above, no text or symbols present.- Immediately unplug the unit and discontinue use if the product is dropped or subjected to an impact in which the interior is exposed. The continued use of a damaged product may cause injuries or fire.
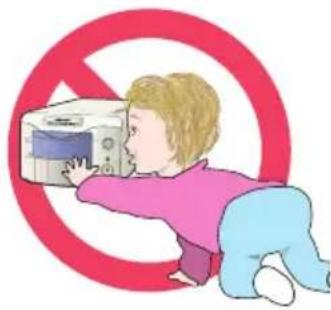
natural_image
Illustration of a child reaching toward a microwave inside a red prohibition symbol (no text or symbols present)- Store this product out of reach of children. Be careful when around children, not to harm them with the product or parts.
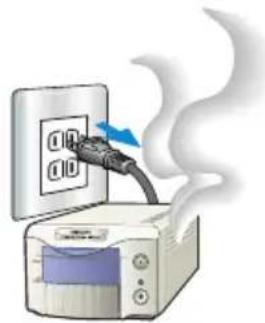
natural_image
Illustration of a microwave oven with a plug inserted into a wall socket, emitting steam (no text or symbols)- If the product emits a strange odour, heat, or smoke, discontinue use. Immediately unplug the power cord taking care not to burn yourself. The continued use of a damaged product or parts may cause injury or fire.

CAUTION
Basic operation:
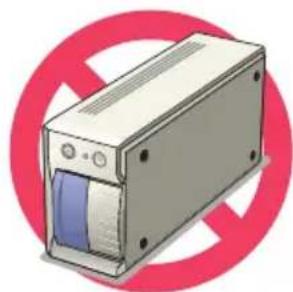
natural_image
Illustration of a beige server unit with a blue internal stripe, set against a red circular background (no text or symbols)- This product should only be operated in the upright position. Inappropriate placement may result in fire.
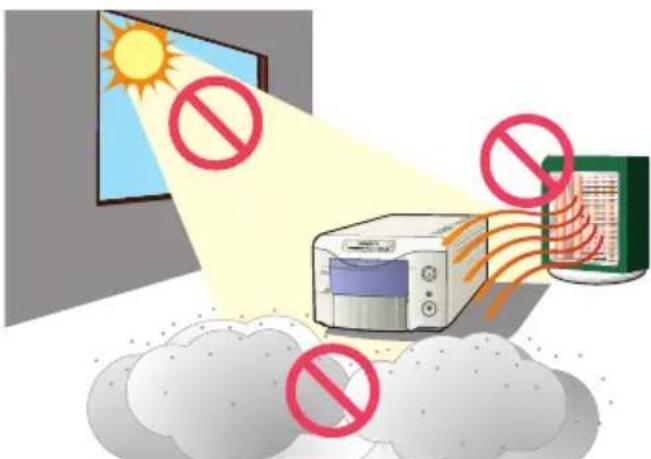
- Damage or injury through fire or electric shock may result if the product is used or stored in the following conditions:
In humid or dusty environments.
In direct sunlight or hot environments.
In smoky or oily areas.
In unventilated areas.
On unstable or unlevel surfaces.
- The required operating environment must be between 10^ and 35^ with less than 80% humidity. A sudden change in temperature can cause condensation inside the product, which may result in electric shock or fire. When the product is subjected to a drastic change in temperature, allow the product time to come to equilibrium with the surrounding environment.
Power supply:
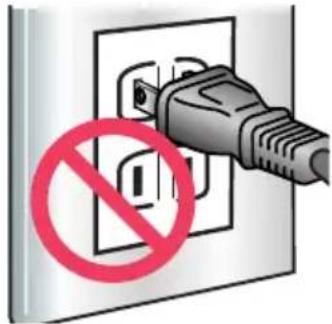
- Insert the plug securely into the electrical outlet.
- Do not obstruct access to the AC adaptor; this can hinder the unplugging of the unit in emergencies.
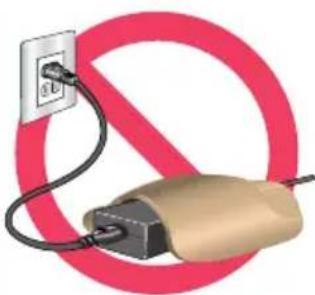
- Do not cover the AC adaptor. A fire may result.
• Periodically check that the power cord is not damaged and the plug is clean. Dust and dirt that may collect between the prongs of the plugs may result in fire.
natural_image
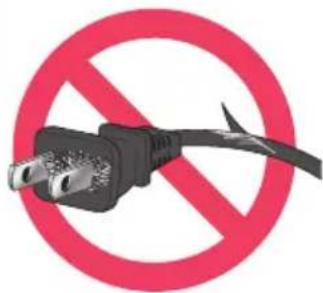
Illustration of a plug connected to a power outlet with a no-smoking symbol (no text or labels)- Do not use if the cord is damaged.
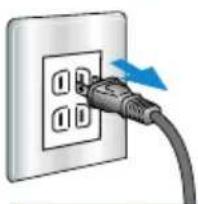
- Unplug the product when cleaning or when the product is not in use for long periods.
natural_image
Close-up of a white electrical outlet with a black plug inserted, showing internal socket layout (no text or symbols)Disconnect power supply when not in use.
Additional cautions:
- Do not move, obstruct, or touch the film holder when scanning. The product or scanned images can be damaged.
- Do not use a brush or air brush to clean the interior of the product.
GETTING STARTED
Before using this product, please take following steps:
- CHECK THE PACKAGE CONTENTS
• INSTALL THE DAMAGE SCAN ELITE II UTILITY SOFTWARE
• INSTALL ADOBE PHOTOSHOP ELEMENTS - CONNECT THE AC ADAPTOR
- CONNECT THE USB OR IEEE1394 CABLE
CHECKING THE PACKAGE CONTENTS
The following is included in this package:
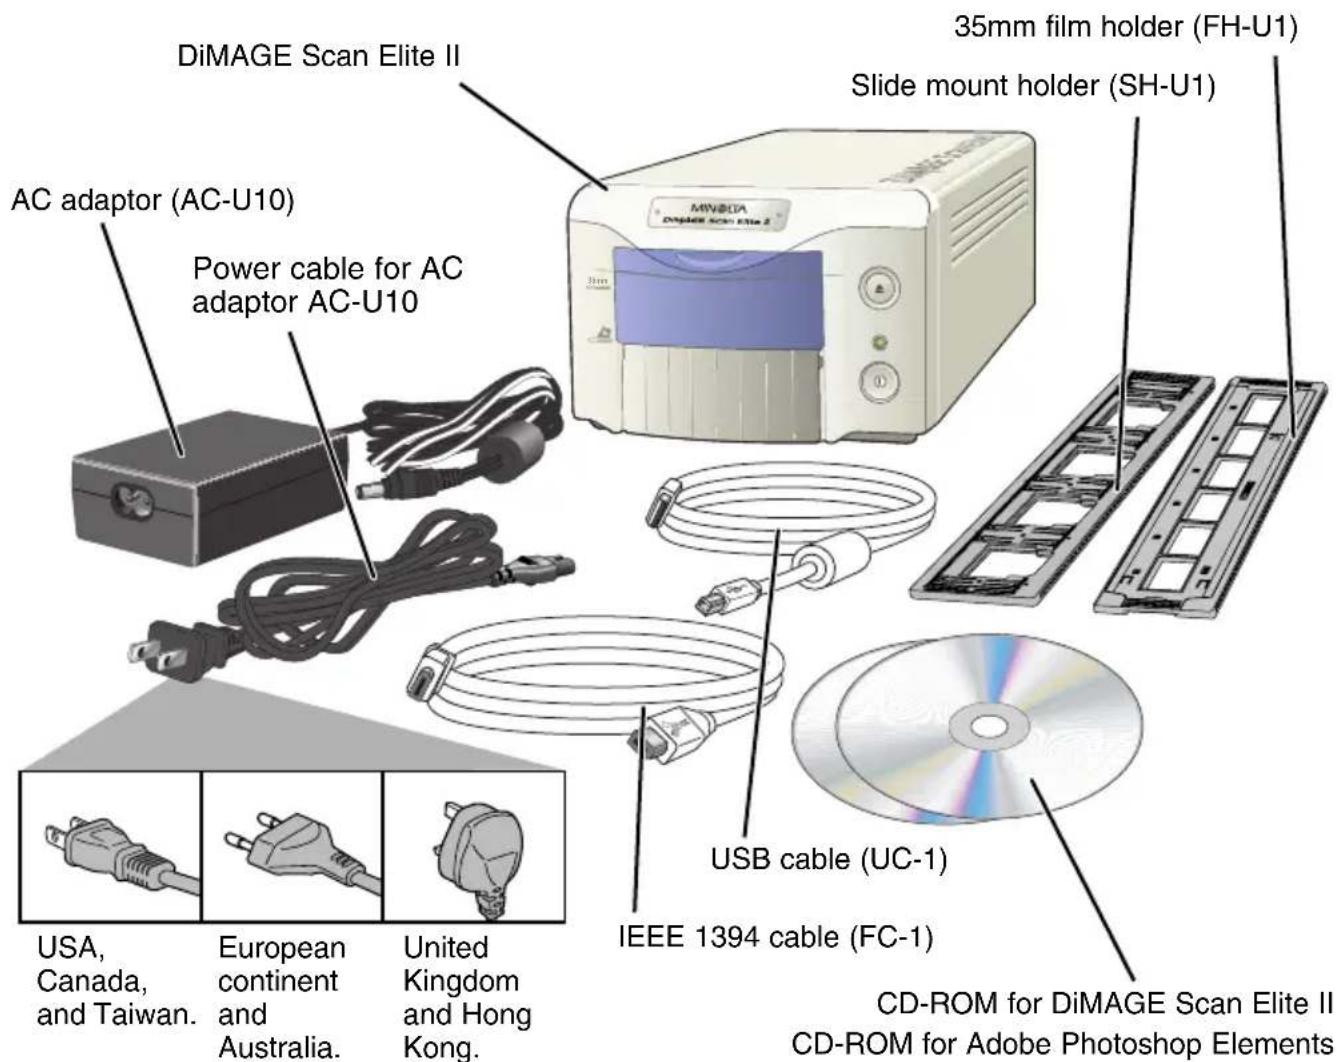
(Shape of input plug varies with destination.)
Printed matter:
Quick Reference Guide,
warranty/registration card.
INSTALLING THE UTILITY SOFTWARE
To use the scanner, your computer system must meet the following requirements:
Windows®
Macintosh
| CPU | Pentium or later processor. Pentium III processor is recommended when scanning with 16 bit output or using Digital ROC or GEM. Operation is not guaranteed for custom or home built computers. | Power PC G3 or later (Except 68 K Macintosh and Mac OS compatible units). Power Macintosh G4 or later is recommended when scanning with 16 bit output or using Digital ROC or GEM.. |
| Operating system | Preinstalled Windows 98, 98 Second Edition, 2000 Professional, XP or Me. | Preinstalled Mac OS 8.6* to 9.2.1. |
| Memory | A minimum of 64 MB (128 with Windows XP) of RAM in addition to the requirements for the OS and applications. For memory requirements for Digital ICE3, see page 69. | A minimum of 64 MB of RAM in addition to the requirements for the Mac OS and applications. For memory requirements for Digital ICE3, see page 69. |
| Hard-disk Space | 100 MB or more of available hard-disk space is required. 200 MB or more is required when scanning with 16-bit colour depth. | |
| Monitor | 640 x 480 monitor capable of displaying High Colour (16 bit) is required. 1024 x 768 monitor is recommended. | 13 inch (640 x 480) monitor capable of displaying at least 32,000 colours is required. 19 inch (1024 x 768) monitor is recommended. |
| CD-ROM drive | Necessary for installing software | |
| Interface | USB (ver.1.1)** and IEEE1394*** | USB (ver.1.1)** and IEEE1394 |
| Recommended IEEE1394 board | Adaptec FireConnect 4300, PROCOMP SpeedDemon 400P or Preinstalled OHCI compatible IEEE1394 port**** | Preinstalled FireWire port. |
| Tested applications | TWAIN driver is compatible with Photoshop ver.5.0.2, ver.5.5 and Ver.6.0, Photoshop 5.0LE, Photoshop Elements, Paint Shop Pro ver.7, CorelPhotoPaint9. | Plug-in is compatible with Photoshop ver.5.0.2, ver.5.5 and ver.6, Photoshop 5.0LE, Photoshop Elements. |
* To use preinstalled Mac OS 8.6 with a built-in FireWire port, a Firewire 2.2 to 2.3.3 extension must be installed. This software can be downloaded free of charge from the apple web site at http://www.apple.com.
** Preinstalled USB port only.
*** IEEE1394 interface can only be used with Windows 2000 Professional, ME or Windows XP.
**** Non-DV-dedicated IEEE port guaranteed by PC manufacturer.

CAUTION
The anti-virus system extensions may conflict with the operation of the software installer. Before installing the scanner utility software, remove or disable any extensions before launching the installer. Replace or re-enable the extensions when the installation is complete.

TIPS
About TWAIN drivers and plug-ins
The scanner can be launched directly from an image-processing application like Adobe Photoshop Elements. When the scanner utility software is installed in a computer with a Windows operating system, a TWAIN driver is automatically installed with it. Although the TWAIN driver cannot be seen, it allows the utility to be launched from an application as well as allowing the computer and scanner to communicate.
When the scanner utility software is installed on a Macintosh computer, a plug-in file is placed in the scanner utility folder. By simply dragging and dropping the plug-in file into an applications import folder, the scanner utility software can be launched from that application.
Windows® 98/98SE/2000 PROFESSIONAL/ME/XP
- In the example below, the hard disk is drive C, and the CD-ROM drive is drive D. The letters designating the drives will vary between computers.
1 Turn on the computer to start Windows.
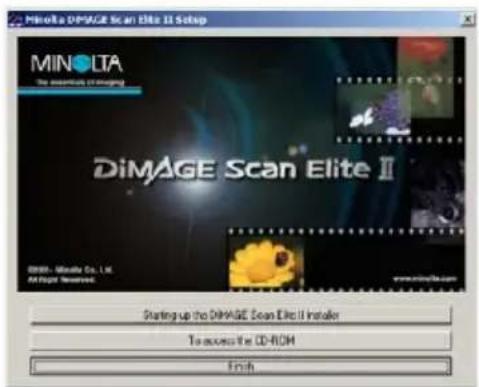
2 Insert the DiMAGE Scan Elite II CD-ROM into the CD-ROM drive.
- The DiMAGE Scan Elite II setup screen will appear.
- To check the contents of the DiMAGE Scan Elite II CD-ROM, click the "To access the CD-ROM" button.
3 Click the "Starting up the DiMAGE Scan II installer" button.
- The program decompression screen will briefly appear. The Install Shield Wizard will start automatically.
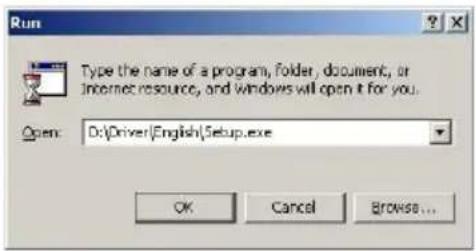
If the Install Shield Wizard does not start up automatically, execute the following procedure:
- Initiate the run routine on the start menu.
- Click "Browse" in the run dialog box.
- Select the CD-ROM drive (DS Elite II(D:)) from the look-in box in the browse dialog box.
- Click on or open the driver folder.
- Click on or open the "English" folder.
- Click on "Setup.exe." The file and its location will be displayed in the run dialog box: D:\Driver\English\Setup.exe. Click "OK".
- The Install Shield Wizard will appear. Click "Next".
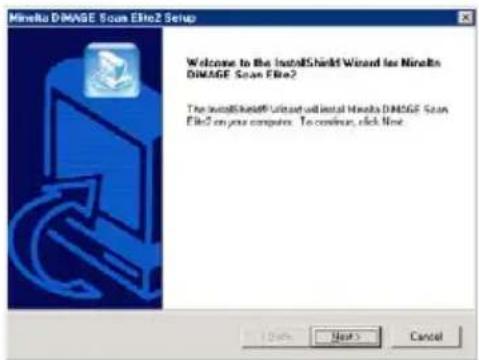
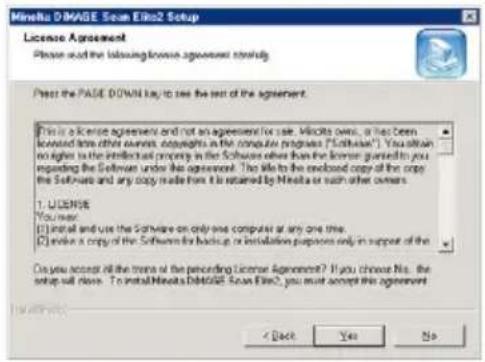
4 Click "Next" to view the license agreement. Click "Yes" to accept the agreement and continue.
- Read the entire agreement carefully before continuing. If you do not agree to the terms of the license agreement, click "No" to exit the setup program.
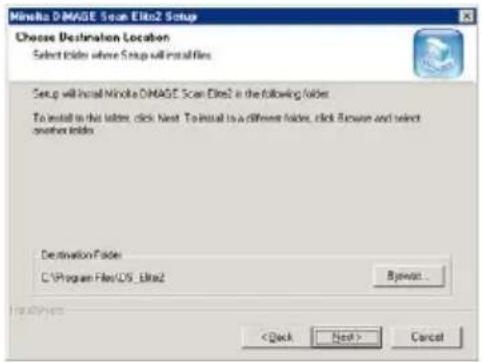
5 To install the software in the default folder (C:\Program Files\DS\_Elite2), click "Next".
- To install the software in another folder, click "Browse..." to display the folder selection window. Specify the directory in which to install the software, then click "OK".
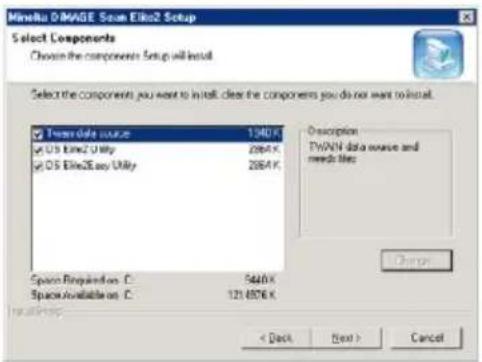
6 Select the components to be installed, then click "Next".
- It is advisable to select all options, all facilities will then be available for use in future.
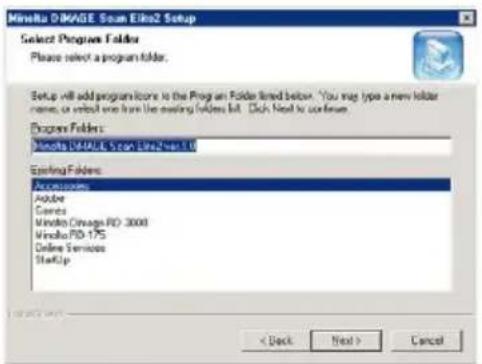
7 The name of the default program folder is displayed. To install the software icons in this folder, click "Next".
- To install the software icons to another existing folder, select one of the folders listed in the existing-folders box below. Click "Next>" to begin installation.
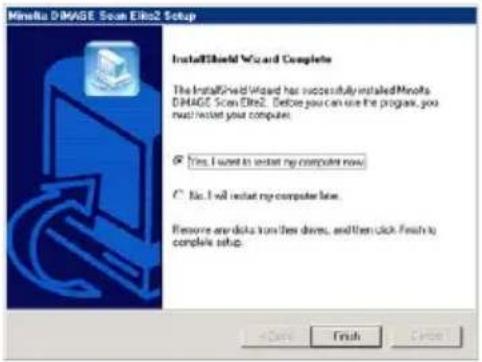
8 The Install Shield Wizard will indicate that installation was successful. Check "Yes, I want to restart my computer now." and then click "Finish".
- When the computer restarts, the scanner driver software will be ready to use.
Macintosh
1 Turn on the computer to start the Mac OS.
2 Insert the DiMAGE Scan Elite II CD-ROM into the CD-ROM drive.
- Dimage Scan Elite2 CD-ROM icon will appear on the desktop.
3 Double-click on the DiMAGE Scan Elite 2 icon.
- The driver, manual, and acrobat reader folders will appear.
4 Double-click on the driver folder.
• The language folders will appear.
5 Open the English language folder, then double click on the DS Elite 2 installer.
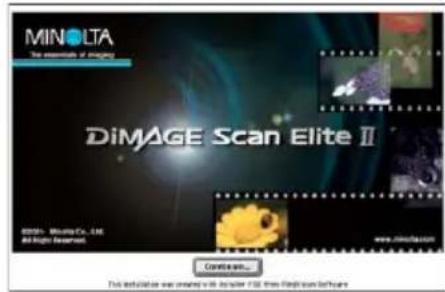
- The installer's start-up screen will appear.
6 Click "Continue" on the installer screen to begin the installation routine.


DS Elite2 Installer
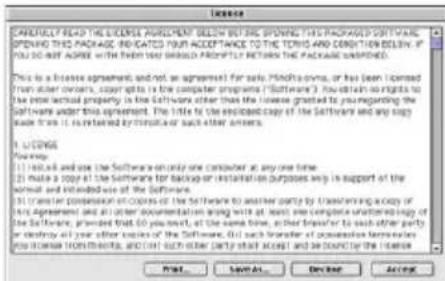
7 The end-user license agreement will appear. If you accept the terms of the agreement, click “Accept” to continue the installation routine.
- If you do not agree to the conditions stated in the end-user license agreement, click "Decline" and the software will not be installed.
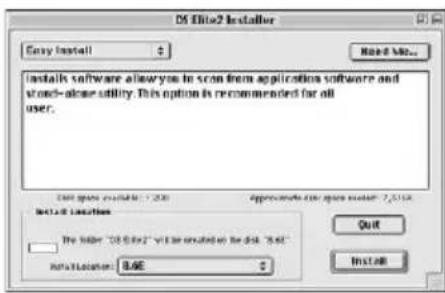
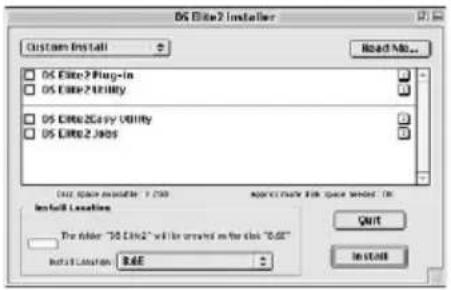
8 At the bottom left of the installer screen, specify the location in which the software will be installed. To change the designated location, use the install-location menu; this menu can be used to select an existing location or create a new folder.
9 Select the installation method from the pop-up menu at the top left of the installer screen. Click on "Install" to begin installation.
- The easy-install option will install the required software. If only specific programs need to be installed, select the custom-install option; click the check box of the files to be installed.
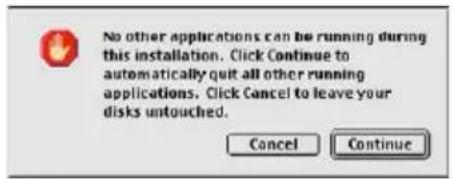
10 Any software that is running must be stopped before the scanner driver can be installed. Click “Continue” to shut down any active applications and continue the installation routine.
- Clicking "Cancel" will end the installation routine.
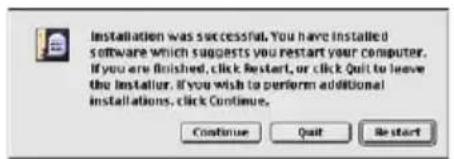
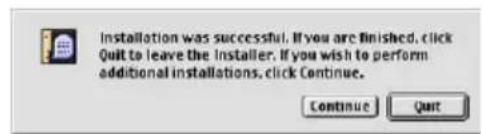
11 A screen confirming the successful installation of the software will appear. Click "Restart" to exit the installation program and restart the computer.
- To exit the installer without restarting the computer, click "Quit". To make additional installations, click "Continue".
12 After the computer restarts, confirm the DS Elite 2 folder is installed in the designated folder.
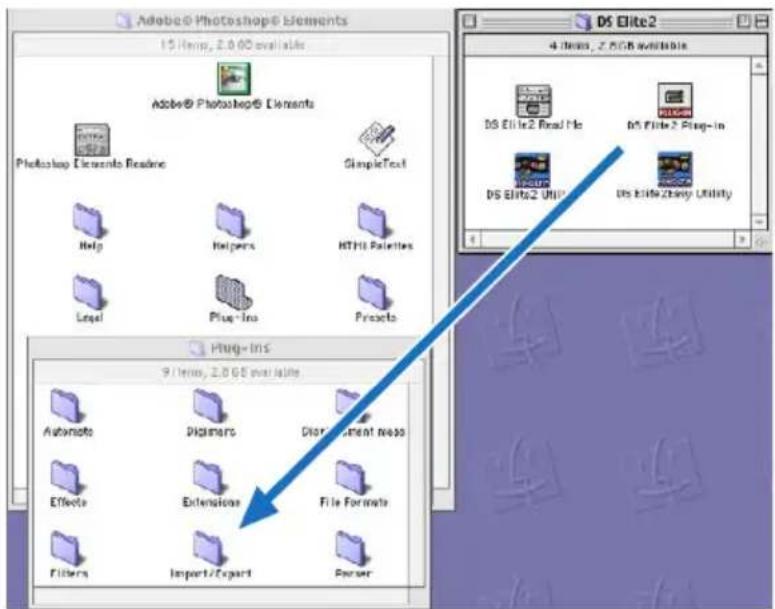
- If easy install was chosen, the DiMAGE Scan Elite 2 folder will contain the following items: DS Elite 2 Easy Utility, DS Elite 2 Utility, DS Elite 2 Plug-in, and DS Elite 2 Read Me.
13 Drag the DS Elite 2 plug-in into the import/export folder in the Adobe Photoshop plug-in folder.
- Shutdown the Adobe application before dragging the DS Elite2 plug-in into the folder.
• To install Adobe Photoshop Elements, see page 14.
INSTALLING ADOBE PHOTOSHOP ELEMENTS
Take time to register your copy of Photoshop Elements with Adobe. You can register online, by fax, or by mail. The software can be registered online during installation by following the instructions on the installer screens. To register by fax or mail, read the instructions in the registration folder located in the technical-information folder on the Adobe Photoshop Elements CD-ROM.
Windows® 98/98SE/2000 PROFESSIONAL/ME/XP
In the procedure below, the hard disk is drive C, and the CD-ROM drive is drive D. The letters designating the drives will vary between computers.
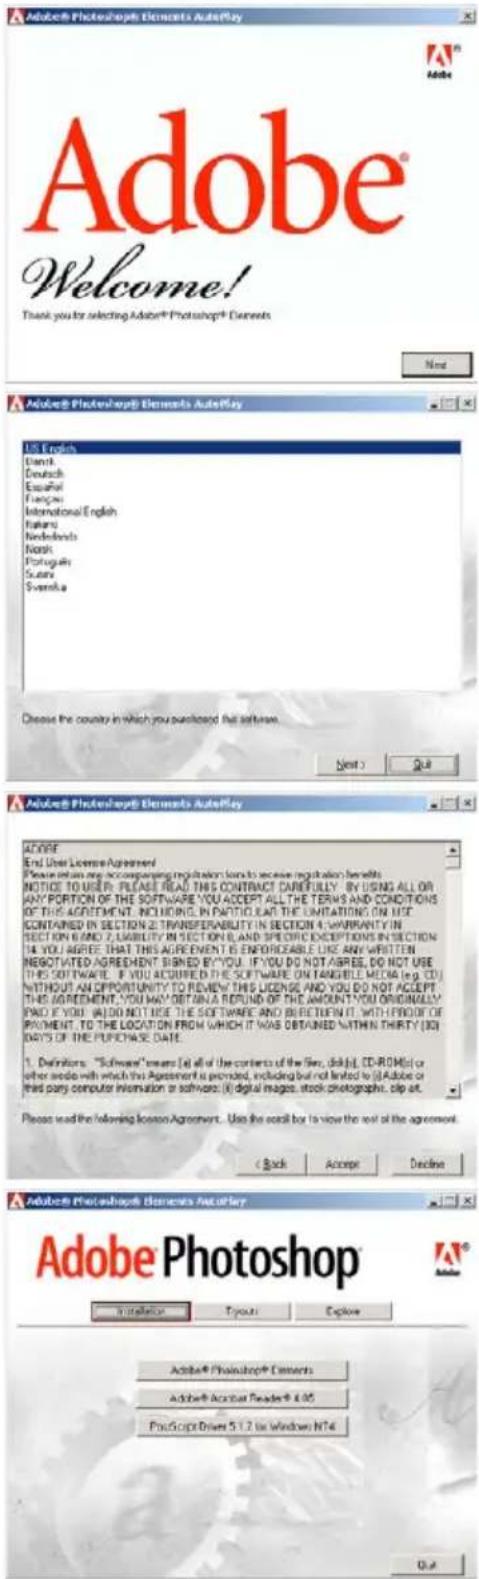
1 Insert the Adobe Photoshop Elements CD-ROM into the CD-ROM drive. The welcome screen will automatically appear.
2 Click "Next" to continue.
3 Click on the preferred language for the software. Click "Next".
4 The end-user license agreement will appear. If you accept the terms of the agreement, click “Accept” to continue the installation routine.
- Read the entire agreement carefully before continuing the setup. If you don't agree to the terms of the agreement, click "Decline" to exit the setup program.
5 Click the installation button; it should be highlighted with a red line. Click “Adobe® Photoshop® Elements” to set up the installation.
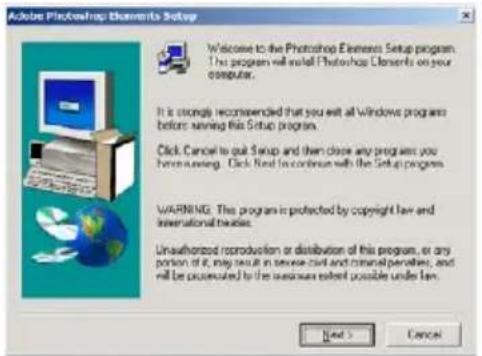
6 Read the cautions on the setup screen. If no other applications are running, click "Next".
- Click "Cancel" to exit the setup routine to stop any applications that may be running. To start the installation routine again, double click on the elements icon in My Computer. The routine will start from step 2.
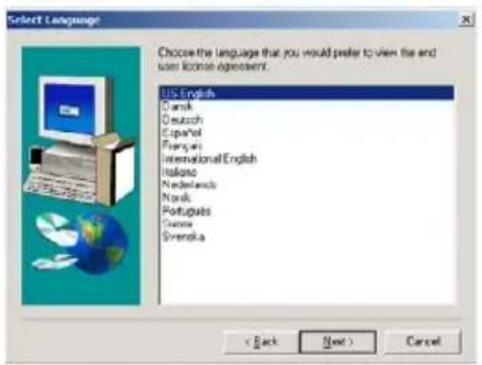
7 Click on the preferred language and click "Next" to continue.
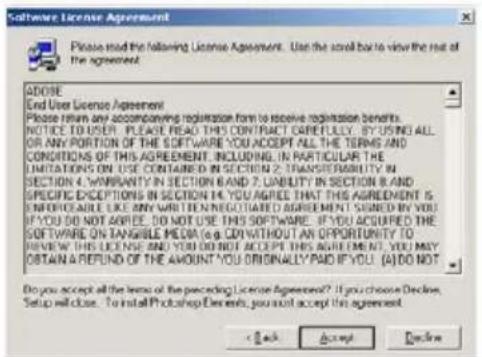
8 The end-user license agreement will appear. If you accept the terms of the agreement, click “Accept” to continue the installation routine.
- Read the entire agreement carefully before continuing the setup. If you do not agree to the terms, click "Decline" to exit the setup program.
9 Choose the type of installation; typical is recommended. The software will be installed in the default folder: C:\Program Files\Adobe Photoshop Elements. Click "Next".
- To install the software in another folder, click "Browse..." to display folders in the computer. Specify the folder, then click "OK".
10 Select the file types that you wish to open in Photoshop Elements. Click "Next>".
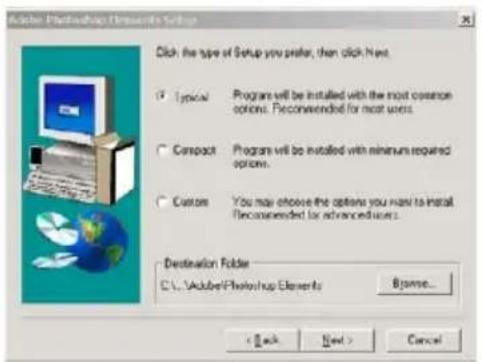
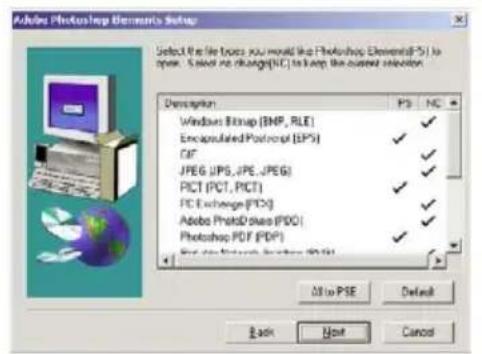
11 Fill in all the fields on the user information screen. Click "Next".
- The serial number is found on the back of the CD-ROM case. Enter the serial exactly as it is displayed.
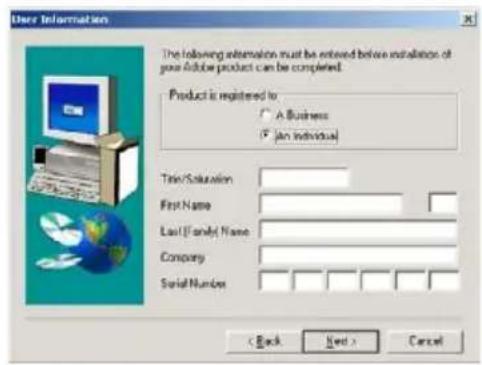
12 Check the registration information on the confirmation screen. If all information is correct, click "Yes".
- To correct the information, click "Back" to return to the user information screen.
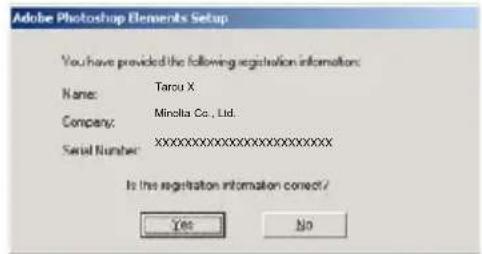
13 Confirm the contents of the installation. Click "Next" to install Adobe Elements.
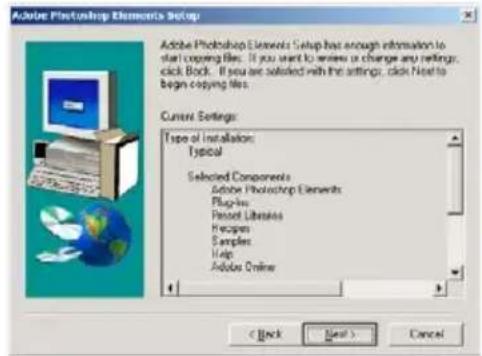
14 The SVG Viewer installation screen will appear. Click "Install" to install the software.
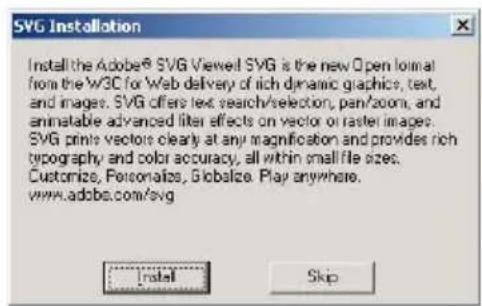
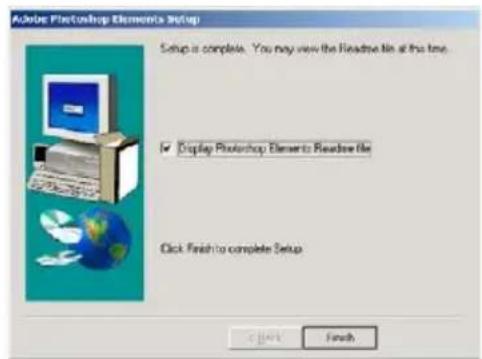
15 A screen confirming the successful installation of the software will appear. Click "Finish" to exit the installation routine.
1 Turn on the computer to start the Mac OS.
2 Insert the Adobe Photoshop Elements CD-ROM into the CD-ROM drive.
- The Adobe Photoshop Elements CD-ROM icon will appear on the desktop.
3 Locate the Photoshop Elements installer in the Adobe Photoshop Elements folder located in the appropriate language folder.
4 Double-click on the Install Photoshop ^® Elements icon.
5 The Adobe Photoshop Elements screen will appear. Click "Continue".
6 Use the drop-down menu to select the preferred language. Click "Continue".
7 The end-user license agreement will appear. If you accept the terms of the agreement, click “Accept” to continue the installation routine.
- Read the entire agreement carefully before continuing the setup. If you do not agree to the terms, click "Decline" to exit the setup program.
8 The read-me screen appears detailing product updates and documentation as well as troubleshooting tips. Click "Continue".
- This information can be printed using the "Print" button.
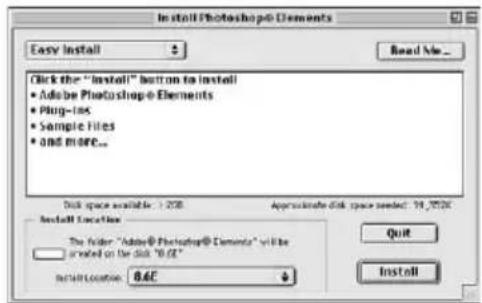
9 At the bottom left of the installer screen, specify the location in which the software will be installed. To change the designated location, use the install-location menu; this menu can be used to select an existing location or create a new folder.

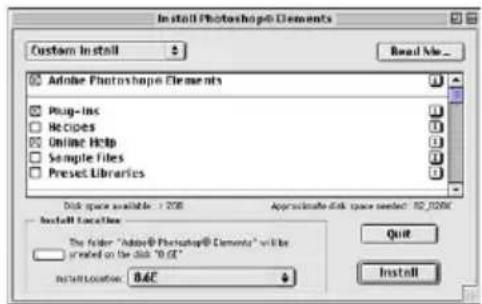
Install Photoshop® Elements
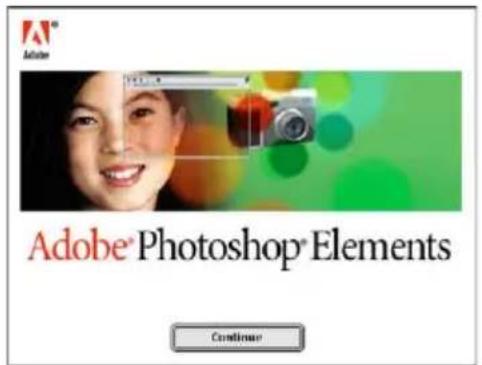
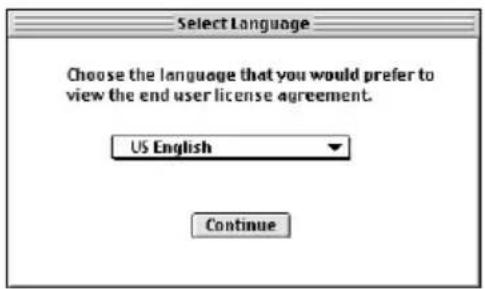
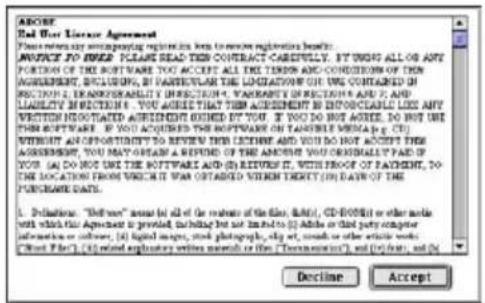
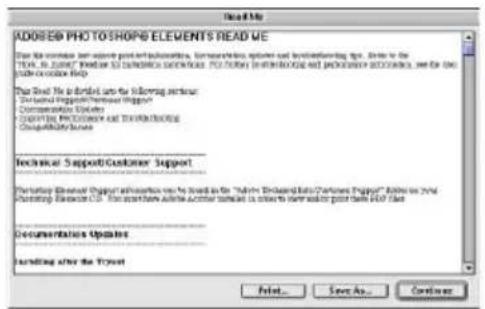
10 Select the installation method from the pop-up menu at the top left of the installer screen. Click "Install" to begin installation.
- The easy-install option will install the required software. If only specific programs need to be installed, select the custom-install option; click the check box of the files to be installed.
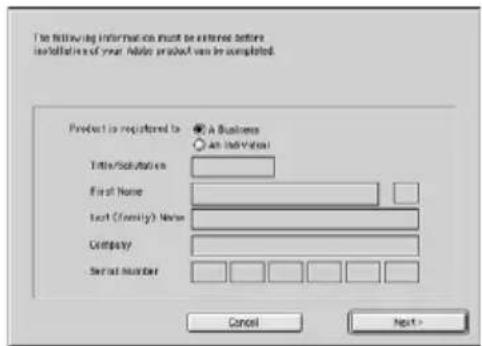
11 Fill in all the fields on the user information screen Click "Next".
- The serial number is found on the back of the CD-ROM case. Enter the serial exactly as it is displayed.
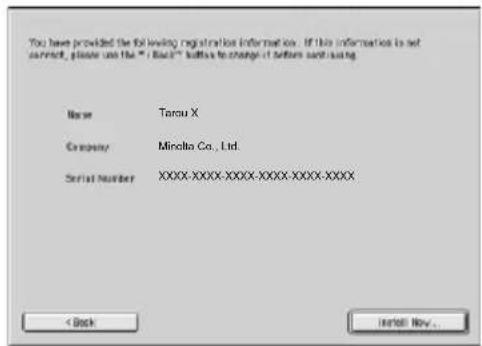
12 Check the registration information on the confirmation screen. If all information is correct, click "Install Now".
- To correct the information, click "Back" to return to the user information screen.
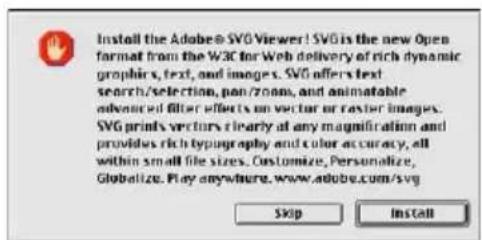
13 The SVG Viewer installation screen will appear. Click "Install" to install the software.
14 A screen confirming the successful installation of the software will appear. Click "Quit" to exit the installation program.
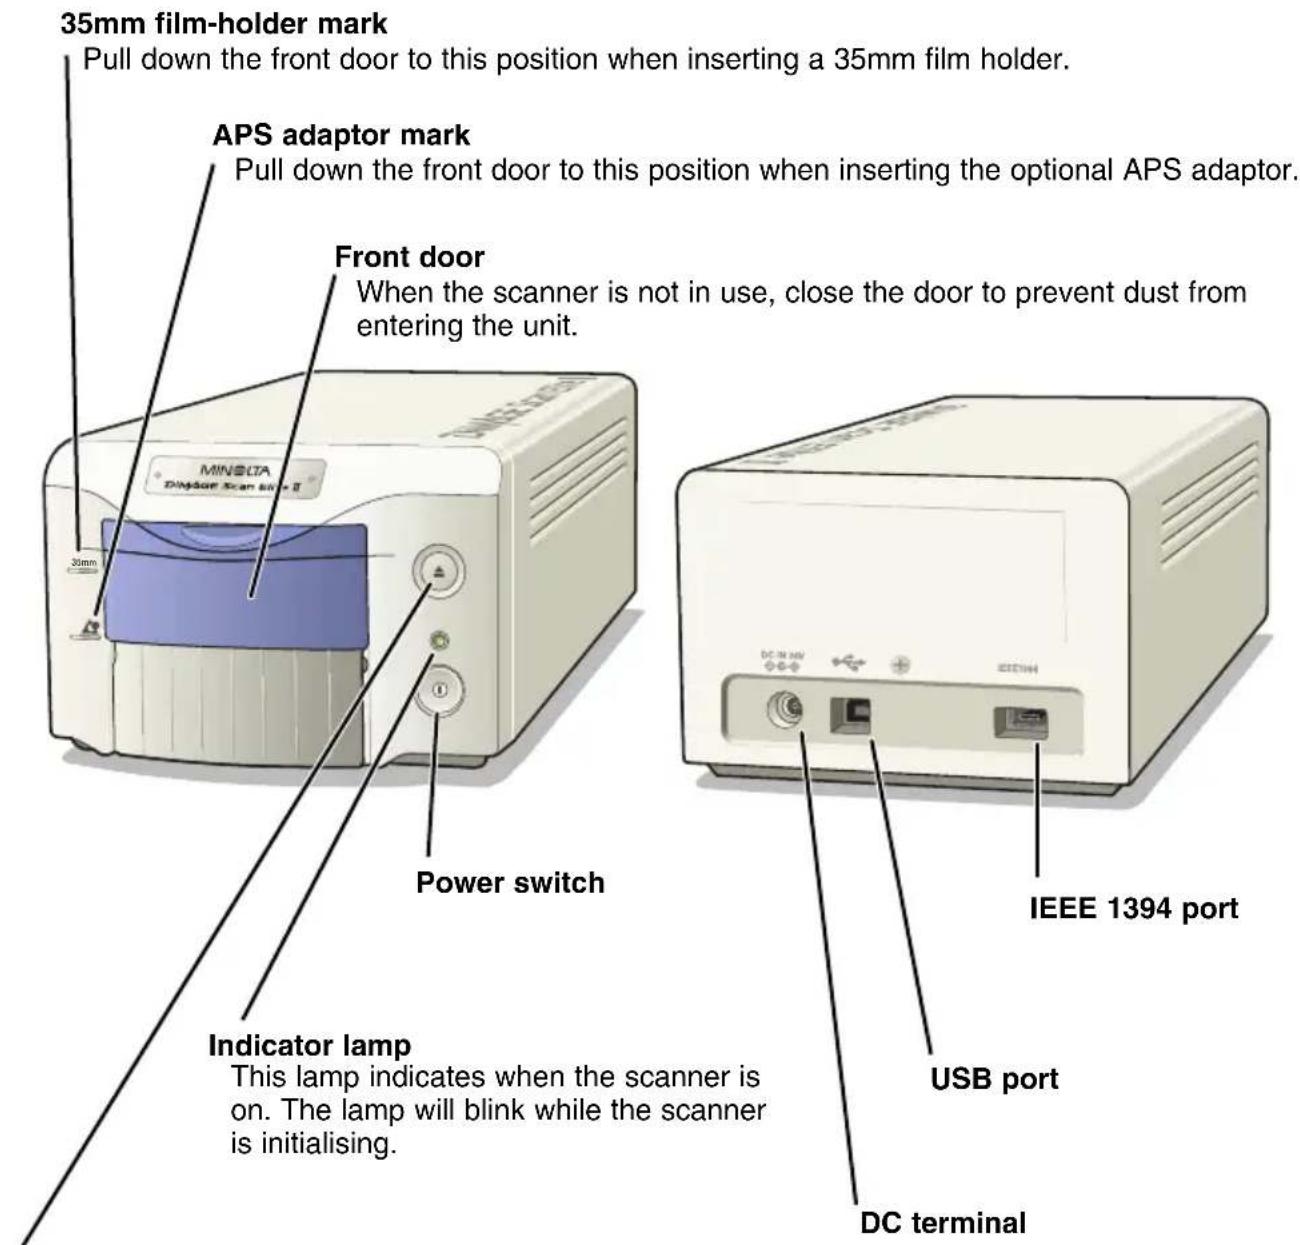
Eject button
This button ejects the film holder, and rewinds the film in the APS adaptor.
CONNECTING THE AC ADAPTOR
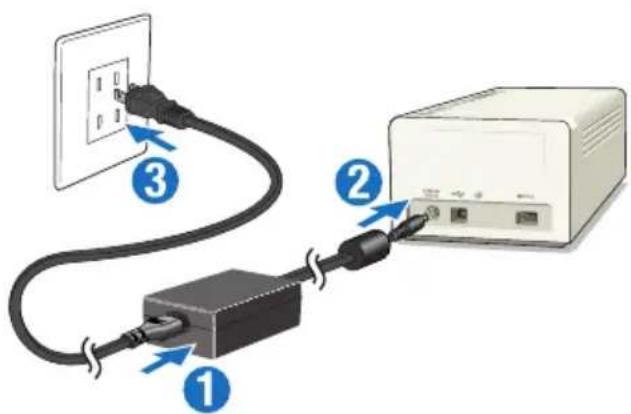
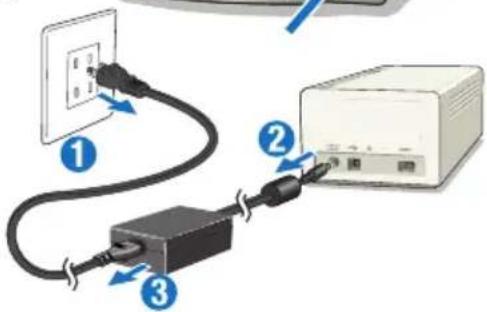
1 Connect the power cable to the AC adaptor.
2 Connect the output plug of AC adaptor to the DC terminal of the scanner.
3 Plug the power cable securely into a standard household outlet.
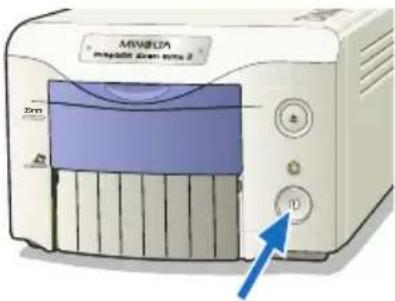
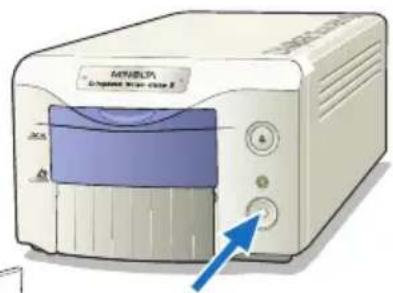
4 Turn on the scanner with the main switch.
5 Turn on the computer to start up the Windows or Macintosh operating system.
CONNECTING THE SCANNER CABLE
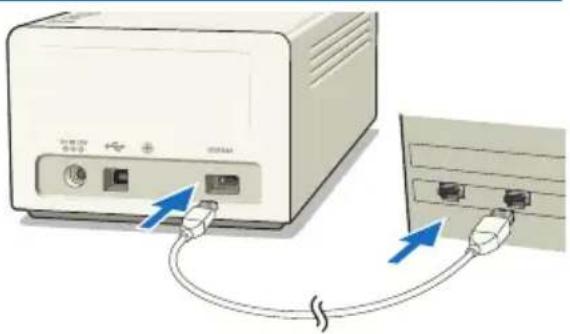
The IEEE 1394 or USB cable is used to connect the scanner to a computer. IEEE 1394 connection can only be used with a computer which incorporates a preinstalled IEEE 1394 or FireWire port with a preinstalled operating system that supports this connection.
The USB and IEEE 1394 ports are covered with protective caps. Always cover the unused port with a cap. When the scanner is not in use for extended periods, unplug the cable and reinsert the cap.
IEEE 1394 CABLE
Connect one end of the IEEE 1394 cable to the scanners IEEE 1394 port, and the other end of the cable to the computer's IEEE 1394 port.
• Make sure the cable is securely plugged in.
- Either end of the cable can be connected to the IEEE 1394 port on the scanner or computer.
natural_image
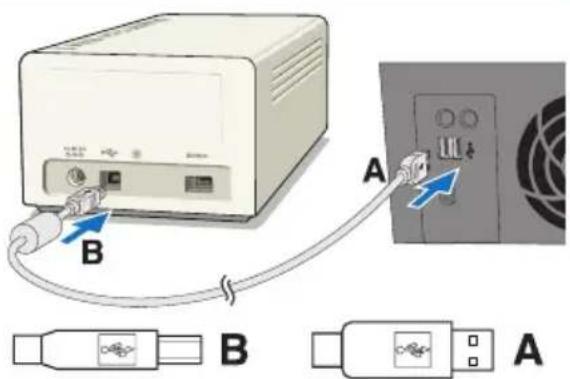
Illustration of a computer interface with USB ports and cables, showing connection to a device (no text or symbols present)USB CABLE
Plug the "A" connector of the USB cable into the computer's USB port, and the "B" connector of the USB cable into the scanners USB port.
- Make sure the cable is securely plugged in.
Windows® 98/98SE/2000 Professional/XP
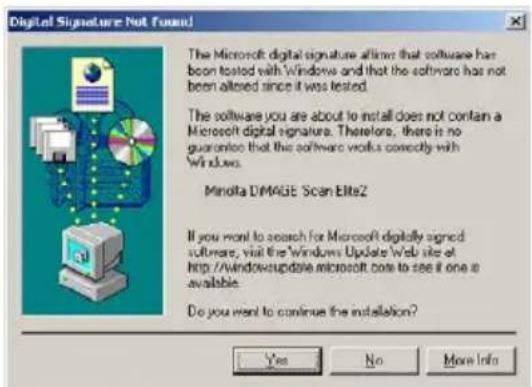
With Windows 98/98SE/2000 Professional, when the scanner is initially connected to a computer, the found-new-hardware wizard will appear briefly. No action is required. With Windows 2000, the "Digital Signature Not Found..." message may appear. Click YES to complete the scanner installation.
With Windows XP, when the scanner is connected, the found-new-hardware wizard will appear. Click NEXT. The "not passed Windows Logo testing" message appears. Click Continue Anyway to complete the scanner installation.
The DiMAGE Scan Elite II is ready to use. The previous routines only need to be completed once.
DISCONNECTING THE CABLE WITH WINDOWS
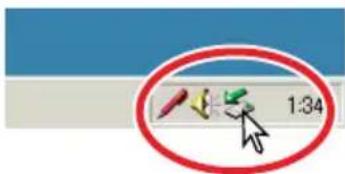
With Windows 2000, Me, or XP always close the utility software before disconnecting the IEEE 1394 or USB cable while the computer and scanner are on. Before unplugging the IEEE 1394 cable with Windows Me, complete the “Unplug or eject hardware” operation by double-clicking on the of “Unplug or eject hardware” icon on the task bar (see page 87).

CAUTION
- Never connect or disconnect the IEEE 1394 or USB cable while the computer, DiMAGE Scan Elite II, or other devices are operating or transferring data.
- Do not connect or disconnect the cable while the computer is starting up or shutting down. The computer or scanner may not operate properly.
- The scanner should be connected directly to the computer's IEEE 1394 or USB port. Attaching the computer to an IEEE or USB hub may prevent the scanner from operating properly.
- An interval of at least five seconds is required between disconnecting and connecting the scanner.
- When using an IEEE 1394 or USB storage device, it is not recommended to save scanned data directly to the device. Save the data on the computer's hard disk before transferring the data to the storage device.
- The unused port should always be covered with its protective cap. When the scanner is not in use for extended periods, unplug the cable and reinsert the port cap.
EASY SCAN UTILITY
Easy Scan Utility is a simple, automatic scanning application. The utility works as a stand-alone program, and cannot be launched through another application.
Simply follow the ten steps to create perfect, trouble-free scans:
- Launch the Easy Scan Utility
- Load the film holder
- Insert the film holder into the scanner
- Specify the film type
- Make an index scan
- Select the image to be scanned
- Specify the use of the scanned image
- Choose Digital ICE, ROC, or GEM processing
-
Confirm the scanner settings
-
Scan and save the image
-
The following functions are automatically set when using the Easy Scan Utility:
- Autofocusing with each 35mm frame, or with first APS frame only.
- Index scan priority : speed setting
- Automatic shutdown of the utility at the end of the scan
- Colour depth: 8 bit
- Multi-sample scanning: OFF
- Automatic cropping: inside edge.
- When Digital ROC is active, colour matching is turned off.
- sRGB output colour space when colour matching is on.
- AE (Auto Exposure) with all films except black and white slides.
1. LAUNCHING THE EASY SCAN UTILITY

CAUTION
The front door of the scanner must be completely closed before turning on the scanner or launching the software.
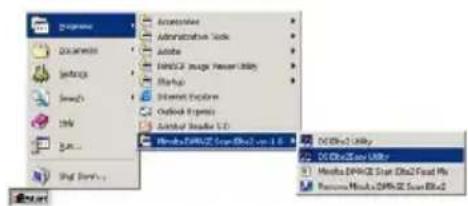
Windows®
Select Start -> Program (P) -> Minolta DiMAGE Scan Elite2 ver.1.0 -> DS Elite2 Easy Utility.
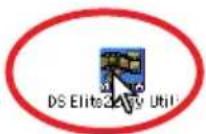
Macintosh
Open the DS Elite 2 folder, and double click the DS Elite 2 Easy Utility icon.

2. LOADING THE FILM HOLDER
Using the included holders, the DiMAGE Scan Elite II can scan mounted or unmounted...
• Colour negatives • Colour positives
- Black and white negatives • Black and white positives
APS (Advanced Photo System) film can also be scanned using the optional APS adaptor AD-10.

CAUTION
Remove any dust from the film before placing it in the film holder. Only use brushes or compressed air specifically for photographic film. Do not blow on the film with your mouth, or use tissue paper or your fingers to wipe the film. Always hold the film by the edges.
LOADING THE 35MM FILM HOLDER - FH-U1
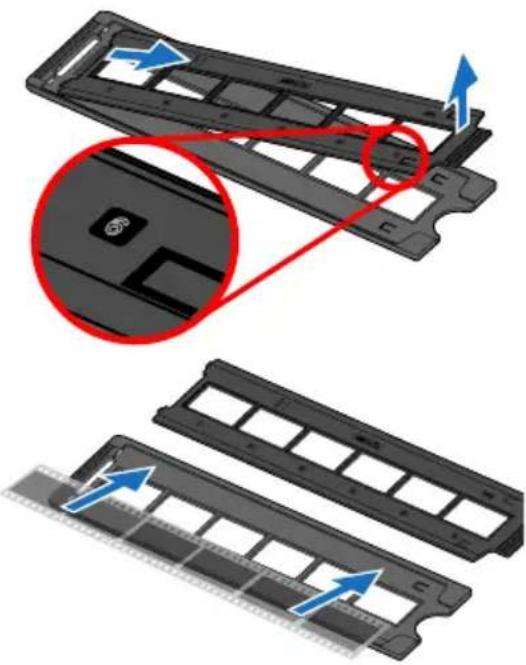
The 35mm film holder FH-U1 accommodates film strips with up to six frames. The horizontal images should be orientated in the same direction as the frame numbers on the film holder.
1 Lift the film cover on the FH-U1 by the tab near the number six frame.
2 Place the film in the film holder with the emulsion down.
- If the frame numbers on the edge of the film near the sprocket holes are reversed, the films emulsion side is up. Turn the film over.
- Align the film frames with the holder frames.
3 Insert the two tabs on the left side of the film cover into the holes in the holder base. Carefully lower the cover taking care not to move the film. Snap the film cover closed by pressing the two "PUSH" marks.
natural_image
Diagram showing a mechanical component with blue arrows indicating direction, and a magnified inset highlighting a specific section (no text or symbols present)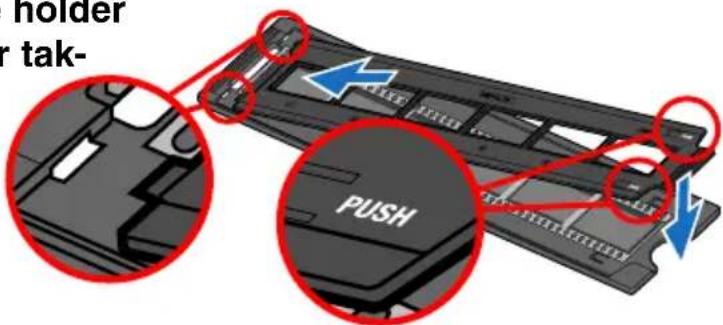
LOADING THE SLIDE MOUNT HOLDER – SH-U1
- The slide mount holder SH-U1 accommodates up to four slides. Slide mounts must be thicker than 1 mm and thinner than 2 mm to be used in the holder. Do not use glass mounted slides. APS slide mounts can be used.
1 Hold the slide mount holder so that the slide slots are to the top and the frame numbers are up-side-down and face up.
2 Insert slides into the slots with the emulsion down.
- When inserting slides, the frame number or date printed on the slide mount should be face up.
- Horizontal images should be inserted up-side-down.
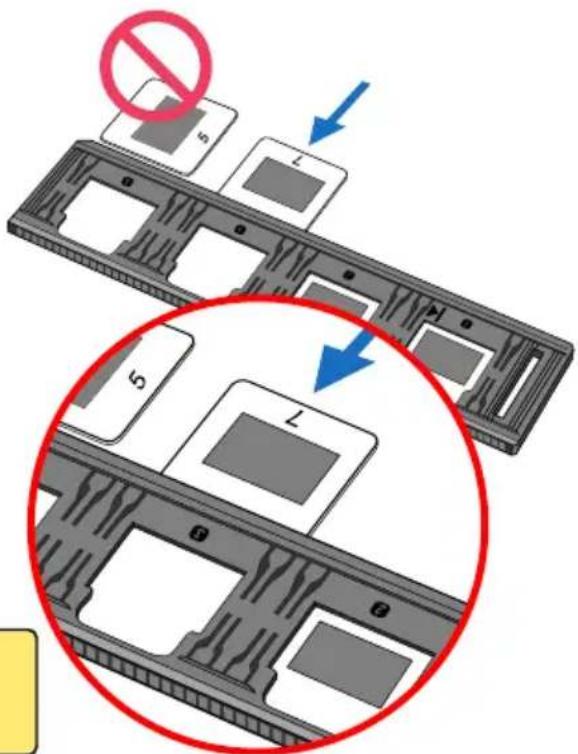

CAUTION
To scan the entire image area, the slides must be inserted horizontally in the holder, not vertically.
LOADING THE APS ADAPTOR - AD-10 (SOLD SEPARATELY)
APS (Advanced Photo System) cassette film can be scanned with the optional APS adaptor AD-10.
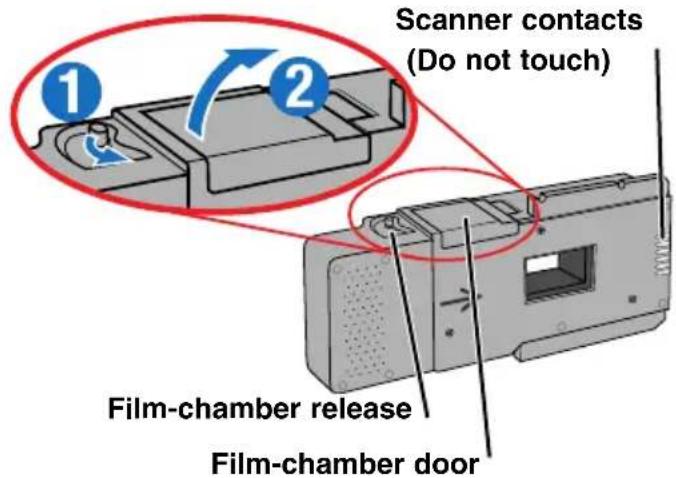
1 Slide the film-chamber release toward the top of the adaptor until the film-chamber door opens.
- The film-chamber release does not return to its original position until the film-chamber door is closed.
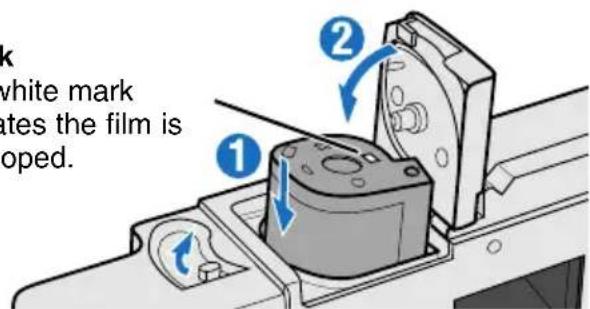
2 Insert the film cassette into the film chamber as shown.
- Only load cassettes with the number 4 (☐) mark highlighted in white.
3 Close the film-chamber door.
- The film-chamber door will not close if any other mark other than number 4 is highlighted. Never force the door shut.
□ Mark
The white mark indicates the film is developed.

CAUTION
- Do not remove the APS film from the cassette.
- When using the APS adaptor, if the scanner makes a strange sound or the "Film advance error" warning appears, eject the APS cassette immediately (see page 29), and do not insert it again.
- Minolta is not responsible for any loss or damage caused from the operation of this product.
3. INSERTING THE FILM HOLDER
For information on loading the film holder, see page 23.

CAUTION
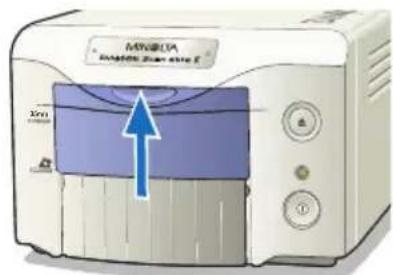
Do not open the front door or insert the film holder while the utility software is launching or the scanner is initialising (the indicator lamp will blink). Insert the holder only after the indicator lamp glows steadily when initialisation is completed.
INSERTING THE FILM HOLDER FH-U1 OR SLIDE MOUNT HOLDER SH-U1
1 Open the front door of scanner until the top of the door lines up with the 35mm mark – 35mm.
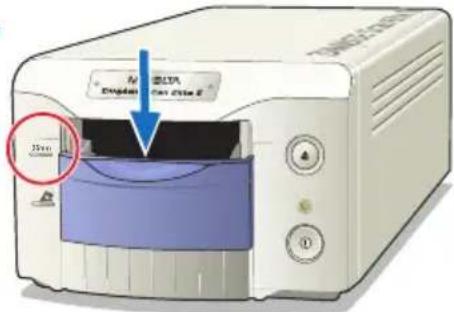
2 Hold the film holder or slide mount holder with the arrow mark face up. Insert the holder into the scanner until the arrow mark ▶ aligns with the body.
- The scanner will detect the holder and automatically load it pulling inside slightly.
- To eject the holder, press the eject button. The scanner will automatically eject the holder to the initial inserting position.
- Never touch or hinder the holder while it is in the scanner. When ejecting the holder, wait until is has come to a complete stop before removing.
- When the scanner is not in use, close the front door
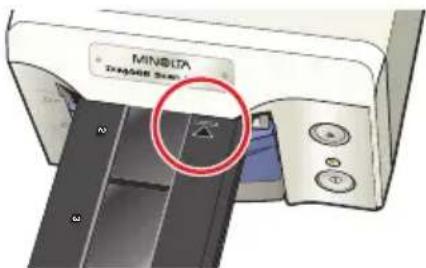
35mm Film Holder FH-U1
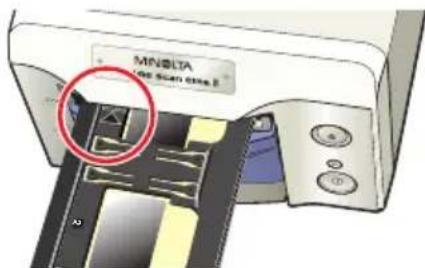
Slide Mount Holder SH-U1
INSERTING THE APS ADAPTOR AD-10 (SOLD SEPARATELY)
1 Open the front door of scanner until the top of the door lines up with the APS mark – .
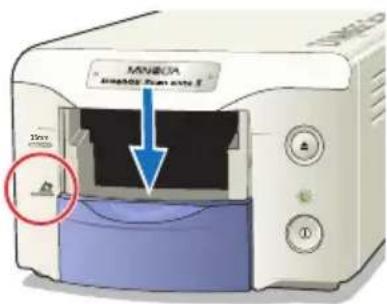
2 With the scanner contacts face up, insert the adaptor into the scanner until it stops.
- The scanner detects the holder and automatically loads the film from the cassette.
- To eject the holder, push the eject button. The scanner will automatically rewind the film. Do not remove the adaptor until the rewind motor has stopped.
- When the scanner is not in use, close the front door.
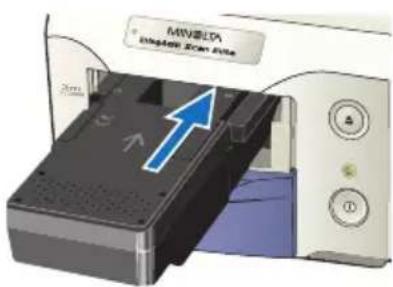
4. SPECIFYING THE FILM TYPE
When the Easy Scan Utility is launched, the easy scan wizard appears. Simply follow the instructions on the scan wizard to scan images.
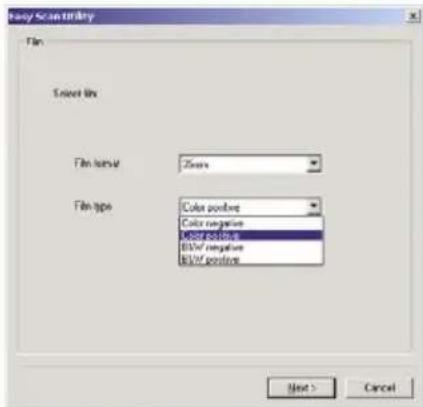
Select the film format and film type to be scanned on the pull-down menus. Click "Next >".
- The following film formats can be chosen:
- 35mm and APS cassette
- The following types of film can be selected:
- Colour negative, colour positive, B&W negative, B&W positive.
- Film for slides is a positive film. Film for prints is a negative film.
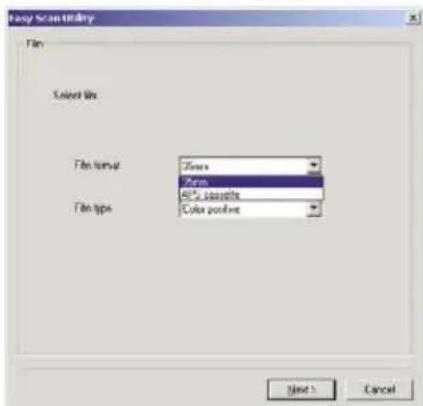

TIPS
- With pull-down menus, click on the arrow next to the menu to display the list. Highlight the item with the mouse and then click it to make the selection.
- With or boxes, simply click on the box to select the item.
- To return to a previous screen, click the "<Back" button at the bottom of the window.
5. MAKING AN INDEX SCAN
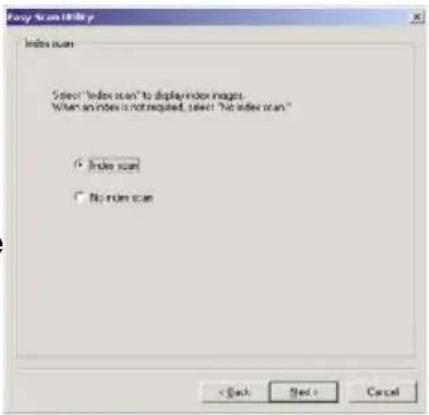
An index scan displays a thumbnail image of all the images in the holder. This is especially useful when a selection needs to be made between similar negatives on one strip of film.
To make an index scan, click on the radio button next to the setting. Click "Next >" to start the scanner.
- When an index scan is not needed, click "No Index Scan".
- If an index scan is made without a film holder or APS adaptor, the "Please set holder properly" message will appear. Click "OK" in the dialog box and then click "Back" to return to the index-scan screen. Insert the film holder and click "Next>" to make the index scan.
6. SELECTING THE IMAGE TO BE SCANNED
The images to be scanned are selected on this screen. Multiple or single images can be chosen.
Click the thumbnail(s) of the image(s) to be scanned. Click "Next>" to continue.
- To select multiple images, press and hold the control key (Windows) or command key (Macintosh) and then click on each image to be scanned; the selected frames will have a dark border. To deselect an image, click on the thumbnail a second time while holding the control key (Windows) or command key (Macintosh). To select consecutive images, press and hold the shift key and then click on the first and last image of the series. Press the control key (Windows) or command key (Macintosh) and "A" key at the same time to select all frames.
- If an index scan was not chosen on the previous screen, a gray box will be displayed in each frame. To choose the image, click on the box with the frame number that corresponds to the frame number on the film holder.
- If all the frames are displayed up-side-down, click the rotate-all-frames-180-degrees check box.
7. SPECIFYING THE USE OF THE SCANNED IMAGE
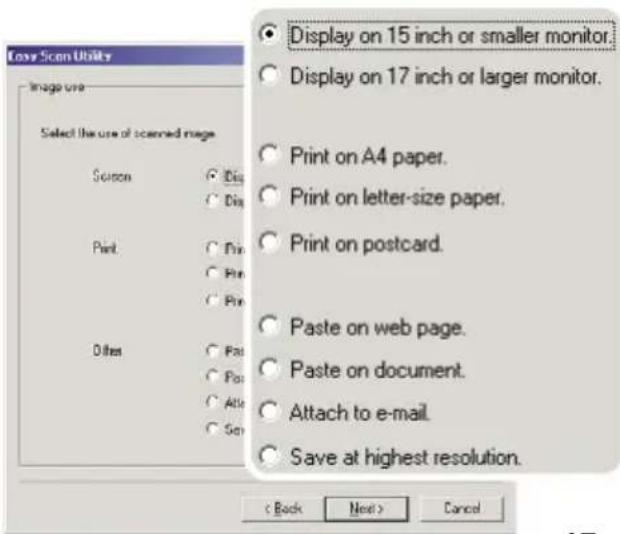
The Easy Scan Utility optimises scan settings based on the final use of the scanned image.
Click the radio box which best describes the final use of scanned image. Click "Next>" to continue.
- Only one choice can be made. If an image has multiple uses, repeat the easy scan procedure for each use of the image.
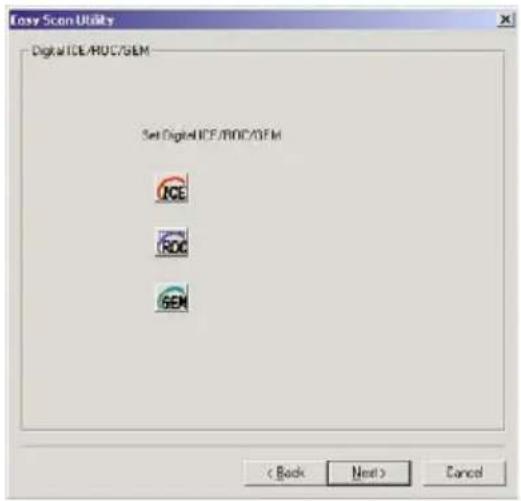
8. CHOOSING DIGITAL ICE/ROC/GEM PROCESSING
The scanned image can be enhanced with Digital ICE ^3 image processing. These tools cannot be used with traditional black and white film.
Click on the buttons to choose the image processing to be applied to the scanned images. Click “Next >” to continue.
- Digital ICE reduces the effect of dust, flaws, scratches, and fingerprints on the film surface. This cannot be used with Kodachrome film.
• Digital ROC restores the colour of faded film.
• Digital GEM reduces the effect of film grain.
• See pages 69 to 73 for more about Digital ICE, ROC, and GEM. - Scanning time increases with the number of image processing routines used.
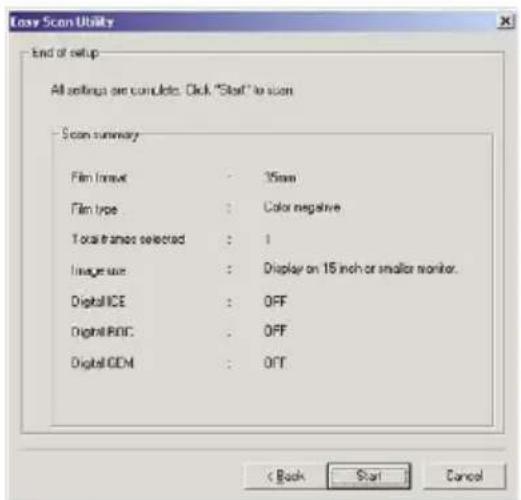
9. CONFIRMING THE SCANNER SETTINGS
Check the scanner settings on the confirmation screen. If all settings are correct, click "Start" to begin the scan.
- To change any setting, continue to click "Back" until the appropriate screen appears.
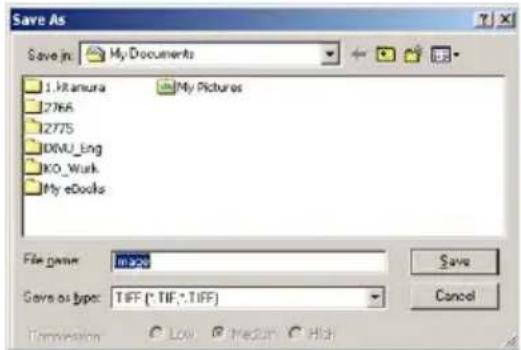
10. SCANNING AND SAVING THE IMAGE
On the save-as screen, specify the file name and destination of the image data. Click "Save".
- When more than one image is scanned, each image is saved with the input file name plus a two-digit serial number.
- When scanning is complete, the Easy Scan Utility is shutdown automatically.
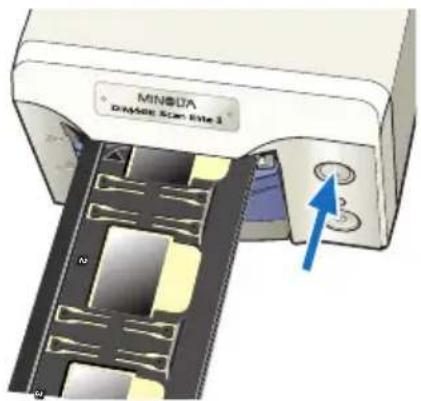
1 Press the eject button to unload the film holder or APS adaptor.
- The scanner automatically ejects the 35mm film or slide mount holder to the initial inserting position. Do not touch or hinder the holder while it is moving.
- When using the optional APS adaptor, the scanner automatically rewinds the film when the eject button is pressed. Do not remove the adaptor until the rewind motor has stopped.
2 Close the front door.
3 Press the main switch to turn off the scanner.
- Unplug the scanner when cleaning or when the product is not in use for extended periods.
- When using the IEEE 1394 cable with Windows Me, complete the "Unplug or eject hardware" operation by double-clicking on the "Unplug or eject hardware" icon on the task bar before turning off the scanner (see page 87). This step is unnecessary if the computer is shutdown before turning off the scanner.
- When restarting the computer, only steps 1 and 2 need to be completed.
STANDARD SCAN UTILITY
The Standard Scan Utility allows individual selection over scan settings to optimise the reproduction of the film image. The following flow diagram shows the usual scanning procedure:
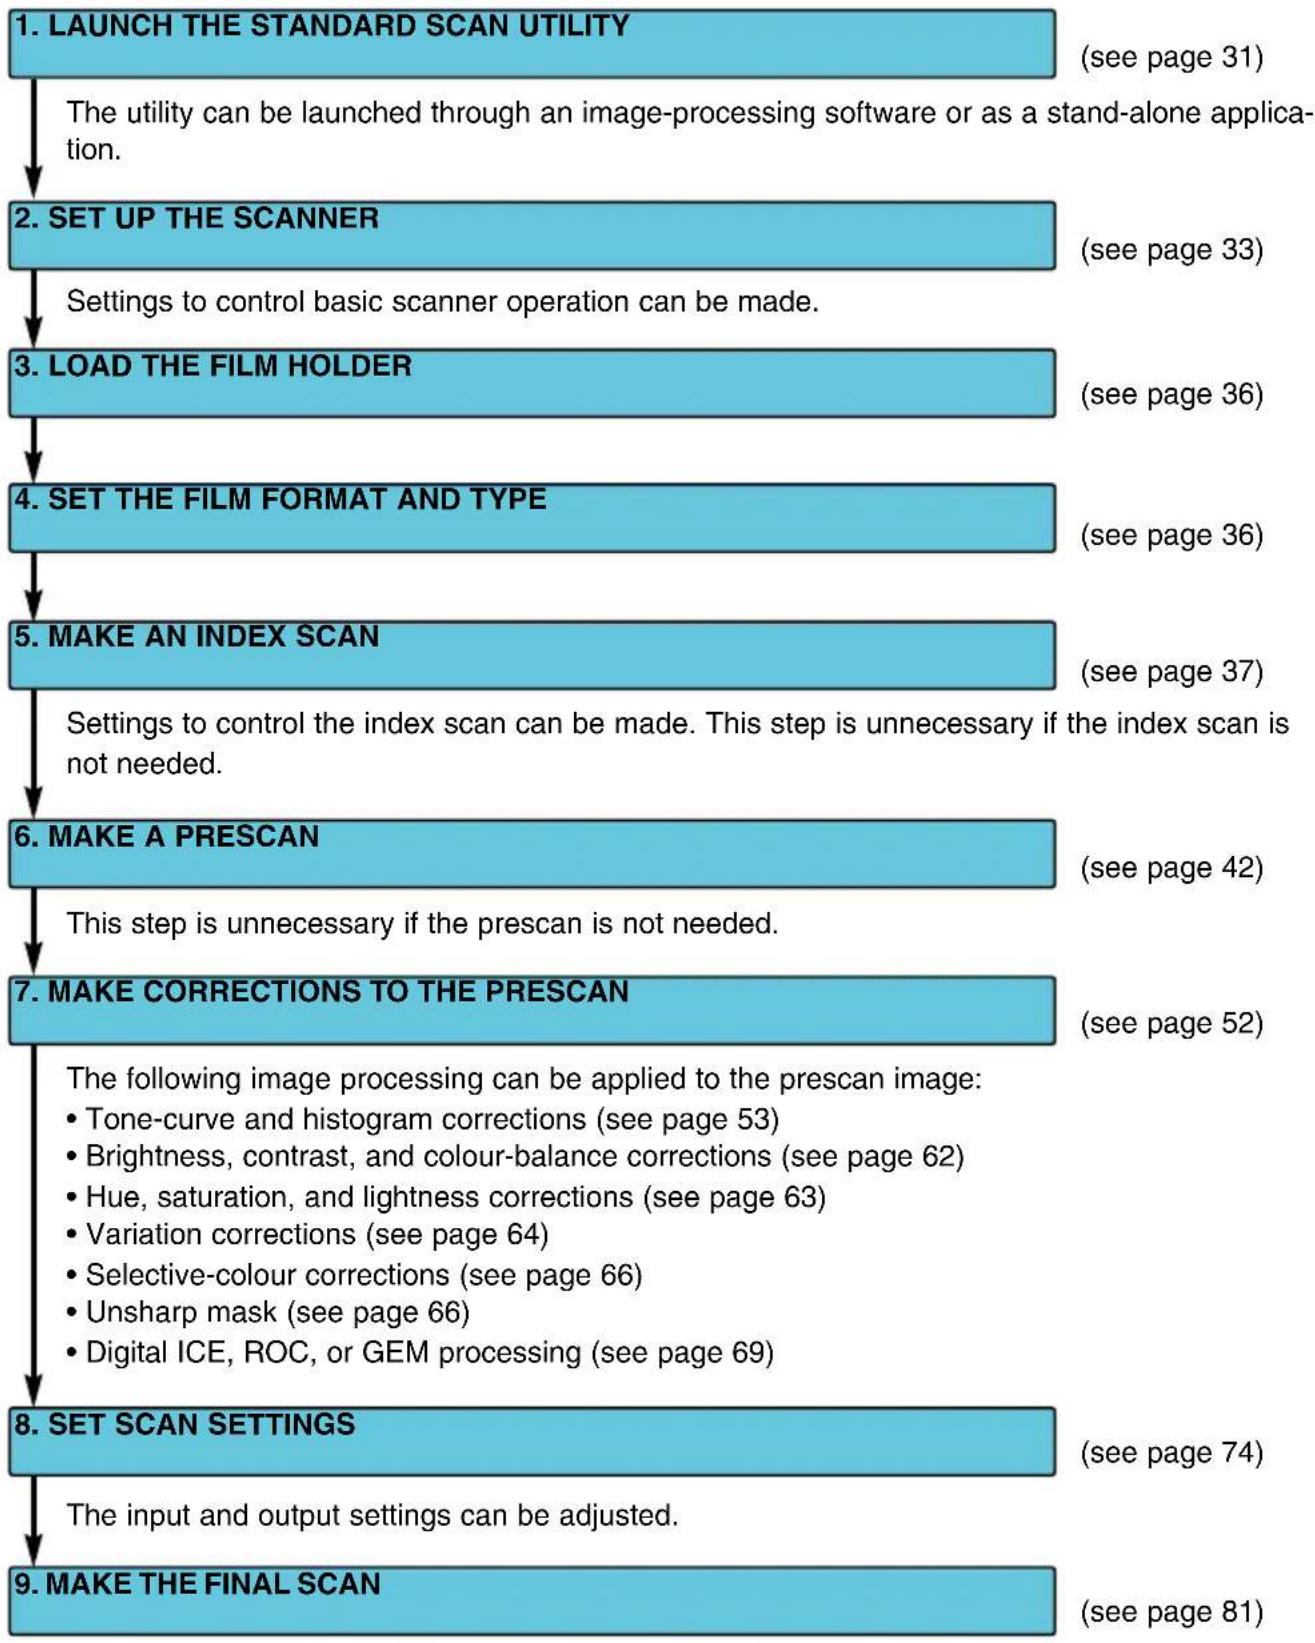
flowchart
graph TD
A["1. LAUNCH THE STANDARD SCAN UTILITY"] --> B["2. SET UP THE SCANNER"]
B --> C["3. LOAD THE FILM HOLDER"]
C --> D["4. SET THE FILM FORMAT AND TYPE"]
D --> E["5. MAKE AN INDEX SCAN"]
E --> F["6. MAKE A PRESCAN"]
F --> G["7. MAKE CORRECTIONS TO THE PRESCAN"]
G --> H["8. SET SCAN SETTINGS"]
H --> I["9. MAKE THE FINAL SCAN"]
style A fill:#cce5ff,stroke:#333
style B fill:#cce5ff,stroke:#333
style C fill:#cce5ff,stroke:#333
style D fill:#cce5ff,stroke:#333
style E fill:#cce5ff,stroke:#333
style F fill:#cce5ff,stroke:#333
style G fill:#cce5ff,stroke:#333
style H fill:#cce5ff,stroke:#333
style I fill:#cce5ff,stroke:#333
note1["The utility can be launched through an image-processing software or as a stand-alone application."<br>(see page 31)"]
note2["Settings to control basic scanner operation can be made."<br>(see page 33)"]
note3["Settings to control the index scan can be made. This step is unnecessary if the index scan is not needed."<br>(see page 36)"]
note4["This step is unnecessary if the prescan is not needed."<br>(see page 42)"]
note5["The following image processing can be applied to the prescan image:<br>• Tone-curve and histogram corrections (see page 53)<br>• Brightness, contrast, and colour-balance corrections (see page 62)<br>• Hue, saturation, and lightness corrections (see page 63)<br>• Variation corrections (see page 64)<br>• Selective-colour corrections (see page 66)<br>• Unsharp mask (see page 66)<br>• Digital ICE, ROC, or GEM processing (see page 69)"]
note6["The input and output settings can be adjusted."<br>(see page 74)"]
1. LAUNCHING THE STANDARD SCAN UTILITY

CAUTION
Confirm the cable is securely connected and the front door of the scanner is closed before turning on the scanner and launching the software. If the front door is open before launching the software, the scanner cannot initialise and will not accept the film holder.
The Standard Scan Utility can be launched through an image processing application like Adobe Photoshop Elements, which allows the image to be processed in the application after it is scanned. The utility can also be used as a stand-alone application that can process and save an image without the need of any other software.
Windows®
LAUNCHING THE STANDARD SCAN UTILITY
LAUNCHING THE UTILITY WITH PHOTOSHOP ELEMENTS
1 Turn on the scanner and computer.
2 Start up Adobe Photoshop Elements.
3 Select the DS Elite 2 utility from the import command on the file menu.
- The Standard Scan Utility will start up and the main window will appear (see page 33).
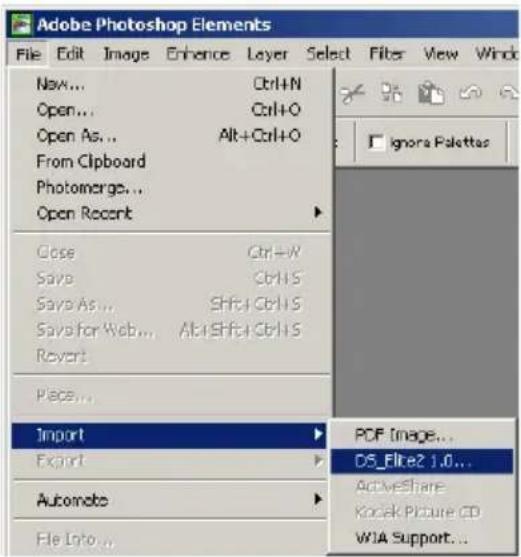
LAUNCHING THE UTILITY SOFTWARE
1 Turn on the scanner and computer.
2 Select the DS Elite 2 utility from the DiMAGE Scan Elite 2 folder in the
program option of the start menu.
- The Standard Scan Utility will start up and the main window will appear (see page 33).
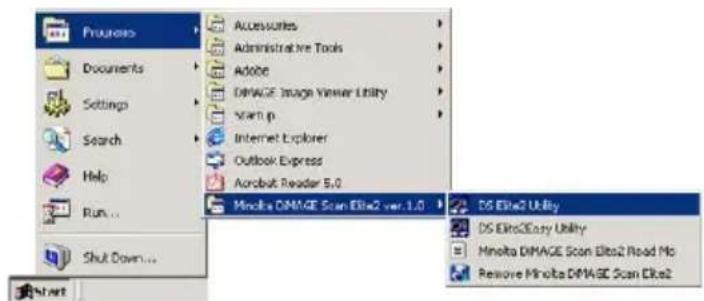
Confirm the cable is securely connected and the front door of the scanner is closed before turning on the scanner and launching the software. If the front door is open before launching the software, the scanner cannot initialise and will not accept the film holder.
Do not launch both the TWAIN model and independent utility together. Only one needs to operate at any time.
Macintosh
LAUNCHING THE STANDARD SCAN UTILITY
LAUNCHING THE UTILITY IN PHOTOSHOP ELEMENTS
The DS Elite2 plug-in must be installed in the Photoshop Elements' import/export folder before launching the software (see page 13).
1 Turn on the scanner and computer.
2 Launch Adobe Photoshop Elements.
3 Select the DS Elite 2 utility from the import command on the file menu.
- The Standard Scan Utility will start up and the main window will appear (see page 33).
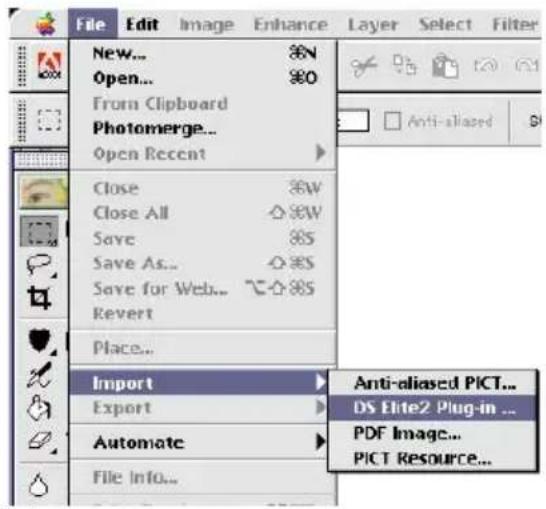
LAUNCHING THE UTILITY SOFTWARE
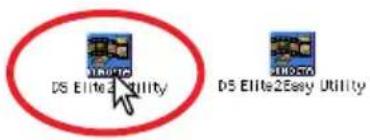
1 Double click on the DS Elite2 utility icon.
- The Standard Scan Utility will start up and the main window will appear (see page 33).

2. SETTING UP THE SCANNER
MAIN WINDOW
When the software is launched, the main window will open. For details on the scan-setting dialog box, see page 74.
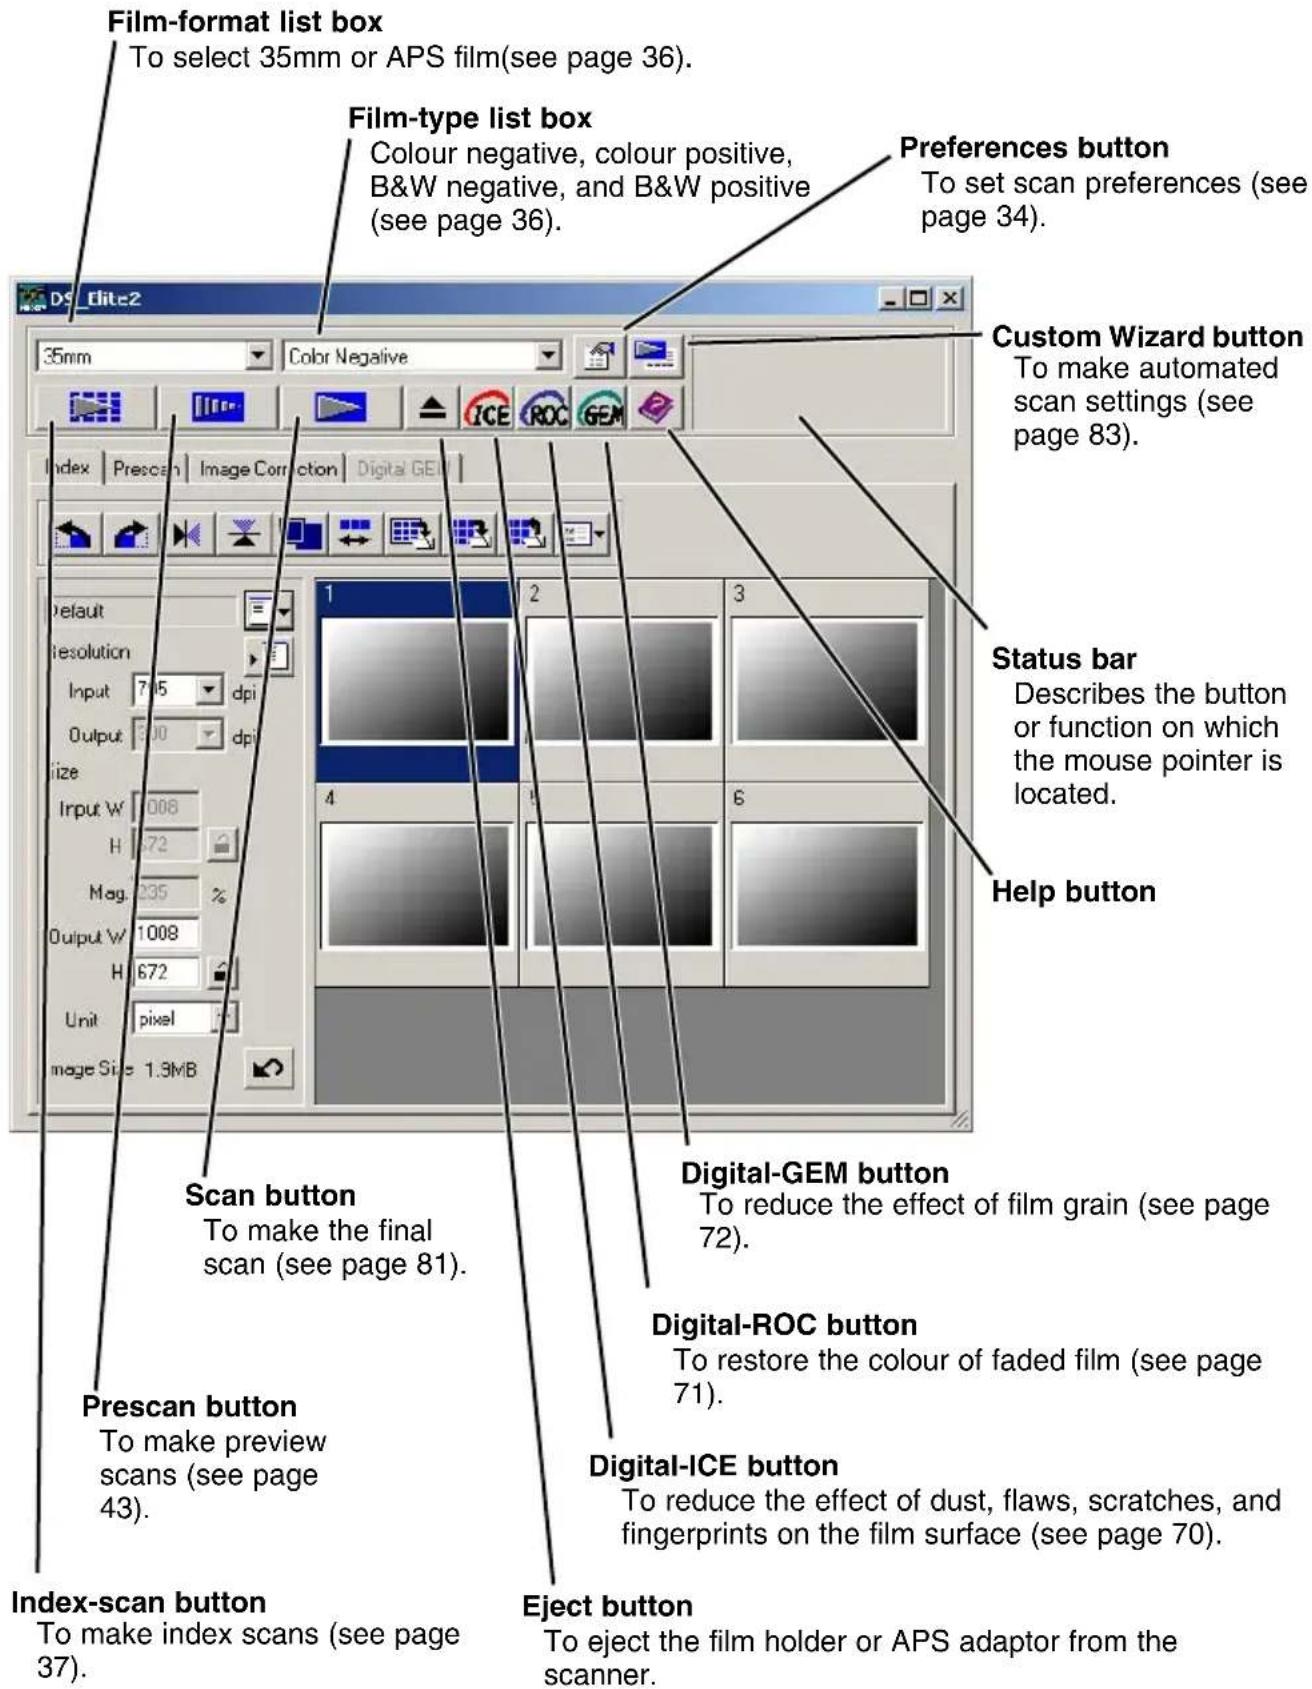
1 Click the preferences button to open the preferences dialog box.
2 Select the preferences as desired.
Auto-expose-for-slides check box
Checking this option activates the auto-exposure function during the prescan and final scan of colour slides. Since the density range of colour slides is relatively uniform, adjusting the exposure for each slide is unnecessary. However, when scanning an underexposed or overexposed slide, the auto exposure system can compensate for the unusual slide density. When using AE lock or AE area selection with slide film (see page 48), the auto-expose-for-slide box must be checked.
Autofocus-at-scan check box
Checking this option activates the autofocus function during the prescan and final scan. When using Digital ICE, ROC or GEM (see page 69), the use of autofocus is record increases the scanning time.
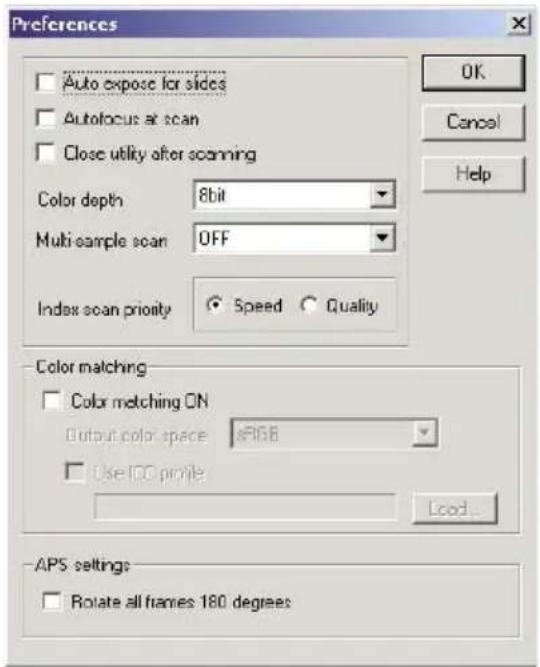
Close-utility-after-scanning check box
Checking this option closes the Standard Scan Utility after the final scan when using the scanner with Photoshop Elements. Activate this function when individual images will be scanned and then processed or retouched in Photoshop Elements. However, uncheck the box when multiple images need to be scanned before retouching.
Colour-depth list box
This option specifies the colour depth of the scanned image. The default setting is 8 bit. The following settings can be made:
- 8 bit 8-bit output for each RGB channel
• 16 bit 16-bit output for each RGB channel - 16 bit linear 16-bit output for each RGB channel with no gamma correction
Because 16 bit linear output does not make any gamma corrections, the scan of a negative will produce a negative image. 16-bit and 16-bit linear images can only be saved in the TIFF file format. Some image processing application, including the Adobe Photoshop Elements, cannot handle 16-bit image files.
Multi-sample list box
Multi-sampling can be used when making scans. This function reduces random noise in the image by analysing the data of each sample scan. The more samples taken, the less random noise in the image and the longer the scanning time. Select from one of five settings:
- OFF No sampling.
- 2 X Makes two samples.
- 4 X Makes four samples.
- 8 X Makes eight samples.
• 16 X Makes sixteen samples.
Index-scan-priority radio button
This option allows the selection of high-speed index scans or quality index scans with prescans. Simply click the appropriate radio button. The default setting is “Speed.”
- Speed: This allows high-speed index scans. Only index thumbnails are created with this setting. The scanner will make separate scans when prescans are required. The autofocus function is disabled when scanning the index thumbnails.
- Quality: An index thumbnail and prescan are made of each image. Double clicking on the index thumbnail immediately displays the larger prescan image. Prescan images are easier to use to make critical decisions over image quality. Image corrections can be applied to prescans. The quality index-scan-priority setting increases index scanning time.
Colour-matching settings: See page 88.
Rotate-all-frames-180-degrees check box (only visible when using APS film)
Checking this option rotates all APS index frames 180 degrees in the index scan window.
Cancel button:
To cancel any settings made and close the window.
Help button:
To open the help window.
3 Click the "OK" button to apply the preference settings.
3. LOADING THE FILM HOLDER
Load the film holder or APS adaptor, and insert it in the scanner. See page 23 for details on how to place film or slides in the film holder.
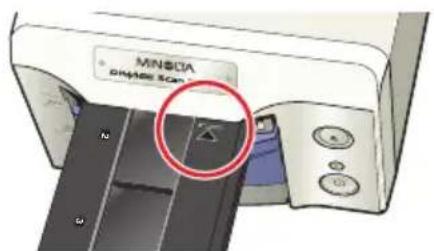
35mm film holder FH-U1
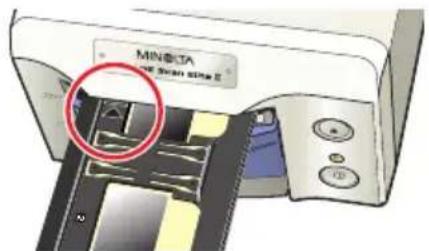
Slide mount holder SH-U1
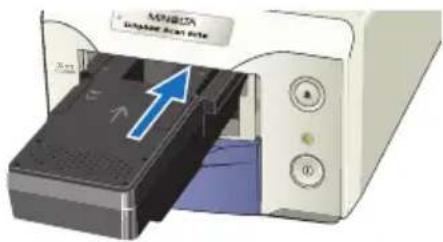
APS adaptor AD-10
(Optional)
4. SETTING THE FILM FORMAT AND TYPE
1 Select the film format from the drop-down list.
- 35mm or APS film formats can be selected. The default setting is "35mm."
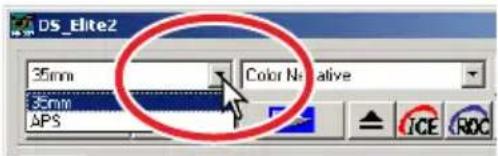
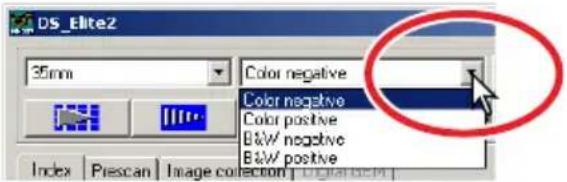
2 Select the film type from the drop-down list.
35mm – Colour negative, Colour positive, B&W negative, B&W positive. (The default setting is “Colour positive.”)
APS – Auto detect, Colour negative, Colour positive, B&W negative, B&W positive. (The default setting is "auto detect.")
- Film for slides is a positive film. Film for prints is a negative film.

5. INDEX SCAN
The index scan is a low-resolution scan used to show thumbnail images of all the frames in the film holder. Index scans are particularly useful when selecting images from negatives. If an index scan is not needed, simply click on the thumbnail frame of the corresponding frame in the film holder to scan a specific image.
The time required for an index scan depends on the performance of your computer. Two index-scan options are available: speed or quality. Select the desired option in the preference dialog box (see page 35).
INDEX TAB
Click the index tab in the main window to view the index-scan window.
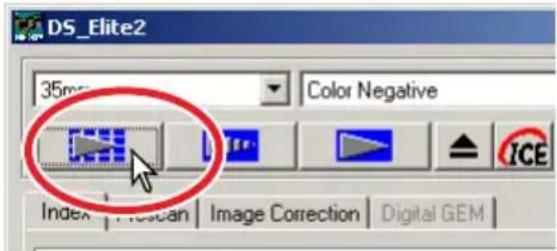
Click on the index-scan button the main window.

- All the frames in the film holder will be scanned.
- To cancel the index scan, click the cancel button in the small dialog box that appears during the scan, or...
Windows®: press the escape key
Macintosh: press the command (key and period (.) at the same time until the cancelling-index-scan message appears.
- Images can be prescanned or scanned without making an index scan (see pages 43 and 81).
- To initialise the index display and remove the current thumbnails:
Windows®: press the control key, shift key, and "R" key at the same time.
Macintosh: press the command (key, shift key, and "R" key at the same time.
- The frame number of the index scan corresponds to the frame number in the film holder. When using APS film, the frame number corresponds to the frame number of the film.
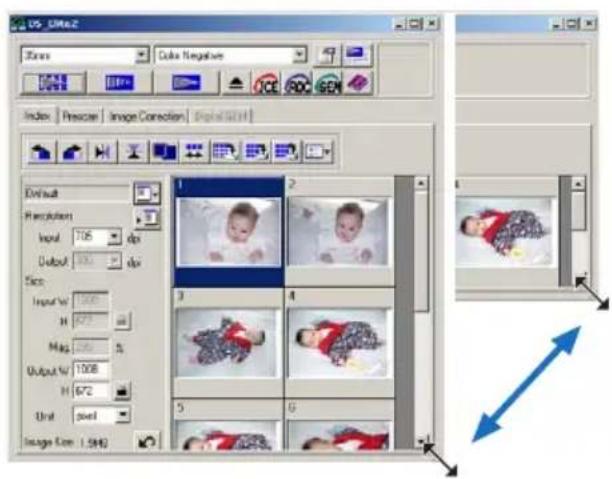
RESIZING THE UTILITY WINDOW
Place the mouse pointer over the lower-right corner of Index window. The cursor shape changes to a double arrow. The window size can be resized by dragging with the mouse.
- The index frames are arranged according to the window shape.
- The size of index thumbnails does not change.
- If the fit-to-window function is active (see page 40), the size of the index thumbnails changes automatically so that all the frames of the index scan are displayed.
SELECTING INDEX THUMBNAILS
Click on the thumbnail(s) to select the image(s) for scanning.
- To select multiple images, press and hold the control key (Windows) or command key (Macintosh) and then click on each image to be scanned; the selected frames will have a dark border. To deselect an image, click on the thumbnail a second time while holding the control key (Windows) or command key (Macintosh).
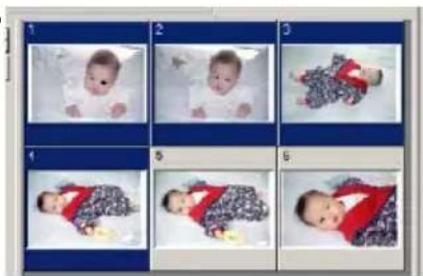
To select consecutive images, press and hold the shift key and then click on the first and last image of the series. Press the control key (Windows) or command key (Macintosh) and "A" key at the same time to select all frames.
- The selected image(s) can be prescanned (see page 42).
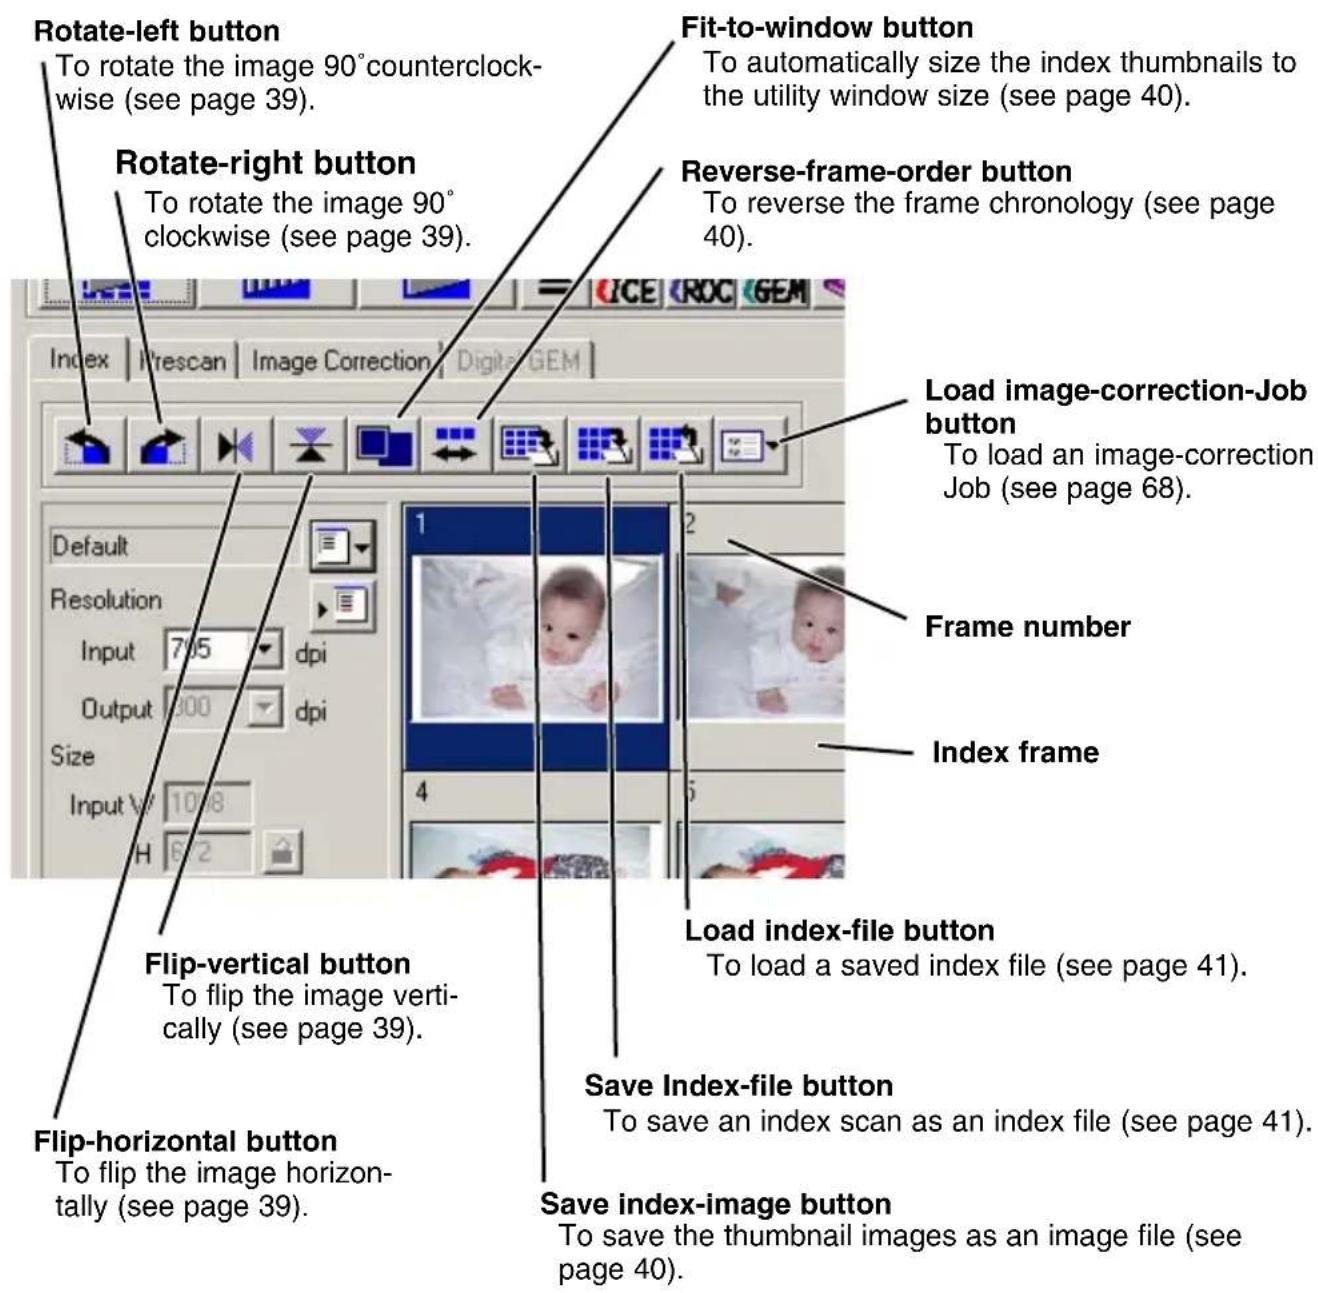
Click the appropriate button to rotate or flip the prescan image.
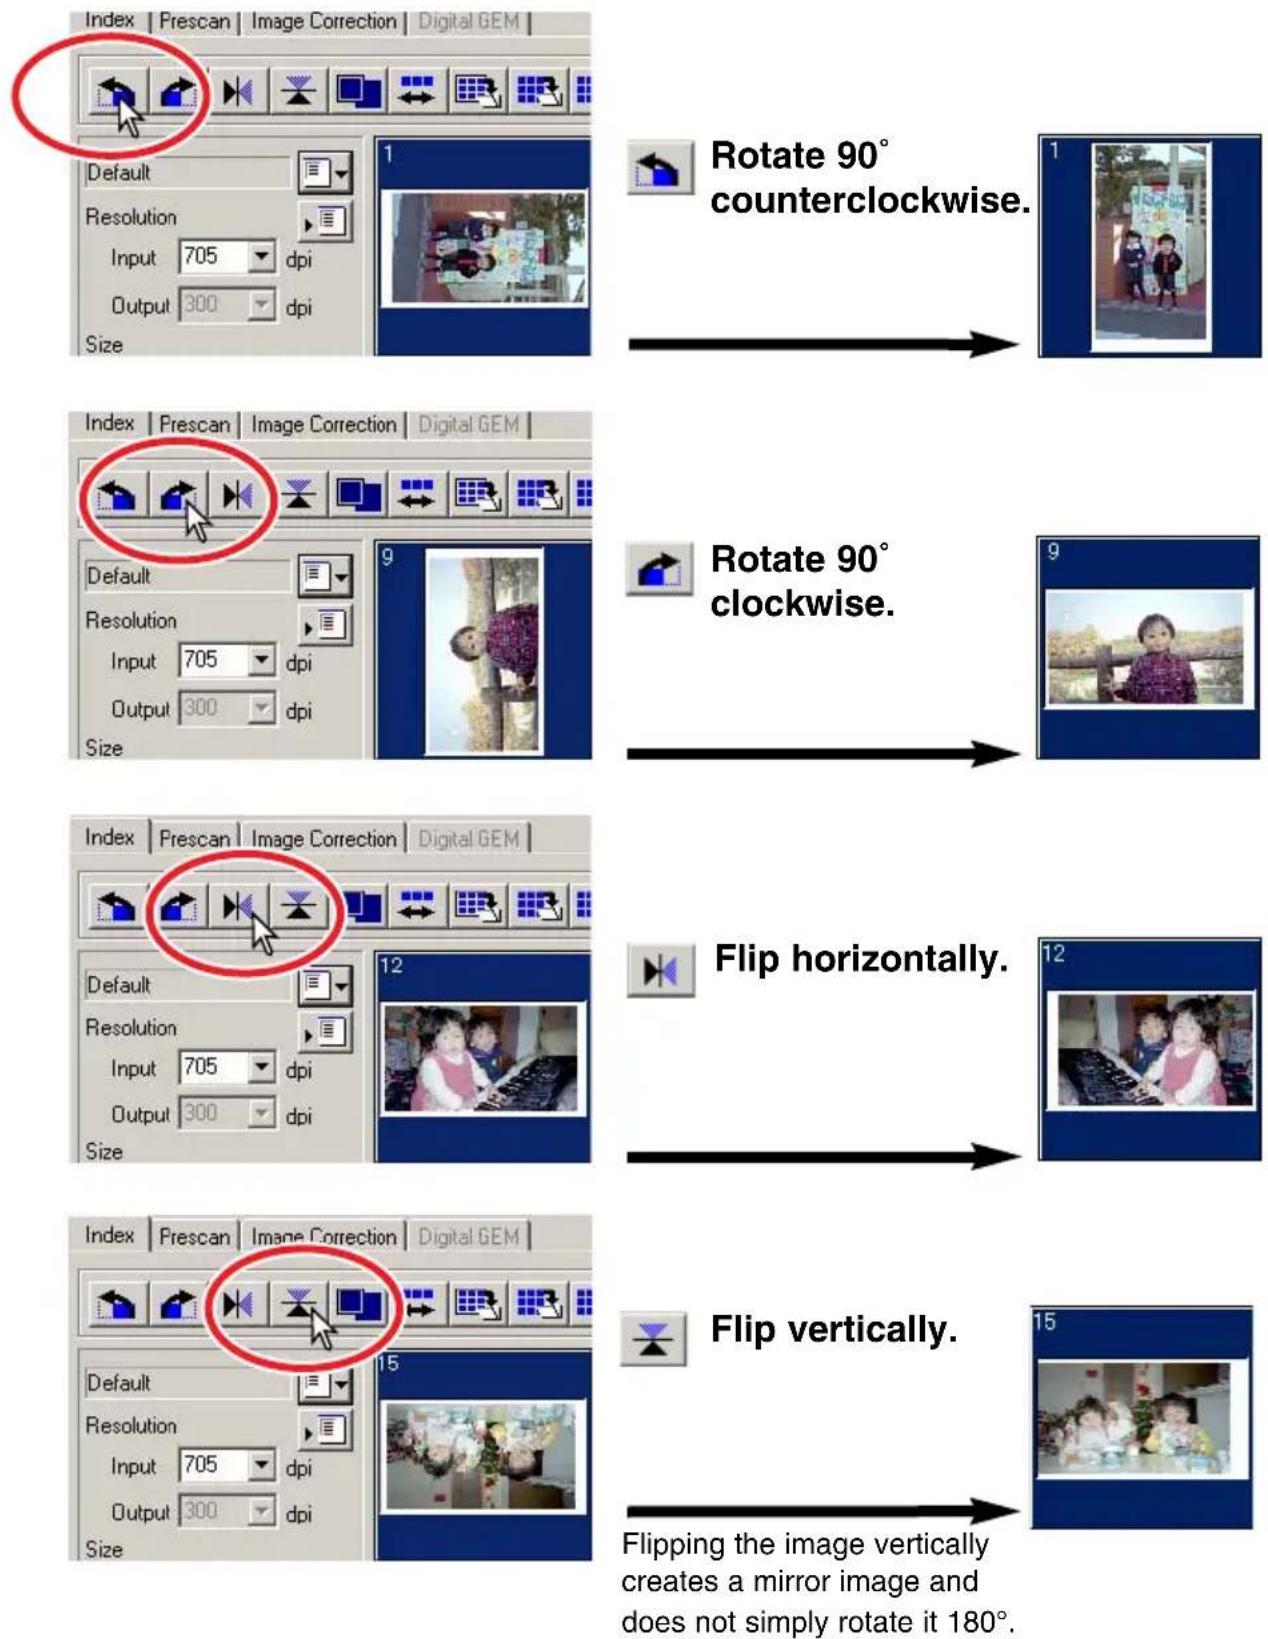
Flipping the image vertically creates a mirror image and does not simply rotate it 180^ .

FIT-TO-WINDOW BUTTON
This function automatically sizes the index images to fit the utility window.
Click the fit-to-window button

- When the fit-to-window button is clicked again, the index images are displayed at their original size.
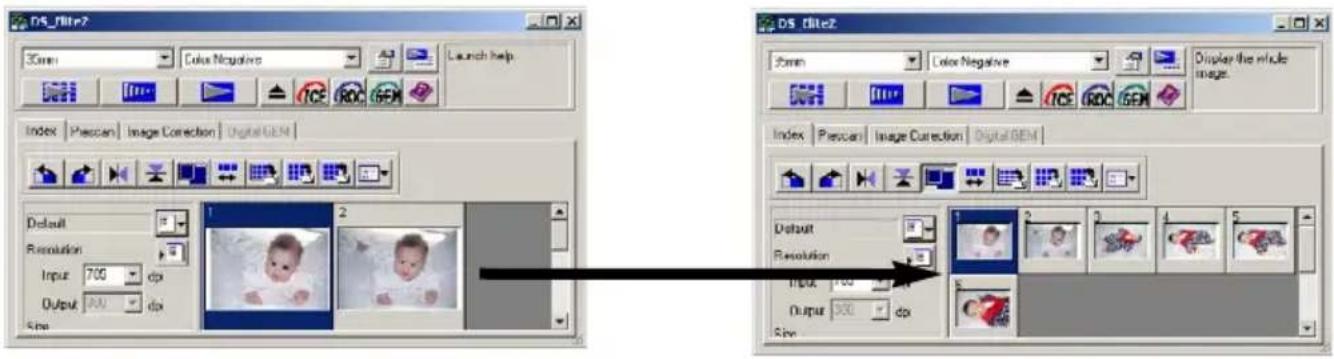

REVERSING THE FRAME ORDER
Some cameras reverse-wind the film so the last frame is exposed at the beginning of the roll. When scanning film strips, the order of the index thumbnails can be reversed to correct the chronology.
Click the reverse-frame-order button

- When the reverse-frame-order button is clicked again, the frame order follows the film holder frame order.
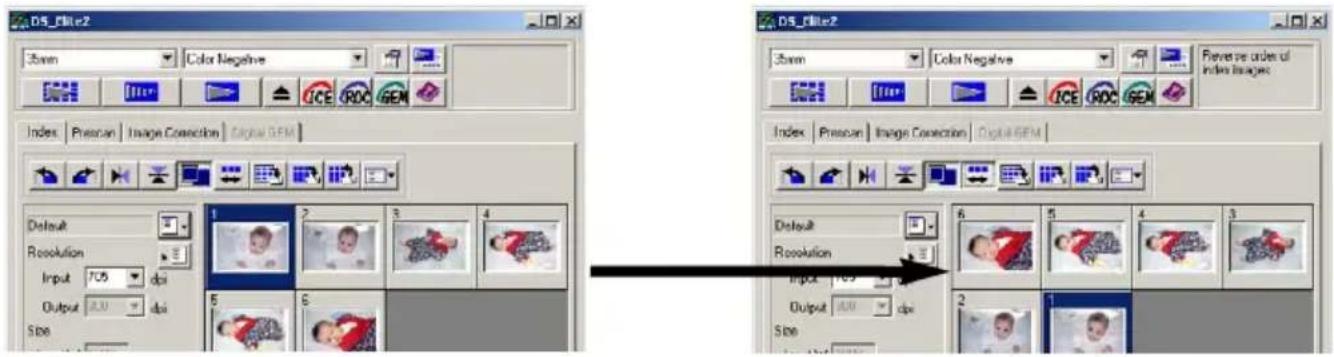

SAVING THE INDEX THUMBNAILS
The displayed thumbnail images can be saved in one image file. All the frames in the film holder, including empty frames, must be scanned before the index thumbnails can be saved.
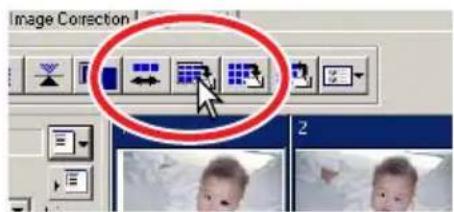
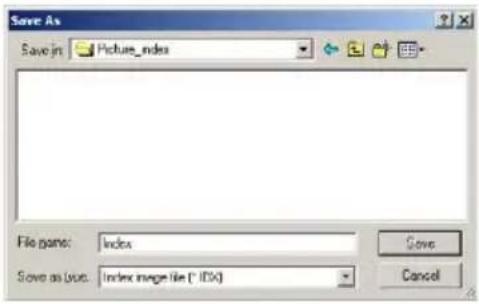
1 Click the save index-image button .
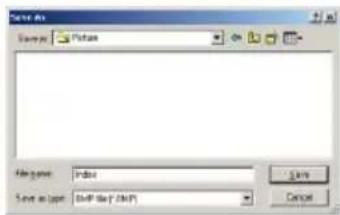
- The standard save-as dialog box will appear.
2 Enter the file name, and select the file destination and file format for the image data. Click "Save".
- File formats with Windows are Bitmap (BTM) or JPEG. File formats with Macintosh are Pict or JPEG.
- The film holder does not have to be in the scanner to save the images.

SAVING AN INDEX FILE
The index thumbnails can be saved as an index file. The index file can be loaded into the scanner so that the index scan does not need to be made again. All the frames in the film holder, including empty frames, must be scanned before the index thumbnails can be saved.
1 Click the save index-file button

2 Enter the file name and select the file destination. Click "Save".
- The displayed index images can be saved regardless if the film holder is in the scanner or not.
- The index image file format is unique to this software.

LOADING AN INDEX FILE
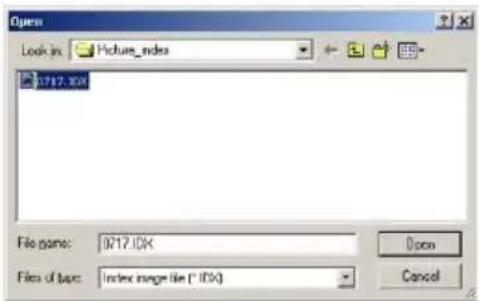
An index file can be displayed in the index window of the utility software.
1 Click the load index-file button to open the open dialog box.
2 Select the index file to be loaded. Click "Open".
- The current index display will be replaced with the images in the new file.
6. MAKING A PRESCAN
Prescanning allows cropping and image processing to be applied to the image before the final scan. This allows the image data to be optimised at the time of scanning.
PRESCAN TAB
Click the prescan tab in the main window to view the prescan window.

MAKING A PRESCAN
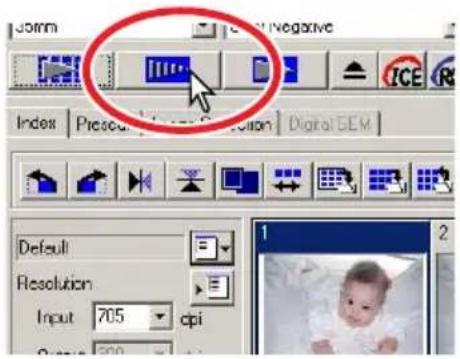
1 Select the index frame(s) to be prescanned.
2 Click the prescan button in the main window.
- The prescan window will be displayed automatically.
- Double clicking on the index frame will activate the prescan even if no thumbnail is displayed in the frame.
- Clicking the prescan button when more than one frame is selected will make a prescan of all the selected frames.
CROPPING THE IMAGE
Cropping is a method of recomposing the image by eliminating unnecessary space around the subject. Many images are improved by cutting out distracting elements in the background. The image can be cropped automatically or manually. When using the image-correction tools, only the cropped area is displayed.

AUTO CROPPING
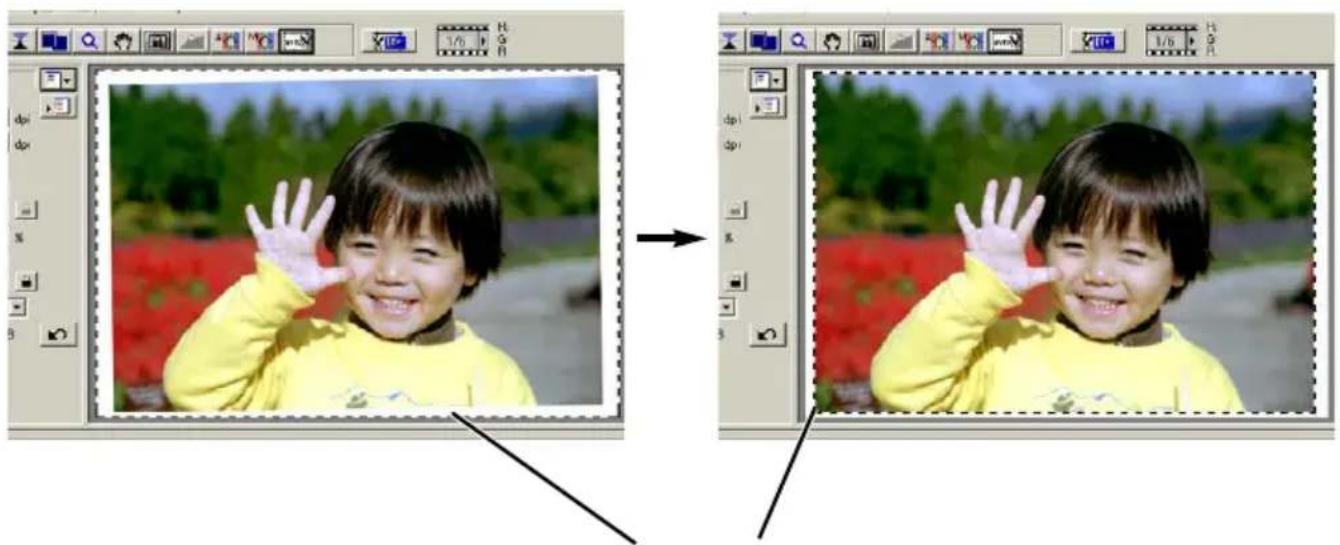
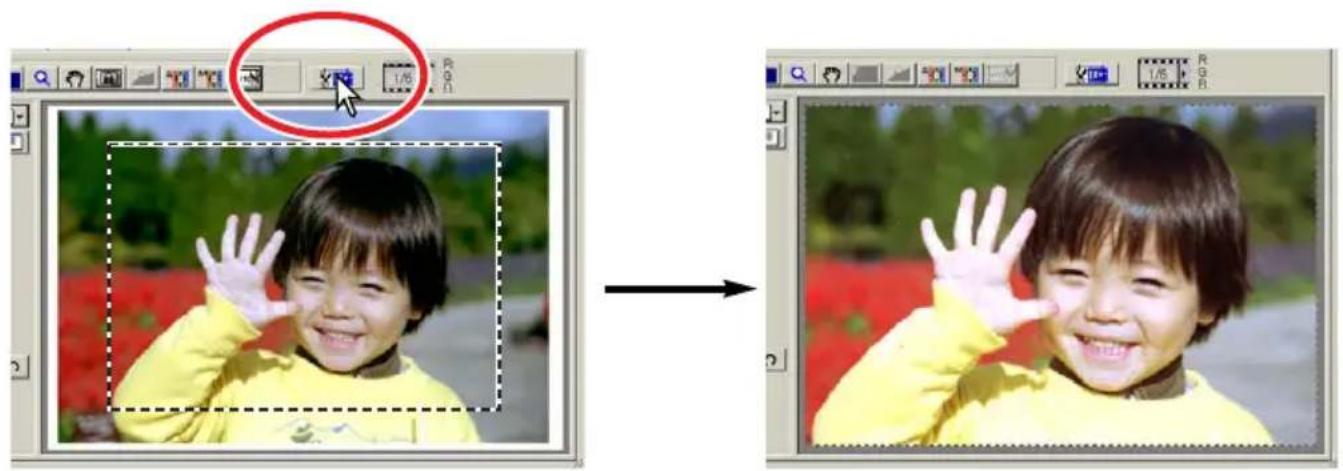
Auto cropping eliminates the blank space around the image area. Pressing the auto-cropping button cycles through its three positions: crop to outside edge, crop to inside edge, and entire window.
After making the prescan, click the auto-cropping button

- Clicking the auto-cropping button once will bring the cropping frame to the outside edge of the image area. Clicking the auto-cropping button a second time will bring the cropping frame to the inside edge of the image area. Clicking the auto-cropping button a third time will return the cropping frame to its original position.
natural_image
Two-step photo editing process showing a smiling child in a yellow shirt waving hands, with toolbars and interface elements visible (no text or symbols on the image itself)The cropping frame, indicated by the dotted line, automatically encloses the image area eliminating unnecessary blank space. The cropping area can also be adjusted manually (see page 44).
MANUAL CROPPING
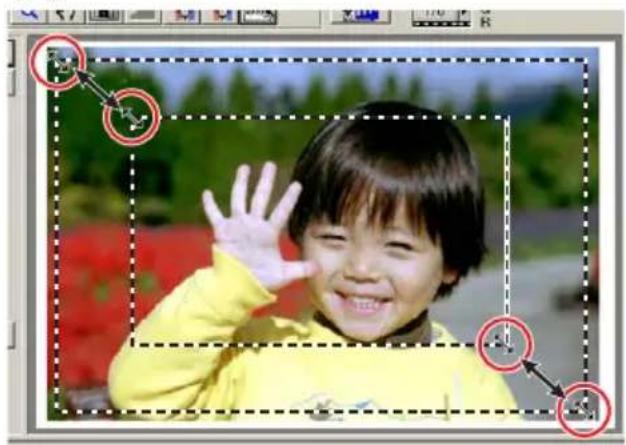
After clicking the auto-cropping button, the cropping frame can be adjusted with the mouse.
To enlarge or reduce the cropping frame...
Using the mouse, place the pointer over the corners or sides of the cropping frame; the pointer will change to a double arrow (figure A). Simply click and drag the edge of the frame to adjust the cropping.
(A)
natural_image
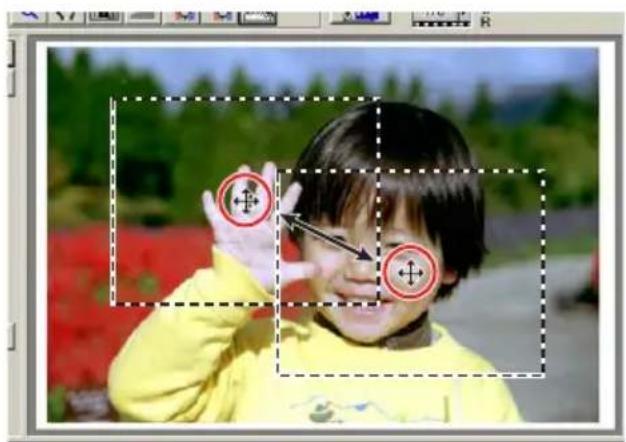
Child smiling outdoors with hand raised, surrounded by red flowers and greenery (no text or symbols visible)To move the cropping frame...
Using the mouse, place the pointer in the centre of the cropping frame; the pointer will change to a four-pointed arrow (figure B). Simply click and drag the entire frame over the image area.
(B)
natural_image
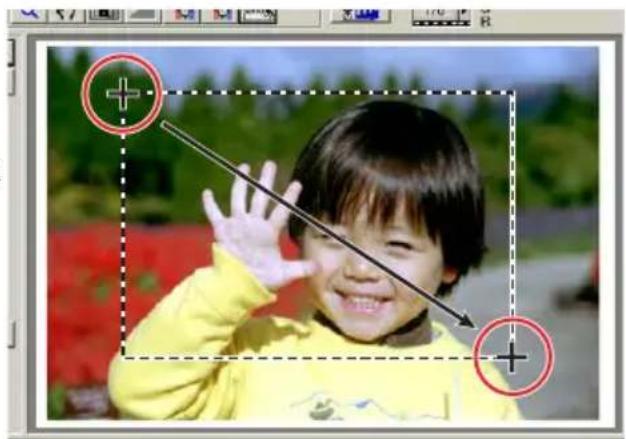
Child in yellow shirt pointing at face with red crosshair and arrow, outdoors with greenery background (no text or symbols)To define a new cropping frame...
When the pointer is outside the cropping frame it will be in the shape of a cross. Click and drag to define a new cropping frame (figure C).
(C)
natural_image
Child smiling outdoors with hand raised, no visible text or symbols- Pressing the auto-cropping button again, resets the cropping frame around the image area.
- The cropping frame can be reset to cover the full prescan area with the following keys:
Windows®
: Press the control key and "A" key at the same time.
Macintosh
: Press the Command ( ) key and "A" key at the same time.
PRESCANNING THE CROPPED IMAGE
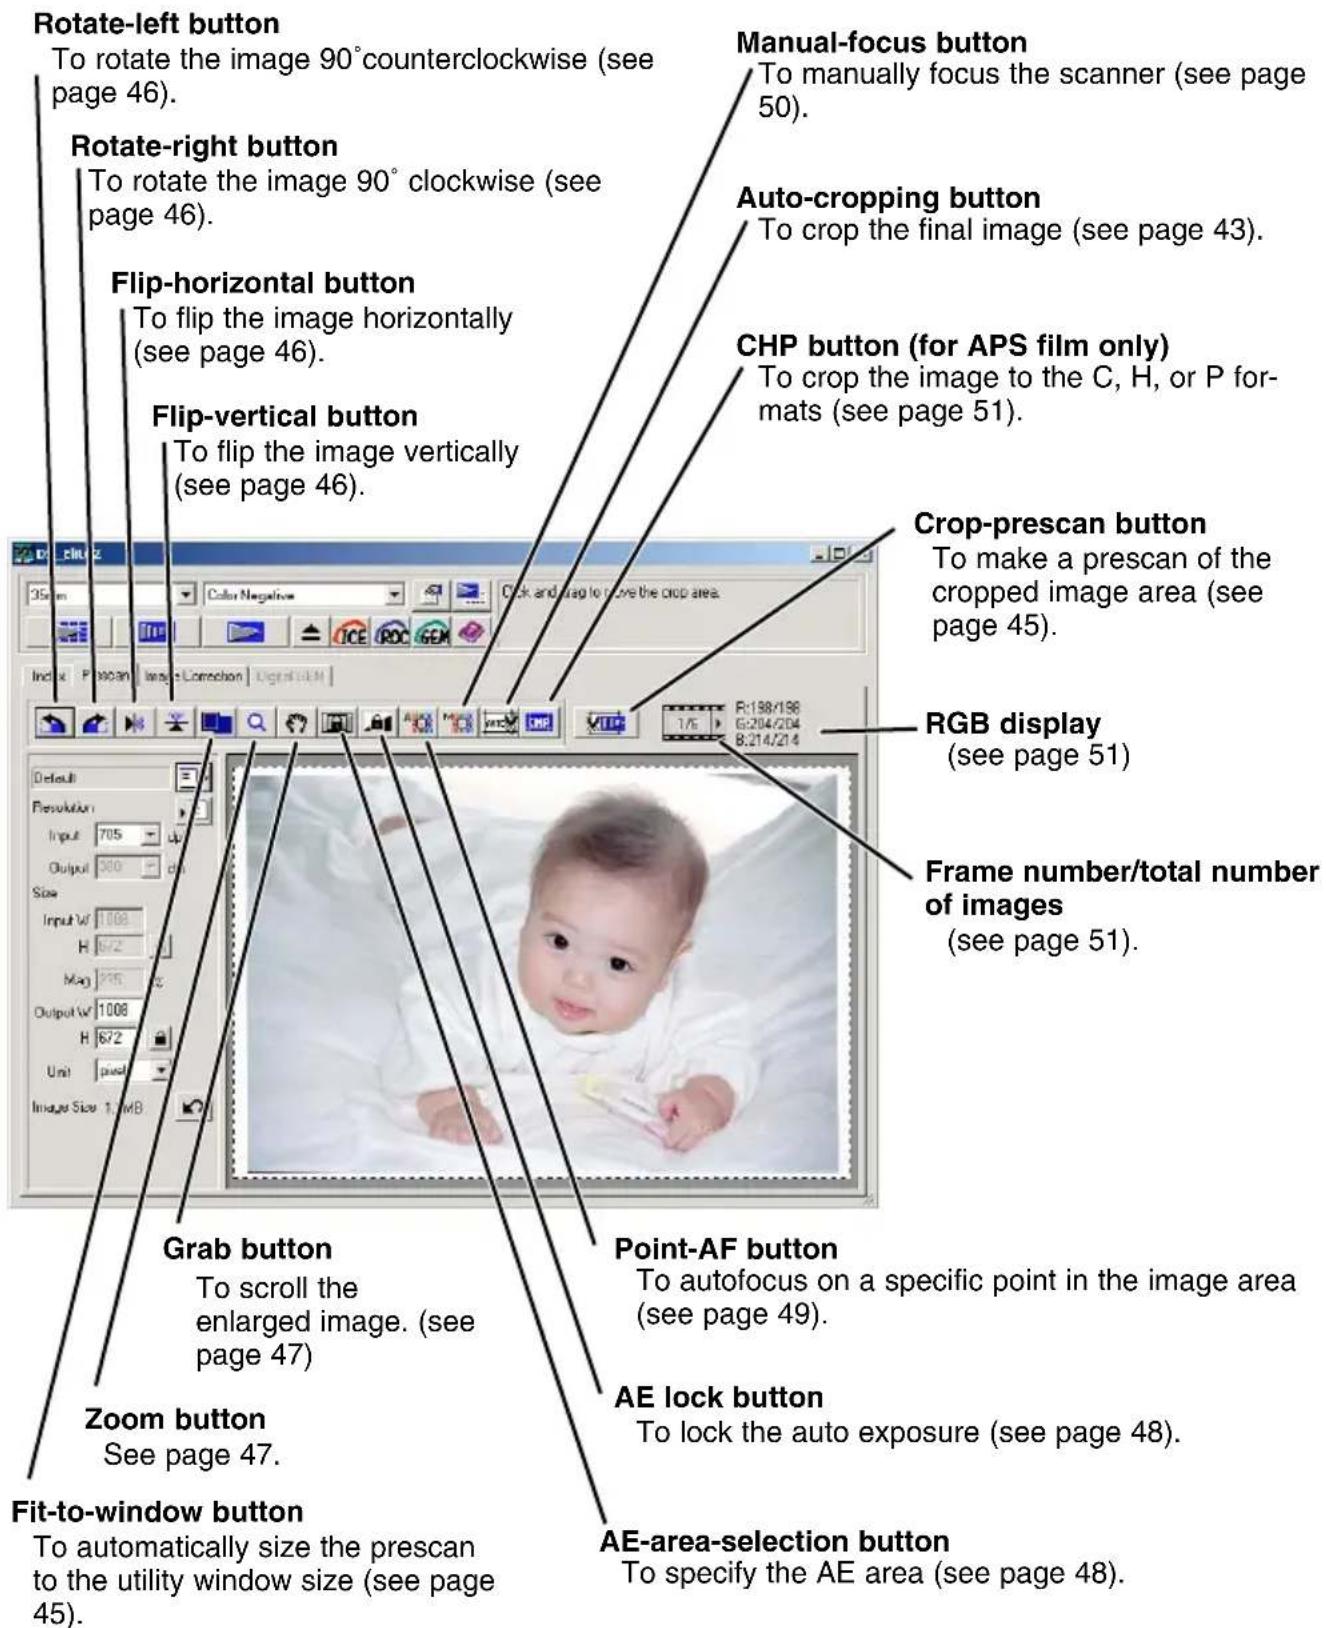
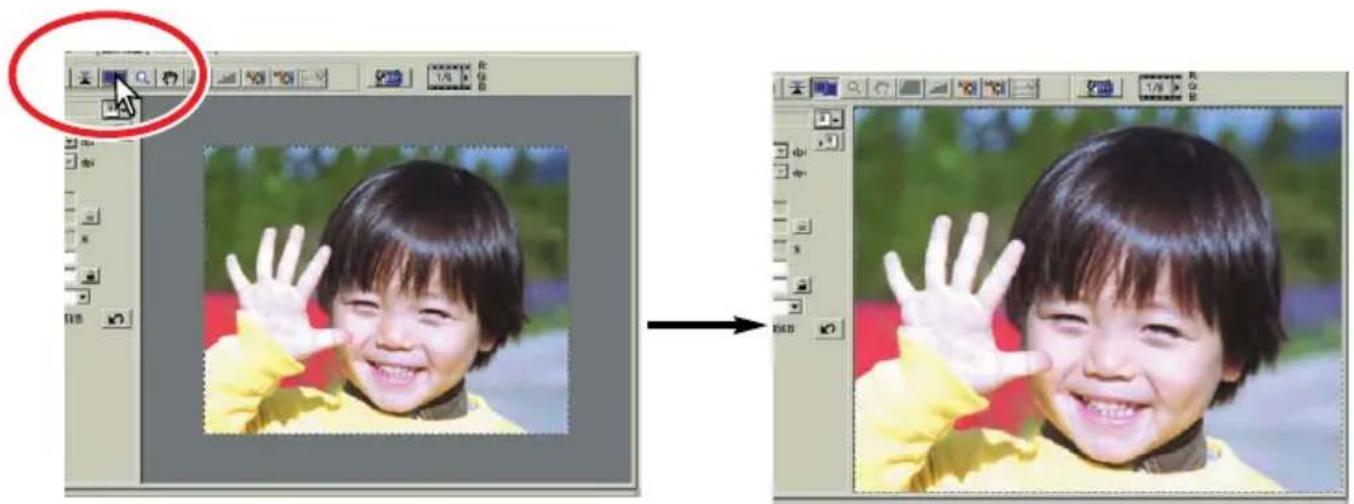
Click the crop-prescan button to prescan the cropped area. Only the cropped area will be displayed.
- To return to the full prescan image, press the prescan button.
natural_image
Two photos showing a smiling child in a yellow shirt, one with a red circle highlighting the left image (no text or symbols)
FIT-TO-WINDOW BUTTON
Click the fit-to-window button ☐ automatically fit the prescanned image to the utility window.
natural_image
Two-step photo editing process showing a child's face being held in a photo frame, with no visible text or symbols.- The prescanned image is automatically magnified or reduced to fit the utility window. To resize the utility window, see page 38.
- To return the prescan to its original size, click the fit-to-window button again.
- The zoom and grab tool cannot be used when the the fit-to-window function is selected.
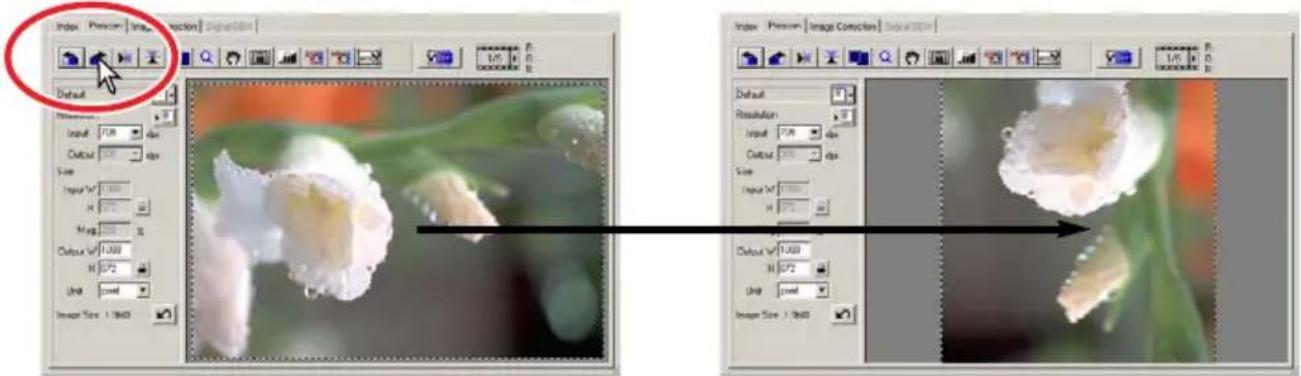
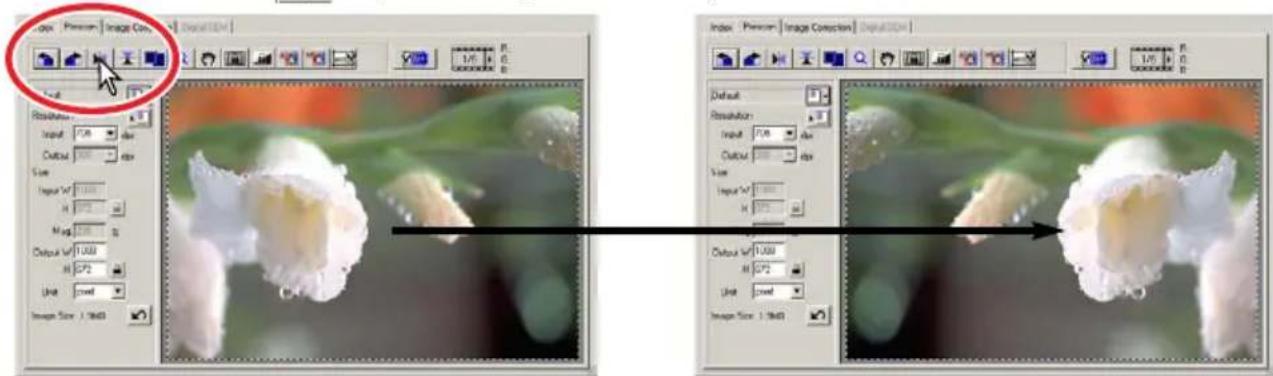
Click the appropriate button to rotate or flip the prescan image.

Rotate the image 90° counterclockwise.
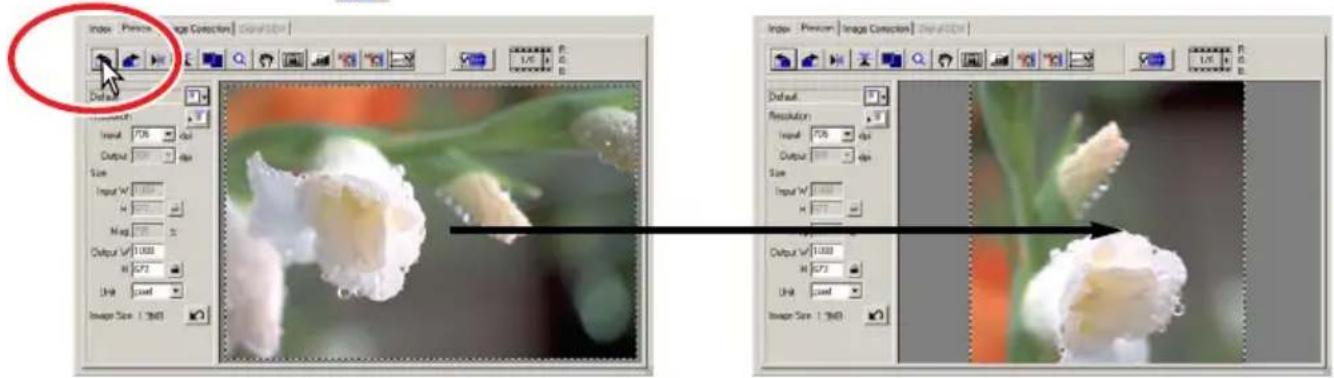

Rotate the image 90° clockwise.

Flip the image horizontally.

Flip the image vertically.
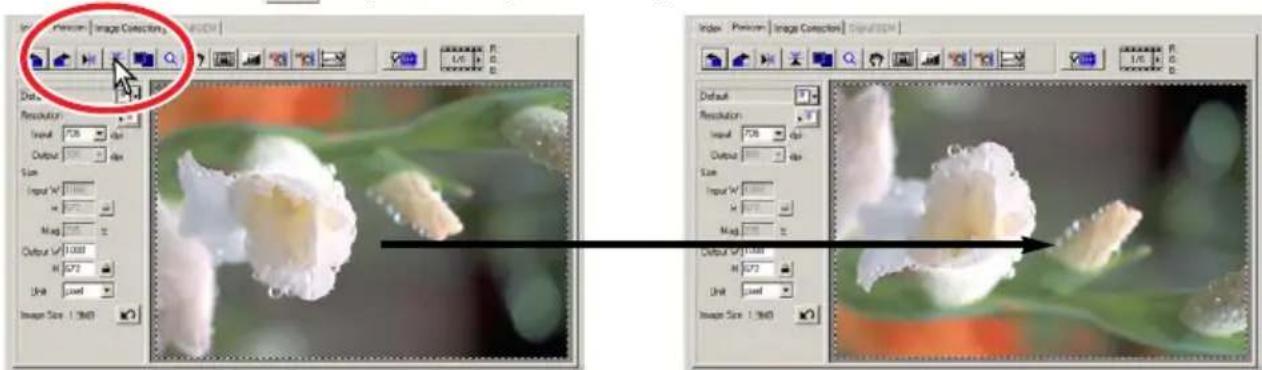
Flipping the image vertically creates a mirror image and does not simply rotate it 180^ .

ZOOMING
The prescan image can be enlarged or reduced to examine areas within the image.
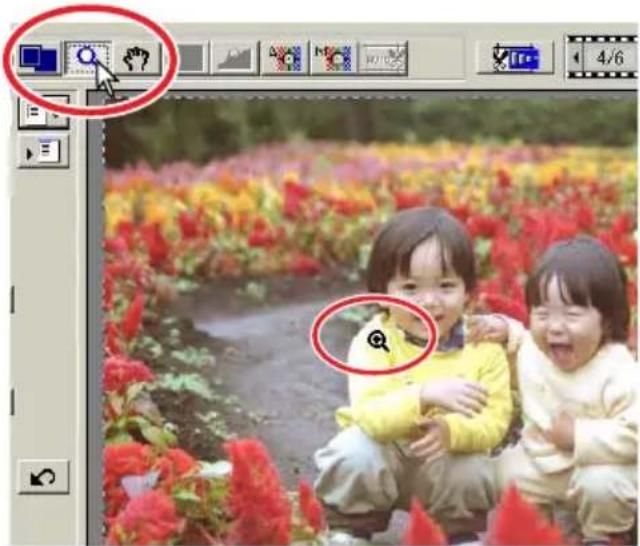
1 Click the zoom button .
- The mouse pointer changes to the plus magnifying glass.
- When the fit-to-window function is active, the zoom button cannot be used.
2 Click on the area in the image to be enlarged.
- The clicked position becomes the centre for zooming.
- The plus sign disappears from the magnifying glass icon when the image is at its greatest magnification.
3 To zoom out, hold the control key (Windows) or option key (Macintosh) down and click on the image.
- The minus sign is displayed in the magnifying glass.
- The minus sign disappears from the magnifying glass icon when the image is at its minimum magnification.
natural_image
Two children sitting in a flower garden, one holding a plush toy (no visible text or symbols)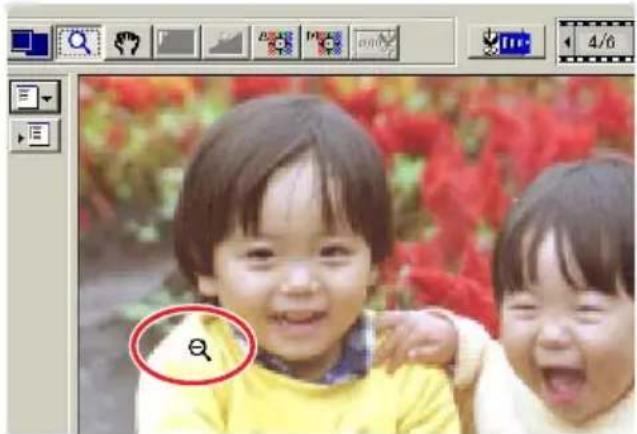
natural_image
Photo of two smiling children outdoors with a magnifying glass highlighting a small object (no text or symbols visible)
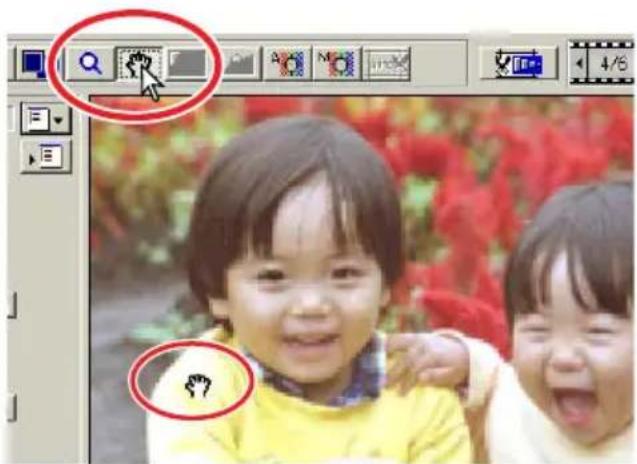
GRAB BUTTON
Click the grab button Click and drag the image to view the image area.
- The image can only be scrolled when the image area has been zoomed beyond the limits of the prescan window.
- The grab button cannot be used when the fit-to-window function is active.
AUTO EXPOSURE
AE area selection is an advanced function to control the scan exposure. This function allows the selection of a small area within the image to be used to determine the scan exposure. The AE lock function sets the scanner exposure based on the exposure of a specific prescan. This exposure can be applied to scans of different images. These two functions are especially useful with negative film.
AE area selection and AE lock can be used with negatives and slides. However, when these functions are used with colour slides, the auto-expose-for-slides option must be checked in the preferences box (see page 34).

AE AREA SELECTION
Use AE area selection with high or low key images, or when the film has been badly exposed.
1 Click the AE-area-selection button after prescanning the image.
2 Pressing the shift key changes the dotted cropping frame to the solid AE area frame. While pressing the shift key, use the mouse to adjust and move the AE area.

- Using the mouse, place the pointer over the corners or sides of the AE area frame; the pointer will change to a double arrow. Simply click and drag the edge of the frame to adjust the area. By
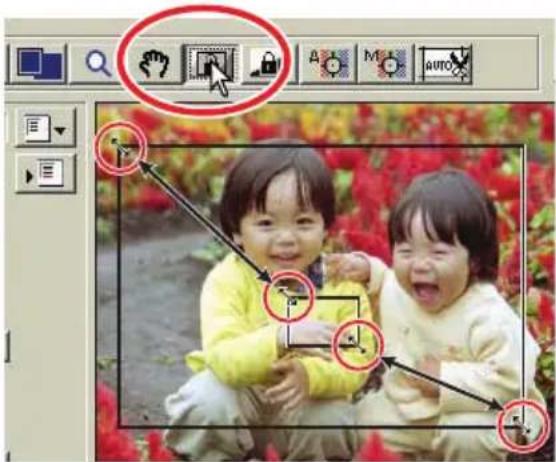
placing the pointer in the centre of the frame, the pointer will changed to a four-pointed arrow. Simply click and drag the entire frame over the image area. When the pointer is outside the frame, it will be in the shape of a cross. Click and drag to define a new AE area. To extend the AE area over the entire image, press shift+control+A (Windows) or shift+command+A (Macintosh).
3 Place the AE area over the section of the image to be used to determine the exposure.
• Usually placing the area over the subject of the picture will produce excellent results. The area should represent on average the mid-tone of the image.
4 Click the prescan button to view the effect on the exposure.
- AE area selection can be cancelled by pressing the AE-area-selection button again.
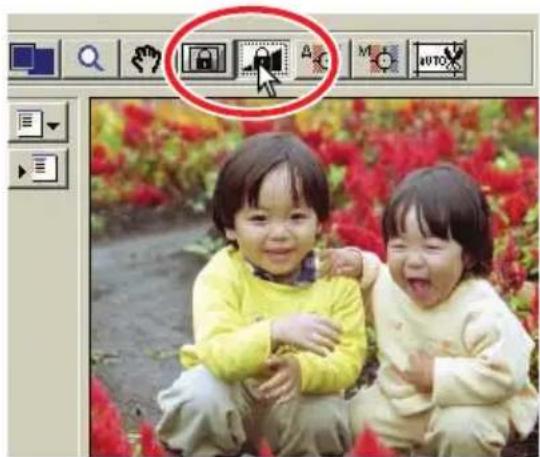
The exposure obtained with AE area selection or a prescan can be applied to other images. This function is useful when scanning a series of high and low-key images that have consistent exposures. Also, when scanning a bracket series on negative film, by locking the exposure on one frame, the prescans of the other frames will show the exposure difference in the bracketed series.
1 After making a prescan or setting the exposure of the reference image with the AE-area-selection function, click the AE lock button
• The scanners exposure now is fixed.
- The normal prescan exposure can be locked without using the AE-area-selection function.
2 Select another image and click the prescan button to view the result with the set exposure.
- To cancel the AE lock, click the AE lock button again, or change the film type.
- The prescan and final scan will be made with the locked exposure settings until the AE lock is cancelled, or the scanner is reinitialized.
natural_image
Two young children sitting outdoors with flowers in the background, no visible text or symbols on the subjects or background.
POINT AF (AUTOFOCUS)
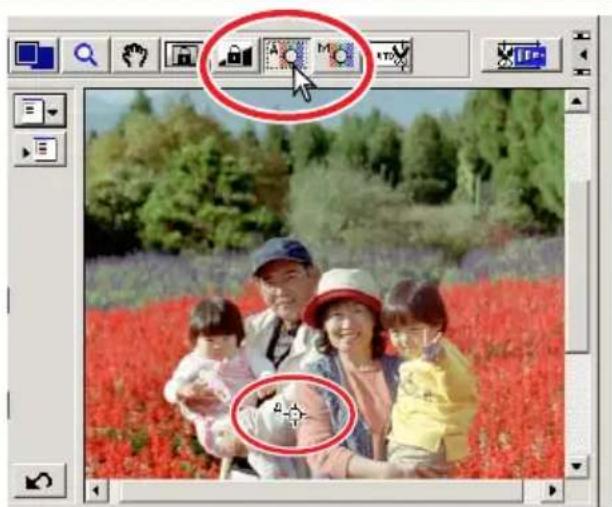
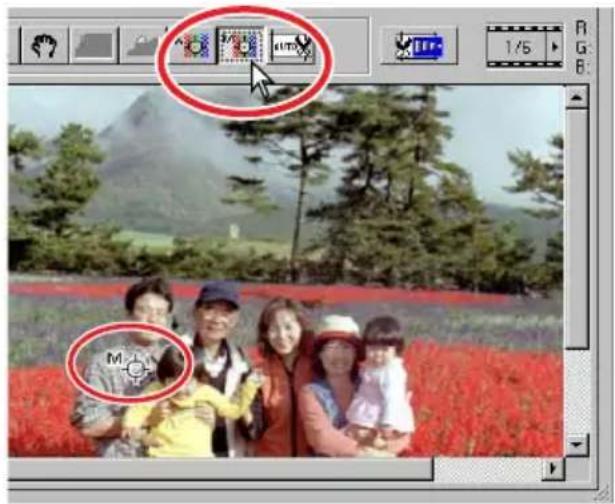
The DiMAGE Scan Elite II's autofocus system uses the CCD sensor to focus the scanner. When the autofocus-at-scan option is selected in the preferences box, the autofocus system uses the centre of the image to determine the focus. This normally results in an excellent scan when the film plane is flat. However, if the film is warped or curled, the scanner can be focused using the point AF or manual focus functions.

CAUTION
For best results when using point AF or manual focus, select an area within the image with contrast or detail. The point AF and manual focus functions cannot focus on a smooth, flat image area such as a cloudless or overcast sky.
1 Click the point-AF button

- The mouse pointer will change to the point-AF icon.
- Click the point-AF button again to cancel the function.
2 Click on the area of image to be used for focus.
- Autofocus will begin. The newly focused prescan will be displayed.
natural_image
Family photo in a red flower field with trees and greenery, displayed within an image editing software interface (no readable text or symbols on the photo itself)The scanner can be focused manually using the focus meter.
1 Click the manual-focus button .
- The mouse pointer will change to the manual-focus icon.
- To cancel the function, click the manual-focus button again.
2 Click on the area of the image to be used for focus.
• The focus meter window will appear.
3 Adjust the slider using the mouse until the black and white bars are at their longest extension for sharpest focus.
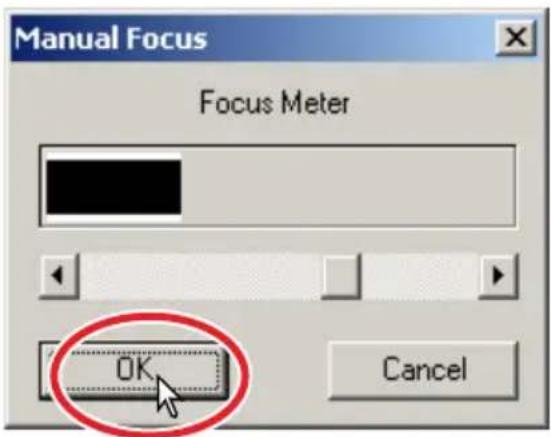
- The black bar indicates the change in focus. The white bar indicates the longest extent of the black bar and the point of sharpest focus.
4 Click "OK" to set the focus.
- A new prescan will start and replace the previous image.
natural_image
Group photo of a family in a red flower field with mountains and trees in the background (no visible text or symbols)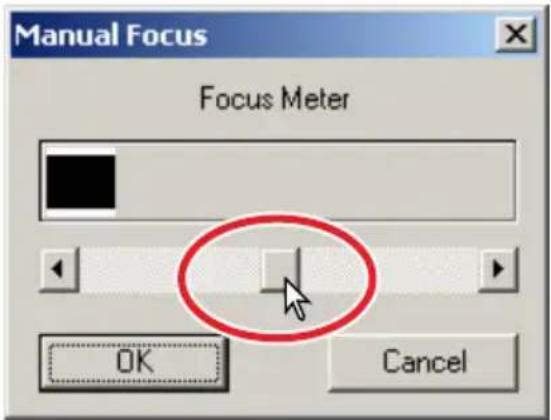

CROPPING APS IMAGES
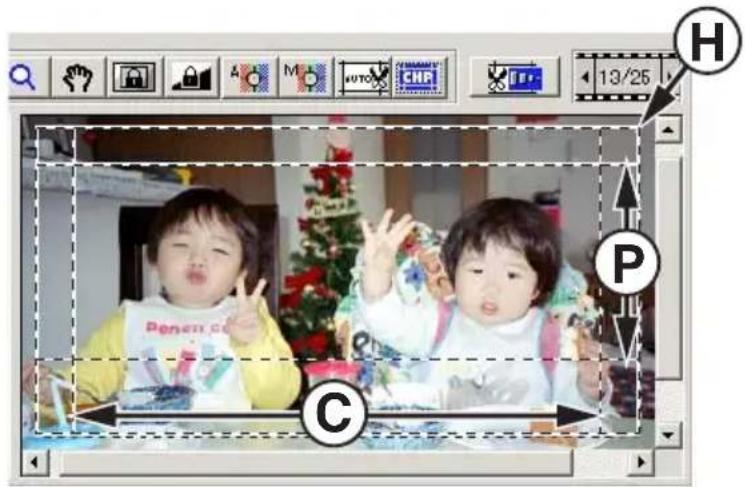
When APS film format is selected, the CHP button is displayed in the prescan window. Clicking the CHP button cycles the cropping frame through the "C," "H," and "P" APS framing formats. When using the image-correction tools, only the cropped area is displayed.
Click the CHP button until the desired frame is displayed.
- The cropping area can be adjusted or moved using the mouse. To move the frame, place the mouse pointer within the framed area and then click and drag. To adjust the frame, place the mouse pointer on the edge of the frame and then click and drag. To extend the frame over the entire image, press control+A (Windows) or command+A (Macintosh).
OTHER DISPLAYS IN THE PRESCAN WINDOW
FRAME NUMBER
The display above the prescan image shows the frame number of the displayed prescan followed by the total number of frames scanned.
Clicking the right arrow displays the next frame, and clicking the left arrow displays the previous frame. When the selected frame has not been prescanned, clicking either button will automatically start the prescan and the image will be displayed when the scan is completed.
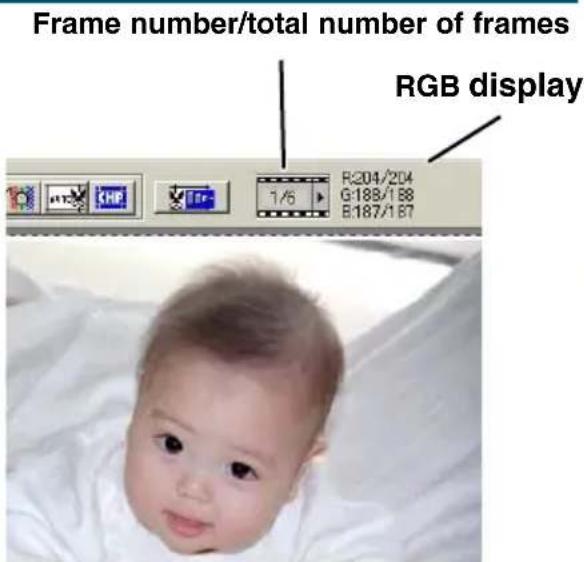
RGB DISPLAY
The RGB information of the mouse-pointer position is displayed in the prescan window. The information shows the brightness levels of each colour channel from 0 to 255. Press the shift key (Windows) or command key (Macintosh) to show CMYK information. The RGB display shows the original scanned values with the values of any corrections made to the displayed prescan: B:167/187 (Blue channel: original scan value/current corrected value). For more about making corrections to the scanned image, see pages 52 to 73.
7. IMAGE CORRECTION
To optimise the scan data, the image can be processed before it is scanned
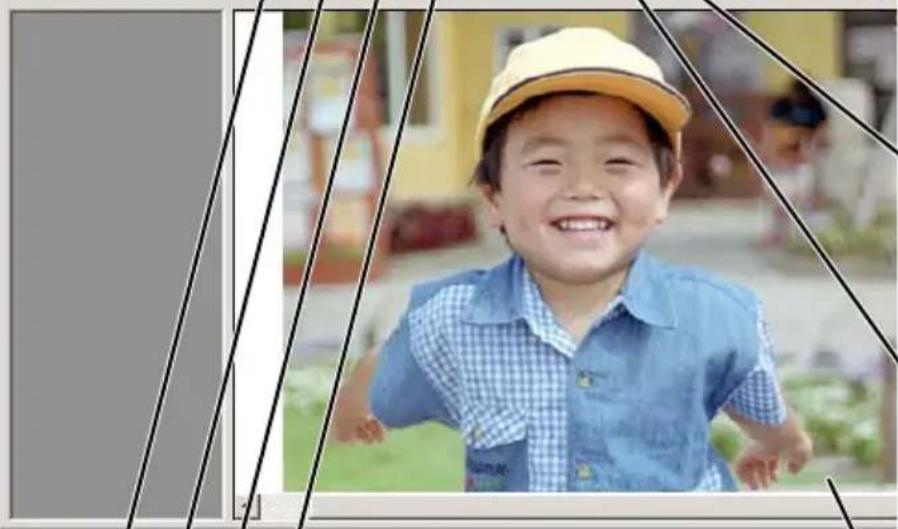
IMAGE CORRECTION TAB
Click the correction tab in the main window to view the correction window.
Tone-curve/Histogram button
Graphic control over colour, contrast, and value (see page 53).
Brightness/Contrast/Colour-balance button
Slider control over colour, contrast, and values (see page 62).
Hue/Saturation/Lightness button
Colour-space controls (see page 63)
Variation button
To select the degree of correction among sample images (see page 64).
Reset button
Cancels all corrections (see page 67).
Snapshot button
To store and display a prescan image temporarily (see page 67).
Comparison display button
To display the original image with the corrected image (see page 68).

Fit-to-window button
To automatically size the image to the utility window.
natural_image
Smiling child wearing a yellow cap and blue shirt, outdoors with blurred background (no text or symbols visible)Load image-correction-Job button
To apply saved image-correction settings to the displayed image (see page 68).
Save image-correction-Job button
To store all correction settings (see page 68).
Redo button
To redo previous corrections (see page 67).
Undo button
To undo the current correction (see page 67).
Unsharp-mask button
To sharpen the image (see page 66).
Correction Display
Selective-colour button
To correct a specific colour without affecting other colours. (see page 66).
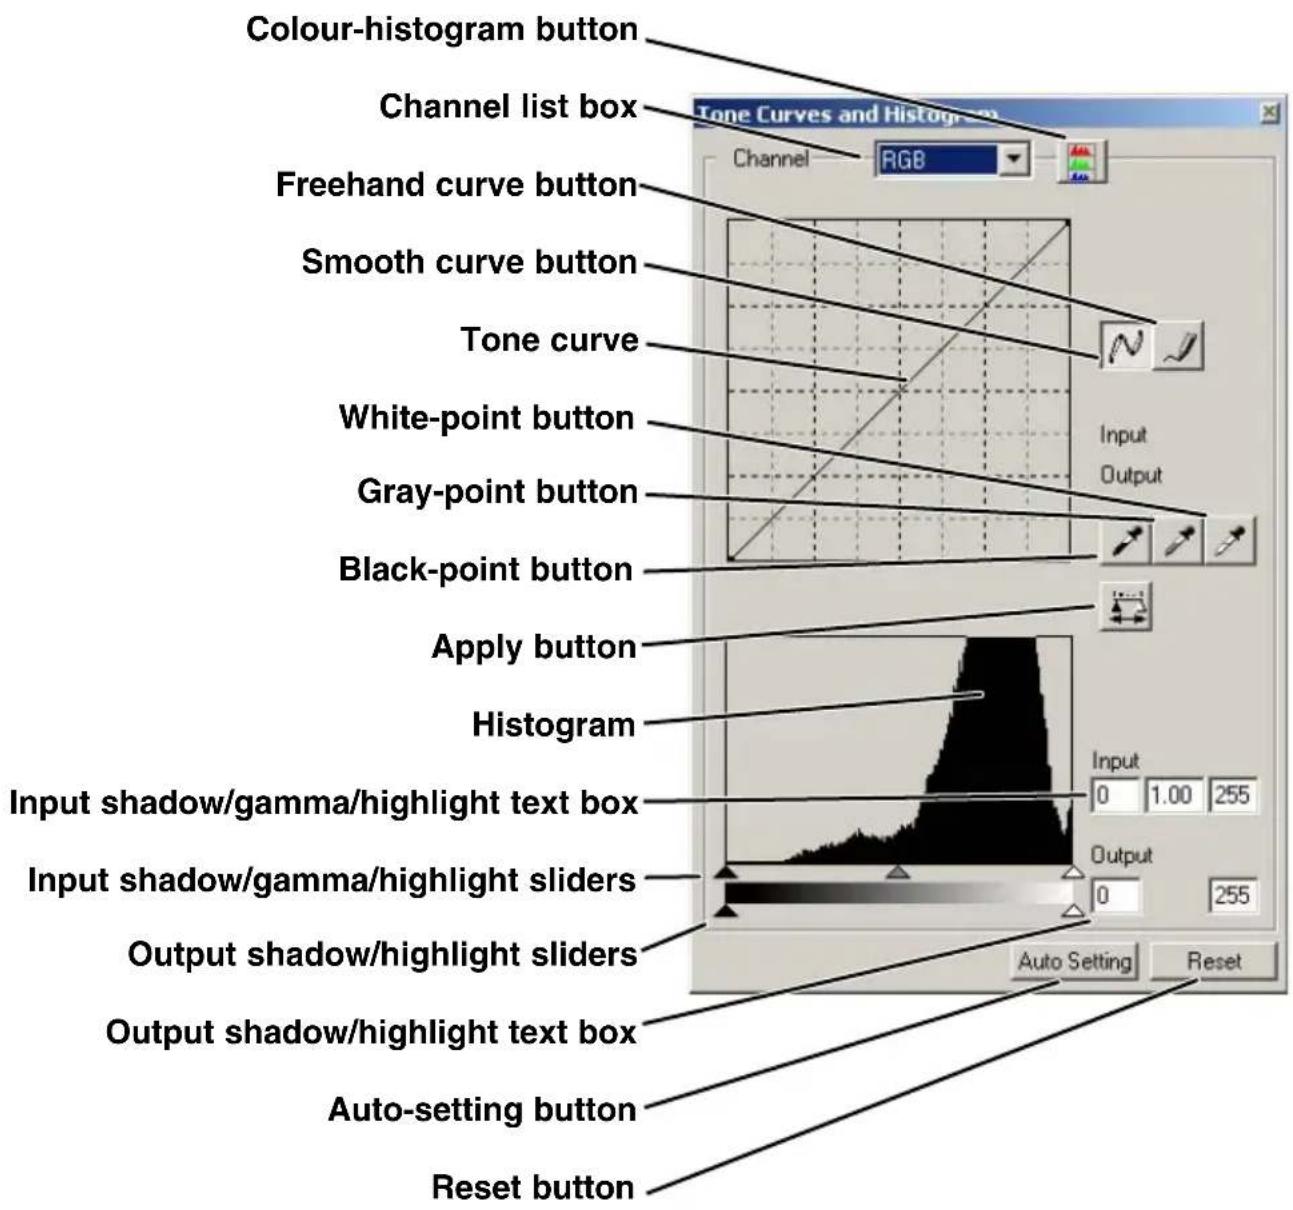
Click the tone curve/histogram button to open the dialog box.
RGB and CMYK
The RGB colour model is an additive process that uses the primary colours of light: red, green, and blue. An additive colour system mixes the three colours to recreate the entire spectrum of light. If all three colours are mixed, white light is produced. Television sets and computer monitors use RGB to create images.
The CMYK colour model is a subtractive process that uses the secondary colours: cyan, magenta, and yellow. A subtractive colour system recreates colour with pigments and dyes to absorb unwanted colour. If all three colours are mixed, black is produced. CMYK systems are used in photography and printing. Unlike photographic systems, printing technology also requires black (K). Because of the imperfections of printing inks, cyan, magenta, and yellow cannot produce a true black when mixed. Printers use a four-colour CMYK process to reproduce images.
Complementary colour
In photography, red, green, and blue are the primary colours. The secondary colours, cyan, magenta, and yellow, are made from combining the primary colours: cyan = blue + green, magenta = blue + red, and yellow = red + green. The primary and secondary colours are grouped in complementary pairs: red and cyan, green and magenta, and blue and yellow.
Knowing the complementary colours is very important in colour balancing: the method of adjusting the colour of the image to look natural. If the image has a specific colour cast, either subtracting the colour or adding its complementary colour will create a natural
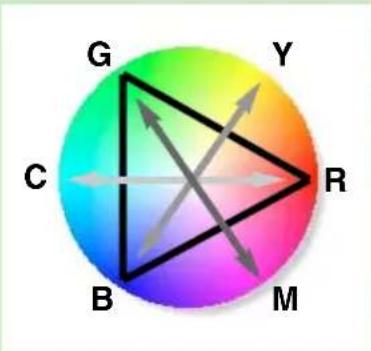
looking image. For example, if the image is too blue, subtracting blue or adding yellow will balance the overall colour of the image.
SELECTING THE TONE-CURVE COLOUR CHANNEL
1 Click the arrow next to the channel box to select the channel.
• Each individual colour channel (red, green, or blue) can be selected. When selected, the tone curve will be displayed in the corresponding colour.
- To make adjustments to the colour balance of the image, select the appropriate colour channel. To adjust the contrast or brightness of the image without affecting the colour, select the RGB channel.
- Only the RGB channel is available with B&W images.
- The tone curves can be displayed with keyboard shortcuts. While holding the shift key (Windows) or command key (Macintosh), press "1" to display the red channel, "2" to display the green channel, "3" to display the blue channel, or "0" (zero) to display the RGB channel.
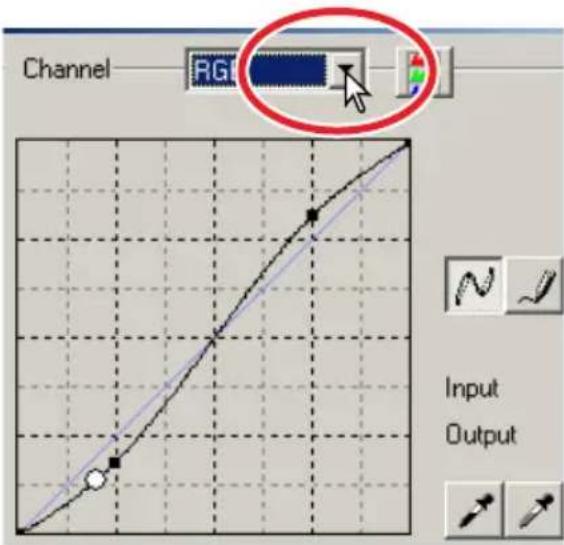
CHANGING THE TONE CURVES
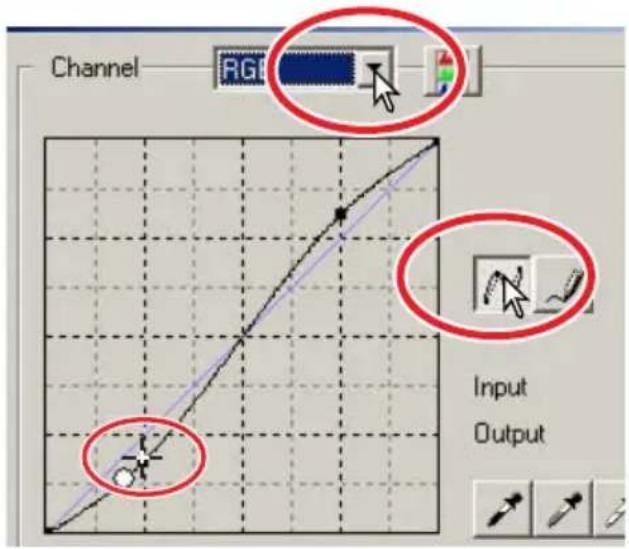
1 Place the mouse pointer over the tone curve. Click and drag the curve.
- Each time the tone curve is clicked, a new node will be attached to the curve. The nodes can be moved by clicking and dragging.
- The input and output levels of the node are displayed as it is moved. The input level (horizontal axis) refers to the original scan, and the output level (vertical axis) refers to the correction applied to the image.
- Any corrections made on the tone curve are immediately applied to the prescan image.
- By placing the mouse pointer on the prescan image, the grey or colour level of that point will be indicated on the tone curve by a white circle.
- The reset button cancels all corrections in all channels.
CHANGING THE TONE CURVES BY FREEHAND
1 Click the freehand-curve button.
- The mouse pointer changes to the pencil tool when placed in the tone-curve box.
2 Click and drag the pointer to draw a new curve.
- Extreme image manipulations are possible with the freehand curve tool.
3 To smooth a rough freehand curve, click the smooth-curve button.
- Nodes will be automatically placed on the curve and can be adjusted with the mouse.
- With extreme freehand curves, the smooth curve button may significantly change the shape of the curve. Press the undo button to return the original freehand curve.
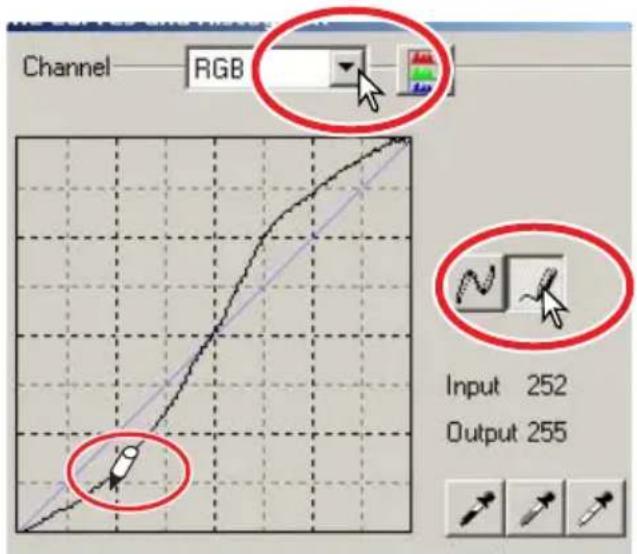
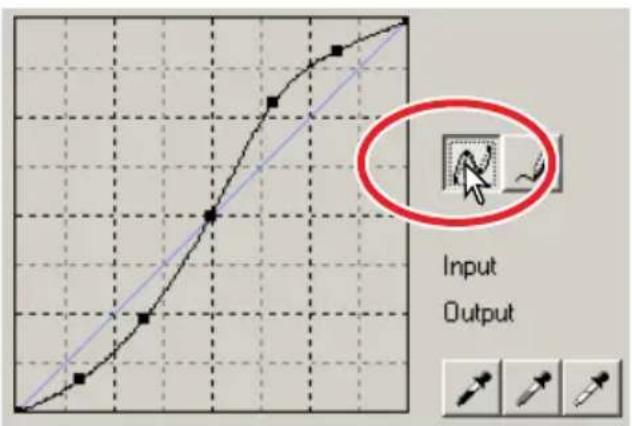
A QUICK GUIDE TO TONE CURVE CORRECTIONS
Image processing is a highly specialised and difficult field that takes years of practice to master. This basic guide to using tone curves covers a few simple procedures to improve your pictures. For more about digital-image processing, consult your local book dealer about self-help guides on this subject.
ABOUT THE TONE CURVE
The tone curve is a graphic representation of the brightness and colour levels of the image. The bottom axis is the 256 levels of the prescan image (input data) from black to white. The vertical axis is the corrected prescan image (output data) with the same scale from top to bottom.
The bottom left portion of the graph represents the dark colours and shadow areas of the image. The middle section represents the mid-tones: skin, grass, blue sky. The top right section is the highlights: clouds, lights. Changing the tone curve can affect the brightness, contrast, and colour of the final image.
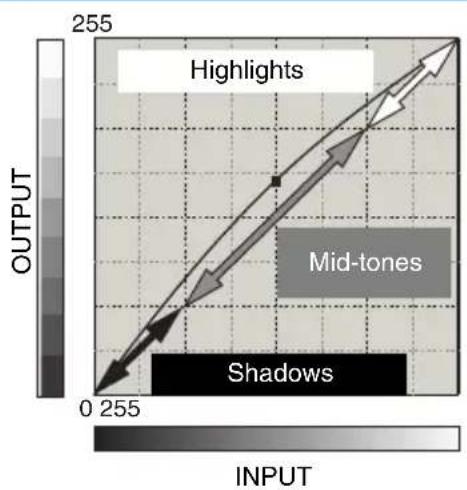
heatmap
| OUTPUT | INPUT | | ------ | ----- | | 0 | 0 | | 255 | 255 |BRINGING OUT DETAIL IN THE SHADOWS
This is a simple technique to make a subject hidden in the shadows brighter. Unlike the brightness level control (page 52), this method of correction will not lose details in the highlight areas of the image.
With the RGB channel selected, place the smooth-curve cursor on the centre of the curve. Click and drag the curve up. Look at the prescan image to judge the result. The adjustment can be very small and still have a significant impact on the image. Moving the tone curve down will make the subject darker.
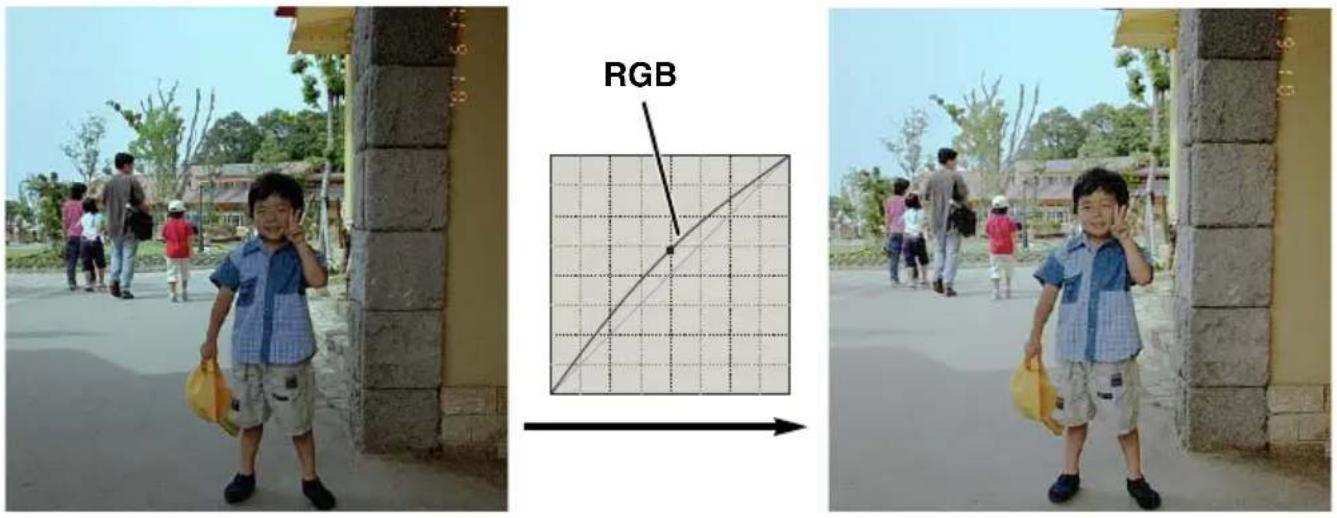
INCREASING THE CONTRAST OF AN IMAGE
The contrast of an image can be changed. The light blue 45^ line on the tone curve chart represents the original contrast of the scanned image. Making the angle of the tone curve greater than 45^ will increase the contrast of the image. Making the angle less than 45^ will reduce the contrast.
With the RGB channel selected, click on the tone curve near the top and bottom to add two nodes. Slightly move the top node up and the bottom node down. This will increase the angle of the central portion of the tone curve and increase the contrast of the image without making an overall change in image brightness.

natural_image
Close-up of a baby lying on a white blanket, no visible text or symbols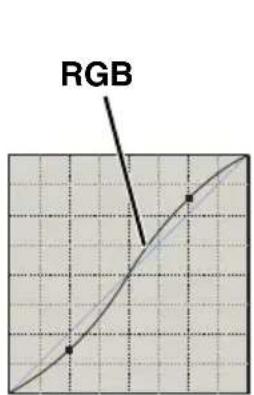
natural_image
Close-up of a baby lying on a white surface, no visible text or symbolsCORRECTING COLOUR WITH THE TONE CURVE
By selecting individual colour channels on the tone curve, adjustments to the overall colour of an image can be made. This can be used to eliminate unnatural colour casts or add warmth to a picture.
If the image is too red, green, or blue, simply drag the corresponding colour-channel curve down until the colour is appears natural. If the colour cast is predominantly one of the secondary colours, cyan, magenta, or yellow, move the curve of the complementary colour up. For example, if the image is too yellow, move the blue curve up. For more on secondary and complementary colours, see page 54.
When daylight film is used under fluorescent lighting without a flash, the resulting photograph has a green cast. To correct the image, display the green channel tone curve. Click on the centre of the curve and move it down. Use the prescan image to judge the results.
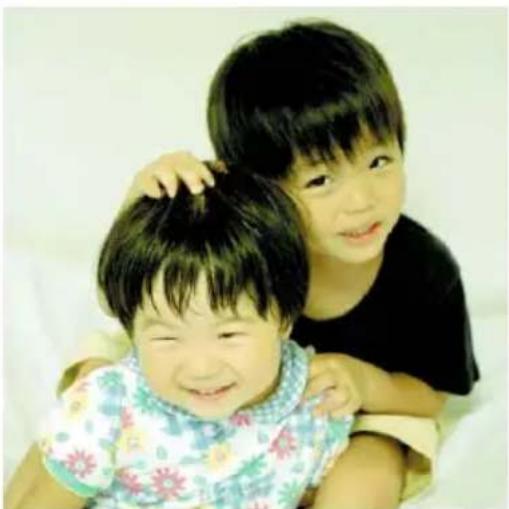
natural_image
Two smiling children sitting together, one with dark hair and the other in a black shirt (no text or symbols visible)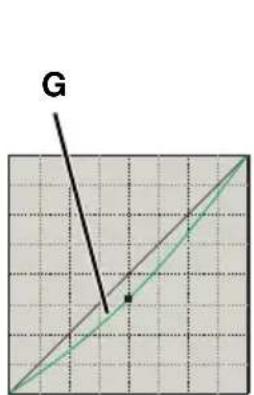
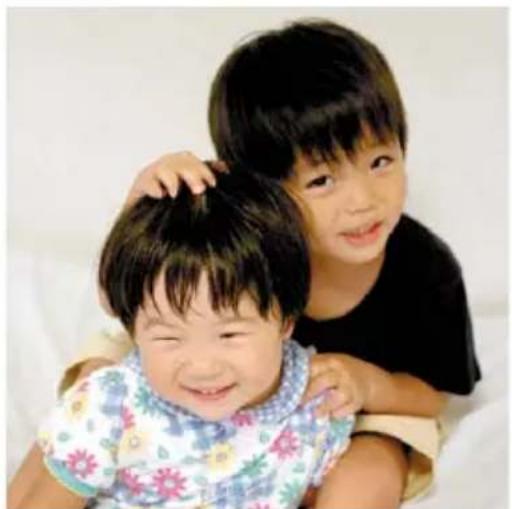
natural_image
Two smiling children posing together, one with a hairpin and the other in a black shirt (no text or symbols visible)
WHITE, BLACK, AND GRAY POINT CORRECTIONS
Advanced image corrections can be made by specifying a white, black, and gray point within the image. Locating an appropriate neutral area within the image is critical to correctly calibrate the software. When the dropper tool is selected, the RGB display is active and can be used to evaluate the image area.
1 Click the white-point button .
- The mouse pointer changes to the white dropper tool.
2 Click on the brightest neutral area of the image to define it as the white point.
- The values of the image will be adjusted based on the selected point. The default level for the white point is 255 for each RGB channel.
- The change is immediately reflected in the prescan image.
3 Click the black-point button . ↗
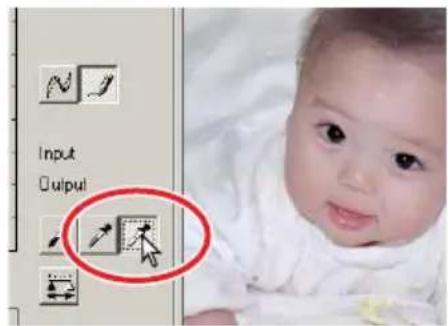
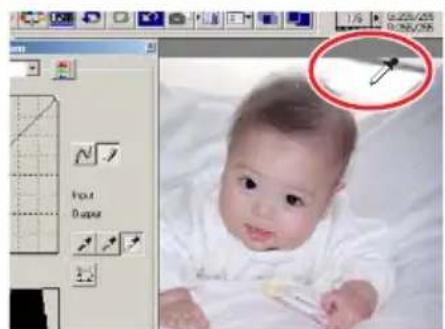
natural_image
Digital photo of a baby in a hospital bed with a red circular annotation highlighting the infant's hair (no text or symbols on the image itself)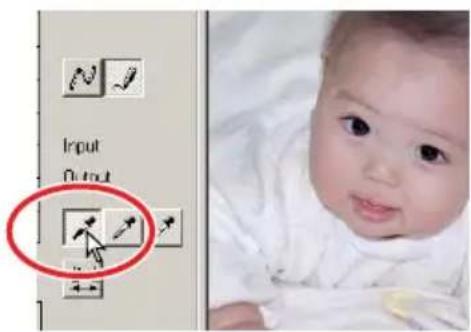
4 Click on the darkest neutral area of the image to define it as the black point.
- The values of the image will be adjusted based on the selected point. The default level for the black point is 0 for each RGB channel.
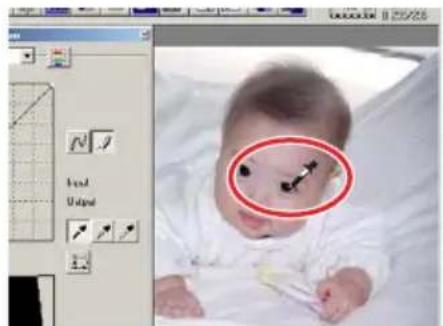
natural_image
Digital photo of a baby with a red circle highlighting the face area, shown within an image editing software interface (no readable text or symbols on the photo itself)5 Click the gray-point button . ↗
- The gray-point button is deselected when using black and white film. The grey point controls the colour of the image.
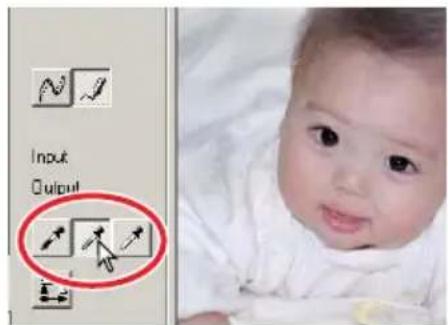
6 Click a neutral area of the image to be defined as the gray point.
- The area used to calibrate the gray point must be neutral. The brightness level of the area is not important, but if the area has a definite colour, the image will not be colour balanced correctly.
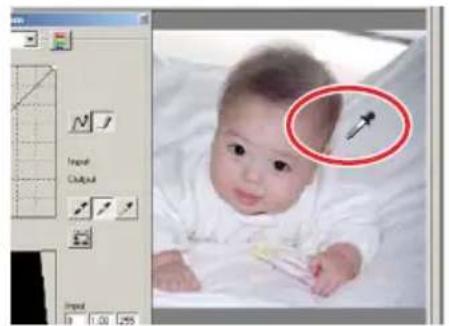
natural_image
Digital photo of a baby lying on a bed, with a red circle highlighting the face (no text or symbols visible)7 Press the apply button to show the change on the histogram.
- Click the reset button to cancel all corrections.
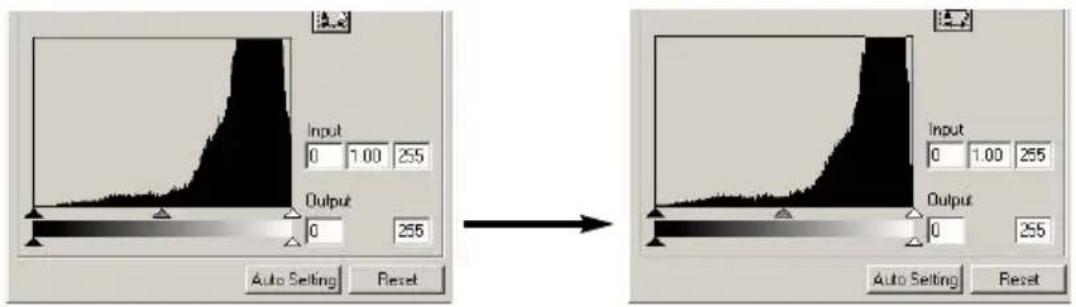
SETTING THE WHITE AND BLACK POINT VALUES
The white and black-point values are set to 255 and 0 for each RGB level. These values can be changed. Changing the white and black-point values allow the calibration of an image with no true white or black. This is an advanced image-processing tool.
1 Double-click on either the white-point or black-point button to activate the point-value-setting dialog box.
2 Input the new white-point or black-point values. Click "OK".
- With the point-value-setting dialog box open, the mouse pointer can be used to measure the colour of any point on the prescan image.
- Press the shift key (Windows) or command key (Macintosh) to display the CMYK levels in the RGB display.
- The RGB display shows the original values for the scanned image on the left and the current values for the image on the right.
3 Calibrate the image following the steps in white, black, and gray point corrections section.
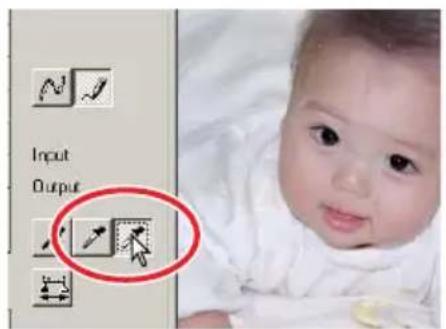
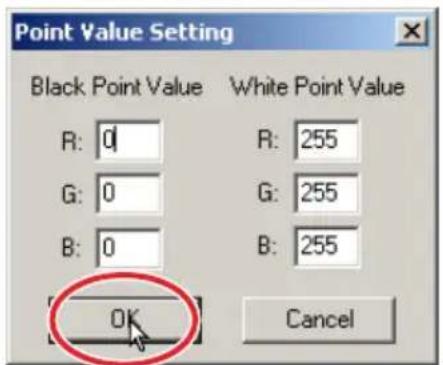
HISTOGRAM CORRECTIONS
The histogram indicates the distribution of pixels with specific brightness and colour values inside the cropping frame. Using the histogram can maximise the output of the image data. Changes made with the histogram are also displayed on the tone curve.
AUTO SETTING
Click the auto-setting button.
- The auto-setting function automatically adjusts the tone curve and histogram to maximise image data. The darkest pixels in the image are set to a black level for 0, the brightest pixels are set to a white level of 255, and the rest of the pixels are distributed between them equally. To view the change in the histogram, press the apply button.
- The change is immediately reflected in the prescan image.
- Click the reset button to cancel the auto setting.
MANUAL SETTING
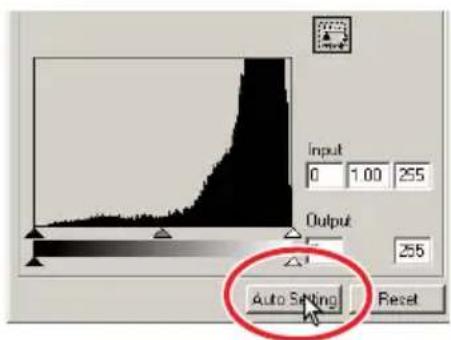
The highlight level, shadow level, and gamma can be set manually. The histogram can be used to maximise the distribution of the pixels in the image. All the levels on the histogram are displayed numerically to the right of the sliders. These numbers can be changed with the keyboard.
The gamma slider defines the mid-tones of the image. Dragging the gamma slider to the right will darken the image, and dragging it to the left will brighten it.
Similar to the tone curve correction described on page 56, the gamma slider allows the brightness of the image to be adjusted without losing image information.
The input highlight slider sets the white level. As the slider is moved to the left, an apparent increase in contrast can be seen in the prescan image. All pixels to the right of the slider are set to 255 and any image detail they may contain will be lost. This can be an important tool for improving copy images of text on a white background. Uneven illumination, or faded or stained paper can be distracting when copying text or line art. By adjusting the white level, the imperfections of the white background can be eliminated leaving only the darker text visible.
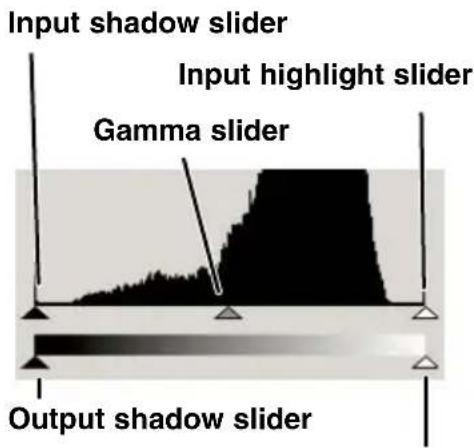
Output highlight slider
The input shadow slider sets the black level. As the slider is moved to the right, an apparent increase in contrast can be seen in the prescan image. All pixels to the left of the slider are set to 0 and any image detail they may contain will be lost.
The black and white output levels can be adjusted. By moving the output highlight and shadow sliders, the contrast of the image can be reduced.
The colour histograms can be displayed with the channel list box or with keyboard shortcuts. While holding the shift key (Windows) or command key (Macintosh), press "1" to display the red channel, "2" to display the green channel, "3" to display the blue channel, or "0" (zero) to display the RGB channel.
1 Click the colour-histogram button to view the red, green, and blue histograms.
- The tone curve and histogram dialog box extends to the right to show the R, G, B channel histograms.
- Click the histogram RGB display button again to close the RGB histograms.
2 Use the slider or enter values in the text boxes to adjust the histograms.
- The changes are reflected in the prescan image.
- Click the reset button to cancel any changes.
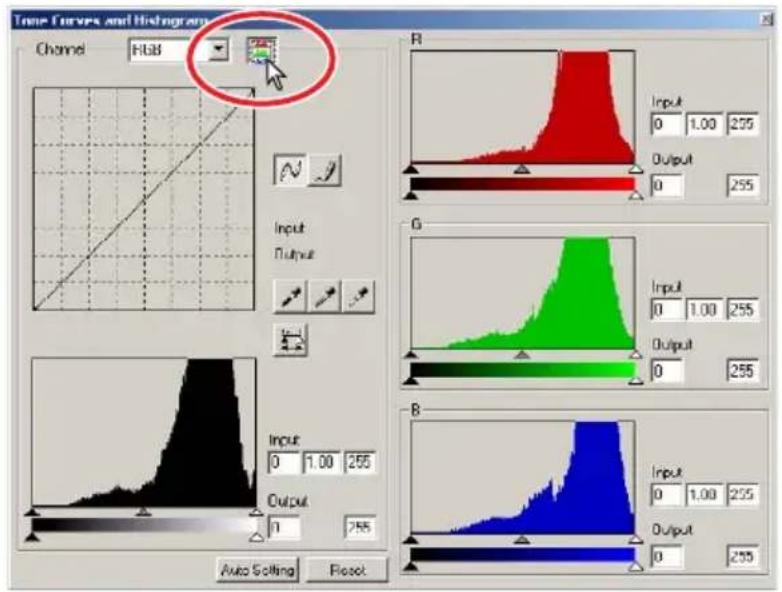
This palette allows easy corrections to be made to brightness, contrast, and colour.
1 Click on the brightness/contrast/colour-balance button to open the correction palette.
2 Drag the brightness, contrast, or colour sliders, or enter specific values in the corresponding text box to make corrections.
- Dragging each slider to the right or inputting a positive number in the text box increases the brightness, contrast, and colour. - To correct for an unnatural colour cast is simple. If the image is too:
Red – decrease the amount of red.
Green – decrease the amount of green.
Blue – decrease the amount of blue.
Cyan – increase the amount of red.
Magenta – increase the amount of green.
Yellow – increase the amount of blue.
For more on colours, see page 54.
- Changes will be reflected in the prescan image and in the graph at the top of the palette. If the tone curve/histogram window is open, the changes can also be seen in the histograms.
- Click the reset button to cancel changes.
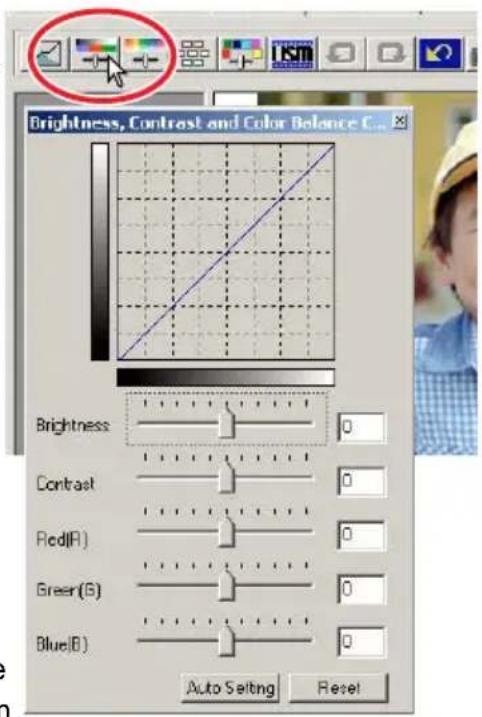
AUTO SETTING
Clicking the auto-setting button corrects the brightness and contrast automatically without affecting the colour balance.
- Click the reset button to cancel any changes.

HUE/SATURATION/LIGHTNESS CORRECTIONS
This palette adjusts the image in reference to the HSB colour model. These controls can be used to manipulate the colour image rather than producing a realistic representation.
The HSB colour model defines colour based upon human perception rather than photographic processes. Hue refers to each separate colour in the model. Saturation is how vivid each colours is. Lightness describes how bright or dark a colour is in the colour space.
The hue control is not a colour balancing tool. It is a creative tool. When changing hue in the palette, each colour is assigned a new hue depending on the degree of rotation through the colour space. For example, a very simple colour space could have three colours: red, green, and blue. I have a red barn next to a green tree with a blue sky. Now I rotate the image in the colour space; the colours are reassigned a new hue based on the position – the barn is green, the tree is blue, and the sky is red. The HSB colour space is similar, but with many more hues.
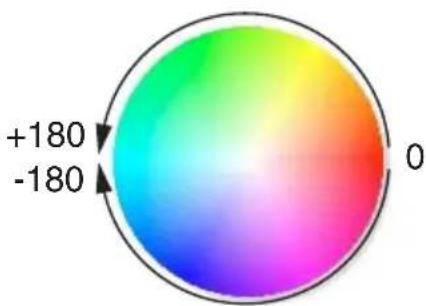
other
| Value | |-------| | +180 | | -180 |Unlike the brightness control in the brightness, contrast, colour balance palette, the lightness control does not change the apparent density of the colours equally. With an extreme increase in lightness, blue will not appear as light as yellow.
1 Click the hue/saturation/lightness button to open the palette.
2 Drag the hue, saturation, or lightness slider, or enter specific values in the corresponding text box to make corrections.
- Dragging each slider to the right or inputting a positive number in the text box increases the saturation, and lightness. The hue slider rotates the colours in the image through the colour space. The maximum position on the left is the same as the maximum position on the right.
- Two colour-sample bars are displayed at the bottom of the palette. The top sample indicates the colour space of the original image. The bottom sample displays the relative changes to the colour space.
- Click the reset button to cancel any changes.
- Changes will be reflected in the prescan image.
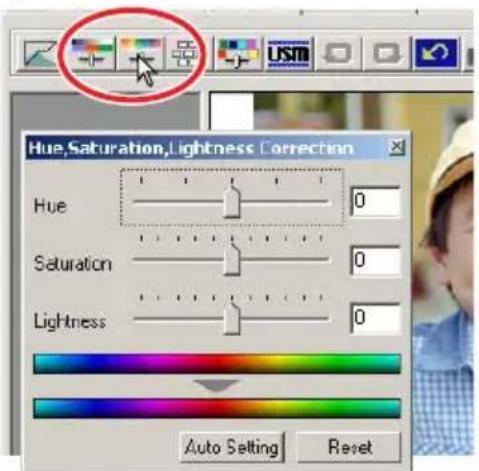
AUTO SETTING
Click the auto-setting button adjusts the saturation automatically without affecting the hue or lightness.
- Click the reset button to cancel any changes.
The variation dialog box allows an image to be corrected by comparing it to other slightly corrected images surrounding it. This is an easy method to correct images for individuals who are inexperienced in image processing or photofinishing.
1 Click the variation button .
• The variation dialog box appears.
2 Click the arrow next to the variation list box to select the image quality to be corrected: colour balance, brightness and contrast, or saturation.
• Each variation shows the current prescan image in the centre with corrected sample images displayed around it.
- Only the brightness and contrast variation can be used with B&W film.
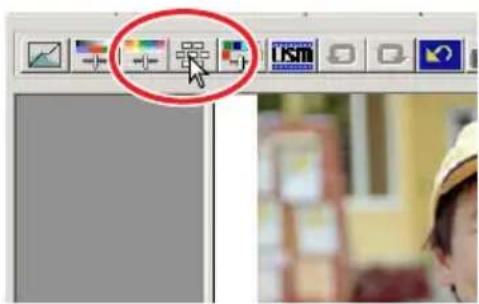
COLOUR BALANCE VARIATION
Six images with a slight colour correction are displayed around a thumbnail of the uncorrected prescan image.
1 Drag the variation-step slider, or enter the correction step into the variation-step text box to set the degree of correction.
- The initial setting is 10. The step can be set between 1 and 20.
- Checking the display-limit check box will indicate when any of the image values exceed 0 (black limit) or 255 (white limit) with the complementary colour. For example, if any part of the blue channel image exceeds those values, the limit is displayed in the complementary colour, yellow.
2 Click the best image among the six frames.
- The selected image becomes the new centre showing six new images corrected by the designated step. This procedure can be repeated until the desired correction is obtained.
- Click the reset button to cancel any changes.
• Changes will be reflected in the prescan image.
Display-limit check box
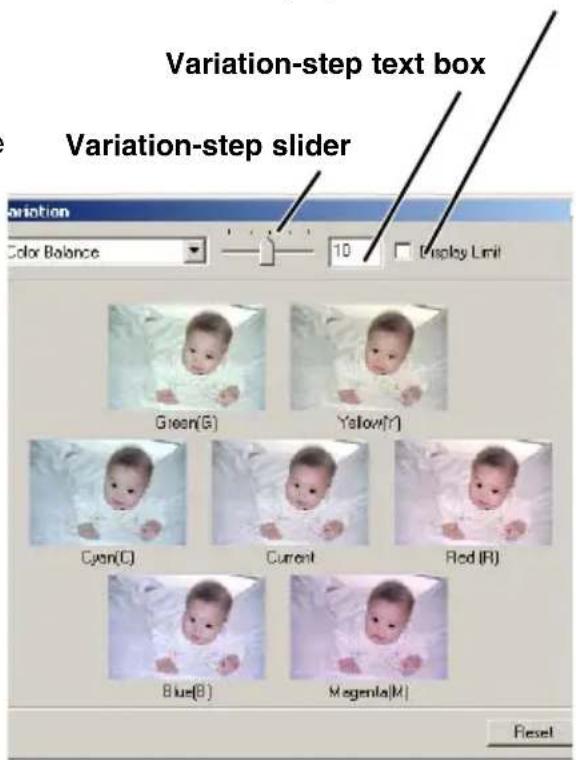
BRIGHTNESS & CONTRAST VARIATION
Eight images with a slight correction to brightness and contrast are displayed around a thumbnail of the uncorrected prescan image.
1 Drag the variation-step slider, or enter the correction step into the variation-step text box to set the degree of correction.
- The initial setting is 10. The step can be set between 1 and 20.
- Checking the display-limit check box will indicate when any of the image values exceed 0 (black limit) or 255 (white limit) with the complementary colour. For example, if the white area of the image exceeds those values, the limit is displayed in the complementary colour, black.
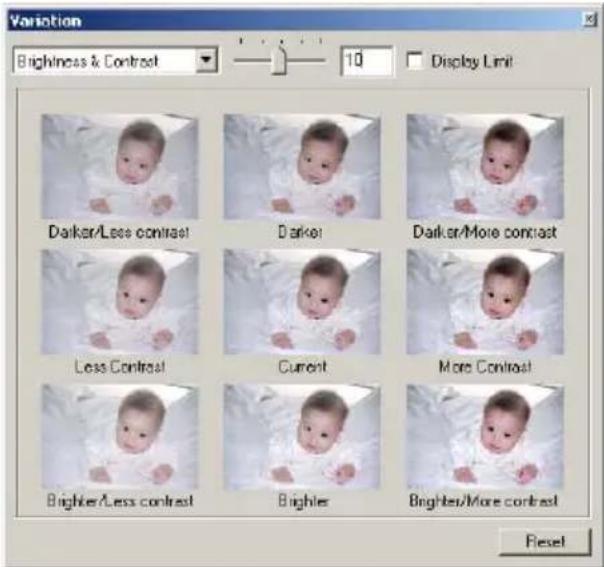
2 Click the best image among the eight frames.
- The selected image becomes the new centre showing eight new images corrected by the designated step. This procedure can be repeated until the desired correction is obtained.
- Click the reset button to cancel any changes.
• Changes will be reflected in the prescan image.
SATURATION VARIATION
Two images with a slight saturation correction are displayed on each side of a thumbnail of the uncorrected prescan image.
1 Drag the variation-step slider, or enter the correction step into the variation-step text box to set the degree of correction.
- The initial setting is 10. The step can be set between 1 and 20.
- Checking the display-limit check box will indicate when any of the image values exceed 0 (black limit) or 255 (white limit) with the complementary colour.
2 Click the best image among the two frames.
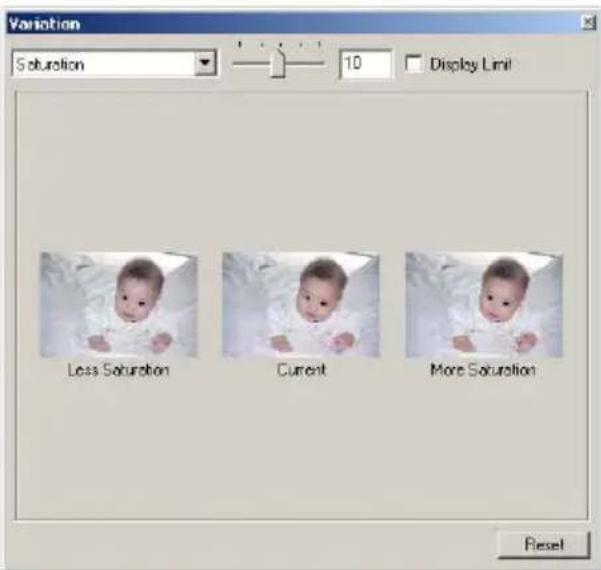
- The selected image becomes the new centre showing two new images corrected by the designated step. This procedure can be repeated until the desired correction is obtained.
- Click the reset button to cancel any changes.
- Changes will be reflected in the prescan image.

SELECTIVE-COLOUR CORRECTIONS
Selective-colour correction is an advanced technique to refine the colours in the image. The colour of each process colour, cyan, magenta, yellow, and black, can be used to adjust the six separate colour groups in the image: red, green, blue, cyan, magenta, and yellow. This type of correction is effective in changing a specific colour without influencing any of the other colours in the image. For example, if the sky looks purplish instead of blue, magenta can be reduced in the blue colour group.
1 Click the selective-colour button

2 Click the arrow next to the colour list box to select the colour group.
3 Drag a slider or enter a value in a text box to adjust the selected colour.
- More than one slider can be used to adjust the selected colour.
- Changes will be reflected in the prescan image.
- Click the reset button to cancel any changes.
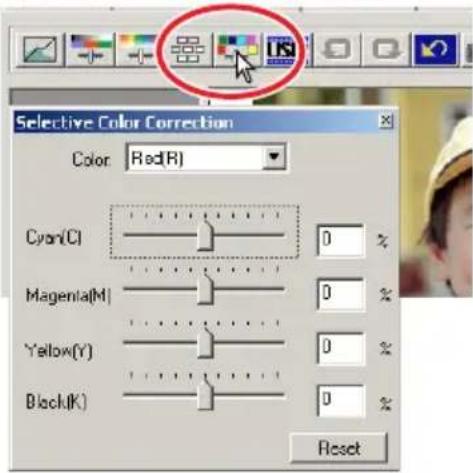

UNSHARP MASK
The unsharp mask sharpens edges in the image without affecting overall image contrast. This mask can be used with soft or slightly out-of-focus images. The effect of the unsharp mask is very subtle, but makes a significant improvement to the overall appearance of the image.
1 Click the unsharp-mask button .
• The unsharp-mask dialog box appears.
2 Drag a slider or enter a value in a text box to adjust the parameters of the mask.
- The effect of the unsharp mask cannot be viewed in the prescan image. It will only be seen in the final scan.
- The result of the unsharp mask differs with image resolution. Make several scans with slight changes to the settings until the settings produce the intended result.
- Clicking the reset button restores the default settings.
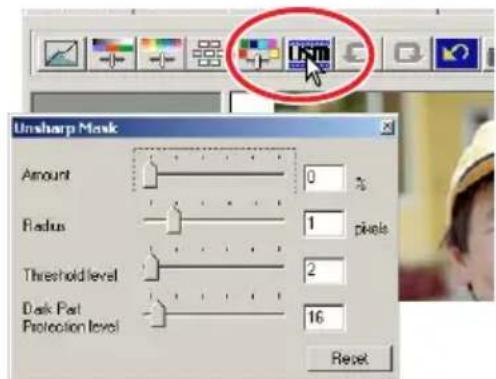
- Amount: can be adjusted between 0% and 500%. Adjust the slider to increase level of contrast. If the value is too high, pixelation (the image becomes noticeably rough or grainy) will be apparent. 150% to 200% is recommended for high quality printed images.
- Radius: can be adjusted between 0.1 and 5. The default setting is 1. Adjust the slider to increase the edge sharpness of the pixels. 1 to 2 is recommended for high quality printed images. Changes to the radius are more apparent on printed images, than images displayed on a monitor.
- Threshold level: can be adjusted between 0 and 255. The default setting is 2. If the difference between the surrounding pixels is greater than the threshold level, that pixel is recognised as a sharp subject pixel. When the level is set to 0, the whole image is corrected. The threshold level can separate smooth or even areas from edges and detailed areas to be sharpened.
- Shadow protection level: can be adjusted between 0 and 255. The default setting is 16. To limit the sharp subject pixels in the shadows. When the luminance level is greater than the shadow protection level, that pixel is recognised as a sharp pixel.
CANCELLING IMAGE CORRECTIONS

UNDOING AN IMAGE CORRECTION
When the undo button is clicked, the last image correction is cancelled.

REDOING A CANCELLED IMAGE COR- TION
When the redo button is clicked, the cancelled image correction is reapplied.

RESETTING ALL IMAGE CORRECS
When the correction reset button 📋 licked, all image corrections are cancelled.
Undo button
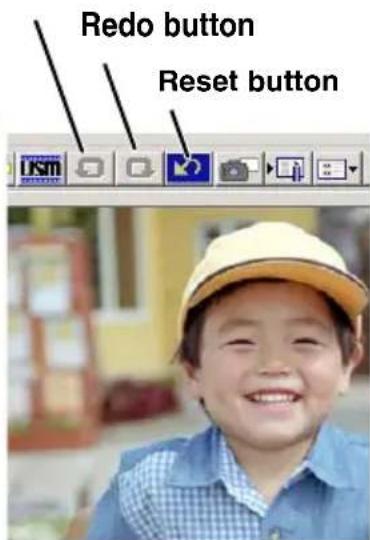

MAKING SNAPSHOT THUMBNAILS
Image corrections can be temporarily stored while processing an image. When the Snapshot button is clicked, the current prescan image is stored in the snapshot display area temporarily as a thumbnail. When the thumbnail is double-clicked, that image will be displayed as a prescan image.
1 Click the snapshot button to store a thumbnail and correction settings of the displayed prescan image.
2 To return to a previous correction, click on the thumbnail in the snapshot display area.
- The thumbnail image will replace the prescan image.
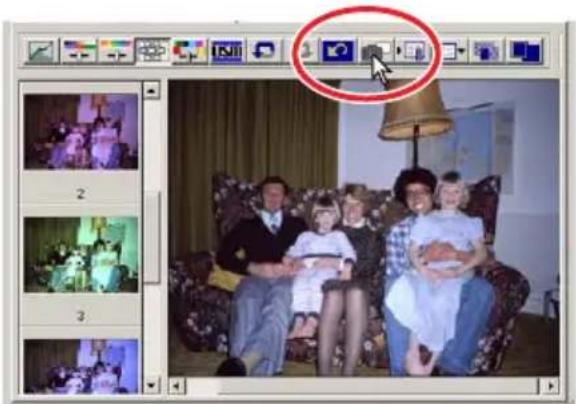
natural_image
Group photo of four people sitting on a sofa in a living room, with a red circle highlighting the person's face (no text or symbols visible)SAVING AND LOADING IMAGE CORRECTIONS
All corrections applied to an image can be saved as a correction Job. The correction Job can be loaded into the utility at any time, and the correction settings can be applied to different images.

SAVING AN IMAGE-CORRECTION JOB
1 Click the save image-correction-Job button to save the current image-correction settings.
• The registration dialog box appears.
2 Input the Job name and click "OK".
- The current image-correction settings are saved as an image-correction Job.
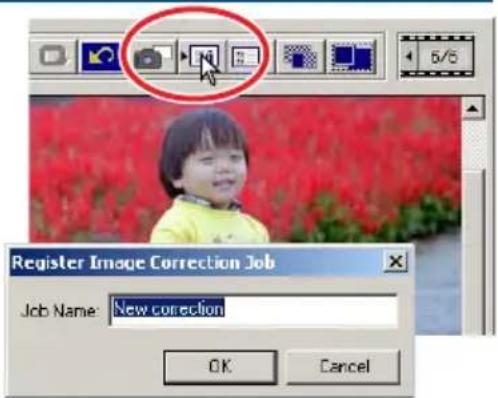

LOADING AN IMAGE-CORRECTION JOB
1 Click the load image-correction-Job button
- The select image-correction-Job dialog box appears.
2 Select the image-correction Job and click "OK" to apply the Job settings to the pres-can image.
- Jobs are loaded into the snapshot display. Multiple Jobs can be loaded.
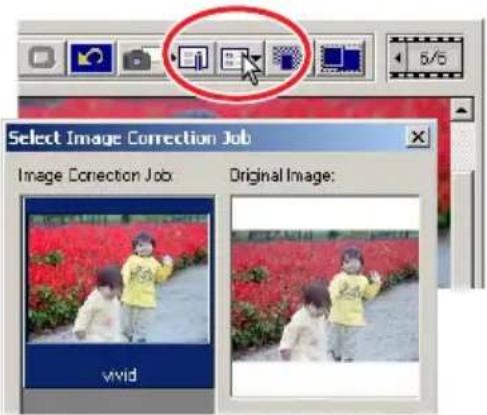
COMPARING PRE/POST CORRECTION IMAGES
Clicking the comparison display button displays the original prescan image on the left, and the corrected image on the right. Clicking the fit-to-window button automatically changes the size of the pre and post-correction images to fit the utility window.
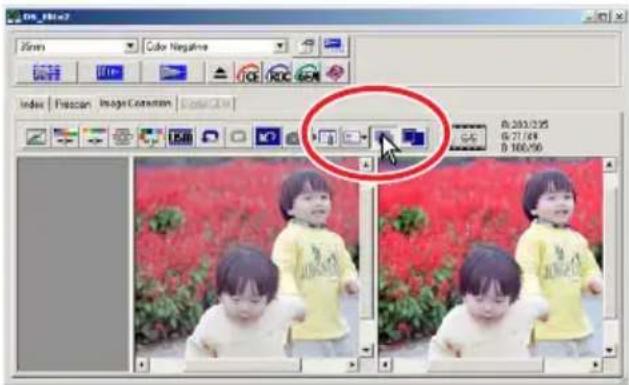
Original image Corrected image
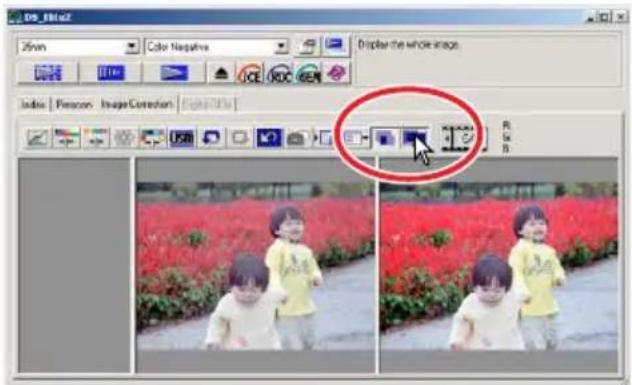
Digital ICE^3 is an collection of powerful image-processing tools: ICE, ROC, and GEM. To make use of these image-processing functions, the following system requirements must be met:
Windows®
| Minimum system requirements | Recommended system requirements | ||||
| CPU Memory | Hard disk space | CPU Memory | Hard disk space | ||
| Pentium 166MHz or later | 128MB | 300MB or more | Pentium III or later 256MB | 600MB or more | |
When using Digital ICE ^3 with 16-bit colour depth.
| Minimum system requirements | Recommended system requirements | ||||
| CPU Memory | Hard disk space | CPU Memory | Hard disk space | ||
| Pentium 166MHz or later | 128MB | 500MB or more | Pentium III or later | 256MB | 1GB or more |
Macintosh
| Minimum system requirements | Recommended system requirements | ||||
| CPU Memory | Hard disk space | CPU Memory | Hard disk space | ||
| Power PC G3 or later 64MB | 300MB or more | Power PC G4 and later 256MB | 600MB or more | ||
When using Digital ICE ^3 with 16-bit colour depth.
| Minimum system requirements | Recommended system requirements | ||||
| CPU Memory | Hard disk space | CPU Memory | Hard disk space | ||
| Power PC G3 or later 128MB | 500MB or more | Power PC G4 and later 256MB | 1GB or more | ||
- The above requirements are based upon use with 35mm film.
- With Macintosh computers, the memory requirement does not include the necessary memory allocation for the operating system or applications.
- When using Photoshop, sufficient memory for the scanned images must be allocated to the application.
Digital ICE (Image Correction Enhancement) eliminates surface defects (dust, scratches, fingerprints, mould, etc.) from the film image during scanning.
Click the Digital-ICE button to activate the function. Press the prescan button to view the results.
- Digital ICE processing is applied to the prescan and final scan.
• Digital ICE cannot be used with Kodak Kodachrome film. - Digital ICE cannot be used with traditional black and white films. The Digital ICE function can be used with special black and white films that are designed to be developed in a C-41 or equivalent colour process (see the list below). These films should be scanned with the colour-negative film-type setting.
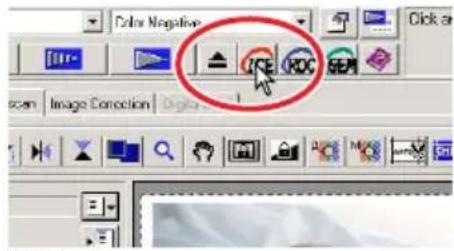
Results cannot be guaranteed with other types of black and white film:
Kodak: Select Black & White 400
Kodak: T400CN
Ilford: XP2 Super
- The scanning time increases with the use of Digital ICE.
- To turn off Digital ICE, click the Digital-ICE button again.
• Each time the Digital ICE button is pressed, the prescan image is deleted and another prescan needs to be made.
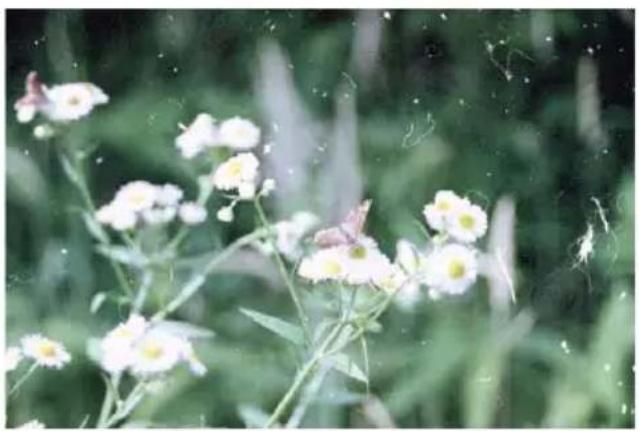
natural_image
Close-up of white daisy-like flowers with green foliage and soft water spray in the background (no text or symbols)Digital ICE off
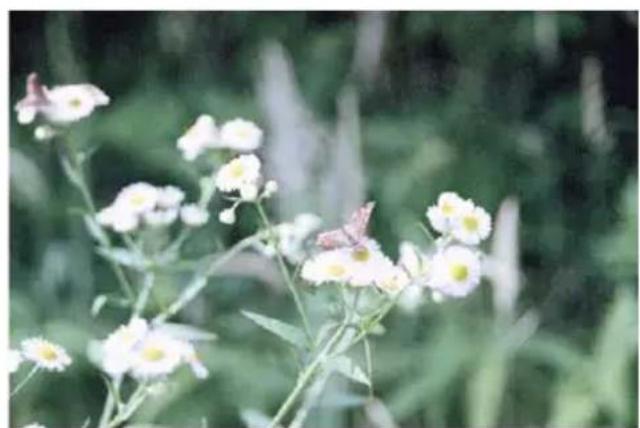
natural_image
Close-up of white wildflowers with yellow centers and green foliage in the background (no text or symbols visible)Digital ICE on
The Digital ROC (Reconstruction of Colour) can restore the faded colour of old film.
Click the Digital-ROC button to activate the function. Press the prescan button to view the results.
- When Digital ROC is used, the prescan also makes the final scan. When the final scan is made, the image data is simply processed and saved. While the final scan is relatively fast, the prescans require more time. Because the final scan and prescan are made at the same time, always perform the prescan with the autofocus-at-scan function active in the preferences box (see page 34), or with point AF or manual focus (see page 49 – 50).
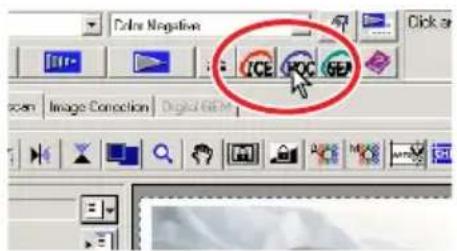
- Digital ROC cannot be used with 16 bit linear colour depth (see page 34).
- When Digital ROC is activated, the auto-expose-for-slides setting in the preferences box (see page 34), colour matching (see page 88), and the AE lock and AE-area-selection functions (see page 48) are disabled.
- The results with Digital ROC depends upon the condition of the film.
- Digital ROC cannot be used with traditional black and white films. The Digital ROC function can be used with special black and white films that are designed to be developed in a C-41 or equivalent colour process (see the list below). These films should be scanned with the colour-negative film-type setting.
Kodak: T400CN
Ilford: XP2 Super
- To turn off Digital ROC, click the Digital-ROC button again.
• Each time the Digital ROC button is pressed, the prescan image is deleted and another prescan needs to be made.
natural_image
Two children sitting at a table with a birthday cake and candles, in a room with bookshelves (no visible text or symbols)
natural_image
Two children sitting at a birthday table with cake and candles, surrounded by bookshelves (no visible text or symbols)Digital ROC off Digital ROC on
Digital GEM (Grain Equalisation and Management) reduces the effect of grain in colour film. Grain is a sandy texture that can sometimes be seen smooth uniform areas of the image, such as the sky. Grain is more pronounced in fast film.
Digital GEM cannot be used with traditional black and white films. The Digital-GEM function can be used with special black and white films that are designed to be developed in a C-41 or equivalent colour process: Kodak Select Black & White 400, Kodak T400CN, and Ilford: XP2 Super. These films should be scanned with the colour-negative film-type setting. Results cannot be guaranteed with other types of black and white film.
1 Click the Digital-GEM button in the main window.
• The Digital-GEM tab is activated.
• Each time the Digital GEM button is pressed, the prescan image is deleted and another prescan needs to be made.
2 Make a prescan of the image to be processed.
- When Digital GEM is used, the prescan also makes the final scan. When the final scan is made, the image data is simply processed and
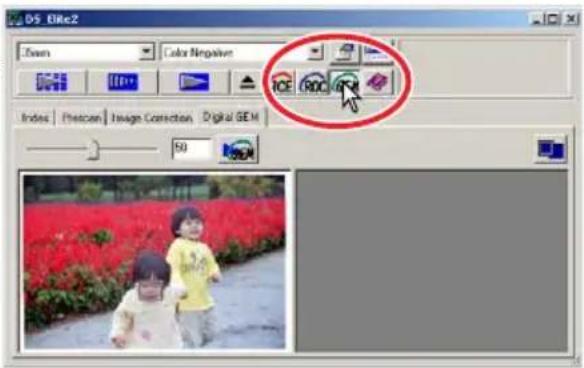
saved. While the final scan is relatively fast, the prescans require more time. Because the final scan and prescan are made at the same time, always perform the prescan with the autofocus-at-scan function active in the preferences box (see page 34), or with point AF or manual focus (see page 49 – 50).
3 Set the input resolution of the image in the scan-setting window (see page 74).
- The effect of image grain is related to the input resolution.
4 Click the Digital-GEM tab.
• The Digital-GEM window appears.
5 Adjust the Digital-GEM slider or enter the Digital-GEM correction value directly in the text box to set the degree of correction.
- Values from 0 to 100 can be set. The larger the value, the greater the correction.
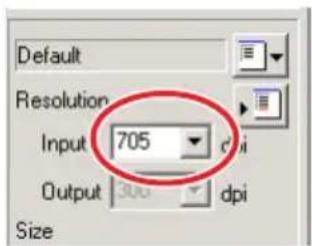
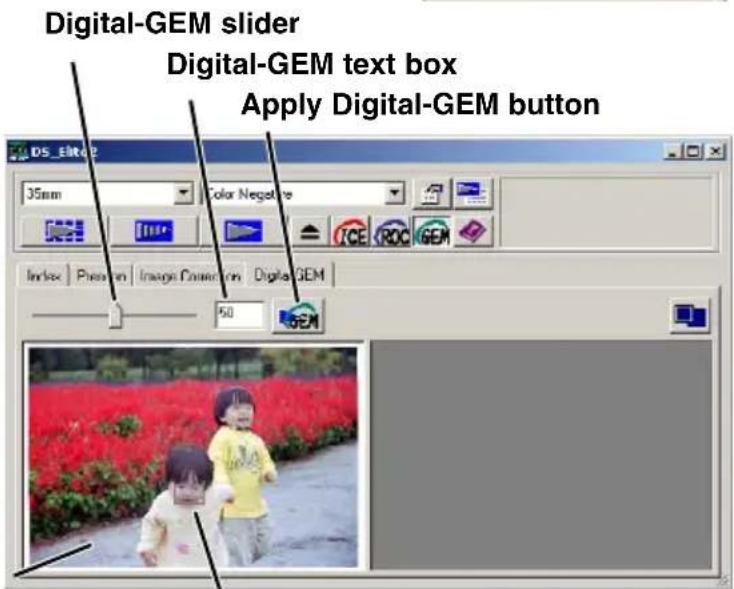
Digital-GEM sample areaPrescan display
6 Adjust or move the Digital-GEM sample area to select the image area to be used to evaluate the Digital-GEM correction.
- Choose a smooth uniform area to evaluate. Skin is a good subject. - Using the mouse, place the pointer over the corners or sides of the GEM sample area frame; the pointer will change to a double arrow. Simply click and drag the edge of the frame to adjust the area. By placing the pointer in the centre of the frame, the pointer will changed to a four-pointed arrow. Simply click and drag the entire frame over the image area. With the pointer outside the frame, click and drag to define a new sample area. To extend the area over the entire image, press control+A (Windows) or command+A (Macintosh).
7 Click the apply Digital-GEM button to preview the Digital-GEM effect on the sample area.
- Every time the Digital-GEM sample area is changed, or the degree of correction is adjusted, press the apply Digital-GEM button to view the results. - The Digital-GEM sample image can be magnified by clicking the fit-to-window button.
8 Click the scan button to save the final image.
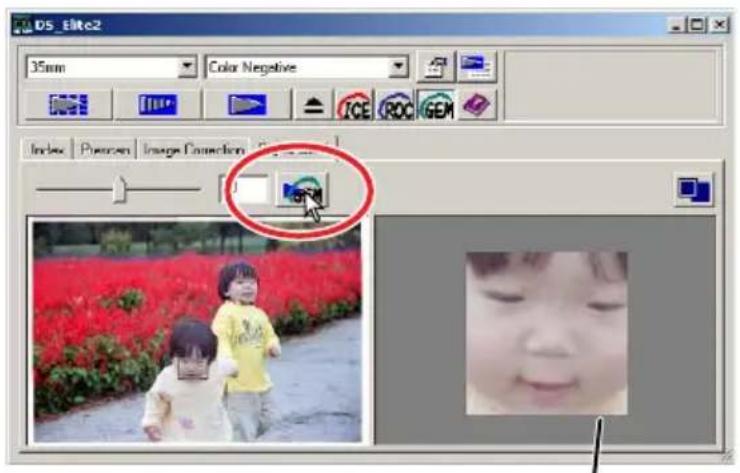
Digital-GEM sample display
- For the operation after performing the final scan, see page 81.
- The result with Digital GEM depends upon the condition of the film.
- To turn off Digital GEM, click the Digital-GEM button again.

natural_image
Close-up of a smiling child holding a small white flower near her ear (no text or symbols visible)
natural_image
Close-up of a smiling child holding a small white flower, no text or symbols visibleDigital GEM off Digital GEM on
8. SCAN SETTINGS
SCAN SETTING DIALOG BOX
Before making the final scan, the input and output parameters must be specified. While it is possible to input the scan settings yourself, DiMAGE Scan Elite II gives you an easier choice – the Job function, which automatically loads the scan settings based on the final use of the image.
Click the prescan or index scan tab to view the scan-setting window.
- The scan-setting dialog box is located on the left of the tab.
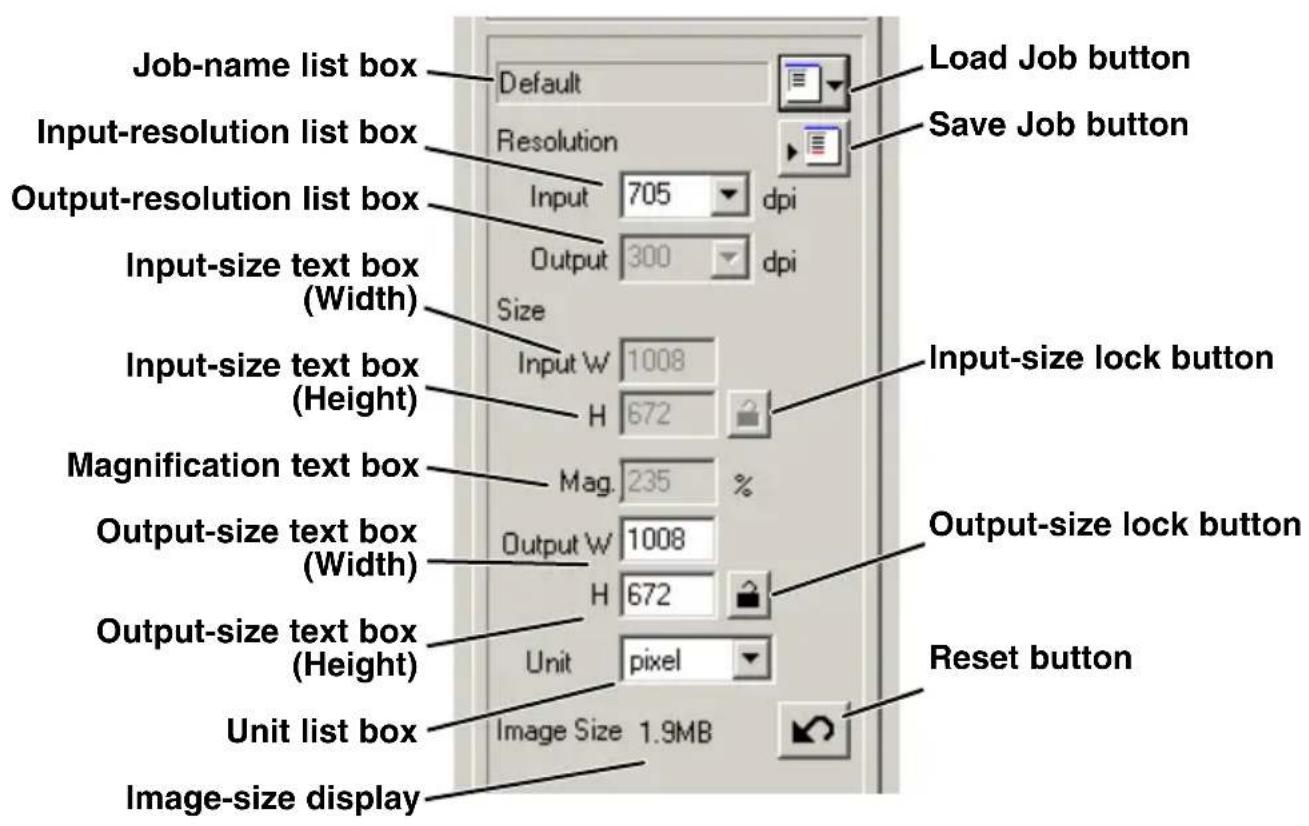
The Standard Scan Utility contains approximately 110 preinstalled Job files to cover a wide range of image use.
1 Click the load Job button

• The Job-selection dialog box will appear.
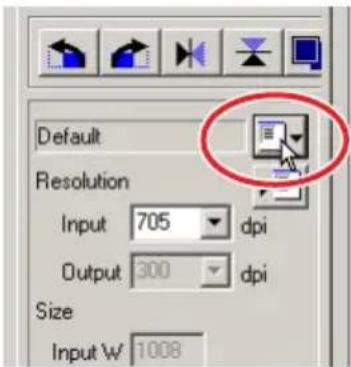
2 Select a category from the drop-down list.
3 Click a Job file name to select it. Click "OK" to apply the Job to the image.
- The scan settings of the selected Job file are displayed on the right side of the selection window.
- The Job names can be listed chronologically or alphabetically. Click the name or date option radio button to sort the Job files.
- When the Job file is loaded, the cropping frame will automatically appear on the image. The frame is proportional to the output type specified. The frame can be resized, but the proportions of the frame will remain the same. The input and output data are also automatically adjusted to match the change of the cropping frame.
- Once made, scan settings remain in effect until changed.
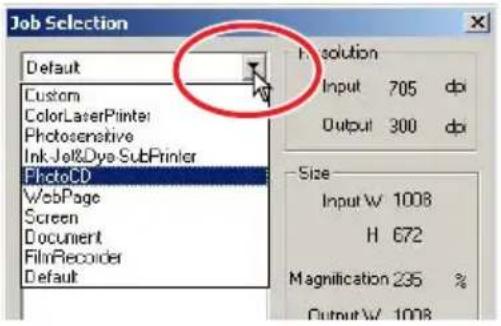
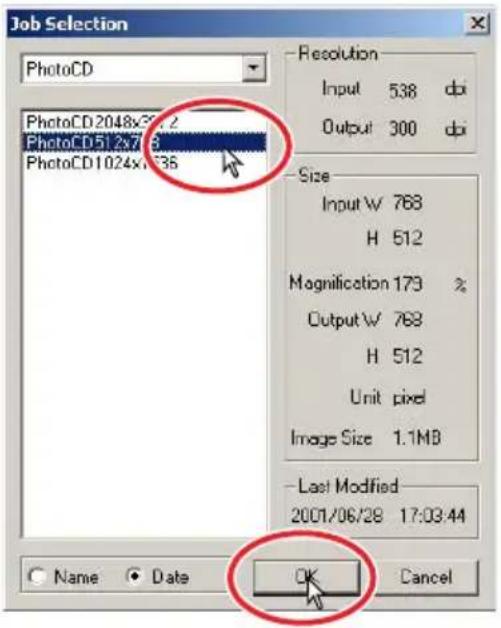
Custom
User-created scan settings (see page 74).
Colour Laser Printer
For digital colour copiers and colour laser printers. Uses an output resolution of 600 dpi with four paper sizes from A4 Quarter through Letter Eighth.
Photosensitive
For printers that use photosensitive/photographic material. Uses an output resolution of 400 dpi with five paper-sizes from A5 full through Postcard 4x6.
Ink Jet & Dye-Sub Printer
For Ink Jet and Dye-sublimation printers. Uses an output resolution of 300 dpi with ten paper-sizes from A4 full through Photo 3x5.
Photo CD
For the photo CD format. Uses an output resolution of 300 dpi. Image size can be selected among 2048 x 3072, 1024 x 1536, and 512 x 768 (pixels).
Web page
For use on the world-wide web. Uses an output resolution of 72 dpi. Seven image sizes can be selected from 320 x 240 to 1280 x 836 (pixels).
Screen
For monitor display. Uses an output resolution of 72 dpi. Nine image sizes can be selected from 640 x 480 to 1920 x 1200 (pixels).
Document
For image to be embedded in a document. Uses an output resolution of 72 dpi. Image size can be selected from Letter Eighth through A4 Half.
Film Recorder
For high-resolution images from a film recorder. Image size is 2048 x 1365 (pixels).
Default
This category uses the default settings for the film format. Uses an output resolution of 300 dpi.
INPUTTING SCAN SETTINGS MANUALLY
Input-resolution list box
Values can be selected from the drop-down list or be entered into the box directly.
The resolutions on the list are 2820, 1410, 940, 705, 470, 352, and 282 dpi. The default setting is 705 dpi.
Output-resolution list box
Values can be selected from the drop-down list or be entered into the box directly.
The resolutions on the list are 2400, 1440, 1200, 800, 720, 600, 400, 360, 350, 300, 240, 200, 180, 150, 96, 72, and 36 dpi. Value between 36 and 2400 dpi can be entered into the box. The default setting is 300 dpi. The output-resolution list box cannot be selected while “pixel” is selected in the unit list box.
Input-size text box
Input size is determined by the cropping frame size (see page 43), and the values entered in the width and height boxes. The cropping frame will adjust to any value entered. The input-size text box cannot be selected while “pixel” is selected in the unit list box.
Input-size lock button
This button locks the input values. The cropping frame can be moved, but not resized while this button is clicked. Clicking the button again releases the lock. The input-size lock button cannot be selected while "pixel" is selected in the unit list box.
Magnification text box
The image magnification can be set in this box. This value equals the input resolution divided by the output resolution, or is the output size divided by the input size. The Magnification text box cannot be selected while “pixel” is selected in the unit list box.
When the input size and output size are unlocked, the input resolution and output size vary according to the entered magnification value. When the output size is locked, the input resolution and input size vary according to the entered magnification value. When the input size is locked, the input resolution and output size vary according to the entered magnification value.
Output-size text box
The output size is determined by the cropping frame size (see page 43), and the input and output resolution values. The width and height of the output can be directly entered into the text boxes, and the input resolution, input size, and cropping size adjust according to the entered dimensions.
Output-size lock button
To lock the output size values.
Unit list box
The unit of the input and output sizes can be changed: pixels, millimetres, centimetres, inches, pica, and points. The default setting is pixels.
Image size display
Indicates the file size of the image.
Reset button
To initialise all current settings.
Resolution and output size
The resolution can be expressed in dpi (dots per inch). This refers to how many pixels are placed along one linear inch. The resolution of 350 dpi, which is commonly used in the commercial printing field, means that an area of one square inch would use 122,500 pixels. The larger the resolution, the greater the detail in the image. However, as the resolution increases, so does the file size.
The image resolution should be decided by the resolution of the output device. A printer with a resolution of 150 dpi will not be able to print a 300 dpi file any better than a 150 dpi file; the 300 dpi file will just be four-times larger.
Once the output resolution is determined, the input resolution should be calculated from the magnification needed to match the output.
$$ \begin{array}{l l} \underline {{\text { Input resolution }}} & \underline {{\text { Output size }}} \ \text { Output resolution Input size } & = \text { Magnification } \end{array} $$
For example, imagine the output print is 150mm x 100mm at the resolution of 150 dpi. The input image is from 35mm film (image size: 36mm x 24mm). The magnification can be calculated as follows:
$$ \frac {\text { Output size }}{\text { Input size 24mm (film) } ^ {=}} \quad \frac {1 0 0 \mathrm{mm(print)}}{} = \text { approx.4 times } $$
From this, the input resolution can be determined: 150 dpi multiplied by 4. The input resolution needed is 600 dpi.
EXAMPLE: SETTING THE SCANNER OUTPUT BY PIXELS
1 Select "pixel" from the unit list box.
- The output-resolution and input-size boxes are deselected.
2 Enter the dpi resolution for the output size. In this example, enter 640 for the width and 480 for the height. Click the output-size lock button to fix the values.
- The output-size boxes will be deselected.
3 Use the mouse to adjust the cropping frame over the prescan image to define the final scanning area.
- Click on the frame of the cropping area to resize the box. The input resolution will adjust according to the cropping area. Click and drag the centre of the area to move the frame.
- The scan setting is now complete.
- Once made, scan settings remain in effect until changed.
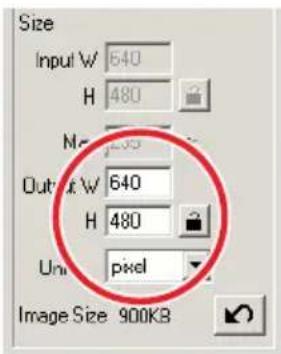
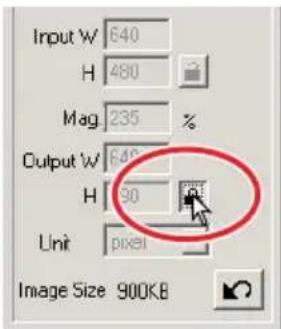
EXAMPLE: SETTING OUTPUT BY PRINT SIZE AND OUTPUT RESOLUTION
1 Select millimetres from the unit list box.
2 Enter the output resolution in the output-resolution list box. In this example, enter 300.
- This example is based on a printer with a 300 dpi output.
3 Enter the output size: in this example, enter 148 for the width and 100 for the height. Click on the output-size lock button to fix the values.
4 Use the mouse to adjust the cropping frame over the prescan image to define the final scanning area.
- Click on the frame of the cropping area to resize the box. The input resolution will adjust according to the cropping area. Click and drag the centre of the area to move the frame.
• The scan setting is now complete.
- Once made, scan settings remain in effect until changed.
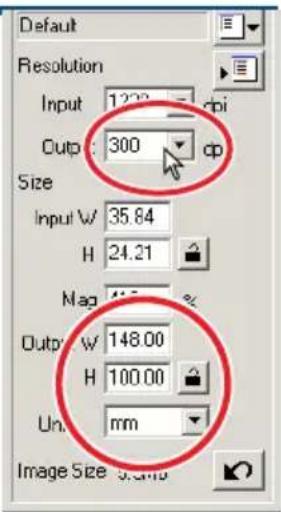
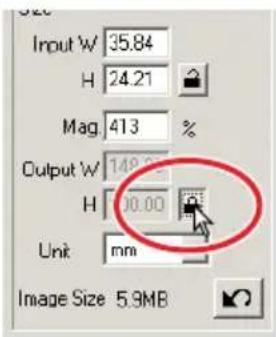

SAVING A JOB FILE
Frequently used scan settings can be saved.
1 With the scan settings to be saved in the scan settings window, click on the save Job button
• The Job-registry dialog box appears.
2 Select the category in which to save the settings from the drop-down menu.
3 Enter the Job file name. Click "OK" to save the settings.
• The Job file name can contain up to 24 characters.
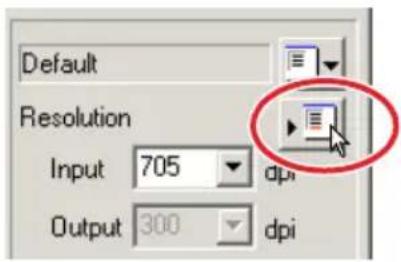
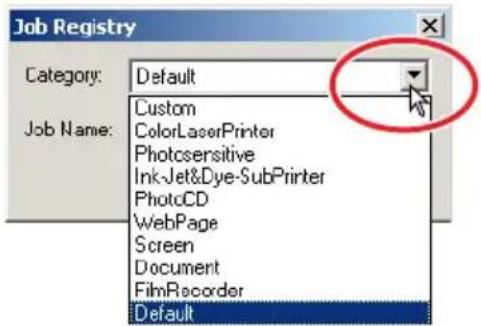
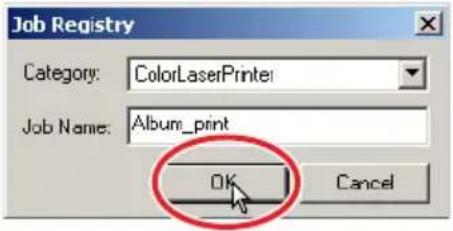
DELETING A JOB FILE
A Job file can be deleted.
1 Click the Job load button.
2 Select the Job file to be deleted from the Job categories in the selection window.
3 Use the following key(s) to delete the selected file:
Windows® : Delete key
Macintosh : Command (key + D.
- Once deleted, the Job file cannot be recovered.
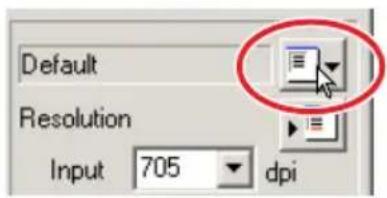
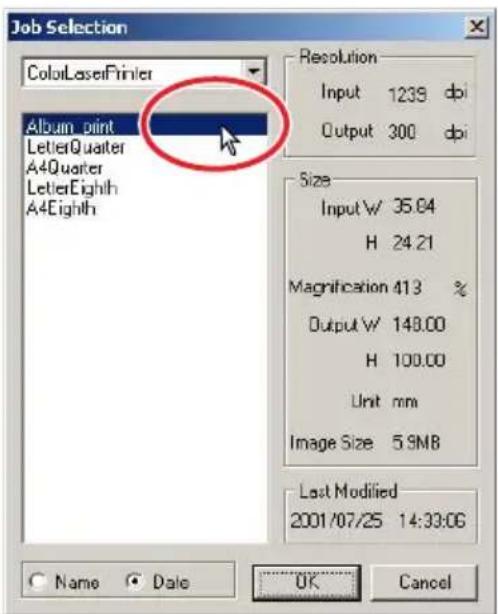
9. MAKING THE FINAL SCAN
WHEN USING THE UTILITY THROUGH AN IMAGE-PROCESSING APPLICATION
1 Click the scan button in the main window.
• The final scan will start.
- When the scanning is complete, the image is automatically loaded into Photoshop Elements.
2 Close the utility software.
- If the close-utility-after-scanning option is active in the preference box, the utility will automatically shut down.
3 Save the image with the Photoshop Elements file menu.
WHEN USING THE UTILITY SOFTWARE ONLY
1 Click the scan button in the main window.
2 On the save-as dialog box, enter the file name, and select the file destination and file format for the image data.
- File types depend on the operating system: Windows – BMP, JPEG, and TIFF: Macintosh – PICT, JPEG, and TIFF.
- When saving JPEG files, the compression ratio can be specified: low, medium, or high.
- 16-bit or 16-bit linear files can only be saved as TIFF files (see page 34).
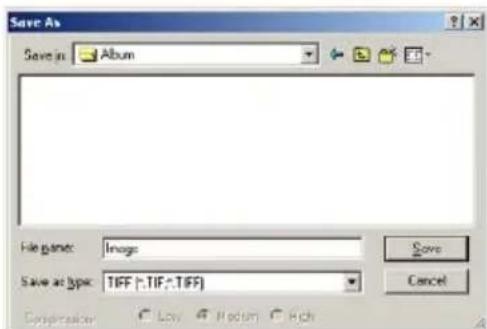
3 Click "Save".
• The final scan will start.
- If the close-utility-after-scanning option is active in the preference box, the utility will automatically shut down.

TIPS
File types
BMP – the bitmap image file type is used in Windows. This file type can be opened in the print software installed in the Windows operating system.
JPEG – the image file can be compressed to reduce the file size. The compression ratio can be selected when saving. The higher the compression ratio, the smaller the file size, and the more deterioration in the image quality.
TIFF – this high-resolution bitmap can be opened on any computer platform. The colour depth of this format can be selected in the preference dialog box (see page 34).
PICT – this image file type is used in Macintosh. This file can be opened in Simple Text installed in the Macintosh operating system.
This function automates the scanning procedure.
1 Set the film holder in the scanner.
2 Click the Custom Wizard button
3 On the Custom-Wizard-setting dialog box, select "New" from the Custom Wizard settings. Click "Next".
- The film format and type should be entered. See details on page 36.
- The frame(s) to be selected can be checked by checking the radio box.
4 On the film dialog box, select the film format, film type, and frame number(s) of the images to be scanned. Click "Next".
- The frame number refers to the frame number of the holder.
5 Select scanner settings in the preferences box. Click "Next".
- "Auto expose for slides," "Autofocus at scan," "Colour depth," "Multi-sample," and "Colour matching" can be selected. Refer to page 34 for details on each setting.
6 Select Digital ICE, ROC, or GEM image processing. Click "Next".
- Digital ICE reduces the effect of dust, flaws, scratches, and fingerprints on the film surface. This cannot be used with Kodachrome film. Digital ROC restores the colour of faded film. The Digital GEM reduces the effect of film grain. When Digital GEM is selected, adjust the slider to set the amount of correction. Digital ICE, ROC, and GEM cannot be used with black and
white film. See pages 69 to 73 for details on Digital ICE, ROC, and GEM.
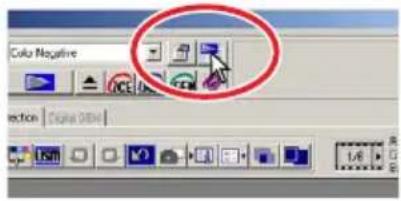
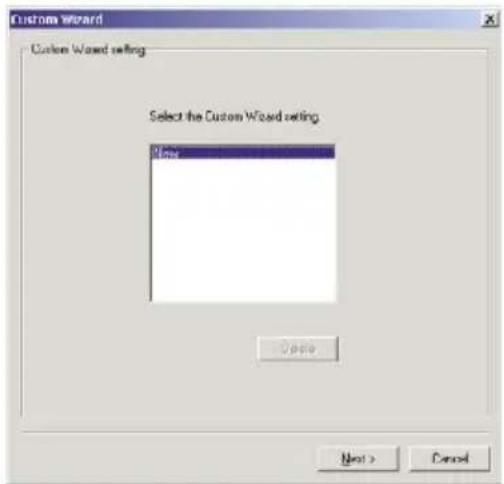
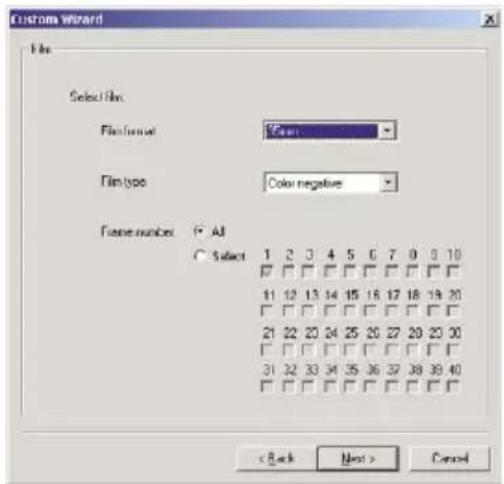
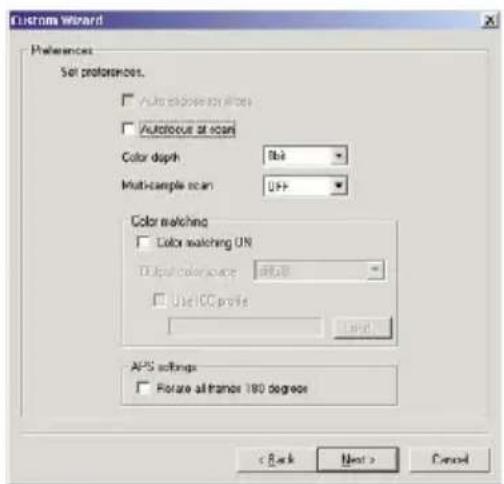
CUSTOM WIZARD
7 Enter scan setting. Click "Next".
• See page 74 for details on scan settings.
- When the window opens, the last scan settings made will be displayed.
- When auto-cropping function is active, blank space around the image area will be automatically eliminated. Inside-edge cropping crops the image just inside the image area. Outside-edge cropping crops the image to the outside limit of the image area. Inside-edge cropping is recommended for mounted slides.
- The auto-cropping function will take priority over any scan settings entered.
8 Select image-correction settings. Click "Next".
- Image corrections can be made by loading an image correction Job. See page 68 for details on image-correction Jobs.
- The auto-setting functions automatically correct the scanned image. The tone curve and histogram setting improves colour and contrast. The brightness, contrast, and colour-balance setting improves contrast and brightness. The hue, saturation, and lightness setting improves the saturation of the colours. refer to the image-correction section on page 52 for details.
9 Click "Save" to save the settings. Enter the file name in the save dialog box and click "OK". Click "Start" to begin automatic scanning.
- The next time the Custom Wizard is used, the settings can be selected in the Custom Wizard setting dialog box, see step 3.
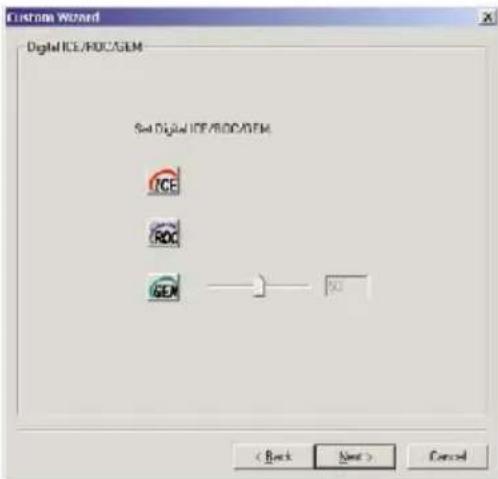
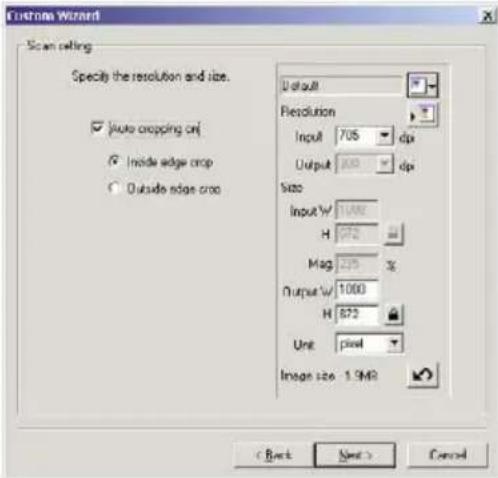
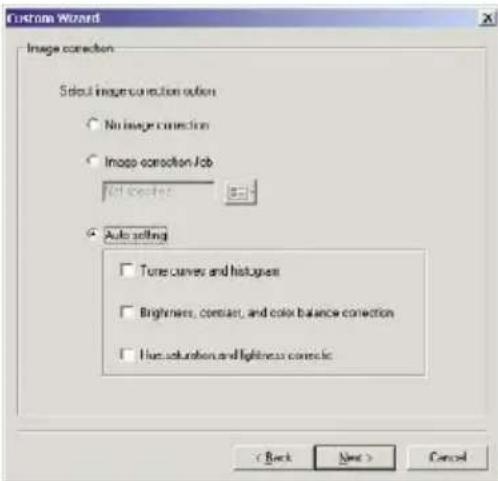
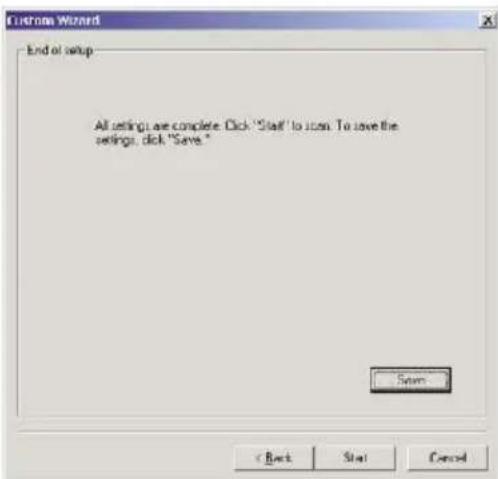
To turn off the scanner at the end of a scanning session, following steps 1 through 4. To restart the computer, following steps 1 through 3.
1 Quit the Standard Scan Utility software or close Photoshop Elements.
2 Press the eject button to unload the film holder or APS adaptor.
- The scanner automatically ejects the 35mm film or slide mount holder to the initial inserting position. Do not touch or hinder the holder while it is moving.
- When using the optional APS Adaptor, the scanner automatically rewinds the film when the
eject button is pressed. Do not remove the adaptor until the rewind motor has stopped.
3 Close the front door.
4 Press the main switch to turn off the scanner.
- Unplug the scanner when cleaning or when the product is not in use for extended periods.
- When using the IEEE 1394 cable with Windows Me, complete the "Unplug or eject hardware" operation by double-click on the "Unplug or eject hardware" icon on the task bar before turning off the scanner (see page 87). This step is unnecessary if the computer is shutdown before turning off the scanner.
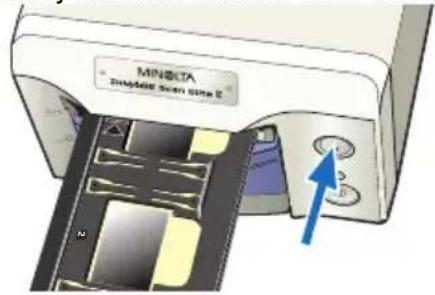
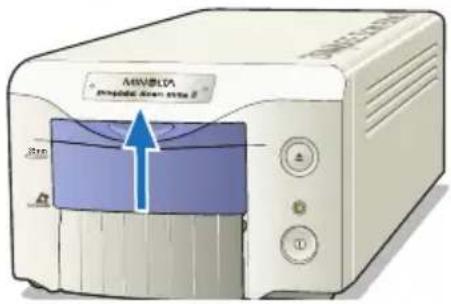
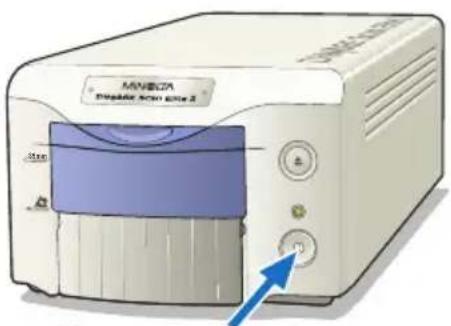
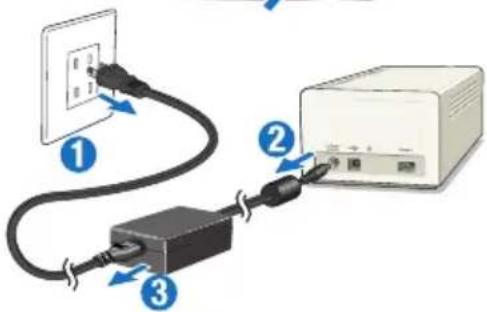

APPENDIX

IEEE 1394 AND USB INTERFACES
IEEE 1394 AND USB
The IEEE 1394 or FireWire interface and the USB interface allow data to be transferred between a computer and devices like scanners, printers, and digital cameras. The advantages to these interfaces are:
- Faster data transfer rates (100Mbps or more with IEEE 1394, 12Mbps with USB1.1)
- No allocation of an ID number or the selection of a terminator is necessary
- Connection and removal of the device from the computer while on
• Automatic confirmation of the connected device from the computer

CAUTION
- Never connect or disconnect the IEEE 1394 or USB cable while the computer, DiMAGE Scan Elite II, or other devices are operating or transferring data.
- Do not connect or disconnect the cable while the computer is starting up or shutting down. The computer or scanner may not operate properly.
- The scanner should be connected directly to the computer's IEEE 1394 or USB port. Attaching the computer to an IEEE or USB hub may prevent the scanner from operating properly.
- An interval of at least five seconds is required between disconnecting and connecting the scanner.
- When using an IEEE 1394 or USB storage device, it is not recommended to save scanned data directly to the device. Save the data on the computer's hard disk before transferring the data to the storage device.
- The unused port should always be covered with its protective cap. When the scanner is not in use for extended periods, unplug the cable and reinsert the port cap.
DISCONNECTING WITH THE COMPUTER AND SCANNER ON
WHEN USING THE USB CABLE, OR WHEN USING THE IEEE 1394 CABLE WITH WINDOWS 2000/XP
1 Quit the utility software.
2 Confirm the DiMAGE Scan Elite II indicator lamp is on and not blinking.
3 Disconnect the IEEE 1394 or USB cable.
1 Quit the utility software.
2 Confirm the DiMAGE Scan Elite II indicator lamp is on and not blinking.
- If other USB or IEEE devices are connected to the computer, confirm that they are not in operation before continuing.
3 Double-click on the "Unplug or Eject Hardware" icon on the task bar.
- The unplug-or-eject-hardware dialog box will appear.
4 Select "Minolta DiMAGE Scan Elite 2" and click "Stop".
• A confirmation screen will appear.
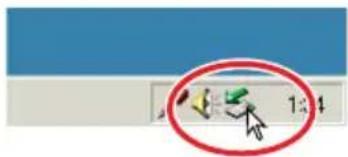
5 On the confirmation screen, confirm the device to be stopped. Click "OK" to stop the device.
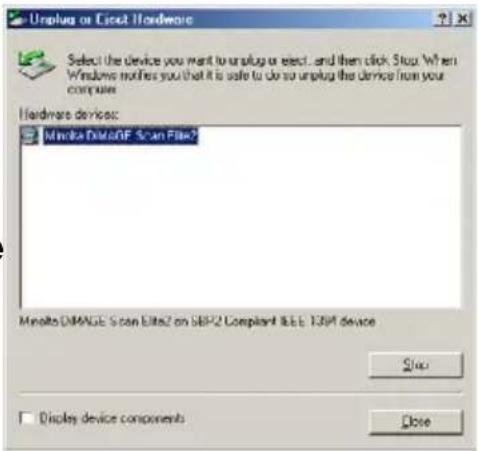
6 The "Safe to remove hardware" message will confirm the operation. Click "OK" to finish.
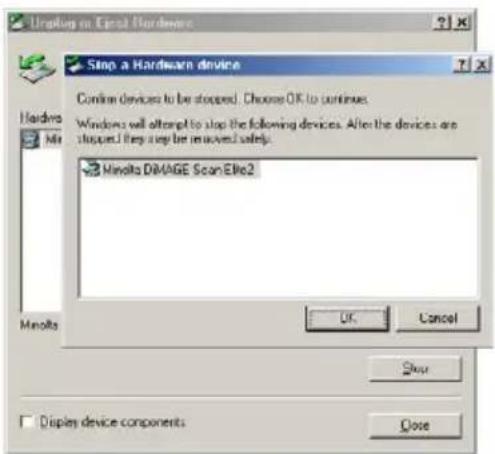
7 Disconnect the cable.
- If the scanner is disconnected or turned off without following the above procedure, a message will appear to indicate that the unsafe removal of device may cause your computer to crash and lose valuable data. Click "OK" and then check the image data.
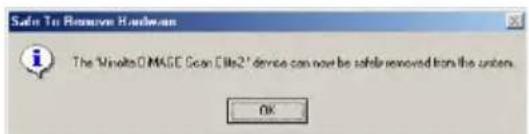
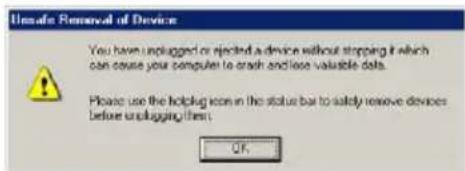
COLOUR MATCHING
Each output device (monitor or printer) defines colour and contrast differently. To ensure the reproduction of the image on the monitor matches the reproduction of the image from the printer, the colour space for both devices must be defined. Colour matching is activated in the preferences box (see page 34). Colour matching increases the scanning time.
The DiMAGE Scan Elite II colour matching function matches the scanned colour with specified colour spaces. The colour matching system can use the monitors ICC profile to display the image as accurately as possible.
Click the preferences button to access the colour-matching function.
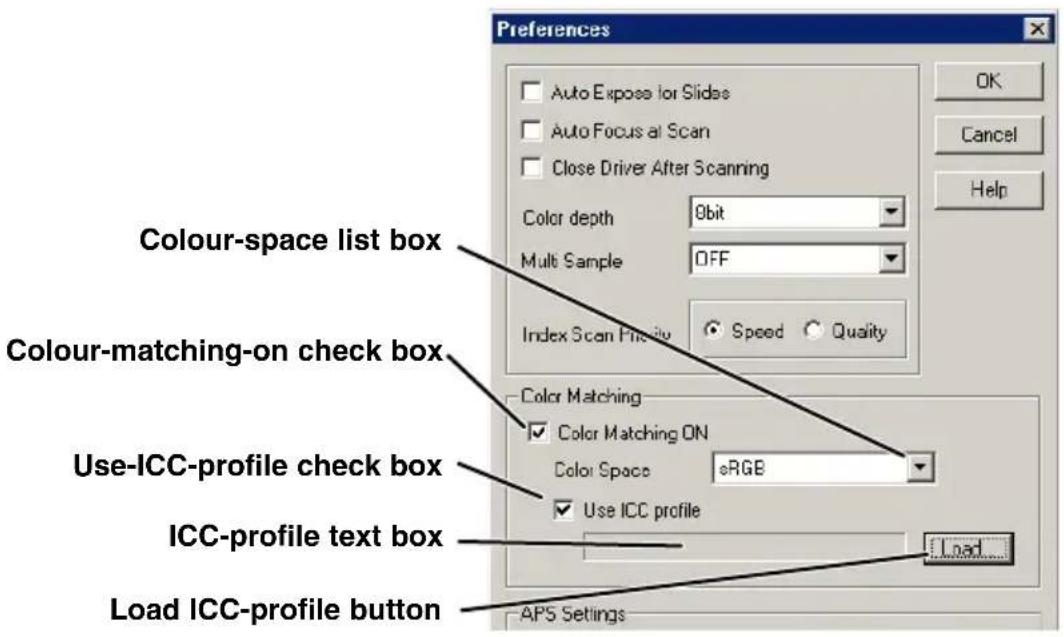
SETTING THE OUTPUT COLOUR SPACE
1 Click the colour-matching-on check box.
2 Select the output colour space from the colour-space drop-down menu.
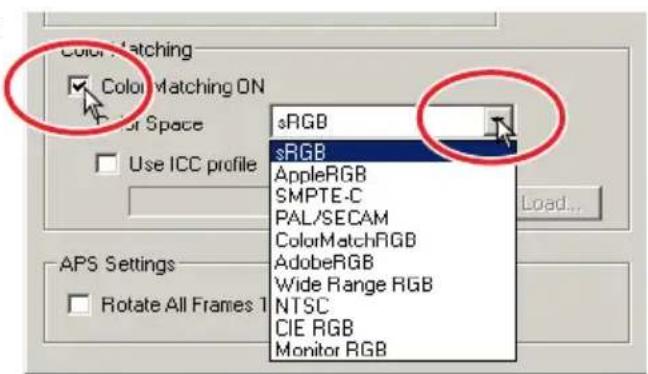
OUTPUT COLOUR SPACE
The choice of output colour space is dependent on how the image will be reproduced. For most home use where the image is displayed on a monitor or printed with a small printer, sRGB colour space is adequate. Other colour spaces have been included for professional and technical applications. For recommendations for colour space use, see page 90.
sRGB
The colour space promoted by Hewlett Packard and Microsoft. Since it reflects the average PC monitor characteristics, this standard is widely used around the world, and is considered to be the standard for multi-media and Internet usage. However, sRGB is not suitable for professional pre-press applications because of its narrower saturation reproduction range compared with other colour spaces.
Apple RGB
This has been available since the introduction of the Apple 13" monitor. It is widely used in DTP, and was used as a standard default setting in many common graphic arts and design applications: Adobe Illustrator, Photoshop, etc. Because the colour space is wider than sRGB, it is commonly used in the production of printed material.
SMPTE-C
This is the current standard used in television broadcasting in the United States.
PAL/SECAM
This is the current standard used in television broadcasting in Europe.
ColourMatch RGB
This colour space standard has a wide colour space and is ideal for use with Radius Press View monitors, which are commonly used in prepress production.
Adobe RGB
This colour space standard is wider than ColourMatch RGB. The extensive range of colours available makes this standard ideal for prepress use. However, the range is so great that it includes many colours that cannot be printed with a four-colour (CMYK) printing process.
Broad Spectrum Colour Scale RGB
Utilising the colour coordinates of the spectrum, this standard offers an extremely extensive range of colours. However, most of the colours that can be generated cannot be reproduced on standard computer monitors or by printing technology.
NTSC
This is the current standard used in television broadcasting in Japan.
CIE RGB
This colour space is defined by the CIE (Commission Internationale d'Eclairage).
Monitor RGB
This colour space is defined by the monitors ICC profile.
1 Click the use-ICC-profile check box.
2 Click the load ICC-profile button.
- The operating systems file-open dialog box will appear.
3 Open the ICC profile for the monitor in use.
- The ICC profiles can be found at the following locations:
Windows® 98/98SE/Me : Select "Windows" folder -> "System" folder -> "Colour" folder.
Windows® 2000/XP : "WINNT" folder ->"System32" folder ->"spool" folder ->"drivers" folder ->"colour" folder
Macintosh : "System folder" ->"ColorSync Profile folder"
4 Click "OK" in the preferences box to set the ICC profile.
- This will apply all the settings in the dialog box. Confirm each settings before clicking "OK".
The following are recommendations for output colour space and monitor ICC-profile settings with image-processing applications. Some applications have a monitor correction display function which automatically corrects the monitor display to a specific colour space.
With an application with a monitor correction display function (such as Adobe Photoshop Ver.5 to 6):
Output Colour Space : Select the same colour space as set in the application.
With Photoshop ver. 5.0 or later, look in the colour-setting option in the file menu for the profile setup window.
ICC Profile : Use the profile for the monitor in use.
With an application without a monitor correction display function such as Photoshop Elements, or when the function is disabled:
Output Colour Space : Monitor RGB
ICC Profile : Use the profile for the monitor in use.
An ICC profile for a specific monitor is available from the manufacturer. These may be downloaded from the manufacturer's web site. See the monitors instruction manual on how to install the ICC profile.
Colour monitor ICC profiles can be created with one of the profile creation tools on the market. They can also be created with the monitor-adjustment-assistant function installed in the Macintosh operating system, or with Adobe gamma included in Adobe Photoshop (ver.5.0 or later) for Windows.
Scanner colour profiles
When installing the utility software, the scanner profiles listed below will be automatically installed in the colour folder in Windows, and in the ColorSync profile folder in Macintosh. These profiles have been included for advanced colour matching with profile to profile conversions in sophisticated image-processing or DTP applications. When using these profiles, the colour reproduced may not be the same as the colour matching system in the utility software.
- MLTAF2920.icc – used with positive film at any colour depth other than 16 bit linear. The indication name is DiMAGE Scan Elite2 (positive).
- MLTAF2920p.icc – used with positive film with 16 bit linear colour depth. The indication name is DiMAGE Scan Elite2 (positive linear).
When installing the utility software, the following files and folders are installed.
Windows®
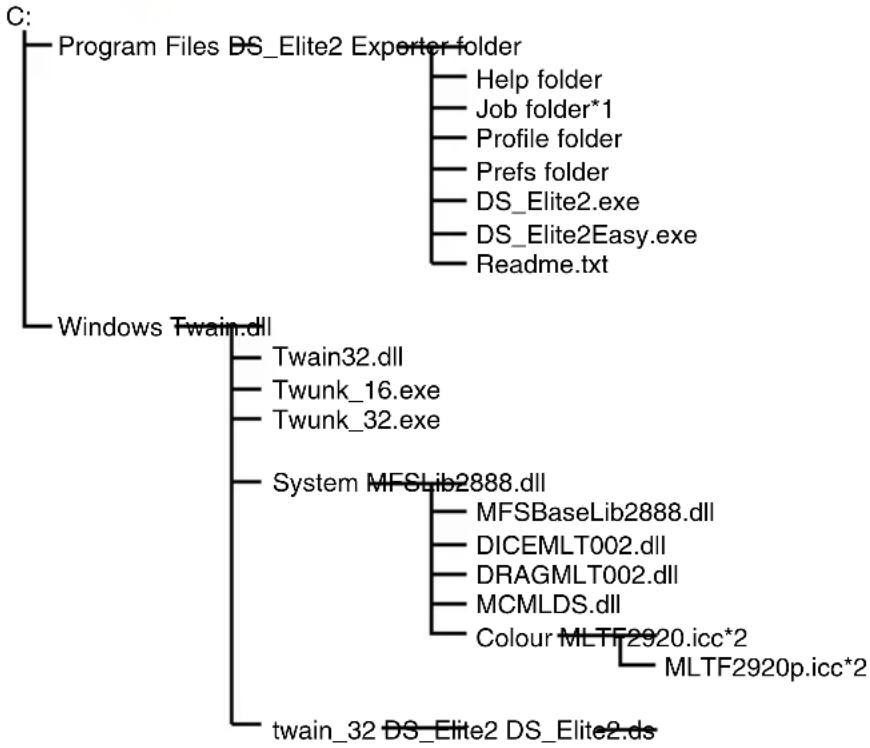
flowchart
graph TD
    A["Program Files DS_Elite2 Exporter folder"] --> B["Help folder"]
    A --> C["Job folder*1"]
    A --> D["Profile folder"]
    A --> E["Prefs folder"]
    A --> F["DS_Elite2.exe"]
    A --> G["DS_Elite2Easy.exe"]
    A --> H["Readme.txt"]
    I["Windows Twain.dll"] --> J["Twain32.dll"]
    I --> K["Twunk_16.exe"]
    I --> L["Twunk_32.exe"]
    I --> M["System MFSLib2888.dll"]
    M --> N["MFSBaseLib2888.dll"]
    M --> O["DICEMLT002.dll"]
    M --> P["DRAGMLT002.dll"]
    M --> Q["MCMLDS.dll"]
    M --> R["Colour MLTF2920.icc*2"]
    M --> S["MLTF2920p.icc*2"]
    I --> T["twain_32 DS_Elite2 DS_Elite2.ds"]
Macintosh
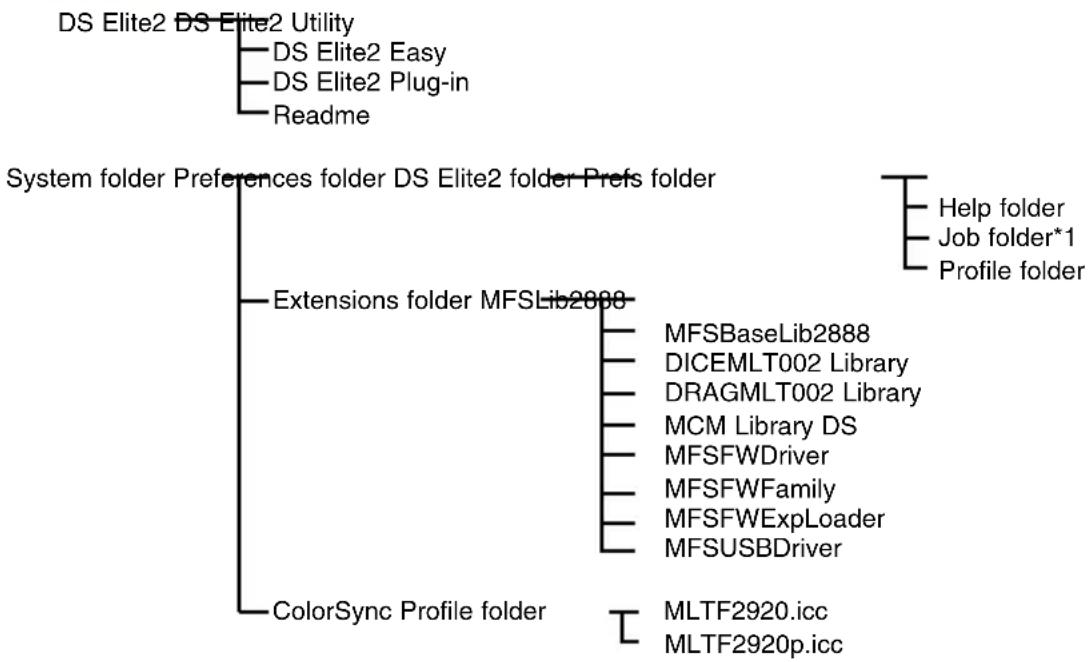
flowchart
graph TD
    A["DS Elite2 DS Elite2 Utility"] --> B["DS Elite2 Easy"]
    A --> C["DS Elite2 Plug-in"]
    A --> D["Readme"]
    E["System folder Preferences folder DS Elite2 folder Prefs folder"] --> F["Extensions folder MFSLib2000"]
    F --> G["MFSBaseLib2888"]
    F --> H["DICEMLT002 Library"]
    F --> I["DRAGMLT002 Library"]
    F --> J["MCM Library DS"]
    F --> K["MFSFWDriver"]
    F --> L["MFSFWFamily"]
    F --> M["MFSFWExpLoader"]
    F --> N["MFSUSBDriver"]
    E --> O["ColorSync Profile folder"]
    O --> P["MLTF2920.icc"]
    O --> Q["MLTF2920p.icc"]
    R["Help folder"] --> S["Job folder*1"]
    R --> T["Profile folder"]
*1 The Job files are included in the Job-category folder in the Job folder. When a new Job file is saved, it is placed in the directory of category specified.
*2 The diagram is for Windows 98/98SE/Me. For Widows 2000/XP, the colour profile can be accessed by "WINNT" folder ->"System32" folder ->"spool" folder ->"drivers" folder ->"colour" folder.
• To save new Job files, see page 80.
- Do not handle the Job file using Explorer in Windows or the Finder in Macintosh.
35MM FILM
| Category Job Name Input Output Mag | Unit Input Res. Res. W H Lock W H Lock | Input Size | Output Size | ||||||||
| Default | Default | 705 | 300 | 235 | pixel | 1008 | 672 | OFF | 1008 | 672 | OFF |
| ColorLaserPrinter | A4Quarter | 2602 | 600 | 433 | mm | 34.18 | 24.25 | OFF | 148 | 105 | ON |
| A4Eighth | 1846 | 600 | 307 | mm | 34.2 | 24.27 | OFF | 105 | 74.5 | ON | |
| LetterQuarter | 2676 | 600 | 446 | inch | 1.22 | 0.95 | OFF | 5.45 | 4.25 | ON | |
| LetterEighth | 1990 | 600 | 331 | inch | 1.22 | 0.95 | OFF | 4.05 | 3.16 | ON | |
| Photosensitive | A5Full | 2445 | 400 | 611 | mm | 34.37 | 24.22 | OFF | 210 | 148 | ON |
| LetterHalf | 2378 | 400 | 594 | inch | 1.43 | 0.92 | OFF | 8.5 | 5.45 | ON | |
| LetterQuarter | 1784 | 400 | 446 | inch | 1.22 | 0.95 | OFF | 5.45 | 4.25 | ON | |
| 2L | 2099 | 400 | 524 | mm | 33.97 | 24.24 | OFF | 178 | 127 | ON | |
| PostCard4x6 | 1679 | 400 | 419 | inch | 1.43 | 0.95 | OFF | 6 | 4 | ON | |
| Ink-Jet & Dye-SubPrinter | A4Full | 2602 | 300 | 867 | mm | 34.26 | 24.22 | OFF | 297 | 210 | ON |
| A4Half | 1834 | 300 | 611 | mm | 34.37 | 24.22 | OFF | 210 | 148 | ON | |
| A4Quarter | 1301 | 300 | 433 | mm | 34.18 | 24.25 | OFF | 148 | 105 | ON | |
| A4Eighth | 923 | 300 | 307 | mm | 34.2 | 24.27 | OFF | 105 | 74.5 | ON | |
| LetterFull | 2676 | 300 | 892 | inch | 1.22 | 0.95 | OFF | 10.9 | 8.5 | ON | |
| LetterHalf | 1784 | 300 | 594 | inch | 1.43 | 0.92 | OFF | 8.5 | 5.45 | ON | |
| LetterQuarter | 1338 | 300 | 446 | inch | 1.22 | 0.95 | OFF | 5.45 | 4.25 | ON | |
| LetterEighth | 995 | 300 | 331 | inch | 1.22 | 0.95 | OFF | 4.05 | 3.16 | ON | |
| Photo4x6 | 1239 | 300 | 413 | mm | 36.32 | 24.21 | OFF | 150 | 100 | ON | |
| Photo3x5 | 1103 | 300 | 367 | mm | 34.61 | 24.25 | OFF | 127 | 89 | ON | |
| WebPage | 1240x836 | 878 | 72 | 1219 | pixel | 1240 | 836 | OFF | 1240 | 836 | ON |
| 1112x750 | 787 | 72 | 1093 | pixel | 1112 | 750 | OFF | 1112 | 750 | ON | |
| 984x663 | 696 | 72 | 966 | pixel | 984 | 663 | OFF | 984 | 663 | ON | |
| 792x534 | 561 | 72 | 779 | pixel | 792 | 534 | OFF | 792 | 534 | ON | |
| 760x512 | 538 | 72 | 747 | pixel | 760 | 512 | OFF | 760 | 512 | ON | |
| 600x404 | 424 | 72 | 588 | pixel | 600 | 404 | OFF | 600 | 404 | ON | |
| 320x240 | 252 | 72 | 350 | pixel | 320 | 240 | OFF | 320 | 240 | ON | |
| PhotoCD | PhotoCD2048x3072 | 2149 | 300 | 716 | pixel | 3072 | 2048 | OFF | 3072 | 2048 | ON |
| PhotoCD1024x1536 | 1075 | 300 | 358 | pixel | 1536 | 1024 | OFF | 1536 | 1024 | ON | |
| PhotoCD512x768 | 538 | 300 | 179 | pixel | 768 | 512 | OFF | 768 | 512 | ON | |
| Screen | 1920x1200 | 1343 | 72 | 1865 | pixel | 1920 | 1200 | OFF | 1920 | 1200 | ON |
| 1600x1200 | 1259 | 72 | 1748 | pixel | 1600 | 1200 | OFF | 1600 | 1200 | ON | |
| 1280x1024 | 1075 | 72 | 1493 | pixel | 1280 | 1024 | OFF | 1280 | 1024 | ON | |
| 1280x960 | 1008 | 72 | 1400 | pixel | 1280 | 960 | OFF | 1280 | 960 | ON | |
| 1152x870 | 913 | 72 | 1268 | pixel | 1152 | 870 | OFF | 1152 | 870 | ON | |
| 1024x768 | 806 | 72 | 1119 | pixel | 1024 | 768 | OFF | 1024 | 768 | ON | |
| 832x624 | 655 | 72 | 909 | pixel | 832 | 624 | OFF | 832 | 624 | ON | |
| 800x600 | 630 | 72 | 875 | pixel | 800 | 600 | OFF | 800 | 600 | ON | |
| 640x480 | 504 | 72 | 700 | pixel | 640 | 480 | OFF | 640 | 480 | ON | |
| Document | A4Half | 440 | 72 | 611 | mm | 34.37 | 24.22 | OFF | 210 | 148 | ON |
| A4Quarter | 312 | 72 | 433 | mm | 34.18 | 24.25 | OFF | 148 | 105 | ON | |
| A4Eighth | 220 | 72 | 305 | mm | 34.43 | 24.26 | OFF | 105 | 74 | ON | |
| LetterHalf | 429 | 72 | 595 | inch | 1.43 | 0.92 | OFF | 8.5 | 5.45 | ON | |
| LetterQuater | 322 | 72 | 447 | inch | 1.22 | 0.95 | OFF | 5.45 | 4.25 | ON | |
| LetterEighth | 215 | 72 | 298 | inch | 1.43 | 0.91 | OFF | 4.25 | 2.72 | ON | |
| FilmRecorder | 2K | 1433 | 2400 | 59 | pixel | 2048 | 1365 | OFF | 2048 | 1365 | ON |
APS FILM
| Category Job Name Input Output Mag. | Unit Input Res. R | Output Res. W H | Lock W H | Lock | Input Size | Output Size | |||||
| Default | Default | 705 | 300 | 235 | pixel | 832 | 480 | OFF | 832 | 480 | OFF |
| ColorLaserPrinter | A4Eighth | 2584 | 600 | 430 | mm | 24.42 | 17.33 | OFF | 105 | 74.5 | ON |
| LetterEighth | 2785 | 600 | 464 | inch | 0.87 | 0.68 | OFF | 4.05 | 3.16 | ON | |
| Photosensitive | A5Full | 2820 | 400 | 705 | mm | 29.79 | 17.3 | OFF | 210 | 121.95 | ON |
| LetterQuarter | 2497 | 400 | 624 | inch | 0.87 | 0.68 | OFF | 5.45 | 4.25 | ON | |
| 2L | 2820 | 400 | 705 | mm | 25.25 | 17.3 | OFF | 178 | 121.95 | ON | |
| PostCard4x6 | 2350 | 400 | 587 | inch | 1.02 | 0.68 | OFF | 6 | 4 | ON | |
| Ink-Jet & Dye-SubPrinter | A4Half | 2568 | 300 | 856 | mm | 24.53 | 17.29 | OFF | 210 | 148 | ON |
| A4Quarter | 1822 | 300 | 607 | mm | 24.38 | 17.3 | OFF | 148 | 105 | ON | |
| A4Eighth | 1292 | 300 | 430 | mm | 24.42 | 17.33 | OFF | 105 | 74.5 | ON | |
| LetterHalf | 2402 | 300 | 800 | inch | 1.06 | 0.68 | OFF | 8.5 | 5.45 | ON | |
| LetterQuarter | 1873 | 300 | 624 | inch | 0.87 | 0.68 | OFF | 5.45 | 4.25 | ON | |
| LetterEighth | 1393 | 300 | 464 | inch | 0.87 | 0.68 | OFF | 4.05 | 3.16 | ON | |
| Photo4x6 | 1735 | 300 | 578 | mm | 25.95 | 17.3 | OFF | 150 | 100 | ON | |
| Photo3x5 | 1544 | 300 | 514 | mm | 24.71 | 17.32 | OFF | 127 | 89 | ON | |
| WebPage | 1240x836 | 1228 | 72 | 1705 | pixel | 1240 | 836 | OFF | 1240 | 836 | ON |
| 1112x750 | 1102 | 72 | 1530 | pixel | 1112 | 750 | OFF | 1112 | 750 | ON | |
| 984x663 | 974 | 72 | 1352 | pixel | 984 | 663 | OFF | 984 | 663 | ON | |
| 792x534 | 785 | 72 | 1090 | pixel | 792 | 534 | OFF | 792 | 534 | ON | |
| 760x512 | 752 | 72 | 1044 | pixel | 760 | 512 | OFF | 760 | 512 | ON | |
| 600x404 | 594 | 72 | 825 | pixel | 600 | 404 | OFF | 600 | 404 | ON | |
| 320x240 | 353 | 72 | 490 | pixel | 320 | 240 | OFF | 320 | 240 | ON | |
| PhotoCD | PhotoCD1024x1536 | 1504 | 300 | 501 | pixel | 1536 | 1024 | OFF | 1536 | 1024 | ON |
| PhotoCD512x768 | 752 | 300 | 250 | pixel | 768 | 512 | OFF | 768 | 512 | ON | |
| Screen | 1920x1200 | 1763 | 72 | 2448 | pixel | 1920 | 1200 | OFF | 1920 | 1200 | ON |
| 1600x1200 | 1763 | 72 | 2448 | pixel | 1600 | 1200 | OFF | 1600 | 1200 | ON | |
| 1280x1024 | 1504 | 72 | 2088 | pixel | 1280 | 1024 | OFF | 1280 | 1024 | ON | |
| 1280x960 | 1410 | 72 | 1958 | pixel | 1280 | 960 | OFF | 1280 | 960 | ON | |
| 1152x870 | 1278 | 72 | 1775 | pixel | 1152 | 870 | OFF | 1152 | 870 | ON | |
| 1024x768 | 1128 | 72 | 1566 | pixel | 1024 | 768 | OFF | 1024 | 768 | ON | |
| 832x624 | 917 | 72 | 1273 | pixel | 832 | 624 | OFF | 832 | 624 | ON | |
| 800x600 | 882 | 72 | 1225 | pixel | 800 | 600 | OFF | 800 | 600 | ON | |
| 640x480 | 705 | 72 | 979 | pixel | 640 | 480 | OFF | 640 | 480 | ON | |
| Document | A4Half | 616 | 72 | 855 | mm | 24.56 | 17.31 | OFF | 210 | 148 | ON |
| A4Quarter | 437 | 72 | 606 | mm | 24.42 | 17.33 | OFF | 148 | 105 | ON | |
| A4Eighth | 307 | 72 | 426 | mm | 24.65 | 17.37 | OFF | 105 | 74 | ON | |
| LetterHalf | 576 | 72 | 800 | inch | 1.06 | 0.68 | OFF | 8.5 | 5.45 | ON | |
| LetterQuarter | 450 | 72 | 625 | inch | 0.87 | 0.68 | OFF | 5.45 | 4.25 | ON | |
| LetterEighth | 287 | 72 | 398 | inch | 1.07 | 0.68 | OFF | 4.25 | 2.72 | ON | |
| FilmRecorder | 2K | 2005 | 2400 | 83 | pixel | 2048 | 1365 | OFF | 2048 | 1365 | ON |

TECHNICAL SPECIFICATIONS
Scan type: Moving film, fixed sensor, single-pass scan
Film type: Negative and positive, colour and monochrome
Film formats: Mounted and unmounted 35mm film. Mounted APS film. APS cassette with optional adaptor.
Scanning dimensions: 35mm - 24.21 x 36.32mm (2688 x 4032 pixels)
APS - 17.29 x 29.98mm(1920 x 3328 pixels)
Optical input resolution: 2820 dpi
Image sensor: 3-line colour CCD (2700 pixels/line)
A/D conversion: 16 bit
Output data: 8 bit and 16 bit (per colour channel)
Dynamic range: 4.8
Light source: Cold cathode fluorescent tube
Focusing: Autofocus, point AF, and manual focus
Other: Digital ICE ^3 image processing
Interface: IEEE 1394 and USB 1.1
Power supply: AC Adaptor AC-U10: 100 – 240 volts AC, 50/60 Hz for North America.
The shape of input plug varies with the destination.
Power consumption: Max. 20 W
Dimensions (W x H x D): 145 x 100 x 325 mm
Weight (approx.): 1.5kg
Scan times (approx.): 35mm colour positive film (Windows and Macintosh operating systems). Index scan: 6 frames/40 sec.
Prescan: 7 sec.
Scan: 33 sec.
Testing conditions:
| Windows | Macintosh |
| Pentium IV 1.5GHz | PowerPC G4 533 MHz |
| Windows 2000 Professional | Mac OS 9.1 |
| RAM: 512 MB | |
| IEEE 1395 with Adaptec FireConnect 4300 | FireWire |
| Host application: Adobe Photoshop ver. 6.0 | |
| Auto exposure: off | |
| Digital ICE ^3 : off | |
Scanning time changes according to the preferences used. Scanning time can be longer for negative film than positive film.
Specifications are based on the latest information available at the time of printing and are subject to change without notice.
This section covers minor problems with scanner operation. For major problems or damage, or if a problem continues to reoccur frequently, contact your dealer or a Minolta Service Facility.
| SOLUTIONSYMPTOM or MESSAG | |
| When starting up the utility software, Error=4 – could-not-confirm-scanner- connection message appears. | Confirm the cable is securely connected between the computer and scanner. Turn the scanner off and on. Click “OK” to continue. |
| When starting up the utility software, Error=42 – close-scanner-door message appears. | Close the scanner door. Click “OK” to continue. |
| • The utility software freezes.• The scanning time increases. | Turn off the scanner. Shut down Photoshop and increase its memory allocation. Restart the computer and scanner. |
| The image colour is strange when scanning colour negative film. | • Confirm the colour negative film type is selected, and rescan the image.• Colour balance the image using the utility’s image correction tools.• If the problem is not solved, reinstall the DiMAGE Elite II software. |
| The scanned image is not sharp. | Select the autofocus-at-scan option in the preference box, or use point AF or manual focus. |
| “Cannot verify home position” message appears during scanning. | The film holder was hindered during the prescan or final scan. Turn off the scanner, and restart the computer. |
| Cannot scan APS film, and initial loading has failed. “An error occurred during film transportation” or “An error occurred during film rewind” message appears. | Press the eject button on the scanner, and remove the APS adaptor after rewinding is completed. Reinsert the holder into the scanner and make the scan again. |
| The scanner indicator lamp blinks rapidly (8Hz). | The scanner door was opened during the setup. Close the front door, and shut down the scanner and utility. Turn on the scanner and start up the utility software. |
| “Please set holder properly” message appears. | Reload the holder into the scanner. |
| “Holder does not match selected film holder. Please select correct film format or insert correct holder” message appears. | Set the correct film format in the utility software or insert the correct holder into the scanner. |
| “Film could not be found in APS holder. Set film properly” message appears. | Load APS cassette in the APS adaptor. |
| “Not enough memory” message appears. | • Increase the memory requirements for the host application.• If multiple images have been scanned, close and relaunch the host application. |
| The utility displays unusual colour reproduction. | Remove the film holder and close the scanner door. Press the shift+control+I (Windows) or command+control+I (Macintosh) to reinitailise the scanner. |
USER TECHNICAL SUPPORT
Please contact your dealer for information regarding installation, IEEE 1394 interface recommendations, or application compatibility. If your dealer is unable to help you, contact an authorised Minolta Service Facility.
Please have the following information ready when calling Minolta Technical Support:
The name and model of your computer:
Available application RAM:
Other connected IEEE 1394 or USB devices:
DS Elite II utility version number:
Symptoms:
Message that appears on the screen when the problem occurs:
Frequency of occurrence:
- The version number of the utility software can be displayed by placing the mouse pointer on the status bar in the main window.
WARRANTY AND PRODUCT REGISTRATION
Please take the time to fill in the warranty and product registration card. Technical support, scanner software upgrades, and product information is available when the product is registered.
16 bit....34
16 bit linear....34
35mm film holder....8, 23
35mm film-holder mark 19,25
8 bit....34
A AC adaptor AC-U10 8, 19
Adobe RGB 91
AE area selection button....34, 42, 48
AE lock button....34, 42, 48
Apple RGB 89
Apply button 53, 59
Apply Digital-GEM button 72
APS adaptor ....24
APS adaptor mark....19, 26
Auto-cropping button 42, 43
Auto-expose-for-slides check box....34
Autofocus-at-scan check box....34
Auto-setting button ....53
Auto-exposure 48
B Brightness/Contrast/Colour-balance button .....52, 62
Black-point button....52, 58
BMP....82
Brightness & Contrast variation....64
Broad Spectrum Colour Scale RGB....91
C Cancelling the image correction....67
Changing the index-window size....38
Changing the tone curve by freehand....55
Changing the tone curve by mouse 55
Channel list box....54
CHP button....42, 51
CIE RGB....89
Close-utility-after-scanning check box....34
Colour-balance variation 64
Colour-depth list box 34
Colour-histogram button....53, 61
Colour laser printer....76
Colour-matching settings....35, 88
Colour-matching-on check box....88
ColourMatch RGB 89
Colour-space list box....88
ColorSync 91
Comparison Display button 52, 68
Complementary colour ....54
Confirming settings (Easy Scan Utility) 28
Connecting AC adaptor 19
Connecting the scanner cable....20
Correction reset button....52, 67
Crop-prescan button....42, 45
Cropping APS film 51
Cropping the image 43
Custom 76
Custom Wizard 83
Custom Wizard button....33, 83
D DC terminal 19
Default (Job category) 76
Deleting a Job file....80
Digital GEM 28,69,72
Digital-GEM button 33,72
Digital-GEM sample display 72
Digital-GEM sample area 72
Digital-GEM slider 72
Digital-GEM text box....72
Digital ICE 28,69,70
Digital-ICE button 33,70
Digital ROC 28,69,71
Digital-ROC button 33,71
Disconnecting the cable 21, 86
Disconnecting with the computer and scanner on ....86
Display-limit check box 64
Document (Job category) 76
E Easy Scan Utility 22
Eject button 19, 29, 33
Examples of tone curve corrections .....56
F Film-chamber door (APS adaptor) 24
Film-chamber release (APS adaptor)....24
Film-format list box....33, 36
Film recorder (Job category) 76
Film-type list box 33, 36
Final scan and saving the scan....81
Flip-horizontal button (Index scan) 37, 39
Flip-horizontal button (Prescan) 42, 46
Flip-vertical button (Index scan) 37, 39
Flip-vertical button (Prescan) 42, 46
Focus Meter....50
Frame number 37,51
Frame number/total number of frames....42, 51
Freehand curve button 53, 55
Front door 19
Fit-to-window button (Image correction)....52, 68
Fit-to-window button (Index scan) 37, 40
Fit-to-window button (Prescan) 42, 45
G Grab button 42, 47
Gray-point button....53, 58
H Help button 33
Histogram correction (Auto setting)....60
Histogram correction 60
HSB colour model 63
Hue/Saturation/Lightness button....52, 63
I ICC-profile text box....88
IEEE 1394 and USB....86
IEEE 1394 board....9
IEEE 1394 cable 8, 20, 29, 86
IEEE 1394 port....19
Image correction....52
Image-correction display ....52
Image-size display....74, 78
Index frame....37
Index scan....37, 38
Index-scan button 33
Index-scan-priority radio button....35
Indicator lamp....19
Ink Jet & Dye-Sub Printer (Job category) 76
Input-resolution list box 74, 77
Input shadow/gamma/highlight slider....53, 60
Input shadow/gamma/highlight text box....53, 60
Input-size lock button 74, 77
Input-size text box 74, 77
Inserting the film holder....25
Installed files and folders....92
Installing Adobe Photoshop Elements ....14
Installing the utility software 9
Installing the plug-in ....13
J Job categories ....76
Job-file list 93
Job-name list box 74
JPEG 82
L Launching the Easy Scan Utility....22
Launching the plug-in module ....32
Launching the Standard Scan Utility....31
Launching the utility software (Macintosh) 32
Launching the utility software (Windows)....31
Load ICC-profile button 88
Load image-correction-Job button 37, 52, 68
Load index-file button 37,41
Load Job button 74, 75, 80
Loading the film holder....23
Loading the scan Job file 75
M Magnification text box....74, 77
Main window....33
Manual cropping....44
Manual-focus button....42, 50
Monitor RGB....89
Multi-sample list box....35
N NTSC....89
O Output colour space ....89
Output-resolution list box....74, 77
Output shadow/highlight slider 53, 60
Output shadow/highlight text box 53, 60
Output-size lock button....74, 77
Output-size text box....74, 77
P PAL/SECAM 89
Photo CD (Job category)....76
Photosensitive (Job category) 76
PICT 82
Point-AF button....42, 49
Power cable for AC-U10....8
Power switch....19
Preferences button 33, 34
Prescan 42, 43
Prescan button 33,43
Prescan tab 42
Prescanning the cropped image ....45
Q Quitting the Easy Scan Utility....29
Quitting the Standard Scan Utility 85
R Redo button....52, 67
Redo a cancelled correction....67
Reset button (Tone-curve/Histogram tab) 53
Reset button (Scan settings)....74
Resolution and output size....78
Reverse-frame-order button 37,40
RGB and CMYK 54
RGB display 42,51
Rotate-all-frames-180-degrees check box 35
Rotate-left button (Index scan)....37, 39
Rotate-left button (Prescan) 42, 46
Rotate-right button (Index scan)....37, 39
Rotate-right button (Prescan)....42, 46
S Saturation variation....65
Save image-correction-Job button 52, 68
Save index-image button....37, 40
Save index-file button 37,41
Save Job button 74,80
Saving a Job file....80
Scan button 33,81
Scan settings....74
Scanning and saving an image (Easy Scan Utility) .....29
Screen (Job category) 76
Scrolling the image....47
Selecting index thumbnails....38
Selective-colour button....52, 66
Setting monitor ICC profiles 90
Setting the film format and film type....36
Setting the output colour space....88
Setting scanner preferences ......33
Slide mount holder 8,24
Smooth curve button 53, 55
SMPTE-C 89
Snapshot button 52,67
Specifications 95
Specifying Digital ICE, ROC, or GEM (Easy Scan Utility)....28
Specifying the film type (Easy Scan Utility)....26
Specifying the frame (Easy Scan Utility)....27
Specifying the index-scan option (Easy Scan Utility)....27
Specifying the use of scanned images (Easy Scan Utility)..27
sRGB 89
Standard Scan Utility....30
Status bar 33
T TIFF 82
Tone-curve/Histogram button 52, 53
Troubleshooting 96
U Undo button....52, 67
Unit list box....74, 78
Unsharp-mask button 52, 66
USB cable 8,20,86
USB port....19
Use-ICC-profile check box....88
User technical support 97
V Variation button 52, 64
Variation-step text box....64
Variation-step slider....64
W Web page (Job category)....76
White-point button 53, 58
Z Zoom button 42, 47
DiMAGE Scan Elite II

natural_image
Blue circular shape with three parallel horizontal black lines on a dark background (no text or symbols)MINOLTA
- IMAGE CORRECTION....52
- SCAN SETTINGS....74
- MAKING THE FINAL SCAN .....81
- APPENDIX....86
- IEEE 1394 AND USB INTERFACES .....86
- COLOUR MATCHING......88
- INSTALLED FILES AND FOLDERS .....92
- JOB FILE LIST ......93
- TECHNICAL SPECIFICATIONS......95
- TROUBLESHOOTING .....96
- USER TECHNICAL SUPPORT......97
- INDEX....98
- BEFORE YOU BEGIN
- CE
- FOR PROPER AND SAFE USE
- WARNING
- Basic operation:
- Power supply:
- Additional warnings:
- CAUTION
- Additional cautions:
- GETTING STARTED
- CHECKING THE PACKAGE CONTENTS
- Printed matter:
- INSTALLING THE UTILITY SOFTWARE
- TIPS
- Windows® 98/98SE/2000 PROFESSIONAL/ME/XP
- Click "Next" to view the license agreement. Click "Yes" to accept the agreement and continue.
- To install the software in the default folder (C:\Program Files\DS\_Elite2), click "Next".
- Select the components to be installed, then click "Next".
- The name of the default program folder is displayed. To install the software icons in this folder, click "Next".
- The Install Shield Wizard will indicate that installation was successful. Check "Yes, I want to restart my computer now." and then click "Finish".
- Macintosh
- INSTALLING ADOBE PHOTOSHOP ELEMENTS
- Fill in all the fields on the user information screen. Click "Next".
- Check the registration information on the confirmation screen. If all information is correct, click "Yes".
- Confirm the contents of the installation. Click "Next" to install Adobe Elements.
- The SVG Viewer installation screen will appear. Click "Install" to install the software.
- A screen confirming the successful installation of the software will appear. Click "Finish" to exit the installation routine.
- Select the installation method from the pop-up menu at the top left of the installer screen. Click "Install" to begin installation.
- Fill in all the fields on the user information screen Click "Next".
- Check the registration information on the confirmation screen. If all information is correct, click "Install Now".
- The SVG Viewer installation screen will appear. Click "Install" to install the software.
- A screen confirming the successful installation of the software will appear. Click "Quit" to exit the installation program.
- CONNECTING THE AC ADAPTOR
- Turn on the computer to start up the Windows or Macintosh operating system.
- CONNECTING THE SCANNER CABLE
- IEEE 1394 CABLE
- USB CABLE
- Windows® 98/98SE/2000 Professional/XP
- DISCONNECTING THE CABLE WITH WINDOWS
- EASY SCAN UTILITY
- LAUNCHING THE EASY SCAN UTILITY
- Windows®
- LOADING THE FILM HOLDER
- LOADING THE 35MM FILM HOLDER - FH-U1
- LOADING THE SLIDE MOUNT HOLDER – SH-U1
- LOADING THE APS ADAPTOR - AD-10 (SOLD SEPARATELY)
- □ Mark
- INSERTING THE FILM HOLDER
- INSERTING THE FILM HOLDER FH-U1 OR SLIDE MOUNT HOLDER SH-U1
- INSERTING THE APS ADAPTOR AD-10 (SOLD SEPARATELY)
- Open the front door of scanner until the top of the door lines up with the APS mark – .
- With the scanner contacts face up, insert the adaptor into the scanner until it stops.
- SPECIFYING THE FILM TYPE
- Select the film format and film type to be scanned on the pull-down menus. Click "Next >".
- MAKING AN INDEX SCAN
- To make an index scan, click on the radio button next to the setting. Click "Next >" to start the scanner.
- SELECTING THE IMAGE TO BE SCANNED
- Click the thumbnail(s) of the image(s) to be scanned. Click "Next>" to continue.
- SPECIFYING THE USE OF THE SCANNED IMAGE
- Click the radio box which best describes the final use of scanned image. Click "Next>" to continue.
- CHOOSING DIGITAL ICE/ROC/GEM PROCESSING
- Click on the buttons to choose the image processing to be applied to the scanned images. Click “Next >” to continue.
- CONFIRMING THE SCANNER SETTINGS
- SCANNING AND SAVING THE IMAGE
- Press the eject button to unload the film holder or APS adaptor.
- Close the front door.
- Press the main switch to turn off the scanner.
- STANDARD SCAN UTILITY
- LAUNCHING THE STANDARD SCAN UTILITY
- LAUNCHING THE STANDARD SCAN UTILITY
- LAUNCHING THE UTILITY WITH PHOTOSHOP ELEMENTS
- LAUNCHING THE UTILITY SOFTWARE
- LAUNCHING THE UTILITY IN PHOTOSHOP ELEMENTS
- Double click on the DS Elite2 utility icon.
- SETTING UP THE SCANNER
- MAIN WINDOW
- Click the preferences button to open the preferences dialog box.
- Select the preferences as desired.
- Auto-expose-for-slides check box
- Autofocus-at-scan check box
- Close-utility-after-scanning check box
- Colour-depth list box
- Multi-sample list box
- Index-scan-priority radio button
- LOADING THE FILM HOLDER
- SETTING THE FILM FORMAT AND TYPE
- Select the film format from the drop-down list.
- Select the film type from the drop-down list.
- INDEX SCAN
- INDEX TAB
- Click on the index-scan button the main window.
- RESIZING THE UTILITY WINDOW
- Place the mouse pointer over the lower-right corner of Index window. The cursor shape changes to a double arrow. The window size can be resized by dragging with the mouse.
- SELECTING INDEX THUMBNAILS
- Click on the thumbnail(s) to select the image(s) for scanning.
- FIT-TO-WINDOW BUTTON
- Click the fit-to-window button
- REVERSING THE FRAME ORDER
- Click the reverse-frame-order button
- SAVING THE INDEX THUMBNAILS
- Click the save index-image button .
- Enter the file name, and select the file destination and file format for the image data. Click "Save".
- SAVING AN INDEX FILE
- Click the save index-file button
- Enter the file name and select the file destination. Click "Save".
- LOADING AN INDEX FILE
- Click the load index-file button to open the open dialog box.
- Select the index file to be loaded. Click "Open".
- MAKING A PRESCAN
- PRESCAN TAB
- MAKING A PRESCAN
- Select the index frame(s) to be prescanned.
- Click the prescan button in the main window.
- CROPPING THE IMAGE
- AUTO CROPPING
- After making the prescan, click the auto-cropping button
- MANUAL CROPPING
- To enlarge or reduce the cropping frame...
- To move the cropping frame...
- To define a new cropping frame...
- PRESCANNING THE CROPPED IMAGE
- ZOOMING
- Click the zoom button .
- Click on the area in the image to be enlarged.
- To zoom out, hold the control key (Windows) or option key (Macintosh) down and click on the image.
- GRAB BUTTON
- Click the grab button Click and drag the image to view the image area.
- AUTO EXPOSURE
- AE AREA SELECTION
- After making a prescan or setting the exposure of the reference image with the AE-area-selection function, click the AE lock button
- Select another image and click the prescan button to view the result with the set exposure.
- POINT AF (AUTOFOCUS)
- Click the point-AF button
- Click on the area of image to be used for focus.
- Click the manual-focus button .
- Click on the area of the image to be used for focus.
- Adjust the slider using the mouse until the black and white bars are at their longest extension for sharpest focus.
- Click "OK" to set the focus.
- CROPPING APS IMAGES
- Click the CHP button until the desired frame is displayed.
- OTHER DISPLAYS IN THE PRESCAN WINDOW
- FRAME NUMBER
- RGB DISPLAY
- IMAGE CORRECTION
- IMAGE CORRECTION TAB
- Tone-curve/Histogram button
- Brightness/Contrast/Colour-balance button
- Hue/Saturation/Lightness button
- Variation button
- Reset button
- Snapshot button
- Comparison display button
- Load image-correction-Job button
- Save image-correction-Job button
- Redo button
- Undo button
- Unsharp-mask button
- Correction Display
- Selective-colour button
- RGB and CMYK
- Complementary colour
- SELECTING THE TONE-CURVE COLOUR CHANNEL
- Click the arrow next to the channel box to select the channel.
- CHANGING THE TONE CURVES
- Place the mouse pointer over the tone curve. Click and drag the curve.
- CHANGING THE TONE CURVES BY FREEHAND
- Click the freehand-curve button.
- Click and drag the pointer to draw a new curve.
- To smooth a rough freehand curve, click the smooth-curve button.
- A QUICK GUIDE TO TONE CURVE CORRECTIONS
- ABOUT THE TONE CURVE
- BRINGING OUT DETAIL IN THE SHADOWS
- INCREASING THE CONTRAST OF AN IMAGE
- CORRECTING COLOUR WITH THE TONE CURVE
- WHITE, BLACK, AND GRAY POINT CORRECTIONS
- Click the white-point button .
- Click on the brightest neutral area of the image to define it as the white point.
- Click the black-point button . ↗
- Click on the darkest neutral area of the image to define it as the black point.
- Click the gray-point button . ↗
- Click a neutral area of the image to be defined as the gray point.
- Press the apply button to show the change on the histogram.
- SETTING THE WHITE AND BLACK POINT VALUES
- Double-click on either the white-point or black-point button to activate the point-value-setting dialog box.
- Input the new white-point or black-point values. Click "OK".
- Calibrate the image following the steps in white, black, and gray point corrections section.
- HISTOGRAM CORRECTIONS
- AUTO SETTING
- Click the auto-setting button.
- MANUAL SETTING
- Click the colour-histogram button to view the red, green, and blue histograms.
- Use the slider or enter values in the text boxes to adjust the histograms.
- HUE/SATURATION/LIGHTNESS CORRECTIONS
- Click the variation button .
- Click the arrow next to the variation list box to select the image quality to be corrected: colour balance, brightness and contrast, or saturation.
- COLOUR BALANCE VARIATION
- Drag the variation-step slider, or enter the correction step into the variation-step text box to set the degree of correction.
- Click the best image among the six frames.
- BRIGHTNESS & CONTRAST VARIATION
- Click the best image among the eight frames.
- SATURATION VARIATION
- Click the best image among the two frames.
- SELECTIVE-COLOUR CORRECTIONS
- Click the selective-colour button
- Click the arrow next to the colour list box to select the colour group.
- Drag a slider or enter a value in a text box to adjust the selected colour.
- UNSHARP MASK
- Click the unsharp-mask button .
- Drag a slider or enter a value in a text box to adjust the parameters of the mask.
- CANCELLING IMAGE CORRECTIONS
- UNDOING AN IMAGE CORRECTION
- REDOING A CANCELLED IMAGE COR- TION
- RESETTING ALL IMAGE CORRECS
- MAKING SNAPSHOT THUMBNAILS
- SAVING AND LOADING IMAGE CORRECTIONS
- SAVING AN IMAGE-CORRECTION JOB
- LOADING AN IMAGE-CORRECTION JOB
- COMPARING PRE/POST CORRECTION IMAGES
- Click the Digital-ICE button to activate the function. Press the prescan button to view the results.
- Click the Digital-ROC button to activate the function. Press the prescan button to view the results.
- Click the Digital-GEM button in the main window.
- Make a prescan of the image to be processed.
- Set the input resolution of the image in the scan-setting window (see page 74).
- Click the Digital-GEM tab.
- Adjust the Digital-GEM slider or enter the Digital-GEM correction value directly in the text box to set the degree of correction.
- Adjust or move the Digital-GEM sample area to select the image area to be used to evaluate the Digital-GEM correction.
- Click the apply Digital-GEM button to preview the Digital-GEM effect on the sample area.
- Click the scan button to save the final image.
- SCAN SETTINGS
- SCAN SETTING DIALOG BOX
- Click the prescan or index scan tab to view the scan-setting window.
- Click the load Job button
- Select a category from the drop-down list.
- Click a Job file name to select it. Click "OK" to apply the Job to the image.
- Custom
- Colour Laser Printer
- Photosensitive
- Ink Jet & Dye-Sub Printer
- Photo CD
- Web page
- Screen
- Document
- Film Recorder
- Default
- INPUTTING SCAN SETTINGS MANUALLY
- Input-resolution list box
- Output-resolution list box
- Input-size text box
- Input-size lock button
- Magnification text box
- Output-size text box
- Output-size lock button
- Unit list box
- Image size display
- Resolution and output size
- EXAMPLE: SETTING THE SCANNER OUTPUT BY PIXELS
- Select "pixel" from the unit list box.
- Enter the dpi resolution for the output size. In this example, enter 640 for the width and 480 for the height. Click the output-size lock button to fix the values.
- Use the mouse to adjust the cropping frame over the prescan image to define the final scanning area.
- EXAMPLE: SETTING OUTPUT BY PRINT SIZE AND OUTPUT RESOLUTION
- SAVING A JOB FILE
- DELETING A JOB FILE
- MAKING THE FINAL SCAN
- WHEN USING THE UTILITY THROUGH AN IMAGE-PROCESSING APPLICATION
- Click the scan button in the main window.
- Close the utility software.
- Save the image with the Photoshop Elements file menu.
- WHEN USING THE UTILITY SOFTWARE ONLY
- On the save-as dialog box, enter the file name, and select the file destination and file format for the image data.
- Click "Save".
- File types
- CUSTOM WIZARD
- Enter scan setting. Click "Next".
- Select image-correction settings. Click "Next".
- Click "Save" to save the settings. Enter the file name in the save dialog box and click "OK". Click "Start" to begin automatic scanning.
- Quit the Standard Scan Utility software or close Photoshop Elements.
- Press the eject button to unload the film holder or APS adaptor.
- Close the front door.
- Press the main switch to turn off the scanner.
- APPENDIX
- IEEE 1394 AND USB INTERFACES
- IEEE 1394 AND USB
- DISCONNECTING WITH THE COMPUTER AND SCANNER ON
- WHEN USING THE USB CABLE, OR WHEN USING THE IEEE 1394 CABLE WITH WINDOWS 2000/XP
- COLOUR MATCHING
- SETTING THE OUTPUT COLOUR SPACE
- OUTPUT COLOUR SPACE
- sRGB
- Apple RGB
- SMPTE-C
- PAL/SECAM
- ColourMatch RGB
- Adobe RGB
- Broad Spectrum Colour Scale RGB
- NTSC
- CIE RGB
- Monitor RGB
- Scanner colour profiles
- TECHNICAL SPECIFICATIONS
- Testing conditions:
- USER TECHNICAL SUPPORT
- WARRANTY AND PRODUCT REGISTRATION
- DiMAGE Scan Elite II
Brand : MINOLTA
Model : DiMAGE Scan Elite II
Category : To scan