
XR2-A-RD - Rechargeable flashlight SureFire - Free user manual and instructions
Find the device manual for free XR2-A-RD SureFire in PDF.


| Product Type | Tactical Flashlight |
| Model | XR2-A-RD |
| Brand | SureFire |
| Length | 5.5 inches (14 cm) |
| Head Diameter | 1.5 inches (3.8 cm) |
| Weight | 5.0 oz (142 g) with batteries |
| Power Source | 2x CR123A lithium batteries |
| Maximum Output | 500 lumens |
| Runtime | 1.5 hours (high output) |
| Switch | Tail cap push-button, momentary and constant-on |
| Body Material | Aerospace-grade aluminum |
| Finish | Military-spec hard-anodized |
| Lens | Pyrex glass with anti-reflective coating |
| Beam Type | Reflector with smooth beam pattern |
| Operating Modes | On/Off (constant and momentary) |
| Water Resistance | IPX7 (submersible to 1 meter) |
| Impact Resistance | 1 meter drop (MIL-STD-810) |
| Temperature Range | -20°C to +60°C |
| Included Accessories | Holster, lanyard, spare O-rings |
| Warranty | Limited Lifetime |
| Country of Origin | USA |
Frequently Asked Questions - XR2-A-RD SureFire
User questions about XR2-A-RD SureFire
0 question about this device. Answer the ones you know or ask your own.
Ask a new question about this device
Download the instructions for your Rechargeable flashlight in PDF format for free! Find your manual XR2-A-RD - SureFire and take your electronic device back in hand. On this page are published all the documents necessary for the use of your device. XR2-A-RD by SureFire.
USER MANUAL XR2-A-RD SureFire
Use a clean, dry cloth to wipe off body and window. Periodically clean and lubricate threads. For additional tips on maintaining your SureFire illumination tool, visit
www.surefire.com/faqs-maintenance.
ACCESSORIES
SureFire makes a full line of accessories for most of its illumination tools. For a complete listing, visit www.surefire.com/partsaccessories.
THE SUREFIRE NO-HASSLE GUARANTEE
We'll do what it takes to keep your SureFire gear running smoothly. SureFire warrants that if you — our customer — purchase one of our products, and we determine that it is defective in material and/or workmanship during your lifetime, we will repair or replace it — no hassle!
Our warranty does not cover consumables or normal wear-and-tear — things like batteries draining, headbands and headpads wearing out, ink cartridges running out, and switches wearing out—or damage resulting from abuse, alterations, unauthorized repairs, or use contrary to SureFire's user manuals.
Should you need a replacement product, SureFire reserves the right to replace an obsolete product with a current production, like model. In the event that any issue with a SureFire product is not covered under this warranty SureFire can arrange to have the product repaired for a reasonable fee.
STANDARD DISCLAIMER
Except as specified above or prohibited by applicable law: all express or implied conditions and warranties, including, without limitation, any implied warranty or condition of merchantability or fitness for a particular purpose, or accuracy of any informational content, are hereby excluded and disclaimed by SureFire; and in no event will SureFire be liable for any special, direct, indirect, consequential, incidental or punitive damages howsoever arising and regardless of the theory of liability, even if advised of the possibility of such damages. Products, prices, availability, specifications, and offers are subject to change or cancellation at any time without notice.

BATTERY INFORMATION & WARNING
Before replacing batteries, read the enclosed BATTERY INFORMATION/WARNING insert in your original packaging. For additional battery safety, handling, and product information, visit www.surefire.com/batteries.

18300 MT. BALDY CIRCLE
FOUNTAIN VALLEY, CA 92708-6122
WWW.SUREFIRE.COM
Patent: 9,551,550
WARRANTY CLAIMS
For claims, contact Customer Service at 714-545-9444 to obtain a Return Merchandise Authorization number (RMA#). Then package the unit carefully and send to (no CODs):
SureFire, LLC.
Repairs Department, RMA#
17680 Newhope Street, Suite B
Fountain Valley, CA 92708
SureFire will pay any reasonable shipping costs to return the unit to you.
BATTERY PACK SPEC TABLE:
| 813 (XR BATTERY) RATING/PERFORMANCE | |
| TYPE | Lithium Polymer |
| VOLTAGE | 3.7V |
| CERTIFICATION | UN38.3 & UL1642 |
| CHARGE END VOLTAGE | 4.2V |
| DISCHARGE END VOLTAGE | 2.7V |
| ENERGY | 1.49 Wh |
| LITHIUM CONTENT | 0.162 g |
| OPERATING TEMP RANGE [Charging] | 0-45C |
| OPERATING TEMP RANGE [Discharging] | -10-60C |
| RATED CAPACITY | 540mAh |
| STANDARD CHARGE RATE | 0.5C |
| STORAGE TEMP RANGE | -10-45C |
| USB CHARGE CURRENT | 500mA |
| USB CHARGE VOLTAGE | 5V |
| WEIGHT | 20.5 g |


DO NOT VIEW THE LASER BEAM WITH OPTICAL INSTRUMENTS (SCOPES, BINGULORS, ETC). DO NOT ATTEMPT TO OPEN OR MODIFY LASER HOUSING.


DO NOT VIEW THE LASER BEAM WITH OPTICAL INSTRUMENTS (SOOPES, BINOCULORS, ETC). DO NOT ATTEMPT TO OPEN OR MODIFY LASER HOUSING.
Revision B 12-2023
71-01-1109
XR2-A-GN, XR2-A-RD

CE

[REDACTED]
SUREFIRE.
XR2
COMPACT RECHARGEABLE HANDGUN LIGHT + LASER SIGHT
XR2-A-GN
XR2-A-RD

SPECIFICATIONS
| XR2 | ||
| SPECIFICATIONS | OUTPUT | 800 lumensGreen laser: < 5 mW; 515 nm; Class IIIaRed laser: < 5 mW; 635 nm; Class IIIa |
| RUNTIME | 35 minutes | |
| PEAK BEAM INTENSITY | 16,000 candela | |
| DISTANCE | 250 meters | |
| CONSTRUCTION | Aluminum | |
| FINISH | Hard Anodized (MIL-A-8625 Type III, Class 2) | |
| WEIGHT (w/batteries) | 2.3 oz (65 g) | |
| LENGTH | 2.46 in (6.25 cm) | |
| BEZEL DIAMETERS | 0.58 in (1.47 cm) | |
| BATTERIES | Integrated rechargeable Lithium Polymer | |
| SWITCHING | Ambidextrous momentary / Ambidextrous toggle tap | |
All performance claims tested to ANSI/PLATO FL1-2019 Standard.
USER MANUAL
WARNING
ALWAYS confirm weapon is unloaded and on SAFE before attempting installation.
KIT CONTENTS:
- XR2 WeaponLight
• B13 Lithium Polymer Battery - CH22 Cradle Charger
- MICRO-USB to USB Type A Cable
- 0.050-inch Hex Wrench for elevation and windage screws
• Picatinny Crossmember
• SIG SAUER P320 Crossmember
*Prior to first use, remove battery contact insulator
INSTALLING CROSSMEMBER
To attach XR2 to a Picatinny rail, the Universal crossmember must first be removed and the included Picatinny crossmember (marked "P") must be correctly installed as follows.
- To remove the crossmember, insert a small flat-head screwdriver or the rim of a fired brass casing into opening on the back side of the crossmember and lift it out (Figure 1). Store for future use.
- Insert crossmember into the vacated crossmember slot.
NOTE: If installing onto a SIG SAUER P320 series pistol, insert the "S" crossmember.
MOUNTING XR2 TO HOST FIREARM
Note: The appropriate crossmember MUST be installed ("U" for Universal rails; "P" for Picatinny rails) to attach XR2 to a weapon's accessory rail. Some pistols with a MIL-STD-1913 rail may require the Universal crossmember to properly interface with the location of the front trigger guard surface.
- Loosen the rail adjustment bolt, press the head of the bolt into the XR2 body, which will create a wide enough gap between the rail guides to fit over the weapon accessory rail.
- Align fixed rail with weapon's accessory rail and hinge XR2 over the cross slot of host weapon.
- Mate crossmember with corresponding slot in weapon's accessory rail.
- Secure by turning Rail Adjustment bolt clockwise. Using a torque wrench, tighten to 6 in-lb when mounting to a polymer rail, and 8-9 in-lb when mounting to a metal rail. If a torque wrench is not available, tighten until snug and then apply an additional 1/4 turn. Do NOT overtighten! The bolt will break if excessive force is applied with a tool.
BATTERY INSTALLATION & REMOVAL
Position battery below XR2 and insert until it clicks into place (Figure 2). Press battery latch lock forward towards the direction of the beam and pull the battery down out of the XR2 (Figure 2).
WARNING
Use of substandard batteries can cause injury or property damage. Visit www.surefire.com/batterysafety.
BODY FUEL GAUGE
The Fuel Gauge LED on the back of the XR2 body illuminates when the light, laser, and light+laser modes are activated (Figure 3). The state of charge is indicated below:
Blinking RED: 0-20%
Solid RED: 21-50%
Solid YELLOW: 51-80%
Solid GREEN: 81-100%
On the shooters left-hand side of the XR2, there is a three position mode selector switch, which allows for laser only, white light only, and laser and light activation. Rotate the mode selector for desired output settings (Figure 4).
ACTIVATING THE XR2
Momentary-on activation Press and hold either toggle switch more than 0.5 second or as long as needed to momentarily activate the XR2. Release to turn off (Figure 3).
Constant-on activation with toggle switches: The XR2 is programmed for constant-on activation by a quick tap and release action via either toggle switches (Figure 3).
NOTE: The light will not activate when these rear switches are pushed upward or side-to-side. This intentional design-feature minimizes unintended activation when drawing or holstering.
BATTERY CHARGING
The B13 battery needs to be removed from the XR2 and placed into the CH22 battery charger to charge.
HOW TO CHARGE THE BATTERY
- Insert the MICRO-USB cable plug into the CH22 battery charger.
- Insert the USB cable plug into a power source.
- Insert the B13 battery into the CH22 charger (Figure 5).
| FUEL GAUGE LED INDICATOR | |
| LEDS BATTERY CAPACITY | |
| ○ ○ ⚙ | 0-15% |
| ○ ○ ● | 16-50% |
| ○ ● ● | 51-80% |
| ● ● ● | 81-95% |
: blinking = off = on
CH22 CHARGER FUEL GAUGE LEDS
The B13 battery pack has LEDs on the top of the pack which are not visible when the pack is inserted into the charger. There are 3 LEDs on the face of the charger (Figure 4):
- Center LED illuminates solid RED which indicates power is active.
- The right and left LEDs beneath each cradle position indicate its state of charge WHILE CHARGING.
- Once the power is present, the state of charge is indicated below: Solid RED: 0-25%
Solid YELLOW: 26-75%
Solid GREEN: 76-95%
Blinking GREEN: 96-100%
NOTE: The three fuel gauge LEDs on the top of the battery will illuminate according to the chart above while charging or when the battery status button is pressed.
The battery pack can remain in the charger indefinitely. Once the battery capacity drops 2%, the charger will begin charging to full capacity.
SureFire recommends zeroing the laser sight at a distance of 25 yards, against a target, to coincide with point-of-aim of the host weapon's factory sights. Any discrepancy in point-of-aim (POA) versus point-of-impact (POI) at target distances between 10 and 25 yards is negligible. Laser sight may require re-zeroing after the first 10-50 rounds, as the adjustment apparatus may settle into position.
- While acquiring target with host weapon sights at the desired range,
determine which direction(s) laser needs to be adjusted for laser dot position to match weapon sight's point of aim. - Make the necessary adjustments, using the included 0.050-inch Hex Wrench to tighten or loosen Windage and/or Elevation adjustment screws (Figure 4) per instructions below, based on XR2's mounting position (from shooter's perspective) and laser dot's relation to weapon's point of aim.
If the laser dot is..
a. ...left of POA, tighten Windage screw by turning counterclockwise.
b. ...right of POA, loosen Windage screw by turning clockwise.
c. ...above POA, loosen Elevation screw by turning clockwise.
d. ...below POA, tighten Elevation screw by turning counterclockwise.
- Once adjustments have been made, use laser to sight target from the designated range and fire several rounds, taking care to steady your aim to minimize any shooter error. Note XR2 point-of-aim in relation to weapon's point-of-impact and make any necessary adjustments. Retest and continue to make any adjustments until laser's point-of-aim and weapon's point-of-impact match.
NOTE: Laser calibration should be verified every time XR2 is removed from host weapon.
FIGURE 1

FIGURE 2
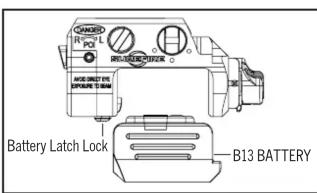
FIGURE 3
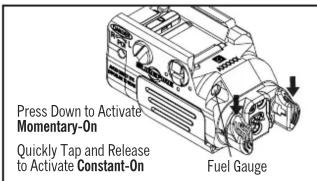
FIGURE 4

FIGURE 5

- ACCESSORIES
- THE SUREFIRE NO-HASSLE GUARANTEE
- STANDARD DISCLAIMER
- BATTERY INFORMATION & WARNING
- WARRANTY CLAIMS
- SUREFIRE.
- XR2
- SPECIFICATIONS
- USER MANUAL
- WARNING
- KIT CONTENTS:
- INSTALLING CROSSMEMBER
- MOUNTING XR2 TO HOST FIREARM
- BATTERY INSTALLATION & REMOVAL
- BODY FUEL GAUGE
- ACTIVATING THE XR2
- BATTERY CHARGING
- HOW TO CHARGE THE BATTERY
- CH22 CHARGER FUEL GAUGE LEDS
Brand : SureFire
Model : XR2-A-RD
Category : Rechargeable flashlight