
AFTWS-1224 - Smartwatch Bauhn - Free user manual and instructions
Find the device manual for free AFTWS-1224 Bauhn in PDF.


| Product type | Smartwatch |
| Brand | Bauhn |
| Model | AFTWS-1224 |
| Dimensions | 45 x 38 x 10 mm |
| Weight | 50 g |
| Battery capacity | 200 mAh Lithium-ion |
| Battery life | Up to 7 days on single charge |
| Charging time | Approximately 2 hours |
| Display | 1.3 inch TFT LCD touchscreen |
| Connectivity | Bluetooth 5.0 |
| Compatible OS | iOS 9.0+ / Android 4.4+ |
| Water resistance | IP67 (splash and dust resistant) |
| Sensors | Heart rate monitor, accelerometer |
| Main functions | Step counting, sleep tracking, heart rate, notifications, alarm, stopwatch |
| Maintenance and cleaning | Wipe with soft dry cloth; avoid solvents and submersion |
| Safety precautions | Do not charge in wet conditions; keep away from extreme heat |
| Spare parts and repairability | Battery not user-replaceable; no spare parts available |
| General information | User manual available for download in PDF format |
Frequently Asked Questions - AFTWS-1224 Bauhn
User questions about AFTWS-1224 Bauhn
0 question about this device. Answer the ones you know or ask your own.
Ask a new question about this device
Download the instructions for your Smartwatch in PDF format for free! Find your manual AFTWS-1224 - Bauhn and take your electronic device back in hand. On this page are published all the documents necessary for the use of your device. AFTWS-1224 by Bauhn.
USER MANUAL AFTWS-1224 Bauhn
Should you for any reason need to return this product for a warranty claim, make sure to include all accessories with the product.
Product does not work?
If you encounter problems with this product, or if it fails to perform to your expectations, make sure to contact our After Sales Support Centre on 1300 002 534.
AFTER SALES SUPPORT
tempo.org/support Model: AFTWS-1224 roduct Code: 718168 12/2024
Weather
On the ma
live weather. You must be connected to the Da
Fit app. NOTE: You must have internet/mobile
NOTE: You must have immediately connection for this function to work. The weather
displayed may not be the same as your phone's
default weather app.
After your smart phone is connected to the
Watch, you can view new messages and other
app notifications on the watch. The latest 8 notifications will be delivered on the watch. Yes
notifications will be displayed on the watch. To smart phone's "Messages" must be set to on.
You can set which app notifications to receive under "Notifications" on the Do Fit app.
under "Notifications" on the La Ft app.
Remote Camera (Shutter)
On the Da Fit app, go to and set "Shutter" to on. You can now use the watch as a camera.
remote for your smart phone. Once the smart
phone is connected to the watch, shake the watch as press the answer to remotely take a
watch or press the screen to remotely take a photo.
Bluetooth Music Player
On the main menu, tap the
Bluetooth music player menu. 13
- Open the music app on your smart phone.
- Tap play/pause icon to play/pause music. - Tap previous/next icon to play the previous
• Far previously next song to play the previous next song.
- Tap the speaker "iton and increase/ decrease the volume"
Note: On the watch home screen, swipe dow
for the shortcut menu, select "Phone" menu
and turn on the Phone Call / Media Audio hands-free mode. Now you can hear the mus
from the watch's speaker.
The battery life will decrease when this function is enabled.
function is enabled.
Breathing Exercise (Relaxation)
On the main menu, select the icon to enter the breathing function interface. Select the
training time and inhale/exhale according to
mythm displayed on the watch.
Voice Assistant On the main menu, tap on the icon to launch
the voice assistant function of the connected
smart phone.
Timer On the main menu, select the choice to set
On the main menu, select the 📋 look to end the timer function. Set the countdown timer
and the watch will alert when the set time is u
Alarm On all ten alarms on the app. ▪ Alarms > ADD then tap > SAVE. When the set time is up, the watch will alert. You can set up to 8 alarms. In the week, on the alarm clock, then swipe left to delete it from the list. Stopwatch On the main menu, select the ▪ icon to enter the stopwatch function. Tap the Start icon to start the stopwatch, press the Stop icon to pause and refresh its reset icon to reset the time. Swipe right to exit. Cycle Tracking for Women On the main menu, tap the ▪ icon to display the reminder for cycle tracking. To use this function in the app, then call a new step to check in the app and then enter your information and turn on the reminder. You can see that there will be a corresponding number of days remaining in the cycle. World Clock On the main menu, tap the ▪ icon to display the world clock. To use this function you need to enable the "World Clock" in the app and add a total of 15
maximum of 8 cities. Tap on the city name, swipe up/down to change the orders, swipe left to delete a city from the list. Find Phone After your smart phone is connected to the watch, tap the Find Phone icon and your smart phone will ring or vibrate. Calculator On the main menu, tap the listen to use the calculator. Swipe right to exit. E-Card To use this function you need to upload the QR code to the app. Tap on e-mail > E-Card. Sedentary Reminder To use this function you need to enable the "Reminders To Move" setting in the app. Tap on the e-mail > Others > Reminders To Move. Drink Reminder To use this function you need to enable the "Intake Reminder" setting in the app. Tap on > Intake Reminder > Setup, and then press the setting numbers and swipe up/down to adjust. 16
Set reminders to notify you to intake. The watch will alert you on the set Time, and you can enter the drinking record of every day. Watch Face and Menu Theme Navigate to the watch "Display" setting menu, which includes the Brightness, Display Time (Sleep), Watch Face, Menu View (List View), Honeycomb, Old View and Twist Raise. On the watch face, you can hold the touch screen or tap the Watch Face on the settings menu for the watch face selection page. Swipe left/right from touch screen can tap the touch screen again to confirm selection. Shortcut menu Swipe is not accessible the shortcut menu where you can turn on Do Not Disturb mode, which is not accessible on Low Power Mode, E- Cards, Torch and enter Settings. Settings On the main menu, tap on the icon to enter the settings menu to change the below: Display Vibrate & Ring Low Power Mode
- Phone (Phone Call / Media Audio hands-free mode) - System (Restart, Power Off and Reset) - About (Firmware Version and APP Download)
Specifications
Display 1.85", 240 x 284 pixels Ingress Protection IP67 Charging time 2 hrs (approx.) Charging base input 5V@30mAh Bluetooth Range < 10m Built-In Battery Liao 3.7V 260mAh Weight 38g Dimensions (mm) 40 (W) x 50 (H) x 10.7mm (D) The Bluetooth word mark and logos are registered trademarks owned by Bluetooth SIG Inc. and any use of such mark by Honda (IP) Holdings Pty Ltd. is under license. Other trademarks and trade names are those of their respective owners. 18
ALDI BAUHN
The product is guaranteed to be free from defects in workmanship and parts for a period of 12 months from the date of purchase. Defects that occur within this warranty period, under normal use and care, will be repaired, replaced or refunded at our discretion, solely at our option with no charge for parts and labour. The benefits conferred by this warranty are in addition to all rights and remedies in respect of the product that the consumer has been acquired. Consumer Concurant Act 2010 and similar state and territory laws. Our goods come with guarantees that cannot be excluded under the Australian Consumer Law. You are entitled to a replacement or refund for a major failure and to compensation for any other reasonably foreseeable loss or damage. You are also entitled to have the goods repaired or replaced if the goods fail to be of acceptable quality and the failure does not amount to a major failure.
Repair and Refurbished Goods or Parts Notice
Unfortunately, sometimes faulty products are manufactured,
which needs to be returned to the supplier for repair.
Please be aware that if your product is capable of retaining user-generated data such as files stored on a computer.
hard drive, telephone numbers stored on a mobile
telephone, songs stored on a portable media player, games saved on a game console or files stored on a USB memory.
marked on the games console of files stored on a 30 memory stick) during the process of repair, some or all of your
stored data may be lost. We recommend you save this data
with review prior to lending the product for repair.
You should also be aware that rather than repairing goods, we may replace them with refublished goods of the same
type or use refurbished parts in the repair process.
Please be assured though, refurbished parts or
replacements are only used where they meet ALDI's
stringent quality specifications.
If at any time you feel your repair is being handled unsatisfactorily, you may escalate your complaint.
Please telephone us on 1300 002 534 or write to us at:
Tempo (Aus) Pty Ltd ABN 70 106 100 252
PO BOX 6097, North Sydney, NSW,2059, Australia
Telephone: 1300 002 534 (Aust) - Fax: (02) 6977 3163 Tempo Help Desk: 1300 002 534 (Aust)
(Operating Hours: Mon-Fri 8:30am-6pm; Sat Ram-6pm EST)
BAUHN
[Non-Text]
广力云智慧零售收银系统
-
(1)
Y
[Non-Text]
-
The Ground Truth image displays a single, solid horizontal line. According to Rule 2 (UNDERSCORE & LINE RULES), this is a stylistic or background line, not a placeholder underscore. Therefore, the OCR result must ignore it and output nothing or only meaningful text. The provided OCR content is "____", which consists of four underscores. This is an incorrect interpretation of the line as a placeholder, violating the rule that stylistic lines must be ignored. The OCR has hallucinated underscores where none should exist based on the GT's visual context. Hence, the OCR result is inconsistent with the Ground Truth.
-
[NO TEXT]
The image is too blurry to recognize any text content.
[Non-Text]
-
Covart
\$man
User
§ 2.21
[Non-Text]
AFTER SALES SUPPORT
[Non-Text]
[Non-Text]
[Non-Text]
-
1
-
•
[Non-Text]
[Non-Text]
4
-
-
•
[Non-Text]
r
v
1
-
[Non-Text]
[Non-Text]
ra
[Non-Text]
[Non-Text]
[Non-Text]
[Non-Text]
[Non-Text]
[Non-Text]
[Non-Text]
[Non-Text]
[Non-Text]
[Non-Text]
[Non-Text]
[Non-Text]
[Non-Text]
[Non-Text]
[Non-Text]
[Non-Text]
[Non-Text]
[Non-Text]
[Non-Text]
[Non-Text]
[Non-Text]
[Non-Text]
[Non-Text]
[Non-Text]
[Non-Text]
[Non-Text]
[Non-Text]
[Non-Text]
[Non-Text]
[Non-Text]
[Non-Text]
[Non-Text]
[Non-Text]
[Non-Text]
[Non-Text]
[Non-Text]
[Non-Text]
[Non-Text]
[Non-Text]
[Non-Text]
[Non-Text]
[Non-Text]
[Non-Text]
[Non-Text]
[Non-Text]
[Non-Text]
[Non-Text]
[Non-Text]
[Non-Text]
[Non-Text]
[Non-Text]
[Non-Text]
[Non-Text]
[Non-Text]
[Non-Text]
[Non-Text]
[Non-Text]
[Non-Text]
[Non-Text]
[Non-Text]
[Non-Text]
[Non-Text]
[Non-Text]
[Non-Text]
[Non-Text]
[Non-Text]
[Non-Text]
[Non-Text]
[Non-Text]
[Non-Text]
[Non-Text]
[Non-Text]
[Non-Text]
[Non-Text]
[Non-Text]
[Non-Text]
[Non-Text]
[Non-Text]
[Non-Text]
[Non-Text]
[Non-Text]
[Non-Text]
[Non-Text]
[Non-Text]
[Non-Text]
[Non-Text]
[Non-Text]
[Non-Text]
[Non-Text]
[Non-Text]
[Non-Text]
[Non-Text]
[Non-Text]
[Non-Text]
[Non-Text]
[Non-Text]
[Non-Text]
[Non-Text]
[Non-Text]
[Non-Text]
[Non-Text]
[Non-Text]
[Non-Text]
[Non-Text]
[Non-Text]
[Non-Text]
[Non-Text]
[Non-Text]
[Non-Text]
[Non-Text]
[Non-Text]
[Non-Text]
[Non-Text]
[Non-Text]
[Non-Text]

。
Manufacturing
Warranty returns Should you for any reason need to return this
should you for any reason need to retain this product for a warranty claim, make sure to
include all accessories with the product.
[Non-Text]
Product does not work?
If you encounter problems with this product, or if it fails to perform to your presentations.
or if it fails to perform to your expectations, make sure to contact our After Sales Support
Centre on 1300 002 534.
[Non-Text]
□ [www.sse.com]
AFTER SALES SUPPORT
1300 002 534 Product Code: 718168 12/2024
[Non-Text]
[Non-Text]
[Non-Text]
[Non-Text]
[Non-Text]
[Non-Text]
[Non-Text]
[Non-Text]
[Non-Text]
[Non-Text]
[Non-Text]
[Non-Text]
[Non-Text]
[Non-Text]
[Non-Text]
[Non-Text]
[Non-Text]
[Non-Text]
[Non-Text]
[Non-Text]
[Non-Text]
[Non-Text]
[Non-Text]
[Non-Text]
[Non-Text]
[Non-Text]
[Non-Text]
[Non-Text]
[Non-Text]
[Non-Text]
[Non-Text]
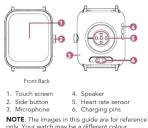
Parts of the watch
First Time Use
Charge your watch before using for the first time, you will need to charge it for about 2 hours.
Charging steps:
-
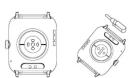
Align the charging pins on the back of the watch to the charging pins on the charging cable. It will snap into position once correctly aligned.
-
Connect the charging cable to a USB charging adaptor (not included) or a USB port on your computer
2017年
- Once fully charged, unplug the charging
cable from the charger.
To keep the charging pins clean, please use a soft cloth and partly clean the charging pins.
Note: If the Smart watch is extremely low on
power when you begin charging it, the screen display may be blank for up to 3 minutes before
display may be blank for up to 2 minutes before the charging image appears.
Da Fit App
Search for the
store to download.
code below for installation.
5.1.1.15.17.2
For Android Fo
[QR CODE]
[Unreadable]
[QR CODE]
无法识别
回
GET IT ON
Google Play
Google Play and the Goopl
Apple, the Apple logo, iPho registered in the U.S. and o
service mark of Apple Inc.
Turn on the Watch
[Non-Text]
you begin charging it, the screen
e blank for up to 1 minute before image appears.
。
[Non-Text]
Da Fit app in the app
noad,
of installation.
oid Fe
回回
[Unreadable]
5
[Unreadable]
密
[Unreadable]
a Flavy
1.10
ie Googi wn: iPh
S. and o
pfa No.
ne screen utes before
OTHER DEFEND
[Non-Text]
-
C
C
广力云
[Non-Text]
[Unreadable]
1
[Unreadable]
[Unreadable]
人
-9%
Road on the Store
s.t.
rks of Goio- medio of Be
iii. App St
[Non-Text]
Once the watch is fully
hold the side button for 3 seconds to turn on
the watch. To turn off the watch, press the side button to turn on the screen, then press and
hold the side butto
Connect to the Apr
Connect to the App Over the DoFtess, One
Open the Da Hi app. Once the app is open, follow: Device > Select ADD A DEVICE >
Select "AFTWS-1224" from the list. The smart
watch will connect to the app. On iOS devices,
you may window
NOTE: If the connected watch has been reset,
please unbind the watch in the app before
reconnecting or select the device from the list in
the app directly to reconnect. Once connected, the shortcut menu on the watch
will display
Disconnect from the App
Open the Da Fit app. Select - tan the
connected device then tap "REMOVE" to
disconnect the
on your iPhone. Go to Bluetooth
the "i" icon on the right side of "AFTWS-1224" and then too /Everest This Devise to finish
and then tap "Forget This Device" to Irish disconnecting.
■ ■
Turn On the Screen
To turn on the screen, Raise your arm if you're wearing the watch, so press the side button.
Wearing the watch, or press the side button. Raising your arm too quickly or slowly may not
turn the screen on.
NOTE: To activate the "Wrist Raise" function.
Navigate to the "Display" setting menu and turn "Waist Raise".
Functions
- Expos up for the notifications are
- Swipe up for the notifications screen - Swipe down for the shortcut menu
- Swipe down for the short-cut hands. - Swipe right to access the quick men
weather and recently run functions.
- Swipe left to access Weather, Activit
Heart Rate, Sleep monitoring and St
- Press the side button to access main men
- Press and hold the watch face for 3 seconds to change the interface.
second to change the interface, swipe left/right to switch and tap to confirm.
Functions in any Screen
- Swipe right or press the side button to return
to the previous screen or main screen.
- Tap on any icon
Applications
Applications Bless or low permission and enable the
Please allow permission and enable the notification settings on the respective smart
phone application
1 11
Pedometer (Activity)
On the main menu, tap on the Moon to enter
the Pedometer interface. The watch will track
the number of step
exercise time. If your exercise goals set on the app, on the Goal Setting menu of the app press
& hold the setting numbers and swipe up/down
to adjust. The watch will display the actual vs
goal ratio. Swipe up on the screen to check your margel in detail. The watch mill automatically
nccurd in detail. The watch will automatically synchronise the data with the Da Fit app.
- 2017年1月1日
Sleep Monitor
The watch has a dedicated built-in sleep monitor
that automatically activates and records your
sleep details within you ran asleep (you must be wearing the watch during the sleep duration for
wearing the listen during the deep duration for the function to work.
On the main menu, tap on the 📁 icon to enter
the Sleep interface and view the sleep summary
where you can see information on your total sleep, deep sleep and light sleep. You can view
more detailed records on the Da Fit app as the
data on the watch will be synchronised to the
app. The watch will record your daily, weekly and
The water and record year today, wetley and monthly sleep data and generate reports
accordingly.
NOTE: If the sleep duration is less than an hour,
the data will be not recorded.
[Non-Text]
On the main menu, tap on the icon to
measure your heart rate. Set measurement
Intervals and view more detailed data on the LaFit app.
When using the heart rate functions, groups the
When using the heart rate functions, ensure the following:
• The smart watch has good contact with
your wrist.
- Check that the sensor is clean and there is
no dirt or debris covering it. • You can turn the heart rate monitor on/
- You can turn the heart-lack monitor off within the app. Select > Others >
Health > Continuous Heart Rate Detection.
Battery life will be reduced when this
NOTE: The results and measurements of heart
rate data cannot be used for medical reference
and should be used as a guide only.
[Non-Text]
Bluetooth Phone Calls
On the main menu, tap on the "con to enter the Bluetooth call menu where you are /very call
the Blantbook can menu where you can view can history, dialer and contacts.
On the watch home screen, swipe down for the
shortcut menu, select "Phone" menu and turn
on the Phone Call / Media Audio hands-free mode
Note: The battery life will get shorter when this
function is enabled.
Call Operation
After your smart phone is connected to the
watch, you can directly answer/reject incoming
calls through the watch.
To answer an incoming call, tap the colon. To assist the call tap the other. During the
To reject the can, tap the upon. During the call, tap the up to mute/undmute. Tap
the 📄on and swipe up/down to adjust the
volume.
Note: If the watch's volume isn't high enough,
please press the smart phone's volume button and top "..." so other setting ions on the volume
bar, the smart phone will list all volume settings.
recommend set all settings to maximum.
Sports (Exercise)
On the main menu, tap on the 1000 to enter the multi-segment series. There are 30-segment modes
the multi-sport screen. There are 20 sport modes for you to choose from.
When you want to pause/stop the activity, swipe
right to display the pause/stop icon. Tap the icon
to pause/stop. You can also start the exercise on the Da Fit
You can also start the exercise on the Day 11 app on your smart phone and it will sync data to
the watch.
GPS connection: Enter the Workout menu on the
Da Fit app, select the sport mode. Tap on the screen and select "Turn on" to
confirm GPS access. The sport mode will start on
the app and watch and synchronise.
NOTE: The smart watch will only save data if the distance is more than 700 steps in duration.
distance is more than 200 steps in duration.
Stress On the main menu, Jan on the 4th to
On the main mind, tap on the open to measure your current stress levels.
,

Brand : Bauhn
Model : AFTWS-1224
Category : Smartwatch