
BCI-FD21 - Air conditioner PAC - Free user manual and instructions
Find the device manual for free BCI-FD21 PAC in PDF.


| Product Type | Split Air Conditioner |
| Model | BCI-FD21 |
| Brand | PAC |
| Cooling Capacity | 9000 BTU (2.64 kW) |
| Heating Capacity | 9000 BTU (2.64 kW) - Heat Pump |
| Power Supply | 220-240V ~ 50Hz |
| Indoor Unit Dimensions (WxHxD) | 800 x 250 x 200 mm |
| Outdoor Unit Dimensions (WxHxD) | 700 x 500 x 250 mm |
| Indoor Unit Weight | 10 kg |
| Outdoor Unit Weight | 30 kg |
| Energy Efficiency Ratio (EER) | 3.5 W/W |
| Noise Level Indoor | 22-45 dB(A) |
| Noise Level Outdoor | 52 dB(A) |
| Refrigerant | R32 |
| Main Functions | Cooling, Heating, Fan, Dehumidifier, Auto, Sleep, Timer, Turbo |
| Control | Remote Control with LCD Display |
| Air Flow | Up to 450 m³/h |
| Filter | Washable Anti-Bacterial Filter |
| Maintenance | Clean air filter every 2 weeks |
| Safety Features | Auto Restart, Child Lock, Overload Protection |
| Repairability | Replaceable filter, refrigerant recharge available, spare parts through PAC service |
| General Notes | Installation by certified technician required. Keep ventilation clear. |
Frequently Asked Questions - BCI-FD21 PAC
User questions about BCI-FD21 PAC
0 question about this device. Answer the ones you know or ask your own.
Ask a new question about this device
Download the instructions for your Air conditioner in PDF format for free! Find your manual BCI-FD21 - PAC and take your electronic device back in hand. On this page are published all the documents necessary for the use of your device. BCI-FD21 by PAC.
USER MANUAL BCI-FD21 PAC
Introduction & Features
The BCI-FD21 is a camera interface that will work with vehicles with or without a factory reverse camera. For vehicles with a factory reverse camera, it will allow the addition of front and side camera inputs. For vehicles without a factory reverse camera, it will program the factory radio to allow the addition of a reverse camera input and will allow the addition of front and side camera inputs.
Important Notes
- It is very important to follow the exact sequence of installation steps as listed below. Failure to do so will result in the interface not working as intended.
- Installation should be done with the ignition off.
- If you change the dip switch settings, you must disconnect and reconnect the power plug for the changes to take effect.
- Camera inputs must be selected via dip switch setting for the interface to function properly. If not, the radio may display a blank screen for as long as 15 seconds or display "CAMERA FAULT". Be sure to set camera input dip switches according to your installation.
- This product can only be programmed to a single vehicle. If you need to install the BCI-FD21 in another vehicle it must be unlocked from the prior vehicle first. See instructions on page 3.
Vehicle Compatibility
| Model | Year |
| Ford C-MAX | 2013-2015 |
| Ford Edge | 2013-2016 |
| Ford Escape | 2013-2015 |
| Ford Expedition | 2015-2016 |
| Ford F-150 / Raptor | 2013-2016 |
| Ford Flex | 2013-2016 |
| Ford Focus | 2013-2016 |
| Model | Year |
| Ford Fusion | 2013-2016 |
| Ford Mustang | 2015-2016 |
| Ford Taurus | 2013-2016 |
| Ford Transit | 2015-2015 |
| Lincoln MKS | 2013-2016 |
| Lincoln MKT | 2013-2016 |
| Lincoln MKX | 2013-2016 |
Product Configuration

flowchart
graph TD
    A["LED See Page 4"] --> B["Camera Input Configuration See side chart"]
    C["Vehicle Configuration See next page"] --> B
    B --> D["CN 1234"]
| Camera Input Configuration | |
| Dip 1 | ON = Rear camera ONOFF = Rear camera OFF |
| Dip 2 | ON = Front camera ONOFF = Front camera OFF |
| Dip 3 | ON = Side cameras ONOFF = Side cameras OFF |
| Dip 4 | ON = For vehicles with OEM rear cameraOFF = For vehicles without OEM rear camera |
Product Configuration (cont.)
| Vehicle Configuration (Dips 1, 2, 3) | |
 | Ford C-Max, Escape and Focus |
 | Ford Expedition, Flex, Lincoln MKS and MKT |
 | Ford Edge, F150, Fusion, Mustang, Raptor and Lincoln MKX |
| Dip 4 | ON = Cannot view OE rear camera image while in motion (up to 7mph). OFF = Can view OE rear cam in motion. |
Installation Steps
- Set the dip switches for your vehicle, and the camera inputs which you wish to activate.
Set the dip switches BEFORE connecting the module to power. If a change is made to the dip switches, disconnect then reconnect the module, for the changes to take effect. - Remove the factory radio (display) and disconnect the factory harness.
- Connect the BCI-FD21-H01 harness to the back of the factory radio (display) and reconnect factory harness to the mating connector on this harness.
- Connect the aftermarket cameras to the appropriate inputs on the BCI-FD21-H02 harness.
- Connect 12-volt power and ground to your aftermarket cameras. (Note: use of this 12v output can extend the life of your cameras as it only powers the cameras when needed)
Brown Wire = 12 Volt + (2A)
Black Wire = Ground
- Connect both BCI-FD21 harnesses to the BCI-FD21.
-
Program the BCI-FD21 to the vehicle:
-
Turn the key to the RUN position.
- Once the radio is fully "booted" and on a source screen, press and hold the Power button of the radio for 10 seconds.
- The radio will program and restart in approximately 15 seconds. Once restarted, the radio will "boot-up", wait for 1-2 minutes until the radio is fully "booted" and on a source screen.
- To finish programming turn off the ignition, open the driver's door and wait until the radio is completely off (1-2 minutes).
- Turn on the ignition and test camera functions.
Power Button Location on 4 Different Vehicles

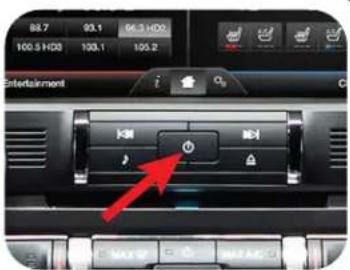


Note: In order for the BCI-FD21 to function, at least one camera input must be set ON in Camera Input Configuration.
Operation
REAR CAMERA
The rear camera will be displayed automatically when vehicle is shifted into Reverse.
FRONT CAMERA
The front camera will display automatically when shifting the vehicle from Reverse into Neutral, or Drive. The front camera will be displayed for 30 seconds, or until the vehicle is travelling at a speed of 7 mph. You can manually cancel / turn off the front camera image by pressing the power button on the radio while it's active.
To disable automatic front camera view when shifting from Reverse to Drive, follow these steps:
- Place the car in Reverse
- Press and hold the Power button for 5 seconds (the image of the rear camera may flash on the screen)
To enable automatic front camera view, repeat the steps above.
SIDE CAMERAS
The side cameras will be displayed automatically when you activate the turn signal (except in reverse).
MANUAL ACTIVATION OF CAMERA VIEWS
Press and hold the Power button for 2 seconds to access the rear camera then give a simple tap to toggle between front and rear camera. To return to the radio screen press and hold the Power button for 2 seconds again.
Note:
During manual activation, the video display may flash momentarily when the vehicle reaches 7mph. This is normal operation.
Installing the BCI-FD21 in Another Vehicle
In order to install the BCI-FD21 to another vehicle you must unlock the interface from the previous vehicle by turning off the video input before removal.
Follow the steps below to turn off the video input:
- Turn the key to the Run position and keep it in Run position until the radio is fully "booted" and on a source screen.
- Set all the Camera Input Configuration dip switches to OFF.
- Disconnect and reconnect the BCI-FD21-H01 harness from the interface.
- Press and hold the Power button of the radio for 10 seconds.
- The LED will begin flashing RED and the radio will unprogram and restart in approximately 15 seconds.
- Once restarted, turn off the ignition, open the driver's door and await until the radio is completely off (1-2 minutes).
- Turn on ignition, shift the vehicle into Reverse and verify no camera input screen is displayed. If radio source screen does not change then you have successfully unprogrammed the radio and unlocked the interface from the vehicle. You can now install the BCI-FD21 into another vehicle.
FAQs
1. No video when I shift the vehicle in Reverse.
- Check that proper dip switches are selected and that power to the interface was disconnected and reconnected after these settings are made.
2. Radio is displaying "CAMERA FAULT".
- Camera inputs must be selected via dip switch setting for the interface to function properly. If not, the radio may display a blank screen for as long as 15 seconds or display "CAMERA FAULT".
- Be sure to set camera input dip switches according to your installation. For example, if you are using rear camera input, camera configuration dip switch #1 should be on. If you are using the side camera inputs then camera configuration dip switch #3 should be on. No other unused camera inputs should be on in the camera configuration dip switches.
- Check that the cameras are powered and are providing a video output.
3. The Side Cameras are not working while in drive and I activate the turn signal.
- Check the camera and vehicle configuration dip switches and consult the LED STATUS while activating the turn-signal.
4. Unable to program the proper video input selections.
- Check if the BCI-FD21 was programmed in another vehicle prior to this installation. Do this by following the instructions on pg3.
NOTE: Previous vehicle is required for unlocking the module.
| LED STATUS | |
| Flashing Blue | Programming the video input |
| Flashing Red | Cancelling the video input programming |
| Flashing Purple | There is no response to programming |
| Solid Purple | The video input was already programmed |
| Solid Red | Interface is locked to another vehicle VIN |
WARNING: In order to avoid distraction, which could lead to an accident, the driver should never watch the front or rear camera when the vehicle is in motion. Even when operated by the passenger, the vehicle driver should maintain their attention on the road at all times.
DISCLAIMER: Under no circumstances shall the manufacture or the distributors of the BCI-FD21 be held liable for claims of any loss or damage, consequential, direct or indirect, arising from the sale, installation, or use of the BCI-FD21. The manufacture and its distributors will not, nor will they authorize any representative or any other individual, to assume obligation or liability in relation to the BCI-FD21 other than its replacement.
AGREEMENT: End user agrees to use this product in compliance with the instructions and terms of use above and with all State and Federal laws. PAC provides instructions and safety warnings with respect to this product and disclaims all liability for any use not in conformity with those instructions or other misuse of its product. If you do not agree, please discontinue use immediately and return product to place of purchase. This product is intended for off-road use and passenger use only.
- Introduction & Features
- Important Notes
- Product Configuration
- Product Configuration (cont.)
- Installation Steps
- Operation
- REAR CAMERA
- FRONT CAMERA
- SIDE CAMERAS
- MANUAL ACTIVATION OF CAMERA VIEWS
- Note:
- Installing the BCI-FD21 in Another Vehicle
- FAQs
- No video when I shift the vehicle in Reverse.
- Radio is displaying "CAMERA FAULT".
- The Side Cameras are not working while in drive and I activate the turn signal.
- Unable to program the proper video input selections.
Brand : PAC
Model : BCI-FD21
Category : Air conditioner