
Genesis SP226 - Video projector INFOCUS - Free user manual and instructions
Find the device manual for free Genesis SP226 INFOCUS in PDF.


| Product Type | Video Projector |
| Brand | InFocus |
| Model | Genesis SP226 |
| Display Technology | Texas Instruments DLP |
| Native Resolution | WXGA (1280 x 800) |
| Brightness (Lumens) | 4000 |
| Contrast Ratio | 30000:1 |
| Light Source | UHP Lamp |
| Light Source Life (Maximum) | 15000 hours |
| Lens Zoom | 1.1x Manual Zoom |
| Keystone Correction (Vertical) | ±40° Manual/Automatic |
| Projection Factor | 1.54 ~ 1.72:1 |
| Projection Distance | 1.0 ~ 10.0 m (3.28 ~ 32.80 ft) |
| Image Offset | 112.4% |
| Audio Output | 1 x 10W |
| Power Consumption (Max) | 267W |
| Standby Power Consumption | < 0.5W |
| Product Dimensions (L x W x H) | 313 x 236 x 96.4 mm (12.4 x 9.3 x 3.8 in) |
| Weight | 2.9 kg (6.4 lb) |
| Fan Noise | 27 dB |
| Operating Temperature | 5°C to 40°C (41°F to 104°F) |
| Connectivity Inputs | VGA, HDMI 1.4 (x2), Composite Video, S-Video, 3.5mm Audio In |
| Connectivity Outputs | VGA, 3.5mm Audio Out, USB-A (Powered) |
| Control | RS232, IR Remote, Keypad |
Frequently Asked Questions - Genesis SP226 INFOCUS
User questions about Genesis SP226 INFOCUS
0 question about this device. Answer the ones you know or ask your own.
Ask a new question about this device
Download the instructions for your Video projector in PDF format for free! Find your manual Genesis SP226 - INFOCUS and take your electronic device back in hand. On this page are published all the documents necessary for the use of your device. Genesis SP226 by INFOCUS.
USER MANUAL Genesis SP226 INFOCUS
natural_image
Illustration of a projector with a circular lens and ventilation grille (no text or symbols)USERS GUIDE SCREENPLAY VISTA, GENESIS I, GENESIS II SERIES

| REGULATORY MODEL | SERIES NAME LENS TYPE | /RESOLUTION SVGA XGA WXGA 1080P WUXGA | |||||
| P122 SCREENPLAY VISTA | STANDARD THROW – SP2234 | SP2236 | SP2238 – | ||||
| P123 SCREENPLAY VISTA | SHORT THROW – | SP2234ST | SP2236ST | SP2238ST | – | ||
| P124 | SCREENPLAY GENESIS I | STANDARD THROW | SP122 | SP124 | SP126 | – | – |
| P125 | SCREENPLAY GENESIS II | STANDARD THROW | SP222 | SP224 | SP226 | SP228 | SP229 |
| P126 | SCREENPLAY GENESIS II | SHORT THROW | – | SP224ST | SP226ST | – | – |
TABLE OF CONTENTS
1. ABOUT THIS GUIDE .... 5
1.1 DESCRIPTION OF THE USER....5
1.2 CONVENTIONS USED IN THIS GUIDE ....5
1.3 EXPLANATION OF SAFETY WARNINGS ....5
1.4 RETAINING INSTRUCTIONS 5
1.5 OBTAINING DOCUMENTATION AND INFORMATION 6
1.6 DOCUMENTATION FEEDBACK......6
1.7 SUPPORT AND SERVICE 6
2. PRODUCT DESCRIPTION ....7
2.1 FEATURES....7
2.2 INTENDED USE AND REASONABLY FORESEEABLE MISUSE....9
2.3 PRODUCT ELEMENTS 9
2.3.1 FRONT 9
2.3.2 RIGHT SIDE....10
2.3.3 LEFT SIDE....11
2.3.4 TOP 12
2.3.5 BACK....13
3. SAFETY 15
3.1 HOW TO USE THE PRODUCT SAFELY 15
3.1.1 VULNERABLE PEOPLE SAFETY INFORMATION ....15
3.1.2 TECHNICAL LIFE SPAN 15
3.1.3 INTENDED USE SAFETY INFORMATION ....15
3.1.4 INSTALLATION SAFETY INFORMATION 15
3.1.5 ELECTRICAL SAFETY INFORMATION 16
3.1.6 SAFETY INFORMATION ....16
3.1.7 MAINTENANCE SAFETY INFORMATION ....16
3.1.8 SERVICE AND REPAIR SAFETY INFORMATION ....16
3.2 SAFE DISPOSAL 16
3.3 GRAPHICAL SYMBOLS....16
4. UNPACKING AND INSTALLING 17
4.1 PACKAGING CONTENTS....17
4.2 INSTALLATION INSTRUCTIONS....17
4.3 PLACEMENT AND DISTANCE FROM THE SCREEN....18
4.3.1 PROJECTION DISTANCE AND SCREEN SIZE 18
4.4 CLEARANCE 24
4.5 CEILING MOUNT 25
4.6 MOUNTING HOLE DIAGRAM 26
5. ADJUSTING....27
5.1 ADJUSTING THE IMAGE HEIGHT AND TILT 27
5.2 ADJUSTING THE ZOOM, LENS SHIFT AND FOCUS....27
5.3 ADJUSTING THE VERTICAL AND HORIZONTAL KEYSTONE....27
6. CONNECTING 29
6.1 CONNECTION DIAGRAM....29
7. USING....30
7.1 LEDs 30
7.2 KEYPAD 30
7.3 REMOTE CONTROL 31
7.3.1 INSTALLING BATTERIES IN THE REMOTE CONTROL....32
7.3.2 REMOTE CONTROL IR CODES....33
7.4 REMOTE CONTROL EFFECTIVE RANGE 33
7.5 TURNING THE PROJECTOR ON....34
7.6 SELECTING A INPUT SOURCE 34
7.7 TURNING THE PROJECTOR TO STANDBY MODE....34
7.8 VIEWING 3D CONTENT 35
7.8.1 PHOTOSENSITIVE SEIZURE WARNING AND OTHER HEALTH RISKS....35
7.8.2 ENABLEING 3D MODE 36
7.8.3 ENABLING AUTO 3D MODE....36
8. USING THE ON SCREEN DISPLAY (OSD) 37
8.1 SELECTING THE LANGUAGE FOR THE ON SCREEN MENU....37
8.2 SELECTING A DISPLAY MODE....37
8.3 ADJUSTING THE IMAGE COLOUR AND TEMPERATURE 38
8.4 ADJUSTING THE SHARPNESS OF THE IMAGE 38
8.5 MAGNIFYING THE IMAGE 38
8.6 SELECTING AN ASPECT RATIO 38
8.7 ADJUSTING THE BRIGHTNESS....39
8.8 ENABLEING ECO MODE 39
8.9 ENABLING CLOSED CAPTIONS....39
8.10 DISPLAYING A TEST PATTERN 39
8.11 PREVENTING UNAUTHORIZED USE 39
8.12 CHANGING THE PASSWORD 39
8.13 CONTROLLING THE PROJECTOR FROM A WEB BROWSER....40
9. CLEANING 45
9.1 CLEANING THE LENS 45
9.2 CLEANING THE CASE....45
9.3 CLEANING THE AIR VENTS 45
10. SANITATION......45
11. DISPOSAL......46
11.1 DISPOSAL OF ELECTRICAL COMPONENTS....46
11.2 DISPOSAL OF PACKAGING WASTE 46
12. TROUBLESHOOTING 47
12.1 LED INDICATOR LIGHTS 47
12.2 SOLVING ON/OFF ISSUES 47
12.3 SOLVING IMAGE ISSUES 47
12.4 SOLVING VIDEO, AUDIO AND REMOTE CONTROL ISSUES 48
12.5 SERVICING 49
13. ADDITIONAL INFORMATION .... 49
13.1 RS232 PIN ASSIGNMENTS 49
13.2 RS232 PROTOCOL FUNCTION LIST 49
13.2.1 RS232 PROJECTOR COMMAND CODES....50
13.2.2 SENT FROM PROJECTOR AUTOMATICALLY 64
13.2.3 RS232 CODES READ FROM PROJECTOR 65
13.3 SUPPORTED RESOLUTIONS AND REFRESH RATES....68
13.4 ON SCREEN DISPLAY (OSD) MENU TREE....70
14. SPECIFICATIONS....79
14.1 VISTA, P122 & P123, SPECIFICATIONS....79
14.2 GENESIS I, P124, SPECIFICATIONS....81
14.3 GENESIS II P125 & P126, SPECIFICATIONS 83
- PRODUCT COMPLIANCE 85
15.1 FOR USERS IN THE UNITED STATES 85
15.2 FOR USERS IN CANADA 85
15.3 FOR USERS IN EUROPEAN UNION 86
15.4 FOR USERS IN THE UNITED KINGDON AND NORTHERN IRELAND 86
15.5 FOR USERS IN RUISSIA....87
- WARRANTY 88
1.1 DESCRIPTION OF THE USER
This document is intended for anyone who will install, setup, or use the projector.
1.2 CONVENTIONS USED IN THIS GUIDE
The following style conventions are used in this document:
Bold
- Names of product elements, commands, options, and programs.
- Names of interface elements (such windows, dialog boxes, buttons, fields, and menus).
- Interface elements the user selects, clicks, taps, or types.
Italic
• Publication titles.
- Emphasis (for example, a new term).
1.3 EXPLANATION OF SAFETY WARNINGS

WARNING
"WARNING" indicates a hazard with a medium to high level of risk which, could result in death or serious injury.

ATTENTION
"ATTENTION" indicates a hazard with a low level of risk which, if not avoided, could result in minor or moderate injury.

INFORMATION
"INFORMATION" Indicates information considered important, but not hazard-related.
1.4 RETAINING INSTRUCTIONS
Keep all safety information and instructions for future reference and pass them on to subsequent users of the product.

WARNING
Ensure that each person who uses the product has read and understood this guide and its safety instructions before using this product. Failure to do so can result in serious injury or death.

ATTENTION
Follow all the instructions. This will avoid fire, explosions, electric shocks, or other hazards that may result in damage to property and/or severe or fatal injuries.

INFORMATION
The manufacturer is not liable for cases of material damage or personal injury caused by incorrect handling or non-compliance with the safety instructions. In such cases, the warranty will be voided.
1.5 OBTAINING DOCUMENTATION AND INFORMATION
The latest version of this document can be obtained by visiting:
- https://www.screenplay.net/projectors/vista
- https://www.screenplay.net/projectors/genesis1
- https://www.screenplay.net/projectors/genesis_II
1.6 DOCUMENTATION FEEDBACK
If you are reading product documentation on the internet, any comments can be submitted Here. We appreciate your comments.
1.7 SUPPORT AND SERVICE
Please contact the support team in your region for technical and product support. Alternatively, you may contact your local distributor if you are in Asia or Australia.
Americas
Monday - Friday
6am - 5pm PST

+1877-388-8360

support@screenplay.net

screenplay.net/support
Europe, Middle East & Africa
Monday - Friday
8am - 5pm CET

eusupport@screenplay.net

screenplay.net/support
Asia Pacific
Monday - Friday
8am - 5pm ICT

apsupport@screenplay.net

screenplay.net/support
2.1 FEATURES
| GENESIS I GENESIS II VISTA | ||||||||||||||||
| P124 P125 P126 P122 P123 | ||||||||||||||||
| SP122 | SP124 | SP126 | SP222 | SP224 | SP226 | SP228 | SP229 | SP234ST | SP236ST | SP2234 | SP2236 | SP2238 | SP2234ST | SP2236ST | SP2238ST | |
| Nine Picture Modes including DICOM Simulation, User Definable and ISF Night & Day | ● | ● | ● | ● | ● | ● | ● | ● | ● | ● | ● | ● | ||||
| Seven Wall Colour Modes | ● | ● | ● | ● | ● | ● | ● | ● | ● | ● | ● | ● | ||||
| Brightness, Sharpness, Contrast, Colour, Tint, Gamma Adjustment Settings | ● | ● | ● | ● | ● | ● | ● | ● | ● | ● | ● | ● | ||||
| 10 Step BrilliantColor Implementation | ● | ● | ● | ● | ● | ● | ● | ● | ● | ● | ● | ● | ||||
| Individual Hue, Saturation and Gain Adjustments for RGB, C. M, Y.W | ● | ● | ● | ● | ● | ● | ● | ● | ● | ● | ● | ● | ||||
| RGB Gain/Bias Adjustments | ● | ● | ● | ● | ● | ● | ● | ● | ● | ● | ● | ● | ||||
| Five Colour Space Adjustment Settings | ● | ● | ● | ● | ● | ● | ● | ● | ● | ● | ● | ● | ||||
| White and Black Level Adjustments | ● | ● | ● | ● | ● | ● | ● | ● | ● | ● | ● | ● | ||||
| IRE and Signal Settings and Adjustments | ● | ● | ● | ● | ● | ● | ● | ● | ● | ● | ● | ● | ||||
| Aspect Ratio Format Settings | ● | ● | ● | ● | ● | ● | ● | ● | ● | ● | ● | ● | ||||
| 4:3 | ● | ● | ● | ● | ● | ● | ● | ● | ● | ● | ● | ● | ||||
| 16:9 | ● | ● | ● | ● | ● | ● | ● | ● | ● | ● | ● | ● | ||||
| 16:10 | ● | ● | ● | ● | ● | ● | ● | ● | ● | ● | ● | ● | ||||
| Letter Box | ● | ● | ● | ● | ● | ● | ● | ● | ● | ● | ● | ● | ● | ● | ● | ● |
| Native | ● | ● | ● | ● | ● | ● | ● | ● | ● | ● | ● | ● | ||||
| Auto | ● | ● | ● | ● | ● | ● | ● | ● | ● | ● | ● | ● | ||||
| Digital Edge Masking | ● | ● | ● | ● | ● | ● | ● | ● | ● | ● | ● | ● | ||||
| Digital Image Shift - Horizontal & Vertical | ● | ● | ● | ● | ● | ● | ● | ● | ● | ● | ● | ● | ||||
| Digital Zoom | ● | ● | ● | ● | ● | ● | ● | ● | ● | ● | ● | ● | ||||
| Vertical Keystone Adjustment | ● | ● | ● | ● | ● | ● | ● | ● | ● | ● | ● | ● | ||||
| 3D Activation, DLP -Link Settings & Formats | ● | ● | ● | ● | ● | ● | ● | ● | ● | ● | ● | ● | ||||
| 3D Sync Invert | ● | ● | ● | ● | ● | ● | ● | ● | ● | ● | ● | ● | ||||
| 2D to 3D Setting | ● | ● | ● | ● | ● | ● | ● | ● | ● | ● | ● | ● | ||||
| Enhanced Low Latency Gaming Mode | ● | ● | ● | ● | ● | ● | ● | ● | ● | ● | ● | ● | ||||
| Picture Mode Lock | ● | ● | ● | ● | ● | ● | ● | ● | ● | ● | ● | ● | ||||
| 27 Selectable OSD Languages | ● | ● | ● | ● | ● | ● | ● | ● | ● | ● | ● | ● | ||||
| Projection Modes - Front, Rear, Front Ceiling, Rear Ceiling OSD Menu Positioning | ● | ● | ● | ● | ● | ● | ● | ● | ● | ● | ● | ● | ||||
| Screen Type - Aspect Ratio Locking 16:10 | ● | ● | ● | ● | ● | ● | ● | ● | ● | ● | ● | ● | ● | ● | ● | ● |
| Screen Type - Aspect Ratio Locking 16:9 | ● | ● | ● | ● | ● | ● | ● | ● | ● | ● | ● | ● | ||||
| Security On/Off Setting | ● | ● | ● | ● | ● | ● | ● | ● | ● | ● | ● | ● | ||||
| Security Timer | ||||||||||||||||
| Security Password Selector | ||||||||||||||||
| Assignable Project ID Number | ||||||||||||||||
| Audio Input and Volume Settings | ||||||||||||||||
| HDMI Link Activation and Settings | ||||||||||||||||
| Startup Logo Removal and Background Colour Selector Projector Information Messaging Override | ||||||||||||||||
| Input Source Lock Auto Source Setting High Altitude Setting Keypad Lock Setting Built in Test Patterns IR Faction Setting | ||||||||||||||||
| 15 user presets with single key activation Direct Power On Setting | ||||||||||||||||
| Signal Power On Setting | ||||||||||||||||
| Auto Power Off Setting | ||||||||||||||||
| Sleep Timer Setting | ||||||||||||||||
| Quick Resume Setting | ||||||||||||||||
| VGA Out Standby Setting | ||||||||||||||||
| USB-A Power Setting | ||||||||||||||||
| Lamp Usage Reminder Setting | ||||||||||||||||
| Lamp Brightness Mode | ||||||||||||||||
| Projector Information Table | ||||||||||||||||
| 24/7 Operation | ||||||||||||||||
| Waveform Lamp Colour Enhancement AV Mute | ||||||||||||||||
| AV Mute | ||||||||||||||||
| Crestron Connect Certified | ||||||||||||||||
2.2 INTENDED USE AND REASONABLY FORESEEABLE MISUSE
The product may only be used in accordance with the instructions described in this guide. Any use other than those described in this guide is considered non-intended use and will void the warranty.
The ambient operating environment should be free of airborne smoke, grease, oil, and other contaminants that can affect the operation or performance of the projector.

WARNING
Do not use the product near water or moisture. Do not expose the product to rain, steam or condensation to reduce the risk of fire or electric shock.
2.3 PRODUCT ELEMENTS
2.3.1 FRONT
a)
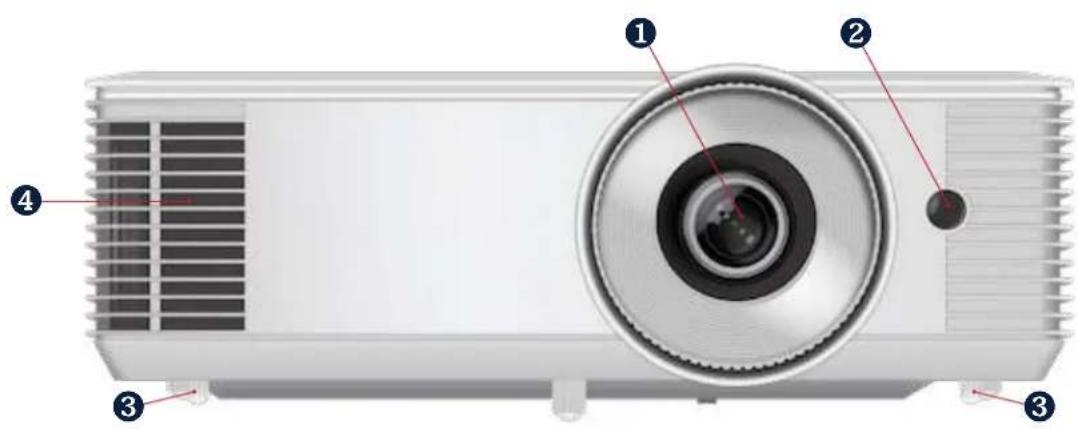
| REGULATORY MODEL | SERIES NAME | LENS TYPE/RESOLUTION | SVGA | XGA | WXGA | 1080P | WUXGA |
| P122 | SCREENPLAY VISTA | STANDARD THROW | - | SP2234 | SP2236 | SP2238 | - |
| P124 | SCREENPLAY GENESIS I | STANDARD THROW | SP122 | SP124 | SP126 | - | - |
| P125 | SCREENPLAY GENESIS II | STANDARD THROW | SP222 | SP224 | SP226 | SP228 | SP229 |
b)
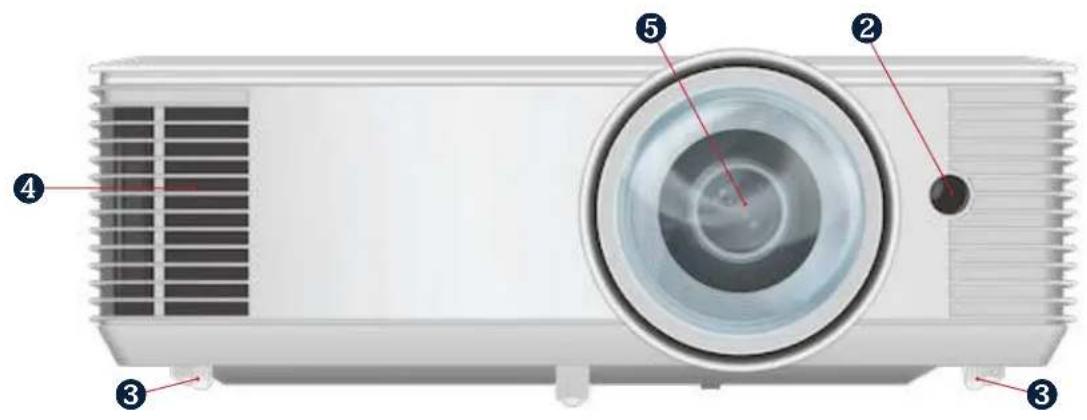
| REGULATORY MODEL | SERIES NAME | LENS TYPE/RESOLUTION | SVGA | XGA | WXGA | 1080P | WUXGA |
| P123 SCREENPLAY VISTA SHORT THROW – | SP2234ST | SP2236ST | SP2238ST | – | |||
| P126 SCREENPLAY GENESIS II SHORT THROW – SP224ST SP226ST | – – | ||||||
2.3.2 RIGHT SIDE
a)
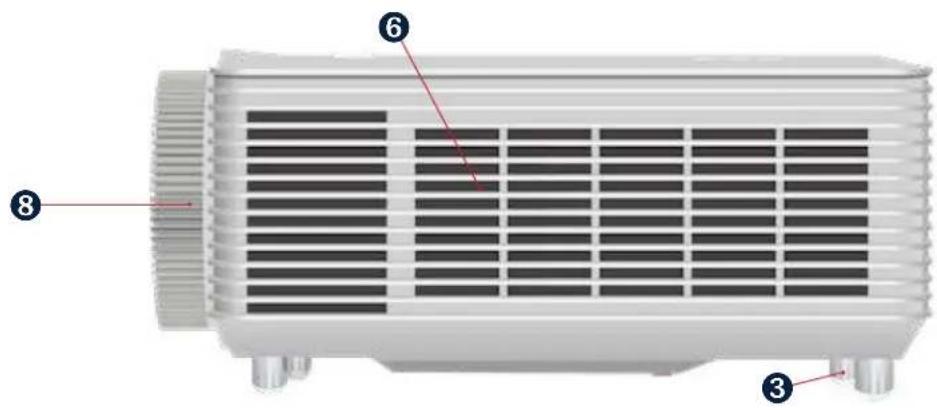
| REGULATORY MODEL | SERIES NAME | LENS TYPE/RESOLUTION | SVGA | XGA | WXGA | 1080P | WUXGA |
| P122 | SCREENPLAY VISTA | STANDARD THROW | - | SP2234 | SP2236 | SP2238 | - |
| P124 | SCREENPLAY GENESIS I | STANDARD THROW | SP122 | SP124 | SP126 | - | - |
| P125 | SCREENPLAY GENESIS II | STANDARD THROW | SP222 | SP224 | SP226 | SP228 | SP229 |
b)
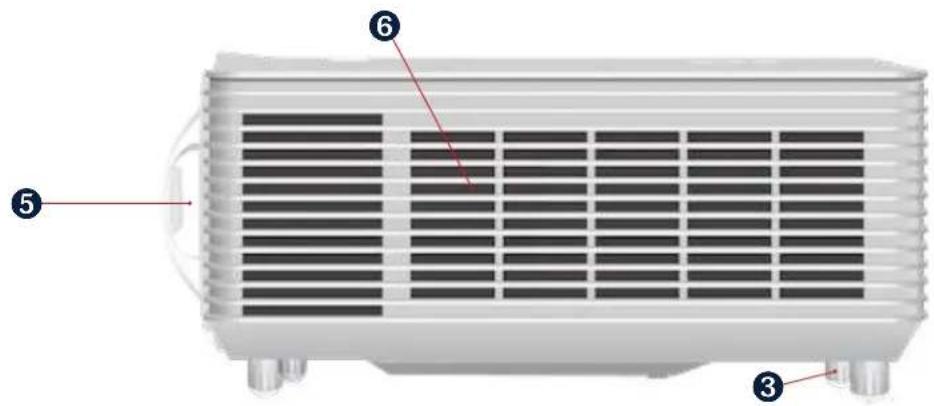
| REGULATORY MODEL | SERIES NAME | LENS TYPE/RESOLUTION | SVGA | XGA | WXGA | 1080P | WUXGA |
| P123 SCREENPLAY VISTA SHORT THROW | SP2234ST | SP2236ST | SP2238ST | - | |||
| P126 SCREENPLAY GENESIS II SHORT THROW - SP224ST SP226ST | -- | ||||||
2.3.3 LEFT SIDE
a)
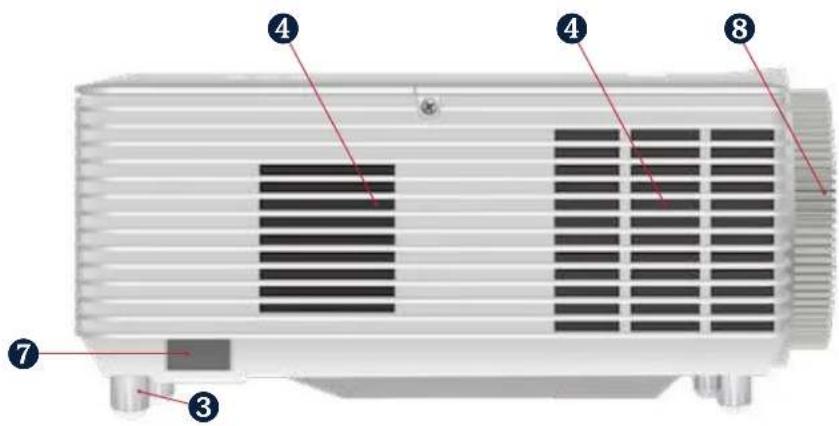
| REGULATORY MODEL | SERIES NAME | LENS TYPE/RESOLUTION | SVGA | XGA | WXGA | 1080P | WUXGA |
| P122 | SCREENPLAY VISTA | STANDARD THROW | - | SP2234 | SP2236 | SP2238 | - |
| P124 | SCREENPLAY GENESIS I | STANDARD THROW | SP122 | SP124 | SP126 | - | - |
| P125 | SCREENPLAY GENESIS II | STANDARD THROW | SP222 | SP224 | SP226 | SP228 | SP229 |
b)
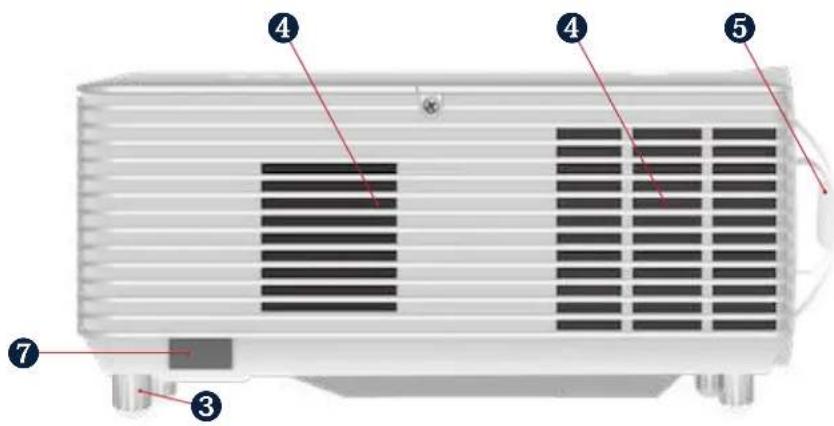
| REGULATORY MODEL | SERIES NAME | LENS TYPE/RESOLUTION | SVGA | XGA | WXGA | 1080P | WUXGA |
| P123 SCREENPLAY VISTA SHORT THROW – | SP2234ST | SP2236ST | SP2238ST | – | |||
| P126 SCREENPLAY GENESIS II SHORT | THROW – SP224ST SP226ST | – | – | ||||
2.3.4 TOP
a)
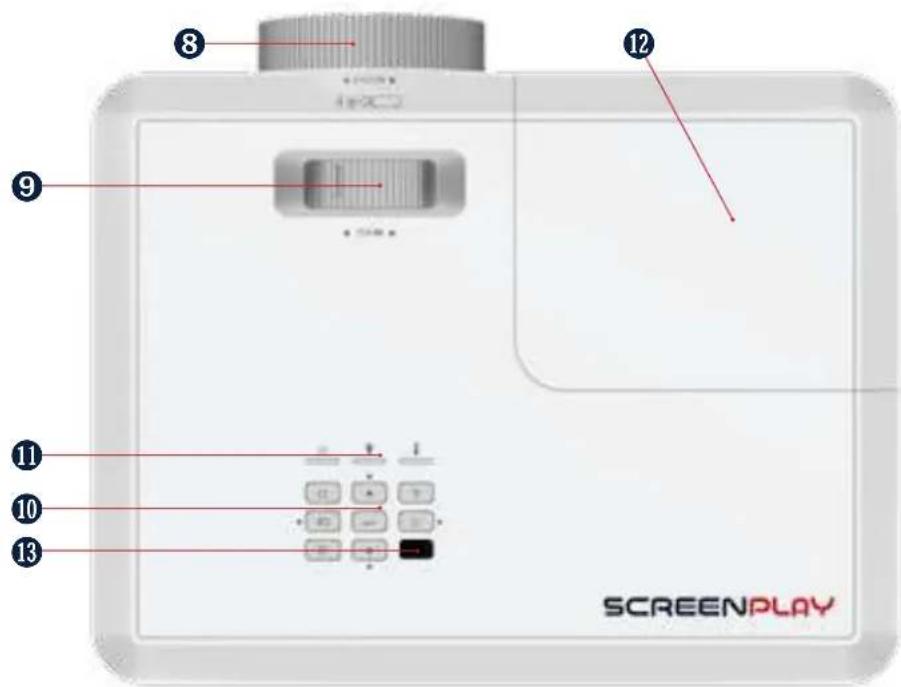
| REGULATORY MODEL | SERIES NAME | LENS TYPE/RESOLUTION | SVGA | XGA | WXGA | 1080P | WUXGA |
| P122 | SCREENPLAY VISTA | STANDARD THROW | - | SP2234 | SP2236 | SP2238 | - |
| P124 | SCREENPLAY GENESIS I | STANDARD THROW | SP122 | SP124 | SP126 | - | - |
| P125 | SCREENPLAY GENESIS II | STANDARD THROW | SP222 | SP224 | SP226 | SP228 | SP229 |
b)
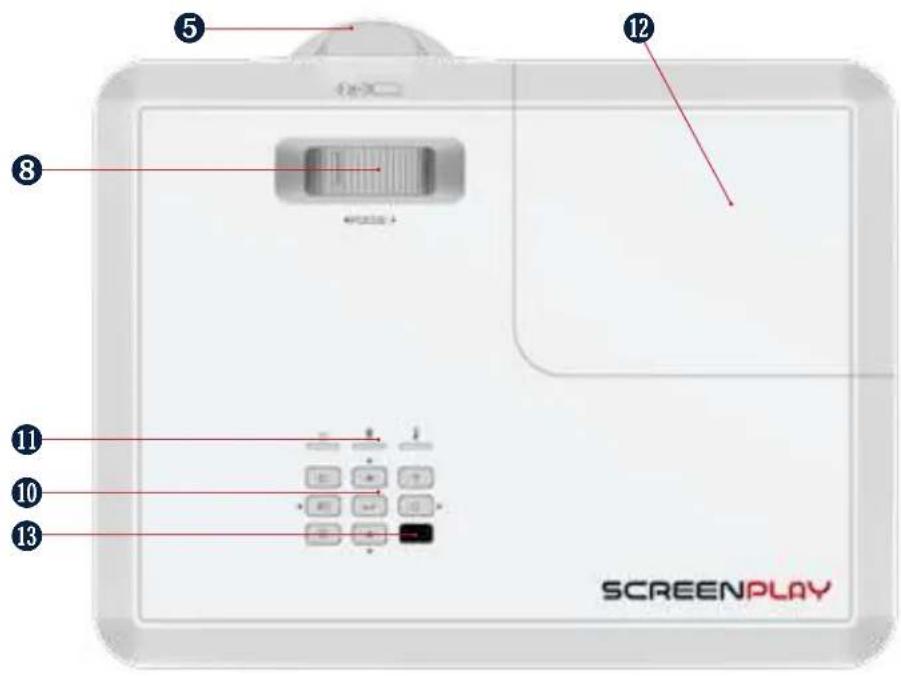
| REGULATORY MODEL | SERIES NAME | LENS TYPE/RESOLUTION | SVGA | XGA | WXGA | 1080P | WUXGA |
| P123 SCREENPLAY VISTA SHORT THROW | SP2234ST | SP2236ST | SP2238ST | - | |||
| P126 SCREENPLAY GENESIS II SHORT | THROW - SP224ST SP226ST | -- | |||||
2.3.5 BACK
a)
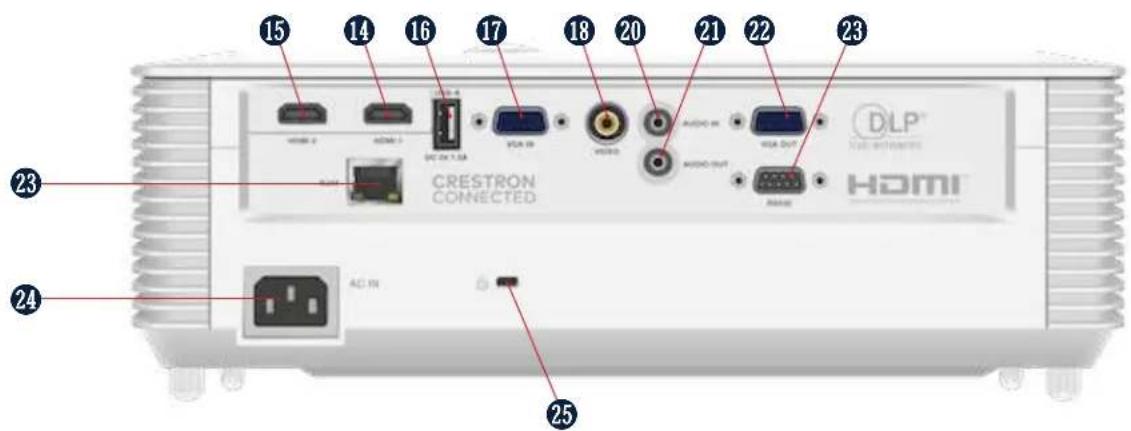
| REGULATORY MODEL | SERIES NAME | LENS TYPE/RESOLUTION | SVGA | XGA | WXGA | 1080P | WUXGA |
| P122 | SCREENPLAY VISTA | STANDARD THROW | - | SP2234 | SP2236 | SP2238 | - |
| P123 SCREENPLAY VISTA SHORT THROW | SP2234ST | SP2236ST | SP2238ST | - | |||
b)
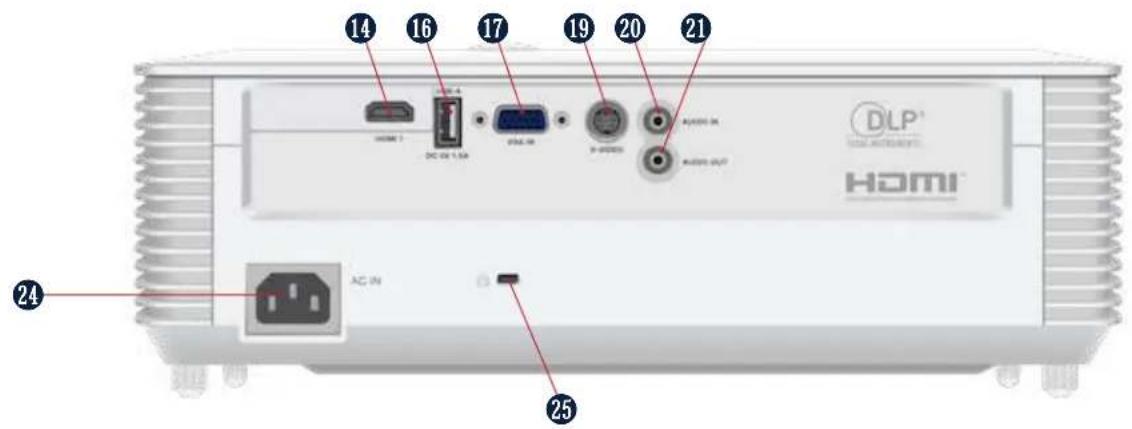
| REGULATORY MODEL | SERIES NAME | LENS TYPE/RESOLUTION | SVGA | XGA | WXGA | 1080P | WUXGA |
| P124 SCREENPLAY GENESIS I STANDARD THROW SP122 SP124 SP126 -- | |||||||
c)
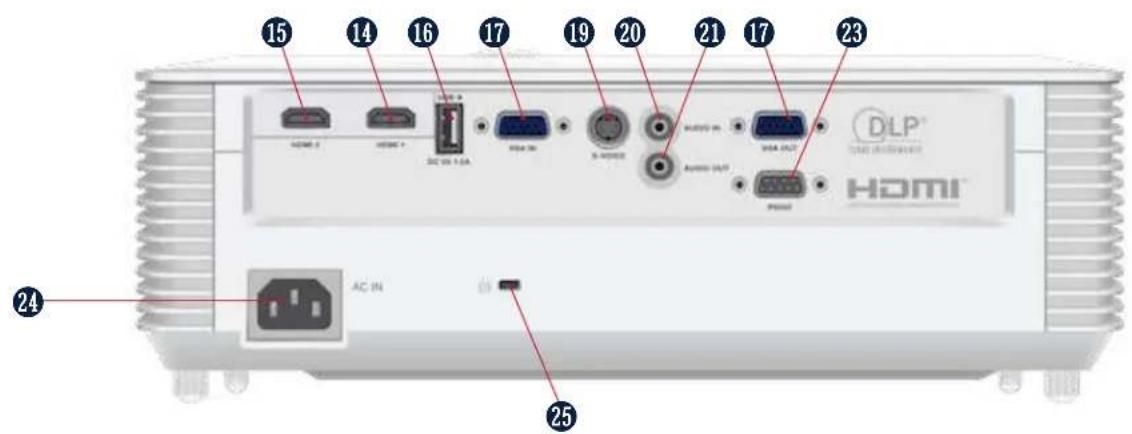
| REGULATORY MODEL | SERIES NAME | LENS TYPE/RESOLUTION | SVGA | XGA | WXGA | 1080P | WUXGA |
| P125 | SCREENPLAY GENESIS II | STANDARD THROW | SP222 | SP224 | SP226 | SP228 | SP229 |
| P126 | SCREENPLAY GENESIS II | SHORT THROW | - | SP224ST | SP226ST | - | - |
| REFERENCE | DESCRIPTION | REFERENCE | DESCRIPTION |
| 1 | Standard throw zoom lens | 14 | HDMI 1, 1.4 Input |
| 2 | Remote control IR receiver 1 | 15 HDMI | 2, 1.4 Input |
| 3 | Adjustable feet | 16 | USB A for service and wireless dongle power 5v/1.5A |
| 4 | Air exhaust grill | 17 | VGA Input |
| 5 | Short throw fixed lens | 18 | Composite Input |
| 6 | Air Intake grill | 19 | S-VIDEO Input |
| 7 | Cable and Lock slot | 20 | 3.5mm Audio Input |
| 8 Focus | adjustment ring 21 3.5mm Audio Output | ||
| 9 Zoom | adjustment ring 22 VGA Output | ||
| 10 Keypad | 23 RS232 Control | ||
| 11 LED function | lights 23 RJ45 Networking and Control | ||
| 12 Lamp | door 24 Power Cord AC IN | ||
| 13 Remote control IR receiver | 2 25 Kensington Lock Slot |
3. SAFETY
3.1 HOW TO USE THE PRODUCT SAFELY

WARNING
Read and understand this guide and its safety instructions before using this product. Failure to do so can result in serious injury.
3.1.1 VULNERABLE PEOPLE SAFETY INFORMATION
This device is not intended for use by persons (including children) with restricted physical, sensory or intellectual capability or lack of experience and/or knowledge.
The projector complies with the safety standards for electromagnetic devices. Contact your physician prior to use if you have a pacemaker or other implanted device.
3.1.2 TECHNICAL LIFE SPAN
The technical lifespan of the projector is five years or 20,000 hours of use in normal mode and 30,000 hours of use in ECO mode under normal operating conditions (whichever comes first).
3.1.3 INTENDED USE SAFETY INFORMATION
Use the projector only for its intended use as described in this user guide.
Do not expose the projector to temperatures above 104 F / 40 C or below 32 F / 0 C.
3.1.4 INSTALLATION SAFETY INFORMATION
Check the projector for damage before installation. If there is any visible damage, do not connect the projector and contact ScreenPlay.
Do not install the projector:
• Near heat sources such as radiators, heat registers, stoves, or other devices that produce heat
• Near water or in direct sunlight
• In an enclosure such as a book case or a cabinet that restricts air flow
3.1.5 ELECTRICAL SAFETY INFORMATION
Check for damage before connecting the power cable.
Only connect the projector to a grounded socket with earth leakage protection using the provided power cable.
Immediately unplug the projector from the wall outlet:
- If it has been damaged
- If water or another substance enters the projector
- If you smell smoke or other odours coming from the projector
• During lightning storms - When unused for long periods of time
3.1.6 SAFETY INFORMATION
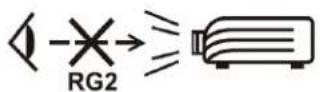

WARNING
Do not look straight at the projector lens during operation. The intense light beam may damage your eyes.
3.1.7 MAINTENANCE SAFETY INFORMATION
Review the instructions in the CLEANING section before cleaning the projector.
Disconnect the power supply before cleaning the projector. Do not use abrasive cleaning cloths or chemicals.
3.1.8 SERVICE AND REPAIR SAFETY INFORMATION
The projector contains no user serviceable parts. Contact ScreenPlay for service or repair.
3.2 SAFE DISPOSAL
Follow the instructions in the DISPOSAL section in this user guide for safe disposal of the projector.
3.3 GRAPHICAL SYMBOLS
The following table describes the safety and regulatory symbols and marks on the packaging and product.
| SYMBOL MEANING | |
 | The CCC mark on the product is the manufacturer's declaration that the product complies with the essential requirements for the relevant safety legislation of China. |
 | The CE mark on the product is the manufacturer's declaration that the product complies with the essential requirements of the relevant European health, safety, and environmental protection legislation. |
  | The cTUVus seal on a product is a seal of quality that confirms that the product has been tested by the German TV testing organization for use in the US and Canada.The EAC mark on the product is the manufacturer's declaration that the product complies with the essential requirements of the relevant safety legislation of the Eurasian Economic Union (EAEU). |
 | The FCC mark on the product is the manufacturer's declaration that the product's electromagnetic radiation is below the limits specified by the Federal Communication Commission (FCC). |
 | The NOM mark on the product is the manufacturer's declaration that the product complies with the essential requirements of the relevant Mexican safety legislation. |
 | The RoHS mark on the product is the manufacturer's declaration that the product complies with the essential requirements of the relevant European Union safety legislation. |
 | The Waste Electrical and Electronic Equipment (WEEE) symbol on the product, the accessories, or packaging indicates that this device shall not be treated as unsorted municipal waste, but shall be collected separately. |
 | The certification scheme of the Bureau of Indian Standards (BIS) is mandatory for specific electronic products in India. The BIS mark on the product is the manufacturer's declaration that the product complies with the essential requirements of the relevant India safety legislation |
4. UNPACKING AND INSTALLING
4.1 PACKAGING CONTENTS
The projector packaging will contain:
- Projector
- Power cable
- VGA cable
- Remote control (batteries not included)
- Simplified users guide
4.2 INSTALLATION INSTRUCTIONS
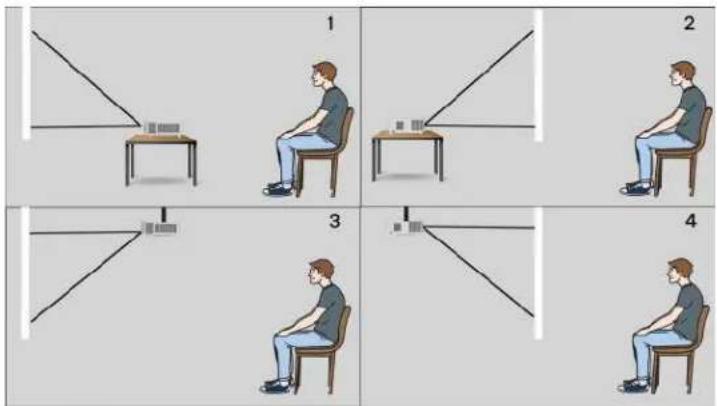
Your projector is designed to be installed in one of four possible positions. Your room layout or personal preference will dictate which installation location you select. Take into consideration the size and position of your screen, the location of a suitable power outlet, as well as the location and distance between the projector and the rest of your equipment.
- Table mounted front proejection
- Table mounted rear projection
- Ceiling mounted front projection
- Ceiling mounted rear projection
4.3 PLACEMENT AND DISTANCE FROM THE SCREEN
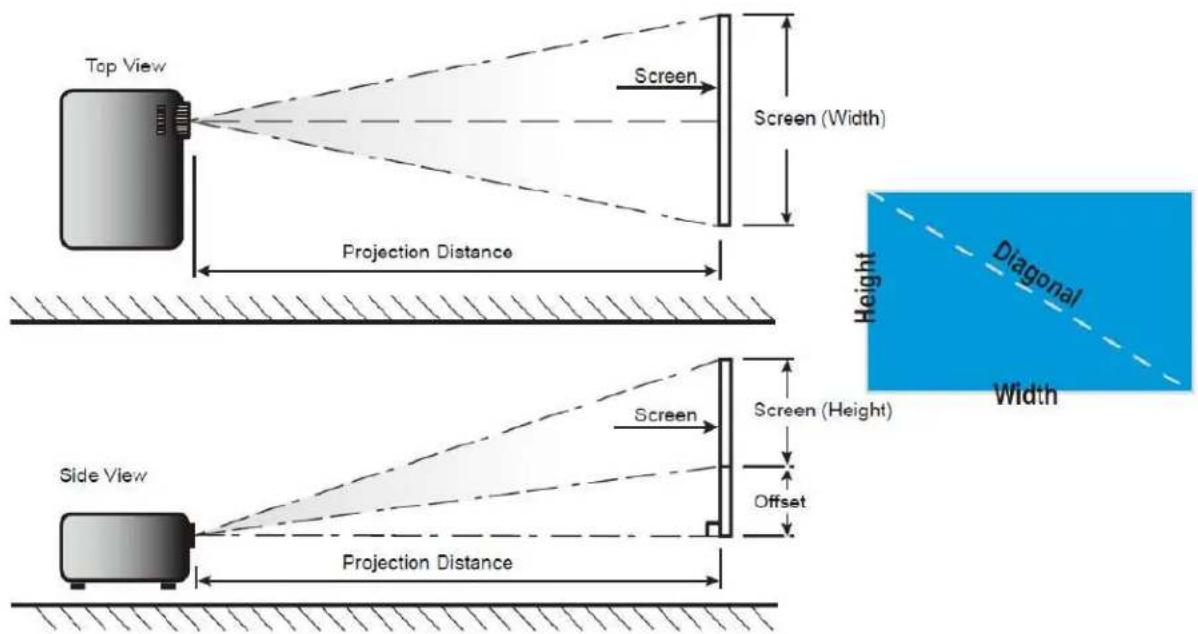
The projected image size will increase based on the projector's distance from the screen or projection surface. You can use the following tables to determine the best location for the projector and screen.
4.3.1 PROJECTION DISTANCE AND SCREEN SIZE
SP2234_RT_XGA 1.3* ZOOM
| Diagonal Screen | Screen size Projection distance Offset | |||||||||
| (m) (inch) (m) (inch) | (cm) (inch) | |||||||||
| Width Hight Width | Hight Wide | Tele Wide Tele | ||||||||
| 30 | 0,61 | 0,46 | 24,02 | 18,11 | 0,9 | 1,2 | 35,43 | 47,24 | 7 | 2,8 |
| 40 | 0,81 | 0,61 | 31,89 | 24,02 | 1,2 | 1,6 | 47,24 | 62,99 | 9 | 3,5 |
| 50 | 1,02 | 0,76 | 40,16 | 29,92 | 1,5 | 2,0 | 59,06 | 78,74 | 12 | 4,7 |
| 60 | 1,22 | 0,91 | 48,03 | 35,83 | 1,8 | 2,4 | 70,87 | 94,49 | 14 | 5,5 |
| 70 | 1,42 | 1,07 | 55,91 | 42,13 | 2,1 | 2,7 | 82,68 | 106,30 | 16 | 6,3 |
| 80 | 1,63 | 1,22 | 64,17 | 48,03 | 2,4 | 3,1 | 94,49 | 122,05 | 18 | 7,1 |
| 90 | 1,83 | 1,37 | 72,05 | 53,94 | 2,7 | 3,5 | 106,30 | 137,80 | 21 | 8,3 |
| 100 | 2,03 | 1,52 | 79,92 | 59,84 | 3,0 | 3,9 | 118,11 | 153,54 | 23 | 9,1 |
| 120 | 2,44 | 1,83 | 96,06 | 72,05 | 3,6 | 4,7 | 141,73 | 185,04 | 27 | 10,6 |
| 150 | 3,05 | 2,29 | 120,08 | 90,16 | 4,5 | 5,9 | 177,17 | 232,28 | 34 | 13,4 |
| 200 | 4,06 | 3,05 | 159,84 | 120,08 | 6,0 | 7,8 | 236,22 | 307,09 | 46 | 18,1 |
| 250 | 5,08 | 3,81 | 200,00 | 150,00 | 7,5 | 9,8 | 295,28 | 385,83 | 57 | 22,4 |
| 300 | 6,1 | 4,57 | 240,16 | 179,92 | 9,0 | == | 354,33 | == | 69 | 27,2 |
SP2236_RT_WXGA 1.3× ZOOM
| Diagonal Screen | Screen size Projection distance Offset | |||||||||
| (m) (inch) (m) (inch) | (cm) (inch) | |||||||||
| Width H | ght Width | Hight Wide | Tele Wide Tele | |||||||
| 30 | 0.65 | 0.4 | 25.59 | 15.75 | 0.8 | 1.0 | 31.5 | 39.4 | 5 | 1.97 |
| 40 | 0.86 | 0.54 | 33.86 | 21.26 | 1.0 | 1.3 | 39.4 | 51.2 | 7 | 2.76 |
| 50 | 1.08 | 0.67 | 42.52 | 26.38 | 1.3 | 1.7 | 51.2 | 66.9 | 9 | 3.54 |
| 60 | 1.29 | 0.81 | 50.79 | 31.89 | 1.5 | 2.0 | 59.1 | 78.7 | 10 | 3.94 |
| 70 | 1.51 | 0.94 | 59.45 | 37.01 | 1.8 | 2.3 | 70.9 | 90.6 | 12 | 4.72 |
| 80 | 1.72 | 1.08 | 67.72 | 42.52 | 2.0 | 2.7 | 78.7 | 106.3 | 13 | 5.12 |
| 90 | 1.94 | 1.21 | 76.38 | 47.64 | 2.3 | 3.0 | 90.6 | 118.1 | 15 | 5.91 |
| 100 | 2.15 | 1.35 | 84.65 | 53.15 | 2.6 | 3.3 | 102.4 | 129.9 | 16 | 6.30 |
| 120 | 2.58 | 1.62 | 101.57 | 63.78 | 3.1 | 4.0 | 122.0 | 157.5 | 20 | 7.87 |
| 150 | 3.23 | 2.02 | 127.17 | 79.53 | 3.8 | 5.0 | 149.6 | 196.9 | 25 | 9.84 |
| 200 | 4.31 | 2.69 | 169.69 | 105.91 | 5.1 | 6.7 | 200.8 | 263.8 | 34 | 13.39 |
| 250 | 5.38 | 3.37 | 211.81 | 132.68 | 6.4 | 8.3 | 252.0 | 326.8 | 41 | 16.14 |
| 300 | 6.46 | 4.04 | 254.33 | 159.06 | 7.7 | == | 303.1 | == | 52 | 20.47 |
SP2238_RT_1080p 1.3* ZOOM
| Diagonal Screen | Screen size Projection distance Offset | |||||||||
| (m) (inch) (m) (inch) | (cm) (inch) | |||||||||
| Width | Hight | Width | Hight | Wide | Tele | Wide | Tele | |||
| 30 | 0,66 | 0,37 | 25,98 | 14,57 | 0,8 | 1 | 31,50 | 39,37 | 6 | 2,36 |
| 40 | 0,89 | 0,50 | 35,04 | 19,69 | 1 | 1,3 | 39,37 | 51,18 | 8 | 3,15 |
| 50 | 1,11 | 0,62 | 43,70 | 24,41 | 1,3 | 1,6 | 51,18 | 62,99 | 10 | 3,94 |
| 60 | 1,33 | 0,75 | 52,36 | 29,53 | 1,5 | 2 | 59,06 | 78,74 | 12 | 4,72 |
| 70 | 1,55 | 0,87 | 61,02 | 34,25 | 1,8 | 2,3 | 70,87 | 90,55 | 14 | 5,51 |
| 80 | 1,77 | 1,00 | 69,69 | 39,37 | 2 | 2,6 | 78,74 | 102,36 | 16 | 6,30 |
| 90 | 1,99 | 1,12 | 78,35 | 44,09 | 2,3 | 2,9 | 90,55 | 114,17 | 18 | 7,09 |
| 100 | 2,21 | 1,25 | 87,01 | 49,21 | 2,5 | 3,3 | 98,43 | 129,92 | 19 | 7,48 |
| 120 | 2,66 | 1,49 | 104,72 | 58,66 | 3 | 3,9 | 118,11 | 153,54 | 24 | 9,45 |
| 150 | 3,32 | 1,87 | 130,71 | 73,62 | 3,8 | 4,9 | 149,61 | 192,91 | 30 | 11,81 |
| 200 | 4,43 | 2,49 | 174,41 | 98,03 | 5 | 6,5 | 196,85 | 255,91 | 40 | 15,75 |
| 250 | 5,53 | 3,11 | 217,72 | 122,44 | 6,3 | 8,1 | 248,03 | 318,90 | 50 | 19,69 |
| 300 | 6,64 | 3,74 | 261,42 | 147,24 | 7,5 | == | 295,28 | == | 59 | 23,23 |
SP2234ST_ST_XGA 1:1× ZOOM
| Diagonal Screen | Screen size Projection distance Offset | |||||||
| (m) (inch) (m) (inch) | (cm) (inch) | |||||||
| Width Hight Width | Hight Fix Fix | |||||||
| 40 | 0,81 | 0,61 | 32,01 | 24,02 | 0,5 | 19,69 | 9 | 3,54 |
| 50 | 1,02 | 0,76 | 40,00 | 30,00 | 0,63 | 24,80 | 11,8 | 4,65 |
| 60 | 1,22 | 0,91 | 47,99 | 35,98 | 0,75 | 29,53 | 13,6 | 5,35 |
| 70 | 1,42 | 1,07 | 55,98 | 42,01 | 0,88 | 34,65 | 16,3 | 6,42 |
| 80 | 1,63 | 1,22 | 64,02 | 47,99 | 1 | 39,37 | 18,1 | 7,13 |
| 90 | 1,83 | 1,37 | 72,01 | 54,02 | 1,13 | 44,49 | 20,8 | 8,19 |
| 100 | 2,03 | 1,52 | 80,00 | 60,00 | 1,25 | 49,21 | 22,6 | 8,90 |
| 120 | 2,44 | 1,83 | 95,98 | 72,01 | 1,5 | 59,06 | 27,1 | 10,67 |
| 150 | 3,05 | 2,29 | 120,00 | 90,00 | 1,88 | 74,02 | 34,4 | 13,54 |
| 180 | 3,66 | 2,74 | 144,02 | 107,99 | 2,26 | 88,98 | 40,7 | 16,02 |
| 250 | 5,08 | 3,81 | 200,00 | 150,00 | 3,13 | 123,23 | 57 | 22,44 |
| 303 | 6,16 | 4,62 | 242,40 | 181,81 | 3,8 | 149,61 | 69,2 | 27,24 |
SP2236SST_ST_WXGA 1:1* ZOOM
| Diagonal Screen | Screen size Projection distance Offset | |||||||
| (m) (inch) (m) (inch) | (cm) (inch) | |||||||
| Width Hight | W | dth Hight | Fix Fix | |||||
| 40 | 0,86 | 0,54 | 33,92 | 21,20 | 0,45 | 17,72 | 7,15 | 2,81 |
| 50 | 1,08 | 0,67 | 42,40 | 26,50 | 0,56 | 22,05 | 8,69 | 3,42 |
| 60 1,29 | 0,81 | 50,88 31,80 | 0,67 26,38 | 10,23 | 4,03 | |||
| 70 | 1,51 | 0,94 | 59,36 | 37,10 | 0,79 | 31,10 | 11,77 | 4,63 |
| 80 | 1,72 | 1,08 | 67,84 | 42,40 | 0,9 | 35,43 | 13,3 | 5,24 |
| 90 | 1,94 | 1,21 | 76,32 | 47,70 | 1,01 | 39,76 | 14,84 | 5,84 |
| 100 | 2,15 | 1,35 | 84,80 | 53,00 | 1,12 | 44,09 | 16,38 | 6,45 |
| 120 | 2,58 | 1,62 | 101,76 | 63,60 | 1,35 | 53,15 | 20,46 | 8,06 |
| 150 | 3,23 | 2,02 | 127,20 | 79,50 | 1,68 | 66,14 | 25,07 | 9,87 |
| 180 | 3,88 | 2,42 | 152,64 | 95,40 | 2,02 | 79,53 | 29,68 | 11,69 |
| 250 | 5,38 | 3,37 | 212,00 | 132,50 | 2,81 | 110,63 | 41,45 | 16,32 |
| 302,9 | 6,52 | 4,08 | 256,86 | 160,54 | 3,4 | 133,86 | 50,24 | 19,78 |
SP2238ST_ST_1080p1:1* ZOOM
| Diagonal Screen | Screen size Projection distance | Offset | ||||||
| (m) (inch) (m) (inch) | (cm) (inch) | |||||||
| Width H | ght Width | Hight Fix Fix | ||||||
| 40 0,89 | 0,50 34,86 | 19,61 | 0,44 17,32 | 8,19 | 3,22 | |||
| 50 | 1,11 | 0,62 | 43,58 | 24,51 | 0,55 | 21,65 | 9,74 | 3,83 |
| 60 | 1,33 | 0,75 | 52,30 | 29,42 | 0,66 | 25,98 | 12,28 | 4,83 |
| 70 | 1,55 | 0,87 | 61,01 | 34,32 | 0,77 | 30,31 | 13,83 | 5,44 |
| 80 | 1,77 | 1,00 | 69,72 | 39,22 | 0,88 | 34,65 | 16,38 | 6,45 |
| 90 | 1,99 | 1,12 | 78,44 | 44,12 | 0,99 | 38,98 | 17,93 | 7,06 |
| 100 | 2,21 | 1,25 | 87,16 | 49,03 | 1,10 | 43,31 | 19,47 | 7,67 |
| 120 | 2,66 | 1,49 | 104,59 | 58,83 | 1,32 | 51,97 | 23,57 | 9,28 |
| 150 | 3,32 | 1,87 | 130,74 | 73,54 | 1,65 | 64,96 | 30,21 | 11,89 |
| 180 | 3,98 | 2,24 | 156,88 | 88,25 | 1,98 | 77,95 | 35,85 | 14,11 |
| 250 | 5,53 | 3,11 | 217,89 | 122,57 | 2,75 | 108,27 | 49,68 | 19,56 |
| 302,9 | 6,71 | 3,77 | 264,00 | 148,50 | 3,33 | 131,10 | 60,81 | 23,94 |
SP122, SP124, SP222, SP224_RT_SVGA & XGA_1.1* ZOOM
| Diagonal Screen | Screen size | Projection distance | Offset | |||||||
| (m) (inch) (m) (inch) | (cm) (inch) | |||||||||
| Width | Hight | Width | Hight | Wide | Tele | Wide | Tele | |||
| 30 | 0.61 | 0.46 | 24.00 | 18.00 | 1.18 | 1.32 | 46.56 | 51.84 | 6.86 | 2.70 |
| 40 | 0.81 | 0.61 | 32.00 | 24.00 | 1.58 | 1.76 | 62.08 | 69.12 | 9.14 | 3.60 |
| 50 | 1.02 | 0.76 | 40.00 | 30.00 | 1.97 | 2.19 | 77.60 | 86.40 | 11.43 | 4.50 |
| 60 | 1.22 | 0.91 | 48.00 | 36.00 | 2.37 | 2.63 | 93.12 | 103.68 | 13.72 | 5.40 |
| 70 | 1.42 | 1.07 | 56.00 | 42.00 | 2.76 | 3.07 | 108.64 | 120.96 | 16.00 | 6.30 |
| 80 | 1.63 | 1.22 | 64.00 | 48.00 | 3.15 | 3.51 | 124.16 | 138.24 | 18.29 | 7.20 |
| 90 | 1.83 | 1.37 | 72.00 | 54.00 | 3.55 | 3.95 | 139.68 | 155.52 | 20.57 | 8.10 |
| 100 | 2.03 | 1.52 | 80.00 | 60.00 | 3.94 | 4.39 | 155.20 | 172.80 | 22.86 | 9.00 |
| 120 | 2.44 | 1.83 | 96.00 | 72.00 | 4.73 | 5.27 | 186.24 | 207.36 | 27.43 | 10.80 |
| 150 | 3.05 | 2.29 | 120.00 | 90.00 | 5.91 | 6.58 | 232.80 | 259.20 | 34.29 | 13.50 |
| 200 | 4.06 | 3.05 | 160.00 | 120.00 | 7.88 | 8.78 | 310.40 | 345.60 | 45.72 | 18.00 |
| 250 | 5.08 | 3.81 | 200.00 | 150.00 | 9.86 | 10.97 | 388.00 | 432.00 | 57.15 | 22.50 |
| 300 | 6.10 | 4.57 | 240.00 | 180.00 | 11.83 | 13.17 | 465.60 | 518.40 | 68.58 | 27.00 |
SP126, SP226_RT_WXGA_1.1× ZOOM
| Diagonal Screen | Screen size Projection distance Offset | |||||||||
| (m) (inch) (m) (inch) | (cm) (inch) | |||||||||
| Width Hight Width | Hight Wide | Tele Wide Tele | ||||||||
| 30 0.6 | 5 | 0.40 25.4 | 15.90 1.00 | 1.11 39.18 43 | 76 5.01 | 1.97 | ||||
| 40 | 0.86 | 0.54 | 33.92 | 21.20 | 1.33 | 1.48 | 52.24 | 58.34 | 6.68 | 2.63 |
| 50 | 1.08 | 0.67 | 42.40 | 26.50 | 1.66 | 1.85 | 65.30 | 72.93 | 8.35 | 3.29 |
| 60 | 1.29 | 0.81 | 50.88 | 31.80 | 1.99 | 2.22 | 78.36 | 87.51 | 10.02 | 3.94 |
| 70 | 1.51 | 0.94 | 59.36 | 37.10 | 2.32 | 2.59 | 91.41 | 102.10 | 11.68 | 4.60 |
| 80 | 1.72 | 1.08 | 67.84 | 42.40 | 2.65 | 2.96 | 104.47 | 116.68 | 13.35 | 5.26 |
| 90 | 1.94 | 1.21 | 76.32 | 47.70 | 2.99 | 3.33 | 117.53 | 131.27 | 15.02 | 5.91 |
| 100 | 2.15 | 1.35 | 84.80 | 53.00 | 3.32 | 3.70 | 130.59 | 145.86 | 16.69 | 6.57 |
| 120 | 2.58 | 1.62 | 101.76 | 63.60 | 3.98 | 4.45 | 156.71 | 175.03 | 20.03 | 7.89 |
| 150 | 3.23 | 2.02 | 127.20 | 79.50 | 4.98 | 5.56 | 195.89 | 218.78 | 25.04 | 9.86 |
| 200 | 4.31 | 2.69 | 169.60 | 106.00 | 6.63 | 7.41 | 261.18 | 291.71 | 33.39 | 13.14 |
| 250 | 5.38 | 3.37 | 212.00 | 132.50 | 8.29 | 9.26 | 326.48 | 364.64 | 41.73 | 16.43 |
| 300 | 6.46 | 4.04 | 254.40 | 159.00 | 9.95 | 11.11 | 391.78 | 437.57 | 50.08 | 19.72 |
SP228_RT_1080p_1.1* ZOOM
| Diagonal Screen | Screen size Projection distance Offset | |||||||||
| (m) (inch) (m) (inch) | (cm) (inch) | |||||||||
| Width Hight Width | Hight | Wide Tele Wide Tele | ||||||||
| 30 | 0.66 | 0.37 | 26.15 | 14.71 | 0.98 | 1.08 | 38.44 | 42.36 | 5.98 | 2.35 |
| 40 | 0.89 | 0.50 | 34.86 | 19.61 | 1.30 | 1.43 | 51.25 | 56.48 | 7.97 | 3.14 |
| 50 | 1.11 | 0.62 | 43.58 | 24.51 | 1.63 | 1.79 | 64.06 | 70.60 | 9.96 | 3.92 |
| 60 | 1.33 | 0.75 | 52.29 | 29.42 | 1.95 | 2.15 | 76.87 | 84.72 | 11.95 | 4.71 |
| 70 | 1.55 | 0.87 | 61.01 | 34.32 | 2.28 | 2.51 | 89.69 | 98.84 | 13.95 | 5.49 |
| 80 | 1.77 | 1.00 | 69.73 | 39.22 | 2.60 | 2.87 | 102.50 | 112.96 | 15.94 | 6.28 |
| 90 | 1.99 | 1.12 | 78.44 | 44.12 | 2.93 | 3.23 | 115.31 | 127.08 | 17.93 | 7.06 |
| 100 | 2.21 | 1.25 | 87.16 | 49.03 | 3.25 | 3.59 | 128.12 | 141.20 | 19.92 | 7.84 |
| 120 | 2.66 | 1.49 | 104.59 | 58.83 | 3.91 | 4.30 | 153.75 | 169.43 | 23.91 | 9.41 |
| 150 | 3.32 | 1.87 | 130.74 | 73.54 | 4.88 | 5.38 | 192.18 | 211.79 | 29.89 | 11.77 |
| 200 | 4.43 | 2.49 | 174.32 | 98.05 | 6.51 | 7.17 | 256.24 | 282.39 | 39.85 | 15.69 |
| 250 | 5.53 | 3.11 | 217.89 | 122.57 | 8.14 | 8.97 | 320.30 | 352.99 | 49.81 | 19.61 |
| 300 | 6.64 | 3.74 | 261.47 | 147.08 | 9.76 | 10.76 | 384.36 | 423.59 | 59.77 | 23.53 |
SP229_RT_WUXGA_1,1× ZOOM
| Diagonal Screen | Screen size Projection distance Offset | |||||||||
| (m) (inch) (m) (inch) | (cm) (inch) | |||||||||
| Width H | ght Width | Hight Wide | Tele Wide T | tele | ||||||
| 30 0.6 | 5 0.40 25.4 | 4 15.90 0.95 | 1.05 37.40 | 41.21 | 4.04 1.59 | |||||
| 40 | 0.86 | 0.54 | 33.92 | 21.20 | 1.27 | 1.40 | 49.86 | 54.95 | 5.38 | 2.12 |
| 50 | 1.08 | 0.67 | 42.40 | 26.50 | 1.58 | 1.74 | 62.33 | 68.69 | 6.73 | 2.65 |
| 60 | 1.29 | 0.81 | 50.88 | 31.80 | 1.90 | 2.09 | 74.79 | 82.43 | 8.08 | 3.18 |
| 70 | 1.51 | 0.94 | 59.36 | 37.10 | 2.22 | 2.44 | 87.26 | 96.16 | 9.42 | 3.71 |
| 80 | 1.72 | 1.08 | 67.84 | 42.40 | 2.53 | 2.79 | 99.72 | 109.90 | 10.77 | 4.24 |
| 90 | 1.94 | 1.21 | 76.32 | 47.70 | 2.85 | 3.14 | 112.19 | 123.64 | 12.12 | 4.77 |
| 100 | 2.15 | 1.35 | 84.80 | 53.00 | 3.17 | 3.49 | 124.66 | 137.38 | 13.46 | 5.30 |
| 120 | 2.58 | 1.62 | 101.76 | 63.60 | 3.80 | 4.19 | 149.59 | 164.85 | 16.15 | 6.36 |
| 150 | 3.23 | 2.02 | 127.20 | 79.50 | 4.75 | 5.23 | 186.98 | 206.06 | 20.19 | 7.95 |
| 200 | 4.31 | 2.69 | 169.60 | 106.00 | 6.33 | 6.98 | 249.31 | 274.75 | 26.92 | 10.60 |
| 250 | 5.38 | 3.37 | 212.00 | 132.50 | 7.92 | 8.72 | 311.64 | 343.44 | 33.65 | 13.25 |
| 300 | 6.46 | 4.04 | 254.40 | 159.00 | 9.50 | 10.47 | 373.97 | 412.13 | 40.39 | 15.90 |
SP224ST_ST_XGA_Fixed Lens
| Diagonal Screen | Screen size Projection distance Offset | |||||||||
| (m) (inch) (m) (inch) | (cm) (inch) | |||||||||
| Width H | ght Width | Hight Fixed | Fixed | |||||||
| 30 | 0.61 | 0.46 | 24.00 | 18.00 | 0.32 | 12.48 | 5.67 | 2.23 | ||
| 40 | 0.81 | 0.61 | 32.00 | 24.00 | 0.42 | 16.64 | 7.56 | 2.98 | ||
| 50 | 1.02 | 0.76 | 40.00 | 30.00 | 0.53 | 20.80 | 9.45 | 3.72 | ||
| 60 | 1.22 | 0.91 | 48.00 | 36.00 | 0.63 | 24.96 | 11.34 | 4.46 | ||
| 70 | 1.42 | 1.07 | 56.00 | 42.00 | 0.74 | 29.12 | 13.23 | 5.21 | ||
| 80 | 1.63 | 1.22 | 64.00 | 48.00 | 0.85 | 33.28 | 15.12 | 5.95 | ||
| 90 | 1.83 | 1.37 | 72.00 | 54.00 | 0.95 | 37.44 | 17.01 | 6.70 | ||
| 100 | 2.03 | 1.52 | 80.00 | 60.00 | 1.06 | 41.60 | 18.90 | 7.44 | ||
| 120 | 2.44 | 1.83 | 96.00 | 72.00 | 1.27 | 49.92 | 22.68 | 8.93 | ||
| 150 | 3.05 | 2.29 | 120.00 | 90.00 | 1.58 | 62.40 | 28.35 | 11.16 | ||
| 200 | 4.06 | 3.05 | 160.00 | 120.00 | 2.11 | 83.20 | 37.80 | 14.88 | ||
| 250 | 5.08 | 3.81 | 200.00 | 150.00 | 2.64 | 104.00 | 47.24 | 18.60 | ||
| 300 | 6.10 | 4.57 | 240.00 | 180.00 | 3.17 | 124.80 | 56.69 | 22.32 | ||
SP226ST_ST_WXGA_Fixed Lens
| Diagonal Screen | Screen size Projection distance Offset | |||||||||
| (m) (inch) (m) (inch) | (cm) (inch) | |||||||||
| Width Hight Width | Hight Fixed | Fixed | ||||||||
| 30 | 0.65 | 0.40 | 25.44 | 15.90 | 0.34 | 13.23 | 5.01 | 1.97 | ||
| 40 | 0.86 | 0.54 | 33.92 | 21.20 | 0.45 | 17.64 | 6.68 | 2.63 | ||
| 50 | 1.08 | 0.67 | 42.40 | 26.50 | 0.56 | 22.05 | 8.35 | 3.29 | ||
| 60 | 1.29 | 0.81 | 50.88 | 31.80 | 0.67 | 26.46 | 10.02 | 3.94 | ||
| 70 | 1.51 | 0.94 | 59.36 | 37.10 | 0.78 | 30.87 | 11.68 | 4.60 | ||
| 80 | 1.72 | 1.08 | 67.84 | 42.40 | 0.90 | 35.28 | 13.35 | 5.26 | ||
| 90 | 1.94 | 1.21 | 76.32 | 47.70 | 1.01 | 39.69 | 15.02 | 5.91 | ||
| 100 | 2.15 | 1.35 | 84.80 | 53.00 | 1.12 | 44.10 | 16.69 | 6.57 | ||
| 120 | 2.58 | 1.62 | 101.76 | 63.60 | 1.34 | 52.92 | 20.03 | 7.89 | ||
| 150 | 3.23 | 2.02 | 127.20 | 79.50 | 1.68 | 66.14 | 25.04 | 9.86 | ||
| 200 | 4.31 | 2.69 | 169.60 | 106.00 | 2.24 | 88.19 | 33.39 | 13.14 | ||
| 250 | 5.38 | 3.37 | 212.00 | 132.50 | 2.80 | 110.24 | 41.73 | 16.43 | ||
| 300 | 6.46 | 4.04 | 254.40 | 159.00 | 3.36 | 132.29 | 50.08 | 19.72 | ||
4.4 CLEARANCE
Allow at least 30cm clearance around the intake and exhaust vent and ensure that the intake vents do not recycle hot air from the exhaust vent.
① Air intake vent
② Air outtake vent
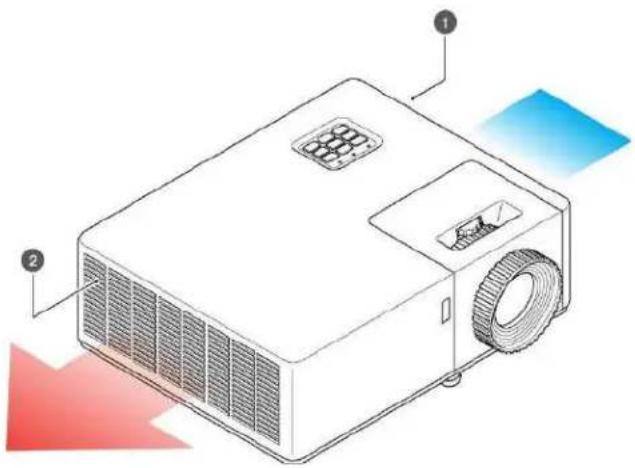
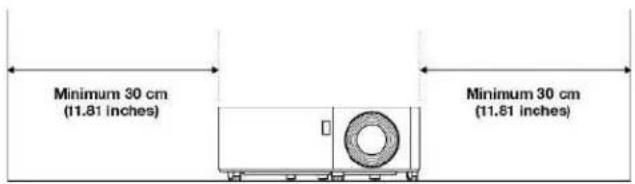
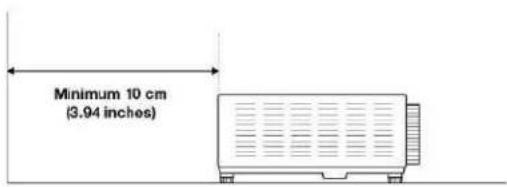
When operating the projector in an enclosed space:
• The surrounding air temperature within the enclosure should not exceed operation temperature while the projector is running
• The air intake and exhaust vents should be unobstructed
- The enclosure should pass a certified thermal evaluation to ensure that the projector does not recycle exhaust air
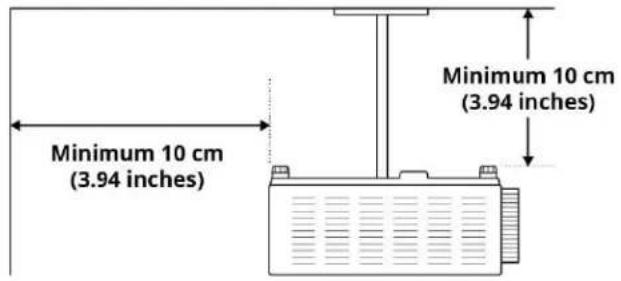
4.5 CEILING MOUNT
- Screw type: M4×10
• Minimum screw length: 10mm
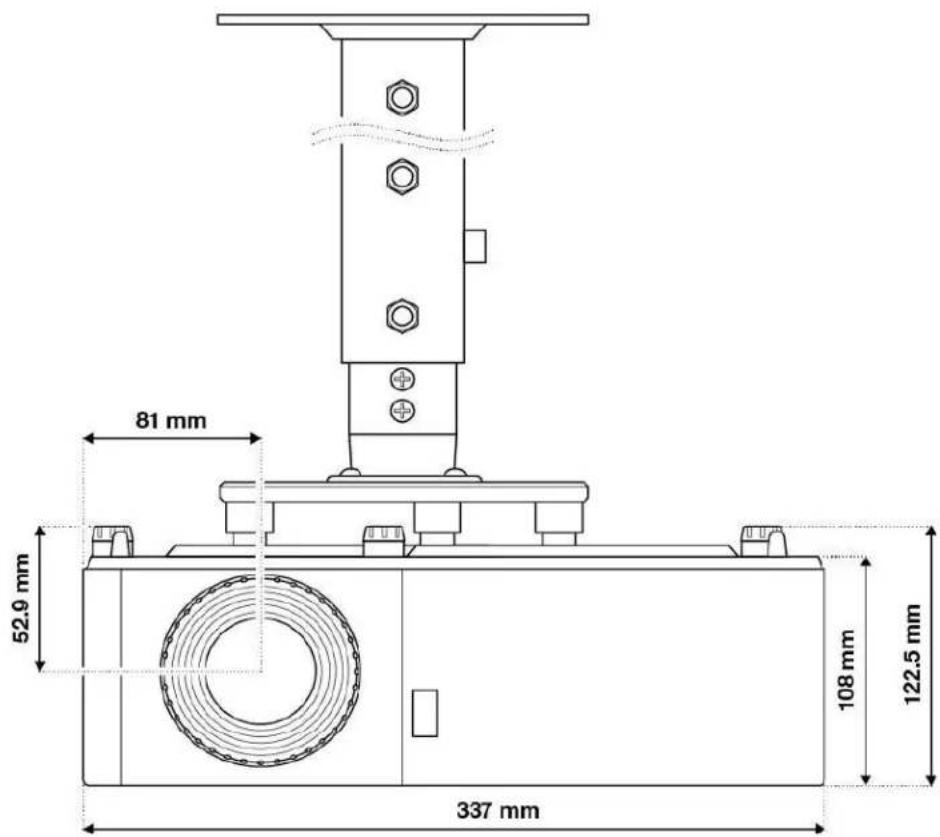

INFORMATION
"Please note that damage resulting from incorrect installation will void the warranty. If you buy a ceiling mount from another company, please be sure to use the correct screw size. Screw size will vary depending on the thickness of the mounting plate.
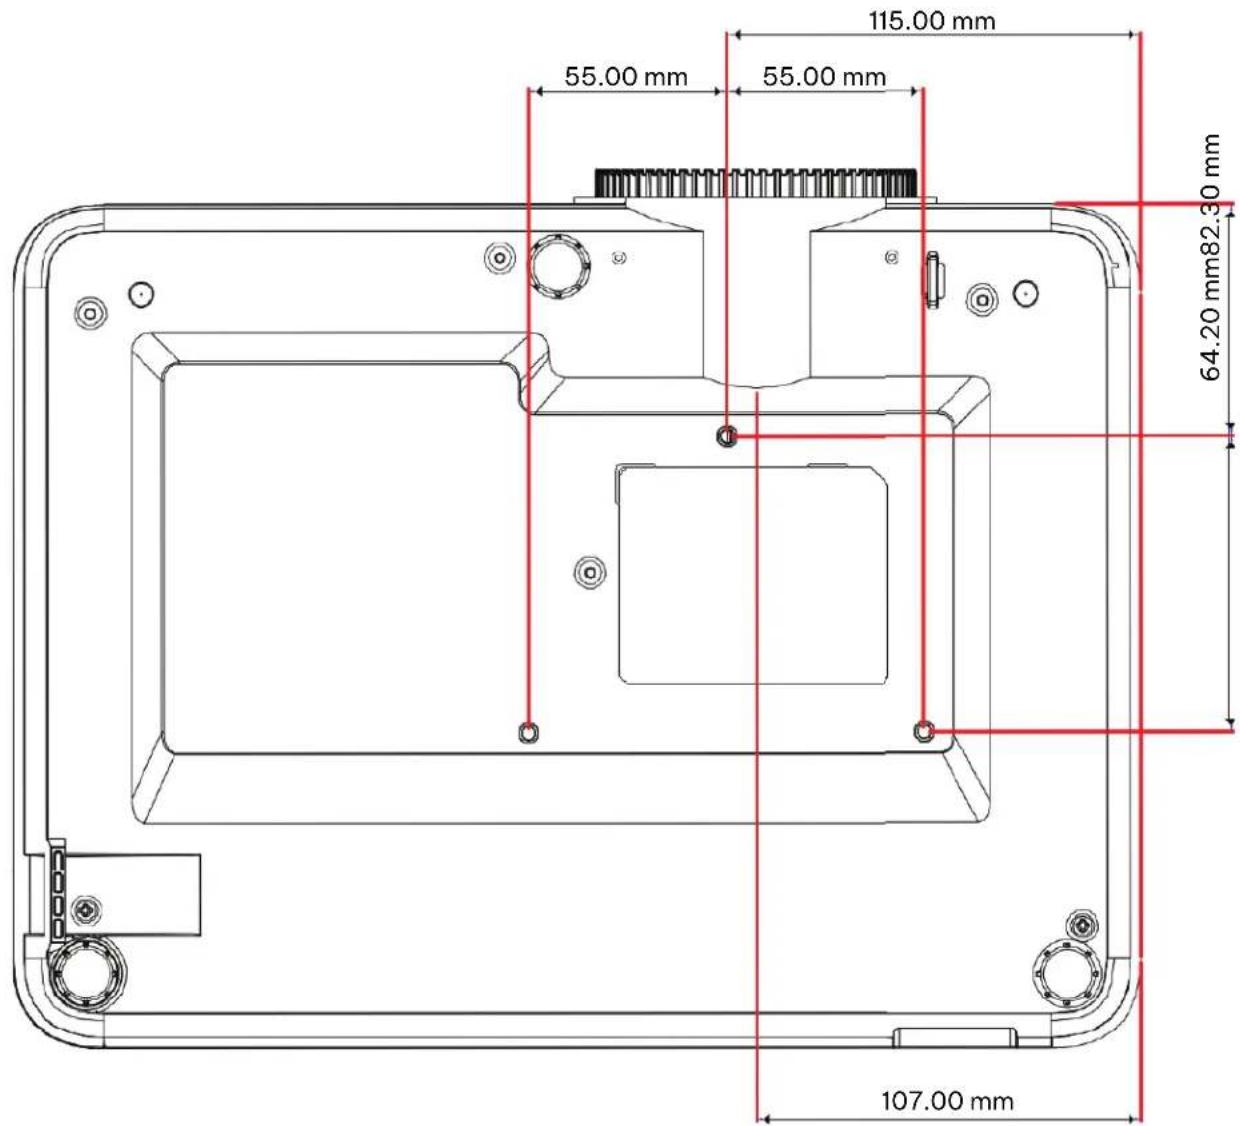
4.6 MOUNTING HOLE DIAGRAM
When using a ceiling mount, please be sure to use the correct screw size. Screw size will vary depending on the thickness of the mounting plate.
Be sure to keep at least 10 cm gap between the ceiling and the bottom of the projector.
Avoid installing the projector near a heat source.
5.1 ADJUSTING THE IMAGE HEIGHT AND TILT
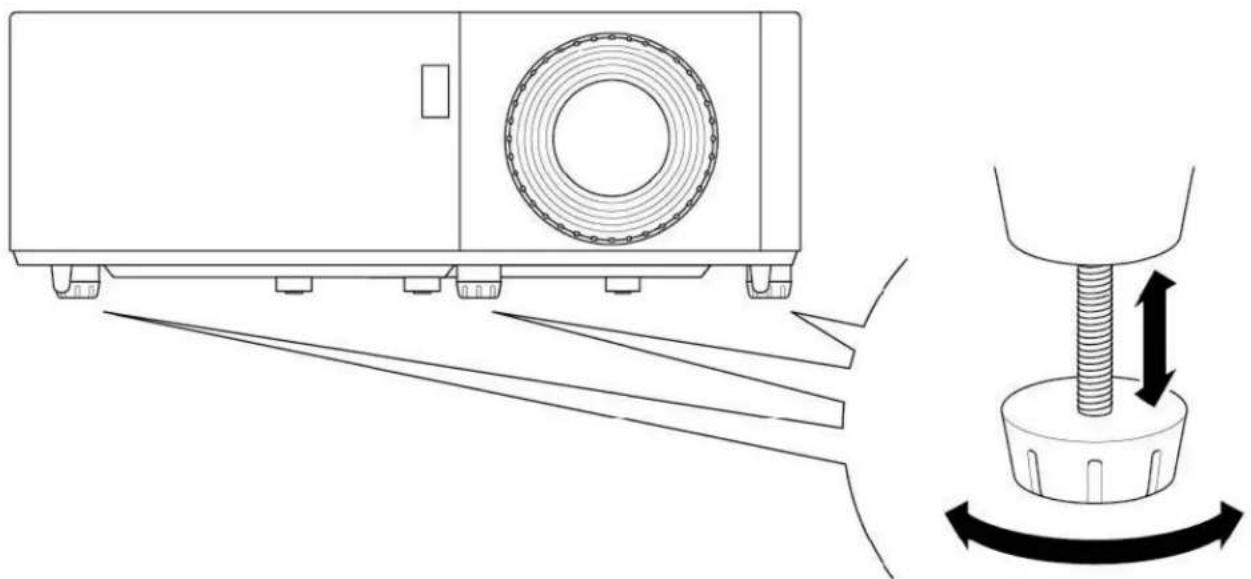
The projector's height and tilt can be adjusted with the tilt adjustment feet and ring. Locate the adjustable foot you wish to adjust on the underside of the projector. Rotate the foot clockwise or counterclockwise to raise or lower the projector.
natural_image
Technical line drawing of a mechanical device with a threaded fastener and rotating base (no text or symbols)5.2 ADJUSTING THE ZOOM, LENS SHIFT AND FOCUS
To adjust the image size, turn the zoom ring clockwise or counterclockwise to increase or decrease the projected image size.
To adjust the image position, turn the lens shift dial clockwise or counterclockwise to adjust the position of the projected image vertically. (Not available on all models.)
To adjust the focus, turn the focus ring clockwise or counterclockwise until the image is sharp and legible.
5.3 ADJUSTING THE VERTICAL AND HORIZONTAL KEYSTONE
If one side of the image is shorter than the other, for example the top is shorter than the bottom, you can either reposition the projector or use keystone correction.
To adjust the top or bottom of the picture (the pitch), angle the projector lower or higher. If that is not possible, adjust the vertical keystone:
Press the Menu button on the projector keypad or the Menu button on the remote control to open the OSD menu.
Select Image > V Keystone
Adjust the settings by using the arrow keys keys
Press the Return symbol or Enter button to select a setting.
Press the Menu symbol or *Menu *button to close the OSD menu. The menu will close and the projector will automatically save the new settings.
To adjust the left or right side of the picture (the yaw), turn the projector slightly left or right. If that is not possible, adjust the horizontal keystone:
Press the Menu button on the projector keypad or the Menu button on the remote control to open the OSD menu.
Select *Image > H Keystone *
Note horizontal keystone correction is not available on all models
Adjust the settings by using the *Arrow *keys.
Press press the Return symbol or *Enter *button to select a setting.
Press the Menu button to close the OSD menu. The menu will close and the projector will automatically save the new settings.

INFORMATION
"Ensure that the projection screen or projection surface is within the required distance from the projector. Refer to "4.3 Placement distance from screen" for more information.
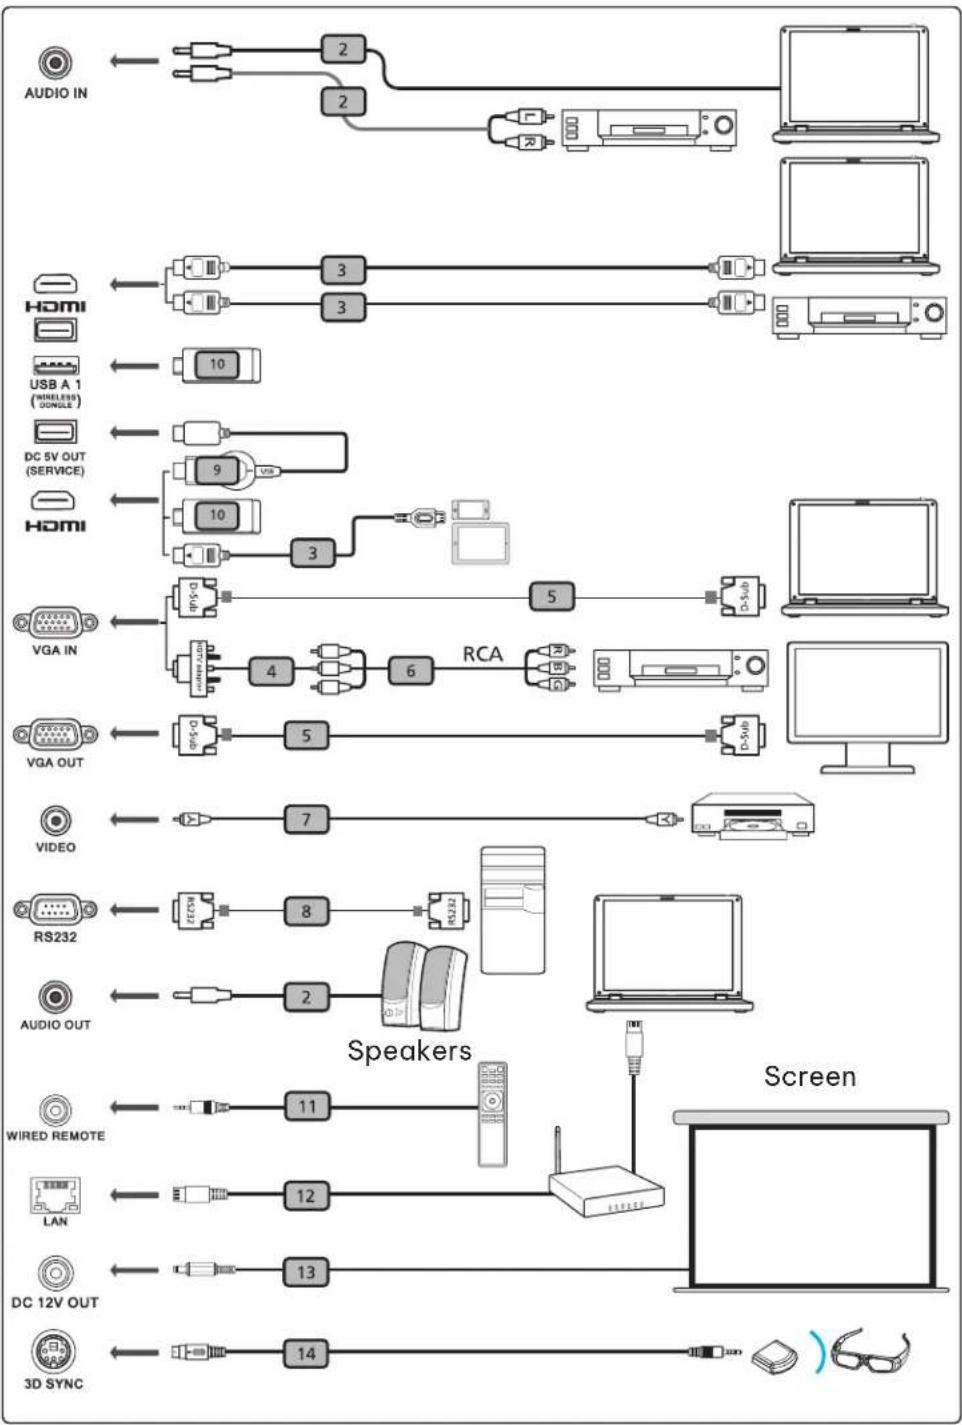
6.1 CONNECTION DIAGRAM
flowchart
graph TD
    A["Audio IN"] --> B["2"]
    A --> C["2"]
    B --> D["20"]
    C --> E["20"]
    D --> F["Laptop"]
    E --> G["PC"]
    H["Home"] --> I["3"]
    H --> J["3"]
    I --> K["10"]
    J --> L["10"]
    K --> M["USB A 1 (WIRELESS GINGLE)"]
    L --> N["DC 5V OUT (SERVICE)"]
    M --> O["9"]
    N --> P["10"]
    O --> Q["10"]
    P --> R["10"]
    Q --> S["3"]
    R --> T["3"]
    S --> U["4"]
    T --> V["5"]
    U --> W["RCA"]
    V --> X["6"]
    W --> Y["7"]
    X --> Z["8"]
    Y --> AA["5"]
    Z --> AB["5"]
    AA --> AC["5"]
    AB --> AD["Video"]
    AC --> AE["Video"]
    AD --> AF["RS232"]
    AE --> AG["AUDIO OUT"]
    AF --> AH["2"]
    AG --> AI["2"]
    AH --> AJ["20"]
    AI --> AK["20"]
    AJ --> AL["20"]
    AK --> AM["20"]
    AL --> AN["20"]
    AM --> AO["20"]
    AN --> AP["20"]
    AO --> AQ["20"]
    AP --> AR["20"]
    AQ --> AS["20"]
    AR --> AT["20"]
    AS --> AU["20"]
    AT --> AV["20"]
    AU --> AW["20"]
    AV --> AX["20"]
    AW --> AY["20"]
    AX --> AZ["20"]
    AY --> BA["20"]
    AZ --> BB["20"]
    BA --> BC["20"]
    BB --> BD["20"]
    BC --> BE["20"]
    BD --> BF["20"]
    BE --> BG["20"]
    BF --> BH["20"]
    BG --> BI["20"]
    BH --> BJ["20"]
    BI --> BK["20"]
    BJ --> BL["20"]

flowchart
graph LR
    A["Electric Meter"] <--> B["Pump"]
    B --> C["Switch 1"]
    C --> D["Plug"]
    D --> E["Battery"]
| # Description # Description | ||
| 1 Power cord 8 RS232 cable | ||
| 2 Audio cable 9 WirelessHD dongle | ||
| 3 HDMI (MHL) cable 10 Wireless dongle | ||
| 4 VGA to component/HDTV adapter 11 Wired remote control | ||
| 5 VGA cable 12 LAN cable | ||
| 6 3 RCA component cable 13 12V DC cable | ||
| 7 Composite video cable 14 3D SYNC cable |

INFORMATION
Not all inputs are available on all models.
7. USING
7.1 LEDs
① Power
② Lamp
③ Temperature

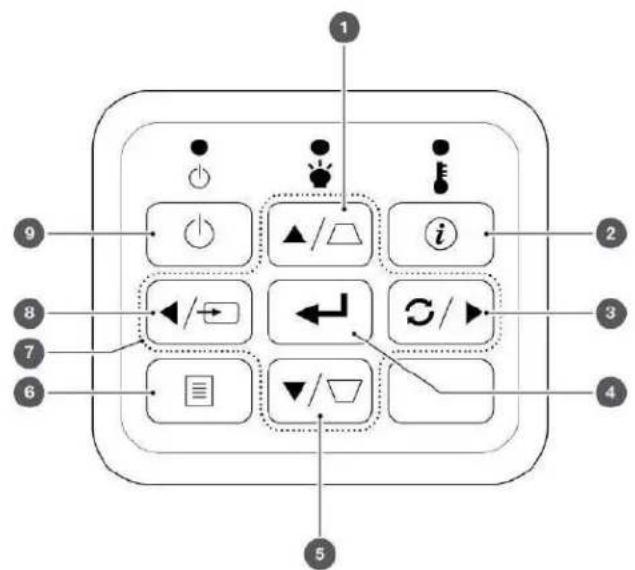
7.2 KEYPAD
① Up / Keystone correction +
② Information
③ Right / Re-sync
4 Enter
⑤ PowerDown / Keystone correction -
6 Menu
⑦ Directional arrows
8 Left / Source
⑨ Power
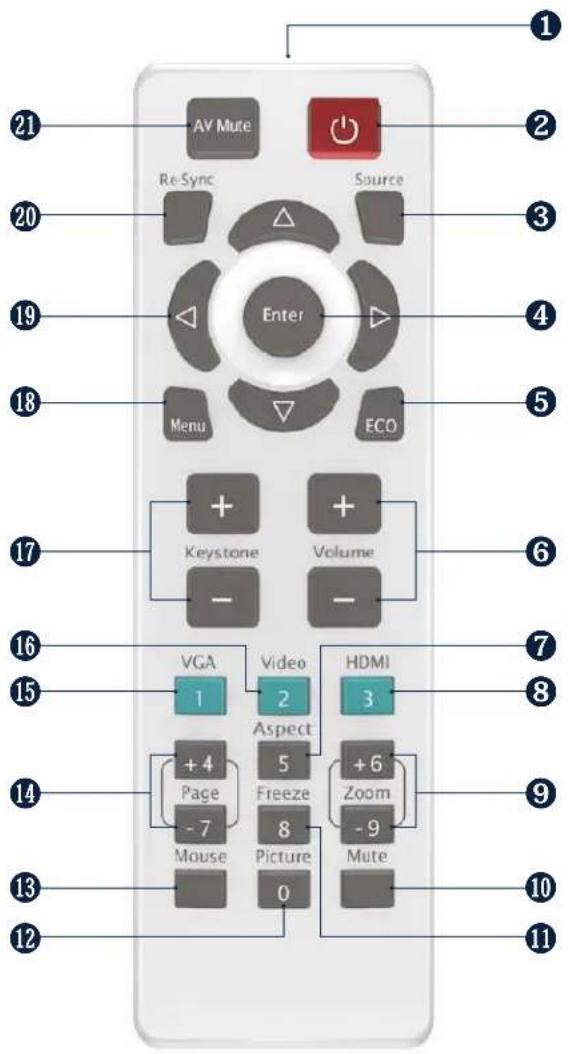
7.3 REMOTE CONTROL
1 IR LED
② Power
③ Source
4 Enter
⑤ ECO
6 Volume
⑦ Aspect
⑧ HDMI – Press once for HDMI 1 and twice for HDMI 2
9 Zoom
10 Mute
11 Freeze
12 Picture
13 Mouse
14 Page
15 VGA
16 Video
17 Keystone correction
18 Menu
19 Directional keys
20 Re-sync
21 AV Mute

INFORMATION
Some keys may have no function for models that do not support the key's feature.
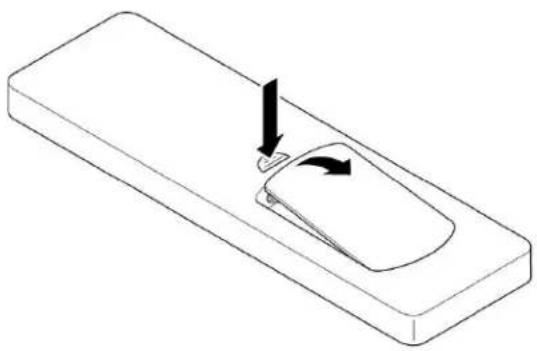
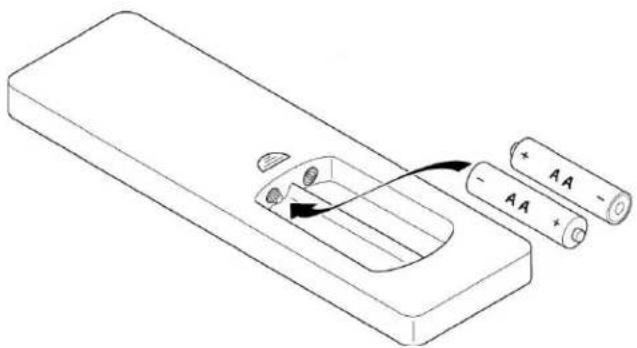
7.3.1 INSTALLING BATTERIES IN THE REMOTE CONTROL
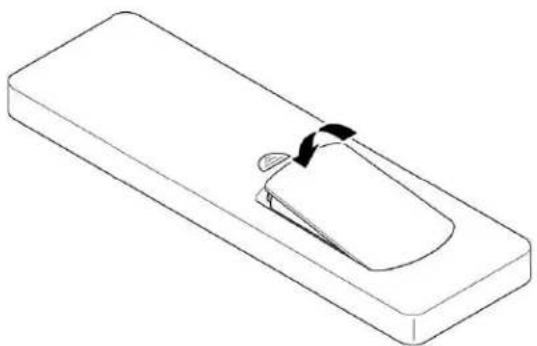
The remote requires two AAA batteries (not included).
- Remove the battery cover on the back of the remote control.
natural_image
Diagram of a device with a button and arrow indicating rotation (no text or symbols)- Insert AAA batteries in the battery compartment. Ensure each battery's polarity ± is aligned correctly.
natural_image
Diagram of a remote control panel with two batteries, one emitting a power cord (no text or symbols)- Replace back cover on the remote control and press down until it clicks in to place.
natural_image
Isometric line drawing of a rectangular device with a curved handle and a small circular component, no text or symbols present.
ATTENTION
The remote control may fail to operate if the infrared remote sensor is exposed to bright sunlight or fluorescent lighting.
Incorrect battery usage may cause leakage of battery fluid and battery rupture, which could result in fire, injury or corrosion of the remote. When replacing batteries, take the following precautions.
Do not use batteries of different types or mix old and new batteries.
Remove the batteries if you will not be using the projector for a long period of time.
Do not expose batteries to heat or flame and do not put them in water.
Dispose of used batteries according to local regulations.
Keep batteries out of the reach of children. Batteries are choking hazards and are very dangerous if swallowed.
7.3.2 REMOTE CONTROL IR CODES
| NUMBER | FUNCTION REPEATFORMAT BYTE1 BYTE2 BYTE3 BYTE4 COMMENTS | ||||||
| 1 AV mute F1 87 4E 51 AE | |||||||
| 2 | Power On/Off | F1 | 87 | 4E | 17 | E8 | |
| 3 | Re-Sync | F1 | 87 | 4E | 33 | CC | |
| 4 | Up | F2 | 87 | 4E | 13 | EC | Do Volume+ when no OSD |
| 5 | Source | F1 | 87 | 4E | 10 | EF | |
| 6 | Left | F2 | 87 | 4E | 11 | EE | Do Source when no OSD |
| 7 | Enter | F1 | 87 | 4E | 32 | CD | |
| 8 | Right | F2 | 87 | 4E | 12 | ED | Do Re-Sync when no OSD |
| 9 | Menu | F1 | 87 | 4E | 02 | FD | |
| 10 | Down | F2 | 87 | 4E | 14 | EB | Do Volume- when no OSD |
| 11 | Eco | F1 | 87 | 4E | 77 | 88 | Open Brightness Mode menu |
| 12 | Keystone+ | F2 | 87 | 4E | 20 | DF | |
| 13 | Volume+ | F2 | 87 | 4E | 08 | F7 | |
| 14 | Keystone- | F2 | 87 | 4E | 21 | DE | |
| 15 | Volume- | F2 | 87 | 4E | 04 | FB | |
| 16 | VGA (1) | F1 | 87 | 4E | 19 | E6 | |
| 17 | Video (2) | F1 | 87 | 4E | 1A | E5 | |
| 18 | HDMI (3) | F1 | 87 | 4E | 71 | 8E | Toggle HDMI 1 and HDMI 2 |
| 19 | Page+(4) | F1 | 87 | 4E | 7D | 82 | Page+ not supported |
| 20 | Aspect (5) | F1 | 87 | 4E | 34 | CB | |
| 21 | Zoom+ | F1 | 87 | 4E | 52 | AD | |
| 22 | page-(7) | F1 | 87 | 4E | 7E | 81 | Page- not supported |
| 23 | Freeze | F1 | 87 | 4E | 0E | F1 | |
| 24 | Zoom- | F1 | 87 | 4E | 53 | AC | |
| 25 | Mouse | F1 | 87 | 4E | 3E | C1 | Mouse not supported |
| 26 | Picture | F1 | 87 | 4E | 2C | D3 | Open Display Mode menu |
| 27 | Mute | F1 | 87 | 4E | 29 | D6 | |
7.4 REMOTE CONTROL EFFECTIVE RANGE
You can locate the infrared (IR) remote control sensors on the top of the projector next to the keypad and on the front to the left of the lens. Hold the remote control at an angle within 60 degrees perpendicular of the projector's IR remote control sensor. Ensure that there are no obstacles between the remote control and the IR sensor on the projector.
The distance between the remote control and the IR sensor should be less than 12 meters (39.4 feet). If the remote control is less than 20cm (8 inches) from the IR sensor, the remote control might become ineffective. The effective range is approximately 5 meters (16.4 feet) when reflecting the IR beam using a screen. The range will depend on the screen's surface and reflectivity. Direct sunlight or fluorescent lamps can reduce the range of the remote control.
7.5 TURNING THE PROJECTOR ON
- Securely connect the mains cable to the projector and to a mains outlet. When connected, the Power LED will turn red.
- Connect a signal/source cable to a source device and the projector.
- Remove the lens cap.
- Press the Power button on the keypad or the symbol on the remote control.
The ScreenPlay startup screen will appear after approximately 10 seconds. The Power LED will flash blue and then steady blue.

ATTENTION
Make sure that people cannot step on any electrical cables or trip over the cables. Do not put objects on the cables.
7.6 SELECTING A INPUT SOURCE
- Turn on the connected source, such as a computer or DVD player, or connect a digital media player, such as a Google Chromecast.
- Press the Source button on the keypad or remote control to select the input source.
- Play the content on the source device.

INFORMATION
You can set up the projector to automatically detect an active source and turn itself on and project the source content automatically. To turn on this feature, press the Menu button on the remote control or keypad, navigate to Settings > Power Settings > Signal Power, and select On.

INFORMATION
Your projector has a Direct Power On setting. This setting will automatically turn on the projector when a power source is connected. To turn on this feature, press the Menu button on the remote control or keypad, navigate to Settings > Power Settings > Direct Power On, and select on.
7.7 TURNING THE PROJECTOR TO STANDBY MODE
- Press the Power button on the keypad or remote control. The following message will appear: Power Off?
-
Press the Power button again to confirm turning off your projector. If the Power button is not pressed a second time, the message will disappear after 10 seconds and the projector will not turn off. The cooling fans will operate for about 10 seconds and the Power LED will flash blue. When the Power LED changes to solid red, the projector has entered standby mode.
-
Replace the lens cap.

INFORMATION
If you want to turn the projector on again, wait 100 seconds.
Always allow the projector fan to turn off after you power down and before you unplug the projector power cable from the electrical outlet.
7.8 VIEWING 3D CONTENT
Please follow all warnings and precautions as recommended before you or your child use the 3D function of this projector and view 3D projected content.

ATTENTION
Children and teenagers may be more susceptible to health issues associated with viewing in 3D and should be closely supervised when viewing 3D content.
7.8.1 PHOTOSENSITIVE SEIZURE WARNING AND OTHER HEALTH RISKS

ATTENTION
- Some viewers may experience an epileptic seizure or stroke when exposed to specific flashing images or lights contained in certain Projector pictures or video games. If you suffer from or have a family history of epilepsy or strokes, please consult with a medical specialist before using the 3D function.
- Even those without a personal or family history of epilepsy or stroke may have an undiagnosed condition that can cause photosensitive epileptic seizures.
- We recommend that the projectors 3D functionality not be used by pregnant women, sufferers of serious medical conditions, persons who are sleep-deprived or under the influence of alcohol.
- If you experience any of the following symptoms, stop viewing 3D content immediately and consult a medical specialist: (1) altered vision; (2) lightheadedness; (3) dizziness; (4) involuntary movements such as eye or muscle twitching; (5) confusion; (6) nausea; (7) loss of awareness; (8) convulsions; (9) cramps; or (10) disorientation. Children and teenagers may be more likely than adults to experience these symptoms. Parents should monitor their children and ask whether they are experiencing these symptoms.
- Watching 3D projected content may also cause motion sickness, perceptual aftereffects, disorientation, eye strain, and decreased postural stability. Users should take frequent breaks to lessen the potential of these effects. If you have any of the above symptoms, immediately discontinue using this device and do not resume using it for at least thirty minutes after the symptoms have subsided.
- Watching 3D projected content while sitting too close to the screen for an extended period may damage your eyesight. The ideal viewing distance should be at least three times the screen height. We recommend that the viewer's eyes are level with the screen.
- Watching 3D projected content while wearing 3D glasses for an extended period may cause headaches or fatigue. If you experience a headache, tiredness or dizziness, stop viewing the 3D projection and rest.
- Do not use 3D glasses for any other purpose than for watching 3D projected content.
- Wearing the 3D glasses for any other purpose (such as spectacles, sunglasses, protective goggles, etc.) may be physically harmful to you and weaken your eyesight.
- Viewing 3D projected content may cause disorientation for some viewers. Accordingly, DO NOT place your 3D projector near open stairwells, cables, balconies, or other objects that can be tripped over, run into, knocked down, broken or fallen over.
To enable 3D mode, the input frame rate should be set to 60Hz. Other frame rate are not supported. For the best 3D performance, use a resolution of 1920 × 1080 . 4K ( 3840 × 2160 ) resolution is not supported in 3D mode.
-
Select Display > Display Mode > 3D > 3D Mode.
-
Select* On*.
If the 3D Mode is set to Off, the 2D-3D and 3D sync Invert functions will not be selectable.
These functions can only be selected if the 3D mode is set to On.
-
Press Enter.
-
If you only want to view the left or right frame: * Select Display > Display Mode > 3D > 3D-2D.
* Select L (left) or R (right). * Press Enter.
-
If you want to turn off the 3D sync invert function:
-
Select Display > Display Mode > 3D > 3D Sync Invert.
- Select Off.
- Press Enter.
7.8.3 ENABLING AUTO 3D MODE
- Select Display > Display Mode > 3D > 3D Format.
- Select Auto.
- Press Enter.
Other options:
- SBS: Display 3D signal in "Side-by-Side" format.
- Top and Bottom: Display 3D signal in "Top and Bottom" format.
- Frame Sequential: Display 3D signal in "Frame Sequential" format.
The multilingual On Screen Display (OSD) menus can be used to setup and adjust the projector.
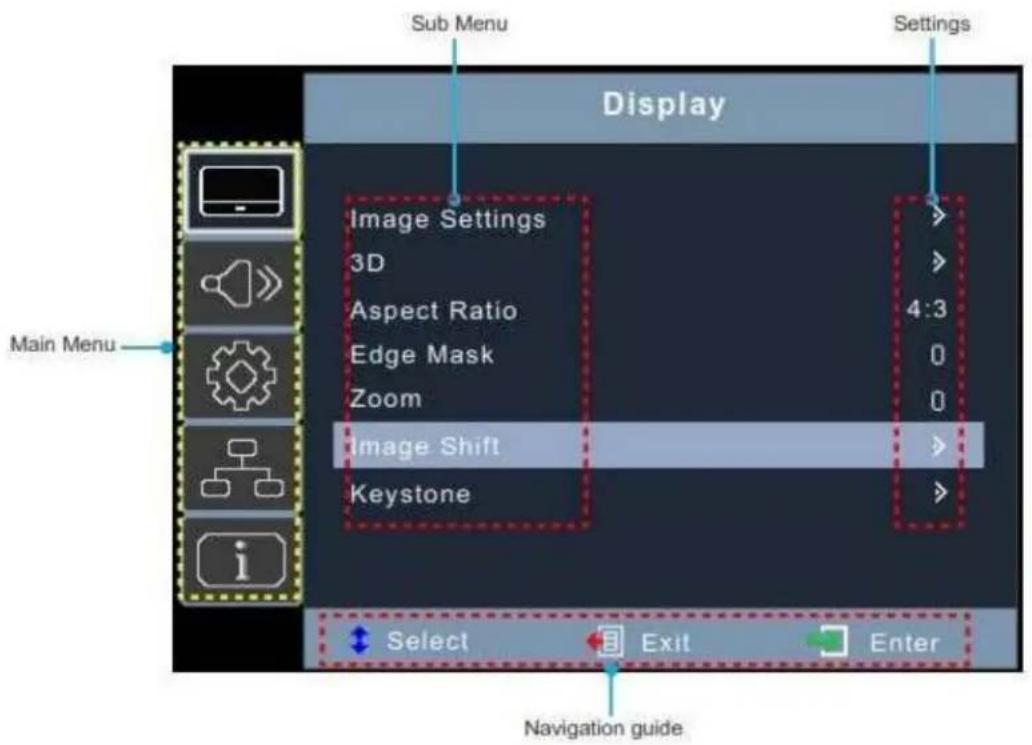
8.1 SELECTING THE LANGUAGE FOR THE ON SCREEN MENU
-
Select Setup > Options > Language
-
Select a language.
-
Press Enter.
8.2 SELECTING A DISPLAY MODE
-
Select Display > Image Settings > Display Mode.
-
Select a display mode:
- Presentation: Suitable for giving presentations using a PC.
- Bright: The brightest possible setting when using a PC.
- HDR SIM.: Decodes and displays High Dynamic Range (HDR) content for the deepest blacks, brightest whites, and vivid cinematic colour using the REC.2020 colour gamut. This mode will be automatically enabled if HDR content is sent to the projector (4K UHD Blu-ray, 1080p/4K UHDHDR/HLG games, or 4K UHD streaming video). While HDR mode is active, other displays cannot be selected as HDR delivers colour that is highly accurate and exceeds the colour performance of the other display modes. HDR mode can also be manually selected for use with non HLG content for simulation effect.
- HLG SIM.: Decodes and displays Hybrid Log Gamma (HLG) content for the deepest blacks, brightest whites, and vivid cinematic colour using the REC.2020 colour gamut. This mode will be automatically
enabled if HLG content is sent to the projector (4K UHD Blu-ray, 1080p/4K UHDHDR/HLG games, or 4K UHD streaming video). HLG mode can also be manually selected for use with non HLG content for simulation effect.
• Cinema: Provides the best colour reproduction for watching movies.
• Game: Increases the brightness and decreases the response time for playing video games with minimal lag.
• sRGB: Standardized accurate colour reproduction.
- DICOM SIM.: Simulation mode for viewing monochrome images such as X-rays.
- User: Saved user settings.
• 3D: To experience 3D, you will need 3D glasses and a video source that is capable of sending 3D content.
- Press Enter.

INFORMATION
The display settings are only visible when an active source is connected to the projector.
8.3 ADJUSTING THE IMAGE COLOUR AND TEMPERATURE
- Select Display > Image Settings > Color Settings > Color Temperature.
- Select a value.
- Press Enter.

INFORMATION
The Display settings are only visible when an active source is connected to the projector.
8.4 ADJUSTING THE SHARPNESS OF THE IMAGE
- Select Display > Image Settings > Color.
- Press Enter.
8.5 MAGNIFYING THE IMAGE
- Select Display > Zoom.
- Press Enter.
8.6 SELECTING AN ASPECT RATIO
- Select Display > Aspect Ratio.
- Select the desired aspect ratio.
- Press Enter.
- Select Display > Image Settings > Brightness Mode.
- Select a brightness mode.
- Press Enter.
8.8 ENABLEING ECO MODE
- Select Display > Image Settings > Brightness Mode.
- Select Eco.
- Press Enter.
8.9 ENABLING CLOSED CAPTIONS
- Select Setup > Options > Closed Caption.
- Select CC1 *or *CC2.
- Press Enter.
8.10 DISPLAYING A TEST PATTERN
- Select Setup > Test Pattern.
- Select a test pattern.
- Press Enter.
8.11 PREVENTING UNAUTHORIZED USE
- Select Setup * > *Security > Security.
- Select* On*. The default password is 1234.
- Press Enter.
8.12 CHANGING THE PASSWORD
- Select Setup > Security > Change Password.
- Type the new password.
- Press Enter.

INFORMATION
Do not lose the password. The password can only be reset at an authorized ScreenPlay repair facility.
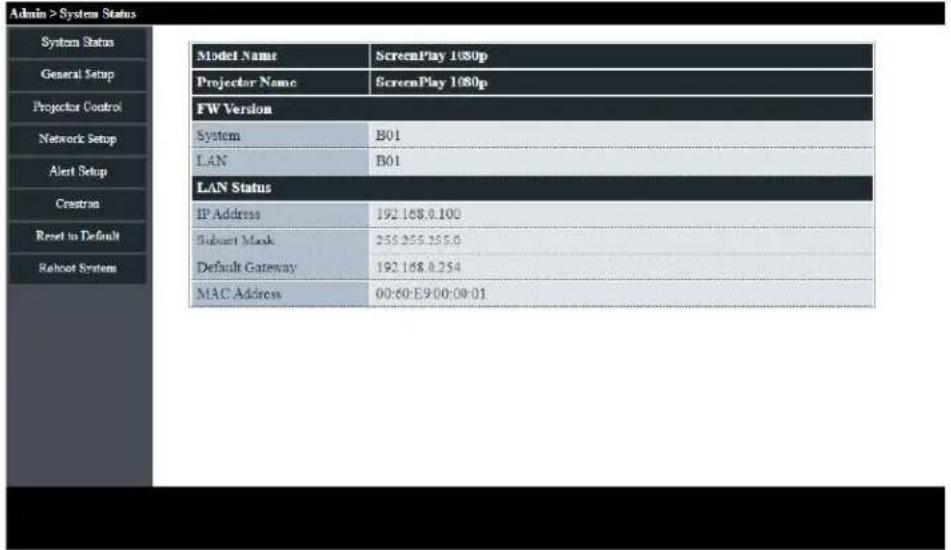
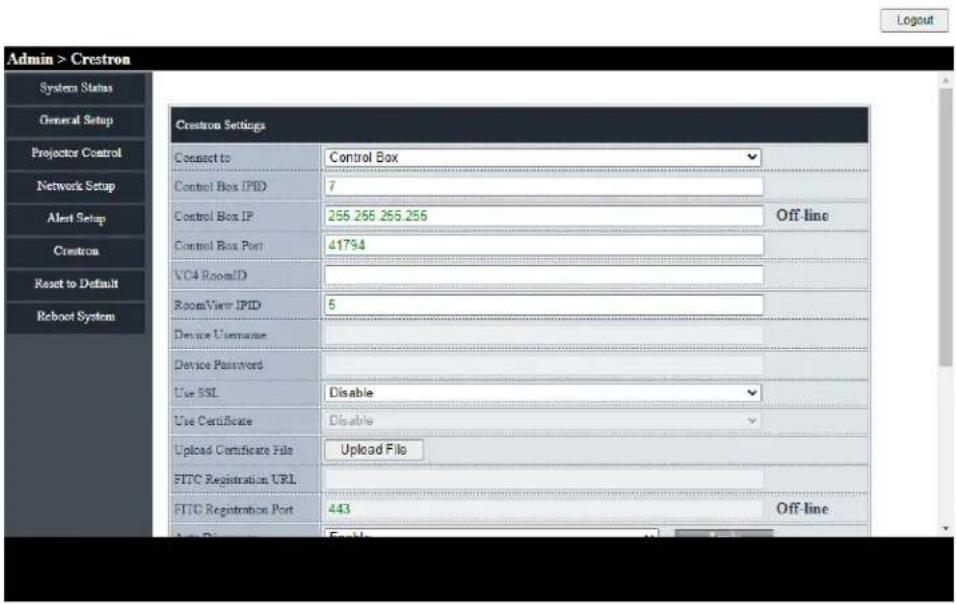
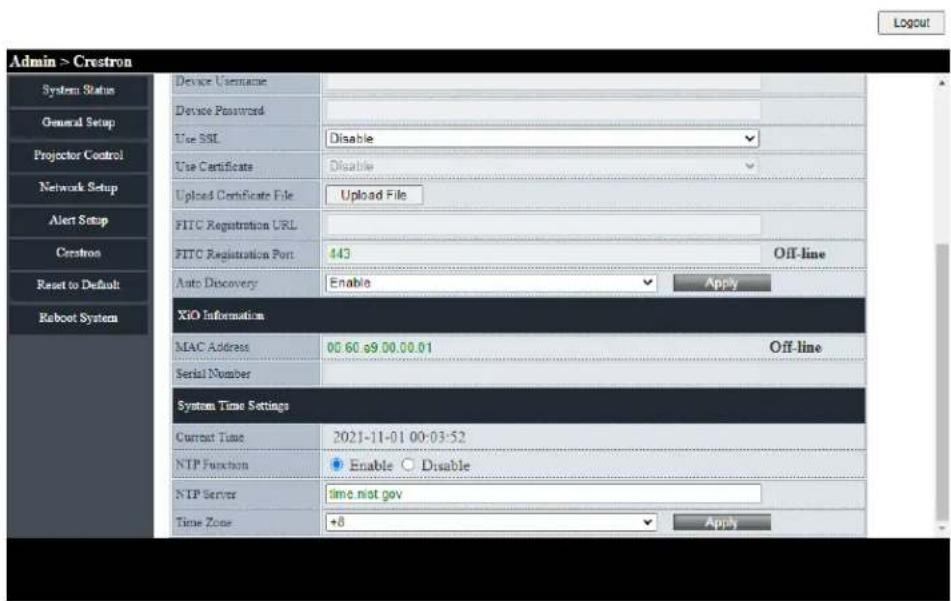
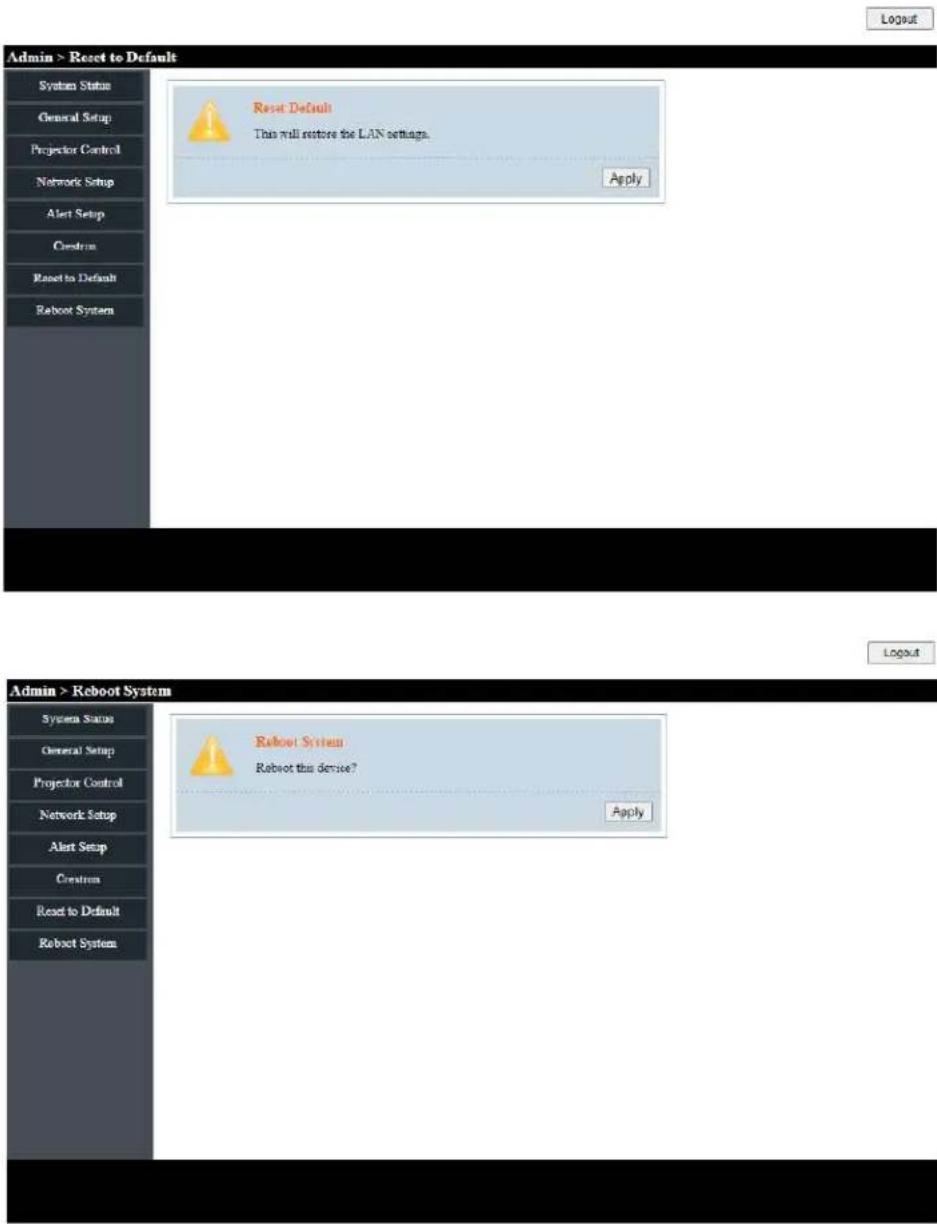
8.13 CONTROLLING THE PROJECTOR FROM A WEB BROWSER
- Connect the projector to an active network port using the RJ45 port on the back of the projector.
- Select* Network* > LAN > DHCP.
- Select On.
- Press Enter.
- Select Network > LAN *> IP Address* to view the projector's IP address.
- Open a web browser.
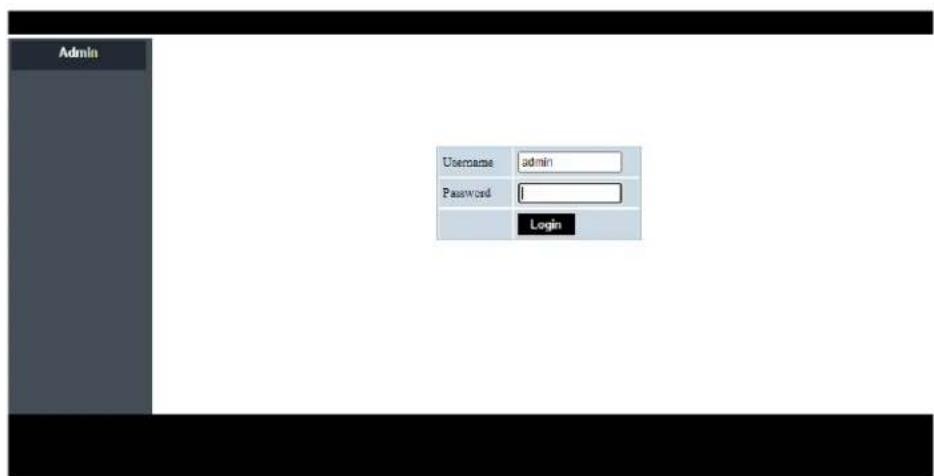
- Type the projector's IP address type the user name and password. The default user name and password is admin.
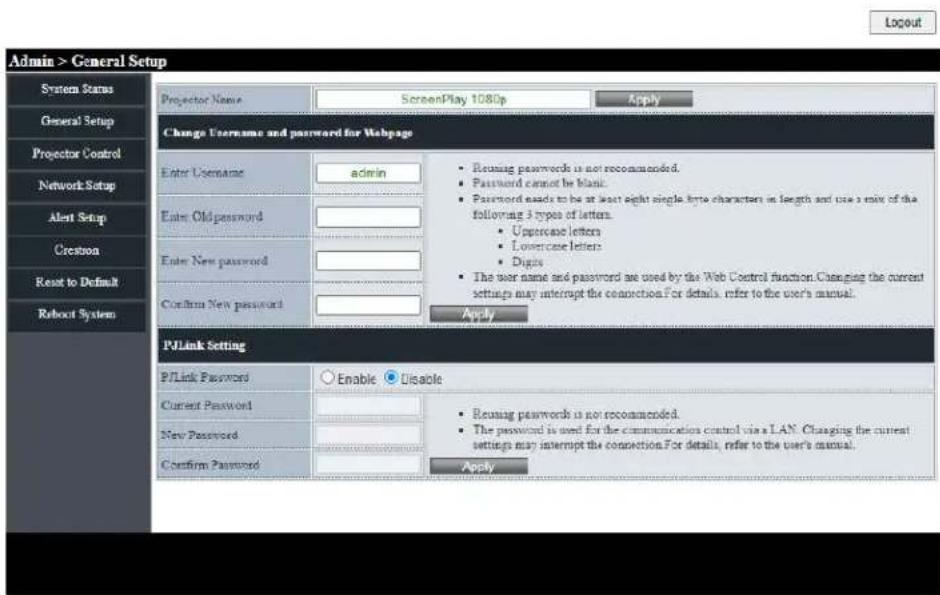
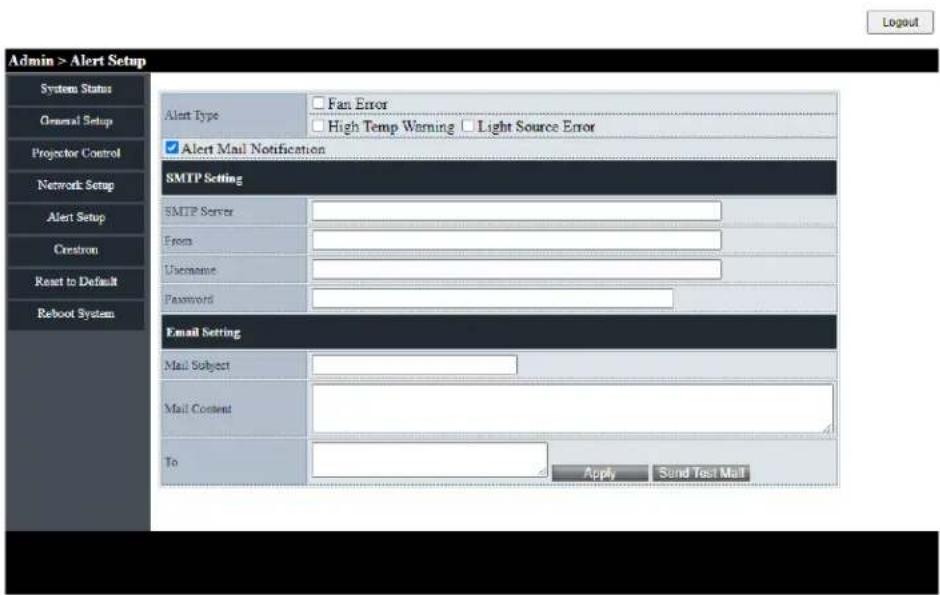
- Click Login. The projector's configuration page appears.

INFORMATION
This section is only applicable to p122 and p123 vista products.
Logout
Logout
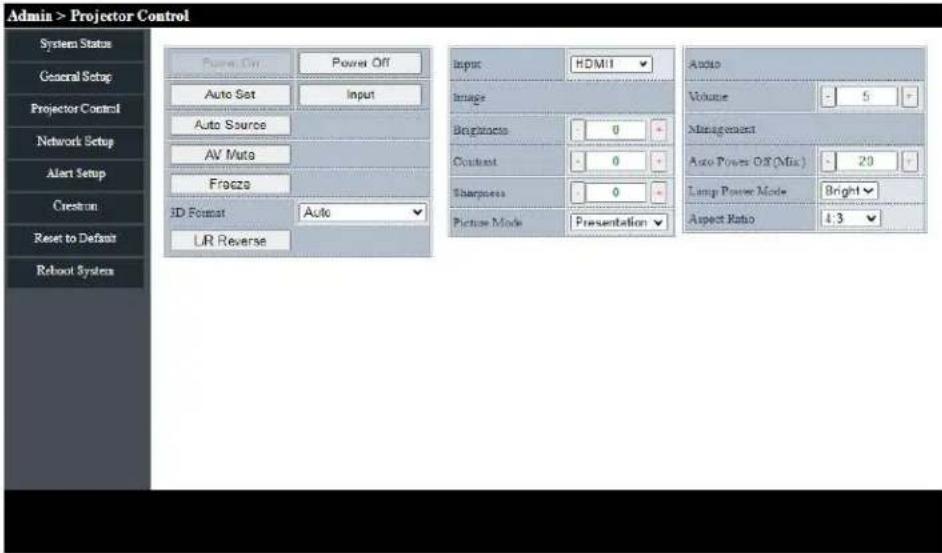

Web Control Aspect Ratio Support list below
| Aspect Ratio XGA WXGA 1080P | ||
| 4:3 V V V | ||
| 16:9 | V | V (Follow OSD->Screen Type) |
| 16 :10 V (Follow OSD->Screen Type) | ||
| LBX V V | ||
| Native V V V | ||
| AUTO V V V | ||
Notice
If web page select the unsupport aspect ratio, projector will do nothing and the web will show the aspect ratio same with OSO.
The aspect ratio of WXGA model will change due to the screen type setting.

INFORMATION
Only applicable to Superior Series
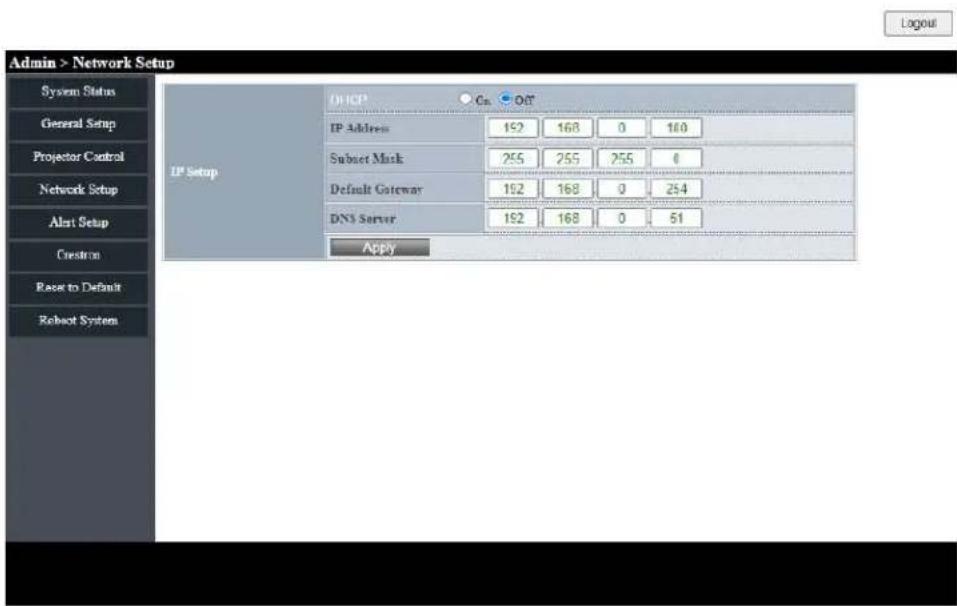
8.14 DIRECTLY CONNECTING A COMPUTER TO THE PROJECTOR
- Select Network > LAN > DHCP.
- Select Off.
- Press Enter.
- Select Network > LAN.
- Configure the IP address, Subnet Mask, Gateway, and DNS settings.
- Set the computer to use the same IP address, subnet mask, gateway, and DNS settings.
- Open a web browser.
- Type the projector's IP address type the user name and password. The default user name and password is admin.

INFORMATION
Only applicable to Superior Series.
9. CLEANING
Do not use canned air or any type of abrasive pad, paper towel, scouring powder, glass cleaner, or solvent (such as alcohol, paint thinner or benzene).
Unplug the projector before cleaning.
9.1 CLEANING THE LENS
Clean the projector's lens with a lightly damp cloth. Do not spray liquid directly onto the lens.
9.2 CLEANING THE CASE
Clean the projector's case using a lightly damp cloth.
9.3 CLEANING THE AIR VENTS
Clean the air intake vents with a soft and dry cloth, a soft brush, or a small vacuum cleaner designed for cleaning electrical devices.
10. SANITATION
- Using only lightly dampened microfibre cloth to avoid malfunction and possible permanent damage to electronic parts, lightly clean the surface of the product, avoiding any connection points, ventilation holes or the lens.
• After the application, dry the product with a clean and dry microfibre cloth.
Please follow all safety and handling instructions listed with the cleaning solution and keep out of reach of children. For schools conducting an overall deep clean of their facilities, here are steps to appropriately protect your ScreenPlay product in advance of chemicals being sprayed or fogging devices being employed:
- Disconnect the product from its power source.
- Cover the product to prevent damage to internal electronic components.
- Remember to remove any covering before use.
Please ensure that those with access to your ScreenPlay products are aware of the cleaning procedure.

ATTENTION
Ensure your ScreenPlay product is fully covered on all sides before facilities deep cleaning. Chemicals must not be allowed to enter or be sprayed on to the surface of the product, this will avoid any damage to the internal electronic components and outer casing parts.

INFORMATION
Good personal hygiene practices of washing and drying hands should be employed before and after use of ScreenPlay products.
Should you have any questions relating to these procedures please contact ScreenPlay Technical Support. Contact details can be found Here.
11. DISPOSAL
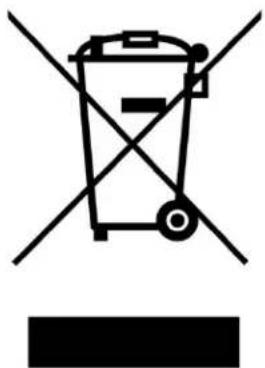
11.1 DISPOSAL OF ELECTRICAL COMPONENTS
natural_image
Symbol of a trash bin crossed with no visible text or labelsThe symbol on the product, the accessories or packaging indicates that this device shall not be treated as unsorted municipal waste, but shall be collected separately. Dispose of the device via a collection point for the recycling of waste electrical and electronic equipment if you live within the EU and in other European countries that operate separate collection systems for waste electrical and electronic equipment. By disposing of the device in the proper manner, you help to avoid possible hazards for the environment and public health that may otherwise be caused by improper treatment of waste equipment. The recycling of materials contributes to the conservation of natural resources.
11.2 DISPOSAL OF PACKAGING WASTE
The packaging is made of environmentally friendly materials, which may be disposed of through your local recycling facilities. By disposing of the packaging and packaging waste in the proper manner, you help to avoid possible hazards for the environment and public health.
12.1 LED INDICATOR LIGHTS
The following table describes the LED indicator light colours and their meaning.
| LED INDICATOR MEANING | ||
| Power Blue solid Normal operation | ||
| Power | Blue flashing | The projector is warming up, shutting down, or cooling down. The remote control may be disabled while the indicator is flashing blue. |
| Power Red solid Standby mode | ||
| Power Off Off or Sleep mode | ||
| Lamp | Red flashing | lamp failure |
| Temperature | Red flashing | Fan failure |
| Temperature | Red solid | Over temperature |
The projector will automatically shutdown if there is a laser failure, a fan failure or if the projector has overheated. Unplug the power cable from the projector, wait 30 seconds, and try again. If the warning indicators light up or flash, contact your nearest service center for assistance.
12.2 SOLVING ON/OFF ISSUES
The following table provides solutions for potential issues that may occur when the projector is turned on or off.
| ISSUE | CAUSE | SOLUTION |
| Projector will not turn on. | No power | Check that the power cable is connected. Check that the power indicator is on. |
| Projector will not turn on. | The projector has overheated | Make sure there is at least 30cm of clearance around the intake and exhaust vents. Wait five minutes and try turning the projector on again. If the projector is being used above 5500 ft/1600 m, use the On Screen Display (OSD) menu to set High Altitude to on. |
| Projector turns off by itself. | The Auto Power Off timer is set | Use the On Screen Display (OSD) menu to adjust the auto power of setting. |
12.3 SOLVING IMAGE ISSUES
The following table provides solutions for potential image issues.
| ISSUE | CAUSE | SOLUTION |
| No image | Incorrect source is selected. | Press the SOURCE button or one of the source buttons again. |
| No image | Source cable is not connected. | Ensure the source cable is securely connected to the projector and source device |
| No image | Source is not playing | Make sure the source has not stopped or paused the video. If the source is a computer, make sure the PC is not in a screen saving or power saving mode and resend the video to the projector. |
| No image | AV-Mute is on | Ensure the AV-MUTE (video off) buttons has not been pressed. |
| No image | Brightness and/or contrast setting is too low | Use the On Screen Display (OSD) menu to adjust the brightness and contrast |
| ISSUE CAUSE SOLUTION | ||
| Image is reversed | Orientation is set incorrectly. | Use the On Screen Display (OSD) menu to adjust the orientation. |
| Image has slanted sides | Projector is not positioned perpendicularly to the screen. | Ensure the projector is centered on the screen and below the bottom of the screen |
| Image has slanted sides | Keystone is not set correctly. | Press the keystone + or - buttons to adjust the image alignment. |
| Image is too small or too large. | Projector is too far from or too close to the screen. | Move the projector |
| Image is too small or too large. | The zoom is not set correctly. | Press the Zoom + or - buttons to adjust the zoom. |
| Image is too dark | ECO mode is enabled Check if the projector is in the Forced ECO mode because the ambient temperature is too high. | |
| Image is blurry | Focus is not set correctly. | Use the focus ring to adjust the focus. |
| Image is blurry | Projector is too close or too far from the screen. | Ensure that the distance between the projector and screen is within the adjustment range of the lens. |
| Image is blurry | Smudge or condensation on the lens. | Clean the lens. Condensation may form on the lens if the projector is cold, brought into a warm place, and turned on. |
| Image is scrolling or flickering. | Source resolution and/or frequency is not supported. | Make sure that the source's resolution and frequency are supported by the projector. |
12.4 SOLVING VIDEO, AUDIO AND REMOTE CONTROL ISSUES
The following table provides solutions for potential video, audio, and remote control issues.
| ISSUE CAUSE SOLUTION | ||
| Video is frozen the Freeze button has been pressed. | Press the Freeze button on the remote to unfreeze the video. | |
| Video is stretched | 16:9 (wide) source is setup incorrectly. | Ensure the source is set to use the 16:9 (wide) display format. |
| Video is stretched | Letterbox (LBX) source is setup incorrectly. | Use the On Screen Display (OSD) menu to set the aspect ratio to LBX. |
| Video is stretched | 4:3 source is setup incorrectly. | Use the On Screen Display (OSD) menu to set the aspect ratio to 4:3. |
| No audio | Projector is muted. | Press the Mute button to unmute the projector. |
| No audio | Volume setting is too low. | Press the volume + button to increase the volume. |
| No audio | Source cable is not connected. | Ensure the source cable is securely connected to the projector and source device. |
| No audio | Source is muted. | Ensure the source has not been muted. |
| Remote does not work. | Batteries expired. | Install new batteries. |
| Remote does not work. | Batteries installed incorrectly. | Remove and reinstall the batteries. |
| Remote does not work. | Remote is too far from projector. | The remote should be within 16.4 feet (5m) of the projector. |
| Remote does not work. | IR receiver cannot detect remote. | Ensure there are no obstructions between the remote and the projector's IR receiver. Ensure the operating angle of the remote control is within ± 20^ to the projector's IR receiver. Ensure there are no fluorescent light sources shining on the projector's IR receiver. |
If you are still experiencing technical issues with your projector, please contact ScreenPlay Customer Support Here
12.5 SERVICING
Servicing is required when the projector has been damaged, exposed to rain or moisture, does not operate normally, or has been dropped. All servicing and repairs should be performed by an authorized ScreenPlay representative.
13. ADDITIONAL INFORMATION
13.1 RS232 PIN ASSIGNMENTS
| PIN NUMBER BO DETAILED TIMING | |
| 1 - | |
| 2 RDX | |
| 3 TXD | |
| 4 | - |
| 5 GND | |
| 6 | - |
| 7 | - |
| 8 | - |
| 9 | - |
13.2 RS232 PROTOCOL FUNCTION LIST
| FUNCTION | VALUE |
| BAUD RATE 19200 | |
| PARITY BIT NONE | |
| DATA BIT | 8 |
| STOP BIT | 1 |
| ON DELAY | 20 SECONDS |
| POWER DOWN DELAY | 20 SECONDS |
| SOURCE CHANGE DELAY | 8 SECONDS |
| INTERCOMMAND DELAY MINIMUM | 500 MILLISECONDS |
| INTERCHARACTER DELAY MINIMUM | 2 MILLISECONDS |
13.2.1 RS232 PROJECTOR COMMAND CODES
| INDEX ASC | CODE HEX | CODE FUNCTION | VALUE/RANGE | SP2234SP2234ST | SP2236SP2236ST | SP2238SP2238ST | |
| S001~XX001 | 7E 30 30 3030 20 31 0D | Power On Yes | Yes Yes | ||||
| S001~XX000 | 7E 30 30 3030 20 30 0D | Power | Off (0/2 for backward compatible) | Yes Yes Yes | |||
| S002 | ~XX001~nnnn | 7E 30 30 3030 20 31 20a 0D | Power ON with Password ~nnnn | "nnnn = Password ~0000 (a=7E 30 30 30 30) ~9999 (a=7E 39 39 39 39)" | Yes Yes Yes | ||
| S003~XX011 | 7E 30 30 3031 20 31 0D | Resync Yes Yes | Yes | ||||
| S004~XX021 | 7E 30 30 3032 20 31 0D | AV Mute | On Yes Yes Yes | ||||
| S004 | ~XX020 | 7E 30 30 3032 20 30 0D | AV Mute | Off (0/2 for backward compatible) | Yes Yes Yes | ||
| S005~XX031 | 7E 30 30 3033 20 31 0D | Mute | On Yes Yes Yes | ||||
| S005 | ~XX030 | 7E 30 30 3033 20 30 0D | Mute | Off (0/2 for backward compatible) | Yes Yes Yes | ||
| S006~XX041 | 7E 30 30 3034 20 31 0D | Freeze | Yes | Yes | Yes | ||
| S006 | ~XX040 | 7E 30 30 3034 20 30 0D | Unfreeze | (0/2 for backward compatible) | Yes Yes Yes | ||
| S007~XX051 | 7E 30 30 3035 20 31 0D | Zoom Plus | Yes Yes Yes | ||||
| S008~XX061 | 7E 30 30 3036 20 31 0D | Zoom Minus | Yes Yes Yes | ||||
| S009~XX110 | 7E 30 30 3131 20 30 0D | IR Function | Off | No | No | No | |
| S009 | ~XX111 | 7E 30 30 3131 20 31 0D | IR Function | On | No | No | No |
| S010~XX125 | 7E 30 30 3132 20 35 0D | Direct Source Commands | VGA | Yes Yes Yes | |||
| S010~XX129 | 7E 30 30 3132 20 39 0D | Direct Source Commands | S-Video | No | No | No | |
| S010 | ~XX1210 | 7E 30 30 3132 20 31 30 0D | Direct Source Commands | Video | Yes Yes Yes | ||
| S010 | ~XX121 | 7E 30 30 3132 20 31 0D | Direct Source Commands | HDMI (HDMI 1) Yes Yes | Yes Yes Yes | ||
| S010 | ~XX1215 | 7E 30 30 3132 20 31 35 0D | Direct Source Commands | HDMI 2 | Yes Yes Yes | ||
| S011 | ~XX201 | 7E 30 30 3230 20 31 0D | Picture Mode | Presentation | Yes | Yes | Yes |
| INDEX ASCI | ICODE HEXCODE FUNCTION VALUE/RANGE | SP2234SP2234ST | SP2236SP2236ST | SP2238SP2238ST | ||
| S011~XX20 2 | 7E 30 30 3230 20 32 0D | Picture Mode Bright Yes Yes Yes | ||||
| S011~XX20 3 | 7E 30 30 3230 20 33 0D | Picture Mode Movie (Cinema) Yes Yes Yes | ||||
| S011~XX20 4 | 7E 30 30 3230 20 34 0D | Picture Mode sRGB Yes Yes Yes | ||||
| S011~XX20 13 | 7E 30 30 3230 20 31 33 0D | Picture Mode DICOM SIM. | Yes Yes Yes | |||
| S011~XX20 5 | 7E 30 30 3230 20 35 0D | Picture Mode User Yes Yes Yes | ||||
| S011~XX20 9 | 7E 30 30 3230 20 39 0D | Picture Mode 3D | Yes Yes Yes | |||
| S011~XX20 12 | 7E 30 30 3230 20 31 32 0D | Picture Mode Game Yes Yes Yes | ||||
| S011 | ~XX20 22 | 7E 30 30 3230 20 32 32 0D | Picture Mode HDR SIM. | Yes Yes Yes | ||
| S011 | ~XX20 26 | 7E 30 30 3230 20 32 36 0D | Picture Mode HLG SIM. | Yes Yes Yes | ||
| S012 | ~XX21 n | 7E 30 30 3231 20 a 0D | Brightness n = -50 (a=2D 35 30) ~ 50 (a=35 30) | Yes Yes Yes | ||
| S013 | ~XX22 n | 7E 30 30 3232 20 a 0D | Contrast n = -50 (a=2D 35 30) ~ 50 (a=35 30) | Yes Yes Yes | ||
| S014~XX23 n | 7E 30 30 3233 20 a 0D | Sharpness n = 1 (a=31) ~ 15 (a=31 35) | Yes Yes Yes | |||
| S015~XX24 n | 7E 30 30 3234 20 a 0D | RGB Gain/Bias Red Gain n = -50 (a=2D 35 30) ~ 50 (a=35 30) | Yes Yes Yes | |||
| S016~XX25 n | 7E 30 30 3235 20 a 0D | RGB Gain/Bias Green Gain n = -50 (a=2D 35 30) ~ 50 (a=35 30) | Yes Yes Yes | |||
| S017 | ~XX26 n | 7E 30 30 3236 20 a 0D | RGB Gain/Bias Blue Gain n = -50 (a=2D 35 30) ~ 50 (a=35 30) | Yes Yes Yes | ||
| S018 | ~XX27 n | 7E 30 30 3237 20 a 0D | RGB Gain/Bias Red Bias n = -50 (a=2D 35 30) ~ 50 (a=35 30) | Yes Yes Yes | ||
| S019~XX28 n | 7E 30 30 3238 20 a 0D | RGB Gain/Bias Green Bias n = -50 (a=2D 35 30) ~ 50 (a=35 30) | Yes Yes Yes | |||
| S020 | ~XX29 n | 7E 30 30 3239 20 a 0D | RGB Gain/Bias Blue Bias n = -50 (a=2D 35 30) ~ 50 (a=35 30) | Yes Yes Yes | ||
| S021~XX34 n | 7E 30 30 3334 20 a 0D | BrilliantColorTM n = 1 (a=30) ~ 10 (a=31 30) | Yes Yes Yes | |||
| S022~XX35 1 | 7E 30 30 3335 20 31 0D | Gamma Film | Yes Yes Yes | |||
| S022 | ~XX35 2 | 7E 30 30 3335 20 32 0D | Gamma Video | Yes Yes Yes | ||
| INDEX ASC | CODE HEX | CODE FUNCTION | VALUE/RANGE | SP2234SP2234ST | SP2236SP2236ST | SP2238SP2238ST | |
| S022 ~XX3 | 5 3 | 7E 30 30 3335 20 33 0D | Gamma Graphics | Yes Yes Yes | |||
| S022 ~XX3 | 5 4 | 7E 30 30 3335 20 34 0D | Gamma Standard | (2.2) Yes Yes Yes | |||
| S022 ~XX3 | 5 5 | 7E 30 30 3335 20 35 0D | Gamma 1.8 Yes | Yes Yes | |||
| S022 ~XX3 | 5 6 | 7E 30 30 3335 20 36 0D | Gamma 2.0 | Yes Yes Yes | |||
| S022 | ~XX35 12 | 7E 30 30 3335 20 31 310D | Gamma 2.4 | Yes Yes Yes | |||
| S022 ~XX3 | 5 8 | 7E 30 30 3335 20 38 0D | Gamma 2.6 | Yes Yes Yes | |||
| S023 ~XX3 | 6 4 | 7E 30 30 3336 20 34 0D | Colour Temp. | Warm | Yes Yes Yes | ||
| S023 | ~XX36 1 | 7E 30 30 3336 20 31 0D | Colour Temp. Standard | Yes Yes Yes | |||
| S023 ~XX3 | 6 2 | 7E 30 30 3336 20 32 0D | Colour Temp. | Cool | Yes Yes Yes | ||
| S023 ~XX3 | 6 3 | 7E 30 30 3336 20 33 0D | Colour Temp. | Cold | Yes Yes Yes | ||
| S024 | ~XX37 1 | 7E 30 30 3337 20 31 0D | Colour Space | Auto | Yes Yes Yes | ||
| S024 | ~XX37 2 | 7E 30 30 3337 20 32 0D | Colour Space | RGB\RGB | Yes Yes Yes | ||
| S024 | ~XX37 3 | 7E 30 30 3337 20 33 0D | Colour Space | YUV | Yes Yes Yes | ||
| S024 | ~XX37 4 | 7E 30 30 3337 20 34 0D | Colour Space | RGB | Yes | Yes | Yes |
| S025 ~XX4 | 4 n | 7E 30 30 3435 20 a 0D | Tint | n = -50 (a=2D 35 30)~50 (a=35 30) | Yes Yes Yes | ||
| S026 ~XX4 | 5 n | 7E 30 30 3434 20 a 0D | Colour (Saturation) | n = -50 (a=2D 35 30)~50 (a=35 30) | Yes Yes Yes | ||
| S027 | ~XX46 1 | 7E 30 30 3436 20 31 0D | Brightness Brightness - | Yes Yes Yes | |||
| S027 | ~XX46 2 | 7E 30 30 3436 20 32 0D | Brightness Brightness + | Yes Yes Yes | |||
| S028 | ~XX47 1 | 7E 30 30 3437 20 31 0D | Contrast | Contrast - | Yes Yes Yes | ||
| S028 | ~XX47 2 | 7E 30 30 3437 20 32 0D | Contrast | Contrast + | Yes Yes Yes | ||
| S029 | ~XX59 1 | 7E 30 30 3539 20 31 0D | Four corners | top-left (right+) | Yes | Yes | Yes |
| S029 ~XX5 | 9 2 | 7E 30 30 3539 20 32 0D | Four corners | top-left (left+) | Yes | Yes | Yes |
| S029 ~XX5 | 9 3 | 7E 30 30 3539 20 33 0D | Four corners | top-left (up +) | Yes | Yes | Yes |
| INDEX ASCI | ICODE HEXCODE FUNCTION VALUE/RANGE | SP2234SP2234ST | SP2236SP2236ST | SP2238SP2238ST | ||
| S029 ~XX59 4 | 7E 30 30 3539 20 34 0D | Four corners top-left (down +) Yes Yes Yes | ||||
| S029 ~XX59 5 | 7E 30 30 3539 20 35 0D | Four corners top right (right +) Yes Yes Yes | ||||
| S029 ~XX59 6 | 7E 30 30 3539 20 36 0D | Four corners top right (left +) Yes Yes Yes | ||||
| S029 ~XX59 7 | 7E 30 30 3539 20 37 0D | Four corners top right (up +) | Yes | Yes | Yes | |
| S029 ~XX59 8 | 7E 30 30 3539 20 38 0D | Four corners top right (down +) | Yes | Yes | Yes | |
| S029 ~XX59 9 | 7E 30 30 3539 20 39 0D | Four corners Bottom-left (right+) | Yes | Yes | Yes | |
| S029 ~XX59 10 | 7E 30 30 3539 20 31 30 0D | Four corners Bottom-left (left+) | Yes | Yes | Yes | |
| S029 ~XX59 11 | 7E 30 30 3539 20 31 31 0D | Four corners Bottom-left (Up+) | Yes | Yes | Yes | |
| S029 ~XX59 12 | 7E 30 30 3539 20 31 32 0D | Four corners Bottom-left (down+) | Yes | Yes | Yes | |
| S029 ~XX59 13 | 7E 30 30 3539 20 31 33 0D | Four corners Bottom-right (right+) | Yes | Yes | Yes | |
| S029 ~XX59 14 | 7E 30 30 3539 20 31 34 0D | Four corners Bottom-right (left+) | Yes | Yes | Yes | |
| S029 ~XX59 15 | 7E 30 30 3539 20 31 35 0D | Four corners Bottom-right (Up+) | Yes | Yes | Yes | |
| S029 ~XX59 16 | 7E 30 30 3539 20 31 36 0D | Four corners Bottom-right (down+) | Yes Yes Yes | |||
| S030 ~XX60 1 | 7E 30 30 3630 20 31 0D | Format (Aspect Ratio) | 4:3 | Yes Yes | ||
| S030 ~XX60 2 | 7E 30 30 3630 20 32 0D | Format (Aspect Ratio) | 16:9 | Yes Yes Yes | ||
| S030 ~XX60 3 | 7E 30 30 3630 20 33 0D | Format (Aspect Ratio) | 16:10 | Yes | No | |
| S030 ~XX60 5 | 7E 30 30 3630 20 35 0D | Format (Aspect Ratio) | LBX | Yes Yes Yes | ||
| S030 ~XX60 6 | 7E 30 30 3630 20 36 0D | Format (Aspect Ratio) | Native | Yes Yes Yes | ||
| S030 ~XX60 7 | 7E 30 30 3630 20 37 0D | Format (Aspect Ratio) | Auto | Yes Yes Yes | ||
| S031 ~XX61 n | 7E 30 30 3631 20 a 0D | Edge mask | n = 0 (a=30) - 10 (a=31 30) | Yes Yes Yes | ||
| INDEX ASCIICODE HEXC | CODE FUNCTION | VALUE/RANGE | SP2234SP2234ST | SP2236SP2236ST | SP2238SP2238ST | |
| S032~XX62 n | 7E 30 30 3632 20 a 0D | Zoom | n = -5 (a=2D 35) ~ 25(a=32 35) | Yes Yes Yes | ||
| S033~XX63 n | 7E 30 30 3633 20 a 0D | H Image Shift | n = -100 (a=2D 31 3030) ~ 100 (a= 31 3030) | Yes Yes Yes | ||
| S034~XX64 n | 7E 30 30 3634 20 a 0D | V Image Shift | n = -100 (a=2D 31 3030) ~ 100 (a= 31 3030) | Yes Yes Yes | ||
| S035~XX65 n | 7E 30 30 3635 20 a 0D | H Keystone | n = -30 (a=2D 33 30)~ 30 (a=33 30) | Yes Yes Yes | ||
| S036~XX66 n | 7E 30 30 3636 20 a 0D | V Keystone | n = -30 (a=2D 33 30)~ 30 (a=33 30) | Yes Yes Yes | ||
| S037~XX69 1 | 7E 30 30 3639 20 31 0D | Auto Keystone On | Yes Yes Yes | |||
| S037~XX69 0 | 7E 30 30 3639 20 30 0D | Auto Keystone | Off (0/2 for backwardcompatible) | Yes Yes Yes | ||
| S037~XX70 1 | 7E 30 30 3730 20 31 0D | Language English | Yes Yes Yes | |||
| S037~XX70 2 | 7E 30 30 3730 20 32 0D | Language | Deutsch | Yes | Yes | Yes |
| S037~XX70 3 | 7E 30 30 3730 20 33 0D | Language | Français | Yes Yes Yes | ||
| S037~XX70 4 | 7E 30 30 3730 20 34 0D | Language | Italiana | Yes Yes Yes | ||
| S037~XX70 5 | 7E 30 30 3730 20 35 0D | Language | Español | Yes Yes Yes | ||
| S037~XX70 6 | 7E 30 30 3730 20 36 0D | Language | Português | Yes Yes Yes | ||
| S037 | ~XX70 7 | 7E 30 30 3730 20 37 0D | Language Polski | Yes Yes Yes | ||
| S037~XX70 8 | 7E 30 30 3730 20 38 0D | Language | Nederlands | Yes Yes Yes | ||
| S037~XX70 9 | 7E 30 30 3730 20 39 0D | Language | Svenska | Yes | Yes | Yes |
| S037 | ~XX70 10 | 7E 30 30 3730 20 31 300D | Language | Norsk/Dansk | Yes | Yes |
| S037~XX70 11 | 7E 30 30 3730 20 31 310D | Language | Suomi | Yes Yes Yes | ||
| S037 | ~XX70 12 | 7E 30 30 3730 20 31 320D | Language | ελληνικά | Yes Yes Yes | |
| S037 | ~XX70 13 | 7E 30 30 3730 20 31 330D | Language | 繁體中文 | Yes Yes Yes | |
| INDEX ASCI | ICODE HEXC | CODE FUNCTION | VALUE/RANGE | SP2234SP2234ST | SP2236SP2236ST | SP2238SP2238ST | |
| S037 ~XX70 | 14 | 7E 30 30 3730 20 31 340D | Language | 简体中文 | Yes Yes Yes | ||
| S037 ~XX70 | 15 | 7E 30 30 3730 20 31 350D | Language | 日本語 | Yes Yes Yes | ||
| S037 ~XX70 | 16 | 7E 30 30 3730 20 31 360D | Language | 한국어 | Yes Yes Yes | ||
| S037 ~XX70 | 17 | 7E 30 30 3730 20 31 370D | Language | Русский | Yes Yes Yes | ||
| S037 ~XX70 | 18 | 7E 30 30 3730 20 31 380D | Language Magyar | Yes Yes Yes | |||
| S037 ~XX70 | 19 | 7E 30 30 3730 20 31 390D | Language Češtin | Yes Yes Yes | |||
| S037 ~XX70 | 20 | 7E 30 30 3730 20 32 300D | Language | يَبْرِع | Yes Yes Yes | ||
| S037 ~XX70 | 21 | 7E 30 30 3730 20 32 310D | Language | يُلْنَ | Yes Yes Yes | ||
| S037 ~XX70 | 22 | 7E 30 30 3730 20 32 320D | Language Türkçe | Yes Yes Yes | |||
| S037 ~XX70 | 23 | 7E 30 30 3730 20 32 330D | Language | يَسْرِاف | Yes Yes Yes | ||
| S037 ~XX70 | 24 | 7E 30 30 3730 20 32 340D | Language | हानी | No No No | ||
| S037 ~XX70 | 25 | 7E 30 30 3730 20 32 350D | Language | Tiếng Việt | Yes | Yes | Yes |
| S037 ~XX70 | 26 | 7E 30 30 3730 20 32 360D | Language | Bahasa Indonesia | Yes | Yes | Yes |
| S037 | ~XX70 27 | 7E 30 30 3730 20 32 370D | Language | Română | Yes | Yes | Yes |
| S037 ~XX70 | 28 | 7E 30 30 3730 20 32 380D | Language | Slovenčina | Yes | Yes | Yes |
| S037 ~XX70 | 29 | 7E 30 30 3730 20 32 390D | Language | Pilipino No No No | |||
| INDEX ASCI | CODE HEXC | CODE FUNCTION | VALUE/RANGE | SP2234SP2234ST | SP2236SP2236ST | SP2238SP2238ST | |
| S037~XX70 | 30 | 7E 30 30 3730 20 33 300D | Language Melayu No No No | ||||
| S037~XX70 | 31 | 7E 30 30 3730 20 33 310D | Language | बांगला | No No No | ||
| S039~XX71 | 11 | 7E 30 30 3731 20 31 0D | Projection | Front | Yes | Yes | Yes |
| S039 | ~XX71 2 | 7E 30 30 3731 20 32 0D | Projection | Rear | Yes | Yes | Yes |
| S039 | ~XX71 3 | 7E 30 30 3731 20 33 0D | Projection | Front-Ceiling | Yes | Yes | Yes |
| S039 | ~XX71 4 | 7E 30 30 3731 20 34 0D | Projection | Rear-Ceiling | Yes | Yes | Yes |
| S040 | ~XX72 1 | 7E 30 30 3732 20 31 0D | Menu Location | Top Left | Yes | Yes | Yes |
| S040 | ~XX72 2 | 7E 30 30 3732 20 32 0D | Menu Location | Top Right | Yes | Yes | Yes |
| S040 | ~XX72 3 | 7E 30 30 3732 20 33 0D | Menu Location | Centre | Yes | Yes | Yes |
| S040 | ~XX72 4 | 7E 30 30 3732 20 34 0D | Menu Location | Bottom Left | Yes | Yes | Yes |
| S040 | ~XX72 5 | 7E 30 30 3732 20 35 0D | Menu Location | Bottom Right | Yes | Yes | Yes |
| S041 | ~XX73 n | 7E 30 30 3733 20 a 0D | Signal Frequency | n = -10 (a=2D 31 30) ~10 (a=31 30) By signal | Yes | Yes | Yes |
| S042 | ~XX74 n | 7E 30 30 3734 20 a 0D | Signal Phase | n = 0 (a=30) ~ 31(a=33 31) By signal | Yes | Yes | Yes |
| S043 | ~XX75 n | 7E 30 30 3735 20 a 0D | Signal H. Position | n = -5 (a=2D 35) ~ 5(a=35) By timing | Yes | Yes | Yes |
| S044 | ~XX76 n | 7E 30 30 3736 20 a 0D | Signal V. Position | n = -5 (a=2D 35) ~ 5(a=35) By timing | Yes | Yes | Yes |
| S045 | ~XX77 n | 7E 30 3037 37 20aabbcc 0D | Security SecurityTimer Month/Day/Hour | “n = mm/dd/hh mm=00 (aa=30 30) ~12 (aa=31 32) dd= 00 (bb=30 30) ~30 (bb=33 30) hh=00 (cc=30 30) ~ 24(cc=32 34)” | Yes | Yes | Yes |
| S046 | ~XX78 1~nnnn | 7E 30 30 3738 20 31 0D | Security | "On with password~nnnn = ~0000 (a= 7E30 30 30 30) ~9999(a=7E 39 39 39 39)” | Yes | Yes | Yes |
| S046 | ~XX78 0~nnnn | 7E 30 30 3738 20 32 20a 0D | Security | “Off (0/2 forbackwardcompatible) withpassword ~nnnn =~0000 (a= 7E 30 3030 30) ~9999 (a=7E39 39 39 39)” | Yes | Yes | Yes |
| INDEX ASCI | ICODE HEXCODE FUNCTION VALUE/RANGE | SP2234SP2234ST | SP2236SP2236ST | SP2238SP2238ST | ||
| S047 ~XX79 n | 7E 30 30 3739 20 a 0D | Projector ID | n = 00 (a=30 30) ~ 99(a=39 39) | No No No | ||
| S048 ~XX801 | 7E 30 30 3830 20 31 0D | Mute On Yes Yes | Yes | |||
| S048 ~XX800 | 7E 30 30 3830 20 30 0D | Mute | Off (0/2 for backward compatible) | Yes Yes Yes | ||
| S049 ~XX81 n | 7E 30 30 3831 20 a 0D | Volume (Audio) | n = 0 (a=30) ~ 10(a=31 30) | Yes Yes Yes | ||
| S050 ~XX821 | 7E 30 30 3832 20 31 0D | Logo | Default | Yes | Yes | |
| S050 | ~XX82 2 | 7E 30 30 3832 20 32 0D | Logo | User | No No No | |
| S050 | ~XX82 3 | 7E 30 30 3832 20 33 0D | Logo | Neutral | Yes | Yes |
| S051 ~XX880 | 7E 30 30 3838 20 30 0D | Closed Captioning | Off | Yes | Yes | |
| S051 | ~XX88 1 | 7E 30 30 3838 20 31 0D | Closed Captioning | CC1 Yes Yes Yes | ||
| S051 ~XX88 2 | 7E 30 30 3838 20 32 0D | Closed Captioning | CC2 | Yes Yes Yes | ||
| S052 ~XX901 | 7E 30 30 3931 20 31 0D | "Screen Type(Only for WXGA/WUXGA)" | 16:10 | Yes No Yes | ||
| S052 ~XX900 | 7E 30 30 3931 20 30 0D | - | 16:9 | Yes | No | |
| S053 | ~XX911 | 7E 30 30 3931 20 31 0D | Signal Automatic | On | Yes Yes Yes | |
| S053 ~XX910 | 7E 30 30 3931 20 30 0D | Signal Automatic | Off | Yes | Yes | |
| S054 | ~XX1011 | 7E 30 30 3130 31 20 31 0D | High Altitude | On | Yes | Yes |
| S054 ~XX1010 | 7E 30 30 3130 31 20 30 0D | High Altitude | Off (0/2 for backward compatible) | Yes Yes Yes | ||
| S055 ~XX1021 | 7E 30 30 3130 32 20 31 0D | Information Hide | On | No No No | ||
| S055 | ~XX102 0 | 7E 30 30 3130 32 20 30 0D | Information Hide | Off (0/2 for backward compatible) | No No No | |
| S056 ~XX1031 | 7E 30 30 3130 33 20 31 0D | Keypad Lock | On | No | No | |
| S056 | ~XX103 0 | 7E 30 30 3130 33 20 30 0D | Keypad Lock | Off (0/2 for backward compatible) | No No No | |
| INDEX ASCIICODE HEXCODE FUNCTION VALUE/RANGE | SP2234SP2234ST | SP2236SP2236ST | SP2238SP2238ST | ||||
| S057~XX104 0 | 7E 30 30 3130 34 20 300D | Background Color None Yes Yes Yes | |||||
| S057~XX104 1 | 7E 30 30 3130 34 20 310D | Background Color Blue Yes Yes Yes | |||||
| S057~XX104 3 | 7E 30 30 3130 34 20 330D | Background Color | Red | Yes | Yes | Yes | |
| S057~XX104 4 | 7E 30 30 3130 34 20 340D | Background Color | Green | Yes | Yes | Yes | |
| S057~XX104 6 | 7E 30 30 3130 34 20 360D | Background Color | Gray | Yes | Yes | Yes | |
| S057 | ~XX104 7 | 7E 30 30 3130 34 20 370D | Background Color | Logo | Yes | Yes | Yes |
| S058~XX105 1 | 7E 30 30 3130 35 20 310D | Direct Power On | On | Yes | Yes | Yes | |
| S058~XX105 0 | 7E 30 30 3130 35 20 300D | Direct Power On | Off (0/2 for backward compatible) | Yes Yes Yes | |||
| S059~XX106 n | 7E 30 30 3130 36 20 a0D | "Auto Power Off(min)" (5 minutes for each step)." | n = 0 (a=30) ~ 180(a=31 38 30) | Yes Yes Yes | |||
| S060 | ~XX107 n | 7E 30 30 3130 37 20 a0D | "Sleep Timer (min)" (30 minutes for each step)." | n = 0 (a=30) ~ 990(a=39 39 30) | No | No | No |
| S061 | ~XX109 1 | 7E 30 30 3130 39 20 310D | Lamp Reminder | On | No | No | No |
| ~XX109 0 | 7E 30 30 3130 39 20 300D | Lamp Reminder | Off (0/2 for backward compatible) | No | No | No | |
| S062 | ~XX110 1 | 7E 30 30 3131 30 20 310D | Brightness Mode | Bright | No | No | No |
| ~XX110 2 | 7E 30 30 3131 30 20 320D | Brightness Mode | Eco | Yes | Yes | Yes | |
| ~XX110 4 | 7E 30 30 3131 30 20 340D | Brightness Mode | Dynamic Yes Yes | Yes | |||
| ~XX110 6 | 7E 30 30 3131 30 20 360D | Brightness Mode | Power | Yes | Yes | Yes | |
| INDEX ASCI | CODE HEXC | CODE FUNCTION | VALUE/RANGE | SP2234SP2234ST | SP2236SP2236ST | SP2238SP2238ST | |
| S063 ~XX111 | 1 | 7E 30 30 3131 31 20 310D | Lamp Reset Yes No No No | ||||
| S064 ~XX121 | 2 | 7E 30 30 3131 32 20 310D | Reset to Default Yes(P.S When security is off) | "Yes with no password (Security is Off)" | Yes Yes Yes | ||
| S065 | ~XX112 1~nnnn | 7E 30 30 3131 32 20 310D | Reset to Default Yes(P.S When security is On/ Off) | "Yes with no password (Security is Off)" | Yes Yes Yes | ||
| S066 ~XX131 | 1 | 7E 30 30 3131 33 20 310D | Signal Power On | On | Yes | Yes | Yes |
| ~XX113 0 | 7E 30 30 3131 33 20 300D | Signal Power On | Off (0/2 for backward compatible) | Yes Yes Yes | |||
| S067 | ~XX114 1 | 7E 30 30 3131 34 20 310D | Power Mode(Standby) | Active | Yes Yes Yes | ||
| ~XX114 0 | 7E 30 30 3131 34 20 300D | Power Mode(Standby) | Eco. (<0.5W) | Yes Yes Yes | |||
| S068 ~XX151 | 1 | 7E 30 30 3131 35 20 310D | Quick Resume | On | No No No | ||
| ~XX115 0 | 7E 30 30 3131 35 20 300D | Quick Resume | Off (0/2 for backward compatible) | No No No | |||
| S069 | ~XX140 10 | 7E 30 30 3134 30 20 3130 0D | IR Function | Up | Yes Yes Yes | ||
| ~XX140 11 | 7E 30 30 3134 30 20 3131 0D | IR Function Left | Yes Yes Yes | ||||
| ~XX140 12 | 7E 30 30 3134 30 20 3132 0D | IR Function | Enter (for Projection MENU) | Yes Yes Yes | |||
| ~XX140 13 | 7E 30 30 3134 30 20 3133 0D | IR Function | Right | Yes Yes Yes | |||
| ~XX140 14 | 7E 30 30 3134 30 20 3134 0D | IR Function | Down | Yes | Yes | Yes | |
| ~XX140 15 | 7E 30 30 3134 30 20 3135 0D | IR Function | Keystone + | Yes Yes Yes | |||
| ~XX140 16 | 7E 30 30 3134 30 20 3136 0D | IR Function | Keystone - | Yes Yes Yes | |||
| INDEX ASCI | CODE HEX | CODE FUNCTION | VALUE/RANGE | ||||
| ~XX140 17 | 7E 30 30 3134 30 20 3137 0D | IR Function Volume - Yes Yes Yes | |||||
| ~XX140 18 | 7E 30 30 3134 30 20 3138 0D | IR Function Volume + Yes Yes Yes | |||||
| ~XX140 19 | 7E 30 30 3134 30 20 3139 0D | IR Function Brightness Yes Yes Yes | |||||
| ~XX140 20 | 7E 30 30 3134 30 20 3230 0D | IR Function Menu Yes Yes Yes | |||||
| ~XX140 21 | 7E 30 30 3134 30 20 3231 0D | IR Function Zoom Yes Yes Yes | |||||
| ~XX140 28 | 7E 30 30 3134 30 20 3238 0D | IR Function | Contrast | Yes Yes Yes | |||
| ~XX140 47 | 7E 30 30 3134 30 20 3437 0D | IR Function | Source | Yes Yes Yes | |||
| S070 | ~XX195 0 | 7E 30 30 3139 35 20 300D | Test Pattern | Off | Yes | Yes | Yes |
| ~XX195 1 | 7E 30 30 3139 35 20 310D | Test Pattern | Grid (White) | Yes | Yes | Yes | |
| ~XX195 2 | 7E 30 30 3139 35 20 320D | Test Pattern | White | Yes | Yes | Yes | |
| ~XX195 3 | 7E 30 30 3139 35 20 330D | Test Pattern | Grid (Green) | Yes | Yes | Yes | |
| ~XX195 4 | 7E 30 30 3139 35 20 340D | Test Pattern | Grid (Magenta) | Yes | Yes | Yes | |
| S071 | ~XX200 n | 7E 30 30 3230 30 20 a0D | White level | n = 0 (a=30) - 31(a=33 31) | No | No | No |
| S072 | ~XX201 n | 7E 30 30 3230 31 20 a0D | Black level | n = -5 (a=2D 35) - 5(a=35) | No | No | No |
| S073 | ~XX204 1 | 7E 30 30 3230 34 20 310D | IRE | 0 | No | No | No |
| ~XX204 0 | 7E 30 30 3230 34 20 300D | IRE | 7.5 | No | No | No | |
| INDEX ASCI | CODE HEXC | CODE FUNCTION | VALUE/RANGE | SP2234SP2234ST | SP2236SP2236ST | SP2238SP2238ST | |
| S074 -XX210 n | 7E 30 30 3230 30 20 n0D | Display message onthe OSD | n: 1-30 characters Yes Yes Yes | ||||
| S075 -XX215 1 | 7E 30 30 3231 35 20 310D | Colour Setting Reset Yes Yes Yes | |||||
| S076 -XX230 0 | 7E 30 30 3233 30 20 300D | 3D Mode Off | Yes Yes Yes | ||||
| ~XX230 1 | 7E 30 30 3233 30 20 310D | 3D Mode | DLP-Link | Yes | Yes | Yes | |
| S077 | ~XX231 0 | 7E 30 30 3233 31 20 300D | 3D Sync Invert | Off | Yes | Yes | Yes |
| ~XX2311 | 7E 30 30 3233 31 20 310D | 3D Sync Invert | On | Yes Yes Yes | |||
| S078 -XX313 1 | 7E 30 30 3331 33 20 310D | Information Menu | On | Yes Yes Yes | |||
| ~XX313 0 | 7E 30 30 3331 33 20 300D | Information Menu | Off (0/2 for backwardcompatible) | Yes Yes Yes | |||
| S079 | ~XX320 1 | 7E 30 30 3332 30 20 310D | Optional FilterInstalled | Yes | No | No | No |
| ~XX320 0 | 7E 30 30 3332 30 20 300D | Optional FilterInstalled | No (0/2 for backwardcompatible) | No | No | No | |
| S080 | ~XX322 0 | 7E 30 30 3332 32 20 300D | Filter Reminder | Off | No | No | No |
| ~XX322 1 | 7E 30 30 3332 32 20 310D | Filter Reminder | 300hr | No | No | No | |
| ~XX322 2 | 7E 30 30 3332 32 20 320D | Filter Reminder | 500hr | No | No | No | |
| ~XX322 3 | 7E 30 30 3332 32 20 330D | Filter Reminder | 800hr | No | No | No | |
| ~XX322 4 | 7E 30 30 3332 32 20 340D | Filter Reminder | 1000hr | No | No | No | |
| S081 -XX323 1 | 7E 30 30 3332 33 20 310D | Filter Reset | Yes | No | No | No | |
| INDEX ASCIICODE HEXC | CODE FUNCTION | VALUE/RANGE | SP2234SP2234ST | SP2236SP2236ST | SP2238SP2238ST | ||
| S082~XX327 n | 7E 30 30 3332 37 20 a0D | Colour Setting RedHue | n = -50 (a=2D 35 30)~ 50 (a=35 30) | Yes Yes Yes | |||
| S083~XX328 n | 7E 30 30 3332 38 20 a0D | Colour SettingGreen Hue | n = -50 (a=2D 35 30)~ 50 (a=35 30) | Yes Yes Yes | |||
| S084~XX329 n | 7E 30 30 3332 39 20 a0D | Colour Setting BlueHue | n = -50 (a=2D 35 30)~ 50 (a=35 30) | Yes Yes Yes | |||
| S085~XX330 n | 7E 30 30 3333 30 20 a0D | Colour Setting CyanHue | n = -50 (a=2D 35 30)~ 50 (a=35 30) | Yes Yes Yes | |||
| S086~XX331 n | 7E 30 30 3333 31 20 a0D | Colour SettingYellow Hue | n = -50 (a=2D 35 30)~ 50 (a=35 30) | Yes Yes Yes | |||
| S087~XX332 n | 7E 30 30 3333 32 20 a0D | Colour SettingMagenta Hue | n = -50 (a=2D 35 30)~ 50 (a=35 30) | Yes Yes Yes | |||
| S088~XX333 n | 7E 30 30 3333 33 20 a0D | Colour Setting RedStutation | n = -50 (a=2D 35 30)~ 50 (a=35 30) | Yes Yes Yes | |||
| S089~XX334 n | 7E 30 30 3333 34 20 a0D | Colour SettingGreen Stutation | n = -50 (a=2D 35 30)~ 50 (a=35 30) | Yes Yes Yes | |||
| S090~XX335 n | 7E 30 30 3333 35 20 a0D | Colour Setting BlueStutation | n = -50 (a=2D 35 30)~ 50 (a=35 30) | Yes Yes Yes | |||
| S091~XX336 n | 7E 30 30 3333 36 20 a0D | Colour Setting CyanStutation | n = -50 (a=2D 35 30)~ 50 (a=35 30) | Yes Yes Yes | |||
| S092~XX337 n | 7E 30 30 3333 37 20 a0D | Colour SettingYellow Stutation | n = -50 (a=2D 35 30)~ 50 (a=35 30) | Yes Yes Yes | |||
| S093~XX338 n | 7E 30 30 3333 38 20 a0D | Colour SettingMagenta Stutation | n = -50 (a=2D 35 30)~ 50 (a=35 30) | Yes Yes Yes | |||
| S094~XX339 n | 7E 30 30 3333 39 20 a0D | Colour Setting RedGain | n = -50 (a=2D 35 30)~ 50 (a=35 30) | Yes Yes Yes | |||
| S095~XX340 n | 7E 30 30 3334 30 20 a0D | Colour SettingGreen Gain | n = -50 (a=2D 35 30)~ 50 (a=35 30) | Yes Yes Yes | |||
| S096~XX341 n | 7E 30 30 3334 31 20 a0D | Colour Setting BlueGain | n = -50 (a=2D 35 30)~ 50 (a=35 30) | Yes Yes Yes | |||
| S097~XX342 n | 7E 30 30 3334 32 20 a0D | Colour Setting CyanGain | n = -50 (a=2D 35 30)~ 50 (a=35 30) | Yes Yes Yes | |||
| INDEX ASCI | CODE HEXC | CODE FUNCTION | VALUE/RANGE | SP2234SP2234ST | SP2236SP2236ST | SP2238SP2238ST | |
| S098 ~XX3 | 43 n | 7E 30 30 3334 33 20 a0D | Colour SettingYellow Gain | n = -50 (a=2D 35 30)~ 50 (a=35 30) | Yes Yes Yes | ||
| S099 ~XX3 | 44 n | 7E 30 30 3334 34 20 a0D | Colour SettingMagenta Gain | n = -50 (a=2D 35 30)~ 50 (a=35 30) | Yes Yes Yes | ||
| S100 ~XX3 | 45 n | 7E 30 30 3334 35 20 a0D | Colour SettingWhite Red | n = -50 (a=2D 35 30)~ 50 (a=35 30) | Yes Yes Yes | ||
| S101 ~XX3 | 46 n | 7E 30 30 3334 36 20 a0D | Colour SettingWhite Green | n = -50 (a=2D 35 30)~ 50 (a=35 30) | Yes Yes Yes | ||
| S102 ~XX3 | 47 n | 7E 30 30 3334 37 20 a0D | Colour SettingWhite Blue | n = -50 (a=2D 35 30)~ 50 (a=35 30) | Yes Yes Yes | ||
| S103 ~XX3 | 48 1 | 7E 30 30 3334 38 20 310D | Display Mode Lock On No No | No | |||
| S103 | ~XX348 0 | 7E 30 30 3334 38 20 300D | Display Mode Lock | Off | No | No | No |
| S104 | ~XX400 0 | 7E 30 30 3430 30 20 300D | 3D→2D | 3D | Yes | Yes | Yes |
| S104 | ~XX400 1 | 7E 30 30 3430 30 20 310D | 3D→2D | L | Yes | Yes | Yes |
| S104 | ~XX400 2 | 7E 30 30 3430 30 20 320D | 3D→2D | R | Yes | Yes | Yes |
| S105 | ~XX405 0 | 7E 30 30 3430 35 20 300D | 3D Format Auto | Yes Yes Yes | |||
| S105 | ~XX405 1 | 7E 30 30 3430 35 20 310D | 3D Format | SBS | Yes Yes Yes | ||
| S105 | ~XX405 2 | 7E 30 30 3430 35 20 320D | 3D Format | Top and Bottom | Yes Yes Yes | ||
| S105 | ~XX405 3 | 7E 30 30 3430 35 20 330D | 3D Format | Frame Sequential Yes Yes Yes | |||
| S106 ~XX5 | 06 0 | 7E 30 30 3530 36 20 300D | Wall Colour OFF (Whiteboard) Yes Yes Yes | ||||
| S106 | ~XX506 1 | 7E 30 30 3530 36 20 310D | Wall Colour | Blackboard | Yes | Yes | Yes |
| INDEX ASC | CODE HEXC | CODE FUNCTION | VALUE/RANGE | SP2234SP2234ST | SP2236SP2236ST | SP2238SP2238ST | |
| S106 ~XX5 | 06 7 | 7E 30 30 3530 36 20 370D | Wall Colour Light | Yellow Yes Yes Yes | |||
| S106 ~XX5 | 06 3 | 7E 30 30 3530 36 20 330D | Wall Colour Light | Green Yes Yes Yes | |||
| S106 ~XX5 | 06 4 | 7E 30 30 3530 36 20 340D | Wall Colour Light | Blue Yes Yes Yes | |||
| S106 ~XX5 | 06 5 | 7E 30 30 3530 36 20 350D | Wall Colour Pink | Yes Yes Yes | |||
| S106 ~XX5 | 06 6 | 7E 30 30 3530 36 20 360D | Wall Colour | Gray | Yes | Yes | Yes |
| S107 | ~XX511 0 | 7E 30 30 3531 31 20 300D | HDMI Link(CEC) | Off (0/2 for backward compatible) | Yes Yes Yes | ||
| S107 | ~XX511 1 | 7E 30 30 3531 31 20 310D | HDMI Link(CEC) | On | Yes | Yes | Yes |
| S108 ~XX5 | 63 0 | 7E 30 30 3536 33 20 300D | Auto Source | Off (0/2 for backward compatible) | Yes Yes Yes | ||
| S108 | ~XX563 1 | 7E 30 30 3536 33 20 310D | Auto Source | On | Yes | Yes | Yes |
13.2.2 SENT FROM PROJECTOR AUTOMATICALLY
| INDEX ASC | IICODE HEXC | CODE FUNCTION | PROJECTORR | RETURN | SP2234SP2234ST | SP2236SP2236ST | SP2238SP2238ST |
| A001 | N/A | N/A | “Projector Informationa=0, Standbya=1, Warminga=2, Coolinga=3, Out of Rangea=6, Fan Locka=7, Over Temperaturea=8, Lamp(SSI)Hours Running Out” | INFOa | Yes Yes Yes |
13.2.3 RS232 CODES READ FROM PROJECTOR
| INDEX ASCIICODE | HEXCODE | FUNCTION PROJECTORRETURN | SP2234P2234ST | SP2236SP2236ST | SP2238SP2238ST | |
| R001~XX871 | 7E 30 3038 37 2031 0D | LAN Settings /Network State | Oka (a=0 Disconnecteda=1 Connected) | Yes Yes | Yes | |
| R002~XX873 | 7E 30 3038 37 2033 0D | LAN Settings /IPAddress | Okaaa_bbb_ccc_ddd Yes | Yes Yes | ||
| R003~XX1081 | 7E 30 3031 30 3820 31 0D | "Lamp Hoursaaaa=(5 digits) TotalLamp Hours" | Okaaaaa Yes Yes Yes | |||
| R004~XX1211 | 7E 30 3031 32 3120 31 0D | "Input SourceCommandsa=0, Nonea=7, HDMI (HDMI1)a=2, VGAa=4, S-Videoa=5, Videoa=8, HDMI 2" | Oka Yes Yes Yes | |||
| R005~XX1221 | 7E 30 3031 32 3220 31 0D | "Software Versionaaaa=SoftwareVersion" | Okaaaa | Yes Yes Yes | ||
| R006~XX1231 | 7E 30 3031 32 3320 31 0D | "Display Modea=0, Nonea=1, Presentationa=2, Brighta=3, Movie (Cinema)a=4, sRGBa=5, Usera=9, 3Da=12, Gamea=13, DICOM SIM.a=22, HDR SIM.a=26, HLG SIM." | Oka Yes Yes Yes | |||
| R007~XX1241 | 7E 30 3031 32 3420 31 0D | "Power Statea=0, Offa=1, On" | Oka Yes Yes Yes | |||
| R008~XX1251 | 7E 30 3031 32 3520 31 0D | "Brightnessaaa=-50~+50" | Okaaa | Yes Yes Yes | ||
| R009~XX1261 | 7E 30 3031 32 3620 31 0D | "Contrastaaa=-50~+50" | Okaaa | Yes Yes Yes | ||
| R010~XX1271 | 7E 30 3031 32 3720 31 0D | "Aspect Ratioaa=0, Noneaa=1, 4:3aa=2, 16:9aa=3, 16:10aa=5, LBXaa=6, Nativeaa=7, Auto" | Okaa | Yes | Yes Yes | |
| INDEX ASCIICODE | HEXCODE | FUNCTION PROJECTORRETURN | SP2234SP2234ST | SP2236SP2236ST | SP2238SP2238ST | |
| R011~XX1281 | 7E 30 3031 32 3820 31 0D | “Color Temperaturea=0, Standarda=1, Coola=2, Colda=3, Warm” | Oka Yes Yes Yes | |||
| R012~XX1291 | 7E 30 3031 32 3920 31 0D | “Projection Modea=0, Fronta=1, Reara=2, Front-Ceilinga=3, Rear-Ceiling” | Oka Yes Yes Yes | |||
| R013~XX1501 | 7E 30 3031 35 3020 31 1D | “Informationa=Power Statusa=0, Power Offa=1, Power Onbbbbb=Lamp Hourscc=Input Sourcecc=00, Nonecc=02, VGAcc=05, Videocc=07, HDMI 1cc=08, HDMI 2dddd=Software Versionee=Display Modeee=00, Noneee=01, Presentationee=02, Brightee=03, Movie(Cinema)ee=04, sRGBee=05, Useree=09, 3Dee=10, DICOM SIM.ee=12, Gameee=22, HDR SIM.ee=26, HLG SIM.” | Okabbbbbbccddddee Yes Yes Yes | |||
| R014~XX1504 | 7E 30 3031 35 3020 34 0D | “Resolutiona=string (e.g. Ok1920×1080)” | Oka Yes Yes Yes | |||
| R020~XX15016 | 7E 30 3031 35 3020 31 360D | “Standby Power Modea=0, Eco.a=1, Active” | Oka Yes Yes Yes | |||
| R015~XX15019 | 7E 30 3031 35 3020 31 390D | “Refresh ratea=string (e.g. Ok60Hz)” | Oka Yes Yes Yes | |||
| INDEX ASCIICODE | HEXCODE | FUNCTION PROJECTORRETURN | SP2234P2234ST | SP2236SP2236ST | SP2238SP2238ST | |
| R016 ~XX1511 | 7E 30 3031 35 3120 31 0D | “Model Namea=1, SVGAa=2, XGAa=3, WXGAa=4, 1080pa=5, WUXGA” | Oka Yes Yes Yes | |||
| R017 ~XX3211 | 7E 30 3033 32 3120 31 0D | “Filter Usage Hoursaaaa=00000-99999” | Okaaaaa No No No | |||
| R018 ~XX3521 | 7E 30 3033 35 3220 31 0D | “System Temperatureaaa=000-999” | Okaaa Yes Yes Yes | |||
| R019 ~XX3531 | 7E 30 3033 35 3320 31 0D | “Serial Numbera=string” | Oka Yes Yes Yes | |||
| R020 ~XX3551 | 7E 30 3033 35 3520 31 0D | “AV Mutea=0, Offa=1, On” | Oka Yes Yes Yes | |||
| R021 ~XX3561 | 7E 30 3033 35 3620 31 0D | “Mutea=0, Offa=1, On” | Oka Yes Yes Yes | |||
| R022 ~XX5431 | 7E 30 3035 34 3320 31 0D | “H Image Shiftaaaa=-100~+100” | Okaaaa Yes Yes Yes | |||
| R023 | ~XX543 2 | 7E 30 3035 34 3320 32 0D | “V Image Shiftaaaa=-100~+100” | Okaaaa Yes Yes Yes | ||
| R024 | ~XX543 3 | 7E 30 3035 34 3320 33 0D | “V Keystoneaaa=-40~+40” | Okaaa Yes Yes Yes | ||
| R025 | ~XX543 4 | 7E 30 3035 34 3320 34 0D | “H Keystoneaaa=-40~+40” | Okaaa Yes Yes Yes | ||
| R026 ~XX5551 | 7E 30 3035 35 3520 31 0D | LAN MAC Address | Ok##:###:###:###:### | Yes Yes Yes | ||
| R027 | ~XX5581 | 7E 30 3035 35 3820 31 0D | “Projector IDaa=00-99” | Okaa | Yes Yes Yes | |
13.3 SUPPORTED RESOLUTIONS AND REFRESH RATES
Video Compatibility
| NTSC NTSC M/J, 3.58MHz, 4.43MHz |
| PAL PAL B/D/G/H/I/M/N, 4.43MHz |
| SECAM SECAM B/D/G/K/K1/L, 4.25/4.4 MHz |
| SDTV 480i/p, 576i/p |
| HDTV 720p(50/60Hz), 1080i(50/60Hz), 1080P(50/60Hz) |
Note Video timing detail
| Signal Resolution Refresh Rate(Hz) Notes | |||
| TV(NTSC) | 720×480 | 60 | For Composite Video /S-video |
| TV(PAL,SECAM) | 720×576 | 50 | |
| SDTV(480I) | 720×480 | 60 | For Component |
| SDTV(480P) | 720×480 | 60 | |
| SDTV(576I) | 720×576 | 50 | |
| SDTV(576P) | 720×576 | 50 | |
| HDTV(720p) | 1280×720 | 50/60 | |
| HDTV(1080I) | 1920×1080 | 50/60 | |
| HDTV(1080p) | 1920×1080 | 24/50/60 | |
True 3D Video Compatibility table
| Input Resolutions | HDMI 1.4a 3D Input | Input timing | ||
| 1280×720P @ 50Hz Top-and-Bottom | ||||
| 1280×720P @ 60Hz Top-and-Bottom | ||||
| 1280×720P @ 50Hz | Frame packing | |||
| 1280×720P @ 60Hz | Frame packing | |||
| 1920×1080i @50 Hz | Side-by-Side (Half) | |||
| 1920×1080i @60 Hz | Side-by-Side (Half) | |||
| 1920×1080P @24 Hz | Top-and-Bottom | |||
| 1920×1080P @24 Hz | Frame packing | |||
| HDMI 1.3 | 1920×1080i @ 50Hz | Side-by-Side(Half) | SBS mode is on | |
| 1920×1080i @ 60Hz | ||||
| 1280×720P @50Hz | ||||
| 1280×720P @60Hz | ||||
| 800×600 @ 60Hz | ||||
| 1024×768 @ 60Hz | ||||
| Input Resolutions HDMI 1.3 | 1920×1080i @ 50Hz | Top-and-Bottom TAB mode is on | |
| 1920×1080i @ 60Hz | |||
| 1280×720P @50Hz | |||
| 1280×720P @60Hz | |||
| 800×600 @ 60Hz | |||
| 1024×768 @ 60Hz | |||
| 480i HQFS | 3D format is Frame sequential |
If 3D input is 1080p@24Hz, the DMD should replay with integral multiple with 3D mode Support NVIDIA 3DTV Play if there is no patent fee from InFocus
Note 1080i@25Hz and 720p@50Hz will run in 100Hz; other 3D timing will run in 120Hz.
VESA standards
Computer Signal (Analog RGB Compatible)
| Signal Resolution | Refresh Rate(Hz) Notes for Mac | |
| VGA 640×480 | 60/67/72/85 Mac 60/72/85/ | |
| SVGA 800×600 | 56/60(*2)/72/85/120(*2) | |
| XGA | 1024×768 | 48/50/60(*2)/70/75/85/120(*2) |
| HDTV(720P) | 1280×720 | 50/60(*2)/120(*2) |
| WXGA | 1280×768 | 60/75/85 |
| 1280×800 | 48/50/60 | |
| WXGA(*3) | 1366×768 | 60 |
| SXGA | 1280×1024 | 60/75/85 |
| SXGA+ | 1400×1050 | 60 |
| UXGA 1600×1200 | 60 | |
| HDTV(1080p) | 1920×1080 | 24/50/60 |
| WUXGA | 1920×1200(*1) | 60/50hz |
(*1) 1920×1200 @60Hz only support RB (reduced blanking)
(*2) Support 3D timing for 3D Ready projector (STD) and True 3D projector (Option)
(*3) Window 10 standard timing
13.4 ON SCREEN DISPLAY (OSD) MENU TREE
IMAGE
| SETTING 1 SETTING | 2 SETTING 3 VALUES | COMMENTS | ||
| Picture Mode | Presentation | 1. RGB source default: Presentation2. YUV source default: Movie3. 3D on default: 3D4. ISF Day and ISF Night are valid while ISF Mode is On or Unlock | ||
| Bright | ||||
| Movie | ||||
| sRGB | ||||
| DICOM SIM. | ||||
| User | ||||
| 3D | ||||
| ISF Day | ||||
| ISF Night | ||||
| Wall Colour | Whiteboard | |||
| Blackboard | ||||
| Light Yellow | ||||
| Light Green | ||||
| Light Blue | ||||
| Pink | ||||
| Gray | ||||
| Brightness -50 ~ 50 | ||||
| Contrast -50 ~ 50 | ||||
| Sharpness 1 ~ 15 | ||||
| Colour -50 ~ 50 Only for YUV source | ||||
| Tint | -50 ~ 50 | Only for YUV source | ||
| Advanced | Gamma | Film | 1. Picture Mode is DICOM SIM. Gamma item will be hide.2. Wall Colour is Blackboard. Gamma item will be hide. | |
| Video | ||||
| Graphics | ||||
| Standard (2.2) | ||||
| 1.8 | ||||
| 2.0 | ||||
| 2.4 | ||||
| BrilliantColorTM | 1 ~ 10 | |||
| Colour Temp | Warm | |||
| Medium | ||||
| Cold | ||||
| Colour Settings | Red- Hue | -50 ~ 50 | ||
| Red- Saturation | -50 ~ 50 | |||
| Red- Gain | -50 ~ 50 | |||
| Exit | ||||
| Advanced | Colour Settings | Green- Hue -50 ~ 50 | ||
| Green- Saturation -50 ~ 50 | ||||
| Green- Gain -50 ~ 50 | ||||
| Exit | ||||
| Blue- Hue -50 ~ 50 | ||||
| Blue- Saturation -50 ~ 50 | ||||
| Blue- Gain -50 ~ 50 | ||||
| Exit | ||||
| Cyan- Hue -50 ~ 50 | ||||
| Cyan-Saturation -50 ~ 50 | ||||
| Cyan- Gain -50 ~ 50 | ||||
| Exit | ||||
| Magenta- Hue -50 ~ 50 | ||||
| Magenta- Saturation | -50 ~ 50 | |||
| Magenta- Gain -50 ~ 50 | ||||
| Exit | ||||
| Yellow- Hue | -50 ~ 50 | |||
| Yellow- Saturation | -50 ~ 50 | |||
| Yellow- Gain | -50 ~ 50 | |||
| Exit | ||||
| White- Red | -50 ~ 50 | |||
| White- Green | -50 ~ 50 | |||
| White- Blue | -50 ~ 50 | |||
| Exit | ||||
| Reset | ||||
| Exit | ||||
| RGB Gain/Bias | Red Gain | -50 ~ 50 | ||
| Green Gain -50 ~ 50 | ||||
| Blue Gain | -50 ~ 50 | |||
| Red Bias | -50 ~ 50 | |||
| Green Bias -50 ~ 50 | ||||
| Blue Bias | -50 ~ 50 | |||
| Reset | ||||
| Exit | ||||
| Colour Space | AUTO | |||
| RGB | Only for non-HDMI source | |||
| RGB (0~255) | Only for HDMI source | |||
| RGB (16~235) | Only for HDMI source | |||
| YUV | ||||
| Advanced | White Level 0 ~ 31 Only for Video | |||
| Black Level -5 ~ 5 Only for Video | ||||
| IRE | 0 For Video Input Source | NTSC Signal default: 7.5PAL Signal default: 0IRE Adjustment Only for NTSC-M/NTSC-J/NTSC-4.43/PAL-M/PAL-60 | ||
| 7.5 | ||||
| Signal | Automatic | Off | Only for Analog VGA source | |
| On | ||||
| Phase 0 ~ 31 | ||||
| Frequency -10 ~ 10 | ||||
| H. Position -5 ~ 5 | ||||
| V. Position -5 ~ 5 | ||||
| Exit | ||||
| Exit | ||||
Display

INFORMATION
Zoom has a total of 30 step adjustment, each step representing 0.04× adjustment from -0.8 to 2.0× Brightness Power, each step represents 5% power adjustment from 100% to 50%
| SETTING 1 SETTING | 2 SETTING 3 VALUES | COMMENTS | ||
| Format | 4:3 | |||
| 16:9 | For all models but WXGA models depend on Screen Type selection | |||
| 16:10 | Only for WXGA models depend on Screen Type selection | |||
| LBX Only for WXGA, 1080p models. | ||||
| Native Original image without any scaling | ||||
| Auto | ||||
| Edge Mask 0 ~ 10 | ||||
| Zoom | -5 ~ 25 | |||
| Image Shift | H | -100 ~ 100 One step: 2 | ||
| V | -100 ~ 100 One step: 2 | |||
| Exit | ||||
| V Keystone | -40 ~ 40 for RT | |||
| -20 ~ 20 (TBD) | for STNote: the V keystone range of 1080p ST: -10~10 in 3D mode by DDP4422 limitation | |||
| 3D | 3D Mode | Off | ||
| DLP-Link | ||||
| 3D-2D | 3D | |||
| L Only display left frame | ||||
| R Only display right frame | ||||
| 3D Format | Auto | |||
| SBS SBS = Side by Side Half | ||||
| Top and Bottom | ||||
| Frame Sequential | ||||
| 3D Sync. Invert | Off | |||
| On | ||||
| Exit | ||||
| Enhanced Gaming | Off | 1. Only for 1920x1080 60Hz timing2. Disable Keystone/Overscan/Zoom/Image Shift/Aspect Ratio when turn On | ||
| On | ||||
| Picture Mode Lock | Off | |||
| On | ||||
Audio
| SETTING 1 SETTING 2 SETTING 3 VALUES | |||
| Mute - | - | Off / On (ICON) | |
| Volume | - | - | 0-10 |
Setup

INFORMATION
Power Mode, Eco/Active – Eco disables LAN and puts USB in to standby mode, Active leaves LAN active and USB in to standby
| SETTING 1 SETTING | 2 SETTING 3 VALUE | Remark | ||
| Language | English English | |||
| Deutsch German | ||||
| Français French | ||||
| Svenska Swedish | ||||
| Español Spanish | ||||
| Português Portuguese | ||||
| Polski Polish | ||||
| Nederlands Dutch | ||||
| हर्दी | Hindi | |||
| Norsk/Dansk Norwegian | /Danish | |||
| Pilipino Filipino | ||||
| Melayu Malay | ||||
| Română Romanian | ||||
| Italiana Italian | ||||
| 简体中文 | Simplified Chinese | |||
| Suomi Finnish | ||||
| ελληνικά | Greek | |||
| Русский | Russian | |||
| Magyar | Hungarian | |||
| Čeština | Czech | |||
| يَبْرِع | Arabic | |||
| ‘الله’ | Thai | |||
| Türkçe | Turkish | |||
| يُسْرَاف | Farsi | |||
| Tiếng Việt | Vietnamese | |||
| Bahasa Indonesia | Indonesian | |||
| बांश्ला | Bengali | |||
| Projection | Front (ICON) | |||
| Rear (ICON) | ||||
| Front–Ceiling (ICON) | ||||
| Rear–Ceiling (ICON) | ||||
| Menu Location | Top-Left (ICON) | |||
| Top-Right (ICON)Center (ICON) | ||||
| Menu Location | ||||
| Bottom-Left (ICON) | ||||
| Bottom-Right (ICON) | ||||
| Screen Type | 16:10 | 1. Only for WXGA models2. Relate to Format | ||
| 16:9 | ||||
| Security | Security | Off | Default PIN: 1234 | |
| On | ||||
| Security Timer | Month 0 ~ 12 | |||
| Day 0 ~ 30 | ||||
| Hour 0 ~ 24 | ||||
| Change Password | PIN is 4 digitals | |||
| Project ID 0 ~ 99 | ||||
| Audio Settings | Mute | Off | ||
| On | ||||
| Volume 0 ~ 10 | ||||
| Audio Input | Default | Only for HDMI source | ||
| AUDIO IN | ||||
| Exit | ||||
| HDMI Link Settings | HDMI Link | Off | ||
| On | ||||
| Power On Link | Mutual | |||
| PJ -> Device | ||||
| Device -> PJ | ||||
| Power Off Link | Off | |||
| On | ||||
| Network | Network State Connect/Disconnect | DHCP Off, default IP configure | setting:IP Address: 192.168.0.100Subnet Mask: 255.255.255.0Gateway: 192.168.0.254DNS: 192.168.0.1Support Network Functions:Crestron 2.0 => Port 41794Extron => Port 2023AMX Device Discovery => Port9131PJ Link => Port 4352Telnet => Port 23HTTP => Port 80, WebpageControl | |
| DHCP | Off | |||
| On | ||||
| IP Address | xxx.xxx.xxx.xxx | |||
| Subnet mask | xxx.xxx.xxx.xxx | |||
| Gateway | xxx.xxx.xxx.xxx | |||
| DNS xxx.xxx.xxx.xxx | ||||
| Apply | Yes | |||
| No | ||||
| Exit | ||||
| Advanced | Logo | Default | ||
| Neutral | Same as below BackgroundColour setting | |||
| Advanced | Background Colour | Black | ||
| Red | ||||
| Blue | ||||
| Green | ||||
| White | ||||
| Logo | ||||
| Information Hide | Off | Warning message & power off not hide | ||
| On | ||||
| Exit | ||||
OPTIONS
| SETTING 1 SETTING | 2 SETTING 3 VALUE | COMMENTS | ||
| Input Source | VGA | |||
| Video | ||||
| HDMI 1 | ||||
| HDMI 2 | ||||
| Exit | ||||
| Auto Source | Off | |||
| On | ||||
| High Altitude | Off | |||
| On | ||||
| Keypad Lock | Off | 1. Keypad unlock hotkey:Press the "Enter" key on keypad for 5s to release keypad lock2. Relate to IR Function:If Keypad Lock setting from Off to On, IR Function will be automatically changed to On. | ||
| On | ||||
| Test Pattern | Red Grid | |||
| Green Grid | ||||
| Blue Grid | ||||
| White | ||||
| Remote Settings | IR Function | Off Relate to Keypad Lock: | ||
| On | If IR Function setting from On to Off, Keypad Lock will be automatically changed to Off. | |||
| User 1 | AV Mute | Executed through the "AV Mute" key on the remote control | ||
| Wall Colour | ||||
| Brightness | ||||
| Contrast | ||||
| Gamma | ||||
| SETTING 1 SETTING | 2 SETTING 3 VALUE COMMENTS | |||
| Remote Settings User 1 | Colour Temp. | Executed through the "AV Mute" key on the remote control | ||
| Colour Settings | ||||
| RGB Gain/Bias | ||||
| Language | ||||
| Projection | ||||
| Security | ||||
| Test Pattern | ||||
| Auto Power Off (min) | ||||
| Sleep Timer (min) | ||||
| Lamp Settings | ||||
| INFO | ||||
| Advanced | Direct Power On | Off | ||
| On | ||||
| Signal Power On | Off | |||
| On | ||||
| Auto Power Off (min) | 0 ~ 180 | One step: 5 | ||
| Sleep Timer (min) 0 ~ 990 One step: 30 | ||||
| Quick Resume | Off | |||
| On | ||||
| VGA Out (Standby) | Off | |||
| On | ||||
| USB Power | Off | Standby not supported | ||
| On | ||||
| Exit | ||||
| Lamp Settings | Lamp Hours (Display Only) Range 0~99999 | |||
| Lamp Reminder | Off | |||
| On | ||||
| Brightness Mode | Bright | |||
| Eco | ||||
| Dynamic | ||||
| Lamp Reset | No | |||
| Yes | ||||
| Exit | ||||
| Reset | No | |||
| Yes | ||||
Information

INFORMATION
The information menu provides information on the active source and other details of the projector, there are no adjustable settings in this section of the menu.
| SETTING 1 SETTING | 2 SETTING 3 VALUE | Remark | ||
| Regulatory | P122 for RTP123 for ST | |||
| Serial Number (DisplayOnly) | ||||
| Input Source (DisplayOnly) | ||||
| Resolution (DisplayOnly) | ||||
| Refresh Rate (DisplayOnly) | ||||
| Picture Mode (DisplayOnly) | ||||
| Lamp Hours | Bright (DisplayOnly) Range 0~99999 | |||
| Eco. (DisplayOnly) Range 0~99999 | ||||
| Dynamic (DisplayOnly) Range 0~99999 | ||||
| Total | (DisplayOnly) | Range 0~99999 | ||
| Brightness Mode | (DisplayOnly) | |||
| Firmware Version | System | (DisplayOnly) | ||
| MCU | (DisplayOnly) | |||
| Project ID | (DisplayOnly) | |||

INFORMATION
All specifications are subject to change without notice.
14.1 VISTA, P122 & P123, SPECIFICATIONS
| SP2234 SP2236 SP2238 | SP2234ST SP2236ST SP2238ST | |||||
| IMAGE | ||||||
| Product Series VISTA | ||||||
| Display Technology Texas Instruments DLP* | ||||||
| Panel Size 0.55" DMD 0.65" DMD 0.65" DMD 0.55" DMD 0.65" DMD | ||||||
| Native Resolution XGA WXGA 1080p XGA WXGA 1080p | ||||||
| Pixels | 1024×768 | 1280×800 | 1920×1080 | 1024×768 | 1280×800 | 1920×1080 |
| Aspect Ratio | 4:3 | 16:10 | 16:9 | 4:3 | 16:10 | 16:9 |
| Contrast Ratio | 30000:1 | |||||
| Brightness (Lumens) | 4600 | 4700 | 4400 | 4200 | 4300 | 4000 |
| Light Source | UHP Lamp | |||||
| Light Source Life Maximum Hours | 15000 | |||||
| Maximum Supported Resolution | 1920×1200 | |||||
| Horizontal Sync. Range (KHz) | 15~97.55 | |||||
| Vertical Sync. Range (Hz) | 54~85 | |||||
| Uniformity (%) | 80 | |||||
| LENS | ||||||
| Lens | 1.3× | 1:1 Fixed | ||||
| Lens Zoom Adjustment | Manual | - | ||||
| Image Offset (%) | 115 | 112.4 | 116 | 115 | 112.4 | 116 |
| Focal Length (mm) | 21.85~24.01 | 7.15 | ||||
| F-Stop | 2.43 | 2.7 | 2.43 | 2.8 | 2.43 | 2.8 |
| Keystone Adjustment | Manual/Automatic | |||||
| Vertical Keystone Correction | ±40° | ±20° | ||||
| Projection Factor | 1.48~1.93 | 1.19~1.54 | 1.13~1.47 | 0.617 | 0.521 | 0.496 |
| Projection Distance (Meters/Feet) | 1.0~9.1/3.28~29.85 | 1.0~7.7/3.28~22.26 | 1.0~10.0/3.28~32.80 | 0.4~3.8/1.31~12.46 | 0.4~3.4/1.31~11.15 | 0.4~3.3/1.31~10.82 |
| Optical Zoom | 1.3:1 | 1:1 | ||||
| Digital Zoom Demagnification / Magnification | 0.8×~2.0× | |||||
| Focus Adjustment | Manual | |||||
| CONNECTIVITY-INPUTS | ||||||
| Mini D-sub 15-pin (VGA) | √ | √ | √ | √ | √ | √ |
| Composite Video | √ | √ | √ | √ | √ | √ |
| S-Video | - | - | - | - | - | - |
| HDMITM 1.4 | √√ | √√ | √√ | √√ | √√ | √√ |
| SP2234 SP2236 SP2238 | SP2234ST SP2236ST SP2238ST | ||||||
| RJ45 - LAN 10/100/1000 | ✓ ✓ | ✓ ✓ ✓ | ✓ | ||||
| 3.5 mm Stereo Mini Jack | ✓ ✓ | ✓ ✓ ✓ | ✓ | ||||
| CONNECTIVITY-OUTPUTS | |||||||
| Mini D-sub 15-pin (VGA) | ✓ ✓ | ✓ ✓ ✓ | ✓ | ||||
| 3.5 mm Stereo Mini Jack | ✓ ✓ | ✓ ✓ ✓ | ✓ | ||||
| Powered USB-A for Wireless Dongle | ✓ ✓ | ✓ ✓ ✓ | ✓ | ||||
| CONNECTIVITY- OTHER | |||||||
| RS232 | ✓ ✓ | ✓ ✓ ✓ | ✓ | ||||
| All Major 3D Formats | ✓ ✓ | ✓ ✓ ✓ | ✓ | ||||
| USB-A for Service | ✓ ✓ | ✓ ✓ ✓ | ✓ | ||||
| POWER | |||||||
| Power Supply 100 - 240 V AC; 50 - 60 Hz | |||||||
| Power Consumption Max (W) 267 | |||||||
| Power Consumption Min. (W) 210 | |||||||
| Power Consumption Network Standby (W) <2.0 | |||||||
| Power Consumption Standby (W) <0.5 | |||||||
| GENERAL | |||||||
| Product Dimensions (L x W x H) (mm / in) 313 x 236 x 96.4 /12.4 x 9.3 x 3.8 | |||||||
| Product Weight (Kilograms/Pounds) 2.9 / 6.4 | |||||||
| Packaged Dimensions (L x W x H) (mm / in) 395 x 337 x 166 / 15.6 x 13.3 x 6.5 | |||||||
| Packaged Weight (Kilograms/Pounds) 4.1 / 9.0 | |||||||
| Fan Noise (dB) 27 | |||||||
| Audio (W) | 1 x 10 | ||||||
| Operating Temperature (Celsius/Fahrenheit) | 5 - 40 / 41 - 104 | ||||||
| Operating Humidity (%) 10 - 85 | |||||||
| Max Operating Altitude (meters / feet) | 3048 / 10000 | ||||||
| Storage Temperature (Celsius/Fahrenheit) | -10 - 60 / 14 - 140 | ||||||
| Storage Humidity (%) | 10 - 85 | ||||||
| Security | Kensington Security SlotTM, PIN Code Lock & Timer | ||||||
| Safety and Regulatory | CB, CE, EAC, cTUVus, CCC, FCC, UKCA, NOM, PSB, BIS | ||||||
| Environmental | WEEE, EU RoHS, China RoHS, CEL, CECP | ||||||
| IN THE BOX | |||||||
| Projector | ✓ ✓ | ✓ ✓ ✓ | ✓ | ||||
| Simplified Users Guide | ✓ ✓ | ✓ ✓ ✓ | ✓ | ||||
| VGA Cable | ✓ ✓ | ✓ ✓ ✓ | ✓ | ||||
| Regional Power Cord | ✓ ✓ | ✓ ✓ ✓ | ✓ | ||||
| Remote Control (no Battery) | ✓ ✓ | ✓ ✓ ✓ | ✓ | ||||
14.2 GENESIS I, P124, SPECIFICATIONS
| SP122 SP1 | 24 SP126 | ||
| IMAGE | |||
| Product Series GENESIS I | |||
| Display Technology Texas Instruments DLP® | |||
| Panel Size 0.55" DMD 0.65" DMD | |||
| Native Resolution SVGA XGA WXGA | |||
| Pixels | 800×600 | 1024×768 | 1280×800 |
| Aspect Ratio | 4:3 | 16:10 | |
| Contrast Ratio | 30000:1 | ||
| Brightness (Lumens) | 4000 | ||
| Light Source | UHP Lamp | ||
| Light Source Life Maximum Hours | 15000 | ||
| Maximum Supported Resolution | 1920×1200 | ||
| Horizontal Sync. Range (KHz) | 15 ~ 97.55 | ||
| Vertical Sync. Range (Hz) | 54 ~ 85 | ||
| Uniformity (%) | 80 | ||
| LENS | |||
| Lens | 1.1x | ||
| Lens Zoom Adjustment | Manual | ||
| Image Offset (%) | 115 | 112.4 | |
| Focal Length (mm) | 21.85 ~ 24.01 | ||
| F-Stop | 2.41 | ||
| Keystone Adjustment | Manual/Automatic | ||
| Vertical Keystone Correction | ±40° | ||
| Projection Factor | 1.94 ~ 2.16:1 | 1.54 ~ 1.72:1 | |
| Projection Distance (Meters/Feet) | 1.2 ~ 12.0 / 3.94 ~ 39.36 | 1.0 ~ 10.0 / 3.28 ~ 32.80 | |
| Optical Zoom | 1.1:1 | ||
| Digital Zoom Demagnification / Magnification | 0.8x ~ 2.0x | ||
| Focus Adjustment | Manual | ||
| CONNECTIVITY-INPUTS | |||
| Mini D-sub 15-pin (VGA) | ☑ | ||
| Composite Video | — | ||
| S-Video | ☑ | ||
| HDMI ^TM 1.4 | ☑ | ||
| RJ45 - LAN 10/100/1000 | — | ||
| 3.5 mm Stereo Mini Jack | ☑ | ||
| CONNECTIVITY-OUTPUTS | |||
| Mini D-sub 15-pin (VGA) | — | ||
| 3.5 mm Stereo Mini Jack | √ | ||
| Powered USB-A for Wireless Dongle | √ | ||
| CONNECTIVITY- OTHER | |||
| RS232 | — | ||
| All Major 3D Formats | √ | ||
| USB-A for Service | √ | ||
| POWER | |||
| Power Supply 100 ~ 240 V AC; 50 ~ 60 Hz | |||
| Power Consumption Max (W) 267 | |||
| Power Consumption Min. (W) 210 | |||
| Power Consumption Network Standby (W) | — | ||
| Power Consumption Standby (W) <0.5 | |||
| GENERAL | |||
| Product Dimensions (L x W x H) (mm / in) | 313×236×96.4 /12.4×9.3×3.8 | ||
| Product Weight (Kilograms/Pounds) 2.9 / 6.4 | |||
| Packaged Dimensions (L x W x H) (mm / in) | 395×337×166 / 15.6×13.3×6.5 | ||
| Packaged Weight (Kilograms/Pounds) 4.1 / 9.0 | |||
| Fan Noise (dB) 27 | |||
| Audio (W) 1×3 | |||
| Operating Temperature (Celsius/Fahrenheit) | 5 ~ 40 / 41 ~ 104 | ||
| Operating Humidity (%) 10 ~ 85 | |||
| Max Operating Altitude (meters / feet) 3048 / 10000 | |||
| Storage Temperature (Celsius/Fahrenheit) | -10 ~ 60 / 14 ~ 140 | ||
| Storage Humidity (%) | 10 ~ 85 | ||
| Security | Kensington Security SlotTM, PIN Code Lock & Timer | ||
| Safety and Regulatory | CB, CE, EAC, cTUVus, CCC, FCC, UKCA, NOM, PSB, BIS | ||
| Environmental | WEEE, EU RoHS, China RoHS, CEL, CECP | ||
| IN THE BOX | |||
| Projector | √ √ | √ | |
| Simplified Users Guide | √ | √ √ | |
| VGA Cable | √ | √ √ | |
| Regional Power Cord | √ | √ √ | |
| Remote Control (no Battery) | √ | √ √ | |
14.3 GENESIS II P125 & P126, SPECIFICATIONS
| SP222 SP | 224 SP226 | SP228 SP229 | SP224ST SP | 226ST | |||
| IMAGE | |||||||
| Product Series GENESIS II | |||||||
| Display Technology Texas Instruments DLP® | |||||||
| Panel Size 0.55" DMD 0.65" DMD 0.47" DMD 0.48" DMD 0.55" DMD 0.65 DMD | |||||||
| Native Resolution | SVGA | XGA | WXGA | 1080p | WUXGA | XGA | WXGA |
| Pixels | 800×600 | 1024×768 | 1280×800 | 1920×1080 | 1920×1200 | 1024×768 | 1280×800 |
| Aspect Ratio | 4:3 | 16:10 | 16:9 | 16:10 | 4:3 | 16:10 | |
| Contrast Ratio | 30000:1 | ||||||
| Brightness (Lumens) | 4000 | 3800 | |||||
| Light Source | UHP Lamp | ||||||
| Light Source Life Maximum Hours | 15000 | ||||||
| Maximum Supported Resolution | 1920×1200 | ||||||
| Horizontal Sync. Range (KHz) | 15~97.55 | ||||||
| Vertical Sync. Range (Hz) | 54~85 | ||||||
| Uniformity (%) | 80 | ||||||
| LENS | |||||||
| Lens | 1.1x | 1:1 Fixed | |||||
| Lens Zoom Adjustment | Manual | - | |||||
| Image Offset (%) | 115 | 112.4 | 116 | 110 | 115 | 112.4 | |
| Focal Length (mm) | 21.85~24.01 | 7.15 | |||||
| F-Stop | 2.41 | 2.1 | 2.7 | 2.8 | |||
| Keystone Adjustment | Manual/Automatic | ||||||
| Vertical Keystone Correction | ±40° | ±20° | |||||
| Projection Factor | 1.94~2.16:1 | 1.54~1.72:1 | 1.47~1.62:1 | 0.621:1 | 0.52:1 | ||
| Projection Distance (Meters/Feet) | 1.2~12.0/3.94~39.36 | 1.0~10.0/3.28~32.80 | 1.0~9.8m/3.28~32.14 | 1.0~9.5/3.28~31.16 | 0.4~3.76/1.31~12.33 | 0.4~3.37/1.31~11.05 | |
| Optical Zoom | 1.1:1 | 1:1 | |||||
| Digital Zoom Demagnification / Magnification | 0.8x~2.0x | ||||||
| Focus Adjustment | Manual | ||||||
| CONNECTIVITY-INPUTS | |||||||
| Mini D-sub 15-pin (VGA) | ☑ | ||||||
| Composite Video | - | ||||||
| S-Video | ☑ | ||||||
| HDMITM 1.4 | ☑ ☑ | ||||||
| RJ45 - LAN 10/100/1000 | - | ||||||
| 3.5 mm Stereo Mini Jack | ☑ | ||||||
| CONNECTIVITY-OUTPUTS | |||||||
| Mini D-sub 15-pin (VGA) | |||||||
| 3.5 mm Stereo Mini Jack | |||||||
| Powered USB-A for Wireless Dongle | |||||||
| CONNECTIVITY- OTHER | |||||||
| RS232 | |||||||
| All Major 3D Formats | |||||||
| USB-A for Service | |||||||
| POWER | |||||||
| Power Supply 100 ~ 240 V AC; 50 ~ 60 Hz | |||||||
| Power Consumption Max (W) 267 | |||||||
| Power Consumption Min. (W) 210 | |||||||
| Power Consumption Network Standby (W) | — | ||||||
| Power Consumption Standby (W) <0.5 | |||||||
| GENERAL | |||||||
| Product Dimensions (L x W x H) (mm / in) | 313 x 236 x 96.4 /12.4 x 9.3 x 3.8 | ||||||
| Product Weight (Kilograms/ Pounds) | 2.9 / 6.4 | ||||||
| Packaged Dimensions (L x W x H) (mm / in) | 395 x 337 x 166 / 15.6 x 13.3 x 6.5 | ||||||
| Packaged Weight (Kilograms/ Pounds) | 4.1 / 9.0 | ||||||
| Fan Noise (dB) 27 | |||||||
| Audio (W) 1 x 10 | |||||||
| Operating Temperature (Celsius/ Fahrenheit) | 5 ~ 40 / 41 ~ 104 | ||||||
| Operating Humidity (%) 10 ~ 85 | |||||||
| Max Operating Altitude (meters / feet) | 3048 / 10000 | ||||||
| Storage Temperature (Celsius/ Fahrenheit) | -10 ~ 60 / 14 ~ 140 | ||||||
| Storage Humidity (%) 10 ~ 85 | |||||||
| Security | Kensington Security SlotTM, PIN Code Lock & Timer | ||||||
| Safety and Regulatory | CB, CE, EAC, cTUVus, CCC, FCC, UKCA, NOM, PSB, BIS | ||||||
| Environmental | WEEE, EU RoHS, China RoHS, CEL, CECP | ||||||
| IN THE BOX | |||||||
| Projector | ✓ ✓ | ✓ ✓ | ✓ ✓ | ✓ ✓ | |||
| Simplified Users Guide | ✓ ✓ | ✓ ✓ | ✓ ✓ | ✓ | |||
| VGA Cable | ✓ ✓ | ✓ ✓ | ✓ ✓ | ✓ | |||
| Regional Power Cord | ✓ ✓ | ✓ ✓ | ✓ ✓ | ✓ | |||
| Remote Control (no Battery) | ✓ ✓ | ✓ ✓ | ✓ ✓ | ✓ | |||
15. PRODUCT COMPLIANCE
15.1 FOR USERS IN THE UNITED STATES

INFORMATION
FCC COMPLIANCE STATEMENT – CLASS B
This equipment generates, uses and can radiate radio frequency energy, and if not installed and used in accordance with the instruction manual may cause interference to radio communications. It has been tested and found to comply with the limits for a Class "B" computing device pursuant to Subpart B of Part 15 of the FCC Rules, which are designed to provide reasonable protection against such interference when operated in a residential installation. However, there is no guarantee that interference will not occur in a particular installation. If this product does cause harmful interference to radio or television reception, or any other form of communication, the user is encouraged to try to correct the interference by one or more of the following measures:
- Reorient or relocate the receiving antenna.
- Increase the separation between the product and receiver.
- Connect the product to an outlet on a circuit different from that to which the receiver is connected.
- Consult the dealer or an experienced radio/TV technician for help.
Any changes or modifications not expressly approved by the party responsible for compliance may void the user's authority to operate the product. Where shielded interface cables have been provided with the product, specified additional components or accessories elsewhere defined to be used with the installation of the product, they shall be used in order to ensure compliance with FCC regulations.
US Importer and Local Representative in accordance with FCC regulations
Maxnerva Technology Services USA LLC
13190 SW 68th Parkway, Suite 120
Portland, Oregon 97223,
15.2 FOR USERS IN CANADA

INFORMATION
This Class B digital apparatus complies with Canadian ICES-003.
Operation is subject to the following two conditions:
(1) this device may not cause interference, and
(2) this device must accept any interference, including interference that may cause undesired operation of the device.
The user is cautioned that this device should be used only as specified within this manual to meet RF exposure requirements. Use of this device in a manner inconsistent with this manual could lead to excessive RF exposure conditions.
INSTRUCTIONS TO USERS: This equipment complies with the requirements of FCC equipment provided that the following conditions are met. If the cables include a EMI ferrite core, attach the ferrite core end of the cable to the projector. Use the cables which are included with the projector or specified.
**Changes or modifications not expressly approved by the party responsible for compliance could void the user's authority to operate the equipment.
Complies with IDA Standards DA103121
15.3 FOR USERS IN EUROPEAN UNION

INFORMATION
EU COMPLIANCE

INFORMATION
CE COMPLIANCE STATEMENT
Electromagnetic Compatibility Statement: Meets 2014/30/EU Directive Low Voltage Directive: Meets 2014/35/EU Directive
EU Importer
Grand Field Technology Limited
Room 1001, 10/F, Houston Centre, 63 Mody Road, Tsim Sha Tsui East, Kowloon, Hong Kong.
EU Authorised Representative
24hour Solutions B.V.
Van Nelleweg 1,
3044 BC, Rotterdam,
The Netherlands
info@24hour-ar.com
www.24hour-ar.com
15.4 FOR USERS IN THE UNITED KINGDON AND NORTHERN IRELAND

INFORMATION
UK COMPLIANCE

INFORMATION
UKCA COMPLIANCE STATEMENT
Electromagnetic Compatibility Regulations 2016
Electrical Equipment (Safety) Regulations 2016
The Restriction of the Use of Certain Hazardous Substances in Electrical and Electronic Equipment Regulations 2012
Manufacturer, Importer and Authorised Representative in accordance with natational directives
Manufacturer
Maxnerva Technology Services Limited
Room 1001, 10/F, Houston Centre, 63 Mody Road, Tsim Sha Tsui East, Kowloon, Hong Kong.
UK Authorised Representative in accordance with UK regulations
24hour Solutions Ltd.
15 Beaufort Court
Admirals Way, Canary Wharf
London, E14 9XL, UK
+44 (0)20 457129 06
Company ID 13630765
15.5 FOR USERS IN RUISSIA

INFORMATION
Russian Authorised Representative
Maxnerva has appointed AUVIX LLC, 129085, c. Moscow, Zvezdny Boulevard, 21, bldg. 1. as the authorised representative in Russia and this product is compliant with TR TC 004/2011, TR TC 020/2011 and TR CU 020/2011 local conformity testing and approvals.
This document details the terms and conditions for the Maxnerva limited warranty supplied with ScreenPlay branded products. Maxnerva is understood to include all company entities involved in the sale or supply of ScreenPlay branded products and includes Maxnerva Technology Services Ltd. Maxnerva Technology Services US LLC., Grand Field Technology, Wisecloud Technology Service Inc. and Maxnerva (Shenzhen) Technology Services Limited collectively referred to as "Maxnerva."
EFFECTIVE DATE
ScreenPlay branded product purchases effective 1st October 2023
WHO THE WARRANTY PROTECTS
The ScreenPlay limited warranty is valid for the first end-user purchase; it is non-transferable.
WARRANTY STATEMENT
Maxnerva warrants its products to be free from defects in material and workmanship during the warranty period. If a product proves to be defective in material or workmanship during the warranty period, Maxnerva or a Maxnerva authorized service company will, in a commercially reasonable time, remedy defects in materials, design and workmanship free of charge by repairing, or should Maxnerva in its discretion deem it necessary, replacing the product in accordance with this warranty (unless otherwise required by law). Replacement products may include remanufactured products or products with neutral or alternative branding of the same or similar performance, which may consist of refurbished parts or components. Maxnerva will process each valid claim as quickly as practicable within the constraints of its operational procedures.
Maxnerva shall not be held responsible or liable for any loss, financial, consequential, or otherwise caused due to any delay whatsoever in the supply of a refurbished or replacement Projector under this warranty.
The balance of time remaining on the customer's original limited warranty will cover the replacement product. Maxnerva provides no warranty for any third-party software, whether included with the product or installed by the customer, installation of any unauthorized or third-party hardware parts or components (e.g., Projector Lamps).
DEAD ON ARRIVAL (DOA)
All new sealed ScreenPlay products carry a fourteen (30) day Dead on Arrival (DOA) warranty policy for the first consumer purchaser. A new replacement unit will be provided if the product is found to be non-operational within fourteen (30) days of purchase or fails due to a manufacturing fault. You are responsible for returning the product in its original "new" condition, with no cosmetic marking or damage and with all packaging and accessories included. Maxnerva will cover two-way freight. For valid DOA claims.
Please indicate whether you prefer a warranty repair when communicating with the ScreenPlay customer service or technical support representative.
WARRANTY PERIOD
| PRODUCT WARRANTY PERIOD | |
| Laser Illumination Projectors Five Years or 20000 Hours | |
| Lamp Illumination Projectors Two Years | |
| Interactive Touch Displays Three Years | |
| Open Pluggable Specification (OPS) Two Years | |
| Original Lamp 1 Year or 1000 Hours | |
| Replacement Lamps 3 Months | |
| Accessories 3 Months |
WHAT THE WARRANTY DOES NOT COVER
-
Any product on which the serial number is removed, erased, defaced, altered, modified or illegible.
-
Products that are not genuine ScreenPlay Products.
-
Damage, deterioration, or malfunction resulting from:
- Accident, misuse, neglect, fire, water, lightning, or other acts of nature,
- Unauthorized product modification or failure to follow instructions supplied with the product.
- Repair or attempted repair by anyone not authorized by Maxnerva.
- Damage to or loss of programs, data, or removable storage media.
- Software or data loss occurring during repair or replacement.
- Any damage to the product due to shipment.
- Removal or installation of the product.
- Causes external to the product, such as electric power fluctuations or failure.
- Use of supplies or parts not meeting Maxnerva specifications.
• Normal wear and tear.
- Failure of the owner to perform periodic product maintenance as stated in the user's guide.
- Any other cause which does not relate to a product defect.
- Damage caused by static (non-moving) images displayed for lengthy periods (image burn-in)
- Any third-party software included with the product or installed by the customer.
• Installation of any unauthorized hardware, accessories, consumable parts, or components
- Damage to, or abuse of, the coating on the surface of the product through inappropriate cleaning as described in the product User Guide
EXTENDED WARRANTY
All extended warranty must be purchased within one month (30 days) from the product purchase date. The Warranty Period starts at the time of the product's original purchase by the first end-user.
This warranty extends product warranty terms and warranty period in the ScreenPlay limited warranty document as follows:
| EXTENSION DETAILS EXTENDS LIMITED WARRANTY BY | ||
| SPEPW1 Extends Lamp Illumination Projector Warranty 1 Year | ||
| SPEPW2 Extends Lamp Illumination Projector Warranty 2 Years | ||
| SPELW1 Extends Lamp Warranty 1 Year | ||
| SPELW2 Extends Lamp Warranty 2 Years | ||
| SPEDW1 Extends Display Warranty 1 Year | ||
| SPEDW2 Extends Display Warranty 2 Years | ||
| SPEOW1 | Extends OPS Warranty | 1 Year |
| SPEOW2 | Extends OPS Warranty | 2 Years |
Extended warranties cannot be stacked to obtain extended warranty periods of more than two years. The Warranty Period will not be extended, renewed, or otherwise affected due to:
-
Subsequent resale or
-
Repair of the product; or
-
Replacement of the product
OBTAINING WARRANTY SERVICE
Submit your request using the service form or contact your local ScreenPlay support, information and details can be located at www.screenplay.net/support
Be sure to read our RMA instructions closely to ensure a smooth and timely process of your report; these will be sent to you with the RMA confirmation.
Products presented for delivery at ScreenPlay repair or logistics centres without an assigned RMA will be refused and returned to the sender. Products delivered to ScreenPlay repair or logistics centres damaged will be held, and customers will be notified. It is the responsibility of the sender to file claims directly with their freight carrier company.
OTHER IMPORTANT NOTICES
This warranty applies exclusively to the complete failure of the Projector. It does not apply to normal wear and tear, such as reduced brightness over time.
The user is advised that Lamps are classed as consumable items. Maxnerva gives no guarantee that the expected life will always be achieved.
Maxnerva reserves the right, at its absolute discretion, to determine the validity of any Warranty claim. Maxnerva's decision will be final.
All parts of the product or other equipment that Maxnerva has replaced shall become the property of Maxnerva. If a product is found not to be covered by the terms and conditions of this Warranty, Maxnerva reserves the right to charge a handling fee.
LIMITATION OF IMPLIED WARRANTIES
To the extent allowed by local law, this product is provided to you "as is" without warranties or conditions of any kind, whether oral or written, express or implied. Maxnerva specifically disclaims any implied warranties or conditions of merchantability, satisfactory quality, noninfringement and fitness for a particular purpose.
EXCLUSION OF DAMAGES
Maxnerva's liability is limited to the cost of repair or replacement of the product. Maxnerva shall not be liable for the following;
- Damage to other property caused by any defects in the product.
- Any other damages, whether direct, special, incidental, consequential, or otherwise.
-
Any claim against the customer by any other party.
-
Damages based upon inconvenience, lost profit, lost data or downtime costs, loss of use of the product, loss of time, loss of profits, loss of business opportunity, loss of goodwill, interference with business relationships, or other commercial loss, even if advised of the possibility of such damages.
LOCAL LAW
This warranty gives you specific legal rights, and you may also have other rights which vary from locality to locality. Some localities do not allow limitations on implied warranties and/or do not allow the exclusion of incidental or consequential damages, so the above limitations and exclusions may not apply to you.
TRADEMARKS
ScreenPlay and the ScreenPlay wordmark are registered trademarks of Maxnerva.
All other trademarks or registered trademarks are property of their respective companies.
Copyright © 2023 by Maxnerva Technology Services Limited.
All rights reserved. No part of this publication may be reproduced, distributed, or transmitted in any form or by any means, including photocopying, recording, or other electronic or mechanical methods, without prior written permission.
- USERS GUIDE SCREENPLAY VISTA, GENESIS I, GENESIS II SERIES
- TABLE OF CONTENTS
- ABOUT THIS GUIDE .... 5
- PRODUCT DESCRIPTION ....7
- SAFETY 15
- UNPACKING AND INSTALLING 17
- ADJUSTING....27
- CONNECTING 29
- USING....30
- USING THE ON SCREEN DISPLAY (OSD) 37
- CLEANING 45
- SANITATION......45
- DISPOSAL......46
- TROUBLESHOOTING 47
- ADDITIONAL INFORMATION .... 49
- SPECIFICATIONS....79
- DESCRIPTION OF THE USER
- CONVENTIONS USED IN THIS GUIDE
- Bold
- Italic
- EXPLANATION OF SAFETY WARNINGS
- RETAINING INSTRUCTIONS
- OBTAINING DOCUMENTATION AND INFORMATION
- DOCUMENTATION FEEDBACK
- SUPPORT AND SERVICE
- Americas
- Europe, Middle East & Africa
- Asia Pacific
- INTENDED USE AND REASONABLY FORESEEABLE MISUSE
- WARNING
- PRODUCT ELEMENTS
- FRONT
- RIGHT SIDE
- LEFT SIDE
- TOP
- BACK
- SAFETY
- HOW TO USE THE PRODUCT SAFELY
- VULNERABLE PEOPLE SAFETY INFORMATION
- TECHNICAL LIFE SPAN
- INTENDED USE SAFETY INFORMATION
- INSTALLATION SAFETY INFORMATION
- Do not install the projector:
- ELECTRICAL SAFETY INFORMATION
- SAFETY INFORMATION
- MAINTENANCE SAFETY INFORMATION
- SERVICE AND REPAIR SAFETY INFORMATION
- SAFE DISPOSAL
- GRAPHICAL SYMBOLS
- UNPACKING AND INSTALLING
- PACKAGING CONTENTS
- INSTALLATION INSTRUCTIONS
- PLACEMENT AND DISTANCE FROM THE SCREEN
- PROJECTION DISTANCE AND SCREEN SIZE
- CLEARANCE
- CEILING MOUNT
- INFORMATION
- MOUNTING HOLE DIAGRAM
- ADJUSTING THE IMAGE HEIGHT AND TILT
- ADJUSTING THE ZOOM, LENS SHIFT AND FOCUS
- ADJUSTING THE VERTICAL AND HORIZONTAL KEYSTONE
- Select Image > V Keystone
- CONNECTION DIAGRAM
- USING
- LEDs
- KEYPAD
- REMOTE CONTROL
- INSTALLING BATTERIES IN THE REMOTE CONTROL
- ATTENTION
- REMOTE CONTROL IR CODES
- REMOTE CONTROL EFFECTIVE RANGE
- TURNING THE PROJECTOR ON
- SELECTING A INPUT SOURCE
- TURNING THE PROJECTOR TO STANDBY MODE
- VIEWING 3D CONTENT
- PHOTOSENSITIVE SEIZURE WARNING AND OTHER HEALTH RISKS
- ENABLING AUTO 3D MODE
- SELECTING THE LANGUAGE FOR THE ON SCREEN MENU
- SELECTING A DISPLAY MODE
- ADJUSTING THE IMAGE COLOUR AND TEMPERATURE
- ADJUSTING THE SHARPNESS OF THE IMAGE
- MAGNIFYING THE IMAGE
- SELECTING AN ASPECT RATIO
- ENABLEING ECO MODE
- ENABLING CLOSED CAPTIONS
- DISPLAYING A TEST PATTERN
- PREVENTING UNAUTHORIZED USE
- CHANGING THE PASSWORD
- CONTROLLING THE PROJECTOR FROM A WEB BROWSER
- Notice
- CLEANING
- CLEANING THE LENS
- CLEANING THE CASE
- CLEANING THE AIR VENTS
- SANITATION
- DISPOSAL
- DISPOSAL OF ELECTRICAL COMPONENTS
- DISPOSAL OF PACKAGING WASTE
- LED INDICATOR LIGHTS
- SOLVING ON/OFF ISSUES
- SOLVING IMAGE ISSUES
- SOLVING VIDEO, AUDIO AND REMOTE CONTROL ISSUES
- SERVICING
- ADDITIONAL INFORMATION
- RS232 PIN ASSIGNMENTS
- RS232 PROTOCOL FUNCTION LIST
- SENT FROM PROJECTOR AUTOMATICALLY
- SUPPORTED RESOLUTIONS AND REFRESH RATES
- VESA standards
- ON SCREEN DISPLAY (OSD) MENU TREE
- Setup
- GENESIS I, P124, SPECIFICATIONS
- PRODUCT COMPLIANCE
- FOR USERS IN THE UNITED STATES
- FCC COMPLIANCE STATEMENT – CLASS B
- US Importer and Local Representative in accordance with FCC regulations
- FOR USERS IN CANADA
- FOR USERS IN EUROPEAN UNION
- FOR USERS IN THE UNITED KINGDON AND NORTHERN IRELAND
- UKCA COMPLIANCE STATEMENT
- Manufacturer
- UK Authorised Representative in accordance with UK regulations
- FOR USERS IN RUISSIA
- Russian Authorised Representative
- EFFECTIVE DATE
- WHO THE WARRANTY PROTECTS
- WARRANTY STATEMENT
- DEAD ON ARRIVAL (DOA)
- WHAT THE WARRANTY DOES NOT COVER
- EXTENDED WARRANTY
- OBTAINING WARRANTY SERVICE
- OTHER IMPORTANT NOTICES
- LIMITATION OF IMPLIED WARRANTIES
- EXCLUSION OF DAMAGES
- LOCAL LAW
- TRADEMARKS
Brand : INFOCUS
Model : Genesis SP226
Category : Video projector