
RHOFR5003B - Heating RUSSELL HOBBS - Free user manual and instructions
Find the device manual for free RHOFR5003B RUSSELL HOBBS in PDF.


| Product Type | Fan Heater |
| Brand | Russell Hobbs |
| Model | RHOFR5003B |
| Power | 2000W |
| Voltage | 220-240V ~ 50/60Hz |
| Heating Settings | Low heat (1000W), High heat (2000W), Fan only |
| Thermostat | Adjustable thermostat with variable temperature control |
| Overheat Protection | Yes, automatic shut-off |
| Tip-Over Safety Switch | Yes |
| Cool-Touch Housing | Yes, plastic body remains cool during operation |
| Dimensions (H x W x D) | 25 x 20 x 30 cm |
| Weight | 2.0 kg |
| Cord Length | 1.5 m |
| Noise Level | Approx. 45 dB |
| Portable | Yes, with carry handle |
| Use Room Size | Up to 25 m² |
| Cleaning | Wipe with damp cloth; clean air intake grille regularly |
| Spare Parts Availability | Contact Russell Hobbs customer service or authorized dealers |
| Warranty | 2 years (subject to terms) |
Frequently Asked Questions - RHOFR5003B RUSSELL HOBBS
User questions about RHOFR5003B RUSSELL HOBBS
0 question about this device. Answer the ones you know or ask your own.
Ask a new question about this device
Download the instructions for your Heating in PDF format for free! Find your manual RHOFR5003B - RUSSELL HOBBS and take your electronic device back in hand. On this page are published all the documents necessary for the use of your device. RHOFR5003B by RUSSELL HOBBS.
USER MANUAL RHOFR5003B RUSSELL HOBBS
natural_image
Line drawing of a standard R-ratio solar oil heater with wheels and control panel (no text or symbols)Model Number:
RHOFR5003 (B) 2500W
220-240V AC 50Hz
This product is only suitable for well insulated spaces or occasional use
For Customer Services & Spare Parts please call 0345 209 7461
Or visit us at mda.russellhobbs.com
PLEASE RETAIN
FOR FUTURE REFERENCE
CONTENTS
| Page(s) | |
| Unpacking your appliance | 3 |
| Safety Instructions | 3-6 |
| Feature Diagram | 7 |
| Base Assembly | 8 |
| Using your Oil Filled Radiator | 9 - 11 |
| Cleaning and Care | 12 |
| Problem Solving | 13 |
| Guarantee and Customer Services | 14 |
| Spare Parts | 15 |
| Connection to the Mains Supply | 16 |
| Specification | 17-18 |
| Notes | 19 |
| Disposable Information | 20 |
UNPACKING YOUR APPLIANCE
Before you use your appliance
- Remove all the packaging.
- Check the appliance after unpacking for any visual damage such as:
• Misaligned or damaged parts
• Damage to the controls
• Damage to the plug or cable
• If you can see any damage do not use the appliance
The appliance should not be used if it has been dropped or there are any visible signs of damage.
This appliance must be placed on a solid stable surface, away from walls, cabinets, furniture, curtains, etc. Position the appliance with minimum spacing of 100cm from the top and sides, front and back.
SAFETY INSTRUCTIONS
When using electrical appliances, basic safety precautions should always be observed, including the following:
- Read all instructions.
- Check that the mains voltage corresponds with the rating on the appliance.
- The appliance must not be left unattended while it is connected to the mains supply.
- Do not touch hot surfaces. Use the handle or the controls.
- To protect against electrical shock do not immerse cord, plug, or appliance in water or other liquid. Do not operate with wet hands.
- Do not let the cord hang over the edge of a worktop, table etc. or touch hot surfaces.
SAFETY INSTRUCTIONS
- Do not operate any appliance with a damaged cord or plug, or after the appliance malfunctions or is dropped or damaged in any manner. The supply cord can not be replaced. If the cord is damaged the appliance should be scrapped.
- The use of accessory attachments not recommended by the appliance manufacturer may cause fire, electric shock or injury.
• This appliance must not be immersed in any liquid - To disconnect, remove the plug from the mains outlet. Do not pull the plug out by the cord.
• Warning: In order to avoid overheating, do not cover the heater. - Never remove parts from the appliance, such as the feet, screws and so on.
- Never use the appliance near a bath, shower or a swimming pool.
- Never place flammable objects or clothing on top of the appliance.
- Allow a 100cm safe area around the appliance on the top and sides, front and back.
- Never use the appliance in a room with explosive gas such as petrol, or while using any kinds of flammable glues, sprays or solvents.
- Prevent overheating of the appliance by keeping the air inlets and outlets clean and free of anything that may cause blockage. Check all inlets and outlets regularly for accumulated dust. DO NOT COVER.
- Do not place any part of your body near the air inlet, outlet or on the fins ,to avoid personal injury, electric shock or fire.
- If overheating should occur, the built-in overheating safety device will shut the appliance off. Note, the appliance will turn on again when it has cooled down sufficiently.
SAFETY INSTRUCTIONS
- Do not insert any foreign objects into the ventilation.
- Keep all ventilation clear of any draped fabric or curtains.
- The appliance must not be located immediately below a mains socket. Do not use the appliance with a programmer, timer or any other device that switches the appliance on automatically. A fire risk exists if the appliance is covered or positioned incorrectly.
- Caution: Some parts of this product can become very hot and cause burns. Particular attention must be given when children or vulnerable people are present.
- Do not operate this appliance for anything other than its intended use.
• This appliance is not intended for commercial use.
- This product is intended for household use only. Do not use outdoors.
• This product is only intended for heating.
- Warning: It is hazardous for anyone other than a competent person to carry out any service or repair operation which involves the removal of a cover which gives protection against exposure to electrical parts.
- This heater is filled with a precise quantity of special oil. Repairs requiring opening of the oil container are only to be made by the manufacturer or his service agent who should be contacted if there is an oil leak.
- When scrapping the heater, follow the regulations concerning the disposal of oil.
- Warning: Children should not use this appliance. Close supervision is necessary when any appliances are used near children.
SAFETY INSTRUCTIONS
- Warning: Children of less than 3 years should be kept away unless continuously supervised.
- Warning: Children aged from 3 years and less than 8 years shall only switch on/off the appliance provided that it has been placed or installed in its intended normal operating position and they have been given supervision or instruction concerning use of the appliance in a safe way and understand the hazards involved.
- Warning: Children aged from 3 years and less than 8 years shall not plug in, regulate and clean the appliance or perform user maintenance.
- Warning: This appliance is not intended for use by persons (including children) with reduced physical, sensory or mental capabilities, or lack of experience and knowledge, unless they have been given supervision or instruction concerning use of the appliance by a person responsible for their safety. Children should be supervised to make sure that they do not play with or use the appliance.
• Warning: In order to avoid overheating, do not cover the heater - Warning: This appliance is not intended for use by persons (including children) with reduced physical, sensory or mental capabilities, or lack of experience and knowledge, unless they have been given supervision or instruction concerning use of the appliance by a person responsible for their safety. Children should be supervised to make sure that they do not play with or use the appliance.
- Warning - Do not touch hot surfaces, do not block openings or cover appliance.
FEATURE DIAGRAM
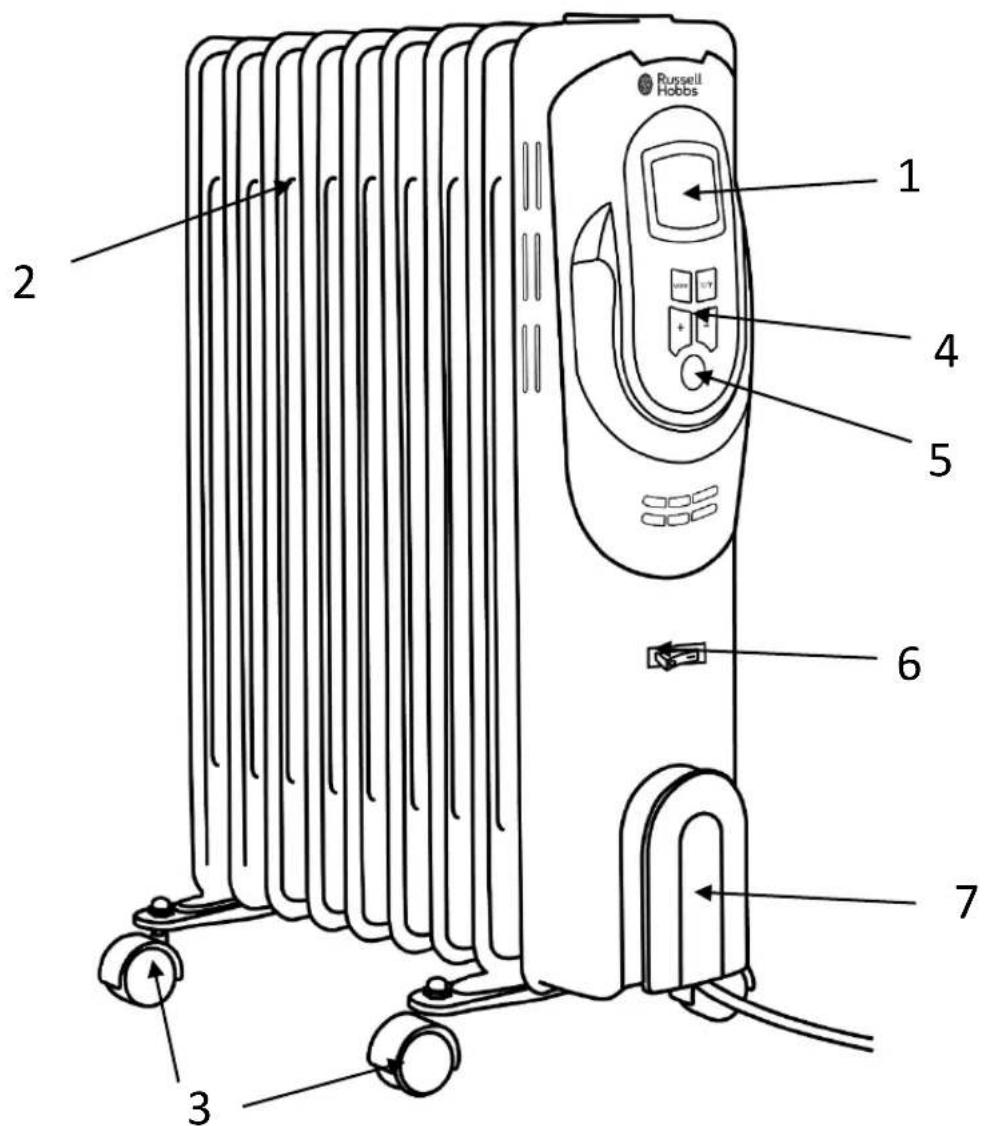
- Display
- Fins
- Castors/Wheels
-
Power/heat setting switches
-
Power button
- Power Switch & indicator light
- Power cable storage
BASE ASSEMBLY
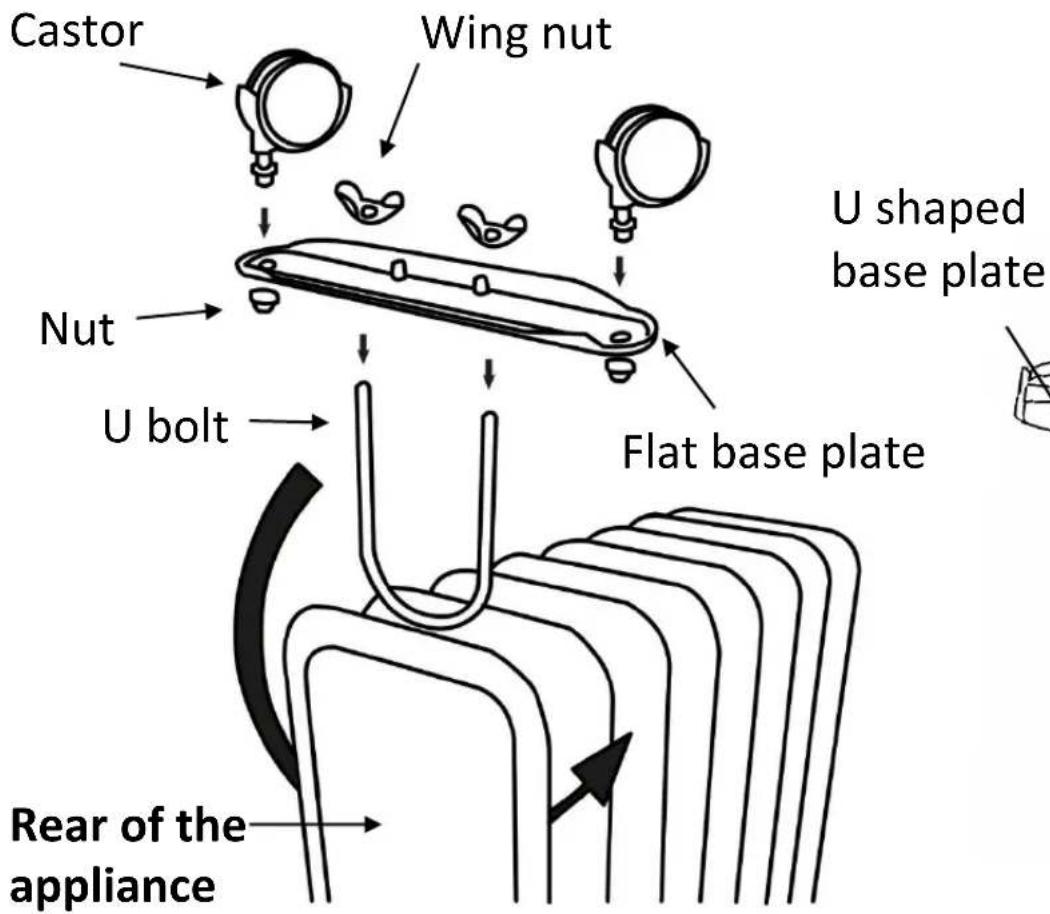
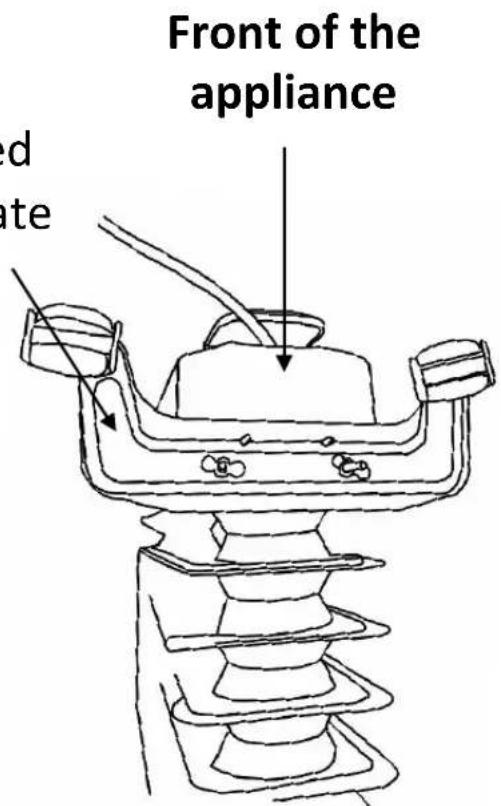
- Attach the castors to the base plate and secure using the 4 x nuts supplied.
- Then turn the heater upside down and position between the end fins.
- Attach the base plates by hooking the 2 x U-bolts through the fins and securing with the 4 x wing nuts.
- Once secure, turn the radiator round so that it is sitting on the wheels.
USING YOUR OIL FILLED RADIATOR
- Before connecting your appliance to the mains socket, position the appliance upright on the floor, at least 100cm away from the wall, away from curtains, furniture or wall coverings.
- Insert the mains plug into a suitable 13 amp mains socket.
- This appliance operates through a digital control to set the temperature. Once a temperature is selected, after <20 minutes the appliance should reach the desired temperature.
- Your heater has the ability to operate continuously, up to a desired temperature, or on a timer.
Continuous Operation
- Turn on the Power Switch (6).
-
To set the heater power, press Power Button (5) to cycle between High Power, Medium Power, and Low Power i. Please note under this setting, operation will be continuous until either the appliance is switched off, or the ambient room temperature reaches 30°C
-
To reduce heat, press the power button.
-
To switch off, press the power button 4 times.
Temperature Control
-
Ensure the Heater is in Standby Mode by pressing the Power Button.
i. You will know it is in standby when the display screen blinks every 1 second. -
Press the 'MODE' button. The display will change to a temperature reading and blink.
-
Press the '+' or '-' buttons to set a desired temperature between 13°C and 30°C.
USING YOUR OIL FILLED RADIATOR
Timer Settings
Auto-Off Setting
To set the heater to automatically switch off after a period of time, follow the below instructions:
- Press the 'MODE' button to go into 'Timer – AUTO OFF' setting
- Press the '+' or '-' buttons to set a time between 1-24 hours.
- The heater will automatically turn off when the timer reaches the set time.
Auto-On Setting
To set the heater to automatically switch on after a period of time, follow the below instructions:
- Press the 'MODE' button to go into 'Timer – AUTO ON' settings.
- Press the ‘+’ or ‘-’ buttons to set a time between 1-24 hours.
- The heater will automatically turn-on when time runs out.
Temperature Scale
- Press the °F/°C button to convert the display between Fahrenheit degrees and Celsius degrees.
Note:
- This appliance will not operate if is not placed on a stable surface.
- This appliance will not operate if the thermostat has been set too low.
- This radiator is oil filled, and will cool down slowly after the power is shut off. Allow the radiator heater to cool prior to any movement, the built in carry handle should be used for easy movement.
USING YOUR OIL FILLED RADIATOR
Safety Protective Devices - The appliance is fitted with an over heat and tip over protection system.
-
Overheat protection - the power to the heating elements will automatically cut off if the temperature of the heating elements exceeds a certain limit. In the event of overheating, the heater will stop operating. Once the appliance has completely cooled the appliance will then resume operating as normal.
-
Tip Over Switch - The unit needs to be placed on a flat, firm and stable surface to ensure that the appliance contacts the floor firmly and internal tip over switch is level. If in the event that the unit tips over or is placed on an uneven or super very surface the appliance will not operate. You may hear a rattling noise from the tip over switch when the appliance is moved, this is normal.
POWER CABLE STORAGE
When the appliance is not in use wrap the power cord around the storage hook to keep your appliance tidy and easy to store away.
The power cord must be completely unwrapped when plugged into the plug socket or in use.
CLEANING AND CARE
WARNING: Electrical Shock Hazard.
Before you clean the appliance, disconnect the mains plug from the wall socket.
- Allow the appliance to cool down completely before cleaning.
- Do not immerse cord, plug or appliance in any liquid or allow moisture to come into contact with electrical parts.
- Clean the outer surface using a moist cloth and wipe over with a dry, soft cloth.
- Do not use harsh detergents, abrasives or spray on cleaners.
- Don’t allow water to seep into the openings or come into contact with electrical connections.
- Allow sufficient drying time before operating again.
- Clean the air inlets and outlets regularly with a vacuum cleaner using the brush attachment (with regular use, at least twice a year).
- When the appliance is not in use. We recommend that, the heater is re-packed in its original packaging and stored in a cool, dry place.
PROBLEM SOLVING
My appliance does not work when I turn it on:
- Check that your appliance is plugged in and the power is turned on at the mains socket.
- Try another mains socket.
- Check the appliance is in an upright position.
- Check that the thermostat setting has not been set too low.
- Check if the Overheat protection has operated by leaving the appliance plugged in and giving it time to cool down. The heater should start to resume operating normally.
- If the appliance still doesn't work, do not try to repair it yourself.
If your appliance power is automatically cut off, follow the step below:
- Unplug your appliance from the mains socket and allow it to completely cool down.
- Inspect your appliance. Clean the air inlet and air outlet with a vacuum cleaner if necessary. If there are any signs of physical damage (e.g. melting, or burning of the case), do not attempt to use the appliance. Please leave all maintenance work to qualified personnel.
- Plug in the appliance and switch it on again. If it cuts off again, move the appliance to a better ventilated location.
GUARANTEE AND CUSTOMER SERVICES
At Russell Hobbs, we take all our customer feedback seriously.
Feel free to contact our Customer Service Team, on 0345 209 7461, who will be more than happy to assist you.
This product is guaranteed for 12 months from the date of the original purchase. If any defect arises due to faulty materials or workmanship, the faulty product must be returned to the place of purchase.
Refund or replacement is at the discretion of the retailer.
The following conditions apply:
- The product must be returned to the retailer with the original proof of purchase.
- The product must be installed and used in accordance with the instructions contained in this instruction guide and any other instructions for use which are supplied.
- It must be used for domestic purposes only and for its intended use.
- This warranty does not cover wear and tear, damage, misuse or consumable parts.
This does not affect your statutory rights.
For Customer Services & Spare Parts please call 03452097461 Or visit us at mda.russellhobbs.com
SPARE PARTS
To check the availability of the following spare parts, simply contact our friendly Customer Services team using the details provided at the bottom of this page.
Castors
U-bolts
Base Plate
For Customer Services & Spare Parts please call 03452097461
Or visit us at mda.russellhobbs.com
CONNECTION TO THE MAINS SUPPLY
This appliance is designed to operate from a mains supply of 220-240V\~50Hz/60Hz.
Check that the voltage marked on the product corresponds with your supply voltage.
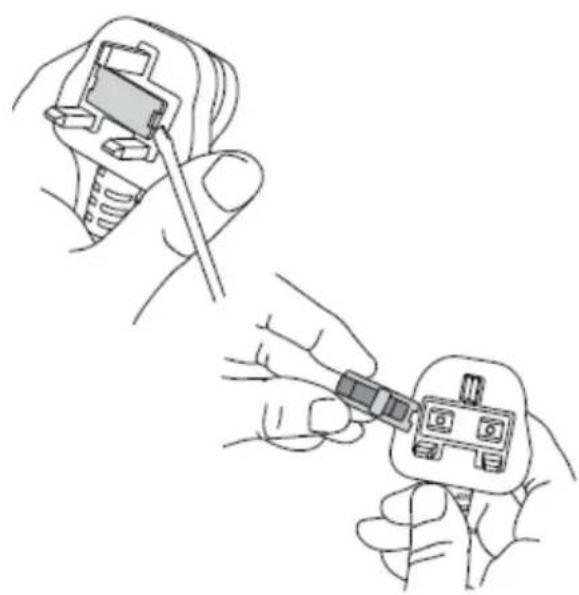
How to change the fuse
- Slot the end of a screwdriver into the recess in the fuse holder of the plug.
- Pull the fuse holder upwards until free of the plug and slide the fuse out.
- Replace the fuse and replace fuse holder, pushing down until locked into place.
Important: Only ever use a 13 amp fuse.
natural_image
Illustration of hands using a screwdriver to adjust or install an electrical plug (no text or symbols present)SPECIFICATION
Model number RHOFR5003 (B)
Rated voltage 220V - 240V \~ 50Hz/60Hz
Power consumption 2500W
Product dimensions (CMS) (H)63.5 x (W)49 x (D)24
| Model number | RHOFR5003 (B) | |||||
| Item Symbol Va | ue Unit Item Unit | |||||
| Heat output | Type of heat input, for electric storage local space heaters only | |||||
| Nominal heat output | ^p nom 1.1015kW | manual heat charge control, with integrated thermostat | No | |||
| Minimum heatoutput (indicative) | ^p min 0.9856 | kW | manual heat charge control with room and/or outdoor temperature feedback | No | ||
| Maximum continuous heat output | ^p max,c | 1.1015 | kW | electronic heat charge control with room and/or outdoor temperature feedback | No | |
| fan assisted heat output | No | |||||
| Auxiliary electricity consumption | Type of heat output/room temperature control | |||||
| At nominal heat output | ^el max 0.0 | kW | single stage heat output and no room temperature control | No | ||
| At minimum heat output | ^el min 0.0 | kW | Two or more manual stages, no room temperature control | No | ||
| In standby mode | ^el SB | 0.0 | kW | with mechanic thermostat room temperature control | No | |
| with electronic room temperature control | Yes | |||||
| electronic room temperature control plus day timer | No | |||||
| electronic room temperature control plus week timer | No | |||||
| Other control options (multiple selections possible) | ||||||
| room temperature control, with presence detection | No | |||||
| room temperature control, with open windowdetection | No | |||||
| with distance control option | No | |||||
| with adaptive start control | No | |||||
| with working time limitation | No | |||||
| with black bulb sensor | No | |||||
| Contact details | G2S LIMITED / G2S (NI) LTD | |||||
| WIGAN, WN2 4AY / BELFAST, BT5 5AD | ||||||
NOTES
NOTES
Russell Hobbs
Russell Hobbs is a registered trademark used under license from Spectrum Brands (UK) Ltd. Made under license by G2S Limited, Wigan, WN2 4AY/G2S (NI) Ltd, Belfast, BT5 5AD.
Russell Hobbs Support: call 0345 209 7461 or visit: mda.russellhobbs.com

The ‘wheelie bin’ symbol is known as the 'Crossed-out wheelie bin Symbol'. When this symbol is marked on a product/batteries, it means that the product/batteries should not be disposed of with your general household waste. Only discard electrical/electronic/battery items in separate collection schemes, which cater for the recovery and recycling of materials contained within. Your co-operation is vital to ensure the success of these schemes and for the protection of the environment. For your nearest disposal facility, visit www.recycle-more.co.uk or ask in store for details.
SEDEX – Connecting businesses and their global suppliers to share ethical data and enabling improvement in ethical performance. Visit www.sedex.org.uk for further information.
We reserve the right, due to possible changes to design, to alter the instruction manual without prior notice.
- CONTENTS
- UNPACKING YOUR APPLIANCE
- SAFETY INSTRUCTIONS
- FEATURE DIAGRAM
- BASE ASSEMBLY
- USING YOUR OIL FILLED RADIATOR
- Continuous Operation
- Temperature Control
- Timer Settings
- Auto-Off Setting
- Auto-On Setting
- Temperature Scale
- Note:
- POWER CABLE STORAGE
- CLEANING AND CARE
- WARNING: Electrical Shock Hazard.
- PROBLEM SOLVING
- My appliance does not work when I turn it on:
- If your appliance power is automatically cut off, follow the step below:
- GUARANTEE AND CUSTOMER SERVICES
- The following conditions apply:
- SPARE PARTS
- CONNECTION TO THE MAINS SUPPLY
- How to change the fuse
- SPECIFICATION
- NOTES
- Russell Hobbs
Brand : RUSSELL HOBBS
Model : RHOFR5003B
Category : Heating