
IBO600X/E - Oven IBERNA - Free user manual and instructions
Find the device manual for free IBO600X/E IBERNA in PDF.


| Product Type | Built-in Electric Oven |
| Brand | Iberna |
| Model | IBO600X/E |
| Dimensions (HxWxD) | 595 x 595 x 575 mm (approx.) |
| Net Weight | Approx. 35 kg |
| Power Supply | 220-240 V, 50/60 Hz |
| Oven Capacity | 70 L (approx.) |
| Energy Class | A (typical) |
| Cooking Functions | Natural Convection, Fan Cooking, Grill, Fan Assisted Grill, Pizza, Defrost, Lower Element |
| Temperature Range | 50°C to MAX (approx. 250°C) |
| Timer | Electronic programmer with minute minder, cooking time, and end of cooking |
| Child Lock | Yes |
| Pyrolytic Self-Cleaning | Yes |
| Catalytic Lining | Optional |
| Interior Light | Replaceable (high-temperature bulb) |
| Safety Features | Auto shut-off, cooling fan, shelf safety system |
| Number of Shelves | 2 (including tray holder) |
| Accessories Included | Drip tray, pizza set, tray holder shelf, simple shelf, handle |
| Grilling | Yes, with door closed |
| Defrost Function | Yes (fan circulates room temperature air) |
| Installation Type | Built-in, requires proper ventilation |
| Cable Type | H05V2V2-F |
| Plug | Not supplied (must be fitted by qualified person) |
| Compliance | CE, WEEE Directive 2012/19/EU |
Frequently Asked Questions - IBO600X/E IBERNA
User questions about IBO600X/E IBERNA
0 question about this device. Answer the ones you know or ask your own.
Ask a new question about this device
Download the instructions for your Oven in PDF format for free! Find your manual IBO600X/E - IBERNA and take your electronic device back in hand. On this page are published all the documents necessary for the use of your device. IBO600X/E by IBERNA.
USER MANUAL IBO600X/E IBERNA
natural_image
Line drawing of a folder with multiple pages, no text or symbols presentCONTENTS
GB
Safety Instructions 03
- General Warnings 04
1.1 Declaration Of Compliance 04
1.2 Safety Hints 04
1.3 Installation 04
1.4 Fitting The Oven Into The Kitchen Unit 04
1.5 Important 04
1.6 Connecting To The Power Supply 04
1.7 Oven Equipment (according To The Model) 05
- Useful Tips 05
2.1 Shelf Safety System 05
2.2 Grilling 05
2.3 Cleaning And Maintenance 05
2.4 Service Centre 05
- Timer 06
3.1 Using The End Of Cooking Timer 06
3.2 Setting The Correct Time 06
3.3 Use Of The Electronic Programmer 06
-
Operating Instructions 07
-
Tables Of Cooking Times 08-09
SAFETY INSTRUCTIONS
- During cooking, moisture may condense inside the oven cavity or on the glass of the door. This is a normal condition. To reduce this effect, wait 10-15 minutes after turning on the power before putting food inside the oven. In any case, the condensation disappears when the oven reaches the cooking temperature.
• Cook the vegetables in a container with a lid instead of an open tray.
- Avoid leaving food inside the oven after cooking for more than 15/20 minutes.
- WARNING: the appliance and accessible parts become hot during use. Be careful not to touch any hot parts.
- WARNING: the accessible parts can become hot when the oven is in use. Children must be kept at a safe distance.
- WARNING: ensure that the appliance is switched off before replacing the bulb, to avoid the possibility of electric shocks.
- WARNING: before initiating the automatic cleaning cycle:
- Clean the oven door;
- Remove large or coarse food residues from the inside of the oven using a damp sponge. Do not use detergents;
- Remove all accessories and the sliding rack kit (where present);
- Do not place tea towels
- In ovens with meat probe it is necessary, before making the cleaning cycle, close the hole with the nut provided. Always close the hole with the nut when the meat probe is not used.
• Children under 8 must be kept at a safe distance from the appliance if not continuously supervised.
• Children must not play with the appliance. The appliance can be used by those aged 8 or over and by those with limited physical, sensorial or mental capacities, without experience or knowledge of the product, only if supervised or provided with instruction as to the operation of the appliance, in a safe way with awareness of the possible risks.
- Cleaning and maintenance should not be carried out by unsupervised children.
- Do not use rough or abrasive materials or sharp metal scrapers to clean the oven door glasses, as they can scratch the surface and cause the glass to shatter.
- The oven must be switched off before removing the removable parts and, after cleaning, reassemble them according the instructions.
- Only use the meat probe recommended for this oven.
- Do not use a steam cleaner for cleaning operations.
- Connect a plug to the supply cable that is able to bear the voltage, current and load indicated on the tag and having the earth contact. The socket must be suitable for the load indicated on the tag and must be having the earth contact connected and in operation. The earth conductor is yellow-green in colour. This operation should be carried out by a suitably qualified professional. In case of incompatibility between the socket and the appliance plug, ask a qualified electrician to substitute the socket with another suitable type. The plug and the socket must be conformed to the current norms of the installation country. Connection to the power source can also be made by placing an omnipolar breaker between the appliance and the power source that can bear the maximum connected load and that is in line with current legislation. The yellow-green earth cable should not be interrupted by the breaker. The socket or omnipolar breaker used for the connection should be easily accessible when the appliance is installed.
- The disconnection may be achieved by having the plug accessible or by incorporating a switch in the fixed wiring in accordance with the wiring rules.
- If the power cable is damaged, it must be substituted with a cable or special bundle available from the manufacturer or by contacting the customer service department.
• The type of power cable must be H05V2V2-F.
- Failure to comply with the above can compromise the safety of the appliance and invalidate the guarantee.
• Any excess of spilled material should be removed before cleaning.
- During the pyrolytic cleaning process, surfaces can heat up more than usual, children must therefore be kept at a safe distance.
• The appliance must not be installed behind a decorative door in order to avoid overheating.
- When you place the shelf inside, make sure that the stop is directed upwards and in the back of the cavity. The shelf must be inserted completely into the cavity
- WARNING: Do not line the oven walls with aluminum foil or single-use protection available from stores. Aluminum foil or any other protection, in direct contact with the hot enamel, risk melting and deteriorating the enamel of the insides.
- WARNING: Never remove the oven door seal.
- No additional operation/setting is required in order to operate the appliance at the rated frequencies.
1. GENERAL WARNINGS
Thank you for choosing one of our products. To get the most out of your oven we recommend that you:
- Read the notes in this manual carefully: they contain important instructions on how to install, use and service this oven safely.
- Keep this booklet in a safe place for easy, future reference.
All accessible parts are hot when the appliance is in operation, take care to not touch these elements.
When the oven is first switched on it may give out acrid smelling fumes. This is because the bonding agent for insulating panels around the oven has been heated up for the first time.
This is a completely normal, if it does occur you merely have to wait for the fumes to clear before putting the food into the oven.
An oven by its very nature becomes very hot. Especially the glass of the oven door.
1.1 DECLARATION OF COMPLIANCE
The parts of this appliance that may come into contact with foodstuffs comply with the provisions of EEC Directive 89/109.
By placing the CE mark on this product, we are confirming compliance to all relevant European safety, health and environmental requirements which are applicable in legislation for this product.
When you have unpacked the oven, make sure that it has not been damaged in any way. If you have any doubts at all, do not use it: contact a professionally qualified person. Keep packing materials such as plastic bags, polystyrene, or nails out of the reach of children because they are dangerous for children.
1.2 SAFETY HINTS
•The oven must be used only for the purpose for which it was designed: it must only be used for cooking food. Any other use, e.g. as a form of heating, is an improper use of the oven and is therefore dangerous.
•The manufacturers cannot be held responsible for any damage caused by improper, incorrect or unreasonable use. When using any electrical appliance you must follow a few basic rules.
— Do not pull on the power cable to remove the plug from the socket.
— Do not touch the oven with wet or damp hands or feet.
— Do not use the oven unless you are wearing something on your feet.
- It is not generally a good idea to use adapters, multiple sockets for several plugs and cable extensions.
- If the oven breaks down or develops a fault switch it off at the mains and do not touch it.
- If the cable is at all damaged it must be replaced promptly.
When replacing the cable, follow these instructions. Remove the power cable and replace it with one of the H05RRF, H05VV-F, H05V2V2-F type. The cable must be able to bear the electrical current required by the oven. Cable replacement must be carried out by properly qualified technicians. The earthing cable (yellow-green) must be 10 mm longer than the power cable.
Use only an approved service centre for repairs and ensure that only original parts are used. If the above instructions are not adhered to the manufacturers cannot guarantee the safety of the oven.
- Do not line the oven walls with aluminium foil or single-use protection available from stores. Aluminium foil or any other protection, in direct contact with the hot enamel, risks melting and deteriorating the enamel of the insides.
1.3 INSTALLATION
Installation is the customer's responsibility. The manufacturers have no obligation to carry this out. If the assistance of the manufacturer is required to rectify faults arising from incorrect installation, this assistance is not covered by the guarantee.
The installation instructions for professionally qualified personal must be followed. Incorrect installation may cause harm or injury to people, animals or belongings. The manufacturer cannot be held responsible for such harm or injury.
1.4 FITTING THE OVEN INTO THE KITCHEN UNIT
Fit the oven into the space provided in the kitchen unit; it may be fitted underneath a work top or into an upright cupboard. Fix the oven in position by screwing into place, using the four fixing holes in the frame. (Fig.on last page).
To locate the fixing holes, open the oven door and look inside. To allow adequate ventilation, the measurements and distances indicated in the diagram on last page must be adhered to when fixing the oven.
Note: For ovens that are combined with a hob unit the instructions contained in the manual for the hob unit must be followed.
1.5 IMPORTANT
If the oven is to work properly, the kitchen housing must be suitable. The panels of the kitchen unit that are next to the oven must be made of a heat resistant material. Ensure that the glues of units made of veneered wood can withstand temperatures of at least 120 °C. Plastics or glues that cannot withstand such temperatures will melt and deform the unit. Once the oven has been lodged inside the unit, the electrical parts must be completely insulated. This is a legal safety requirement. All guards must be firmly fixed into place so that it is impossible to remove them without using special tools.
Remove the back of the kitchen unit to ensure an adequate current of air circulates around the oven. The hob must have a rear gap of at least 45 mm.
1.6 CONNECTING TO THE POWER SUPPLY
Plug into the power supply. Ensure first that there is a third contact that acts as earthing for the oven. The oven must be properly earthed.
If the model of oven is not fitted with a plug, fit a standard plug to the power cable. It must be able to bear the power supply indicated on the specifications plate. The earthing cable is yellowgreen. The plug must be fitted by a properly qualified person. If the socket and the plug are incompatible the socket must be changed by a properly qualified person. A properly qualified person must also ensure that the power cables can carry the current required to operate the oven.
An ON/OFF switch may also be connected to the power supply. The connections must take account of the current supplied and must comply with current legal requirements. The yellow-green earthing cable must not be governed by the ON/OFF switch. The socket or the ON/OFF switch used for connecting to the power supply must be easily accessible when the oven has been installed.
Important: During installation, position the power cable in such a way that it will not be subjected to temperatures of above 50^ C at any point. The oven complies with safety standards set by the regulatory bodies. The oven is safe to use only if it has been adequately earthed in compliance with current legal requirements on wiring safety. You must ensure that the oven has been adequately earthed.
The manufacturers cannot be held responsible for any harm or injury to persons, animals or belongings caused by failure to properly earth the oven.
WARNING: the voltage and the supply frequency are showed on the rating plate (fig. on last page).
The cabling and wiring system must be able to bear the maximum electric power required by the oven. This is indicated on the specifications plate. If you are in any doubt at all, use the services of a professionally qualified person.

This appliance is marked according to the European directive 2012/19/EU on Waste Electrical and Electronic Equipment (WEEE). WEEE contains both polluting substances (which can cause negative consequences for the environment) and basic components (which can be reused). It is important to have WEEE subjected to specific
treatments, in order to remove and dispose properly all pollutants, and recover and recycle all materials. Individuals can play an important role in ensuring that WEEE does not become an environmental issue; it is essential to follow some basic rules:
• WEEE shall not be treated as household waste
- WEEE shall be handed over to the relevant collection points managed by the municipality or by registered companies. In many countries, for large WEEE, home collection could be present.
- When you buy a new appliance, the old one may be returned to the retailer who has to collect it free of charge on a one-to-one basis, as long as the equipment is of equivalent type and has the same functions as the supplied equipment.
ENERGY SAVING AND RESPECTING THE ENVIRONMENT
Where possible, avoid pre-heating the oven and always try to fill it. Open the oven door as infrequently as possible, because heat from the cavity disperses every time it is opened. For a significant energy saving, switch off the oven between 5 and 10 minutes before the planned end of the cooking time, and use the residual heat that the oven continues to generate. Keep the seals clean and in order, to avoid any heat dispersal outside of the cavity. If you have an electric contract with an hourly tariff, the "delayed cooking" programme makes energy saving more simple, moving the cooking process to start at the reduced tariff time slot.
1.7 OVEN EQUIPMENT (according to the model)
It is necessary to do an initial cleaning of the equipment before the first use of each of them. Wash them with a sponge. Rinse and dry off.
The simple shelf can take moulds and dishes.
The tray holder shelf is especially good for grilling things. Use it with the drip tray.
The special profile of the shelves means they stay horizontal even when pulled right out. There is no risk of a dish sliding or spilling.

natural_image
Two wire mesh plates with slats, one flat and one tilted (no text or symbols)The drip tray catches the juices from grilled foods. It is only used with the Grill, Rotisserie, or Fan Assisted Grill; remove it from the oven for other cooking methods.
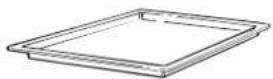
Never use the drip tray as a roasting tray as this creates smoke and fat will spatter your oven making it dirty.
The pizza set is designed for pizza cooking. In order to obtain the best results the set must be used together with Pizza function.

The tray holder
The tray holder shelf is ideal for grilling. Use it in conjunction with the drip tray. A handle is included to assist in moving the both accessories safely. Do no leave the handle inside the oven.
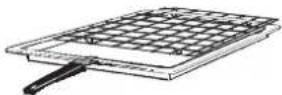
Removing and cleaning wire racks
1- Remove the knurled nuts by turning them counter clockwise.
2- Remove the wire racks by pulling them towards yourself.
3- To clean the wire racks either put them in the dishwasher or use a wet sponge, ensuring that they are dried afterwards.
4- After the cleaning process install the wire racks in reverse order.
5- Replace the knurled nuts.

2. USEFUL TIPS
2.1 SHELF SAFETY SYSTEM
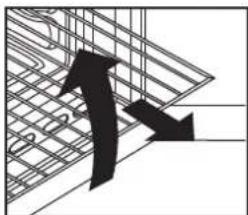
natural_image
Abstract black-and-white line drawing of two opposing arrows emerging from a grid-like structure (no text or symbols)The oven features a new shelf safety system.
This allows you to pull out the oven shelves when inspecting the food without danger of food spillages or shelves falling accidentally out of the oven.
To remove the shelves pull out and lift.
2.2 GRILLING
Grilling makes it possible to give food a rich brown colour quickly. For browning we recommend that you insert the grill onto the fourth level, depending on the proportions of the food (see fig. page 7).
Almost all food can be cooked under the grill except for very lean game and meat rolls.
Meat and fish that are going to be grilled should first be lightly doused with oil.
2.3 CLEANING AND MAINTENANCE
Never use abrasive cleaners, wire wool or sharp objects to clean the glass oven door.
Clean the stainless steel and enamelled surfaces with warm, soapy water or with suitable brand products. On no account use abrasive powders that may damage surfaces and ruin the oven's appearance. It is very important to clean the oven each time that it is used. Melted fat is deposited on the sides of the oven during cooking. The next time the oven is used this fat could cause unpleasant odours and might even jeopardise the success of the cooking. Use hot water and detergent to clean; rinse out thoroughly.
To make this chore unnecessary all models can be lined with catalytic self-cleaning panels: these are supplied as an optional extra (see the section SELF-CLEANING OVEN WITH CATALYTIC LINING).
Use detergents and abrasive metal pads like «brillo pads» for the stainless steel grills.
The glass surfaces as the top, oven door and warming compartment door must be cleaned when they are cold. Damage that occurs to
them because this rule was not adhered to are not covered by the guarantee.
To replace the interior light:
- switch off the mains power supply and unscrew bulb. Replace with an identical bulb that can withstand very high temperatures.
2.4 SERVICE CENTRE
Before calling the Service Centre:
- If the oven is not working, we recommend that:
You check that the oven is properly plugged into the power supply.
- If the cause of the fault cannot be detected:
Disconnect the oven from the mains, do not touch the oven and call the after sales service.
Before calling the Service Centre remember to make a note of the serial number on the specifications plate (see fig. On last page).
The oven is supplied with a guarantee certificate that ensures that it will be repaired free of charge by the Service Centre.

Customer Care Telephone 0844 692 3605
Spare Parts Telephone 0844 692 3606
3. TIMER
3.1 USING THE END OF COOKING TIMER

This control enables to set the desired cooking time (max. 120 min.) the oven will automatically switch off at the end of the set time.
The timer will count down from the set time return to the O position and switch off automatically.
For normal use of oven set the timer to the position.
To set the oven ensure the timer is not on the O position.
3.2 SETTING THE CORRECT TIME

WARNING : the first operation to carry out after the oven has been installed or following the interruption of power supply (this is recognizable the display pulsating and showing 1200 ) is setting the correct time. This is achieved as follows.
- Push the central button 4 times
- Set time with "-" "+" buttons.
- Release all buttons.
ATTENTION: The oven will only operate providing the clock is set.
3.3 USE OF THE ELECTRONIC PROGRAMMER
| FUNCTION | HOW TO ACTIVATE IT | HOW TO SWITCH ITOFF | WHAT IT DOES | WHAT IT IS FOR |
| KEY LOCK | •Child Lock function is activated by touching Set (+) for a minimum of 5 seconds. From this moment on all other function are locked and the display will flash STOP and preset time intermittently. | •Child Lock function is deactivated by touching touchpad Set (+) again for a minimum of 5 seconds. From this moment on all functions are selectable again. | ||
| MINUTE MINDER TIMER | •Push the central button 1 times•Press the buttons "-" "+" to set the required time•Release all the buttons | •When the set time as elapsed an audible alarm is activated (this alarm will stop on its own, however it can be stopped immediately by pressing the button) SELECT. | •Sounds an alarm at the end of the set time.•During the process, the display shows the remaining time. | •Allows to use the oven as alarm clock (could be activated either with operating the oven or with out operating the oven) |
| COOKING TIME | •Push the central button 2 times•Press the buttons "-" or "+" to set the length of cooking required•Release all buttons•Set the cooking function with the oven function selector | •When the time is elapsed the oven will switch off automatically. Should you wish to stop cooking earlier either turn the function selector to 0, or set time to 0:00 (SELECT and "-" "+" buttons) | •It allows to preset the cooking time required for the recipe chosen.•To check how long is left to run press the SELECT button 2 Times.•To alter/change the preset time press SELECT and "-" "+" buttons. | •Push any button to stop the signal. Push the central button to return to the clock function |
| END OF COOKING STOP | •Push the central button 3 times•Press the buttons "-" "+" to set the time at which you wish the oven to switch off•Release the buttons•Set the cooking function with the oven function selector | •At the time set, the oven will switch off. To switch off manually, turn the oven function selectorto position O. | •Enables you to set the end of cooking time•To check the preset time push the central button 3 times•To modify the preset time press buttons SELECT + "-" "+" | •This function is typically used with "cooking time" function.For example if the dish has to be cooked for 45 minutes and needs to be ready by 12:30, simply select the required function, set the cooking time to 45 minutes and the end of cooking time to 12:30.•At the end of the cooking set time, the oven will switch off automatically and an audible alarm will ring•Cooking will start automatically at 11:45 (12:30 minus 45 mins) and will continue until the pre-set end-of-cooking-time, when the oven will switch itself off automatically.WARNING.If the END of cooking is selected without setting the length of cooking time, the oven will start cooking immediately and it will stop at the END of cooking time set. |
- OPERATING INSTRUCTIONS
| Function dial | Thermostat dial | Function |
 | Turns on the oven lightThis will automatically activate the cooling fan (on fan cooled models only) | |
 | DefrostingWhen the dial is set to this position. The fan circulates air at room temperature around the, frozen food so that it defrosts in a few minutes without the protein content of the food being changed or altered. | |
 * * | 50÷MAX | Natural convectionBottom and top oven elements are used. This is the traditional form of baking and roasting. It is ideal for roasting joints of meat and game, baking biscuits and apples and making the food nice and crunchy. |
 | 50÷MAX | Lower ResistanceLower element, This function is ideal for delicate dishes (pies-souffle). |
 * * | 50÷MAX | Fan cookingBoth top and bottom heating elements are used with the fan circulating the air inside the oven. We recommend you use this method for poultry, pastries, fish and vegetables. Heat penetrates into the food better and both the cooking and preheating times are reduced. You can cook different foods at the same time with or without the same preparation in one or more positions. This cooking method gives even heat distribution and the smells are not mixed. Allow about ten minutes extra when cooking foods at the same time. |
 | ||
 | 50÷MAX | Fan plus lower elementThis function is ideal for delicate dishes (pies-souffle). |
 | 50÷MAX | GRILL: use the grill with the door closed.The top heating element is used alone and you can adjust the temperature. Five minutes preheating is required to get the elements red-hot. Success is guaranteed for grills, kebabs and gratin dishes. White meats should be put at a distance from the grill; the cooking time is longer, but the meat will be tastier. You can put red meats and fish fillets on the shelf with the drip tray underneath. |
 | 50÷200 | FAN ASSISTED GRILL (a): use the turbo-grill with the door closed.The top heating element is used with the fan circulating the air inside the oven. Preheating is necessary for red meats but not for white meats. Ideal for cooking thick food items, whole pieces such as roast pork, poultry, etc. Place the food to be grilled directly on the shelf centrally, at the middle level. Slide the drip tray under the shelf to collect the juices. Make sure that the food is not too close to the grill. Turn the food over halfway through cooking. |
 | 50÷MAX | Function PizzaThis function with hot air circulated in the oven ensure perfect result for dishes such as pizza or focaccia. |
* Tested in accordance with the CENELEC EN 60350-1 used for definition of energy class.
5. TABLES OF COOKING TIMES
The overall suggested cooking times set out below are intended as a rough guide only. They may in fact vary according to the quality, the freshness, the size and the thickness of the food cooked and of course cooking time is also partly a matter of taste. Let the food stand for a few minutes before serving because the ingredients continue cooking after they have been removed from the oven.
HANDY TIP: Lower the temperature so as to avoid the surface of the food becoming hard and dry.

| Static electric oven | Electric fan oven | |||||||
| Food | Quantity | Shelf | Time of cooking in minutes | Oven temperature | Shelf | Time of cooking in minutes | Oven temperature | Remarks |
| • Pasta | ||||||||
| Lasagne | Kg 3,5 | 2 | 70 ÷ 75 | 220 | 2 | 60 ÷ 65 | 200 | Put the lasagne into an unheated oven |
| Cannelloni | Kg 1,8 | 2 | 50 ÷ 60 | 220 | 2 | 40 ÷ 50 | 200 | Put the cannelloni into an unheated oven |
| Oven baked pasta | Kg 2,5 | 2 | 55 ÷ 60 | 220 | 2 | 45 ÷ 50 | 200 | Put the oven baked pasta into an unheated oven |
| • Baking (not cakes) | ||||||||
| Bread | Kg 1 di pasta | 2 | 35 10 (pre-heating) | 200 | 2 | 30 ÷ 35 10 (pre-heating) | 180 | Form the dough into a loaf and make a cross with a knife on top of the dough leave the dough to rise for at least 2 hours. Grease the baking tin and put the dough in the middle of it. |
| Pizza | Kg 1 | 1 | 25 ÷ 35 | 190 | 1 | 20 ÷ 25 | 190 | Warm the oven for 15 minutes and place the pizzas on the greased baking tray. Garnish them with tomatoes, mozzarella, ham, oil, salt and origano. |
| Pastry (frozen) vol au vents | n° 24 | 1 | 30 ÷ 35 | 220 | 2 | 25 ÷ 30 | 200 | Place 24 vol au vents in the oven and bake. |
| Focaccia (n° 4) | gr. 200 of dough each | 2 | 25 ÷ 30 | 200 | 2 | 20 ÷ 25 | 180 | Warm the oven for 15 minutes, grease the baking tray, season the 4 focaccia with oil and salt and leave them to rise at room temperature for at least 2 hours before putting them in the oven. |
| • Meat | ||||||||
| All meats can be roasted in shallow or deep roasting trays.It is advisable to cover the shallow trays to avoid splattering the sides of the oven with grease.The roasting times are the same whether the meat has been covered up or not. | ||||||||
| Whole joint of beef | Kg 1 | 3 | 70 ÷ 80 | 220 | 3 | 50 ÷ 60 | 200 | Put the meat into a deep Pyrex dish and season with salt and pepper; turn the meat half way through cooking. |
| Joint of deboned beef | Kg 1 | 2 | 100 ÷ 110 | 220 | 2 | 80 ÷ 90 | 200 | Cook the meat in a covered Pyrex dish with herbs, spice, oil and butter. |
| Joint of deboned veal | Kg 1,3 | 1 | 90 ÷ 110 | 220 | 2 | 90 ÷ 100 | 200 | Cook as indicated above |
| Joint of fillet of beef | Kg 1 | 2 | 80 ÷ 90 | 220 | 2 | 80 ÷ 90 | 200 | Cook as indicated above. |
| • Fish | ||||||||
| Trout | 3 whole trout or / Kg 1 | 2 | 40 ÷ 45 | 220 | 2 | 35 ÷ 40 | 200 | Cover the trout with salt, oil and onions and cook in a Pyrex dish. |
| Salmon | 700 g 2,5 cm slice | 2 | 30 ÷ 35 | 220 | 2 | 30 ÷ 25 | 200 | Cook the salmon in an open Pyrex dish with salt, pepper and oil. |
| Sole | Kg 1 | 2 | 40 ÷ 45 | 220 | 2 | 35 ÷ 40 | 200 | Cook the sole with salt and a spoonful of oil. |
| Bream | 2 whole ones | 2 | 40 ÷ 45 | 220 | 2 | 35 ÷ 40 | 200 | Cook the bream in oil and salt in a covered dish. |
- TABLES OF COOKING TIMES
| Static electric oven | Electric fan oven | |||||||
| Food | Quantity | Shelf | Time of cooking in minutes | Oven temperature | Shelf | Time of cooking in minutes | Oven temperature | Remarks |
| • Rabbits and Poultry | ||||||||
| Guinea fowl | Kg 1-1,3 | 2 | 60 ÷ 80 | 220 | 2 | 60 ÷ 70 | 200 | Place the guinea fowl in a deep Pyrex or pottery dish with very little oil and season with herbs and spices. |
| Chicken | Kg 1,5-1,7 | 2 | 110 ÷ 120 | 220 | 2 | 100 ÷ 110 | 200 | Follow the procedure for cooking the guinea fowl. |
| Rabbit pieces | Kg 1-1,2 | 2 | 55 ÷ 65 | 220 | 2 | 50 ÷ 60 | 200 | Put all the pieces of the same size in the glazed tray.Season with herbs and spices.Turn the pieces as and when required. |
| • Cakes | ||||||||
| Coconut cake baked in a tin | 1 | 55 | 180 | 1 | 50 | 160 | Use a tin that is 22 cm deep. Pre-heat for 10 mins. | |
| Sponge cake | 1 | 55 | 175 | 1 | 40 ÷ 45 | 160 | Use a tin that is 22 cm deep. Pre-heat for 10 mins. | |
| Carrot cake baked in a tin | 1 | 65 | 180 | 1 | 50 ÷ 60 | 160 | Use a tin that is 22 cm deep. Pre-heat for 10 mins. | |
| Apricot pie | 700 gr | 1 | 40 | 200 | 2 | 30 ÷ 35 | 180 | Use a tin that is 22 cm deep. Pre-heat for 10 mins. |
| • Vegetable | ||||||||
| Fennel | 800 gr | 1 | 70 ÷ 80 | 220 | 1 | 60 ÷ 70 | 200 | Cut the fennel into four pieces, add butter, salt and potatoes if required and place in a Pyrex face up. Cover the dish. |
| Courgettes | 800 gr | 1 | 70 | 220 | 1 | 60 ÷ 70 | 200 | Slice the courgettes, place in a Pyrex dish and add butter and salt. |
| Potatoes | 800 gr | 2 | 60 ÷ 65 | 220 | 2 | 60 ÷ 65 | 200 | Cut the potatoes into equal parts and place in a Pyrex dish. Season with salt, origano and rosemary. Cook in oil. |
| Carrots | 800 gr | 1 | 80 ÷ 85 | 220 | 1 | 70 ÷ 80 | 200 | Slice the carrots, place in a Pyrex dish and cook. |
| • Fruit | ||||||||
| Whole apples | Kg 1 | 1 | 45 ÷ 55 | 220 | 2 | 45 ÷ 55 | 200 | Bake the fruit in an open Pyrex or earthenware dish. Leave it to cool inside the oven. |
| Pears | Kg 1 | 1 | 45 ÷ 55 | 220 | 2 | 45 ÷ 55 | 200 | Follow procedure above. |
| Peaches | Kg 1 | 1 | 45 ÷ 55 | 220 | 2 | 45 ÷ 55 | 200 | Follow procedure above. |
| • Grilling | ||||||||
| Place the food to be grilled underneath the infra-red grill.Warning: When the grill is on it takes on a bright red colour. Place the tray underneath the grill to collect juices and fat from the food being grilled. | ||||||||
| Squares of bread for toasting | 4 pieces | 4 | 5(5 to heat up grill) | Grill | 4 | 5(10 to heat up grill) | Grill | Lay the bread on the grill tray. When one side of the bread has been toasted, turn over and toast the other side. Remember: keep the toast warm at the bottom of the oven until you are ready to serve it. |
| Toasted sandwiches | 4 | 3 | 10(10 to heat up grill) | Grill | 3 | 5/8(10 to heat up grill) | Grill | Lay the bread on the grill tray. When one side of the sandwich has been toasted, turn over and toast the other side. |
| Sausages | n°6 / Kg 0,9 | 4 | 25/30(5 to heat up grill) | Grill | 4 | 15/20(10 to heat up grill) | Grill | Cut the sausages in half and lay them face down on the grill. Half way through grilling turn them over. Every so often, check that they are being cooked equally all over. (If this is not happening, turn and reposition the ones being cooked ether less or more than the others. |
| Ribs of beef | n°4 / Kg 1,5 | 4 | 25 (5 to heat up grill) | Grill | 4 | 15/20 (10 to heat up grill) | Grill | Make sure that the ribs of beef are exposed to the full effect on the main grill. |
| Chicken legs | n°4 / Kg 1,5 | 3 | 50/60 (5 to heat up grill) | Grill | 3 | 50/60 (10 to heat up grill) | Grill | Turn them over twice during grilling |

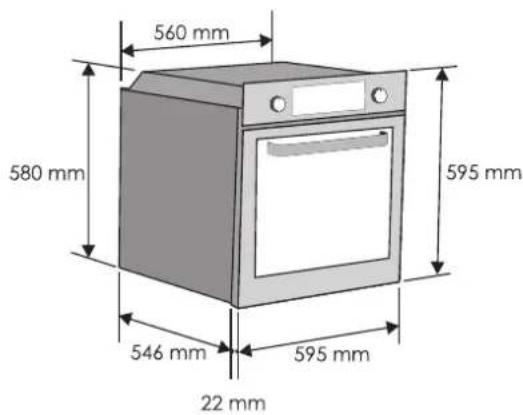
GB If the furniture is equipped with a bottom at the back part, provide an opening for the power supply cable.
A GB If the mounting of the plinth does not allow air circulation, to obtain the maximum performance of the oven it is necessary to create an opening of 500x10mm or the same surface in 5.000 mm ^2
GB If the oven does not have a cooling fan, create an opening 460 mm x 15 mm

- CONTENTS
- GB
- SAFETY INSTRUCTIONS
- GENERAL WARNINGS
- DECLARATION OF COMPLIANCE
- SAFETY HINTS
- INSTALLATION
- FITTING THE OVEN INTO THE KITCHEN UNIT
- IMPORTANT
- CONNECTING TO THE POWER SUPPLY
- ENERGY SAVING AND RESPECTING THE ENVIRONMENT
- OVEN EQUIPMENT (according to the model)
- Removing and cleaning wire racks
- USEFUL TIPS
- SHELF SAFETY SYSTEM
- GRILLING
- CLEANING AND MAINTENANCE
- SERVICE CENTRE
- Customer Care Telephone 0844 692 3605
- Spare Parts Telephone 0844 692 3606
- TIMER
- USING THE END OF COOKING TIMER
- SETTING THE CORRECT TIME
- TABLES OF COOKING TIMES
Brand : IBERNA
Model : IBO600X/E
Category : Oven