
FDWS 614 D8P DOS E - Dishwasher FRANKE - Free user manual and instructions
Find the device manual for free FDWS 614 D8P DOS E FRANKE in PDF.


| Product Type | Dishwasher |
| Brand | Franke |
| Model | FDWS 614 D8P DOS E |
| Dimensions (W x H x D) | 598 x 820 x 555 mm |
| Capacity | 14 standard place settings |
| Energy Efficiency Class | Not specified (check energy label) |
| Water Supply Connection | Cold or hot water (max 60°C), 3/4" thread |
| Water Pressure | 0.05 – 1 MPa (0.5 – 10 bar) |
| Programs | 8 programs: Eco, Auto, Intensive, Fast Wash&Dry, Crystals, Rapid 30', Silent, Prewash |
| Eco Program Duration | 3:10 h |
| Eco Program Water Consumption | 9.5 L |
| Eco Program Energy Consumption | 0.95 kWh |
| Options | Multizone, Keylock, Sani Rinse, Tablet, Delay Start, Drain Out, CoolDry |
| Noise Level (Silent program) | Low noise emission (not specified in dB) |
| Salt Reservoir Capacity | Approx. 1 kg |
| Rinse Aid Dispenser Capacity | Max 110 ml |
| Water Softener | Automatic regeneration, adjustable hardness levels (1-5) |
| Drying System | CoolDry convection drying with automatic door opening (can be disabled) |
| Anti-Flooding Protection | Built-in safety system, optional New Aqua Stop |
| Filter System | 3-part filter assembly: cylindrical, cup, stainless steel plate |
| Spare Parts Availability | Minimum 10 years after production date |
| Installation | Freestanding or integrated under worktop, adjustable feet |
| Rack Features | Upper rack height adjustable, foldable flaps, lower rack with tip-up supports, cutlery basket |
Frequently Asked Questions - FDWS 614 D8P DOS E FRANKE
User questions about FDWS 614 D8P DOS E FRANKE
0 question about this device. Answer the ones you know or ask your own.
Ask a new question about this device
Download the instructions for your Dishwasher in PDF format for free! Find your manual FDWS 614 D8P DOS E - FRANKE and take your electronic device back in hand. On this page are published all the documents necessary for the use of your device. FDWS 614 D8P DOS E by FRANKE.
USER MANUAL FDWS 614 D8P DOS E FRANKE
FDWS 614 D8P DOS E
EN User manual
OPTIONS AND FUNCTIONS....7
LOADING THE RACKS 8
DAILY USE....9
ADVICE AND TIPS....9
CARE AND MAINTENANCE....10
INSTALLATION....11
TROUBLESHOOTING....12
SUPPORT....13
Before using the appliance carefully read Safety Instructions guide.
OVERVIEW
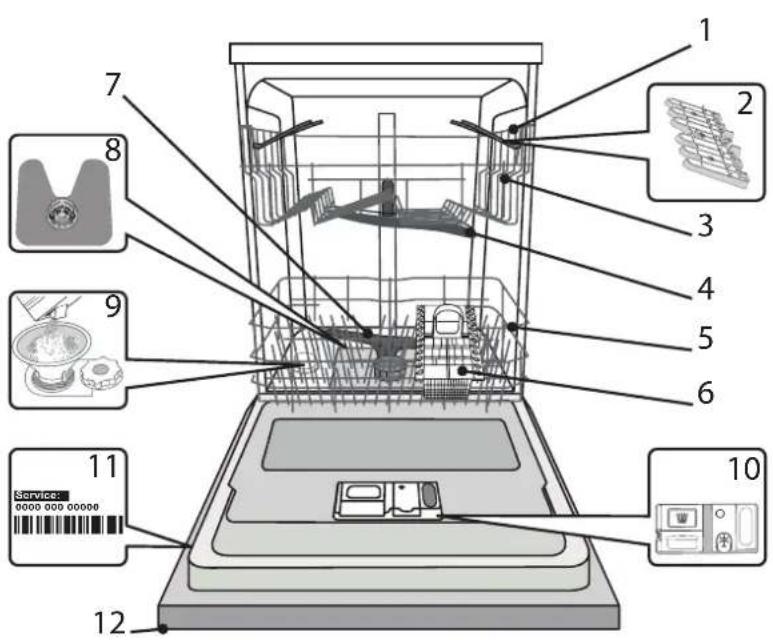
- Upper rack
- Foldable flaps
- Upper rack height adjuster
- Upper spray arm
- Lower rack
- Cutlery basket
- Lower spray arm
- Filter Assembly
- Salt reservoir
- Detergent and Rinse Aid dispensers
- Rating plate
- Control panel
CONTROL PANEL

- On-Off/Reset button with indicator light
- Program selection button with indicator light
- Multizone button with indicator light / Keylock
- Eco program indicator light
- Key lock indicator light
- Display
- Program number and remaining time indicator
- Tablet (Tab) indicator light
- Closed water tap indicator light
- Rinse Aid refill indicator light
- Salt refill indicator light
- Sani Rinse button with indicator light / Tablet (Tab)
- Delay button with indicator light
- Start/Pause button with indicator light / Drain out
FIRST TIME USE SALT, RINSE AID AND DETERGENT
After installation, remove the stoppers from the racks and the retaining elastic elements from the upper rack.
FILLING THE SALT RESERVOIR
The use of salt prevents the formation of LIMESCALE on the dishes and on the machine's functional components.
- It is mandatory that THE SALT RESERVOIR NEVER BE EMPTY.
- It is important to set the water hardness.
The salt reservoir is located in the lower part of the dishwasher (see PRODUCT DESCRIPTION) and must be filled when the SALT REFILL indicator light in the control panel is lit.
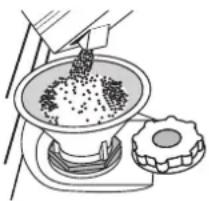
- Remove the lower rack and unscrew the reservoir cap (anticlockwise).
- Only the first time you do this: fill the salt reservoir with water.
- Position the funnel (see figure) and fill the salt reservoir right up to its edge (approximately 1 kg); it is not unusual for a little water to leak out.
- Remove the funnel and wipe any salt residue away from the opening.
Make sure the cap is screwed on tightly, so that no detergent can get into the container during the wash program (this could damage the water softener beyond repair).
Whenever you need to add salt, it is mandatory to complete the procedure before the beginning of the washing cycle to avoid corrosion.
SETTING THE WATER HARDNESS
To allow the water softener to work in a perfect way, it is essential that the water hardness setting is based on the actual water hardness in your house. This information can be obtained from your local water supplier. The factory sets the default value for the water hardness
- Switch on the appliance by pressing the ON/OFF button.
- Switch off the appliance by pressing the ON/OFF button.
- Hold down button START/Pause for 5 seconds, until you hear a beep.
- Switch on the appliance by pressing the ON/OFF button.
- The current selection level number and the salt indicator light both flash.
- Press button P to select the desired hardness level (see WATER HARDNESS TABLE).
| Water Hardness Table | ||||
| Level | °dHGerman degrees | °fHFrench degrees | °ClarkEnglish degrees | |
| 1 | Soft | 0 - 6 | 0 - 10 | 0 - 7 |
| 2 | Medium | 7 - 11 | 11 - 20 | 8 - 14 |
| 3 | Average | 12 - 16 | 21 - 29 | 15 - 20 |
| 4 | Hard | 17 - 34 | 30 - 60 | 21 - 42 |
| 5 | Very hard | 35 - 50 | 61 - 90 | 43 - 62 |
- Switch off the appliance by pressing the ON/OFF button.
Setting is complete!
As soon as this procedure is complete, run a program without loading. Only use salt that has been specifically designed for dishwashers.
After the salt has been poured into the machine, the SALT REFILL indicator light switches off.
If the salt container is not filled, the water softener and the heating element may be damaged as a result of limescale accumulation.
Using salt is recommended with any type of dishwasher detergent.
FILLING THE RINSE AID DISPENSER
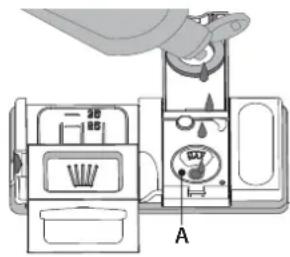
Rinse aid makes dish DRYING easier. The rinse aid dispenser A should be filled when the RINSE AID REFILL ✦ indicator light in the control panel is lit.
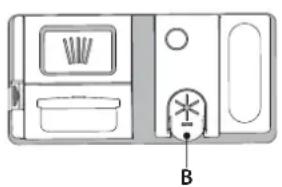
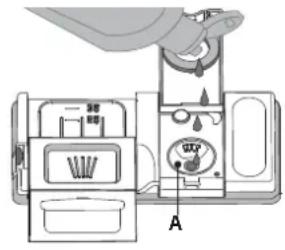
- Open the dispenser B by pressing and pulling up the tab on the lid.
- Pour in the rinse aid (max. 110 ml), making sure it does not overflow from the dispenser. If this happens, clean the spill immediately with a dry cloth.
- Press the lid down until you hear a click to close it. NEVER pour the rinse aid directly into the appliance tub.
ADJUSTING THE DOSAGE OF RINSE AID
If you are not completely satisfied with the drying results, you can adjust the quantity of rinse aid used.
- Switch the dishwasher on using the ON/OFF button.
- Switch it off using the ON/OFF button.
- Press button START/Pause three times - a beep will be heard.
- Switch it on using the ON/OFF button.
- The current selection level number and rinse aid indicator light flash.
- Press button P to select the level of rinse aid quantity to be supplied.
- Switch it off using the ON/OFF button
Setting is complete!
If the rinse aid level is set to 1 (ECO), no rinse aid will be supplied. The LOW RINSE AID indicator light will not be lit if you run out of rinse aid.
A maximum of 5 levels can be set according to the dishwasher model. The factory setting is specific to the model, please follow instruction above to check this for your machine.
- If you see bluish streaks on the dishes, set a low number (1-2).
- If there are drops of water or limescale marks on the dishes, set a mid-range number (3-4).
FILLING THE DETERGENT DISPENSER
Usage of detergent not designed for dishwashers may cause malfunction or damage to the appliance.
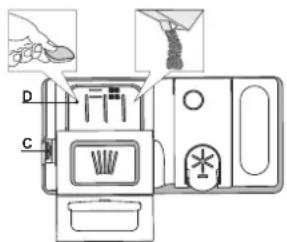
To open the detergent dispenser use the opening device C. Introduce the detergent into the dry dispenser D only. Place the amount of detergent for pre-washing directly inside the tub.
- When measuring out the detergent, refer to the information mentioned earlier to add the proper quantity. Inside the dispenser D there are indications to help with detergent dosing.
- Remove detergent residues from the edges of the dispenser and close the cover until it clicks.
- Close the lid of the detergent dispenser by pulling it up until the closing device is secured in place.
The detergent dispenser automatically opens up at the right time according to the program.
If all-in-one detergents are used, we recommend using the TABLET button, because it adjusts the program so that the best washing and drying results are always achieved.
PROGRAMS TABLE
| Program | Drying phase | CoolDry | Available options*) | Duration of wash program (h:min)**) | Water consumption (litres/cycle) | Energy consumption (kWh/cycle) | ||||
| 1. Eco |  | 50° | √ | √ |  |   | 3:10 9.5 0.95 | |||
| 2. Auto |  | 50-60° | √ | √ | MULTI ZONE |  |   | 1:25 - 3:00 7.0 | 14.0 0.90 - 1.40 | |
| 3. Intensive |  | 65° | √ | √ | MULTI ZONE |  |   | 2:50 14.0 1.50 | ||
| 4. Fast Wash&Dry |  | 50° | √ | √ | MULTI ZONE |  |   | 1:25 11.5 1.10 | ||
| 5. Crystals |  | 45° | √ | √ | MULTI ZONE |  |   | 1:40 11.5 1.20 | ||
| 6. Rapid 30' |  | 50° | - | - | MULTI ZONE |  |   | 0:30 9.0 0.50 | ||
| 7. Silent |  | 50° | √ | √ |  | [KCBS]  | 3:30 15.0 1.15 | |||
| 8. Prewash |  | - | - | - | MULTI ZONE | 0:12 4.5 0.01 | ||||
ECO program data is measured under laboratory conditions according to European Standard EN 60436:2020.
Pre-treatment of the dishes is not needed before any of the programs. *) Not all options can be used simultaneously. **) Values given for programs other than the program Eco are indicative only. The actual time may vary depending on many factors such as temperature and pressure of the incoming water, room temperature, amount of detergent, quantity and type of load, load balancing, additional selected options and sensor calibration. The sensor calibration can increase program duration up to 20 min.
PROGRAMS DESCRIPTION
Instructions on wash cycle selection.
1 ECO
Eco programme is suitable to clean normally soiled tableware, that for this use, it is the most efficient programme in terms of its combined energy and water consumption, and that it is used to assess compliance with the EU Ecodesign legislation.
2 AUTO
For normally soiled dishes with dried food residues. Senses the level of soiling on the dishes and adjusts the program accordingly.
3 INTENSIVE
Program recommended for heavily soiled crockery, especially suitable for pans and saucepans (not to be used for delicate items).
4 FAST WASH&DRY
Normally soiled crockery. Everyday cycle, that ensures optimal cleaning and drying performance in shorter time.
5 CRYSTALS
Program for delicate items, which are more sensitive to high temperatures, for example glasses and cups.
6 RAPID 30'
Program to be used for half load of lightly-soiled dishes with no dried food residues. Does not include drying phase.
7 SILENT
Suitable for night-time operation of the appliance. Ensures optimal cleaning and drying performance with the lowest noise emission.
8 PREWASH
Use to refresh crockery planned to be washed later. No detergent to be used with this program.
Notes:
Please note that cycle Rapid 30' is dedicated for lightly soiled dishes.
OPTIONS AND FUNCTIONS
OPTIONS can be selected directly by pressing the corresponding button (see CONTROL PANEL). If an option is not compatible with the selected program see PROGRAMS TABLE, the corresponding LED flashes rapidly 3 times and beeps will sound. The option will not be enabled.
MULTI MULTIZONE
ZONE If there are not many dishes to be washed, a half loading may be used in order to save water, electricity and detergent.
Select the program and then press the MULTIZONE button: the indicator over the button lights up and the symbol of the chosen rack will appear on the display. By default the appliance washes dishes in all racks.
To wash only the specific rack, press this button repeatedly:
| _ | shown on the display (only lower rack)
2 1 - -1 shown on the display (only upper rack)
OFF shown on the display (option is OFF and the appliance will wash dishes in all racks).
Remember to load the upper or lower rack only, and to reduce the amount of detergent accordingly.
If upper rack is removed, please apply detergent directly to tub instead of detergent dispenser.
KEYLOCK
A long press (for 3 seconds) of MULTIZONE button, will activate the KEYLOCK function. The KEYLOCK function will block the control panel except the ON/OFF button. To deactivate the KEYLOCK, long press again.

WATER TAP CLOSED – Alarm
Flashes when there is no inlet water or water tap is closed.
SANI RINSE This option can be
It will increase final rinse temperature and add antibacterial wash to the selected program.
Select the washing program, press the SANI RINSE button; the indicator light will light up. To deselect the option, press the same button again. Ideal to clean crockery and feeding bottles. The dishwasher door must be kept shut for the entire duration of the program in order to guarantee reduction of germs. If the door is opened the indicator lamp starts flashing.
WARNING: the crockery and plates could be extremely hot at the end of the cycle.

TAB
This setting allows you to optimize the performance of the program according to the type of detergent used.
Press the SANI RINSE button for 3 seconds (the corresponding symbol will light up) if you use combined detergents in tablet form (rinse aid, salt and detergent in 1 dose).
If you use powder or liquid detergent, this option should be off.
DELAY The start
- Select the program and any desired options. Press the DELAY button (repeatedly) to delay the start of the program. Adjustable from 0:30 to 24 hours. With each press of the button, the delay start increases by: 0:30 if selection below 4 hours, 1:00 if selection is below 12 hours, 4 hours if selection is above 12 hours. If 24 hours reached, and the button is pressed, the delayed start is deactivated.
- Press the START/PAUSE button: the timer will begin counting down;
- Once this time has elapsed, the indicator light switches off and the program begins automatically. If at the time of the countdown the START/PAUSE button is pressed again the DELAY option is cancelled and the selected program starts automatically.
The DELAY function cannot be set once a program has been started.
DRAIN OUT To stop and can
To stop and cancel the active cycle, the DRAIN OUT function can be used. A long press of START/PAUSE button, will activate the DRAIN OUT function. The active program will be stopped and the water in the dishwasher will be drained out.
CoolDry
CoolDry is a convection drying system which automatically opens the door during/after drying phase to ensure exceptional drying performance every day. Door opens at the temperature that is safe to your kitchen furniture, thus door will not be opened when the option of SANI RINSE is on.
As additional steam protection, a specially designed protection foil is included with the dishwasher (depending on the model, it may need to be purchased). To see how to mount the protection foil, please refer to the (INSTALLATION GUIDE).
The CoolDry functionality can be disabled by the user as follows:
- To DISABLE: Switch On, then switch Off the machine. Keep the P button pressed for 5 sec. At the end of 5 sec, the dishwasher plays a short beep. Switch On the machine, the display shows "oOF".
- To ENABLE: Switch On, then switch Off the machine. Keep the P button pressed for 5 sec. At the end of 5 sec, the dishwasher plays a short beep. Switch On the machine, the display shows "oOn".
LOADING THE RACKS
UPPER RACK
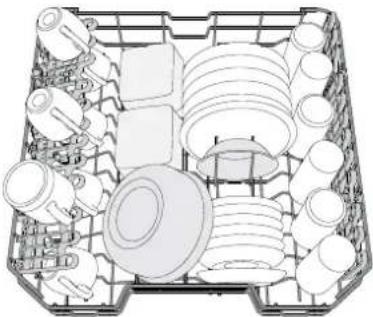
(loading example for the upper rack)
Load delicate and light dishes: glasses, cups, saucers, low salad bowls.
ADJUSTING THE HEIGHT OF THE UPPER RACK
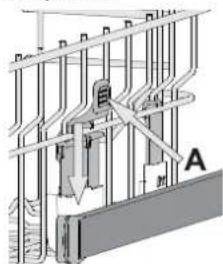
The height of the upper basket can be adjusted: high position to place bulky crockery in the lower basket and low position to make the most of the tip-up compartments by creating more space upwards.
The upper rack is equipped with an Upper Rack height adjuster (see figure). Without pressing the levers, lift it up by simply holding the rack sides, as soon as the rack is stable in its upper position. To restore to the lower position, press the levers (A) at the sides of the rack and move the basket downwards.
We strongly recommend that you do not adjust the height of the rack when it is loaded.
NEVER raise or lower the basket on one side only.
FOLDABLE FLAPS WITH ADJUSTABLE POSITION
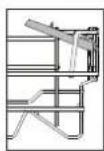
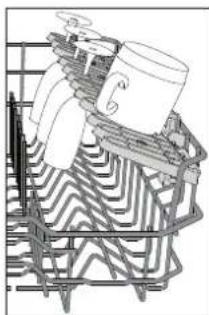
The side foldable flaps can be folded or unfolded to optimize the arrangement of crockery inside the rack.
Wine glasses can be placed safely in the foldable flaps by inserting the stem of each glass into the corresponding slots.
Depending on the model:
- To unfold the flaps, slide them up and rotate, or release them from the snaps and pull them down.
- To fold the flaps, rotate them and slide them down, or pull them up and attach them to the snaps.
LOWER RACK
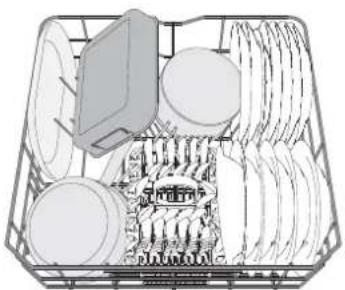
For pots, lids, plates, salad bowls, cutlery, etc. Large plates and lids should ideally be placed at the sides to avoid interference with the spray arm.
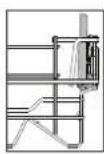
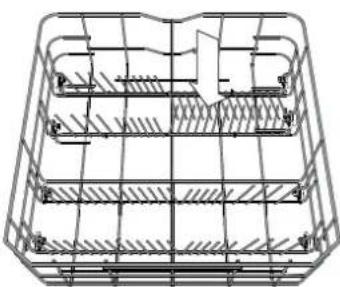
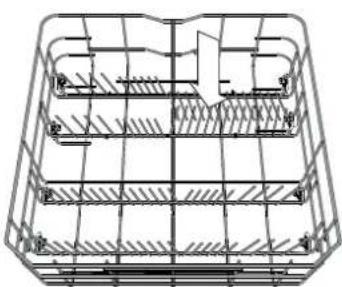
The lower rack has tip-up supports that can be used in a vertical position when arranging plates or in a horizontal position (lower) to load pans and salad bowls easily.
(Loading example for the lower rack)
CUTLERY BASKET
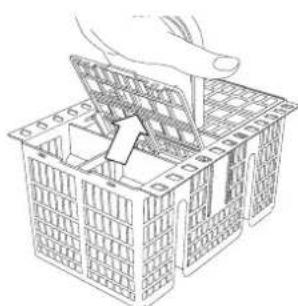
The basket is equipped with top grilles for improved cutlery arrangement. The cutlery basket should be positioned only at the front of the lower rack.
Knives and other utensils with sharp edges must be placed in the cutlery basket with the points facing downwards, or they must be positioned horizontally in the tip-up compartments on the upper rack.
DAILY USE
1. CHECK WATER CONNECTION
Check that the dishwasher is connected to the water supply and that the tap is open.
2. SWITCH ON THE DISHWASHER
Open the door and press the ON/OFF button.
3. LOAD THE RACKS (see LOADING THE RACKS)
4. FILLING THE DETERGENT DISPENSER
5. CHOOSE THE PROGRAM AND CUSTOMISE THE CYCLE
Select the most appropriate program in accordance with the type of crockery and its soiling level (see PROGRAMS DESCRIPTION) by pressing the P button. Select the desired options (see OPTIONS AND FUNCTIONS).
6. START
Start the wash cycle by pressing the START/Pause button. When the program starts you hear a beep.
7. END OF WASH CYCLE
The end of the wash cycle is indicated by beeps and the display shows End. Open the door and switch off the appliance by pressing the ON/OFF button. Wait for a few minutes before removing the crockery - to avoid burns. Unload the racks, beginning with the lower one.
The machine will switch off automatically during certain extended periods of inactivity, in order to minimise electricity consumption. If the crockery is only lightly soiled or if it has been rinsed with water before being placed in the dishwasher, reduce the amount of detergent used accordingly.
MODIFYING A RUNNING PROGRAM
If a wrong program was selected, it is possible to change it, provided that it has only just begun: press and hold the ON/OFF button, the machine will switch off. Switch the machine back on using the ON/OFF button and select the new wash cycle and any desired options; start the cycle by pressing the START/PAUSE button.
ADDING EXTRA CROCKERY
Without switching off the machine, open the door (beware of HOT steam!) and place the crockery inside the dishwasher. Close the door and press the START/Pause button; the cycle will begin from the point at which it was interrupted.
ACCIDENTAL INTERRUPTIONS
If the door is opened during the wash cycle, or if there is a power cut, the cycle stops. Once the door has been closed or the electricity supply is restored, to start again the cycle from where it was interrupted, press the START/Pause button.
To disable the DEMO MODE the following actions must be carried out in sequence, without breaks. Switch the machine ON and then switch it OFF again. Press the DELAY button until the buzzer is heard. Switch the machine on again. The "dOF" indicator flashes and then turns OFF.
ADVICE AND TIPS
TIPS
Before loading the baskets, remove all food residues from the crockery and empty the glasses. You do not need to rinse beforehand under running water.
Arrange the crockery so that it is held in place firmly and does not tip over; and arrange the containers with the openings facing downwards and the concave/convex parts placed obliquely, thus allowing the water to reach every surface and flow freely.
Warning: lids, handles, trays and frying pans do not prevent the sprayer arms from rotating.
Place any small items in the cutlery basket.
Very soiled dishes and pans should be placed in the lower basket because in this sector the water sprays are stronger and allow a higher washing performance.
After loading the appliance, make sure that the sprayer arms can rotate freely.
TIPS ON ENERGY SAVING
- When the household dishwasher is used according to the manufacturer's instructions, washing tableware in a dishwasher usually consumes less energy and water than hand dishwashing.
- In order to maximize dishwasher efficiency it is recommended to initiate the wash cycle once dishwasher is fully loaded. Loading the household dishwasher up to the capacity indicated by the manufacturer will contribute to energy and water savings. Information on correct loading of tableware can be found in Loading chapter.
In case of partial loading it is recommended to use dedicated wash options if available (Half load/ Zone Wash, Multizone), filling up only selected racks. Incorrect loading or overloading the dishwasher may increase resources usage (such as water, energy and time, as well as increase noise level), reducing cleaning and drying performance.
- Manual pre-rinsing of tableware items leads to increased water and energy consumption and is not recommended.
HYGIENE
To avoid odour and sediment which can accumulate in the dishwasher, please run a high temperature program at least once a month. Use a teaspoon of detergent and run it without loading to clean your appliance.
UNSUITABLE CROCKERY
Items which are not dishwasher-safe:
- Wooden dishes, pots or pans: these may be damaged by the high washing temperatures.
- Handcrafted items: these are rarely suitable for washing in a dishwasher. The relatively high water temperatures and the detergents used may damage them.
- Plastic dishes: these are not heat resistant and may lose their shape. Heat resistant plastic dishes must be washed in the upper basket.
- Dishes and objects in copper, tin, zinc or brass: these tend to stain.
- Aluminium dishes: items made from anodised aluminium may lose their colour. • Silverware: silver items may stain.
- Glass and crystal: in general, glass and crystal objects can be washed in the dishwasher. However, certain types of glass and crystal may become dull and lose their clearness after many washings. Therefore, for these items we recommend using the least aggressive program available.
- Decorated items: the decorated objects available on the market are generally able to withstand washing in the dishwasher, although the colours may fade after a great many washes. If in doubt as to the fastness of the colours, it is advisable to wash just a few items at a time for approximately one month.
DAMAGE TO GLASS AND CROCKERY
- Only use glasses and porcelain guaranteed by the manufacturer as dishwasher safe.
- Use a delicate detergent suitable for crockery
- Collect glasses and cutlery from the dishwasher as soon as the wash cycle is over.
CLEANING AND MAINTENANCE
Always unplug the appliance when cleaning it and when performing maintenance work. Do not use flammable liquids to clean the machine.
CLEANING THE DISHWASHER
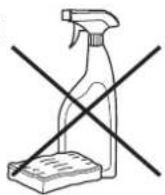
Any marks on the inside of the appliance may be removed using a cloth dampened with water and a little vinegar. The external surfaces of the machine and the control panel can be cleaned using a non-abrasive cloth which has been dampened with water. Do not use solvents or abrasive products.
PREVENTING UNPLEASANT ODOURS
Always keep the door of the appliance ajar in order to avoid moisture from forming and being trapped inside the machine.
Clean the seals around the door and detergent dispensers regularly using a damp sponge. This will avoid food becoming trapped in the seals, which is the main cause behind the formation of unpleasant odours.
CLEANING THE WATER INLET HOSE
If the water hoses are new or have not been used for an extended period of time, let the water run to make sure it is clear and free of impurities before performing the necessary connections. If this precaution is not taken, the water inlet could become blocked and damage the dishwasher.
CHECKING THE WATER SUPPLY HOSE
Check the inlet hose regularly for brittleness and cracks. If damaged, replace it by a new hose available through our After-Sales Service or your specialist dealer. Depending on the hose type:
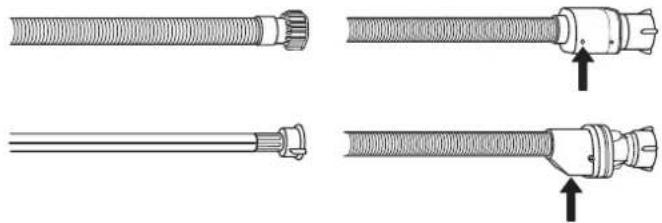
If the inlet hose has a transparent coating, periodically check if the colour intensifies locally. If yes, the hose may have a leak and should be replaced.
For water stop hoses: check the small safety valve inspection window (see arrow). If it is red, the water stop function was triggered, and the hose must be replaced by a new one.
For unscrewing this hose, press the release button while unscrewing the hose.
CLEANING THE FILTER ASSEMBLY
Regularly clean the filter assembly so that the filters do not clog and that the waste water flows away correctly.
Using dishwasher with clogged filters or foreign objects inside filtration system or sprayarms may cause unit malfunction resulting in lose of performance, noisy work or higher resources usage.
The filter assembly consists of three filters which remove food residues from the washing water and then recirculate the water.
The dishwasher must not be used without filters or if the filter is loose.
At least once per month or after each 30 cycles, check the filter assembly and if necessary clean it thoroughly under running water, using a non-metallic brush and following the instructions below:
- Turn the cylindrical filter A in an anti-clockwise direction and pull it out (Fig 1).
- Remove the cup filter B by exerting a slight pressure on the side flaps (Fig 2).
- Slide out the stainless-steel plate filter C (Fig 3).
- In case you find foreign objects (such as broken glass, porcelain, bones, fruit seeds etc.) please remove them carefully.
- Inspect the trap and remove any food residues. NEVER REMOVE the wash-cycle pump protection (black detail) (Fig 4).
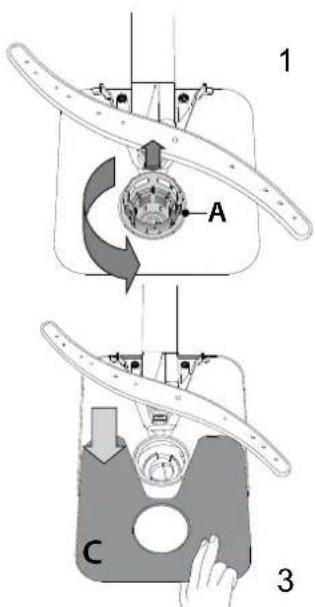
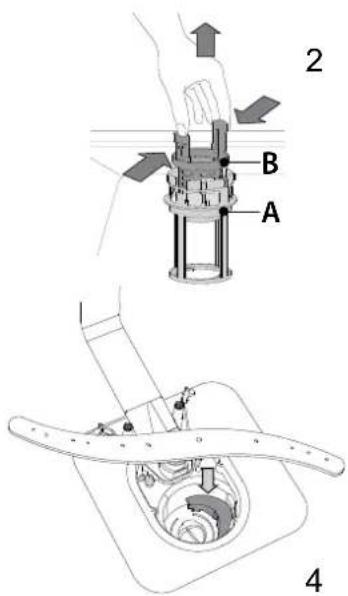
After cleaning the filters, replace the filter assembly and fix it in position correctly; this is essential for maintaining the efficient operation of the dishwasher.
CLEANING THE SPRAY ARMS
On occasions, food residue may become encrusted onto the spray arms and block the holes used to spray the water. It is therefore recommended that you check
the arms from time to time and clean them with a small non-metallic brush.
To remove the upper spray arm, turn the plastic locking ring in a clockwise
direction. The upper spray arm should be replaced so that the side with the greater number of holes is facing upwards.
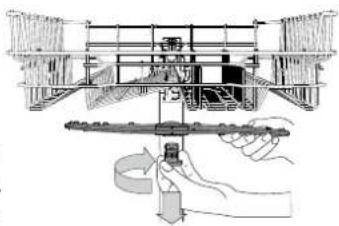
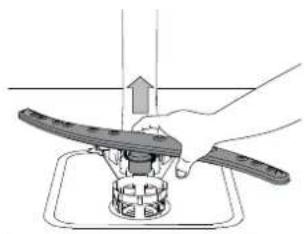
The lower spray arm may be removed by pulling it upwards.
WATER SOFTENING SYSTEM
The water softener automatically reduces water hardness, consequently preventing scale buildup on the heater, and also contributing to better cleaning efficiency.
This system regenerates itself with salt, therefore it is required to refill the salt container when empty.
The frequency of regeneration depends on the water hardness level setting - regeneration takes place once per 6 Eco cycles with the water hardness level set to 3.
The regeneration process starts in the final rinse and finishes in the drying phase, before the cycle ends.
- Single regeneration consumes: ~3.5 L of water; • Takes up to 5 additional minutes for the cycle;
- Consumes below 0.005 kWh of energy.
INSTALLATION
If the appliance must be moved at any time, keep it in an upright position; if absolutely necessary, it may be tilted onto its back.
CONNECTING THE WATER SUPPLY
Adaptation of the water supply for installation should only be performed by a qualified technician.
The water inlet and outlet hoses may be positioned towards the right or the left in order to achieve the best possible installation.
Make sure the dishwasher does not bend or squash the hoses.
CONNECTING THE WATER INLET HOSE
- Run the water until it is perfectly clear.
- Screw the inlet hose tightly into position and turn on the tap. If the inlet hose is not long enough, contact a specialist store or an authorized technician.
The water pressure must be within the values indicated in the Technical Data table - otherwise the dishwasher may not function properly. Make sure the hose is not bent or compressed.
SPECIFICATIONS FOR THE CONNECTION OF THE WATER SUPPLY HOSE:
| WATER SUPPLY cold or hot (max. 6 | 0°C) |
| WATER INTAKE 3/4" | |
| POWER OF WATER PRESSURE | 0,05 ÷ 1 MPa (0.5 ÷ 10 bar)7,25 – 145 psi |
CONNECTING THE WATER OUTLET HOSE
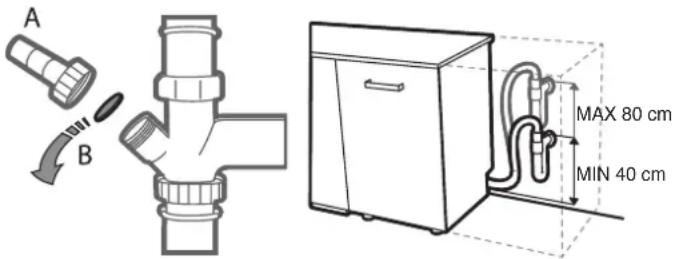
Connect the outlet hose to a drain duct with a minimum diameter of 2 cm A.
The outlet hose connection must be at a height ranging from 40 to 80 cm from the floor or surface where the dishwasher rests.
Before connecting the water outlet hose to the sink drain, remove the plastic plug B.
ANTI-FLOODING PROTECTION
Anti-flooding protection. To ensure floods do not occur, the dishwasher:
- is provided with a special system which blocks the water supply in the event of anomalies or leaks from inside the appliance.
Some models are also equipped with the supplementary safety device New Aqua Stop, which guarantees anti-flooding protection even in the event of a supply hose rupture.
Under no circumstances should the water inlet hose be cut as it contains live electrical parts.
ELECTRICAL CONNECTION
WARNING: Under no circumstances should the water inlet hose be cut as it contains live electrical parts.
Before inserting the plug into the electrical socket, make sure that:
- The socket is earthed and complies with current regulations;
- The socket can withstand the maximum load of the appliance as shown on the data plate located on the inside of the door (see PRODUCT DESCRIPTION).
- The power supply voltage falls within the values indicated on the data plate on the inside of the door.
- The socket is compatible with the plug of the appliance. If this is not the case, ask an authorised technician to replace the plug (see AFTER-SALES SERVICE). Do not use extension cables or multiple sockets. Once the appliance has been installed, the power supply cable and the electrical socket should be easily accessible.
The cable should not be bent or compressed.
If the power supply cable is damaged, have it replaced by the manufacturer or its authorised Technical Assistance Service in order to prevent all potential hazards.
The Company shall not be held responsible for any incidents, if these regulations are not observed.
POSITIONING AND LEVELLING
- Position the dishwasher on a level sturdy floor. If the floor is uneven, the front feet of the appliance may be adjusted until it reaches a horizontal position. If the appliance is levelled correctly, it will be more stable and much less likely to move or cause vibrations and noise while it is operating.
- Before recessing the dishwasher, stick the adhesive transparent strip under the wooden shelf in order to protect it from any condensation which may form.
- Place the dishwasher so that its sides or back panel are in contact with the adjacent cabinets or the wall. This appliance can also be recessed under a single worktop.
- To adjust the height of the rear foot, turn the red hexagonal bushing on the lower central part at the front of the dishwasher using a hexagonal spanner with an opening of 8 mm. Turn the spanner in a clockwise direction to increase the height and in an anticlockwise direction to decrease it.
DIMENSIONS AND CAPACITY:
| WIDTH 598 mm | |
| HEIGHT 820 mm | |
| DEPTH 555 mm | |
| CAPACITY 14 standard place-settings | |
If your dishwasher doesn't work properly, check if the problem can be solved by going through the following list. For other errors or issues, please contact the authorized After-sales Service, whose contact details can be found in the warranty booklet. The manufacturer ensures the availability of spare parts for at least 10 years after the production date of this appliance.
| PROBLEMS POSSIBLE CAUSES SOLUTIONS | ||
| Salt indicator is lit | Salt reservoir is empty (after refill the salt indicator may remain lit for several wash cycles). | Refill reservoir with salt (for more information - see page 2).Adjust water hardness (see table, page 2). |
| Rinse aid indicator is lit | Rinse aid dispenser is empty (after refill the rinse aid indicator may remain lit for several wash cycles). | Refill dispenser with rinse aid (for more information - see page 2). |
| The dishwasher won't start or does not respond to commands. | The appliance has not been plugged in properly. | Insert the plug into the socket. |
| Power outage. | For safety reasons, dishwasher will not restart automatically when power returns. Press the START/Pause button to resume the cycle. | |
| The dishwasher door is not closed.CoolDry pin is not pulled in. | Vigorously push the door until you hear the "click". | |
| Cycle is interrupted by door opening for >4 sec. | Close the door and press START/Pause. | |
| It does not respond to commands.Display shows: F9 or F12 and both On/Off and START/Pause LEDs are blinking rapidly. | Switch off the appliance by pressing the ON/OFF button, switch it back on after approximately one minute and restart the program. If problem persists, unplug the appliance for 1 minute, then plug it back in. | |
| The dishwasher won't drain.Display shows: F3 and both On/Off and START/Pause LEDs are blinking rapidly. | The wash cycle has not finished yet. Wait until the wash cycle finishes. | |
| The drain hose is bent. Check that the drain hose is not bent (see INSTALLATION INSTRUCTION). | ||
| The sink drain pipe is blocked. Clean the sink drain pipe. | ||
| The filter is clogged up with food residues. Clean the filter (see CLEANING THE FILTER ASSEMBLY). | ||
| The dishwasher makes excessive noise. | The dishes are rattling against each other. | Position the crockery correctly (see LOADING THE RACKS). |
| An excessive amount of foam has been produced. | The detergent has not been measured out correctly or it is not suitable for use in dishwashers (see FILLING THE DETERGENT DISPENSER). Restart dishwasher by pressing the DRAIN button (see OPTIONS AND FUNCTIONS) and run new program without detergent. | |
| The dishes are not clean. | The crockery has not been arranged properly. | Arrange the crockery correctly (see LOADING THE RACKS). |
| The spray arms cannot rotate freely, being hindered by the dishes. | Arrange the crockery correctly (see LOADING THE RACKS). | |
| The wash cycle is too gentle. Select an appropriate wash cycle (see PROGRAMS TABLE). | ||
| An excessive amount of foam has been produced. | The detergent has not been measured out correctly or it is not suitable for use in dishwashers (see FILLING THE DETERGENT DISPENSER). | |
| The cap on the rinse aid compartment has not been shut correctly. | Make sure the cap of the rinse aid dispenser is closed. | |
| The filter is soiled or clogged. Clean the filter assembly (see CARE AND MAINTENANCE). | ||
| There is no salt. Fill the salt reservoir (see FILLING THE SALT RESERVOIR). | ||
| The dishwasher does not fill the water. Display shows: and F6, both On/Off and START/Pause LEDs are blinking rapidly. | No water in the water supply or the tap is closed. | Make sure there is water in the water supply or the tap running. |
| The inlet hose is bent. | Make sure the inlet hose is not bent (see INSTALLATION) reprogram the dishwasher and reboot. | |
| The sieve in the water inlet hose is clogged; it is necessary to clean it. | After having carried out the verification and cleaning, turn off and turn on the dishwasher and restart a new program. | |
| Dishwasher finishes the cycle prematurely. Display shows: F15 and both On/Off and START/Pause LEDs are blinking rapidly. | Drain hose positioned too low or siphoning into home sewage system. | Check if end of drain hose is placed at correct height (see INSTALLATION). Check for siphoning into home sewage system, install air admittance valve if necessary. |
| Air in water supply. | Check water supply for leaks or other issues letting air inside. | |
SUPPORT
In the event of any operational problems, contact a Franke Technical Service Centre. Never use the services of unauthorized technicians.
Specify:
- the type of fault
– the appliance model (art./Code)
– the serial number (S.N.) on the rating plate.
When you contact the After-Sales Service, you must provide the codes shown on the rating plate attached to the left or right side inside the door of the dishwasher.
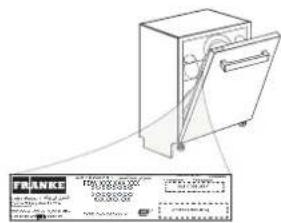
The model information can be retrieved using the QR code reported on the energy label.
The label also includes the model identifier that can be used to consult the portal of the registry at https://eprel.ec.europa.eu

WWW.FRANKE.COM
© Franke Technology and Trademark Ltd, Switzerland
DAILY USE
DIMENSIONS AND CAPACITY:
WWW.FRANKE.COM
© Franke Technology and Trademark Ltd, Switzerland
CONTENTS
OVERVIEW 26
FIRST USE 27
PROGRAM TABLE 28
OPTIONS AND FUNCTIONS....29
LOADING THE SHELVES 30
DAILY USE....31
ADJUSTABLE FOLDING WINGS
BOTTOM SHELF
DAILY USE
1. CHECK THE WATER CONNECTION
WATER SOFTENING SYSTEM
WWW.FRANKE.COM
© Franke Technology and Trademark Ltd, Switzerland

EN - EL - TR

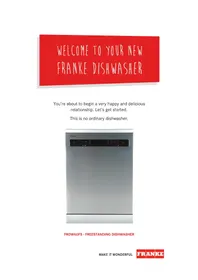
- FDWS 614 D8P DOS E
- BEFORE USING THE APPLIANCE CAREFULLY READ SAFETY INSTRUCTIONS GUIDE
- OVERVIEW
- CONTROL PANEL
- FIRST TIME USE SALT, RINSE AID AND DETERGENT
- FILLING THE SALT RESERVOIR
- SETTING THE WATER HARDNESS
- FILLING THE RINSE AID DISPENSER
- ADJUSTING THE DOSAGE OF RINSE AID
- FILLING THE DETERGENT DISPENSER
- PROGRAMS DESCRIPTION
- ECO
- AUTO
- INTENSIVE
- FAST WASH&DRY
- CRYSTALS
- RAPID
- SILENT
- PREWASH
- NOTES
- OPTIONS AND FUNCTIONS
- MULTI MULTIZONE
- KEYLOCK
- WATER TAP CLOSED – ALARM
- SANI RINSE THIS OPTION CAN BE
- TAB
- DELAY THE START
- DRAIN OUT TO STOP AND CAN
- COOLDRY
- LOADING THE RACKS
- UPPER RACK
- ADJUSTING THE HEIGHT OF THE UPPER RACK
- FOLDABLE FLAPS WITH ADJUSTABLE POSITION
- LOWER RACK
- CUTLERY BASKET
- DAILY USE
- CHECK WATER CONNECTION
- SWITCH ON THE DISHWASHER
- LOAD THE RACKS (SEE LOADING THE RACKS)
- CHOOSE THE PROGRAM AND CUSTOMISE THE CYCLE
- START
- END OF WASH CYCLE
- MODIFYING A RUNNING PROGRAM
- ADDING EXTRA CROCKERY
- ACCIDENTAL INTERRUPTIONS
- ADVICE AND TIPS
- TIPS
- TIPS ON ENERGY SAVING
- HYGIENE
- UNSUITABLE CROCKERY
- DAMAGE TO GLASS AND CROCKERY
- CLEANING AND MAINTENANCE
- CLEANING THE DISHWASHER
- PREVENTING UNPLEASANT ODOURS
- CLEANING THE WATER INLET HOSE
- CHECKING THE WATER SUPPLY HOSE
- CLEANING THE FILTER ASSEMBLY
- THE DISHWASHER MUST NOT BE USED WITHOUT FILTERS OR IF THE FILTER IS LOOSE
- CLEANING THE SPRAY ARMS
- WATER SOFTENING SYSTEM
- THIS SYSTEM REGENERATES ITSELF WITH SALT, THEREFORE IT IS REQUIRED TO REFILL THE SALT CONTAINER WHEN EMPTY
- INSTALLATION
- CONNECTING THE WATER SUPPLY
- CONNECTING THE WATER INLET HOSE
- CONNECTING THE WATER OUTLET HOSE
- ANTI-FLOODING PROTECTION
- ELECTRICAL CONNECTION
- WARNING: UNDER NO CIRCUMSTANCES SHOULD THE WATER INLET HOSE BE CUT AS IT CONTAINS LIVE ELECTRICAL PARTS
- POSITIONING AND LEVELLING
- SUPPORT
- SPECIFY
- WWW.FRANKE.COM
- CONTENTS
- ADJUSTABLE FOLDING WINGS
- BOTTOM SHELF
- CHECK THE WATER CONNECTION
Brand : FRANKE
Model : FDWS 614 D8P DOS E
Category : Dishwasher