
KT-107-INWL - Panneau tactile mural Kramer - Free user manual and instructions
Find the device manual for free KT-107-INWL Kramer in PDF.


| Product Type | Wall Plate Interface |
| Model | KT-107-INWL |
| Brand | Kramer |
| Dimensions (H x W x D) | 1.7 x 4.9 x 3.1 inches (43 x 124 x 79 mm) |
| Weight | 0.3 lbs (0.14 kg) |
| Power Supply | 12V DC, 0.5A (optional, not included) |
| Power Consumption | 2.5W max |
| Input Connectors | 1 x HDMI (female), 1 x USB-C (female), 1 x 3.5mm audio (female) |
| Output Connectors | 1 x HDMI (female), 1 x USB-A (female) |
| Supported Video Resolutions | Up to 4K@60Hz (3840x2160) |
| Audio Support | Embedded audio via HDMI, analog stereo via 3.5mm |
| HDCP Compliance | HDCP 2.2 and 1.4 |
| HDR Support | HDR10, HLG |
| USB Data Rate | USB 2.0, up to 480 Mbps |
| Mounting Type | In-wall (requires standard gang box) |
| Operating Temperature | 32°F to 104°F (0°C to 40°C) |
| Storage Temperature | -4°F to 140°F (-20°C to 60°C) |
| Humidity | 10% to 90% RH (non-condensing) |
| Included Accessories | Installation guide, screws, wall plate frame |
| Certifications | CE, FCC, RoHS |
| Warranty | Limited 7 years |
Frequently Asked Questions - KT-107-INWL Kramer
User questions about KT-107-INWL Kramer
0 question about this device. Answer the ones you know or ask your own.
Ask a new question about this device
Download the instructions for your Panneau tactile mural in PDF format for free! Find your manual KT-107-INWL - Kramer and take your electronic device back in hand. On this page are published all the documents necessary for the use of your device. KT-107-INWL by Kramer.
USER MANUAL KT-107-INWL Kramer

Scan for full manual
KT-107-INWL Quick Start Guide
This guide helps you install and use your KT-107-INWL for the first time.
Go to www.kramerav.com/downloads/KT-107-INWL to download the latest manual and check for updates.
Step 1: Check what's in the box
KT-107-INWL enclosure
1 Cardboard cut-out template
1 Quick start guide
4 4x1/2" screws for wood (packed separately)
4 Inner frame M3x8 screws (packed separately
√ Outer frame
Inner frame
Step 2: Get to know your KT-107-INWL
The KT-107-INWL In-Wall Kit secures KT-107, KT-107RB and KT-107S Touch Panels safely into a wall (drywall, wood, or concrete).
Step 3: Prepare the surface for installation
For drywall and wooden surfaces:
- Place the cut-out template (included, use for drywall and wood installations) over the surface exactly where you want to install KT-107-INWL.
- Mark the inside edge (W, H: 19.5cm x 15cm) of the template and cut an opening in the surface according to the given dimensions.
Kramer is not responsible for any damage caused to the surface.

For concrete or block wall surfaces:
Use the Kramer KT-107-INWB in-wall box (purchased separately) for concrete installations.
1. Make sure that the prepared opening in the concrete fits the dimensions of the in-wall junction box.
2. Insert the KT-107-INWB into the opening.
Make sure to place the KT-107-INWB flush with the plaster surface.

Step 4: Mount the KT-107-INWL enclosure
For each surface type you need to use different screws to mount the KT-107-INWL enclosure.
For drywall surfaces:
- Insert the KT-107-INWL enclosure into the opening.

- Slightly release the 4 drywall screws until you notice (via the openings next to the drywall screws) that the drywall anchor turns outwards.
- Tighten the screws to fix the enclosure in place.
Rear view of drywall screw anchor in the vertical position and tightened, in the horizontal position:

natural_image
Two technical line drawings of a mechanical clamp or bracket assembly, shown in circular views with no text or symbols.For wooden surfaces:
- Insert the 4 4x1/2" wood screws (supplied) through the wood screw-openings and tighten to the wooden surface.
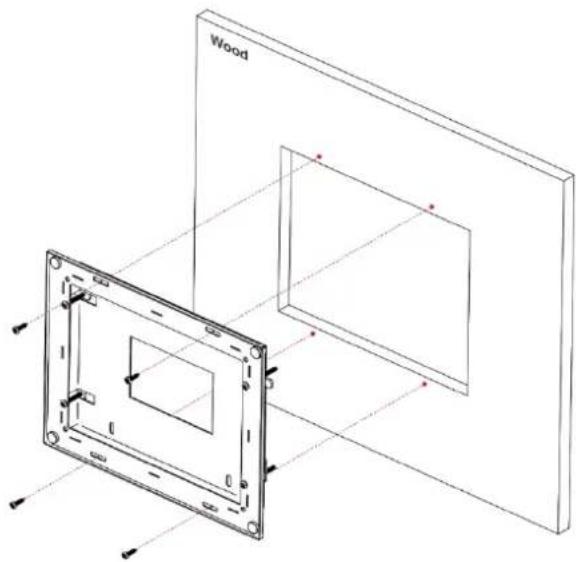
natural_image
Technical line drawing of a wooden panel assembly with mounting holes and internal compartments (no text or symbols)For concrete surfaces:
- Place the KT-107-INWL enclosure inside the junction box opening.
- Insert the 4 concrete screws (supplied with KT-107-INWB) through the KT-107-INWL enclosure concrete screw-openings and the screw openings of the junction box, and tighten.

Step 5: Prepare the Touch Panel for installation
Before attaching the touch panel to the KT-107-INWL enclosure, you need to attach the panel-mount plate to the rear side of the Touch Panel and then to the on-wall mount.

The panel-mount plate and the on-wall mount are supplied with the Touch Panel.
To prepare the touch panel for installation:
- Insert the cables through the openings of the Touch-Panel on-wall mount (for example, a USB cable to connect to an external device).
- On the rear side of the Touch Panel, unscrew the cover and set the cover and screw aside.
- Attach the panel mount plate onto the rear side of the Touch Panel using the 4 M2x4 screws (supplied with the Touch Panel) and tighten.
- Connect the flat cable between the on-wall mount and the Touch Panel.

natural_image
Technical line drawing of an electrical panel with internal components and mounting holes (no text or symbols)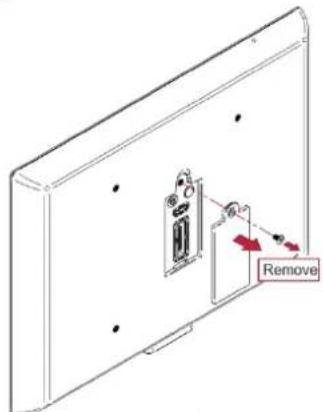


- Slide the Touch Panel panel-mount tabs over the grooves on the on-wall mount unit.

Step 6: Assemble the Touch Panel
Once the KT-107-INWL enclosure is mounted and the Touch Panel prepared, you can mount it onto the KT-107-INWL enclosure.
To assemble the Touch Panel:

To prevent any damage to the Touch Panel, use the M3x8 screws for attaching the inner frame to the KT-107-INWL enclosure.
- Insert the Touch Panel.
- Place the inner frame over the inner panel and fix with the 4 M3x8 screws (supplied).
- Attach the outer frame to the four magnets on the KT-107-INWL enclosure.

Technical Specifications
| Environmental Conditions | Operating Temperature | 0° to +40°C (32° to 104°F) |
| Storage Temperature | -40° to +70°C (-40° to 158°F) | |
| Humidity | 10% to 90%, RH non-condensing | |
| Regulatory Compliance | Safety | CE |
| Environmental | RoHs, WEEE | |
| General | Net Dimensions (W, D, H) | 22.4cm x 16.6cm x 5.3cm (8.8" x 6.5" x 2.1") |
| Shipping Dimensions (W, D, H) | 35.1cm x 21.2cm x 7.2cm (13.8" x 8.4" x 2.8") | |
| Cardboard Template opening Dimensions (W, H) | 19.5cm x 15cm (7.68" x 5.91") | |
| Net Weight | 0.6kg (1.3lbs) approx. | |
| Shipping Weight | 0.8kg (1.8lbs) approx. | |
| Accessories | Included | KT-107-INWL (enclosure, inner frame and outer frame), 1 pack of 4 screws for wood (4x1/2"), 1 pack of 4 screws for the inner frame (M3x8) |
| Optional | KT-107-INWB Junction box for concrete in-wall installations | |
| Specifications are subject to change without notice at www.kramerav.com | ||
- KT-107-INWL Quick Start Guide
- Step 1: Check what's in the box
- Step 2: Get to know your KT-107-INWL
- Step 3: Prepare the surface for installation
- Step 4: Mount the KT-107-INWL enclosure
- For drywall surfaces:
- For wooden surfaces:
- For concrete surfaces:
- Step 5: Prepare the Touch Panel for installation
- To prepare the touch panel for installation:
- Step 6: Assemble the Touch Panel
Brand : Kramer
Model : KT-107-INWL
Category : Panneau tactile mural