
PGS3006 - Cooker Premium - Free user manual and instructions
Find the device manual for free PGS3006 Premium in PDF.


| Product Type | Freestanding Cooker |
| Brand | Premium |
| Model | PGS3006 |
| Width | 60 cm |
| Depth | 60 cm |
| Height | 85 cm |
| Weight | 50 kg |
| Power Supply | 220-240 V / 50-60 Hz (electric oven); Gas (hob) |
| Hob Type | Gas burners |
| Number of Burners | 4 |
| Oven Type | Electric conventional oven |
| Oven Functions | Conventional baking, grilling, defrosting |
| Oven Capacity | 65 L |
| Ignition | Automatic electronic ignition |
| Safety Features | Flame failure device on gas burners; Oven thermostat |
| Cleaning | Enamel interior for easy wipe; Removable oven door |
| Spare Parts Availability | Burner caps, thermocouples, oven heating elements |
| Repairability | Modular design; User-replaceable parts with manual |
| Energy Class | A (oven) |
Frequently Asked Questions - PGS3006 Premium
User questions about PGS3006 Premium
0 question about this device. Answer the ones you know or ask your own.
Ask a new question about this device
Download the instructions for your Cooker in PDF format for free! Find your manual PGS3006 - Premium and take your electronic device back in hand. On this page are published all the documents necessary for the use of your device. PGS3006 by Premium.
USER MANUAL PGS3006 Premium
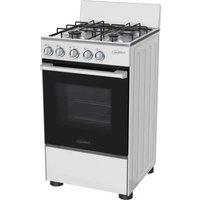
Freestanding Gas Stove
MODEL: PGS3006 GPEES30C
InstallationandMaintenanceManual
This product is for domestic use only
Use & Care Manual
Important Safeguards

Warning
Maintenancproductshouldbeariedubprofessionalandtechnicapersonnel withelevamqualificationsimpropermaintenancemayleadtootherdangers!
●Beforemaintenance,besuretocutoffthepower!
If powerlines have faulted danger(s) is required to replace powerlines with relevant technical parameters (seethemanual for parameters)!
- Beforemaintenanceofproduct,pleasereadthesafetywarningsinthismanualcarefully!
Table
SPECIFICATIONS....1
TECHNICALINFORMATION....1
INSTALLATIONS....2
SAFETYPRECAUTIONSFORINSTALLATION 2
INSTALLATIONOFOVEN....2
SERVICE INFORMATION....3
NECESSARYTOOLS....3
DISASSEMBLYANDADJUSTMENT....5
COMPONENTS THE PROCEDURE 6
TROUBLESHOOTING....7
EXPLODEVIEW....8
TechnicalParameters
| ProductType | 30inch |
| ProductDimensions (Height/width/depth)(mm) | 760*600*940 |
| Maximumtemperature250°C | |
| Functionswitch(quantity)9/11 | |
| Grillnumberoflayers4 | |
| Nozzle hole diameter (mm) | 0.88/ 0.5/ 0.64/ 0.8 |
| Heatingtubepower(down)(W)2800 |

BeforeMaintenance, pleasereadthefollowinginstructionscarefully!

InstallationWarning
- All the equipment around 50mm of the product should be able to have heat resistance above 75^ C, otherwise, nearby apparatus may deform during the use of this product.
- When removing packing materials, keep metal plates, packaging bags, foam, screws and other materials away from the reach of children to avoid potential threat. For example, children may swallow small parts or lead to asphyxiation when playpackagingbags.
OvenInstallation
- Please remove packaging first, and then install in reference to the below specified size. (Please dispose packaging materials properly)
- If it is necessary to lift or move the oven, please open the oven door, touch the top and square holes on the back. Please donotdirectlyuseovendoorhandletolifttheoven.
- Theovenshouldnottouchorgetclosetoflammable, explosive, non-temperature items.
4.Floorforplacingtheovenshouldbes moothenoughtoensuresufficientstabilityfortheproduct.
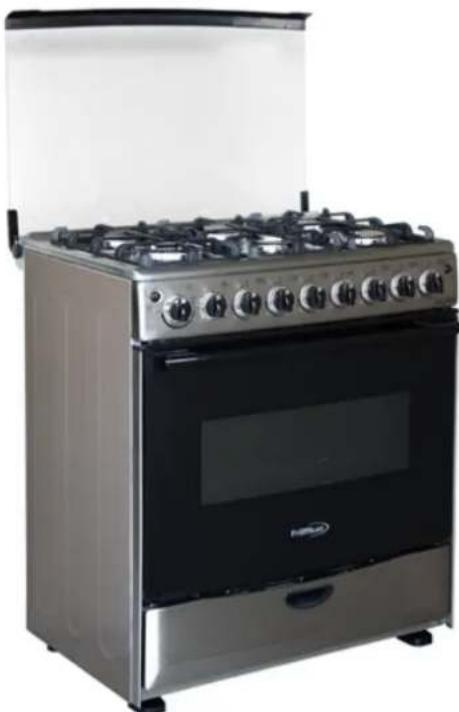
5.Productdimensions(Height/width/depth)(mm)760*600*940
natural_image
Exterior view of a stainless steel electric stove with multiple gas stove handles and open door (no visible text or symbols)RelevantTools
Relevanttoolslist.
- Drillsteelclamp(vise)
- Solderwire
-
ACVoltageMeter
-
Needle-nosedpliers
- Insulationtape
- Ohmmeter
• Phillipsscrewdriver•
- Sandpaper
- Electriciron
- DCVoltageMeter
Disassembleandrepair
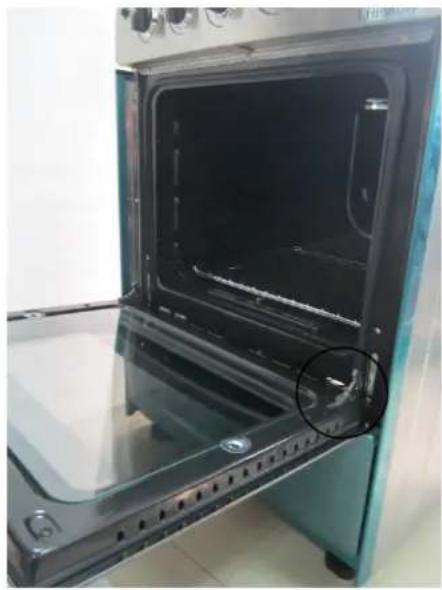
A. Theremovalofdoor
1) Opentheovendoortothchorizontalposition.
2) Slidesnapsoftheleftandrighthingetothemaximumposition.(Seebelowpictures)
3) Closethedoorto50degreesposition,graspthedoor pictures) withbothhands,pulltogetherwiththehinge.(Seebelow
natural_image
Interior view of a modern kitchen oven with open door and glass doors, no visible text or symbols
natural_image
Close-up of a car's front panel showing engine compartment and handle (no text or symbols visible)Warning: the door cannot be pulled out forcibly to prevent brokenglass in theremoval process
B. The removal of cooktop back guard
1) Remove the screws for fixing the back board. (See below pictures)
Remove the screws

natural_image
3D rendering of a kitchen stove with visible panes and doors, no text or symbols presentC. Remove the right and left bracket of the cooktop
1) Turn off the gas source.
2) Remove the screws on supporting blocks of both sides of the cooktop cover. (See below pictures)

natural_image
Metal stainless steel industrial machine with ventilation grilles and a small control knob (no visible text or symbols)D.Removeofthestoveboard
1) Turnoff the gassupply, disconnect the power, removethe power line.
2) Removebackplateconnectionboard
3) Remove the screws of the end of the cooking plate connection the cup (See below pictures)
4) Push forward 10-20mm from behind of the stove board by hand, then use the appropriate force to squeeze the side of the stoveboard, takedownthestoveboardcarefully (can'ttakedownforcibly)
5) According to the maintenance circuit diagram of part of the power failure, the inspection and maintenance
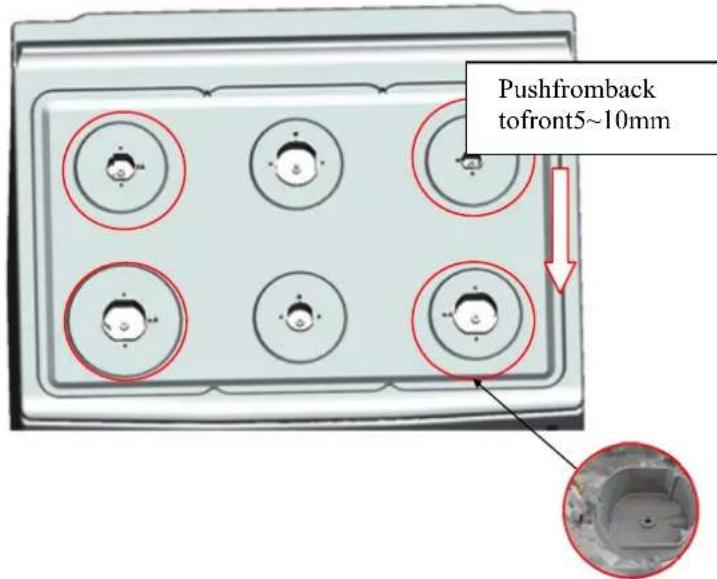
Pneumatic controlpart
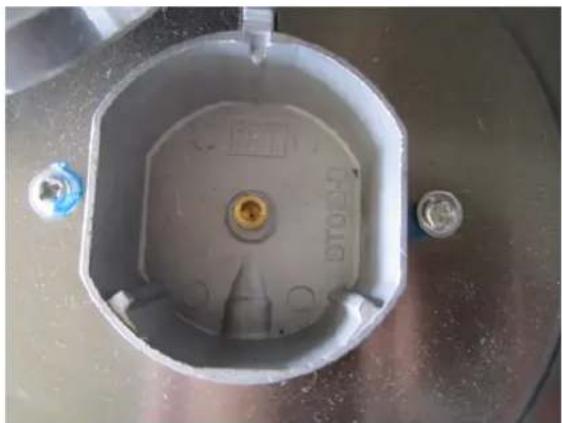
natural_image
Top-down view of a mechanical component with a central circular opening and two small protrusions (no visible text or symbols)E. RemovalandReplacementofGlassDoor
1) Removethedoorandlieflatcarefully.
2) Removethescrewsforfixingsupportingblocksatthebottomofdoor.
3)Removethescrewsforfixinghandle,removethehandle,sealandwindowglassoutsidethedoor carefully.
4)Removethesilicainthefourcornersofinsideglasswithabladeorothertools.(Glasswithcare)
5) Replace glass in the same specifications provided by manufactures. (Glass must be high temperature and toughened)

natural_image
Exploded view diagram of a smart TV module showing internal components and exterior views (no text or symbols)RelevantTestofParts
| Parts | TestprogramResults | |
| Stovebody | Testtightness(useairtightinstrumenttest:under15kpa pressure) | Normal:lessthan0.5ml/min,Fault:∞ormorethan0.5 |
When you receive customer complaints, what need to do first is analyzing complaints carefully. If some of the following situation issuitable, please tell the customer how to set the oven properly. This will avoid unnecessary maintenance.
Attention!
- Checkgroundingbeforetrouble
- Notethatsomehigh-voltagecircuit

flowchart
graph TD
    A["SituationCheckResults"] --> B["Overdoes not work"]
    C["Causes"] --> D["SwitchfailureReplace"]
    E["Resolve"] --> F["Replace"]
    B --> G["Checkwhetherthe switchispoweron"]
    D --> H["SwitchfailureReplace"]
    F --> I["Energyizedcable failure"]
    G --> J["Nopower"]
    H --> K["Nopower"]
    I --> L["Nopower"]
    J --> M["Checkwhetherthe energizedcableis poweron"]
    K --> N["Checkwhetherthe switchispoweron"]
    L --> O["Checkwhetherthe energizedcableis poweron"]

flowchart
graph TD
    A["Overnot heating"] --> B["Checktheupper tube heating components"]
    B --> C["Replace AbnormalDamage"]
    C --> D[" "]
    D --> E[" "]
    F["tubeating components"] --> G["Abnormal"]
    G --> H["Replace"]
    H --> I["Damage"]
    I --> J["Cheltinder"]
    K[" "] --> L["Abnormal Replace"]
    L --> M["Damage"]
    M --> N["Stoveatingtube"]
    L --> O["Connectorpoor contact"]
    O --> P["Replace/service"]
- Warning
- Table
- SPECIFICATIONS....1
- INSTALLATIONS....2
- SERVICE INFORMATION....3
- COMPONENTS THE PROCEDURE 6
- TROUBLESHOOTING....7
- EXPLODEVIEW....8
- TechnicalParameters
- InstallationWarning
- OvenInstallation
- RelevantTools
- Relevanttoolslist.
- Disassembleandrepair
- Theremovalofdoor
- D.Removeofthestoveboard
- RemovalandReplacementofGlassDoor
- Attention!
Brand : Premium
Model : PGS3006
Category : Cooker