MKDW FI607314 EHP D - Dishwasher Master Kitchen - Free user manual and instructions
Find the device manual for free MKDW FI607314 EHP D Master Kitchen in PDF.


| Brand | Master Kitchen |
| Model | MKDW FI607314 EHP D |
| Product Type | Built-in Dishwasher |
| Energy Efficiency Class | D |
| Place Settings | 14 |
| Noise Level | 44 dB |
| Annual Energy Consumption | 294 kWh |
| Annual Water Consumption | 3360 L |
| Number of Programs | 6 |
| Programs | Eco 50°C, Intensive 70°C, Normal 60°C, Quick 45°C, Rinse, Self-Clean |
| Dimensions (H x W x D) | 815 x 598 x 550 mm |
| Weight | 45 kg |
| Power Supply | 220-240 V, 50/60 Hz |
| Water Connection | Cold water only |
| Safety Features | Child lock, Anti-flood system, Overflow protection |
| Cleaning and Maintenance | Clean filters regularly; descale every 3 months; wipe door seals |
| Spare Parts Availability | Filters, racks, spray arms, heating element, pump |
| Repairability | User-replaceable filters and spray arms; professional service for electrical parts |
Frequently Asked Questions - MKDW FI607314 EHP D Master Kitchen
User questions about MKDW FI607314 EHP D Master Kitchen
0 question about this device. Answer the ones you know or ask your own.
Ask a new question about this device
Download the instructions for your Dishwasher in PDF format for free! Find your manual MKDW FI607314 EHP D - Master Kitchen and take your electronic device back in hand. On this page are published all the documents necessary for the use of your device. MKDW FI607314 EHP D by Master Kitchen.
USER MANUAL MKDW FI607314 EHP D Master Kitchen
natural_image
Line drawing of a kitchen appliance inside a circular frame (no text or symbols)Lavastoviglie
flowchart
graph LR
    A["Person holding a cup with a lid"] --> B["Salt being added to a pot"]
    B --> C["Add salt into a container"]
    C --> D["Heating the salt in a container with a drop"]
    D --> E["Heating the container with a drop"]
natural_image
Line drawing of a shopping cart with wheels and an arrow indicating direction (no text or symbols)natural_image
Line drawing of a shopping cart with wheels and a black arrow indicating direction (no text or symbols)natural_image
Line drawing of a mechanical device with a hand operating it, no text or symbols presentnatural_image
Illustration of a tracked vehicle with gear and wrench components, showing a hand adjusting the engine (no text or symbols present)natural_image
Illustration of hands cleaning a car with a tool and spray, no text or symbols presentnatural_image
Diagram of a mechanical assembly inside a transparent enclosure, showing internal components and a magnified inset view (no text or symbols)natural_image
Technical illustration of a mechanical assembly with a magnified inset showing internal components (no text or symbols)natural_image
Illustration of a hand using a tool to adjust or install a small mechanical component on a tray (no text or symbols visible)natural_image
Illustration of a kitchen sink with a hand using a tool to clean or spray the surface (no text or symbols)natural_image
Diagram showing two structural beam assemblies with circular elements, one with a rotation arrow and the other with a curved cutout (no text or labels)natural_image
Diagram showing two stages of a mechanical or structural assembly, with no visible text or symbols.natural_image
Diagram showing a hand holding a tool with an arrow indicating motion, enclosed in a dashed circle (no text or symbols)NOTA
natural_image
Line drawing of a simple kitchen counter with a grid-patterned wall and an arrow indicating a component (no text or symbols)natural_image
Diagram showing a mechanical assembly transformation from a bracket to a housing, with no visible text or symbols.| Number | Item |
| 1 | Tazzine |
| 2 | Terine |
| 3 | Bicchieri |
| 4 | Tazze |
| 5 | Piccole pentole |
CESTO INFERIORE
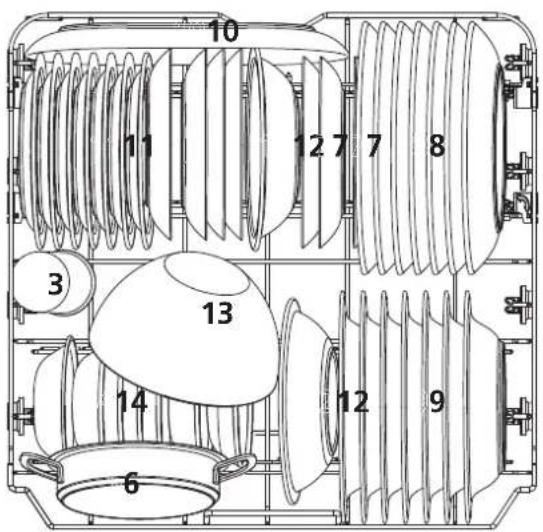
| Number | Item |
| 6 | Pentole da forno |
| 7 | Piatti da dessert |
| 8 | Piatti piani |
| 9 | Piatti fondi |
| 10 | Piatti da portata |
| 11 | Piatti da dessert in melaminica |
| 12 | Terrine in melaminica |
| 13 | Bicchieri in melaminica |
| 14 | Terrine |
flowchart
graph TD
    A["Grid with arrows indicating rebar placement"] --> B["Rebar grid with grid lines"]
    B --> C["Rebar grid with grid lines and arrows indicating rebar placement"]
    C --> D["Rebar grid with grid lines and arrows indicating rebar placement"]
    D --> E["Final structure with grid lines and arrows"]
natural_image
Diagram showing two steps of a structural grid assembly, with an arrow indicating the process (no text or symbols present)natural_image
Simple line drawing of a kitchen appliance inside a circular frame (no text or symbols)Lavastoviglie
MKDW FI607314 EHP D
natural_image
Pure diagram of a mechanical or electrical system with no text, numbers, or symbolsnatural_image
Simple line drawing of a fish and a magnifying glass above a surface, no text or symbols present.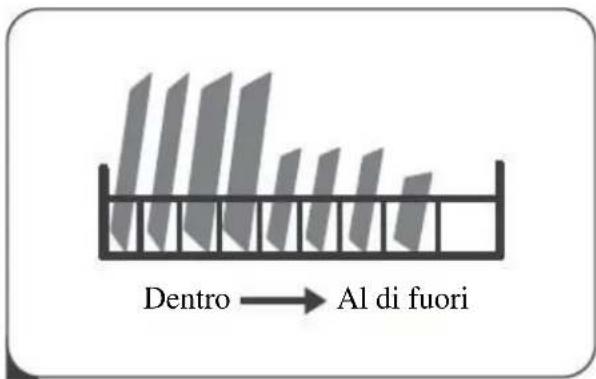
natural_image
Line drawing of a hand inserting a plug into a device with a lid and fan (no text or symbols)natural_image
Simple line drawing of a kitchen appliance with smoke or steam above it (no text or symbols)natural_image
Technical line drawing of a mechanical component with gears and shafts (no text or symbols)natural_image
Pure geometric diagram of vertical planes mounted on a horizontal base (no text or symbols)natural_image
Line drawing of a door with indicator lights and a switch, no text or symbols presentnatural_image
Line drawing of a hand pressing down on a device with a screen and scroll (no text or symbols)natural_image
Line drawing of a hand inserting a device into a device with a screen and plug (no text or symbols)flowchart
graph TD
    A["Sliding it to the right"] --> B["Press down"]
    B --> C["Press in"]
natural_image
Simple line drawing of a cleaning machine with a chimney and fan (no text or symbols)natural_image
Simple line drawing of a bin with a recycling arrow (no text or symbols)
NOTE:
natural_image
Line drawing of a kitchen appliance inside a circular frame (no text or symbols)Dishwasher
Instruction manual
PART I Generic version
CONTENT
01
3 SAFETY INFORMATION
02
7 PRODUCT OVERVIEW
03
8 USING THE DISHWASHER
8 Salt insertion
04
11 MAINTENANCE AND CLEANING
11 External cleaning
12 Internal cleaning
05
16 INSTALLATION INSTRUCTIONS
16 Water supply and drainage
16 Drining connection
17 Correct positioning of the dishwasher
18 Free-standing machine installation
18 Built-in machine installation
06
23 TROUBLESHOOTING TIPS
07
26 LOADING THE BASKETS ACCORDING TO STANDARD
Thank you for purchasing a Master Kitchen appliance.
By purchasing a Master Kitchen dishwasher, you have chosen a product designed in Italy and designed to clean your dishes with quality, reducing the time of housework.

NOTE
- Reviewing the "troubleshooting tips" section will help you solve some problems on your own.
- If you can't solve problems by yourself, please ask a professional technician for help.
- The manufacturer, following a policy of constant product development and updating, may make changes without prior notice.
- If the manual gets lost or is outdated, you may receive a new user manual from the manufacturer or the supplier.
SAFETY INFORMATION
Read carefully the instructions provided before installing and using the equipment. This is the only way to use the appliance safely and efficiently. The manufacturers are not liable for any injury or damage resulting from improper installation or use. Always keep the instructions in a safe and accessible place for future reference.
- Check the appliance after unpacking. Do not connect the appliance if it has been damaged during transport.
- This equipment may only be used by children from the age of 8 years and adults with limited physical, sensory or mental capabilities or with little experience or knowledge of using the equipment, if they are supervised and have understood the risks involved.
- Children under 8 years of age and people with widespread and complex disabilities should be kept away from the equipment.
- Do not allow children to play with the equipment.
- Keep the detergent out of the reach of children.
- Keep children away from the open appliance. The water inside the wash tank is not drinkable. It may contain detergent and rinse aid residues.
- Keep children and pets away from the equipment when the door is open.
- Children must not carry out cleaning and maintenance work on the appliance.
- Make sure that children do not play with the product packaging materials. They are dangerous and could cause suffocation.
- This appliance is intended for domestic use only in private houses and closed spaces and not for professional use.
- Do not change the technical specifications of the appliance.
- The water working pressure (minimum and maximum) must be between 0.04 / 1.00 bar (MPa)
-
Observe the maximum number of 14 place settings.
-
If the power cord is damaged, it must be replaced by the manufacturer, the authorized Service Centre or a qualified person to avoid dangerous situations.
- Place the cutlery inside the cutlery basket with the sharp ends pointing downwards, or place it in the cutlery drawer in a horizontal position with the sharp ends pointing downwards.
- If you open the appliance door while it is in operation, hot water can be sprayed out of the appliance. Carefully open the door of the appliance while the program is running.
- If overloaded, dish racks can cause the appliance to tip over. Never overload dish racks in free-standing appliances.
- Do not leave the equipment with the door open unattended to prevent anybody from tripping and falling.
- Before performing any maintenance work, turn off the equipment and pull the plug out of the socket.
- Do not use high-pressure water spray or steam to clean the appliance.
- If the equipment has ventilation openings in the base, these should not be covered by objects such as a carpet.
- The equipment must be correctly connected to the water system with the new pipes supplied. Used pipes must not be reused.
- In case of built-in installation, do not use the equipment before installation is completed, because of the safety measures.
- Follow the instructions supplied with the appliance.
• Always be careful when moving the equipment,
since it's heavy. Always wear safety gloves and appropriate footwear. - Do not place or use the equipment in a place where the temperature may fall below 0 °C.
- Install the equipment in a safe and suitable place that meets the installation requirements.
- For disused devices, disconnect the power cord plug, then cut the power cord and destroy the door locking system of the appliance so that the door may not be closed again.
- For the installation and connection of the appliance, follow the instructions given in the operating and installation instructions. Incorrect installation may cause injury.
Power and grounding instructions
- The equipment must be grounded.
- Do not use multiple sockets and extensions.
-
Make sure not to damage the plug and cable. If the electrical cable needs to be replaced, the work must be carried out by qualified and experienced personnel.
-
Insert the power plug into the socket only after the installation is completed. Check that the power plug remains accessible after installation.
- Do not pull the power cord to disconnect the equipment. Always pull the plug.
WARNING - Electrical Shock Hazard and Injuries
- Connect and use the appliance only in accordance with the data on the rating plate.
- Connect the appliance to an AC mains power supply only with an earthed socket installed in accordance with standards.
- The protective conductor system of the domestic electrical system must be installed in accordance with the applicable standards.
- Never power the appliance from an external switch, e.g. an external timer or remote control.
-
Incorrect installation of the appliance may cause burns.
-
In case of built-in installation, the power plug of the mains connection cable must be freely accessible, or if it is not possible to access the plug freely, an all-pole separator must be installed in the fixed electrical system in accordance with the installation regulations. The distance between the contacts must be at least 3 mm.
- When installing the appliance, make sure that the power cord does not get stuck and is not damaged.
- It is dangerous to use a power cord with an extension cord and an adapter that is not allowed. Do not use extension cables or multiple sockets. If the power cord is too short, contact a technician.
- It is dangerous to disconnect the inlet hose or immerse the Aquastop valve in water (if present).
- Never immerse the plastic housing in water. The plastic housing on the inlet hose contains an electric valve.
- Never disconnect the inlet hose. Power connection lines run through the inlet hose.
- The hinges move when opening and closing the appliance door and can cause injury.
- If under countertop or built-in appliances are not installed in a special housing but one side of the appliance is accessible, the hinge area must be covered laterally. Covers are available from specialist dealers.
- Incorrect installation may cause the appliance to tip over.
- Only install the dishwasher under a seamless countertop, which is permanently connected to adjacent furniture.
- For free-standing appliances, make sure that the rear of the appliance rests against a wall.
Disposal
- Please go to a recycling centre for the disposal of the packaging and the appliance. Then cut the power cord and make the door locking device unusable.
- Cardboard packaging is made from recycled materials and paper and must be disposed of in the paper collection bin.
- By ensuring that this product is disposed of properly, you will help prevent potential negative consequences for the environment and human health, which could otherwise be caused by inappropriate waste management such as this product.
- For more detailed information about recycling of this product, please contact your local city office and your household waste disposal service.
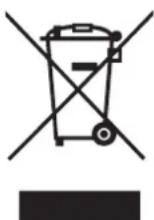
DISPOSAL: Do not dispose of this product as unsorted municipal waste. The collection of such waste must take place separately and with special treatment.
PRODUCT OVERVIEW
IMPORTANT
To get the best performance from your dishwasher, read all the instructions carefully before using it for the first time.
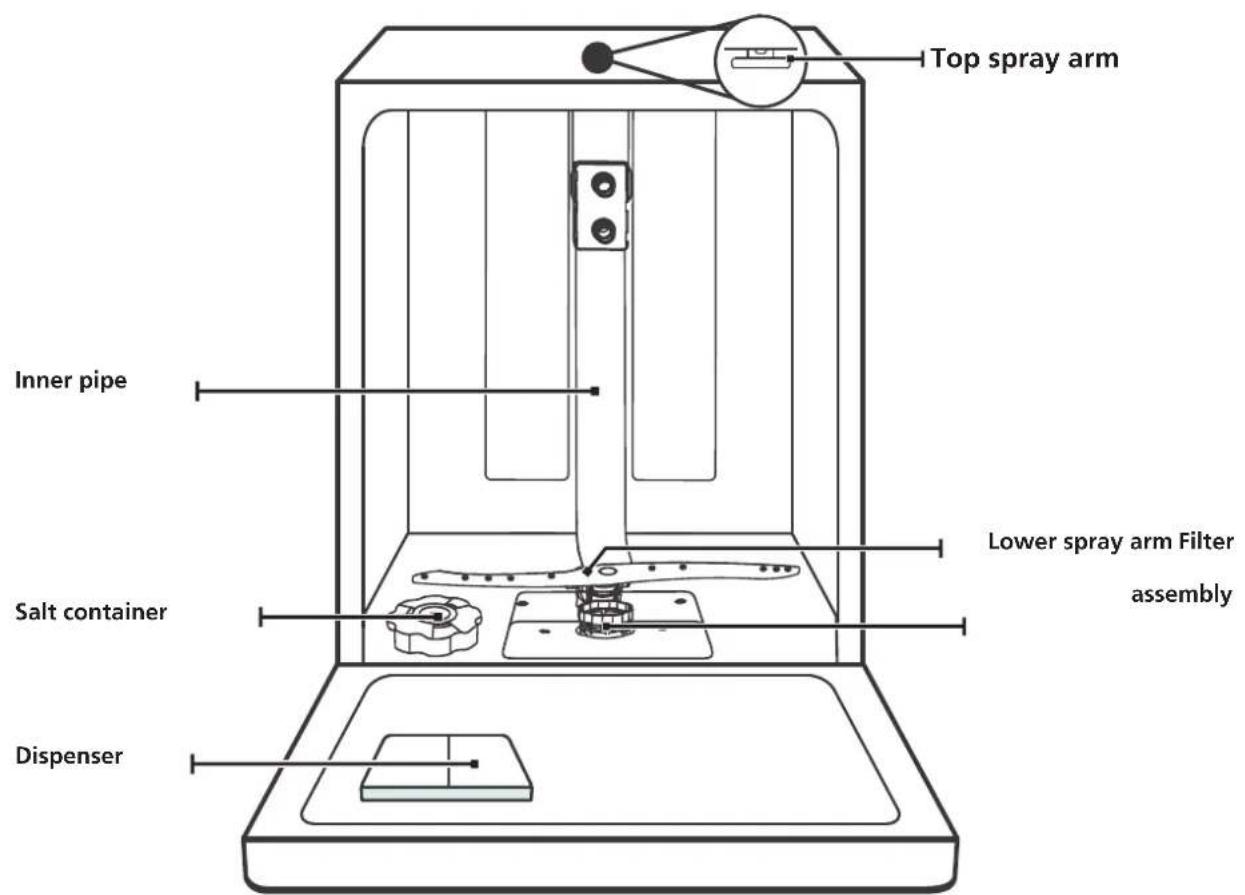
natural_image
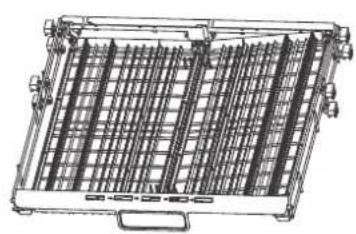
Technical line drawing of a mechanical component with internal grid structure (no text or symbols)Cutlery rack
natural_image
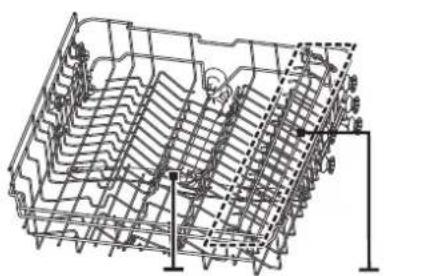
Technical line drawing of a multi-layered structural framework with grid patterns and support beams (no text or symbols)Upper basket
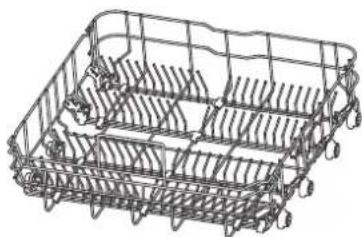
natural_image
Line drawing of a multi-tiered fish or shell cage (no text or symbols)Lower basket

NOTE
Images are for reference only and may differ depending on the model purchased. Please evaluate them on a generic level.
USING THE DISHWASHER
Before using the dishwasher:

flowchart
graph LR
    A["SALT"] --> B["Inside Bar Chart"]
    B --> C["Outside"]
- Setting the water softener
- Salt insertion
- Loading the rack
- Filling the dispenser
Salt insertion

NOTE
If your model doesn't have water softeners, you can skip this section. Always use dishwasher salt.

IMPORTANT
Use only dishwasher-specific salt!
Any other type of salt not specifically designed for use in dishwashers, particularly kitchen salt, will damage the water softener. In case of damage caused by the use of unsuitable salt, the manufacturer does not provide any warranty and is not liable for any damage caused.
Fill the salt container first and perform a short washing cycle. This will prevent any grain of salt or salt water, which may have been spilled, from remaining at the bottom of the machine for an extended period of time causing corrosion.
The salt container is located under the lower basket and must be filled as explained below:
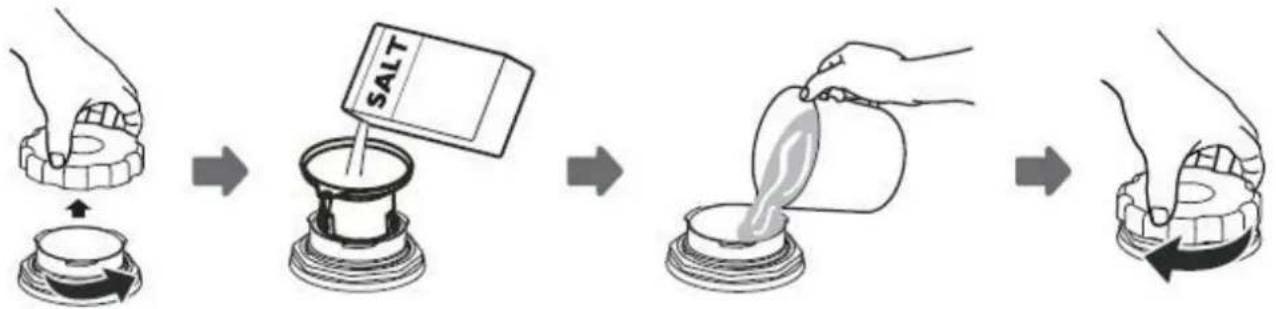
flowchart
graph LR
    A["Person holding a sponge with an arrow"] --> B["Salt being added to a container"]
    B --> C["Add salt into a glass jar"]
    C --> D["Transfer from salt into a container with liquid"]
    D --> E["End with hand holding a sponge"]
- Remove the lower basket and unscrew the tank cap.
- Insert the end of the funnel (supplied) into the hole and pour about 1.5 kg of dishwasher salt.
- Fill the salt container up to the maximum limit with water, it is normal for a small amount of water to come out of the salt container.
- After filling the container, tighten the cap firmly.
- The salt light will go out after the salt container is filled.
- Immediately after filling the salt container, a washing program should be started (we recommend using a short cycle). Otherwise, the filter system, pump or other important parts of the machine may be damaged by salt residues. In this case, the damage caused is not covered by the warranty.

NOTE
- The salt container must only be filled when the salt control light ( is lit on the control panel. Depending on how the salt dissolves, the light may still be on even if the salt container is full. If there is no salt control light on the control panel (for some models), you can estimate when to fill the salt in the softener based on the cycles the dishwasher has made.
- If some salt escapes from the container, perform soaking or a quick program to remove it.
TIPS FOR ADJUSTING THE UPPER BASKET
Type 1:
The height of the upper basket can be easily adjusted to accommodate taller dishes or pans.
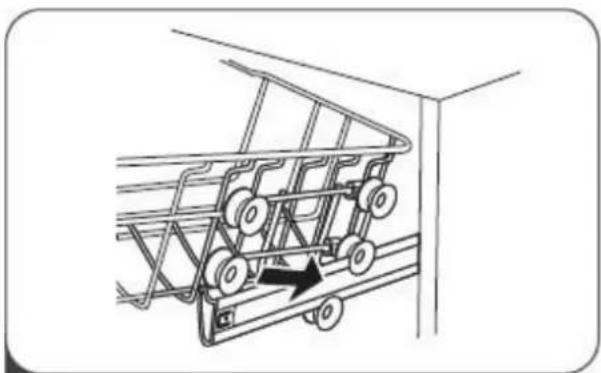
To adjust the height of the upper basket, follow the procedure below:
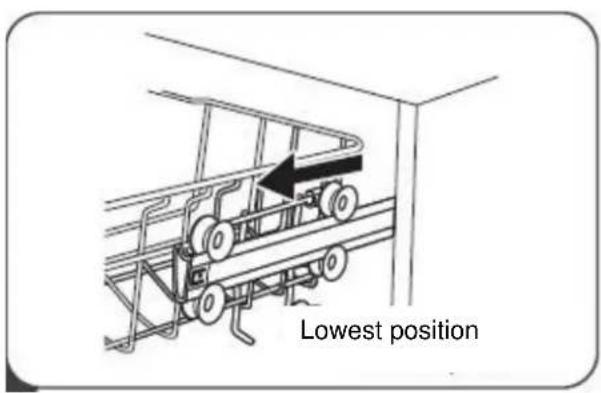
- Pull out the upper basket.
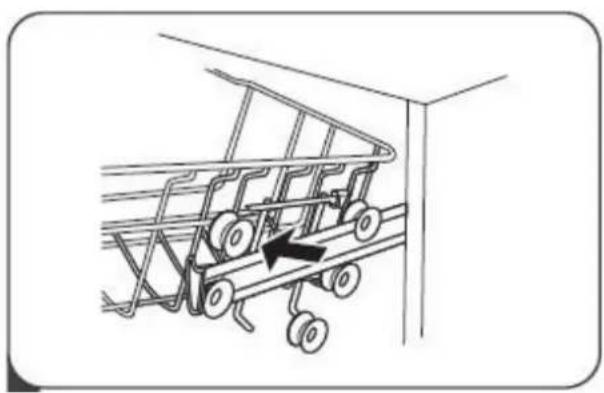
natural_image
Line drawing of a shopping cart with wheels and an arrow indicating direction (no text or symbols)- Remove the upper basket.
natural_image
Line drawing of a car chassis with wheels and a black arrow indicating motion (no text or symbols)- Reattach the upper basket to the upper or lower rollers.
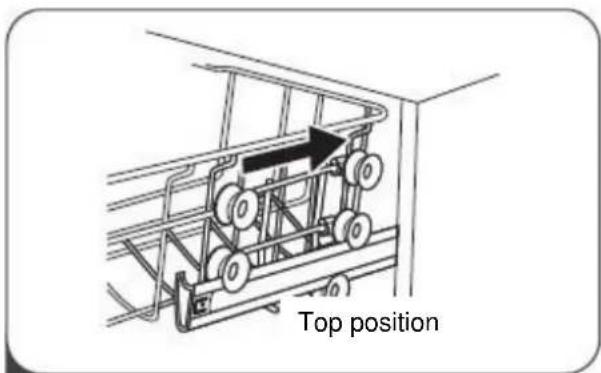
- Push the upper basket inwards.
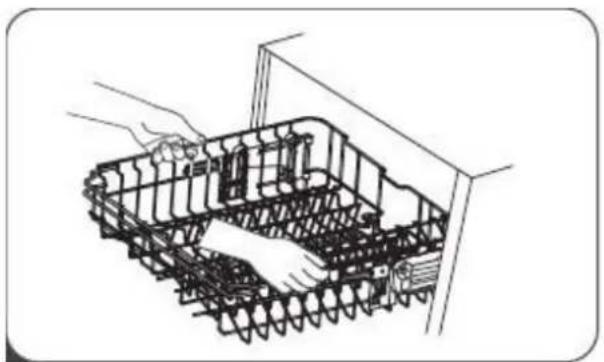
Type 2:
natural_image
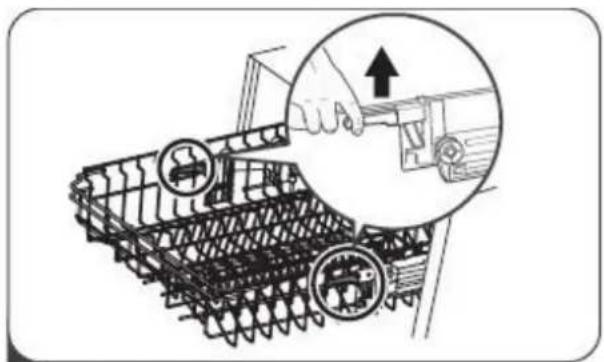
Line drawing of a mechanical assembly with spring-loaded components and a hand holding a tool (no text or symbols)- To lift the basket to the top position, lift it until both sides are at the same height. The basket will lock into place.
natural_image
Illustration of a tracked vehicle with gear and wrench components, showing a hand adjusting the engine (no text or symbols present)- To lower the basket, press down and release.
MAINTENANCE AND CLEANING
External cleaning
Door and door seal
Clean the door seals regularly with a soft, damp cloth to remove food deposits.
When loading the dishwasher, food and drink residues can drip on the outside of the dishwasher door and should be removed before closing the door.
Control panel
If cleaning is necessary, use only a soft, damp cloth to clean the control panel.
IMPORTANT
To prevent water from penetrating the door lock and electrical control panel, do not use spray cleaners of any kind.
Never use abrasive cleaners or abrasive pads on external surfaces because they can scratch; even some paper towels can scratch or leave marks on the surface.
Internal cleaning
Filtering system
The filtering system in the base of the wash cabinet retains coarse debris from the washing cycle, including foreign objects such as tooth picks or shards. The collected coarse debris may cause the filters to clog. Check the condition of the filters regularly, carefully remove foreign objects and clean the parts of the filtering system if necessary with water. Follow the steps below to clean the filter.

NOTE
The images are for reference only, depending on the model purchased the filtering system and the lower wash arm may be different. The images are intended only as an example.
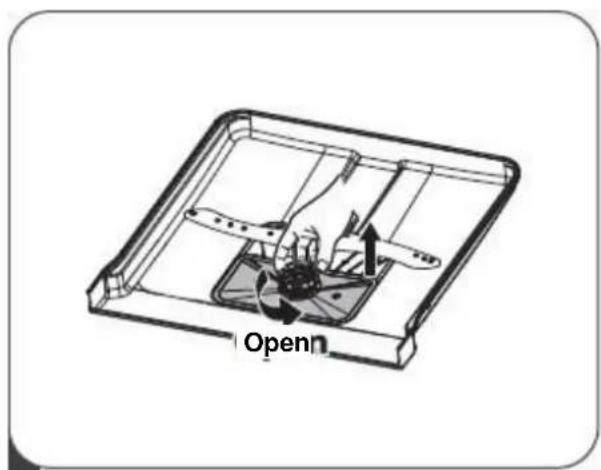
- Hold filter 1 and turn it counterclockwise to unlock. Lift the filter up and pull it out of the dishwasher.
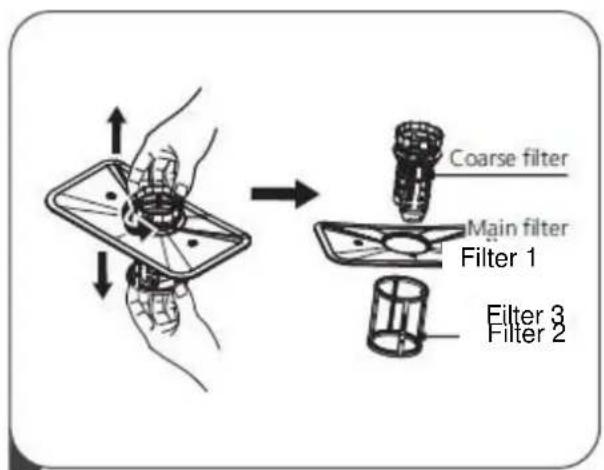
- Filter 3 can be removed from the bottom of the filter assembly. Filter 1 can be removed from filter 2 gently by pressing and turning it counterclockwise and pulling it upwards
natural_image
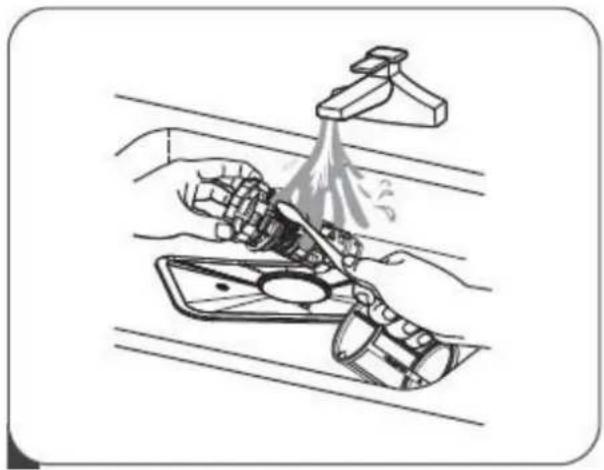
Illustration of hands cleaning a car with a tool, no text or symbols present- Larger food residues can be cleaned by rinsing the filter under running water. For more thorough cleaning, use a soft brush suitable for cleaning.
natural_image
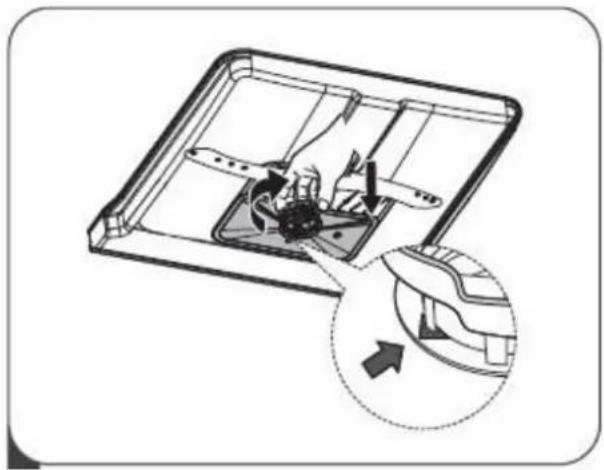
Diagram of a mechanical device with internal components and an inset close-up showing a component detail (no text or symbols)- Refit the filters on the back in disassembly order, replace and insert the filter and turn clockwise as shown by the arrow.
IMPORTANT
Don't overtighten the filters. Put the filters back in sequence safely, otherwise coarse debris could enter the system and cause a blockage.
NEVER use the dishwasher without filters. Improper filter replacement can reduce the performance level of the appliance and create damage to dishes and tools that will not be covered under warranty.
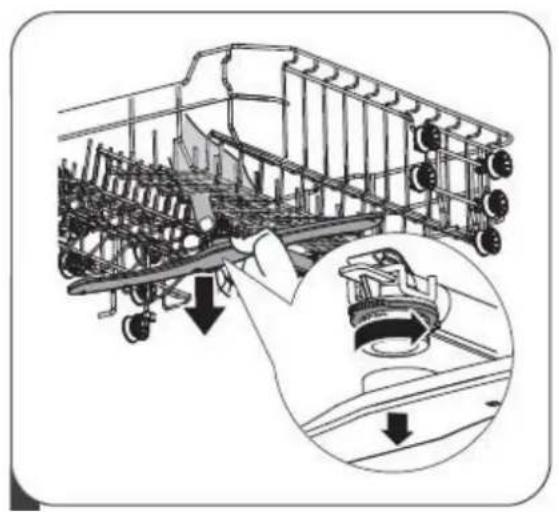
Washing arms
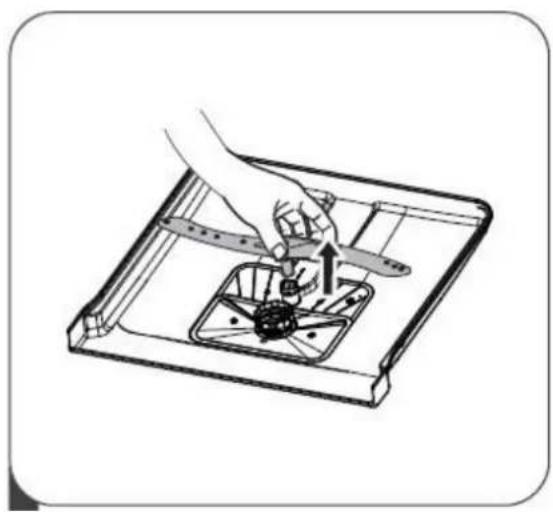
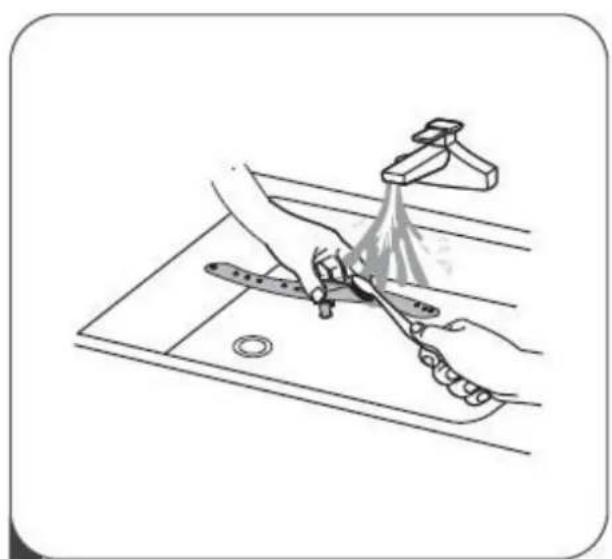
The washing arms must be cleaned regularly to prevent hard water chemicals from clogging the washing arm jets and bearings. To clean the spray arms, follow the instructions below:
natural_image
Technical illustration of an agricultural machine with a close-up inset showing internal components (no text or symbols)- To remove the upper washing arm, hold the nut in the centre and turn the washing arm counter-clockwise to remove it.
natural_image
Illustration of a hand using a tool to lift a small mechanical component inside a tray (no text or symbols)- To remove the lower washing arm, pull it upwards.
natural_image
Illustration of a kitchen sink with a hand using a tool to clean or spray the surface (no text or symbols)- Wash your arms with soap and warm water and use a soft brush to clean the jets. Dry them after rinsing them thoroughly.
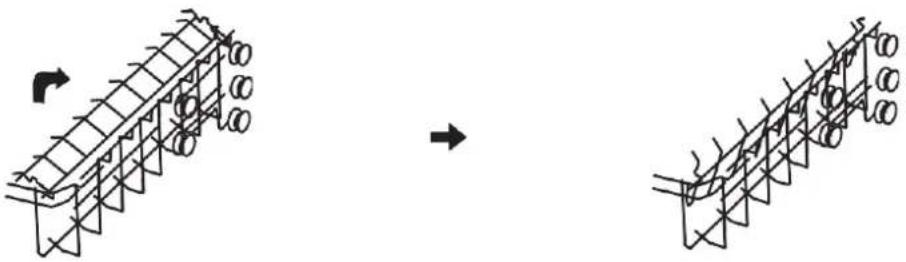
Folding the shelves
To make room for taller objects in the dishwasher basket, lift the grill upwards. It will then be possible to place the tall glasses against it. You can even remove it when you don't need to use it.
natural_image
Diagram showing structural deformation of a steel frame with circular elements, before and after (no text or symbols)Folding the racks
Racks are used to hold trays and dishes. They can be lowered to create more space for large objects.
Pull upwards Bend backwards
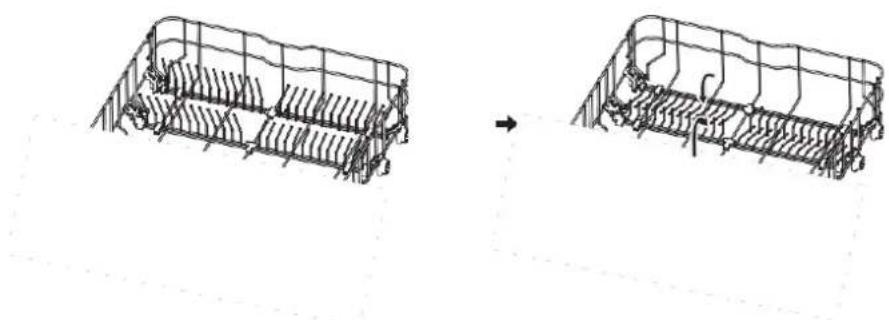
natural_image
Diagram showing two stages of a mechanical or structural assembly, with no visible text or symbols.INSTALLATION INSTRUCTION
Water supply and drainage
CONNECTION TO THE DRINKING WATER SYSTEM

NOTE
If the appliance is replaced, a new water filling hose must be used.
Connect the appliance to a drinking water system using the components provided.
Make sure that the drinking water connection is not bent, crushed or wrapped around itself.
Connect the cold water supply hose to a 3/4 (inch) threaded connector and make sure it is tightened correctly.
If the water pipes are new or have not been used for a long period of time, let the water run to make sure it is clear. This precaution is necessary to avoid the risk of water blocking or damaging the appliance.
Information on the safety supply pipe
The safety water supply pipe consists of double walls. The hose system guarantees a preventive intervention by blocking the water flow in case of breakage and when the air space between the water supply hose itself and the external corrugated hose is full of water.

IMPORTANT
A hose attached to a sink can burst if installed on the same water line as the dishwasher.
How to connect the safety water supply pipe
- Pull the safety supply pipes completely out of the storage compartment located behind the dishwasher.
- Tighten the screws of the safety supply pipe to the tap with the 3/4-inch thread.
- Run the water completely before starting the dishwasher.
How to disconnect the safety water supply pipe
- Turn off the water.
- Unscrew the safety supply pipe from the tap.
DRAINING CONNECTION
Connect the appliance to a water draining connection so that dirty water from the washing cycle can drain off.
Connect the draining pipe with a diameter of 4 cm to the siphon drain sleeve.
Make sure that the draining pipe is not bent, crushed or wrapped around itself.
Make sure that there is no plug in the drain that prevents water from draining.
The height of the draining pipe must be less than 1000 mm. The end of the pipe must not be immersed in water to prevent backflow.
Fasten the draining pipe firmly in either position A or B
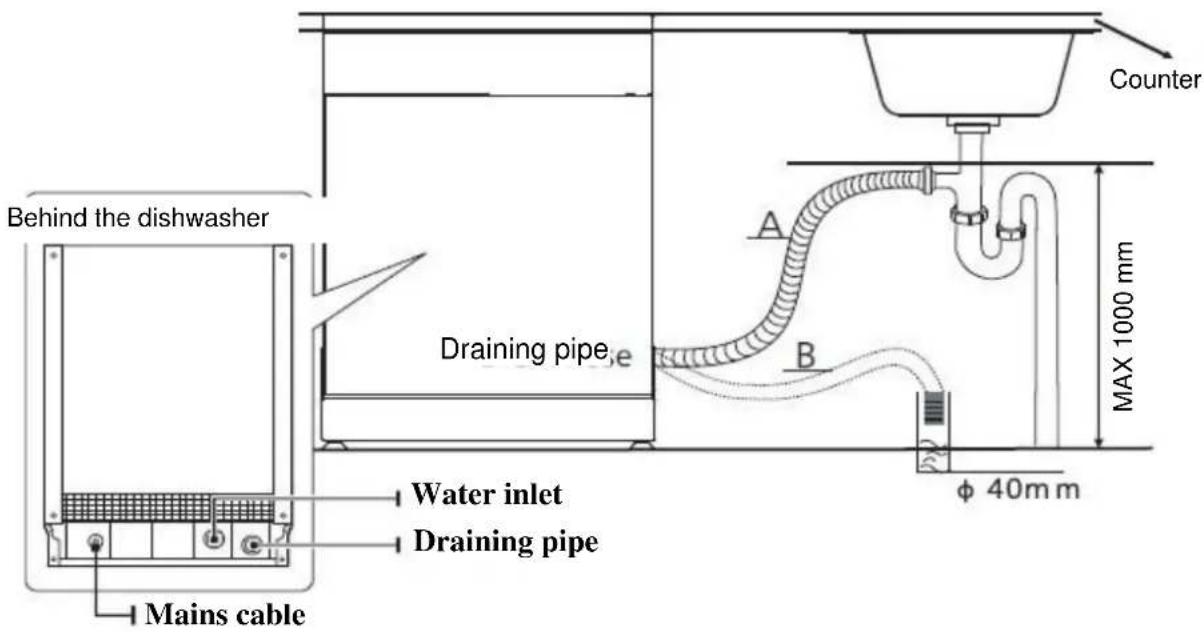
How to drain excess water from pipes
If the sink is higher than 1000 mm from the floor, excess water in the pipes cannot be discharged directly into the sink. You will need to drain excess water from the pipes into a suitable bowl or container that is held outside and lower than the sink.
Water outlet
Connect the water draining pipe. The draining pipe must be installed correctly to prevent water leaks. Make sure that the water draining pipe is not bent or crushed.
Extension tube
If a draining pipe extension is required, be sure to use a similar draining pipe.
It must be no longer than 4 metres; otherwise the cleaning effect of the dishwasher may be reduced.
Siphon connection
The connection to the siphon trap must be 100 cm below the bottom of the dish. The water draining pipe must be secured.
CORRECT POSITIONING OF THE DISHWASHER
Place the appliance in the desired position. The rear should rest on the wall, and on the sides, along adjacent furniture or walls. The dishwasher is equipped with a water supply and the drainpipes can be positioned on the right or left side to facilitate correct installation.
Levelling the appliance
Once the appliance has been positioned for levelling, the height of the dishwasher can be changed by adjusting the level of screwing in the feet.

NOTE
Apply only on free-standing dishwasher.
Free-standing machine installation
The height of the dishwasher, 845 mm, has been designed to allow the machine to be installed between existing furniture in modern and modular kitchens.
The feet can be adjusted so that the correct height is reached.
The laminate top of the machine does not require special attention as it is heat resistant, scratch-proof and stain-resistant.
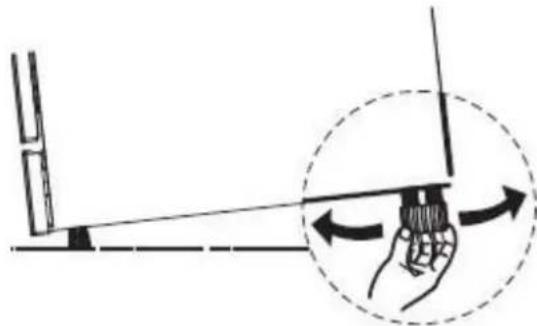
natural_image
Diagram showing a hand holding a tool with an arrow indicating motion, enclosed in a dashed circle (no text or symbols)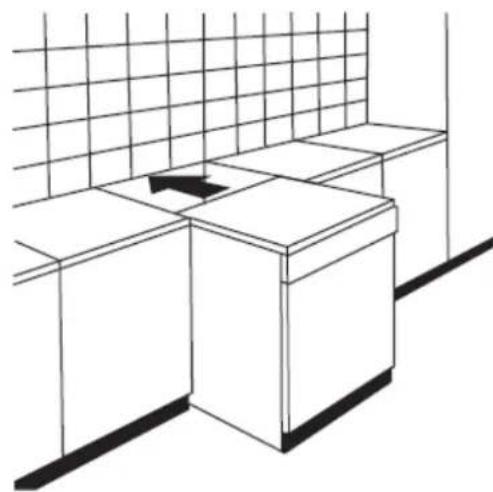
natural_image
Line drawing of a simple kitchen counter with a grid-patterned wall and an arrow indicating a component (no text or symbols)Built-in machine installation
Step 1. Selecting the best installation position for the dishwasher
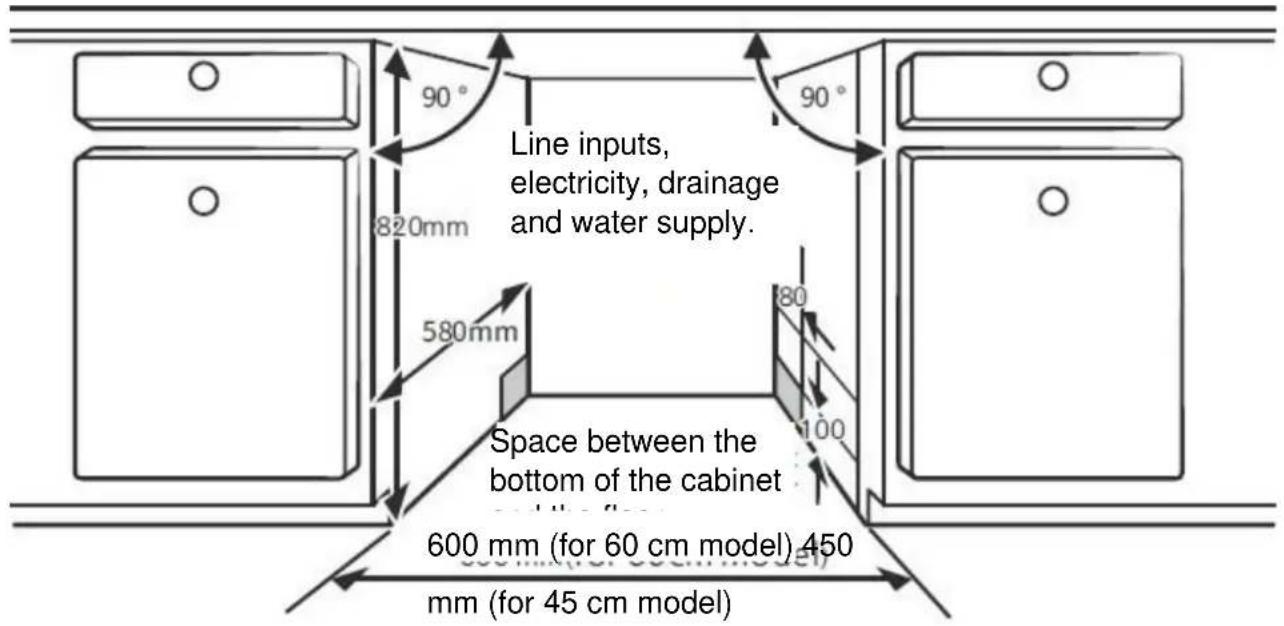
The installation position of the dishwasher must be close to the existing inlet and outlet pipes and the power cord.
Please refer to the figures of the cabinet dimensions and installation position of the dishwasher.
- There must be a distance of less than 5 ~mm between the top of the dishwasher, and the cabinet and the outside door must be aligned with the cabinet.
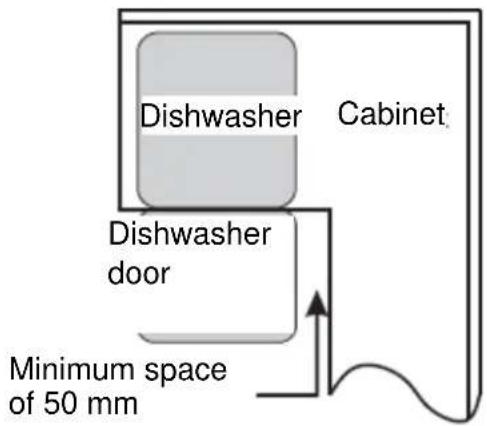
2 If the dishwasher is installed in the corner of the cabinet, there should be some space when the door is open.

NOTE
Depending on where your electrical outlet is, you might need to cut a hole in the side opposite of the cabinet.
Step 2. Dimensions and installation of the external panel
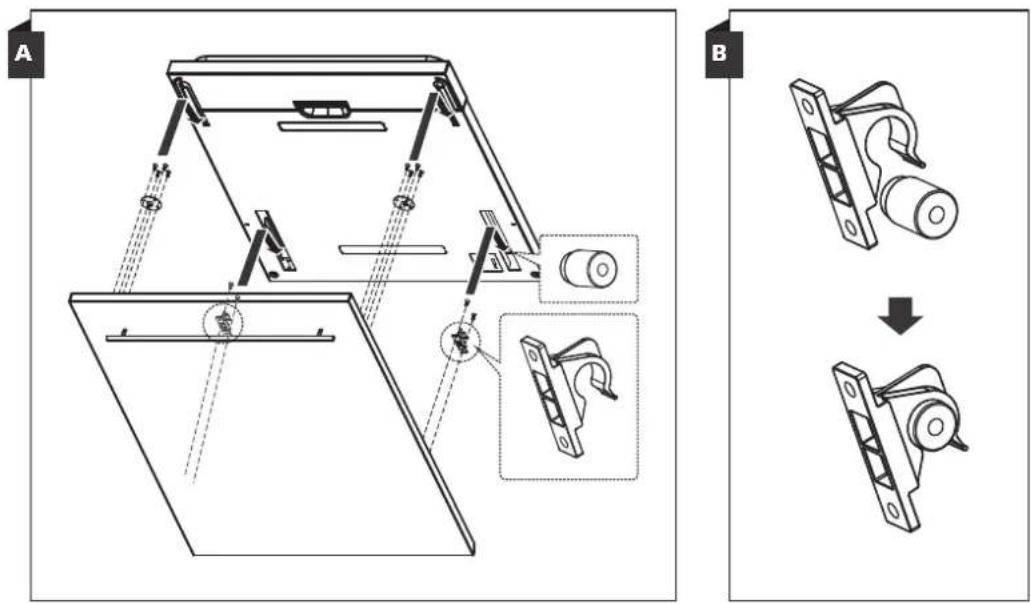
The external wooden panel could be realized according to the installation drawings.
Built-in model
Install the hook on the aesthetic wooden panel (see figure 4) and put the hook into the slot of the outer door of dishwasher (see figure 4). After positioning of the panel, press top of the aesthetic wooden panel to make sure that the plastic hook are fastened.
Step 3. Adjusting the door spring tension
-
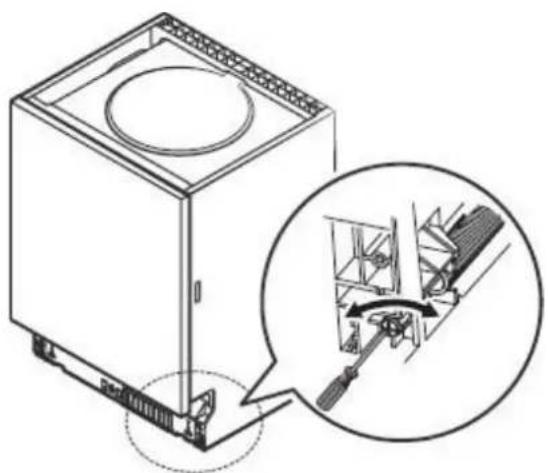
The door springs are factory set to the correct tension for the outer door. When installing the decorative panel, adjust the door spring tension. Turn the adjusting screw to guide the regulator to stretch or relax the steel cable.
-
The spring tension of the door is correct when the door remains in the fully open horizontal position, but is raised with the slight pressure of a finger.
natural_image
Technical line drawing of a refrigerator with an inset close-up showing internal components (no text or symbols)Step 4. Dishwasher installation steps Refer to the installation steps specified in the installation drawings.
- Fix the condensation strip under the countertop of the cabinet. Make sure the strip is levelled with the edge of the countertop. (Step 2)
- Connect the supply hose to the cold water source.
- Connect the draining pipe.
- Connect the power cord.
-
Place the dishwasher in the right position. (Step 4)
-
Level the dishwasher. The back can be adjusted from the front of the dishwasher by turning the screw in the middle of the dishwasher base using a screwdriver. To adjust the front feet, use a flat screwdriver and turn the front feet until the dishwasher is levelled. (Step 5 to step 6)
- Install the cabinet door on the outer door of the dishwasher. (Step 7 to step 10)
- Adjust the tension of the door springs using an Allen key that turns clockwise to tighten the left and right door springs. Failure to do so may cause damage to the dishwasher. (Step 11)
- The dishwasher must be fixed in place. There are two ways to do it:
A. Normal countertop: Insert the installation hook into the slot on the side and fasten it to the countertop with the wood screws.
B. Marble or granite countertop: fix the side with the screw.
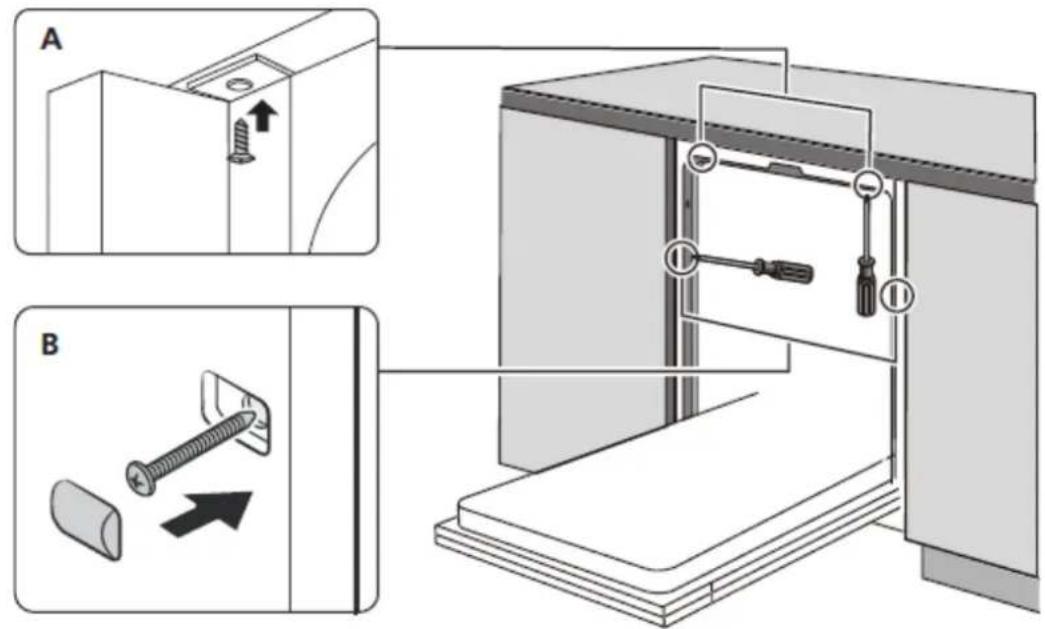
Step 4. Dishwasher levelling
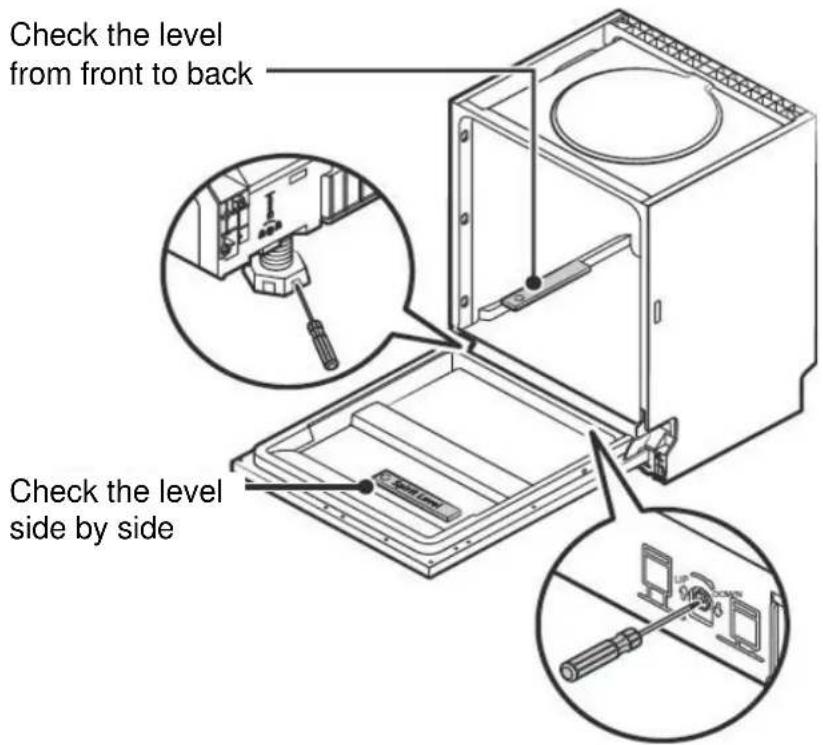
The dishwasher must be levelled for proper operation and washing performance.
- Place a bubble level on the door and rack guide inside the dishwasher as shown to check that the dishwasher is levelled.
-
Level the dishwasher by individually adjusting the three levelling legs.
-
When levelling the dishwasher, be careful not to tip the dishwasher over.

NOTE
The maximum adjustment height of the feet is 50 mm.
TROUBLESHOOTING TIPS
Before calling customer service please consult the table below
| Problem | Possible causes | What to do |
| The dishwasher does not start | Blown fuse, or circuit breaker. | Replace the fuse or reset the circuit breaker. Remove any other devices shared with the same circuit as the dishwasher. |
| The power is not on. | Make sure the dishwasher is switched on and the door is closed properly.Make sure that the power cord is properly plugged into the wall outlet. | |
| Water pressure is low | Check that the water supply is properly connected and open. | |
| Dishwasher door does not close properly | Make sure the door is closed properly. | |
| Dishwasher does not charge water | Bent or trapped draining pipe | Check the draining pipe. |
| Clogged filter | Check the filter. | |
| Kitchen sink clogged | Check the kitchen sink to make sure it can drain water properly. If the kitchen sink is not draining properly, you may need a plumber rather than a dishwasher technician. | |
| Foam inside the dishwasher | Wrong detergentRinse aid spill | Use only specific detergents for dishwashers. If this occurs, open the dishwasher and let the foam evaporate.Add 1 litre of cold water to the bottom of the dishwasher.Close the dishwasher door, then select any cycle. Initially, the dishwasher will drain the water. Open the door after the draining phase has been completed and check whether the foam is gone.Repeat if necessary.Always clean up spills of rinse aid immediately. |
| The inner surface of the dishwasher is stained | The detergent contains some dye | Make sure the detergent has no dye. |
| White layer on the inner surface | Hard water minerals | To clean the inside, use a damp sponge with dishwasher detergent and wear rubber gloves. Never use any other type of detergent or detergent as it may cause foam. |
| There are rust stains on the cutlery | The objects concerned are not resistant to corrosion | Avoid washing objects that are not corrosion-resistant in dishwashers. |
| Traces of salt in the washing cycle | Always run a washing program without dishes after adding salt. Do not select the Turbo function (if any). | |
| The lid of the softener's is locked up tight | Check that the softener cover is closed correctly. | |
| Noise of knocks inside the dishwasher | A washing arm is banging against the dishes | Stop the program and reorganize the objects that are obstructing the washing arm. |
| Noise rattling inside the dishwasher | The dishes have been incorrectly positioned | Stop the program and reorganize the objects inside the dishwasher. |
| Noise of blows inside the water pipes | This could be caused by the installation of the pipes | This is not about the dishwasher. Contact a qualified plumber. |
| The dishes are not clean | The dishes were not loaded correctly. | See the notes in "Loading and unloading your dishwasher." |
| The program wasn't powerful enough. | Select a more intensive program. | |
| The dishes are not dry | The selected program is wrong | With a short program, the washing temperature is lower, thus decreasing the drying performance.Choose a program with a longer washing time. |
| Use of low quality cutlery. | Water drainage is more difficult with these objects. Cutlery or dishes of this type are not suitable for washing in the dishwasher. |
WARNING
Self-repair or non-professional repair may cause serious risks to the safety of the user of the appliance and impact warranty.
LOADING THE BASKETS ACCORDING TO STANDARD EN60436
Loading the dishwasher to its full capacity will contribute to energy and water savings. UPPER BASKET
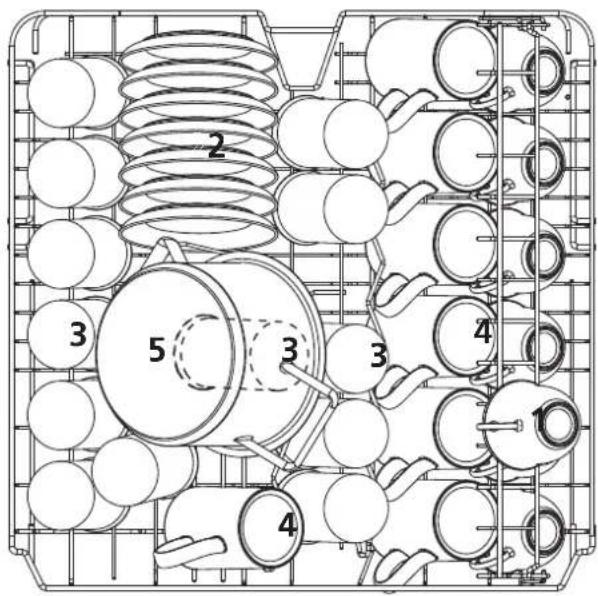
LOWER BASKET
| Number | Item |
| 1 | Cups |
| 2 | Saucers |
| 3 | Glasses |
| 4 | Mugs |
| 5 | Small pot |
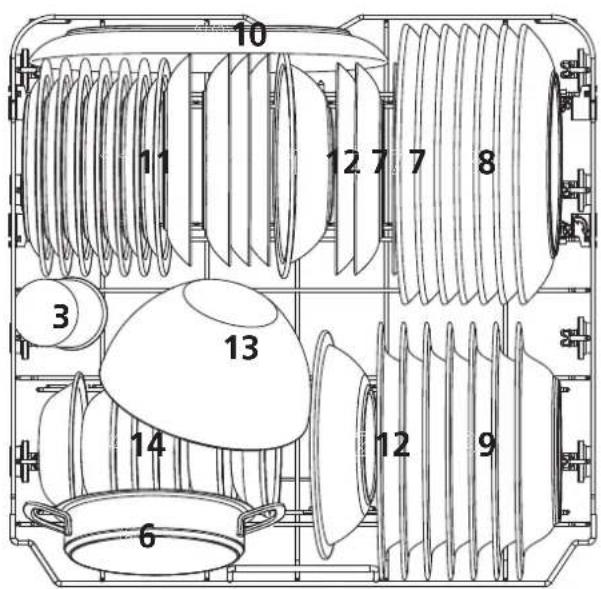
| Number | Item |
| 6 | Oven pot |
| 7 | Dessert plates |
| 8 | Dinner plates |
| 9 | Soup plates |
| 10 | Oval platter |
| 11 | Melamine dessert plates |
| 12 | Melamine bowls |
| 13 | Glass bowl |
| 14 | Dessert bowls |
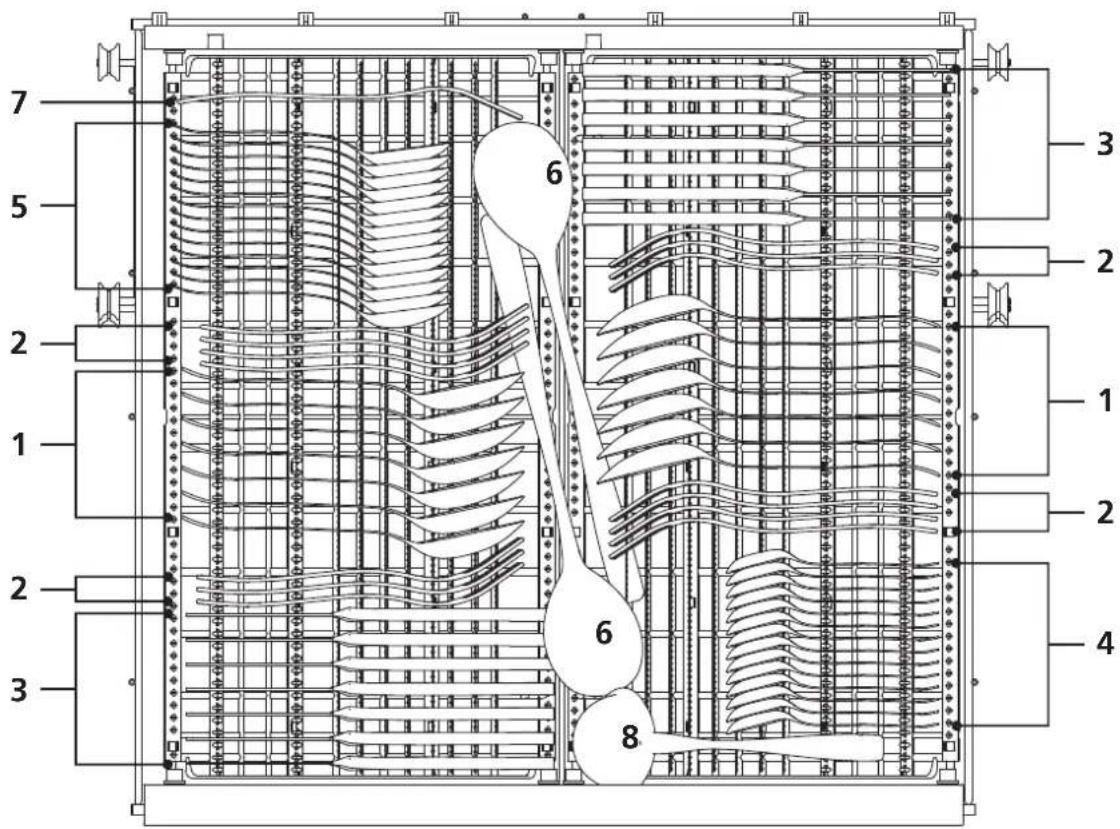
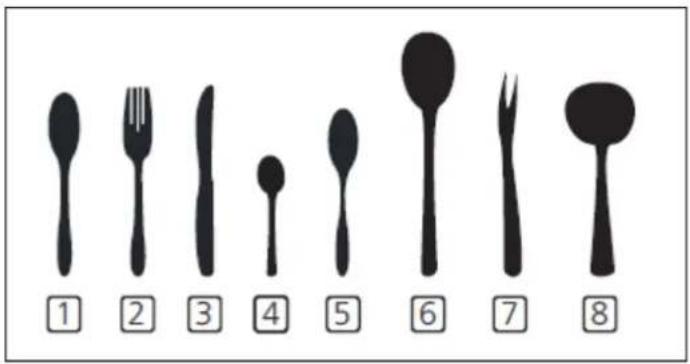
CUTLERY BASKET
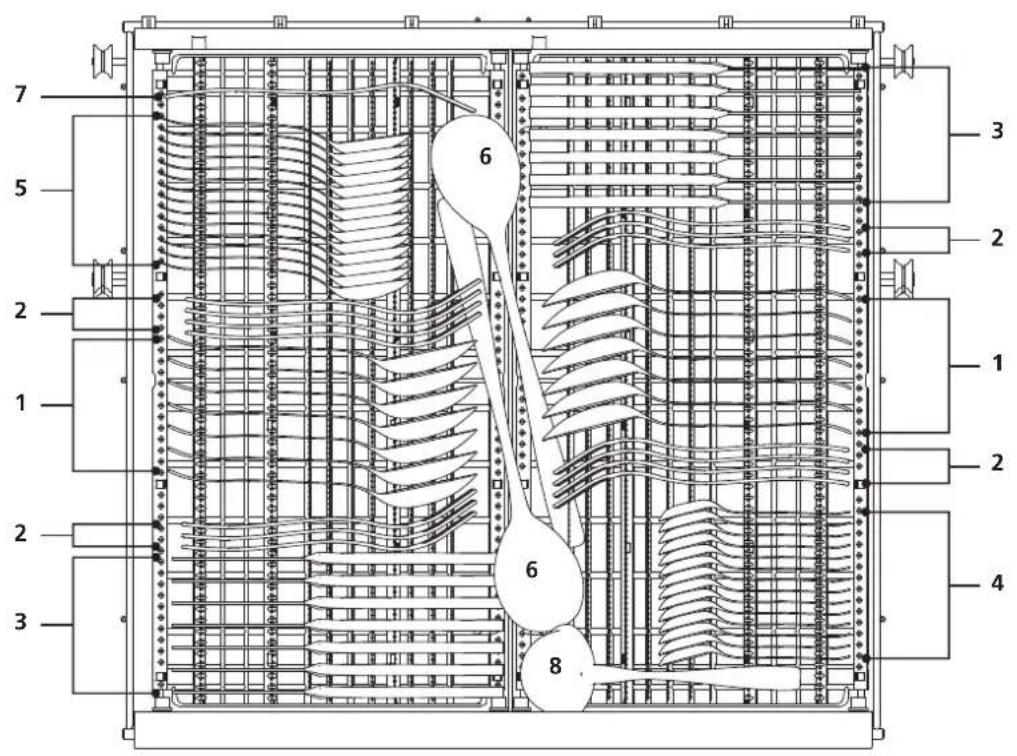
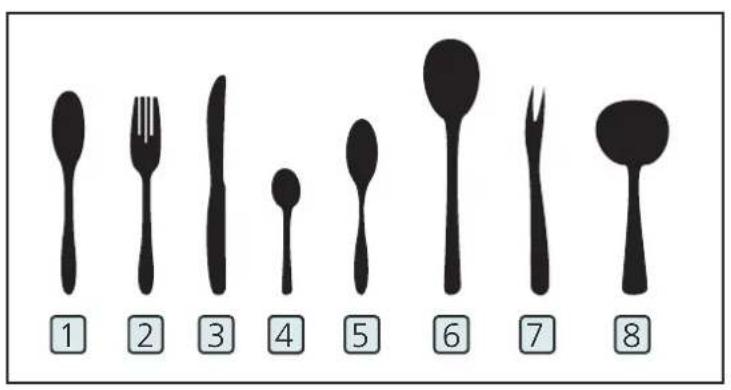
| Number Object | |
| 1 | Spoon |
| 2 | Fork |
| 3 | Knife |
| 4 | Tea spoon |
| 5 | Dessert spoon |
| 6 | Serving spoon |
| 7 | Service fork |
| 8 | Ladle |
Information for comparability tests according to standard EN 60436
Capacity: 14 place settings
Upper basket position: lower position
Program: ECO
Setting the rinse aid: Max
Setting the softener: H3
• Cutlery Rack Used Tips
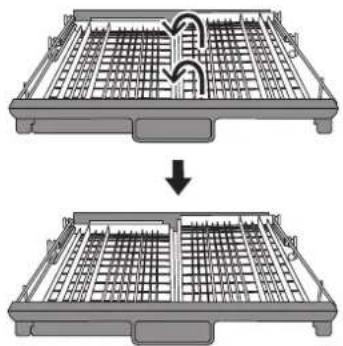
natural_image
Two-step diagram showing a grid-based mechanical assembly before and after disassembly, with no visible text or symbols.Lift the right basket up, both left and right baskets are flat.
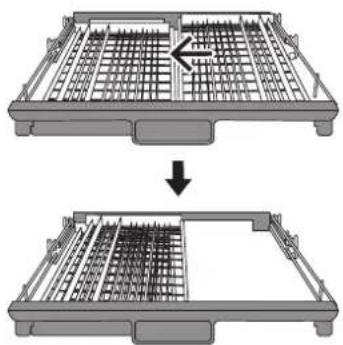
natural_image
Two-step diagram showing a grid-based structure before and after modification, with no visible text or symbols.Move the right basket from right to left, two basket are overlapping.
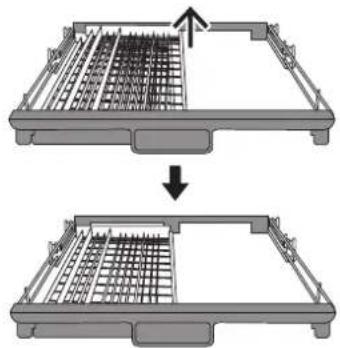
natural_image
Two-step diagram showing a mechanical assembly with grid patterns before and after processing (no text or symbols)Remove the right basket from the tray, only has the left basket.
natural_image
Line drawing of a kitchen appliance inside a circular frame (no text or symbols)Dishwasher
MKDW FI607314 EHP D
PART II
Instruction manual
01
4 USING THE DISHWASHER
4 Control panel
6 Water softener
8 Preparation and loading of dishes
10 Detergent and rainse aid
11 Fill the rainse aid tank
13 Fill the detergent tank
02
14 DISHWASHER PROGRAMMING
14 Washing cycles table
16 Starting a washing cycle
17 Change program during washing
17 Did you forget to add a dish?
03
17ERROR CODES
04
1 TECHNICAL INFORMATION8

NOTE
If you can't solve problems by yourself, please ask a professional technician for help.
The manufacturer, following a policy of constant product development and updating, may make changes without prior notice.
If the manual gets lost or is outdated, you may receive a new user manual from the manufacturer or the supplier.
QUICK USER GUIDE
Where indicated, please read the corresponding content in Section I of the manual.
INSTALLATION OF THE DISHWASHER
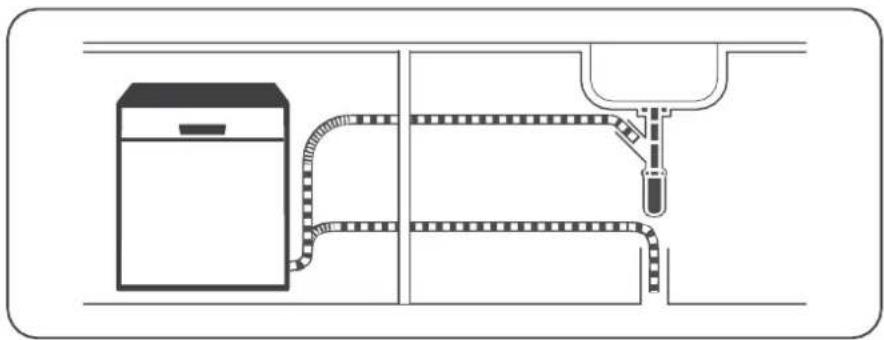
natural_image
Pure technical diagram of a mechanical or electrical system with no text, numbers, or symbols(Please refer to Section 5 "INSTALLATION INSTRUCTIONS" of PART I: Generic version)
POSITIONING OF DISHES
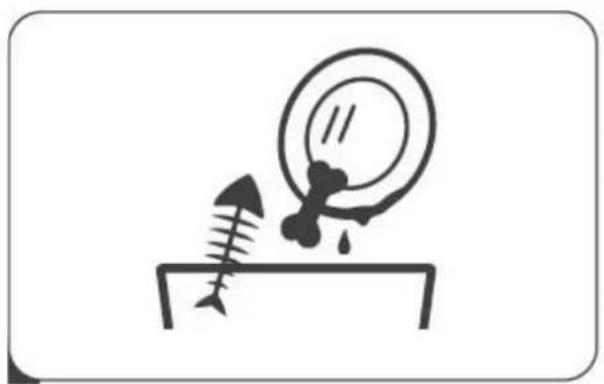
natural_image
Simple line drawing of a mechanical or electrical component with a hammer, screw, and droplet on a base (no text or symbols)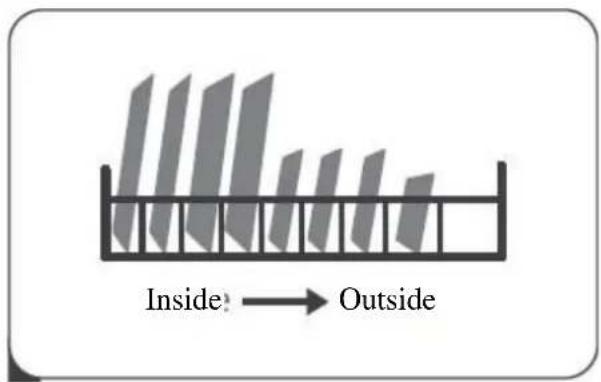
- Removal of food waste 3. Loading baskets
natural_image
Line drawing of a device with a hand inserting a plug into a tray, showing internal components (no text or symbols)- Fill the dispenser with detergent
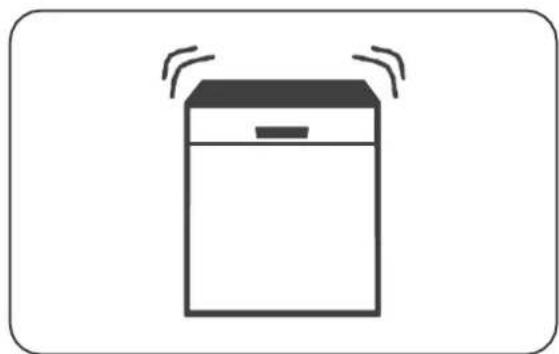
natural_image
Simple line drawing of a trash bin with smoke or dust clouds above it (no text or symbols)- Select the desired washing program and start the dishwasher
USING THE DISHWASHER
Control panel
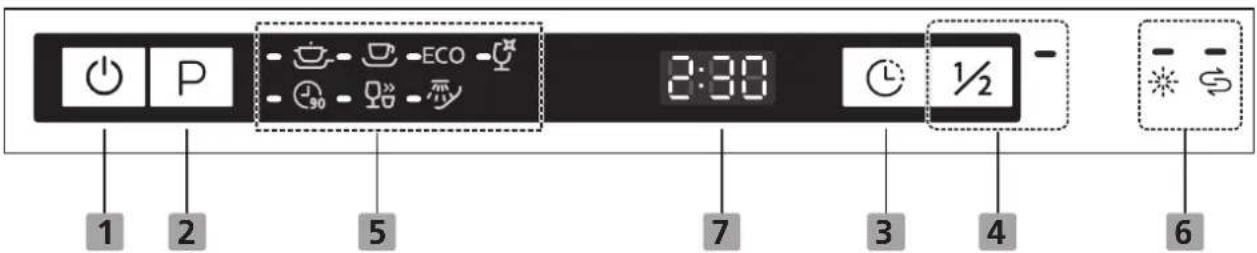
Operation (Button)
| 1 Power | Press this button to turn on your dishwasher. |
| 2 Program | Select the appropriate washing program, the selected program indicator will be lit. |
| 3 Delay | Press this button to set the delayed hours for washing. You can delay the start of washing up to 24 hours. One press on this button delays the start of washing by one hour. |
| 4 Half-load | When you have about or less than half of full place settings dishware to wash, you can choose this function to save energy and water.(It can be used programs except rapid and soak) |
Display
| 5 Program indicator |  IntensiveFor heaviest soiled crockery, and normally soiled pots, pans, dishes etc. With dried-on food.[WDSX] UniversalFor normally soiled loads, such as pots, plates, glasses and lightly soiled pans. IntensiveFor heaviest soiled crockery, and normally soiled pots, pans, dishes etc. With dried-on food.[WDSX] UniversalFor normally soiled loads, such as pots, plates, glasses and lightly soiled pans. |
| 5 Program indicator |  ECOThis is standard program, it is suitable to clean normally soiled tableware and it is the most efficient program in terms of its combined energy and water consumption for that type of tableware. ECOThis is standard program, it is suitable to clean normally soiled tableware and it is the most efficient program in terms of its combined energy and water consumption for that type of tableware. GlassFor lightly soiled crockery and glass. GlassFor lightly soiled crockery and glass. 90 minFor normally soiled loads that need quick wash. 90 minFor normally soiled loads that need quick wash. RapidA shorter wash for lightly soiled loads that do not need drying. RapidA shorter wash for lightly soiled loads that do not need drying. SoakTo rinse dishes that you plan to wash later that day. SoakTo rinse dishes that you plan to wash later that day. |
| 6 Warning indicator |  Rinse AidIf the “ indicator is lit, it means the dishwasher is low on dishwasher rinse aid and requires a refill. Water Faucet Rinse AidIf the “ indicator is lit, it means the dishwasher is low on dishwasher rinse aid and requires a refill. Water Faucet If the “ indicator is lit, it means the dishwasher is low on dishwasher salt and needs to be refilled. If the “ indicator is lit, it means the dishwasher is low on dishwasher salt and needs to be refilled. |
| 7 Screen |  To show the reminding time and delay time, error codes etc. To show the reminding time and delay time, error codes etc. |

NOTE:
Indicator lamp function
The Indicator lamp will be lit up during the washing program, then blink for 5 minutes and extinguished on the end of the program.
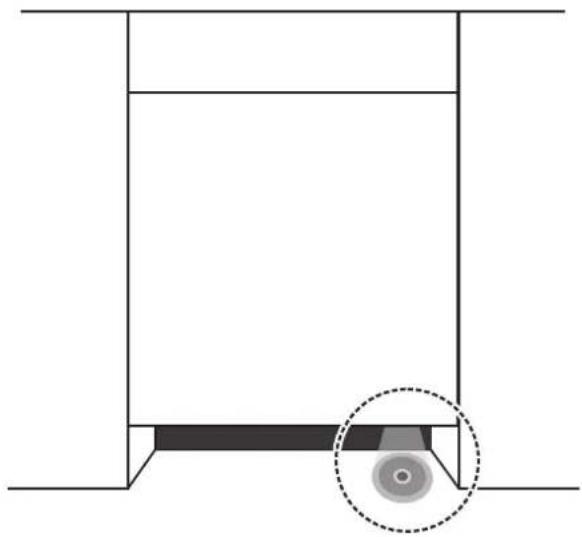
natural_image
Pure technical diagram of a mechanical component with no text or symbolsWATER SOFTENER
Hard limescale water leaves a residue of limescale on the dishes and inside the dishwasher which can clog parts of the appliance.
For good washing results, you can soften the water with the water softener and dishwasher salt.
To prevent damage to the appliance, water with a hardness of more than 7
°dH must be softened.
The water softener must be set manually, using the water hardness dial. The softener should be adjusted to the hardness of the water in your area. Your local water supply can advise you on water hardness in your area.
Adjusting salt consumption
The dishwasher is designed to allow the amount of salt consumed to be adjusted according to the hardness of the water used. This aims to optimize and customize the level of salt consumption.
Please follow the steps below to adjust the salt consumption.
- Turn the appliance on;
- Press the Quick button for more than 5 seconds to start the water softener program set within 60 seconds of switching on the appliance;
-
Press the Quick button to select the correct setting according to your local environment, the sets will change in the following sequence: H1 > H2 > H3 > H4 > H5 > H6;
-
Press the power button to complete the installation.
| WATER HARDNESS | Water softner level | Regeneration occurs every X program sequence 1) | Salt consumption (grams / cycle) | |||
| German * dH | French * fH | British English *Clarke | Mmol/l | |||
| 0 - 5 | 0 - 9 | 0 - 6 | 0 - 0.94 | H1 | No regeneration | 0 |
| 6 - 11 | 10 - 20 | 7 - 14 | 1.0 - 2.0 | H2 | 10 | 9 |
| 12 - 17 | 21 - 30 | 15 - 21 | 2.1 - 3.0 | H3 | 5 | 12 |
| 18 - 22 | 31 - 40 | 22 - 28 | 3.1 - 4.0 | H4 | 3 | 20 |
| 23 - 34 | 41 - 60 | 29 - 42 | 4.1 - 6.0 | H5 | 2 | 30 |
| 35 - 55 | 61 - 98 | 43 - 69 | 6.1 - 9.8 | H6 | 1 | 60 |
1^ = 1,25^ = 1,78^ = 0,178mmol / l
The setting: H3factory
1) Every cycle with a regeneration operation consumes additional 2.0 litres of water, the energy consumption increases by 0.02 kWh and the program extends by 4 minutes.
water supplied. See also the section "Salt loading" in the first part.

NOTE
If your model doesn't have water softeners, you can skip this section.
Water hardness varies from one place to another. If hard water is used in the dishwasher, deposits will form on dishes and tools.
The appliance is equipped with a special softener that uses a salt container specifically designed to remove limescale and minerals from the water.
PREPARATION AND LOADING OF DISHES
It is important to only wash objects in the dishwasher when washing in the dishwasher is expressly indicated. In the case of special tools, use a program in which the temperature is lower.
To avoid burns and damage to the dishes, do not remove the glass and cutlery from the dishwasher immediately after the washing program has finished.
Below is a list of products that cannot be washed in the dishwasher,
• Cutlery with wooden, porcelain or mother-of-pearl handles
- Plastic objects that are not heat-resistant
- Older cutlery with glued parts that are not temperature resistant
• Dented cutlery or dishes
- Objects made of pewter or cooper
- Crystal
• Steel objects subject to rust
- Wooden dishes
- Objects made with synthetic fibres
Please, also consider that,
- some types of glasses can become dull after a large number of washes
• silver and aluminium parts tend to discolour during washing - enamelled patterns may fade if washed frequently
Recommendations for loading the dishwasher
It is important to scrape off large amounts of food residues. Soften the residues of encrusted food in the pans.
For best dishwasher performance, follow these loading guidelines.
(The features and appearance of baskets and cutlery may differ from your model.)
Put the objects in the dishwasher as follows:
- Objects such as cups, glasses, pots / pans, etc. facing downwards.
- Curved objects, or those with recesses, must be diagonally loaded so that water can flow regularly.
- All tools must be stacked securely and must not tip over.
- All tools must be positioned so that the washing arms can rotate freely during washing.
- Loading empty objects such as cups, glasses, pans etc. with the opening side down so that water doesn't accumulate inside the container.
- Dishes and cutlery must not lie inside each other or cover each other.
• To avoid damage, the glasses must not touch each other. - The upper basket is designed to hold lighter and more delicate tableware such as glasses, coffee and teacups.
- Long blade knives positioned vertically represent a potential danger!
- Place long and/or pointed objects such as cutlery horizontally in the upper basket.
- Please do not overload the dishwasher. This is important for good washing results and reasonable energy consumption.

NOTE
- Very small objects should not be washed in the dishwasher as they could easily fall out of the basket.
- To prevent water from dripping from the upper basket into the lower basket, we recommend emptying the lower basket first, followed by the upper basket.
- To avoid damage, wait at least 15 minutes after the end of the washing program before taking glassware and cutlery out of the dishwasher.
Loading the upper basket
The upper basket is designed to hold delicate and lighter tableware such as glasses, coffee and teacups and saucers, as well as dishes, small bowls and shallow pans (as long as they are not too dirty). Place the dishes and pans so that they are not touched by the washing arm.
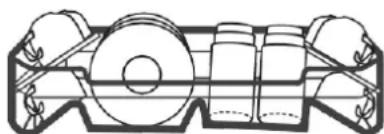
natural_image
Technical line drawing of a mechanical component with rollers and flanges (no text or symbols)Loading the lower basket
We recommend placing large objects that are difficult to clean at the bottom of the basket: position pots, pans, lids, serving dishes and bowls, as shown in the figure below. It is preferable to place dishes and covers on the side of the racks to avoid blocking the rotation of the upper washing arm.
The maximum recommended diameter for dishes in front of the detergent dispenser is 19 cm, so as
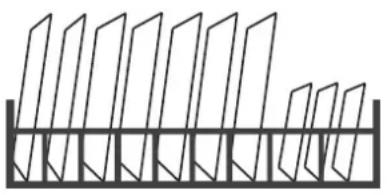
natural_image
Pure diagram of vertical panels mounted on a horizontal base, no text or symbols presentLoading the cutlery basket
Cutlery should be placed in the cutlery holder separately from each other in the appropriate positions, ensuring that they do not overlap on top of each other to avoid unsatisfactory results.
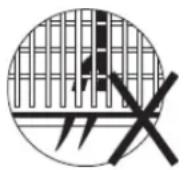
Make sure the cutlery doesn't go beyond the basket.
Always load sharp objects with the tip pointing downwards.
DETERGENT AND RINSE AID
Use only a specific detergent for dishwashers. Keep the detergent in a cool, dry place.
Only fill the dispenser when the dishwasher has already been loaded and is ready for operation.
Dishwasher detergent is corrosive! Keep the detergent out of the reach of children.
At the end of washing, rinse aid is released during the rinse function to prevent the water from forming droplets that can stain and leave streaks on the dishes. The rinse aid also improves the drying function. Please note that the dishwasher is designed to use liquid rinse aid.

NOTE
Use only brand-name rinse aid for dishwashers. Never fill the rinse aid dispenser with any other substance (e.g. dishwasher detergent, liquid detergent).
This would damage the appliance.
The rinse aid dispenser should be refilled according to the frequency of dish washing and the adjustment of the dispenser according to use.
When the rinse is about to run out, the light will come on Do not overfill the rinse aid dispenser.
Fill the rinse aid tank
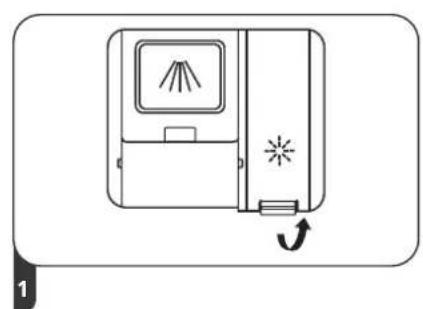
natural_image
Simple line drawing of a device with a screen and starburst symbol, no text or labels presentOpen the cap by pulling it upwards.
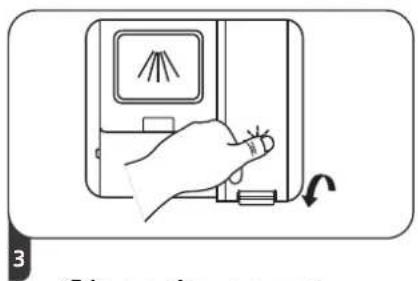
natural_image
Line drawing of a hand holding a device with a screen and scroll, no text or symbols presentClose the cover.
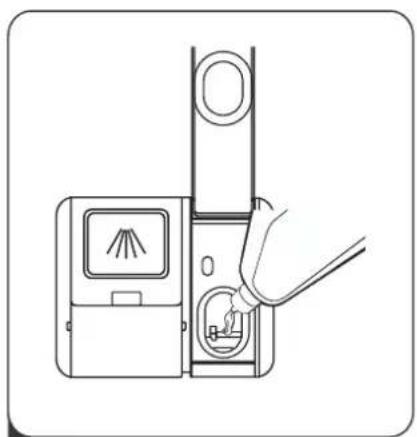
natural_image
Line drawing of a hand inserting a device into a device with a lamp and screen (no text or symbols)Add the rinse aid taking care not to spill it.
Rinse aid adjustment
To obtain a better drying performance using little rinse aid, it is possible to adjust the quantity used for each washing cycle. Please proceed as follows.
- Open the door and switch the appliance on.
- Within 60 seconds of Step 1, press the Program button for more than 5 seconds, then press the Delay button to access the set model, the rinse aid indication flashes with a frequency of 1Hz.
- Press the Program button to select the correct series according to your usage habits, the series will change in the following sequence: D1 > D2 > D3 > D4 > D5 > D1.
The greater the number, the bigger will be the quantity of rinse aid used by the dishwasher.
- To exit the configuration mode, press the power button or do not take any action for 5 seconds.
| Rinse aid level | Selected position |
| D1 | The Quick program light turns on |
| D2 | The 90 min program light turns on |
| D3 | The 90 min and Quick program lights turn on |
| D4 | The Eco program lamp turn on |
| D5 | The Eco and Quick program lights turn on |
Filling the detergent tank
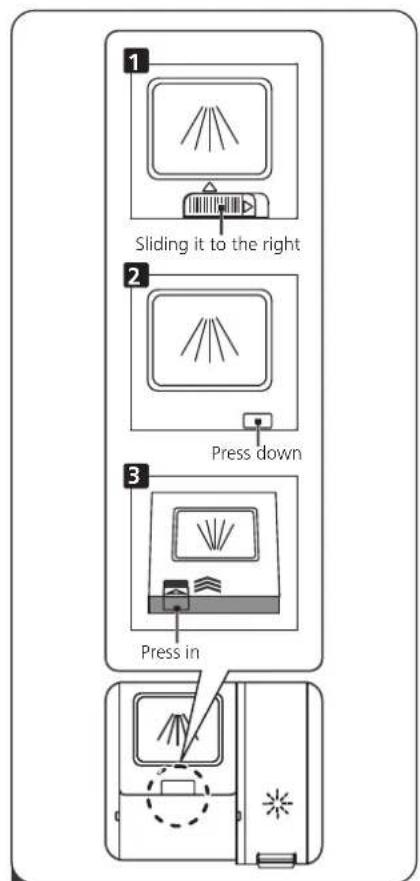
flowchart
graph TD
    A["Sliding it to the right"] --> B["Press down"]
    B --> C["Press in"]
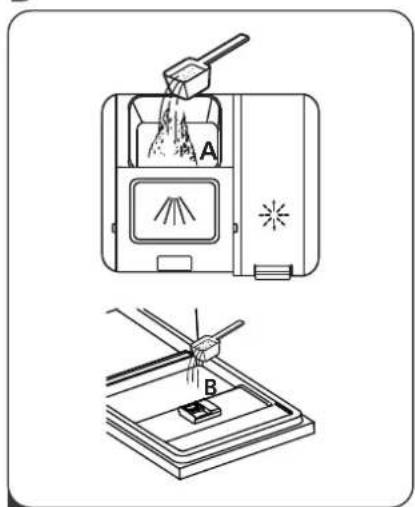
Depending on the model purchased, please choose between the following opening modes:
- Open the cap by sliding the release latch.
- Open the cap by pressing the release latch.
natural_image
Two technical diagrams showing a 3D printer with labeled parts and a mechanical component, no text or symbols present.Add the detergent in the largest part of the container (A) for washing.
For a better cleaning result, especially if you have very dirty objects, pour a small amount of detergent on the door. The additional detergent will be activated during the pre-wash phase.
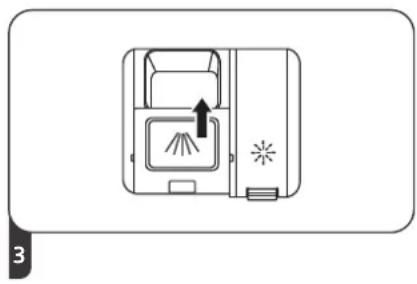
2
natural_image
Line drawing of a device with a lid and indicator lights, no text or symbols presentClose the door by sliding it forward and then pressing it down.

NOTE
Follow the manufacturer's recommendations on the detergent packaging.
DISHWASHER PROGRAMMING
Washing cycles table
The following table shows the best programs to use depending on how dirty the dishes are and how much detergent you need to use.
(●) Meaning: The rinse aid dispenser must be filled.
EN60436: This is the test washing cycle. The information for the compatibility test is in accordance with standard EN60436.
| Program | Description Of Cycle | Detergent Pre/Main | Running Time(min) | Energy (kWh) | Water (L) | Rinse Aid |
 Intensive Intensive | Pre-wash(50°C)Wash(65°C)RinseRinseRinse60°C)Drying | 4/18g(1 or 3 pieces) | 205 | 1.651 | 18.7 | ● |
 Universal Universal | Pre-wash(45°C)Wash(55°C)RinseRinse(60°C)Drying | 4/18g(1 or 3 pieces) | 175 | 1.451 | 18.7 | ● |
| ECO(*EN60436) | Wash(50°C)RinseRinse(50°C)Drying | 4/18g(1 or 2 pieces) | 198 | 0.849 | 11.0 | ● |
 Glass Glass | Pre-wash(40°C)Wash(50°C)RinseRinse(50°C)Drying | 4/18g(1 or 3 pieces) | 120 0.902 | 15.2 | ● | |
 90 min 90 min | Wash(55°C)RinseRinse(50°C)Drying | 22g(1 piece) | 90 0.891 11.5 | ● | ||
 Rapid Rapid | Wash(40°C)Rinse(40°C)Rinse(55°C) | 12g | 30 | 0.781 | 11.0 | ○ |
 Soak Soak | Pre-wash | / | 15 0.021 4.0 | ○ |
STARTING A WASHING CYCLE
-
Remove the lower and upper basket, load the dishes and push the basket into the dishwasher. It is recommended to load the lower basket first, then the upper basket.
-
Pour the detergent.
- Ensure that the water supply is switched on and the appropriate pressure is applied.
- Open the door, touch the power button and the light will come on.
- Choose a program. Then close the door and the dishwasher will start its cycle.
Saving Energy
- Pre-rinsing of tableware items leads to increased water and energy consumption and is not recommended.
- Washing tableware in a household dishwasher usually consumes less energy and water in the use phase than hand dishwashing when the household dishwasher is used according to the instructions.
CHANGE PROGRAM DURING WASHING
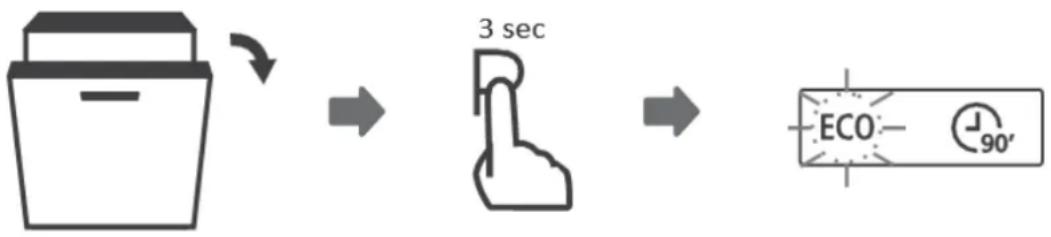
A washing cycle can only be changed if it has been run for a short time, otherwise the detergent may have already been released and the dishwasher may already have mixed it with water. In this case, the dishwasher must be reset and the detergent dispenser must be filled again. To reset the dishwasher, follow the instructions below:
- Open the door slightly to stop the dishwasher. After the washing arm has stopped working you can open the door completely.
- Press the ">" Program button for more than three seconds because the machine will be in stand-by mode.
- You can change the washing cycle by selecting the desired program.
flowchart
graph LR
    A["Food Box"] --> B["3 sec Finger"]
    B --> C["ECO - 90°"]
Auto Open
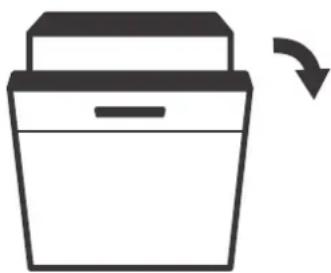
After washing, the door will open automatically to achieve better drying effect.
natural_image
Simple line drawing of a bin with a recycling arrow (no text or symbols)
NOTE:
The dishwasher door must not be blocked when set to open automatically.
This can disrupt door lock functionality.
The rapid and soak program don't have the Auto open function.
DID YOU FORGET TO ADD A DISH?
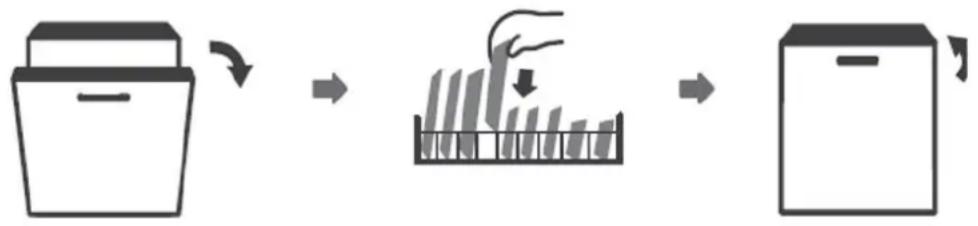
A forgotten dish can be added at any time before the detergent dispenser opens. If this is the case, follow the instructions below:
- Open the door slightly to stop the washing cycle.
- After the spray arms stop working, you can open the door completely.
- Add the forgotten dishes.
- Close the door.
- The dishwasher will start after 10 seconds.
NEVER OPEN THE DOOR MID-CYCLE AS STEAM COULD CAUSE BURNS OR SERIOUS INJURY.
flowchart
graph LR
    A["Container"] --> B["Rack with Drop"]
    B --> C["Storage Unit"]
ERROR CODES
In case of malfunction, the dishwasher will display some error codes:
| Codes | Meanings | Possible Causes | |
| E1 | Longer inlet time. | Faucets is not opened, or water intake is restricted, or water pressure is too low. | |
| E3 | Not reaching required temperature. | Malfunction of heating element. | |
| E4 | Overflow. | Some element of dishwasher leaks. | |
| Ed | Failure of communication between main PCB with display pcb. | Open circuit or break wiring for the communication. |

NOTE
If a spill occurs, turn off the main water supply before calling the customer service.
If there is water inside the dishwasher due to overfilling or a small leak, the water must be removed before restarting the dishwasher.
If there is an error code that cannot be solved, please request professional assistance.
TECHNICAL INFORMATION
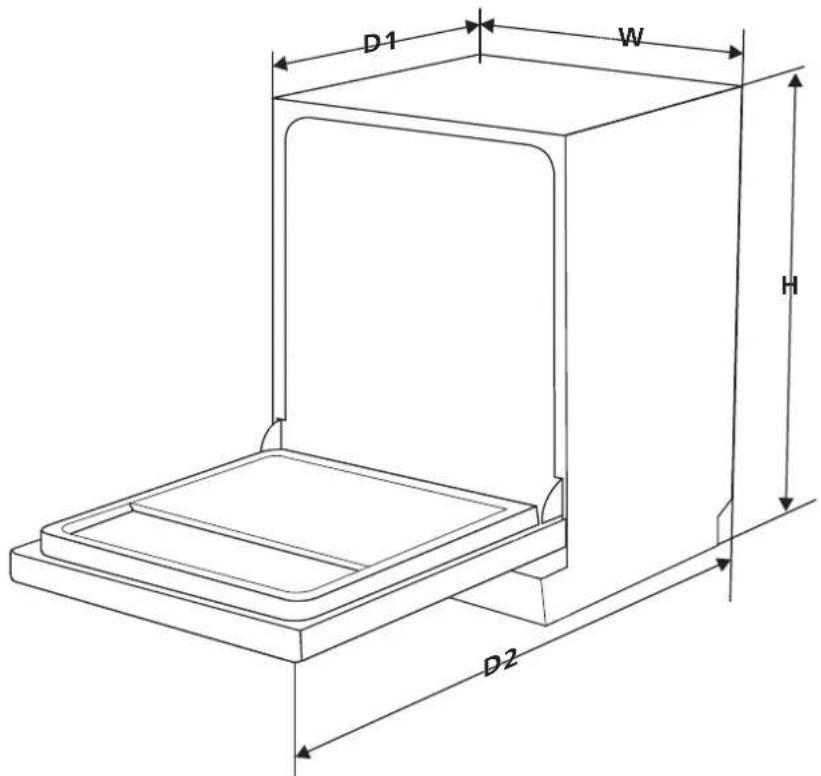
| Height (H) | 815 mm |
| Width (W) | 598 mm |
| Depth (D1) | 550 mm (with the door closed) |
| Depth (D2) | 1150 mm (with the door opened at 90°) |
Supplier's name or trade mark: Master Kitchen
Supplier's address (b): Midea Italia srl a Socio UnicoViale Luigi Bodio, 29 20158 Milano
Model identifier: MKDW FI607314 EHP D
General product parameters:
| Parameter Value Parameter Value | ||||
| Rated capacity (a) (ps) | 14 | Dimensions in cm | Height | 82 |
| Width | 60 | |||
| Depth | 55 | |||
| EEI (a) | 49,9 | Energy efficiency class (a) | D(c) | |
| Cleaning performance index (a) | 1,125 | Drying performance index (a) | 1,065 | |
| Energy consumption in kWh [per cycle], based on the eco programme using cold water fill. Actual energy consumption will depend on how the appliance is used. | 0,849 | Water consumption in litres [per cycle], based on the eco program. Actual water consumption will depend on how the appliance is used and on the hardness of the water. | 11,0 | |
| Program duration (a) (h:min) | 3:18 | Type | Built-in | |
| Airborne acoustical noise emissions (a) (dB(A) re 1 pW) | 47 | Airborne acoustical noise emission class (a) | C (c) | |
| Off-mode (W) | 0,49 | Standby mode (W) | N/A | |
| Delay start (W) (if applicable) | 1,00 | Networked standby (W) (if applicable) | N/A | |
Minimum duration of the guarantee offered by the supplier (b): 24 months
Additional information:
Weblink to the supplier's website, where the information in point 6 of Annex II to Commission Regulation (EU) 2019/2022 (1) (b) is found: www.masterkitchen.it
(a) for the eco program.
(b) changes to these items shall not be considered relevant for the purposes of paragraph 4 of Article 4 of Regulation (EU) 2017/1369.
(c) if the product database automatically generates the definitive content of this cell the supplier shall not enter these data.
(1) Commission Regulation (EU) 2019/2022 of 1 October 2019 laying down eco design requirements for household dishwashers pursuant to Directive 2009/125/EC of the European Parliament and of the Council amending Commission Regulation (EC) No 1275/2008 and repealing Commission Regulation (EU) No 1016/2010 (see page 267 of this Official Journal).
- Lavastoviglie
- NOTA
- NOTE:
- Dishwasher
- Instruction manual
- PART I Generic version
- CONTENT
- NOTE
- SAFETY INFORMATION
- Power and grounding instructions
- WARNING - Electrical Shock Hazard and Injuries
- Disposal
- PRODUCT OVERVIEW
- IMPORTANT
- USING THE DISHWASHER
- Salt insertion
- Use only dishwasher-specific salt!
- TIPS FOR ADJUSTING THE UPPER BASKET
- Type 1:
- MAINTENANCE AND CLEANING
- External cleaning
- Door and door seal
- Control panel
- Internal cleaning
- Filtering system
- Washing arms
- Folding the shelves
- Folding the racks
- INSTALLATION INSTRUCTION
- Water supply and drainage
- CONNECTION TO THE DRINKING WATER SYSTEM
- Information on the safety supply pipe
- How to connect the safety water supply pipe
- How to disconnect the safety water supply pipe
- DRAINING CONNECTION
- How to drain excess water from pipes
- Water outlet
- Extension tube
- Siphon connection
- CORRECT POSITIONING OF THE DISHWASHER
- Levelling the appliance
- Free-standing machine installation
- Built-in machine installation
- Step 1. Selecting the best installation position for the dishwasher
- Step 2. Dimensions and installation of the external panel
- Built-in model
- Step 3. Adjusting the door spring tension
- Step 4. Dishwasher installation steps Refer to the installation steps specified in the installation drawings.
- Step 4. Dishwasher levelling
- TROUBLESHOOTING TIPS
- WARNING
- LOADING THE BASKETS ACCORDING TO STANDARD EN60436
- CUTLERY BASKET
- • Cutlery Rack Used Tips
- MKDW FI607314 EHP D
- USING THE DISHWASHER
- DISHWASHER PROGRAMMING
- 17ERROR CODES
- TECHNICAL INFORMATION8
- QUICK USER GUIDE
- Indicator lamp function
- WATER SOFTENER
- Adjusting salt consumption
- PREPARATION AND LOADING OF DISHES
- Recommendations for loading the dishwasher
- Loading the upper basket
- Loading the lower basket
- Loading the cutlery basket
- DETERGENT AND RINSE AID
- Fill the rinse aid tank
- Rinse aid adjustment
- Filling the detergent tank
- DISHWASHER PROGRAMMING
- STARTING A WASHING CYCLE
- Saving Energy
- CHANGE PROGRAM DURING WASHING
- Auto Open
- DID YOU FORGET TO ADD A DISH?
- NEVER OPEN THE DOOR MID-CYCLE AS STEAM COULD CAUSE BURNS OR SERIOUS INJURY.
- ERROR CODES
- TECHNICAL INFORMATION
- Supplier's name or trade mark: Master Kitchen
- Supplier's address (b): Midea Italia srl a Socio UnicoViale Luigi Bodio, 29 20158 Milano
- Model identifier: MKDW FI607314 EHP D
- Minimum duration of the guarantee offered by the supplier (b): 24 months
- Additional information:
Brand : Master Kitchen
Model : MKDW FI607314 EHP D
Category : Dishwasher