
LP3-4 - Audio converter PAC - Free user manual and instructions
Find the device manual for free LP3-4 PAC in PDF.


| Product Type | Power Supply |
| Brand | PAC |
| Model | LP3-4 |
| Input Voltage | 100-240V AC, 50/60Hz |
| Output Voltage | 12V DC |
| Output Current | 3A |
| Power Rating | 36W |
| Dimensions (L x W x H) | 15 x 10 x 5 cm |
| Weight | 0.5 kg |
| Connector Type | Barrel jack 5.5mm x 2.1mm |
| Cable Length | 1.5 m |
| Operating Temperature | 0°C to 40°C |
| Storage Temperature | -20°C to 60°C |
| Protection Features | Overload, short circuit, overvoltage |
| Certification | CE, RoHS |
| Mounting | Desktop or wall-mount (bracket included) |
| LED Indication | Power on (green) |
| Material | ABS plastic |
| Efficiency | >85% |
| Warranty | 2 years |
| Maintenance | Wipe with dry cloth; do not use liquids |
Frequently Asked Questions - LP3-4 PAC
User questions about LP3-4 PAC
0 question about this device. Answer the ones you know or ask your own.
Ask a new question about this device
Download the instructions for your Audio converter in PDF format for free! Find your manual LP3-4 - PAC and take your electronic device back in hand. On this page are published all the documents necessary for the use of your device. LP3-4 by PAC.
USER MANUAL LP3-4 PAC
Replacing your radio? PAC also produces RadioPRO ^™ which is a radio replacement solution, with steering wheel control retention built-in. This greatly expedites the installation of a new radio into your vehicle.
To see if there is a RadioPRO™ interface for your vehicle, visit www.pac-audio.com and search "Radio PRO".
Install It Right with L.O.C. PRO™
Don't cheat yourself out of all the performance your new radio or amplifier can deliver. Proper audio line level matching is critical when replacing your vehicle's factory (OEM) radio or amplifier. It can be the difference between a great sounding system that you enjoy every day and a buggy, noisy mess that drives you crazy. PAC L.O.C.PRO™ interfaces have been professionally designed for those who want the very best.
General Overview
The L.O.C.PRO™ LP3-2 can be used for adding amplifiers to a system that does not have RCA outputs. Level matching is achieved using precision stereo gain dials and will enable proper adjustment of audio output of the radio for optimum system performance. Included in these instructions are the most common applications for the L.O.C.PRO™ LP3-2.
For specialty applications not covered in this manual, please visit www.pac-audio.com for more comprehensive, vehicle specific wiring diagrams.
Direct url - www.pac-audio.com/products/locpro
Speaker Level Input to RCA Level Output
Speaker level input to RCA level output is the most commonly used configuration for the LP3-4.
Use this when you need to create RCA level outputs from a source that only has speaker level outputs.
After all the connections are made, skip to the level adjustment section of this manual.

Note: If using large RCA connectors that are difficult to insert into housing, unsnap the L.O.C.PRO™ cover and remove end panel insert around RCA outputs.
New School –
Required items: Digital Multi-Meter, Test track media @ 1kHz and 100Hz. Max Amplifier Line-level Input Voltage Specification (i.e., 4vrms, 8vrms, etc.) Proper level adjustment is crucial for obtaining the best possible sound quality. Following the guidelines below will enable you to properly set the output gain of the LP3-4 using equipment that is readily available. Although this device can be set by ear (Old School), we recommend using a multi-meter and test tracks for pinpoint accuracy and the least chance of noise.
Amplifiers usually have 2, 4 or 8v max line-level input ratings but this can vary. This max line-level input will be your target setting you will read on the multi-meter. Perform the following procedure for each amplifier you are installing.
Example:
Amplifier 1 (Mid/High frequency) has a maximum 4v input voltage, so you will be targeting a 4 volt output voltage from the LP3-4.
Amplifier 2 (Sub frequency) has a maximum 2v input voltage, so you will be targeting a 2 volt output voltage from the LP3-4.
- Start with gain adjustment levels on LP3-4 and amplifiers set to minimum.
- Turn source unit to 34 maximum volume and start test track
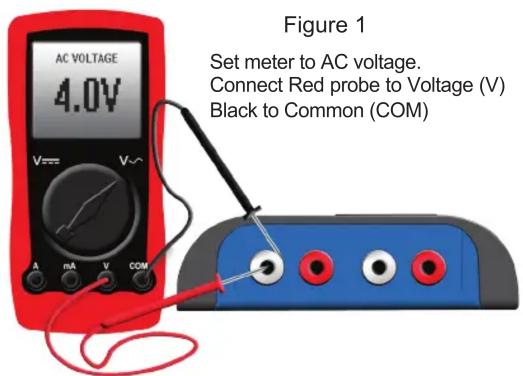
(1kHz for mid/high or full range, 100Hz for sub). - Choose either left or right channel - With multi-meter, test output of LP3-4 front channels. Probe with negative on RCA shield and positive in center of RCA output. (figure 1)
-
Slowly adjust level on LP3-4 until you reach the target voltage of the amplifier. (figure 2)
-
Repeat steps for rear channels (if connecting to a different amplifier, adjust to that amplifier's voltage requirements)
-
Turn volume down and system off.
-
Connect RCAs, set gains on amplifiers to minimum
- Turn system on and fine tune gains of amplifier (if needed).
Old School –
- Start with gain adjustment levels on LP3-4 and amplifiers set to minimum.
- Turn source unit to 34 maximum volume and play a familiar song that has dynamic attributes.
For example, if your volume goes to 40 you will turn it up to 30 and play a song that has some set sections and some really loud sections. - Slowly adjust front channel gain of LP3-4 until just a hint of distortion is audible, and then back down gain just under that threshold and the distortion goes away. (figure 2)
- Repeat steps 1-3 for rear channels.
Figure 2

Note: If using large RCA connectors and have difficulty inserting into housing, unsnap the L.O.C.PRO™ cover and remove insert around RCA outputs.
Pacific Accessory Corporation
Santa Ana, CA 92705
techsupport@pac-audio.com • www.pac-audio.com

Brand : PAC
Model : LP3-4
Category : Audio converter